


ROOM AIR CONDITIONING AND DEHUMIDIFIER PRODUCTS
PORTABLE AIR CONDITIONER CLIMATISEUR PORTATIF ACONDICIONADOR DE AIRE PORTATIL
Model AP125D
Modèle AP125HD
Modelo

English
SAFETY PRECAUTIONS
Following these basic precautions will reduce the risk of fire, electrical shock, injury or death when using your air conditioner.
1)Air conditioner must be connected to proper electrical outlet with the correct electrical supply. (see table)
2)Proper grounding must be ensured to reduce the risk of shock and fire. DO NOT CUT OR REMOVE THE GROUNDING PRONG. If you do not have a three-prong electric receptacle outlet in the wall, have a certified electrician install the proper receptacle. The wall receptacle MUST be properly grounded.
3)Do not operate air conditioner if power cord is frayed or otherwise damaged. Also avoid using it if there are cracks or abrasion damage along the length or plug connector, or if the unit malfunctions or is damaged in any manner. Contact an authorized service location for examination, repairs or adjustments.
4) DO NOT USE AN ADAPTER OR AN EXTENSION CORD.
5)Do not block airflow around the air conditioner. Also the exhaust hose should be free of any obstructions.
6)Always unplug the air conditioner before servicing it or moving it.
7)Do not install or use the air conditioner in any area where the atmosphere contains combustible gases or where the atmosphere is oily or sulphurous. Avoid any chemicals coming in contact with your air conditioner.
8)Do not place any object on the top of the unit.
9)Never operate the air conditioner without the filters in place.
10)Do not use the air conditioners near a bathtub, shower or wash basin.
Note: This unit meets the National Electric Code (NEC), article/section 440.65, which mandates the use of Leakage Current Detection and Interruption (LCDI).
(1)
English
A Word From Amana
Thank you for buying a dependable, energy-saving and easy-to-operate AMANA air conditioner. This manual contains useful information for you to maintain, operate, install and safely use your air conditioner. Your air conditioner cleans, cools and dehumidifies the air in your room to provide you with the ultimate level of comfort.
Please read instructions carefully before using the product. Also, do not forget to fill out and mail the Product Registration Card.
Product Registration
Record Your Model and Serial Number.
For all your service calls during the warranty period the following information will be needed. Attach the sales receipt to this guide and keep for future reference. (This information can be obtained from the serial plate, which is on your air conditioner.)
Model Number:...................................................................................................................
Serial Number:....................................................................................................................
Date of Purchase:.................................................................................................................
DealerÕs Name:...................................................................................................................
Dealers Address:..................................................................................................................
Dealers Phone Number:.......................................................................................................
T A B L E
R E C E P T A C L E A N D F U S E T Y P E S
RATED VOLTS |
|
|
|
125/60 |
|
|
|
|
|
|
|
|
|
|
250/60 |
|
|
|
|
|
|
||||||
|
|
|
|
|
|
|
|
|
|
|
|
|
|
|
|
|
|
|
|
|
|
|
|
|
|
|
|
AMPS |
15 |
|
|
20 |
|
|
15 |
|
20 |
|
30 |
|
|
||||||||||||||
|
|
|
|
|
|
|
|
|
|
|
|
|
|
|
|
|
|
|
|
|
|
|
|
|
|
|
|
WALL OUTLET |
|
|
|
|
|
|
|
|
|
|
|
|
|
|
|
|
|
|
|
|
|
|
|
|
|
|
|
|
|
|
|
|
|
|
|
|
|
|
|
|
|
|
|
|
|
|
|
|
|
|
|
|
|
|
|
FUSE SIZE |
15 |
|
|
20 |
|
|
15 |
|
20 |
|
30 |
|
|
||||||||||||||
|
|
|
|
|
|
|
|
|
|
|
|
|
|
|
|
|
|
|
|
|
|
|
|
|
|
|
|
TIME DELAY FUSE |
|
|
Plug |
|
|
|
|
|
Plug |
|
|
|
|
|
|
|
|
Plug |
|
|
|
|
|
||||
(or circuit braker) |
|
|
|
|
|
|
|
|
|
|
|
|
|
|
|
|
|
|
|
|
|
|
|
|
|
|
|
|
|
|
|
|
|
|
|
|
|
|
|
|
|
|
|
|
|
|
|
|
|
|
|
|
|
|
|
(2)

English
Table Of Contents |
|
|
PAGE |
Safety Precautions...................................................................................................................... |
1 |
A Word From Amana................................................................................................................. |
2 |
Product Registration................................................................................................................... |
2 |
Advantages................................................................................................................................ |
4 |
Parts and Features..................................................................................................................... |
5 |
Assembly and Installation.......................................................................................................... |
6 |
Operation.................................................................................................................................. |
9 |
Product Specification................................................................................................................ |
12 |
Care and Cleaning.................................................................................................................. |
12 |
Storage.................................................................................................................................... |
12 |
Troubleshooting....................................................................................................................... |
13 |
Warranty Information............................................................................................................... |
14 |
(3)

English
Advantages of this Model
1.Unique dual-hose design, providing more powerful and faster cooling than the single-hose design.
2.Adjustable airflow direction for convenient and effective cooling.
3.Heat and cool functions for Model AP125HD only.
4.This model is easy to operate. The electronic control panel has a timer, thermostat, three cooling speeds, three fan speeds and a dehumidification function (dry).
5.This portable air conditioner does not require water to be added.
6.The unit has a unique design which evaporates the water. Therefore no condensation tank is necessary, thus avoiding having to wake up in the middle of the night to empty the bucket and turn on the unit.
7.An easy-to-install window kit is included which consists of the exhaust hose, 2 hose nozzle, the window panel kit, exhaust hose connector and cover for the exhaust hose connector.
8.Full-directional casters are included to help to move the unit to be conveniently used in almost any area.
9.The filter screen is designed to be easily accessible.
10.Portable air conditioners are easy to store when not in use.
(4)

English
Parts and Features
1. Control Panel
2. Cold Air Outlet
3. Signal Receptor
4. Transport Handle
5. Air Outlet Hose
6. Evaporator Air Intake
7. Air Intake Hose
8. Drain Port
9. Power Supply
Fig. 1
(5)
English
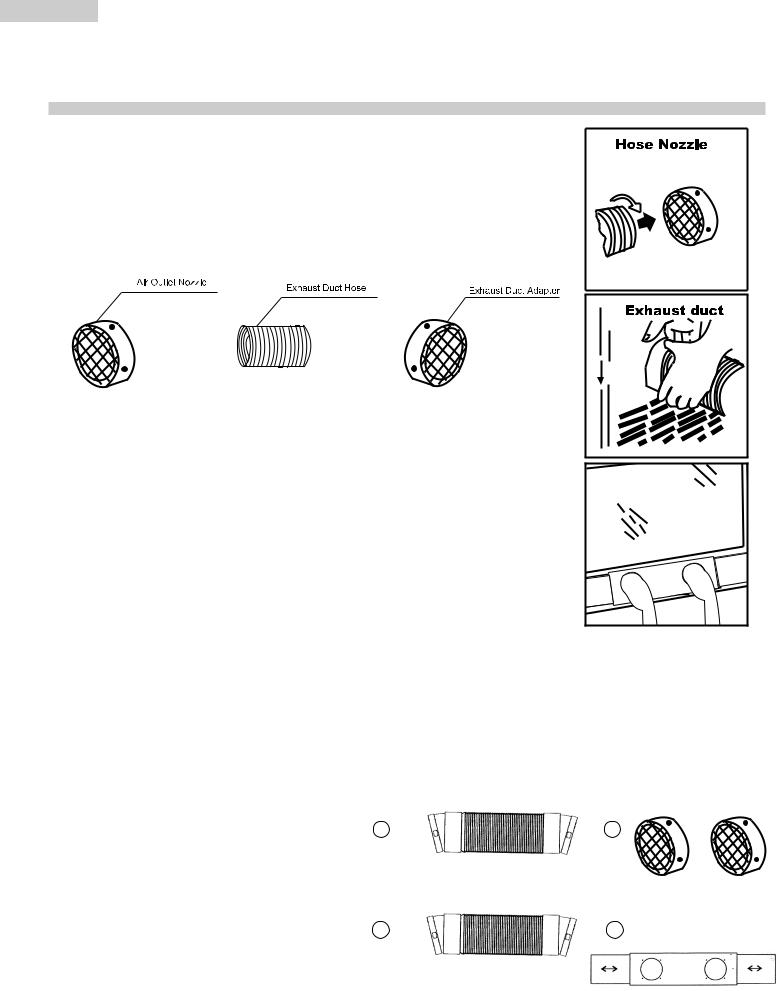
Assembly and Installation
Assembly Instruction
A. Connect exhaust hose to the back of the unit. Extend hose to desired length and connect with window kit.
USING EXHAUST DUCT SET
Fig. 2
1.Insert ends of Exhaust hose into air outlet nozzle and Exhaust duct ÒAÓ by twisting until it stops.
2.Fix the Exhaust duct ÒAÓ to the exhaust outlet on the rear of the unit. This is achieved by sliding the appropriate connector downward over the exhaust outlet, ensuring that the lugs on the outlet are engaged with the grooves on the connector.
3.The exhaust hose is snap-fit to the unit. To take it off, turn it clockwise and remove.
Note: Air outlet hose should be mounted at right side (see fig. 1)
4.Extend the Exhaust hose and close the Window as far as possible, trapping the air outlet nozzle.
B.Repeat same steps for the air intake hose.
IN DOOR |
Window Kit Installation
USING WINDOW PANEL KIT
1.Air Inlet Hose - 1 set
2.Air Outlet Hose - 1 set
3.Window Exhaust Adapter - 2 pieces
4.Window/Patio Door Slider Kit - 1 set
1 |
3 |
2 |
4 |
(6)
English
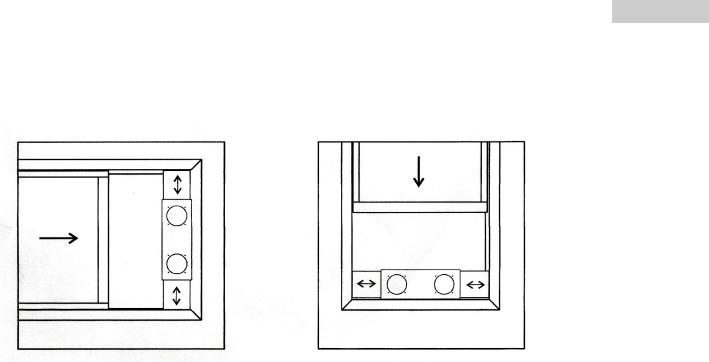
Your window kit has been designed to fit most standard vertical and horizontal window applications. However, it may be necessary for you to improvise/modify some aspects of the installation procedures for certain type windows. Please refer to for minimum and maximum window openings.
Fig. 3
Installation Instruction
¥Air outlet intake on the indoor side should not be blocked by curtains or similar objects.
¥The end of the air hose cannot be blocked by shutters or other similar objects.
¥Do not bend the air hose when assembling: keep it straight.
¥When appliance in cool or dry mode, condensation may concentrate in water box or chassis. When the box is full, water full indicator lights up (red), and the LCD window shows the error
sign E. The appliance will stop running at the same time. Unplug the unit from the outlet, then pull out the rubber plug in drain port located on the bottom of the appliance, drain the water into
a prepared container, or drain the water by moving the appliance to a suitable place.
Note: Water should be drained out when the water full light is on. Otherwise, the appliance will not work.
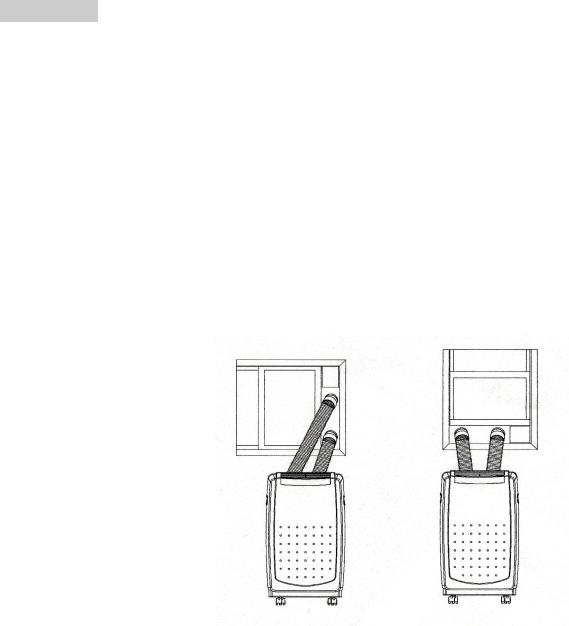
¥Select the best location for your air conditioner. It must be beside a window, door to the outside, or French window.
¥Keep the required distance from the return air outlet to the wall or other obstacles at least 20Ó.
¥Attach one end of each hose to the unit. They will snap in. Connect the other end of each hose to the window kit that comes with the unit.
¥Air outlet or intake cannot be blocked by protective grid or similar object.
¥The distance between two ends of the air hose should be kept at 8Ó at least.
Note: It is not recommended to use only one hose. This will greatly reduce the cooling capacity of the unit.
(7)
English
Installation Sequence
Before Starting this Unit
1.Select a suitable location, making sure you have easy access to an electrical outlet.
2.Install the flexible exhaust hose and adjustable window slider kit as depicted in Fig. 2 & 3. Note: 1. Step 2 is required only while using cooling or dry mode. In cooling mode you can
select to install two hoses or air outlet hose only. In dry mode you may install air outlet hose only.
2.While running or installing, the hoses should not be blocked by curtains or other objects.
3.Plug the appliance into a grounded electrical outlet. Please select an appropriate power supply based the nameplate information on the unit.
Note: Do not use a regular extension cord.
4.To turn the appliance on, press ON/OFF button.
(8)

English
Operation
Note: Wait for 24 hours to turn on air conditioner if the unit has been tilted for any reason. This is for the oils and the coolants to settle and level off.
1.Wait for 3 minutes before restarting the unit after a normal shutdown to complete the compressor cycle.
2.Use an 115v 15 amp outlet for the air conditioner. Do not use any other electrical appliances on this outlet or you may trip the fuse. Use a dedicated outlet for this air conditioner.
3.Do not place the air conditioner in direct sunlight or close to any heating appliances. (ex. baseboard heaters, stoves, etc.)
4.Operate on a flat surface only.
5.Keep the unit free of any obstructions such as drapes, curtains, blinds, etc.
6.Keep unit at least 1 foot away from the wall.
7.Check and clean the filter once every week to get the highest efficiency.
Note: Do not use unit without filter.
8.If the unit is not being used for a long period of time, remove the plug from the water drain pipe and drain out any condensed water.
When turning on the unit first time after plugging it into an electrical outlet the unit will start in a low fan cool mode. The temperature reading on the LED will be the room temperature. When turning on the unit in regular usage it will remember the last setting prior to shut-off.
(9)
English
Control Panel
Power Control
The power control turns the unit on and off.
Light
Unit will not operate if this light is lit. Drain water by removing plug from the bottom back of the unit. (See page 7 for details.)
Mode Control
The mode control has 3 settings:
• Cool • Dehumidifier
• Heating/Fan (Model AP125HD Only)
The settings are adjusted with Mode Control button. A green light will indicate which setting is currently being used.
Cooling Mode
¥During the cooling mode the air is cooled and hot air is vented to the outside through
the exhaust tube.
¥ Adjust fan speed and temperature to suit your desired comfort level.
Dehumidifier Mode
¥Air is dehumidified as it passes through the air conditioner, without being in full cooling mode. (Note: The warm air exhaust hose must vent inside the room, not outside as it does when cooling. If the unit is vented outside some cooling will occur.)
Heating Mode - Model AP125HD Only
(LED in Red)
¥In heating mode, the air flow is selectable. (Note: Heating is activated only when the ambient temperature is below 77û F.)
Fan Mode (LED in Yellow)
¥Air is circulated throughout the room with no cooling. (Note: Unit does not need to be vented in Fan mode.)
Fan Speed
The Fan Speed Control has three settings: High, Medium or Low. In the Dehumidifier or Dry Mode, the fan will only operate at low speed.
(10)
English
Timer
Auto turn off:
With machine in fan mode, press timer button to select number of hours you would like the unit to run in air conditioning mode until it automatically shuts off.
Auto turn on:
With machine powered off, press timer button
to select number of hours until you would like the unit to automatically start running in air conditioning mode.
Timer / Temperature Buttons
¥Used for adjusting the timer and thermostat.
¥The default display is room temperature.
¥When Ò Ò or Ò Ò button is pressed, the set temperature is displayed and may be adjusted. After 15 seconds the display will revert back to room temperature.
¥The temperature can be raised or lowered in the cool and dehumidifier or dry mode. The temperature cannot be adjusted in the fan mode.
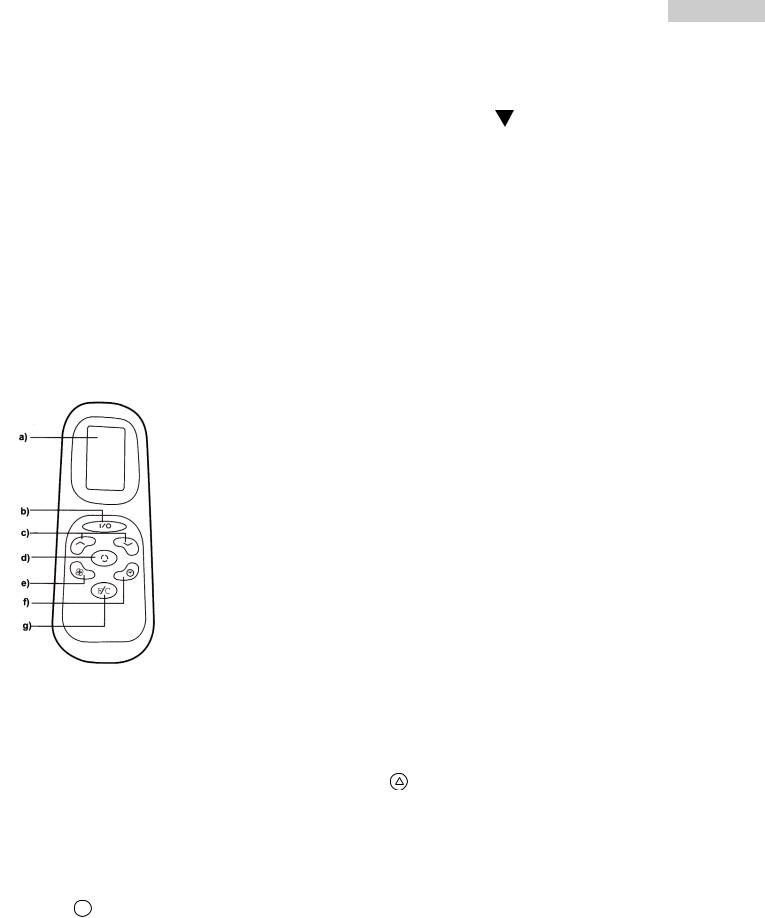
Remote Control
a)LCD Screen
b)Power On/Off Button
c)Timer and Thermostat Setting Buttons
d)Mode Button (Select A/C, Fan or Dehumidifier)
e)A/C Fan Speed Button (High, Medium, or Low)
f)Timer On/Off Button
g)Fahrenheit/Celsius Selector
Timer Programming
1.Press the ( ) button on the remote or the ÒTimer SettingÓ button on the control panel to turn on the Timer Function.
2. Press the ( ) or (
 ) buttons on the remote or the ( ) or (
 ) buttons on the control panel to set the desired shut-off period.
3. The unit will shut off when the set time elapses.
Dehumidification Operation
Press the (  ) button on the remote or the ÒMODEÓ button on the control panel to sleect the dehumidifier mode. When the dehumidifier mode is on, the temperature buttons and the fan speed buttons do not function and the fan will operate on low speed. The dehumidifier indicator light
will illuminate and stay solid while the unit is dehumidifying, and the dehumidifier light will blink. Remember, the exhaust hose does not need to be used in dehumidifier mode.
(11)
English
Air Conditioner Remote Control
The functions work the same as your air conditionerÕs touch controls.
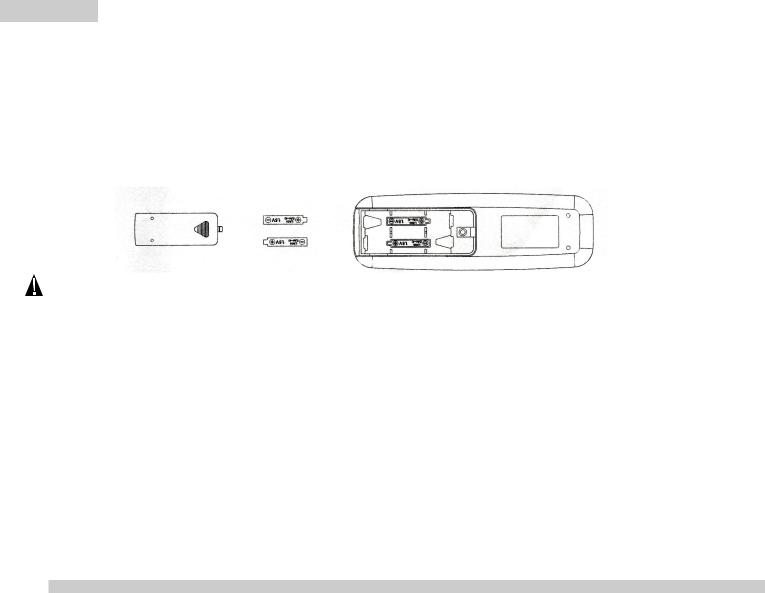
Batteries: Remove the cover on the back of the remote controller and insert the batteries with the
(+) and (-) poles pointing in the proper direction.
CAUTION
Use only AAA or IEC R03 1.5V batteries.
Remove the batteries if the remote controller is not used for a month or longer.
Do not attempt to recharge the supplied batteries.
All batteries should be replaced at the same time.
Do not dispose of the batteries in a fire as they may explode.
Do not mix old batteries with new batteries.
Product Specification
|
Voltage and Frequency |
115V / 60Hz |
|||
|
Input Power (cooling/heating-Model AP125HD Only) |
1,250 / 1,450 W |
|||
|
Cooling Capacity |
12,000 BTU |
|
||
|
Heating Capacity |
6,200 BTU |
|||
|
|
|
|
|
|
|
Moisture Removal (pints/day) |
85.0 |
|
|
|
|
|
|
|
|
|
|
Refrigerant |
R-22/19.1oz. |
|||
|
|
|
|
|
|
|
Timer |
12 Hours |
|||
|
|
|
|
|
|
|
Operating Temperature Range |
61˚F - 100˚F |
|||
|
|
|
|
|
|
|
Unit Dimensions (WxDxH) |
19 11/16" x 15 3/4" x 33 1/4" |
|||
|
|
|
|
|
|
|
Net Weight approximate |
80 lbs. |
|||
|
|
|
|
||
|
Power Cord |
6 Feet |
|||
|
Exhaust Hose |
5 Feet |
|||
|
|
|
|
|
|
(12)

English
Care and Cleaning Guide
¥ Always unplug your air conditioner before cleaning.
¥ Air filter needs to be cleaned at least once a week for your unit to operate at optimum efficiency. The filter can be slid out from the back by pulling on the tab. The filter may be washed or vacuumed. Remove the excess water from the filter by gently shaking the filter. This will remove dust and particles trapped in the filter. After cleaning, reinstall the filter. DO NOT use your air conditioner without the air filter in place.
¥ To clean the cabinet DO NOT use harsh chemicals, abrasives, ammonia, chlorine, bleach, concentrated detergents, solvents or metal scouring pads. Some of these chemicals may dissolve, damage and/or discolor your air conditioner.
¥ Always use a soft cloth dampened with water or mild soap and water solution to
wipe the front of the cabinet. Wipe dry with a soft cloth.
Storage
¥To store your air conditioner when not being used for a long period of time, drain condensed water using the drain pipe. Remove exhaust hose, clean filters, cover with plastic bag and store away.
Troubleshooting
If air conditioner does not operate:
¥Check if unit is plugged in. The plug may have come loose.
¥Check if the electrical wall receptacle is of proper voltage.
¥Check if the circuit breaker needs to be reset or if the fuse needs to be replaced.
¥Check if the unit is in ÒOffÓ mode.
¥The tank full warning light is on. Call for service.
Air conditioner working but room not cooling:
¥Room may have appliances that produce heat. Use an exhaust fan to remove excess heat.
¥Check exhaust hose for proper installation.
¥Redirect the airflow. Remove any obstacles.
¥All doors and windows need to be closed so cool air does not escape the room.
¥Air filter may be blocked or may need cleaning.
¥Unit BTU may be too low for the required cooling area.
¥On extremely hot & humid days air conditioners may take a little longer to cool.
¥Unit may be in fan or dry mode. Put air conditioner in cool mode.
(13)
 Loading...