


Altec Lansing inMotion Kick Portable Stereo for iPhone and iPod Enceinte portable pour iPhone et iPod Altec Lansing inMotion Kick Estéreo portátil Altec Lansing inMotion Kick para iPhone y iPod Sistema estéreo portátil inMotion Kick da Altec Lansing para iPhone e iPod
iMT520
User Guide Guide d’utilisation Guía del usuario Guia do Usuário
Welcome
Thank you for purchasing the Altec Lansing inMotion Kick speaker system. Designed specifically to work with your iPhone and iPod, this system provides high-quality audio performance that brings out the best in your music.
Please carefully read this User Guide for instructions on setting up and using your inMotion Kick speaker system.
Prior to installing or operating the Altec Lansing inMotion Kick speaker system, refer to the important product safety information.
Getting Assistance
The answers to most setup and performance questions can be found in the Troubleshooting section of this guide. You can also consult the frequently asked questions (FAQ) in the customer support section of our Web site at www.alteclansing.com.
If you live in North America and still can’t find the information you need, please call our customer service team for assistance before returning this product to your retailer under their return policy.
Tel: 800-258-3288 (Toll Free in US and Canada)
Email: csupport@alteclansing.com
If you live outside of North America, please visit our Web site at www.alteclansing.com and select your region to locate your country’s distributor.
For the most up-to-date information, be sure to check our Web site at www.alteclansing.com.
International Distribution
International customers: For information regarding the distribution of Altec Lansing products in your country, please visit www.alteclansing.com and click on your region.
Registering Your Product
Visit www.alteclansing.com to register your product online,
so we can provide you with the best possible service and technical support.
FCC Compliance
Changes or modifications not expressly approved by the party responsible for compliance could void the user’s authority to operate this equipment.
This device complies with Part 15 of the FCC Rules. Operation is subject to the following two conditions:
1)This device may not cause harmful interference, and
2)This device must accept any interference received, including interference that may cause undesired operation.
ii
|
|
Safety Information |
The lightning flash with arrowhead, within an equilateral triangle, |
Caution: To prevent the risk of electric shock, do not remove cover |
The exclamation point within an equilateral triangle is intended |
is intended to alert the user to the presence of uninsulated |
(or back). No user-serviceable parts inside. Refer servicing to |
to alert the user to the presence of important operating |
“dangerous voltage” within the product’s enclosure that may be of |
qualified service personnel. |
and maintenance (servicing) instructions in the literature |
sufficient magnitude to constitute a risk of electric shock to persons. |
|
accompanying the appliance. |
CAUTION
To prevent electric shock do not use this (polarized) plug with an extension cord, receptacle or other outlet unless the blades can be fully inserted to prevent blade exposure.
WARNING
To reduce the risk of fire or electric shock, do not expose this appliance to rain or moisture.
IMPORTANT SAFETY INSTRUCTIONS
1.Read these instructions.
2.Keep these instructions.
3.Heed all warnings.
4.Follow all instructions.
5.Do not use this apparatus near water. This apparatus shall not be exposed to dripping or splashing, and no objects filled with liquids, such as vases, shall be placed on the apparatus.
6.Clean only with dry cloth.
7.Do not block any ventilation openings. Install in accordance with the manufacturer’s instructions.
8.Do not install near any heat sources such as radiators, heat registers, stoves, or other apparatus (including amplifiers) that produce heat.
9.Do not defeat the safety purpose of the polarized or grounding-type plug. A polarized plug has two blades with one wider than the other. A grounding type plug has two blades and a third grounding prong. The wide blade or the third prong are provided for your safety. If the provided plug does not fit into your outlet, consult an electrician for the replacement of the obsolete outlet.
10. Protect the power cord from being walked on or pinched particularly at plugs, convenience receptacles, and the point where they exit from the apparatus.
11. Only use attachments/accessories specified by the manufacturer.
12.
13. Unplug this apparatus during lightning storms or when unused for long periods of time.
14. Refer all servicing to qualified service personnel. Servicing is required when the apparatus has been damaged in any way, such as power-supply cord or plug is damaged, liquid has been spilled or objects have fallen into the apparatus, the apparatus has been exposed to rain or moisture, does not operate normally, or has been dropped.
15. Do not install in an area which impedes the access to the power plug. Disconnecting the power plug is the only way to completely remove power to the product and must be readily accessible at all times.
16. Do not install the appliance in a confined space, such as a bookcase or built-in cabinet.
NOTE The lithium-ion battery must be properly recycled or disposed of. Please contact your local recycling center for proper battery handling and disposal instructions.
Please read FCC information and important safety logos at the bottom of the unit.
EN
1
Contents |
|
Welcome............................................................................................................................................................................................................................... |
ii |
Safety Information................................................................................................................................................................................................................. |
1 |
Package Contents................................................................................................................................................................................................................. |
3 |
Getting Started...................................................................................................................................................................................................................... |
4 |
Placing and Removing Adapters for the iPhone and iPod.................................................................................................................................................... |
6 |
Speaker Features and Indicators.......................................................................................................................................................................................... |
7 |
Speaker Controls.................................................................................................................................................................................................................. |
8 |
Full-featured Remote Details................................................................................................................................................................................................ |
9 |
Listening to Your iPhone or iPod......................................................................................................................................................................................... |
11 |
Charging your iPhone or iPod............................................................................................................................................................................................. |
12 |
Listening to a Non-docking iPod or Other Portable Audio Device..................................................................................................................................... |
13 |
Maintaining Your Speaker System...................................................................................................................................................................................... |
13 |
Troubleshooting.................................................................................................................................................................................................................. |
14 |
Warranty.............................................................................................................................................................................................................................. |
17 |
2
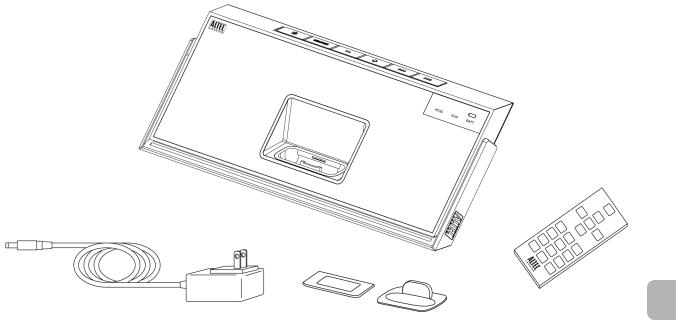
Package Contents
Altec Lansing inMotion Kick speaker system
AC adapter
Full-featured remote
Miscellaneous adapters for iPhone and iPod
EN
3

Getting Started
How to Position the Adjustable Handle
Your Altec Lansing inMotion Kick speaker system is equipped with a unique adjustable handle that doubles as a kick-stand. It provides both an easy way to carry the speaker system as well as a stand to support the speaker system when placed on a flat surface.
|
The adjustable handle doubles as a stand. |
Prop the speaker system |
Rotate the handle to its rearmost position. |
on its adjustable handle |
Simply grasp and swing the handle backward |
|
from either the pack position or carry position. |
|
|
|
Rotate the handle to its top position. Simply |
Lift the speaker system |
grasp and swing the handle backward from the |
handle for carry |
pack position or forward from the kick-stand |
|
position. |
|
|
|
Rotate the handle to its down point, tucking it |
|
snugly under the base of the speaker system. |
Pack up the |
Simply grasp and swing the handle down from |
speaker system |
either the kick-stand position or carry position. |
|
When the handle is in the pack position, the |
|
speaker system will automatically turn off. |
WARNING In order to prevent accidentally dropping your iPhone or iPod, be sure to remove it from the docking station before picking up the speaker system by the handle.
How to Install the AC Adapter
1Connect the AC adapter cable plug into the speaker system’s jack.
The jack is located on the back of the system.
2Plug the AC adapter into the wall outlet.
WARNING Use of another AC adapter may damage the product. Use only the supplied AC adapter.
How to Charge the Lithium-Ion Battery
Your Altec Lansing inMotion Kick speaker system includes a rechargeable lithium-ion
battery. This battery should be fully charged before initial use of the speaker system. A full charge will provide up to 6.5 hours of continuous playing time.
1Connect the speaker system to a wall outlet.
See the How to Install the AC Adapter section. When the speaker system is on, the “Battery” LED will flash slowly to show the battery is charging. Once the battery is fully charged, the “Battery” LED will remain solid.
2Allow the battery to charge.
Charging time: Approximately 4 hours for a full charge. When the battery is low, the “Battery” LED will flash rapidly.
WARNING During the recharging process, it is typical for the battery to become warm. To be safe, keep flammable materials away from the speaker system.
4

How to Disconnect the Rechargeable Battery
1Unplug the inMotion Kick from the wall outlet.
2Remove the rechargeable battery compartment cover at the back of the system by removing the screw.
3Unplug the battery and remove it.
WARNING There is a danger of explosion if the battery is incorrectly replaced. Replace it only with the same or equivalent type. Do not expose it to excessive heat such as sunshine, fire, etc.
BATTERY DISPOSAL The battery used in this product must be properly recycled or disposed of. Please contact your local recycling center for proper battery handling and disposal instructions.
Rated Voltage: 3.7V Capacity: 1800mAh Type: McR18650
Getting Started
How to Install the Full-featured Remote Battery
The full-featured remote battery (included) is not installed at the factory. To install the battery, follow the steps below:
1Pull out the battery holder.
The battery door is located on the lower end of the remote. Simply pull the tab to open the battery holder.
2Position the included lithium coin battery (CR2025) battery so it sits in the battery holder correctly.
Make sure the polarity (the + and – sides of the battery) is correct.
3Replace the battery door.
NOTE Please discard used batteries properly.
EN
5
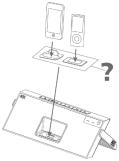
Placing and Removing Adapters for the iPhone and iPod
Your Altec Lansing inMotion Kick speaker system includes removable adapters for today’s popular iPhone and iPod models. These adapters ensure that your iPhone and iPod properly fit in the speaker system’s dock. As new iPhone and iPod models are introduced, new adapters will be made available to customers. You may also use the adapter supplied with your iPhone or iPod, or available for purchase at www.apple.com.
How to Place an Adapter
1Select the correct adapter for your iPhone or iPod.
Using the correct adapter ensures a proper fit for your iPhone or iPod.
2Gently press the iPhone or iPod adapter into the dock.
Now you can carefully place your iPhone or iPod into the dock.
NOTE Your iPhone or iPod cannot be in a case.
How to Remove an Adapter
1
2
Remove your iPhone or iPod.
Grip the adapter and pull gently upward.
6

iPod LED
AUX LED
Battery LED
Track forward button
Track back button
Volume increase button
Volume decrease button
Source button
Power on/off button
Power LED
Universal docking station for iPhone or iPod
Speaker Features and Indicators
Adjustable handle |
EN |
|
|
AC adapter jack |
|
AUX jack |
|
7

Speaker Controls
Turn on your speaker system |
Ensure the AC adapter is connected to the system and plugged into the wall. See the Getting Started |
|||
section for more information. Press the |
button. |
|||
|
||||
|
|
|||
Turn off your speaker system |
Press the button. Whenever you are finished using your speaker system, please remember to turn it |
|||
and your iPhone, iPod or other MP3 player off to conserve electricity. |
||||
|
||||
|
|
|||
Change audio source |
Press the “SOURCE” button to select the audio source: iPod or AUX. |
|||
|
|
|
|
|
Turn up the volume |
Press the “+” button. |
|
|
|
|
|
|
|
|
Turn down the volume |
Press the “–” button. |
|
|
|
|
|
|
|
|
Skip to the beginning of the current song |
In “iPod” mode, press the |
button. |
|
|
on your iPhone or iPod |
|
|||
|
|
|
||
|
|
|
|
|
Rewind the currently playing track on |
In “iPod” mode, press and hold the |
button. |
||
your iPhone or iPod |
||||
|
|
|
||
|
|
|
|
|
Skip to the beginning of the next song |
In “iPod” mode, press the |
button. |
|
|
on your iPhone or iPod |
|
|||
|
|
|
||
|
|
|
|
|
Fast-forward the currently playing track |
In “iPod” mode, press and hold the |
button. |
||
on your iPhone or iPod |
||||
|
|
|
||
Listen to a non-docking iPod or MP3 player |
See the Listening to a Non-docking iPod or Other Portable Audio Device section for specific information |
|
on using devices attached to your speaker system’s AUX jack. |
||
|
||
|
|
8
The full-featured remote lets you operate many functions of your Altec Lansing inMotion Kick speaker system:
Turn on your speaker system |
Press the |
button. |
|
|
|
|
|
|
|
Turn off your speaker system |
Press the |
button. |
|
|
|
|
|
||
Turn up the volume |
Press the “+” button. |
|
||
|
|
|
||
Turn down the volume |
Press the “–” button. |
|
||
|
|
|
||
Play/pause a song on |
In “iPod” mode, press the |
button to |
||
begin playing a selected track. Press the |
||||
your iPhone or iPod |
||||
button again to pause it. |
|
|||
|
|
|||
|
|
|
|
|
Skip to the beginning of the current |
In “iPod” mode, press the |
button. |
||
song on your iPhone or iPod |
||||
|
|
|
||
|
|
|||
Rewind the currently playing |
In “iPod” mode, press and hold the |
|||
track on your iPhone or iPod |
button. |
|
|
|
|
|
|
|
|
Skip to the beginning of the next |
In “iPod” mode, press the |
button. |
||
song on your iPhone or iPod |
||||
|
|
|
||
|
|
|||
Fast-forward the currently playing |
In “iPod” mode, press and hold the |
|||
track on your iPhone or iPod |
button. |
|
|
|
|
|
|
|
|
Full-featured Remote Details
Power on/off button
Volume increase button
Track back button
Menu button
Source button
Expanded Sound Stage technology button
Menu back button
Mute button
Play/pause button
Track forward button
Volume decrease button
Shuffle button
Menu up button Repeat button
Select button
Previous playlist button
 Menu down button Next playlist button
EN
9

Full-featured Remote Details
Change audio source |
Press the “SOURCE” button to to select the audio source: iPod or AUX. |
|
|
|
|
Enter the menu on the iPod |
Press the |
button to enter the menu on the iPod. |
|
|
|
Navigate up in the menu |
Press the |
button to scroll up within a menu screen on the iPod. |
|
|
|
Navigate down in the menu |
Press the |
button to scroll down within a menu screen on the iPod. |
|
|
|
Navigate back in the menu |
Press the |
button to move back one level within a menu on the iPod. |
|
|
|
Make a selection in the menu |
Press the “SELECT” button to make a selection within a menu on the iPod. |
|
|
|
|
Activate Expanded Sound Stage |
Press the “ESS” button to widen the stereo image to fill a room with sound. The “iPod” or “AUX” LED will flash |
|
proprietary technology |
3 times. Press the “ESS” button again to cancel. |
|
Mute the audio |
Press the “MUTE” button to mute the audio. The “iPod” or “AUX” LED will flash. Press the “MUTE” button again to |
|
unmute the audio. |
||
|
NOTE For best results, aim the full-featured remote toward the inMotion Kick speaker system.
10

1
2
3
4
5
Dock your iPhone or iPod in the Altec Lansing inMotion Kick speaker system.
Select “iPod” mode.
Press the “SOURCE” button on your speaker system or full-featured remote until the “iPod” LED lights up.
Press the  button on your iPhone or iPod.
Music from your iPhone or iPod will start playing. The speaker system and its remote are capable of controlling 3rd-generation iPod models, the iPod touch and iPhone.
Adjust the volume.
Use the“+” and “–” buttons on the Altec Lansing speaker system or full-featured remote to adjust the system volume.
Find your desired song.
Press the  or
or  button on your speaker system or full-featured remote to go to the next or previous track. Press and hold the
  or
or  button on your speaker system or full-featured remote while a
track is playing for high-speed forward or reverse music search of the current track.
Listening to Your iPhone or iPod
NOTE To conserve battery power, reduce the speaker system volume level.
NOTE During battery-only operation, the speaker system automatically shuts down if no audio is detected for a few minutes. This is to conserve battery power. Press the  button to turn the speaker system back on.
NOTE The speaker system is compatible with the alarm clock and sleep timer features built into select iPhone and iPod models. For these features to work properly, the speaker system must be connected to a wall outlet. When an iPhone or iPod is docked, the speaker system will not shut down automatically, enabling the alarm or sleep timer to play through the speaker system. See the user guide for iPhone or iPod for details on how to access these features.
NOTE During AC operation, if there is no iPhone or iPod docked and no audio input signal is detected for a few minutes, the speaker system
automatically shuts down to conserve energy. Press the  button to turn the speaker system back on.
EN
11

Listening to Your iPhone or iPod
How to Access Additional Features on Your iPhone or iPod Using the Full-featured Remote
|
Press the |
button once on the full- |
|
|
featured remote to advance to the next |
||
Shuffle function |
shuffle mode. Note: Use the |
button |
|
|
on some older iPod models. Functionality |
||
|
may vary per iPhone or iPod model. |
||
|
|
|
|
|
Press the |
button once on the full- |
|
|
featured remote to advance to the next |
||
Repeat function |
repeat mode. Note: Use the |
button |
|
|
on some older iPod models. Functionality |
||
|
may vary per iPhone or iPod model. |
||
|
|
|
|
Access the previous playlist |
Press the |
button on the full-featured |
|
remote. |
|
|
|
|
|
|
|
|
|
|
|
Access the next playlist |
Press the |
button on the full-featured |
|
remote. |
|
|
|
|
|
|
|
|
|
|
|
Charging Your iPhone or iPod
Whenever your iPhone or iPod is docked and your Altec Lansing inMotion Kick speaker system is plugged into an AC outlet, your iPhone or iPod is charging (until fully charged) – even if the speaker system is switched off.
12

Listening to a Non-docking iPod or Other Portable Audio Device
If you have a non-iPod MP3 player or other non-docking portable audio device, you can enjoy it through your Altec Lansing inMotion Kick speaker system as well. Just connect it via the AUX jack. Here’s how:
1Locate a 3.5mm stereo cable (not included).
2Plug one end of the stereo cable into your device.
Your device should have either a headphone or LINE OUT jack for you to plug into.
3Plug the other end of the stereo cable into your speaker system’s AUX jack.
The AUX jack is located on the back of the unit.
4Select “AUX” mode.
Press the “SOURCE” button on your speaker system or the full-featured remote until the “AUX” LED lights up.
5Turn on your device and start it playing.
6Adjust the volume.
Use the “+” and “–” buttons on the speaker system or full-featured remote to adjust the volume.
NOTE You may need to adjust the device volume also. Your device’s volume should be set to approximately ¾ volume.
7 When you are finished listening to your portable audio device,
please remember to turn both it and your speaker system off to conserve electricity.
Maintaining Your Speaker System
Place your speaker system on a level surface away from sources of direct sunlight or excessive heat.
Protect your furniture with a cloth or other protective material when placing your speaker system on a natural wood or lacquered finish.
Clean your speaker system with a soft cloth moistened only with mild soap and water. Stronger cleaning agents, such as benzene, thinner or similar materials, can damage the surface of the unit.
EN
13

Troubleshooting
Symptom |
Possible Problem |
Solution |
AC adapter isn’t plugged into a wall outlet or the connector isn’t plugged into the power supply jack on the back of the speaker system.
Plug the AC adapter into a wall outlet and plug the connector into the power supply jack on the back of the speaker system.
Speaker system doesn’t respond (no power)
Wall outlet is not functioning. |
Plug another device into the same outlet to confirm the outlet is working. |
|
|
The rechargeable battery isn’t charged. |
Recharge the battery. (See the Getting Started section for details.) |
|
|
The power isn’t turned on. |
Turn on the speaker system by pressing the button. The “Power” LED |
|
lights up. |
|
Using the wrong adapter for iPhone or |
Make sure the adapter is the proper fit for your iPhone or iPod. |
iPhone or iPod doesn’t |
iPod, or no adapter. |
|
|
|
|
dock properly |
iPhone or iPod didn’t install properly. |
Remove your iPhone or iPod from the dock and check for obstruction on the |
|
||
|
|
connectors in the dock and on your iPhone or iPod. Then reseat it in the dock. |
|
|
|
14

|
|
Troubleshooting |
|
|
|
Symptom |
Possible Problem |
Solution |
|
|
|
|
iPhone or iPod is not installed properly. |
Remove your iPhone or iPod from the dock and check for obstructions on |
|
|
the connectors in the dock and on your iPhone or iPod. Then reseat it in |
|
|
the dock. |
|
|
|
iPhone or iPod doesn’t |
Your iPhone or iPod software is too old. |
Upgrade software on your iPhone or iPod. For details visit |
|
www.apple.com/ipod/download. |
|
respond to the speaker |
|
|
|
|
|
system or remote |
iPhone or iPod is locked up. |
Please make sure your iPhone or iPod is working properly before docking into |
|
||
|
|
the unit. Please refer to your iPhone or iPod manual for details. |
|
|
|
|
Using 1stor 2ndgeneration iPod, iPod |
Your speaker system cannot control those iPod models or other devices. |
|
shuffle or other devices. |
|
|
|
|
|
iPhone or iPod is not installed properly. |
Remove your iPhone or iPod from the dock and check for obstructions on the |
|
|
connectors in the dock and on your iPhone or iPod. Then reseat it in the dock. |
|
|
|
|
iPhone or iPod is locked up. |
Please make sure your iPhone or iPod is working properly before docking into |
iPhone or iPod didn’t charge |
|
the unit. Please refer to your iPhone or iPod manual for details. |
|
|
|
|
AC adapter isn’t plugged into a wall outlet, |
Plug the AC adapter into a wall outlet and plug the connector into the supply |
|
or the connector is not plugged into the |
jack on the speaker system. |
|
power supply jack on the back of the |
|
|
speaker system. |
|
|
|
|
EN
15

Troubleshooting
Symptom |
Possible Problem |
Solution |
|
|
|
|
|
|
Volume level is set too high. |
Decrease the volume. |
|
|
|
|
|
Sound is distorted |
Sound source is distorted. |
If the iPhone or iPod original sound source (MP3) is of poor quality, distortion |
|
|
|
and noise are easily noticed with high-power speakers. Try a different audio |
|
|
|
source such as a music CD. |
|
|
|
|
|
|
Battery is weak. |
Replace current battery with a new battery. |
|
Full-featured remote |
|
|
|
Full-featured remote is not pointed toward |
Point the full-featured remote toward the Altec Lansing speaker system and |
||
doesn’t work |
|||
|
the speaker system. |
move within 10 feet of the unit. |
|
|
|
|
|
No sound from the AUX |
Volume on the device is set too low. |
Increase the volume on the device to approximately ¾ full volume. |
|
device, such as an MP3 |
|
|
|
Source selector is not set to AUX. |
Set source selector to AUX. |
||
player or CD player |
|||
connected to the AUX jack |
|
|
The speaker system exhibits erratic or unexpected behavior; controls do not function
Static electricity, momentary interruption of power or abnormal operating conditions may be responsible.
1.Disconnect the AC adapter cable plug from the speaker system’s jack.
2.Place the handle in the pack position.
3.Wait 20–30 seconds.
4.Place the handle in the kick-stand position.
Reconnect the AC adapter cable plug to the speaker system’s jack.
Note: See the How to Position the Adjustable Handle section for handle positions.
16

ALTEC LANSING ONE-YEAR LIMITED WARRANTY What Does the Warranty Cover?
Altec Lansing warrants that its products shall be free from defects in materials or workmanship, with the exceptions stated below.
What Is the Period of Coverage?
This warranty runs for one year from the date of purchase. The term of any warranties implied by law shall expire when your limited warranty expires. Some states and/or Member States in the European Union do not allow limitations on how long an implied warranty lasts, so the above limitation may not apply to you.
What Does the Warranty Not Cover?
This warranty does not cover any defect, malfunction or failure that occurs as a result of: improper installation; misuse or failure to follow the product directions; abuse; or use with improper, unintended or faulty equipment. (For information on proper installation, operation and use consult the manual supplied with the product. If you require a replacement manual, you may download a manual from www.alteclansing.com.) Also, consequential and incidental damages are not recoverable under this warranty. Some states do not allow the exclusion or limitation of incidental or consequential damages, so the above limitation or exclusion may not apply to you.
What Will Altec Lansing Do to Correct the Problem?
Altec Lansing will, at its option, repair or replace any product that proves to be defective in material or workmanship. If your product is no longer being manufactured, or is out of stock, at its option, Altec Lansing may replace your product with a similar or better Altec Lansing product.
How to Get Warranty Service
To get a covered product repaired or replaced, you must contact Altec Lansing during the warranty period by email (csupport@alteclansing.com). You must include in your email, your name, address, email address, telephone number, date of purchase and a complete description of the problem you are experiencing. In the United States, you may alternatively contact Altec Lansing by telephone at 1-800-ALTEC88 – please be prepared to provide the same information. If the problem appears to be related to a
defect in material or workmanship, Altec Lansing will provide you a return authorization and instructions for return shipment. Return shipments shall be at the customer’s expense, and the return must be accompanied by the original proof of purchase. You should insure the shipment as appropriate because you are responsible for the product until it arrives at Altec Lansing.
Warranty
How Will State Law Affect Your Rights?
This warranty gives you specific legal rights, and you may also have other rights which vary from state to state. Please note that in the European Union, you as a consumer might have other legal rights under national legislation of European Union Member States governing the sale of Altec Lansing’s goods. Those rights are not affected by this guarantee.
The above limited warranties and remedies are sole warranties and remedies available to purchaser, if, and to the extent, valid and enforceable under the applicable law.
DISPOSAL OF OLD ELECTRICAL AND ELECTRONIC EQUIPMENT
This symbol on the product or on its packaging indicates that this product shall not be treated as household waste. Instead it shall be handed over to the applicable collection point for the recycling of electrical and electronic equipment. By ensuring this product is disposed of correctly, you will help prevent potential negative consequences for the environment and human
health, which could otherwise be caused by inappropriate waste handling of this product. The recycling of materials will help to conserve natural resources. For more detailed information about recycling of this product, please contact your local city office or your household waste disposal service.
EN
17
Bienvenue
Merci d’avoir acheté le système d’enceinte Altec Lansing inMotion Kick. Conçu spécialement pour fonctionner avec votre iPhone ou iPod, ce système offre des performances audio de haute qualité, pour vous faire profiter du meilleur de la musique.
Veuillez lire attentivement votre guide d’utilisation, vous y trouverez les instructions nécessaires pour installer et écouter votre système d’enceinte inMotion Kick.
Avant d’installer ou de faire fonctionner le système d’enceinte inMotion Kick d’Altec Lansing, veuillez prendre connaissance d’importantes informations concernant la sécurité du produit, ci-dessous.
Services d’assistance
Les réponses à la plupart des questions relatives à la configuration et aux performances sont disponibles dans le guide de dépannage à la section Dépannage. Vous pouvez aussi consulter la foire aux questions (FAQ) de la section d’assistance à la clientèle de notre site, à l’adresse www.alteclansing.com.
Si vous vivez en Amérique du Nord et ne parvenez pas à trouver les informations dont vous avez besoin, veuillez demander l’aide de notre équipe d’assistance clientèle avant de renvoyer ce produit au détaillant selon la politique de retour en vigueur.
Tél. : 800-258-3288 (appel gratuit aux USA et au Canada)
E-mail : csupport@alteclansing.com
Si vous ne vivez pas en Amérique du Nord, veuillez consulter notre site Internet www.alteclansing.com et sélectionnez le pays dans lequel vous vivez pour localiser le distributeur de votre pays.
Veuillez consulter notre site Internet www.alteclansing.com pour obtenir les informations les plus récentes.
Distribution internationale
Clients internationaux : pour plus d’informations au sujet de la distribution des produits Altec Lansing dans votre pays, veuillez consulter notre site Internet www.alteclansing.com et cliquez sur votre pays.
Enregistrer votre produit
Veuillez visiter www.alteclansing.com pour enregistrer votre produit en ligne, pour que nous puissions vous apporter le meilleur service après-vente possible, ainsi que notre assistance technique.
18
|
|
Consignes de sécurité |
Le symbole de l’éclair terminé par une flèche au centre d’un triangle |
ATTENTION : pour prévenir le risque d’électrocution, ne retirez |
Le point d’exclamation placé au centre d’un triangle équilatéral |
équilatéral indique à l’utilisateur la présence d’une tension non |
pas le couvercle (ou le panneau arrière) de l’appareil. L’appareil ne |
est destiné à attirer l’attention de l’utilisateur sur des instructions |
isolée, « dangereuse », régnant à l’intérieur du boîtier ; cette tension |
contient aucune pièce réparable par l’utilisateur. Confiez l’ensemble |
de fonctionnement et d’entretien (ou de réparation) importantes |
peut être suffisante pour constituer un risque d’électrocution. |
des travaux d’entretien et de réparation au personnel qualifié. |
figurant dans la notice accompagnant le produit. |
ATTENTION
Pour prévenir l’électrocution, ne pas brancher la fiche polarisée dans un prolongateur, une prise de courant ou toute autre prise d’alimentation si les broches ne peuvent pas être entièrement insérées et restent exposées.
AVERTISSEMENT
Pour réduire les risques d’incendie ou de choc électrique, ne pas exposer cet appareil à la pluie ou à l’humidité.
CONSIGNES DE SÉCURITÉ IMPORTANTES
1.Lisez ces instructions.
2.Conservez ces instructions.
3.Suivez l’ensemble des avertissements.
4.Respectez l’ensemble des instructions.
5.N’utilisez pas cet appareil près de l’eau. N’utilisez pas l’appareil à proximité d’un point d’eau. Cet appareil ne doit pas être exposé à des gouttes ou des éclaboussures. Aucun objet rempli de liquide (un vase, par exemple) ne doit être placé sur l’appareil.
6.Nettoyez uniquement l’appareil à l’aide d’un chiffon sec.
7.N’obstruez pas les orifices de ventilation. Installez l’appareil conformément aux instructions du fabricant.
8.N’installez pas l’appareil à proximité de sources de chaleur telles que des radiateurs, des registres de chaleur, des fourneaux ou autres appareils produisant de la chaleur (amplificateurs inclus).
9.N’effectuez pas de dérivation contournant les dispositifs de sécurité de fiche polarisée ou mise à la terre. Aux États-Unis, les fiches polarisées sont munies de deux lames (l’une plus large que l’autre). Les fiches assorties d’un dispositif de mise à la masse disposent de deux lames et d’une broche de mise à la terre. La
lame plus large ou la broche est fournie pour votre sécurité. Si la fiche fournie ne correspond pas à votre prise électrique, consultez un électricien afin de remplacer la prise obsolète.
10. Faites en sorte que le cordon d’alimentation ne puisse être piétiné ou pincé, notamment au niveau des prises et près de sa connexion à l’appareil.
11. Utilisez uniquement les accessoires spécifiés par le fabricant.
12. |
Utilisez uniquement le chariot, le présentoir, le pied, le support ou la table |
|
spécifié(e) par le fabricant ou vendu(e) avec l’appareil. Si vous utilisez un |
|
chariot, déplacez avec précaution l’ensemble chariot-appareil afin d’éviter |
|
toute blessure en cas de chavirage. |
13. Débranchez l’appareil en cas d’orage ou lorsque vous ne l’utilisez pas pendant des périodes de temps prolongées.
14. Confiez l’ensemble des travaux d’entretien au personnel d’entretien qualifié. Des travaux de réparation sont nécessaires lorsque l’appareil est endommagé (la fiche ou le cordon d’alimentation est endommagé, du liquide s’est renversé ou des objets sont tombés dans l’appareil, l’appareil a été exposé à la pluie ou à l’humidité, l’appareil ne fonctionne pas normalement ou l’appareil est tombé).
15. N’installez pas l’appareil dans une zone où l’accès à la fiche d’alimentation n’est pas garanti. Le débranchement de la fiche d’alimentation est la seule manière de mettre le produit complètement hors tension. Vous devez pouvoir accéder facilement à la fiche à tout moment.
16. Ne pas installer l’appareil dans un lieu clos, comme une étagère ou un placard.
REMARQUE La pile utilisée dans cet appareil doit être recyclée ou mise au rebut de la manière prescrite. Veuillez contacter votre centre de recyclage local pour les instructions concernant le recyclage correct de cette pile.
Veuillez lire les informations de la FCC et les logos de sécurité importants situés sous l’appareil.
FR
19
Sommaire |
|
Bienvenue........................................................................................................................................................................................................................... |
18 |
Consignes de sécurité........................................................................................................................................................................................................ |
19 |
Contenu de l’emballage...................................................................................................................................................................................................... |
21 |
Mise en route...................................................................................................................................................................................................................... |
22 |
Insertion et retrait des adaptateurs pour iPhone et iPod.................................................................................................................................................... |
24 |
Caractéristiques et indicateurs de l’enceinte...................................................................................................................................................................... |
25 |
Commandes........................................................................................................................................................................................................................ |
26 |
Détails de la télécommande multifonctions........................................................................................................................................................................ |
27 |
Écouter votre iPhone ou votre iPod.................................................................................................................................................................................... |
29 |
Charger votre iPhone ou iPod............................................................................................................................................................................................. |
30 |
Écouter un iPod non inséré ou un autre dispositif portable................................................................................................................................................ |
31 |
Entretien et maintenance de votre système........................................................................................................................................................................ |
31 |
Recherche de pannes......................................................................................................................................................................................................... |
32 |
Garantie............................................................................................................................................................................................................................... |
35 |
20

Contenu de l’emballage
Système d’enceinte inMotion Kick d’Altec Lansing
Adaptateur CA
Télécommande toutes fonctions
Divers adaptateurs pour iPhone et iPod
FR
21
 Loading...