


GT•5051 |
User’s guide |
Guía del usuario |
Mode d’emploi |
Guia do Usuário |
|
|
|
|
FCC INSTRUCTIONS FOR A CLASS B DIGITAL DEVICE OR PERIPHERAL
Note: This equipment has been tested and found to comply with the limits for a Class B digital device, pursuant to part 15 of the FCC Rules. These limits are designed to provide reasonable protection against harmful interference in a residential installation. This equipment generates, uses and can radiate radio frequency energy and, if not installed and used in accordance with the instructions, may cause harmful interference to radio communications. However, there is no guarantee that interference will not occur in a particular installation. If this equipment does cause harmful interference to radio or television reception, which can be determined by turning the equipment off and on, the user is encouraged to try to correct the interference by one or more of the following measures:
•Reorient or relocate the receiving antenna.
•Increase the separation between the equipment and receiver.
•Connect the equipment into an outlet on a circuit different from that to which the receiver is connected.
•Consult the dealer or an experienced radio/TV technician for help.
THIS CLASS B DIGITAL APPARATUS COMPLIES WITH CANADIAN ICES-003.
INSTRUCTIONS FCC POUR UN PÉRIPHÉRIQUE OU UN DISPOSITIF NUMÉRIQUE DE CLASSE B
Remarque : cet équipement a été testé et déclaré conforme aux limitations définies pour les dispositifs numériques de classe B, conformément à la section 15 de la réglementation FCC. Ces limitations ont pour but d’assurer une protection raisonnable contre les interférences nuisibles dans le cadre d’une installation résidentielle. Cet équipement génère, utilise et peut émettre de l’énergie à radiofréquences. S’il n’est pas installé et utilisé conformément aux instructions, il peut occasionner des interférences nuisibles au niveau des communications radiophoniques. Il n’existe néanmoins aucune garantie que de telles interférences ne seront pas générées dans une installation particulière. Si cet équipement occasionne des interférences au niveau de la réception radiophonique ou télévisuelle (ce qui peut être déterminé en mettant l’équipement hors tension, puis de nouveau sous tension), l’utilisateur est invité à corriger les interférences en appliquant une ou plusieurs des mesures suivantes :
•Réorientez ou déplacez l’antenne de réception.
•Augmentez la distance entre l’équipement et le récepteur.
•Branchez l’équipement dans une prise appartenant à un autre circuit que celui sur lequel le récepteur est branché.
•Consultez votre revendeur ou un technicien radio/télévision expérimenté afin d’obtenir de l’aide.
CET APPAREILLAGE DIGITAL DE CLASSE B EST CONFORME AU ICES-003 CANADIEN.
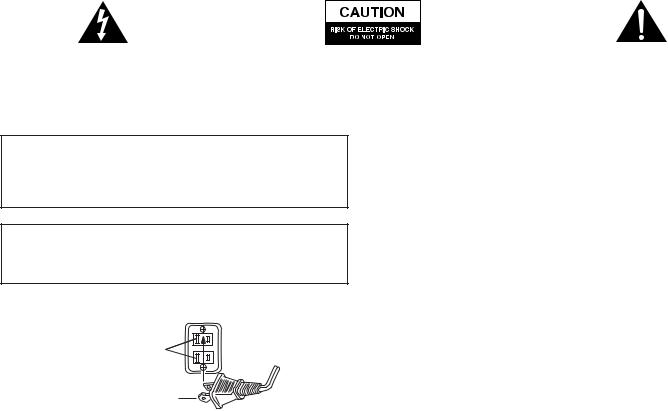
The lightning flash with arrowhead, within an equilateral triangle, is intended to alert the user to the presence of uninsulated “dangerous voltage” within the product’s enclosure that may be of sufficient magnitude to constitute a risk of electric shock to persons.
Caution: To prevent the risk of electric shock, do not remove cover (or back). No user-serviceable parts inside. Refer servicing to qualified service personnel.
The exclamation point within an equilateral triangle is intended to alert the user to the presence of important operating and maintenance (servicing) instructions in the literature accompanying the appliance.
CAUTION
To prevent electric shock do not use this (polarized) plug with an extension cord, receptacle or other outlet unless the blades can be fully inserted to prevent blade exposure.
WARNING
TO REDUCE THE RISK OF FIRE OR ELECTRIC SHOCK, DO NOT EXPOSE THIS APPLIANCE TO RAIN OR MOISTURE.
CONNECTING THE POWER CORD (AC WALL SOCKET)
Long slot is neutral (ground) side.
Insert the wide blade into the ground side slot.
15.Lightning Storms — Unplug the apparatus during lightining storms.
16.Object and Liquid Entry — Care should be taken so that objects do not fall and liquids are not spilled into the enclosure through openings.
17.Accessories — Only use attachment acessories specified by Altec Lansing Technolgies, Inc.
18.Damage Requiring Service — The appliance should be serviced by qualified service personnel when:
•The power-supply cord or the plug has been damaged.
•Objects have fallen, or liquid has been spilled into the appliance.
•The appliance has been exposed to rain.
•The appliance does not appear to operate normally or exhibits a marked change in performance.
•The appliance has been dropped or the enclosure damaged.
19.Servicing — The user should not attempt to service the appliance. Servicing should be referred to qualified service personnel or returned to the dealer or call the Altec Lansing service line for assistance.
ONE-YEAR LIMITED WARRANTY
Altec Lansing Technologies, Inc. warrants to the end user that all of its powered audio, PC audio, portable audio, TV or gaming speaker systems are free from defects in material and workmanship in the course of normal and reasonable use for a term of one year from the date of purchase.
IMPORTANT SAFETY INSTRUCTIONS
1.Read Instructions — All the safety and operating instructions should be read before the appliance is operated.
2.Retain Instructions — The operating instructions should be retained for future reference.
3.Heed Warning — All warnings on the appliance and in the operating instructions should be adhered to.
4.Follow Instructions — All operating and use instructions should be followed.
5.Water and Moisture — The appliance should not be used near water — for example, near a bathtub, washbowl, kitchen sink, laundry tub, in a wet basement, or near a swimming pool, etc.
6.Outdoor Use — Warning: To reduce the risk of fire or electric shock, do not expose this appliance to rain or moisture.
7.Location — The appliance should be installed in a stable location.
8.Ventilation — The appliance should be situated so that its location or position does not interfere with its proper ventilation. For example, the appliance should not be situated on a bed, sofa, rug, or similar surface that may block the ventilation openings; or placed in a built-in installation, such as a closed bookcase or cabinet that may impede the flow of air through the ventilation openings.
9.Heat — The appliance should be situated away from heat sources such as radiators, heat registers, stoves, or other appliances (including amplifiers) that produce heat.
10.Power Sources — The appliance should be connected to a power supply only of the type described in the operating instructions or as marked on the appliance.
11.Power-Cord Protection — Power-supply cords should be routed so that they are not likely to be walked on or pinched by items placed upon or against them. Pay particular attention to cords at plugs, convenience receptacles, and the point where they exit from the appliance.
12.Grounding or Polarization — The precautions that should be taken so that the grounding or polarization means of an appliance is not defeated.
13.Cleaning — The appliance should be cleaned only with a polishing cloth or a soft dry cloth. Never clean with furniture wax, benzene, insecticides or other volatile liquids since they may corrode the cabinet.
14.Non-Use Periods — The power cord of the appliance should be unplugged from the outlet when left unused for a long period of time.
This warranty is the exclusive and only warranty in effect relative to Altec Lansing powered audio, PC audio, portable audio, TV or gaming speaker systems and
any other warranties, either expressed or implied, are invalid. Neither Altec Lansing Technologies, Inc. nor any authorized Altec Lansing Technologies, Inc. reseller is responsible for any incidental damages incurred in the use of the speakers. (This limitation of incidental or consequential damage is not applicable where prohibited.)
Altec Lansing Technologies, Inc.’s obligation under this warranty does not apply to any defect, malfunction or failure as a result of misuse, abuse, improper installation, use with faulty or improper equipment or the use of the speaker systems with any equipment for which they were not intended.
The terms of this warranty apply only to powered audio, PC audio, portable audio, TV or gaming speaker systems when such speakers are returned to the respective authorized Altec Lansing Technologies, Inc. reseller where they were purchased.
CUSTOMER SERVICE
The answers to most setup and performance questions can be found in the Troubleshooting guide. You can also consult the FAQs in the customer support section of our Web site at www.alteclansing.com. If you still can’t find the information you need, please call our customer service team for assistance before returning the speakers to your retailer under their return policy.
1-800-ALTEC-88 (1-800-258-3288)
Email: csupport@alteclansing.com
For the most up-to-date information, be sure to check our Web site at www.alteclansing.com.
© 2003 Altec Lansing Technologies, Inc.
Designed and engineered in the USA and manufactured in our ISO9002 certified factory. United States Patents 4429181 and 4625328 plus other patents pending.
INTERNATIONAL DISTRIBUTION
International customers: For information regarding the distribution of Altec Lansing products in your country, please visit www.alteclansing.com and click on “International.”
1

GT5051
SIX-CHANNEL POWERED AUDIO SYSTEM
Thank you for purchasing this Altec Lansing product. For generations, Altec Lansing has been first in audio innovation. Today, our line of powered speakers has received more performance awards than any other brand. In all kinds of desktop environments, in every price range, Altec Lansing offers sound of distinction — giving even the most demanding customers the audio enjoyment they seek. Just listen to this!
BOX CONTENTS
•Two “two in one” satellite speakers with removable grills
•One center speaker with removable grill
•One subwoofer
•Color-coded cables
•User’s guide and quick connect instructions
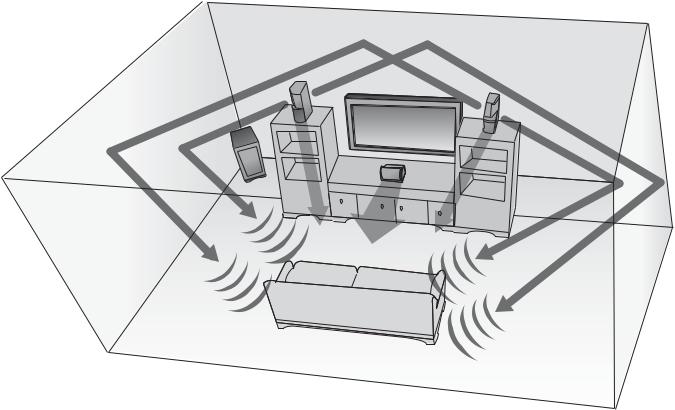
PLACING SPEAKERS
SUBWOOFER
All stereo-encoded information is heard through the satellite speakers. The subwoofer contains no stereo imaging, and its sound is non-directional. As a result, the subwoofer doesn’t have to be placed in any particular relationship to the satellites. However, placing the subwoofer on the floor close to a wall or room corner provides better bass efficiency and optimum sound.
Warning: The subwoofer is not magnetically shielded. As such, it SHOULD be placed at least 2 feet (0.6m) from TVs, computer monitors, computer hard drives or any other magnetic media (e.g. floppy disks, Zip disks, computer or audio tapes, etc.).
SATELLITE SPEAKERS
•Place the left satellite speaker to the left of the TV or computer monitor, and the right satellite speaker to the right.
•Direct the lower part of each satellite speaker toward the listener. The left front/surround or upper portion of the left satellite will then be angled toward the left, and the right front/surround or upper portion of the right satellite toward the right.
•Make sure each satellite speaker is at equal distance from the listener.
•Note: In order to maximize the surround sound effect, do not place the satellites too close to an adjacent wall.
CENTER SPEAKER
Place the center speaker either on top or below the center of the TV or computer monitor.
MAKING CONNECTIONS
Warning: Do not insert the speaker system’s power plug into a wall outlet until all connections are made. Also, turn off audio source (i.e., your PC, MP3 player, Sony PlayStation, etc.) before connecting the outputs to the speaker system’s inputs.
To ensure first-time operation as expected, please carefully follow the connection sequences described below in the order indicated.
SPEAKER SYSTEM
To set-up the speaker system:
1.Connect each satellite to the subwoofer by plugging each color-coded DIN connector into the corresponding output on the back of the subwoofer.
2.Connect the center speaker to the subwoofer by plugging the color-coded
3.5 mm connector into the corresponding output on the back of the subwoofer.
Note: If you don’t have space for the center channel, simply remove it. The GT5051 system’s center channel auto-detect feature will automatically create a “phantom” center channel by re-routing the center channel’s audio information to the left and right speakers.
INPUTS
Various connection schemes between your audio source and the speaker system are available. Determine if you’ll be setting up the speaker system for PC audio/PC gaming, DVD playback, console gaming or with portable audio devices (such as MP3 or portable CD players), then skip to the appropriate section.
PC AUDIO/PC GAMING/DVD PLAYBACK
Sound cards designed for PC gaming or DVD playback have unique audio outputs. Typically, the outputs will be marked as “front output,” “rear output” and “LFE/center output.” In some cases, slightly different terminology may be used. The sound card’s documentation should help you determine which outputs to use with your speaker system.
6-CHANNEL/5.1 SOUND CARDS WITH ANALOG OUTPUTS
1.Locate the green, black, and orange 3.5 mm cables.
2.Insert one end of the green cable into the computer soundcard’s green output, and the other end into the color-coded input labeled “front,” located on the back of the subwoofer.
3.Insert one end of the black cable into the computer soundcard’s black output, and the other end into the color-coded input labeled “rear,” located on the back of the subwoofer.
4.Insert one end of the orange cable into the computer soundcard’s orange output, and the other end into the color-coded input labeled “center,” located on the back of the subwoofer.
5.Be sure that the switch on the back of the subwoofer is in the 6-channel position.
4-CHANNEL GAMING SOUND CARDS
1.Locate the green and black 3.5 mm cables.
2.Insert one end of the green cable into the computer soundcard’s green output, and the other end into the color-coded input labeled “front,” located on the back of the subwoofer.
3.Insert one end of the black cable into the computer soundcard’s black output, and the other end into the color-coded input labeled “rear,” located on the back of the subwoofer.
4.Be sure that the switch on the back of the subwoofer is in the 2/4-channel position.
2-CHANNEL/STEREO SOUND CARDS
1.Locate the green 3.5 mm cable.
2.Insert one end of the green cable into the computer soundcard’s green output, and the other end into the color-coded input labeled “front,” located on the back of the subwoofer.
3.Be sure that the switch on the back of the subwoofer is in the 2/4-channel position.
CONSOLE GAMING OR TV
Most console game systems and TVs feature dual-RCA outputs. To connect your speakers, follow the steps below:
1.Make sure the power to your console gaming system or TV is turned off.
2.Locate the red and white RCA cable that came with your console gaming system or TV.
3.Connect one end of the RCA cable to the matching red and white RCA jacks located on the back of the subwoofer, and the other end to the back of your console gaming system or TV.
4.Be sure that the switch on the back of the subwoofer is in the 2/4-channel position.
PORTABLE AUDIO DEVICES (MP3, PORTABLE CD PLAYERS, ETC.)
1.Locate the green 3.5 mm cable.
2.Insert one end of the green cable into the headphone jack of the portable audio device, and the other end into the input labeled “AUX,” located on the back of the subwoofer.
3.Be sure that the switch on the back of the subwoofer is in the 2/4-channel position.
POWERING ON
1.After all other connections are made, plug the AC power cord (on the back of subwoofer) into a wall outlet. The speaker system is now ready to operate.
2.Turn on the audio source.
3.Turn on the speaker system by pushing the On/Off button located on the top of the right satellite  . An LED will light up when the power is ON.
Note: To avoid hearing a popping sound when you turn on your Altec Lansing speaker system, always turn on your audio source first.
2

MASTER VOLUME
The VOLUME knob on the top of the right satellite controls the master volume. Turn the knob clockwise to increase the volume and counterclockwise to decrease the volume.
SURROUND VOLUME
When the SURROUND button on the top of the right satellite is pushed, the VOLUME knob controls the volume of the left and right surround speakers. Adjust this control as necessary to create the optimal balance of surround information. The surround volume control operates in the same manner even on computers that only have stereo outputs when the switch on the back of the subwoofer is in the 2/4-channel position.
SYSTEM SPECIFICATIONS*
CENTER VOLUME
When the CENTER button on the top of the right satellite is pushed, the VOLUME knob controls the volume of the center speaker. If the center speaker is not in use, this action will control the level of the center information from the left and right satellites. Adjust this control as necessary to achieve a balanced sound.
SUBWOOFER VOLUME
When the SUB button on the top of the right satellite is pushed, the VOLUME knob controls the volume of the subwoofer. Adjust this control as necessary to achieve optimum bass.
HEADPHONES
To use headphones with the system, plug them into the labeled  jack
jack
on the back of the right satellite. When headphones are connected, the speaker system is muted.
Altec Lansing’s superior sound comes from our patent-pending Side-Firing Surround™ technology and our patented Dynamic EQ technology, which utilizes custom-built, high-fidelity drivers, state-of-the-art equalization circuitry, and a harmonious mix of the following specifications:
Sound Pressure Level (SPL): |
106 dB |
Frequency Response: |
40 Hz – 20 kHz (-10 dB) |
|||
|
|
|
|
|
|
|
Total Continuous Power: |
80 |
Watts RMS |
Signal to Noise Ratio |
|
||
|
|
|
@ 1 kHz input: |
> 75 dB |
||
• Front Speakers: |
10 |
Watts/channel @ 8 ohms |
||||
|
|
|
||||
|
@ 10% THD @ 122 Hz – 20 kHz |
Drivers (per satellite): |
One 3" full-range driver (front channel) |
|||
|
2 Channels Loaded |
|
|
and one 3" full-range dipole driver |
||
|
|
|
|
|
(surround channel) |
|
• Surround Speakers: |
10 |
Watts/channel @ 8 ohms |
|
|
||
|
|
|
||||
|
@ 10% THD @ 101 Hz – 20 kHz |
Drivers (center speaker): |
One 3" full-range driver |
|||
|
2 Channels Loaded |
|
|
|
||
|
Subwoofer: |
One 5.25" woofer |
||||
|
|
|
||||
• Center Speaker: |
10 |
Watts @ 8 ohms |
|
|
|
|
|
@ 10% THD @ 115 Hz – 20 kHz |
|
|
|
||
|
Single Channel Loaded |
|
|
|
||
|
|
|
|
|
|
|
• Subwoofer: |
30 |
Watts @ 8 ohms |
|
|
|
|
@ 10% THD @ 33 – 140 Hz
Single Channel Loaded
*Power rating conforms to FTC Amplifier Rule #16 C.F.R. Part 432.
TROUBLESHOOTING
SYMPTOM |
POSSIBLE PROBLEM |
SOLUTION |
No LEDs are lit. |
Power isn’t turned on. |
Turn on the speaker system by pushing the On/Off button located on the top of |
|
|
the right satellite. An LED will light up when the power is ON. |
|
|
|
|
AC power cord isn’t connected to the wall outlet. |
Check to see if the “Power On” LED is illuminated on the top of the right |
|
|
satellite. If not, connect AC power. |
|
|
|
|
Surge protector (if used) isn’t powered on. |
If the AC power cord is plugged into a surge protector, make sure the surge |
|
|
protector is switched on. |
|
|
|
|
Wall outlet not functioning. |
Plug another device into the wall outlet (same jack) to verify the wall outlet |
|
|
is working. |
|
|
|
3
SYMPTOM |
POSSIBLE PROBLEM |
SOLUTION |
|
No sound |
Power isn’t turned on. |
Verify the AC power cord is plugged into the wall outlet. |
|
from one or |
|
|
|
|
Turn on the speaker system by pushing the On/Off button located on the top |
||
more speakers. |
|
||
|
|
of the right satellite. An LED will light up when the power is ON. |
|
|
|
|
|
|
Volume is set too low. |
Turn the VOLUME knob clockwise to raise the volume. |
|
|
|
|
|
|
|
Check volume level on the computer sound card or alternate audio source |
|
|
|
device, and set at mid-level. |
|
|
|
|
|
|
Speaker system isn’t connected to audio source. |
Check plug connections on the audio source. Make sure the signal cable(s) is/are |
|
|
|
inserted firmly into the correct jacks. |
|
|
|
|
|
|
Speaker system is connected to wrong output on |
Make sure the lime green 3.5mm stereo cable is connected and fully inserted |
|
|
audio source. |
into the “line-out,” “audio-out,” or the headphone jack of the audio source. |
|
|
|
|
|
|
Problem with audio source device. |
Test the speakers on another audio device. Remove the lime green 3.5mm |
|
|
|
stereo cable from the audio source device and connect it to the “line-out,” |
|
|
|
“audio-out,” or the headphone jack of another audio source. |
|
|
|
|
|
No sound from |
Switch on the back of the subwoofer is not in the |
Change the position of the switch. |
|
center or surround |
proper position. |
|
|
satellites. |
|
|
|
Surround or center level is set too low. |
Increase the surround or center speaker volume level. |
||
|
|||
|
|
|
|
Crackling sound |
Bad connection. |
Check all cables. Make sure they are connected to the “line-out” or “audio-out” |
|
from speakers. |
|
jack on your sound card or other audio source — NOT “speaker-out.” |
|
|
|
|
|
|
Volume level in computer operating system is set |
Check the computer operating system volume level and decrease it if necessary. |
|
|
too high. |
|
|
|
|
|
|
|
A problem with your audio source device. |
Unplug the stereo cable from the audio source. Then plug it into the |
|
|
|
headphone jack of an alternate audio source (e.g., Walkman, Discman or |
|
|
|
FM radio). |
|
|
|
|
|
Sound is |
Volume level set too high. |
Turn the VOLUME knob counterclockwise to lower the volume. |
|
distorted. |
|
|
|
Computer operating system volume level is set |
Adjust the computer operating system volume and balance levels to the |
||
|
|||
|
too high. |
center as a starting point, then adjust the level on the speaker using the |
|
|
|
volume control. |
|
|
|
|
|
|
Sound source is distorted. |
WAV files are often of poor quality. So distortion and noise are easily noticed |
|
|
|
with high-powered speakers. Try a different sound source such as a music CD. |
|
|
|
|
|
Radio |
Too close to a radio tower. |
Move your speakers until the interference goes away. |
|
interference. |
|
|
|
|
|
|
|
No sound |
Subwoofer volume is too low. |
Increase the subwoofer volume on the top of the right satellite. |
|
from subwoofer. |
|
|
|
Bad connection. |
Check to make sure that all cables are connected properly and are making |
||
|
|||
|
|
a clear connection. |
|
|
|
|
|
Low hum |
The AC in your house is at 60 cycles per second, which is |
Some low hum may be detected when your speaker system is powered on |
|
from subwoofer. |
within the audio frequency of the subwoofer. |
without an audio source playing, or when the volume is set at an extremely |
|
|
|
low level. |
|
|
|
|
|
Loud hum |
Bad connection. |
Unplug the AC power cord from the surge protector (if used), and plug directly |
|
from subwoofer. |
|
into an AC wall outlet. |
|
|
|
|
|
|
|
Move your cables. Check to ensure they are making a clear connection. |
|
|
|
|
|
|
Volume on your audio source device is set too high. |
Disconnect your 3.5mm stereo cable from the audio source. If the loud hum |
|
|
|
goes away, lower the volume on the audio source. |
|
|
|
|
|
|
|
Lower the master volume or subwoofer volume on your computer, portable |
|
|
|
device, etc. |
|
|
|
|
|
Too much bass |
Subwoofer volume is too high. |
Decrease the subwoofer volume on the top of the right satellite. |
|
from subwoofer. |
|
|
|
|
|
|
|
Distorted monitor. |
Subwoofer too close to monitor. |
Because the subwoofer is not magnetically shielded, it can cause distortion if |
|
|
|
it’s too close to your monitor. Move the subwoofer so it’s at least 2 feet from |
|
|
|
your monitor. |
|
|
|
|
4
 Loading...