

Page 1

FOR CAR USE ONLY/NUR FÜR AUTOMOBIL GEBRAUCH/POUR APPLICATION AUTOMOBILE UNIQUEMENT/
PARA USO EN AUTOMÓVILES/SOLO PER L’UTILIZZO IN AUTOMOBILE/ENDAST FÖR BILBRUK/ALLEEN VOOR
GEBRUIK IN DE AUTO/ТОЛЬКО ДЛЯ ИСПОЛЬЗОВАНИЯ В АВТОМОБИЛЯХ/DO UŻYCIA TYLKO W
SAMOCHODZIE
ADVANCED NAVI STATION
INE-W990HDMI
QUICK REFERENCE GUIDE
Kurzanleitung
GUIDE DE RÉFÉRENCE RAPIDE
GUÍA DE REFERENCIA RÁPIDA
GUIDA RAPIDA
SNABBGUIDE
SNELSTARTGIDS
КРАТКОЕ СПРАВОЧНОЕ РУКОВОДСТВО
SKRÓCONA INSTRUKCJA DLA UŻYTKOWNIKA
R
EN
DE
FR
ES
IT
SE
NL
RU
PL
Page 2

Page 3

Contents
WARNING ................................................................................................................................................................2
CAUTION .................................................................................................................................................................2
Getting Started .....................................................................................................................................................3
Radio Operation ...................................................................................................................................................5
MP3/WMA/AAC Operation ...............................................................................................................................5
DVD Operation ...................................................................................................................................................... 6
iPod/iPhone Operation (Optional) .................................................................................................................7
USB Memory Operation (Optional) ...............................................................................................................8
Hands-Free Phone Control ...............................................................................................................................9
Map Functions.....................................................................................................................................................10
Navigation Menu ................................................................................................................................................10
Go to a Destination............................................................................................................................................11
Installation ............................................................................................................................................................13
Connections .........................................................................................................................................................16
Specifications ......................................................................................................................................................18
IMPORTANT
Please record the serial number of your unit in the space provided below and keep it as a permanent
record.
SERIAL NUMBER:
ISO SERIAL NUMBER: AL
INSTALLATION DATE:
INSTALLATION TECHNICIAN:
PLACE OF PURCHASE:
For details on all functions, refer to the Owner’s Manual stored in the supplied CD-ROM. (As it is
data CD, the CD cannot be used for playing back music and images on the player.) If required, an
ALPINE dealer will readily provide you with a print out of the Owner’s Manual contained in the
CD-ROM.
1-EN
Page 4

WARNING
WARNING
This symbol means important instructions. Failure
to heed them can result in serious injury or death.
DO NOT OPERATE ANY FUNCTION THAT TAKES YOUR
ATTENTION AWAY FROM SAFELY DRIVING YOUR VEHICLE.
Any function that requires your prolonged attention should only be
performed after coming to a complete stop. Always stop the vehicle in a
safe location before performing these functions.
Failure to do so may result in an accident.
KEEP SMALL OBJECTS SUCH AS SCREWS OUT OF THE REACH
OF CHILDREN.
Swallowing them may result in serious injury. If swallowed, consult a
physician immediately.
KEEP THE VOLUME AT A LEVEL WHERE YOU CAN STILL HEAR
OUTSIDE NOISES WHILE DRIVING.
Excessive volume levels that obscure sounds such as emergency vehicle
sirens or road warning signals (train crossings, etc.) can be dangerous
and may result in an accident. LISTENING AT LOUD VOLUME
LEVELS IN A CAR MAY ALSO CAUSE HEARING DAMAGE.
DO NOT DISASSEMBLE OR ALTER.
Doing so may result in an accident, fire or electric shock.
USE ONLY IN CARS WITH A 12 VOLT NEGATIVE GROUND.
(Check with your dealer if you are not sure.) Failure to do so may result
in fire, etc.
USE THE CORRECT AMPERE RATING WHEN REPLACING
FUSES.
Failure to do so may result in fire or electric shock.
DO NOT BLOCK VENTS OR RADIATOR PANELS.
Doing so may cause heat to build up inside and may result in fire.
USE THIS PRODUCT FOR MOBILE 12V APPLICATIONS.
Use for other than its designed application may result in fire, electric
shock or other injury.
DO NOT PLACE HANDS, FINGERS OR FOREIGN OBJECTS IN
INSERTION SLOTS OR GAPS.
Doing so may result in personal injury or damage to the product.
MAKE THE CORRECT CONNECTIONS.
Failure to make the proper connections may result in fire or product
damage.
BEFORE WIRING, DISCONNECT THE CABLE FROM THE
NEGATIVE BATTERY TERMINAL.
Failure to do so may result in electric shock or injury due to electrical
shorts.
DO NOT SPLICE INTO ELECTRICAL CABLES.
Never cut away cable insulation to supply power to other equipment.
Doing so will exceed the current carrying capacity of the wire and result
in fire or electric shock.
DO NOT DAMAGE PIPE OR WIRING WHEN DRILLING HOLES.
When drilling holes in the chassis for installation, take precautions so
as not to contact, damage or obstruct pipes, fuel lines, tanks or electrical
wiring. Failure to take such precautions may result in fire.
DO NOT USE BOLTS OR NUTS IN THE BRAKE OR STEERING
SYSTEMS TO MAKE GROUND CONNECTIONS.
Bolts or nuts used for the brake or steering systems (or any other
safety-related system), or tanks should NEVER be used for installations
or ground connections. Using such parts could disable control of the
vehicle and cause fire, etc.
DO NOT INSTALL IN LOCATIONS WHICH MIGHT HINDER
VEHICLE OPERATION, SUCH AS THE STEERING WHEEL OR
GEARSHIFT.
Doing so may obstruct forward vision or hamper movement etc., and
results in serious accident.
CAUTION
This symbol means important instructions. Failure
to heed them can result in injury or material
property damage.
HALT USE IMMEDIATELY IF A PROBLEM APPEARS.
Failure to do so may cause personal injury or damage to the product.
Return it to your authorized Alpine dealer or the nearest Alpine Service
Center for repairing.
HAVE THE WIRING AND INSTALLATION DONE BY EXPERTS.
The wiring and installation of this unit requires special technical skill
and experience. To ensure safety, always contact the dealer where you
purchased this product to have the work done.
USE SPECIFIED ACCESSORY PARTS AND INSTALL THEM
SECURELY.
Be sure to use only the specified accessory parts. Use of other than
designated parts may damage this unit internally, or may not securely
install the unit in place. This may cause parts to become loose resulting
in hazards or product failure.
ARRANGE THE WIRING SO IT IS NOT CRIMPED OR PINCHED
BY A SHARP METAL EDGE.
Route the cables and wiring away from moving parts (like the seat rails)
or sharp or pointed edges. This will prevent crimping and damage to the
wiring. If wiring passes through a hole in metal, use a rubber grommet
to prevent the wire’s insulation from being cut by the metal edge of the
hole.
DO NOT INSTALL IN LOCATIONS WITH HIGH MOISTURE OR
DUST.
Avoid installing the unit in locations with high incidence of moisture
or dust. Moisture or dust that penetrates into this unit may result in
product failure.
2-EN
Page 5
Owner’s manual Touch operation, Location of Controls, Turning Power On or Off
Getting Started
Touch operation
You can operate the system by using the touch panel on the screen.
e
Common onscreen buttons
: Returns to the previous screen. Depending on the function, this button may cancel the operations
performed on the screen.
: Closes the window.
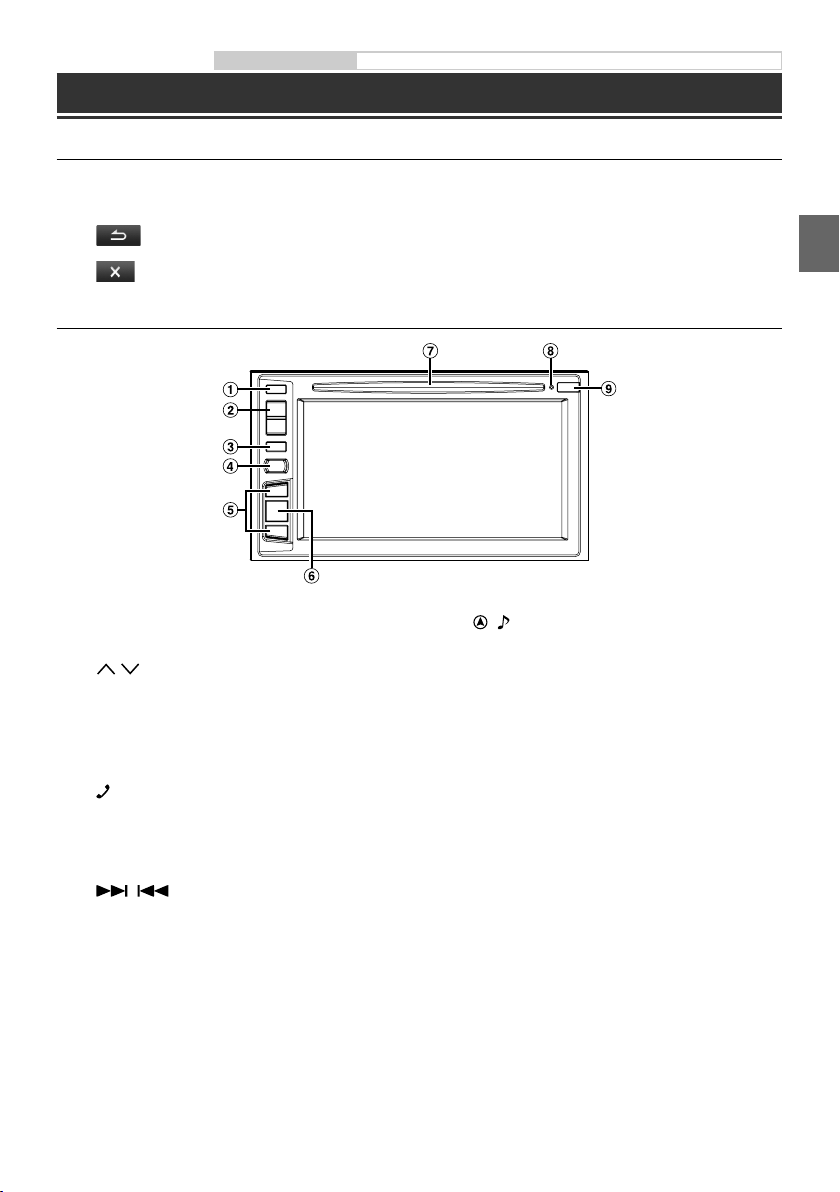
Location of Controls
A c (Eject) button
Ejects a disc.
/ (UP/DOWN) button
B
Press to adjust the volume.
C MUTE/C button
Press to activate /deactivate the mute mode.
Press and hold for at least 3 seconds to turn the power
off.
D
(Phone)/VOICE CTRL. button
Recalls the Telephone Menu screen.
When a voice dial compatible hands-free phone is
connected, press and hold for at least 3 seconds to
switch to the Voice Dial screen.
E
/ button
This action varies according to the Audio/Visual source.
(Track Up/Down, Fast reverse/Fast forward, etc.)
F
Each time you press this button, the Navigation mode
and the Audio/Visual Source mode are changed
alternately.
Press and hold for at least 3 seconds to activate the
Quick Sound screen.
For details of navigation operations, refer to “Navigation
System OM” in the CD-ROM.
G DISC Slot
H RESET switch
The system of this unit is reset.
I Remote Sensor
Point the remote control transmitter towards the
remote sensor within a range of 2 metres.
/ button
3-EN
Page 6

Turning Power On or Off
1 Turn the ignition key to the ACC or ON position.
The system is turned on.
2 Press and hold the MUTE button for at least 3 seconds to turn the power off.
4-EN
Page 7
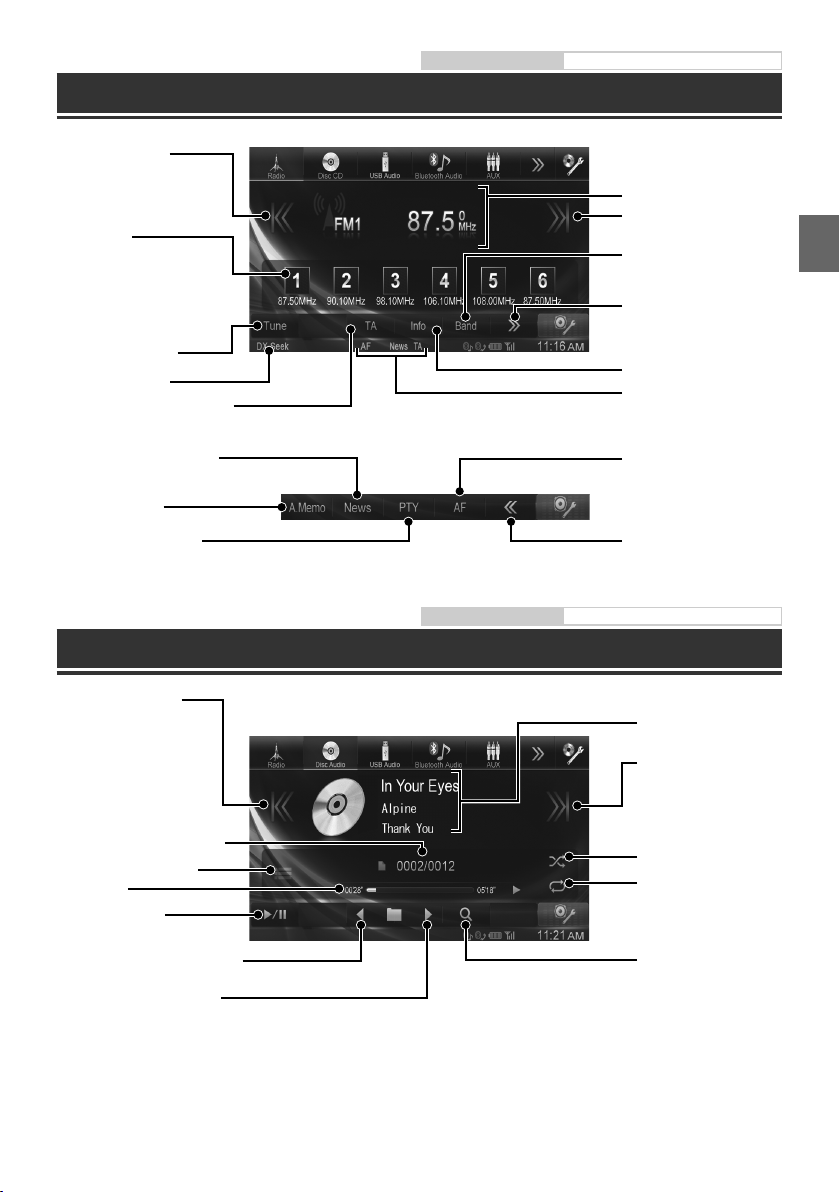
Radio Operation
Decreases frequency
Preset button
Displays the preset stations with a
short touch.
Touch for at least 2 seconds to
memorise the current station as a
preset station.
Owner’s manual Radio
RDS information display
Increases frequency
Switches band
Changes operation button
Changes tuning mode
Seek mode indicator
Traffic Information mode On/Off
PRIORITY NEWS mode On/Off
Memorises stations
automatically
Displays Select PTY screen
MP3/WMA/AAC Operation
Finds the beginning of
the current file/Finds a
previous file within one
second after playback
starts/Fast-reverses when
touched for at least 2
seconds
Current song no./Total song no.
Displays the search screen
Playing time
Pause and Playback
Changes text information
RDS indicator
AF mode On/Off
Changes operation button
Owner’s manual CD/MP3/WMA/AAC
MP3/WMA/AAC
information display
Finds the beginning of the
next file/Fast-forwards
when touched for at least
2 seconds
Random Play
Repeat Playback
Finds beginning of previous folder
Finds beginning of next folder
Displays the search
screen
5-EN
Page 8
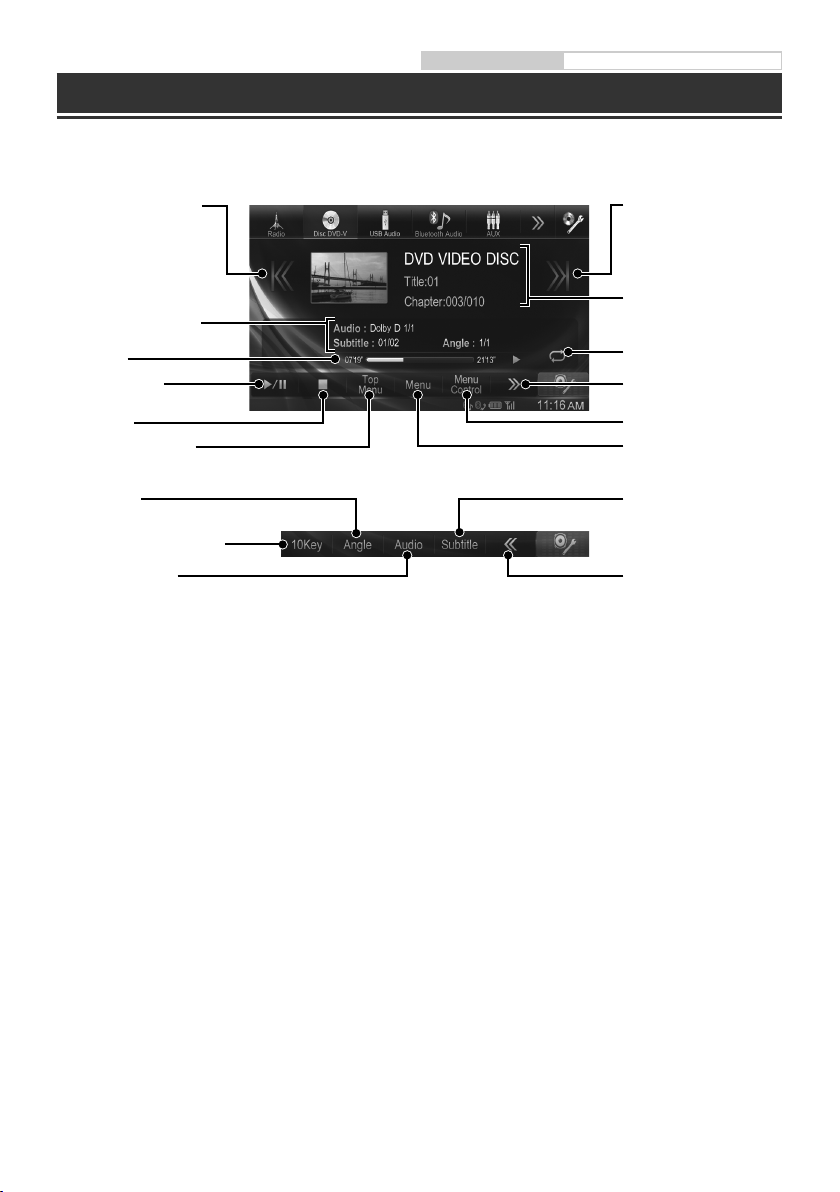
Owner’s manual DVD
DVD Operation
When you touch the DVD playback screen, the DVD operation screen is displayed. The following is an example of
the DVD-VIDEO operation screen.
Finds the beginning of the
current chapter/Finds a
previous chapter within
one second after playback
starts/Fast-reverses when
touched for at least 2
seconds
DVD information display-2
Playing time
Pause and Playback
Stop Playback
Displays Top Menu screen
Switches Angle
Displays numeric keypad input
mode screen
Switches Audio Tracks
Finds the beginning of
next chapter/Fast-forwards
when touched for at least
2 seconds
DVD information display-1
Repeat Playback
Changes operation button
Displays Menu control screen
Displays Menu screen
Switches Subtitles
Changes operation button
6-EN
Page 9

Owner’s manual iPod/iPhone (Optional)
iPod/iPhone Operation (Optional)
A separately sold USB iPod/iPhone AV cable (KCU-461iV) or a separately sold Lightning to USB cable (KCU-471i) is
required depending on the type of iPod/iPhone.
Audio mode
Artwork display
Finds the beginning of the
current file/Finds a previous
file within one second after
playback starts/Fast-reverses
when touched for at least 2
seconds
Current song no./Total song no.
Displays the search screen
Playing time*
Pause and Playback
Finds beginning of previous Playlist/
Artist/Album/Podcast/Genre/Composer
Direct switch mode icon
Playback starts from the position (time) you touch on the time bar.*
Searching for a Music File
For example: Searching by Artist name
1 Touch [ (Search)] during playback.
2 Touch [Artists].
iPod/iPhone information
display
Finds the beginning of the
next file/Fast-forwards
when touched for at least
2 seconds
Random Play
Repeat Playback
Displays the search screen
Finds beginning of next
Playlist/Artist/Album/
Podcast/Genre/Composer
3 Touch the desired artist’s name.
The Albums search screen of the selected artist is
displayed.
Touching [p] of the desired artist will play back all
songs of the selected artist.
4 Touch the desired album’s name.
All songs of the selected album are displayed.
Touching [p] of the desired album will play back all
songs of the selected album.
5 Touch the desired song’s name.
The selected song is played back.
Touching [p] of “ALL” will play back all songs in the list.•
7-EN
Page 10

Owner’s manual USB Memory (Optional)
USB Memory Operation (Optional)
You can play back music files (MP3/WMA/AAC) and video files (DivX® ) stored in a USB memory device on the
internal player of this system.
Refer to the “MP3/WMA/AAC Operation” (page 5) for information on music.
Video mode
Finds the beginning of the
current file/Finds a previous
file within one second
after playback starts/Fastreverses when touched for
at least 2 seconds
DivX® information
display-1
Finds the beginning of
next file/Fast-forwards
when touched for at least
2 seconds
DivX® information display-2
Displays the search screen
Pause and Playback
Stop Playback
Finds beginning of previous folder
Finds beginning of next folder
Switches Audio Tracks
DivX® files stored in a USB memory device and protected by DRM (Digital Rights Management) cannot be played.
•
Some DivX files stored in a USB memory cannot be operated/played.
•
Playing time
Repeat Playback
Changes operation button
Displays the search screen
Switches Subtitles
Changes operation button
8-EN
Page 11

Owner’s manual BLUETOOTH Setting, BLUETOOTH Operation
Hands-Free Phone Control
Hands-free calls are possible when using an HFP (Hands-Free Profile) compatible mobile phone with the INEW990BT.
How to connect to a BLUETOOTH
compatible device (Pairing)
The BLUETOOTH function is always available on this unit.
You can, therefore, search for a BLUETOOTH device for pairing at
any time.
1 Touch [Setup] icon of Top banner.
[SETUP] icon
2 Touch [ (BLUETOOTH)].
3 Touch [Set Bluetooth Device].
4 Touch [Search] of “No Device.”
5 Touch [Audio], [Hands-free] or [Both] of the
device you want to connect from the list.
6 When the device registration is complete, a
message appears and the device returns to
normal mode.
•
You can register up to 3 BLUETOOTH compatible
mobile phones.
•
The BLUETOOTH registration process differs depending
on the device version and SSP (Simple Secure Pairing). If
a 4 or 6 character Passcode appears on this device, enter
the Passcode using the BLUETOOTH compatible device.
If a 6 character Passkey appears on this device, make
sure the same passkey is displayed on the BLUETOOTH
compatible device and touch “Yes.”
Answering a Call
1 An incoming call triggers the ringtone and
an incoming call display.
2 Touch [ ] or press (Phone) button.
The call starts.
Hanging up the Telephone
1 Touch [ ].
The call finishes.
Audio: Sets for use as an Audio device.
Hands-free: Sets for use as a Hands Free Device.
Both: Sets for use as both an Audio device
and Hands Free Device.
Muting the Speech Volume
You can temporarily lower the microphone level to 0.
1 Touch [ ] during a conversation.
During the mute mode, is highlighted. Touch
again to cancel the mute mode.
9-EN
Page 12

Map Functions
Below is an overview of different buttons and icons on the map display. For more detailed information about this
screen, please see the Owner’s Manual.
Next Street Name
Next Manoeuvre Arrow
Distance to next Manoeuvre
Traffic Information
Access the customizable
Quick Menu
Trip Information
Map Orientation
Access the menu
Navigation Menu
To access the Navigation Menu, touch [ ].
Route
Get route information, edit
the route (set, delete, optimise
waypoints, optimise route), see
the route overview, avoid special
sections, specific roads, the
route ahead, save, load, delete
the route, simulate navigation,
change route settings, check for
the itinerary and for max. 7 route
alternatives.
Go to
Set destinations using any of 9
different input methods (Find
Address, Postcode, Find Places
(POI), Map, Address book, History,
Coordinate, Picture , Free-form
Search).
Map
Access the Map
Current Street Name
Information
Get access to useful add-ons like
Picture Viewer, Unit Converter,
Calculator, Trip Monitor,
Fuel Consumption, Country
Information.
Settings
Allows you to customize various
characteristics of your navigation
system’s look and feel.
Displaying Audio/Visual
Information
You can display the currently
playing information (Frequency,
Track No., etc.) in the Indicator
Bar of the Navigation screen.
10-EN
Page 13

Go to a Destination
The following example briefly describes how to input a destination.
1 Touch [Go to] from Navigation Menu.
2 Select a destination input method. ([Find
Address] is selected.)
4 Type in the city name or postcode until
3 To change the country, touch the button
with the country name. Enter a country
name and select the country from the list.
You can touch [Results] to display the candidate
•
list.
displayed in the selection list. Select the
matching entry.
You can touch [Results] to display the candidate
•
list.
11-EN
Page 14

5 Type in the street name until displayed
in the selection list. Select the matching
entry.
You can touch [Results] to display the candidate
•
list.
6 Enter a house number. Touch [Done] to
access the confirmation screen.
7 Touch [Select] to initialize route calculation
and start navigation.
12-EN
Page 15

Installation
When making connections to the vehicle’s electrical
•
system, be aware of the factory installed components
(e.g. on-board computer). Do not tap into these leads
to provide power for this unit. When connecting the
INE-W990BT to the fuse box, make sure the fuse for the
intended circuit of the INE-W990BT has the appropriate
amperage. Failure to do so may result in damage to the
unit and/or the vehicle. When in doubt, consult your
Alpine dealer.
1 Install at an angle between horizontal
and 30°. Note that installing at an angle
outside of this range will result in a loss of
performance and possibly damage.
Owner’s manual Installation
3 Mounting the Microphone.
For safe use, make sure of the following:
•
location is stable and firm.
•
driver’s view and operations are not obstructed.
•
microphone is located where the driver’s voice
can be easily picked up (on the sun visor, etc.).
When you speak into the microphone, you should
not have to change your driving posture. This may
cause a distraction, taking your attention away
from safely driving your vehicle. Carefully consider
direction and distance while mounting the
microphone. Confirm that the driver’s voice can be
easily picked up at the selected location.
Microphone
0 - 30°
2 Mounting the GPS Antenna inside the
vehicle.
1 Clean the mounting location.
2 Put on the GPS Antenna mounting plate.
3 Mount the GPS Antenna.
GPS Antenna
Antenna mounting plate
Mount the GPS Antenna on a flat plane of the
•
dash board or rear tray.
Some thermal reflection type or thermal
•
absorption type glass may interrupt high
frequency waves. If reception is poor with the
antenna installed inside the car, try to mount the
antenna outside the car.
•
Make sure the GPS Antenna is not covered
(obstructed) by any metallic surface or object.
Cable clamp
(Sold separately)
13-EN
Page 16

4 Remove the mounting sleeve from the
main unit.
This unit
Bracket keys
(Included)
Slide the unit into the mounting sleeve and
secure it.
Mounting Sleeve
(Included)
Dashboard
5 When your vehicle has the Bracket, mount
the long hex bolt onto the rear panel of the
INE-W990BT and put the Rubber Cap on
the hex bolt. If your vehicle does not have
the Mounting Support, reinforce the head
unit with the metal mounting strap (not
supplied). Secure the ground lead of the
unit to a clean metal spot using a screw (*1)
already attached to the vehicle’s chassis.
Connect all the leads of the INE-W990BT
according to details described in the
Connections section.
Hex Nut (M5)
Screw
Rubber Cap
Bracket
Pressure
Plates*
(Included)
1
Hex Bolt
(Included)
This unit
Face Plate*2
(Included)
*1 If the installed mounting sleeve is loose in the
dashboard, the pressure plates may be bent slightly to
remedy the problem.
*2 The supplied face plate may be mounted.
2
*
Bolt Stud
Metal
Mounting
Strap
Ground Lead
For the screw marked “*2,” use an appropriate screw for
•
1
*
Chassis
This unit
the chosen mounting location.
6 Slide the INE-W990BT into the dashboard
until it clicks. This ensures that the unit is
properly locked and will not accidentally
come out from the dashboard.
14-EN
Page 17

Connection Diagram of SPST Switch (sold separately)
(If the ACC power supply is not available)
ACC
INE-W990BT
If your vehicle has no ACC power supply, add an SPST (Single-Pole, Single-Throw) switch (sold separately) and fuse (sold
•
(Red)
BATTERY
(Yellow)
SPST SW (Optional)
separately).
The diagram and the fuse amperage shown above are in the case when INE-W990BT is used individually.
•
If the switched power (ignition) lead of the INE-W990BT is connected directly to the positive (+) post of the vehicle’s
•
battery, the INE-W990BT draws some current (several hundred milliamperes) even when its switch is placed in the OFF
position, and the battery may be discharged.
FUSE (5A)
(Optional)
FUSE (20A)
(Optional)
Battery
15-EN
Page 18

Connections
Connections 1/2
Owner’s manual Connections
GPS Antenna (Included)
Antenna
ISO Antenna Plug
iPod/iPhone
iPod/iPhone with a
30-pin connector
(Sold separately)
with a Lightning
connector
(Sold separately)
16-EN
ACC (IGNITION)
(Red)
GND
(Black)
P.ANT
(Blue)
(BATTERY)
15A
iPod VIDEO AV extension cable
KCU-461iV (Sold separately)
USB extension cable (Included)
REMO
(Blue/White)
REVERSE
(Orange/White)
PARKING BRAKE
(Yellow/Blue)
BATT
(Yellow)
(Green)
(Green/Black)
(White)
(White/Black)
(Gray/Black)
(Gray)
(Violet/Black)
(Violet)
Connection kit
KCU-461iV
(Sold separately)
Lightning to USB Cable KCU-471i
(Sold separately)
USB Memory (Sold separately)
To amplifier or equalizer
To plus side of the back lamp signal lead of the car
To the parking brake signal lead
To power antenna
Ignition key
Battery
Rear left
Front left
Front right
Rear right
Speakers
Page 19

Connections 2/2
Connect this to the optional Vehicle
Display Interface box
To steering remote control
interface box
CAMERA
(Yellow)
REMOTE OUT
(Brown)
Microphone (Included)
To Camera with RCA Output terminal
To remote input lead
AUX OUTPUT
(Yellow)
To Rear Monitor Input terminal
Amplifier
Amplifier
Amplifier
Rear Left
Rear Right
Front Left
Front Right
Subwoofers
17-EN
Page 20

Specifications
Owner’s manual Specifications
MONITOR SECTION
Screen Size 6.1”
LCD Type Transparent type TN LCD
Operation System TFT active matrix
Number of Picture Elements
1,152,000 pcs.
Effective Number of Picture Elements
99% or more
Illumination System LED
(800 × 3 × 480)
FM TUNER SECTION
Tuning Range 87.5 – 108.0 MHz
Mono Usable Sensitivity 8.1 dBf (0.7 µV/75 ohms)
50 dB Quieting Sensitivity 12 dBf (1.1 µV/75 ohms)
Alternate Channel Selectivity 80 dB
Signal-to-Noise Ratio 65 dB
Stereo Separation 35 dB
Capture Ratio 2.0 dB
MW TUNER SECTION
Tuning Range 531 – 1,602 kHz
Usable Sensitivity 25.1 µV/28 dBf
LW TUNER SECTION
Tuning Range 153 – 281 kHz
Sensitivity (IEC Standard) 31.6 V/30 dBf
USB SECTION
USB requirements USB 1.1/2.0
Max. Power Consumption 1,000 mA
USB Class USB (Play From Device)/
File System FAT16/32
MP3 Decoding MPEG-1/2 AUDIO Layer-3
WMA Decoding Windows Media™ Audio
AAC Decoding AAC-LC format “.m4a” file
Number of Channels 2-Channel (Stereo)
Frequency Response* 5-20,000 Hz (±1 dB)
Total Harmonic Distortion 0.008% (at 1 kHz)
Dynamic Range 95 dB (at 1 kHz)
Signal-to-Noise Ratio 100 dB
Channel Separation 85 dB (at 1 kHz)
*
Frequency response may differ depending on the encoder
software/bit rate.
USB (Mass Storage Class)
CD/DVD SECTION
Frequency Response 5 – 20,000 Hz (±1 dB)
Wow & Flutter (% WRMS) Below measurable limits
Total Harmonic Distortion 0.008% (at 1 kHz)
Dynamic Range 95 dB (at 1 kHz)
Channel Separation 85 dB (at 1 kHz)
Signal system NTSC/PAL
Horizontal resolution 500 lines or greater
Video output level 1Vp-p (75 ohms)
Video S/N ratio DVD: 60 dB
Audio S/N ratio 100 dB
PICKUP
Wave length DVD: 666 nm
CD: 785 nm
Laser power CLASS II
GPS SECTION
GPS Reception frequency 1575.42 ±1 MHz
GPS Reception sensitivity -130 dB max.
BLUETOOTH SECTION
BLUETOOTH Specification Bluetooth V2.1+EDR
Output Power +4 dBm Max. (Power class 2)
Profile HFP (Hands-Free Profile)
OPP (Object Push Profile)
PBAP (Phone Book Access Profile)
A2DP (Advanced Audio
AVRCP (Audio/Video Remote
Distribution Profile)
Control Profile)
GENERAL
Power Requirement 14.4 V DC
Operating temperature -20°C to + 60°C
Maximum Power Output 50 W × 4
Weight 2.12 kg
Audio output level
Preout (Front, Rear): 4 V/10k ohms (max.)
Preout (Subwoofer): 4 V/10k ohms (max.)
(11–16 V allowable)
CHASSIS SIZE
Width 178 mm
Height 100 mm
Depth 165 mm
NOSE SIZE
Width 170 mm
Height 96 mm
Depth 11.5 mm
Due to continuous product improvement, specifications
•
and design are subject to change without notice.
The LCD panel is manufactured using an extremely
•
high precision manufacturing technology. Its effective
pixel ratio is over 99.99%. This means that there is a
possibility that 0.01% of the pixels could be either always
ON or OFF.
18-EN
Page 21

This item incorporates copy protection technology
•
that is protected by U.S. patents and other intellectual
property rights of Rovi Corporation. Reverse
engineering and disassembly are prohibited.
Manufactured under licence from Dolby Laboratories.
•
Dolby and the double-D symbol are trademarks of
Dolby Laboratories.
Windows Media, and the Windows logo are trademarks,
•
or registered trademarks of Microsoft Corporation in
the United States and/or other countries.
•
iPhone, iPod, iPod classic, iPod nano, iPod touch, and
iTunes are trademarks of Apple Inc., registered in the
U.S. and other countries.
“Made for iPod,” and “Made for iPhone,” mean that an
•
electronic accessory has been designed to connect
specifically to iPod, or iPhone, respectively, and
has been certified by the developer to meet Apple
performance standards. Apple is not responsible for the
operation of this device or its compliance with safety
and regulatory standards. Please note that the use of
this accessory with iPod, or iPhone may affect wireless
performance.
DivX®, DivX Certified® and associated logos are
•
trademarks of Rovi Corporation or its subsidiaries and
are used under license.
The Bluetooth® word mark and logos are registered
•
trademarks owned by the Bluetooth SIG, Inc. and any
use of such marks by Alpine Electronics, Inc. is under
licence. Other trademarks and trade names are those of
their respective owners.
The terms HDMI and HDMI High-Definition Multimedia
•
Interface, and the HDMI Logo are trademarks or
registered trademarks of HDMI Licensing, LLC in the
United States and other countries.
“MPEG Layer-3 audio coding technology licenced from
•
Fraunhofer IIS and Thomson.”
“Supply of this product only conveys a licence for
•
private,non-commercial use and does not convey
a licence nor imply any right to use this product in
any commercial (i.e. revenue-generation) real time
broadcasting (terrestrial, satellite, cable and/or any
other media), broadcasting/streaming via internet,
intranets and/or other networks or in other electronic
content distribution systems, such as pay-audio or
audio-on-demand applications. An independent
licence for such use is required. For details, please visit
http://www.mp3licensing.com”
Portions ©2014, Microsoft Corporation. All Rights
•
Reserved.
Android is a trademark of Google Inc.
•
©1987-2014 HERE. All rights reserved.
•
is a trademark of DVD Format/Logo Licensing
•
Corporation.
19-EN
Page 22

Page 23

Page 24

R
ALPINE ELECTRONICS MARKETING, INC.
1-7, Yukigaya-Otsukamachi, Ota-ku,
Tokyo 145-0067, JAPAN
Phone: 03-5499-4531
ALPINE ELECTRONICS OF AMERICA, INC.
19145 Gramercy Place, Torrance,
California 90501, U.S.A.
Phone 1-800-ALPINE-1 (1-800-257-4631)
1-888-NAV-HELP (1-888-628-4357)
ALPINE ELECTRONICS OF AUSTRALIA PTY. LTD.
161-165 Princes Highway,
Hallam Victoria 3803, Australia
Phone 03-8787-1200
ALPINE ELECTRONICS GmbH
Wilhelm-Wagenfeld-Str. 1-3,
80807 München, Germany
Phone 089-32 42 640
ALPINE ELECTRONICS OF U.K. LTD.
Alpine House Fletchamstead Highway,
Coventry CV4 9TW, U.K.
www.alpine.co.uk
ALPINE ELECTRONICS France S.A.R.L.
184 allée des Erables
CS 52016 – Villepinte
95 945 Roissy CDG cedex
FRANCE
Phone : + 33(0)1 48 63 89 89
ALPINE ITALIA S.p.A.
Viale Cristoforo Colombo, 8
20090 Trezzano sul Naviglio MI, Italy
Phone +39 02 484781
ALPINE ELECTRONICS DE ESPAÑA, S.A.
Portal de Gamarra 36, Pabellón, 32
01013 Vitoria (Alava)-APDO 133, Spain
Phone 945-283588
JEIL Moon Hwa Co.
18-6, 3Ga, Pil_dong, Jung_gu, Seoul, Korea
S/NO. LABEL
Designed by ALPINE Japan
Printed in Korea
68-33122Z73-A (Y_A5)
M3514633010
 Loading...