

Page 1
FOR CAR USE ONLY/NUR FÜR AUTOMOBIL GEBRAUCH/POUR APPLICATION AUTOMOBILE UNIQUEMENT/
PARA USO EN AUTOMÓVILES/SOLO PER L’UTILIZZO IN AUTOMOBILE/ENDAST FÖR BILBRUK/ALLEEN VOOR
GEBRUIK IN DE AUTO/ТОЛЬКО ДЛЯ ИСПОЛЬЗОВАНИЯ В АВТОМОБИЛЯХ/DO UŻYCIA TYLKO W
SAMOCHODZIE
9-INCH ADVANCED NAVI STATION
X902D
EN
DE
FR
8-INCH ADVANCED NAVI STATION
X802D-U
7-INCH ADVANCED NAVI STATION
INE-W710D
9-INCH MONITOR RECEIVER
i902D
7-INCH MONITOR RECEIVER
iLX-702D
QUICK REFERENCE GUIDE
Kurzanleitung
GUIDE DE RÉFÉRENCE RAPIDE
GUÍA DE REFERENCIA RÁPIDA
GUIDA RAPIDA
SNABBGUIDE
SNELSTARTGIDS
КРАТКОЕ СПРАВОЧНОЕ РУКОВОДСТВО
SKRÓCONA INSTRUKCJA DLA UŻYTKOWNIKA
ES
IT
SE
NL
RU
PL
ALPINE X902D/X802D-U/INE-W710D/i902D/iLX-702D 68-34732Z07-A_QRG (EN)
Page 2

(X902D/X802D-U/INE-W710D Only)
ALPINE X902D/X802D-U/INE-W710D/i902D/iLX-702D 68-34732Z07-A_QRG (EN)
Page 3
Contents
WARNING ................................................................................................................................................................2
CAUTION .................................................................................................................................................................3
Getting Started .....................................................................................................................................................4
Favourite Function ............................................................................................................................................... 6
Registering Items .................................................................................................................................................6
Android Auto (Optional) ....................................................................................................................................7
Apple CarPlay (Optional) ................................................................................................................................... 7
Alpine Connect App (Optional) (X902D/X802D-U/INE-W710D only) ...............................................7
Radio/RDS Operation .........................................................................................................................................8
DAB/DAB+/DMB Operation .............................................................................................................................9
USB Flash drive Operation (Optional) .........................................................................................................10
HDMI Device (DVD Player) Operation (Optional) ...................................................................................11
iPod/iPhone Operation (Optional) ...............................................................................................................12
Hands-Free Phone Control .............................................................................................................................13
Map Functions (X902D/X802D-U/INE-W710D only) .............................................................................14
Navigation Menu (X902D/X802D-U/INE-W710D only) ........................................................................15
Setting a Destination (X902D/X802D-U/INE-W710D only) .................................................................16
Specifications ......................................................................................................................................................17
IMPORTANT
Please record the serial number of your unit in the space provided below and keep it as a permanent
record.
SERIAL NUMBER:
ISO SERIAL NUMBER: AL
INSTALLATION DATE:
INSTALLATION TECHNICIAN:
PLACE OF PURCHASE:
EN
DE
FR
ES
IT
SE
NL
RU
For details on all functions, refer to the Owner’s Manual stored in the supplied CD-ROM. (As it is
data CD, the CD cannot be used for playing back music and images on the player.) If required, an
ALPINE dealer will readily provide you with a print out of the Owner’s Manual contained in the
CD-ROM.
ALPINE X902D/X802D-U/INE-W710D/i902D/iLX-702D 68-34732Z07-A_QRG (EN)
PL
1-EN
Page 4
WARNING
C
m
t
o
a
n
h
I
Y
p
n
o
E
R
a
p
i
h
N
l
u
u
WARNING
This symbol means important instructions. Failure
to heed them can result in serious injury or death.
INSTALL THE PRODUCT CORRECTLY SO THAT THE DRIVER
CANNOT WATCH TV/VIDEO UNLESS THE VEHICLE IS STOPPED
AND THE EMERGENCY BRAKE IS APPLIED.
It is dangerous for the driver to watch TV/Video while driving a vehicle.
Installing this product incorrectly enables the driver to watch TV/Video
while driving. This may cause a distraction, preventing the driver from
looking ahead, thus causing an accident. The driver or other people
could be severely injured.
DO NOT WATCH VIDEO WHILE DRIVING.
Watching the video may distract the driver from looking ahead of the
vehicle and cause an accident.
DO NOT OPERATE ANY FUNCTION THAT TAKES YOUR
ATTENTION AWAY FROM SAFELY DRIVING YOUR VEHICLE.
Any function that requires your prolonged attention should only be
performed after coming to a complete stop. Always stop the vehicle in a
safe location before performing these functions. Failure to do so may
result in an accident.
DO NOT FOLLOW ROUTE SUGGESTIONS IF THE NAVIGATION
SYSTEM INSTRUCTS YOU TO PERFORM AN UNSAFE OR
ILLEGAL MANEUVER, OR PLACES YOU IN AN UNSAFE
SITUATION OR AREA.
This product is not a substitute for your personal judgement. Any route
suggestions by this system should never supersede any local traffic
regulations or your personal judgement or knowledge of safe driving
practise.
KEEP THE VOLUME AT A LEVEL WHERE YOU CAN STILL HEAR
OUTSIDE NOISES WHILE DRIVING.
Excessive volume levels that obscure sounds such as emergency vehicle
sirens or road warning signals (train crossings, etc.) can be dangerous
and may result in an accident. LISTENING AT LOUD VOLUME
LEVELS IN A CAR MAY ALSO CAUSE HEARING DAMAGE.
MINIMIZE DISPLAY VIEWING WHILE DRIVING.
Viewing the display may distract the driver from looking ahead of the
vehicle and cause an accident.
DO NOT DISASSEMBLE OR ALTER.
Doing so may result in an accident, fire or electric shock.
USE ONLY IN CARS WITH A 12 VOLT NEGATIVE GROUND.
(Check with your dealer if you are not sure.) Failure to do so may result
in fire, etc.
KEEP SMALL OBJECTS SUCH AS SCREWS OUT OF THE REACH
OF CHILDREN.
Swallowing them may result in serious injury. If swallowed, consult a
physician immediately.
USE THE CORRECT AMPERE RATING WHEN REPLACING
FUSES.
Failure to do so may result in fire or electric shock.
DO NOT BLOCK VENTS OR RADIATOR PANELS.
Doing so may cause heat to build up inside and may result in fire.
2-EN
USE THIS PRODUCT FOR MOBILE 12V APPLICATIONS.
Use for other than its designed application may result in fire, electric
shock or other injury.
MAKE THE CORRECT CONNECTIONS.
Failure to make the proper connections may result in fire or product
damage.
BEFORE WIRING, DISCONNECT THE CABLE FROM THE
NEGATIVE BATTERY TERMINAL.
Failure to do so may result in electric shock or injury due to electrical
shorts.
DO NOT ALLOW CABLES TO BECOME ENTANGLED IN
SURROUNDING OBJECTS.
Arrange wiring and cables in compliance with the manual to prevent
obstructions when driving. Cables or wiring that obstruct or hang up on
places such as the steering wheel, shift lever, brake pedals, etc. can be
extremely hazardous.
DO NOT SPLICE INTO ELECTRICAL CABLES.
Never cut away cable insulation to supply power to other equipment.
Doing so will exceed the current carrying capacity of the wire and result
in fire or electric shock.
DO NOT DAMAGE PIPE OR WIRING WHEN DRILLING HOLES.
When drilling holes in the chassis for installation, take precautions so as
not to contact, damage or obstruct pipes, fuel lines, tanks or electrical
wiring. Failure to take such precautions may result in fire.
DO NOT USE BOLTS OR NUTS IN THE BRAKE OR STEERING
SYSTEMS TO MAKE GROUND CONNECTIONS.
Bolts or nuts used for the brake or steering systems (or any other
safety-related system), or tanks should NEVER be used for installations
or ground connections. Using such parts could disable control of the
vehicle and cause fire etc.
DO NOT INSTALL IN LOCATIONS WHICH MIGHT HINDER
VEHICLE OPERATION, SUCH AS THE STEERING WHEEL OR
SHIFT LEVER.
Doing so may obstruct forward vision or hamper movement etc. and
results in serious accident.
This sy
to heed
proper
HALT USE
Failure to d
Return it to
Centre for r
HAVE THE
The wiring
and experie
purchased t
USE SPEC
SECUREL
Be sure to u
designated
install the u
in hazards
ARRANG
BY A SHA
Route the c
or sharp or
wiring. If w
to prevent t
hole.
DO NOT I
DUST.
Avoid insta
dust. Moist
product fail
• The foll
They m
ALPINE X902D/X802D-U/INE-W710D/i902D/iLX-702D 68-34732Z07-A_QRG (EN)
Page 5
S.
h
i
electric
CAUTION
This symbol means important instructions. Failure
to heed them can result in injury or material
property damage.
roduct
E
lectrical
prevent
ang up on
. can be
pment.
and result
HOLES.
tions so as
lectrical
RING
her
stallations
l of the
ER
tc. and
HALT USE IMMEDIATELY IF A PROBLEM APPEARS.
Failure to do so may cause personal injury or damage to the product.
Return it to your authorized Alpine dealer or the nearest Alpine Service
Centre for repairing.
HAVE THE WIRING AND INSTALLATION DONE BY EXPERTS.
The wiring and installation of this unit requires special technical skill
and experience. To ensure safety, always contact the dealer where you
purchased this product to have the work done.
USE SPECIFIED ACCESSORY PARTS AND INSTALL THEM
SECURELY.
Be sure to use only the specified accessory parts. Use of other than
designated parts may damage this unit internally or may not securely
install the unit in place. This may cause parts to become loose resulting
in hazards or product failure.
ARRANGE THE WIRING SO IT IS NOT CRIMPED OR PINCHED
BY A SHARP METAL EDGE.
Route the cables and wiring away from moving parts (like the seat rails)
or sharp or pointed edges. This will prevent crimping and damage to the
wiring. If wiring passes through a hole in metal, use a rubber grommet
to prevent the wire’s insulation from being cut by the metal edge of the
hole.
DO NOT INSTALL IN LOCATIONS WITH HIGH MOISTURE OR
DUST.
Avoid installing the unit in locations with high incidence of moisture or
dust. Moisture or dust that penetrates into this unit may result in
product failure.
EN
DE
FR
ES
IT
SE
NL
• The following screen examples of X902D/X802D-U/INE-W710D used in this manual are for reference only.
They may differ from the actual screen displays.
ALPINE X902D/X802D-U/INE-W710D/i902D/iLX-702D 68-34732Z07-A_QRG (EN)
RU
PL
3-EN
Page 6

Getting Started
n
e
e
h
s
e
t
b
c
u
S
a
Owner’s manual Getting Started
Turni
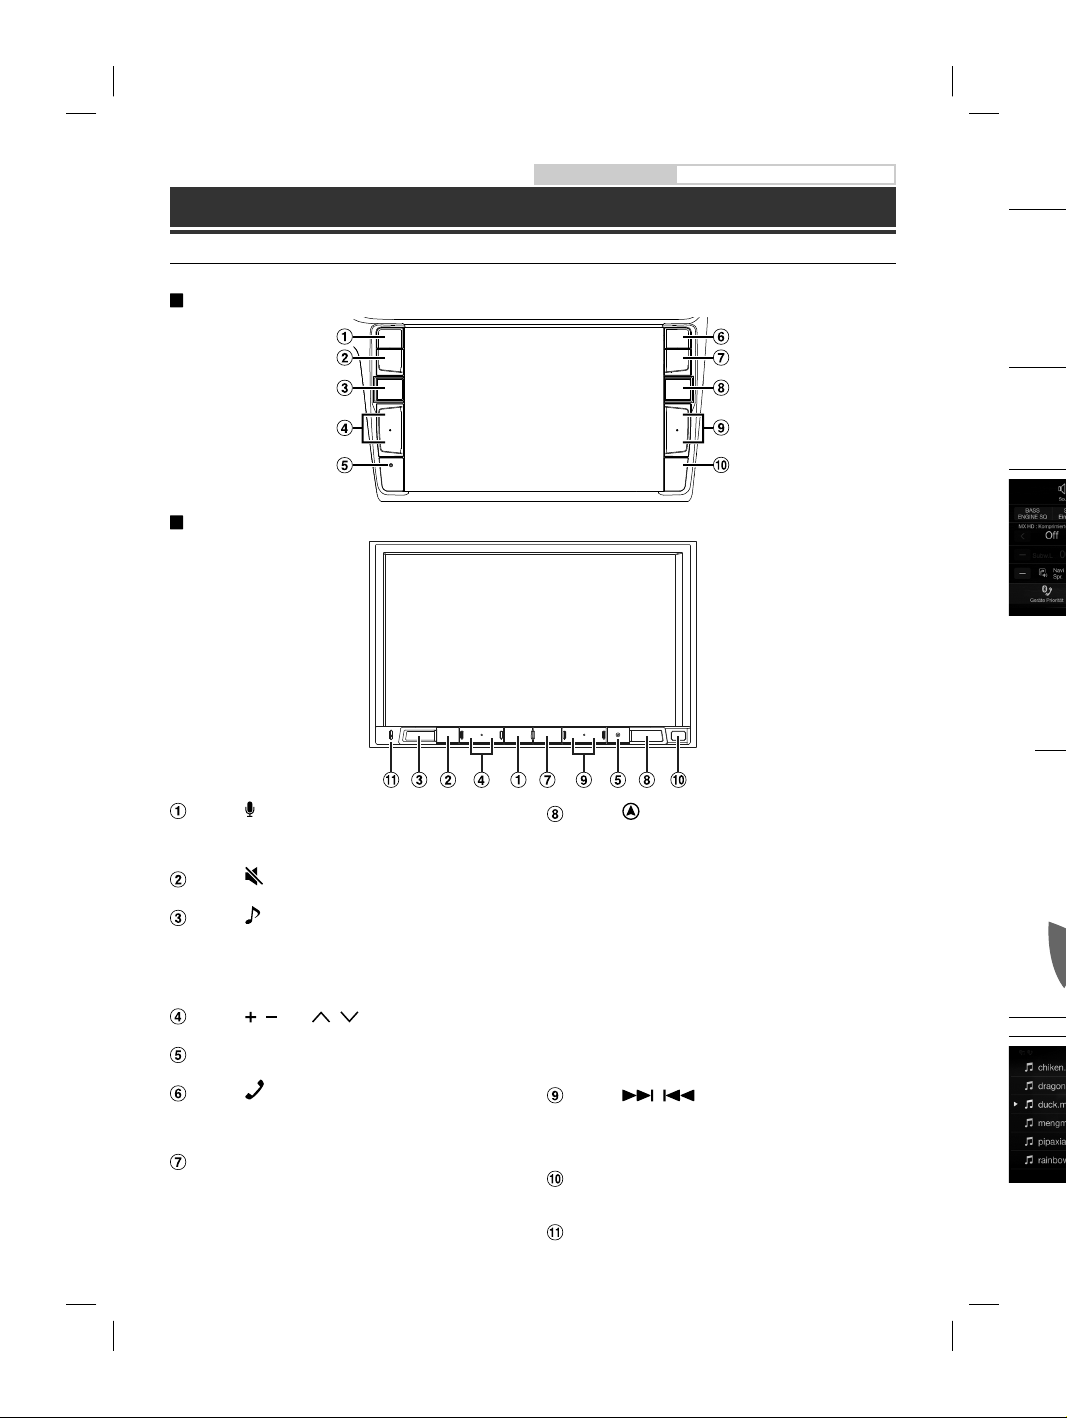
Location of Controls
The screen design used in the Owner’s Manual may differ from the actual screen.
For X902D/i902D
For X802D-U/INE-W710D/iLX-702D
1 Tu
Th
2 Pr
Switc
You can
the scre
Shortcu
You can s
Seat Ente
A
(U
or VOICE button
Depending on the connected smartphone, press to
recall Siri function or voice recognition mode.
(MUTE) button
Press to activate/deactivate the mute mode.
(AUDIO)/(Favourite) button
Displays the Audio/Visual screen. If the Audio/Visual
screen is already displayed, changes the source.
Press and hold for at least 2 seconds to recall the
Favourite screen.
/ or / (UP/DOWN) button
Press to adjust the volume.
RESET switch
The system of this unit is reset.
(PHONE) button (X902D/i902D only)
Recalls the Phone Menu screen.
Press to start a conversation when a call is incoming.
MENU/ (Power Off) button
Recalls the Menu screen.
Press and hold this button for at least 5 seconds to turn
the power off.
(NAV) button
For X902D/X802D-U/INE-W710D:
Recalls the navigation map screen.
Press again to switch to Navigation menu screen.
Press and hold this button for at least 2 seconds to
change to Go Home route screen. (If Home is not set
yet, it will change to the Home setting screen.)
For details of navigation operations, refer to “Navigation
System OM” in the CD-ROM.
For i902D/iLX-702D:
Recalls the connected smartphone’s map screen.
Depending on the smartphone, this function may not
available.
/ button
Press to seek up/down a station in radio mode or up/
down a track, chapter, etc., in other audio/visual
sources.
Remote Sensor
Point the remote control transmitter towards the
remote sensor within a range of 2 metres.
Microphone (X802D-U/INE-W710D/iLX702D only)
Used for Hands-free or Voice Control modes.
4-EN
ALPINE X902D/X802D-U/INE-W710D/i902D/iLX-702D 68-34732Z07-A_QRG (EN)
Preset
mode S
The Se
Page 7
Turning Power On or Off
1 Turn the ignition key to the ACC or ON position.
The system is turned on.
2 Press and hold the MENU button for at least 5 seconds to turn the power off.
en.
ds to
not set
.)
avigation
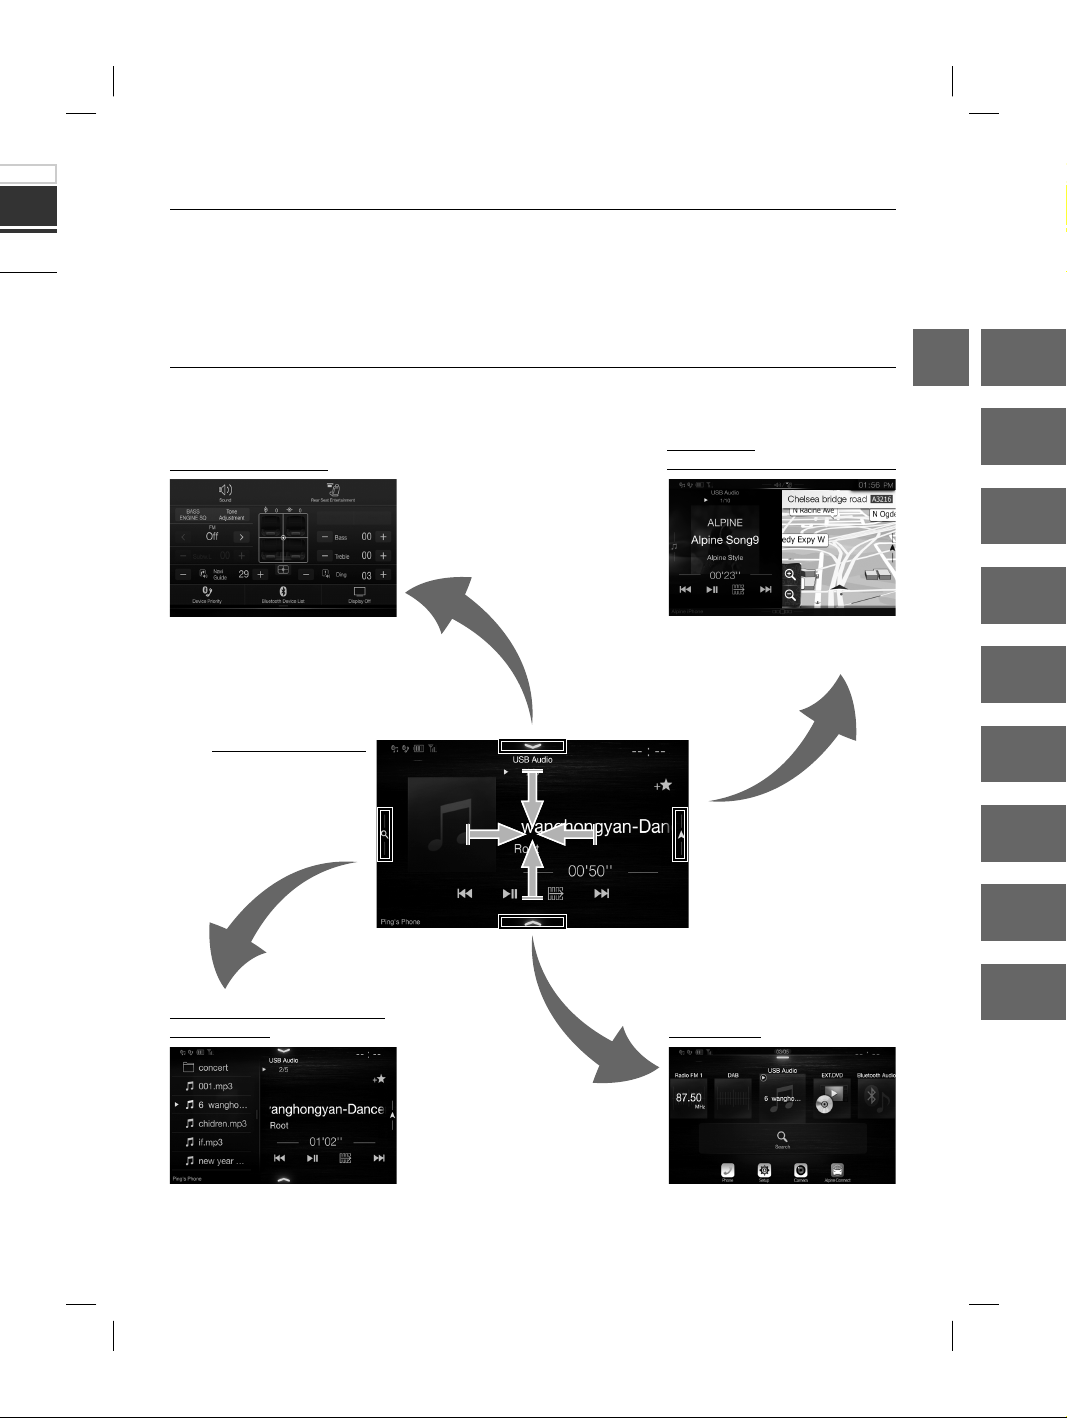
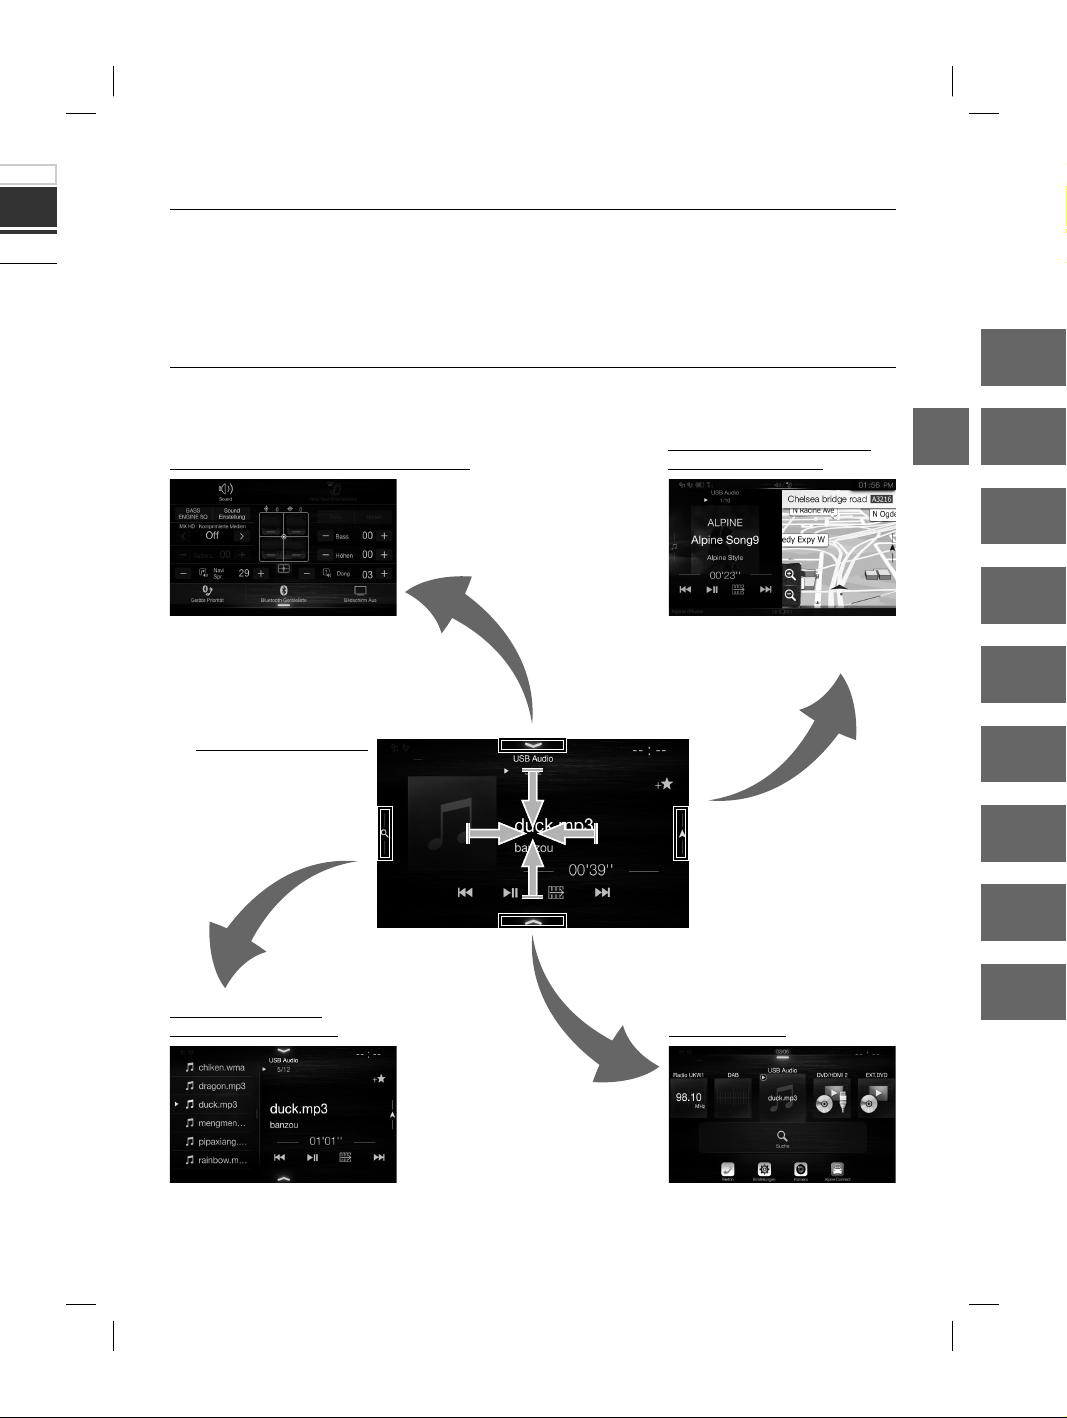
Switching the Audio Sources Screen to a Dedicated Screen
You can switch the Audio Sources screen to a dedicated screen by touching the icon on one of the four edges of
the screen, or by swiping vertically or horizontally.
Dual Screen
Shortcut Setup Screen
You can set the Sound Setup or Rear
Seat Entertainment System.
Audio Sources Screen
(USB Audio)
(X902D/X802D-U/INE-W710D only)
You can switch between the
displayed screens on the Dual Screen.
EN
DE
FR
ES
IT
SE
NL
RU
en.
may not
or up/
al
the
2D only)
Preset button or Quick Search
mode Screen*
The Search mode differs depending on the audio source. For details, see the operating instructions of the audio source.
ALPINE X902D/X802D-U/INE-W710D/i902D/iLX-702D 68-34732Z07-A_QRG (EN)
Menu Screen
You can make settings on the Menu
Screen.
PL
5-EN
Page 8
Owner’s manual Favourite Function
d
A
M
a
e
e
e
F
p
a
m
o
o
m
a
i
a
o
n
e
e
e
e
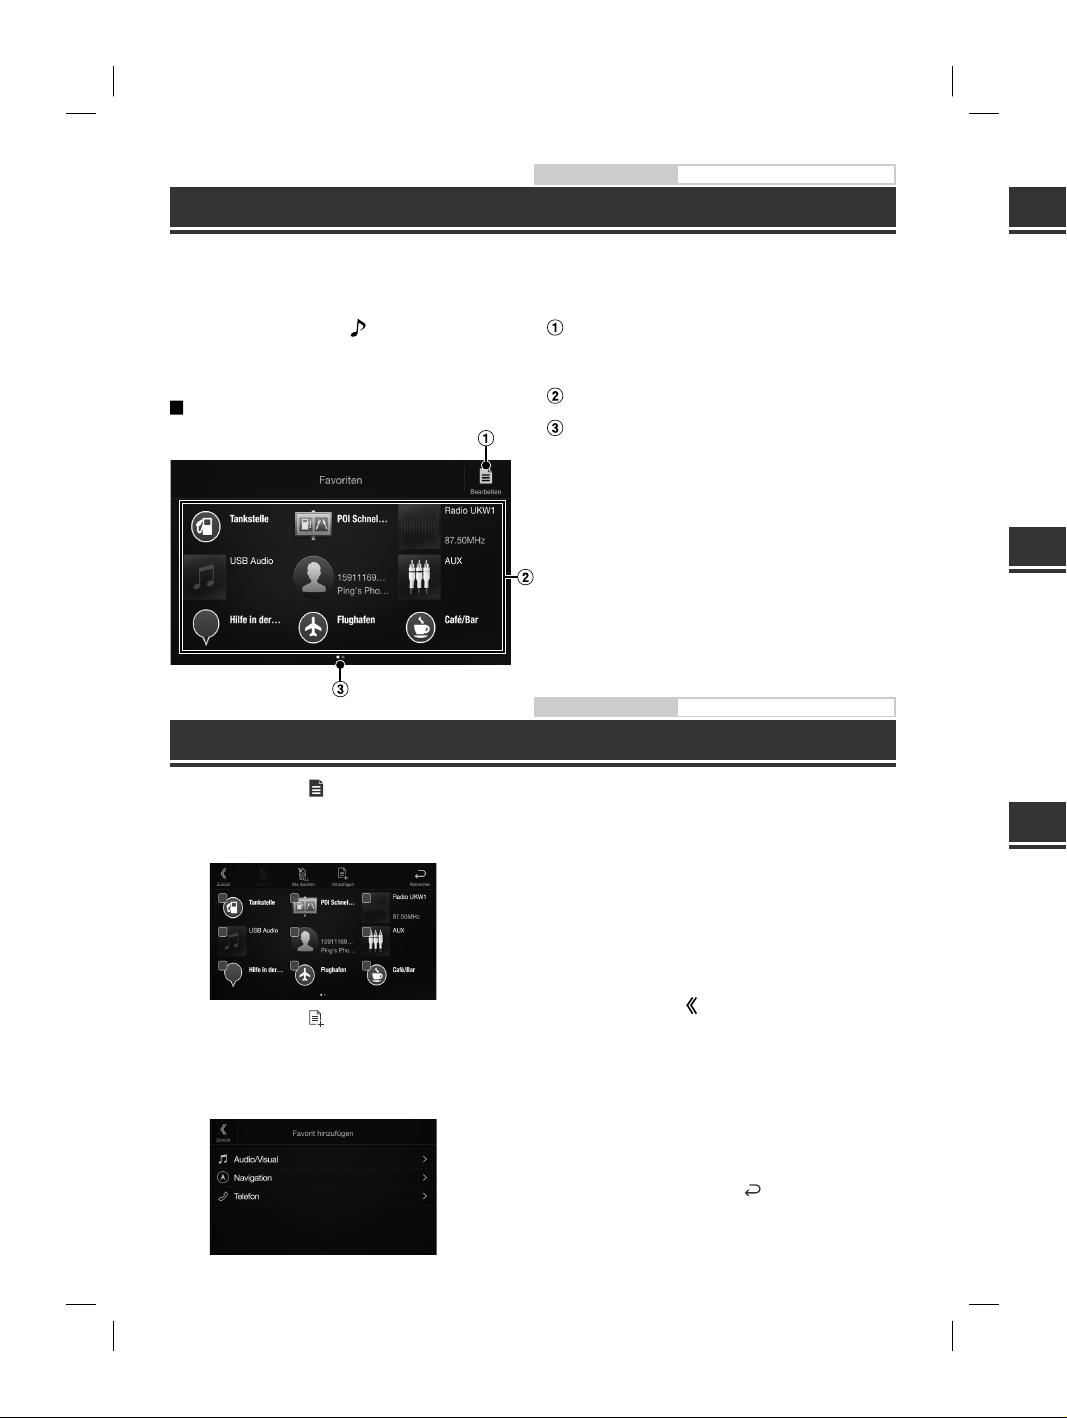
Favourite Function
This unit enables you to recall functions easily by registering frequently used items such as the Audio source, the
navigation search function, etc. to the Favourite screen. You can recall any of these items easily.
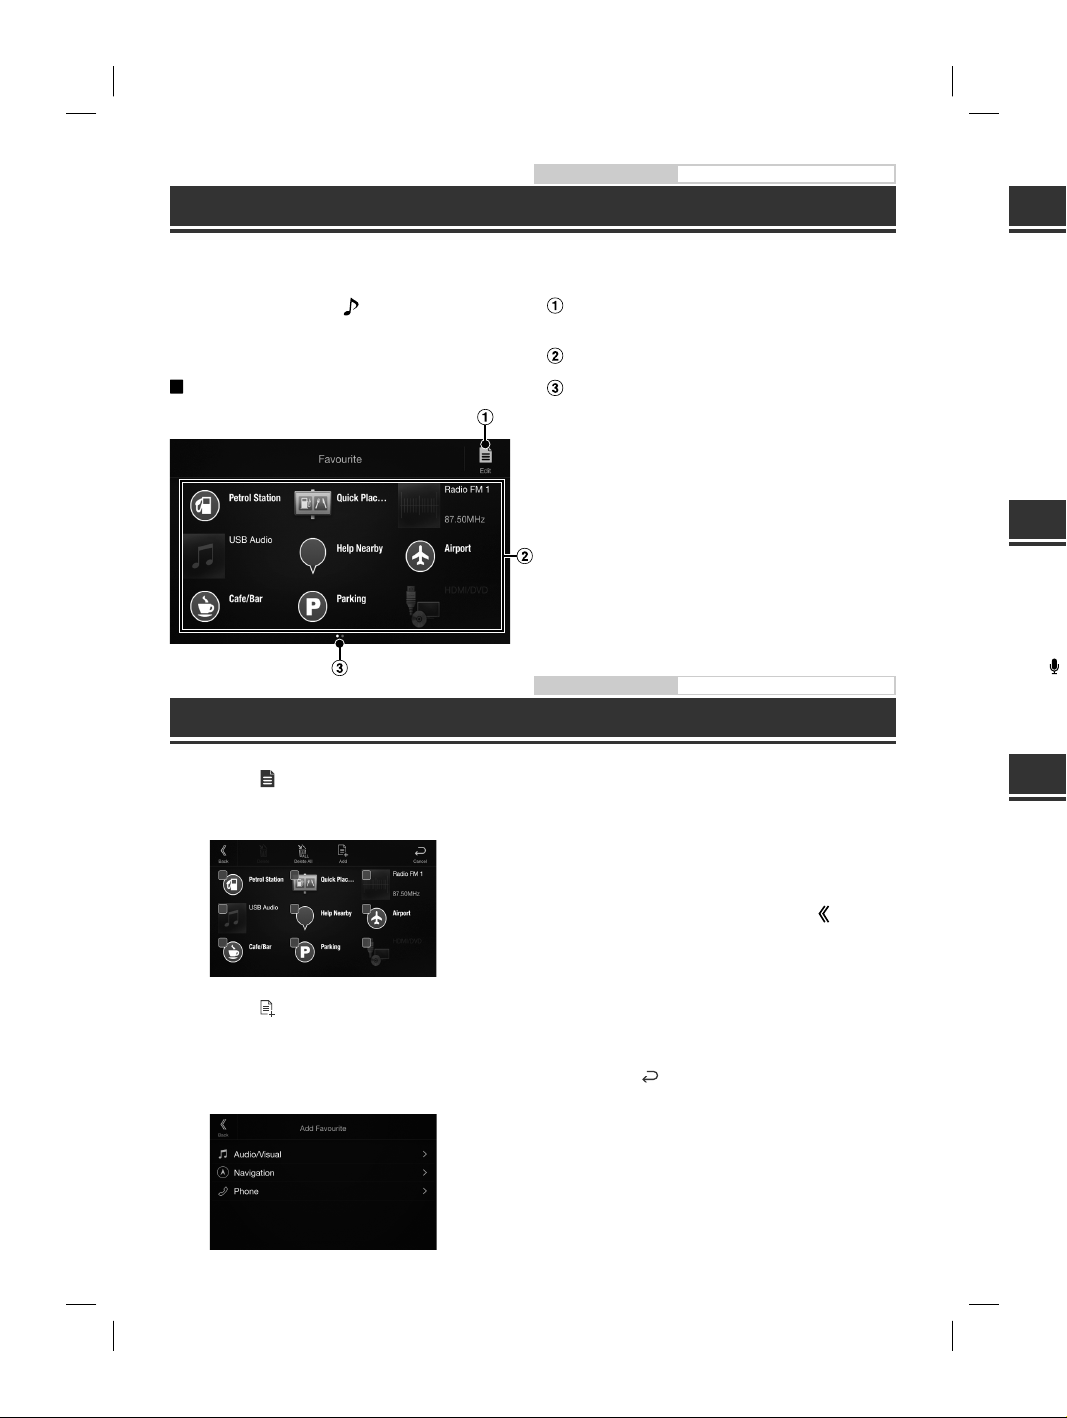
1 Press and hold the /(Favourite) button for
at least 2 seconds.
The Favourite screen is displayed.
Favourite screen example
Changes to the Edit screen used for registering
items or changing names.
Favourite registration item
Indicates the location of the currently displayed
Favourite screen.
Swipe to the left and right to change the pages. You
can add up to 6 pages.
Owner’s manual Registering Items
Registering Items
1 Touch [ ] (Edit).
A checkbox is displayed on the upper left area of
the registration icon and it changes to Edit mode.
4 Choose the desired item to be added.
For details on the items to be added, refer to
“Editing the Favourite Screen” in the Owner’s
Manual.
• You can add up to 54 items.
• You cannot register an item more than once.
5 After editing is complete, touch [ ] (Back).
6 After the caption for the confirmation is
displayed, touch [OK].
2 Touch [ ] (Add).
The items to be added (categories) are displayed.
3 Touch the desired item to be added
(category).
7 Editing is complete and the screen switches
to the Favourite screen.
• If you touch [ ] (Cancel) while editing, the screen
switches to the previous Favourite Edit screen.
An
Android
Google
Downlo
Connect
1 Pr
Th
2 To
Th
•
Ap
Apple C
with you
receive
iPhone t
For detai
Press
You can
You can
Alp
Downlo
Alpine C
For detai
Before th
dependi
1 La
2 Th
3 Pr
Th
4 To
Th
6-EN
ALPINE X902D/X802D-U/INE-W710D/i902D/iLX-702D 68-34732Z07-A_QRG (EN)
5 Se
Th
Page 9
Owner’s manual Android Auto (Optional)
Android Auto (Optional)
ce, the
ering
played
.
to
nce.
Back).
n is
witches
Android Auto is designed to make it easier to use apps from your phone while you’re on the road. Navigate with
Google Maps, listen to playlists or podcasts from your favourite apps, and more.
Download the Android Auto App from the Google Play store before continuing.
Connect your Android compatible Phone to begin using Android Auto.
1 Press the MENU button.
The Menu screen is displayed.
2 Touch [Android Auto].
The Android Auto screen is displayed.
• For details operation of Android Auto, refer to “Android Auto” in the Owner’s Manual (CD-ROM).
Owner’s manual Apple CarPlay (Optional)
Apple CarPlay (Optional)
Apple CarPlay is a smarter, safer way to use your iPhone in the car. Apple CarPlay takes the things you want to do
with your iPhone while driving and puts them right on this unit. You can get directions, make calls, send and
receive messages, and listen to music, all in a way that allows you to stay focused on the road. Just plug in your
iPhone to this unit and go.
For details, refer to Owner’s Manual (CD-ROM).
Press or VOICE to activate Siri function of the iPhone.
You can make a call, play music, etc., by using Siri function of the iPhone.
You can also control Apple CarPlay on touchscreen.
Owner’s manual Alpine Connect App (Optional) (X902D/X802D-U/INE-W710D only)
Alpine Connect App (Optional) (X902D/X802D-U/INE-W710D only)
Download an app that supports Alpine Connect to your smartphone, and you can operate it from the unit.
Alpine Connect App is downloadable from Apple’s App Store; the Android user can download it from Google Play.
For details, consult your Alpine dealer.
Before these operations, set Connectivity Setting or Alpine Connect to USB (iPhone) or Bluetooth (Android)
depending on the connected Smartphone.
1 Launch Alpine Connect App.
2 Then connect the smartphone to this unit.
3 Press the MENU button.
The Menu screen is displayed.
EN
DE
FR
ES
IT
SE
NL
RU
PL
4 Touch [Alpine Connect].
The Alpine Connect App select screen is displayed.
5 Select the desired App.
The selected App screen is displayed.
ALPINE X902D/X802D-U/INE-W710D/i902D/iLX-702D 68-34732Z07-A_QRG (EN)
7-EN
Page 10
Spotify®
e
B
e
a
h
h
e
s
s
u
e
e
N
m
Spotify is a music streaming distribution service not affiliated with Alpine. More information is available at
http://www.spotify.com.
The Spotify application is available for iPhone and Android phones, please visit https://support.spotify.com/ for
the latest compatibility information.
To enjoy Spotify as you drive, first download the Spotify app to your iPhone or Android device. You can download
it on the iTunes App Store or Google Play™. Choose a free account or a paid Premium account, either in the app or
at spotify.com. A Premium account gives you more features, like offline listening.
• This product incorporates Spotify software which is subject to 3rd party licenses found here:
www.spotify.com/connect/third-party-licenses.
• For information on the countries and regions where Spotify can be used, take a look at
https://www.spotify.com/us/select-your-country/.
Owner’s manual Radio/RDS
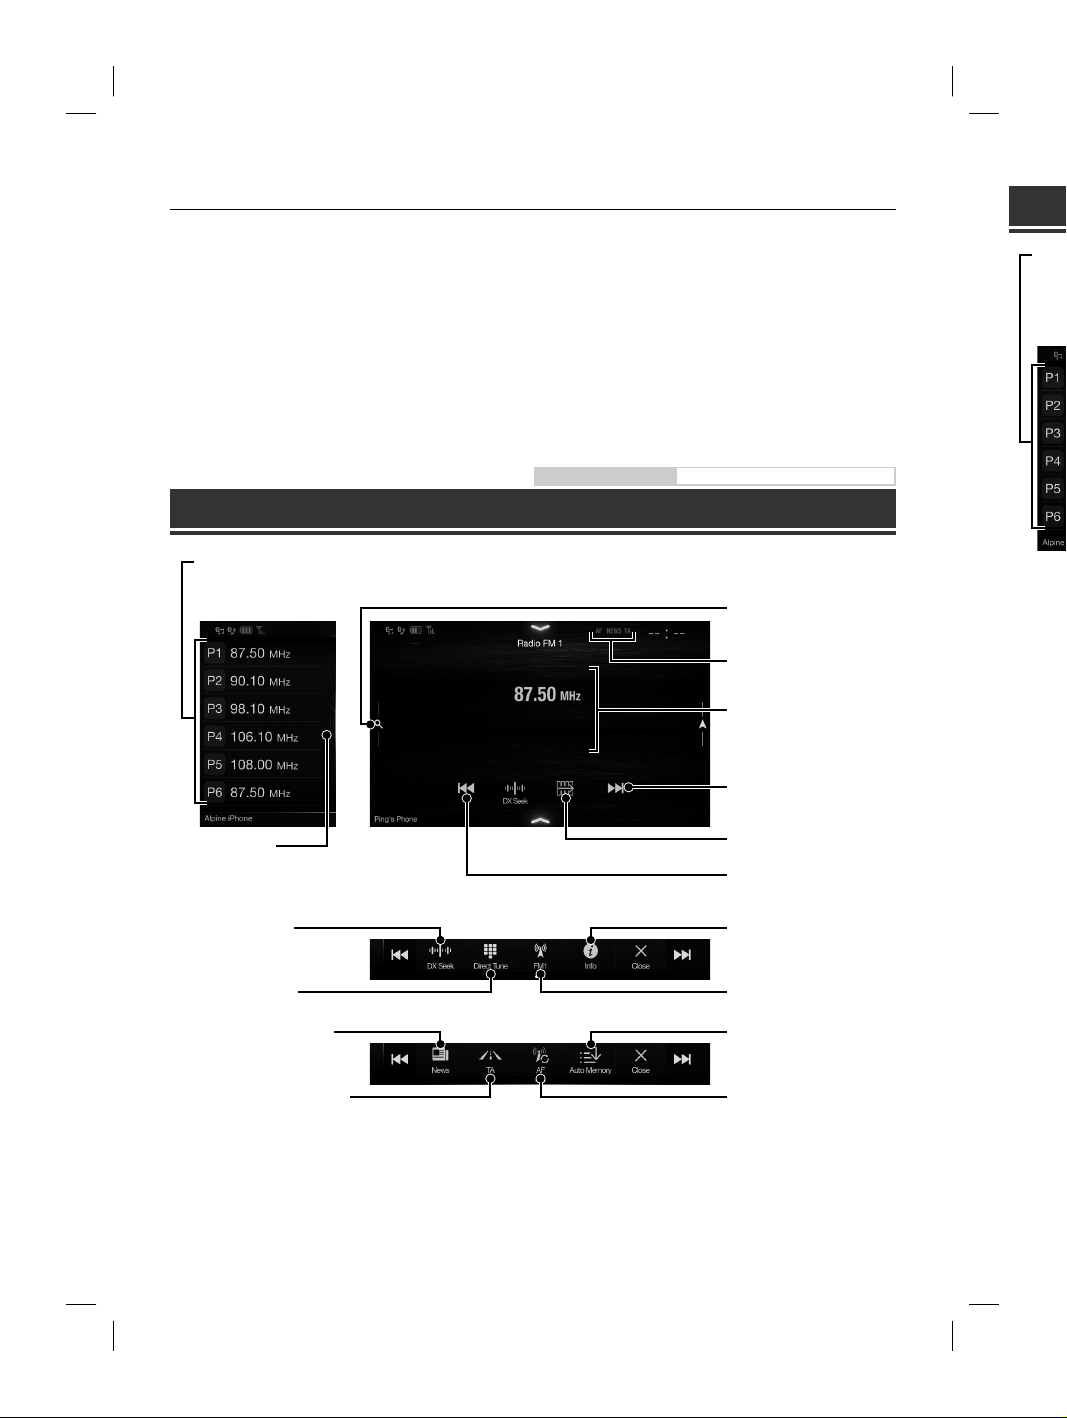
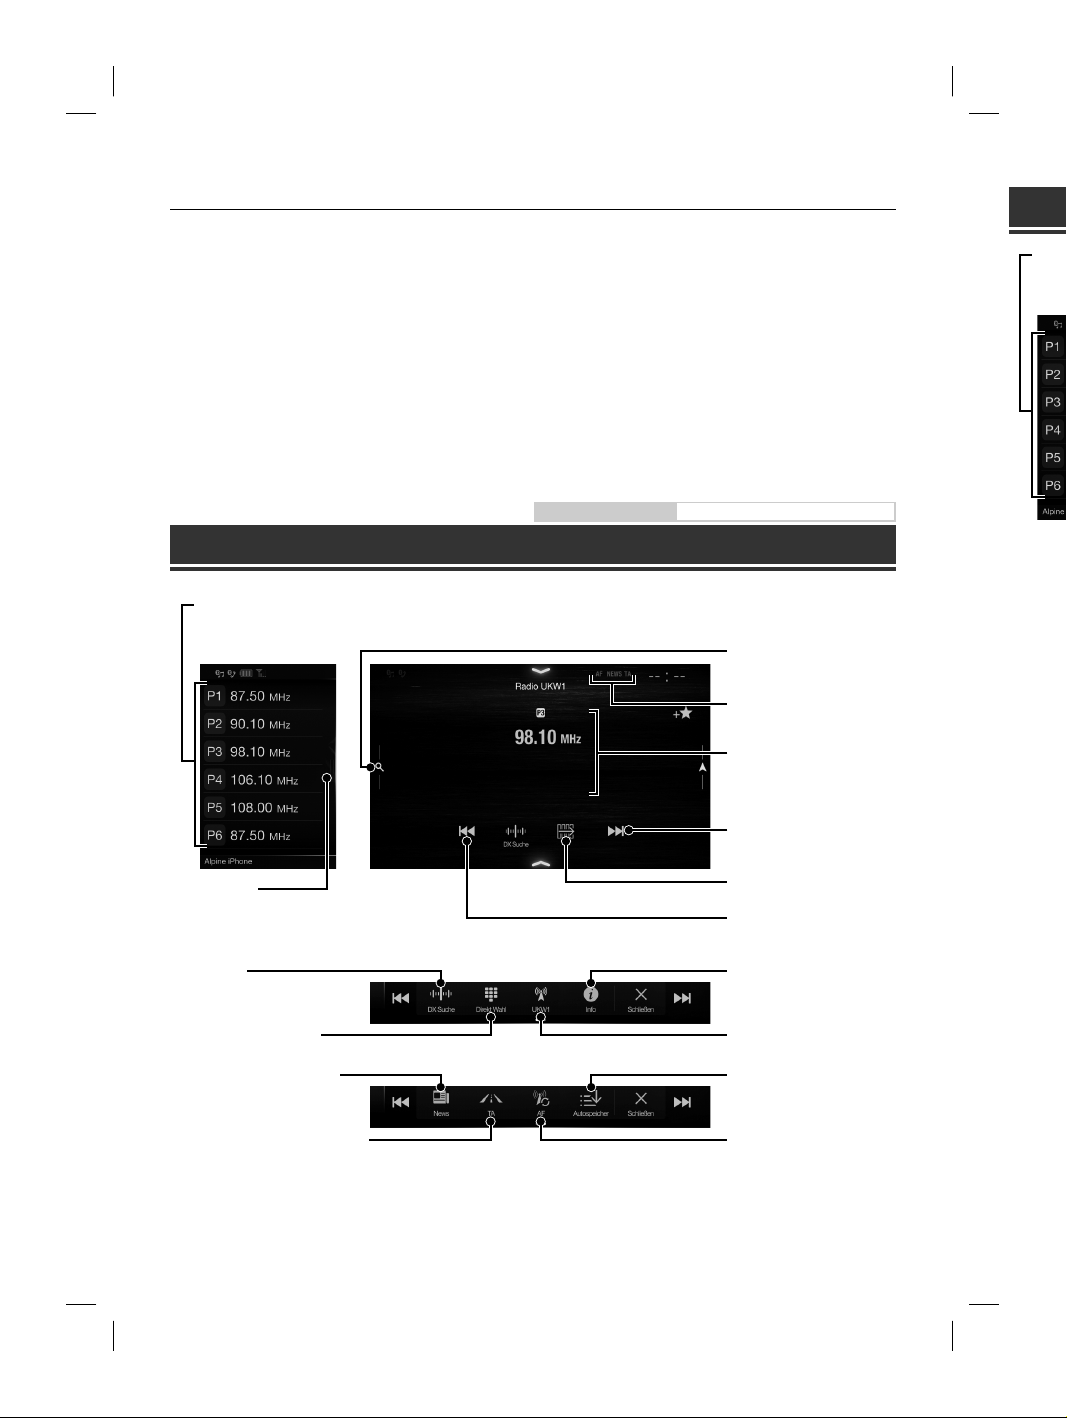
Radio/RDS Operation
DA
Pres
Displ
Touc
Pres
Preset button
Displays the preset stations with a short touch.
Touch for at least 2 seconds to memorise the current station as a preset station.
Preset mode screen
PTY Search button
Swipe to the right when you use
the PTY list screen.
Changes tuning mode
Input Radio Frequency
PRIORITY NEWS mode On/Off
Traffic Information mode On/Off
Preset mode button
Touch or swipe to the right when
you use the Preset mode screen.
RDS indicator
Information display
Increases frequency
Switches Function button
Decreases frequency
Changes text information
Switches band
Memorises stations
automatically
AF mode On/Off
Full Searc
Swipe to th
Service list
(All Service l
PTY list is di
Changes t
Displays s
Changes t
PRIORITY
They
8-EN
ALPINE X902D/X802D-U/INE-W710D/i902D/iLX-702D 68-34732Z07-A_QRG (EN)
Page 11

/ for
wnload
e app or
DAB/DAB+/DMB Operation
Preset button
Displays the preset service with a short touch.
Touch for at least 2 seconds to memorise the current service as a preset station.
Preset mode screen
Owner’s manual DAB/DAB+/DMB
Preset mode button
Touch or swipe to the right when
you use the Preset mode screen.
DAB indicator
EN
ight when
e screen.
tton
ation
Full Search mode button
Swipe to the right when you use the All
Service list screen.
(All Service list, Current Ensemble list or
PTY list is displayed)
Changes text information
PRIORITY NEWS mode On/Off
Information display
Increases frequency
Switches Function button
Decreases frequency
Slide Show
Displays the program information,
artist photos, and advertisements
that are synchronised with the
Service component currently
being received.*
Inputting Frequency DirectlyChanges tuning mode
Displays Select PTY screenDisplays select service screen
Changes Primary/Secondary
Service
Traffic Information mode On/
Off
DE
FR
ES
IT
SE
NL
RU
PL
They may not be displayed, depending on the Service component currently being received.
ALPINE X902D/X802D-U/INE-W710D/i902D/iLX-702D 68-34732Z07-A_QRG (EN)
9-EN
Page 12
Owner’s manual USB Flash drive Operation (Optional)
M
h
v
t
1
M
b
A
u
p
c
t
d
I
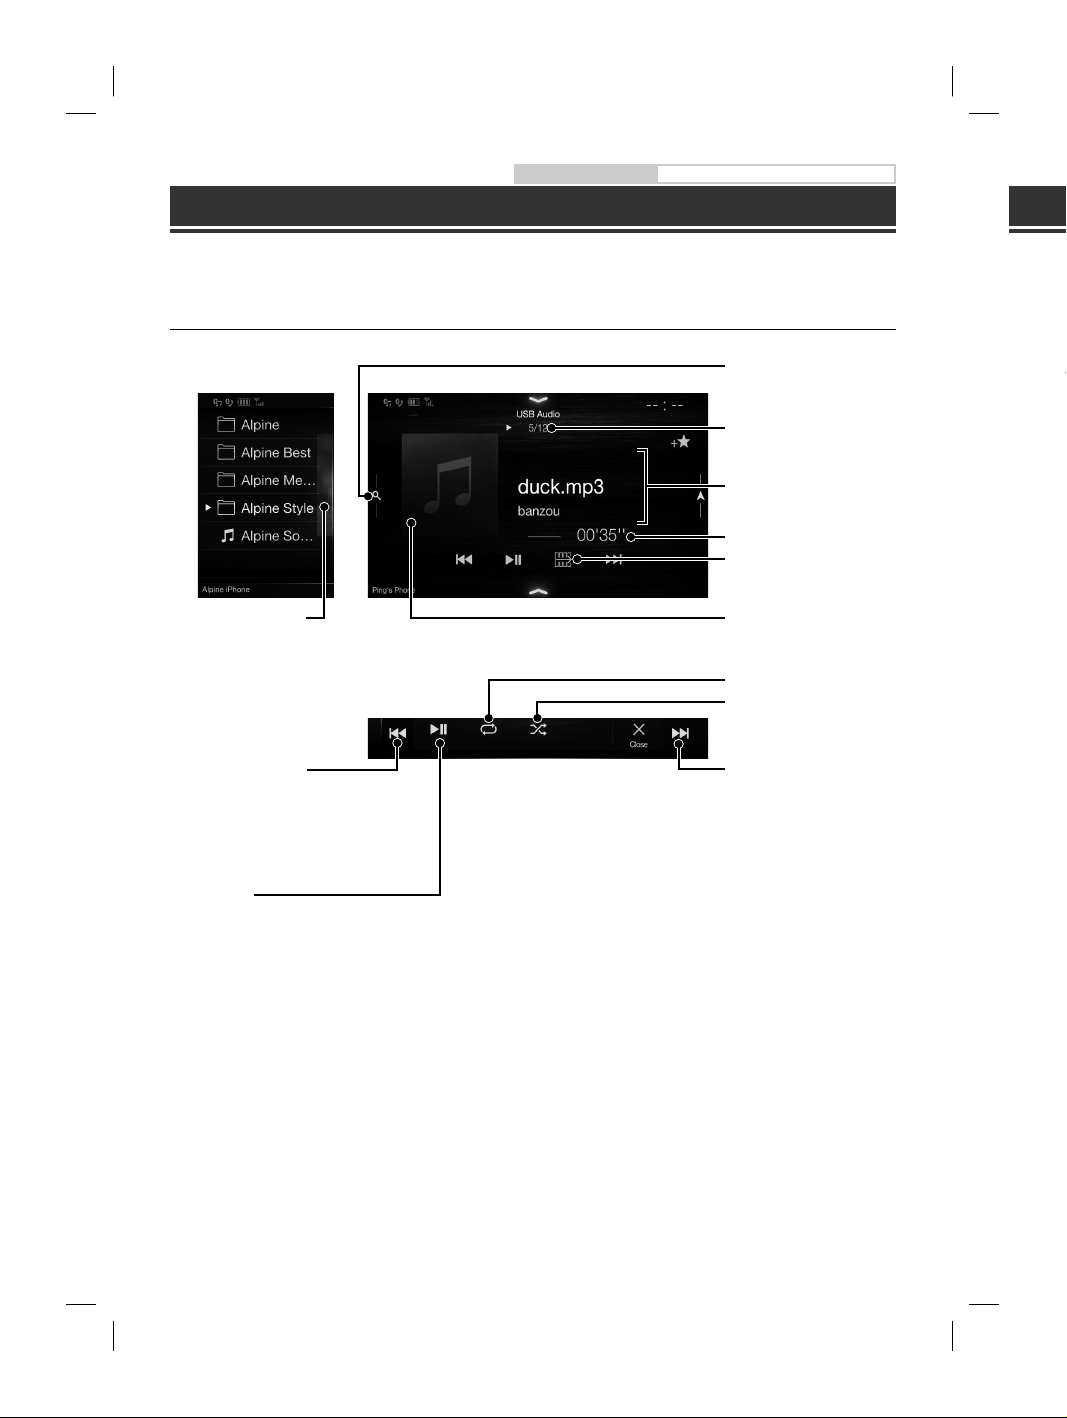
USB Flash drive Operation (Optional)
You can play back music files (MP3/WMA/AAC/FLAC) and video files (AVI/MKV/MP4) stored in a USB flash drive on
the internal player of this system.
USB Audio main screen example
Quick Search button
Quick Search mode screen
Full Search mode button
Swipe to the right when you use
the Full Search mode screen.
Restarts the current file/
skip to previous file if
pushed within 1 second/
Touch for 1 second or more
to rewind file
Touch or swipe to the right to use
the Quick Search mode.
Current song no./Total song no.
Information display
Elapsed time
Switches Function button
Artwork display
Repeat Playback
Random Play
Skip to the next track/
Touch for 1 second or more to
fast forward file
HD
When yo
Restarts t
skip to pre
pushed wi
Touch for
to rewind
Pause and
Stop Play
HDMI inpu
Switches
Displays
Switches S
DVD Setu
Pause and Play
10-EN
ALPINE X902D/X802D-U/INE-W710D/i902D/iLX-702D 68-34732Z07-A_QRG (EN)
If you
when
depen
HDM
Page 13
ional)
Owner’s manual HDMI (Option) DVD
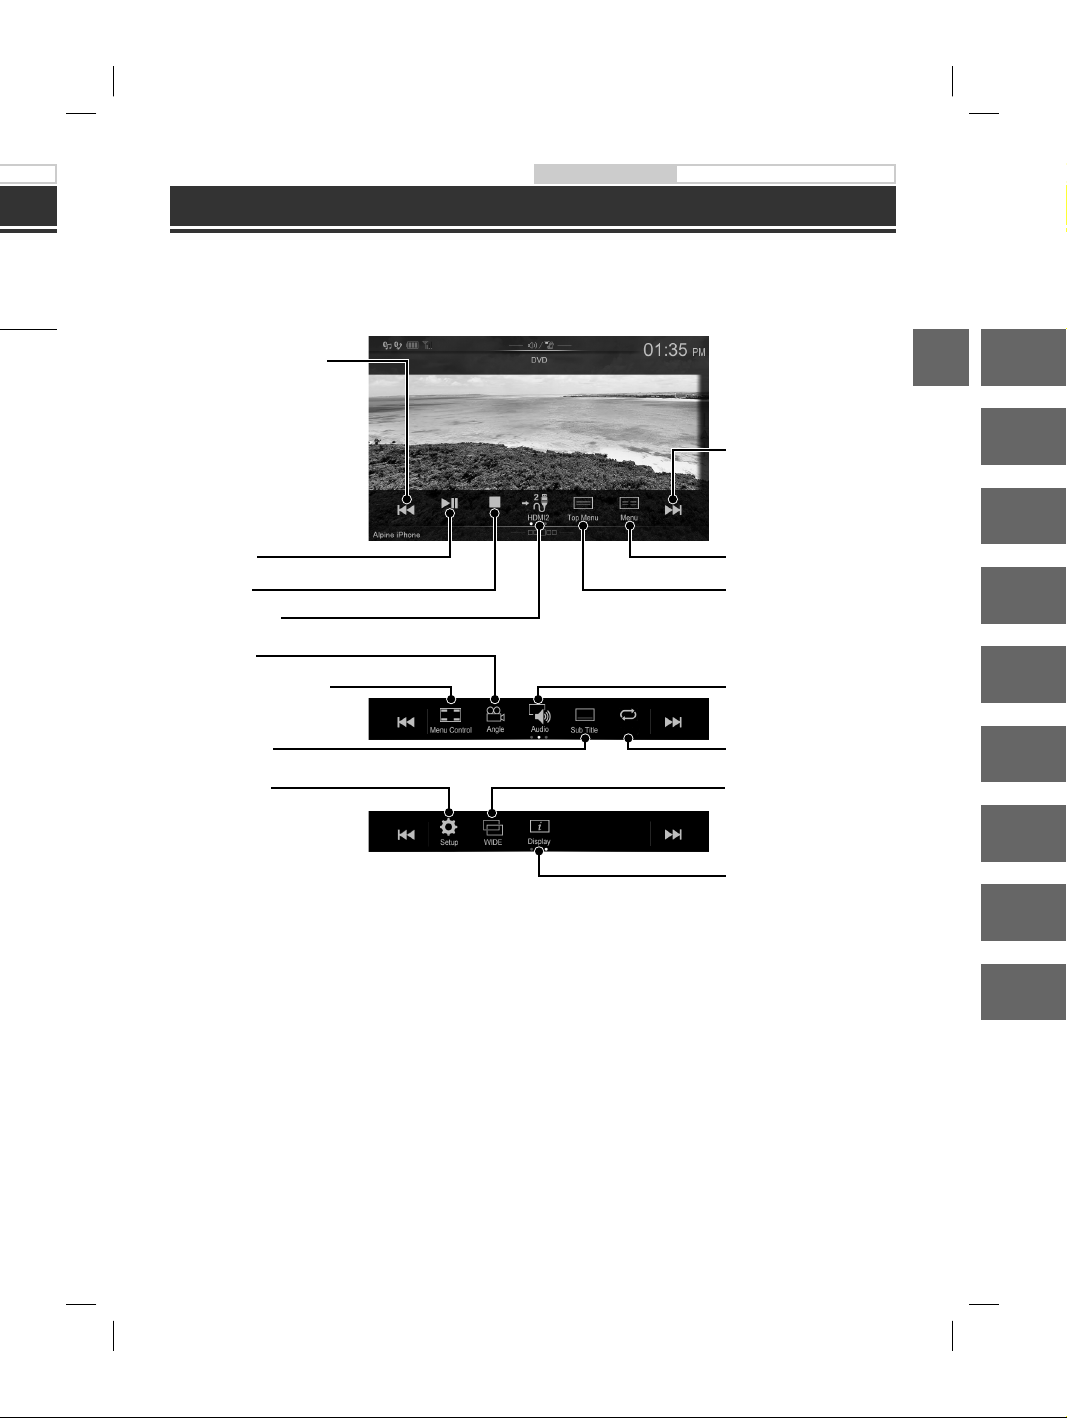
HDMI Device (DVD Player) Operation (Optional)
rive on
ight to use
.
al song no.
tton
/
r more to
When you connect an optional DVE-5300 (DVD Player), you can operate it from the unit.
Restarts the current chapter/
skip to previous chapter if
pushed within 1 second/
Touch for 1 second or more
to rewind
Pause and Play
Stop Playback
HDMI input switch *
Switches Angle
Displays Menu control screen
DVD Setup screen
Skip to the next chapter/Touch
for 1 second or more to fast
forward
Displays Menu screen
Displays Top Menu screen
Switches Audio Tracks
Repeat PlaybackSwitches Subtitles
Switching Display Modes
EN
DE
FR
ES
IT
SE
Changes text information
If you connect an optional HDMI selector module, you can connect two HDMI devices. If the HDMI selector is set to “On”
when two HDMI devices are connected, the HDMI input switch button is displayed. The displayed button differs
depending on the settings and the HDMI input currently selected. For details, refer to “HDMI Setup” and “Setting the
HDMI Selector On/Off” in the OWNER’S MANUAL (CD-ROM).
ALPINE X902D/X802D-U/INE-W710D/i902D/iLX-702D 68-34732Z07-A_QRG (EN)
NL
RU
PL
11-EN
Page 14

Owner’s manual iPod/iPhone (Optional)
n
n
p
o
a
M
t
h
e
o
iPod/iPhone Operation (Optional)
A separately sold Lightning to USB cable (KCU-471i), etc., is required depending on the type of iPod/iPhone.
Audio mode
Quick Search button
Quick Search mode screen
Full Search mode button
Swipe to the right when you use
the Full Search mode screen.
Finds the beginning of the
current file/Finds a previous file
within one second after
playback starts/Fast-reverses
when touched for at least 1
second
Touch or swipe to the right to use
the Quick Search mode.
Current song no./Total song no.
Information display
Playing time
Switches Function button
Pause and Playback
Artwork display
Repeat Playback
Random Play
Finds the beginning of the
next file/Fast-forwards when
touched for at least 1 second
Ha
The unit
If you co
order of
How t
comp
1 To
2 To
•
3 To
Searching for a Music File (Full Search
2 Touch the desired artist’s name.
Mode)
For example: Searching by Artist name
1 Touch [Artists] in the Full Search mode
screen.
The Albums search screen of the selected artist is
displayed.
Touching [
songs of the selected artist.
] of the desired artist will play back all
3 Touch the desired album’s name.
All songs of the selected album are displayed.
Touching [
songs of the selected album.
] of the desired album will play back all
4 Touch the desired song’s name.
The selected song is played back.
12-EN
ALPINE X902D/X802D-U/INE-W710D/i902D/iLX-702D 68-34732Z07-A_QRG (EN)
4 To
5 To
6 W
[
co
Au
Ha
Bo
m
n
Page 15
l)
Owner’s manual Bluetooth Setup, Bluetooth Operation
Hands-Free Phone Control
e.
ight to use
.
al song no.
tton
of the
ds when
second
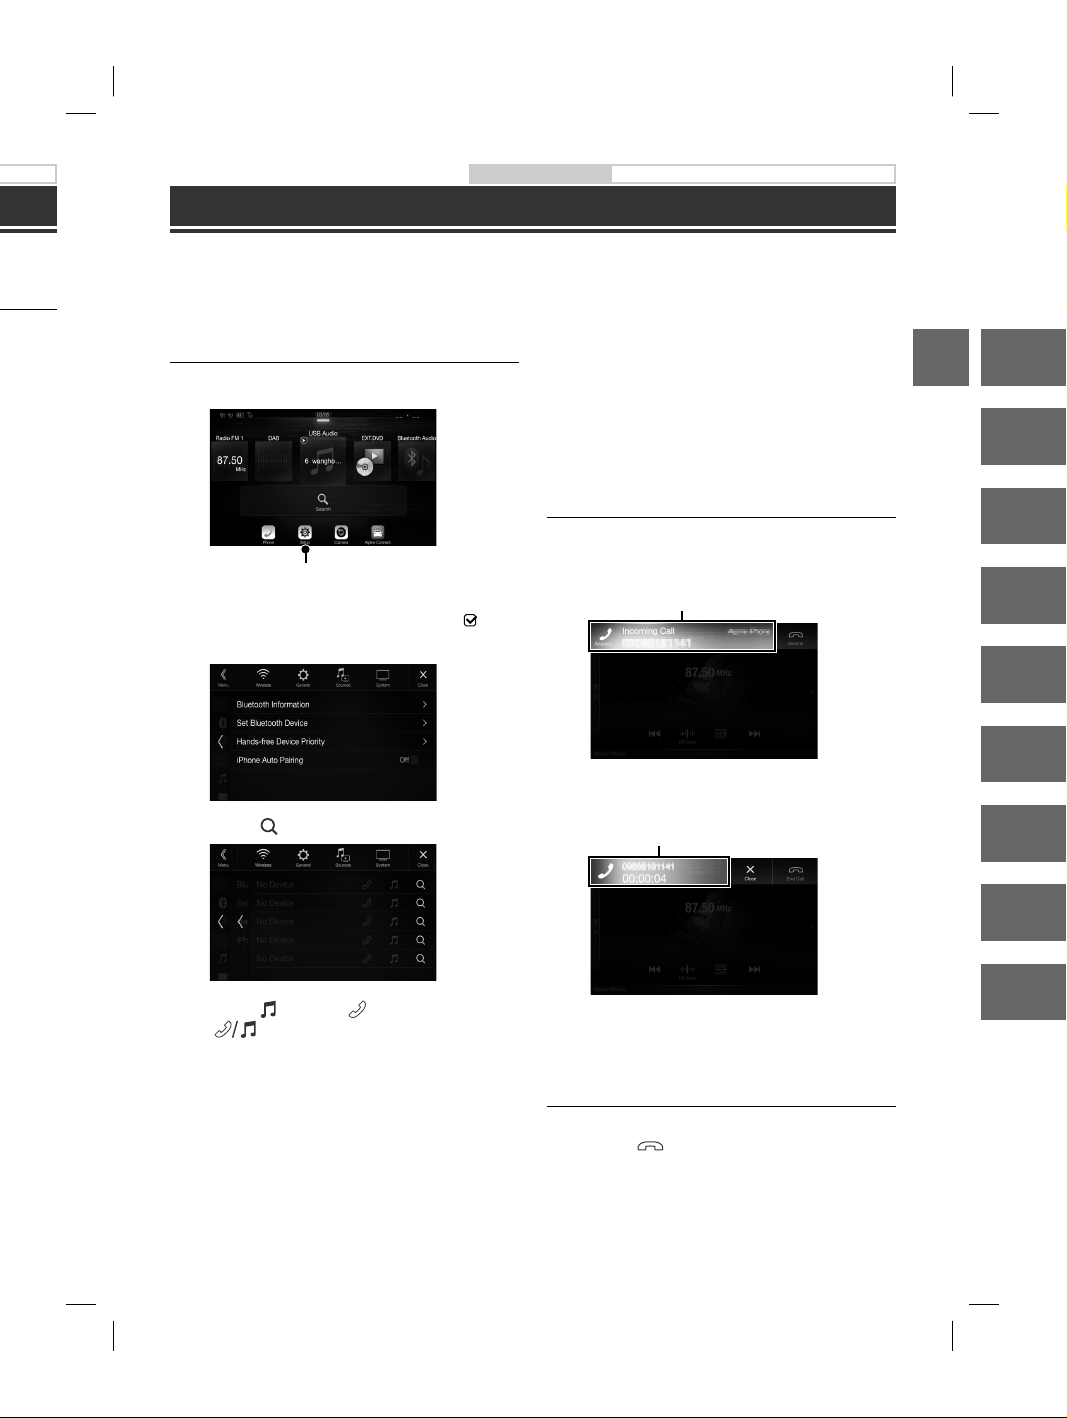
The unit can connect with up to two hands-free phones.
If you connect two hands-free phones to the unit, select “Hands-free Device Priority” in “Bluetooth Setup” to set the
order of precedence. For details, refer to OWNER’S MANUAL in the AUDIO VISUAL SECTION (CD-ROM).
How to connect to a Bluetooth
compatible device (Pairing)
1 Touch [Setup] button on the Menu screen.
• You can register up to 5 Bluetooth compatible mobile
phones.
• The Bluetooth registration process differs depending on
the device version and SSP (Simple Secure Pairing). If a 4
or 6 character Passcode appears on this device, enter the
Passcode using the Bluetooth compatible device.
If a 6 character Passkey appears on this device, make
sure the same passkey is displayed on the Bluetooth
compatible device and touch “Yes.”
Answering a Call
[Setup] button
2 Touch [Bluetooth].
• Make sure the “Bluetooth” setting is “On” ( ).
1 An incoming call triggers the ringtone and
an incoming call display.
Incoming call notification screen
3 Touch [Set Bluetooth Device].
2 Touch incoming call notification screen.
4 Touch [ ] to search for a new device.
The call starts.
Call info area
EN
DE
FR
ES
IT
SE
NL
rtist is
ed.
back all
5 Touch [ ] (Audio), [ ] (Hands-free) or
[ ] (Both) for the device you want to
connect from the list.
Audio: Sets for use as an Audio device.
Hands-free: Sets for use as a Hands Free Device.
Both: Sets for use as both an Audio device
and Hands Free Device.
6 When the device registration is complete, a
message appears and the device returns to
normal mode.
ALPINE X902D/X802D-U/INE-W710D/i902D/iLX-702D 68-34732Z07-A_QRG (EN)
Touch the call info area during a call changes to the
Phone Operation screen. Use this screen to adjust
the speech volume, etc.
Hanging up the Telephone
1 Touch [ ] (End Call).
The call finishes.
RU
PL
13-EN
Page 16
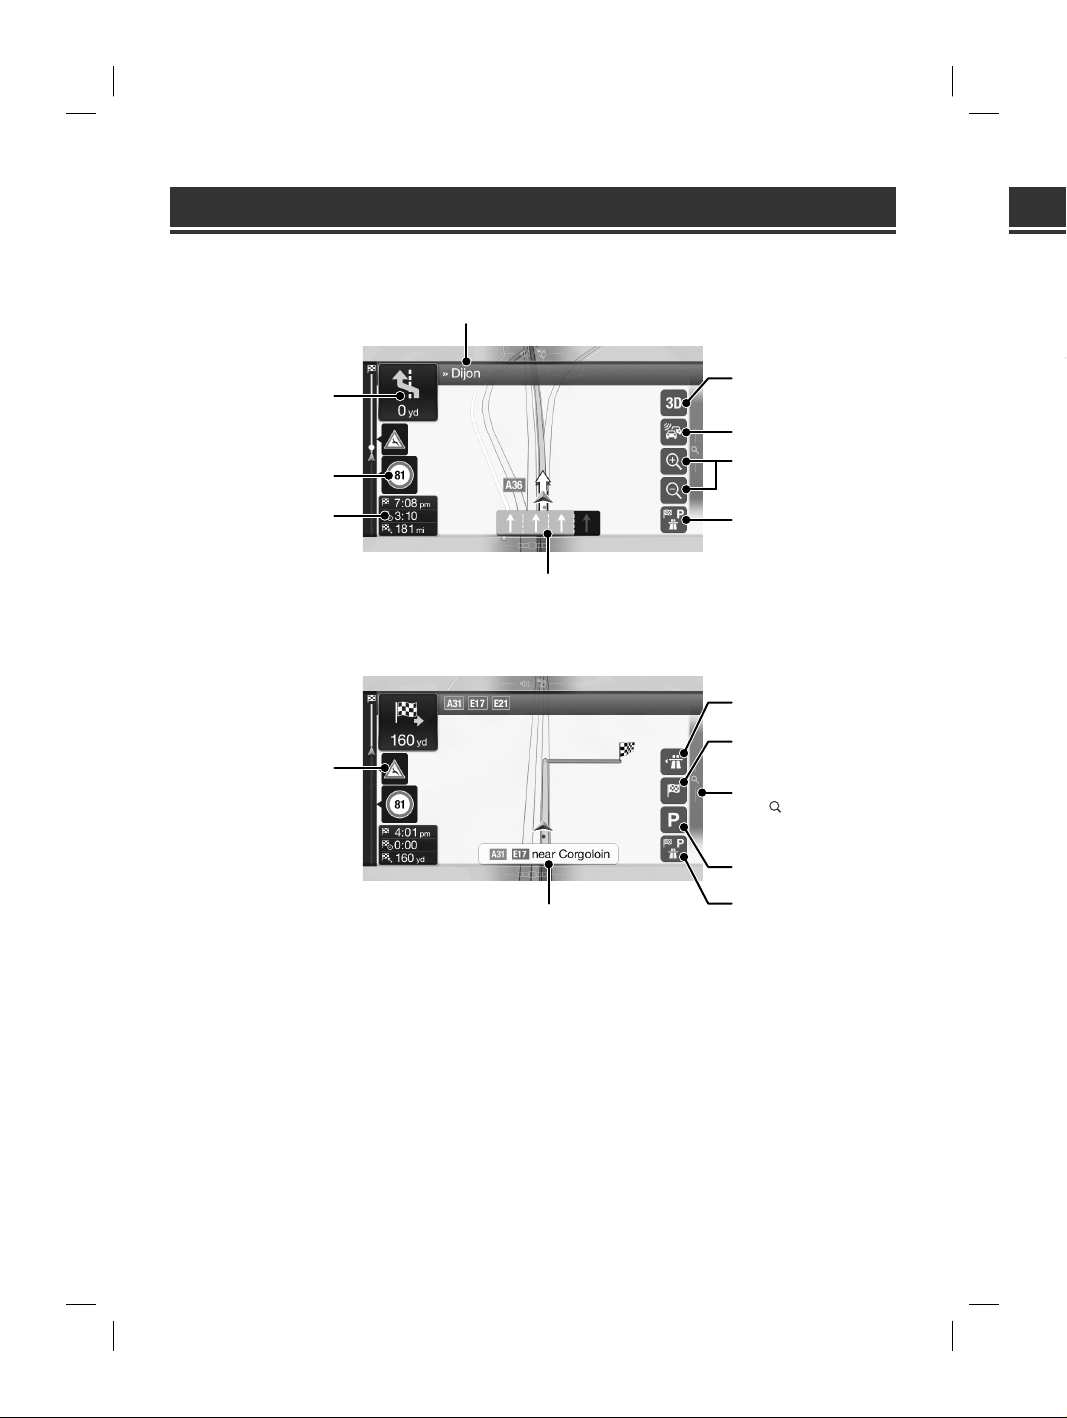
Map Functions (X902D/X802D-U/INE-W710D only)
d
t
P
e
n
S
w
o
e
w
v
s
e
Na
Below is an overview of different buttons and icons on the map display. For more detailed information about this
screen, please see the Owner’s Manual.
Next street
Next turn preview
Speed limit warning
Data fields
Lane information
Warning road sign
2D/2D North up/3D views
Traffic
Zoom
Additional information
Motorway services
Destination menu
Access the menu
Touch [
], or swipe to the left.
To acces
press th
Multipoint
Build your r
plan a rout
setting a ne
New Rout
Select your
address or i
selecting a
Saved Rout
recent desti
When Inter
the Online
further help
Access the
Touch or s
Parking around destination
Street name
Additional information
14-EN
ALPINE X902D/X802D-U/INE-W710D/i902D/iLX-702D 68-34732Z07-A_QRG (EN)
Page 17
Navigation Menu (X902D/X802D-U/INE-W710D only)
ut this
views
ion
the left.
ination
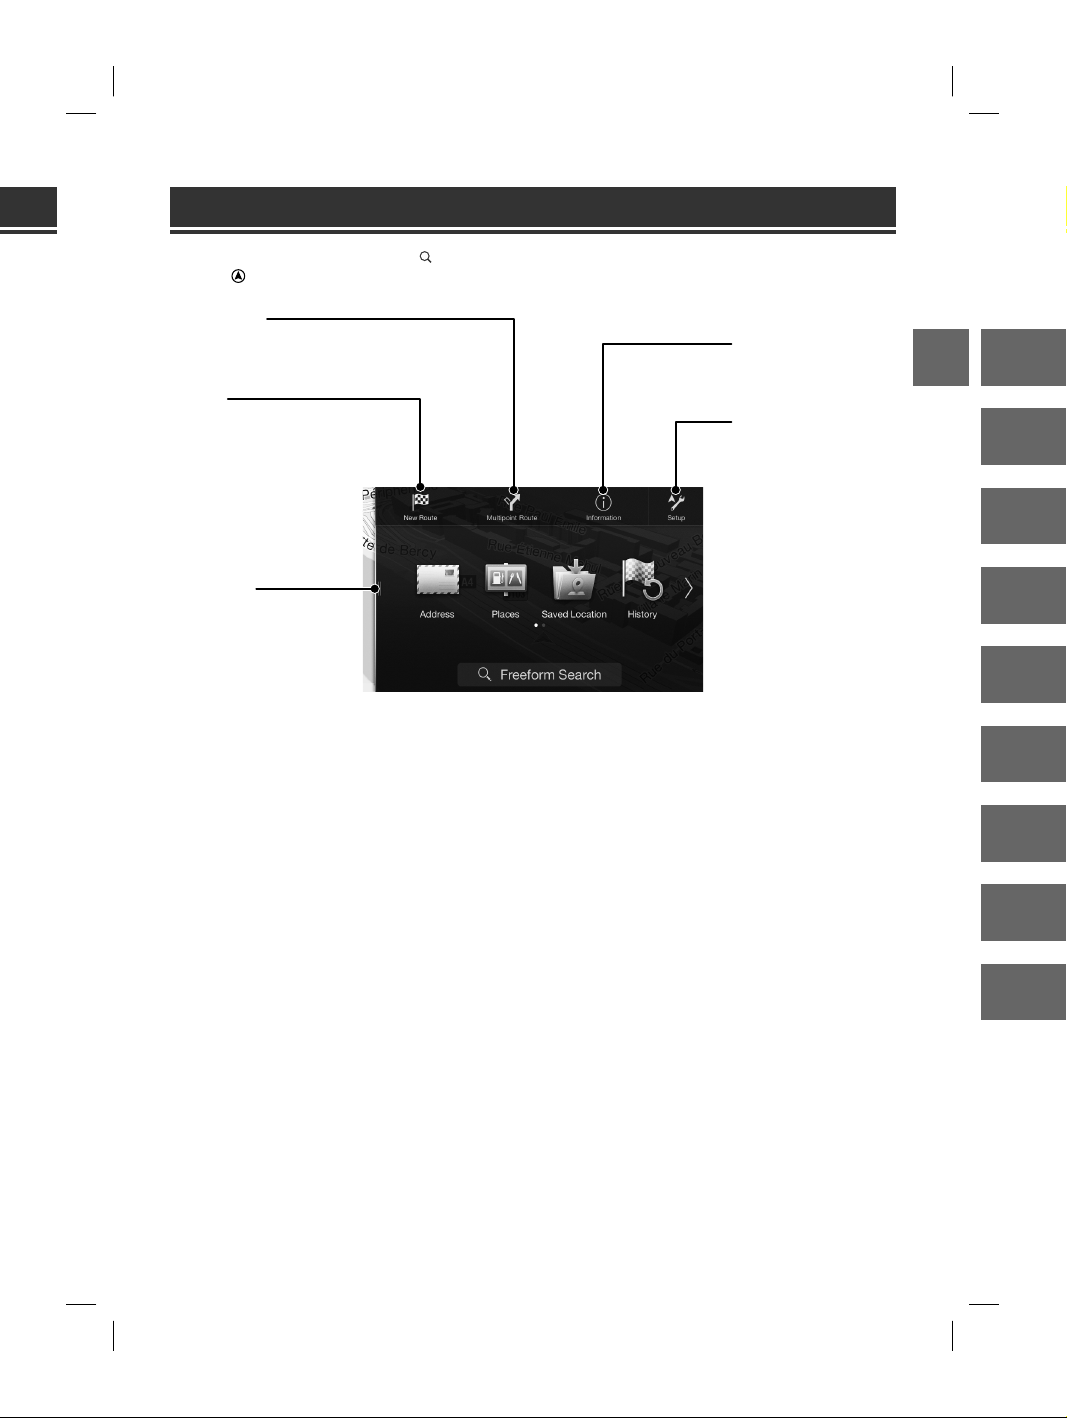
To access the Navigation Menu, touch [ ] on the right edge of the map screen or swipe to the left. Alternatively,
press the button.
Multipoint Route
Build your route from one or more route points. You can also
plan a route independently of your current GPS position by
setting a new starting point.
New Rout
Select your destination by entering an
address or its coordinate, or by
selecting a Place, a Saved Location, or a
Saved Route. You can also look up your
recent destinations from the History.
When Internet connection is available,
the Online Search option can be a
further help to find your destination.
Access the Map
Touch or swipe to the right.
Information
Access additional options and
check navigation-related
information.
Setup
Customise the way the
navigation software works.
EN
DE
FR
ES
IT
SE
NL
ion
RU
PL
15-EN
ALPINE X902D/X802D-U/INE-W710D/i902D/iLX-702D 68-34732Z07-A_QRG (EN)
Page 18
Setting a Destination (X902D/X802D-U/INE-W710D only)
e
O
e
S
u
n
E
n
b
C
N
a
N
n
E
n
(
C
n
n
N
a
C
e
r
m
a
N
e
n
e
E
m
r
C
t
t
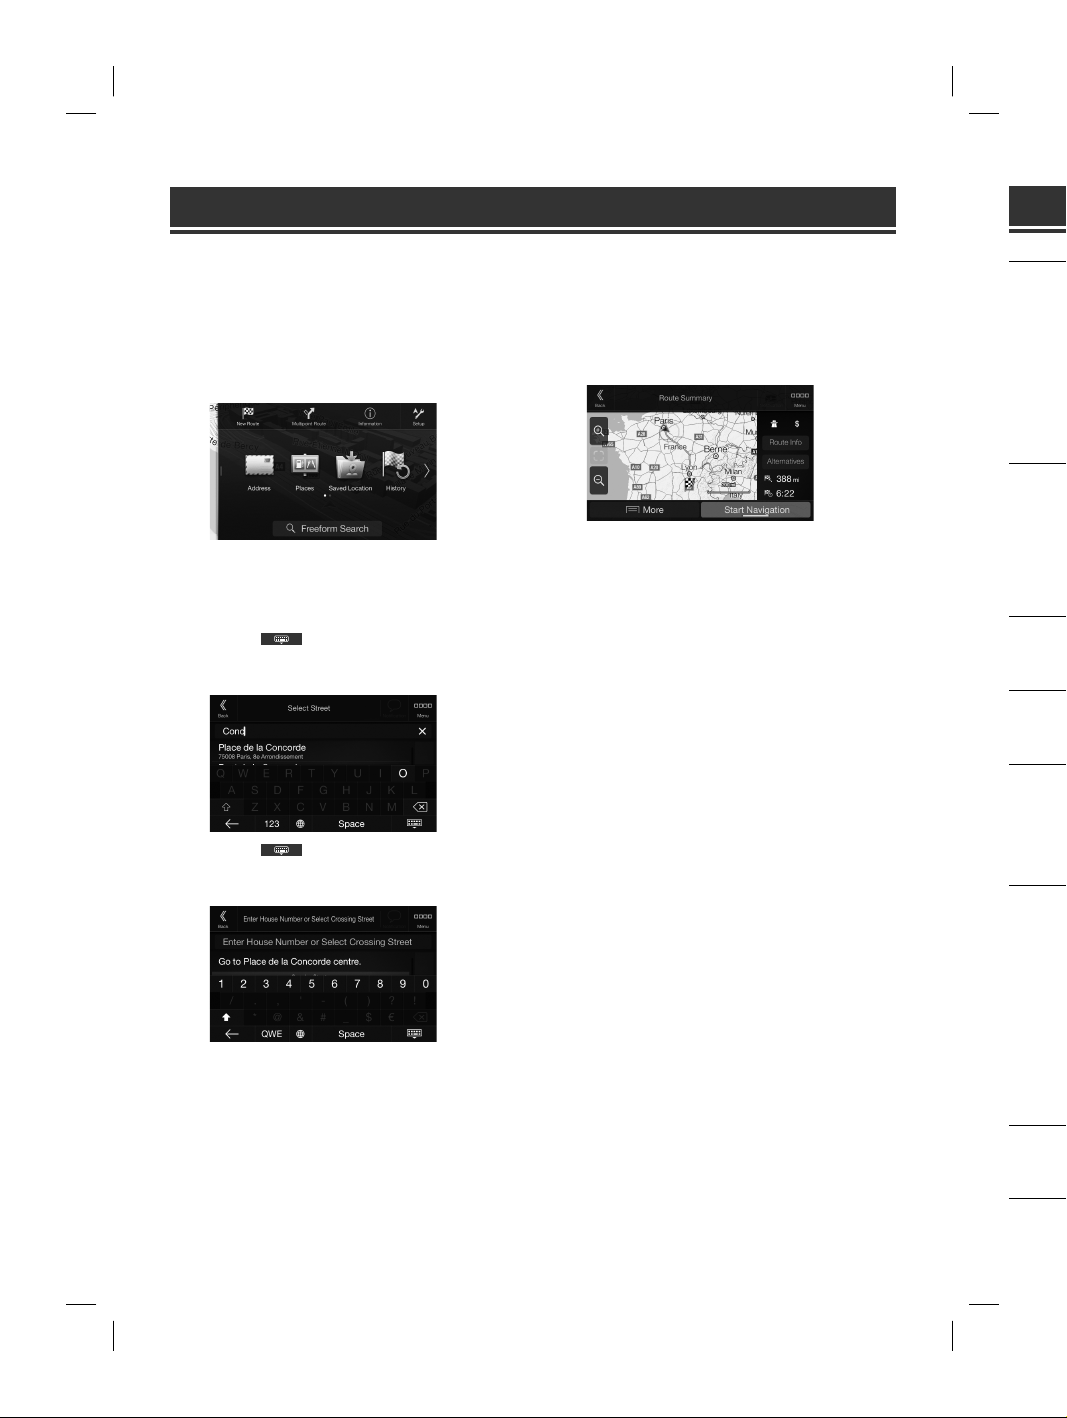
The following example describes how to search for a destination when choosing [Town/Postcode] from [Address].
• You can search and narrow down the Country/State by starting from [Country/State].
1 Touch [New Route] from the Navigation
Menu.
7 Touch [More] to modify the route
parametres, or touch [Start Navigation] to
start your journey.
2 Touch [Address].
3 Touch [Town/Postcode].
4 Enter the town name or postcode.
• Touch to display the candidate list.
5 Enter the desired street name.
• Touch to display the candidate list.
6 Enter the house number or crossing street.
The route is calculated, and a map appears,
showing the entire route. Here you can check route
information and route alternatives.
Sp
MONIT
Screen Siz
LCD Type
Operation
Number of
Effective N
Illuminatio
FM TUN
Tuning Ra
Mono Usa
50 dB Quie
Alternate
Signal-toStereo Sep
Capture Ra
MW TU
Tuning Ra
Usable Sen
LW TUN
Tuning Ra
Sensitivity
DAB SE
Tuning Ra
Tuning Ra
Usable Sen
Signal-toStereo Sep
USB SE
USB requir
Max. Powe
USB Class
File Syste
Number of
Frequency
Total Harm
Dynamic R
Signal-toChannel S
1 Freque
softwar
HDMI S
Input For
Output Fo
16-EN
ALPINE X902D/X802D-U/INE-W710D/i902D/iLX-702D 68-34732Z07-A_QRG (EN)
GPS SE
GPS Recep
GPS Recep
Page 19
Specifications
Owner’s manual Specifications
ddress].
on] to
MONITOR SECTION
Screen Size 9” (X902D/i902D)
LCD Type Transparent type TN LCD
Operation System TFT active matrix
Number of Picture Elements 1,152,000 pcs.
Effective Number of Picture Elements
Illumination System LED
8” (X802D-U)
7” (INE-W710D/iLX-702D)
(800 × 480 × 3 (RGB))
99% or more
FM TUNER SECTION
Tuning Range 87.5 – 108.0 MHz
Mono Usable Sensitivity 8.1 dBf (0.7 µV/75 ohms)
50 dB Quieting Sensitivity 12 dBf (1.1 µV/75 ohms)
Alternate Channel Selectivity 80 dB
Signal-to-Noise Ratio 65 dB
Stereo Separation 35 dB
Capture Ratio 2.0 dB
MW TUNER SECTION
Tuning Range 531 – 1,602 kHz
Usable Sensitivity 25.1 V/28 dBf
LW TUNER SECTION
Tuning Range 153 – 281 kHz
Sensitivity (IEC Standard) 31.6 V/30 dBf
DAB SECTION
Tuning Range BAND III 174.93 – 239.2 MHz
Tuning Range L-BAND 1,452.96 – 1,490.6 MHz
Usable Sensitivity -103 dBm
Signal-to-Noise Ratio 95 dB
Stereo Separation 85 dB
USB SECTION
USB requirements USB 2.0
Max. Power Consumption 1,500 mA (CDP Support)
USB Class USB (Mass Storage Class)
File System FAT16/32
Number of Channels 2-Channels (Stereo)
Frequency Response
Total Harmonic Distortion 0.008% (at 1 kHz)
Dynamic Range 95 dB (at 1 kHz)
Signal-to-Noise Ratio 100 dB
Channel Separation 85 dB (at 1 kHz)
1 Frequency response may differ depending on the encoder
software/bit rate.
1
5 – 20,000 Hz (±1 dB)
HDMI SECTION
Input Format 720p/480p/480i/VGA
Output Format 480p
Bluetooth SECTION
Bluetooth Specification
Frequency band
Output Power
Profile
Bluetooth v3.0
2,402 – 2,480 MHz
+4 dBm Max. (Power class 2)
HFP (Hands-Free Profile)
OPP (Object Push Profile)
PBAP (Phone Book Access Profile)
A2DP (Advanced Audio
Distribution Profile)
AVRCP (Audio/Video Remote
Control Profile)
SPP (Serial Port Profile)
GENERAL
Power Requirement
Operating temperature
Maximum Power Output
Audio output level
Preout (Front, Rear):
Preout (Subwoofer):
Weight
14.4 V DC
(11–16 V allowable)
-4°F to +140°F
(-20°C to + 60°C)
50 W × 4
2V/10k ohms (max.)
2V/10k ohms (max.)
1.54 kg (3 lbs. 6 oz) (X802D-U) 1.41
kg (3 lbs. 2 oz) (INE-W710D/
iLX-702D)
CHASSIS SIZE
Width
Height
Depth
NOSE SIZE
Width
Height
Depth
198 mm (7–13/16”) (X802D-U) 178
mm (7”) (INE-W710D/iLX-702D) 125
mm (4–15/16”) (X802D-U) 100 mm
(3–15/16”) (INE-W710D/iLX-702D)
147 mm (5–3/4”)
191 mm (7–1/2”) (X802D-U)
171 mm (6–3/4”) (INE-W710D/
iLX-702D)
121 mm (4–3/4”) (X802D-U)
96 mm (3–3/4”) (INE-W710D/
iLX-702D)
19 mm (3/4”)
• X902D/i902D is sized exclusively for a certain car model.
• Due to continuous product improvement, specifications
and design are subject to change without notice.
• The LCD panel is manufactured using an extremely high
precision manufacturing technology. Its effective pixel
ratio is over 99.99%. This means that there is a
possibility that 0.01% of the pixels could be either always
ON or OFF.
EN
DE
FR
ES
IT
SE
NL
RU
PL
GPS SECTION
GPS Reception frequency 1,575.42 ±1 MHz
GPS Reception sensitivity -130 dB max.
ALPINE X902D/X802D-U/INE-W710D/i902D/iLX-702D 68-34732Z07-A_QRG (EN)
17-EN
Page 20

• Windows Media, and the Windows logo are trademarks,
or registered trademarks of Microsoft Corporation in
the United States and/or other countries.
• Apple, iPhone, iPod, and iPod touch are trademarks of
Apple Inc., registered in the U.S. and other countries.
Apple CarPlay is a trademark of Apple Inc.
• Use of the Apple CarPlay logo means that a vehicle
user interface meets Apple performance standards.
Apple is not responsible for the operation of this
vehicle or its compliance with safety and regulatory
standards. Please note that the use of this product with
iPhone, or iPod may affect wireless performance.
• “Made for iPod,” and “Made for iPhone,” mean that an
electronic accessory has been designed to connect
specifically to iPod, or iPhone, respectively, and has
been certified by the developer to meet Apple
performance standards. Apple is not responsible for the
operation of this device or its compliance with safety
and regulatory standards. Please note that the use of
this accessory with iPod, or iPhone may affect wireless
performance.
• Android is a trademark of Google Inc.
• The Android robot is reproduced or modified from
work created and shared by Google and used
according to terms described in the Creative Commons
3.0 Attribution Licence.
• SPOTIFY and the Spotify logo are among registered
trademarks of Spotify AB.
• The Bluetooth® word mark and logos are registered
trademarks owned by the Bluetooth SIG, Inc. and any
use of such marks by Alpine Electronics, Inc. is under
licence.
• The terms HDMI and HDMI High-Definition Multimedia
Interface, and the HDMI Logo are trademarks or
registered trademarks of HDMI Licensing, LLC in the
United States and other countries.
• MPEG Layer-3 audio coding technology licensed from
Fraunhofer IIS and Thomson. Supply of this product
only conveys a licence for private,non-commercial use
and does not convey a licence nor imply any right to
use this product in any commercial (i.e. revenuegeneration) real time broadcasting (terrestrial, satellite,
cable and/or any other media), broadcasting/streaming
via internet, intranets and/or other networks or in other
electronic content distribution systems, such as
pay-audio or audio-on-demand applications. An
independent licence for such use is required. For
details, please visit
http://www.mp3licensing.com
• ©2006-2016 TomTom. All rights reserved. This material
is proprietary and the subject of copyright protection,
database right protection and other intellectual
property rights owned by TomTom or its suppliers. The
use of this material is subject to the terms of a license
agreement. Any unauthorized copying or disclosure of
this material will lead to criminal and civil liabilities.
18-EN
About the Rules of Bluetooth Electromagnetic
Radiation Regulation
Declaration of Conformity
ALPINE X902D/X802D-U/INE-W710D/i902D/iLX-702D 68-34732Z07-A_QRG (EN)
Page 21

Inhalt
WARNUNG ..............................................................................................................................................................2
VORSICHT ................................................................................................................................................................3
Erste Schritte .......................................................................................................................................................... 4
Favoritenfunktion ................................................................................................................................................6
Registrieren von Funktionen............................................................................................................................6
Android Auto (Option) .......................................................................................................................................7
Apple CarPlay (Option) ......................................................................................................................................7
Alpine Connect App (Option) (nur X902D/X802D-U/INE-W710D) ....................................................7
Radio/RDS-Betrieb ...............................................................................................................................................8
DAB/DAB+/DMB-Betrieb ...................................................................................................................................9
USB-Flash-Laufwerksbetrieb (Option) ........................................................................................................10
HDMI-Betrieb (DVD-Player) (Option) ..........................................................................................................11
iPod/iPhone-Betrieb (Option)........................................................................................................................12
Steuerung der Freisprechfunktion ...............................................................................................................13
Kartenfunktionen (nur X902D/X802D-U/INE-W710D) .........................................................................14
Navigationsmenü (nur X902D/X802D-U/INE-W710D) .........................................................................15
Eingeben von Zielorten (nur X902D/X802D-U/INE-W710D) ..............................................................16
Technische Daten ...............................................................................................................................................17
WICHTIG!
Notieren Sie sich die Seriennummer des Geräts bitte an der unten angegebenen Stelle und bewahren
Sie die Notiz auf.
SERIENNUMMER:
ISO-SERIENNUMMER: AL
EINBAUDATUM:
EINGEBAUT VON:
GEKAUFT BEI:
EN
DE
FR
ES
IT
SE
NL
RU
Detaillierte Erläuterungen zu allen Funktionen finden Sie in der Bedienungsanleitung auf der
mitgelieferten CD-ROM. (Bei dieser CD handelt es sich um eine Daten-CD. Daher kann sie nicht
zum Abspielen von Musik oder zum Anzeigen von Bildern auf dem Player verwendet werden.) Bei
Bedarf erhalten Sie bei Ihrem ALPINE-Händler einen Ausdruck der Bedienungsanleitung auf der
CD-ROM.
ALPINE X902D/X802D-U/INE-W710D/i902D/iLX-702D 68-34732Z07-A (DE)
PL
1-DE
Page 22
WARNUNG
V
S
u
Ä
.
d
e
L
e
n
g
a
V
C
e
W
n
L
C
e
i
w
n
ü
n
Ä
E
a
t
b
g
WARNUNG
Dieses Symbol weist auf wichtige Anweisungen
hin. Bei Nichtbeachtung besteht die Gefahr von
schweren Verletzungen oder Todesfällen.
DAS GERÄT SO EINBAUEN, DASS DER FAHRER DIE TV-/
VIDEOANZEIGE WÄHREND DER FAHRT NICHT SEHEN KANN,
BIS DAS FAHRZEUG STEHT UND DIE HANDBREMSE
ANGEZOGEN WIRD.
Es ist gefährlich, während der Fahrt fernzusehen oder Videos
anzuschauen. Sie können dadurch vom Verkehr abgelenkt werden und
einen Unfall verursachen. Wenn das Gerät nicht richtig eingebaut wird,
kann der Fahrer beim Fahren die TV-/ Videoanzeige sehen und dadurch
vom Verkehr abgelenkt werden. In diesem Fall besteht hohe
Unfallgefahr. Der Fahrer und andere Personen können dabei schwer
verletzt werden.
BEIM FAHREN DIE VIDEOANZEIGE AUSSCHALTEN.
Sie können dadurch vom Verkehr abgelenkt werden und einen Unfall
verursachen.
KEINE BEDIENUNG AUSFÜHREN, DIE VOM SICHEREN LENKEN
DES FAHRZEUGS ABLENKEN KÖNNTE.
Führen Sie Bedienungen, die Ihre Aufmerksamkeit längere Zeit in
Anspruch nehmen, erst aus, nachdem das Fahrzeug zum Stillstand
gekommen ist. Halten Sie das Fahrzeug immer an einer sicheren Stelle
an, bevor Sie solche Bedienungen ausführen. Andernfalls besteht
Unfallgefahr.
ROUTENVORSCHLÄGE DES NAVIGATIONSSYSTEMS NICHT
BEFOLGEN, WENN SIE DABEI GEFÄHRLICHE ODER
VERBOTENE FAHRMANÖVER AUSFÜHREN MÜSSTEN ODER
DADURCH IN EINE GEFÄHRLICHE SITUATION ODER GEGEND
GERATEN KÖNNTEN.
Dieses Gerät kann Ihr eigenes Urteilsvermögen nicht ersetzen. Aufgrund
von Routenvorschlägen dieses Systems dürfen Sie nie die örtlichen
Verkehrsregeln oder Ihr eigenes Urteilsvermögen bezüglich der
Vermeidung von Gefahrensituationen im Straßenverkehr missachten.
DIE LAUTSTÄRKE NUR SO HOCH STELLEN, DASS SIE
WÄHREND DER FAHRT NOCH AUSSENGERÄUSCHE
WAHRNEHMEN KÖNNEN.
Übermäßige Lautstärkepegel, die Geräusche wie die Sirenen von
Notarztwagen oder Warnsignale (an einem Bahnübergang usw.)
übertönen, können gefährlich sein und zu einem Unfall führen. HOHE
LAUTSTÄRKEPEGEL IN EINEM AUTO KÖNNEN AUSSERDEM
GEHÖRSCHÄDEN VERURSACHEN.
WÄHREND DER FAHRT MÖGLICHST WENIG AUF DEN
BILDSCHIRM SCHAUEN.
Sie können dadurch vom Verkehr abgelenkt werden und einen Unfall
verursachen.
GERÄT NICHT ÖFFNEN.
Andernfalls besteht Unfallgefahr, Feuergefahr oder die Gefahr eines
elektrischen Schlages.
NUR IN FAHRZEUGEN MIT 12-VOLT-BORDNETZ UND MINUS
AN MASSE VERWENDEN.
Fragen Sie im Zweifelsfall Ihren Händler. Andernfalls besteht
Feuergefahr usw.
2-DE
KLEINE GEGENSTÄNDE WIE SCHRAUBEN VON KINDERN
FERNHALTEN.
Werden solche Gegenstände verschluckt, besteht die Gefahr
schwerwiegender Verletzungen. Suchen Sie unverzüglich einen Arzt auf,
wenn ein Kind einen solchen Gegenstand verschluckt.
SICHERUNGEN IMMER DURCH SOLCHE MIT DER RICHTIGEN
AMPEREZAHL ERSETZEN.
Andernfalls besteht Feuergefahr oder die Gefahr eines elektrischen
Schlages.
LÜFTUNGSÖFFNUNGEN UND KÜHLKÖRPER NICHT
ABDECKEN.
Andernfalls kann es zu einem Wärmestau im Gerät kommen und es
besteht Feuergefahr.
DAS GERÄT NUR AN EIN 12-V-BORDNETZ IN EINEM
FAHRZEUG ANSCHLIESSEN.
Andernfalls besteht Feuergefahr, die Gefahr eines elektrischen Schlages
oder anderer Verletzungen.
AUF KORREKTE ANSCHLÜSSE ACHTEN.
Bei fehlerhaften Anschlüssen besteht Feuergefahr und es kann zu
Schäden am Gerät kommen.
VOR DEM ANSCHLUSS DAS KABEL VOM MINUSPOL DER
BATTERIE ABKLEMMEN.
Andernfalls besteht die Gefahr eines elektrischen Schlages oder
Verletzungsgefahr durch einen Kurzschluss.
DAFÜR SORGEN, DASS SICH DIE KABEL NICHT IN
GEGENSTÄNDEN IN DER NÄHE VERFANGEN.
Verlegen Sie die Kabel wie im Handbuch beschrieben, damit sie beim
Fahren nicht hinderlich sind. Kabel, die sich im Lenkrad, im Schalthebel,
im Bremspedal usw. verfangen, können zu äußerst gefährlichen
Situationen führen.
ELEKTRISCHE KABEL NICHT SPLEISSEN.
Kabel dürfen nicht abisoliert werden, um andere Geräte mit Strom zu
versorgen. Andernfalls wird die Strombelastbarkeit des Kabels
überschritten und es besteht Feuergefahr oder die Gefahr eines
elektrischen Schlages.
BEIM BOHREN VON LÖCHERN LEITUNGEN UND KABEL NICHT
BESCHÄDIGEN.
Wenn Sie beim Einbauen Löcher in das Fahrzeugchassis bohren, achten
Sie unbedingt darauf, die Kraftstoffleitungen und andere Leitungen, den
Benzintank und elektrische Kabel nicht zu berühren, zu beschädigen
oder zu blockieren. Andernfalls besteht Feuergefahr.
BOLZEN UND MUTTERN DER BREMSANLAGE NICHT ALS
MASSEPUNKTE VERWENDEN.
Verwenden Sie für Einbau oder Masseanschluß NIEMALS Bolzen oder
Muttern der Brems- bzw. Lenkanlage oder eines anderen
sicherheitsrelevanten Systems oder des Benzintanks. Andernfalls besteht
die Gefahr, dass Sie die Kontrolle über das Fahrzeug verlieren oder ein
Feuer ausbricht.
DAS GERÄT NICHT AN EINER STELLE EINBAUEN, AN DER ES
BEIM FAHREN HINDERLICH SEIN KÖNNTE, WEIL ES Z. B. DAS
LENKRAD ODER DEN SCHALTHEBEL BLOCKIERT.
Andernfalls ist möglicherweise keine freie Sicht nach vorne gegeben,
oder die Bewegungen des Fahrers sind so eingeschränkt, dass
Unfallgefahr besteht.
Dieses
hin. Bei
Verletz
DAS GER
AUFTRITT
Andernfalls
Geben Sie
Händler od
VERKABE
AUSFÜHR
Die Verkab
Geschick u
Verkabelun
erworben h
NUR DAS
DIESES SI
Verwenden
wird das G
einbauen.
und es kan
DIE KABE
DURCH S
Verlegen Si
den Sitzsch
beschädigt
Kabel. Wen
führen, sch
Beschädigu
DAS GER
HOHER F
Bauen Sie d
geschützt is
es zu Betrie
• Die fol
lediglic
ALPINE X902D/X802D-U/INE-W710D/i902D/iLX-702D 68-34732Z07-A (DE)
Page 23
n Arzt auf,
HTIGEN
schen
und es
Schlages
zu
DER
er
chalthebel,
n
trom zu
s
s
VORSICHT
Dieses Symbol weist auf wichtige Anweisungen
hin. Bei Nichtbeachtung besteht die Gefahr von
Verletzungen bzw. Sachschäden.
DAS GERÄT NICHT WEITERBENUTZEN, WENN EIN PROBLEM
AUFTRITT.
Andernfalls kann es zu Verletzungen oder Schäden am Gerät kommen.
Geben Sie das Gerät zu Reparaturzwecken an einen autorisierten AlpineHändler oder den nächsten Alpine-Kundendienst.
VERKABELUNG UND EINBAU VON FACHPERSONAL
AUSFÜHREN LASSEN.
Die Verkabelung und der Einbau dieses Geräts erfordern technisches
Geschick und Erfahrung. Zu Ihrer eigenen Sicherheit sollten Sie
Verkabelung und Einbau dem Händler überlassen, bei dem Sie das Gerät
erworben haben.
NUR DAS VORGESCHRIEBENE ZUBEHÖR VERWENDEN UND
DIESES SICHER EINBAUEN.
Verwenden Sie ausschließlich das vorgeschriebene Zubehör. Andernfalls
wird das Gerät möglicherweise beschädigt oder es lässt sich nicht sicher
einbauen. Wenn sich Teile lösen, stellen diese eine Gefahrenquelle dar
und es kann zu Betriebsstörungen kommen.
DIE KABEL SO VERLEGEN, DASS SIE NICHT GEKNICKT ODER
DURCH SCHARFE KANTEN GEQUETSCHT WERDEN.
Verlegen Sie die Kabel so, dass sie sich nicht in beweglichen Teilen wie
den Sitzschienen verfangen oder an scharfen Kanten oder spitzen Ecken
beschädigt werden können. So verhindern Sie eine Beschädigung der
Kabel. Wenn Sie ein Kabel durch eine Bohrung in einer Metallplatte
führen, schützen Sie die Kabelisolierung mit einer Gummitülle vor
Beschädigung durch die Metallkanten der Bohrung.
DAS GERÄT NICHT AN STELLEN EINBAUEN, AN DENEN ES
HOHER FEUCHTIGKEIT ODER STAUB AUSGESETZT IST.
Bauen Sie das Gerät so ein, dass es vor hoher Feuchtigkeit und Staub
geschützt ist. Wenn Feuchtigkeit oder Staub in das Gerät gelangen, kann
es zu Betriebsstörungen kommen.
EN
DE
FR
ES
IT
SE
NL
EL NICHT
en, achten
ungen, den
ädigen
ALS
lzen oder
alls besteht
oder ein
DER ES
. B. DAS
egeben,
RU
PL
• Die folgenden in diesem Handbuch verwendeten Bildschirmbeispiele für X902D/X802D-U/INE-W710D dienen
lediglich der Veranschaulichung. Sie weichen möglicherweise von den tatsächlichen Bildschirmanzeigen ab.
3-DE
ALPINE X902D/X802D-U/INE-W710D/i902D/iLX-702D 68-34732Z07-A (DE)
Page 24
Erste Schritte
O
a
h
e
b
r
s
i
n
e
m
u
Bedienungsanleitung Erste Schritte
Ein- (
Lage und Funktion der Teile und Bedienelemente
Die Bildschirmabbildungen in der Bedienungsanleitung können von den tatsächlichen Bildschirmen abweichen.
Für X902D/i902D
Für X802D-U/INE-W710D/iLX-702D
Taste oder VOICE
Abhängig vom angeschlossenen Smartphone rufen Sie
durch Drücken die Siri-Funktion oder den
Spracherkennungsmodus auf.
Taste (STUMMSCHALTEN)
Zum Aktivieren/Deaktivieren des Stummschaltmodus.
Taste (AUDIO)/(Favoriten)
Ruft den Audio-/Video-Bildschirm auf. Wenn der
Audio-/Video-Bildschirm bereits angezeigt wird, wird
die Signalquelle gewechselt.
Halten Sie die Taste mindestens 2 Sekunden lang
gedrückt, um den Favoritenbildschirm aufzurufen.
Taste / oder / (AUF/AB)
Zum Regeln der Lautstärke.
RESET-Schalter
Das Gerätesystem wird zurückgesetzt.
Taste (PHONE) (nur X902D/i902D)
Ruft den Telefon-Menübildschirm auf.
Drücken Sie diese Taste, um ein Gespräch zu beginnen,
wenn ein Anruf eingeht.
Taste MENU/(Ausschalten)
Ruft den Menübildschirm auf.
Halten Sie diese Taste mindestens 5 Sekunden
gedrückt, um das Gerät auszuschalten.
4-DE
Taste (NAV)
Für X902D/X802D-U/INE-W710D:
Ruft den Navigationskartenbildschirm auf.
Drücken Sie die Taste erneut, um zum NavigationsMenübildschirm zu wechseln.
Halten Sie diese Taste mindestens 2 Sekunden lang
gedrückt, um zum Heimatadressen-Routenbildschirm
zu wechseln. (Ist noch keine Heimatadresse eingestellt,
erscheint der Bildschirm zum Einstellen der
Heimatadresse.)
Einzelheiten zu den Navigationsfunktionen finden Sie
in der „Anleitung zum Navigationssystem“ auf der
CD-ROM.
Für i902D/iLX-702D:
Ruft den Kartenbildschirm des angeschlossenen
Smartphones auf.
Abhängig vom Smartphone ist diese Funktion
möglicherweise nicht verfügbar.
Taste /
Drücken Sie diese Taste, um im Radiomodus vorwärts/
rückwärts nach einem Sender zu suchen bzw. in einer
anderen Audio-/Videoquelle ein Stück, ein Kapitel usw.
vorwärts/rückwärts zu suchen.
Fernbedienungssensor
Richten Sie die Fernbedienung in einem Abstand von
maximal 2 Metern auf diesen Sensor.
Mikrofon (nur X802D-U/INE-W710D/iLX-702D)
Wird mit den Freisprech- oder Sprachsteuerungsmodi
verwendet.
1 Dr
Da
2 H
Umsc
Sie könn
das Sym
Bildschi
Hier kön
vornehm
Entertain
Aud
(USB
Speiche
Schnell
Der S
ALPINE X902D/X802D-U/INE-W710D/i902D/iLX-702D 68-34732Z07-A (DE)
Page 25
eichen.
Ein- (On) und Ausschalten (Off)
1 Drehen Sie den Zündschlüssel in die Stellung ACC oder EIN.
Das System schaltet sich ein.
2 Halten Sie die Taste MENU mindestens 5 Sekunden gedrückt, um das Gerät auszuschalten.
ions-
lang
dschirm
Umschalten zwischen Audioquellenbildschirm und Funktionsbildschirmen
Sie können zwischen dem Audioquellenbildschirm und einem der Funktionsbildschirme umschalten, indem Sie
das Symbol an einem der vier Bildschirmränder berühren oder vertikal bzw. horizontal wischen.
Dual-Bildschirm (nur X902D/
Bildschirm für Direktzugriffseinstellungen
Hier können Sie Klangeinstellungen
vornehmen und das Rear Seat
Entertainment-System konfigurieren.
Audioquellenbildschirm
(USB Audio)
X802D-U/INE-W710D)
Auf dem Dual-Bildschirm können Sie
zwischen den angezeigten
Bildschirmen wechseln.
EN
DE
FR
ES
IT
SE
NL
RU
den Sie
der
en
orwärts/
. in einer
pitel usw.
and von
02D)
gsmodi
Speichertasten- oder
Schnellsuchbildschirm*
Der Suchmodus variiert je nach Audioquelle. Erläuterungen dazu finden Sie in der Bedienungsanleitung zur Audioquelle.
ALPINE X902D/X802D-U/INE-W710D/i902D/iLX-702D 68-34732Z07-A (DE)
Menübildschirm
Auf dem Menübildschirm können Sie
Einstellungen vornehmen.
PL
5-DE
Page 26
Bedienungsanleitung Favoritenfunktion
d
A
g
e
e
e
e
E
C
p
a
ü
d
a
n
e
e
i
e
u
n
G
o
a
e
e
ä
Favoritenfunktion
An diesem Gerät können Sie häufig benutzte Funktionen wie die Audioquelle, die Navigationssuche usw. mühelos
aufrufen, indem Sie sie auf dem Favoritenbildschirm registrieren. Danach können Sie die entsprechenden
Funktionen direkt aufrufen.
1 Halten Sie die Taste /(Favoriten)
mindestens 2 Sekunden lang gedrückt.
Der Favoritenbildschirm wird angezeigt.
Beispiel für den Favoritenbildschirm
Wechselt zum Bearbeitungsbildschirm, auf dem
Funktionen registriert oder Namen geändert
werden können.
Registrierte Favoriten
Gibt die Position des gerade angezeigten
Favoritenbildschirms an.
Durch Wischen nach links oder rechts können Sie
zwischen den Seiten wechseln. Bis zu 6 Seiten sind
möglich.
Bedienungsanleitung Registrieren von Funktionen
Registrieren von Funktionen
1 Berühren Sie [ ] (Bearbeiten).
Ein Kontrollkästchen erscheint oben links neben
dem Registrierungssymbol und dieses wechselt in
den Bearbeitungsmodus.
4 Wählen Sie die Funktion, die hinzugefügt
werden soll.
Erläuterungen zu den Funktionen, die Sie
hinzufügen können, finden Sie unter „Bearbeiten
des Favoritenbildschirms“ in der
Bedienungsanleitung.
• Bis zu 54 Funktionen sind möglich.
• Sie können ein und dieselbe Funktion nicht
mehrfach registrieren.
5 Wenn die Bearbeitung abgeschlossen ist,
2 Berühren Sie [ ] (Hinzufügen).
Die Funktionen (Kategorien), die hinzugefügt
werden können, werden angezeigt.
3 Berühren Sie die Funktion (Kategorie), die
hinzugefügt werden soll.
berühren Sie [ ] (Zurück).
6 Wenn die Bestätigungsmeldung angezeigt
wird, berühren Sie [OK].
7 Damit ist die Bearbeitung abgeschlossen
und der Favoritenbildschirm wird
angezeigt.
• Wenn Sie bei der Bearbeitung [ ] (Abbrechen)
berühren, wird wieder der vorhergehende
Bearbeitungsbildschirm für die Favoriten angezeigt.
An
Android
unterwe
Apps wi
Laden Si
Verbind
1 Dr
De
2 B
De
•
Ap
Apple C
CarPlay
können
und das
iPhone e
Einzelhei
Drücke
Sie könn
Sie könn
Alp
Laden Si
nutzen z
Die Alpi
sie über
Einzelhei
Stellen Si
Smartph
1 St
2 V
3 Dr
De
4 B
De
5 W
De
(
6-DE
ALPINE X902D/X802D-U/INE-W710D/i902D/iLX-702D 68-34732Z07-A (DE)
Page 27
Android Auto (Option)
Bedienungsanleitung Android Auto (Option)
mühelos
uf dem
ert
Sie
sind
efügt
eiten
ht
n ist,
ezeigt
ssen
eigt.
Android Auto wurde entwickelt, um die Verwendung von Apps über Ihr Telefon zu vereinfachen, während Sie
unterwegs sind. Navigieren Sie mit Google Maps, geben Sie Wiedergabelisten oder Podcasts über Ihre LieblingsApps wieder und vieles mehr.
Laden Sie die Android Auto App über den Google Play-Store herunter, bevor Sie fortfahren.
Verbinden Sie Ihr Android-kompatibles Telefon, um Android Auto zu verwenden.
1 Drücken Sie die Taste MENU.
Der Menübildschirm wird angezeigt.
2 Berühren Sie [Android Auto].
Der Bildschirm Android Auto wird angezeigt.
• Einzelheiten zur Bedienung von Android Auto finden Sie unter „Android Auto“ in der Bedienungsanleitung
(CD-ROM).
Bedienungsanleitung Apple CarPlay (Option)
Apple CarPlay (Option)
Apple CarPlay ist eine intelligentere und sicherere Möglichkeit, um Ihr iPhone im Auto zu verwenden. Apple
CarPlay überträgt die gewünschten Funktionen auf Ihrem iPhone während der Fahrt direkt auf das Gerät. Sie
können das Navigationssystem nutzen, Anrufe tätigen, Nachrichten senden und empfangen und Musik hören,
und das auf eine Weise, die Ihre Aufmerksamkeit nicht vom Geschehen auf der Straße ablenkt. Stecken Sie Ihr
iPhone einfach in das Gerät ein.
Einzelheiten finden Sie in der Bedienungsanleitung (CD-ROM).
Drücken Sie die Taste oder VOICE, um die Siri-Funktion des iPhones zu aktivieren.
Sie können einen Anruf tätigen, Musik wiedergeben usw., indem Sie die Siri-Funktion des iPhone nutzen.
Sie können Apple CarPlay auch über den Touchscreen bedienen.
Bedienungsanleitung Alpine Connect App (Option) (nur X902D/X802D-U/INE-W710D)
Alpine Connect App (Option) (nur X902D/X802D-U/INE-W710D)
Laden Sie eine App auf Ihr Smartphone herunter, die Alpine Connect unterstützt, um die Funktion über das Gerät
nutzen zu können.
Die Alpine Connect App kann über den App Store von Apple heruntergeladen werden; Android-Nutzer können
sie über Google Play herunterladen.
Einzelheiten können Sie bei Ihrem Alpine-Händler in Erfahrung bringen.
Stellen Sie vor diesen Schritten die Verbindungseinstellung oder Alpine Connect je nach dem verbundenen
Smartphone auf „USB (iPhone)“ oder „Bluetooth (Android)“ ein.
1 Starten Sie die Alpine Connect App.
2 Verbinden Sie daraufhin das Smartphone mit diesem Gerät.
3 Drücken Sie die Taste MENU.
Der Menübildschirm wird angezeigt.
4 Berühren Sie [Alpine Connect].
Der Auswahlbildschirm Alpine Connect App wird angezeigt.
5 Wählen Sie die gewünschte App.
Der ausgewählte App-Bildschirm wird angezeigt.
EN
DE
FR
ES
IT
SE
NL
RU
PL
ALPINE X902D/X802D-U/INE-W710D/i902D/iLX-702D 68-34732Z07-A (DE)
7-DE
Page 28
c
B
c
h
o
e
d
i
w
d
N
h
Spotify®
Spotify ist ein Musik-Streaming-Service, der in keinerlei Weise mit Alpine verbunden ist. Weitere Informationen
finden Sie unter http://www.spotify.com.
Die Spotify-App kann auf iPhone und Android-Geräten verwendet werden; aktuelle Informationen zur
Kompatibilität finden Sie unter https://support.spotify.com/.
Um Spotify auch während der Fahrt nutzen zu können, laden Sie zunächst die Spotify-App auf Ihr iPhone oder
Android-Gerät herunter. Sie können die App über den iTunes App Store oder Google Play™ herunterladen. Wählen
Sie über die App selbst oder unter spotify.com ein kostenloses Benutzerkonto oder ein kostenpflichtiges
Premium-Konto aus. Das Premium-Konto bietet weitaus mehr Funktionen wie beispielsweise die OfflineWiedergabe.
• Dieses Produkt nutzt die Spotify-Software, die einer Drittanbieter-Lizenz unterliegt, die Sie hier finden:
www.spotify.com/connect/third-party-licenses.
• Information über die Länder und Regionen, in denen Spotify genutzt werden kann, finden Sie unter
https://www.spotify.com/us/select-your-country/.
Bedienungsanleitung Radio/RDS
Radio/RDS-Betrieb
Speichertaste
Durch kurzes Antippen wird der entsprechende Festsender eingestellt.
Wenn Sie den momentan eingestellten Sender als Festsender speichern möchten, berühren Sie diese Taste mindestens 2 Sekunden lang.
Speichermodusbildschirm
Speichermodustaste
Berühren Sie diese Stelle oder wischen
Sie nach rechts, um den
Speichermodusbildschirm aufzurufen.
RDS-Anzeige
DA
Spei
Durc
Wenn
Spei
Vollsuchm
Wischen Si
Listenbildsc
(Die Liste all
Ensemblelis
angezeigt)
PTY-Suchtaste
Wischen Sie nach rechts, um den
PTY-Listenbildschirm aufzurufen.
Wechselt den
Senderabstimmmodus
Eingabe der Radiofrequenz
PRIORITY NEWS-Modus ein/aus
Verkehrsinformationsmodus ein/aus
8-DE
Informationsanzeige
Erhöht die Frequenz
Umschalttaste
Verringert die Frequenz
Wechselt die
Textinformationen
Wechselt das Frequenzband
Automatisches Speichern von
Sendern
AF-Modus ein/aus
Wechselt
Senderabs
Ruft den B
Dienstaus
Wechselt
PRIORITY
Je nac
ALPINE X902D/X802D-U/INE-W710D/i902D/iLX-702D 68-34732Z07-A (DE)
Page 29

nen
oder
. Wählen
Bedienungsanleitung DAB/DAB+/DMB
DAB/DAB+/DMB-Betrieb
Speichertaste
Durch kurzes Antippen wird der entsprechende Festdienst eingestellt.
Wenn Sie den momentan eingestellten Dienst als Festsender speichern möchten, berühren Sie diese Taste mindestens 2 Sekunden lang.
Speichermodusbildschirm
Speichermodustaste
Berühren Sie diese Stelle oder
wischen Sie nach rechts, um den
Speichermodusbildschirm
aufzurufen.
DAB-Anzeige
Informationsanzeige
Erhöht die Frequenz
EN
DE
g.
der wischen
aufzurufen.
enz
nzband
hern von
Vollsuchmodustaste
Wischen Sie nach rechts, um den
Listenbildschirm für alle Dienste aufzurufen.
(Die Liste aller Dienste, die aktuelle
Ensembleliste oder die PTY-Liste wird
angezeigt)
Wechselt den
Senderabstimmmodus
Ruft den Bildschirm zur
Dienstauswahl auf
Wechselt die Textinformationen
PRIORITY NEWS-Modus ein/aus
Umschalttaste
Verringert die Frequenz
Diashow
Hier werden auf die derzeit
empfangene Dienstkomponente
abgestimmte
Programminformationen, Fotos
des Interpreten und
Werbeeinblendungen angezeigt.*
Frequenzdirekteingabe
Ruft den Bildschirm zur
PTY-Auswahl auf
Wechselt zwischen primärem/
sekundärem Dienst
Verkehrsinformationsmodus
ein/aus
Je nach der derzeit empfangenen Dienstkomponente werden diese Informationen eventuell nicht angezeigt.
FR
ES
IT
SE
NL
RU
PL
ALPINE X902D/X802D-U/INE-W710D/i902D/iLX-702D 68-34732Z07-A (DE)
9-DE
Page 30

E
Bedienungsanleitung USB-Flash-Laufwerksbetrieb (Option)
M
e
s
m
r
i
h
p
M
g
d
w
t
e
USB-Flash-Laufwerksbetrieb (Option)
Sie können Musikdateien (MP3/WMA/AAC/FLAC) und Videodateien (AVI/MKV/MP4), die auf einem USB-FlashLaufwerk gespeichert sind, mit dem internen Player dieses Systems wiedergeben.
Beispiel für den USB Audio-Hauptbildschirm
Schnellsuchtaste
Schnellsuchbildschirm
Vollsuchmodustaste
Wischen Sie nach rechts, um den
Vollsuchmodusbildschirm
aufzurufen.
Startet die aktuelle Datei neu/
springt zur vorherigen Datei,
wenn innerhalb 1 Sekunde
berührt/Mindestens 1 Sekunde
lang berühren, um in der Datei
zurückzuspulen
Berühren Sie diese Stelle oder
wischen Sie nach rechts, um den
Schnellsuchmodus aufzurufen.
Nr. des aktuellen Titels/
Gesamtzahl der Titel
Informationsanzeige
Abgelaufene Zeit
Umschalttaste
Anzeige des Coverbilds
Wiederholfunktion
Zufallswiedergabe
Springt zum nächsten Titel/
Mindestens 1 Sekunde lang
berühren, um in der Datei
schnell vorzuspulen
HD
Wenn Si
Startet da
springt zu
wenn inne
berührt/M
lang berü
zurückzus
Pause und
Stoppt die
HDMI-Ein
Wechselt
Ruft den
auf
Wechselt z
den Unter
Bildschirm
DVD-Einst
Pause und Wiedergabe
10-DE
ALPINE X902D/X802D-U/INE-W710D/i902D/iLX-702D 68-34732Z07-A (DE)
Bei An
Umsc h
angeze
finden
BEDI
Page 31

ption)
Bedienungsanleitung HDMI-/DVD-Betrieb (Option)
HDMI-Betrieb (DVD-Player) (Option)
sh-
le oder
s, um den
zurufen.
ls/
lds
n Titel/
e lang
Datei
Wenn Sie einen optionalen DVE-5300 (DVD-Player) anschließen, kann dieser über das Gerät bedient werden.
Startet das aktuelle Kapitel neu/
springt zum vorherigen Kapitel,
wenn innerhalb von 1 Sekunde
berührt/Mindestens 1 Sekunde
lang berühren, um
zurückzuspulen
Pause und Wiedergabe
Stoppt die Wiedergabe
HDMI-Eingangsumschalter *
Wechselt den Blickwinkel
Ruft den Menübedienbildschirm
auf
Wechselt zwischen
den Untertiteln
Bildschirm für
DVD-Einstellungen
Springt zum nächsten Kapitel/
Mindestens 1 Sekunde lang
berühren, um schnell
vorzuspulen
Ruft den Menübildschirm auf
Ruft den Top-Menübildschirm
auf
Wechselt zwischen den
Tonspuren
Wiederholfunktion
Wechselt zwischen den
Display-Modi
EN
DE
FR
ES
IT
SE
NL
Wechselt die
Textinformationen
Bei Anschluss eines optionalen HDMI-Umschalters können Sie zwei HDMI-Geräte anschließen. Wenn der HDMI-
Umschalter beim Anschluss von zwei HDMI-Geräten auf „On“ eingestellt ist, wird der HDMI-Eingangsumschalter
angezeigt. Die angezeigte Taste variiert je nach Einstellungen und aktuell ausgewähltem HDMI-Eingang. Einzelheiten
finden Sie unter „HDMI-Einstellung“ und „Ein- und Ausschalten des HDMI-Umschalters“ in der
BEDIENUNGSANLEITUNG (CD-ROM).
ALPINE X902D/X802D-U/INE-W710D/i902D/iLX-702D 68-34732Z07-A (DE)
RU
PL
11-DE
Page 32

Bedienungsanleitung iPod/iPhone (Option)
u
S
t
V
e
o
e
e
e
V
e
e
e
e
r
e
e
iPod/iPhone-Betrieb (Option)
Abhängig vom verwendeten iPod/iPhone-Modell ist ein separat erhältliches Lightning-zu-USB-Kabel (KCU-471i)
usw. erforderlich.
Audiomodus
Schnellsuchtaste
Schnellsuchbildschirm
Vollsuchmodustaste
Wischen Sie nach rechts, um den
Vollsuchmodusbildschirm
aufzurufen.
Springt zum Anfang der
aktuellen Datei/Springt zum
Anfang der vorhergehenden
Datei, wenn innerhalb der ersten
Sekunde nach Wiedergabebeginn
angetippt/Startet den schnellen
Rücklauf, wenn mindestens 1
Sekunde lang berührt
Berühren Sie diese Stelle oder
wischen Sie nach rechts, um den
Schnellsuchmodus aufzurufen.
Nr. des aktuellen Titels/
Gesamtzahl der Titel
Informationsanzeige
Wiedergabedauer
Umschalttaste
Pause und Wiedergabe
Anzeige des Coverbilds
Wiederholfunktion
Zufallswiedergabe
Springt zum Anfang der
nächsten Datei/Startet den
schnellen Vorlauf, wenn
mindestens 1 Sekunde lang
berührt
Ste
Das Gerä
Wählen
„Bluetoo
„Audio/
Herst
Bluet
1 B
d
2 B
•
3 B
(
Suchen nach einer Musikdatei
(Vollsuchmodus)
Zum Beispiel: Suchen nach Interpretenname
2 Berühren Sie den Namen des gewünschten
Interpreten.
1 Berühren Sie [Interpret] auf dem
Vollsuchmodusbildschirm.
Der Albumsuchbildschirm des gewählten
Interpreten erscheint.
Wenn Sie [ ] neben dem gewünschten Interpreten
berühren, werden alle Titel dieses Interpreten
wiedergegeben.
3 Berühren Sie den Namen des gewünschten
Albums.
Alle Titel im gewählten Album werden angezeigt.
Wenn Sie [ ] neben dem gewünschten Album
berühren, werden alle Titel in diesem Album
wiedergegeben.
4
Berühren Sie den Namen des gewünschten Titels
12-DE
ALPINE X902D/X802D-U/INE-W710D/i902D/iLX-702D 68-34732Z07-A (DE)
Der ausgewählte Titel wird wiedergegeben.
4 B
5 B
G
(F
G
h
Au
Fre
Bei
Page 33

Bedienungsanleitung Bluetooth-Einstellungen, Bluetooth-Betrieb
Steuerung der Freisprechfunktion
-471i)
le oder
s, um den
zurufen.
ls/
be
lds
der
et den
nn
e lang
Das Gerät kann mit bis zu zwei Telefonen mit Freisprechfunktion verbunden werden.
Wählen Sie bei Verbindung von zwei Telefonen mit Freisprechfunktion mit dem Gerät „Telefon Prioriät“ unter
„Bluetooth-Einstellungen“ aus, um die Rangfolge der Geräte festzulegen. Einzelheiten finden Sie im Abschnitt
„Audio/Video“ in der Bedienungsanleitung (CD-ROM).
6
Herstellen der Verbindung zu einem
Bluetooth-kompatiblen Gerät (Pairing)
1 Berühren Sie die Taste [Einstellungen] auf
dem Menübildschirm.
Wenn die Geräteregistrierung abgeschlossen
ist, erscheint eine Meldung und das Gerät
schaltet in den Normalmodus zurück.
• Sie können bis zu 5 Bluetooth-kompatible Mobiltelefone
registrieren.
• Der Bluetooth-Registrierungsprozess ist je nach
Geräteversion und SSP (Simple Secure Pairing) verschieden.
Wenn ein Passcode mit 4 oder 6 Zeichen auf diesem Gerät
erscheint, geben Sie den Passcode am Bluetooth-kompatiblen
Gerät ein.
Wenn ein Passcode aus 6 Zeichen auf diesem Gerät erscheint,
überprüfen Sie, ob derselbe Passcode auf dem Bluetoothkompatiblen Gerät erscheint, und berühren Sie „Yes.“
Annehmen eines Anrufs
Taste [Einstellungen]
1
2 Berühren Sie [Bluetooth].
• Vergewissern Sie sich, dass „Bluetooth“ auf „On“
) gesetzt ist.
(
Ein eingehender Anruf löst den Klingelton
aus und wird auf dem Bildschirm angezeigt.
Mitteilungsbildschirm für eingehende Anrufe
3 Berühren Sie [Bluetooth Gerät auswählen].
EN
DE
FR
ES
IT
SE
schten
erpreten
en
schten
ezeigt.
bum
en Titels
.
4 Berühren Sie [ ], um nach einem neuen
Gerät zu suchen.
5 Berühren Sie [ ] (Audio), [ ]
(Freisprechen) oder [ ] (Beides) für das
Gerät in der Liste, zu dem eine Verbindung
hergestellt werden soll.
Audio: Einstellung als Audiogerät.
Freisprechen:
Beides: Einstellung als Audiogerät und als
Einstellung als Freisprecheinrichtung.
Freisprecheinrichtung.
ALPINE X902D/X802D-U/INE-W710D/i902D/iLX-702D 68-34732Z07-A (DE)
2 Berühren Sie den Mitteilungsbildschirm für
eingehende Anrufe.
Das Gespräch beginnt.
Anrufinformationsbereich
Wenn Sie den Anrufinformationsbereich während
eines Anrufs berühren, wechseln Sie zum
Telefonbetriebsbildschirm. Über diesen Bildschirm
können Sie die Gesprächslautstärke einstellen usw.
Auflegen des Telefons
1 Berühren Sie [ ] (Anruf beenden).
Das Gespräch endet.
NL
RU
PL
13-DE
Page 34

Kartenfunktionen (nur X902D/X802D-U/INE-W710D)
e
e
e
n
i
c
k
e
u
n
k
e
o
e
Z
e
e
v
k
Na
Im Folgenden sehen Sie eine Übersicht über die verschiedenen Tasten und Symbole auf der Kartenanzeige.
Detaillierte Angaben zu diesem Bildschirm finden Sie in der Bedienungsanleitung.
Nächste Straße
Vorschau auf das nächste
Geschwindigkeitsbeschränkungen
Manöver
Warnhinweis auf
Datenfelder
Warnschilder
Fahrspurinformationen
2D/2D, Norden oben/3D
Verkehrsinformationen
Zoom
Weitere Informationen
Raststätte/Tankstelle
Zielmenü
Aufrufen des Menüs
Berühren Sie [ ] oder wischen
Sie nach links.
Zum Auf
nach lin
Route mit
Sie können
Zwischenzi
Route auch
indem Sie e
Neue Rout
Sie können
indem Sie s
Koordinate
einen Ort, e
eine gespei
Außerdem
letzten Ziel
Zielorte abr
Steht eine I
Verfügung,
Zielortsuch
Suchfunkti
Aufrufen d
Berühren Si
wischen Sie
Straßenname
14-DE
ALPINE X902D/X802D-U/INE-W710D/i902D/iLX-702D 68-34732Z07-A (DE)
Parkmöglichkeiten in der
Nähe
Weitere Informationen
Page 35

Navigationsmenü (nur X902D/X802D-U/INE-W710D)
e.
/3D
en
e
wischen
n der
Zum Aufrufen des Navigationsmenüs berühren Sie [ ] am rechten Rand des Kartenbildschirms oder wischen Sie
nach links. Oder drücken Sie die Taste .
Route mit Zwischenzielen
Sie können eine Route unter Vorgabe von einem oder mehreren
Zwischenzielen berechnen lassen. Darüber hinaus können Sie eine
Route auch unabhängig von ihrer aktuellen GPS-Position planen,
indem Sie einfach einen neuen Startpunkt festlegen.
Neue Route
Sie können einen Zielort auswählen,
indem Sie seine Adresse oder seine
Koordinaten eingeben oder indem Sie
einen Ort, ein gespeichertes Ziel oder
eine gespeicherte Route auswählen.
Außerdem können Sie in der Liste der
letzten Ziele die vorhergehenden
Zielorte abrufen.
Steht eine Internet-Verbindung zur
Verfügung, können Sie für Ihre
Zielortsuche auch die OnlineSuchfunktion nutzen.
Aufrufen der Karte
Berühren Sie diese Stelle oder
wischen Sie nach rechts.
Information
Über dieses Symbol können Sie
weitere Optionen und
navigationsrelevante
Informationen abrufen.
Setup
Mit dieser Option können Sie die
Funktionsweise der
Navigationssoftware anpassen.
EN
DE
FR
ES
IT
SE
NL
en
RU
PL
15-DE
ALPINE X902D/X802D-U/INE-W710D/i902D/iLX-702D 68-34732Z07-A (DE)
Page 36

Eingeben von Zielorten (nur X902D/X802D-U/INE-W710D)
h
O
g
p
l
n
U
b
p
e
d
a
e
N
b
b
h
b
b
d
a
d
m
a
r
m
d
n
h
o
o
a
a
Im folgenden Beispiel wird erläutert, wie Sie einen Zielort eingeben können, indem Sie zunächst [Adresse]
aufrufen und ihn dann über [Stadt/PLZ] suchen.
• Sie können die Suche auch auf bestimmte Länder/Bundesstaaten eingrenzen, indem Sie zunächst [Land/Bundesstaat]
auswählen.
1 Berühren Sie [Neue Route] im
Navigationsmenü.
6 Geben Sie die Hausnummer oder die
nächste Querstraße ein.
2 Berühren Sie [Adresse].
Die Route wird berechnet und eine Karte mit der
gesamten Route wird angezeigt. Hier können Sie
3 Berühren Sie [Stadt/PLZ].
4 Geben Sie den Ortsnamen oder die
Postleitzahl ein.
• Berühren Sie , um die Kandidatenliste
aufzurufen.
Routeninformationen und eventuelle
Routenalternativen anzeigen lassen.
7 Berühren Sie [More], um Routenparameter
zu modifizieren, oder berühren Sie
[Navigation starten], um die Fahrt zu
beginnen.
5 Geben Sie den Namen der gewünschten
Straße ein.
Te c
MONIT
Bildschirm
L
CD-Typ
Funktions
Anzahl Bild
Effektive Bi
Beleuchtu
UKW-T
Empfangs
Mono-Em
Geräuschb
Trennschär
Störabstan
Stereokan
Gleichwell
MW-TU
Empfangs
Nutzbare E
LW-TUN
Empfangs
Empfindlic
DAB
Empfangs
Empfangs
Nutzbare E
Störabstan
Stereokan
• Berühren Sie , um die Kandidatenliste
aufzurufen.
16-DE
ALPINE X902D/X802D-U/INE-W710D/i902D/iLX-702D 68-34732Z07-A (DE)
USB
USB-Anfor
Max. Energ
USB-Klasse
Dateisyste
Anzahl der
Frequenzg
Gesamtklir
Dynamiku
Störabstan
Kanaltrenn
1 Freque
abweic
HDMI
Eingangsf
Ausgangsf
GPS
GPS-Empf
GPS-Empf
Page 37

Technische Daten
Bedienungsanleitung Technische Daten
]
taat]
it der
en Sie
meter
MONITOR
Bildschirmgröße 9 Zoll (X902D/i902D)
LCD-Typ Transparentes TN LCD
Funktionsprinzip TFT-Aktivmatrix
Anzahl Bildelemente 1.152.000 Pixel
Effektive Bildelemente Mindestens 99 %
Beleuchtung LED
8 Zoll (X802D-U)
7 Zoll (INE-W710D/iLX-702D)
(800 × 480 × 3 (RGB))
UKW-TUNER
Empfangsbereich 87,5 – 108,0 MHz
Mono-Empfindlichkeit 8,1 dBf (0,7 µV/75 Ohm)
Geräuschberuhigung, 50 dB 12 dBf (1,1 µV/75 Ohm)
Trennschärfe 80 dB
Störabstand 65 dB
Stereokanaltrennung 35 dB
Gleichwellenselektion 2,0 dB
MW-TUNER
Empfangsbereich 531 – 1.602 kHz
Nutzbare Empfindlichkeit 25,1 V/28 dBf
LW-TUNER
Empfangsbereich 153 – 281 kHz
Empfindlichkeit (IEC-Standard) 31,6 V/30 dBf
DAB
Empfangsbereich BAND III 174,93 – 239,2 MHz
Empfangsbereich L-BAND 1.452,96 – 1.490,6 MHz
Nutzbare Empfindlichkeit -103 dBm
Störabstand 95 dB
Stereokanaltrennung 85 dB
USB
USB-Anforderungen USB 2.0
Max. Energieverbrauch 1.500 mA (CDP-Unterstützung)
USB-Klasse USB (Massenspeicher)
Dateisystem FAT16/32
Anzahl der Kanäle 2 Kanäle (Stereo)
Frequenzgang
Gesamtklirrfaktor 0,008 % (bei 1 kHz)
Dynamikumfang 95 dB (bei 1 kHz)
Störabstand 100 dB
Kanaltrennung 85 dB (bei 1 kHz)
1 Frequenzgang kann je nach Codierungssoftware/Bitrate
abweichen.
1
5 – 20.000 Hz (±1 dB)
HDMI
Eingangsformat 720p/480p/480i/VGA
Ausgangsformat 480p
Bluetooth
Bluetooth-Spezifikation
Frequenzbereich
Ausgangsleistung
Profile
Bluetooth v3,0
2.402 – 2.480 MHz
+4 dBm max. (Leistungsklasse 2)
HFP (Hands-Free Profile)
OPP (Object Push Profile)
PBAP (Phone Book Access Profile)
A2DP (Advanced Audio
Distribution Profile)
AVRCP (Audio/Video Remote
Control Profile)
SPP (Serial Port Profile)
ALLGEMEINES
Spannungsversorgung
Betriebstemperatur -20°C bis + 60°C
Max. Ausgangsleistung 50 W × 4
Audioausgangspegel
Vorverstärkerausgang (Front, Heck): 2 V/10k Ohm (max.)
Vorverstärkerausgang (Subwoofer): 2 V/10k Ohm (max.)
Gewicht 1,54 kg (X802D-U)
14,4 V Gleichspannung
(11–16 V zulässig)
1,41 kg (INE-W710D/iLX-702D)
GEHÄUSEGRÖSSE
Breite 198 mm (X802D-U)
Höhe 125 mm (X802D-U)
Tiefe 147 mm
178 mm (INE-W710D/iLX-702D)
100 mm (INE-W710D/iLX-702D)
VORSPRUNGGRÖSSE
Breite 191 mm (X802D-U)
Höhe 121 mm (X802D-U)
Tiefe 19 mm
171 mm (INE-W710D/iLX-702D)
96 mm (INE-W710D/iLX-702D)
• X902D/i902D ist in Bezug auf die Größe ausschließlich
für ein bestimmtes Automodell ausgelegt.
• Aufgrund ständiger Produktverbesserungen bleiben
Änderungen an technischen Daten und Design ohne
Vorankündigung vorbehalten.
• Das LCD-Display (Flüssigkristallbildschirm) wird mit
hochpräzisen Fertigungsverfahren hergestellt. Der Anteil
der effektiven Bildpunkte beträgt mehr als 99,99 %. Dies
wiederum bedeutet, dass bis zu 0,01% der Bildpunkte
unter Umständen dauerhaft aktiviert oder deaktiviert
sind.
EN
DE
FR
ES
IT
SE
NL
RU
PL
GPS
GPS-Empfangsfrequenz 1.575,42 ±1 MHz
GPS-Empfangsempfindlichkeit -130 dB max.
17-DE
ALPINE X902D/X802D-U/INE-W710D/i902D/iLX-702D 68-34732Z07-A (DE)
Page 38

• Windows Media und das Windows-Logo sind Marken
oder eingetragene Marken der Microsoft Corporation
in den USA und/oder anderen Ländern.
• Apple, iPhone, iPod und iPod touch sind Marken von
Apple Inc. und in den USA und anderen Ländern
eingetragen. Apple CarPlay ist eine Marke von Apple
Inc.
• Die Verwendung des Apple CarPlay-Logos verweist
darauf, dass die Benutzeroberfläche eines Fahrzeugs
die Leistungsstandards von Apple erfüllt. Apple
übernimmt keine Garantie für die Funktionsfähigkeit
dieses Geräts bzw. die Einhaltung von
Sicherheitsstandards und behördlichen Auflagen.
Beachten Sie bitte, dass der Gebrauch dieses Produkts
mit einem iPhone oder iPod die Funkleistung
beeinträchtigen kann.
• „Made for iPod“ und „Made for iPhone“ bedeuten, dass
ein elektronisches Zubehör speziell für den Anschluss
eines iPod oder iPhone entworfen und vom Entwickler
für die Übereinstimmung mit den Leistungsstandards
von Apple zertifiziert wurde. Apple übernimmt keine
Garantie für die Funktionsfähigkeit dieses Geräts bzw.
die Einhaltung von Sicherheitsstandards und
behördlichen Auflagen. Beachten Sie bitte, dass der
Gebrauch dieses Zubehörs mit einem iPod oder iPhone
die Funkleistung beeinträchtigen kann.
• Android ist eine Marke von Google Inc.
• Der Android-Roboter wird auf Basis von Werken
reproduziert bzw. verändert, die von Google erstellt
und freigegeben wurden, und wird laut Bestimmungen
der Creative Commons 3.0 Attribution License
verwendet.
• SPOTIFY und das Spotify-Logo gehören zu den
eingetragenen Marken von Spotify AB.
• Der Bluetooth®-Schriftzug und die Logos sind
eingetragene Marken von Bluetooth SIG, Inc., und jede
Nutzung solcher Marken durch Alpine Electronics, Inc.,
erfolgt in Lizenz.
• Die Begriffe HDMI und HDMI High-Definition
Multimedia Interface sowie das HDMI-Logo sind
Marken oder eingetragene Marken der HDMI Licensing
LLC in den Vereinigten Staaten und anderen Ländern.
• MPEG Layer-3 Audio-Codiertechnologie ist von
Fraunhofer IIS und Thomson lizenziert. Die Lieferung
dieses Produkts schließt lediglich eine Lizenz für
private, nicht kommerzielle Nutzung ein und beinhaltet
weder eine Lizenz noch ein impliziertes Nutzungsrecht
für einen kommerziellen (d. h. Gewinn bringenden)
Einsatz für Echtzeit-Rundfunk (terrestrisch, über Satellit,
Kabel und/oder beliebige andere Medien), Senden/
Streaming über das Internet, Intranets und/oder andere
Netzwerke sowie andere elektronische InhaltsVertriebssysteme wie Pay-Audio- oder Audio-onDemand-Anwendungen. Für solche Einsatzzwecke ist
eine unabhängige Lizenz erforderlich. Einzelheiten
dazu finden Sie unter der Adresse
http://www.mp3licensing.com
18-DE
• ©2006-2016 TomTom. All rights reserved. This material
is proprietary and the subject of copyright protection,
database right protection and other intellectual
property rights owned by TomTom or its suppliers. The
use of this material is subject to the terms of a license
agreement. Any unauthorized copying or disclosure of
this material will lead to criminal and civil liabilities.
About the Rules of Bluetooth Electromagnetic
Radiation Regulation
Declaration of Conformity
ALPINE X902D/X802D-U/INE-W710D/i902D/iLX-702D 68-34732Z07-A (DE)
Page 39

Table des matières
AVERTISSEMENT ...................................................................................................................................................2
ATTENTION .............................................................................................................................................................3
Mise en route ......................................................................................................................................................... 4
Fonction Favoris ...................................................................................................................................................6
Mémorisation d’éléments .................................................................................................................................6
Android Auto (en option) ..................................................................................................................................7
Apple CarPlay (en option) .................................................................................................................................7
Application Alpine Connect (en option) (X902D/X802D-U/INE-W710D uniquement) ..............7
Utilisation de la radio et du système RDS....................................................................................................8
Utilisation du mode DAB/DAB+/DMB ..........................................................................................................9
Utilisation d’un périphérique de mémoire flash USB (en option) ....................................................10
Utilisation d’un périphérique HDMI (lecteur de DVD, en option) ....................................................11
Utilisation d’un iPod/iPhone (en option) ...................................................................................................12
Utilisation de la fonction Téléphone mains libres ..................................................................................13
Fonctions de carte (X902D/X802D-U/INE-W710D uniquement) ......................................................14
Menu Navigation (X902D/X802D-U/INE-W710D uniquement) ........................................................15
Sélection d’une destination (X902D/X802D-U/INE-W710D uniquement) ....................................16
Spécifications ......................................................................................................................................................17
IMPORTANT
Notez le numéro de série inscrit sur votre appareil dans l’espace ci-dessous prévu à cet effet et
conservez-le pour toute référence ultérieure.
NUMÉRO DE SÉRIE:
NUMÉRO DE SÉRIE ISO: AL
DATE D’INSTALLATION:
TECHNICIEN D’INSTALLATION:
LIEU D’ACHAT:
EN
DE
FR
ES
IT
SE
NL
RU
Pour plus d’informations sur l’ensemble des fonctions, consultez le mode d’emploi enregistré sur
le CD-ROM fourni. (Étant donné qu’il s’agit d’un CD de données, il est impossible de l’utiliser pour
lire de la musique et visionner des images sur le lecteur.) Si nécessaire, un revendeur ALPINE peut
vous fournir une version imprimée du mode d’emploi enregistré sur le CD-ROM.
ALPINE X902D/X802D-U/INE-W710D/i902D/iLX-702D 68-34732Z07-A (FR)
PL
1-FR
Page 40

AVERTISSEMENT
A
b
s
M
p
e
é
T
e
e
n
L
E
q
s
e
n
d
E
C
n
e
m
p
S
R
t
l
AVERTISSEMENT
Ce symbole désigne des instructions importantes.
Le non-respect de ces instructions peut entraîner
de graves blessures, voire la mort.
INSTALLER L’APPAREIL CORRECTEMENT DE FACON A CE QUE
LE CONDUCTEUR NE PUISSE PAS REGARDER LA TV/VIDEO
TANT QUE LA VOITURE N’EST PAS A L’ARRET ET LE FREIN A
MAIN ACTIONNE.
Il est dangereux de regarder la télévision/ vidéo tout en conduisant un
véhicule. Si le produit n’est pas correctement installé, le conducteur sera
en mesure de regarder la télévision/vidéo pendant la conduite du
véhicule, ce qui risque de le distraire et de causer un accident. Le
conducteur ainsi que d’autres personnes risquent d’être blessées.
NE PAS REGARDER DE VIDEO PENDANT LA CONDUITE.
Le visionnage d’un enregistrement vidéo peut distraire le conducteur de
la conduite du véhicule et causer un accident.
N’ACTIVER AUCUNE FONCTION SUSCEPTIBLE DE
DETOURNER VOTRE AT TENTION DE LA CONDUITE DU
VEHICULE.
Les fonctions requérant une attention prolongée ne doivent être
exploitées qu’à l’arrêt complet du véhicule. Toujours arrêter le véhicule à
un endroit sûr avant d’activer ces fonctions. Il y a risque de provoquer un
accident.
NE PAS SUIVRE LES ITINERAIRES CONSEILLES SI LE SYSTEME
DE NAVIGATION INVITE A EFFECTUER UNE MANŒUVRE
DANGEREUSE OU ILLEGALE, OU VOUS PLACE DANS UNE
SITUATION OU A UN ENDROIT DANGEREUX.
Ce produit ne peut en aucun cas se substituer à votre bon sens. Tout
itinéraire conseillé par ce système ne peut se substituer au code de la
route local, à votre jugement personnel ni à la sécurité de conduite.
GARDER LE VOLUME À FAIBLE NIVEAU DE MANIÈRE À
POUVOIR ENTENDRE LES BRUITS EXTÉRIEURS PENDANT LA
CONDUITE.
Des niveaux de volume excessifs qui couvrent les sirènes des ambulances
ou les signaux routiers (passages à niveau, etc.) peuvent être dangereux
et provoquer un accident. UN NIVEAU DE VOLUME TROP ÉLEVÉ À
L’INTÉRIEUR DU VÉHICULE PEUT ÉGALEMENT AVOIR DES
EFFETS IRRÉVERSIBLES SUR VOTRE AUDITION.
MINIMISER L’AFFICHAGE EN COURS DE CONDUITE.
La visualisation de l’affichage peut distraire le conducteur de la conduite
du véhicule et, partant, de provoquer un accident.
NE PAS DESASSEMBLER NI MODIFIER L’APPAREIL.
Il y a risque d’accident, d’incendie ou de choc électrique.
A UTILISER UNIQUEMENT SUR DES VOITURES A MASSE
NEGATIVE DE 12 VOLTS.
(Vérifiez auprès de votre concessionnaire si vous n’en êtes pas certain.) Il
y a risque d’incendie, etc.
GARDER LES PETITS OBJETS, COMME LES VIS, HORS DE LA
PORTÉE DES ENFANTS.
L’ingestion de tels objets peut entraîner de graves blessures. En cas
d’ingestion, consulter immédiatement un médecin.
UTILISER DES FUSIBLES DE L’AMPERAGE APPROPRIE.
Il y a risque d’incendie ou de décharge électrique.
2-FR
NE PAS OBSTRUER LES SORTIES D’AIR NI LES PANNEAUX DU
RADIATEUR.
Une surchauffe interne peut se produire et provoquer un incendie.
UTILISER CET APPAREIL POUR DES APPLICATIONS MOBILES
DE 12 V.
Toute utilisation autre que l’application désignée comporte un risque
d’incendie, de choc électrique ou de blessure.
EFFECTUER CORRECTEMENT LES CONNEXIONS.
Il y a risque de blessures ou de dommages à l’appareil.
AVANT TOUTE CONNEXION, DEBRANCHER LE CABLE DE LA
BORNE NEGATIVE DE LA BATTERIE.
Il y a risque de choc électrique ou de blessure par courts-circuits.
NE PAS COINCER LES CABLES AVEC DES OBJETS VOISINS.
Positionner les câbles conformément au manuel de manière à éviter
toute obstruction en cours de conduite. Les câbles qui obstruent ou
dépassent à des endroits tels que le volant, le levier de changement de
vitesses, la pédale de frein, etc., peuvent s’avérer extrêmement dangereux.
NE PAS DENUDER LES CABLES ELECTRIQUES.
Ne jamais enlever la gaine isolante pour alimenter un autre appareil. Il y
a risque de dépassement de la capacité de courant et, partant, d’incendie
ou de choc électrique.
NE PAS ENDOMMAGER DE CONDUITES NI DE CABLES LORS
DU FORAGE DES TROUS.
Lors du forage de trous dans le châssis en vue de l’installation, veiller à
ne pas entrer en contact, endommager ni obstruer de conduites, de
tuyaux à carburant ou de fils électriques. Le non-respect de cette
précaution peut entraîner un incendie.
NE PAS UTILISER DES ECROUS NI DES BOULONS DU CIRCUIT
DE FREINAGE OU DE DIRECTION POUR LES CONNEXIONS DE
MASSE.
Les boulons et les écrous utilisés pour les circuits de freinage et de
direction (ou de tout autre système de sécurité) ou les réservoirs ne
peuvent JAMAIS être utilisés pour l’installation ou la liaison à la masse.
L’utilisation de ces organes peut désactiver le système de contrôle du
véhicule et causer un incendie, etc.
NE PAS INSTALLER A DES ENDROITS SUSCEPTIBLES
D’ENTRAVER LA CONDUITE DU VEHICULE, COMME LE
VOLANT OU LE LEVIER DE VITESSES.
La vue vers l’avant pourrait être obstruée ou les mouvements gênés, etc.,
et provoquer un accident grave.
Ce sym
Le nondes ble
INTERRO
Le non-res
endommag
Alpine agré
réparation.
FAIRE INS
EXPERTS.
Le câblage
techniques
l’installatio
UTILISER
CORRECT
Utiliser uni
composant
internes à c
correcteme
provoquer
FAIRE CH
COINCER
Faire chemi
d’un siège)
et d’endom
utiliser un
du câble ne
NE PAS IN
POUSSIE
Eviter d’ins
à de la pous
l’intérieur d
• Les exe
manue
ALPINE X902D/X802D-U/INE-W710D/i902D/iLX-702D 68-34732Z07-A (FR)
Page 41

AUX DU
ndie.
OBILES
risque
its.
SINS.
éviter
nt ou
ent de
dangereux.
pareil. Il y
d’incendie
S LORS
, veiller à
es, de
tte
CIRCUIT
IONS DE
irs ne
la masse.
ôle du
ATTENTION
Ce symbole désigne des instructions importantes.
Le non-respect de ces instructions peut entraîner
des blessures ou des dommages matériels.
INTERROMPRE TOUTE UTILISATION EN CAS DE PROBLEME.
Le non-respect de cette précaution peut entraîner des blessures ou
endommager l’appareil. Retourner l’appareil auprès du distributeur
Alpine agréé ou un centre de service après-vente Alpine en vue de la
réparation.
FAIRE INSTALLER LE CABLAGE ET L’APPAREIL PAR DES
EXPERTS.
Le câblage et l’installation de cet appareil requiert des compétences
techniques et de l’expérience. Pour garantir la sécurité, faire procéder à
l’installation de cet appareil par le distributeur qui vous l’a vendu.
UTILISER LES ACCESSOIRES SPECIFIES ET LES INSTALLER
CORRECTEMENT.
Utiliser uniquement les accessoires spécifiés. L’utilisation d’autres
composants que les composants spécifiés peut causer des dommages
internes à cet appareil ou son installation risque de ne pas être effectuée
correctement. Les pièces utilisées risquent de se desserrer et de
provoquer des dommages ou une défaillance de l’appareil.
FAIRE CHEMINER LE CABLAGE DE MANIERE A NE PAS LE
COINCER CONTRE UNE ARETE METALLIQUE.
Faire cheminer les câbles à l’écart des pièces mobiles (comme les rails
d’un siège) et des arêtes acérées ou pointues. Cela évitera ainsi de coincer
et d’endommager les câbles. Si un câble passe dans un orifice métallique,
utiliser un passe-cloison en caoutchouc pour éviter que la gaine isolante
du câble ne soit endommagée par le rebord métallique de l’orifice.
NE PAS INSTALLER A DES ENDROITS TRES HUMIDES OU
POUSSIEREUX.
Eviter d’installer l’appareil à des endroits soumis à une forte humidité ou
à de la poussière en excès. La pénétration d’humidité ou de poussière à
l’intérieur de cet appareil risque de provoquer une défaillance.
EN
DE
FR
ES
IT
SE
NL
E
gênés, etc.,
RU
PL
• Les exemples d’écrans qui suivent, correspondant aux modèles X902D/X802D-U/INE-W710D, utilisés dans ce
manuel le sont uniquement à titre indicatif. Ils peuvent différer des écrans effectivement affichés.
3-FR
ALPINE X902D/X802D-U/INE-W710D/i902D/iLX-702D 68-34732Z07-A (FR)
Page 42

Mode d’emploi Mise en route
o
a
p
s
e
c
d
e
a
B
v
d
d
Mise en route
Emplacement des commandes
L’écran illustré dans le mode d’emploi peut être différent de l’écran réel.
Pour les modèles X902D/i902D
Pour les modèles X802D-U/INE-W710D/iLX-702D
Mise s
1 Pl
Le
2 A
Bascul
Pour pas
coins de
Écran d
raccour
Vous pou
système
arrière.
Écr
(US
Bouton ou VOICE
Selon le smartphone connecté, appuyez pour rappeler
la fonction Siri ou le mode reconnaissance vocale.
Bouton (SOURDINE)
Appuyez sur ce bouton pour activer/désactiver le
mode silencieux.
Bouton (AUDIO)/(Favoris)
Ce bouton permet d’afficher l’écran Audio/Visuel. Si
l’écran Audio/Visuel est déjà affiché, ce bouton permet
de changer de source.
Maintenez enfoncé ce bouton pendant au moins
2secondes pour rappeler l’écran Favoris.
Bouton / ou / (HAUT/BAS)
Appuyez sur ce bouton pour régler le volume.
Commutateur RESET
Appuyez sur ce bouton pour réinitialiser le système.
Bouton (PHONE) (X902D/i902D uniquement)
Rappelle l’écran du menu Téléphone.
Appuyez pour démarrer une conversation lorsque vous
recevez un appel.
Bouton MENU/(mise hors tension)
Ce bouton permet de rappeler l’écran Menu.
Appuyez dessus pendant au moins 5 secondes pour
mettre l’appareil hors tension.
4-FR
Bouton (NAV)
Pour les modèles X902D/X802D-U/INE-W710D :
Ce bouton permet de rappeler l’écran des cartes de
navigation.
Appuyez une nouvelle fois sur ce bouton pour passer à
l’écran du menu de navigation.
Appuyez sur ce bouton pendant au moins 2 secondes
pour passer à l’écran de l’itinéraire de retour au
domicile. (Si cet itinéraire n’est pas encore défini, l’écran
de configuration de l’adresse du domicile s’affiche.)
Pour plus d’informations sur les fonctions de
navigation, consultez la section « Système de
navigation OM » sur le CD-ROM.
Pour les modèles i902D/iLX-702D :
Ce bouton permet de rappeler l’écran des cartes du
smartphone connecté.
Selon le smartphone utilisé, cette fonction risque de ne
pas être disponible.
Bouton /
Appuyez sur ce bouton pour rechercher la station
suivante/précédente en mode radio ou la piste, le
chapitre, etc., suivant/précédent dans une autre source
Audio/Visuel.
Capteur Télécommande
Dirigez la télécommande vers ce capteur dans un
champ de portée de 2 mètres.
Microphone (pour les modèles X802D-U/
INE-W710D/iLX-702D uniquement)
Utilisé pour les modes mains-libres et Commande vocale.
ALPINE X902D/X802D-U/INE-W710D/i902D/iLX-702D 68-34732Z07-A (FR)
Touche
du mod
Le mo
audio.
Page 43

Mise sous (On) ou hors tension (Off)
1 Placez la clé de contact en position ACC ou ON.
Le système est mis sous tension.
2 Appuyez sur le bouton MENU pendant au moins 5secondes pour mettre l’appareil hors tension.
710D :
tes de
r passer à
econdes
ini, l’écran
iche.)
Basculement de l’écran des sources sur un écran spécifique
Pour passer de l’écran des sources audio à un écran spécifique, appuyez sur l’une des icônes situées aux quatre
coins de l’écran, ou balayez l’écran verticalement ou horizontalement.
Écran de configuration des
raccourcis
Vous pouvez configurer le son ou le
système de divertissement passager
arrière.
Écran des sources audio
(USB Audio)
Écran double (X902D/X802D-U/
INE-W710D uniquement)
Vous pouvez commuter les écrans
affichés sur l’écran double.
EN
DE
FR
ES
IT
SE
NL
RU
tes du
ue de ne
tion
e, le
re source
s un
de vocale.
Touche de préréglage ou écran
du mode de recherche rapide*
Le mode de recherche diffère selon la source audio. Pour plus d’informations, consultez le mode d’emploi de la source
audio.
ALPINE X902D/X802D-U/INE-W710D/i902D/iLX-702D 68-34732Z07-A (FR)
Écran Menu
Vous pouvez définir les paramètres
sur l’écran Menu.
PL
5-FR
Page 44

Mode d’emploi Fonction Favoris
d
A
s
g
e
p
c
p
c
P
d
p
a
p
o
d
e
s
z
u
u
p
-
g
v
u
e
)
u
p
c
p
c
c
Fonction Favoris
Cet appareil vous permet de rappeler facilement certaines fonctions en mémorisant les éléments fréquemment
utilisés tels que la source audio, la fonction de recherche de navigation, etc., sur l’écran des favoris. Vous pouvez
ainsi rappeler les fonctions de votre choix.
1 Appuyez sur le bouton /(Favoris) pendant
au moins 2 secondes.
L’écran des favoris s’affiche.
Exemple d’écran Favoris
L’écran Editer s’affiche pour mémoriser des
éléments ou en modifier le nom.
Élément de mémorisation des favoris
Indique l’emplacement de l’écran Favoris
actuellement affiché.
Balayez l’écran vers la gauche ou vers la droite pour
changer de page. Vous pouvez ajouter jusqu’à 6 pages.
Mode d’emploi Mémorisation d’éléments
Mémorisation d’éléments
An
Android
route. Na
préférée
Téléchar
Raccord
1 A
L’é
2 A
L’é
•
Ap
Apple C
CarPlay
vous y d
recevoir
raccordi
Pour plu
Appuye
Vous po
Vous po
1 Appuyez sur la touche [ ] (Editer).
Une coche apparaît dans la zone supérieure
gauche de l’icône de mémorisation, et le mode
Editer est activé.
4 Sélectionnez l’élément que vous souhaitez
ajouter.
Pour plus d’informations sur les éléments à ajouter,
reportez-vous à la section « Modification de l’écran
Favoris » du mode d’emploi.
• Vous pouvez ajouter jusqu’à 54 éléments.
• Vous ne pouvez pas ajouter plusieurs fois un
même élément.
5 Une fois la modification terminée, appuyez
sur la touche [ ] (Retour).
2 Appuyez sur la touche [ ] (Ajouter).
Les éléments à ajouter (catégories) s’affichent.
3 Appuyez sur l’élément que vous souhaitez
ajouter (catégorie).
6-FR
ALPINE X902D/X802D-U/INE-W710D/i902D/iLX-702D 68-34732Z07-A (FR)
6 Lorsque le message de confirmation
s’affiche, appuyez sur [OK].
7 La modification est terminée et l’écran des
favoris est rétabli.
• Si vous appuyez sur la touche [ ] (Annuler) lors de la
modification, l’écran de modification des favoris
précédent est rétabli.
Ap
INE
Téléchar
l’utiliser
Vous po
Android.
Avant d’
(Android
1 La
2 P
3 A
L’é
4 A
L’é
5 Sé
L’é
Page 45

Mode d’emploi Android Auto (en option)
Android Auto (en option)
ment
uvez
s
pour
6 pages.
ts
haitez
ajouter,
e l’écran
Android Auto est conçu pour faciliter l’utilisation des applications de votre téléphone lorsque vous êtes sur la
route. Naviguez avec Google Maps, écoutez des listes de lecture ou des podcasts à partir de vos applications
préférées, et bien plus encore.
Téléchargez l’application Android Auto depuis Google Play store avant de poursuivre.
Raccordez votre téléphone compatible Android pour commencer à utiliser Android Auto.
1 Appuyez sur le bouton MENU.
L’écran de menu s’affiche.
2 Appuyez sur [Android Auto].
L’écran Android Auto s’affiche.
• Pour plus de détails concernant le fonctionnement d’Android Auto, référez-vous à la section « Android Auto »
dans le mode d’emploi (CD-ROM).
Mode d’emploi Apple CarPlay (en option)
Apple CarPlay (en option)
Apple CarPlay vous permet d’utiliser intelligemment votre iPhone dans votre véhicule, en toute sécurité. Apple
CarPlay prend en charge toutes les fonctionnalités de votre iPhone que vous souhaitez utiliser en conduisant et
vous y donne accès directement sur l’appareil. Vous pouvez obtenir des itinéraires, passer des appels, envoyer et
recevoir des messages, et écouter de la musique, tout en restant concentré sur la route. Il suffit que vous
raccordiez votre iPhone à l’appareil.
Pour plus de détails, référez-vous au mode d’emploi (CD-ROM).
Appuyez sur ou VOICE pour activer la fonction Siri de l’iPhone.
Vous pouvez passer des appels, écouter de la musique, etc., en utilisant la fonction Siri de l’iPhone.
Vous pouvez également contrôler Apple CarPlay sur l’écran tactile.
Mode d’emploi Application Alpine Connect (en option) (X902D/X802D-U/INE-W710D uniquement)
Application Alpine Connect (en option) (X902D/X802D-U/
INE-W710D uniquement)
EN
DE
FR
ES
IT
SE
NL
.
un
ppuyez
an des
rs de la
Téléchargez une application prenant en charge Alpine Connect sur votre smartphone, et il vous sera possible de
l’utiliser via l’appareil.
Vous pouvez télécharger l’application Alpine Connect sur l’Apple App Store ou sur Google Play si vous utilisez
Android. Pour obtenir des informations détaillées à ce sujet, consultez votre revendeur Alpine.
Avant d’effectuer ces opérations, réglez Réglages connectivité ou Alpine Connect sur USB (iPhone) ou Bluetooth
(Android) en fonction du smartphone connecté.
1 Lancez l’application Alpine Connect.
2 Puis connectez le smartphone à cet appareil.
3 Appuyez sur le bouton MENU.
L’écran de menu s’affiche.
4 Appuyez sur [Alpine Connect].
L’écran de sélection de l’application Alpine Connect s’affiche.
5 Sélectionnez l’application de votre choix.
L’écran de l’application choisie s’affiche.
ALPINE X902D/X802D-U/INE-W710D/i902D/iLX-702D 68-34732Z07-A (FR)
RU
PL
7-FR
Page 46

h
y
c
s
T
o
s
d
d
o
/
O
o
Spotify®
Spotify est un service de distribution de musique en continu, qui n’a aucun lien avec Alpine. Vous trouverez de
plus amples informations à l’adresse suivante : http://www.spotify.com.
L’application Spotify est disponible pour les iPhones et les téléphones Android, veuillez consulter la page
https://support.spotify.com/ pour connaître les dernières informations en date en matière de compatibilité.
Afin de profiter de Spotify en conduisant, commencez par télécharger l’application Spotify sur votre iPhone ou sur
votre périphérique Android. Vous pouvez le faire à partir de l’iTunes App Store ou de Google Play™. Choisissez un
compte gratuit ou un compte Premium payant, à partir de l’application ou sur spotify.com. Un compte Premium
vous donne accès à un plus grand nombre de fonctionnalités, telles que l’écoute hors connexion.
• Ce produit incorpore le logiciel Spotify qui est soumis à des licences de tierces parties disponibles ici :
www.spotify.com/connect/third-party-licenses.
• Pour en savoir plus sur les pays et régions où Spotify peut être utilisé, consultez le site
https://www.spotify.com/us/select-your-country/.
Mode d’emploi Radio/RDS
Util
Touc
Cette
Appu
Écran
Utilisation de la radio et du système RDS
Touche de préréglage
Cette touche permet d’afficher les stations préréglées à l’aide d’un appui bref.
Appuyez sur cette touche pendant au moins 2 secondes pour mémoriser la station en cours.
Écran du mode de préréglage
Touche de recherche
de PTY
Balayez l’écran vers la droite
lorsque vous utilisez l’écran de la
liste des PTY.
Modification du mode
de syntonisation
Radiofréquence d’entrée
Activation/désactivation du mode
PRIORITY NEWS
Activation/désactivation du mode
Informations routières
Touche du mode de préréglage
Appuyez sur cette touche ou balayez
l’écran vers la droite pour utiliser
l’écran du mode de préréglage.
Indicateur RDS
Zone d’informations
Augmentation de la fréquence
Touche de changement de
fonction
Réduction de la fréquence
Modification des informations
de texte
Changement de bande
Mémorisation automatique
des stations
Activation/désactivation du
mode AF
Touche du
recherche
Balayez l’écr
l’écran de la
(La liste Tou
ou la liste P
Modificati
de syntoni
Affichage
sélection
Modificati
informatio
Activation
mode PRI
Il est p
8-FR
ALPINE X902D/X802D-U/INE-W710D/i902D/iLX-702D 68-34732Z07-A (FR)
Page 47

z de
é.
e ou sur
sez un
mium
Mode d’emploi DAB/DAB+/DMB
Utilisation du mode DAB/DAB+/DMB
Touche de préréglage
Cette touche permet d’afficher le service préréglé à l’aide d’un appui bref.
Appuyez sur cette touche pendant au moins 2 secondes pour mémoriser le service en cours.
Écran du mode de préréglage
Touche du mode de préréglage
Appuyez sur cette touche ou
balayez l’écran vers la droite pour
utiliser l’écran du mode de
préréglage.
Indicateur DAB
Zone d’informations
Augmentation de la fréquence
EN
DE
réréglage
e ou balayez
r utiliser
glage.
fréquence
nt de
rmations
de
atique
Touche du mode de
recherche complète
Balayez l’écran vers la droite pour utiliser
l’écran de la liste Tous les services.
(La liste Tous les services, la liste Présent
ou la liste PTY s’affiche)
de syntonisation
Affichage de l’écran de
sélection du service
Modification des
informations de texte
Activation/désactivation du
mode PRIORITY NEWS
Touche de changement de
fonction
Réduction de la fréquence
Diaporama
Affiche les informations du
programme, les photos de l’artiste
et les publicités synchronisées
avec le composant de service en
cours de réception.*
Saisie directe de la fréquenceModification du mode
Affichage de l’écran de
sélection du PTY
Sélection du service principal/
secondaire
Activation/désactivation du
mode Informations routières
Il est possible que ces informations ne s’affichent pas sur le composant de service en cours de réception.
FR
ES
IT
SE
NL
RU
PL
tion du
9-FR
ALPINE X902D/X802D-U/INE-W710D/i902D/iLX-702D 68-34732Z07-A (FR)
Page 48

Mode d’emploi Utilisation d’un périphérique de mémoire flash USB (en option)
v
a
t
h
u
u
d
e
o
s
I
.
O
Utilisation d’un périphérique de mémoire flash USB (en option)
Vous pouvez lire les fichiers musicaux (MP3/WMA/AAC/FLAC) et les fichiers vidéo (AVI/MKV/MP4) stockés sur un
périphérique de mémoire flash USB sur le lecteur interne du système.
Exemple d’écran principal USB Audio
Écran du mode de
recherche rapide
Touche du mode de
recherche complète
Balayez l’écran vers la droite pour
utiliser l’écran du mode Recherche
complète.
Redémarrage du fichier en
cours/Saut au morceau
précédent si vous appuyez sur
cette touche dans la seconde/
Appuyez sur cette touche
pendant au moins 1 seconde
pour rembobiner le fichier
Touche de recherche rapide
Appuyez sur cette touche ou
balayez l’écran vers la droite pour
utiliser le mode de recherche rapide.
Nº du morceau actuel/Nbre
total de morceaux
Zone d’informations
Temps écoulé
Touche de changement de
fonction
Affichage des illustrations
Lecture répétée
Lecture aléatoire
Saut au morceau suivant/
Appuyez sur cette touche
pendant au moins 1 seconde
pour faire avancer rapidement
le fichier
Util
Lorsque
Redémarr
cours/Sau
précédent
cette touc
Appuyez s
pendant a
pour remb
Pause et le
Arrêt de la
Commutat
Changem
Affichage
contrôle M
Activation
Écran de c
du DVD
Pause et lecture
10-FR
ALPINE X902D/X802D-U/INE-W710D/i902D/iLX-702D 68-34732Z07-A (FR)
Si vou
HDM
affiché
référez
(CD R
Page 49

option)
Mode d’emploi Périphérique HDMI (DVD, en option)
on)
sur un
rapide
e ou
ite pour
rche rapide.
l/Nbre
nt de
tions
ant/
uche
seconde
pidement
Utilisation d’un périphérique HDMI (lecteur de DVD, en option)
Lorsque vous raccordez un lecteur de DVD DVE-5300 (en option), vous pouvez le commander via l’appareil.
Redémarrage du chapitre en
cours/Saut au chapitre
précédent si vous appuyez sur
cette touche dans la seconde/
Appuyez sur cette touche
pendant au moins 1 seconde
pour rembobiner
Pause et lecture
Arrêt de la lecture
Commutateur d’entrée HDMI*
Changement d’angle
Affichage de l’écran de
contrôle Menu
Activation des sous-titres
Écran de configuration
du DVD
Saut au chapitre suivant/
Appuyez sur cette touche
pendant au moins 1 seconde
pour faire avancer rapidement
Affichage de l’écran Menu
Affichage de l’écran Menu
principal
Changement de piste audio
Lecture répétée
Changement de mode
d’affichage
EN
DE
FR
ES
IT
SE
Modification des informations
de texte
Si vous raccordez un module sélecteur HDMI en option, vous pouvez raccorder deux périphériques HDMI Si le sélecteur
HDMI est activé lorsque deux périphériques HDMI sont connectés, le bouton de commutation de l’entrée HDMI est
affiché. Le bouton affiché diffère selon les réglages et l’entrée HDMI actuellement sélectionnés. Pour plus de détails,
référez-vous aux sections « Réglages HDMI » et « Activation/Désactivation du sélecteur HDMI » du MODE D’EMPLOI
(CD ROM).
ALPINE X902D/X802D-U/INE-W710D/i902D/iLX-702D 68-34732Z07-A (FR)
NL
RU
PL
11-FR
Page 50

Mode d’emploi iPod/iPhone (en option)
o
e
h
l
p
c
p
V
p
u
p
o
p
u
e
a
r
s
Utilisation d’un iPod/iPhone (en option)
Un câble Lightning vers USB vendu séparément (KCU-471i), etc., est nécessaire selon le type d’iPod/iPhone utilisé.
Mode Audio
Écran du mode de
recherche rapide
Touche du mode de
recherche complète
Balayez l’écran vers la droite pour
utiliser l’écran du mode Recherche
complète.
Recherche du début du fichier
en cours/recherche d’un fichier
précédent une seconde après
le démarrage de la lecture/
recherche rapide vers l’arrière
lorsque vous appuyez sur cette
touche pendant au moins
1seconde
Touche de recherche rapide
Appuyez sur cette touche ou
balayez l’écran vers la droite pour
utiliser le mode de recherche rapide.
Nº du morceau actuel/Nbre
total de morceaux
Zone d’informations
Durée de lecture
Touche de changement de
fonction
Pause et lecture
Affichage des illustrations
Lecture répétée
Lecture aléatoire
Recherche du début du fichier
suivant/recherche rapide vers
l’avant lorsque vous appuyez
sur cette touche pendant au
moins 1seconde
Util
L’apparei
Si vous c
« Réglag
dans la S
Comm
périp
(jume
1 A
l’é
2 A
•
3 A
Bl
«
Recherche d’un fichier audio (mode de
2
recherche complète)
Par exemple : Recherche par nom d’artiste
1 Appuyez sur la touche [Artistes] dans
l’écran du mode de recherche complète.
3
4
12-FR
ALPINE X902D/X802D-U/INE-W710D/i902D/iLX-702D 68-34732Z07-A (FR)
Appuyez sur le nom de l’artiste de votre choix.
L’écran de recherche Albums de l’artiste sélectionné
s’affiche.
Appuyez sur la touche [ ] de l’artiste souhaité pour
démarrer la lecture des morceaux de l’artiste
sélectionné.
Appuyez sur le nom de l’album de votre choix.
Tous les morceaux de l’album sélectionné s’affichent.
Appuyez sur la touche [ ] de l’album souhaité pour
démarrer la lecture de tous les morceaux de
l’album sélectionné.
Appuyez sur le nom du morceau de votre choix.
La lecture du morceau sélectionné démarre.
4 A
5 A
n
o
d
Au
M
lib
Le
Page 51

)
Mode d’emploi Configuration Bluetooth, Utilisation de la fonction Bluetooth
Utilisation de la fonction Téléphone mains libres
utilisé.
rapide
e ou
ite pour
rche rapide.
l/Nbre
nt de
tions
du fichier
pide vers
appuyez
dant au
L’appareil peut se connecter à deux téléphones mains-libres.
Si vous connectez deux téléphones mains-libres sur l’appareil, sélectionnez « Priorité Appareil Main-Libre » dans
« Réglages Bluetooth » pour régler l’ordre de priorité. Pour plus de détails, référez-vous au MANUEL UTILISATEUR
dans la SECTION AUDIO VISUEL (CD ROM).
Comment raccorder l’appareil à un
périphérique compatible Bluetooth
(jumelage)
1 Appuyez sur la touche [Réglages] sur
l’écran Menu.
6 Une fois l’enregistrement du périphérique
terminé, un message s’affiche et le
périphérique revient au mode normal.
• Vous pouvez enregistrer jusqu’à 5téléphones portables
compatibles Bluetooth.
• Le processus d’enregistrement Bluetooth diffère selon la
version du périphérique et de la fonction SSP (jumelage
simple et sécurisé). Si un mot de passe à 4 ou 6 caractères
s’affiche sur cet appareil, saisissez-le à l’aide du
périphérique compatible Bluetooth.
Si un mot de passe à 6 caractères s’affiche sur cet appareil,
vérifiez que le même mot de passe s’affiche sur le périphérique
compatible Bluetooth et appuyez sur «Yes».
Prendre un appel
Touche [Réglages]
2 Appuyez sur la touche [Bluetooth].
• Vérifiez que le réglage « Bluetooth » est défini sur
« On » (
).
1 Un appel entrant déclenche la sonnerie,
puis s’affiche sur le moniteur.
Écran de notification d’appel entrant
3 Appuyez sur la touche [Reg. Appareils
Bluetooth].
EN
DE
FR
ES
IT
SE
e choix.
aité pour
te
e choix.
’affichent.
aité pour
e
re choix.
e.
4 Appuyez sur [ ] pour rechercher un
nouveau périphérique.
5 Appuyez sur [ ] (Audio), [ ] (Mains libres)
ou [ ] (Les deux) pour le périphérique
de la liste que vous souhaitez connecter.
Audio : Utilisation comme périphérique audio.
Mains
libres :
Les deux : Utilisation comme périphérique audio
Utilisation comme périphérique mains
libres.
et périphérique mains libres.
ALPINE X902D/X802D-U/INE-W710D/i902D/iLX-702D 68-34732Z07-A (FR)
2 Appuyez sur l’écran de notification d’appel
entrant.
L’appel démarre.
Zone d’informations d’appel
Appuyez sur la zone d’informations d’appel lors
d’un appel pour passer à l’écran des opérations du
téléphone. Utilisez cet écran pour régler le volume
de la voix, etc.
Raccrocher le téléphone
1
Appuyez sur la touche [ ] (Terminer appel).
L’appel se termine.
NL
RU
PL
13-FR
Page 52

Fonctions de carte (X902D/X802D-U/INE-W710D uniquement)
n
n
e
r
é
n
r
c
r
m
V
m
n
é
e
Me
Voici une présentation des différentes touches et icônes sur l’écran de la carte. Pour plus d’informations sur cet
écran, consultez le mode d’emploi.
Rue suivante
Aperçu du prochain virage
Avertissement de limitation
Panneau de signalisation
de vitesse
Champs de données
Informations sur les voies
Vues 2D/2D Nord en haut/3D
Trafic
Zoom
Informations supplémentaires
Services d’autoroutes
Menu Destination
Accès au menu
Appuyez sur la touche [
balayez l’écran vers la gauche.
], ou
Pour acc
l’écran v
Itinéraire
Créez votre
d’itinéraire.
indépenda
un nouveau
Nouvel iti
Sélectionne
saisissant u
coordonné
lieu, une ad
itinéraire m
ailleurs rech
récentes da
Si la connex
l’option de
vous aider à
Accès aux
Appuyez su
balayez l’éc
Nom de la rue
14-FR
ALPINE X902D/X802D-U/INE-W710D/i902D/iLX-702D 68-34732Z07-A (FR)
Parking près de la destination
Informations supplémentaires
Page 53

t)
Menu Navigation (X902D/X802D-U/INE-W710D uniquement)
r cet
haut/3D
mentaires
s
[ ], ou
auche.
estination
Pour accéder au menu Navigation, appuyez sur la touche [ ] située à droite de l’écran des cartes ou balayez
l’écran vers la gauche. Vous pouvez également appuyer sur le bouton .
Itinéraire multipoint
Créez votre propre itinéraire à partir d’un ou de plusieurs points
d’itinéraire. Vous pouvez également programmer un itinéraire
indépendamment de votre position GPS actuelle en définissant
un nouveau point de départ.
Nouvel itinéraire
Sélectionnez votre destination en
saisissant une adresse ou ses
coordonnées, ou en sélectionnant un
lieu, une adresse mémorisée ou un
itinéraire mémorisé. Vous pouvez par
ailleurs rechercher vos destinations
récentes dans l’historique.
Si la connexion Internet est disponible,
l’option de recherche en ligne peut
vous aider à trouver votre destination.
Accès aux cartes
Appuyez sur cette zone ou
balayez l’écran vers la droite.
Information
Accédez à des options
supplémentaires et consultez les
informations liées à la navigation.
Setup
Personnalisez les options du
logiciel de navigation.
EN
DE
FR
ES
IT
SE
NL
mentaires
RU
PL
15-FR
ALPINE X902D/X802D-U/INE-W710D/i902D/iLX-702D 68-34732Z07-A (FR)
Page 54

Sélection d’une destination (X902D/X802D-U/INE-W710D
é
N
c
e
é
é
é
N
y
u
n
d
g
e
N
y
u
N
y
(
N
y
y
u
g
N
B
a
e
e
n
h
y
g
N
n
s
uniquement)
L’exemple suivant décrit comment rechercher une destination lors de la sélection de [Ville/code postal] dans
[Adresse].
• Vous pouvez restreindre votre recherche au pays ou à l’état en commençant par [Paya/État].
1 Appuyez sur la touche [Nouvel itinéraire]
dans le menu Navigation.
2 Appuyez sur la touche [Adresse].
les itinéraires alternatifs.
7 Appuyez sur la touche [More] pour
modifier les paramètres de l’itinéraire, ou
appuyez sur la touche [Lancer navigation]
pour commencer l’itinéraire.
3 Appuyez sur la touche [Ville/code postal].
4 Saisissez le nom de la ville ou le code
postal.
• Appuyez sur pour afficher la liste des
propositions.
5 Saisissez le nom de la rue.
Sp
SECTIO
Taille de l’é
T
ype de LC
Système d
Nombre d’
Nombre d’
Syst
ème d’
SECTIO
Plage de s
Sensibilité
Seuil de se
Sélectivité
Rapport si
Séparation
Rapport d
SECTIO
Plage de s
Sensibilité
SECTIO
Plage de s
Sensibilité
SECTIO
Plage de s
P
lage de s
Sensibilit
Rapport si
Séparation
é
• Appuyez sur pour afficher la liste des
propositions.
6 Saisissez le numéro du logement ou la rue
qui traverse.
L’itinéraire est calculé et une carte s’affiche
indiquant l’itinéraire complet. Sur cet écran vous
pouvez consulter les informations de l’itinéraire et
16-FR
ALPINE X902D/X802D-U/INE-W710D/i902D/iLX-702D 68-34732Z07-A (FR)
SECTIO
Version US
Consomm
Classe USB
Système d
Nombre d
Réponse e
Distorsion
Gamme d
Rapport si
Séparation
1 La répo
d’encod
SECTIO
Format d’e
Format de
Page 55

Spécifications
Mode d’emploi Spécifications
ns
re, ou
ation]
SECTION DU MONITEUR
Taille de l’écran 9” (X902D/i902D)
Type de LCD LCD TN de type transparent
Système de fonctionnement Matrice active TFT
Nombre d’éléments d’image 1 152 000 pièces
Nombre d’éléments d’image effectifs
Système d’éclairage LED
8” (X802D-U)
7” (INE-W710D/iLX-702D)
(800 × 480 × 3 (RGB))
99 % ou plus
SECTION DU TUNER FM
Plage de syntonisation 87,5 – 108,0 MHz
Sensibilité utilisable en mode mono
Seuil de sensibilité à 50 dB 12 dBf (1,1 µV/75 ohms)
Sélectivité de canal alternatif 80 dB
Rapport signal sur bruit 65 dB
Séparation Stereo 35 dB
Rapport de captage 2,0 dB
8,1 dBf (0,7 µV/75 ohms)
SECTION DU TUNER MW
Plage de syntonisation 531 – 1 602 kHz
Sensibilité utilisable 25,1 V/28 dBf
SECTION DU TUNER LW
Plage de syntonisation 153 – 281 kHz
Sensibilité (norme CEI) 31,6 V/30 dBf
SECTION DAB
Plage de syntonisation BANDE III
Plage de syntonisation BANDE L
Sensibilité utilisable -103 dBm
Rapport signal/bruit 95 dB
Séparation stéréo 85 dB
174,93 – 239,2 MHz
1452,96 – 1490,6 MHz
SECTION USB
Version USB USB 2.0
Consommation d’énergie max. 1 500 mA (prise en charge CDP)
Classe USB USB (stockage de masse)
Système de fichiers FAT16/32
Nombre de canaux 2 canaux (stéréo)
Réponse en fréquence
Distorsion harmonique totale 0,008 % (à 1 kHz)
Gamme dynamique 95 dB (à 1 kHz)
Rapport signal sur bruit 100 dB
Séparation des canaux 85 dB (à 1 kHz)
1 La réponse en fréquence peut différer selon le logiciel
d’encodage ou le débit binaire.
1
5 – 20 000 Hz (±1 dB)
SECTION HDMI
Format d’entrée 720p/480p/480i/VGA
Format de sortie 480p
SECTION GPS
Fréquence de réception du GPS
Sensibilité de réception du GPS
1 575,42 ±1 MHz
-130 dB max.
SECTION DU PÉRIPHÉRIQUE Bluetooth
Spécification Bluetooth
Gamme de fréquences
Puissance de sortie
Profil
Bluetooth v3,0
2.402 – 2.480 MHz
+4 dBm Max. (classe 2)
HFP (profil mains libres)
OPP (profil de push d’objets)
PBAP (profil d’accès au répertoire)
A2DP (profil de distribution audio
avancée)
AVRCP (profil de télécommande
audio/vidéo)
SPP (profil de port série)
GÉNÉRALITÉS
Alimentation
Température de fonctionnement
Puissance de sortie maximale 50 W × 4
Niveau de sortie audio
Présortie (avant, arrière) : 2 V/10k ohms (max.)
Présortie (caisson de graves) :
Poids 1,54 kg (3 lbs. 6 oz) (X802D-U)
14,4 V c.c.
(11 – 16 V autorisés)
-20° C à +60° C
2 V/10k ohms (max.)
1,41 kg (3 lbs. 2 oz) (INE-W710D/
iLX-702D)
DIMENSIONS DU CHÂSSIS
Largeur 198 mm (7 -13/16”) (X802D-U)
Hauteur 125 mm (4 -15/16”) (X802D-U)
Profondeur 147 mm (5 -3/4”)
178 mm (7”) (INE-W710D/iLX-702D)
100 mm (3 -15/16”) (INE-W710D/
iLX-702D)
DIMENSIONS DU NEZ
Largeur 191 mm (7 -1/2”) (X802D-U)
Hauteur 121 mm (4 -3/4”) (X802D-U)
Profondeur 19 mm (3/4”)
171 mm (6 -3/4”) (INE-W710D/
iLX-702D)
96 mm (3 -3/4”) (INE-W710D/
iLX-702D)
• Le X902D/i902D est dimensionné exclusivement pour
un certain modèle de voiture.
• En raison des améliorations que nous apportons
continuellement à nos produits, les caractéristiques
techniques et la conception peuvent être modifiées sans
avis préalable.
• L’affichage à cristaux liquides (LCD) a été fabriqué avec
des technologies de très haute précision. Sa résolution
effective est supérieure à 99,99%. Il est donc possible que
0,01% des pixels soit toujours ACTIVÉ ou DÉSACTIVÉ.
EN
DE
FR
ES
IT
SE
NL
RU
PL
17-FR
ALPINE X902D/X802D-U/INE-W710D/i902D/iLX-702D 68-34732Z07-A (FR)
Page 56

• Windows Media et le logo Windows sont des marques
de commerce ou des marques déposées de Microsoft
Corporation aux États-Unis et/ou dans d’autres pays.
• Apple, iPhone, iPod et iPod touch sont des marques de
commerce d’Apple Inc., déposées aux États-Unis et
d’autres pays. Apple CarPlay est une marque de
commerce d’Apple Inc.
• L’utilisation du logo Apple CarPlay signifie que
l’interface utilisateur du véhicule répond aux normes
de performances d’Apple. Apple n’est pas responsable
du fonctionnement de ce véhicule ni de sa conformité
à la législation ou aux normes de sécurité en vigueur.
Veuillez noter que l’utilisation de ce produit avec un
iPhone où un iPod peut affecter les performances de
communication sans fil.
• « Made for iPod » et « Made for iPhone » indiquent que
l’accessoire électronique a été spécialement conçu
pour se connecter spécifiquement a un iPod ou un
iPhone, respectivement, et que le fabricant certifie qu’il
répond aux normes de performances d’Apple. Apple
n’accepte aucune responsabilité liée à l’utilisation de
cet accessoire ou à sa conformité aux normes de
sécurité en vigueur. Notez que l’utilisation de cet
accessoire avec un iPod ou un iPhone peut avoir une
incidence sur les performances sans-fils.
• Android est une marque de commerce de Google Inc.
• Le robot Android est reproduit ou modifié à partir de
travaux créés et partagés par Google, et utilisés
conformément aux conditions décrites dans la licence
d’attribution Creative Commons 3.0.
• SPOTIFY et le logo Spotify figurent parmi les marques
de commerce de Spotify AB.
• La marque et les logos Bluetooth® sont des marques
déposées qui appartiennent à Bluetooth SIG, Inc., et
leur utilisation par Alpine Electronics, Inc., fait l’objet
d’une licence.
• Les termes HDMI et HDMI High-Definition Multimedia
Interface, ainsi que le logo HDMI sont des marques de
commerce ou des marques déposées de HDMI
Licensing, LLC aux États-Unis et dans d’autres pays.
• Technologie de codage audio MPEG Layer-3 sous
licence de Fraunhofer IIS et Thomson. L’acquisition de
ce produit ne fournit qu’une seule licence pour un
usage privé et ne permet pas à l’utilisateur d’utiliser ce
produit à des fins commerciales (par exemple pour
générer des recettes), pour une transmission en direct
(terrestre, par satellite, par câble et/ou tout autre
média), pour une transmission par Internet, intranet et/
ou autres réseaux ou avec des systèmes de distribution
de contenu électronique (plates-formes payantes ou
applications de téléchargements de matériel audio).
Une licence indépendante est requise pour ce type
d’utilisation. Pour plus d’informations, consultez le site
http://www.mp3licensing.com
• ©2006-2016 TomTom. All rights reserved. This material
is proprietary and the subject of copyright protection,
database right protection and other intellectual
property rights owned by TomTom or its suppliers. The
use of this material is subject to the terms of a license
agreement. Any unauthorized copying or disclosure of
this material will lead to criminal and civil liabilities.
About the Rules of Bluetooth Electromagnetic
Radiation Regulation
Declaration of Conformity
18-FR
ALPINE X902D/X802D-U/INE-W710D/i902D/iLX-702D 68-34732Z07-A (FR)
Page 57

Contenido
ADVERTENCIA........................................................................................................................................................2
PRUDENCIA ............................................................................................................................................................3
Primeros pasos ...................................................................................................................................................... 4
Función Favoritos ................................................................................................................................................. 6
Registro de elementos .......................................................................................................................................6
Android Auto (opcional) ....................................................................................................................................7
Apple CarPlay (opcional) ...................................................................................................................................7
Alpine Connect App (opcional) (X902D/X802D-U/INE-W710D solo) ................................................7
Funcionamiento de radio/RDS ........................................................................................................................ 8
Funcionamiento de DAB/DAB+/DMB ...........................................................................................................9
Funcionamiento de unidad flash USB (Opcional) ..................................................................................10
Funcionamiento del dispositivo HDMI (reproductor de DVD) (Opcional) ....................................11
Funcionamiento de iPod/iPhone (Opcional)............................................................................................12
Control del teléfono manos libres................................................................................................................13
Funciones de mapas (X902D/X802D-U/INE-W710D solo) ..................................................................14
Menú de navegación (X902D/X802D-U/INE-W710D solo) .................................................................15
Establecer un destino (X902D/X802D-U/INE-W710D solo) ................................................................16
Especificaciones..................................................................................................................................................17
IMPORTANTE
Anote el número de serie de la unidad en el espacio proporcionado a continuación y consérvelo
como registro permanente.
NÚMERO DE SERIE:
NÚMERO DE SERIE ISO: AL
FECHA DE INSTALACIÓN:
INSTALADOR:
LUGAR DE ADQUISICIÓN:
EN
DE
FR
ES
IT
SE
NL
RU
Para obtener más información sobre todas las funciones, consulte el Manual de operación
incluido en el CD-ROM suministrado. (Al tratarse de un CD de datos, este CD no se puede utilizar
para reproducir música e imágenes en el reproductor.) Si fuera necesario, puede solicitar a un
distribuidor de ALPINE una copia del Manual de operación incluido en el CD-ROM.
ALPINE X902D/X802D-U/INE-W710D/i902D/iLX-702D 68-34732Z07-A (ES)
PL
1-ES
Page 58

ADVERTENCIA
P
m
a
n
U
R
s
o
e
L
O
c
r
O
A
d
d
j
A
O
b
d
d
m
l
L
D
a
v
u
f
ADVERTENCIA
Este símbolo indica que las instrucciones son
importantes. De no tenerse en cuenta, podrían
ocasionarse heridas graves o la muerte.
INSTALE LA UNIDAD CORRECTAMENTE PARA QUE EL
CONDUCTOR NO PUEDA VER EL VIDEO/TELEVISOR A MENOS
QUE EL VEHÍCULO SE ENCUENTRE PARADO Y SE HAYA
ACCIONADO EL FRENO DE MANO.
Ver el vídeo/televisor mientras se conduce se considera peligroso. Si la
unidad no se instala correctamente, el conductor podrá ver el vídeo/
televisor y distraerse mientras conduce, incrementando el riesgo de
accidente. Esto podría causar heridas graves al conductor y a otras
personas.
NO MIRE EL VÍDEO MIENTRAS CONDUCE.
El conductor puede distraer su atención de la carretera mientras mira el
vídeo y ocasionar un accidente.
NO REALICE NINGUNA OPERACIÓN QUE PUEDA DISTRAER
SU ATENCIÓN Y COMPROMETER LA SEGURIDAD DURANTE
LA CONDUCCIÓN DEL VEHÍCULO.
Las operaciones que requieren su atención durante más tiempo sólo
deben realizarse después de detener completamente el vehículo.
Estacione el vehículo en un lugar seguro antes de realizar dichas
operaciones. De lo contrario, podría ocasionar un accidente.
NO SIGA LAS INDICACIONES DE RUTA SI EL SISTEMA DE
NAVEGACIÓN DA INSTRUCCIONES PARA REALIZAR
MANIOBRAS PELIGROSAS O PROHIBIDAS, O SI ESTO SUPONE
ENCONTRARSE EN SITUACIONES O ÁREAS DE RIESGO.
Este producto no es sustituto de su capacidad de razonamiento. El
seguimiento de las indicaciones de ruta sugeridas por esta unidad nunca
debe contradecir las normas de tráfico locales ni sus criterios o
conocimientos de lo que supone una conducción segura.
MANTENGA EL VOLUMEN A UN NIVEL QUE NO LE IMPIDA
ESCUCHAR LOS SONIDOS DEL EXTERIOR MIENTRAS
CONDUCE.
Los niveles de volumen demasiado altos que reducen la percepción de
otros sonidos como las sirenas de emergencia o posibles señales
acústicas de advertencia en carretera (cruces de trenes, etc.) podrían ser
peligrosos y provocar un accidente. LOS NIVELES DE VOLUMEN
ALTOS EN EL VEHÍCULO TAMBIÉN PUEDEN DAÑAR EL SISTEMA
AUDITIVO DE LOS PASAJEROS.
REDUZCA AL MÁXIMO LA VISUALIZACIÓN DE LA PANTALLA
MIENTRAS CONDUCE.
El conductor puede distraer su atención de la carretera mientras mira la
pantalla y ocasionar un accidente.
NO DESMONTE NI ALTERE LA UNIDAD.
Si lo hace, podrá ocasionar un accidente, un incendio o una descarga
eléctrica.
UTILICE LA UNIDAD SOLAMENTE EN VEHÍCULOS QUE
TENGAN 12 VOLTIOS CON NEGATIVO A MASA.
(Consulte a su distribuidor en caso de duda.) De no ser así, podría
ocasionar un incendio, etc.
MANTENGA LOS OBJETOS PEQUEÑOS, COMO TORNILLOS,
FUERA DEL ALCANCE DE LOS NIÑOS.
La ingestión de estos objetos puede provocar lesiones graves. Si esto
ocurre, consulte con un médico inmediatamente.
UTILICE EL AMPERAJE CORRECTO CUANDO CAMBIE
FUSIBLES.
De lo contrario, puede producirse un incendio o una descarga eléctrica.
NO OBSTRUYA LOS ORIFICIOS DE VENTILACIÓN O LOS
PANELES DEL RADIADOR.
Si los bloquea, el calor podría acumularse en el interior y producir un
incendio.
UTILICE ESTE PRODUCTO CON APLICACIONES MÓVILES DE
12 V.
Si se emplea para otra aplicación distinta de la prevista, podría
producirse un incendio, una descarga eléctrica u otras lesiones.
REALICE LAS CONEXIONES CORRECTAMENTE.
Una conexión incorrecta puede producir un incendio o dañar el equipo.
ANTES DE EFECTUAR EL CABLEADO, DESCONECTE EL CABLE
DEL TERMINAL NEGATIVO DE LA BATERÍA.
De no hacerlo así, podría ocasionar una descarga eléctrica o heridas
debido a cortocircuitos eléctricos.
IMPIDA QUE LOS CABLES SE ENREDEN CON LOS OBJETOS
SITUADOS ALREDEDOR.
Disponga la instalación eléctrica y los cables conforme a lo descrito en el
manual para evitar obstáculos durante la conducción. Los cables que
obstaculizan la conducción o que cuelgan de partes del vehículo como el
volante de dirección, la palanca de cambios, los pedales de freno, etc., se
consideran extremadamente peligrosos.
NO EMPALME CABLES ELÉCTRICOS.
Nunca corte el aislamiento de un cable para suministrar energía a otro
equipo. Esto hace que la capacidad portadora del cable se supere y puede
ser la causa de incendios o descargas eléctricas.
EVITE DAÑAR LOS TUBOS Y EL CABLEADO CUANDO
TALADRE AGUJEROS.
Si taladra agujeros en el chasis durante la instalación, tome las
precauciones necesarias para no rozar, dañar u obstruir los tubos, las
tuberías de combustible, los depósitos o el cableado eléctrico. De lo
contrario, podría provocar un incendio.
NO UTILICE TUERCAS O PERNOS EN EL SISTEMA DE FRENOS
O DE DIRECCIÓN PARA REALIZAR LAS CONEXIONES A MASA.
Los pernos o tuercas empleados en los sistemas de freno o de dirección
(o en cualquier otro sistema relacionado con la seguridad del vehículo),
o los depósitos, NUNCA deben utilizarse para instalaciones de cableado
o conexión a masa. Si utiliza tales partes podrá incapacitar el control del
vehículo y provocar un incendio, etc.
NO INSTALE EL EQUIPO EN LUGARES QUE PUEDAN
INTERFERIR CON LA OPERACIÓN DEL VEHÍCULO, COMO EL
VOLANTE DE DIRECCIÓN O LA CAJA DE CAMBIOS DE
VELOCIDAD.
Esto podría obstaculizar la visibilidad y dificultar el movimiento, etc. y
provocar accidentes graves.
Este sí
import
ocasio
DEJE DE
ALGÚN P
Su uso en e
daños al pr
al Centro d
CONFÍE E
PROFESI
El cableado
experiencia
siempre en
para confia
UTILICE L
CORRECT
Asegúrese
utilización
el interior d
pueden aflo
averías.
DISPONG
SE DOBLE
METÁLIC
Aleje los ca
asientos) o
dobleces y
orificio de
metálico de
NO INSTA
LLENOS
Evite instal
Si entra pol
2-ES
ALPINE X902D/X802D-U/INE-W710D/i902D/iLX-702D 68-34732Z07-A (ES)
• Los sig
para re
Page 59

ILLOS,
Si esto
PRUDENCIA
Este símbolo indica que las instrucciones son
importantes. De no tenerse en cuenta, podría
ocasionarse heridas graves o daños materiales.
eléctrica.
OS
ucir un
ILES DE
a
s.
el equipo.
L CABLE
eridas
ETOS
scrito en el
les que
lo como el
no, etc., se
ía a otro
ere y puede
bos, las
De lo
FRENOS
A MASA.
dirección
vehículo),
e cableado
control del
DEJE DE USAR LA UNIDAD INMEDIATAMENTE SI APARECE
ALGÚN PROBLEMA.
Su uso en estas condiciones podría ocasionar lesiones personales o
daños al producto. Lleve la unidad a un distribuidor Alpine autorizado o
al Centro de servicio Alpine más próximo para repararla.
CONFÍE EL CABLEADO Y LA INSTALACIÓN A
PROFESIONALES.
El cableado y la instalación de este equipo requieren una competencia y
experiencia técnica confirmada. Para garantizar la seguridad, póngase
siempre en contacto con el distribuidor al que ha comprado el equipo
para confiarle estas tareas.
UTILICE LOS ACCESORIOS ESPECIFICADOS E INSTÁLELOS
CORRECTAMENTE.
Asegúrese de utilizar los accesorios especificados solamente. La
utilización de otras piezas no designadas puede ser la causa de daños en
el interior de la unidad o de una instalación incorrecta. Las piezas
pueden aflojarse, lo que, además de ser peligroso, puede provocar
averías.
DISPONGA EL CABLEADO DE FORMA QUE LOS CABLES NO
SE DOBLEN, NO SE CONTRAIGAN NI ROCEN UN BORDE
METÁLICO AFILADO.
Aleje los cables y el cableado de piezas móviles (como los raíles de los
asientos) o de bordes puntiagudos o afilados. De esta forma evitará
dobleces y daños en el cableado. Si los cables se introducen por un
orificio de metal, utilice una arandela de goma para evitar que el borde
metálico del orificio corte el aislamiento del cable.
NO INSTALE LA UNIDAD EN LUGARES MUY HÚMEDOS O
LLENOS DE POLVO.
Evite instalar la unidad en lugares con altos índices de humedad o polvo.
Si entra polvo o humedad, el equipo puede averiarse.
EN
DE
FR
ES
IT
SE
NL
RU
PL
MO EL
E
to, etc. y
• Los siguientes ejemplos de pantalla de X902D/X802D-U/INE-W710D utilizados en este manual son únicamente
para referencia. Es posible que difieran de las visualizaciones reales de pantalla.
3-ES
ALPINE X902D/X802D-U/INE-W710D/i902D/iLX-702D 68-34732Z07-A (ES)
Page 60

Manual de operación Primeros pasos
d
r
s
u
d
a
o
a
e
d
a
a
a
d
n
Primeros pasos
Ubicación de los controles
El diseño de pantalla empleado en el Manual de operación puede no coincidir con la pantalla real.
Para X902D/i902D
Para X802D-U/INE-W710D/iLX-702D
Encen
1 Gi
2 P
Pasar
Puede p
los cuatr
Pantall
Puede re
el sistem
traseros.
Pantall
(USB Aud
El
4-ES
Botón o VOICE
Dependiendo del smartphone conectado, pulse para
acceder a la función de volumen del Siri o al modo de
reconocimiento de voz.
Botón (MUTE)
Pulse este botón para activar/desactivar el modo de
silenciamiento.
Botón (AUDIO)/(Favoritos)
Muestra la pantalla Audio/Visual. Si la pantalla Audio/
Visual ya está visible, cambia la fuente.
Mantenga pulsado durante al menos 2 segundos para
acceder a la pantalla de Favoritos.
Botón / o / (SUBIR/BAJAR)
Pulse este botón para ajustar el volumen.
Interruptor RESET
Reinicia el sistema de esta unidad.
Botón (PHONE) (X902D/i902D solo)
Rellamadas de la pantalla del menú del teléfono.
Pulse para iniciar una conversación cuando hay una
llamada entrante.
Botón MENU/(Apagado)
Accede a la pantalla de menús.
Pulse este botón durante al menos 5 segundos para
apagar la unidad.
Botón (NAV)
Para X902D/X802D-U/INE-W710D:
Accede a la pantalla del mapa de navegación.
Vuelva a pulsar el botón para cambiar a la pantalla del
menú de navegación.
Pulse este botón durante al menos 2 segundos para
cambiar a la pantalla de la ruta para regresa a su
domicilio. (Si aún no ha definido ninguna ubicación
como su domicilio, cambiará a la pantalla que permite
configurar su domicilio como ubicación
predeterminada.)
Para obtener más información sobre las operaciones de
navegación, consulte el “Manual de operación del
sistema de navegación” incluido en el CD-ROM.
Para i902D/iLX-702D:
Accede a la pantalla del mapa del smartphone
conectado.En función del smartphone, es posible que
esta función no esté disponible.
Botón /
Pulse este botón para buscar ascendentemente o
descendentemente una emisora en el modo de radio o
para avanzar o retroceder una pista, un capítulo, etc.,
en otras fuentes de audio/visuales.
Sensor remoto
Apunte el transmisor del mando a distancia hacia el
sensor remoto desde una distancia máxima de 2 metros.
Micrófono (X802D-U/INE-W710D/iLX-702D solo)
Utilizado para los modos de control de voz o manos libres.
ALPINE X902D/X802D-U/INE-W710D/i902D/iLX-702D 68-34732Z07-A (ES)
Botón d
del mo
El mo
funcio
Page 61

Encendido (On) y apagado (Off)
1 Gire la llave de contacto a la posición ACC u ON.
El sistema se enciende.
2 Pulse el botón MENU durante al menos 5 segundos para apagar la unidad.
.
talla del
s para
su
ación
permite
Pasar de la pantalla de fuentes de audio a una pantalla específica
Puede pasar de la pantalla de fuentes de audio a una pantalla específica tocando uno de los iconos situados en
los cuatro bordes de la pantalla, o deslizando el dedo horizontalmente o verticalmente.
Pantalla resumida de ajustes
Puede realizar los ajustes de sonido o
el sistema Entretenimiento asientos
traseros.
Pantalla de fuentes de audio
(USB Audio)
Pantalla dual (X902D/X802D-U/
INE-W710D solo)
Puede alternar entre las pantallas
mostradas en la pantalla dual.
EN
DE
FR
ES
IT
SE
NL
RU
ciones de
del
.
e
ible que
te o
lo, etc.,
cia el
2 metros.
D solo)
nos libres.
Botón de memorización o pantalla
del modo de búsqueda rápida*
El modo de búsqueda varía en función de la fuente de audio. Para obtener más información, consulte las instrucciones de
funcionamiento de la fuente de audio.
ALPINE X902D/X802D-U/INE-W710D/i902D/iLX-702D 68-34732Z07-A (ES)
Pantalla de menús
Puede realizar ajustes en la pantalla
de menús.
PL
5-ES
Page 62

Manual de operación Función Favoritos
d
A
u
u
P
d
p
a
n
e
e
o
i
u
o
o
h
i
c
u
Función Favoritos
Esta unidad permite recuperar funciones fácilmente registrando en la pantalla Favoritos elementos usados
frecuentemente, como la fuente de audio, la función de búsqueda de navegación, etc. Es posible recuperar
cualquiera de estos elementos fácilmente.
1 Mantenga pulsado el botón /(Favoritos)
durante al menos 2 segundos.
Aparecerá la pantalla Favoritos.
Ejemplo de la pantalla Favoritos
Cambios de la pantalla Editar utilizada para
registrar elementos o cambiar nombres.
Elemento registrado en Favoritos
Indica la ubicación de la pantalla Favoritos
visualizada en ese momento.
Deslice el dedo hacia la izquierda y hacia la derecha
para cambiar de página. Puede añadir hasta 6 páginas.
Manual de operación Registro de elementos
Registro de elementos
1 Toque [ ] (Editar).
Aparece una casilla de verificación en la zona
superior izquierda del icono de registro y cambia al
modo Editar.
4 Elija el elemento que desee añadir.
Para obtener más información sobre los elementos
que se van a añadir, consulte “Edición de la pantalla
Favoritos” en el Manual de operación.
• Puede añadir hasta 54 elementos.
• No es posible registrar un elemento varias veces.
5 Una vez finalizada la edición, toque [ ]
(Volver).
An
Android
carretera
Descarg
Conecte
1 P
Ap
2 To
Ap
•
Ap
Apple C
las cosas
direccio
perman
Para obt
Pulse
Con la fu
También
Alp
Descarg
unidad.
Alpine C
desde G
Antes de
Bluetoot
6 Cuando aparezca el mensaje de
2 Toque [ ] (Añadir).
Se visualizan los elementos que se van a añadir
(categorías).
3 Toque el elemento que desee añadir
(categoría).
6-ES
ALPINE X902D/X802D-U/INE-W710D/i902D/iLX-702D 68-34732Z07-A (ES)
confirmación, toque [OK].
7 La edición ha finalizado y la pantalla vuelve
a la pantalla Favoritos.
• Si toca [ ] (Cancelar) durante la edición, la pantalla
regresa a la pantalla anterior de edición de Favoritos.
1 In
2 A
3 P
Ap
4 To
Ap
5 Se
Ap
Page 63

s
Manual de operación Android Auto (opcional)
Android Auto (opcional)
s
r
ra
s
recha
páginas.
tos
mentos
pantalla
s veces.
[ ]
Android Auto está diseñado para que sea más sencillo el uso de apps desde su teléfono mientras usted está en la
carretera. Navegar con Google Maps, escuchar listas de reproducción o podcasts desde sus apps favoritas y más.
Descargue la app de Android Auto de la tienda de Google Play antes de continuar.
Conecte su teléfono compatible Android para empezar a usar Android Auto.
1 Pulse el botón MENU.
Aparece la pantalla de menús.
2 Toque [Android Auto].
Aparecerá la pantalla de Android Auto.
• Para obtener más información sobre el funcionamiento de Android Auto, consulte “Android Auto” en el Manual
de operación (CD-ROM).
Manual de operación Apple CarPlay (opcional)
Apple CarPlay (opcional)
Apple CarPlay es una forma más segura, inteligente de utilizar su iPhone en el coche. Apple CarPlay se ocupa de
las cosas que desea hacer con su iPhone mientras conduce y las pone en orden en la unidad. Puede obtener
direcciones, realizar llamadas, enviar y recibir mensajes y escuchar música, en conjunto, lo que le permite
permanecer centrado al volante. Conecte su iPhone a la unidad y disfrute.
Para obtener más información, consulte el Manual de operación (CD-ROM).
Pulse o VOICE para activar la función Volumen del Siri del iPhone.
Con la función Siri del iPhone, puede realizar llamadas, reproducir música, etc.
También puede controlar Apple CarPlay desde la pantalla táctil.
Manual de operación Alpine Connect App (opcional) (X902D/X802D-U/INE-W710D solo)
Alpine Connect App (opcional) (X902D/X802D-U/INE-W710D solo)
Descargue una aplicación que sea compatible con Alpine Connect en su smartphone, y podrá utilizarla desde la
unidad.
Alpine Connect App puede descargarse desde el App Store de Apple y, en el caso de los usuarios de Android,
desde Google Play. Para obtener más información, consulte a su distribuidor Alpine.
Antes de estas operaciones, configure los ajustes de conectividad o Alpine Connect como USB (iPhone) o
Bluetooth (Android), en función del smartphone conectado.
EN
DE
FR
ES
IT
SE
NL
RU
vuelve
ntalla
ritos.
1 Inicie Alpine Connect App.
PL
2 A continuación, conecte el smartphone a esta unidad.
3 Pulse el botón MENU.
Aparece la pantalla de menús.
4 Toque [Alpine Connect].
Aparece la pantalla de selección de Alpine Connect App.
5 Seleccione la aplicación deseada.
Aparecerá la pantalla de la aplicación deseada.
7-ES
ALPINE X902D/X802D-U/INE-W710D/i902D/iLX-702D 68-34732Z07-A (ES)
Page 64

n
n
t
e
m
c
a
m
i
d
i
t
z
Spotify®
Spotify es un servicio de distribución de difusión musical no afiliada con Alpine. Más información disponible en
http://www.spotify.com.
La aplicación Spotify está disponible para teléfonos iPhone y Android, visite https://support.spotify.com/ para
obtener la información de compatibilidad más reciente.
Para disfrutar de Spotify durante la conducción, descargue primero la aplicación Spotify en su dispositivo iPhone o
Android. Puede descargarlo en la App Store de iTunes o Google Play™. Seleccione una cuenta gratuita o una
cuenta Premium de pago, en la aplicación o en spotify.com. Una cuenta Premium le da más características, como
audio sin conexión.
• Este producto contiene software de Spotify sujeto a autorización de terceras partes que puede verse aquí:
www.spotify.com/connect/third-party-licenses.
• Para más información sobre países y regiones donde puede usarse Spotify, vaya a
https://www.spotify.com/us/select-your-country/.
Manual de operación Radio/RDS
Fu
Botó
Mues
Toqu
Panta
Funcionamiento de radio/RDS
Botón de memorización
Muestra las emisoras memorizadas con un toque corto.
Toque durante al menos 2 segundos para memorizar la emisora actual como una emisora memorizada.
Pantalla de modos predefinidos
Botón de búsqueda
PTY
Deslice hacia la derecha
cuando utilice la pantalla
de lista PTY.
Cambia el modo de
sintonización
Frecuencia de entrada de radio
Modo de prioridad de noticias
(NEWS) activado/desactivado
Modo de información de tráfico
activado/desactivado
Botón de modo predefinido
Toque o deslice hacia la derecha
cuando utilice la pantalla de
modos predefinidos.
Indicador RDS
Información
Aumenta la frecuencia
Botón para cambiar de función
Reduce la frecuencia
Cambia la información de
texto
Cambia la banda
Memoriza automáticamente
las emisoras
Modo AF activado/
desactivado
Botón de
búsqueda
Deslice haci
pantalla de
(Se visualiza
la lista Actu
Cambia el
sintonizac
Muestra la
selección
Cambia la
de texto
Modo de p
(NEWS) ac
Tal ve
8-ES
ALPINE X902D/X802D-U/INE-W710D/i902D/iLX-702D 68-34732Z07-A (ES)
Page 65

le en
ara
iPhone o
na
Manual de operación DAB/DAB+/DMB
Funcionamiento de DAB/DAB+/DMB
Botón de memorización
Muestra el servicio memorizado con un toque corto.
Toque durante al menos 2 segundos para memorizar el servicio actual como una emisora memorizada.
Pantalla de modos predefinidos
Botón de modo predefinido
Toque o deslice hacia la derecha
cuando utilice la pantalla de
modos predefinidos.
Indicador DAB
Información
Aumenta la frecuencia
EN
DE
efinido
a derecha
lla de
ia
de función
n de
amente
Botón de modo de
búsqueda completa
Deslice hacia la derecha cuando utilice la
pantalla de lista de todos los servicios.
(Se visualiza la lista de todos los servicios,
la lista Actual o la lista PTY)
Cambia el modo de
sintonización
Muestra la pantalla de
selección de servicios
Cambia la información
de texto
Modo de prioridad de noticias
(NEWS) activado/desactivado
Tal vez no se visualicen en función del componente del servicio que se esté recibiendo.
Botón para cambiar de función
Reduce la frecuencia
Presentación de diapositivas
Muestra la información del
programa, las fotografías de los
artistas y los anuncios
sincronizados con el componente
del servicio que se está
recibiendo.*
Introducción directa de la
frecuencia
Muestra la pantalla de
selección PTY
Cambia el servicio principal/
secundario
Modo de información de
tráfico activado/desactivado
FR
ES
IT
SE
NL
RU
PL
ALPINE X902D/X802D-U/INE-W710D/i902D/iLX-702D 68-34732Z07-A (ES)
9-ES
Page 66

e
I
f
A
c
e
r
u
To
r
a
á
s
e
Manual de operación Funcionamiento de unidad flash USB (Opcional)
Funcionamiento de unidad flash USB (Opcional)
Puede reproducir archivos de música (MP3/WMA/AAC/FLAC) y archivos de vídeo (AVI/MKV/MP4) guardados en
una unidad flash USB en el reproductor interno de este sistema.
Ejemplo de la pantalla principal de USB Audio
Pantalla del modo de
búsqueda rápida
Botón de modo de
búsqueda completa
Deslice hacia la derecha cuando
utilice la pantalla del modo de
búsqueda completa.
Vuelva a arrancar el archivo
actual/vuelva al archivo anterior
pulsando un segundo/Toque
durante un segundo o más para
rebobinar el archivo
Botón de búsqueda rápida
Toque o deslice hacia la derecha
para utilizar el modo de búsqueda
rápida.
N.º canción actual/n.º canciones
totales
Información
Tiempo transcurrido
Botón para cambiar de función
Visualización de imágenes
artísticas
Reproducción repetida
Reproducción aleatoria
Saltar a la pista siguiente/
Toque durante un segundo o
más para un avance rápido a
otro archivo
Fun
Si se con
Vuelve a a
actual/vue
anterior p
segundo/
segundo o
Pausa y pl
Detener re
Interrupto
Cambia el
Muestra la
control de
Cambia lo
Pantalla d
Pausa y play
10-ES
ALPINE X902D/X802D-U/INE-W710D/i902D/iLX-702D 68-34732Z07-A (ES)
Si con
posició
HDM
más in
OPER
Page 67

cional)
Manual de operación HDMI (Opcional) DVD
Funcionamiento del dispositivo HDMI (reproductor de DVD) (Opcional)
os en
ápida
a derecha
búsqueda
º canciones
de función
genes
da
ria
ente/
gundo o
Si se conecta una unidad opcional DVE-5300 (reproductor de DVD), puede controlarlo desde la unidad.
Vuelve a arrancar el capítulo
actual/vuelva al capítulo
anterior pulsando un
segundo/Toque durante un
segundo o más para rebobinar
Saltar al capítulo siguiente/
Toque durante un segundo o
más para un avance rápido
Pausa y play
Detener reproducción
Interruptor de entrada HDMI *
Cambia el ángulo
Muestra la pantalla de
control de menús
Cambia los subtítulos
Pantalla de ajustes de DVD
Muestra la pantalla de menús
Muestra la pantalla del menú
principal
Cambia las pistas de audio
Reproducción repetida
Cambio de modos de
visualización
EN
DE
FR
ES
IT
SE
Cambia la información de
texto
Si conecta un módulo selector HDMI opcional, puede conectar dos dispositivos HDMI. Si el selector HDMI está en la
posición “ACTIVADO” cuando están conectados dos dispositivos HDMI, aparecerá el botón del interruptor de entrada
HDMI. El botón que aparece varía en función de los ajustes y la entrada HDMI actualmente seleccionada. Para obtener
más información, consulte “Configuración HDMI” y “Activación/desactivación de selector HDMI” en el MANUAL DE
OPERACIÓN (CD-ROM).
ALPINE X902D/X802D-U/INE-W710D/i902D/iLX-702D 68-34732Z07-A (ES)
NL
RU
PL
11-ES
Page 68

n
d
t
c
u
e
V
e
u
u
a
r
m
Manual de operación iPod/iPhone (Opcional)
Funcionamiento de iPod/iPhone (Opcional)
Es necesario un cable Lightning a USB que se vende aparte (KCU-471i), etc., dependiendo del tipo de iPod/iPhone.
Modo de audio
Pantalla del modo de
búsqueda rápida
Botón de modo de
búsqueda completa
Deslice hacia la derecha cuando
utilice la pantalla del modo de
búsqueda completa.
Va al principio del archivo
actual/va a un archivo previo un
segundo después de que se
inicie la reproducción/retrocede
rápidamente cuando se toca
durante al menos 1 segundo
Botón de búsqueda rápida
Toque o deslice hacia la derecha
para utilizar el modo de búsqueda
rápida.
N.º canción actual/n.º canciones
totales
Información
Tiempo de reproducción
Botón para cambiar de función
Pausa y reproducción
Visualización de imágenes
artísticas
Reproducción repetida
Reproducción aleatoria
Va al principio del siguiente
archivo/avanza rápidamente
cuando se toca durante al
menos 1 segundo
Co
La unida
Si conec
“Configu
DEL PRO
Cómo
con Bl
1 To
2 To
3 To
m
•
Búsqueda de un archivo de música
2 Toque el nombre del artista que desee.
(modo de búsqueda completa)
Por ejemplo: Búsqueda por nombre de artista
1 Toque [Artistas] en la pantalla del modo de
búsqueda completa.
3 Toque el nombre del álbum que desee.
4 Toque el nombre de la canción que desee.
12-ES
ALPINE X902D/X802D-U/INE-W710D/i902D/iLX-702D 68-34732Z07-A (ES)
Aparecerá la pantalla de búsqueda de álbumes del
artista seleccionado.
Si toca [ ] en el artista deseado, se reproducirán
todas las canciones del artista seleccionado.
Se visualizarán todas las canciones del álbum
seleccionado.
Si toca [ ] en el álbum deseado, se reproducirán
todas las canciones del álbum seleccionado.
Se reproducirá la canción seleccionada.
4 To
5 To
n
[
q
Au
M
lib
A
Page 69

l)
Manual de operación Ajustes de Bluetooth, Funcionamiento de Bluetooth
Control del teléfono manos libres
/iPhone.
ápida
a derecha
búsqueda
º canciones
ción
de función
genes
da
ria
uiente
amente
te al
ee.
La unidad puede conectar con hasta dos teléfonos manos libres.
Si conecta dos teléfonos manos libres a la unidad, seleccione “Prioridad dispositivo manos libres” en
“Configuración de Bluetooth” para definir el orden de prioridad. Para obtener más información, consulte MANUAL
DEL PROPIETARIO en la SECCIÓN AUDIOVISUAL (CD-ROM).
Cómo conectar un dispositivo compatible
con Bluetooth (emparejamiento)
1 Toque el botón [Ajustes] en la pantalla de
menús.
Botón [Ajustes]
2 Toque [Bluetooth].
• Verifique que el ajuste “Bluetooth” está ajustado
en “On” (
).
3 Toque [Establecer Dispositivo Bluetooth].
6 Una vez finalizado el registro del
dispositivo, aparece un mensaje y el
dispositivo vuelve al modo normal.
• Es posible registrar hasta 5 teléfonos móviles compatibles
con Bluetooth.
• El proceso de registro de Bluetooth varía en función de la
versión del dispositivo y la tecnología SSP (Simple Secure
Pairing). Si aparece una contraseña de 4 o 6 caracteres en
este dispositivo, introduzca la contraseña desde el dispositivo
compatible con Bluetooth.
Si aparece una contraseña de 6 caracteres en este dispositivo,
asegúrese de que se muestra la misma contraseña en el
dispositivo compatible con Bluetooth y toque “Yes”.
Atender una llamada
1 Una llamada entrante activa el tono y se
muestra una pantalla de llamada entrante.
Pantalla de notificación de llamada entrante
EN
DE
FR
ES
IT
SE
NL
mes del
cirán
.
ee.
m
ucirán
o.
esee.
4 Toque [ ] para buscar un dispositivo
nuevo.
2 Toque la pantalla de notificación de
llamada entrante.
La llamada se inicia.
Zona de información de llamada
5 Toque [ ] (Audio), [ ] (manos libres) o
[ ] (ambos) para usar el dispositivo
que desea conectar de la lista.
Audio: Se define para su uso como dispositivo
Manos
libres:
Ambos:
ALPINE X902D/X802D-U/INE-W710D/i902D/iLX-702D 68-34732Z07-A (ES)
de audio.
Se define para su uso como dispositivo
manos libres.
Se define para su uso como dispositivo
de audio y como dispositivo manos libres.
Si pulsa la zona de información de la llamada
durante una llamada, se cambia a la pantalla de
funcionamiento del teléfono. Use esta pantalla para
ajustar el volumen de voz, etc.
Colgar el teléfono
1 Toque [ ] (Colgar).
La llamada finaliza.
RU
PL
13-ES
Page 70

a
s
ó
o
a
c
ó
r
m
s
p
a
t
n
e
a
Funciones de mapas (X902D/X802D-U/INE-W710D solo)
Me
A continuación puede ver una descripción general de los distintos iconos y botones que aparecen en la pantalla
del mapa. Para obtener información más detallada sobre esta pantalla, consulte el Manual de operación.
Siguiente calle
Vistas en 2D/dirección norte
Previsualización del siguiente
Advertencia de límite de
Campos de datos
Señalización de advertencia
giro
velocidad
Información del carril
2D/3D
Tráfico
Zoom
Información adicional
Servicios de autopistas
Menú de destino
Acceso al menú
] o deslice hacia la
Toque [
izquierda.
Para acc
izquierd
Ruta multi
Permite cre
También pu
posición ac
Nueva rut
Seleccione
una direcci
bien selecci
ubicación g
guardada. T
destinos re
Si está cone
usar la opci
para facilita
destino.
Acceso al
Toque o de
Nombre de la calle
14-ES
ALPINE X902D/X802D-U/INE-W710D/i902D/iLX-702D 68-34732Z07-A (ES)
Aparcamiento cerca del
destino
Información adicional
Page 71

Menú de navegación (X902D/X802D-U/INE-W710D solo)
antalla
n norte
al
tas
Para acceder al menú de navegación, toque [ ] en el borde derecho de la pantalla del mapa o deslice hacia la
izquierda. Otra opción es pulsar el botón .
Ruta multipunto
Permite crear una ruta desde uno o varios puntos de la ruta.
También puede planificar una ruta sin tener en cuenta la
posición actual del GPS si configura un nuevo punto de inicio.
Nueva ruta
Seleccione su destino introduciendo
una dirección o sus coordenadas, o
bien seleccionando un lugar, una
ubicación guardada o una ruta
guardada. También puede buscar sus
destinos recientes en el historial.
Si está conectado a Internet, puede
usar la opción de búsqueda en línea
para facilitar la localización de su
destino.
Acceso al mapa
Toque o deslice hacia la derecha.
Informaciones
Permite acceder a opciones
adicionales para comprobar la
información relacionada con la
navegación.
Setup
Permite personalizar el modo en
que funciona el software de
navegación.
EN
DE
FR
ES
IT
SE
del
al
NL
RU
PL
15-ES
ALPINE X902D/X802D-U/INE-W710D/i902D/iLX-702D 68-34732Z07-A (ES)
Page 72

e
N
e
D
e
e
N
s
d
d
e
e
N
s
d
N
s
d
N
s
s
d
e
N
d
m
S
e
d
a
á
e
u
f
N
e
e
N
d
Establecer un destino (X902D/X802D-U/INE-W710D solo)
El siguiente ejemplo describe cómo buscar un destino al elegir [Ciudad/Código postal] en [Dirección].
• Puede buscar y acotar por país/provincia si comienza por [País/Provincia].
Esp
SECCIÓ
Tamaño d
1 Toque [Nueva ruta] en el menú de
navegación.
2 Toque [Dirección].
3 Toque [Ciudad/Código postal].
4 Introduzca el nombre del municipio o el
código postal.
• Toque para visualizar la lista de opciones.
5 Introduzca el nombre de la calle que desee.
• Toque para visualizar la lista de opciones.
6 Introduzca el número de la calle o la calle
con la que cruza.
Se calcula la ruta y aparece un mapa con la ruta
completa. En este mapa puede consultar la
información de la ruta y otras rutas alternativas.
7 Toque [More] para modificar los
parámetros de la ruta, o bien toque [Iniciar
navegación] para comenzar el viaje.
Tipo de L
Sistema de
Número d
la imagen
Número ef
Sist
ema de
SECCIÓ
Rango de
Sensibilida
Umbral de
Selectivida
Relación d
Separación
Relación d
SECCIÓ
Rango de
Sensibilida
SECCIÓ
Rango de
Sensibilida
SECCIÓ
Rango de
Rango de
Sensibilida
Relación d
Separación
SECCIÓ
Requisitos
Consumo
Clase de U
Sistema de
Número d
Respuesta
Distorsión
Rango din
Relación d
Separación
1 La resp
de codi
SECCIÓ
Formato d
Formato d
C
16-ES
ALPINE X902D/X802D-U/INE-W710D/i902D/iLX-702D 68-34732Z07-A (ES)
SECCIÓ
Frecuencia
Sensibilida
Page 73

Especificaciones
Manual de operación Especificaciones
[Iniciar
SECCIÓN DEL MONITOR
Tamaño de la pantalla 9” (X902D/i902D)
Tipo de LCD LCD TN de tipo transparente
Sistema de funcionamiento Matriz activa TFT
Número de elementos de 1.152.000 pcs.
la imagen (800 × 480 × 3 (RGB))
Número efectivo de elementos de la imagen
Sistema de iluminación LED
8” (X802D-U)
7” (INE-W710D/iLX-702D)
99% o más
SECCIÓN DEL SINTONIZADOR FM
Rango de sintonización 87,5 – 108,0 MHz
Sensibilidad útil en mono 8,1 dBf (0,7 µV/75 ohmios)
Umbral de sensibilidad 50 dB 12 dBf (1,1 µV/75 ohmios)
Selectividad de canal alternativo
Relación de señal/ruido 65 dB
Separación estéreo 35 dB
Relación de captura 2,0 dB
80 dB
SECCIÓN DEL SINTONIZADOR MW
Rango de sintonización 531 – 1.602 kHz
Sensibilidad útil 25,1 V/28 dBf
SECCIÓN DEL SINTONIZADOR LW
Rango de sintonización 153 – 281 kHz
Sensibilidad (Norma IEC) 31,6 V/30 dBf
SECCIÓN DAB
Rango de sintonía BAND III 174,93 – 239,2 MHz
Rango de sintonía L-BAND 1.452,96 – 1.490,6 MHz
Sensibilidad útil -103 dBm
Relación de señal/ruido 95 dB
Separación estéreo 85 dB
SECCIÓN USB
Requisitos de USB USB 2.0
Consumo máx. energía 1.500 mA (Soporte CDP)
Clase de USB USB (Mass Storage Class)
Sistema de archivos FAT16/32
Número de canales 2 canales (estéreo)
Respuesta de frecuencia
Distorsión armónica total 0,008% (a 1 kHz)
Rango dinámico 95 dB (a 1 kHz)
Relación de señal/ruido 100 dB
Separación de canales 85 dB (a 1 kHz)
1 La respuesta de frecuencia puede variar en función del software
de codificación o la velocidad de bits.
1
5 – 20.000 Hz (±1 dB)
SECCIÓN Bluetooth
Especificación de Bluetooth
Rango de frecuencia
Potencia de salida
Perfil
Bluetooth v3,0
2.402 – 2.480 MHz
+4 dBm máx. (Tipo de potencia 2)
HFP (Hands-Free Profile)
OPP (Object Push Profile)
PBAP (Phone Book Access Profile)
A2DP (Advanced Audio
Distribution Profile)
AVRCP (Audio/Video Remote
Control Profile)
SPP (Serial Port Profile)
GENERAL
Alimentación
Temperatura de funcionamiento
Salida de potencia máxima 50 W × 4
Nivel de salida de audio
Salida previa (delantera, trasera):
Salida previa (subwoofer): 2 V/10 kohmios (máx.)
Peso 1,54 kg (X802D-U)
14,4 V CC
(11 – 16 V margen permisible)
de -20 °C a +60 °C
2 V/10 kohmios (máx.)
1,41 kg (INE-W710D/iLX-702D)
TAMAÑO DEL CHASIS
Anchura 198 mm (X802D-U)
Altura 125 mm (X802D-U)
Profundidad 147 mm
178 mm (INE-W710D/iLX-702D)
100 mm (INE-W710D/iLX-702D)
TAMAÑO CUERPO DELANTERO
Anchura 191 mm (X802D-U)
Altura 121 mm (X802D-U)
Profundidad 19 mm
171 mm (INE-W710D/iLX-702D)
96 mm (INE-W710D/iLX-702D)
• X902D/i902D está diseñado exclusivamente para un
modelo concreto de coche.
• Debido a la mejora continua del producto, las
especificaciones y el diseño están sujetos a cambios sin
previo aviso.
• El panel LCD se fabrica utilizando una tecnología de
fabricación de una precisión extremadamente alta. Su
ratio de píxel efectivo es superior al 99,99%. Ello significa
que existe una posibilidad de que el 0,01% de los píxeles
estén siempre ENCENDIDOS o APAGADOS.
EN
DE
FR
ES
IT
SE
NL
RU
PL
SECCIÓN HDMI
Formato de entrada 720p/480p/480i/VGA
Formato de salida 480p
SECCIÓN GPS
Frecuencia de recepción GPS 1.575,42 ±1 MHz
Sensibilidad de recepción GPS -130 dB max.
ALPINE X902D/X802D-U/INE-W710D/i902D/iLX-702D 68-34732Z07-A (ES)
17-ES
Page 74

• Windows Media y el logotipo de Windows son marcas
comerciales o marcas registradas de Microsoft
Corporation en Estados Unidos y/o en otros países.
• Apple, iPhone, iPod e iPod touch son marcas
comerciales de Apple Inc., registradas en Estados
Unidos y en otros países. Apple CarPlay es una marca
comercial de Apple Inc.
• El uso del logotipo de Apple CarPlay significa que la
interfaz de usuario del vehículo cumple las normas de
funcionamiento de Apple. Apple no se hace
responsable del funcionamiento de este vehículo o
cumplimiento con los requisitos normativos y de
seguridad. Tenga en cuenta que el uso de este
producto con un iPhone o iPod puede afectar el
rendimiento inalámbrico.
• “Made for iPod” y “Made for iPhone” significa que un
dispositivo electrónico se ha diseñado pensando
específicamente en su conexión a un iPod o a un
iPhone, respectivamente, y que el fabricante garantiza
su conformidad con los requisitos de rendimiento de
Apple. Apple no se responsabiliza del funcionamiento
de este dispositivo ni de su cumplimiento de las
normas de seguridad y reglamentarias. Tenga en
cuenta que el uso de este accesorio con un iPod o un
iPhone puede afectar el rendimiento inalámbrico.
• Android es una marca comercial de Google Inc.
• El robot de Android es una reproducción o una
modificación de la obra creada y compartida por
Google y se utiliza de acuerdo con las condiciones
descritas en la licencia de distribución de Creative
Commons 3.0.
• SPOTIFY y el logotipo de Spotify están entre las marcas
comerciales registradas de Spotify AB.
• La marca y los logotipos de Bluetooth® son marcas
comerciales registradas propiedad de Bluetooth SIG,
Inc. y cualquier uso que de ellos hace Alpine
Electronics, Inc. siempre es bajo licencia.
• Los términos HDMI y HDMI High-Definition Multimedia
Interface, así como el logotipo de HDMI son marcas
comerciales o marcas comerciales registradas de HDMI
Licensing, LLC en Estados Unidos y en otros países.
• Tecnología de codificación de audio MPEG Layer-3 con
licencia de Fraunhofer IIS y Thomson. El suministro de
este producto solo cubre la licencia para uso privado y
no comercial, y no implica una licencia ni ningún
derecho de uso de este producto en ninguna difusión
comercial (es decir, que genere ingresos) en tiempo
real (terrestre, por satélite, por cable y/u otros medios),
la difusión/reproducción mediante Internet, intranets
y/u otras redes o mediante otros sistemas de
distribución de contenido electrónico, como
aplicaciones de audio de pago o audio bajo demanda.
Es necesaria una licencia independiente para dicho
uso. Para obtener más información, vaya a
http://www.mp3licensing.com
• ©2006-2016 TomTom. All rights reserved. This material
is proprietary and the subject of copyright protection,
database right protection and other intellectual
property rights owned by TomTom or its suppliers. The
use of this material is subject to the terms of a license
agreement. Any unauthorized copying or disclosure of
this material will lead to criminal and civil liabilities.
About the Rules of Bluetooth Electromagnetic
Radiation Regulation
Declaration of Conformity
18-ES
ALPINE X902D/X802D-U/INE-W710D/i902D/iLX-702D 68-34732Z07-A (ES)
Page 75

Sommario
AVVERTENZA..........................................................................................................................................................2
ATTENZIONE ..........................................................................................................................................................3
Informazioni preliminare ...................................................................................................................................4
Funzione Preferiti ................................................................................................................................................. 6
Registrazione di funzioni ................................................................................................................................... 6
Android Auto (opzionale)..................................................................................................................................7
Apple CarPlay (opzionale) .................................................................................................................................7
Alpine Connect App (opzionale) (solo X902D/X802D-U/INE-W710D) .............................................7
Funzionamento della Radio/RDS ...................................................................................................................8
Funzionamento di DAB/DAB+/DMB .............................................................................................................9
Utilizzo di un’unità Flash USB (opzionale) .................................................................................................10
Utilizzo del dispositivo HDMI (lettore DVD) (opzionale) ......................................................................11
Funzionamento con iPod/iPhone (opzionale) .........................................................................................12
Controllo del telefono in vivavoce ...............................................................................................................13
Funzioni di mappa (solo X902D/X802D-U/INE-W710D) ......................................................................14
Menu Navigazione (solo X902D/X802D-U/INE-W710D) ......................................................................15
Impostazione di una destinazione (solo X902D/X802D-U/INE-W710D) ........................................16
Specifiche ..............................................................................................................................................................17
IMPORTANTE
Riportare il numero di serie dell’unità nello spazio sottostante e conservarlo come riferimento per il
futuro.
NUMERO DI SERIE:
NUMERO DI SERIE ISO: AL
DATA DI INSTALLAZIONE:
TECNICO DI INSTALLAZIONE:
LUOGO DI ACQUISTO:
EN
DE
FR
ES
IT
SE
NL
RU
Per informazioni dettagliate su tutte le funzioni, consultare le Istruzioni per l’uso disponibili sul
CD-ROM in dotazione (è un CD di dati e quindi non può essere utilizzato per riprodurre musica e
immagini sul lettore). Se necessario, un concessionario ALPINE sarà in grado di fornire una copia
cartacea delle Istruzioni per l’uso contenute sul CD-ROM.
ALPINE X902D/X802D-U/INE-W710D/i902D/iLX-702D 68-34732Z07-A (IT)
PL
1-IT
Page 76

AVVERTENZA
A
a
M
n
r
A
A
n
v
n
R
d
i
e
r
e
R
c
p
n
b
A
S
n
a
u
AVVERTENZA
Questo simbolo indica istruzioni importanti. Se
vengono ignorate, possono verificarsi lesioni
gravi o mortali.
INSTALLARE IL PRODOTTO CORRETTAMENTE IN MODO CHE
IL CONDUCENTE NON POSSA GUARDARE LA TV SE NON
DOPO AVERE ARRESTATO IL VEICOLO E TIRATO IL FRENO A
MANO.
Durante la guida, osservare la TV è pericoloso; il conducente potrebbe
distrarsi e causare incidenti. Se il prodotto non viene installato
correttamente, il conducente sarà in grado di guardare la TV durante la
guida aumentando così il rischio di danni alla propria persona o a terzi.
DURANTE LA GUIDA EVITARE DI GUARDARE A LUNGO IL
VIDEO.
Ciò potrebbe distogliere l’attenzione del conducente dalla guida e
causare incidenti.
NON EFFETTUARE ALCUNA OPERAZIONE CHE POSSA
DISTOGLIERE L’ATTENZIONE DALLA GUIDA DEL VEICOLO.
Qualsiasi operazione che necessita di attenzione prolungata deve essere
effettuata solo dopo il completo arresto del veicolo. Arrestare sempre il
veicolo in un luogo sicuro prima di effettuare queste operazioni. In caso
contrario si potrebbero causare incidenti.
NON SEGUIRE I SUGGERIMENTI DEL SISTEMA DI
NAVIGAZIONE SE CONSIGLIANO MANOVRE ILLEGALI O
RISCHIOSE, SE METTONO IN UNA SITUAZIONE RISCHIOSA O
SE CONDUCONO IN ZONE PERICOLOSE.
Questo prodotto non rappresenta un sostitutivo del giudizio del
conducente. Qualsiasi suggerimento del presente sistema non deve mai
infrangere le normative stradali vigenti o avere la priorità rispetto al
giudizio del conducente o alla conoscenza delle norme per una guida
sicura.
TENERE IL VOLUME AD UN LIVELLO CHE PERMETTA DI UDIRE
I RUMORI ESTERNI DURANTE LA GUIDA.
Livelli eccessivi di volume, in grado di coprire suoni quali le sirene dei
mezzi di soccorso o segnali stradali di attenzione (ad esempio, passaggi a
livello, ecc.), possono essere pericolosi e provocare incidenti. INOLTRE,
L’ASCOLTO DI AUDIO AD ALTO VOLUME IN AUTO PUÒ
PROVOCARE DANNI ALL’UDITO.
DURANTE LA GUIDA EVITARE DI GUARDARE A LUNGO IL
MONITOR.
Ciò potrebbe distogliere l’attenzione del conducente dalla guida e
causare incidenti.
NON SMONTARE O MODIFICARE.
Tale azione potrebbe causare incidenti, incendi o scosse elettriche.
UTILIZZARE SOLO IN VEICOLI CON TERRA NEGATIVA A 12
VOLT.
(se non si è sicuri, controllare con il proprio rivenditore.) Diversamente
si potrebbero causare incendi o altri danni.
TENERE LE PARTI PICCOLE QUALI VITI FUORI DALLA
PORTATA DEI BAMBINI.
Se ingeriti potrebbero causare gravi danni. In caso di ingerimento,
consultare immediatamente un medico.
2-IT
USARE FUSIBILI DI RICAMBIO DELL’AMPERAGGIO
CORRETTO.
Altrimenti potrebbero derivarne incendi o scosse elettriche.
NON BLOCCARE LE FESSURE O I PANNELLI DI IRRADIAZIONE.
Bloccandoli si potrebbe causare un surriscaldamento interno
dell’apparecchio che potrebbe dare luogo a incendi.
UTILIZZARE IL PRODOTTO IN VEICOLI CON BATTERIA DA 12 V.
Un utilizzo diverso da quello indicato potrebbe causare incendi, scosse
elettriche o altri incidenti.
ESEGUIRE CORRETTAMENTE I COLLEGAMENTI.
Altrimenti ne potrebbero derivarne incendi o danni al prodotto.
PRIMA DI ESEGUIRE I COLLEGAMENTI, SCOLLEGARE IL CAVO
DEL TERMINALE NEGATIVO DELLA BATTERIA.
Altrimenti potrebbero derivare scosse elettriche o altre lesioni dovute a
cortocircuiti.
EVITARE CHE I CAVI SI IMPIGLINO AGLI OGGETTI
CIRCOSTANTI.
Effettuare i collegamenti seguendo le istruzioni in modo che i cavi non
interferiscano con la guida. I cavi o i fili che interferiscono o si
impigliano in parti quali lo sterzo, la leva del cambio, i pedali, ecc.
potrebbero essere pericolosi.
NON UTILIZZARE I CAVI PER EFFETTUARE ALTRI
COLLEGAMENTI.
Non eliminare mai le parti isolanti dei cavi per alimentare altri
apparecchi. Diversamente la capacità di trasporto di corrente del cavo in
questione viene superata causando incendi o scosse elettriche.
NELL’EFFETTUARE I FORI, NON DANNEGGIARE I TUBI O I
CAVI.
Nell’effettuare i fori nel telaio per l’installazione, fare attenzione a non
entrare in contatto, danneggiare o ostruire i tubi, i condotti della
benzina, i serbatoi o i cavi elettrici. La non osservanza di queste
precauzioni potrebbe causare incendi.
PER ESEGUIRE I COLLEGAMENTI DI TERRA, NON UTILIZZARE
BULLONI O DADI DEI SISTEMI DI FRENATA O DI STERZO.
Non utilizzare MAI bulloni o dadi dei sistemi di frenata e di sterzo (o di
qualsiasi altro sistema di sicurezza), o dei serbatoi per eseguire
l’installazione o per i collegamenti di terra. L’utilizzo di queste parti
potrebbe inibire il controllo del veicolo e causare incendi o altro.
NON INSTALLARE IN LUOGHI CHE POTREBBERO INTERFERIRE
CON LE OPERAZIONI DI GUIDA QUALI LO STERZO O LA LEVA
DEL CAMBIO.
Diversamente si potrebbe ostruire la visuale della strada o interferire con
i movimenti del conducente e causare gravi incidenti.
Questo
mancat
lesioni
INTERRO
PROBLEM
Diversame
riparazioni,
vicino cent
I COLLEG
EFFETTU
I collegame
tecniche ed
sempre il ri
eseguire l’i
UTILIZZA
INSTALLA
Assicurarsi
component
determinar
non rimane
funzionam
SISTEMA
COMPRES
Per evitare
lontano da
aguzze. Se i
utilizzare u
tagliato dal
NON INST
POLVERO
Evitare di i
polverosi. L
potrebbe ca
• I segue
titolo d
ALPINE X902D/X802D-U/INE-W710D/i902D/iLX-702D 68-34732Z07-A (IT)
Page 77

IAZIONE.
DA 12 V.
di, scosse
to.
IL CAVO
i dovute a
cavi non
i
ecc.
i
del cavo in
.
I O I
e a non
lla
te
LIZZARE
ZO.
terzo (o di
e
parti
ro.
ERFERIRE
LA LEVA
erferire con
ATTENZIONE
Questo simbolo indica istruzioni importanti. La
mancata osservanza di tali istruzioni può causare
lesioni alle persone o danni agli oggetti.
INTERROMPERE IMMEDIATAMENTE L’USO IN CASO DI
PROBLEMI.
Diversamente si potrebbero causare danni alla persona o al prodotto. Per
riparazioni, rivolgersi ad un rivenditore autorizzato Alpine o al più
vicino centro di assistenza Alpine.
I COLLEGAMENTI E L’INSTALLAZIONE DEVONO ESSERE
EFFETTUATI DA PERSONALE QUALIFICATO.
I collegamenti e l’installazione dell’apparecchio richiedono conoscenze
tecniche ed esperienza particolari. Per ragioni di sicurezza, contattare
sempre il rivenditore presso il quale è stato acquistato il prodotto per
eseguire l’installazione.
UTILIZZARE LE PARTI ACCESSORIE SPECIFICATE E
INSTALLARLE IN MODO CORRETTO.
Assicurarsi di utilizzare solo parti accessorie specificate. L’utilizzo di altri
componenti potrebbe danneggiare l’apparecchio all’interno o
determinare in un’installazione non corretta. I componenti potrebbero
non rimanere collegati in modo saldo e provocare problemi di
funzionamento o pericoli.
SISTEMARE I CAVI IN MODO CHE NON VENGANO PIEGATI O
COMPRESSI DA PARTI METALLICHE TAGLIENTI.
Per evitare che vengano danneggiati o piegati, sistemare i cavi e i fili
lontano da parti mobili (quali le guide dei sedili) o da parti taglienti o
aguzze. Se i cavi vengono fatti passare attraverso un foro metallico,
utilizzare un anello di gomma per evitare che l’isolante dei cavi venga
tagliato dal bordo metallico del foro.
NON INSTALLARE IN LUOGHI ECCESSIVAMENTE UMIDI O
POLVEROSI.
Evitare di installare l’apparecchio in luoghi eccessivamente umidi o
polverosi. La presenza di umidità o polvere all’interno del prodotto
potrebbe causare problemi di funzionamento.
EN
DE
FR
ES
IT
SE
NL
RU
PL
• I seguenti esempi di schermate di X902D/X802D-U/INE-W710D usati in questo manuale sono esclusivamente a
titolo di riferimento. Possono essere differenti dalle schermate effettive.
ALPINE X902D/X802D-U/INE-W710D/i902D/iLX-702D 68-34732Z07-A (IT)
3-IT
Page 78

Istruzioni per l’uso Informazioni preliminare
s
o
i
n
g
a
e
a
a
m
m
u
d
m
d
o
Informazioni preliminare
Posizione dei comandi
La configurazione dello schermo utilizzata nel Istruzioni per l’uso potrebbe essere diversa da quella dello schermo
effettivo.
Per X902D/i902D
Per X802D-U/INE-W710D/iLX-702D
Accen
1 P
Il s
2 Te
Passa
Per pass
della sch
Scherm
Consente
Setup au
Intratteni
Scher
(USB A
4-IT
Tasto o VOICE
A seconda dello smartphone collegato, premerlo per
richiamare la funzione Siri o la modalità di
riconoscimento vocale.
Tasto (MUTE)
Premere per attivare/disattivare l’audio.
Tasto (AUDIO)/(Preferiti)
Consente di visualizzare la schermata Audio/Video. Se
la schermata Audio/Video è già visualizzata, consente
di cambiare la sorgente.
Tenerlo premuto per almeno 2 secondi per richiamare
la schermata Preferiti.
Tasto / o / (SU/GIÙ)
Premere per regolare il volume.
Interruttore RESET
Consente di resettare il sistema dell’unità.
Tasto (PHONE) (solo X902D/i902D)
Consente di richiamare la schermata del menu del
telefono.
Premere per avviare una conversazione in caso di
chiamata in arrivo.
Tasto MENU/(Spegnimento)
Consente di visualizzare la schermata Menu.
Tenere premuto questo pulsante per almeno 5 secondi
per spegnere l’unità.
Tasto (NAV)
Per X902D/X802D-U/INE-W710D:
Consente di visualizzare la schermata con la mappa di
navigazione.
Premere di nuovo per passare alla schermata del menu
Navigazione.
Tenere premuto questo pulsante per almeno 2 secondi
per passare alla schermata per percorso Torna a casa
(se non è ancora stato impostato un indirizzo Casa,
verrà visualizzata la schermata di impostazione Casa).
Per informazioni dettagliate sulle operazioni di
navigazione, consultare “Sistema di navigazione OM”
disponibile sul CD-ROM.
Per i902D/iLX-702D:
Richiama la schermata della mappa dello smartphone
collegato.A seconda dello smartphone, questa
funzione potrebbe non essere disponibile.
Tasto /
Pulse este botón para buscar ascendentemente o
descendentemente una emisora en el modo de radio o
para avanzar o retroceder una pista, un capítulo, etc.,
en otras fuentes de audio/visuales.
Sensore infrarosso
Puntare il trasmettitore del telecomando verso il
sensore remoto da una distanza inferiore a 2 metri.
Microfono (solo X802D-U/INE-W710D/iLX-702D)
Usato per le modalità Vivavoce o Comando vocale.
ALPINE X902D/X802D-U/INE-W710D/i902D/iLX-702D 68-34732Z07-A (IT)
Scherm
o della
La mo
della s
Page 79

re
chermo
Accensione e spegnimento (On/Off)
1 Portare la chiavetta di avviamento in posizione ACC o ON.
Il sistema si attiva.
2 Tenere premuto il tasto MENU per almeno 5 secondi per spegnere l’unità.
appa di
2 secondi
a casa
Casa,
e Casa).
i
e OM”
rtphone
a
Passaggio dalla schermata Sorgenti audio a una schermata specifica
Per passare dalla schermata Sorgenti audio a una schermata specifica, toccare l’icona su uno dei quattro bordi
della schermata oppure trascinarla in senso verticale o orizzontale.
Schermata Impostazione collegamenti
Consente di impostare le opzioni di
Setup audio o il sistema
Intrattenimento Sedili Posteriori.
Schermata Sorgenti audio
(USB Audio)
Schermata dei pulsanti di preselezione
o della modalità Ricerca Rapida*
Schermata doppia (solo X902D/
X802D-U/INE-W710D)
Nella schermata doppia è possibile
passare da una schermata all’altra.
Schermata Menu
EN
DE
FR
ES
IT
SE
NL
RU
PL
te o
lo, etc.,
il
etri.
-702D)
cale.
La schermata Menu consente di
configurare le impostazioni.
La modalità Ricerca varia a seconda della sorgente audio. Per informazioni dettagliate consultare le istruzioni per l’uso
della sorgente audio.
ALPINE X902D/X802D-U/INE-W710D/i902D/iLX-702D 68-34732Z07-A (IT)
5-IT
Page 80

Istruzioni per l’uso Funzione Preferiti
d
A
c
a
l
e
e
e
P
C
p
a
h
m
m
e
d
r
i
o
q
)
o
e
e
e
e
Funzione Preferiti
L’unità consente di richiamare con facilità le funzioni utilizzate più spesso, come la sorgente Audio, la funzione di
ricerca per la navigazione ecc., registrando tali voci nella schermata Preferiti. Ciascuna di queste funzioni può
essere richiamata in modo rapido e semplice.
1 Tenere premuto il tasto /(Preferiti) per
almeno 2 secondi.
Viene visualizzata la schermata Preferiti.
Esempio di schermata Preferiti
Per visualizzare la schermata Modifica, che
consente di registrare funzioni o modificare i
nomi.
Funzione registrata nei Preferiti
Indicatore della posizione della schermata
Preferiti visualizzata al momento.
Per passare da una pagina all’altra è sufficiente scorrere
verso sinistra o destra. È possibile aggiungere fino a un
massimo di 6 pagine.
Istruzioni per l’uso Registrazione di funzioni
Registrazione di funzioni
1 Toccare [ ] (Modifica).
Nell’area superiore sinistra dell’icona di registrazione
viene visualizzato un segno di spunta e viene
visualizzata la modalità Modifica.
4 Scegliere la funzione da aggiungere.
Per informazioni dettagliate fare riferimento a
“Modica della schermata Preferiti” nelle Istruzioni
per l’uso.
• È possibile aggiungere un massimo di 54 voci.
• Non è possibile registrare una voce più di una
volta.
5 Dopo avere completato le modifiche
toccare [ ] (Indietro).
An
Android
Maps, as
Scarica l
Collega i
1 Pr
Vi
2 To
Vi
•
Ap
Apple C
le cose c
ottenere
che per
Per infor
Premer
Utilizzan
Per cont
Alp
Scaricare
Alpine C
maggiori
Prima di
(Android
1 La
(
2 Toccare [ ] (Aggiungi).
Vengono visualizzate le funzioni da aggiungere
(categorie).
3 Toccare la funzione da aggiungere
(categoria).
6-IT
ALPINE X902D/X802D-U/INE-W710D/i902D/iLX-702D 68-34732Z07-A (IT)
6 Dopo che è stato visualizzato il messaggio
di conferma toccare [OK].
7 Le modifiche sono state completate e viene
visualizzata la schermata Preferiti.
• Se si tocca [ ] (Cancella) mentre si eseguono le
modifiche, viene nuovamente visualizzata la precedente
schermata Modifica dei Preferiti.
2 C
3 Pr
Vi
4 To
Vi
5 Se
Vi
Page 81

uò
e
feriti
re i
Istruzioni per l’uso Android Auto (opzionale)
Android Auto (opzionale)
Android Auto è progettato per semplificare l’uso delle app dal telefono durante la guida. Naviga con Google
Maps, ascolta le playlist o i podcast dalle tue app preferite e molto altro.
Scarica la App Android Auto dallo store Google Play prima di continuare.
Collega il tuo telefono compatibile con Android per iniziare a usare Android Auto.
1 Premere il tasto MENU.
Viene visualizzata la schermata di menu.
EN
a
scorrere
fino a un
i funzioni
.
o a
voci.
i una
2 Toccare [Android Auto].
Viene visualizzata la schermata Android Auto.
• Per il funzionamento dettagliato di Android Auto, fare riferimento ad “Android Auto” nel Istruzioni per l’uso
(CD-ROM).
Istruzioni per l’uso Apple CarPlay (opzionale)
Apple CarPlay (opzionale)
Apple CarPlay è un modo intelligente e sicuro per utilizzare il proprio iPhone in un veicolo. Apple CarPlay prende
le cose che un utente desidera fare col proprio iPhone mentre si trova alla guida e le colloca sull’unità. È possibile
ottenere istruzioni stradali, effettuare chiamate, inviare e ricevere messaggi e ascoltare musica, in una modalità
che permette di restare concentrati sulla strada. Basta collegare il proprio iPhone all’unità e si è pronti.
Per informazioni dettagliate, fare riferimento al Istruzioni per l’uso (CD-ROM).
Premere o VOICE per attivare la funzione Siri dell’iPhone.
Utilizzando la funzione Siri dell’iPhone è possibile telefonare, ascoltare musica, ecc.
Per controllare Apple CarPlay è anche possibile utilizzare il touchscreen.
Istruzioni per l’uso Alpine Connect App (opzionale) (solo X902D/X802D-U/INE-W710D)
Alpine Connect App (opzionale) (solo X902D/X802D-U/INE-W710D)
Scaricare un’app che supporti Alpine Connect sul proprio smartphone, in modo da poterlo controllare dall’unità.
Alpine Connect App è scaricabile dall’App Store di Apple; gli utenti Android possono scaricarla da Google Play. Per
maggiori informazioni, consultare il rivenditore Alpine.
Prima di queste operazioni, impostare Impostazioni Connettività o Alpine Connect su USB (iPhone) o Bluetooth
(Android), a seconda dello smartphone collegato.
1 Lancio di Alpine Connect App.
DE
FR
ES
IT
SE
NL
RU
aggio
e viene
2 Collegare lo smartphone all’unità.
3 Premere il tasto MENU.
Viene visualizzata la schermata di menu.
4 Toccare [Alpine Connect].
Viene visualizzata la schermata di selezione Alpine Connect App.
5 Selezionare l’app desiderata.
Viene visualizzata la schermata dell’app selezionata.
ALPINE X902D/X802D-U/INE-W710D/i902D/iLX-702D 68-34732Z07-A (IT)
PL
7-IT
Page 82

r
a
n
e
m
d
t
P
a
z
z
c
o
e
P
n
Spotify®
Spotify è un servizio di distribuzione di musica in streaming non affiliato con Alpine. Ulteriori informazioni sono
disponibili all’indirizzo http://www.spotify.com.
L’applicazione Spotify è disponibile per telefoni iPhone e Android, visitare https://support.spotify.com/ per le
informazioni più recenti sulla compatibilità.
Per utilizzare Spotify mentre ci si trova alla guida, scaricare prima l’app Spotify sul proprio iPhone o dispositivo
Android. La si può scaricare sull’App Store iTunes o su Google Play™. Scegliere un account gratuito o Premium a
pagamento, o dalla app o sul sito spotify.com. Un account Premium mette a disposizioni maggiori funzioni, come
l’ascolto offline.
• Questo prodotto integra il software Spotify, soggetto a licenze di terzi consultabili qui:
www.spotify.com/connect/third-party-licenses.
• Per informazioni su paesi e regioni in cui è possibile utilizzare Spotify, consultare
https://www.spotify.com/us/select-your-country/.
Istruzioni per l’uso Radio/RDS
Fu
Pulsa
Tocca
Tocca
Sche
mod
Funzionamento della Radio/RDS
Pulsante di preselezione
Toccare brevemente per visualizzare le stazioni preselezionate.
Toccare per almeno 2 secondi per memorizzare la stazione corrente tra le stazioni preselezionate.
Schermata della modalità
Preselezione
Pulsante Ricerca PTY
Scorrere verso destra quando si
utilizza la schermata dell’elenco
PTY.
Per cambiare la modalità
di sintonizzazione
Frequenza radio d’ingresso
Per attivare/disattivare la
modalità PRIORITÀ NEWS
Per attivare/disattivare la
modalità Informazioni sul traffico
Pulsante della modalità Preselezione
Toccare o scorrere verso destra
quando si utilizza la schermata
della modalità Preselezione.
Indicatore RDS
Informazioni sul display
Per passare a frequenze più
alte
Per cambiare pulsante
Funzioni
Per passare a frequenze più
basse
Per modificare le informazioni
testuali
Per cambiare banda di
frequenza
Per memorizzare le stazioni
automaticamente
Per attivare/disattivare la
modalità AF
Pulsante d
Ricerca co
Scorrere ver
schermata
(È visualizza
Corrente o
Per cambi
di sintoniz
Per visuali
di selezion
Per modifi
informazi
Per attivar
modalità
A seco
8-IT
ALPINE X902D/X802D-U/INE-W710D/i902D/iLX-702D 68-34732Z07-A (IT)
Page 83

sono
le
tivo
ium a
i, come
S
o destra
ermata
ione.
lay
Istruzioni per l’uso DAB/DAB+/DMB
Funzionamento di DAB/DAB+/DMB
Pulsante di preselezione
Toccare brevemente per visualizzare il servizio preselezionato.
Toccare per almeno 2 secondi per memorizzare il servizio corrente tra le stazioni preselezionate.
Schermata della
modalità Preselezione
Pulsante della modalità
Ricerca completa
Scorrere verso destra quando si utilizza la
schermata dell’elenco Tutti i servizi.
(È visualizzato l’elenco Tutti i servizi,
Corrente o PTY)
Pulsante della modalità
Preselezione
Toccare o scorrere verso destra
quando si utilizza la schermata
della modalità Preselezione.
Indicatore DAB
Informazioni sul display
Per passare a frequenze più
alte
Per cambiare pulsante
Funzioni
Per passare a frequenze più
basse
Presentazione
Vengono visualizzate le
informazioni sul programma, le
foto degli artisti e gli annunci
pubblicitari sincronizzati con la
componente del servizio in corso
di ricezione.*
EN
DE
FR
ES
IT
nze più
te
nze più
rmazioni
di
tazioni
re la
Per cambiare la modalità
di sintonizzazione
Per visualizzare la schermata
di selezione del servizio
Per modificare le
informazioni testuali
Per attivare/disattivare la
modalità PRIORITÀ NEWS
A seconda della componente del servizio in corso di ricezione, potrebbero non essere visualizzate.
Per immettere la frequenza
direttamente
Per visualizzare la schermata
di selezione di PTY
Per passare dal servizio
primario al secondario e
viceversa
Per attivare/disattivare la
modalità Informazioni sul
traffico
SE
NL
RU
PL
9-IT
ALPINE X902D/X802D-U/INE-W710D/i902D/iLX-702D 68-34732Z07-A (IT)
Page 84

r
e
e
r
z
d
n
p
a
e
i
Istruzioni per l’uso Utilizzo di un’unità Flash USB (opzionale)
o
a
i
l
U
Utilizzo di un’unità Flash USB (opzionale)
Il lettore interno del sistema consente di riprodurre file musicali (MP3/WMA/AAC/FLAC) e file video (AVI/MKV/
MP4) memorizzati in una chiavetta USB.
Esempio di schermata principale USB Audio
Schermata della modalità
Ricerca rapida
Pulsante della modalità
Ricerca completa
Scorrere verso destra quando si
utilizza la schermata della
modalità Ricerca completa.
Per riavviare il file corrente/
Per passare al file precedente
se premuto entro 1 secondo/
Per riavvolgere il file se
toccare per almeno 1 secondo
Pulsante Ricerca rapida
Toccare o scorrere verso destra
per usare la modalità Ricerca
rapida.
N. canzone corrente/N. totale
canzoni
Informazioni sul display
Tempo trascorso
Per cambiare pulsante
Funzioni
Visualizzazione della grafica
Riproduzione ripetuta
Riproduzione causale
Per passare al brano
successivo/Per avanzare in
modo rapido se toccato per
almeno 1 secondo
Util
Se viene
Per riavvia
attuale/Pe
precedent
secondo/P
toccato pe
Pausa e Ri
Per interro
riproduzio
Selettore i
Per cambi
Per visuali
dei coman
Per attivar
i sottotitol
Schermata
per DVD
Pausa e Riproduzione
10-IT
ALPINE X902D/X802D-U/INE-W710D/i902D/iLX-702D 68-34732Z07-A (IT)
Se si c
impost
tasto v
dettag
ISTR
Page 85

zionale)
Istruzioni per l’uso DVD HDMI (opzione)
Utilizzo del dispositivo HDMI (lettore DVD) (opzionale)
KV/
ida
o destra
icerca
N. totale
lay
te
grafica
ta
e
are in
ato per
Se viene collegato un dispositivo DVE-5300 (lettore DVD) opzionale, è possibile controllarla dall’unità.
Per riavviare il capitolo
attuale/Per passare al capitolo
precedente se premuto entro 1
secondo/Per riavvolgere se
toccato per almeno 1
Per passare al capitolo
successivo/Per avanzare in
modo rapido se toccato per
almeno 1 secondo
Pausa e Riproduzione
Per interrompere la
riproduzione
Selettore ingresso HDMI *
Per cambiare angolatura
Per visualizzare la schermata
dei comandi da menu
Per attivare/disattivare
i sottotitoli
Schermata Impostazione
per DVD
Per visualizzare la schermata
Menu
Per visualizzare la schermata
Menu di primo livello
Per passare attivare/
disattivare le tracce audio
Riproduzione ripetuta
Per cambiare la modalità di
visualizzazione
EN
DE
FR
ES
IT
SE
Per modificare le informazioni
testuali
Se si collega un modulo selettore HDMI opzionale, è possibile collegare due dispositivi HDMI. Se il selettore HDMI è
impostato su “On” quando sono collegati due dispositivi HDMI, è visualizzato il tasto di selezione dell’ingresso HDMI. Il
tasto visualizzato differisce a seconda delle impostazioni e dell’ingresso HDMI attualmente selezionato. Per informazioni
dettagliate, fare riferimento a “Impostazione di HDMI” e “Attivazione/disattivazione del Selettore HDMI” nel
ISTRUZIONI PER L’USO (CD-ROM).
ALPINE X902D/X802D-U/INE-W710D/i902D/iLX-702D 68-34732Z07-A (IT)
NL
RU
PL
11-IT
Page 86

n
u
e
h
Z
a
p
h
V
c
s
e
v
t
Istruzioni per l’uso iPod/iPhone (opzionale)
Funzionamento con iPod/iPhone (opzionale)
A seconda del tipo di iPod/iPhone, è richiesto un cavo Lightning-USB (KCU-471i) venduto separatamente.
Modalità audio
Schermata della modalità
Ricerca rapida
Pulsante della modalità
Ricerca completa
Scorrere verso destra quando si
utilizza la schermata della
modalità Ricerca completa.
Per passare all’inizio del file
corrente/Per passare al file
precedente entro un secondo
dall’inizio della riproduzione/
Per tornare indietro in modo
rapido se viene toccato per
almeno 1 secondo
Pulsante Ricerca rapida
Toccare o scorrere verso destra
per usare la modalità Ricerca
rapida.
N. canzone corrente/N. totale
canzoni
Informazioni sul display
Tempo di riproduzione
Per cambiare pulsante
Funzioni
Pausa e Riproduzione
Visualizzazione della grafica
Riproduzione ripetuta
Riproduzione causale
Per passare all’inizio del file
successivo/Per avanzare in
modo rapido se viene toccato
per almeno 1 secondo
Co
L’unità p
Se si coll
Bluetoot
nella SE
Conne
comp
(acco
1 To
sc
2 To
•
3
To
Ricerca di un file musicale (modalità
2 Toccare il nome dell’artista di interesse.
Ricerca completa)
Per esempio: ricerca per Nome artista
1 Toccare [Artista] nella schermata della
modalità Ricerca completa.
Viene visualizzata la schermata di ricerca degli
album dell’artista selezionato.
Toccando [ ] vicino all’artista selezionato verranno
riprodotte tutte le canzoni di quell’artista.
3 Toccare il nome dell’album di interesse.
Vengono visualizzate tutte le canzoni comprese
nell’album selezionato.
Toccando [ ] vicino all’album selezionato verranno
riprodotte tutte le canzoni comprese in
quell’album.
4 Toccare il nome della canzone di interesse.
Viene riprodotta la canzone selezionata.
12-IT
ALPINE X902D/X802D-U/INE-W710D/i902D/iLX-702D 68-34732Z07-A (IT)
4 To
5 To
di
[
d
Au
Vi
En
Page 87

nale)
Istruzioni per l’uso Impostazione Bluetooth, Utilizzo di Bluetooth
Controllo del telefono in vivavoce
L’unità può collegare fino a due telefoni vivavoce.
Se si collegano due telefoni vivavoce all’unità, selezionare “Priorità Dispositivo Viva Voce” in “Impostazione di
Bluetooth” per impostare l’ordine di precedenza. Per informazioni dettagliate, fare riferimento al manuale d’uso
nella SEZIONE AUDIO VISIVA (CD-ROM).
ida
o destra
icerca
N. totale
lay
ne
te
e
grafica
ta
e
del file
are in
e toccato
o
sse.
gli
erranno
Connessione di un dispositivo
compatibile con Bluetooth
(accoppiamento)
1 Toccare il pulsante [Impostazioni] nella
schermata Menu.
Pulsante [Impostazioni]
2 Toccare [Bluetooth].
• Verificare che “Bluetooth” sia impostato su “On” ( ).
3
Toccare [Impostazioni Periferiche Bluetooth].
4 Toccare [ ] per cercare un nuovo
dispositivo.
6
Una volta completata la registrazione del
dispositivo, viene visualizzato un messaggio
e il dispositivo torna in modalità normale.
• È possibile registrare fino a 5 telefoni cellulare
compatibili con Bluetooth.
• La procedura di registrazione Bluetooth varia a seconda
della versione del dispositivo e di SSP (Simple Secure
Pairing). Se su questo dispositivo viene visualizzato un
codice a 4 o 6 caratteri, immettere il codice utilizzando il
dispositivo compatibile con Bluetooth.
Se su questo dispositivo viene visualizzato un codice a 6
caratteri, verificare che lo stesso codice sia visualizzato sul
dispositivo compatibile con Bluetooth, quindi toccare “Yes”.
Risposta a una chiamata
1 Se si riceve una chiamata, si attiva la
suoneria e viene visualizzata la schermata
Chiamata in Arrivo.
Schermata di notifica Chiamata in Arrivo
2 Toccare la schermata di notifica Chiamata
in Arrivo.
La chiamata ha inizio.
Riquadro Informazioni chiamata
EN
DE
FR
ES
IT
SE
NL
RU
PL
erranno
resse.
5 Toccare [ ] (Audio), [ ] (Vivavoce) o
[ ] (Entrambi) per il dispositivo che si
desidera connettere dall’elenco.
Audio: consente di utilizzare il dispositivo per
la riproduzione audio.
Vivavoce: consente di utilizzare il dispositivo per
chiamate in vivavoce.
Entrambi: consente di utilizzare il dispositivo sia
per la riproduzione audio sia per
chiamate in vivavoce.
ALPINE X902D/X802D-U/INE-W710D/i902D/iLX-702D 68-34732Z07-A (IT)
Toccare l’area delle informazioni della chiamata
durante una chiamata fa passare alla schermata
operativa del telefono. Usare questa schermata per
regolare il volume della voce, ecc.
Chiusura della chiamata
1 Toccare [ ] (Fine Chiamata).
La chiamata viene terminata.
13-IT
Page 88

c
o
o
e
i
r
n
c
d
r
d
n
d
i
Funzioni di mappa (solo X902D/X802D-U/INE-W710D)
Me
Di seguito è riportata una panoramica dei pulsanti e delle icone presenti nella schermata della mappa. Per
informazioni dettagliate su questa schermata consultare le Istruzioni per l’uso.
Prossima via
Anteprima delle prossima
Avvertenza di limite di
Segnale stradale di
svolta
velocità
Campi di dati
avvertenza
Informazioni sulle corsie
Viste 2D/2D Nord in alto/3D
Traffico
Zoom
Informazioni aggiuntive
Servizi autostradali
Menu Destinazione
Accesso al menu
] o scorrere verso
Toccare [
sinistra.
Per acce
verso sin
Percorso a
È possibile
deve comp
percorso in
impostare u
Nuovo per
Consente di
immettend
coordinate,
luogo, una l
percorso sal
cercare tra l
presenti nel
Se è dispon
Internet, pe
possibile uti
ricerca on-li
Accesso all
Toccare o s
Nome della via
14-IT
ALPINE X902D/X802D-U/INE-W710D/i902D/iLX-702D 68-34732Z07-A (IT)
Parcheggi in prossimità della
destinazione
Informazioni aggiuntive
Page 89

alto/3D
tive
Menu Navigazione (solo X902D/X802D-U/INE-W710D)
Per accedere al menu Navigazione toccare [ ] sul bordo destro della schermata della mappa oppure scorrere
verso sinistra. È possibile anche toccare il tasto .
Percorso a più tappe
È possibile definire il percorso sulla base di uno o più punti che
deve comprendere. Inoltre è possibile programmare un
percorso indipendente dalla posizione GPS attuale: è sufficiente
impostare un nuovo punto di partenza.
Nuovo percorso
Consente di selezionare la destinazione
immettendo un indirizzo o le relative
coordinate, oppure selezionando un
luogo, una località salvata o un
percorso salvato. Permette inoltre di
cercare tra le destinazioni recenti
presenti nella cronologia.
Se è disponibile una connessione
Internet, per trovare una destinazione è
possibile utilizzare anche l’opzione di
ricerca on-line.
Informazioni
Consente di accedere a opzioni
aggiuntive e di controllare
informazioni relative alla
navigazione.
Setup
Consente di personalizzare le
impostazioni delle funzioni del
software di navigazione.
EN
DE
FR
verso
ità della
tive
Accesso alla mappa
Toccare o scorrere verso destra.
ES
IT
SE
NL
RU
PL
ALPINE X902D/X802D-U/INE-W710D/i902D/iLX-702D 68-34732Z07-A (IT)
15-IT
Page 90

e
E
f
g
f
E
u
p
d
E
u
E
(
E
u
E
S
d
m
e
n
o
a
E
E
d
Impostazione di una destinazione (solo X902D/X802D-U/
INE-W710D)
Negli esempi che seguono è descritto come cercare una destinazione quando si seleziona [Città/CAP] in
[Indirizzo].
• È possibile restringere la ricerca partendo dal paese/regione selezionando [Paese/Regione].
1 Toccare [Nuovo percorso] nel menu
Navigazione.
7 Toccare [More] per modificare i parametri
del percorso o toccare [Avvia navigazione]
per iniziare il percorso.
2 Toccare [Indirizzo].
3 Toccare [Città/CAP].
4 Immettere il nome della città o il CAP.
• Toccare per visualizzare l’elenco dei
possibili risultati.
5 Immettere il nome della via di interesse.
Sp
SEZION
Dimension
Tipo LCD
Sistema di
Numero di
dell’imma
Numero ef
Sist
ema di
SEZION
Gamma di
Sensibilità
Sensibilità
Selettività
Rapporto s
Separazion
Rapporto
SEZION
Gamma di
Sensibilità
SEZION
Gamma di
Sensibilità
SEZION
Gamma di
Gamma di
Sensibilità
Rapporto s
Separazion
• Toccare per visualizzare l’elenco dei
possibili risultati.
6 Immettere il numero civico o la strada di
intersezione.
Viene calcolato il percorso e quindi viene
visualizzata una mappa con l’intero percorso. In
questa schermata è possibile controllare le
informazioni sul percorso e percorsi alternativi.
16-IT
ALPINE X902D/X802D-U/INE-W710D/i902D/iLX-702D 68-34732Z07-A (IT)
SEZION
Requisiti U
Consumo
Classe USB
File Syste
Numero di
Risposta in
Distorsion
Gamma di
Rapporto s
Separazion
1 La risp
codific
SEZION
Formato di
Formato in
SEZION
Frequenza
Sensibilità
Page 91

Specifiche
Istruzioni per l’uso Specifiche
metri
zione]
SEZIONE MONITOR
Dimensioni dello schermo 9” (X902D/i902D)
Tipo LCD TN LCD di tipo trasparente
Sistema di funzionamento TFT a matrice attiva
Numero di elementi 1.152.000 pcs.
dell’immagine (800 × 480 × 3 (RGB))
Numero effettivo di elementi dell’immagine
Sistema di illuminazione LED
8” (X802D-U)
7” (INE-W710D/iLX-702D)
99% o più
SEZIONE SINTONIZZATORE FM
Gamma di sintonizzazione 87,5 – 108,0 MHz
Sensibilità utile mono 8,1 dBf (0,7 µV/75 ohm)
Sensibilità per 50 dB 12 dBf (1,1 µV/75 ohm)
Selettività 80 dB
Rapporto segnale-rumore 65 dB
Separazione stereo 35 dB
Rapporto di cattura 2,0 dB
SEZIONE SINTONIZZATORE AM
Gamma di sintonizzazione 531 – 1.602 kHz
Sensibilità utile 25,1 V/28 dBf
SEZIONE SINTONIZZATORE LW
Gamma di sintonizzazione 153 – 281 kHz
Sensibilità (Standard IEC) 31,6 V/30 dBf
SEZIONE DAB
Gamma di sintonizzazione BAND III
Gamma di sintonizzazione L-BAND
Sensibilità utile -103 dBm
Rapporto segnale-rumore 95 dB
Separazione stereo 85 dB
174,93 – 239,2 MHz
1.452,96 – 1.490,6 MHz
SEZIONE USB
Requisiti USB USB 2.0
Consumo di corrente massimo 1.500 mA (supporto CDP)
Classe USB USB (Classe Archiviazione di Massa)
File System FAT16/32
Numero di canali 2 canali (Stereo)
Risposta in frequenza
Distorsione armonica totale 0,008% (a 1 kHz)
Gamma dinamica 95 dB (a 1 kHz)
Rapporto segnale-rumore 100 dB
Separazione tra canali 85 dB (a 1 kHz)
1 La risposta in frequenza può variare a seconda del software di
codifica/velocità in bit.
1
5 – 20.000 Hz (±1 dB)
SEZIONE Bluetooth
Specifica Bluetooth
Frequenza gamma
Potenza in uscita
Profilo
Bluetooth v3,0
2.402 – 2.480 MHz
+4 dBm max. (Classe di potenza 2)
HFP (Hands-Free Profile)
OPP (Object Push Profile)
PBAP (Phone Book Access Profile)
A2DP (Advanced Audio
Distribution Profile)
AVRCP (Audio/Video Remote
Control Profile)
erial Port Profile)
SPP (S
SPECIFICHE GENERALI
Requisiti di alimentazione
Temperatura di esercizio
Potenza massima in uscita
Livello di uscita audio
Preout (anteriore, posteriore):
Preout (subwoofer): 2V/10k ohm (max.)
Peso 1,54 kg (X802D-U)
14,4 V CC
(11–16 V consentiti)
Da -20 °C a + 60 °C
50 W × 4
2V/10k ohm (max.)
1,41 kg (INE-W710D/iLX-702D)
DIMENSIONI DEL TELAIO
Ampiezza 198 mm (X802D-U)
Altezza 125 mm (X802D-U)
Profondità 147 mm
178 mm (INE-W710D/iLX-702D)
100 mm (INE-W710D/iLX-702D)
DIMENSIONI DEL FRONTALINO
Ampiezza 191 mm (X802D-U)
Altezza 121 mm (X802D-U)
Profondità 19 mm
171 mm (INE-W710D/iLX-702D)
96 mm (INE-W710D/iLX-702D)
• X902D/i902D è dimensionato unicamente per un
determinato modello di auto.
• Dati i continui miglioramenti del prodotto, le specifiche e
il design possono cambiare senza previa notifica.
• Il pannello LCD viene fabbricato utilizzando una
tecnologia di fabbricazione costruzione ad altissima
precisione. Il rapporto di pixel effettivo è superiore a
99,99%: ciò significa che esiste una possibilità che lo
0,01% dei pixel sia sempre acceso o spento.
EN
DE
FR
ES
IT
SE
NL
RU
PL
SEZIONE HDMI
Formato di ingresso 720p/480p/480i/VGA
Formato in uscita 480p
SEZIONE GPS
Frequenza di ricezione GPS 1.575,42 ±1 MHz
Sensibilità di ricezione GPS -130 dB max.
ALPINE X902D/X802D-U/INE-W710D/i902D/iLX-702D 68-34732Z07-A (IT)
17-IT
Page 92

• Windows Media e il logo Windows logo sono marchi di
fabbrica o marchi registrati di Microsoft Corporation
negli Stati Uniti e/o in altri paesi.
• Apple, iPhone, iPod e iPod touch sono marchi di
fabbrica di Apple Inc., registrati negli Stati Uniti e in altri
paesi. Apple CarPlay è un marchio di fabbrica di Apple
Inc.
• L’utilizzo del logo Apple CarPlay indica che l’interfaccia
di un veicolo utente soddisfa gli standard di
prestazione Apple. Apple non è responsabile del
funzionamento del presente veicolo o della sua
conformità agli standard normativi e di sicurezza. Si
noti che l’uso di questo prodotto con un iPhone o iPod
potrebbe influire sulle prestazioni della rete wireless.
• “Made for iPod” e “Made for iPhone” significano che un
accessorio elettronico è stato specificamente
progettato per essere collegato, rispettivamente, a un
iPod o a un iPhone e la sua conformità agli standard di
prestazione Apple è stata certificata dallo sviluppatore.
Apple non è responsabile del funzionamento di questo
dispositivo e della sua conformità agli standard
normativi e di sicurezza. Si noti che l’uso di questo
accessorio con un iPod o iPhone potrebbe influire sulle
prestazioni wireless.
• Android è un marchio di fabbrica di Google Inc.
• Il dispositivo Android è realizzato o aggiornato
attraverso il lavoro creato e condiviso da Google e
utilizzato in base alle condizioni descritte nella Licenza
di attribuzione Creative Commons 3.0.
• SPOTIFY e il logo Spotify logo sono fra i marchi
registrati di Spotify AB.
• Il marchio Bluetooth® e i relativi loghi sono marchi
registrati di proprietà di Bluetooth SIG, Inc. e Alpine
Electronics, Inc. utilizza tali marchi su licenza.
• I termini HDMI, HDMI High-Definition Multimedia
Interface e il logo HDMI sono marchi di fabbrica o
marchi registrati di HDMI Licensing, LLC negli Stati Uniti
e in altri paesi.
• La tecnologia di codifica audio MPEG Layer-3 è
utilizzata su licenza di Fraunhofer IIS e Thomson. La
fornitura del presente prodotto concede una licenza
esclusivamente per uso privato e non commerciale e
non trasferisce alcuna licenza per l’uso del presente
prodotto, né comprende alcun diritto di utilizzarlo per
trasmissioni (terrestri, satellitari, via cavo e/o qualsiasi
altro mezzo) di tipo commerciale (ovvero con
generazione di profitti), trasmissioni/streaming tramite
Internet, intranet e/o altri tipi di rete, o per altri sistemi
di distribuzione di contenuti in formato elettronico,
quali applicazioni di pay-audio o audio-on-demand. Per
tali usi è richiesta una licenza autonoma. Per
informazioni dettagliate visitare il sito
http://www.mp3licensing.com
• ©2006-2016 TomTom. All rights reserved. This material
is proprietary and the subject of copyright protection,
database right protection and other intellectual
property rights owned by TomTom or its suppliers. The
use of this material is subject to the terms of a license
agreement. Any unauthorized copying or disclosure of
this material will lead to criminal and civil liabilities.
About the Rules of Bluetooth Electromagnetic
Radiation Regulation
18-IT
ALPINE X902D/X802D-U/INE-W710D/i902D/iLX-702D 68-34732Z07-A (IT)
Declaration of Conformity
Page 93

Innehåll
VARNING ..................................................................................................................................................................2
FÖRSIKTIGT .............................................................................................................................................................3
Komma igång ........................................................................................................................................................4
Funktionen Favorit ...............................................................................................................................................6
Registrera funktioner ..........................................................................................................................................6
Android Auto (tillval)...........................................................................................................................................7
Apple CarPlay (tillval) .......................................................................................................................................... 7
Alpine Connect-appen (tillval) (endast X902D/X802D-U/INE-W710D) ............................................7
Radio/RDS-användning .....................................................................................................................................8
DAB/DAB+/DMB-användning .........................................................................................................................9
Användning av USB-minne (tillval) ..............................................................................................................10
Användning av HDMI-enhet (DVD-spelare) (tillval)...............................................................................11
Användning av iPod/iPhone (tillval)............................................................................................................12
Styrning av handsfreetelefon ........................................................................................................................13
Kartfunktioner (endast X902D/X802D-U/INE-W710D) .........................................................................14
Navigeringsmeny (endast X902D/X802D-U/INE-W710D) ...................................................................15
Ställa in destination (endast X902D/X802D-U/INE-W710D)...............................................................16
Specifikationer ....................................................................................................................................................17
VIKTIGT
Skriv in enhetens serienummer i fältet nedan och ha det alltid tillgängligt som referens.
SERIENUMMER:
ISO SERIENUMMER: AL
INSTALLATIONSDATUM:
INSTALLATIONSTEKNIKER:
INKÖPSSTÄLLE:
Se bruksanvisningen som finns lagrad på medföljande CD-ROM för ytterligare information om
samtliga funktioner. (Eftersom det är en data-CD kan den inte användas för att spela musik eller
bilder i spelaren). Om så behövs ger en ALPINE-återförsäljare dig gärna en utskrift av den
bruksanvisning som finns lagrad på CD-ROM:en.
EN
DE
FR
ES
IT
SE
NL
RU
PL
ALPINE X902D/X802D-U/INE-W710D/i902D/iLX-702D 68-34732Z07-A (SE)
1-SE
Page 94

VARNING
F
r
å
G
k
a
N
i
h
d
A
Ö
e
a
s
L
A
m
r
n
o
A
M
a
VARNING
Den här symbolen innebär viktiga instruktioner.
Om inte dessa anvisningar följs kan det kan leda
till allvarliga olyckor som till och med kan få
dödlig utgång.
INSTALLERA PRODUKTEN KORREKT OCH SÅ ATT FÖRAREN
INTE KAN SE TV/VIDEO ANNAT ÄN DÅ FORDONET STÅR STILL
OCH PARKERINGSBROMSEN DRAGITS ÅT.
TV/Videovisning i ett fordon i drift innebär risker eftersom det kan
distrahera föraren och innebär därmed en olycksrisk. Om inte enheten
installerats korrekt finns möjlighet för föraren att se på TV/Video under
körning, vilket i värsta fall kan leda till en svår olycka.
KOMBINERA INTE VIDEOTITTANDE OCH BILKÖRNING.
Videovisning under körning kan distrahera föraren med olyckor som
följd.
UTFÖR ALDRIG NÅGON OPERATION SOM INNEBÄR ATT
UPPMÄRKSAMHETEN DRAS BORT FRÅN KÖRNINGEN.
Stanna alltid fordonet på en säker plats innan apparaten manövreras. I
annat fall kan olyckor lätt inträffa.
LÅT INTE NAVIGERINGS-SYSTEMETS INFORMATION OM
FÄRDVÄG FÖRLEDA TILL TRAFIKFARLIGA ELLER ILLEGALA
MANÖVRER ELLER ANNAT TRAFIKFARLIGT BETEENDE.
Låt inte den här produkten ersätta det egna omdömet. Låt aldrig de
föreslagna färdvägarna leda till något som bryter mot lokala
förordningar eller som talar mot den egna erfarenheten.
STÄLL IN LJUDVOLYMEN PÅ EN NIVÅ MED VILKEN DET
FORTFARANDE ÄR MÖJLIGT ATT HÖRA YTTRE LJUD UNDER
PÅGÅENDE KÖRNING.
För hög volym som döljer utryckningsfordons sirener eller vägsignaler (t
ex järnvägsövergångar) kan vara farlig och orsaka en olycka. DET KAN
OCKSÅ ORSAKA HÖRSELSKADA OM MAN LYSSNAR PÅ FÖR
HÖGA VOLYMER I EN BIL.
HÅLL I MÖJLIGASTE MÅN BLICKEN BORTA FRÅN
TECKENFÖNSTRET UNDER KÖRNING.
Teckenfönstret kan vara en störande faktor och leda bort
uppmärksamheten från trafiken, vilket kan leda till olyckor.
TAG INTE ISÄR OCH GÖR INGA ÄNDRINGAR.
Det kan resultera i en olycka, brand eller elektriska stötar.
ANVÄND BARA ENHETEN I BILAR MED 12-VOLTSYSTEM SOM
HAR NEGATIV (–) JORD.
(Återförsäljaren kan hjälpa dig om du är osäker.) Felaktig anslutning kan
resultera i brand, elektriska stötar eller andra skador.
FÖRVARA SMÅ FÖREMÅL SOM T.EX. BULTAR OCH SKRUVAR
UTOM RÄCKHÅLL FÖR BARN.
Om nagot föremal skulle sväljas, skall en läkare kontaktas omedelbart.
ANVÄND RÄTT AMPERETAL VID BYTE AV SÄKRINGAR.
Fel amperetal kan orsaka brand eller elektriska stötar.
BLOCKERA INTE VENTILATIONS-ÖPPNINGAR ELLER
VÄRME-PANELER.
Det kan göra att värme alstras inuti apparaten, vilket kan leda till brand.
2-SE
DEN HÄR PRODUKTEN ÄR ENDAST AVSEDD FÖR
MONTERING I BILAR MED 12 VOLTS-SYSTEM.
Annan användning kan resultera i brand, elektriska stötar eller andra
skador.
GÖR ANSLUTNINGARNA PÅ KORREKT SÄTT.
Felaktiga anslutningar kan orsaka brand eller skador på enheten.
KOPPLA UR KABELN FRÅN DET NEGATIVA (–) UTTAGET PÅ
BILBATTERIET INNAN ANSLUTNINGARNA GÖRS.
Detta för att undvika risken för elektriska stötar eller olycksfall på grund
av kortslutning.
SE TILL ATT INTE KABLARNA TRASSLAR IN SIG I OMGIVANDE
FÖREMÅL.
Utför kabeldragningen enligt anvisningarna för att undvika
arrangemang som kan äventyra körningen. Kablar och anslutningar i
närheten av rattstång, växelspak, bromspedal och liknande kritiska
platser kan vara mycket farligt.
KAPA INTE BORT KABELMANTELN FRÅN EN STRÖMKABEL
FÖR ATT STRÖMFÖRSÖRJA NÅGOT ANNANT TILLBEHÖR.
Det leder till en för hög kabelbelastning och kan resultera i brand eller
elektriska stötar.
SE TILL ATT VARKEN RÖR, VÄTSKELEDNINGAR ELLER KABLAR
VIDRÖRS, SKADAS ELLER FÖRHINDRAS VID BORRNING AV
HÅL.
Undersök chassit innan hålen borras så att inte några slangar, kablar,
bränsleledningar eller liknande råkar skadas. Det kan leda till att brand
uppstår.
MONTERA VARKEN MUTTRAR ELLER BULTAR I NÅGON DEL
AV BROMSSYSTEMET VID JORDANSLUTNINGAR.
Bultar eller muttrar som hör till någon vätsketank, styr- eller
bromssystemet (eller något annan system som är av betydelse för
säkerheten) ska ALDRIG användas för kabeldragning eller
jordanslutning. Användandet av sådana delar kan leda till att fordonets
styrförmåga försämras och orsaka bromsfel, brand eller personskada.
MONTERA INTE APPARATEN PÅ EN PLATS DÄR DEN KAN
UTGÖRA RISK FÖR FORDONETS MANÖVRERING, T.EX. I
NÄRHETEN AV RATT ELLER VÄXELSPAK.
Om installationen försämrar sikten eller hindrar rörelsen hos väsentliga
funktioner kan det lätt leda till olyckor.
Den hä
Underl
person
AVBRYT
I annat fall
Lämna app
LÅT EN FA
OCH MO
Kabeldragn
kunskap oc
för utföran
ANVÄND
TILLBEH
Användand
leda till att
grund av lo
DRA KAB
ELLER SK
Undv ik klä
rörliga dela
Om kablar
användas s
MONTER
ELLER DA
Undvik att i
in och ställ
• Följand
De kan
ALPINE X902D/X802D-U/INE-W710D/i902D/iLX-702D 68-34732Z07-A (SE)
Page 95

r andra
en.
ET PÅ
ll på grund
IVANDE
ningar i
itiska
KABEL
HÖR.
and eller
KABLAR
ING AV
kablar,
att brand
N DEL
för
fordonets
nskada.
KAN
X. I
väsentliga
FÖRSIKTIGT
Den här symbolen innebär viktiga instruktioner.
Underlåtenhet att följa dem kan leda till skador på
person eller egendom.
AVBRYT GENAST ANVÄNDNING OM PROBLEM UPPSTÅR.
I annat fall kan personskador eller skador på själva enheten uppstå.
Lämna apparaten till återförsäljaren för reparation.
LÅT EN FACKKUNNIG TEKNIKER GÖRA KABELDRAGNINGEN
OCH MONTERINGEN.
Kabeldragningen och monteringen av denna apparat kräver teknisk
kunskap och erfarenhet. Kontakta återförsäljaren, som sålde apparaten,
för utförandet av säker montering.
ANVÄND ALLTID SPECIFICERADE TILLBEHÖR OCH MONTERA
TILLBEHÖREN ORDENTLIGT.
Användandet av andra delar än som är avsedda för denna apparat kan
leda till att apparaten skadas invändigt eller till ostadig montering på
grund av lossnande delar.
DRA KABLARNA RAKA OCH SÅ ATT DE INTE KOMMER I KLÄM
ELLER SKAVER MOT SKARPA KANTER.
Undvik kläm- och nötskador genom att se till att kablarna går fria från
rörliga delar (t.ex. bilsätenas glidbanor) och skarpa och spetsiga kanter.
Om kablarna måste dras genom hål i plåten bör gummibussningar
användas som skydd, så att inte kablarna ligger och nöter mot metallen.
MONTERA INTE APPARATEN DÄR DEN UTSÄTTS FÖR FUKT
ELLER DAMM.
Undvik att installera enheten på platser där fukt och damm kan tränga
in och ställa till skador.
EN
DE
FR
ES
IT
SE
NL
RU
• Följande skärmexempel av X902D/X802D-U/INE-W710D som används i denna handbok är endast som referens.
De kan skilja sig från den verkliga skärmvisningen.
ALPINE X902D/X802D-U/INE-W710D/i902D/iLX-702D 68-34732Z07-A (SE)
PL
3-SE
Page 96

Bruksanvisning Komma igång
i
s
u
m
ö
ö
m
L
ö
y
e
Komma igång
Kontrollernas placering
Utformningen på den skärm som används i bruksanvisningen kan skilja sig från den faktiska skärmen.
För X902D/i902D
För X802D-U/INE-W710D/iLX-702D
Slå på
1 Vr
Sy
2 D
Ändra
Du kan ä
ikonerna
Skärm
Du kan g
ställa in s
underhåll
Skär
(USB
4-SE
Knappen eller VOICE
Tryck för att använda Siri-funktionen eller
röstigenkänningsläget beroende på ansluten
smartphone.
Knappen (MUTE)
Tryck för att aktivera/avaktivera ljudavstängningsläget.
Knappen (AUDIO)/(Favorit)
Visar skärmen Ljud/Bild. Om skärmen Ljud/Bild redan
visas, byts källan.
Öppna favoritskärmen genom att hålla knappen
intryckt i minst 2 sekunder.
Knappen / eller / (UPP/NER)
Tryck för att justera volymen.
RESET-brytare
Enhetens system återställs.
Knappen (PHONE) (endast X902D/i902D)
Hämtar menyskärmen Telefon.
Tryck för att starta ett samtal när någon ringer till dig.
Knappen MENU/ (Ström av)
Visar menyskärmen.
Du stänger av strömmen genom att hålla den här
knappen intryckt i minst 5 sekunder.
Knappen (NAV)
För X902D/X802D-U/INE-W710D:
Visa navigationskartan.
Tryck igen för att växla till navigeringsmenyskärmen.
Håll denna knapp intryckt i minst 2 sekunder för att
växla till ruttskärmen Åk hem. (Om du inte ställt in
”hem” ännu växlar den istället till skärmen för att ställa
in ”hem”).
Se ”Navigationssystemet OM” på CD-ROM-skivan för
mer information om navigering.
För i902D/iLX-702D:
Öppnar kartskärmen för ansluten smartphone.
Beroende på vilken smartphone du använder kan det
hända att denna funktion inte är tillgänglig.
Knappen /
Tryck för att söka station uppåt/nedåt i radioläge eller
spår, kapitel etc. i andra ljud/bildkällor.
Fjärrsensor
Rikta fjärrkontrollens sändare mot fjärrsensorn inom ett
avstånd på 2 meter.
Mikrofon (endast X802D-U/INE-W710D/iLX-702D)
Används för handsfree- eller röststyrningsläget.
ALPINE X902D/X802D-U/INE-W710D/i902D/iLX-702D 68-34732Z07-A (SE)
Skärm f
snabbs
Sökläg
Page 97

Slå på (On) eller stänga av (Off) strömmen
1 Vrid tändningsnyckeln till läge ACC eller ON.
Systemet slås på.
2 Du stänger av strömmen genom att hålla knappen MENU intryckt i minst 5 sekunder.
rmen.
ör att
llt in
tt ställa
an för
.
kan det
Ändra skärmen för val av ljudkälla till en specialanpassad skärm
Du kan ändra skärmen för val av ljudkälla till din egen specialanpassade skärm genom att trycka på någon av
ikonerna längs skärmens fyra kanter eller genom att dra vertikalt eller horisontellt.
Dubbel skärmbild (endast
Skärm med inställningsgenvägar
Du kan göra ljudinställningar eller
ställa in systemet för Baksätes
underhållning.
Skärm för val av ljudkälla
(USB Ljud)
Skärm för snabbvalsknapp eller
snabbsökningsläge*
X902D/X802D-U/INE-W710D)
Du kan växla mellan de visade
skärmarna på den delade
skärmbilden.
Menyskärm
EN
DE
FR
ES
IT
SE
NL
RU
PL
ge eller
inom ett
X-702D)
t.
Du kan göra inställningar på
menyskärmen.
Sökläget är olika beroende på ljudkälla. Se ljudkällans bruksanvisning för ytterligare information.
5-SE
ALPINE X902D/X802D-U/INE-W710D/i902D/iLX-702D 68-34732Z07-A (SE)
Page 98

Bruksanvisning Funktionen Favorit
d
A
e
y
e
y
M
p
a
e
r
å
o
i
e
o
P
n
o
a
n
y
e
y
p
ä
ä
Funktionen Favorit
Med denna funktion kan du enkelt öppna dina favoritfunktioner genom att registrera funktioner du använder ofta,
t ex val av ljudkälla, navigeringens sökfunktion m. fl på skärmen Favorit. Du kan lätt öppna vilken som helst av
dessa funktioner.
1 Håll /(Favorit)-knappen intryckt i minst
2 sekunder.
Skärmen Favorit visas.
Exempel på skärmen Favorit
Byter till Redigeringsskärmen för att registrera
funktioner eller ändra namn.
Registrerade Favorit
Visar vilken sida av Favorit som visas.
Dra till vänster eller höger för att bläddra mellan
sidorna. Du kan lägga till upp till 6 sidor.
Bruksanvisning Registrera funktioner
Registrera funktioner
An
Android
befinner
favoritap
Ladda n
Anslut di
1 Tr
M
2 Tr
An
•
Ap
Apple C
du vill an
skicka oc
iPhone i
Mer info
Tryck p
Du kan t.
Du kan
1 Tryck på [ ] (Ändra).
En kryssruta visas i registreringsikonens övre vänstra
del och den byter till Redigeringsläge.
4 Välj den funktion du ska lägga till.
Se bruksanvisningens avsnitt ”Redigera Favoriter”
för ytterligare information om funktioner som kan
läggas till.
• Du kan lägga till upp till 54 funktioner.
• En funktion kan bara registreras en gång.
5 Tryck på [ ] (Tillbaka) när du redigerat
klart.
6 Tryck på [OK] efter det att
2 Tryck på [ ] (Lägg till).
De funktioner (kategorier) som kan läggas till visas.
3 Tryck på den funktion (kategori) du ska
lägga till.
6-SE
ALPINE X902D/X802D-U/INE-W710D/i902D/iLX-702D 68-34732Z07-A (SE)
bekräftelsemeddelandet visats.
7 Redigeringen är avslutad och nu visas
skärmen Favorit.
• Om du trycker på [ ] (Avbryt) medan du redigerar
växlar skärmen till att visa förutvarande skärm Redigera
Favorit.
Alp
Ladda n
Alpine C
Google
Ställ in a
smartph
1 St
2 A
3 Tr
4 Tr
5 V
M
Al
Sk
Page 99

g
Android Auto (tillval)
Bruksanvisning Android Auto (tillval)
der ofta,
t av
strera
an
oriter”
m kan
rat
Android Auto är utformad för att göra det lättare för dig att använda appar på din telefon samtidigt som du
befinner dig på resande fot. Navigera med Google Maps, lyssna på spellistor eller podsändningar från dina
favoritappar och mycket mer.
Ladda ner Android Auto-appen från Google Play store innan du fortsätter.
Anslut din Android-kompatibla telefon för att börja använda Android Auto.
1 Tryck på knappen MENU.
Menyskärmen visas.
2 Tryck på [Android Auto].
Android Auto-skärmen visas.
• Mer information om användning av Android Auto, se ”Android Auto” i bruksanvisningen (CD-ROM).
Bruksanvisning Apple CarPlay (tillval)
Apple CarPlay (tillval)
Apple CarPlay är ett smartare, säkrare sätt att använda din iPhone i bilen. Med Apple CarPlay får du de funktioner
du vill använda på din iPhone, samtidigt som du kör, direkt på enheten. Du kan får väganvisningar, ringa samtal,
skicka och ta emot meddelanden och lyssna på musik, och samtidigt hålla fokus på vägen. Koppla bara in din
iPhone i enheten och kör.
Mer information finns i bruksanvisningen (CD-ROM).
Tryck på eller VOICE för att aktivera Siri-funktionen på din iPhone.
Du kan t.ex. ringa ett samtal, spela musik genom att använda Siri-funktionen på din iPhone.
Du kan också manövrera Apple CarPlay på pekskärmen.
Bruksanvisning Alpine Connect-appen (tillval) (endast X902D/X802D-U/INE-W710D)
Alpine Connect-appen (tillval) (endast X902D/X802D-U/INE-W710D)
Ladda ner en app som har stöd för Alpine Connect till din smartphone så kan du manövrera den via enheten.
Alpine Connect-appen kan laddas ner från Apples App Store och Android-användare kan ladda ner appen från
Google Play. Kontakta din Alpine-återförsäljare för utförlig information.
Ställ in anslutningsinställningar eller Alpine Connect till USB (iPhone) eller Bluetooth (Android) beroende på vilken
smartphone som är ansluten, innan dessa funktioner utförs.
1 Starta Alpine Connect-appen.
EN
DE
FR
ES
IT
SE
NL
RU
as
erar
Redigera
2 Anslut sedan din smartphone till denna enhet.
3 Tryck på knappen MENU.
Menyskärmen visas.
4 Tryck på [Alpine Connect].
Alpine Connect -appens väljarskärm visas.
5 Välj önskad app.
Skärmen för vald app visas.
ALPINE X902D/X802D-U/INE-W710D/i902D/iLX-702D 68-34732Z07-A (SE)
PL
7-SE
Page 100

m
B
b
r
u
f
e
g
s
m
R
n
Spotify®
Spotify är en musikströmningstjänst som inte tillhör Alpine. Mer information hittar du på http://www.spotify.com.
Spotify-applikationen finns tillgänglig för iPhone- och Android-telefoner. Se https://support.spotify.com/ för den
senaste informationen om kompatibilitet.
Ladda först ner Spotify-appen till din iPhone- eller Android-enhet för att kunna lyssna på Spotify när du kör bil. Du
kan ladda ner det från iTunes App Store eller Google Play™. Välj ett gratiskonto eller ett Premium-konto
(betalkonto) antingen i appen eller på spotify.com. Med ett Premium-konto får du fler funktioner t.ex. lyssna
offline.
• Denna produkt innehåller programvaran Spotify som är föremål för licenser från tredje part. Information om det hittar
du här: www.spotify.com/connect/third-party-licenses.
• Information om i vilka länder och områden Spotify går att använda finns här:
https://www.spotify.com/us/select-your-country/.
Bruksanvisning Radio/RDS
Radio/RDS-användning
Snabbvalsknapp
En kort tryckning visar förvalda stationer.
Tryck under minst 2 sekunder för att lägga till nuvarande station som ett snabbval.
Skärm för snabbvalsläge
Knapp för snabbvalsläge
Tryck eller dra till höger när du
använder skärmen för
snabbvalsläge.
RDS-indikator
Informationsskärm
Ökar frekvensen
DA
Snab
En ko
Tryck
Skär
Knapp för
sökläge
Tryck eller d
skärmen m
(Lista över a
Nuvarande
Ändrar läg
stationsin
PTY-sökknapp
Tryck eller dra till höger när du
använder PTY-listan.
Ändrar läge för
stationsinställning
Inmatad radiofrekvens
Läge för PRIORITY NEWS På/Av
Knapp för att växla funktion
Minskar frekvensen
Ändrar textinformation
Byter frekvensband
Automatisk snabbvalslagring
av stationer
Läge för AF På/AvLäge för trafikinformation På/Av
8-SE
ALPINE X902D/X802D-U/INE-W710D/i902D/iLX-702D 68-34732Z07-A (SE)
Visar skär
Ändrar tex
Läge för P
De ka
 Loading...