

Page 1

FOR CAR USE ONLY/NUR FÜR AUTOMOBIL GEBRAUCH/POUR APPLICATION AUTOMOBILE UNIQUEMENT/
PARA USO EN AUTOMÓVILES/SOLO PER L’UTILIZZO IN AUTOMOBILE/ENDAST FÖR BILBRUK/ALLEEN VOOR
GEBRUIK IN DE AUTO/ТОЛЬКО ДЛЯ ИСПОЛЬЗОВАНИЯ В АВТОМОБИЛЯХ/DO UŻYCIA TYLKO W
SAMOCHODZIE
IN-DASH APP RECEIVER
ICS-X7
R
EN
DE
FR
ES
IT
SE
NL
RU
QUICK REFERENCE GUIDE
Kurzanleitung
GUIDE DE RÉFÉRENCE RAPIDE
GUÍA DE REFERENCIA RÁPIDA
GUIDA RAPIDA
SNABBGUIDE
SNELSTARTGIDS
КРАТКОЕ СПРАВОЧНОЕ РУКОВОДСТВО
SKRÓCONA INSTRUKCJA DLA UŻYTKOWNIKA
PL
Page 2

Page 3

Contents
WARNING ................................................................................................................................................................2
CAUTION .................................................................................................................................................................2
Getting Started .....................................................................................................................................................3
Home Screen and Favorites ..............................................................................................................................4
Using the Media Control buttons ................................................................................................................... 4
Using the Media View button ..........................................................................................................................5
Setting the Time ................................................................................................................................................... 5
Radio Operation ...................................................................................................................................................6
iPod/iPhone Operation (Optional) ................................................................................................................. 7
USB Memory Operation (Optional) ...............................................................................................................8
Hands-Free Phone Control ...............................................................................................................................9
Aha Operation (Optional)................................................................................................................................10
MirrorLink™ Operation (Optional) ................................................................................................................11
Installation ............................................................................................................................................................12
Connections .........................................................................................................................................................14
Specifications ......................................................................................................................................................16
IMPORTANT
Please record the serial number of your unit in the space provided below and keep it as a permanent
record.
SERIAL NUMBER:
ISO SERIAL NUMBER: AL
INSTALLATION DATE:
INSTALLATION TECHNICIAN:
PLACE OF PURCHASE:
For details on all functions, refer to the Owner’s Manual stored in the supplied CD-ROM. (As it is
data CD, the CD cannot be used for playing back music and images on the player.) If required, an
ALPINE dealer will readily provide you with a print out of the Owner’s Manual contained in the
CD-ROM.
1-EN
Page 4
WARNING
WARNING
This symbol means important instructions. Failure
to heed them can result in serious injury or death.
DO NOT OPERATE ANY FUNCTION THAT TAKES YOUR
ATTENTION AWAY FROM SAFELY DRIVING YOUR VEHICLE.
Any function that requires your prolonged attention should only be
performed after coming to a complete stop. Always stop the vehicle in a
safe location before performing these functions.
Failure to do so may result in an accident.
KEEP SMALL OBJECTS SUCH AS SCREWS OUT OF THE REACH
OF CHILDREN.
Swallowing them may result in serious injury. If swallowed, consult a
physician immediately.
KEEP THE VOLUME AT A LEVEL WHERE YOU CAN STILL HEAR
OUTSIDE NOISES WHILE DRIVING.
Excessive volume levels that obscure sounds such as emergency vehicle
sirens or road warning signals (train crossings, etc.) can be dangerous
and may result in an accident. LISTENING AT LOUD VOLUME
LEVELS IN A CAR MAY ALSO CAUSE HEARING DAMAGE.
DO NOT DISASSEMBLE OR ALTER.
Doing so may result in an accident, fire or electric shock.
USE ONLY IN CARS WITH A 12 VOLT NEGATIVE GROUND.
(Check with your dealer if you are not sure.) Failure to do so may result
in fire, etc.
USE THE CORRECT AMPERE RATING WHEN REPLACING
FUSES.
Failure to do so may result in fire or electric shock.
DO NOT BLOCK VENTS OR RADIATOR PANELS.
Doing so may cause heat to build up inside and may result in fire.
USE THIS PRODUCT FOR MOBILE 12V APPLICATIONS.
Use for other than its designed application may result in fire, electric
shock or other injury.
MAKE THE CORRECT CONNECTIONS.
Failure to make the proper connections may result in fire or product
damage.
BEFORE WIRING, DISCONNECT THE CABLE FROM THE
NEGATIVE BATTERY TERMINAL.
Failure to do so may result in electric shock or injury due to electrical
shorts.
DO NOT SPLICE INTO ELECTRICAL CABLES.
Never cut away cable insulation to supply power to other equipment.
Doing so will exceed the current carrying capacity of the wire and result
in fire or electric shock.
DO NOT DAMAGE PIPE OR WIRING WHEN DRILLING HOLES.
When drilling holes in the chassis for installation, take precautions so
as not to contact, damage or obstruct pipes, fuel lines, tanks or electrical
wiring. Failure to take such precautions may result in fire.
DO NOT USE BOLTS OR NUTS IN THE BRAKE OR STEERING
SYSTEMS TO MAKE GROUND CONNECTIONS.
Bolts or nuts used for the brake or steering systems (or any other
safety-related system), or tanks should NEVER be used for installations
or ground connections. Using such parts could disable control of the
vehicle and cause fire, etc.
DO NOT INSTALL IN LOC ATIONS WHICH MIGHT HINDER
VEHICLE OPERATION, SUCH AS THE STEERING WHEEL OR
SHIFT LEVER.
Doing so may obstruct forward vision or hamper movement etc., and
results in serious accident.
CAUTION
This symbol means important instructions. Failure
to heed them can result in injury or material
property damage.
HALT USE IMMEDIATELY IF A PROBLEM APPEARS.
Failure to do so may cause personal injury or damage to the product.
Return it to your authorized Alpine dealer or the nearest Alpine Service
Center for repairing.
HAVE THE WIRING AND INSTALLATION DONE BY EXPERTS.
The wiring and installation of this unit requires special technical skill
and experience. To ensure safety, always contact the dealer where you
purchased this product to have the work done.
USE SPECIFIED ACCESSORY PARTS AND INSTALL THEM
SECURELY.
Be sure to use only the specified accessory parts. Use of other than
designated parts may damage this unit internally, or may not securely
install the unit in place. This may cause parts to become loose resulting
in hazards or product failure.
ARRANGE THE WIRING SO IT IS NOT CRIMPED OR PINCHED
BY A SHARP METAL EDGE.
Route the cables and wiring away from moving parts (like the seat rails)
or sharp or pointed edges. This will prevent crimping and damage to the
wiring. If wiring passes through a hole in metal, use a rubber grommet
to prevent the wire’s insulation from being cut by the metal edge of the
hole.
DO NOT INSTALL IN LOC ATIONS WITH HIGH MOISTURE OR
DUST.
Avoid installing the unit in locations with high incidence of moisture
or dust. Moisture or dust that penetrates into this unit may result in
product failure.
2-EN
Page 5
Owner’s manual Touch operation, Location of Controls, Turning Power On or Off
Getting Started
Touch operation
You can operate the system by using the touch panel on the screen.
e
Common onscreen buttons
: Returns to the previous screen. Depending on the function, this button may cancel the operations
performed on the screen.
: Closes the window.
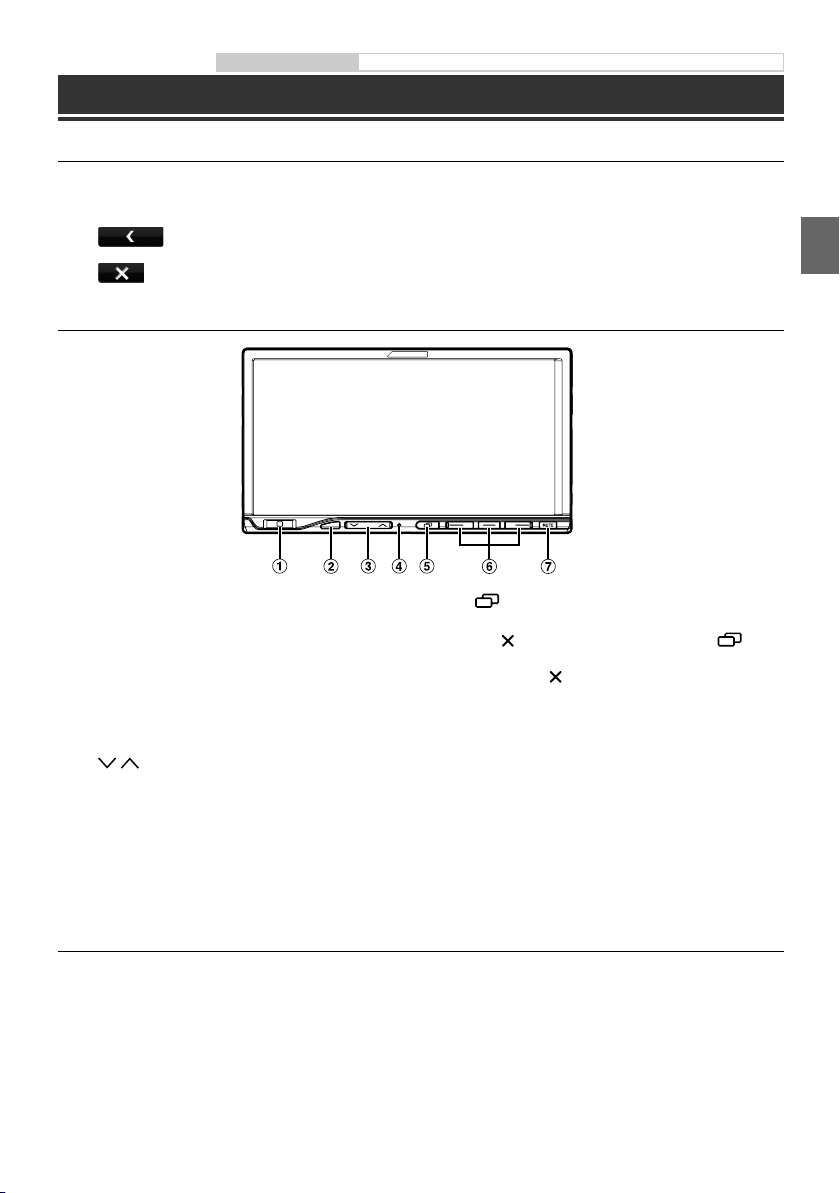
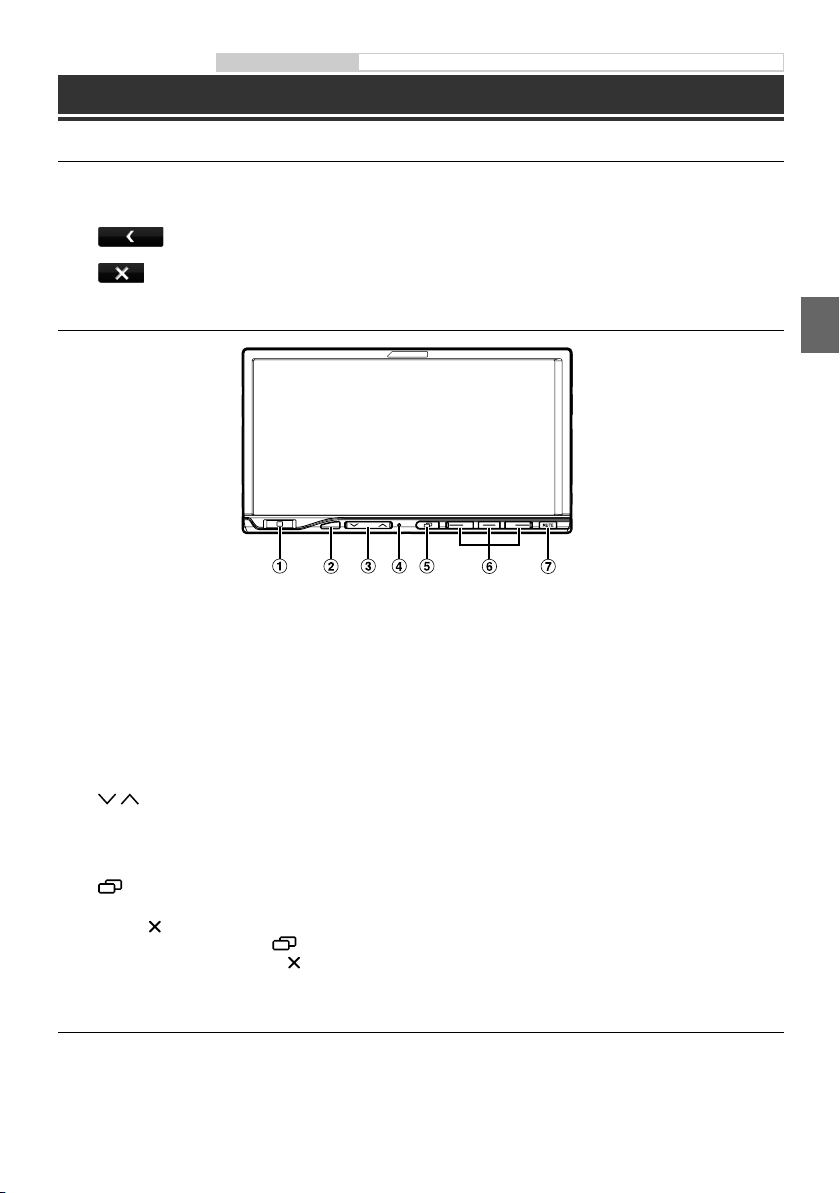
Location of Controls
A Home/C button
Touch the Home button to call up Favorites.
Press the Home button to call up the Home Screen.
Press and hold for at least 5 seconds to turn the power
off.
B Remote Sensor
Point the remote control transmitter towards the
remote sensor within a range of 2 metres.
/ button
C
Press to adjust the volume.
D RESET switch
The system of this unit is reset.
E
F Media Control button 1/2/3
G MUTE button
(Media View) button
•
When not using the Navigation system:
If appears on the screen, pressing the
button will close the screen in the same way as
touching [
When using the Navigation system:
•
Pressing toggles between the Navigation screen
and Audio/Visual screen.
This action varies according to the Audio/Visual
application. (Track Up/Down, PLAY/PAUSE, Fast
reverse/Fast forward, etc)
Activating this function will instantly lower the volume
level by 20 dB.
].
Turning Power On or Off
1 Turn the ignition key to the ACC or ON position.
The system is turned on.
2 Press and hold the Home/C button for at least 5 seconds to turn the power off.
3-EN
Page 6

Owner’s manual Home Screen and Favorites
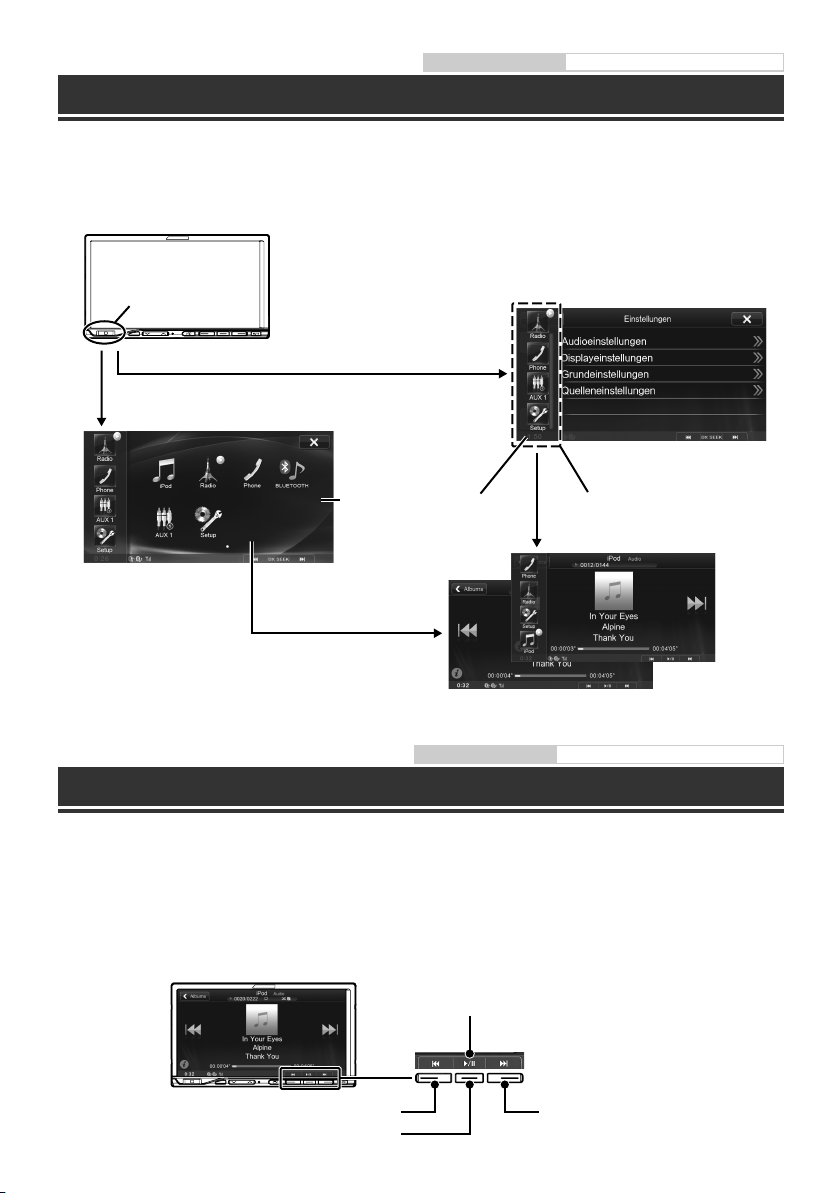
Home Screen and Favorites
You can easily switch to the application of your choice from the Home Screen or Favorites. The Home Screen
displays icons for applications usable with this unit. Favorites is a shortcut function that displays up to 4 icons on
the screen you are using. The icon layout is customisable for your convenience.
Home button
Touch the Home button.
Press the Home button.
Home Screen
Touch an application
icon to switch to that
application.
Owner’s manual Using the Media Control buttons
Favorites
Using the Media Control buttons
For operations like moving up or down between songs, in addition to using the operation buttons displayed on
the screen, you can also use the Media Control buttons on the unit itself. This allows you to press a Media Control
button to select a song even if the main screen for the media is not being displayed.
The operation of the Media Control buttons may change depending on the media you are using. A guide will
display on the screen to show which switch controls what function.
Guide display
4-EN
Media Control button 1
Media Control button 2
Media Control button 3
Page 7
Owner’s manual Using the Media View button
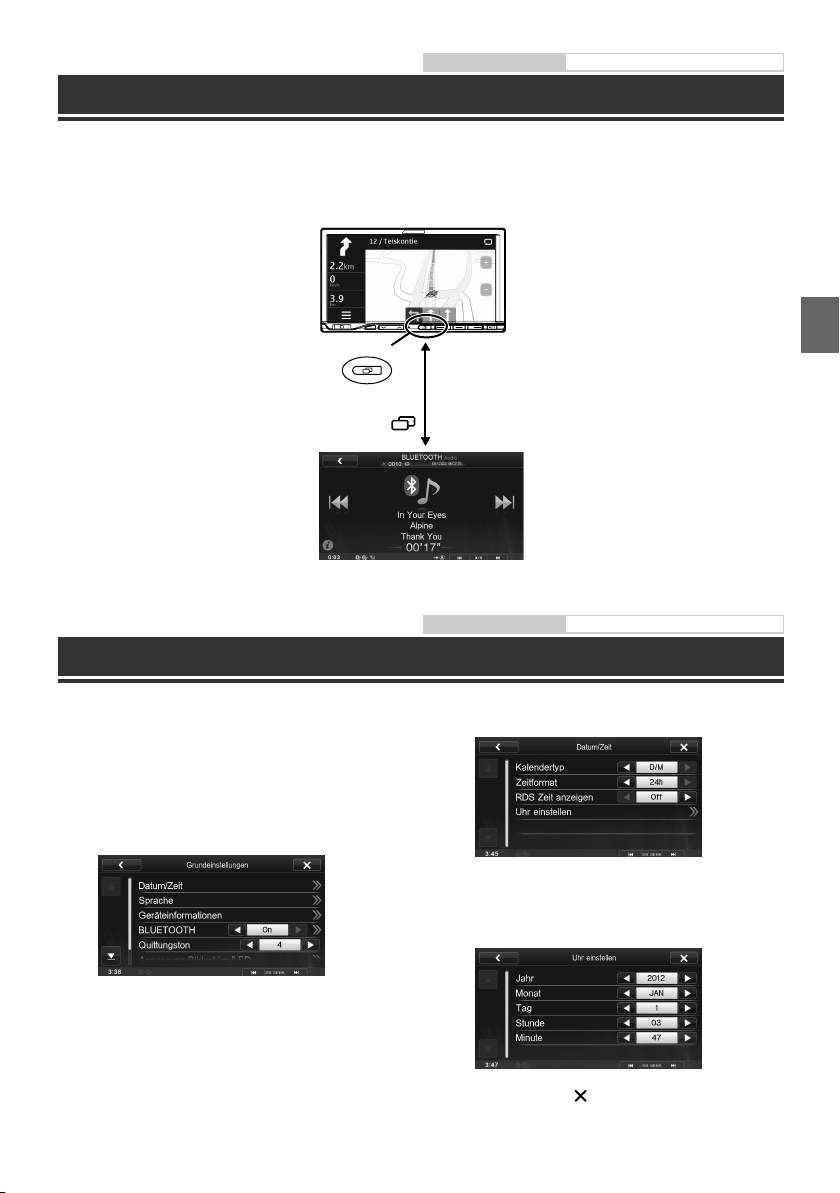
Using the Media View button
You can switch between the Navigation screen and the main screen for the current media source with just one
touch.
Media View button
Press
.
Media screen
Owner’s manual Date/Time Setting
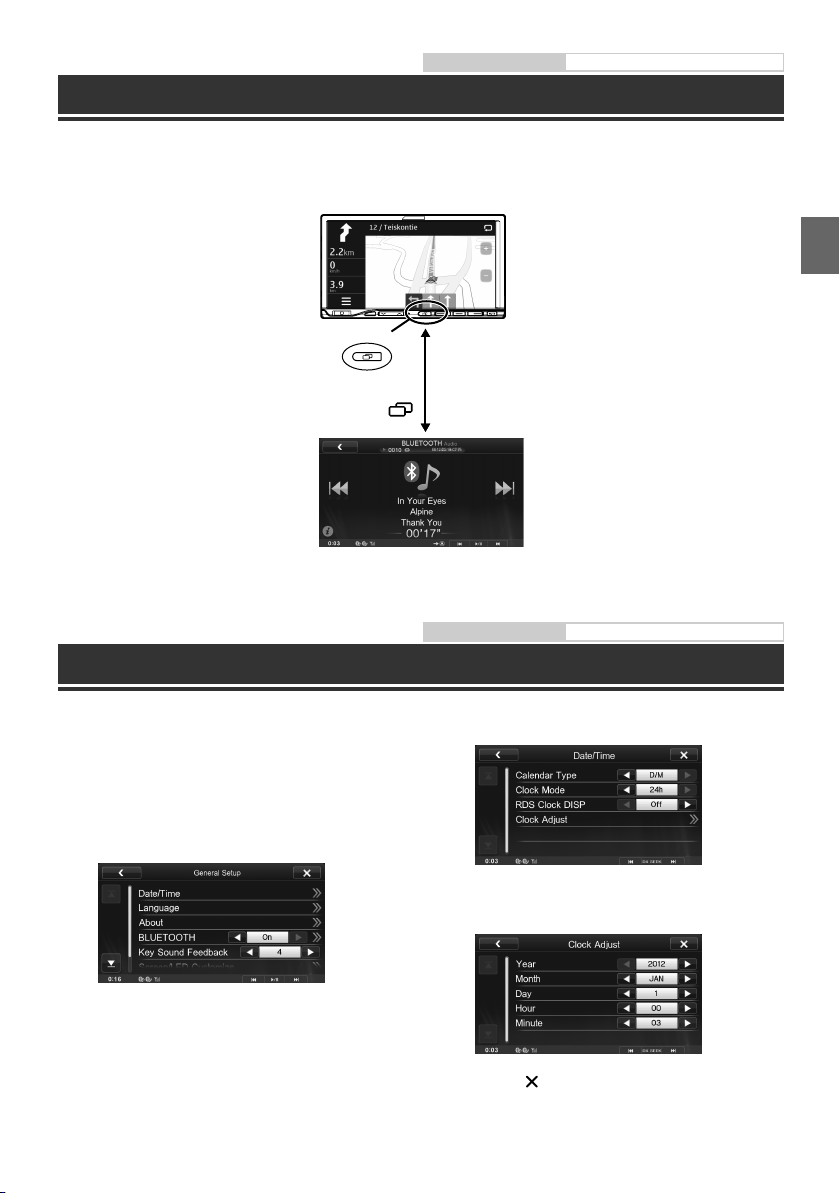
Setting the Time
1 Press the Home button.
2 Touch [Setup].
3 Touch [General Setup].
4 Touch [Date/Time].
5 Touch [Clock Adjust].
6 Touch [o] or [p] of “Year,” “Month,” “Day,”
“Hour” and “Minute” to adjust the clock.
7 Touch [ ].
5-EN
Page 8
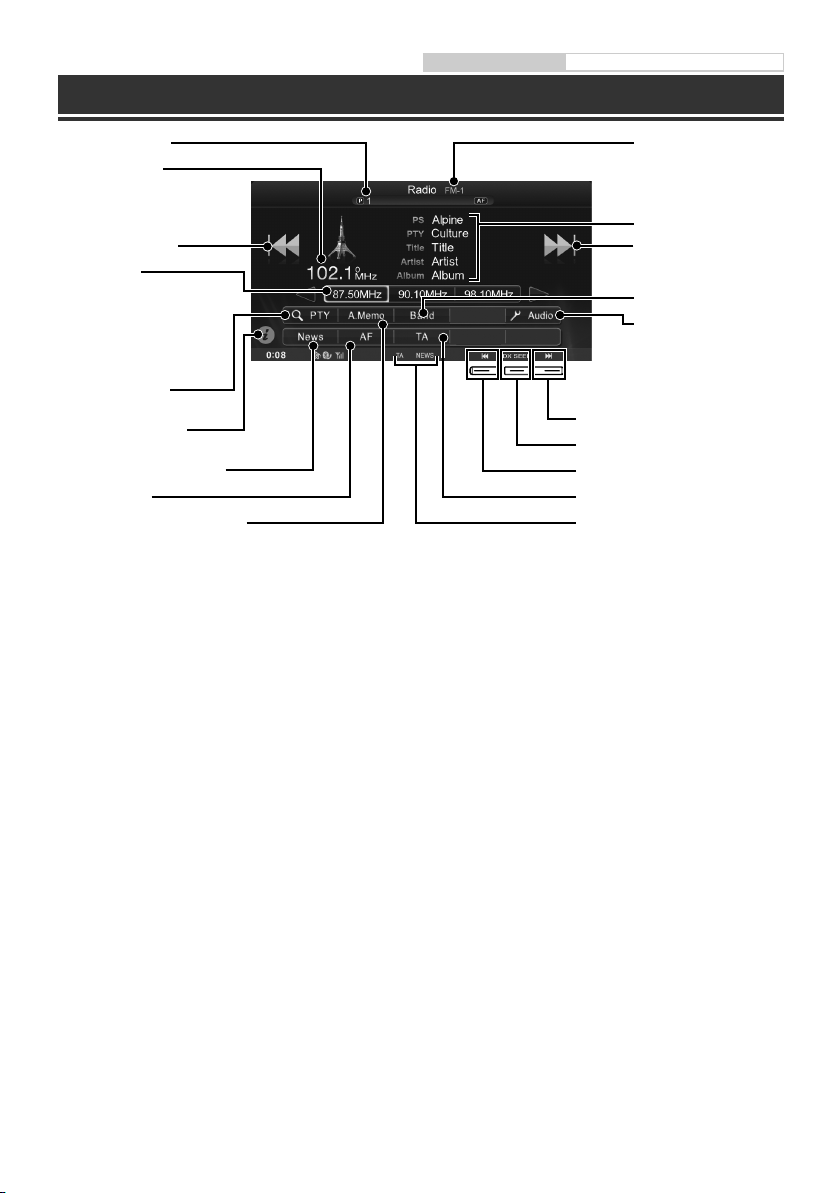
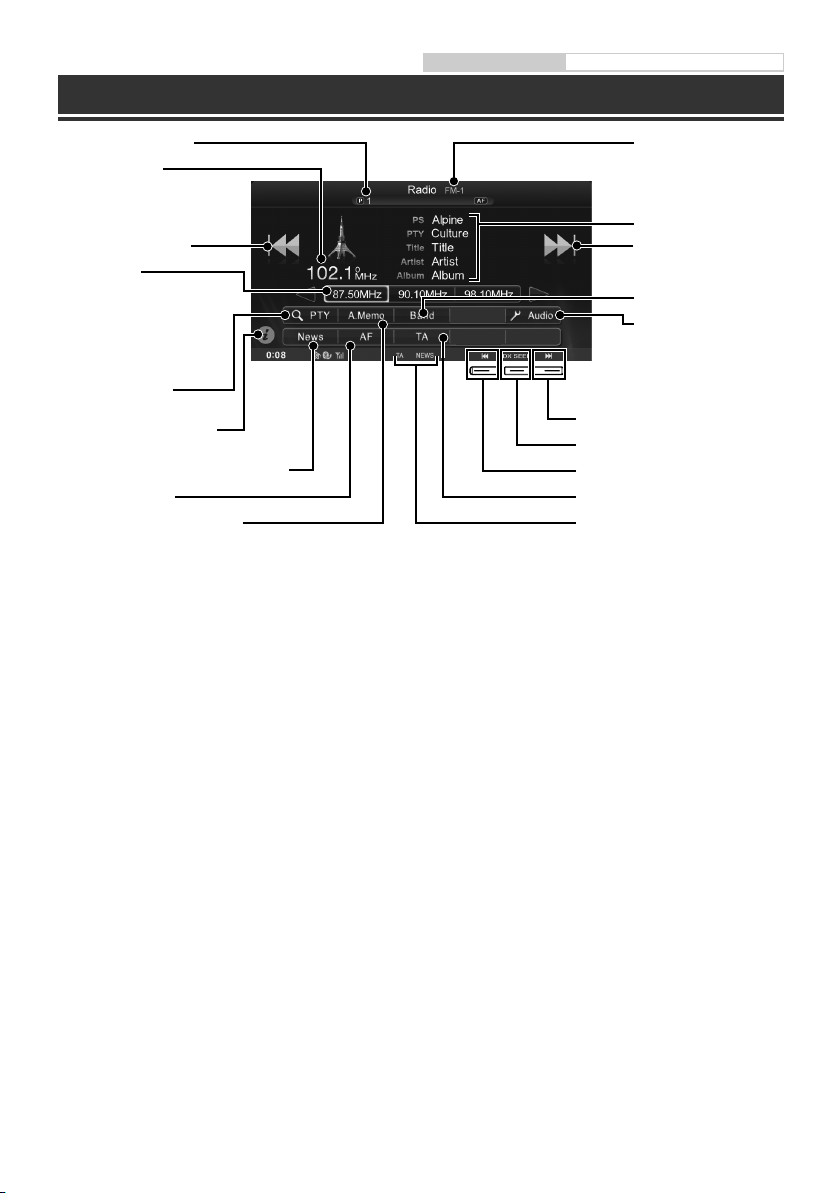
Radio Operation
Owner’s manual Radio, RDS
Preset No. Indicator
Frequency display
Decreases frequency
Preset button
Displays the preset stations with
a short touch.
Touch for at least 2 seconds to
memorise the current station as
a preset station.
Displays Select PTY
screen
The screen changes to
Simple mode or Info mode
PRIORITY NEWS mode On/Off
AF mode On/Off
Memorises stations automatically RDS indicator
Increases frequency
Changes tuning mode
Decreases frequency
Traffic Information mode On/Off
Band display
Info area
Increases frequency
Switches band
Displays the Audio Setup
screen
6-EN
Page 9
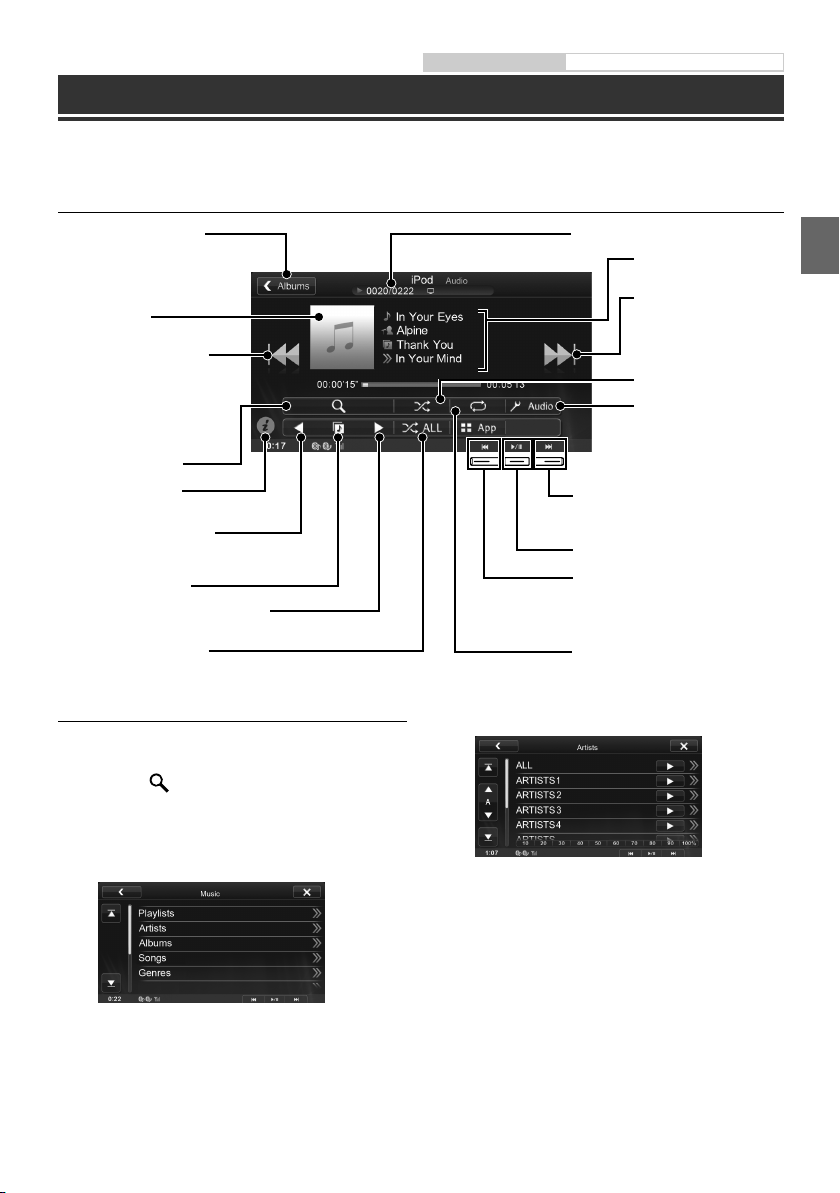
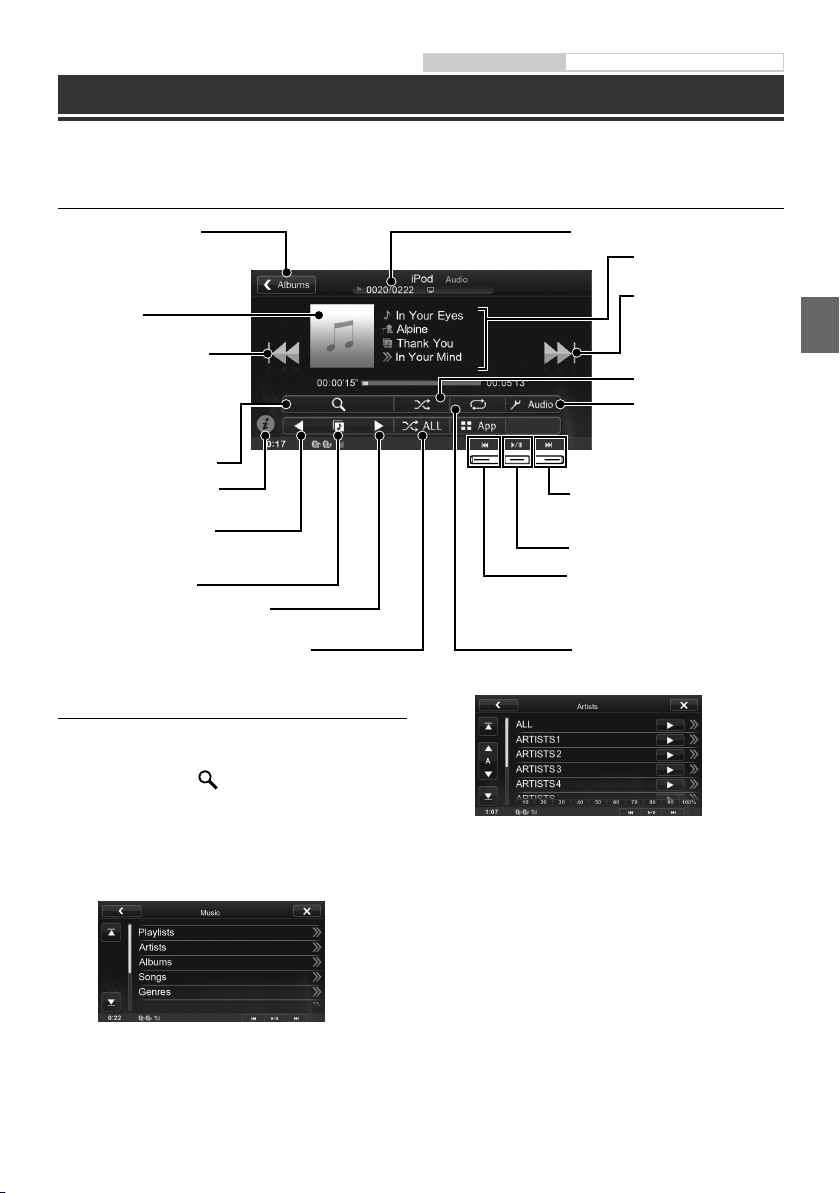
Owner’s manual iPod/iPhone (Optional)
iPod/iPhone Operation (Optional)
An iPod/iPhone can be connected to this unit by using the cable (KCU-461iV) (sold separately). You can connect a
video-capable iPod to enjoy not only Music but also Video files.
Audio mode
Displays the search screen
Artwork display
Finds the beginning of the
current file/Finds a previous
file within one second after
playback starts/Fast-reverses
when touched for at least 2
seconds
Search screen display
The screen changes to
Simple mode or Info mode
Finds beginning of previous
Playlist/Artist/Album/Podcast/
Genre/Composer
Direct switch mode icon
Finds beginning of next Playlist/Artist/
Album/Podcast/Genre/Composer
Random Play (Shuffle ALL)
Current song no./Total song no.
iPod/iPhone information
display
Finds the beginning of the
next file/Fast-forwards
when touched for at least
2 seconds
Random Play (Shuffle)
Displays the Audio Setup
screen
Finds the beginning of the next
file/Fast-forwards when touched for at
least 2 seconds
Pause and Playback
Finds the beginning of the current file/
Finds a previous file within one second
after playback starts/Fast-reverses
when touched for at least 2 seconds
Repeat Playback
Searching for a Music File
For example: Searching by Artist name
1 Touch [ (Search)] during playback.
2 Touch [Music].
3 Touch [Artists].
4 Touch the desired artist’s name.
The Albums search screen of the selected artist is
displayed.
Touching [p] of the desired artist will play back all
songs of the selected artist.
5 Touch the desired album’s name.
All songs of the selected album are displayed.
Touching [p] of the desired album will play back all
songs of the selected album.
6 Touch the desired song’s name.
The selected song is played back.
Touching [p] of “ALL” will play back all songs in the list.•
7-EN
Page 10
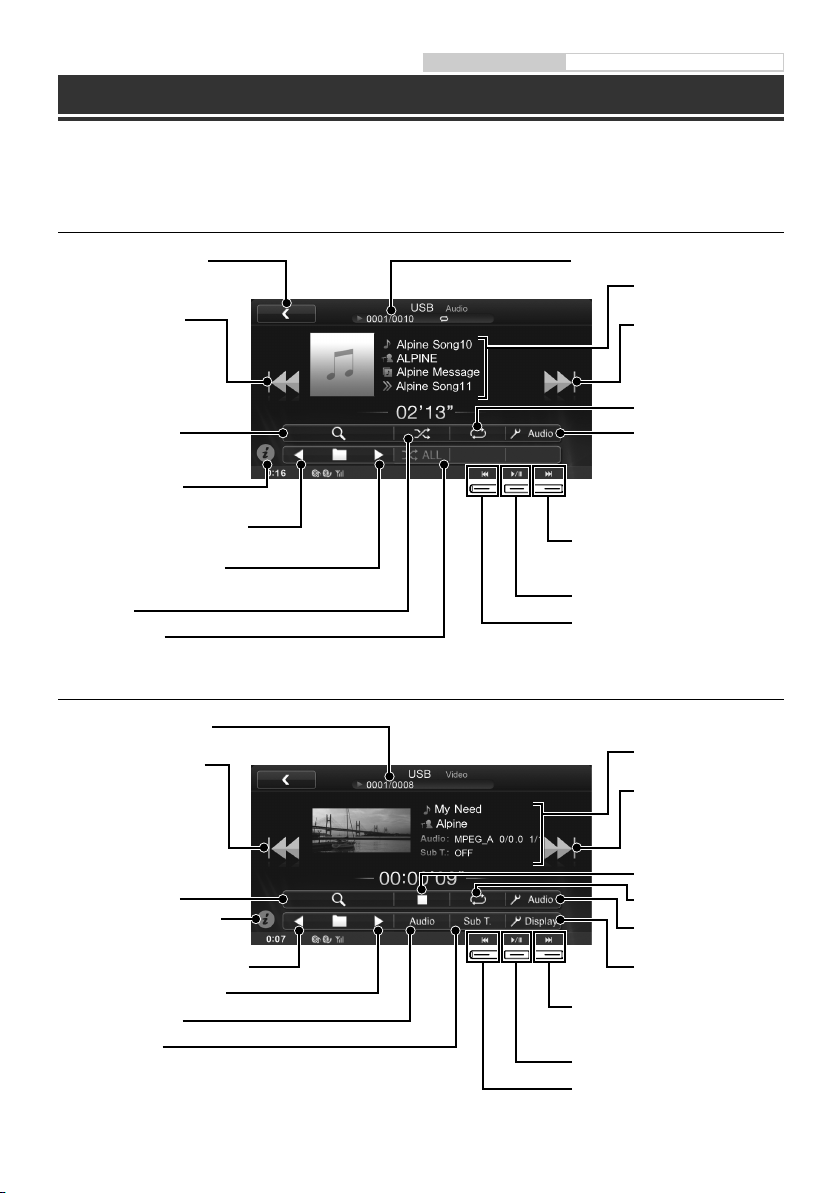
Owner’s manual USB Memory (Optional)
USB Memory Operation (Optional)
This unit can connect to USB memory device.
You can play back music files (MP3/WMA/AAC) and video files (DivX® ) stored in a USB memory device on the
internal player of this system.
Audio mode
Displays the search screen
Finds the beginning of
the current file/Finds a
previous file within one
second after playback
starts/Fast-reverses when
touched for at least 2
seconds
Search screen display
The screen changes to
Simple mode or Info mode
Finds beginning of previous folder
(Playlist/Artist/Album/Genre/Composer)
Finds beginning of next folder
(Playlist/Artist/Album/Genre/Composer)
Random Play
Random Play (ALL)
Video mode
Current file no./Total file no.
Finds the beginning of the
current file/Finds a previous
file within one second
after playback starts/Fastreverses when touched for
at least 2 seconds
Current song no./Total song no.
MP3/WMA/AAC
information display
Finds the beginning of the
next file/Fast-forwards
when touched for at least
2 seconds
Repeat Playback
Displays the Audio Setup
screen
Finds the beginning of the next
file/Fast-forwards when touched for at
least 2 seconds
Pause and Playback
Finds the beginning of the current file/
Finds a previous file within one second
after playback starts/Fast-reverses
when touched for at least 2 seconds
DivX® information display
Finds the beginning of
next file/Fast-forwards
when touched for at least
2 seconds
Search screen display
The screen changes to Simple
mode or Info mode
Finds beginning of previous folder
Finds beginning of next folder
Switches Audio Tracks
Switches Subtitles
8-EN
Stop Playback
Repeat Playback
Displays the Audio Setup
screen
Displays the Display Setup
screen
Finds the beginning of next file/Fastforwards when touched for at least 2
seconds
Pause and Playback
Finds the beginning of the current file/
Finds a previous file within one second
after playback starts/Fast-reverses
when touched for at least 2 seconds
Page 11
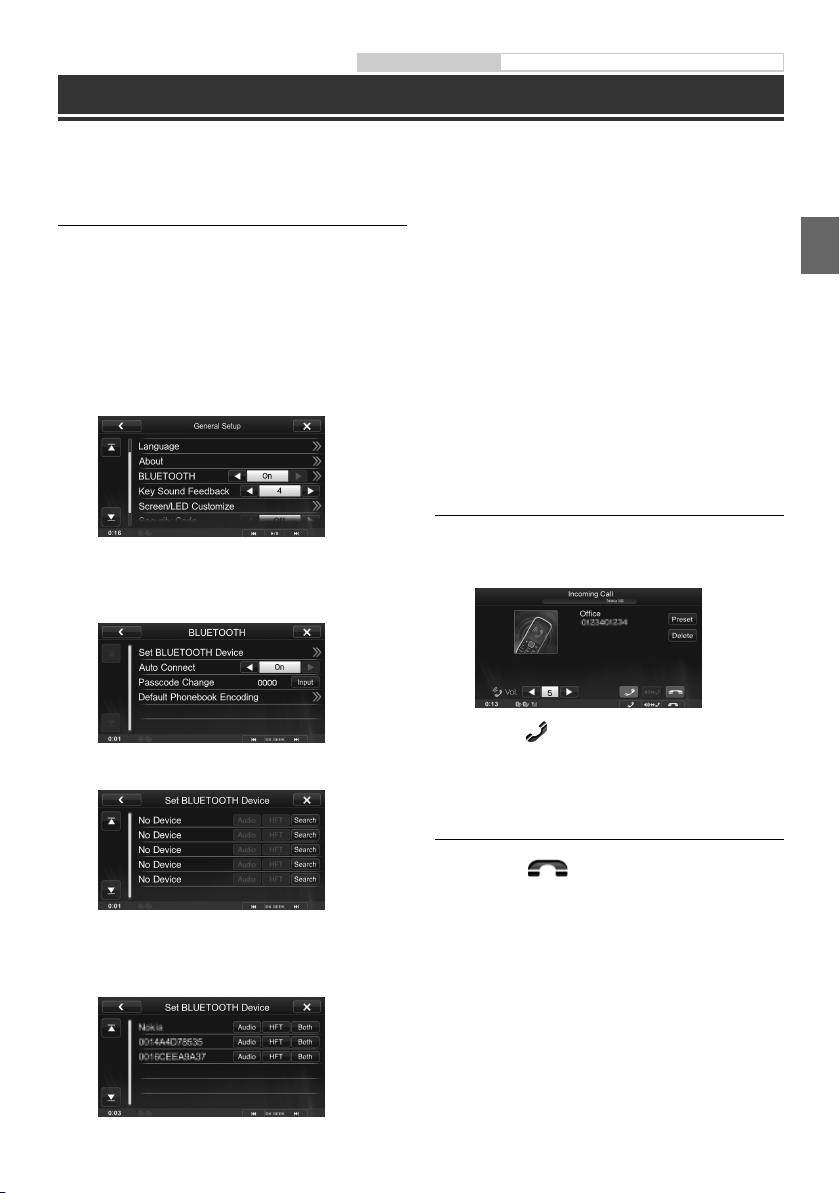
Owner’s manual BLUETOOTH Setting, BLUETOOTH Operation
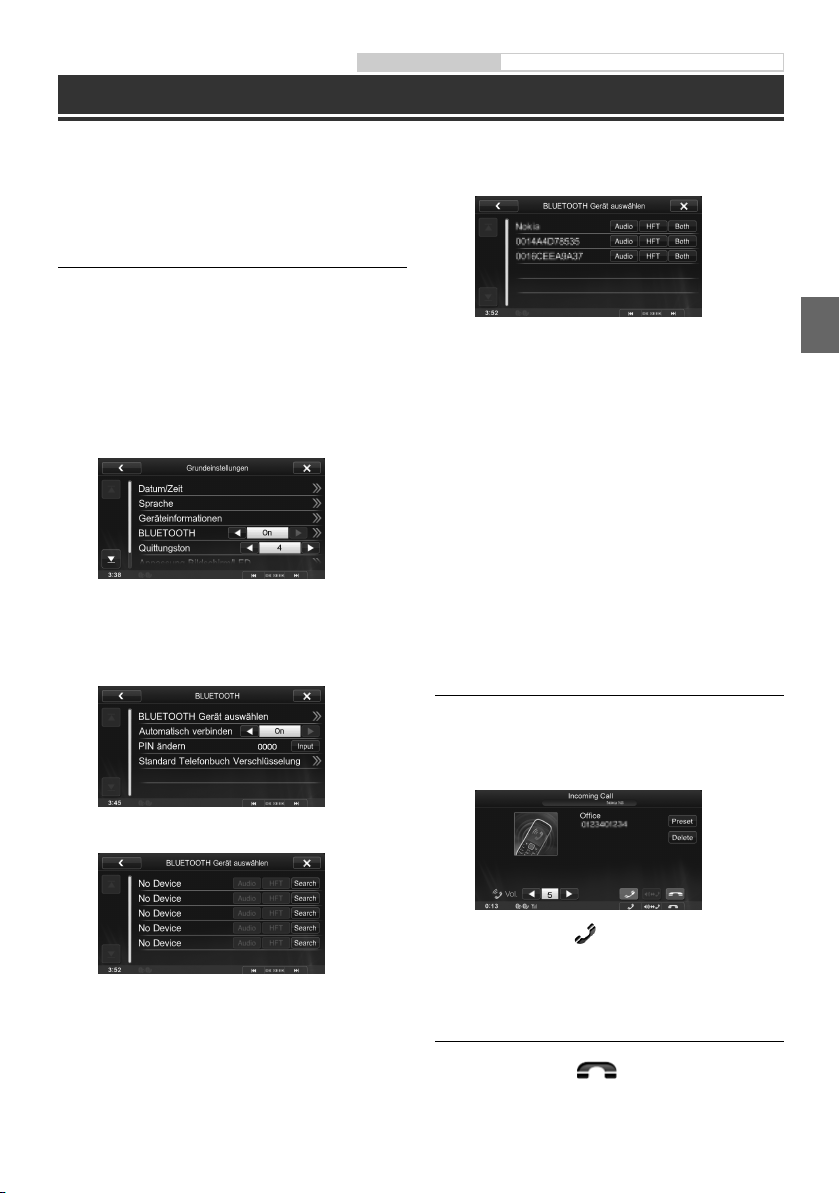
Hands-Free Phone Control
Hands-free calls are possible when using an HFP (Hands-Free Profile) compatible mobile phone with the ICS-X7.
How to connect to a BLUETOOTH
compatible device (Pairing)
1 Press the Home button.
2 Touch [Setup].
3 Touch [General Setup].
4 Touch [o] or [p] of “BLUETOOTH” to set to
“On.”
5 Touch [BLUETOOTH].
6 Touch [Set BLUETOOTH Device].
7 Touch [Search] of “No Device.”
Audio: Sets for use as an Audio device.
HFT: Sets for use as a Hands Free Device.
Both: Sets for use as both an Audio device and
Hands Free Device.
9 When the device registration is complete, a
message appears and the device returns to
normal mode.
The BLUETOOTH registration process differs depending
•
on the device version and SSP (Simple Secure Pairing). If
a 4 or 6 character Passcode appears on this device, enter
the Passcode using the BLUETOOTH compatible device.
If a 6 character Passkey appears on this device, make
sure the same passkey is displayed on the BLUETOOTH
compatible device and touch “Yes.”
Answering a Call
1 An incoming call triggers the ringtone and
an incoming call display.
2 Touch [ ] or press Media Control button
1.
The call starts.
The Device list displays up to 10 items.
8 Touch [Audio], [HFT] or [Both] of the device
you want to connect from the list.
Hanging up the Telephone
1 Touch [ ] or press Media Control
button 3.
The call finishes.
9-EN
Page 12
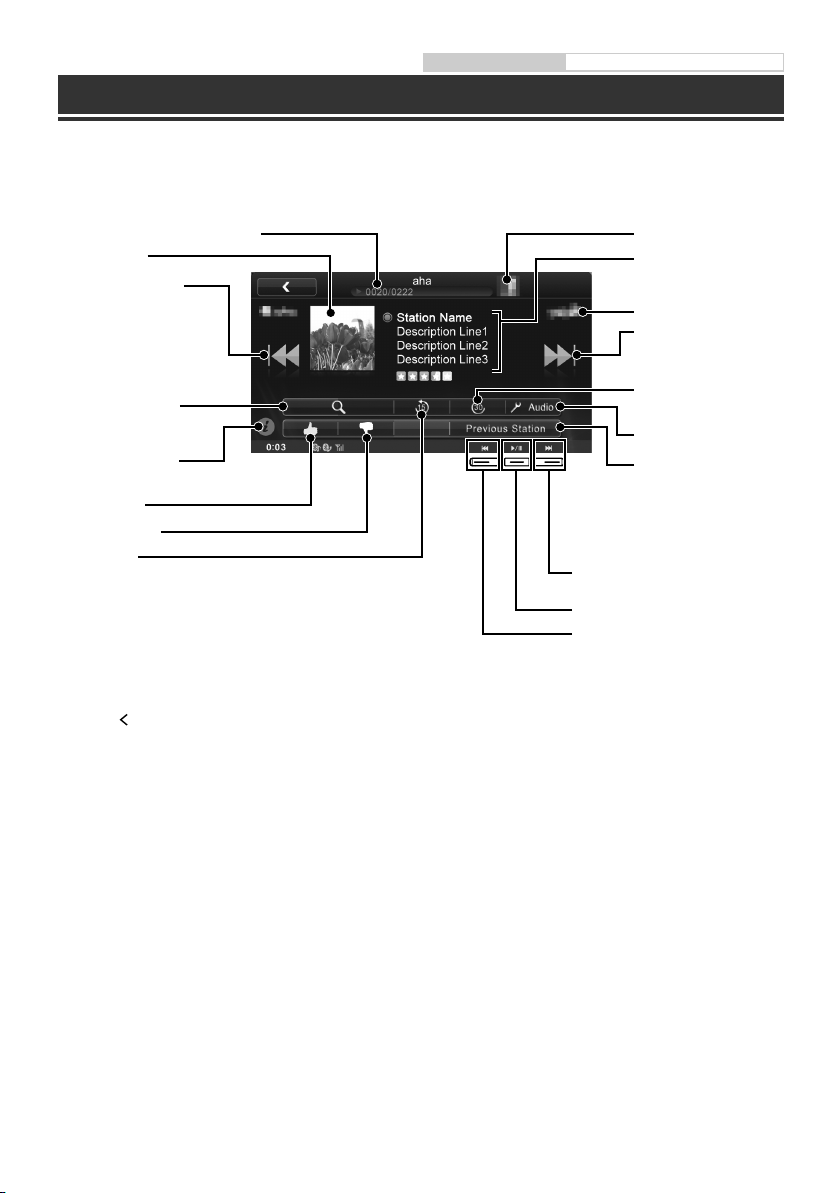
Owner’s manual Aha (Optional)
Aha Operation (Optional)
Aha offers you quick, personalized access to content you really want, and it’s their mission to ensure your listening
experience is gratifying every day.
If the Aha application is installed in an iPhone, you can display and operate the Aha display screen with the ICS-X7.
Current content no./Total content no.
Artwork display
Finds the beginning of
the current content/
Finds a previous content
Search screen display
The screen changes to
Simple mode or Info mode
“Like” feedback
“Dislike” feedback
15 Sec rewind
The currently playing
content jumps back
15 seconds.
Touch [ (Back)] on the playback screen to return to the preset station selection screen.•
Station Logo display
Aha information display
Partner Logo display
Finds the beginning of the
next content
30 Sec skip
The currently playing content
jumps ahead 30 seconds.
Displays the Audio Setup
screen
Recall the Previous Station
Function
You can recall a previously
selected station. You can
switch between the currently
selected and previously
selected station.
Finds the beginning of the next
content
Pause and Playback
Finds the beginning of the current
content/Finds a previous content
10-EN
Page 13

Owner’s manual MirrorLink™ (Optional)
MirrorLink™ Operation (Optional)
MirrorLink is a standard for connecting provides for a connection between an ICS-X7 and a mobile phone.
Using MirrorLink, you can display a displays mobile phone screen and allows you to operate your mobile phone
applications via this unit.
When using MirrorLink, we recommend that you connect your mobile phone via both USB and
BLUETOOTH.
1 Press the Home button.
2 Touch [Mirror Mode], [Car Mode], [Navigation] or [Music].
The screen for the selected mode is displayed.
After connecting to a mobile phone that is compatible with this unit, application icons will appear on the Home screen.
•
3 Press the Media Control button to operate the unit.
The functions of the Media Control button differ, depending on the mode.
•
Operable modes on this unit may differ from operations on your mobile phone, depending on the connected mobile phone.
•
In Navigation mode, you can operate the system by using the touch panel only.
•
11-EN
Page 14

Installation
When making connections to the vehicle’s electrical
•
system, be aware of the factory installed components
(e.g. on-board computer). Do not tap into these leads to
provide power for this unit. When connecting the ICSX7 to the fuse box, make sure the fuse for the intended
circuit of the ICS-X7 has the appropriate amperage.
Failure to do so may result in damage to the unit and/or
the vehicle. When in doubt, consult your Alpine dealer.
The Display must be completely retracted in the casing
•
when installing. If it is not, problems may occur.
Owner’s manual Installation
3 Remove the mounting sleeve from the
main unit.
This unit
Bracket keys
(Included)
1 Install at an angle between horizontal
and 30°. Note that installing at an angle
outside of this range will result in a loss of
performance and possibly damage.
0 - 30°
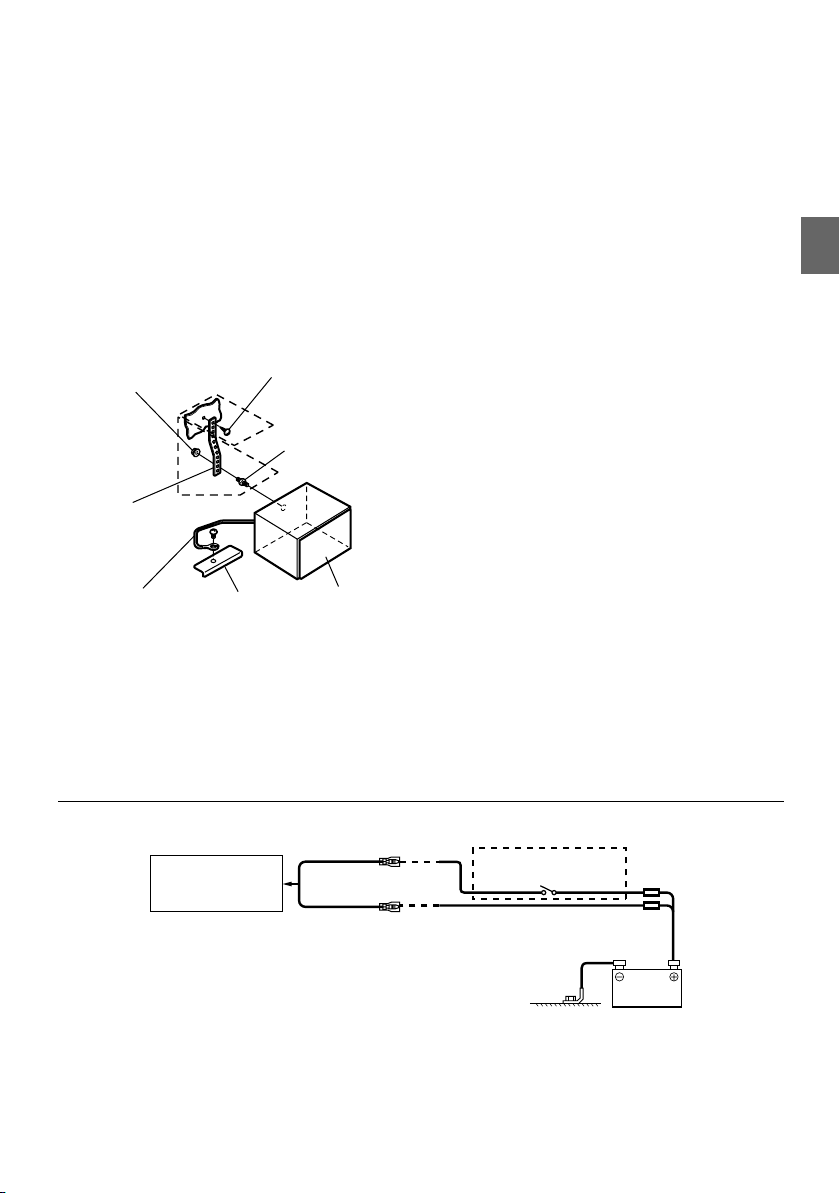
2 Mounting the Microphone.
For safe use, make sure of the following:
•
location is stable and firm.
•
driver’s view and operations are not obstructed.
•
microphone is located where the driver’s voice
can be easily picked up (on the sun visor, etc.).
When you speak into the microphone, you should
not have to change your driving posture. This may
cause a distraction, taking your attention away
from safely driving your vehicle. Carefully consider
direction and distance while mounting the
microphone. Confirm that the driver’s voice can be
easily picked up at the selected location.
Microphone
Slide the unit into the mounting sleeve and
secure it.
Mounting Sleeve
Bracket
(Included)
Pressure
Plates*
1
Dashboard
Rubber Cap
(Included)
Hex Bolt
(Included)
This unit
Face Plate*
(Included)
2
*1 If the installed mounting sleeve is loose in the
dashboard, the pressure plates may be bent slightly to
remedy the problem.
*2 The supplied face plate may be mounted.
12-EN
Cable clamp
(Sold separately)
Page 15
4 When your vehicle has the Bracket, mount
the long hex bolt onto the rear panel of
the ICS-X7 and put the Rubber Cap on the
hex bolt. If your vehicle does not have the
Mounting Support, reinforce the head
unit with the metal mounting strap (not
supplied). Secure the ground lead of the
unit to a clean metal spot using a screw (*1)
already attached to the vehicle’s chassis.
Connect all the leads of the ICS-X7
according to details described in the
CONNECTION section.
Hex Nut (M5)
Metal
Mounting
Strap
Screw
2
*
Bolt Stud
1
*
5 Slide the ICS-X7 into the dashboard until it
clicks. This ensures that the unit is properly
locked and will not accidentally come out
from the dashboard.
Ground Lead
For the screw marked “*2,” use an appropriate screw for
•
Chassis
This unit
the chosen mounting location.
Connection Diagram of SPST Switch (sold separately)
(If the ACC power supply is not available)
ACC
ICS-X7
If your vehicle has no ACC power supply, add an SPST (Single-Pole, Single-Throw) switch (sold separately) and fuse (sold
•
(Red)
BATTERY
(Yellow)
SPST SW (Optional)
separately).
The diagram and the fuse amperage shown above are in the case when ICS-X7 is used individually.
•
If the switched power (ignition) lead of the ICS-X7 is connected directly to the positive (+) post of the vehicle’s battery, the
•
ICS-X7 draws some current (several hundred milliamperes) even when its switch is placed in the OFF position, and the
battery may be discharged.
FUSE (5A)
(Optional)
FUSE (20A)
(Optional)
Battery
13-EN
Page 16

Connections
Connections 1/2
Owner’s manual Connections
Antenna
ISO Antenna Plug
To steering remote control
interface box.
Connect this to the optional Vehicle
Display Interface box.
Not used
REMOTE OUT
(Brown)
REVERSE
(Orange/White)
(Yellow)
(Red)
(White)
To remote input lead
To plus side of the back lamp
signal lead of the car
Microphone (Included)
To Video Output terminal
To Audio Output terminals (R, L)
Amplifier
Amplifier
Rear Left
Rear Right
Front Left
Front Right
14-EN
Amplifier Subwoofers
Page 17
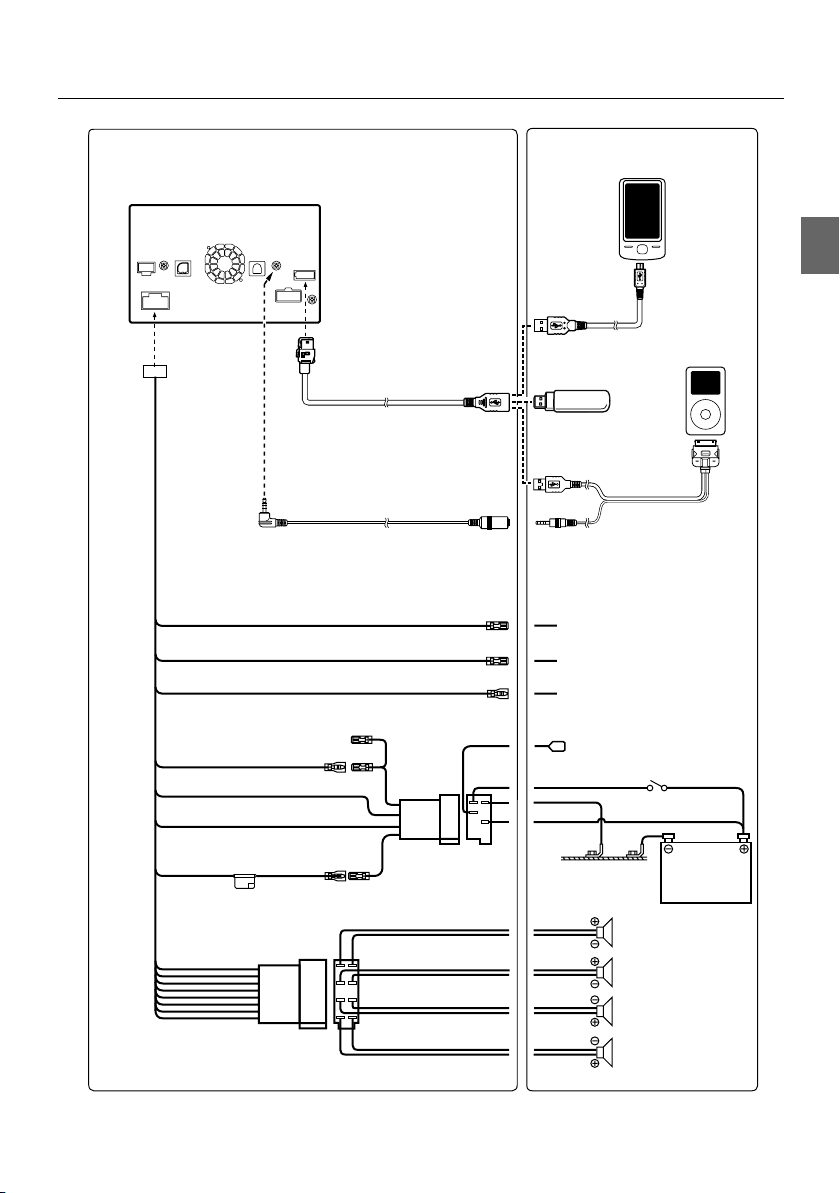
Connections 2/2
Mobile Phone
(Sold separately)
USB extension cable (Included)
iPod VIDEO AV extension cable (Included with KCU-461iV)
REMOTE TURN-ON
(Blue/White)
AUDIO INTERRUPT IN
(Pink/Black)
PARKING BRAKE
(Yellow/Blue)
IGNITION
(Red)
GND
(Black)
POWER ANT
(Blue)
BATTERY
(Yellow)
10A
(Green)
(Green/Black)
(White)
(White/Black)
(Grey/Black)
(Grey)
(Violet/Black)
(Violet)
Mobile Phone cable
(Sold separately)
USB Memory
(Sold separately)
To amplifier or equalizer
Not used
To the parking brake
signal lead
To power antenna
iPod/iPhone
(Sold separately)
Connection kit KCU-461iV
(Sold separately)
Ignition key
Battery
Rear left
Front left
Front right
Rear right
Speakers
15-EN
Page 18

Specifications
Owner’s manual Specifications
MONITOR SECTION
Screen Size 7.0”
LCD Type Transparent type TN LCD
Operation System TFT active matrix
Number of Picture Elements
1,152,000 pcs.
Effective Number of Picture Elements
99% or more
Illumination System LED
(800 × 3 × 480)
FM TUNER SECTION
Tuning Range 87.5 – 108.0 MHz
Mono Usable Sensitivity 8.1 dBf (0.7 µV/75 ohms)
50 dB Quieting Sensitivity 12 dBf (1.1 µV/75 ohms)
Alternate Channel Selectivity
80 dB
Signal-to-Noise Ratio 65 dB
Stereo Separation 35 dB
Capture Ratio 2.0 dB
MW TUNER SECTION
Tuning Range 531 – 1,602 kHz
Usable Sensitivity 25.1 µV/28 dBf
LW TUNER SECTION
Tuning Range 153 – 281 kHz
Sensitivity (IEC Standard) 31.6 µV/30 dB
USB SECTION
USB requirements USB 1.1/2.0
Max. Power Consumption 1,000 mA
USB Class USB (Play From Device)/
File System FAT12/16/32
MP3 Decoding MPEG-1/2 AUDIO Layer-3
WMA Decoding Windows Media™ Audio
AAC Decoding AAC-LC format “.m4a” file
Number of Channels 2-Channel (Stereo)
Frequency Response* 5-20,000 Hz (±1 dB)
Total Harmonic Distortion 0.008% (at 1 kHz)
Dynamic Range 95 dB (at 1 kHz)
Signal-to-Noise Ratio 100 dB
Channel Separation 85 dB (at 1 kHz)
Frequency response may differ depending on the encoder
*
software/bit rate.
USB (Mass Storage Class)
BLUETOOTH SECTION
BLUETOOTH Specification Bluetooth V2.1+EDR
Output Power +4 dBm Max. (Power class 2)
Profile HFP (Hands-Free Profile)
OPP (Object Push Profile)
PBAP (Phone Book Access Profile)
A2DP (Advanced Audio
AVRCP (Audio/Video Remote
Distribution Profile)
Control Profile)
GENERAL
Power Requirement 14.4 V DC
Operating temperature -4°F to +140°F
Maximum Power Output 50 W × 4
Output Voltage 2,000 mV/10 Kohms
Weight 1.6 kg
Audio output level
Preout (Front, Rear): 2 V/10 Kohms (max.)
Preout (Subwoofer): 2 V/10 Kohms (max.)
(11–16 V allowable)
(-20°C to + 60°C)
CHASSIS SIZE
Width 178 mm
Height 100 mm
Depth 159 mm
Due to continuous product improvement, specifications
•
and design are subject to change without notice.
The LCD panel is manufactured using an extremely
•
high precision manufacturing technology. Its effective
pixel ratio is over 99.99%. This means that there is a
possibility that 0.01% of the pixels could be either always
ON or OFF.
16-EN
Page 19

Manufactured under licence from Dolby Laboratories.
•
Dolby and the double-D symbol are trademarks of
Dolby Laboratories.
Windows Media, and the Windows logo are trademarks,
•
or registered trademarks of Microsoft Corporation in
the United States and/or other countries.
iPhone, iPod, iPod classic, iPod nano, iPod touch, and
•
iTunes are trademarks of Apple Inc., registered in the
U.S. and other countries.
“Made for iPod,” and “Made for iPhone,” mean that an
•
electronic accessory has been designed to connect
specifically to iPod, or iPhone, respectively, and
has been certified by the developer to meet Apple
performance standards. Apple is not responsible for the
operation of this device or its compliance with safety
and regulatory standards. Please note that the use of
this accessory with iPod, or iPhone may affect wireless
performance.
© 2010 Nokia. All rights reserved. Nokia and Works with
•
Nokia are trademarks or registered trademarks of Nokia
Corporation.
®
DivX
•
, DivX Certified® and associated logos are
trademarks of Rovi Corporation or its subsidiaries and
are used under license.
•
The BLUETOOTH® word mark and logos are registered
trademarks owned by the Bluetooth SIG, Inc. and any
use of such marks by Alpine Electronics, Inc. is under
licence.
•
“MPEG Layer-3 audio coding technology licenced from
Fraunhofer IIS and Thomson.”
•
“Supply of this product only conveys a licence for
private,non-commercial use and does not convey
a licence nor imply any right to use this product in
any commercial (i.e. revenue-generation) real time
broadcasting (terrestrial, satellite, cable and/or any
other media), broadcasting/streaming via internet,
intranets and/or other networks or in other electronic
content distribution systems, such as pay-audio or
audio-on-demand applications. An independent
licence for such use is required. For details, please visit
http://www.mp3licensing.com”
•
aha, the Aha logo, and the Aha trade dress are
trademarks or registered trademarks of HARMAN
International Industries, used with permission.
17-EN
Page 20

Page 21

Inhalt
WARNUNG ..............................................................................................................................................................2
VORSICHT ................................................................................................................................................................2
Erste Schritte ..........................................................................................................................................................3
Home-Bildschirm und Favoriten ....................................................................................................................4
Verwendung der Mediensteuertasten ......................................................................................................... 4
Benutzung der Medienanzeigetaste.............................................................................................................5
Uhrzeiteinstellung ...............................................................................................................................................5
Radio-Funktionsbildschirm ..............................................................................................................................6
iPod-/iPhone-Funktionsbildschirm (Option) ..............................................................................................7
USB-Speicher-Betrieb (Option) .......................................................................................................................8
Steuerung der Freisprechtelefonfunktion .................................................................................................. 9
Aha-Funktionsbildschirm (Option) ..............................................................................................................10
MirrorLink™-Bedienung (Option) .................................................................................................................11
Einbau ....................................................................................................................................................................12
Anschlüsse ............................................................................................................................................................14
Technische Daten ...............................................................................................................................................16
WICHTIG
Notieren Sie sich die Seriennummer des Geräts bitte an der unten angegebenen Stelle und bewahren
Sie die Notiz auf.
SERIENNUMMER:
ISO-SERIENNUMMER: AL
EINBAUDATUM:
EINGEBAUT VON:
GEKAUFT BEI:
Detaillierte Erläuterungen zu den Gerätefunktionen finden Sie in der Bedienungsanleitung auf
der mitgelieferten CD-ROM. Bei dieser CD handelt es sich um eine Daten-CD. Die Wiedergabe
von Musik oder Bildern auf dem Player ist damit nicht möglich. Bei Bedarf erhalten Sie bei Ihrem
ALPINE-Händler einen Ausdruck der Bedienungsanleitung auf der CD-ROM.
1-DE
Page 22
WARNUNG
WARNUNG
Dieses Symbol weist auf wichtige Anweisungen
hin. Bei Nichtbeachtung besteht die Gefahr von
schweren Verletzungen oder Todesfällen.
KEINE BEDIENUNG AUSFÜHREN, DIE VOM SICHEREN LENKEN
DES FAHRZEUGS ABLENKEN KÖNNTE.
Führen Sie Bedienungen, die Ihre Aufmerksamkeit längere Zeit in
Anspruch nehmen, erst aus, nachdem das Fahrzeug zum Stillstand
gekommen ist. Halten Sie das Fahrzeug immer an einer sicheren Stelle
an, bevor Sie solche Bedienungen ausführen.
Andernfalls besteht Unfallgefahr.
KLEINE GEGENSTÄNDE WIE SCHRAUBEN VON KINDERN
FERNHALTEN.
Werden solche Gegenstände verschluckt, besteht die Gefahr
schwerwiegender Verletzungen. Suchen Sie unverzüglich einen Arzt auf,
wenn ein Kind einen solchen Gegenstand verschluckt.
DIE LAUTSTÄRKE NUR SO HOCH STELLEN, DASS SIE
WÄHREND DER FAHRT NOCH AUSSENGERÄUSCHE
WAHRNEHMEN KÖNNEN.
Übermäßige Lautstärkepegel, die Geräusche wie die Sirenen von
Notarztwagen oder Warnsignale (an einem Bahnübergang usw.)
übertönen, können gefährlich sein und zu einem Unfall führen. HOHE
LAUTSTÄRKEPEGEL IN EINEM AUTO KÖNNEN AUSSERDEM
GEHÖRSCHÄDEN VERURSACHEN.
GERÄT NICHT ÖFFNEN.
Andernfalls besteht Unfallgefahr, Feuergefahr oder die Gefahr eines
elektrischen Schlages.
NUR IN FAHRZEUGEN MIT 12-VOLT-BORDNETZ UND MINUS
AN MASSE VERWENDEN.
Fragen Sie im Zweifelsfall Ihren Händler. Andernfalls besteht
Feuergefahr usw.
SICHERUNGEN IMMER DURCH SOLCHE MIT DER RICHTIGEN
AMPEREZAHL ERSETZEN.
Andernfalls besteht Feuergefahr oder die Gefahr eines elektrischen
Schlages.
LÜFTUNGSÖFFNUNGEN UND KÜHLKÖRPER NICHT
ABDECKEN.
Andernfalls kann es zu einem Wärmestau im Gerät kommen, und es
besteht Feuergefahr.
DAS GERÄT NUR AN EIN 12-V-BORDNETZ IN EINEM
FAHRZEUG ANSCHLIESSEN.
Andernfalls besteht Feuergefahr, die Gefahr eines elektrischen Schlages
oder anderer Verletzungen.
AUF KORREKTE ANSCHLÜSSE ACHTEN.
Bei fehlerhaften Anschlüssen besteht Feuergefahr, und es kann zu
Schäden am Gerät kommen.
VOR DEM ANSCHLUSS DAS KABEL VOM MINUSPOL DER
BATTERIE ABKLEMMEN.
Andernfalls besteht die Gefahr eines elektrischen Schlages oder
Verletzungsgefahr durch einen Kurzschluss.
ELEKTRISCHE KABEL NICHT SPLEISSEN.
Kabel dürfen nicht abisoliert werden, um andere Geräte mit Strom zu
versorgen. Andernfalls wird die Strombelastbarkeit des Kabels überschritten,
und es besteht Feuergefahr oder die Gefahr eines elektrischen Schlages.
BEIM BOHREN VON LÖCHERN LEITUNGEN UND KABEL NICHT
BESCHÄDIGEN.
Wenn Sie beim Einbauen Löcher in das Fahrzeugchassis bohren, achten
Sie unbedingt darauf, die Kraftstoffleitungen und andere Leitungen, den
Benzintank und elektrische Kabel nicht zu berühren, zu beschädigen
oder zu blockieren. Andernfalls besteht Feuergefahr.
BOLZEN UND MUTTERN DER BREMSANLAGE NICHT ALS
MASSEPUNKTE VERWENDEN.
Verwenden Sie für Einbau oder Masseanschluß NIEMALS Bolzen oder
Muttern der Brems- bzw. L enkanlage oder eines anderen sicherheitsrelevanten
Systems oder des Benzintanks. Andernfalls besteht die Gefahr, dass Sie die
Kontrolle über das Fahrzeug verlieren oder ein Feuer ausbricht.
DAS GERÄT NICHT AN EINER STELLE EINBAUEN, AN DER ES
BEIM FAHREN HINDERLICH SEIN KÖNNTE, WEIL ES Z. B. DAS
LENKRAD ODER DEN SCHALTHEBEL BLOCKIERT.
Andernfalls ist möglicherweise keine freie Sicht nach vorne gegeben,
oder die Bewegungen des Fahrers sind so eingeschränkt, dass
Unfallgefahr besteht.
VORSICHT
Dieses Symbol weist auf wichtige Anweisungen
hin. Bei Nichtbeachtung besteht die Gefahr von
Verletzungen bzw. Sachschäden.
DAS GERÄT NICHT WEITERBENUTZEN, WENN EIN PROBLEM
AUFTRITT.
Andernfalls kann es zu Verletzungen oder Schäden am Gerät kommen.
Geben Sie das Gerät zu Reparaturzwecken an einen autorisierten AlpineHändler oder den nächsten Alpine-Kundendienst.
VERKABELUNG UND EINBAU VON FACHPERSONAL
AUSFÜHREN LASSEN.
Die Verkabelung und der Einbau dieses Geräts erfordern technisches
Geschick und Erfahrung. Zu Ihrer eigenen Sicherheit sollten Sie
Verkabelung und Einbau dem Händler überlassen, bei dem Sie das Gerät
erworben haben.
NUR DAS VORGESCHRIEBENE ZUBEHÖR VERWENDEN UND
DIESES SICHER EINBAUEN.
Verwenden Sie ausschließlich das vorgeschriebene Zubehör. Andernfalls
wird das Gerät möglicherweise beschädigt, oder es lässt sich nicht sicher
einbauen. Wenn sich Teile lösen, stellen diese eine Gefahrenquelle dar,
und es kann zu Betriebsstörungen kommen.
DIE KABEL SO VERLEGEN, DASS SIE NICHT GEKNICKT ODER
DURCH SCHARFE KANTEN GEQUETSCHT WERDEN.
Verlegen Sie die Kabel so, dass sie sich nicht in beweglichen Teilen wie
den Sitzschienen verfangen oder an scharfen Kanten oder spitzen Ecken
beschädigt werden können. So verhindern Sie eine Beschädigung der
Kabel. Wenn Sie ein Kabel durch eine Bohrung in einer Metallplatte
führen, schützen Sie die Kabelisolierung mit einer Gummitülle vor
Beschädigung durch die Metallkanten der Bohrung.
DAS GERÄT NICHT AN STELLEN EINBAUEN, AN DENEN ES
HOHER FEUCHTIGKEIT ODER STAUB AUSGESETZT IST.
Bauen Sie das Gerät so ein, dass es vor hoher Feuchtigkeit und Staub
geschützt ist. Wenn Feuchtigkeit oder Staub in das Gerät gelangen, kann
es zu Betriebsstörungen kommen.
2-DE
Page 23
Bedienungsanleitung
Bedienung über den Touchscreen, Lage und Funktion der Teile und Bedienelemente, Ein- und Ausschalten
Erste Schritte
Bedienung über den Touchscreen
Sie können das System über die berührungsempfindlichen Schaltflächen auf dem Bildschirm bedienen.
e
Häufig benutzte Schaltflächen
: Rückkehr zum vorherigen Bildschirm. Je nach Funktion kann mit dieser Taste der Touchscreen-
Bedienvorgang abgebrochen werden.
: Schließt das Fenster.
Lage und Funktion der Teile und Bedienelemente
Bei Verwendung des Navigationssystems:
A Home/C-Taste
Berühren Sie die Home-Taste, um die Favoriten
aufzurufen.
Drücken Sie die Home-Taste, um den Home-Bildschirm
aufzurufen.
Wenn Sie die Taste länger als 5 Sekunden drücken, wird
das Gerät ausgeschaltet.
B Fernbedienungssensor
Richten Sie die Fernbedienung in einem Abstand von
maximal 2 Metern auf diesen Sensor.
C / -Taste
Drücken, um die Lautstärke zu regeln.
D RESET-Schalter
Das Gerätesystem wird zurückgesetzt.
E
(Medienanzeige)-Taste
Wenn Sie das Navigationssystem nicht verwenden:
•
Wenn
auf dem Bildschirm erscheint, wird der
Bildschirm durch Drücken der
Weise wie durch Berührung von [
-Taste auf die gleiche
] geschlossen.
•
Durch Drücken wird zwischen dem
Navigationsbildschirm und dem Audio/VideoBildschirm umgeschaltet.
F Mediensteuertaste 1/2/3
Diese Funktion hängt von der Audio/VideoAnwendung ab. (Titel Auf/Ab, WIEDERGABE/PAUSE
Zurückspulen/Vorspulen usw.)
G MUTE-Taste
Durch die Aktivierung dieser Funktion wird der
Lautstärkepegel sofort um 20 dB gesenkt.
Ein- und Ausschalten
1 Drehen Sie den Zündschlüssel in die Stellung ACC oder EIN.
Das System schaltet sich ein.
2
Halten Sie die Home/C-Taste mindestens 5 Sekunden lang gedrückt, um das Gerät auszuschalten.
3-DE
Page 24
Bedienungsanleitung Home -Bildschirm und Favoriten
Home-Bildschirm und Favoriten
Vom Home-Bildschirm oder von den Favoriten können Sie einfach zur Anwendung Ihrer Wahl umschalten. Auf dem HomeBildschirm werden Symbole für die Anwendungen angezeigt, die mit diesem Gerät benutzt werden können. „Favoriten“ ist eine
Verknüpfungsfunktion, die bis zu 4 Symbole auf dem Bildschirm anzeigt, den Sie gerade verwenden. Das Symbollayout kann nach
Ihren Wünschen angepasst werden.
Home-Taste
Berühren Sie die Home-Taste.
Drücken Sie die Home-Taste.
Home-Bildschirm
Berühren Sie ein
Anwendungssymbol, um
zu dieser Anwendung zu
wechseln.
Bedienungsanleitung Verwendung der Mediensteuertasten
Favoriten
Verwendung der Mediensteuertasten
Für Vorgänge wie das Hoch- oder Herunterwechseln zwischen den Titeln können Sie zusätzlich zu den
Bedientasten auf dem Bildschirm auch die Mediensteuertasten am Gerät selbst benutzen. So können Sie einen
Titel mit der Mediensteuertaste auswählen, auch wenn der Hauptbildschirm für die Medien nicht angezeigt wird.
Die Funktion der Mediensteuertasten kann sich je nach verwendetem Medium ändern. Eine Hilfefunktion wird auf
dem Bildschirm eingeblendet, die die Belegung der Tasten anzeigt.
Hilfe-Anzeige
4-DE
Mediensteuertasten 1
Mediensteuertasten 2
Mediensteuertasten 3
Page 25
Bedienungsanleitung Benutzung der Medienanzeigetaste
Benutzung der Medienanzeigetaste
Sie können mit nur einer Berührung zwischen dem Navigationsbildschirm und dem Hauptbildschirm für die
aktuelle Medienquelle umschalten.
Medienanzeigetaste
Drücken Sie .
Medienbildschirm
Bedienungsanleitung Einstellung von Datum/Zeit
Uhrzeiteinstellung
1 Drücken Sie die Home-Taste.
2 Berühren Sie [Setup].
3 Berühren Sie [Grundeinstellungen].
4 Berühren Sie [Datum/Zeit].
5 Berühren Sie [Uhr einstellen].
6 Berühren Sie [o] oder [p] bei „Jahr“,
„Monat“, „Tag“, „Stunde“ und „Minute“, um
die Uhr einzustellen.
7 Berühren Sie [ ].
5-DE
Page 26
Radio-Funktionsbildschirm
Bedienungsanleitung Radio, RDS
Senderspeicher-Anzeige
Frequenzanzeige
Verringert die Frequenz
Stationstaste
Durch kurzes Antippen wird
der entsprechende Festsender
eingestellt.
Durch mindestens zwei
Sekunden langes Halten wird der
momentan eingestellte Sender
als Festsender gespeichert.
Zeigt den Bildschirm
„PTY auswählen“ an
Der Bildschirm wechselt zum
Einfachen Modus bzw. zum
Info-Modus
Empfang mit Nachrichtenpriorität Ein/Aus
AF-Funktion Ein/Aus
Speichert Sender automatisch ab RDS-Anzeige
Erhöht die Frequenz
Ändert den Abstimmmodus
Verringert die Frequenz
Verkehrsfunkmodus Ein/Aus
Frequenzbandanzeige
Infobereich
Erhöht die Frequenz
Wechselt das
Frequenzband
Die Anzeige zur AudioEinstellung erscheint
6-DE
Page 27
Bedienungsanleitung iPod/iPhone (Option)
iPod-/iPhone-Funktionsbildschirm (Option)
Sie können mit dem separat erhältlichen Kabel (KCU-461iV) einen iPod/ein iPhone an dieses Gerät anschließen. Wenn
Sie einen videofähigen iPod anschließen, können Sie nicht nur Musik, sondern auch Videodateien wiedergeben.
Audiomodus
Der Suchbildschirm wird
angezeigt
Grafikanzeige
Rücksprung zum Anfang
der aktuellen Datei/
Rücksprung zum Anfang der
vorhergehenden Datei, wenn
innerhalb der ersten Sekunde
nach Wiedergabebeginn
angetippt/Schneller Rücklauf,
wenn mindestens zwei
Sekunden lang gehalten
Zeigt den Suchbildschirm an
Der Bildschirm wechselt zum
Einfachen Modus bzw. zum
Info-Modus
Sprung zur vorhergehenden
Wiedergabeliste/Interpret/
Album/Podcast/Genre/
Komponist
Direktwahltastensymbol
Sprung zur nächsten Wiedergabeliste/
zum nächsten Interpreten/Album/
Podcast/Genre/Komponisten
Zufallswiedergabe (Alle zufällig wiedergeben)
Nummer des aktuellen Songs/
Gesamtzahl der Songs
iPod/iPhone-Informationen
Sprung zum Anfang der
nächsten Datei/Schneller
Vorlauf, wenn mindestens
zwei Sekunden lang
gehalten
Zufallswiedergabe (Shuffle)
Die Anzeige zur AudioEinstellung erscheint
Sprung zum Anfang der nächsten Datei/
Schneller Vorlauf, wenn mindestens
zwei Sekunden lang gehalten
Pause und Wiedergabe
Rücksprung zum Anfang der aktuellen
Datei/Rücksprung zum Anfang der
vorhergehenden Datei, wenn innerhalb der
ersten Sekunde nach Wiedergabebeginn
angetippt/Schneller Rücklauf, wenn
mindestens zwei Sekunden lang gehalten
Wiederholfunktion
Nach einer Musikdatei suchen
Zum Beispiel: Suchen nach einem Interpretennamen
1 Berühren Sie [ (Search)] während der
Wiedergabe.
2 Berühren Sie [Music].
3 Berühren Sie [Artists].
4 Berühren Sie den Namen des gewünschten
Interpreten an.
Der Album-Suchbildschirm des gewählten
Interpreten erscheint.
Bei Berühren von [p] des gewünschten Interpreten
werden alle seine Songs wiedergegeben.
5 Berühren Sie den Namen des gewünschten
Albums.
Alle Songs des gewählten Albums werden angezeigt.
Bei Berühren von [p] des gewünschten Albums
werden alle Songs aus Diesem wiedergegeben.
6 Berühren Sie den Namen des gewünschten
Songs.
Der gewählte Song wird wiedergegeben.
Durch das Antippen von [p] unter der Option „ALL“
•
werden alle Songs aus der List abgespielt.
7-DE
Page 28

Bedienungsanleitung USB-Speicher (Option)
USB-Speicher-Betrieb (Option)
An dieses Gerät kann ein USB-Speichermedium angeschlossen werden.
Sie können Musikdateien (MP3/WMA/AAC) und Videodateien (DivX®), die in einem USB-Speichermedium auf dem
internen Player dieses Systems gespeichert sind, wiedergeben.
Audiomodus
Der Suchbildschirm wird angezeigt
Rücksprung zum Anfang
der aktuellen Datei/
Rücksprung zum Anfang der
vorhergehenden Datei, wenn
innerhalb der ersten Sekunde
nach Wiedergabebeginn
angetippt/Schneller Rücklauf,
wenn mindestens zwei
Sekunden lang gehalten
Zeigt den Suchbildschirm an
Der Bildschirm wechselt zum
Einfachen Modus bzw. zum
Info-Modus
Findet den Anfang des vorherigen Ordners
Wiedergabeliste/Interpret/Album/Genre/
Komponist
Findet den Anfang des nächsten Ordners
Wiedergabeliste/Interpret/Album/Genre/
Komponist
Zufallswiedergabe
Zufallswiedergabe (Alle zufällig wiedergeben)
Video-Modus
Nr. der aktuellen Datei/Anzahl
aller Dateien
Rücksprung zum Anfang
der aktuellen Datei/
Rücksprung zum Anfang der
vorhergehenden Datei, wenn
innerhalb der ersten Sekunde
nach Wiedergabebeginn
angetippt/Schneller Rücklauf,
wenn mindestens zwei
Sekunden lang gehalten
Zeigt den Suchbildschirm an
Der Bildschirm wechselt zum
Einfachen Modus bzw. zum
Info-Modus
Findet den Anfang des vorherigen
Ordners
Findet den Anfang des nächsten Ordners
Schaltet zwischen Audiospuren hin und her
Schaltet zwischen Untertiteln hin und her
8-DE
Nummer des aktuellen Songs/Gesamtzahl der Songs
MP3-/WMA-/AACInformationsanzeige
Sprung zum Anfang der
nächsten Datei/Schneller
Vorlauf, wenn mindestens
zwei Sekunden lang
gehalten
Wiederholfunktion
Die Anzeige zur AudioEinstellung erscheint
Sprung zum Anfang der nächsten
Datei/Schneller Vorlauf, wenn
mindestens zwei Sekunden lang
gehalten
Pause und Wiedergabe
Rücksprung zum Anfang der aktuellen
Datei/Rücksprung zum Anfang der
vorhergehenden Datei, wenn innerhalb der
ersten Sekunde nach Wiedergabebeginn
angetippt/Schneller Rücklauf, wenn
mindestens zwei Sekunden lang gehalten
DivX® Informationsanzeige
Sprung zum Anfang der
nächsten Datei/Schneller
Vorlauf, wenn mindestens
zwei Sekunden lang
gehalten
Stoppen der Wiedergabe
Wiederholfunktion
Die Anzeige zur AudioEinstellung erscheint
Der Bildschirm
„Displayeinstellungen“
wird angezeigt
Sprung zum Anfang der nächsten
Datei/Schneller Vorlauf, wenn
mindestens zwei Sekunden lang
gehalten
Pause und Wiedergabe
Rücksprung zum Anfang der aktuellen
Datei/Rücksprung zum Anfang der
vorhergehenden Datei, wenn innerhalb der
ersten Sekunde nach Wiedergabebeginn
angetippt/Schneller Rücklauf, wenn
mindestens zwei Sekunden lang gehalten
Page 29
Bedienungsanleitung BLUETOOTH-Einstellung, BLUETOOTH-Bedienung
Steuerung der Freisprechtelefonfunktion
Telefongespräche über die Freisprecheinrichtung sind nur möglich, wenn ein HFP- (Hands-Free Profile)
kompatibles Mobiltelefon mit dem ICS-X7 verwendet wird.
Herstellen der Verbindung zu einem
BLUETOOTH-kompatiblen Gerät
(Pairing)
1 Drücken Sie die Home-Taste.
2 Berühren Sie [Setup].
3 Berühren Sie [Grundeinstellungen].
4 Berühren Sie [o] oder [p] unter
„BLUETOOTH“, um ihn auf „On“ zu stellen.
5 Berühren Sie [BLUETOOTH].
6 Berühren Sie [BLUETOOTH Gerät
auswählen].
Audio: Einstellung als Audiogerät.
HFT: Einstellung als Freisprecheinrichtung.
Both: Einstellung als Audiogerät und als
Freisprecheinrichtung.
9
Wenn die Geräteregistrierung abgeschlossen
ist, erscheint eine Meldung und das Gerät
kehrt in den Normalmodus zurück.
Der BLUETOOTH-Registrierungsprozess ist je nach
•
Geräteversion und SSP (Simple Secure Pairing)
verschieden. Wenn ein Passcode mit 4 oder 6 Zeichen auf
diesem Gerät erscheint, geben Sie den Passcode mit dem
BLUETOOTH-kompatiblen Gerät ein.
Wenn ein Passschlüssel aus 6 Zeichen auf diesem Gerät
erscheint, überprüfen Sie, ob derselbe Passschlüssel auf
dem BLUETOOTH-kompatiblen Gerät erscheint und
berühren Sie „Yes“.
Annehmen eines Anrufs
7 Berühren Sie [Search] unter „No Device“.
Die Geräteliste zeigt bis zu 10 Einträge an.
8 Berühren Sie [Audio], [HFT] oder [Both] für
das Gerät aus der Liste, mit dem Sie sich
verbinden möchten.
1 Ein eingehender Anruf löst den Klingelton
aus und wird auf dem Bildschirm
angezeigt.
2 Berühren Sie [ ] oder drücken Sie die
Mediensteuerungstaste 1.
Das Gespräch wird gestartet.
Auflegen des Telefons
1 Berühren Sie [ ] oder drücken Sie die
Mediensteuerungstaste 3.
Das Gespräch wird beendet.
9-DE
Page 30
Bedienungsanleitung Aha (Option)
Aha-Funktionsbildschirm (Option)
Aha bietet Ihnen einen schnellen und personalisierten Zugang zu gewünschten Inhalten. Der Dienst möchte
sicherstellen, dass Sie sich jeden Tag über Ihr Hörerlebnis freuen.
Wenn die Anwendung Aha auf einem iPhone installiert ist, können Sie den Aha-Anzeigebildschirm mit dem ICSX7 bedienen.
Nr. des aktuellen Inhalts/Anzahl Gesamtinhalt
Grafikanzeige
Rücksprung zum Anfang
des aktuellen Inhalts/
Rücksprung zum Anfang
des vorhergehenden
Inhalts
Zeigt den Suchbildschirm an
Der Bildschirm wechselt
zum Einfachen Modus bzw.
zum Info-Modus
Feedback „Like“
Feedback „Dislike“
15 Sek. zurückspulen
Der aktuell wiedergegebene Inhalt
springt 15 Sekunden zurück.
Pause und Wiedergabe
Rücksprung zum Anfang des aktuellen
Inhalts/Rücksprung zum Anfang des
vorhergehenden Inhalts
Berühren Sie [ (Zurück)] auf dem Wiedergabebildschirm, um zum Auswahlbildschirm für Vorwahlsender
•
Anzeige des Senderlogos
Aha-Informationen
Anzeige des Partnerlogos
Sprung zum Anfang des
nächsten Inhalts
30 Sek. überspringen
Der aktuell wiedergegebene
Inhalt springt 30 Sekunden
vor.
Die Anzeige zur Audio-
Einstellung erscheint
Funktion „Vorhergehende
Station aufrufen“
Sie können einen zuvor
ausgewählten Sender erneut
aufrufen. Sie können zwischen
dem derzeit ausgewählten
und dem zuvor ausgewählten
Sender umschalten.
Sprung zum Anfang des nächsten
Inhalts
zurückzukehren.
10-DE
Page 31

Bedienungsanleitung MirrorLink™ (Option)
MirrorLink™-Bedienung (Option)
MirrorLink ist ein Anschlussstandard für die Verbindung zwischen einem ICS-X7 und einem Mobiltelefon. Mit
MirrorLink können Sie den Bildschirm eines Mobiltelefons anzeigen und die Anwendungen des Mobiltelefons
über dieses Gerät bedienen.
Wenn Sie MirrorLink nutzen, empfehlen wir Ihnen, das Mobiltelefon sowohl über USB als auch über
BLUETOOTH zu verbinden.
1 Drücken Sie die Home-Taste.
2 Berühren Sie [Mirror Mode], [Car Mode], [Navigation] oder [Music].
Der Bildschirm für den ausgewählten Modus erscheint.
Nach dem Herstellen einer Verbindung mit dem Mobiltelefon, das mit diesem Gerät kompatibel ist, erscheinen die
•
Programmsymbole auf dem Home-Bildschirm.
3 Drücken Sie die Mediensteuertaste, um das Gerät zu bedienen.
Die Funktionen der Mediensteuertaste variieren abhängig vom Modus.
•
Die über dieses Gerät bedienbaren Modi können abhängig vom angeschlossenen Mobiltelefon von den Bedienschritten des
•
Mobiltelefons abweichen.
Im Navigation-Modus können Sie das System nur über den Berührungsbildschirm bedienen.
•
11-DE
Page 32

Einbau
Bedienungsanleitung Einbau
Beim Anschließen an das Bordnetz des Fahrzeugs
•
unbedingt die werkseitig eingebauten Komponenten
(z. B. Bordrechner) beachten. Keinesfalls die
Stromversorgung für das Gerät an diesen Komponenten
abgreifen. Beim Anschluss im Sicherungskasten des
ICS-X7 darauf achten, dass die Sicherung des gewählten
Stromkreises die für den ICS-X7 vorgeschriebene
Amperezahl aufweist. Bei Nichtbeachtung dieses Punktes
sind Folgeschäden am Gerät bzw. am Fahrzeug nicht
ausgeschlossen. Wenden Sie sich im Zweifelsfall an Ihren
Alpine-Händler.
Der Monitor muss beim Einbau ganz eingefahren sein.
•
Wenn er offen steht, können Einbauprobleme auftreten.
1 Die Installation sollte in einem Winkel
zwischen horizontal und 30° erfolgen. Liegt
der Installationswinkel außerhalb dieses
Bereichs, kann es zu Leistungseinbußen
und möglicherweise zu Schäden kommen.
0 -30°
2 Befestigung des Mikrofons.
Beachten Sie Folgendes für den sicheren Gebrauch:
Der Einbauort ist stabil und fest.
•
Die Sicht und Tätigkeiten des Fahrers werden
•
nicht behindert.
Das Mikrofon ist dort angebracht, wo die Stimme
•
des Fahrers gut hörbar ist (an der Sonnenblende
usw.).
Beim Sprechen in das Mikrofon sollten Sie
nicht die Haltung ändern müssen, die Sie zum
Fahren eingenommen haben. Dies könnte Ihre
Aufmerksamkeit vom sicheren Fahren Ihres Wagens
ablenken. Beachten Sie die Richtung und den
Abstand beim Anbringen des Mikrofons. Bestätigen
Sie, ob die Stimme des Fahrers am ausgewählten
Ort gut hörbar ist.
Mikrofon
Kabelklammer
(separat erhältlich)
3 Nehmen Sie den Einbaurahmen vom
Hauptgerät.
Dieses Gerät
Halterungsklammern
(mitgeliefert)
Schieben Sie das Gerät in den
Einbaurahmen und sichern Sie es.
Einbaurahmen
(mitgeliefert)
Halterungsklammer
DruckPlatten*
*1 Wenn der angebrachte Einbaurahmen lose im
Armaturenbrett sitzt, können die Druckplatten
geringfügig gebogen werden, um das Problem zu
beheben.
*2 Die mitgelieferte Frontplatte kann angebracht werden.
Armaturenbrett
1
Sechskantbolzen
(mitgeliefert)
Gummikappe
(mitgeliefert)
Dieses Gerät
Frontplatte*
(mitgeliefert)
2
12-DE
Page 33

4 Falls das Fahrzeug eine Stützhalterung
aufweist, bringen Sie die lange
Sechskantschraube an der Rückseite
des ICS-X7 an und decken sie mit der
Gummikappe ab. Bei einem Fahrzeug ohne
Stützhalterung muss das Hauptgerät mit
Hilfe einer Befestigungsstrebe (nicht im
Lieferumfang) hinten abgestützt werden.
Sichern Sie das Massekabel des Geräts
mit Hilfe einer bereits am Chassis des
Fahrzeugs vorhandenen Schraube (*1) an
einer sauberen Metallstelle. Schließen Sie
alle anderen Kabel des ICS-X7 an dieses
Gerät gemäß den Angaben im Abschnitt
ANSCHLÜSSE an.
*
1
*
Schraube
2
Stiftschraube
Sechskantmutter (M5)
Befestigungsstrebe
5 Schieben Sie den ICS-X7 in das
Armaturenbrett, bis ein Klicken ertönt.
Hierdurch wird sichergestellt, dass das
Gerät vorschriftsmäßig arretiert ist und
nicht aus dem Armaturenbrett rutschen
kann.
Massekabel
Für die Schraube, gekennzeichnet mit „*2“, eine für den
•
Chassis
Dieses Gerät
gewählten Einbauort geeignete Schraube verwenden.
Anschlussschema für SPST-Schalter (separat erhältlich)
(Falls keine ACC-Spannungsversorgung vorhanden ist)
ACC
ICS-X7
Wenn Ihr Fahrzeug keine ACC-Spannungsversorgung bietet, schließen Sie das Gerät über einen separat erhältlichen
•
(Rot)
BATTERIE
(Gelb)
SPST SW (Option)
SPST-Schalter (einpoliger Ein-/Ausschalter) und über eine separat erhältliche Sicherung an.
Das Diagramm und die oben angegebene Amperezahl der Sicherung beziehen sich auf den Fall, in dem der ICS-X7 allein
•
verwendet wird.
Wenn das Zuleitungskabel für die geschaltete Stromversorgung (Zündung) des ICS-X7 direkt mit dem Pluspol (+)
•
der Batterie des Fahrzeugs verbunden ist, zieht der ICS-X7 auch im ausgeschalteten Zustand Strom (einige hundert
Milliampere), was ein Entladen der Batterie zur Folge haben kann.
SICHERUNG
(5A) (Option)
SICHERUNG
(20A) (Option)
Batterie
13-DE
Page 34

Anschlüsse
Anschlüsse 1/2
Bedienungsanleitung Anschlüsse
Antenne
ISO-Antennenstecker
An LenkradfernbedienungsSchnittstellenbox.
Nicht verwendet
Verbinden Sie dies mit der optionalen
Fahrzeug-Display-Schnittstellenbox.
REMOTE OUT
(Braun)
REVERSE
(Orange/Weiß)
(Gelb)
(Rot)
(Weiß)
An das Fernbedienungs-Eingangskabel
An die Plusader des
Rückfahrscheinwerferkabels am Fahrzeug
Mikrofon (mitgeliefert)
An Videoausgang
An Audioausgängen (R, L)
Linker
Verstärker
Verstärker
Verstärker Subwoofer
Hecklautsprecher
Rechter
Hecklautsprecher
Linker
Frontlautsprecher
Rechter
Frontlautsprecher
14-DE
Page 35

Anschlüsse 2/2
Mobiltelefon
(separat erhältlich)
USB-Verlängerungskabel (mitgeliefert)
iPod VIDEO AV-Verbindungskabel (Mitgeliefert mit KCU-461iV )
REMOTE TURN-ON
(Blau/Weiß)
AUDIO INTERRUPT IN
(Rosa/Schwarz)
PARKING BRAKE
(Gelb/Blau)
IGNITION
(Rot)
GND
(Schwarz)
POWER ANT
(Blau)
BATTERY
(Gelb)
10A
(Grün)
(Grün/Schwarz)
(Weiß)
(Weiß/Schwarz)
(Grau/Schwarz)
(Grau)
(Violett/Schwarz)
(Violett)
Mobiltelefon-Kabel
(separat erhältlich)
USB-Speicher
(separat erhältlich)
Verbindungssatz KCU-461iV
(separat erhältlich)
An den Verstärker bzw. Equalizer
Nicht verwendet
An das HandbremsenSignalkabel
An die Motorantenne
Hinten links
Vorne links
Vorne rechts
Hinten rechts
iPod/iPhone
(separat erhältlich)
Zündschlüssel
Batterie
Lautsprecher
15-DE
Page 36

Technische Daten
Bedienungsanleitung Technische Daten
MONITOR-ABSCHNITT
Bildschirmgröße 7,0”
LCD-Typ (Flüssigkristallanzeige)
Transparentes TN LCD
Arbeitsprinzip TFT-Aktivmatrix
Anzahl Bildelemente 1.152.000 Pixel
(800 × 3 × 480)
Effektive Anzahl an Bildelementen
mindestens 99%
Beleuchtung LED
UKW-TUNER
Empfangsbereich 87,5 - 108,0 MHz
Mono-Empfindlichkeit 8,1 dBf (0,7 µV/75 Ohm)
Geräuschberuhigung, 50 dB 12 dBf (1,1 µV/75 Ohm)
Ersatzkanal-Abstimmschärfe 80 dB
Störabstand 65 dB
Stereokanaltrennung 35 dB
Gleichwellenselektion 2,0 dB
MW-TUNER
Empfangsbereich 531 - 1.602 kHz
Nutzbare Empfindlichkeit 25,1 µV/28 dBf
LW-TUNER
Empfangsbereich 153 - 281 kHz
Empfindlichkeit (IEC-Standard) 31,6 µV/30 dBf
USB-ABSCHNITT
USB-Anforderungen USB 1.1/2.0
Max. Energieverbrauch 1.000 mA
USB-Klasse USB ( Wiedergabe vom Gerät)/
Dateisystem FAT12/16/32
MP3-Decodierung MPEG-1/2 AUDIO Layer-3
WMA-Decodierung Windows Media™ Audio
AAC-Decodierung AAC-LC-Format, „.m4a“-Datei
Anzahl der Kanäle 2-Kanal (Stereo)
Frequenzgang* 5-20.000 Hz (±1 dB)
Gesamtklirrfaktor 0,008% (bei 1 kHz)
Dynamikumfang 95 dB (bei 1 kHz)
Störabstand 100 dB
Kanaltrennung 85 dB (bei 1 kHz)
*
Frequenzgang kann abhängig von Codierungssoftware/Bitrate
abweichen.
USB (Massenspeicher)
BLUETOOTH-ABSCHNITT
BLUETOOTH-Spezifikation Bluetooth V2.1+EDR
Ausgangsleistung +4 dBm Max. (Leistungsklasse 2)
Profile HFP (Hands Free Profile)
OPP (Object Push Profile)
PBAP (Phone Book Access Profile)
A2DP (Advanced Audio
Distribution Profile)
AVRCP (Audio/Video Remote
Control Profile)
ALLGEMEINES
Spannungsversorgung 14,4 V Gleichspannung
Betriebstemperatur -20°C bis + 60°C
Maximale Ausgangsleistung 50 W × 4
Ausgangsspannung 2.000 mV/10 kOhm
Gewicht 1,6 kg
Audio-Ausgangspegel
Vorverstärkerausgang
(Front, Heck): 4 V/10 kOhm (max.)
Vorverstärkerausgang
(Subwoofer): 4 V/10 kOhm (max.)
(11 - 16 V zulässig)
GEHÄUSEGRÖSSE
Breite 178 mm
Höhe 100 mm
Tiefe 159 mm
Aufgrund ständiger Produktverbesserungen bleiben
•
Änderungen an technischen Daten und Design ohne
Vorankündigung vorbehalten.
Das LCD-Display (Flüssigkristallbildschirm) wird mit
•
hochpräzisen Fertigungsverfahren hergestellt. Der Anteil
der effektiven Bildpunkte beträgt mehr als 99,99%. Dies
wiederum bedeutet, dass bis zu 0,01% der Bildpunkte
unter Umständen dauerhaft aktiviert oder deaktiviert
sind.
16-DE
Page 37

Hergestellt unter Lizenz von Dolby Laboratories. Dolby
•
und das Doppel-D-Symbol sind Marken der Dolby
Laboratories.
Windows Media und das Windows-Logo sind Marken
•
oder eingetragene Marken der Microsoft Corporation
in den USA und/oder anderen Ländern.
iPhone, iPod, iPod classic, iPod nano, iPod touch und
•
iTunes sind Marken von Apple Inc. in den USA und
anderen Ländern.
„Made for iPod“ und „Made for iPhone“ bedeuten,
•
dass ein elektronisches Zubehör speziell für den
Anschluss eines iPod bzw. iPhone entworfen und
vom Entwickler für die Übereinstimmung mit den
Leistungsstandards von Apple zertifiziert wurde. Apple
ist nicht verantwortlich für den Betrieb dieses Geräts
oder dessen Einhaltung der Sicherheitsstandards und
behördlichen Auflagen. Beachten Sie bitte, dass der
Gebrauch dieses Zubehörs mit einem iPod oder iPhone
die Funkleistung beeinträchtigen kann.
© 2010 Nokia. Alle Rechte vorbehalten. Nokia und
•
Works with Nokia sind Marken oder eingetragene
Marken der Nokia Corporation.
DivX®, DivX Certified® und die zugehörigen Logos
•
sind Marken der Rovi Corporation oder ihrer
Tochtergesellschaften und werden unter Lizenz
verwendet.
Die Wortmarke BLUETOOTH® und die Logos sind
•
eingetragene Marken von Bluetooth SIG, Inc.,
und jegliche Nutzung solcher Marken von Alpine
Electronics, Inc. unterliegt den Lizenzbestimmungen.
•
„MPEG Layer-3 Audio-Codiertechnologie ist von
Fraunhofer IIS und Thomson lizenziert.“
„Die Lieferung dieses Produkts schließt lediglich eine
•
Lizenz für private, nicht kommerzielle Nutzung ein und
beinhaltet weder eine Lizenz noch ein impliziertes
Nutzungsrecht für einen kommerziellen (d. h. Gewinn
bringenden) Einsatz für Echtzeit-Rundfunk (terrestrisch,
über Satellit, Kabel und/oder beliebige andere Medien),
Senden/Streaming über das Internet, Intranets und/
oder andere Netzwerke sowie andere elektronische
Inhalts-Vertriebssysteme wie Pay-Audio- oder Audioon-Demand-Anwendungen. Für solche Einsatzzwecke
ist eine unabhängige Lizenz erforderlich. Weitere
Einzelheiten finden Sie unter
http://www.mp3licensing.com“
aha, das Aha-Logo und die Aha-Handelsaufmachung
•
sind Marken oder eingetragene Marken von HARMAN
International Industries, die mit Genehmigung
verwendet werden.
17-DE
Page 38

Page 39

Contenu
AVERTISSEMENT ...................................................................................................................................................2
ATTENTION .............................................................................................................................................................2
Mise en route ......................................................................................................................................................... 3
Écran Home et favoris ......................................................................................................................................... 4
Utilisation des boutons de commande média .......................................................................................... 4
Utilisation du bouton de vue média .............................................................................................................5
Réglage de l’heure ............................................................................................................................................... 5
Fonctionnement de la radio ............................................................................................................................. 6
Fonctionnement de l’iPod/iPhone (en option) .........................................................................................7
Utilisation d’un lecteur USB (en option) ......................................................................................................8
Utilisation de la fonction mains libres ..........................................................................................................9
Utilisation de l’application Aha (en option) ..............................................................................................10
Utilisation de la fonction MirrorLink™ (en option) .................................................................................11
Installation ............................................................................................................................................................12
Raccordements ...................................................................................................................................................14
Caractéristiques techniques ...........................................................................................................................16
IMPORTANT
Notez le numéro de série de l’appareil dans l’espace prévu ci-contre et conservez-le.
NUMÉRO DE SÉRIE :
NUMÉRO DE SÉRIE ISO : AL
DATE D’INSTALLATION :
INSTALLATEUR :
LIEU D’ACHAT :
Pour obtenir de plus amples informations sur l’ensemble des fonctions, reportez-vous au mode
d’emploi fourni sur le CD-ROM. (Étant donné qu’il s’agit d’un CD de données, ce CD ne peut pas
être utilisé pour lire des fichiers audio ou image sur le lecteur.) Si vous le souhaitez, demandez
à votre revendeur ALPINE de vous fournir la version papier du mode d’emploi contenu dans le
CD-ROM.
1-FR
Page 40

AVERTISSEMENT
AVERTISSEMENT
Ce symbole désigne des instructions importantes.
Le non-respect de ces instructions peut entraîner
de graves blessures, voire la mort.
N’ACTIVER AUCUNE FONCTION SUSCEPTIBLE DE
DETOURNER VOTRE ATTENTION DE LA CONDUITE DU
VEHICULE.
Les fonctions requérant une attention prolongée ne doivent être
exploitées qu’à l’arrêt complet du véhicule. Toujours arrêter le véhicule à
un endroit sûr avant d’activer ces fonctions.
Il y a risque de provoquer un accident.
TENIR LES PETITS OBJETS TELS QUE DES VIS HORS DE LA
PORTÉE DES ENFANTS.
L’ingestion de tels objets peut entraîner de graves blessures. En cas
d’ingestion, consulter immédiatement un médecin.
GARDER LE VOLUME À FAIBLE NIVEAU DE MANIÈRE À
POUVOIR ENTENDRE LES BRUITS EXTÉRIEURS PENDANT LA
CONDUITE.
Des niveaux de volume excessifs qui couvrent les sirènes des ambulances
ou les signaux routiers (passages à niveau, etc.) peuvent être dangereux
et provoquer un accident. UN NIVEAU DE VOLUME TROP ÉLEVÉ
À L’INTÉRIEUR DU VÉHICULE PEUT ÉGALEMENT AVOIR DES
EFFETS IRRÉVERSIBLES SUR VOTRE AUDITION.
NE PAS DESASSEMBLER NI MODIFIER L’APPAREIL.
Il y a risque d’accident, d’incendie ou de choc électrique.
A UTILISER UNIQUEMENT SUR DES VOITURES A MASSE
NEGATIVE DE 12 VOLTS.
(Vérifiez auprès de votre concessionnaire si vous n’en êtes pas certain.) Il
y a risque d’incendie, etc.
UTILISER DES FUSIBLES DE L’AMPERAGE APPROPRIE.
Il y a risque d’incendie ou de décharge électrique.
NE PAS OBSTRUER LES SORTIES D’AIR NI LES PANNEAUX DU
RADIATEUR.
Une surchauffe interne peut se produire et provoquer un incendie.
UTILISER CET APPAREIL POUR DES APPLICATIONS MOBILES
DE 12 V.
Toute utilisation autre que l’application désignée comporte un risque
d’incendie, de choc électrique ou de blessure.
EFFECTUER CORRECTEMENT LES CONNEXIONS.
Il y a risque de blessures ou de dommages à l’appareil.
AVANT TOUTE CONNEXION, DEBRANCHER LE CABLE DE LA
BORNE NEGATIVE DE LA BAT TERIE.
Il y a risque de choc électrique ou de blessure par courts-circuits.
NE PAS DENUDER LES CABLES ELECTRIQUES.
Ne jamais enlever la gaine isolante pour alimenter un autre appareil. Il y
a risque de dépassement de la capacité de courant et, partant, d’incendie
ou de choc électrique.
NE PAS ENDOMMAGER DE CONDUITES NI DE CABLES LORS
DU FORAGE DES TROUS.
Lors du forage de trous dans le châssis en vue de l’installation, veiller
à ne pas entrer en contact, endommager ni obstruer de conduites,
de tuyaux à carburant ou de fils électriques. Le non-respect de cette
précaution peut entraîner un incendie.
NE PAS UTILISER DES ECROUS NI DES BOULONS DU CIRCUIT
DE FREINAGE OU DE DIRECTION POUR LES CONNEXIONS DE
MASSE.
Les boulons et les écrous utilisés pour les circuits de freinage et de
direction (ou de tout autre système de sécurité) ou les réservoirs ne
peuvent JAMAIS être utilisés pour l’installation ou la liaison à la masse.
L’utilisation de ces organes peut désactiver le système de contrôle du
véhicule et causer un incendie, etc.
NE PAS INSTALLER A DES ENDROITS SUSCEPTIBLES
D’ENTRAVER LA CONDUITE DU VEHICULE, COMME LE
VOLANT OU LE LEVIER DE VITESSES.
La vue vers l’avant pourrait être obstruée ou les mouvements gênés, etc.,
et provoquer un accident grave.
ATTENTION
Ce symbole désigne des instructions importantes.
Le non-respect de ces instructions peut entraîner
des blessures ou des dommages matériels.
INTERROMPRE TOUTE UTILISATION EN CAS DE PROBLEME.
Le non-respect de cette précaution peut entraîner des blessures ou
endommager l’appareil. Retourner l’appareil auprès du distributeur
Alpine agréé ou un centre de service après-vente Alpine en vue de la
réparation.
FAIRE INSTALLER LE C ABLAGE ET L’APPAREIL PAR DES
EXPERTS.
Le câblage et l’installation de cet appareil requiert des compétences
techniques et de l’expérience. Pour garantir la sécurité, faire procéder à
l’installation de cet appareil par le distributeur qui vous l’a vendu.
UTILISER LES ACCESSOIRES SPECIFIES ET LES INSTALLER
CORRECTEMENT.
Utiliser uniquement les accessoires spécifiés. L’utilisation d’autres
composants que les composants spécifiés peut causer des dommages
internes à cet appareil ou son installation risque de ne pas être effectuée
correctement. Les pièces utilisées risquent de se desserrer et de
provoquer des dommages ou une défaillance de l’appareil.
FAIRE CHEMINER LE CABLAGE DE MANIERE A NE PAS LE
COINCER CONTRE UNE ARETE METALLIQUE.
Faire cheminer les câbles à l’écart des pièces mobiles (comme les rails
d’un siège) et des arêtes acérées ou pointues. Cela évitera ainsi de coincer
et d’endommager les câbles. Si un câble passe dans un orifice métallique,
utiliser un passe-cloison en caoutchouc pour éviter que la gaine isolante
du câble ne soit endommagée par le rebord métallique de l’orifice.
NE PAS INSTALLER A DES ENDROITS TRES HUMIDES OU
POUSSIEREUX.
Eviter d’installer l’appareil à des endroits soumis à une forte humidité ou
à de la poussière en excès. La pénétration d’humidité ou de poussière à
l’intérieur de cet appareil risque de provoquer une défaillance.
2-FR
Page 41

Mode d’emploi
Mise en route
Utilisation de l’écran tactile
Vous pouvez utiliser le système via l’écran tactile.
e
Touches communes de l’écran
: Revient à l’écran précédent. Selon la fonction, cette touche peut annuler les opérations exécutées à
l’écran.
: Ferme la fenêtre.
Emplacement des commandes
Utilisation de l’écran tactile, Emplacement des commandes, Mise sous et hors tension
A Bouton Home/C
Appuyez sur le bouton Home pour appeler les favoris.
Appuyez sur le bouton Home pour appeler l’écran
Home.
Appuyez sur cette touche et maintenez-la enfoncée
pendant au moins 5 secondes pour mettre l’appareil
hors tension.
B Capteur de télécommande
Pointez l’émetteur de la télécommande vers le capteur
de télécommande dans un rayon de 2 mètres.
C Bouton /
Appuyez sur cette touche pour régler le volume.
D Commutateur RESET
Le système de cet appareil est réinitialisé.
E Bouton (vue média)
•
Lorsque vous n’utilisez pas le système de navigation :
Si apparaît à l’écran, une pression sur le bouton
va fermer l’écran de la même manière qu’en
appuyant sur [
Lorsque vous utilisez le système de navigation :
•
Le fait d’appuyer permute entre l’écran de
navigation et l’écran Audio/Vidéo.
F Bouton de commande média 1/2/3
Cette action dépend de l’application Audio/Vidéo.
(Piste suivante/précédente, LECTURE/PAUSE, retour
rapide/avance rapide, etc.)
G Bouton MUTE
Activez cette fonction pour baisser instantanément le
volume de 20 dB.
].
Mise sous et hors tension
1 Placer la touche de démarrage sur ACC ou ON.
L’appareil se met en marche.
2 Maintenez enfoncé le bouton Home/C pendant au moins 5 secondes pour mettre sous tension.
3-FR
Page 42

Mode d’emploi Écran Home et favoris
Écran Home et favoris
Vous pouvez aisément basculer vers l’application de votre choix à partir de l’écran Home ou des favoris. L’écran
Home affiche les icônes des applications utilisables avec cet appareil. Les favoris consistent en une fonction de
raccourci affichant jusqu’à 4 icônes sur l’écran que vous êtes en train d’utiliser. La mise en page des touches est
personnalisable selon votre convenance.
Bouton Home
Appuyez sur le bouton Home.
Appuyez sur le bouton Home.
Écran Home
Appuyez sur l’icône d’une
application pour basculer
sur cette application.
Mode d’emploi Utilisation des boutons de commande média
Favoris
Utilisation des boutons de commande média
Pour des opérations du type passer d’une chanson à l’autre, en plus d’utiliser les touches d’opérations affichées
à l’écran, vous pouvez également utiliser les boutons de commande média sur l’appareil lui-même. Cela vous
permet d’appuyer sur un bouton de commande média pour sélectionner une chanson même si l’écran principal
média n’est pas affiché.
Le fonctionnement des boutons de commande média peut varier en fonction des médias utilisés. Un guide
s’affiche à l’écran pour vous indiquer quel bouton commande telle fonction.
Affichage du guide
4-FR
Boutons de commande média 1
Boutons de commande média 2
Boutons de commande média 3
Page 43

Mode d’emploi Utilisation du bouton de vue média
Utilisation du bouton de vue média
Vous pouvez passer de l’écran de navigation à l’écran principal pour la source média actuelle d’une simple
pression.
Bouton de la vue média
Appuyez sur .
Écran média
Réglage de l’heure
1 Appuyez sur le bouton Home.
2 Appuyez sur [Setup].
3 Appuyez sur [Réglages Généraux].
4 Appuyez sur [Date/Heure].
Mode d’emploi Réglage de la date et de l’heure
5 Appuyez sur [Réglage de l’horloge].
6
Appuyez sur [o] ou [p] de « Année », « Mois »,
« Jour », « Heure » et « Minute » pour régler l’horloge.
7 Appuyez sur [ ].
5-FR
Page 44

Fonctionnement de la radio
Mode d’emploi Radio, RDS
Indicateur du numéro de présélection
Affichage de la fréquence
Diminue la fréquence
Touche de présélection
Affiche les émetteurs
présélectionnés par un bref
effleurement. Effleurer pendant
au moins deux secondes pour
mémoriser l’émetteur en cours
comme présélection.
Affiche l’écran de
sélection PTY
L’écran change pour le mode
simple ou le mode info
Mode de priorité aux actualités
en/hors fonction
Mode AF en/hors fonction
Mémorise les émetteurs automatiquement Voyant RDS
Augmente la fréquence
Modifie le mode de syntonisation
Diminue la fréquence
Mode d’information de circulation
en/hors fonction
Affichage de la bande
Zone d’information
Augmente la fréquence
Commue la gamme
Affiche l’écran de réglage
audio
6-FR
Page 45

Mode d’emploi iPod/iPhone (en option)
Fonctionnement de l’iPod/iPhone (en option)
Un iPod/iPhone peut être connecté à cet appareil en utilisant le câble vendu séparément (KCU-461iV). Vous
pouvez connecter un iPod avec capacité vidéo pour utiliser les fichiers musicaux et vidéo.
Mode Audio
Affiche l’écran de recherche
Affichage des illustrations
Trouve le début de fichier en
cours / un fichier antérieur en
une seconde après le début de
la lecture / du rembobinage en
cas d’effleurement pendant au
moins deux secondes
Affichage d’écran de recherche
L’écran change pour le mode
simple ou le mode info
Trouve le début de liste de lecture/
artiste/album/podcast/genre/
compositeur précédent
Icône de mode de commutation directe
Trouve le début de liste de lecture/artiste/
album/podcast/genre/compositeur suivant
Lecture aléatoire (Tout Mélanger)
Numéro de la chanson actuelle / nombre total de chansons
Affichage d’information
iPod/iPhone
Trouve le début du
fichier suivant / avance
rapidement en cas
d’effleurement pendant au
moins deux secondes
Lecture aléatoire
Affiche l’écran de réglage
audio
Trouve le début du fichier suivant /
avance rapidement en cas d’effleurement
pendant au moins deux secondes
Pause et lecture
Trouve le début de fichier en cours /
un fichier antérieur en une seconde
après le début de la lecture / du
rembobinage en cas d’effleurement
pendant au moins deux secondes
Lecture répétitive
(Mélanger)
Recherche d’un fichier de musique
Par exemple : Recherche par nom d’artiste
1 Appuyez sur [ (Recherche)] pendant la
lecture.
2 Appuyez sur [Music].
3 Appuyez sur [Artists].
4 Appuyez sur le nom de l’artiste choisi.
L’écran de recherche par albums correspondant à
l’artiste sélectionné s’affiche.
Appuyez sur [p] de l’artiste de votre choix pour lire
toutes les chansons de l’artiste sélectionné.
5 Appuyez sur le nom de l’album choisi.
Tous les morceaux de l’album sélectionné sont affichés.
Appuyez sur [p] de l’album de votre choix pour lire
toutes les chansons de l’album sélectionné.
6 Appuyez sur le nom du morceau choisi.
La lecture du morceau sélectionné commence.
Appuyez sur [p] en regard de « ALL » permettra la
•
lecture de tous les morceaux de la liste.
7-FR
Page 46

Mode d’emploi Clé USB (en option)
Utilisation d’un lecteur USB (en option)
Cet appareil peut se connecter à un périphérique USB.
Vous pouvez jouer des fichiers de musique (MP3/WMA/AAC) et des fichiers vidéo (DivX® ) stockés sur la clé USB
sur le lecteur interne du système.
Mode Audio
Affiche l’écran de recherche
Trouve le début de fichier
en cours / un fichier
antérieur en une seconde
après le début de la lecture
/ du rembobinage en cas
d’effleurement pendant au
moins deux secondes
Affichage d’écran de
recherche
L’écran change pour le mode
simple ou le mode info
Trouve le début du dossier précédent
(lecture/artiste/album/genre/compositeur)
Trouve le début du dossier suivant
(lecture/artiste/album/genre/compositeur)
Lecture aléatoire
Lecture aléatoire (Tout Mélanger)
Mode vidéo
Numéro de la chanson actuelle /
nombre total de chansons
Trouve le début du fichier suivant /
avance rapidement en cas d’effleurement
pendant au moins deux secondes
Pause et lecture
Trouve le début de fichier en cours /
un fichier antérieur en une seconde
après le début de la lecture / du
rembobinage en cas d’effleurement
pendant au moins deux secondes
Affichage des informations
de MP3/WMA/AAC
Trouve le début du
fichier suivant / avance
rapidement en cas
d’effleurement pendant au
moins deux secondes
Lecture répétitive
Affiche l’écran de réglage
audio
Numéro du fichier actuel / nombre total de fichiers
Trouve le début de fichier en
cours / un fichier antérieur en
une seconde après le début de
la lecture / du rembobinage en
cas d’effleurement pendant au
moins deux secondes
Affichage d’écran de recherche
L’écran change pour le mode
simple ou le mode info
Trouve le début du dossier précédent
Trouve le début du dossier suivant
Commute les pistes audio
Commute les sous-titres
8-FR
Affichage des informations
DivX®
Trouve le début du
fichier suivant / avance
rapidement en cas
d’effleurement pendant au
moins deux secondes
Arrête la lecture
Lecture répétitive
Affiche l’écran de réglage
audio
Affiche l’écran de réglage
de l’affichage
Trouve le début du fichier suivant /
avance rapidement en cas d’effleurement
pendant au moins deux secondes
Pause et lecture
Trouve le début de fichier en cours /
un fichier antérieur en une seconde
après le début de la lecture / du
rembobinage en cas d’effleurement
pendant au moins deux secondes
Page 47

Mode d’emploi
Réglage BLUETOOTH, Utilisation du système BLUETOOTH
Utilisation de la fonction mains libres
L’appareil ICS-X7 autorise les appels téléphoniques mains libres en utilisant un téléphone compatible avec mains
libres (HFP).
Comment connecter un appareil
compatible BLUETOOTH (jumelage)
1 Appuyez sur le bouton Home.
2 Appuyez sur [Setup].
3 Appuyez sur [Réglages Généraux].
4 Appuyez sur la touche [o] ou [p] de
« BLUETOOTH » pour mettre sur « On ».
5 Appuyez sur [BLUETOOTH].
6 Appuyez sur [Reg. Appareils BLUETOOTH].
7 Appuyez sur [Search] de « No Device ».
Audio : Règle pour utiliser comme un périphérique
audio.
HFT : Règle pour utiliser comme un périphérique
mains-libres.
Both : Pour utiliser comme un périphérique audio
et un périphérique mains-libres.
9 Lorsque l’enregistrement du périphérique
est terminé, un message apparaît et
l’appareil revient en mode normal.
Le processus d’enregistrement BLUETOOTH varie en
•
fonction de la version de l’appareil et de SSP (Simple
Secure Pairing). Si un code de 4 à 6 caractères apparaît
sur cet appareil, insérez le code à l’aide du périphérique
compatible BLUETOOTH.
Si un mot de passe à 6 caractères apparaît sur cet
appareil, veillez à ce que le même mot de passe soit
affiché sur le périphérique compatible BLUETOOTH et
appuyez sur « Yes ».
Pour répondre à un appel
1 Un appel entrant déclenche la sonnerie et
l’écran d’appel entrant.
La liste de périphérique peut afficher jusqu’à 10
éléments.
8 Appuyez sur [Audio], [HFT] ou [Both] du
périphérique que vous désirez connecter
depuis la liste.
2 Appuyez sur [ ] ou pressez le bouton de
contrôle des media 1.
L’appel commence.
Raccrochage du téléphone
1 Appuyez sur [ ] ou pressez le bouton
de contrôle des media 3.
L’appel se termine.
9-FR
Page 48

Mode d’emploi Application Aha (en option)
Utilisation de l’application Aha (en option)
L’application Aha vous permet d’accéder rapidement et de façon personnalisée au contenu de votre choix en
vous garantissant une expérience d’écoute toujours plus agréable.
Si l’application Aha est installée sur un iPhone, vous pouvez afficher et utiliser l’écran Aha avec l’ICS-X7.
Numéro du contenu actuelle /
nombre total de contenus
Affichage des illustrations
Trouve le début du
contenu en cours / un
contenu antérieur
Affichage d’écran de
recherche
L’écran change pour le mode
simple ou le mode info
Réaction « Like »
Réaction « Dislike »
Recul de 15 secondes
Le contenu en cours de lecture
recule de 15 secondes.
Appuyez sur [ (retour)] sur l’écran de lecture pour revenir à l’écran de sélection de la station prédéfinie.•
Affichage du logo de la
station
Affichage d’information
Aha
Affichage du logo du
partenaire
Trouve le début du contenu
suivant
Avance de 30 secondes
Le contenu en cours de lecture
avance de 30 secondes.
Affiche l’écran de réglage
audio
Rappelle la fonction de la
station précédente
Vous pouvez rappeler
une station sélectionnée
précédemment. Vous
pouvez commuter la station
actuellement sélectionnée
et la station sélectionnée
précédemment.
Trouve le début du contenu suivant
Pause et lecture
Trouve le début du contenu en cours /
un contenu antérieur
10-FR
Page 49

Mode d’emploi MirrorLink™ (en option)
Utilisation de la fonction MirrorLink™ (en option)
MirrorLink est une norme de connexion entre un récepteur ICS-X7 et un téléphone portable. MirrorLink permet
d’afficher l’écran d’un téléphone portable et d’utiliser les applications de votre téléphone portable via cet appareil.
Lorsque vous utilisez MirrorLink, nous vous recommandons de connecter votre téléphone portable
via USB et BLUETOOTH.
1
Appuyez sur le bouton Home.
2
Appuyez sur [Mirror Mode], [Car Mode], [Navigation] ou [Music].
L’écran du mode sélectionné s’affiche.
Après avoir connecté un téléphone portable compatible avec cet appareil, les icônes de l’application apparaissent sur
•
l’écran Home.
3
Appuyez sur le bouton de contrôle média pour commander cet appareil.
Les fonctions du bouton de contrôle média diffèrent selon le mode.
•
Les modes disponibles sur cet appareil peuvent différer des opérations sur votre téléphones portable en fonction du
•
téléphone connecté.
En mode de navigation, vous pouvez contrôler le système uniquement à l’aide du panneau tactile.
•
11-FR
Page 50

Installation
Mode d’emploi Installation
Lorsque vous raccordez les fils au système électrique du
•
véhicule, faites attention aux composants installés en
usine (par exemple, le microprocesseur). Ne pas essayer
d’alimenter l’appareil en le raccordant aux fils de ces
appareils. Lorsque vous raccordez l’ICS-X7 au boîtier
à fusibles, assurez-vous que le fusible du circuit destiné
à l’ICS-X7 possède le nombre d’ampères approprié ; si
ce n’est pas le cas, vous risquez d’endommager l’appareil
et/ou le véhicule. Si ce n’est pas le cas, vous risquez
d’endommager l’appareil et/ou le véhicule. En cas de
doute, consultez votre revendeur Alpine.
Lors de l’installation, l’écran doit être complètement
•
replié dans le coffret. Si ce n’est pasle cas, des problèmes
peuvent survenir.
1 Installez à un angle compris entre 30° et
l’horizontale. Remarquez que l’installation
à un angle non compris dans cette gamme
aboutira à une perte de performance et
éventuellement des dommages.
0 -30°
2 Montage du microphone.
Pour une utilisation en toute sécurité, vérifiez ce
qui suit :
La position est stable et rigide.
•
La vision et les opérations du conducteur ne sont
•
pas gênées.
Le microphone est positionné pour capter
•
facilement la voix du conducteur (sur le paresoleil, etc.).
Lorsque vous parlez dans le microphone, vous
ne devriez pas avoir à changer votre posture
de conduite. Cela peut causer une distraction,
vous divertir d’une conduite en toute sécurité de
votre véhicule. Considérez avec soin l’orientation
et la distance du microphone lors du montage.
Confirmez que la voix du conducteur peut
facilement être captée à l’emplacement choisi.
Microphone
Serre-Câble
(vendu séparément)
3 Retirez la gaine de montage de l’unité
principale.
Cet appareil
Clés de support
(fournies)
Faites glisser l’appareil dans la gaine de
montage, puis fixez-le.
Gaine de montage
(fourni)
Clé de
support
Compression
Plaques*
*1 Si la gaine de montage installée n’épouse pas bien la
forme du tableau de bord, les plaques de compression
peuvent être légèrement pliées pour remédier au
problème.
*2 Le cadran fourni peut être monté.
1
Tableau de bord
Capuchon en
caoutchouc (fourni)
Boulon hex
(fourni)
Cet appareil
Cadran*
(fourni)
2
12-FR
Page 51

4 Si votre véhicule possède un support,
installez le long boulon à tête hexagonale
sur le panneau arrière de l’appareil ICS-X7
et placez le capuchon en caoutchouc sur
le boulon. Si le véhicule ne possède pas de
support de montage, renforcez l’appareil
principal avec une attache de montage
métallique (non fournie). Fixez le fil de
terre de l’appareil à un élément métallique
propre à l’aide d’une vis (*1) déjà fixée au
châssis du véhicule. Raccordez tous les
fils de l’ICS-X7 selon les indications de la
section RACCORDEMENTS.
Écrou hexagonal (M5)
Languette
de fixation
métallique
Vis
2
*
Tige filetée
1
*
5 Faites glisser l’ICS-X7 dans le tableau de
bord jusqu’à ce que vous entendiez un clic.
Cela permet de s’assurer que l’appareil est
correctement bloqué et qu’il ne risque pas
de sortir accidentellement du tableau de
bord.
Fil de terre
Pour la vis désignée par le symbole « *2 », utilisez une
•
Châssis
Cet appareil
vis appropriée à l’emplacement de montage choisi.
Schéma de raccordement de l’interrupteur SPST (vendu séparément)
(Si l’alimentation ACC n’est pas disponible)
ACC
ICS-X7
Si votre véhicule est dépourvu d’alimentation ACC, installez un interrupteur SPST (Single-Pole, Single-Throw) (vendu
•
(Rouge)
BATTERIE
(Jaune)
SPST SW (en option)
séparément) et un fusible (vendu séparément).
Le schéma et l’ampérage des fusibles indiqués ci-dessus s’appliquent lorsque l’ICS-X7 est utilisé seul.
•
Si le fil de l’alimentation commutée (allumage) de l’ICS-X7 est directement raccordé à la borne positive (+) de la batterie
•
du véhicule l’ICS-X7 véhicule un certain courant (plusieurs centaines de milliampères) même lorsqu’il est hors tension, ce
qui risque de décharger la batterie.
FUSIBLE (5 A)
(en option)
FUSIBLE (20 A)
(en option)
Batterie
13-FR
Page 52

Raccordements
Raccordements 1/2
Mode d’emploi Raccordements
Antenne
Fiche d’antenne ISO
Vers le boîtier d’interface de la
télécommande au volant.
Connectez ceci au boîtier optionnel de
l’interface d’affichage pour véhicule.
Non utilisé
REMOTE OUT
(Brun)
REVERSE
(Orange/Blanc)
(Jaune)
(Rouge)
(Blanc)
Vers le fil d’entrée de la télécommande
Vers côté positif du fil du signal
du feu de recul du véhicule
Microphone (fourni)
Vers borne de sortie vidéo
Vers bornes de sortie audio (R, L)
Amplificateur
Amplificateur
Arrière gauche
Arrière droite
Avant gauche
Avant droite
14-FR
Amplificateur Caissons de graves
Page 53

Raccordements 2/2
Téléphone portable
(vendu séparément)
Câble d’extension USB
(fourni)
Câble d’extension AV de l’iPod (Inclus avec KCU-461iV)
REMOTE TURN-ON
(Bleu/Blanc)
AUDIO INTERRUPT IN
(Rose/Noir)
PARKING BRAKE
(Jaune/Bleu)
IGNITION
(Rouge)
GND
(Noir)
POWER ANT
(Bleu)
BATTERY
(Jaune)
10A
(Vert)
(Vert/Noir)
(Blanc)
(Blanc/Noir)
(Gris/Noir)
(Gris)
(Violet/Noir)
(Violet)
Câble de téléphone portable
(vendu séparément)
Clé USB
(vendue séparément)
Kit de connexion KCU-461iV
(vendu séparément)
Vers l’amplificateur ou l’égaliseur
Non utilisé
Vers le fil du signal du frein à main
Vers l’antenne électrique
Clé de contact
Arrière gauche
Avant gauche
Avant droite
Arrière droite
l’iPod/iPhone
(vendu séparément)
Batterie
Enceintes
15-FR
Page 54

Caractéristiques techniques
Mode d’emploi Caractéristiques techniques
SECTION DU MONITEUR
Taille de l’écran 7,0”
Type d’affi chage à cristaux liquides
Affi chage à cristaux liquides TN de
Système de fonctionnement
Matrice active TFT
Nombre d’éléments d’image
1 152 000 pixels (800 × 3 × 480)
Nombre effectif d’éléments d’image
99% ou plus
Système d’illumination LED
type transparent
SECTION DU TUNER FM
Plage d’accord 87,5 – 108,0 MHz
Sensibilité utilisable en mode mono
8,1 dBf (0,7 µV/75 ohms)
Sensibilité du silencieux à 50dB
12 dBf (1,1 µV/75 ohms)
Sélectivité du canal de remplacement
80 dB
Rapport signal/bruit 65 dB
Séparation stéréo 35 dB
Rapport de captage 2,0 dB
SECTION DU TUNER MW
Plage d’accord 531 – 1 602 kHz
Sensibilité utilisable 25,1 µV/28 dBf
SECTION DU TUNER LW
Plage d’accord 153 – 281 kHz
Sensibilité (norme CEI) 31,6 µV/30 dBf
SECTION USB
Version USB USB 1.1/2.0
Consommation maximale 1 000 mA
Classe USB USB (lecture depuis le périphérique)/
Système de fi chiers FAT12/16/32
Décodage MP3 MPEG-1/2 AUDIO Layer-3
Décodage WMA Windows Media™ Audio
Décodage AAC Fichier « .m4a » au format AAC-LC
Nombre de canaux 2 canaux (stéréo)
Réponse en fréquence* 5-20 000 Hz (±1 dB)
Distorsion harmonique totale
0,008% (à 1 kHz)
Gamme dynamique 95 dB (à 1 kHz)
Rapport signal/bruit 100 dB
Séparation des canaux 85 dB (à 1 kHz)
La réponse en fréquence peut varier en fonction du logiciel de
*
codage ou du débit binaire.
USB (classe de stockage de masse)
GÉNÉRALITÉS
Puissance requise 14,4 V CC
(11-16 V admissibles)
Température de fonctionnement -4°F to +140°F
(-20°C à + 60°C)
Puissance de sortie maximum 50 W × 4
Tension de sortie 2 000 mV/10 kohms
Poids 1,6 kg
Niveau de sortie audio
Présortie (avant, arrière) : 4 V/10 kohms (max.)
Présortie (caisson de graves) :
4 V/10 kohms (max.)
DIMENSIONS DU CHÂSSIS
Largeur 178 mm
Hauteur 100 mm
Profondeur 159 mm
En raison des améliorations que nous apportons
•
continuellement à nos produits, les caractéristiques
techniques et la conception peuvent être modifiés sans
avis préalable.
L’affichage à cristaux liquides a été fabriqué avec des
•
technologies de construction de très haute précision. Sa
résolution effective est supérieure à 99,99%. Il est donc
possible que 0,01% des pixels soient toujours ON ou OFF.
SECTION BLUETOOTH
Spécifi cations BLUETOOTH
Bluetooth V2.1+EDR
Puissance de sortie +4 dBm Max. (Puissance classe 2)
Profi l HFP (Profi l mains libres)
OPP (Profi l d’envoi de fi chiers)
PBAP (Profi l d’accès au répertoire
téléphonique)
A2DP (Profi l de distribution audio
avancé)
AVRCP (Profi l de télécommande
multimédia)
16-FR
Page 55

Fabriqué sous licence des laboratoires Dolby. Dolby
•
et la marque au double D sont des marques de Dolby
Laboratories.
Windows Media et le logo Windows sont des marques
•
ou des marques déposées enregistrées de Microsoft
Corporation aux États-Unis et/ou dans d’autres pays.
iPhone, iPod, iPod classic, iPod nano, iPod touch et
•
iTunes sont des marques commerciales d’Apple Inc.
déposées aux États-Unis et dans d’autres pays.
•
« Made for iPod » et « Made for iPhone » indiquent
que l’accessoire électronique a été conçu pour se
connecter spécifiquement a un iPod ou un iPhone,
respectivement, et qu’il a été certifié conforme par le
développeur aux normes de performance Apple. Apple
n’est pas responsable quant au fonctionnement de ce
système ou bien du respect de celui-ci de la législation
ou des normes de sécurité en vigueur. Notez que
l’utilisation de cet accessoire avec un appareil iPod ou
iPhone peut avoir une incidence sur les performances
sans-fils.
•
© 2010 Nokia. Tous droits réservés. Nokia et Works with
Nokia sont des marques ou des marques déposées de
Nokia Corporation.
DivX®, DivX Certified® et les logos associés sont des
•
marques de la société Rovi et ses filiales, et sont utilisés
sous licence.
La marque et les logos BLUETOOTH® sont des marques
•
de commerce appartenant à Bluetooth SIG, Inc. et
ces marques sont utilisées sous licence par Alpine
Electronics, Inc.
•
« Technologie de codage audio MPEG Layer-3 sous
licence de Fraunhofer IIS et Thomson ».
•
« L’acquisition de ce produit ne fournit qu’une seule
licence pour un usage privé et ne permet pas à
l’utilisateur d’utiliser ce produit à des fins commerciales
(par exemple pour générer des recettes), pour une
télétransmission en direct (terrestre, par satellite, par
câble et/ou tout autre média), pour une transmission
par Internet, intranet et/ou autres réseaux, ou avec
des systèmes de distribution de contenu électronique
(plates-formes payantes ou applications de
téléchargements de matériel audio). Il est nécessaire
d’acquérir une licence indépendante pour de telles
utilisations. Pour en savoir plus, veuillez visiter le site
http://www.mp3licensing.com »
aha, le logo Aha et l’habillage commercial Aha sont
•
des marques commerciales ou des marques déposées
de HARMAN International Industries, utilisées avec sa
permission.
17-FR
Page 56

Page 57

Índice
ADVERTENCIA........................................................................................................................................................2
PRECAUCIÓN .........................................................................................................................................................2
Primeros pasos ......................................................................................................................................................3
Pantalla Home y Favoritos ................................................................................................................................4
Usando los botones de Control de Medio ..................................................................................................4
Uso del botón Ver Medio ...................................................................................................................................5
Configuración de la hora ...................................................................................................................................5
Funcionamiento de la radio ............................................................................................................................. 6
Funcionamiento del iPod/iPhone (Opcional) ............................................................................................7
Funcionamiento Memoria USB (Opcional) ................................................................................................. 8
Control de teléfonos manos libres ................................................................................................................. 9
Funcionamiento de Aha (Opcional) ............................................................................................................10
Funcionamiento de MirrorLink™ (Opcional) ............................................................................................11
Instalación ............................................................................................................................................................12
Conexiones ...........................................................................................................................................................14
Especificaciones..................................................................................................................................................16
IMPORTANTE
Anote el número de serie de la unidad en el espacio proporcionado a continuación y consérvelo
como registro permanente.
NÚMERO DE SERIE:
NÚMERO DE SERIE ISO: AL
FECHA DE INSTALACIÓN:
INSTALADOR:
LUGAR DE ADQUISICIÓN:
Para obtener información detallada de todas las funciones, consulte el manual del propietario
contenido en el CD-ROM que se suministra. (Al ser un CD de datos, el CD no se puede utilizar para
reproducir música o imágenes en el reproductor.) Si es necesario, un distribuidor de ALPINE podrá
facilitarle una copia impresa del manual del propietario incluido en el CD-ROM.
1-ES
Page 58

ADVERTENCIA
ADVERTENCIA
Este símbolo indica que las instrucciones son
importantes. De no tenerse en cuenta, podrían
ocasionarse heridas graves o muerte.
NO REALICE NINGUNA OPERACIÓN QUE PUEDA DISTRAER
SU ATENCIÓN Y COMPROMETER LA SEGURIDAD DURANTE
LA CONDUCCIÓN DEL VEHÍCULO.
Las operaciones que requieren su atención durante más tiempo sólo
deben realizarse después de detener completamente el vehículo. Estacione
el vehículo en un lugar seguro antes de realizar dichas operaciones.
De lo contrario, podría ocasionar un accidente.
MANTENGA LOS OBJETOS PEQUEÑOS, COMO POR EJEMPLO
LOS TORNILLOS, FUERA DEL ALCANCE DE LOS NIÑOS.
La ingestión de estos objetos puede provocar lesiones graves. Si esto
ocurre, consulte con un médico inmediatamente.
MANTENGA EL VOLUMEN A UN NIVEL QUE NO LE IMPIDA
ESCUCHAR LOS SONIDOS DEL EXTERIOR MIENTRAS
CONDUCE.
Los niveles de volumen demasiado altos que reducen la percepción
de otros sonidos como las sirenas de emergencia o posibles señales
acústicas de advertencia en carretera (cruces de trenes, etc.) podrían
ser peligrosos y provocar un accidente. LOS NIVELES DE VOLUMEN
ALTOS EN EL VEHÍCULO TAMBIÉN PUEDEN DAÑAR EL
SISTEMA AUDITIVO DE LOS PASAJEROS.
NO DESMONTE NI ALTERE LA UNIDAD.
Si lo hace, podrá ocasionar un accidente, un incendio o una descarga
eléctrica.
UTILICE LA UNIDAD SOLAMENTE EN VEHÍCULOS QUE
TENGAN 12 VOLTIOS CON NEGATIVO A MASA.
(Consulte a su distribuidor en caso de duda.) De no ser así, podría
ocasionar un incendio, etc.
UTILICE EL AMPERAJE CORRECTO CUANDO CAMBIE
FUSIBLES.
De lo contrario, puede producirse un incendio o una descarga eléctrica.
NO OBSTRUYA LOS ORIFICIOS DE VENTILACIÓN O LOS
PANELES DEL RADIADOR.
Si los bloquea, el calor podría acumularse en el interior y producir un
incendio.
UTILICE ESTE PRODUCTO CON APLICACIONES MÓVILES DE
12 V.
Si se emplea para otra aplicación distinta de la prevista, podría
producirse un incendio, una descarga eléctrica u otras lesiones.
REALICE LAS CONEXIONES CORRECTAMENTE.
Una conexión incorrecta puede producir un incendio o dañar el equipo.
ANTES DE EFECTUAR EL CABLEADO, DESCONECTE EL CABLE
DEL TERMINAL NEGATIVO DE LA BATERÍA.
De no hacerlo así, podría ocasionar una descarga eléctrica o heridas
debido a cortocircuitos eléctricos.
NO EMPALME CABLES ELÉCTRICOS.
Nunca corte el aislamiento de un cable para suministrar energía a otro
equipo. Esto hace que la capacidad portadora del cable se supere y puede
ser la causa de incendios o descargas eléctricas.
EVITE DAÑAR LOS TUBOS Y EL CABLEADO CUANDO
TALADRE AGUJEROS.
Si taladra agujeros en el chasis durante la instalación, tome las
precauciones necesarias para no rozar, dañar u obstruir los tubos, las
tuberías de combustible, los depósitos o el cableado eléctrico. De lo
contrario, podría provocar un incendio.
NO UTILICE TUERCAS O PERNOS EN EL SISTEMA DE FRENOS
O DE DIRECCIÓN PARA REALIZAR LAS CONEXIONES A MASA.
Los pernos o tuercas empleados en los sistemas de freno o de dirección
(o en cualquier otro sistema relacionado con la seguridad del vehículo),
o los depósitos, NUNCA deben utilizarse para instalaciones de cableado
o conexión a masa. Si utiliza tales partes podrá incapacitar el control del
vehículo y provocar un incendio, etc.
NO INSTALE EL EQUIPO EN LUGARES QUE PUEDAN
INTERFERIR CON LA OPERACIÓN DEL VEHÍCULO, COMO
EL VOLANTE DE DIRECCIÓN O LA CAJA DE CAMBIOS DE
VELOCIDAD.
Esto podría obstaculizar la visibilidad y dificultar el movimiento, etc. y
provocar accidentes graves.
PRECAUCIÓN
Este símbolo indica que las instrucciones son
importantes. De no tenerse en cuenta, podrían
ocasionarse heridas graves o daños materiales.
DEJE DE USAR LA UNIDAD INMEDIATAMENTE SI APARECE
ALGÚN PROBLEMA.
Su uso en estas condiciones podría ocasionar lesiones personales o
daños al producto. Lleve la unidad a un distribuidor Alpine autorizado o
al Centro de servicio Alpine más próximo para repararla.
CONFÍE EL CABLEADO Y LA INSTALACIÓN A
PROFESIONALES.
El cableado y la instalación de este equipo requieren una competencia y
experiencia técnica confirmada. Para garantizar la seguridad, póngase
siempre en contacto con el distribuidor al que ha comprado el equipo
para confiarle estas tareas.
UTILICE LOS ACCESORIOS ESPECIFICADOS E INSTÁLELOS
CORRECTAMENTE.
Asegúrese de utilizar los accesorios especificados solamente. La
utilización de otras piezas no designadas puede ser la causa de daños
en el interior de la unidad o de una instalación incorrecta. Las piezas
pueden aflojarse, lo que, además de ser peligroso, puede provocar
averías.
DISPONGA EL CABLEADO DE FORMA QUE LOS CABLES
NO SE DOBLEN, NO SE CONTRAIGAN NI ROCEN UN BORDE
METÁLICO AFILADO.
Aleje los cables y el cableado de piezas móviles (como los raíles de los
asientos) o de bordes puntiagudos o afilados. De esta forma evitará
dobleces y daños en el cableado. Si los cables se introducen por un
orificio de metal, utilice una arandela de goma para evitar que el borde
metálico del orificio corte el aislamiento del cable.
NO INSTALE LA UNIDAD EN LUGARES MUY HÚMEDOS O
LLENOS DE POLVO.
Evite instalar la unidad en lugares con altos índices de humedad o polvo.
Si entra polvo o humedad, el equipo puede averiarse.
2-ES
Page 59

Manual de operación
Funcionamiento del Touch ( Toque), Ubicación de los controles, Encendido y apagado
Primeros pasos
Funcionamiento del Touch (Toque)
Puede manejar el sistema utilizando el touch panel en la pantalla.
e
Botones en pantalla comunes
: Vuelve a la pantalla anterior. Dependiendo de la función, este botón puede cancelar las operaciones
que se realizan en la pantalla.
: Cierra la ventana.
Ubicación de los controles
A Botón Home/C
Toque el botón Home para acceder a Favoritos.
Pulse el botón Home para acceder a la Pantalla Home.
Manténgalo pulsado durante al menos 5 segundos
para apagar la unidad.
B Sensor Remoto
Apunte el transmisor del mando a distancia hacia
el sensor remoto desde una distancia máxima de 2
metros.
C Botón
D Interruptor RESET
/
Púlselo para ajustar el volumen.
El sistema de esta unidad es reseteado.
E Botón
•
•
F Botón Control de Medios 1/2/3
Esta acción varía según la aplicación Audio/Visual.
(Pista Arriba/Abajo, REPRODUCIR/PAUSA, Retroceder
rápido/Avanzar rápido, etc)
G Botón MUTE
Al activar esta función el nivel de volumen se reducirá
instantáneamente en 20 dB.
(Ver Medio)
Cuando no utilice el sistema de navegación:
Si aparece en la pantalla, al pulsar el botón
se cerrará la pantalla de la misma forma que al
tocar [
].
Cuando utilice el sistema de navegación:
Presionar alterna entre la pantalla de navegación y
la pantalla de Audio/Visual.
Encendido y apagado
1 Gire la llave de contacto a la posición ACC u ON.
El sistema se enciende.
2 Mantenga pulsado el botón Home/C durante al menos 5 segundos para el encendido.
3-ES
Page 60

Manual de operación Pantalla Home y Favoritos
Pantalla Home y Favoritos
Puede cambiar fácilmente a la aplicación de su elección desde la Pantalla Home o Favoritos. La Pantalla Home
muestra iconos para las aplicaciones utilizables con ésta unidad. Favoritos es una función de acceso directo que
muestra hasta 4 iconos en la pantalla que está utilizando. La distribución de los iconos puede ser personalizada
para su comodidad.
Botón Home
Toque el botón Home.
Pulse el botón Home.
Pantalla Home
Toque el icono de una
aplicación para cambiar
a dicha aplicación.
Manual de operación Usando los botones de Control de Medio
Favoritos
Usando los botones de Control de Medio
También puede usar los botones de Control de Medios para operaciones como moverse arriba o abajo entre
canciones, además de usar los botones de operación visualizados en la pantalla. Esto le permite pulsar el botón
de Control de Medios para seleccionar una canción incluso si la pantalla principal para los medios no se está
mostrando.
La operación de los botones del Control de Medios puede cambiar dependiendo del medio que esté usando. Se
mostrará una guía en pantalla para mostrar qué interruptor controla una función determinada.
Guía de funciones
4-ES
Botón de control de medios 1
Botón de control de medios 2
Botón de control de medios 3
Page 61

Manual de operación Uso del botón Ver Medio
Uso del botón Ver Medio
Puede cambiar entre la pantalla de Navegación y la pantalla principal para la fuente de medio actual con sólo un
toque.
Botón Ver Medio
Pulse .
Pantalla Medio
Configuración de la hora
1 Pulse el botón Home.
2 Toque [Setup].
3 Toque [Ajustes Generales].
4 Toque [Fecha/Hora].
Manual de operación Configuración de la Fecha/Hora
5 Toque [Ajustes de Reloj].
6 Toque [o] o [p] de “Año”, “Mes”, “Día”,
“Hora” y “Minutos” para ajustar el reloj.
7 Toque [ ].
5-ES
Page 62

Funcionamiento de la radio
Manual de operación Radio, RDS
No. Indicador Predeterminado
Visualización de la frecuencia
Baja de frecuencia
Botón de Predeterminado
Si lo toca brevemente, visualiza
las emisoras predefinidas.
Si lo toca durante al menos 2
segundos, memoriza la emisora
actual como predefinida.
Visualiza la pantalla
Seleccionar PTY
La pantalla cambia a modo
Simple o Info
Modo PRIORITY NEWS On/Off
Modo AF On/Off
Memoriza emisoras automáticamente Indicador RDS
Visualización de banda
Área de Info
Sube de frecuencia
Cambia de banda
Visualiza la pantalla de
Ajustes de Sonido
Sube de frecuencia
Cambia el modo de sintonización
Baja de frecuencia
Modo Traffic Information On/Off
6-ES
Page 63

Manual de operación iPod/iPhone (Opcional)
Funcionamiento del iPod/iPhone (Opcional)
A esta unidad puede conectarse un iPod/iPhone mediante el cable adecuado (KCU-461iV) (se vende por separado).
Puede conectar un iPod compatible con vídeo para disfrutar tanto de archivos de sonido como de vídeo.
Modo audio
Visualiza la pantalla de búsqueda
Visualización de
imágenes artísticas
Va al principio del archivo
actual/Va al archivo anterior
si se toca en menos de un
segundo tras el inicio de la
reproducción/Retrocede
rápidamente si se toca
durante al menos 2 segundos
Visualización de la
pantalla de búsqueda
La pantalla cambia a modo
Simple o Info
Va al principio de la anterior lista
de reproducción/artista/álbum/
podcast/género/compositor
Icono de modo del botón directo
Va al principio de la siguiente lista de reproducción/
artista/álbum/podcast/género/compositor
Reproducción aleatoria (Shuffle ALL)
No. de canción actual/No. total de
canciones
Visualización de información
del iPod/iPhone
Va al inicio del siguiente
archivo/Avanza
rápidamente si se toca
durante al menos 2
segundos
Reproducción aleatoria
(Shuffle)
Visualiza la pantalla de
Ajustes de Sonido
Va al inicio del siguiente archivo/
Avanza rápidamente si se toca durante
al menos 2 segundos
Pausa y reproducción
Va al principio del archivo actual/Va
al archivo anterior si se toca en menos
de un segundo tras el inicio de la
reproducción/Retrocede rápidamente
si se toca durante al menos 2 segundos
Repite reproducción
Búsqueda de un archivo de música
Por ejemplo: Búsqueda por nombre de artista
1 Toque [ (Búsqueda)] durante la
reproducción.
2 Toque [Music].
3 Toque [Artists].
4 Toque el nombre del artista deseado.
Aparece la pantalla de búsqueda de Álbumes del
artista seleccionado.
Tocar [p] del artista deseado reproducirá todas las
canciones del artista seleccionado.
5 Toque el nombre del álbum deseado.
Se visualizarán todas las canciones del álbum
seleccionado.
Tocar [p] del álbum deseado reproducirá todas las
canciones del álbum seleccionado.
6 Toque el nombre de la canción deseada.
Se reproducirá la canción seleccionada.
Tocar [p] de “ALL” reproducirá todas las canciones de
•
la lista.
7-ES
Page 64

Manual de operación Memoria USB (Opcional)
Funcionamiento Memoria USB (Opcional)
Esta unidad puede conectarse a un dispositivo de memoria USB.
Puede reproducir archivos de música (MP3/WMA/AAC) y archivos de vídeo (DivX® ) almacenados en un
dispositivo de memoria USB en el reproductor interno de este sistema.
Modo audio
Visualiza la pantalla de búsqueda
Va al principio del archivo
actual/Va al archivo anterior
si se toca en menos de un
segundo tras el inicio de la
reproducción/Retrocede
rápidamente si se toca
durante al menos 2 segundos
Visualización de la pantalla
de búsqueda
La pantalla cambia a modo
Simple o Info
Busca el principio de la carpeta anterior
(reproducción/artista/álbum/género/compositor)
Busca el principio de la siguiente carpeta
(reproducción/artista/álbum/género/compositor)
Reproducción aleatoria
Reproducción aleatoria (ALL)
Modo vídeo
No. de archivo actual/No. total de archivos
Va al principio del archivo
actual/Va al archivo
anterior si se toca en menos
de un segundo tras el
inicio de la reproducción/
Retrocede rápidamente si
se toca durante al menos 2
segundos
Visualización de la pantalla
de búsqueda
La pantalla cambia a modo
Simple o Info
Busca el principio de la carpeta anterior
Busca el principio de la siguiente carpeta
Cambia las pistas de audio
Cambia los subtítulos
8-ES
No. de canción actual/No. total de
canciones
Va al inicio del siguiente archivo/
Avanza rápidamente si se toca durante
al menos 2 segundos
Pausa y reproducción
Va al principio del archivo actual/Va
al archivo anterior si se toca en menos
de un segundo tras el inicio de la
reproducción/Retrocede rápidamente
si se toca durante al menos 2 segundos
Pantalla de información
MP3/WMA/AAC
Va al inicio del siguiente
archivo/Avanza
rápidamente si se toca
durante al menos 2
segundos
Repite reproducción
Visualiza la pantalla de
Ajustes de Sonido
Pantalla de información
DivX®
Va al inicio del siguiente
archivo/Avanza
rápidamente si se toca
durante al menos 2
segundos
Detiene la reproducción
Repite reproducción
Visualiza la pantalla de
Ajustes de Sonido
Visualiza la pantalla de
Ajustes de Display
Page 65

Manual de operación
Configuración del BLUETOOTH, Funcionamiento del BLUETOOTH
Control de teléfonos manos libres
Es posible hacer llamadas con manos libres si se utiliza un teléfono compatible con un perfil de manos libres
(Hands-Free Profile) con el ICS-X7.
Cómo conectarse con un dispositivo de
BLUETOOTH compatible (vinculación)
1 Pulse el botón Home.
2 Toque [Setup].
3 Toque [Ajustes Generales].
4 Toque [o] o [p] de “BLUETOOTH” para
ajustar a “On”.
5 Toque [BLUETOOTH].
6 Toque [Establecer Dispositivo BLUETOOTH].
7 Toque [Search] de “No Device”.
Audio: Ajustes para uso como un dispositivo de
Audio.
HFT: Ajustes para uso como un dispositivo
Manos Libres.
Both: Ajustes para un uso tanto de un dispositivo
de Audio como de Manos Libres.
9 Cuando el registro del dispositivo se ha
completado, aparece un mensaje y el
dispositivo vuelve al modo normal.
El proceso de registro con BLUETOOTH difiere dependiendo
•
de la versión del dispositivo y SSP (Simple Secure Pairing,
Pareado Simple Seguro). Si aparece una contraseña de 4 ó 6
caracteres en este dispositivo, introduzca la contraseña usando
el dispositivo compatible con BLUETOOTH.
Si aparece una contraseña de seis caracteres en este dispositivo,
asegúrese de que esa misma contraseña se visualiza en el
dispositivo compatible con BLUETOOTH y toque “Yes”.
Responder una llamada
1 Una llamada entrante activará el tono y la
pantalla de llamada entrante.
La lista de dispositivos muestra hasta 10 elementos.
8 Toque [Audio], [HFT] o [Both] del
dispositivo que desee conectar de la lista.
2 Toque [ ] o pulse el botón de control de
medios 1.
Se iniciará la llamada.
Colgar el teléfono
1 Toque [ ] o pulse el botón de control
de medios 3.
Se da por terminada la llamada.
9-ES
Page 66

Manual de operación Aha (Opcional)
Funcionamiento de Aha (Opcional)
Aha ofrece acceso rápido y personalizado al contenido que realmente desea escuchar, y tiene como misión
garantizar que su experiencia de escucha sea gratificante todos los días.
Si la aplicación Aha se instala en un iPhone, es posible visualizar y utilizar la pantalla Aha con la unidad ICS-X7.
No. de contenido actual/No. total de contenido
Visualización de
imágenes artísticas
Va al principio del
contenido actual/Va al
contenido anterior
Visualización de la
pantalla de búsqueda
La pantalla cambia a
modo Simple o Info
Información “Like”
Información “Dislike”
Retroceder 15 segundos
El contenido en reproducción
retrocederá 15 segundos.
Toque [ (Atrás)] en la pantalla de reproducción para volver a la pantalla de selección de emisoras memorizadas.•
Pantalla del logotipo de la
emisora
Visualización de
información Aha
Pantalla del logotipo del
proveedor
Va al inicio del siguiente
contenido
Avanzar 30 segundos
El contenido en reproducción
avanzará 30 segundos.
Visualiza la pantalla de
Ajustes de Sonido
Función de recuperación de
emisora anterior
Puede recuperar una emisora
seleccionada previamente.
Puede cambiar entre la
emisora seleccionada
actualmente y la anterior.
Va al inicio del siguiente contenido
Pausa y reproducción
Va al principio del contenido actual/
Va al contenido anterior
10-ES
Page 67

Manual de operación MirrorLink™ (Opcional)
Funcionamiento de MirrorLink™ (Opcional)
MirrorLink es un estándar de conexión para proporcionar conexión entre una unidad ICS-X7 y un teléfono móvil.
Con MirrorLink es posible visualizar una pantalla de teléfono móvil y utilizar las aplicaciones del teléfono móvil en
esta unidad.
Si utiliza MirrorLink, recomendamos conectar el teléfono móvil mediante USB y BLUETOOTH.
1
Pulse el botón Home.
2
Toque [Mirror Mode], [Car Mode], [Navigation] o [Music].
Aparecerá la pantalla del modo seleccionado.
Tras conectarse a un teléfono móvil compatible con esta unidad, los iconos de la aplicación serán visualizados en la
•
pantalla Home.
3
Pulse el botón Control de Medios para utilizar la unidad.
Las funciones del botón Control de Medios varían en función del modo seleccionado.
•
Los modos de funcionamiento de esta unidad pueden no coincidir con los del teléfono móvil, en función del teléfono móvil
•
conectado.
En el modo de navegación, puede utilizar el sistema únicamente a través del panel táctil.
•
11-ES
Page 68

Instalación
Manual de operación Instalación
Cuando haga las conexiones al sistema eléctrico del
•
vehículo, tenga en cuenta los componentes instalados en
fábrica (p.ej., el ordenador de a bordo). No coja corriente
de estos conductores para alimentar esta unidad. Cuando
conecte el ICS-X7 a la caja de fusibles, asegúrese de que
el fusible del circuito que piensa utilizar para el ICS-X7
tiene el amperaje adecuado. De lo contrario, la unidad y/o
el vehículo podrán sufrir daños. Cuando no esté seguro,
consulte a su distribuidor Alpine.
La pantalla deberá estar completamente cerrada en el
•
alojamiento al realizar la instalación. En caso contrario,
podrán surgir problemas.
1 Instalar en un ángulo que se encuentre
entre horizontal y 30°. Tenga en cuenta que
si instala en un ángulo fuera de este rango,
podría provocar la pérdida de rendimiento
y causar posibles daños.
0 -30°
2 Instalación del micrófono.
Para un uso seguro, asegúrese de cumplir con lo
siguiente:
que la ubicación sea estable y firme.
•
que la vista del conductor y de las operaciones
•
no sea obstruida.
que el micrófono esté ubicado en un lugar en el
•
que alcance fácilmente la voz del conductor (en
el parasol, etc.).
Cuando hable en el micrófono, no debe de cambiar
su postura de conducción. De lo contrario podría
distraerle, desviando su atención de la conducción
segura de su vehículo. Considere cuidadosamente
la dirección y la distancia al instalar el micrófono.
Confirme que la voz del conductor sea captada
fácilmente en la ubicación seleccionada.
Micrófono
Fijación del cable
(se vende por separado)
3 Retire la funda de montaje de la unidad
principal.
Esta unidad
Llaves del soporte
(suministradas)
Deslice la unidad en la funda de montaje y
fíjela.
Funda de montaje
(incluida)
Llave de
soporte
Presión
Placas*
*1 Si el manguito de montaje instalado en el salpicadero
está flojo, las placas de presión pueden doblarse un
poco para solventar el problema.
*2 La placa frontal suministrada se puede montar.
Salpicadero
Funda de caucho
(incluida)
1
Pasador hexagonal
(incluida)
Esta unidad
Placa frontal*
(incluida)
2
12-ES
Page 69

4 Si su vehículo posee soporte, instale
el perno hexagonal largo en el panel
posterior del ICS-X7 y coloque el tapón de
caucho sobre dicho perno. Si su vehículo no
dispone de soporte de montaje, refuerce la
unidad principal con una brida de montaje
metálica (no suministrada). Fije el cable de
tierra de la unidad en un punto metálico
desnudo con un tornillo (*1) ya fijado al
chasis del vehículo.
Conecte todos los cables del ICS-X7
siguiendo las indicaciones de la sección
CONEXIONES.
Tuerca hexagonal (M5)
Brida
metálica de
montaje
Tornillo
2
*
Pasador
1
*
5 Deslice el ICS-X7 en el salpicadero hasta
que oiga un clic. Esto permite asegurarse
de que la unidad queda correctamente
fijada y no se saldrá accidentalmente del
salpicadero.
Cable de tierra
Para el tornillo con la marca “*2”, utilice un tornillo
•
Bastidor
Esta unidad
adecuado para la ubicación de montaje elegida.
Diagrama de conexión del interruptor SPST (vendido por separado)
(Si la fuente de alimentación de ciclo combinado no está disponible)
ACC
ICS-X7
Si su vehículo no tiene fuente de alimentación de ciclo combinado, agregue un interruptor SPST (Single-Pole, Single-
•
(Rojo)
BATTERY
(Amarillo)
SPST SW (Opcional)
Throw) (vendido por separado) y un fusible (vendido por separado).
El diagrama y el amperaje de los fusibles que se muestran arriba corresponden a los casos en los que ICS-X7 se utiliza
•
individualmente.
Si el cable de alimentación conmutado (contacto) del ICS-X7 se conecta directamente al polo positivo (+) de la batería
•
del vehículo, el ICS-X7 absorbe parte de la corriente (unos cientos de miliamperios), incluso cuando el interruptor está
apagado (posición OFF), y la batería podría descargarse.
FUSIBLE (5 A)
(Opcional)
FUSIBLE (20 A)
(Opcional)
Batería
13-ES
Page 70

Conexiones
Conexiones 1/2
Manual de operación Conexiones
A la caja de la interfaz de
control remoto del volante.
Conéctelo a la caja de interfaz de la
pantalla del vehículo opcional.
No se utiliza
REMOTE OUT
(Marrón)
REVERSE
(Naranja/Blanco)
(Amarillo)
(Blanco)
(Rojo)
Conector de antena ISO
Antena
Al cable de entrada remota
Al polo positivo del cable de
señal de la luz trasera del coche
Micrófono (Incluido)
Al terminal de salida de vídeo
A los terminales de salida de audio (R, L)
14-ES
Amplificador
Amplificador
Amplificador Subwoofers
Posterior izquierdo
Posterior derecho
Frontal izquierdo
Frontal derecho
Page 71

Conexiones 2/2
Teléfono móvil
(vendido por separado)
Prolongador USB (incluido)
Prolongador iPod VIDEO AV (incluido con KCU-461iV)
REMOTE TURN-ON
(Azul/Blanco)
AUDIO INTERRUPT IN
(Rosa/Negro)
PARKING BRAKE
(Amarillo/Azul)
IGNITION
(Rojo)
GND
(Negro)
POWER ANT
(Azul)
BATTERY
(Amarillo)
10A
(Verde)
(Verde/Negro)
(Blanco)
(Blanco/Negro)
(Gris/Negro)
(Gris)
(Violeta/Negro)
(Violeta)
Cable de teléfono móvil
(vendido por separado)
Memoria USB
(vendido por separado)
Kit de conexión KCU-461iV
(vendido por separado)
Al amplificador o al ecualizador
No se utiliza
Al cable de señal del freno de mano
A la antena eléctrica
Llave de contacto
Posterior izquierdo
Frontal izquierdo
Frontal derecho
Posterior derecho
iPod/iPhone
(vendido por separado)
Batería
Altavoces
15-ES
Page 72

Especificaciones
Manual de operación Especificaciones
SECCIÓN DEL MONITOR
Tamaño de la pantalla 7,0”
Tipo de LCD TN LCD de tipo transparente
Sistema operativo Matriz activa TFT
Número de elementos de la imagen
1.152.000 elementos
(800 × 3 × 480)
Número efectivo de elementos de la imagen
99% o más
Sistema de iluminación LED
SECCIÓN DEL SINTONIZADOR FM
Rango de sintonía 87,5 – 108,0 MHz
Sensibilidad útil en mono 8,1 dBf (0,7 µV/75 ohmios)
Umbral de sensibilidad 50 dB
12 dBf (1,1 µV/75 ohmios)
Selectividad de canal alternativo
80 dB
Relación de señal/ruido 65 dB
Separación estéreo 35 dB
Relación de captura 2,0 dB
SECCIÓN DEL SINTONIZADOR MW
Rango de sintonía 531 – 1.602 kHz
Sensibilidad útil 25,1 µV/28 dBf
SECCIÓN DEL SINTONIZADOR DE LW
Rango de sintonía 153 – 281 kHz
Sensibilidad (Norma IEC) 31,6 µV/30 dBf
SECCIÓN DE USB
Requisitos de USB USB 1.1/2.0
Consumo máx. energía 1.000 mA
Clase USB USB (dispositivo de reproducción)/
Sistema de archivos FAT12/16/32
Decodifi cación MP3 MPEG-1/2 AUDIO Layer-3
Decodifi cación WMA Windows Media™ Audio
Decodifi cación AAC Archivo “.m4a” en formato AAC-LC
Número de canales 2 canales (estéreo)
Respuesta de frecuencia* 5-20.000 Hz (±1 dB)
Distorsión armónica total 0,008% (a 1 kHz)
Gama dinámica 95 dB (a 1 kHz)
Relación de señal/ruido 100 dB
Separación de canales 85 dB (a 1 kHz)
La respuesta de frecuencia puede variar en función del software
*
de codificación o la velocidad de bits.
USB (almacenamiento masivo)
GENERAL
Alimentación 14,4 V CC
(11–16 V de margen permisible)
Temperatura de funcionamiento
-20°C a + 60°C
Salida de alimentación máxima
50 W × 4
Voltaje de salida 2.000 mV/10 k ohmios
Peso 1,6 kg
Nivel de salida de audio
Salida previa
(delantero, trasero): 4 V/10 k ohmios (máx.)
Salida previa
(subwoofer): 4 V/10 k ohmios (máx.)
TAMAÑO DEL CHASIS
Anchura 178 mm
Altura 100 mm
Profundidad 159 mm
Debido a la mejora continua del producto, las
•
especificaciones y el diseño están sujetos a cambio sin
previo aviso.
El panel LCD se fabrica utilizando una tecnología de
•
fabricación de una precisión extremadamente alta. Su
ratio de píxel efectivo es superior al 99,99%. Ello significa
que existe una posibilidad de que el 0,01% de los píxeles
estén siempre ON u OFF.
SECCIÓN BLUETOOTH
Especifi cación del BLUETOOTH
Bluetooth V2.1+EDR
Potencia de Salida +4 dBm Máx. (Clase de Potencia 2)
Perfi l HFP (Hands-Free Profi le, perfi l
OPP (Object Push Profi le, perfi l
PBAP (Phone Book Access Profi le,
A2DP (Advanced Audio Distribution
AVRCP (Audio/Video Remote Control
manos libres)
empujar objeto)
perfi l de acceso a la agenda)
Profi le, perfi l de distribución
avanzada de audio)
Profi le, perfi l de control remoto de
Audio/Video)
16-ES
Page 73

Fabricado bajo licencia de Dolby Laboratories. Dolby y
•
la marca de doble D son marcas registradas de Dolby
Laboratories.
Windows Media y el logotipo Windows son marcas
•
comerciales o marcas registradas de Microsoft
Corporation en los Estados Unidos de América y/o en
otros países.
iPhone, iPod, iPod classic, iPod nano, iPod touch
•
e iTunes son marcas comerciales de Apple Inc.,
registradas en Estados Unidos y en otros países.
“Made for iPod”, y “Made for iPhone”, significa que un
•
accesorio electrónico se ha diseñado exclusivamente
para conectarse a un iPod o iPhone, respectivamente,
y su cumplimiento de las normas de funcionamiento
de Apple ha sido certificado por los programadores.
Apple no se hace responsable del funcionamiento
de este dispositivo o cumplimiento con los requisitos
normativos y de seguridad. Tenga en cuenta que el
uso de este accesorio con un iPod o un iPhone puede
afectar el rendimiento inalámbrico.
© 2010 Nokia. Todos los derechos reservados. Nokia
•
y Works with Nokia son marcas comerciales o marcas
comerciales registradas de Nokia Corporation.
DivX®, DivX Certified® y los logotipos asociados
•
son marcas comerciales de Rovi Corporation o sus
subsidiarios y deben utilizarse en virtud de una licencia.
La marca y los logotipos de la palabra BLUETOOTH® son
•
marcas comerciales registradas propiedad de Bluetooth
SIG, Inc. y cualquier uso de dichas marcas realizado por
Alpine Electronics, Inc. se realiza bajo licencia.
“Tecnología de codificación de audio MPEG Layer-3
•
con licencia de Fraunhofer IIS y Thomson”.
“El suministro de este producto solo cubre la licencia
•
para uso privado y no comercial, y no implica una
licencia ni ningún derecho de uso de este producto
en ninguna difusión comercial (es decir, que genere
ingresos) en tiempo real (terrestre, por satélite, por
cable y/u otros medios), la difusión/reproducción
mediante Internet, intranets y/u otras redes o
mediante otros sistemas de distribución de contenido
electrónico, como aplicaciones de audio de pago
o audio bajo demanda. Es necesaria una licencia
independiente para dicho uso. Para más información,
consulte http://www.mp3licensing.com”
aha, el logotipo de Aha y la imagen de marca de
•
Aha son marcas comerciales o marcas comerciales
registradas de HARMAN International Industries,
utilizadas con autorización.
17-ES
Page 74

Page 75

Indice
AVVERTIMENTO ....................................................................................................................................................2
ATTENZIONE ..........................................................................................................................................................2
Operazioni preliminari .......................................................................................................................................3
Schermata Home e Preferiti .............................................................................................................................4
Uso dei tasti di Controllo Supporto ...............................................................................................................4
Uso del tasto di Visualizzazione Supporti....................................................................................................5
Impostazione dell’ora ......................................................................................................................................... 5
Funzionamento della radio ..............................................................................................................................6
Funzionamento dell’iPod/iPhone (Opzionale) ..........................................................................................7
Funzionamento memoria USB (Opzionale) ................................................................................................8
Controllo vivavoce del telefono ...................................................................................................................... 9
Funzionamento di Aha (Opzionale).............................................................................................................10
Funzionamento di MirrorLink™ (Opzionale) .............................................................................................11
Installazione .........................................................................................................................................................12
Collegamenti .......................................................................................................................................................14
Specifiche ..............................................................................................................................................................16
IMPORTANTE
Riportare il numero di serie dell’unità nell’apposito spazio sottostante e conservarlo per riferimenti
futuri.
NUMERO DI SERIE:
NUMERO DI SERIE ISO: AL
DATA DI INSTALLAZIONE:
TECNICO DI INSTALLAZIONE:
LUOGO DI ACQUISTO:
Per informazioni dettagliate su tutte le funzioni, consultare le Istruzioni per l’uso memorizzate nel
CD-ROM fornito. (Trattandosi di un CD dati, non è possibile utilizzare il CD per riprodurre musica e
immagini sul lettore). Se necessario, il rivenditore ALPINE fornirà prontamente una copia cartacea
delle Istruzioni per l’uso contenute nel CD.
1-IT
Page 76

AVVERTIMENTO
AVVERTIMENTO
Questo simbolo indica istruzioni importanti. La
non osservanza di tali norme potrebbe causare
gravi ferite o morte.
NON EFFETTUARE ALCUNA OPERAZIONE CHE POSSA
DISTOGLIERE L’ATTENZIONE DALLA GUIDA DEL VEICOLO.
Qualsiasi operazione che necessita di attenzione prolungata deve essere
effettuata solo dopo il completo arresto del veicolo. Arrestare sempre il
veicolo in un luogo sicuro prima di effettuare queste operazioni.
In caso contrario si potrebbero causare incidenti.
TENERE LE PARTI PICCOLE QUALI LE BATTERIE FUORI DALLA
PORTATA DEI BAMBINI.
Se ingeriti potrebbero causare gravi danni. In caso di ingerimento,
consultare immediatamente un medico.
TENERE IL VOLUME AD UN LIVELLO CHE PERMETTA DI UDIRE
I RUMORI ESTERNI DURANTE LA GUIDA.
Livelli eccessivi di volume, in grado di coprire suoni quali le sirene dei
mezzi di soccorso o segnali stradali di attenzione (ad esempio, passaggi a
livello, ecc.), possono essere pericolosi e provocare incidenti. INOLTRE,
L’ASCOLTO DI AUDIO AD ALTO VOLUME IN AUTO PUÒ
PROVOCARE DANNI ALL’UDITO.
NON SMONTARE O MODIFICARE.
Tale azione potrebbe causare incidenti, incendi o scosse elettriche.
UTILIZZARE SOLO IN VEICOLI CON TERRA NEGATIVA A 12
VOLT.
(se non si è sicuri, controllare con il proprio rivenditore.) Diversamente
si potrebbero causare incendi o altri danni.
USARE FUSIBILI DI RICAMBIO DELL’AMPERAGGIO
CORRETTO.
Altrimenti potrebbero derivarne incendi o scosse elettriche.
NON BLOCCARE LE FESSURE O I PANNELLI DI IRRADIAZIONE.
Bloccandoli si potrebbe causare un surriscaldamento interno
dell’apparecchio che potrebbe dare luogo a incendi.
UTILIZZARE IL PRODOTTO IN VEICOLI CON BATTERIA DA
12 V.
Un utilizzo diverso da quello indicato potrebbe causare incendi, scosse
elettriche o altri incidenti.
ESEGUIRE CORRETTAMENTE I COLLEGAMENTI.
Altrimenti ne potrebbero derivarne incendi o danni al prodotto.
PRIMA DI ESEGUIRE I COLLEGAMENTI, SCOLLEGARE IL CAVO
DEL TERMINALE NEGATIVO DELLA BATTERIA.
Altrimenti potrebbero derivare scosse elettriche o altre lesioni dovute a
cortocircuiti.
NON UTILIZZARE I CAVI PER EFFETTUARE ALTRI
COLLEGAMENTI.
Non eliminare mai le parti isolanti dei cavi per alimentare altri
apparecchi. Diversamente la capacità di trasporto di corrente del cavo in
questione viene superata causando incendi o scosse elettriche.
NELL’EFFETTUARE I FORI, NON DANNEGGIARE I TUBI O I
CAVI.
Nell’effettuare i fori nel telaio per l’installazione, fare attenzione a
non entrare in contatto, danneggiare o ostruire i tubi, i condotti
della benzina, i serbatoi o i cavi elettrici. La non osservanza di queste
precauzioni potrebbe causare incendi.
PER ESEGUIRE I COLLEGAMENTI DI TERRA, NON UTILIZZARE
BULLONI O DADI DEI SISTEMI DI FRENATA O DI STERZO.
Non utilizzare MAI bulloni o dadi dei sistemi di frenata e di sterzo
(o di qualsiasi altro sistema di sicurezza), o dei serbatoi per eseguire
l’installazione o per i collegamenti di terra. L’utilizzo di queste parti
potrebbe inibire il controllo del veicolo e causare incendi o altro.
NON INSTALLARE IN LUOGHI CHE POTREBBERO INTERFERIRE
CON LE OPERAZIONI DI GUIDA QUALI LO STERZO O LA LEVA
DEL CAMBIO.
Diversamente si potrebbe ostruire la visuale della strada o interferire con
i movimenti del conducente e causare gravi incidenti.
ATTENZIONE
Questo simbolo indica istruzioni importanti. La
non osservanza di queste norme potrebbe causare
ferite o provocare danni alle cose.
INTERROMPERE IMMEDIATAMENTE L’USO IN CASO DI
PROBLEMI.
Diversamente si potrebbero causare danni alla persona o al prodotto.
Per riparazioni, rivolgersi ad un rivenditore autorizzato Alpine o al più
vicino centro di assistenza Alpine.
I COLLEGAMENTI E L’INSTALLAZIONE DEVONO ESSERE
EFFETTUATI DA PERSONALE QUALIFICATO.
I collegamenti e l’installazione dell’apparecchio richiedono conoscenze
tecniche ed esperienza particolari. Per ragioni di sicurezza, contattare
sempre il rivenditore presso il quale è stato acquistato il prodotto per
eseguire l’installazione.
UTILIZZARE LE PARTI ACCESSORIE SPECIFICATE E
INSTALLARLE IN MODO CORRETTO.
Assicurarsi di utilizzare solo parti accessorie specificate. L’utilizzo di
altri componenti potrebbe danneggiare l’apparecchio all’interno o
determinare in un’installazione non corretta. I componenti potrebbero
non rimanere collegati in modo saldo e provocare problemi di
funzionamento o pericoli.
SISTEMARE I CAVI IN MODO CHE NON VENGANO PIEGATI O
COMPRESSI DA PARTI METALLICHE TAGLIENTI.
Per evitare che vengano danneggiati o piegati, sistemare i cavi e i fili
lontano da parti mobili (quali le guide dei sedili) o da parti taglienti
o aguzze. Se i cavi vengono fatti passare attraverso un foro metallico,
utilizzare un anello di gomma per evitare che l’isolante dei cavi venga
tagliato dal bordo metallico del foro.
NON INSTALLARE IN LUOGHI ECCESSIVAMENTE UMIDI O
POLVEROSI.
Evitare di installare l’apparecchio in luoghi eccessivamente umidi o
polverosi. La presenza di umidità o polvere all’interno del prodotto
potrebbe causare problemi di funzionamento.
2-IT
Page 77

Istruzioni per l’uso
Funzionamento del pannello a sfioramento, Individuazione dei comandi, Accensione o spegnimento
Operazioni preliminari
Funzionamento del pannello a sfioramento
È possibile utilizzare il sistema tramite il pannello a sfioramento sullo schermo.
e
Tasti comuni sullo schermo
: Consente di ritornare alla schermata precedente. In base alla funzione, questo tasto potrebbe
cancellare le operazioni effettuate sullo schermo.
: Chiude la finestra.
Individuazione dei comandi
A Tasto Home/C
Toccare il tasto Home per visualizzare i Preferiti.
Premere il tasto Home per visualizzare la schermata
Home.
Tenere premuto per almeno 5 secondi per disattivare
l’alimentazione.
B Sensore del telecomando
Rimanendo entro un raggio di 2 metri, puntare il
trasmettitore del telecomando in direzione del sensore
del telecomando.
C Tasto /
Premere per regolare il volume.
D Interruttore RESET
Viene reimpostato il sistema di questa unità.
E Tasto (Visualizzazione Supporti)
•
Quando non si utilizza il Sistema di navigazione:
Se appare sullo schermo, la pressione del tasto
chiude la schermata nello stesso modo di
quando si tocca [
Quando si utilizza il Sistema di navigazione:
•
La pressione commuta fra le schermate di
Navigazione e Audio/Video.
F Tasto Controllo Supporto 1/2/3
Questa azione cambia in base all’applicazione
Audio/Video. (Traccia Precedente/Successiva,
RIPRODUZIONE/PAUSA, Ritorno indietro rapido/
Avanzamento rapido, ecc.)
G Tasto MUTE
Tramite questa funzione è possibile ridurre
immediatamente il volume di 20 dB.
]
Accensione o spegnimento
1 Girare la chiave di accensione sulla posizione di attivazione (ACC o ON).
Il sistema si accende.
2 Mantenere premuto il tasto Home /C per almeno 5 secondi per spegnere il sistema.
3-IT
Page 78

Istruzioni per l’uso Schermata Home e Preferiti
Schermata Home e Preferiti
Si può passare facilmente all’applicazione scelta dalla schermata Home o dai Preferiti. La schermata Home
visualizza le icone per le applicazioni utilizzabili con questa unità. I Preferiti sono una funzione di scorciatoia che
visualizza fino a 4 icone sulla schermata che si sta utilizzando. L’aspetto delle icone è personalizzabile a piacere.
Tasto Home
Toccare il tasto Home.
Premere il tasto Home.
Schermata Home
Toccare un’icona di
un’applicazione per
passare a tale applicazione.
Istruzioni per l’uso Uso dei tasti di Controllo Supporto
Preferiti
Uso dei tasti di Controllo Supporto
Per operazioni come lo spostamento alle canzoni precedenti o successive, oltre a usare i tasti operativi visualizzati
sulla schermata, è anche possibile usare i tasti di Controllo Supporto presenti sull’unità. Ciò permette di premere
un tasto di Controllo Supporto per selezionare una canzone anche se la schermata principale del supporto non è
visualizzata.
Il funzionamento dei tasti di Controllo Supporto può cambiare in base ai supporti che si stanno utilizzando. Viene
visualizzata una guida sullo schermo per mostrare quali interruttori sono associati a quali funzioni.
Visualizzazione guida
4-IT
Tasti di Controllo Supporto 1
Tasti di Controllo Supporto 2
Tasti di Controllo Supporto 3
Page 79

Istruzioni per l’uso Uso del tasto di Visualizzazione Supporti
Uso del tasto di Visualizzazione Supporti
È possibile commutare con un solo tocco fra le schermate di Navigazione e quella principale per la fonte del
supporto attuale.
Tasto di Visualizzazione
Supporti
Premere .
Schermata Supporti
Impostazione dell’ora
1 Premere il tasto Home.
2 Toccare [Setup].
3 Toccare [Impostazioni Generali].
4 Toccare [Data/Ora].
Istruzioni per l’uso Impostazione di data/ora
5 Toccare [Regolazione Data/Ora].
6 Toccare [o] o [p] di “Anno”, “Mese”, “Giorno”,
“Ora” e “Minuti” per regolare l’orologio.
7 Toccare [ ].
5-IT
Page 80

Funzionamento della radio
Istruzioni per l’uso Radio, RDS
Indicatore n. di preselezione
Visualizzazione
della frequenza
Consente di decrementare
la frequenza
Tasto preselezione
Consente di visualizzare le
stazioni preselezionate mediante
una breve pressione.
Toccare il tasto per almeno 2
secondi al fine di memorizzare la
stazione corrente come stazione
preselezionata.
Consente di visualizzare la
schermata di selezione PTY
La schermata passa al modo
Semplice o al modo Info
Attivazione/disattivazione modo
PRIORITY NEWS (Priorità notiziari)
Attivazione/disattivazione modo AF
Consente di memorizzare le stazioni
in maniera automatica
Visualizzazione della
banda radio
Area Info
Consente di aumentare
la frequenza
Consente di cambiare
banda
Visualizza la schermata
Impostazioni audio
Consente di aumentare la frequenza
Consente di cambiare il modo di
sintonizzazione
Consente di decrementare la frequenza
Attivazione/disattivazione modo
informazioni sul traffico
Indicatore RDS
6-IT
Page 81

Istruzioni per l’uso iPod/iPhone (opzionale)
Funzionamento dell’iPod/iPhone (Opzionale)
A questa unità è possibile collegare un iPod/iPhone utilizzando il cavo (KCU-461iV) (venduto separatamente). Il
collegamento dell’iPod consente non solo di ascoltare la musica ma anche di riprodurre i file video.
Modo Audio
Visualizza la schermata di ricerca
Display copertina
Consente di trovare l’inizio
del file corrente/Consente di
trovare un file precedente
entro un secondo dall’inizio
della riproduzione/Esegue
il ritorno rapido quando
toccato per almeno 2 secondi
Visualizzazione della
schermata di ricerca
La schermata passa al modo
Semplice o al modo Info
Consente di trovare l’inizio dell’elenco
di riproduzione/artista/album/podcast/
genere/compositore precedente
Icona modo tasto diretto
Consente di trovare l’inizio dell’elenco di riproduzione/
artista/album/podcast/genere/compositore successivo
Riproduzione casuale (Shuffle ALL)
N. brano corrente/N. totale di brani
Visualizzazione delle
informazioni sull’iPod/iPhone
Consente di trovare l’inizio
del file successivo/Eseguire
l’avanzamento rapido
quanto toccato per almeno
2 secondi
Riproduzione casuale
(Shuffle)
Visualizza la schermata
Impostazioni audio
Consente di trovare l’inizio del file
successivo/Eseguire l’avanzamento rapido
quanto toccato per almeno 2 secondi
Pausa e riproduzione
Consente di trovare l’inizio del file
corrente/Consente di trovare un file
precedente entro un secondo dall’inizio
della riproduzione/Esegue il ritorno rapido
quando toccato per almeno 2 secondi
Riproduzione ripetuta
Ricerca di un file musicale
Per esempio: Ricerca per nome dell’artista
1 Toccare [ (Ricerca)] durante la
riproduzione.
2 Toccare [Music].
3 Toccare [Artists].
4 Toccare il nome dell’artista desiderato.
Viene visualizzata la schermata di ricerca degli
album dell’artista selezionato.
Toccando [p] dell’artista desiderato vengono
riprodotte tutte le canzoni dell’artista selezionato.
5 Toccare il nome dell’album desiderato.
Vengono visualizzati tutti i brani dell’album
selezionato.
Toccando [p] dell’album desiderato vengono
riprodotte tutte le canzoni dell’album selezionato.
6 Toccare il nome del brano desiderato.
La canzone desiderata viene riprodotta.
Toccare [p] di “ALL” riprodurrà tutte le canzoni in
•
elenco.
7-IT
Page 82

Istruzioni per l’uso Memoria USB (opzionale)
Funzionamento memoria USB (Opzionale)
Questa unità può collegarsi al dispositivo di memoria USB.
È possibile riprodurre file musicali (MP3/WMA/AAC) e file video (DivX® ) memorizzati in un dispositivo di memoria
USB sul lettore interno del sistema.
Modo Audio
Visualizza la schermata di ricerca
Consente di trovare l’inizio
del file corrente/Consente di
trovare un file precedente
entro un secondo dall’inizio
della riproduzione/Esegue
il ritorno rapido quando
toccato per almeno 2 secondi
Visualizzazione della
schermata di ricerca
La schermata passa al modo
Semplice o al modo Info
Trova l’inizio della cartella precedente
(riproduzione/artista/album/genere/
compositore)
Trova l’inizio della cartella successiva
(riproduzione/artista/album/genere/
compositore)
Riproduzione casuale
Riproduzione casuale (ALL)
N. brano corrente/N. totale di brani
Visualizzazione informazioni
MP3/WMA/AAC
Consente di trovare l’inizio
del file successivo/Eseguire
l’avanzamento rapido
quanto toccato per almeno
2 secondi
Riproduzione ripetuta
Visualizza la schermata
Impostazioni audio
Consente di trovare l’inizio del file
successivo/Eseguire l’avanzamento rapido
quanto toccato per almeno 2 secondi
Pausa e riproduzione
Consente di trovare l’inizio del file
corrente/Consente di trovare un
file precedente entro un secondo
dall’inizio della riproduzione/Esegue
il ritorno rapido quando toccato per
almeno 2 secondi
Modo Video
N. file corrente/N. totale file
Consente di trovare l’inizio
del file corrente/Consente di
trovare un file precedente
entro un secondo dall’inizio
della riproduzione/Esegue
il ritorno rapido quando
toccato per almeno 2
secondi
Visualizzazione della
schermata di ricerca
La schermata passa al modo
Semplice o al modo Info
Trova l’inizio della cartella precedente
Trova l’inizio della cartella successiva
Consente di commutare i brani audio
Consente di commutare i sottotitoli
8-IT
Visualizzazione
informazioni DivX®
Consente di trovare l’inizio
del file successivo/Eseguire
l’avanzamento rapido
quanto toccato per almeno
2 secondi
Arresto riproduzione
Riproduzione ripetuta
Visualizza la schermata
Impostazioni audio
Visualizza la schermata
Impostazioni display
Consente di trovare l’inizio del file
successivo/Eseguire l’avanzamento
rapido quanto toccato per almeno 2
secondi
Pausa e riproduzione
Consente di trovare l’inizio del file
corrente/Consente di trovare un
file precedente entro un secondo
dall’inizio della riproduzione/Esegue
il ritorno rapido quando toccato per
almeno 2 secondi
Page 83

Istruzioni per l’uso
Impostazione BLUETOOTH, Funzionamento di BLUE TOOTH
Controllo vivavoce del telefono
Utilizzando un telefono cellulare compatibile HFP (Hands-Free Profile) con ICS-X7 è possibile effettuare e ricevere
telefonate in vivavoce.
Collegamento di un dispositivo
compatibile BLUETOOTH
(accoppiamento)
1 Premere il tasto Home.
2 Toccare [Setup].
3 Toccare [Impostazioni Generali].
Audio: Imposta per l’uso come dispositivo audio.
HFT: Imposta per l’uso come dispositivo
vivavoce.
Both: Imposta per l’uso come dispositivo audio e
vivavoce.
4 Toccare [o] o [p] di “BLUETOOTH” per
impostarlo su “On”.
5 Toccare [BLUETOOTH].
6 Toccare [Impostazioni periferiche
BLUETOOTH].
9 Al completamento della registrazione
del dispositivo, appare un messaggio e il
dispositivo torna al modo normale.
Il processo di registrazione BLUETOOTH varia in base
•
alla versione del dispositivo e a SSP (Simple Secure
Pairing - Collegamento Semplice Sicuro). Se un codice
di protezione di 4 o di 6 caratteri appare su questo
dispositivo, immettere il codice di protezione tramite il
dispositivo compatibile BLUETOOTH.
Se appare un codice di protezione di 6 caratteri,
assicurarsi che lo stesso codice sia visualizzato sul
dispositivo compatibile BLUETOOTH e toccare “Yes”.
Rispondere a una chiamata
7 Toccare [Search] in “No Device”.
L’elenco dei dispositivi visualizza fino a 10 voci.
8 Toccare [Audio], [HFT] o [Both] del
dispositivo in elenco che si desidera
collegare.
1 Una chiamata in entrata fa partire la
suoneria e un display di chiamata in
entrata.
2 Toccare [ ] o premere il tasto 1 Media
Control.
Inizia la conversazione telefonica.
Riagganciare il telefono
1 Toccare [ ] o premere il tasto 3 Media
Control.
La conversazione telefonica termina.
9-IT
Page 84

Istruzioni per l’uso Aha (opzionale)
Funzionamento di Aha (Opzionale)
Aha offre accesso rapido e personalizzato al contenuto desiderato e ha l’obiettivo di garantire che l’esperienza di
ascolto sia sempre appagante.
Se l’applicazione Aha è installata in un iPhone, è possibile visualizzare la schermata di Aha ed eseguire operazioni
mediante l’unità ICS-X7.
N. del contenuto corrente/N. totale di contenuti
Display copertina
Consente di trovare
l’inizio del file corrente/
Consente di trovare un
contenuto precedente
Visualizzazione della
schermata di ricerca
La schermata passa al
modo Semplice o al modo
Info
Feedback “Like”
Feedback “Dislike”
Indietro 15 sec
Il contenuto in corso di
riproduzione viene portato
indietro di 15 secondi.
Toccare [ (Indietro)] per tornare alla schermata di selezione della stazione preimpostata.•
Logo della stazione
Visualizzazione
informazioni Aha
Logo del partner
Consente di trovare l’inizio
del contenuto successivo
Avanti 30 sec
Il contenuto in corso di
riproduzione viene portato
avanti di 30 secondi.
Visualizza la schermata
Impostazioni audio
Richiama la funzione
Stazione precedente
È possibile richiamare una
stazione precedentemente
selezionata. È possibile passare
dalla stazione correntemente
selezionata ad una selezionata
in precedenza.
Consente di trovare l’inizio del
contenuto successivo
Pausa e riproduzione
Consente di trovare l’inizio del file
corrente/Consente di trovare un
contenuto precedente
10-IT
Page 85

Istruzioni per l’uso M irrorLink™ (opzionale)
Funzionamento di MirrorLink™ (Opzionale)
MirrorLink è uno standard che consente la connessione fra un’unità ICS-X7 e un cellulare. Tramite MirrorLink è
possibile visualizzare su questa unità le schermate del cellulare e utilizzarne le applicazioni.
Per l’uso di MirrorLink si raccomanda di collegare il telefono cellulare sia tramite USB che
BLUETOOTH.
1 Premere il tasto Home.
2 Toccare [Mirror Mode], [Car Mode], [Navigation] o [Music].
Viene visualizzata la schermata del modo selezionato.
Dopo aver collegato all’unità un telefono cellulare compatibile, le icone delle applicazioni compaiono nella schermata
•
Home.
3 Per eseguire le operazioni desiderate, premere il tasto Media Control.
Le funzioni del tasto Media Control variano a seconda del modo attivo.
•
Con alcuni cellulari le modalità di funzionamento di questa unità potrebbero essere diverse da quelle del telefono cellulare.
•
Nel modo Navigazione è possibile eseguire operazioni sul sistema solo mediante il pannello a sfioramento.
•
11-IT
Page 86

Installazione
Istruzioni per l’uso Installazione
Quando si eseguono i collegamenti al sistema elettrico
•
della vettura, fare attenzione ai componenti installati in
fabbrica (per es. il computer di bordo). Non servirsi di
questi cavi per fornire alimentazione all’unità. Quando si
collega l’unità ICS-X7 alla scatola dei fusibili, assicurarsi
che il fusibile per il particolare circuito dell’unità ICS-X7
sia dell’amperaggio corretto. Altrimenti ne potrebbero
derivare danni all’unità e/o alla vettura. Se non si è
sicuri, consultare il rivenditore Alpine.
Il display deve essere completamente ritirato
•
nell’intelaiatura durante l’installazione. Diversamente, si
potrebbero verificare problemi.
1 Installare l’unità a un angolo compreso
tra la posizione orizzontale e i 30°. Tenere
in considerazione che l’installazione a
un angolo non compreso nell’intervallo
indicato comporterà una riduzione delle
prestazioni ed eventuali danneggiamenti.
0 -30°
2 Montaggio del Microfono.
Per ragioni di sicurezza, verificare quanto segue:
la posizione è stabile e ferma.
•
la visuale e le operazioni di guida del conducente
•
non sono ostruite.
il microfono è posizionato in un punto dove
•
la voce del conducente può essere facilmente
ricevuta (su un’aletta parasole, ecc.).
Quando si parla al microfono, non deve essere
necessario cambiare la posizione di guida. Ciò
potrebbe causare una distrazione, spostando
l’attenzione dalla guida sicura del veicolo. Quando
si monta il microfono, tenere in particolare
considerazione la direzione e la distanza.
Confermare che la voce del conducente possa
essere facilmente ricevuta dalla posizione prescelta.
Microfono
Morsetto del cavo
(venduto separatamente)
3 Rimuovere il manicotto di montaggio
dall’unità principale.
Questa unità
Chiavi della staffa
(in dotazione)
Far scorrere l’unità nel manicotto di
montaggio e fissarla.
Manicotto di montaggio
(in dotazione)
Staffa
Piastrine di
pressione*
*1 Se il manicotto di montaggio installato è allentato
nel cruscotto, piegare leggermente le piastrine di
pressione per risolvere il problema.
*2 È possibile montare la mascherina in dotazione.
1
Bullone
esagonale
(in dotazione)
Cruscotto
Cappuccio in gomma
(in dotazione)
Mascherina*
(in dotazione)
Questa unità
2
12-IT
Page 87

4 Una volta dotata la vettura della staffa,
montare il bullone esagonale lungo sul
pannello posteriore dell’unità ICS-X7 e
applicare al bullone esagonale il cappuccio
in gomma. Se la vettura non è dotata del
supporto di montaggio, rinforzare l’unità
principale con la staffa di montaggio in
metallo (venduta separatamente). Fissare
il cavo di massa dell’unità a una parte in
metallo libera per mezzo di una vite (*1) già
attaccata al telaio della vettura. Collegare
tutti gli altri cavi dell’unità ICS-X7 secondo
le indicazioni della sezione COLLEGAMENTI.
Dado esagonale (M5)
Staffa di
montaggio
in metallo
Vite
2
*
Prigioniero
1
*
5 Far scorrere l’unità ICS-X7 nel cruscotto
fino a quando non si sente uno scatto.
Questo assicura che l’unità sia bloccata
adeguatamente e che non cada
accidentalmente fuori dal cruscotto.
Cavo di massa
Per la vite contrassegnata con “*2”, usare una vite
•
Telaio
Questa unità
appropriata alla posizione di montaggio scelta.
Diagramma di collegamento dell’interruttore SPST (venduto separatamente)
(se l’alimentazione ACC non è disponibile)
ACC
ICS-X7
Se la vettura non è dotata di alimentazione ACC, aggiungere un interruttore SPST (Single-Pole, Single-Throw) venduto
•
(rosso)
BATTERY
(giallo)
SPST SW (opzionale)
separatamente e un fusibile venduto separatamente.
Il diagramma e l’amperaggio del fusibile di cui sopra si riferiscono all’uso della sola unità ICS-X7.
•
Se il cavo di alimentazione (accensione) dell’unità ICS-X7 è collegato direttamente al polo positivo (+) della batteria della
•
vettura, l’unità ICS-X7 consuma una certa corrente (alcune centinaia di milliampere) anche quando l’interruttore è nella
posizione OFF; pertanto, la batteria si può scaricare.
FUSIBILE (5A)
(opzionale)
FUSIBILE (20A)
(opzionale)
Batteria
13-IT
Page 88

Collegamenti
Collegamenti 1/2
Istruzioni per l’uso Collegamenti
Antenna
Spina antenna ISO
Alla scatola interfaccia del
telecomando sullo sterzo.
Collegarlo al box interfaccia display
opzionale della vettura.
Non utilizzato
REMOTE OUT
(marrone)
REVERSE
(arancione/bianco)
(giallo)
(rosso)
(bianco)
Al conduttore di ingresso del telecomando
Al lato positivo del cavo del segnale delle luci
posteriori della vettura
Microfono (in dotazione)
Al terminale di uscita video
Ai terminali di uscita audio (L/R)
Amplificatore
Amplificatore
Posteriore sinistro
Posteriore destro
Anteriore sinistro
Anteriore destro
14-IT
Amplificatore Subwoofer
Page 89

Collegamenti 2/2
Cellulare
(venduto separatamente)
IGNITION
(rosso)
GND
(nero)
POWER ANT
(blu)
10A
Prolunga AV VIDEO per iPod
(in dotazione con KCU-461iV)
REMOTE TURN-ON
(blu/bianco)
AUDIO INTERRUPT IN
(rosa/nero)
PARKING BRAKE
(giallo/blu)
BATTERY
(giallo)
Prolunga USB
(in dotazione)
(verde)
(verde/nero)
(bianco)
(bianco/nero)
(grigio/nero)
(grigio)
(viola/nero)
(viola)
Cavo Cellulare
(venduto separatamente)
Memoria USB
(venduta separatamente)
Kit di collegamento KCU-461iV
(venduto separatamente)
All’amplificatore o equalizzatore
Non utilizzato
Al conduttore del segnale
del freno di stazionamento
All’antenna
Chiave di accensione
Posteriore sinistro
Anteriore sinistro
Anteriore destro
Posteriore destro
iPod/iPhone
(venduto separatamente)
Batteria
Altoparlanti
15-IT
Page 90

Specifiche
Istruzioni per l’uso Specifiche
SEZIONE MONITOR
Dimensioni schermo 7,0”
Tipo LCD TN LCD di tipo trasparente
Sistema operativo Matrice attiva TFT
Numero di pixel 1.152.000 pixel
(800 × 3 × 480)
Numero di pixel effettivo 99% o superiore
Sistema di illuminazione LED
SEZIONE SINTONIZZATORE FM
Gamma di sintonizzazione 87,5 – 108,0 MHz
Sensibilità utile 8,1 dBf (0,7 µV/75 ohm)
Sensibilità per 50 dB 12 dBf (1,1 µV/75 ohm)
Selettività 80 dB
Rapporto segnale-rumore 65 dB
Separazione stereo 35 dB
Rapporto di cattura 2,0 dB
SEZIONE SINTONIZZATORE MW
Gamma di sintonizzazione 531 – 1.602 kHz
Sensibilità utile 25,1 µV/28 dBf
SEZIONE SINTONIZZATORE LW
Gamma di sintonizzazione 153 – 281 kHz
Sensibilità (IEC Standard) 31,6 µV/30 dBf
SEZIONE USB
Requisiti USB USB 1.1/2.0
Consumo energetico massimo
1.000 mA
Categoria USB USB (Riproduzione da dispositivo)/
File System FAT12/16/32
Decodifica MP3 MPEG-1/2 AUDIO Layer-3
Decodifica WMA Windows Media™ Audio
Decodifica AAC File “.m4a” formato AAC-LC
Numero di canali 2 canali (Stereo)
Risposta in frequenza* 5-20.000 Hz (±1 dB)
Distorsione armonica totale 0,008% (a 1 kHz)
Gamma dinamica 95 dB (a 1 kHz)
Rapporto segnale-rumore 100 dB
Separazione fra canali 85 dB (a 1 kHz)
La risposta in frequenza potrebbe variare a seconda del software
*
per la codifica o della velocità di trasmissione.
USB (Archiviazione di massa)
SEZIONE BLUETOOTH
Specifica BLUETOOTH Bluetooth V 2.1+EDR
Potenza in uscita +4 dBm Max. (Classe potenza 2)
Profilo HFP (Hands-Free Profile)
OPP (Object Push Profile)
PBAP (Phone Book Access Profile)
A2DP (Advanced Audio
AVRCP (Audio/Video Remote
Distribution Profile)
Control Profile)
GENERALI
Potenza richiesta 14,4 V CC
(11–16 V consentiti)
Temperatura di esercizio da -20°C a + 60°C
Uscita di potenza massima 50 W × 4
Tensione in uscita 2.000 mV/10 kohm
Peso 1,6 kg
Livello uscita audio
Preout (anteriore, posteriore):
4V/10 kohm (max.)
Pre-out (subwoofer): 4V/10 kohm (max.)
DIMENSIONI DEL TELAIO
Ampiezza 178 mm
Altezza 100 mm
Profondità 159 mm
A causa di continui miglioramenti del prodotto, i dati
•
tecnici e il design sono soggetti a modifiche senza
preavviso.
Il pannello LCD viene fabbricato usando tecnologie
•
di costruzione ad altissima precisione. Il numero di
pixel effettivo è pari a 99,99%. Ciò significa che c’è una
possibilità che lo 0,01% di pixel potrebbe essere sempre
accesa o sempre spenta.
16-IT
Page 91

•
Prodotto con licenza di Dolby Laboratories. Dolby
e il simbolo della doppia D sono marchi di Dolby
Laboratories.
•
Windows Media e il logo di Windows sono marchi di
fabbrica o marchi di fabbrica registrati di Microsoft
Corporation negli Stati Uniti e/o in altri paesi.
iPhone, iPod, iPod classic, iPod nano, iPod touch e
•
iTunes sono marchi di Apple Inc., registrati negli Stati
Uniti e in altri paesi.
•
“Made for iPod,” e “Made for iPhone,” significano che un
accessorio elettronico è stato progettato per essere
collegato specificatamente a un iPod o a un iPhone,
rispettivamente, e ha la certificazione dallo sviluppatore
di soddisfare gli standard di prestazione di Apple. Apple
non è responsabile del funzionamento del presente
dispositivo o della sua conformità agli standard
normativi e di sicurezza. Si noti che l’uso di questo
accessorio con un iPod o iPhone potrebbe influire sulle
prestazioni della rete senza fili.
•
© 2010 Nokia. Tutti i diritti riservati. Nokia e Works
with Nokia sono marchi o marchi registrati di Nokia
Corporation.
•
DivX®, DivX Certified® e i relativi logo sono marchi di
fabbrica di Rovi Corporation o delle sue sussidiarie e
vengono utilizzati su licenza.
La parola e i loghi BLUETOOTH® sono marchi di fabbrica
•
registrati di proprietà di Bluetooth SIG, Inc. e qualsiasi
utilizzo di questi marchi da parte di Alpine Electronics,
Inc. avviene su licenza.
•
“Tecnologia di codifica audio MPEG Layer-3 concessa in
licenza da Fraunhofer IIS e Thomson.”
•
“La fornitura del presente prodotto concede soltanto una
licenza per uso privato, non commerciale e non garantisce
licenze né implica diritti d’uso del prodotto in trasmissioni
in tempo reale di tipo commerciale (cioè con ricavo di
profitti) di tipo terrestre, satellitare, via cavo e/o mediante
altri supporti, trasmissioni/streaming via Internet, intranet
e/o altre reti o in altri sistemi di distribuzione elettronica
del contenuto, quali applicazioni pay-audio o audio-ondemand. È richiesta una licenza indipendente per tali usi.
Per informazioni, visitare http://www.mp3licensing.com”
•
aha, il logo Aha e l’immagine aziendale Aha sono marchi
o marchi registrati di HARMAN International Industries,
utilizzati con la relativa autorizzazione.
17-IT
Page 92

Page 93

Innehåll
VARNING ..................................................................................................................................................................2
FÖRSIKTIGT .............................................................................................................................................................2
Komma igång ........................................................................................................................................................ 3
Home-skärmen och favoriter ...........................................................................................................................4
Använda Media View-kontrollknapparna ...................................................................................................4
Använda Media View-knappen ....................................................................................................................... 5
Ställa in tiden ......................................................................................................................................................... 5
Radiofunktion ........................................................................................................................................................6
Använda iPod/iPhone (tillval) ..........................................................................................................................7
USB-minnesanvändning (tillval) ..................................................................................................................... 8
Styrning av handsfree-telefon ......................................................................................................................... 9
Aha-funktion (tillval) .........................................................................................................................................10
MirrorLink™-funktion (tillval) .........................................................................................................................11
Installation ............................................................................................................................................................12
Anslutningar ........................................................................................................................................................14
Specifikationer ....................................................................................................................................................16
VIKTIGT
Skriv in enhetens serienummet i fältet nedan och ha det alltid tillgängligt som referens.
SERIENUMMER:
ISO SERIENUMMER: AL
INSTALLATIONSDATUM:
INSTALLATIONSTEKNIKER:
INKÖPSSTÄLLE:
Läs användarhandledningen på den medföljande cd-skivan för detaljerad information om alla
funktioner (eftersom det är en dataskiva kan den inte användas för uppspelning av musik och
bilder på spelaren). Vid behov kan en ALPINE-återförsäljare enkelt förse dig med en utskrift av den
användarhandledning som finns på cd-skivan.
1-SE
Page 94

VARNING
VARNING
Denna symbol indikerar viktiga instruktioner.
Om dessa inte följs kan det kan leda till allvarliga
skador eller dödsfall.
UTFÖR ALDRIG NÅGON OPERATION SOM INNEBÄR ATT
UPPMÄRKSAMHETEN DRAS BORT FRÅN KÖRNINGEN.
Stanna alltid fordonet på en säker plats innan apparaten manövreras. I
annat fall kan olyckor lätt inträffa.
FÖRVARA SMÅ FÖREMÅL SÅ SOM SKRUVAR UTOM
RÄCKHÅLL FÖR BARN.
Om något föremål skulle sväljas, skall en läkare kontaktas omedelbart.
STÄLL IN LJUDVOLYMEN PÅ EN NIVÅ MED VILKEN DET
FORTFARANDE ÄR MÖJLIGT AT T HÖRA YTTRE LJUD UNDER
PÅGÅENDE KÖRNING.
För hög volym som döljer utryckningsfordons sirener eller vägsignaler
(t ex järnvägsövergångar) kan vara farlig och orsaka en olycka. DET
KAN OCKSÅ ORSAKA HÖRSELSKADA OM MAN LYSSNAR PÅ FÖR
HÖGA VOLYMER I EN BIL.
TAG INTE ISÄR OCH GÖR INGA ÄNDRINGAR.
Det kan resultera i en olycka, brand eller elektriska stötar.
ANVÄND BARA ENHETEN I BILAR MED 12-VOLTSYSTEM SOM
HAR NEGATIV (–) JORD.
(Återförsäljaren kan hjälpa dig om du är osäker.) Felaktig anslutning kan
resultera i brand, elektriska stötar eller andra skador.
ANVÄND RÄTT AMPERETAL VID BYTE AV SÄKRINGAR.
Fel amperetal kan orsaka brand eller elektriska stötar.
BLOCKERA INTE VENTILATIONS -ÖPPNINGAR ELLER VÄRMEPANELER.
Det kan göra att värme alstras inuti apparaten, vilket kan leda till brand.
DEN HÄR PRODUKTEN ÁR ENDAST AVSEDD FÖR
MONTERING I BILAR MED 12 VOLTS-SYSTEM.
Annan användning kan resultera i brand, elektriska stötar eller andra
skador.
GÖR ANSLUTNINGARNA PÅ KORREKT SÄTT.
Felaktiga anslutningar kan orsaka brand eller skador på enheten.
KOPPLA UR KABELN FRÅN DET NEGATIVA (–) UTTAGET PÅ
BILBATTERIET INNAN ANSLUTNINGARNA GÖRS.
Detta för att undvika risken för elektriska stötar eller olycksfall på grund
av kortslutning.
KAPA INTE BORT KABELMANTELN FRÅN EN STRÖMKABEL
FÖR ATT STRÖMFÖRSÖRJA NÅGOT ANNANT TILLBEHÖR.
Det leder till en för hög kabelbelastning och kan resultera i brand eller
elektriska stötar.
SE TILL ATT VARKEN RÖR, VÄTSKELEDNINGAR ELLER KABLAR
VIDRÖRS, SKADAS ELLER FÖRHINDRAS VID BORRNING AV
HÅL.
Undersök chassit innan hålen borras så att inte några slangar, kablar,
bränsleledningar eller liknande råkar skadas. Det kan leda till att brand
uppstår.
MONTERA VARKEN MUTTRAR ELLER BULTAR I NÅGON DEL
AV BROMSSYSTEMET VID JORDANSLUTNINGAR.
Bultar eller muttrar som hör till någon vätsketank, styr- eller
bromssystemet (eller något annan system som är av betydelse
för säkerheten) ska ALDRIG användas för kabeldragning eller
jordanslutning. Användandet av sådana delar kan leda till att fordonets
styrförmåga försämras och orsaka bromsfel, brand eller personskada.
MONTERA INTE APPARATEN PÅ EN PLATS DÄR DEN KAN
UTGÖRA RISK FÖR FORDONETS MANÖVRERING, T.EX. I
NÄRHETEN AV RATT ELLER VÄXELSPAK.
Om installationen försämrar sikten eller hindrar rörelsen hos väsentliga
funktioner kan det lätt leda till olyckor.
FÖRSIKTIGT
Denna symbol indikerar viktiga instruktioner.
Underlåtenhet att följa dem kan leda till skador på
person eller egendom.
AVBRYT GENAST ANVÄNDNING OM PROBLEM UPPSTÅR.
I annat fall kan personskador eller skador på själva enheten uppstå.
Lämna apparaten till återförsäljaren för reparation.
LÅT EN FACKKUNNIG TEKNIKER GÖRA KABELDRAGNINGEN
OCH MONTERINGEN.
Kabeldragningen och monteringen av denna apparat kräver teknisk
kunskap och erfarenhet. Kontakta återförsäljaren, som sålde apparaten,
för utförandet av säker montering.
ANVÄND ALLTID SPECIFICERADE TILLBEHÖR OCH MONTERA
TILLBEHÖREN ORDENTLIGT.
Användandet av andra delar än som är avsedda för denna apparat kan
leda till att apparaten skadas invändigt eller till ostadig montering på
grund av lossnande delar.
DRA KABLARNA RAKA OCH SÅ ATT DE INTE KOMMER I KLÄM
ELLER SKAVER MOT SKARPA KANTER.
Undvik kläm- och nötskador genom att se till att kablarna går fria från
rörliga delar (t.ex. bilsätenas glidbanor) och skarpa och spetsiga kanter.
Om kablarna måste dras genom hål i plåten bör gummibussningar
användas som skydd, så att inte kablarna ligger och nöter mot metallen.
MONTERA INTE APPARATEN DÄR DEN UTSÄTTS FÖR FUKT
ELLER DAMM.
Undvik att installera enheten på platser där fukt och damm kan tränga
in och ställa till skador.
2-SE
Page 95

Användarhandledning Pekstyrning, Kontrollernas placering, Slå på eller stänga av strömmen
Komma igång
Pekstyrning
Du kan styra systemet med hjälp av pekskärmen.
e
Vanliga knappar på skärmen
: Återgår till föregående skärm. Beroende på funktionen kanske denna knapp avbryter åtgärderna som
utförts på skärmen.
: Stänger fönstret.
Kontrollernas placering
A Home/C-knapp
Tryck på Home-knappen för att visa favoriter.
Tryck på Home-knappen för att visa Home-skärmen.
Stäng av strömmen genom att hålla knappen intryckt i
minst 5 sekunder.
B Fjärrsensor
Rikta fjärrkontrollens sändare mot fjärrsensorn inom ett
avstånd på 2 meter.
/ -knapp
C
Tryck för att justera volymen.
D RESET-brytare
Enhetens system återställs.
E
F Mediaknapp 1/2/3
G MUTE-knapp
-knapp (Media View)
•
När navigationssystemet inte används:
Om visas på skärmen stänger en tryckning på
-knappen skärmen på samma sätt som ett
tryck på [
När navigationssystemet används:
•
Tryck för att växla mellan navigationsskärmen och
ljud/bild-skärmen.
Denna åtgärd varierar beroende på ljud/bildapplikationen. (Spår upp/ner, PLAY/PAUS,
Snabbspolning bakåt/framåt, etc.)
När den här funktionen aktiveras dämpas volymen
omedelbart med 20 dB.
].
Slå på eller stänga av strömmen
1 Vrid tändningsnyckeln till läge ACC eller ON.
Systemet slås på.
2 Stäng av strömmen genom att hålla Home/C-knappen intryckt i minst 5 sekunder.
3-SE
Page 96

Användarhandledning Home-skärmen och favoriter
Home-skärmen och favoriter
Du kan enkelt växla till den applikation du vill välja från Home-skärmen eller favoriter. Home-skärmen visar ikoner
för applikationer som kan användas med denna enhet. Favoriter är en genvägsfunktion som visar upp till 4 ikoner
på den skärm du använder. Du kan anpassa ikonernas layout.
Home-knapp
Tryck på Home-knappen.
Tryck på Home-knappen.
Home-skärm
Växla till en
applikation genom att
trycka på dess ikon.
Användarhandledning
Favoriter
Använda Media View-kontrollknapparna
Använda Media View-kontrollknapparna
För åtgärder som att flytta upp och ner mellan låtar kan du, förutom att använda knapparna som visas på skärmen,
också använda mediaknapparna på själva enheten. Detta låter dig trycka på en mediaknapp för att välja en låt
även om huvudskärmen för media inte visas.
Användningen av mediaknapparna kan ändras beroende på mediet du använder. En guide visas på skärmen för
att visa vilken funktion varje knapp styr.
Funktionsguide
4-SE
Mediaknappar 1
Mediaknappar 2
Mediaknappar 3
Page 97

Användarhandledning Använda Media View-knappen
Använda Media View-knappen
Du kan växla mellan navigationsskärmen och huvudskärmen med bara en knapptryckning.
Media View-knapp
Tryck på .
Mediaskärm
Ställa in tiden
1 Tryck på Home-knappen.
2 Tryck på [Setup].
3 Tryck på [Generell inställning].
4 Tryck på [Datum/Tid].
Användarhandledning
Ställa in datum/tid
5 Tryck på [Klockjustering].
6 Tryck på [o] eller [p] för ”År”, ”Månad”,
”Dag”, ”Timme” och ”Minut” och ställ in
klockan.
7 Tryck på [ ].
5-SE
Page 98

Radiofunktion
Användarhandledning Radio, RDS
Indikator för snabbvalsnummer
Frekvens
Minskar frekvens
Snabbvalsknapp
En kort beröring av knapparna
aktiverar de förinställda
stationerna.
Om en knapp hålls intryckt
längre än 2 sekunder, lagras den
nuvarande stationen som en
förinställd station.
Visar skärmen Välj PTY
Skärmen ändras till
enkelt läge eller infoläge
Aktiverar/deaktiverar läget
PRIORITERA NYHETE
Aktiverar/deaktiverar AF-läge
Automatisk lagring av stationer RDS-indikator
Frekvensband
Infoområde
Ökar frekvens
Byter frekvensba
Skärmen för ljudinställning
visas
Ökar frekvens
Ändrar kanalsökningsläge
Minskar frekvens
Aktiverar/deaktiverar läget
Trafikinformatio
6-SE
Page 99

Användarhandledning iPod/iPhone (tillval)
Använda iPod/iPhone (tillval)
En iPod/iPhone kan anslutas till den här enheten med hjälp av en adapterkabel (KCU-461iV, säljs separat). Om du
ansluter en iPod som kan visa video, kan du förutom att lyssna på musik även titta på filmer.
Ljudläge
Sökskärmen visas
Visning av illustration
Går till början av nuvarande
fil/Går till föregående fil
om du pekar på knappen
inom en sekund efter
uppspelningsstarten/
Snabbspolar bakåt om du
pekar på knappen längre än
2 sekunder
Visa Sökskärm
Skärmen ändras till
enkelt läge eller infoläge
Går till början av föregående
Spellista/Artist/Album/Podcast/
Genre/Kompositör
Ikon för direktväxling mellan lägen
Går till början av nästa Spellista/Artist/
Album/Podcast/Genre/Kompositör
Slumpvis uppspelning (Shuffle ALL)
Aktuellt låtnr./Totalt antal låtar
Visning av information från
iPod/iPhone
Går till början av nästa fil/
Snabbspolar framåt om du
pekar på knappen längre
än 2 sekunder
Slumpvis uppspelning
(Shuffle)
Skärmen för ljudinställning
visas
Går till början av nästa fil/Snabbspolar
framåt om du pekar på knappen längre
än 2 sekunder
Paus och Uppspelning
Går till början av nuvarande fil/Går
till föregående fil om du pekar på
knappen inom en sekund efter
uppspelningsstarten/Snabbspolar
bakåt om du pekar på knappen längre
än 2 sekunder
Upprepad spelning
Söka efter en musikfil
Till exempel: Söka efter artistens namn
1 Tryck på [ (Search)] under uppspelning.
2 Tryck på [Music].
3 Tryck på [Artists].
4 Tryck på den önskade artistens namn.
Sökningsskärmen för album för markerad artist
visas.
Tryck på [p] för önskad artist för att spela upp alla
låtar med den valda artisten.
5 Tryck på det önskade albumets namn.
Alla låtar för det valda albumet visas.
Tryck på [p] för önskat album för att spela upp alla
låtar från det valda albumet.
6 Tryck på den önskade låtens namn.
Den valda låten spelas upp.
Om du trycker på [p] för ”ALL” så kommer alla låtar i
•
listan att spelas upp.
7-SE
Page 100

Användarhandledning USB-minne (tillval)
USB-minnesanvändning (tillval)
Denna enhet kan ansluta till USB-minnesenhet.
Du kan spela upp musikfiler (MP3/WMA/AAC) och videofiler (DivX® ) lagrade i ett USB-minne på det här systemets
interna spelare. Denna sektion förklarar endast musikrelaterade åtgärder.
Ljudläge
Sökskärmen visas
Går till början av
nuvarande fil/Går till
föregående fil om du
pekar på knappen
inom en sekund efter
uppspelningsstarten/
Snabbspolar bakåt om du
pekar på knappen längre
än 2 sekunder
Visa Sökskärm
Skärmen ändras till
enkelt läge eller infoläge
Hittar början av föregående mapp
(Spellista/Artist/Album/Genre/Kompositör)
Hittar början av nästa mapp
(Spellista/Artist/Album/Genre/Kompositör)
Slumpvis uppspelning
Slumpvis uppspelning (ALL)
Videoläge
Nuvarande filnr./Totalt filnr.
Går till början av nuvarande
fil/Går till föregående fil
om du pekar på knappen
inom en sekund efter
uppspelningsstarten/
Snabbspolar bakåt om du
pekar på knappen längre
än 2 sekunder
Visa Sökskärm
Skärmen ändras till enkelt
läge eller infoläge
Hittar början av föregående mapp
Hittar början av nästa mapp
Byter ljudspår
Byter undertexter
8-SE
Aktuellt låtnr./Totalt antal låtar
MP3/WMA/AAC
informationsdisplay
Går till början av nästa fil/
Snabbspolar framåt om du
pekar på knappen längre
än 2 sekunder
Upprepad spelning
Skärmen för ljudinställning
visas
Går till början av nästa fil/Snabbspolar
framåt om du pekar på knappen längre
än 2 sekunder
Paus och Uppspelning
Går till början av nuvarande fil/Går
till föregående fil om du pekar på
knappen inom en sekund efter
uppspelningsstarten/Snabbspolar
bakåt om du pekar på knappen längre
än 2 sekunder
DivX® informationsdisplay
Går till början av nästa fil/
Snabbspolar framåt om du
pekar på knappen längre
än 2 sekunder
Stoppar uppspelning
Upprepad spelning
Skärmen för ljudinställning
visas
Displayinställningsskärmen
visas
Går till början av nästa fil/Snabbspolar
framåt om du pekar på knappen
längre än 2 sekunder
Paus och Uppspelning
Går till början av nuvarande fil/Går
till föregående fil om du pekar på
knappen inom en sekund efter
uppspelningsstarten/Snabbspolar
bakåt om du pekar på knappen längre
än 2 sekunder
 Loading...