

Page 1
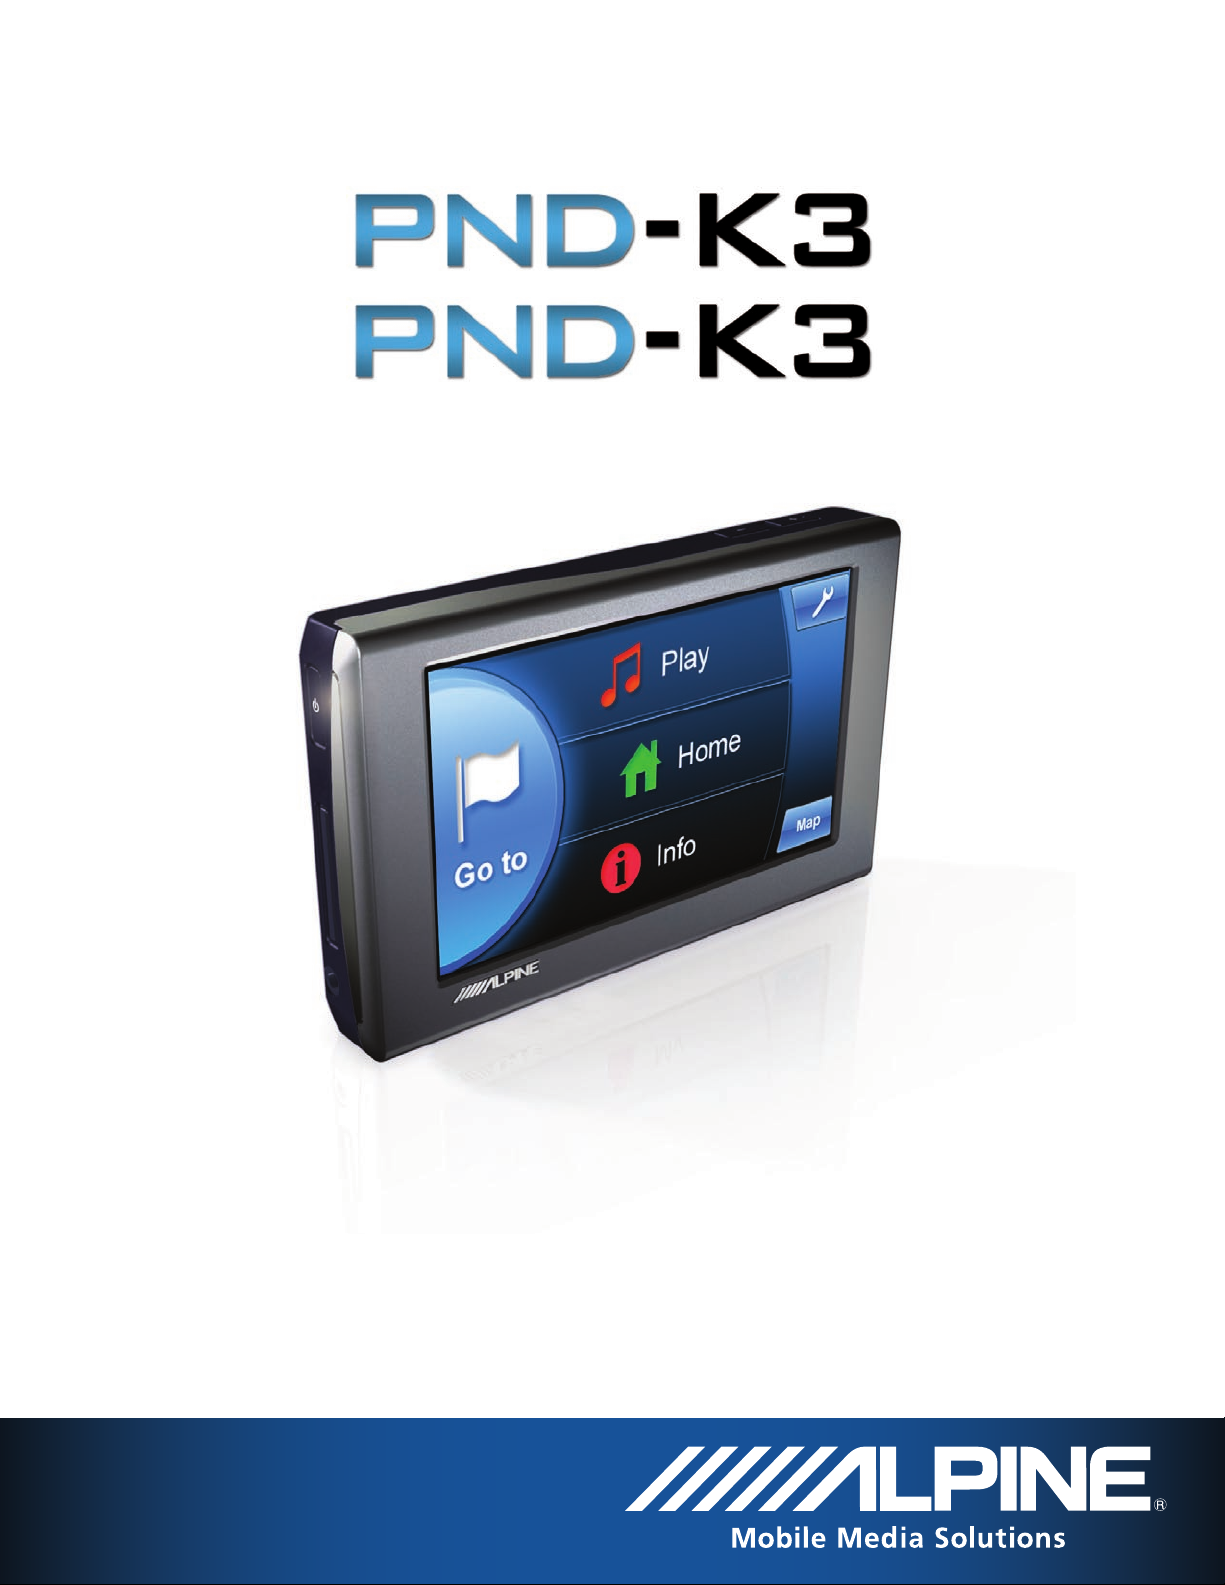
PND-K3
Portable Navigation System
msn
OWNER’S MANUAL
PND-K3 / PND-K3msn
Version 1.1
Page 2

PRECAUTIONS AND NOTICES
IMPORTANT INFORMATION
PLEASE READ CAREFULLY BEFORE
USING THIS PRODUCT
This product is intended to provide turn by turn instructions
to get you to a desired destination. Please make certain that
all persons using this navigation system carefully read these
precautions and the following instructions fully.
This product is not a substitute for your personal
1
judgment. Any route suggestions made by this
navigation system may never supersede any local
traffic regulations or your personal judgment and/or
knowledge of safe driving practices. Do not follow
route suggestions if the navigation system instructs
you to perform an unsafe or illegal maneuver, places
you in an unsafe situation, or routes you into an area
which you consider unsafe.
Glance at the screen only when necessary and
2
safe to do so. If prolonged viewing of the screen is
necessary, pull over in a safe and legal manner and
location.
Do not input destinations, change settings, or access
3
any functions requiring a prolonged view of the
monitor and/or remote control while you are driving.
Pull over in a safe and legal manner and location
before attempting to access the system.
Do not use the navigation system to route you to
4
emergency services. Not all locations of emergency
services such as police and fire stations, hospitals
and clinics are contained in the database. Please use
your own judgment and ask for directions in these
situations.
The map database used in the navigation system
5
is the most recent map data available at the time
of production. Because of changes in streets and
neighborhoods, there may be situations where the
navigation system is not able to route you to your
desired destination. In these cases, use your own
judgment.
The map database is designed to provide you with
6
route suggestions and does not take into account
the relative safety of a suggested route or of factors
which may affect the time required to reach your
destination. The system does not reflect road
closures or construction, road characteristics (i.e.
type of road surface, slope or grade, weight or
height restrictions, etc.), traffic congestion, weather
conditions, or any other factors which may affect the
safety or timing of your driving experience. Use your
own personal judgment if the navigation system is
unable to provide you with an alternate route.
There may be situations where the navigation system
7
displays the vehicle’s location erroneously. Use
your own driving judgment in this situation, taking
into account current driving conditions. Please be
aware that in this situation the navigation system
should correct the vehicle’s position automatically.
However, there may be times where you may have to
correct the position yourself. If this is the case, pull
over in a safe and legal manner and location before
attempting operation.
Make certain that the volume level of the navigation
8
system is set to a level which still allows you to hear
outside traffic and emergency vehicles.
If there is anything in the manual about the operation of the
navigation system which you are uncertain about, please
contact your local Alpine authorized navigation dealer or
Alpine at 1-888-NAV-HELP (1-888-628-4357) before using
the navigation system.
FCC COMPLIANCE STATEMENT
PND-K3 has been tested and found to comply with the
limits for a Class B digital device, pursuant to part 15
of the FCC Rules. These limits are designed to provide
more reasonable protection against harmful interference
in a residential installation, and are more stringent than
“outdoor” requirements.
Operation is subject to the following two conditions: (1)
This device may not cause harmful interference, and (2)
this device must accept any interference received, including
interference that may cause undesired operation.
This equipment generates, uses, and can radiate radio
frequency energy and, if not installed and used in
accordance with the instructions, may cause harmful
interference to radio communications. However, there
is no guarantee that interference will not occur in a
particular installation. If this equipment does cause harmful
interference to radio or television reception, which can be
determined by turning the equipment off and on, you are
encouraged to try to correct the interference by one of the
following measures:
· Reorient or relocate the receiving antenna.
· Increase the separation between the equipment and
the receiver.
·Connect the equipment into an outlet on a circuit
different from that to which the receiver is connected.
·Consult an experienced radio/TV technician.
2
Page 3
WARNINGS
POINTS TO OBSERVE FOR SAFE USAGE
Read this manual carefully before using this system. It
contains instructions on how to use this product in a safe
and effective manner. Alpine cannot be responsible for
problems resulting from failure to observe the instructions
in this manual.
This manual uses various pictorial displays to show you
how to use this product safely and to alert you to potential
dangers resulting from improper connections and operation.
Following are explanations of these pictorial displays. It is
important to fully understand the meanings of these pictorial
displays in order to use this manual and the system properly.
DO NOT OPERATE ANY FUNCTION THAT
TAKES YOUR ATTENTION AWAY FROM
SAFELY DRIVING YOUR VEHICLE.
Any function that requires your prolonged attention should
only be performed after coming to a complete stop. Always
stop the vehicle in a safe location before performing these
functions. Failure to do so may result in an accident.
KEEP THE VOLUME AT A LEVEL WHERE YOU CAN
STILL HEAR OUTSIDE NOISE WHILE DRIVING.
Failure to do so may result in an accident.
DO NOT BLOCK VENTS OR RADIATOR PANELS.
Doing so may cause heat to build up inside and may result
in fire.
HALT USE IMMEDIATELY IF A PROBLEM APPEARS.
Failure to do so may cause personal injury or damage to the
product. Return it to your authorized ALPINE dealer or the
nearest ALPINE Service Center for repairing.
Temperature
Be sure the temperature inside the vehicle is between +45°C
(+113°F) and -0°C (+32°F) before turning your unit on.
Fuse Replacement
When replacing the fuse(s), the replacement must be of
the same amperage as shown on the fuse holder. If the
fuse(s) blows more than once, carefully check all electrical
connections for shorted circuitry. Also have your vehicle’s
voltage regulator checked.
Servicing the Unit
If you have problems, do not attempt to repair the unit
yourself. Return it to your ALPINE dealer or the nearest
ALPINE Service Station for servicing.
MINIMIZE DISPLAY VIEWING WHILE DRIVING.
Viewing the display may distract the driver from looking
ahead of the vehicle and cause an accident.
DO NOT DISASSEMBLE OR ALTER.
Doing so may result in an accident, fire or electric shock.
USE THIS PRODUCT AS SPECIFIED.
Use for other than its designed application may result in
fire, electric shock or other injury.
KEEP SMALL OBJECTS SUCH AS BATTERIES
OUT OF THE REACH OF CHILDREN.
Swallowing them may result in serious injury. If swallowed,
consult a physician immediately.
DO NOT PLACE HANDS, FINGERS OR FOREIGN
OBJECTS IN INSERTION SLOTS OR GAPS.
Doing so may result in personal injury or damage to the
product.
USE THE CORRECT AMPERE RATING
WHEN REPLACING FUSES.
Failure to do so may result in fire or electric shock.
Installation Location
Make sure the PND-K3 will not be exposed to:
• Direct sun and heat • Excessive dust
• High humidity • Excessive vibrations
Characteristics of LCD Panel
• After turning the system off, a slight ghost of the
image will remain temporarily. This is an effect
peculiar to LCD technology and is normal.
• Under cold temperature conditions, the screen may
lose contrast temporarily. After a short warm-up
period, it will return to normal.
• The LCD panel is manufactured using an extremely
high precision manufacturing technology. Its effective
pixel ratio is over 99.99%. This means that 0.01% of
the pixels could be either always ON or OFF.
Using Headphones
If ACC or the monitor’s power source is turned off, a loud
noise may be produced through the headphone jack. Be
sure to remove the headphones from your ears before you
turn the monitor off.
3
Page 4

USER AGREEMENT
In using this PND-K3 Portable Navigation System (hereinafter referred to as “System”), which includes
Alpine Electronics, Inc. (“Alpine”) Specifications, Space Machine, Inc. (“Space Machine”) Software
and NAVTEQ North America, LLC. (“NAVTEQ”) Database, you are bound by the terms and conditions
set forth below. By breaking the seal on the System and using your copy of the System, you have
demonstrated your agreement to the terms and conditions of this Agreement. You should, therefore,
make sure that you read and understand the following provisions.
The System may not be copied, duplicated or otherwise modified, in whole or in part, without the
express written permission of Alpine, Space Machine and NAVTEQ.
The System may not be transferred or sublicensed to any third party for profit, rent or loan or licensed
for reuse in any manner.
The System may not be decompiled, reverse engineered or otherwise disassembled, in whole or in part.
The System may not be used in a network or by any other manner of simultaneous use in multiple
systems.
The System is intended solely for personal use (or internal use where the end-user is a business) by the
consumer.
The System is not to be used for commercial purposes.
Neither Alpine, Space Machine nor NAVTEQ guarantees to the customer that the System meet the
specific objectives of the user.
Neither Alpine, Space Machine nor NAVTEQ shall be responsible for any damages caused by the use of
the System to the actual user and to any third party.
The warranty on the System shall not extend to an exchange or refund due to misspelling, omission of
letters, or any other cosmetic discrepancy in layout found in the System.
The right to use the System shall expire either when the user destroys this software, or when any of the
terms for use is violated and Alpine, Space Machine and/or NAVTEQ exercise the option to revoke the
license to use this software.
The terms and conditions hereof apply to all subsequent users and owners as well as to the original
purchaser.
The NAVTEQ Database may include or reflect data of licensors, including Her Majesty The Queen in
right of CANADA. Such data is licensed on an “AS IS” basis. The licensors, including Her Majesty The
Queen, make no guarantees, representations or warranties respecting such data, either express or
implied, arising by law or otherwise, accuracy or fitness for a particular purpose.
The licensors, including Her Majesty The Queen, shall not be liable in respect of any claim, demand or
action, irrespective of the nature of the cause of the claim, demand or action alleging any loss, injury
or damages, direct or indirect, which may result from the use or possession of the data or the NAVTEQ
database. The licensors, including Her Majesty The Queen, shall not be liable in any way for loss of
revenues or contracts, or any other consequential loss of any kind resulting from any defect in the data
or the NAVTEQ database.
End User shall indemnify and save harmless the licensors, including Her Majesty The Queen and the
minister, and their officers, employees and agents from and against any claim, demand or action,
irrespective of the nature of the cause of the claim, demand or action, alleging loss, costs, expenses,
damages or injuries (including injuries resulting in death) arising out of the use or possession of the
data or the NAVTEQ database.
4
Page 5

TABLE OF CONTENTS
PRECAUTIONS AND NOTICES .............................................. 2
Important Information....................................................... 2
WARNINGS .......................................................................... 3
Points to Observe for Safe Usage ......................................3
USER AGREEMENT .............................................................. 4
TABLE OF CONTENTS .......................................................... 5
IN THE BOX ......................................................................... 6
Accessories ........................................................................6
SYSTEM FEATURES .............................................................. 7
PND-K3 Portable Navigation System.................................7
Cradle with Cigarette Lighter Charger ..............................7
INSTALLATION ..................................................................... 8
Before You Start ................................................................8
How to Mount the PND-K3 ............................................... 8
How to Remove the PND-K3 ............................................. 8
MAIN MENU ........................................................................ 9
MAP FUNCTIONS ............................................................... 10
Setting the Map Orientation ...........................................10
Estimate Time Display ..................................................... 10
Route Button ...................................................................10
Repeating the Announcement ......................................... 10
GPS Status Bar ................................................................11
Battery Status .................................................................. 11
Zoom In/Out Map ............................................................ 11
Switching Map Display .................................................... 11
FROM THE MAP DISPLAY .................................................. 12
Setting a Destination .....................................................12
Finding Local Places ....................................................... 12
Setting Waypoints .......................................................... 12
INPUT A DESTINATION ...................................................... 13
SET A DESTINATION BY ADDRESS .................................... 14
Finding a Destination by Entering Street Name First ......14
Finding a Destination by City Name First ........................ 14
SET A DESTINATION BY PLACE ......................................... 15
Finding a Place Near You or Near Your Destination ....... 15
Finding a Place Within City Vicinity ................................16
Finding a Place Along Your Route .................................. 16
SET A DESTINATION BY HISTORY ..................................... 16
Deleting All History .........................................................16
SET A DESTINATION FROM THE ADDRESS BOOK ............. 17
Editing Address Book ......................................................17
SET A DESTINATION BY COORDINATES ............................ 17
SET A DESTINATION BY INTERSECTION ............................ 18
Finding a Destination by Entering a Street Name First ... 18
Finding a Destination by Entering a City Name First ......18
DESTINATION OPTIONS ..................................................... 19
Finding Nearby Places ..................................................... 19
Finding Alternative Routes to the Destination ................19
Setting a Destination as Home. ....................................... 19
Saving a Destination into the Address Book ...................20
Setting Waypoints ........................................................... 20
ROUTE ............................................................................... 22
Viewing Turn List During Guidance ................................. 22
Finding an Alternate Route ............................................ 22
Finding a Detour ............................................................22
Editing Waypoints .......................................................... 22
Canceling Route .............................................................. 22
HOME ................................................................................ 23
Going Home .................................................................... 23
BLUETOOTH ....................................................................... 24
Enable Bluetooth ............................................................. 24
Auto Connect ..................................................................24
Auto Answer ...................................................................24
MOBILE PHONE ................................................................. 25
Placing Calls .................................................................... 25
Receiving Phone Calls .....................................................26
Call Options ....................................................................26
SETTINGS ........................................................................... 27
CUSTOMIZING DISPLAY .................................................... 28
Menu Color .....................................................................28
Brightness .......................................................................28
Setting Day/Night Mode .................................................. 28
Screen Recalibration ........................................................ 28
Backlight Timing .............................................................28
CUSTOMIZING MAP .......................................................... 28
Displaying and Editing Icons on the Map .......................28
Showing Trail Dots .......................................................... 28
CUSTOMIZING NAVIGATION TOOL ................................... 29
Route Method .................................................................29
Guidance Map ................................................................. 29
Route Button ...................................................................29
Show Route Overview ..................................................... 29
Auto Zoom ......................................................................29
Avoid Unverified Roads if Possible .................................. 29
Start Demo ...................................................................... 29
SETTING AUDIO ................................................................. 30
Changing Navi Mix Volume ............................................ 30
Button Sounds ................................................................. 30
Guidance Prompt ............................................................30
REGIONAL SETTINGS ......................................................... 30
Language ........................................................................30
Units ................................................................................30
Clock ............................................................................... 30
Time Zone .......................................................................30
MSN DIRECT SETTING
Before Using MSN-Direct ...............................................31
MSN Direct Settings ....................................................... 31
(ONLY ON PND-K3MSN) ............................... 31
INFORMATION .................................................................. 32
VIEWING DASHBOARD ...................................................... 32
VIEWING GPS STATUS ....................................................... 33
VIEWING SYSTEM INFORMATION ..................................... 33
MUSIC PLAYER .................................................................. 34
MSN DIRECT (Only on PND-K3msn) .................................. 35
MSN DIRECT, CONTINUED ................................................ 36
IN CASE OF DIFFICULTY .................................................... 37
SPECIFICATIONS ................................................................ 38
INDEX ................................................................................ 39
LIMITED WARRANTY ......................................................... 40
5
Page 6

Congratulations and thank you for purchasing the Alpine PND-K3 Portable Navigation System. We
QUICK REFERENCE GUIDE
Portable Navigation System
hope you enjoy using this exciting product and trust that it will make your driving experience more
comfortable, stress-free, and entertaining.
The PND-K3 Portable Navigation System provides an easy-to-use user interface, clear, easy-tounderstand spoken driving instructions, and award winning design all in a portable product. PND-K3
is built upon Alpine’s history of navigation success in North America. Please read this manual
carefully. If you have any further questions about PND-K3’s operation, feel free to call Alpine at
1-888-NAV-HELP (628-4357) for technical assistance.
IN THE BOX
ACCESSORIES
CRADLE WITH CIGARETTE LIGHTER CHARGER
QUICK REFERENCE GUIDE
REGISTRATION CARD
MOUNTING PLATE
POWER ADAPTER
USB CABLE
6
Page 7
SYSTEM FEATURES
PND-K3 PORTABLE NAVIGATION SYSTEM
POWER BUTTON
Press and hold for 2
seconds to turn the
device on or off
SD/MMC CARD SLOT
For music playback
(SD card not included )
HEADPHONE JACK
(Headphone not included)
VOLUME UP BUTTON
VOLUME DOWN BUTTON
SCREEN
SPEAKERS
CRADLE WITH CIGARETTE LIGHTER CHARGER
MUTE WIRE
For Installation
with Stereo
Head Unit
AMPS/NEC MOUNTING HOLES (X 4)
Use metric M4 8MM Machine Screw
EXTERNAL
GPS/ANTENNA
CONNECTOR
RESET BUTTON
Press and hold for 2 seconds
CRADLE CONNECTOR
MINI USB
CONNECTOR
CRADLE EJECT BUTTON
POWER CORD
AUDIO
OUTPUT
EXTERNAL MICROPHONE
INPUT/OUTPUT
CRADLE CONNECTOR SLOT
7
Page 8
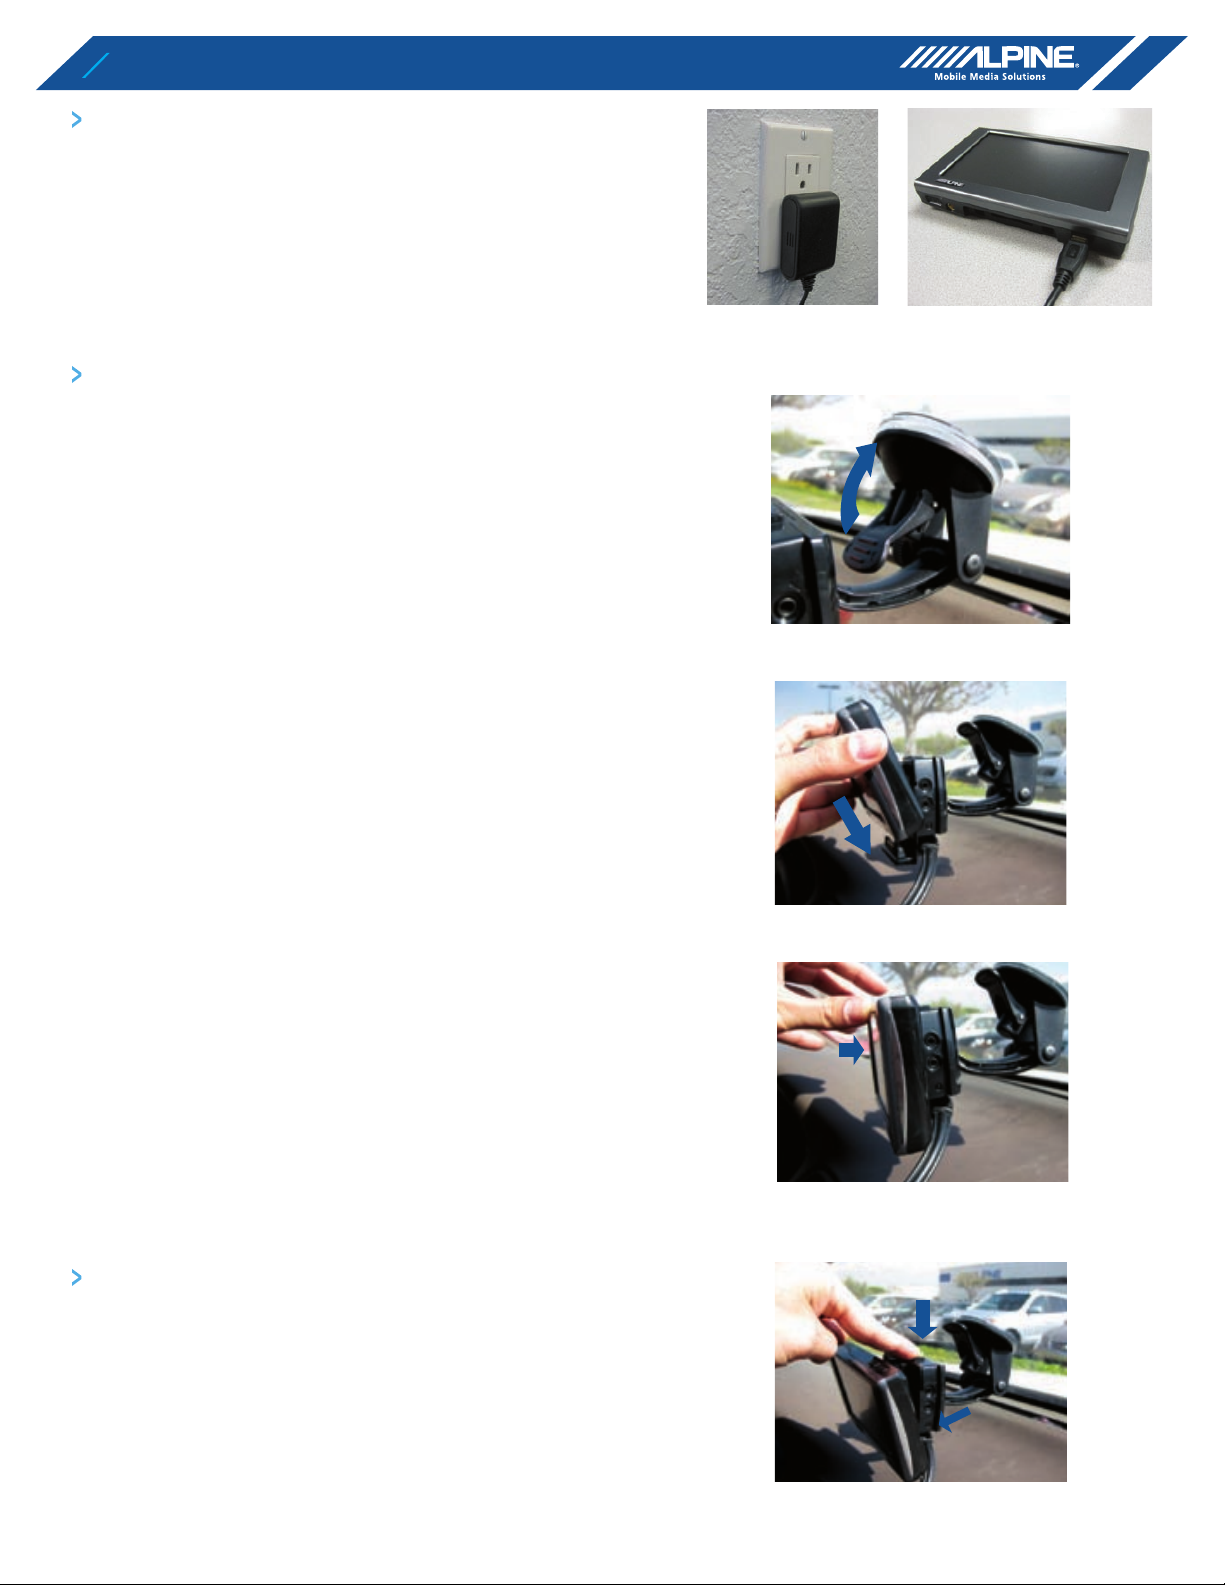
INSTALLATION
BEFO
RE YOU START
INSTALLATION
Before you start, charge the
PND-K3
f
or at least three hours,
using t
h
e included AC charger.
W TO MOUNT THE PND-K
3
ind a spot suitable for the
avigation device. Stick the
suction cup against t
he d
esire
d
ounting location. Press the
ever to secure the suction cup.
Guide the navigation device onto
t
h
e cradle
.
ently push until a click sound
s heard and the device is locked
n place
.
W TO REMOVE THE PND-K
3
Press on the button immediately
ehind the navigation device.
This will release the unit forward.
ently lift the device from its
r
adle
.
W TO M
OU
NT THE PND-K
3
ind a spot suitable for the
avigation device. Stick the
suction cup against t
he d
esire
d
ounting location. Press the
ever to secure the suction cup.
Guide the navigation device onto
t
h
e cradle
.
ently push until a click sound
s heard and the device is locked
n place
.
EFORE YOU START
INSTALLATION
Before you start, charge the
PND-K3
f
or at least three hours,
using t
h
e included AC charger.
W TO MOUNT THE PND-K
3
ind a spot suitable for the
avigation device. Stick the
suction cup against t
he d
esire
d
ounting location. Press the
ever to secure the suction cup.
Guide the navigation device onto
t
h
e cradle
.
ently push until a click sound
s heard and the device is locked
n place
.
BEFORE YOU START
Before you start, charge the PND-K3 for at least 3 hours,
using the included AC charger.
HOW TO MOUNT THE PND-K3
Find a spot suitable for the navigation device. Stick the
1
suction cup against the desired mounting location. Press
the lever to secure the suction cup.
Guide the navigation device onto the cradle.
2
Gently push until a click sound is heard and the device is
3
locked in place.
HOW TO REMOVE THE PND-K3
Press on the button immediately behind the navigation
1
device. This will release the unit forward. Gently lift the
device from its cradle.
8
Page 9
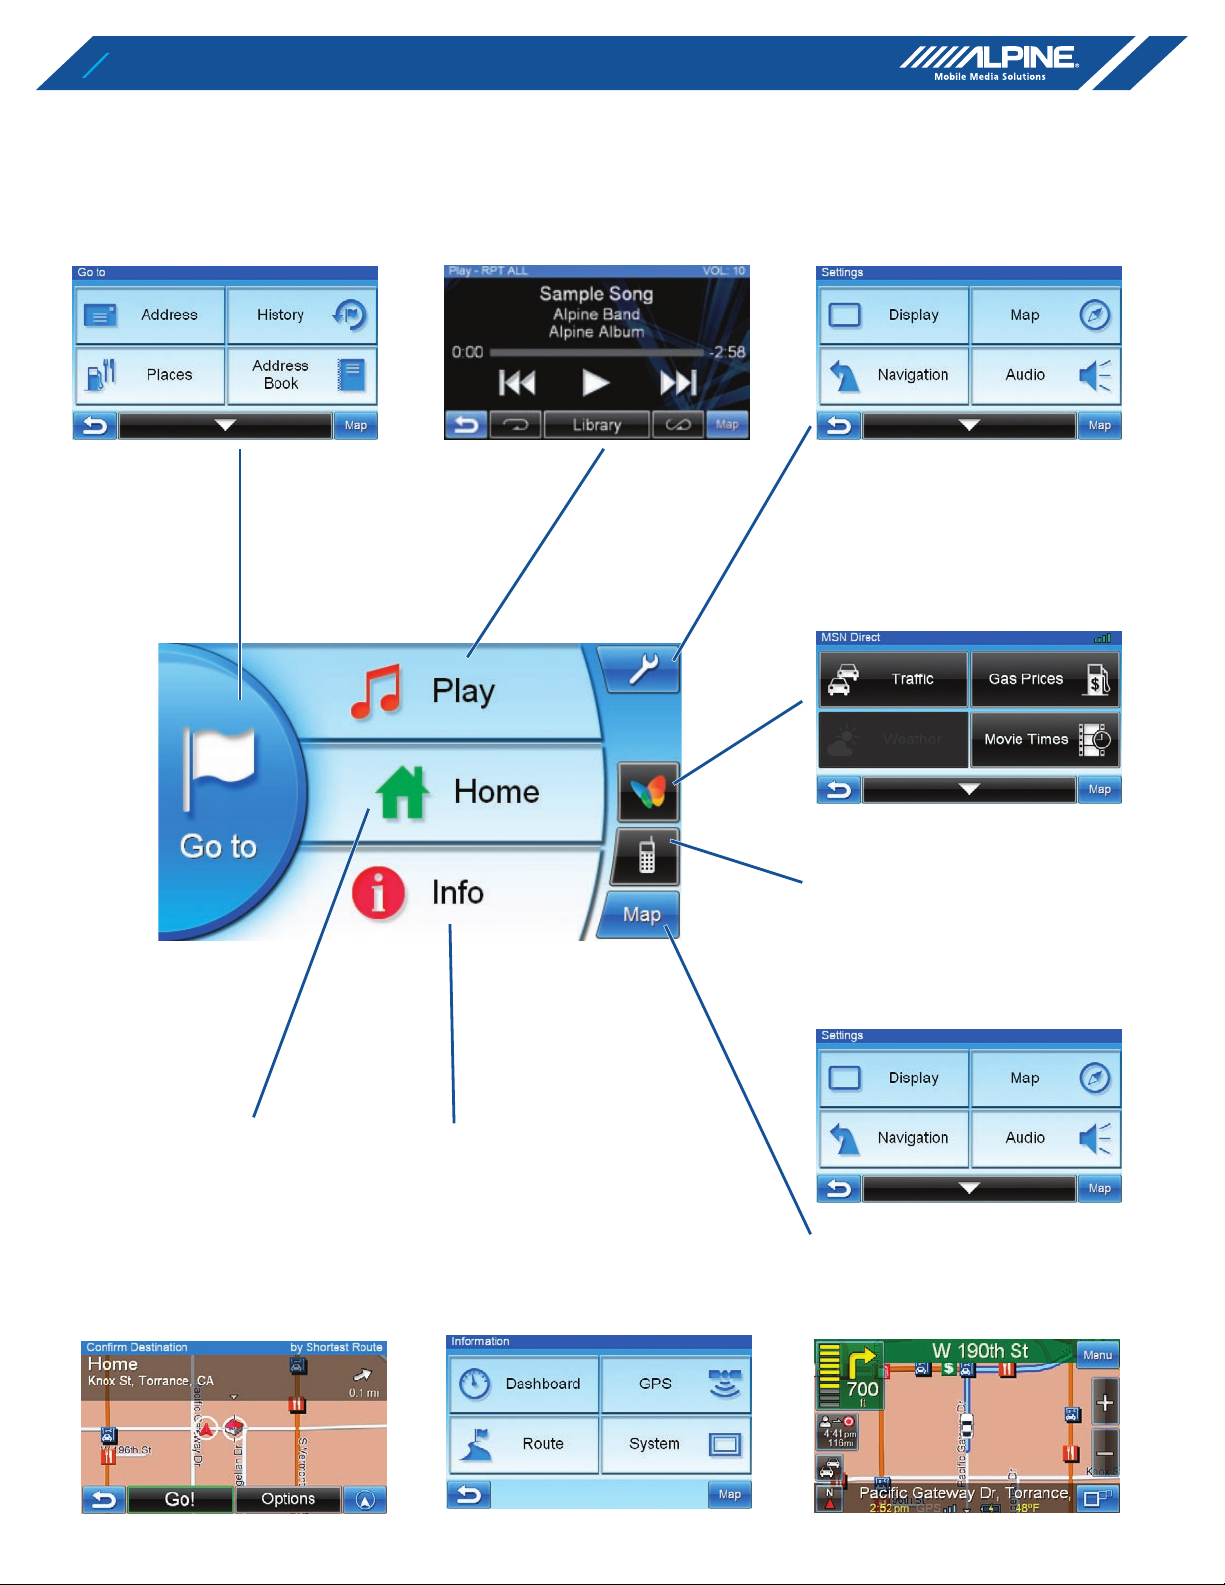
MAIN MENU
GO TO BUTTON
Press this to start entering a
destination.
See page 13-18.
PLAY BUTTON
Press this to go to the music
player.
See page 33.
SETTINGS BUTTON
Press this to change system
settings.
See page 27-30.
MSN DIRECT BUTTON
Press this to receive real-time
news and traffic.
See page 35-36.
HOME BUTTON
Press this to go to a saved
home location.
See page 23.
INFO BUTTON
Press this to check
information such as:
See page 31-32.
PHONE BUTTON
Press this button to make a
phone call, when Bluetooth
device is connected
See page 25-26.
MAP BUTTON
Press this to go to the map.
See page 10-11.
9
Page 10
MAP FUNCTIONS
NEXT MANEUVER ARROW
AND VOICE PROMPT BUTTON NEXT STREET NAME MAIN MENU BUTTON
ROUTE
BUTTON
ETA/ETR/DISTANCE
TO DESTINATION
TRAFFIC BUTTON
MAP ORIENTATION
GPS STATUS BAR
SETTING THE MAP ORIENTATION
Touch this icon to switch between North Up,
Heading Up and 3D View.
BATTERY STATUS
NORTH UP
In north up view, north is always
at the top of the display. This
makes it easy to determine your
current heading with respect to
the map.
HEADING UP
In heading-up view, the current
direction is always pointing to the
top of the display. This makes it
easy to see the direction of the
next turn on the map.
3D VIEW
The 3D View offers you a more
realistic perspective by tilting
the map and displaying it with a
horizon line. Streets are displayed
as you approach them instead of
from a birds-eye view.
INDICATOR
ESTIMATE TIME DISPLAY
Note: The time estimates are based on the average speed. The
ROUTE BUTTON
Note:
REPEATING THE ANNOUNCEMENT
ZOOM IN
BUTTON
ZOOM OUT
BUTTON
CHANGE ROUTE VIEW TO
ARROW ONLY MODE
CURRENT POSITION
This icon displays Estimated Time
Remaining, Estimated Time of
Arrival or Direction to Destination.
See page 29 to change this
setting.
estimate time will vary depending on vehicle speed. The
arrow always points toward the destination.
Touch this icon and it will take you
to the route menu.
When not in the guidance mode, only the current position can
be seen. Zoom buttons, Map Orientation button and Main
Menu are
available.
Touch this icon to repeat the guide
announcement.
(Same as Next Maneuver Arrow)
10
Page 11
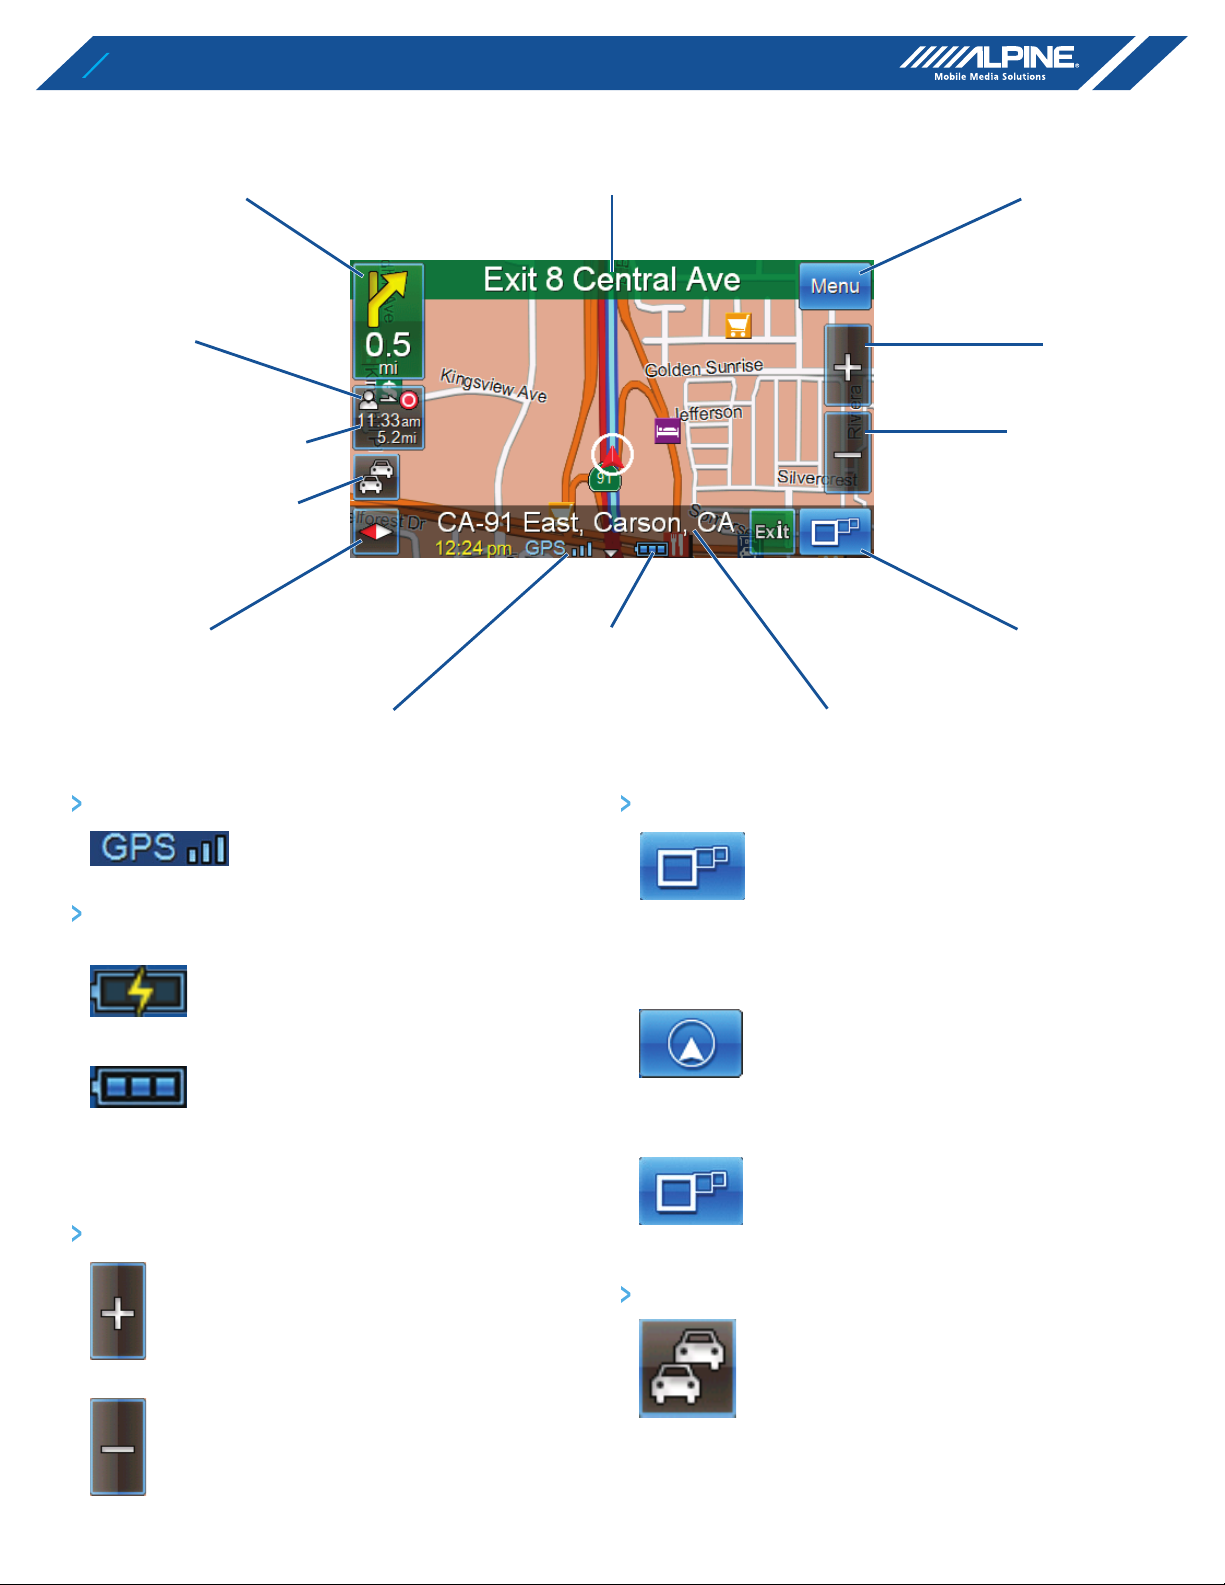
MAP FUNCTIONS, CONTINUED
NEXT MANEUVER ARROW
AND VOICE PROMPT BUTTON NEXT STREET NAME MAIN MENU BUTTON
ROUTE
BUTTON
ETA/ETR/DISTANCE
TO DESTINATION
TRAFFIC BUTTON
MAP ORIENTATION
GPS STATUS BAR
GPS STATUS BAR
GPS Signal Strength
BATTERY STATUS
INDICATOR
SWITCHING MAP DISPLAY
ZOOM IN
BUTTON
ZOOM OUT
BUTTON
CHANGE ROUTE VIEW TO
ARROW ONLY MODE
CURRENT POSITION
Touch this button to switch
between Map and Arrow modes.
BATTERY STATUS
This shows status of the battery.
(Lightning bolt) indicates that the
battery is currently charging.
(3 bars) indicates that the battery
has more than 60% charge.
(2 bars) indicates that the battery
has more than 40% charge.
(1 bar) indicates that the battery
has about 10% charge remaining.
ZOOM IN/OUT MAP
Touch this icon to zoom in.
Touch this icon to zoom out.
Note: You can only switch map display during guidance mode.
ARROW MODE
Displays three successive arrow
maneuvers all the way to your
destination while providing turnby-turn guidance prompts.
MAP MODE
Shows a full-screen map of the
area while providing turn-by-turn
guidance prompts.
TRAFFIC BUTTON
Touch this icon to receive the live
traffic information.
Note: You must subscribe to MSN Direct.
11
Page 12
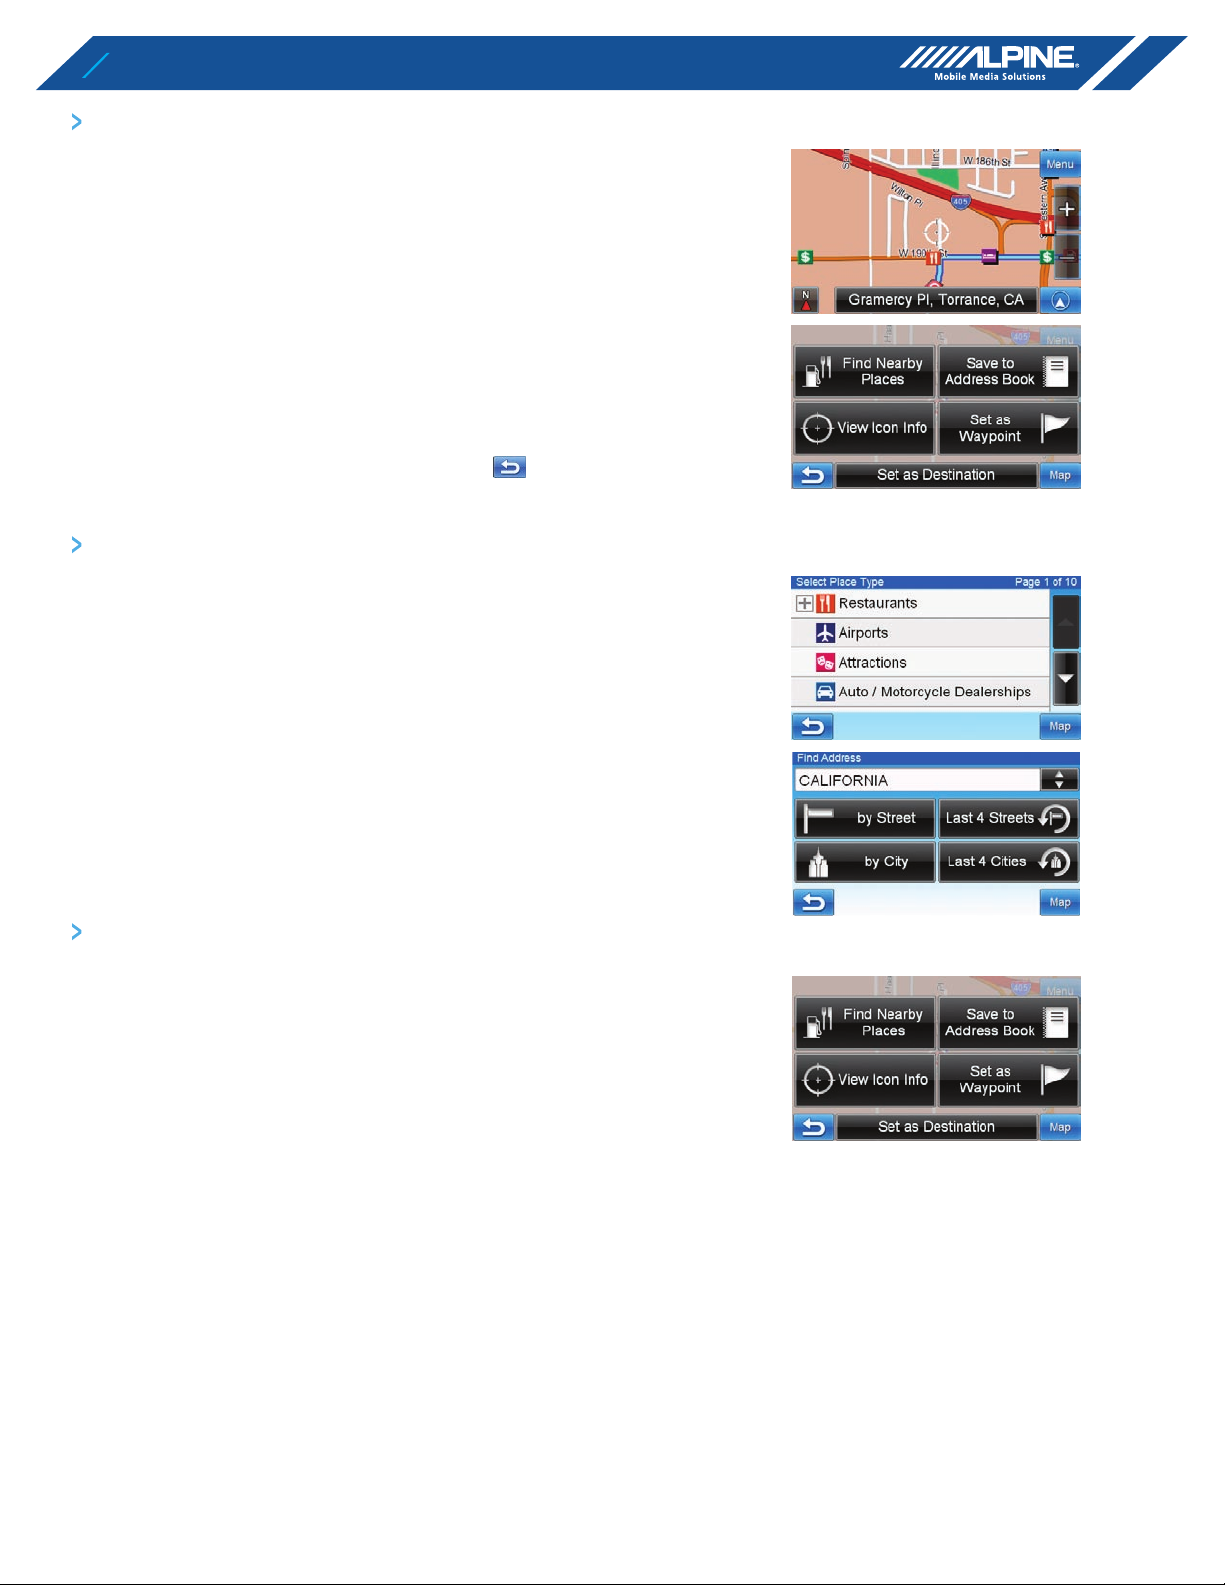
FROM THE MAP DISPLAY
SETTING A DESTINATION
Touch anywhere on map screen.
1
The vehicle arrow changes to a crosshair cursor.
2
Move the cursor to the new desired street.
3
NOTE: Use Map Zoom button to zoom out the map if the destination is far from the
current location.
Touch the selected position bar on the bottom of the screen.
4
Select Set as Destination.
5
Touch Go! on the Confirm Destination Screen.
6
NOTE: To use destination options on the Confirm Destination Screen, see page 19-21 for
details. To cancel, touch Previous Screen icon .
FINDING LOCAL PLACES
Touch anywhere on map screen.
1
The vehicle arrow changes to a crosshair cursor.
Touch the selected position bar on the bottom of the screen.
2
Select Find Nearby Places.
3
Select the desired category and the desired place.
4
Touch OK on the Confirm Destination Screen.
5
NOTE: To use destination options on the Confirm Destination Screen, see page 19-21
for details. See Find Local Places on page 15-16 for finding places though Places
menu.
SETTING WAYPOINTS
Touch anywhere on map screen.
1
The vehicle arrow changes to a crosshair cursor.
2
Move the cursor to the desired waypoint.
3
Touch the selected position bar on the bottom of the screen.
4
Select Set as Waypoint and the destinationn will automatically be
5
added to the Waypoint List.
Touch Go!
6
NOTE: To add another waypoint, see page 20.
12
Page 13

INPUT A DESTINATION
ADDRESS BUTTON
Search by typing an
address.
See page 14.
PLACES BUTTON
Select places.
See page 15-16.
HISTORY BUTTON
Select from recent
destinations.
See page 16.
ADDRESS BOOK
BUTTON
Select from saved
destinations.
INTERSECTION
BUTTON
Set destination by
intersection.
See page 18.
See page 17.
COORDINATES
BUTTON
Set destination
using geographic
coordinates.
See page 17.
13
Page 14

SET A DESTINATION BY ADDRESS
There are several ways to set a destination. You can set a destination directly from the map (Page 12)
or select Go to from the main menu.
Go to Main Menu ➜ Go to ➜ Address
FINDING A DESTINATION BY ENTERING STREET NAME FIRST
Select by Street.
1
Type the street name and touch OK.
2
If there are multiple matches, the system automatically displays
a short list of street names.
Type only the name of the street. Prefix and suffix of the street
are not necessary.
The list of applicable street names appears.
Select the desired street name from the list.
3
Type the address number and touch OK.
4
Type the desired city.
5
If there are multiple matches, the system lists cities containing
the street name and address number that you keyed in.
The Confirm Destination Screen appears. Select Go! to calculate
6
the route.
See page 20-22, to see more details about Options on the
7
confirmation destination screen.
FINDING A DESTINATION BY CITY NAME FIRST
Select by City.
1
Type the city name and touch OK.
2
If there are multiple matches, the system automatically displays
a short list of city names. Select the desired city.
Type the characters of the street name and touch OK.
3
The list of applicable street names appears. Select the desired
4
street.
Type the address number and touch OK.
5
The Confirm Destination Screen appears. Touch Go! to calculate
6
the route.
14
Page 15

SET A DESTINATION BY PLACE
You can select from approximately 6 million place locations stored inside your PND-K3 Portable
Navigation System.
Go to Main Menu ➜ Go to ➜ Places
FINDING A PLACE NEAR YOU OR NEAR YOUR DESTINATION
NOTE: Last 4 names and Last 4 types takes you to a list from the last 4 places/types you
have previously entered.
BY NAME
Select by Name.
1
Type the desired place name. Touch OK.
2
A list of place names appears.
Use the arrow to the right of the list to scroll up and down the
3
list.
Select the desired place.
4
For emergency locations such as Police Stations, Hospitals, etc.,
please verify availability before proceeding to such locations.
The Confirm Destination Screen appears. Touch Go! to calculate a
5
route.
BY TYPE
Select by Type.
1
Select a desired type.
2
There are 37 Place categories to choose from including ATMs,
3
Banks, Gas Stations, Grocery Stores, Hotels, Parking Lots,
Restaurants and more.
Follow steps 3 through 6 of the instructions above.
4
15
Page 16

SET A DESTINATION BY PLACE, CONTINUED
Go to Main Menu ➜ Go to ➜ Places
FINDING A PLACE WITHIN CITY VICINITY
Select Within City Vicinity.
1
Select Within a City.
2
NOTE: Last 4 Cities takes you straight to the list of cities you have previously entered.
Type a city name and select a city.
3
You can choose by Name or by Type.
4
Follow steps from “by Name” or “by Type” on page 16.
5
FINDING A PLACE ALONG YOUR ROUTE
Select Along Route.
1
Select the desired place type button. Touch OK.
2
NOTE: Highlighted (YELLOW) button means it is selected. You can select multiple place
types. Touch the button again to turn the selection on or off.
A list of places appears
3
Select the desired place.
Touch Go!
4
SET A DESTINATION BY HISTORY
Go to Main Menu ➜ Go to ➜ History
The list of recent destinations appears. Select the destination.
1
The Confirm Destination Screen appears. Touch Go! to calculate
2
the route.
NOTE: To use destination options on the Confirm Destination Screen, see pages 20-22 for
details.
DELETING ALL HISTORY
Go to Main Menu ➜ History
Touch Clear All.
1
Touch Ye s to delete all previous destinations.
2
16
Page 17

SET A DESTINATION FROM THE ADDRESS BOOK
Go to Main Menu ➜ Go to ➜ Address Book
Select the desired destination.
1
The Confirm Destination Screen appears. Touch Go! to calculate
2
the route.
EDITING ADDRESS BOOK
Go to Main Menu ➜ Go to ➜ Address Book
Select the destination you would like to modify.
1
Touch to edit your entry.
2
Edit Name, Phone Number and Icon or delete the selected
3
destination.
NOTE: Select DELETE ALL to delete all addresses saved in the address book.
SET A DESTINATION BY COORDINATES
Go to Main Menu ➜ Go to ➜ Coordinate
Enter the Latitude of your destination. Touch OK.
1
Enter the Longitude of your destination. Touch OK.
2
The Confirm Destination Screen appears. Touch Go! to calculate
3
the route.
NOTE: To use destination options on the Confirm Destination Screen, see pages 19-21 for
details.
17
Page 18

SET A DESTINATION BY INTERSECTION
Go to Main Menu ➜ Go to ➜ Intersection
FINDING A DESTINATION BY ENTERING A STREET NAME FIRST
Select by Street.
1
Type in the first street name. Touch OK.
2
The list of applicable street names appears. Select the desired
street and input the address number.
Input the second street name.
3
If there is only one street crossing with the first street, the
name of the street automatically appears.
Confirm City name if there are more than 1 cites with the same
4
intersection.
The Confirm Destination Screen appears. Touch Go! to calculate
5
the route.
Note: To use other functions on the Confirm Destination Screen, see page 19-21 for details.
FINDING A DESTINATION BY ENTERING A CITY NAME FIRST
If you know the city name of the intersection you are
searching, select by City. The choice of the street is narrowed
down automatically. This saves time in entering the street
information.
Select by City.
1
Type the city name, then select the city from the list.
2
Input the first street name.
3
Input the second street name.
4
The Confirm Destination Screen appears. Touch Go! to calculate
5
the route.
NOTE: Last 4 Street and Last 4 Cities takes you to a list of the last 4 entries.
18
Page 19

DESTINATION OPTIONS
The Destination Options Menu allows you to find places nearby, find alternative routes to get to
your destination, set a destination as your home, save a destination in the address book, and create
waypoints.
To get to the Destination Options Menu, enter your desired
destination by using the method on pages 13-18 in order to get to
the Confirm Destination Screen.
Select Options.
FINDING NEARBY PLACES
Touch Find Nearby Places.
1
Select a desired place type.
2
Select a desired place name.
3
Touch Go! to calculate the route.
4
NOTE: To find local places directly from the map, go to page 12.
FINDING ALTERNATIVE ROUTES TO THE DESTINATION
Touch Change Method.
1
Select a method below.
2
Avoid Freeway
Avoid Toll Road
Use Time Restricted Road
Use Ferry
Select Quickest or Shortest.
3
Touch the Back button.
4
SETTING A DESTINATION AS HOME.
Touch Set as Home.
1
Touch OK or type desired name and touch OK.
2
Select desire icon. If there is no desired icon, touch No Icon.
3
Touch OK.
4
19
Page 20

DESTINATION OPTIONS, CONTINUED
To get to the Destination Options Menu, enter your desired destination by using the method on pages
13 through 18 in order to get to the Confirm Destination screen.
Select Options.
SAVING A DESTINATION INTO THE ADDRESS BOOK
Touch Save to Address Book.
1
Type in desired name. Touch OK.
2
Select an icon. If there is no desired icon, touch No Icon.
3
Touch Ok.
4
SETTING WAYPOINTS
You can set up to 3 waypoints between you current location
and your destination. The final destination must be set before
entering any waypoints
ADDING A WAYPOINT
Touch Set as Waypoint and the destination is automatically added
1
to the Waypoint List.
Touch Go! to calculate the route.
2
ADDING ANOTHER WAYPOINT
Before you touch Go! at the Waypoint List screen, touch Add a
1
Waypoint.
Enter the waypoint with any method just as finding a destination.
2
(Page 13-18)
Touch Set as Waypoint to confirm.
3
The system returns to the Waypoint List screen. Touch Go! to
4
calculate the new route.
SETTING A WAYPOINT DIRECTLY FROM THE MAP
See page 12.
20
Page 21

DESTINATION OPTIONS, CONTINUED
To get to the Destination Options Menu, enter your desired destination by using the method on pages
13 through 18 in order to get to the Confirm Destination screen.
Select Options.
SETTING WAYPOINTS, CONTINUED
OPTIMIZING YOUR ROUTE
Touch Set as Waypoint. The Waypoint List appears.
1
Touch Options. Waypoint options screen appears.
2
Touch Optimize Route.
3
The system takes you back to the Waypoint List screen with
4
optimal route. Touch Go! to calculate the route.
DELETING A WAYPOINT
Select the desired waypoint to delete from the list.
1
Touch Delete.
2
DELETING ALL WAYPOINTS
Touch Options.
1
Touch Delete All Waypoints. Touch Yes to confirm.
2
Touch the Back button to get back the Waypoint List or touch the
3
Map button to get back to the map.
EDITING ORDER OF WAYPOINTS
Main Menu ➜ Info ➜ Route ➜ Edit Waypoints
1
or from the Map ➜ Route ➜ Edit Waypoints
At the Waypoint List Screen, select the desired waypoint to edit.
2
Touch Edit Order.
3
Use the Up and Down buttons to move the waypoint.
4
Touch OK and the system returns to the Waypoint List screen.
5
Touch Go! to calculate the route.
6
21
Page 22

ROUTE
VIEWING TURN LIST DURING GUIDANCE
You can view a list of street names and upcoming turns and streets.
Main Menu ➜ Info ➜ Route
or
directly from the Map ➜
Touch View Turn List.
1
A list of upcoming streets and turns appears on the screen.
2
To preview a specific point, select a street name/maneuver on
the list.
FINDING AN ALTERNATE ROUTE
On Route screen, touch Change Method.
NOTE: You can select and re-calculate an alternate route based on Quickest Route or
Shortest Route and select Avoid Freeway, Toll Road, Time Restricted Road or
Ferry.
FINDING A DETOUR
BY DISTANCE
On Route screen, touch Detour.
1
Choose detour from 1/2 mile, 1 mile, 2 miles or 5 miles.
2
The system automatically calculates and displays a detoured
route.
AVOIDING A PARTICULAR STREET
Touch View Turn List
1
List of upcoming streets and turns appears on the screen. Select
2
the Street Name.
Touch Avoid.
3
EDITING WAYPOINTS
To edit waypoints, see page 21.
CANCELING ROUTE
From Route screen, touch Cancel Route.
NOTE: After canceling the route, you can not select Route Menu until the next
destination has been set. To set next the destination, see Destination Menu on
Page 13.
22
Page 23

HOME
You can go Home from anywhere once the Home Address is set. See page 19 to set a destination as
Home.
GOING HOME
Go to Main Menu ➜ Home
Touch Go! to calculate the route.
NOTE: To find an alternate Route to go Home, see page 22.
23
Page 24

BLUETOOTH
Bluetooth enabled mobile phones can be paired to interface with PND-K3. You can customize this
interface using the Bluetooth Setup controls.
Go to Main Menu ➜ ➜ Bluetooth
The Bluetooth Setup menu appears and displays the setup
options.
Select ‘Bluetooth Devices...’.
1
Select ‘Discoverable Mode’.
2
On the Bluetooth enabled mobile phone, search for Bluetooth
3
devices
Once the PND-K3 is found on the mobile phone, connect to the
4
PND-K3.
ENABLE BLUETOOTH
This allows you to turn the Bluetooth functionality ON or OFF.
AUTO CONNECT
Turning Auto Connect on allows the last connected phone to
automatically connect with the PND-K3 whenever they are in
range of each other and both have Bluetooth turned on.
AUTO ANSWER
This allows the PND-K3 to automatically answer all incoming calls
for you after the first ring.
24
Page 25

MOBILE PHONE
Most Bluetooth enabled mobile phones can be synchronized to interface with PND-K3. Once you have
paired and synchronized your mobile phone with PND-K3 (see Setup on page 24) you can place and
receive calls in addition to many other convenient functions. Some Bluetooth enabled phones may not
be compatible and some features may not be available even after synchronizing and pairing.
Note: It may take a few minutes for information to transfer from your phone to the PND-K3.
PLACING CALLS
Touch Main Menu ➜
USING THE 12 KEY DIAL PAD
Touch Dial Pad.
1
Enter the number and touch .
2
USING YOUR PHONEBOOK
Touch Phonebook.
Begin entering the name of the contact you wish to call.
1
A list appears. Select the desired contact from the list.
2
The confirmation screen appears with the contact’s detailed
3
information. Touch Dial to place the call.
25
Page 26

MOBILE PHONE SETTINGS, CONTINUED
Touch Main Menu ➜
USING YOUR CALL LOGS
Touch Call Logs.
1
Touch Dialed Calls, Missed Calls or Received Calls.
2
A list of your call history appears. Select the desired contact from
3
the list.
Confirmation screen appears with the contact’s detailed
4
information if available. Touch Dial to place the call.
NOTE: You can continue to use the PND-K3 during an active call. Touch the icons to jump
to the Map screen or Main Menu screen. Touch the red phone icon to return to the
call menu.
RECEIVING PHONE CALLS
When your mobile phone is actively paired with the PND-K3, a
pop-up window appears when you have an incoming call. The
caller ID number is displayed when available.
Touch Answer to accept the call or Ignore to ignore it.
1
NOTE: Touch Answer via Phone if you need to take the call with your mobile phone
handset.
CALL OPTIONS
During an active call, the in-call option menu will appear. This
menu displays the Caller ID Name, Phone Number, and Call
Duration. The following options are also available from this menu:
Mute Mic
This allows you to temporarily mute the microphone. You can still
hear the caller, but the caller cannot hear you.
Transfer to Phone
You can transfer the call from the PND-K3 to your mobile phone
for greater flexibility.
End Call
This ends the current phone call.
NOTE: After ending a call the previous menu appears automatically..
More…
This takes you to the phone menu.
26
Page 27

SETTINGS
DISPLAY BUTTON
For display settings,
see page 28.
NAVIGATION BUTTON
For navigation
settings, see page 29.
MAP BUTTON
For map settings, see
page 28.
AUDIO BUTTON
For audio settings, see
page 30.
REGIONAL BUTTON
For Regional settings,
see page 30.
RESTORE DEFAULTS
BUTTON
This allows you to
delete all stored
information and
default back to the
original factory
settings.
BLUETOOTH BUTTON
For Bluetooth settings,
see page 24.
MSN DIRECT BUTTON
For MSN Direct
settings, see page 31.
27
Page 28

CUSTOMIZING DISPL AY
Go to Main Menu ➜ ➜ Display
NOTE: Touch OK to complete the setting.
MENU COLOR
You can choose from 8 different colors for all menu screens.
BRIGHTNESS
The brightness of the screen can be adjusted.
SETTING DAY/NIGHT MODE
Day - a bright tone screen
Night - a dark tone screen
Auto - switches automatically between Day and Night modes
SCREEN RECALIBRATION
This allows you to recalibrate the touch screen for better accuracy.
BACKLIGHT TIMING
You can change the length of time before the display switches to
energy saver mode.
CUSTOMIZING MAP
You can customize map color, vehicle icon, and place icons on the
map.
Go to Main Menu ➜ ➜ Map
NOTE: Touch OK to complete the setting.
DISPLAYING AND EDITING ICONS ON THE MAP
Place Icons, the Home Icon and Icons used in the Address Book can
be turned on and off from the Display Setup Menu.
SHOWING TRAIL DOTS
The Trail feature allows you to turn on and off trail dots that
appear wherever the vehicle icon traverses. This is especially
helpful for off-road enthusiasts.
28
Page 29

CUSTOMIZING NAVIGATION TOOL
Go to Main Menu ➜ ➜ Navigation
NOTE: Touch OK to complete the setting.
ROUTE METHOD
You can change the routing method.
See page 22 for details.
GUIDANCE MAP
You can choose between full map and arrow only in guidance
mode.
ROUTE BUTTON
You can choose between 3 different route buttons.
Arrival time & distance to destination
Remaining time & distance to destination
Direction of destination
SHOW ROUTE OVERVIEW
This button allows you to view the full route after the destination
has been calculated and before the guidance begins.
AUTO ZOOM
When approaching a maneuver, the map automatically zooms in.
AVOID UNVERIFIED ROADS IF POSSIBLE
This button avoids using roads not verified by the map provider.
START DEMO
You can watch a navigation demonstration with the system’s voice
and screen guidance.
NOTE: Set a destination before using this function.
29
Page 30

SETTING AUDIO
Go to Main Menu ➜ ➜ Audio
NOTE: Touch OK to complete the setting.
CHANGING NAVI MIX VOLUME
This allows you to vary the volume of the voice prompts with
respect to the music.
BUTTON SOUNDS
This allows you to turn button sounds ON or OFF.
GUIDANCE PROMPT
This allows you to turn ON or OFF the guidance voice prompts.
REGIONAL SETTINGS
Go to Main Menu ➜ ➜ Regional
NOTE: Touch OK to complete the setting.
LANGUAGE
You can select a Language from English, French and Spanish.
UNITS
You can set the Units of Measure to read in kilometers or miles.
CLOCK
You can set the Clock to 12 or 24 hour style and set Daylight
Savings to fit your region.
TIME ZONE
You can set the Time Zone to fit your region.
30
Page 31

MSN DIRECT SETTING
BEFORE USING MSN-DIRECT
You must subscribe to MSN-Direct to enable the feature on the
PND-K3.
1 Go to www.msndirect.com/activate to begin activation.
2 Make sure to have the product key. To find the product key,
Go to Main Menu ➜ ➜ MSN ➜ MSN Subscription Status
3 Follow as instructed and the cradle will be activated.
MSN DIRECT SETTINGS
TRAFFIC AVOIDANCE:
You can set detour automatically, prompt, or off.
Automatic - Your route will detour automatically, when heavy
traffic occurs.
Prompt - When heavy traffic occurs, the PND-K3 will prompt you
if you prefer to take a detour,
(Only on PND-K3msn)
OFF - The PND-K3 will stay on the original route without
prompting you to detour.
SHOW TRAFFIC ICONS:
You can turn on/off traffic related icons and traffic flow
information.
MSN SUBSCRIPTION STATUS
You can view the detail of MSN subscription status.
Product key is necessary to activate MSN-DIRECT feature.
XXXXX-XXXXXX-XXXXX-XXXXX
31
Page 32

INFORMATION
Go to Main Menu ➜ Info
DASHBOARD BUTTON
For viewing dashboard,
see page 31.
ROUTE BUTTON
For changing the
route, see page 22.
GPS BUTTON
For viewing GPS, see
page 32.
SYSTEM BUTTON
For viewing system
information, see page
32.
VIEWING DASHBOARD
Go to Main Menu ➜ Info ➜ Dashboard
The odometer displays the route distance and time traveled.
Driving Average Average speed.
Overall Average Average speed (includes idle time.).
Maximum Speed Maximum speed reached.
Driving Time Time vehicle has been moving.
Idle Time Time vehicle has been stopped (not moving).
Total Time Total elapsed time (driving time plus idle time).
32
Page 33

VIEWING GPS STATUS
This feature allows you to view GPS satellite signal information. You can view the dynamic location
information received from satellite, such as, signal strength, compass (direction information), latitude/
longitude, approximate altitude, and speed.
An explanation of the messages is shown below.
Go to Main Menu ➜ Information➜ GPS
The following messages are displayed while the GPS receiver is
tracking satellites:
Locating GPS Satellites
The PND-K3 searches the sky looking for GPS satellites.
Acquiring GPS Signal
The PND-K3 acquires positioning information transmitted from 1
to 3 tracked satellites while searching for more satellites (minimum
4 of needed).
Fixing GPS Position
The PND-K3 requires continuous signals from 4 or more tracked
satellites (for 30 seconds) in order to accurately fix your position.
Temporary Poor GPS Coverage
Thunderstorms, dense foliage or surrounding tall buildings may
cause temporary loss of position fix (acceptable if under 30
seconds).
Poor GPS Signal, Lost Position Fix
You may have entered an area where consistently poor GPS signal
(lasting 30 seconds or more) makes it impossible to maintain a
position fix.
No Line of Sight, Lost GPS Tracking
You are in an area where line of sight to GPS satellites has been
blocked.
VIEWING SYSTEM INFORMATION
You can check software application, database version, and other information on this screen.
Go to Main Menu ➜ Information➜ GPS
NOTE: Make a note of this information and refer to it whenever you communicate with
customer support.
33
Page 34

MUSIC PLAYER
MUSIC PLAYER
The PND-K3 is not only a navigation device, it’s also a music player! Choose “Play” from the Main
Menu, then just place an SD card with your favorite music into the PND-K3. It’s that simple!
PLAY
SKIP TO PREVIOUS
TRACK
BACK TO MAIN
MENU
REPEAT
SKIP TO NEXT
TRACK
MAP
SHUFFLE
MUSIC LIBRARY
ONCE MUSIC IS PLAYING, CLICK AND DRAG
TO SKIP TO ANYWHERE IN THE SONG.
34
Page 35

MSN DIRECT (Only on PND-K3msn)
Go to Main Menu ➜
VIEWING TRAFFIC
You can view traffic and
receive instructions for
detours.
Incident List
Takes you to a list of incidents
sorted by distance.
On Route button shows all
incidents occurring on your route.
Detour
To set-up automatic detour, see
page 31.
VIEWING GAS PRICES
You can view gas price
information by distance or
by price.
VIEWING WEATHER
Change the Location
Touch .
The list of cities near
you appears. To select
manually, click Non-Local
Cities. The list of cities
appears in alphabetical
order.
Details
Touch details to view
humidity, winds, dew point,
visibility and pressure.
Forecast
You can view the 3 day
forecast.
35
SEARCHING MOVIE TIMES.
By Movie Title
The list of movie titles
appears in alphabetical
order.
By Movie Theater Distance
The list of movie theaters
appears.
Page 36

MSN DIRECT, CONTINUED
Go to Main Menu ➜
VIEWING NEWS AND ALERTS
News
You can read a brief description
of latest news. Breaking news
appears in red text.
Emergency Alerts
The wether alerts appars
Subscriber Announcement
MSN updated subscriber
message announcements
appear here.
VIEWING STOCKS
You can check the latest
market activity.
You can search and/or
add your favorite stock
by Market Index or Stock
Symbol.
SEARCHING LOCAL EVENTS
You can search current local
events.
1 Select by Category
2 Select by Sub Category
(if applicable)
3 Select by Name or Date.
RECEIVED LOCATIONS
You can send the address information from your computer.
1 Go to www.maps.live.com
2 Search and select a destination
3 Select option to send destination to GPS device
NOTE: This step may require you to log in.
36
Page 37

IN CASE OF DIFFICULTY
If you encounter a problem, please review the items in the following checklist. This guide will help
you isolate the problem if the unit is at fault. Otherwise make sure the rest of your system is properly
connected and completely charged. Contact your authorized Alpine dealer or Alpine directly at 1-888NAV-HELP (1-888-628-4357).
Unable to play Music from SD card.
Some SD cards may not be compatible with the PND-K3.
Unable to use Phone feature.
Some Bluetooth enabled phones may not be compatible and some features may not be available
even after synchronizing and pairing.
The vehicle’s position is erroneous.
Drive the vehicle in an area of good GPS reception to allow the unit to recalibrate itself. Move to a
location where strong GPS reception is possible.
No operation
Moisture condensation: Allow enough time for the condensation to evaporate
(about 1 hour).
Ambient Temperature: Make sure the temperature inside the vehicle is between -10C
and 60°C (14°F and 140°F)
Blown Fuse on Cradle
Cigarette Adapter:
Replace the fuse with a 2A fuse of the same size.
Unit does not work after removing from cradle or dock
Make sure battery is fully charged. Unit does not charge in cradle or dock while the car is not on.
Reset
37
Page 38

SPECIFICATIONS
Main Unit Size: 123mm x 74mm x 20mm
Main Unit Weight: 6.4 oz
CPU: SiRF Titan
GPS: Embedded 20 channel GPS with built-in antenna
Internal Storage: Built-in flash memory with Pre-loaded Maps of US, Canada, Puerto Rico, and the
Virgin Islands
Card Slot: Secure Digital (SD) or Multimedia Card (MMC) for playback of MP3 or WMA
music files
Audio: Integrated speaker and headphone slot on main unit. Audio output slot on
cradle.
USB Interface: 2.0
Display Size: 4.3 inch diagonal
Display Resolution: QWVGA 480 x 272 pixels
Display Brightness: 450 nits (maximum)
Note: Due to continuous improvements, specification are subject to change without notice
38
Page 39

INDEX
A
Accessories 6
Address Book 17
Announcement 10
Audio 30
Button Sounds 30
Changing Navi Mix Volume 30
Guidance Prompt 30
B
Battery Status 11
Indicator 10
Before Using This Product 2
Before You Start 8
Bluetooth 24
Auto Answer 24
Auto Connect 24
Enable Bluetooth 24
C
Change Route View 10
Cigarette Lighter Charger 6, 7
Clock 30
Confirm Destination Screen 19
Coordinates 17
Cradle 6, 7
AMPS/NEC Mounting Holes 7
Connector 7
Connector Slot 7
Eject Button 7
Mounting Plate 6
Mute Wire 7
power cord 7
Current Position 10
D
Dashboard 32
Delete
Address Book 17
Delete one letter
History 16
Waypoints 21
Destination
by Address 14
By Coordinates 17
By History 16
By Intersection 18
By Place 15
From The Address Book 17
From the Map Display 12
Destination Options 19
Alternative Routes 19
Destination as Home 19
Finding Nearby Places 19
Saving to the Address Book 20
Setting Waypoints 20
Detour 22
Display 28
Backlight timing 28
Brightness 28
Day/Night Mode 28
Menu Color 28
Screen Recalibration 28
E
Edit 17
Address Book 17
Icons 28
Waypoints 21
Estimate Time Display 10
ETA/ETR/Distance to Destination 10
External GPS/Antenna Connector 7
External Microphone Input/Output 7
F
FCC Compliance Statement 2
G
Go To Button 9
GPS Status 33
GPS Status Bar 10, 11
H
Headphone Jack 7
Home 23
Going Home 23
Setting a Destination as 19
Home Button 9
I
Icons
Address Book 20
Home 19
Map 28
Information 32
Dashboard Button 32
GPS Button 32
Route Button 32
System Button 32
Info Button (Information) 9
Input a Destination 13
Installation 8
Before You Start 8
Mount the PND-K3 8
Remove the PND-K3 8
In Case of Difficulty 37
In the Box 6
Accessories 6
L
Language 30
Limited Warranty 40
M
Main Menu 9
Main Menu Button 10
Map 28
Icons 28
Trail Dots 28
Map Button 9
Map Display 12
Changing State
Finding Local Places 12
Keyboard
Memorizing Last 4 Inputs
Setting a Destination 12
Setting Waypoints 12
Map Display Functions
Battery Status 11
Estimate Time Display 10
GPS Status Bar 11
Map Orientation 10
Repeating the Announcement 10
Route Button 10
Switching Map Display 11
Zoom In/Out Map 11
Mini USB Connector 7
Mobile Phone 25
Call Options 26
Placing Calls 25
Receiving Phone Calls 26
MSN DIRECT 35
MSN Direct Settings 31
Music Player 34
Music Library 34
Play 34
N
Navigation Tool 29
Auto Zoom 29
Demo 29
Guidance Map 29
Route Button 29
Route Method 29
Route Overview 29
Unverified Roads 29
Next Maneuver Arrow/Voice Prompt Button 10
Next Street Name 10
P
Phone Button 9
Places
39
Along Your Route 16
Local Places 12
Near You 15
Near Your Destination 15
Within City Vicinity 16
Play Button 9
Power Adapter 6
Power Button 7
Precautions and Notices 2
Q
Quick Reference Guide 6
R
Regional Settings 30
Clock 30
Language 30
Time Zone 30
Units 30
Registration Card 6
Repeating the Announcement 10
Reset 37
Reset Button 7
Route 22
Alternate Route 22, 31
Canceling Route 22
Editing Waypoints 22
Finding a Detour 22, 31
Viewing Turn List 22
Route Button 10
S
Screen 7
SD/MMC Card Slot 7
Settings 27
Audio 30
Bluetooth 24
Customizing Display 28
Customizing Map 28
Customizing Navigation Tool 29
Regional Settings 30
Settings Button 9
Speakers 7
Specifications 38
Switching Map Display 11
Arrow Mode 11
Map Mode 11
System Features 7
Cradle with Cigarette Lighter Charger 7
PND-K3 Portable Navigation System 7
System Information 33
T
Table of Contents 5
Time Zone 30
Trail Dots 28
Troubleshooting 37
U
Units of Measure 30
USB Cable 6
User Agreement 4
V
Volume Down Button 7
Volume Up Button 7
W
Warnings 3
Warranty 40
Waypoints 20
Adding 20
Adding Another 20
Deleting 21
Deleting All 21
Directly From The Map 20
Editing Order 21
Optimizing Your Route 21
Z
Zoom In Button 10, 11
Zoom Out Button 10, 11
Page 40

LIMITED WARRANTY
ALPINE ELECTRONICS OF AMERICA, INC. AND ALPINE OF CANADA INC. (“Alpine”), are dedicated to quality craftsmanship and are pleased to offer this
Warranty. We suggest that you read it thoroughly. Should you have any questions, please contact your Dealer or contact Alpine at one of the telephone
numbers listed below.
PRODUCTS COVERED:
This Warranty covers Car Audio, Navigation Products and Related
Accessories (“the product”). Products purchased in the Canada are
covered only in the Canada. Products purchased in the U.S.A. are covered
only in the U.S.A.
LENGTH OF WARRANTY:
This Warranty is in effect for one year from the date of the first consumer
purchase.
WHO IS COVERED:
This Warranty only covers the original purchaser of the product, who
must reside in the United States, Puerto Rico or Canada.
WHAT IS COVERED:
This Warranty covers defects in materials or workmanship (parts and
labor) in the product.
WHAT IS NOT COVERED:
This Warranty does not cover the following:
Damage occurring during shipment of the product to Alpine for
1
repair (claims must be presented to the carrier).
Damage caused by accident or abuse, including burned voice
2
coils caused by over-driving the speaker (amplifier level is turned
up and driven into distortion or clipping).
Speaker mechanical failure (e.g. punctures, tears or rips).
Cracked or damaged LCD panels. Dropped or damaged hard
drives.
Damage caused by negligence, misuse, improper operation or
3
failure to follow instructions contained in the Owner’s manual.
Damage caused by act of God, including without limitation,
4
earthquake, fire, flood, storms or other acts of nature.
Any cost or expense related to the removal or reinstallation of
the product.
Service performed by an unauthorized person, company or
5
association.
Any product which has the serial number defaced, altered or
6
removed.
Any product which has been adjusted, altered or modified
7
without Alpine’s consent.
Any product not distributed by Alpine within the United States,
8
Puerto Rico or Canada.
Any product not purchased from an Authorized Alpine Dealer.
9
HOW TO OBTAIN WARRANTY SERVICE:
You are responsible for delivery of the product to an Authorized
1
Alpine Service Center or Alpine for repair and for payment of
any initial shipping charges. Alpine will, at its option, repair or
replace the product with a new or reconditioned product without
charge. If the repairs are covered by the warranty, and if the
product was shipped to an Authorized Alpine Service Center or
Alpine, Alpine will pay the return shipping charges.
You should provide a detailed description of the problem(s) for
2
which service is required.
You must supply proof of your purchase of the product.
3
You must package the product securely to avoid damage during
4
shipment. To prevent lost packages it is recommended to use a
carrier that provides a tracking service.
HOW WE LIMIT IMPLIED WARRANTIES:
ANY IMPLIED WARRANTIES INCLUDING FITNESS FOR USE AND
MERCHANTABILITY ARE LIMITED IN DURATION TO THE PERIOD OF
THE EXPRESS WARRANTY SET FORTH ABOVE AND NO PERSON IS
AUTHORIZED TO ASSUME FOR ALPINE ANY OTHER LIABILITY IN
CONNECTION WITH THE SALE OF THE PRODUCT.
HOW WE EXCLUDE CERTAIN DAMAGES:
ALPINE EXPRESSLY DISCLAIMS LIABILITY FOR INCIDENTAL AND
CONSEQUENTIAL DAMAGES CAUSED BY THE PRODUCT. THE TERM
“INCIDENTAL DAMAGES” REFERS TO EXPENSES OF TRANSPORTING
THE PRODUCT TO THE ALPINE SERVICE CENTER, LOSS OF THE ORIGINAL
PURCHASER’S TIME, LOSS OF THE USE OF THE PRODUCT, BUS FARES,
CAR RENTALS OR OTHERS COSTS RELATING TO THE CARE AND CUSTODY
OF THE PRODUCT. THE TERM “CONSEQUENTIAL DAMAGES” REFERS TO
THE COST OF REPAIRING OR REPLACING OTHER PROPERTY WHICH IS
DAMAGED WHEN THIS PRODUCT DOES NOT WORK PROPERLY.
THE REMEDIES PROVIDED UNDER THIS WARRANTY ARE EXCLUSIVE AND
IN LIEU OF ALL OTHERS.
HOW STATE/PROVINCIAL LAW RELATES TO THE WARRANTY:
This Warranty gives you specific legal rights, and you may also have
other rights which vary from state to state and province to province. In
addition, some states/provinces do not allow limitations on how long an
implied warranty lasts, and some do not allow the exclusion or limitation
of incidental or consequential damages. Accordingly, limitations as to
these matters contained herein may not apply to you.
IN CANADA ONLY:
This Warranty is not valid unless your Alpine car audio product has been
installed in your vehicle by an Authorized Installation Center, and this
warranty stamped upon installation by the installation center.
HOW TO CONTACT CUSTOMER SERVICE:
Should the product require service, please call the following number for
your nearest Authorized Alpine Service Center.
CAR AUDIO 1-800-ALPINE-1 (1-800-257-4631)
NAVIGATION 1-888-NAV-HELP (1-888-628-4357)
Or visit our website at; http://www.alpine-usa.com
ALPINE ELECTRONICS OF AMERICA, INC.,
19145 Gramercy Place, Torrance, California 90501, U.S.A.
ALPINE ELECTRONICS OF CANADA, INC.,
777 Supertest Road, Toronto, Ontario M3J 2M9, Canada Phone 1-416-736-6211
Do not send products to these addresses.
Call the toll free telephone number or visit the website to locate a service center.
© 2006 NAVTEQ. All Rights Reserved.
© 2006 Alpine Electronics of America, Inc. All Rights Reserved.
40
The WTR Logo is a trademark of the
Consumer Electronics Association.
 Loading...