

Page 1
Portable Navigation System
QUICK REFERENCE GUIDE
Page 2

IMPORTANT INFORMATION INSTALLATION
WARNING
This product is designed to assist you while you drive your vehicle. It should not be used as a
substitute for your personal judgment. Road conditions and regulations take precedence over
information contained on the map display; observe actual traffic restrictions and circumstances
while driving. For safety, users should stop vehicle before operating the system.
Please read the complete Owner’s Manual before operating this product; please see Page 10 of
this Quick Reference Guide for instructions on accessing the Owner’s Manual.
INSTALLATION NOTE
Certain state and local regulations may prohibit the placement of any object on windows or the
dash. See your authorized Alpine dealer for other installation options.
MAPS
All map coverage includes only roads and regions that have been mapped in a digitized format.
Product information listed in this brochure is based upon current information at the time of printing, but cannot be guaranteed.
All designs, features, specifications and delivery dates are subject to change without notice. For updated product information,
please visit www.alpine-usa.com or www.alpine-canada.com | ©2008 Alpine Electronics, Inc. All rights reserved.
Page 3
INSTALLATION
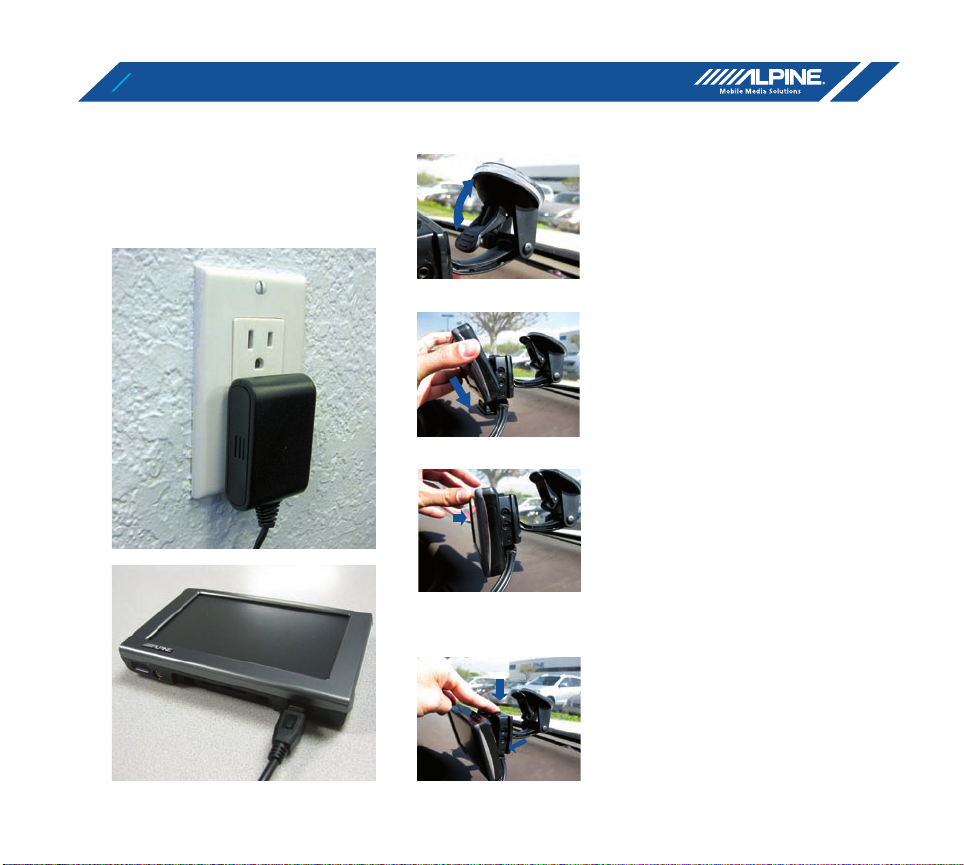
AVANT DE COMMENCER
Avant de commencer, rechargez
le PND-K3 pendant au moins
trois heures, à l’aide du chargeur
c.a. fourni.
>>
COMMENT INSTALLER LE PND-K3
Trouvez un emplacement
1
convenable pour l’appareil de
navigation. Collez la ventouse
à l’emplacement de montage
désiré. Appuyez sur le levier
pour fixer la ventouse.
Placez l’appareil de navigation sur
2
le socle.
Poussez délicatement jusqu’à ce
3
qu’un son soit entendu et que
l’appareil soit verrouillé en place.
>
COMMENT RETIRER LE PND-K3
Appuyez sur le bouton situé
1
directement à l’arrière de l’appareil
de navigation. Cela provoquera le
relâchement de l’appareil vers
l’avant. Soulevez délicatement
l’appareil de son socle.
Page 4
CONTROLS
>
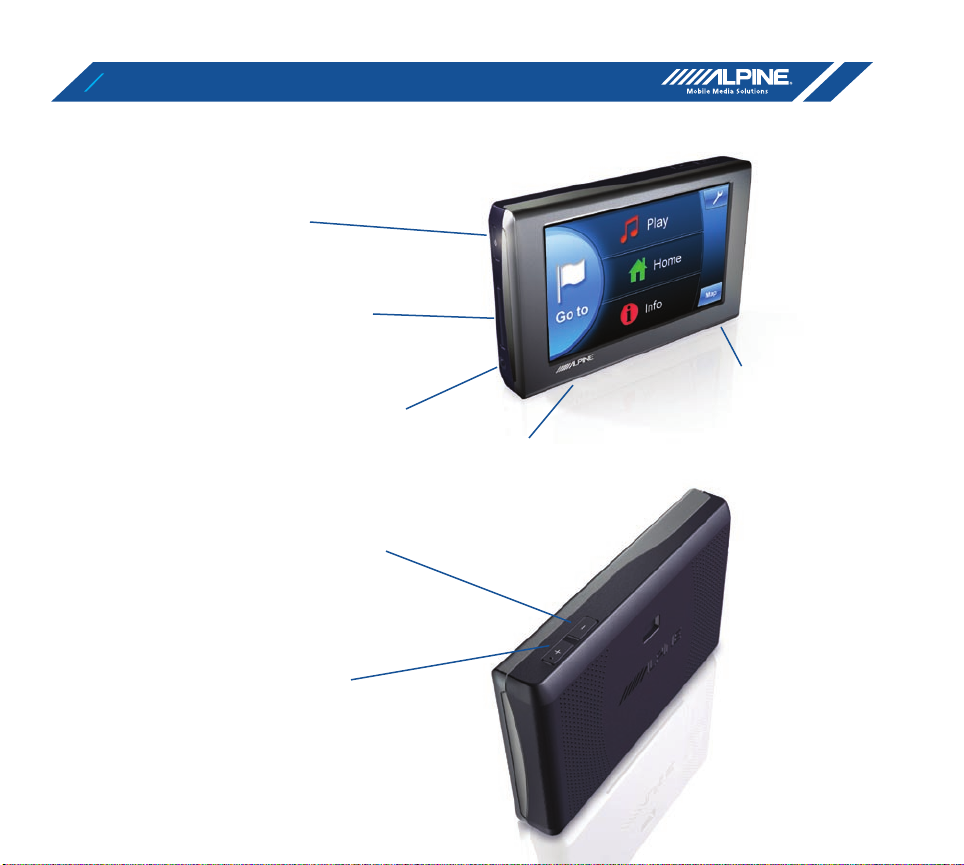
PRIMARY BUTTON CONTROLS
POWER
Press and hold for two
seconds to turn on/off
the device.
SD CARD SLOT
For music playback.
(SD card not included.)
HEADPHONE JACK
(Headphone not included.)
VOLUME DOWN
Controls audio volume
level down.
MINI-USB CONNECTOR
RESET BUTTON
Press and hold for
two seconds (if necessary).
VOLUME UP
Controls audio volume
level up.
Page 5

MAIN MENU
“GO TO” BUTTON
Press this to start entering
a destination.
“HOME” BUTTON
Press this to go to a saved
home location.
“PLAY” BUTTON
Press this to go to the
music player.
“INFO” BUTTON
Press this to check
information such as:
• GPS receiver status
• Speed and trip information
“SETTINGS” BUTTON
Press this to change
system settings.
“MAP” BUTTON
Press this to go to the
map.
Page 6

INPUT A DESTINATION
Type in a new address.
Search by entering
street name.
Search by entering
city name.
Select from
recent destinations.
Select from
saved destinations.
More options
(setting destination
using coordinates or
by intersection).
Select from
recent streets.
Select from
recent cities.
Page 7

FIND A PLACE
Search from a list
of places (restaurants,
ATMs, gas stations, etc.).
Search near
current location.
Search near
destination.
Search within
a city.
Search along
current route.
>
POINT OF INTEREST (POI)
KEYWORD SEARCH
Don’t know the full POI name? Instead,
type in what you know or need and find
relevant results. This search method returns
POI names containing — not necessarily
beginning with — the search term.
Page 8

MAP
>
MAP WITHOUT GUIDANCE
Changes map view (2D, 3D).
>
MAP WITH GUIDANCE
Press to repeat voice
guidance.
Press to view
Route Menu.
Goes back to Main
Menu screen.
Zooms Map View in.
Zooms Map View out.
Goes back to Main
Menu screen.
Zooms Map View in.
Changes map view (2D, 3D).
Zooms Map View out.
Change navigation mode
to arrow only mode.
Page 9

SET UP BLUETOOTH
Access the Settings menu.
1
Press the Down Arrow to access
2
page two of the Settings menu.
Enter the Bluetooth setup screen.
3
Select ‘Bluetooth Devices…’.
4
Select ‘Discoverable Mode’.
5
On the Bluetooth enabled mobile
6
phone, search for Bluetooth
devices.
Once the PND-K3 is found on the
7
mobile phone, connect to the
PND-K3.
Page 10

UPDATES AND OWNER’S MANUAL
>
ACCESS SOFTWARE AND/OR MAP UPDATES
Software and/or map updates can be accessed by connecting the PND-K3 to a PC. The
PND-K3’s Owner’s Manual can also be accessed the same way (internet connection required
for either function).
Turn on the PND-K3.
1
Connect the PND-K3 to the PC using the provided USB cable.
2
Open “My Computer” on the PC. Click the “Alpine Update” icon that appears.
3
Follow the on-screen instructions.
4
Software Update: When a software
update is available, this button will be
active. Follow the on-screen instructions
to access the software update.
View Owner’s Manual.
>
Periodic software and/or map updates will be available. Some may require an additional fee,
please refer to the on-screen instructions.
Page 11

PERSONALIZE YOUR SYSTEM
>
CHANGE THE BACKGROUND COLORS
There are eight menu colors and eight map colors to choose from.
Select “Display” from the Settings menu to change your color scheme.
Press to return
to the previous
color scheme.
Press to advance
to the next
color scheme.
Page 12

MUSIC PLAYER
>
MUSIC PLAYER
The PND-K3 is not only a navigation device, it’s also a music player! Choose
“Play” from the Main Menu, then just place an SD card with your favorite
music into the PND-K3. It’s that simple!
Play
Skip to last track. Skip to next track.
Back to Main Menu. Map
Repeat
Once music is playing, click and drag to skip to anywhere in the song.
ShuffleMusic Library
 Loading...