

Quick Reference Guide
PMD-B
200
Kurzreferenz
Guide de référence rapide
Guida rapida
Guía de referencia rápida
P
Beknopte handleiding
Snabbreferensguide
Lynguide
Краткий справочник
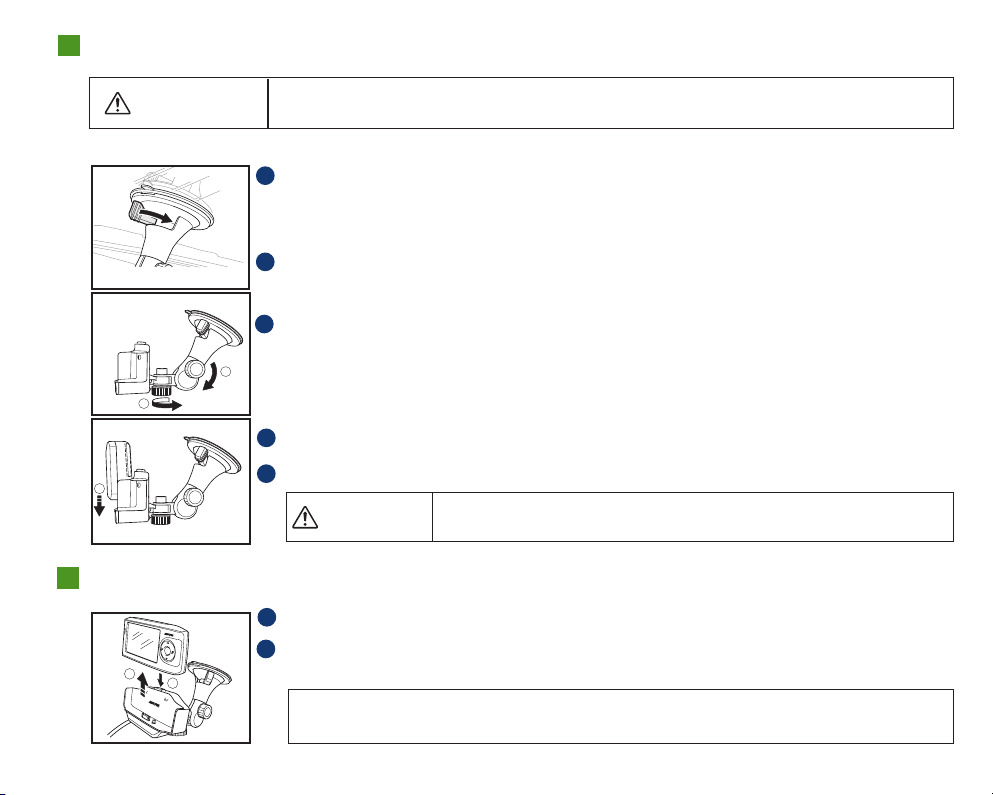
How to Mount My Blackbird
2
3
4
2
1
WARNING
Note: The cradle consists of 2 separate parts that must be assembled before mounting.
Improper installation may make the navigation system fall from the cradle while driving.
Ensure all locks and knobs are tight. Do not install the navigation system while driving.
1
Find a spot suitable for the navigation system. Ensure that both the
suction cup and windshield area are clean. Stick the suction cup against
the windshield. Turn the knob to lock it in position.
2
Turn the knob counterclockwise to adjust up/down position. Turn
clockwise to set the position.
Turn the knob clockwise to adjust right/left position. Turn
3
counterclockwise to set the position.
THE DEVICE SHOULD NOT BE INSTALLED SO THAT IT OBSTRUCTS THE
DRIVER’S VIEW.
4
Slide the navigation system into the cradle until it clicks.
Plug in the cigarette lighter charger.
5
CAUTION
Remove the navigation system when you are away from the vehicle to prevent theft.
How to Remove My Blackbird
Press and hold the cradle’s eject button.
1
Grasp the navigation system behind the antenna and slide up and out of
2
the cradle.
NOTE: Local regulations may prohibit the placement of any object on windows or the dash. See your authorised
ALPINE dealer for other installation options.
EN-1
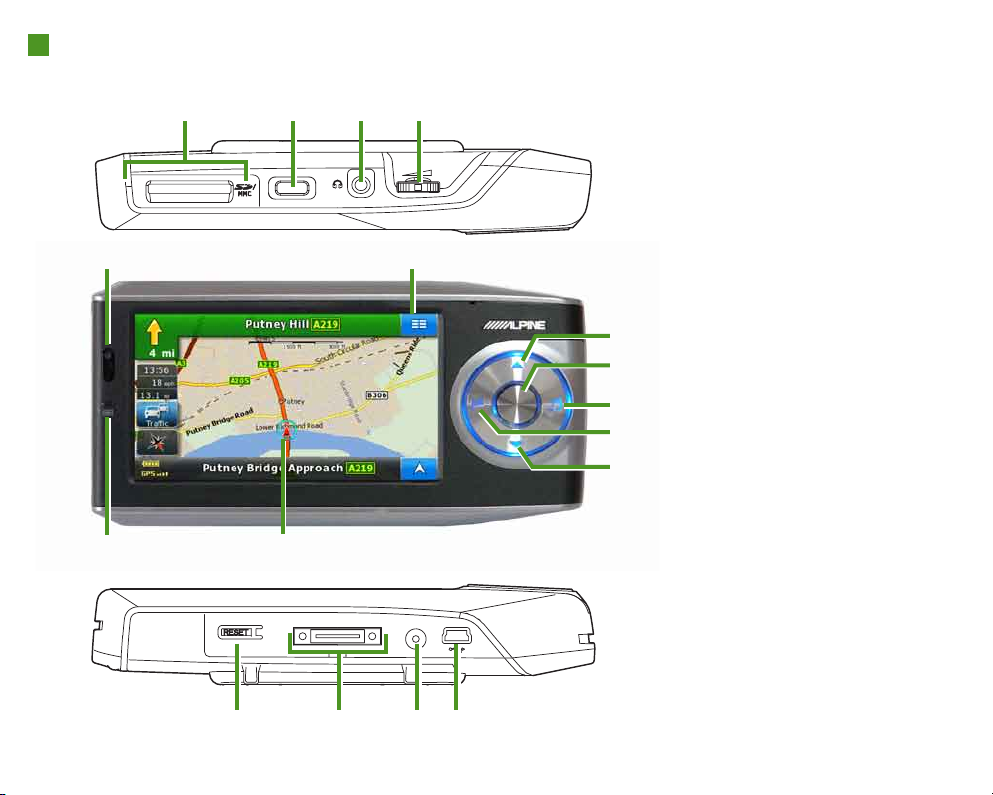
Blackbird
1 2 3 4
5 6
12 13
1 - SD/MMC Card Slot
2 - Power Button
3 - Headphone Jack
4 - Volume Control
5 - Remote and Ambient Light
Sensor
6 - Navigation Menu Button
7 - Map Zoom Out
7
8 - Center Key (Phone Key)
8
9 - Music
9
10 - Destination
10
11 - Map Zoom In
11
12 - Battery Charging Status
Indicator
13 - Current Vehicle Position Icon
14 - Reset Button
15 - Cradle Connector
16 - External GPS Antenna
Connector
17 - Mini USB Connector
EN-2
14 15 16 17

Map Functions
Below is an overview of dierent buttons and icons on the map display. For more
detailed information about this screen, please see the Owner’s Manual.
Next Street Name
Next Manoeuvre
Arrow
Distance to next
Manoeuvre
Trip Information
Trac Information
Map Orientation
Navigation Menu – Press this icon
to access the navigation menu.
Map Scale Bar
Battery Status
Indicator
GPS Status Bar
Current Street Name
Current Vehicle Position – Press this icon
to return to the map from any screen.
Voice Prompt Repeat Button – Repeats
the last voice prompt command.
EN-3

Navigation Menu
From the Map or any screen, touch the Navigation Menu to access the following menus:
Destination
Set and save
destinations using any
of six dierent input
methods (Address,
Home, History, POI,
Favourites, Coordinate).
Edit Favourites,
Personal POI, Saved
Routes and Track Logs.
Multimedia
Listen to Music and
watch Pictures
stored on your
SD or MMC card.
EN-4
Edit
Route
Get route information, see
the turn list, edit the route,
change methods as well
as load, save, delete and
simulate the route.
Phone
Access your Bluetoothenabled mobile phone.
Settings
Allows you to customise
various characteristics of
your navigation system’s
look and feel.

Go to a Destination
The following example briey describes how to input a destination in the Blackbird
Navigation System.
1
Select Destination from
Navigation Menu .
Or press Destination
button.
2
Select a destination input
method. (Address is
selected.)
4
Press the button <City
Name> to type in the
destination. Press OK to
access the list to select a
matching entry.
To change the country
3
press the button with the
countryname. Select a
country from the list.
EN-5

5
Type in the street name.
Press OK to access the list
to select a matching entry.
6
Enter a house number.
Press OK to access the
conrmation screen.
EN-6
Press Go to initialise route
7
calculation and start
navigation.

Docking with IVA-W
CLOSE
1
2
Additional On-Screen Button
When Blackbird is docked, an additional on-screen button allows you to
conveniently access additional system features.
205
R and IVA-W
505
R
Open IVA-W
1
unit monitor.
Insert Blackbird into the unit with the
2
screen facing up and the navigation
wheel on the left.
Press Blackbird rmly into place.
3
205
R / IVA-W
button will give you
access to the A/V Head
Unit’s display control.
505
R head
Touching this
EN-7

ALPINE ELECTRONICS MARKETING, INC.
1-1-8 Nishi Gotanda
Shinagawa-ku, Tokyo 141-0031, Japan
Phone 03-5496-8231
ALPINE ELECTRONICS OF AMERICA, INC.
19145 Gramercy Place, Torrance,
California 90501 U.S.A.
Phone 1-800-ALPINE-1 (1-800-257-4631)
1-888-NAV-HELP (1-888-628-4357)
ALPINE ELECTRONICS OF CANADA, INC.
777 Supertest Road, Toronto,
Ontario M3J 2M9 Canada
Phone 1-800-ALPINE-1 (1-800-257-4631)
1-888-NAV-HELP (1-888-628-4357)
ALPINE ELECTRONICS OF AUSTRALIA PTY, LTD.
161-165 Princess Highway,
Hallam Victoria 3803, Australia
Phone 03-8787-1200
ALPINE ELECTRONICS GmbH
Wilhelm-Wagenfeld-Str. 1-3,
80807 München, Germany
Phone 089-32 42 640
ALPINE ELECTRONICS OF U.K., LTD.
ALPINE House
Fletchamstead Highway,
Coventry CCV4 9TW, U.K.
Phone 0870-33 33 763
ALPINE ELECTRONICS FRANCE S.A.R.L.
(RCS PONTOISE B 338 101 280)
98, Rue de la Belle Etoile, Z.I. paris Nord II,
B.P. 50016, 95945 Roissy Charles de Gaulle
Cedex, France
Phone 01-48638989
ALPINE ITALIA S.p.A.
Viale C. Colombo 8, 20090 Trezzano
Sul Naviglio (MI), Italy
Phone 02-484781
ALPINE ELECTRONICS DE ESPAÑA, S.A.
Portal de Gamarra 36, Pabellón, 32
01013 Vitoria (Alava)-APDO 133, Spain
Phone 945-283588
ALPINE ELECTRONICS (BENELUX) GmbH
Leuvensesteenweg 510-B6,
1930 Zaventem, Belgium
Tel.: 02-725 1315
© 2009 NAVTEQ. All Rights Reserved
© 2009 ALPINE Electronics, Inc. All Rights Reserved
 Loading...