

Page 1
FOR CAR USE ONLY/ POUR APPLICATION AUTOMOBILE UNIQUEMENT/ PARA USO EN
AUTOMÓVILES/ NUR FÜR AUTOMOBIL GEBRAUCH/ SOLO PER L’UTILIZZO IN
AUTOMOBILE/ ENDAST FÖR BILBRUK/ ALLEEN VOOR GEBRUIK IN DE AUTO/ DO UŻYCIA
TYLKO W SAMOCHODZIE
DAB/CD/USB RECEIVER WITH ADVANCED BLUETOOTH
CDE-205DAB
DIGITAL MEDIA/DAB RECEIVER WITH ADVANCED BLUETOOTH
EN
FR
ES
DE
UTE-204DAB
DIGITAL MEDIA/DAB RECEIVER
UTE-202DAB
• OWNER’S MANUAL
Please read before using this equipment.
• MODE D’EMPLOI
Veuillez lire avant d’utiliser cet appareil.
• MANUAL DE OPERACIÓN
Léalo antes de utilizar este equipo.
• BEDIENUNGSANLEITUNG
Lesen Sie diese Bedienungsanleitung bitte
vor Gebrauch des Gerätes.
• ISTRUZIONI PER L’USO
Si prega di leggere prima di utilizzare il
attrezzatura.
• ANVÄNDARHANDLEDNING
Innan du använder utrustningen bör du läsa
igenom denna användarhandledning.
• GEBRUIKERSHANDLEIDING
Lees deze aanwijzingen aandachtig alvorens
dit toestel te gebruiken.
• INSTRUKCJA OBSŁUGI
Prosimy zapoznać się z tą instrukcją przed
przystąpieniem do użytkowania urządzenia.
Printed in Thailand
68-40368Z04-B (Y-D)
IT
SE
NL
PL
Page 2
For safety, be sure to install this unit in the
dashboard of the car as the rear side of the
unit becomes hot during use.
For details, see “Connection/Installation”
(page35).
Hereby, Alpine Electronics (Europe) declares that
the radio equipment type CDE-205DAB, UTE204DAB, UTE-202DAB is in compliance with
Directive 2014/53/EU.
The full text of the EU declaration of conformity
is available at the following internet address:
http://www.alpine.com/e/research/doc/
Information on Disposal of Old Electrical and
Electronic Equipment and Battery (applicable
for countries that have adopted separate
waste collection systems)
If you want to dispose this product, do not mix it
with general household waste. There is a
separate collection system for used electronic
products in accordance with legislation that
requires proper treatment, recovery and
recycling. Contact your local authority for details
in locating a recycle facility nearest to you.
Proper recycling and waste disposal will help
conserve resources whist preventing detrimental
effects on our health and the environment.
Warning if your car’s ignition has no ACC
position
Be sure to set the AUTO OFF function (page
22). The unit will shut off completely and
automatically in the set time after the unit is
turned off, which prevents battery drain. If
you do not set the AUTO OFF function, press
and hold
disappears each time you turn the ignition off.
(power) until the display
Disclaimer regarding services offered by
third parties
Services offered by third parties may be
changed, suspended, or terminated without
prior notice. Alpine does not bear any
responsibility in these sorts of situations.
Important notice
Caution
IN NO EVENT SHALL ALPINE BE LIABLE FOR ANY
INCIDENTAL, INDIRECT OR CONSEQUENTIAL
DAMAGES OR OTHER DAMAGES INCLUDING,
WITHOUT LIMITATION, LOSS OF PROFITS, LOSS
OF REVENUE, LOSS OF DATA, LOSS OF USE OF
THE PRODUCT OR ANY ASSOCIATED EQUIPMENT,
DOWNTIME, AND PURCHASER’S TIME RELATED
TO OR ARISING OUT OF THE USE OF THIS
PRODUCT, ITS HARDWARE AND/OR ITS
SOFTWARE.
Dear customer, this product includes a radio
transmitter.
According to UNECE Regulation no. 10, a vehicle
manufacturers may impose specific conditions
for installation of radio transmitters into vehicles.
Please check your vehicle operation manual or
contact the manufacturer of your vehicle or your
vehicle dealer, before you install this product into
your vehicle.
Emergency calls
This BLUETOOTH car handsfree and the
electronic device connected to the handsfree
operate using radio signals, cellular, and landline
networks as well as user-programmed function,
which cannot guarantee connection under all
conditions.
2-EN
Page 3

Therefore do not rely solely upon any electronic
device for essential communications (such as
medical emergencies).
On BLUETOOTH communication
• Microwaves emitting from a BLUETOOTH
device may affect the operation of electronic
medical devices. Turn off this unit and other
BLUETOOTH devices in the following locations,
as it may cause an accident.
– where inflammable gas is present, in a
hospital, train, airplane, or petrol station
– near automatic doors or a fire alarm
• This unit supports security capabilities that
comply with the BLUETOOTH standard to
provide a secure connection when the
BLUETOOTH wireless technology is used, but
security may not be enough depending on the
setting. Be careful when communicating using
BLUETOOTH wireless technology.
• We do not take any responsibility for the
leakage of information during BLUETOOTH
communication.
If you have any questions or problems
concerning your unit that are not covered in this
manual, consult your nearest Alpine dealer.
IMPORTANT
Please record the serial number of your unit in the space provided below and keep it as a
permanent record.
SERIAL NUMBER:
ISO SERIAL NUMBER: AL
INSTALLATION DATE:
INSTALLATION TECHNICIAN:
PLACE OF PURCHASE:
3-EN
Page 4

WARNING
WARNING
This symbol means important instructions.
Failure to heed them can result in serious
injury or death.
DO NOT OPERATE ANY FUNCTION THAT
TAKES YOUR ATTENTION AWAY FROM
SAFELY DRIVING YOUR VEHICLE.
Any function that requires your prolonged
attention should only be performed after
coming to a complete stop. Always stop the
vehicle in a safe location before performing
these functions. Failure to do so may result in
an accident.
KEEP THE VOLUME AT A LEVEL WHERE YOU
CAN STILL HEAR OUTSIDE NOISES WHILE
DRIVING.
Excessive volume levels that obscure sounds
such as emergency vehicle sirens or road
warning signals (train crossings, etc.) can be
dangerous and may result in an accident.
LISTENING AT LOUD VOLUME LEVELS IN A CAR
MAY ALSO CAUSE HEARING DAMAGE.
DO NOT DISASSEMBLE OR ALTER.
Doing so may result in an accident, fire or
electric shock.
USE ONLY IN CARS WITH A 12 VOLT
NEGATIVE GROUND.
(Check with your dealer if you are not sure.)
Failure to do so may result in fire, etc.
KEEP SMALL OBJECTS SUCH AS BATTERIES
OUT OF THE REACH OF CHILDREN.
Swallowing them may result in serious injury. If
swallowed, consult a physician immediately.
USE THE CORRECT AMPERE RATING WHEN
REPLACING FUSES.
Failure to do so may result in fire or electric
shock.
DO NOT BLOCK VENTS OR RADIATOR
PANELS.
Doing so may cause heat to build up inside
and may result in fire.
USE THIS PRODUCT FOR MOBILE 12V
APPLICATIONS.
Use for other than its designed application may
result in fire, electric shock or other injury.
DO NOT PLACE HANDS, FINGERS OR
FOREIGN OBJECTS IN INSERTION SLOTS OR
GAPS.
Doing so may result in personal injury or
damage to the product.
MAKE THE CORRECT CONNECTIONS.
Failure to make the proper connections may
result in fire or product damage.
BEFORE WIRING, DISCONNECT THE CABLE
FROM THE NEGATIVE BATTERY TERMINAL.
Failure to do so may result in electric shock or
injury due to electrical shorts.
DO NOT SPLICE INTO ELECTRICAL CABLES.
Never cut away cable insulation to supply
power to other equipment. Doing so will
exceed the current carrying capacity of the
wire and result in fire or electric shock.
DO NOT DAMAGE PIPE OR WIRING WHEN
DRILLING HOLES.
When drilling holes in the chassis for
installation, take precautions so as not to
contact, damage or obstruct pipes, fuel lines,
tanks or electrical wiring. Failure to take such
precautions may result in fire.
DO NOT USE BOLTS OR NUTS IN THE BRAKE
OR STEERING SYSTEMS TO MAKE GROUND
CONNECTIONS.
Bolts or nuts used for the brake or steering
systems (or any other safety-related system), or
tanks should NEVER be used for installations or
ground connections. Using such parts could
disable control of the vehicle and cause fire etc.
4-EN
Page 5
DO NOT INSTALL IN LOCATIONS WHICH
MIGHT HINDER VEHICLE OPERATION, SUCH
AS THE STEERING WHEEL OR SHIFT LEVER.
Doing so may obstruct forward vision or
hamper movement etc. and results in serious
accident.
CAUTION
This symbol means important instructions.
Failure to heed them can result in injury or
material property damage.
HALT USE IMMEDIATELY IF A PROBLEM
APPEARS.
Failure to do so may cause personal injury or
damage to the product. Return it to your
authorized Alpine dealer or the nearest Alpine
Service Centre for repairing.
HAVE THE WIRING AND INSTALLATION
DONE BY EXPERTS.
The wiring and installation of this unit requires
special technical skill and experience. To ensure
safety, always contact the dealer where you
purchased this product to have the work done.
USE SPECIFIED ACCESSORY PARTS AND
INSTALL THEM SECURELY.
Be sure to use only the specified accessory
parts. Use of other than designated parts may
damage this unit internally or may not securely
install the unit in place. This may cause parts to
become loose resulting in hazards or product
failure.
ARRANGE THE WIRING SO IT IS NOT
CRIMPED OR PINCHED BY A SHARP METAL
EDGE.
Route the cables and wiring away from moving
parts (like the seat rails) or sharp or pointed
edges. This will prevent crimping and damage
to the wiring. If wiring passes through a hole in
metal, use a rubber grommet to prevent the
wire’s insulation from being cut by the metal
edge of the hole.
DO NOT INSTALL IN LOCATIONS WITH HIGH
MOISTURE OR DUST.
Avoid installing the unit in locations with high
incidence of moisture or dust. Moisture or dust
that penetrates into this unit may result in
product failure.
5-EN
Page 6

Table of Contents
WARNING . . . . . . . . . . . . . . . . . . . . . . . . . . . . . . . . . . . . . 4
Guide to Parts and Controls . . . . . . . . . . . . . . . . . . . . 7
Getting Started
Detaching the Front Panel . . . . . . . . . . . . . . . . . . . . . 9
Resetting the Unit . . . . . . . . . . . . . . . . . . . . . . . . . . . . . 9
Setting the Clock . . . . . . . . . . . . . . . . . . . . . . . . . . . . . . 9
Preparing a BLUETOOTH Device (CDE-205DAB/
UTE-204DAB only) . . . . . . . . . . . . . . . . . . . . . . . . . .10
Connecting a USB Device . . . . . . . . . . . . . . . . . . . . . 12
Connecting Other Portable Audio Device . . . . .12
Listening to the Radio
Listening to the Radio . . . . . . . . . . . . . . . . . . . . . . . . 12
Receiving DAB . . . . . . . . . . . . . . . . . . . . . . . . . . . . . . . 12
Using FM/MW/LW . . . . . . . . . . . . . . . . . . . . . . . . . . . . 14
Using Radio Data System (RDS) . . . . . . . . . . . . . . . 14
Playback
Playing a Disc (CDE-205DAB only) . . . . . . . . . . . . .16
Playing a USB Device . . . . . . . . . . . . . . . . . . . . . . . . .16
Playing a BLUETOOTH Device (CDE-205DAB/
UTE-204DAB only) . . . . . . . . . . . . . . . . . . . . . . . . . .16
Searching and Playing Tracks . . . . . . . . . . . . . . . . . 17
Settings
Canceling the DEMO Mode . . . . . . . . . . . . . . . . . . .22
Basic Setting Operation . . . . . . . . . . . . . . . . . . . . . . . 22
General Setup (GENERAL) . . . . . . . . . . . . . . . . . . . . . 22
Audio Setup (AUDIO) . . . . . . . . . . . . . . . . . . . . . . . . . 23
Display Setup (DISPLAY) . . . . . . . . . . . . . . . . . . . . . . 23
BLUETOOTH Setup (BLUETOOTH) (CDE-205DAB/
UTE-204DAB only) . . . . . . . . . . . . . . . . . . . . . . . . . .24
Additional Information
Updating the Firmware . . . . . . . . . . . . . . . . . . . . . . .25
Precautions . . . . . . . . . . . . . . . . . . . . . . . . . . . . . . . . . .25
Maintenance . . . . . . . . . . . . . . . . . . . . . . . . . . . . . . . . . 26
Specifications . . . . . . . . . . . . . . . . . . . . . . . . . . . . . . . . 27
Troubleshooting . . . . . . . . . . . . . . . . . . . . . . . . . . . . . 29
Messages . . . . . . . . . . . . . . . . . . . . . . . . . . . . . . . . . . . . 33
Connection/Installation
Cautions . . . . . . . . . . . . . . . . . . . . . . . . . . . . . . . . . . . . .35
Parts List for Installation . . . . . . . . . . . . . . . . . . . . . . 35
Connection . . . . . . . . . . . . . . . . . . . . . . . . . . . . . . . . . .36
Installation . . . . . . . . . . . . . . . . . . . . . . . . . . . . . . . . . . . 40
Handsfree Calling (via BLUETOOTH
only) (CDE-205DAB/ UTE-204DAB
only)
Receiving a Call . . . . . . . . . . . . . . . . . . . . . . . . . . . . . . 18
Making a Call . . . . . . . . . . . . . . . . . . . . . . . . . . . . . . . . . 18
Available Operations during Call . . . . . . . . . . . . . . 19
Useful Functions
Adjusting Bass Level/ Mid Level/ Treble Level/
Subwoofer Level/ Balance (Between Left and
Right)/ Fader (Between Front and Rear) . . . . . . 20
Setting the BASS ENGINE SQ . . . . . . . . . . . . . . . . . . 20
Using Siri Eyes Free (CDE-205DAB/ UTE-204DAB
only) . . . . . . . . . . . . . . . . . . . . . . . . . . . . . . . . . . . . . . . 20
6-EN
Page 7
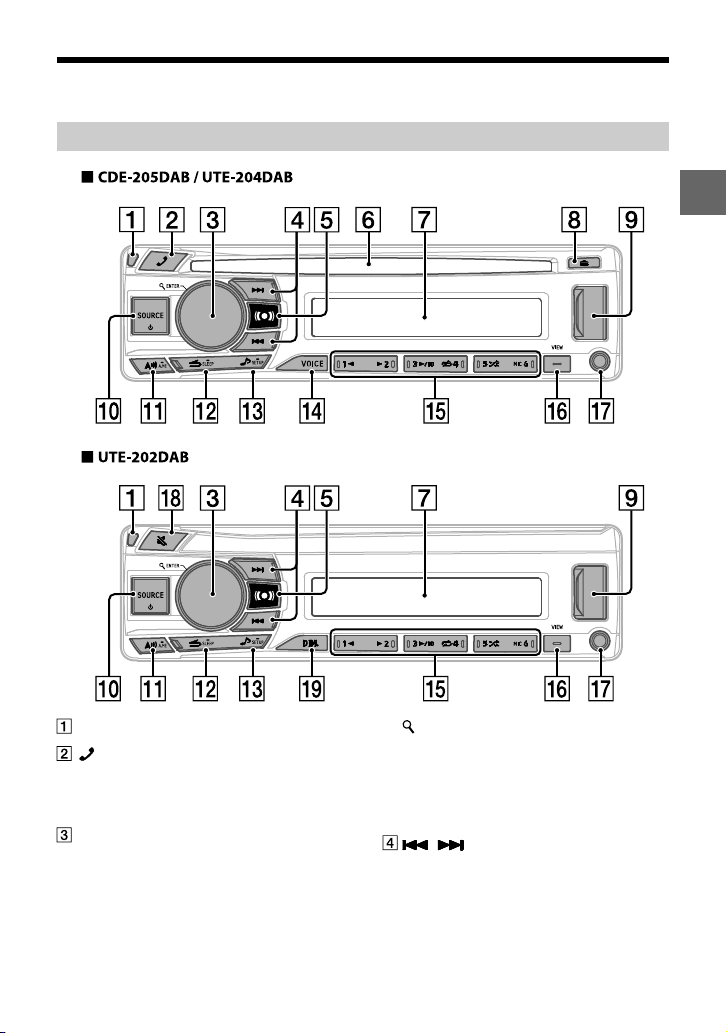
Guide to Parts and Controls
Main unit
Front panel release button
Enter the call menu. Receive/end a call.
Press and hold for more than 2 seconds to
switch the BLUETOOTH signal.
Control dial
Rotate to adjust the volume.
ENTER
Enter the selected item.
(browse) (pages 13, 15, 17)
Enter the browse mode during playback.
(Not available when a USB device in Android
mode or iPod is connected.)
During DAB reception: Select service.
During FM reception: Select PTY in RDS.
/
Radio mode:
Tune in radio stations automatically. Press
and hold to tune manually.
Disc/USB Device mode:
Switch between previous/next song.
Press and hold for 2 seconds to fast-reverse/
fast-forward.
7-EN
Page 8
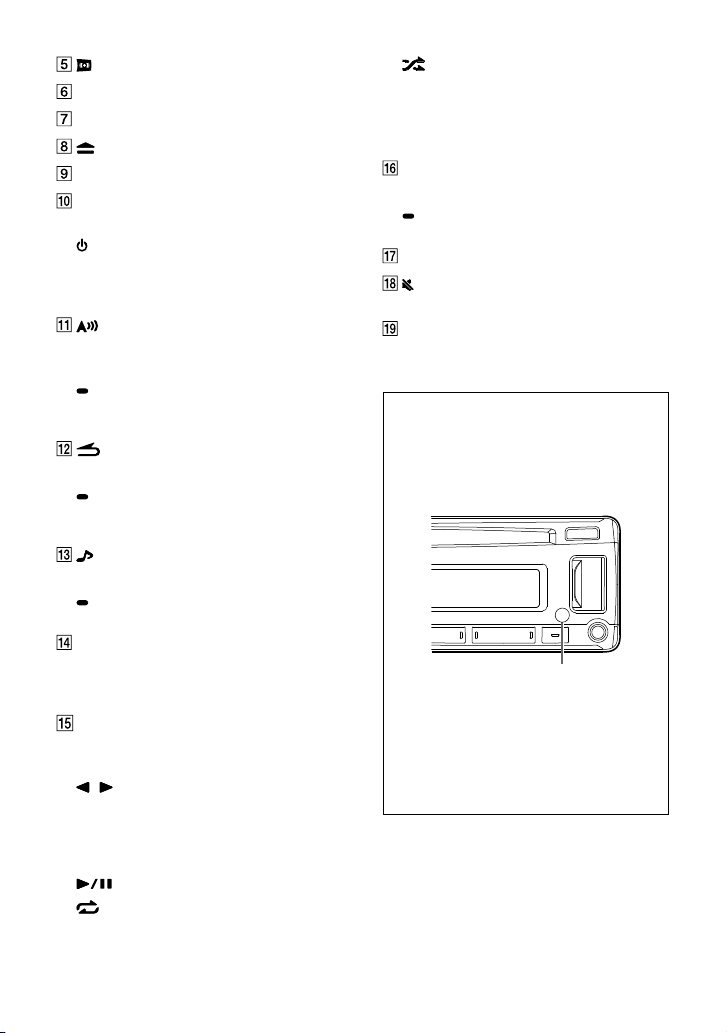
(page 20)
Disc slot (CDE-205DAB only)
Display window
(disc eject) (CDE-205DAB only)
USB port
SOURCE
Change the source.
(power)
Turn on the power.
Press and hold for more than 2 seconds to
turn off the power and the display.
Press in the Radio mode to change the radio
band.
A.ME
Press and hold for more than 2 seconds in the
Radio mode to store stations automatically.
(back)
Return to the previous display.
SLEEP
Press and hold for 2 seconds to turn the
source off and display the clock.
(page 20)
Open audio setup mode directly.
SETUP
Press and hold to open the setup menu.
VOICE (pages 19, 20)
Press to activate voice dial, voice recognition
(Android™ smartphone only), or the Siri
function (iPhone only).
Number buttons (1 to 6)
Receive stored radio stations. Press and hold
to store stations.
/
Skip an album for audio device. Press and
hold to skip albums continuously.
(Not available when a USB device in Android
mode or iPod is connected.)
(play/pause)
(repeat)
(Not available when a USB device in Android
mode is connected.)
(shuffle)
(Not available when a USB device in Android
mode is connected.)
MIC (CDE-205DAB/ UTE-204DAB only)
(page 19)
VIEW
Change display items.
(scroll)
Press and hold to scroll a display item.
AUX input jack
(MUTE)
Set the mute mode to on/off.
DIM.
Press to change the Dimmer function.
Controllable with Remote Control
This unit can be controlled with an optional
Alpine remote control. For details, consult
your Alpine dealer.
Point the optional remote control transmitter
at the remote control sensor.
Remote control sensor
Connectable to Remote Control Interface
Box
With an optional Alpine Steering Wheel
Remote Control Interface Box (not included),
this unit is controllable from the vehicles
steering wheel controls. For details, contact
your Alpine dealer.
8-EN
Page 9
Getting Started
To cancel the demonstration (DEMO)
display, see page 22.
For the connection/installation, see page
35.
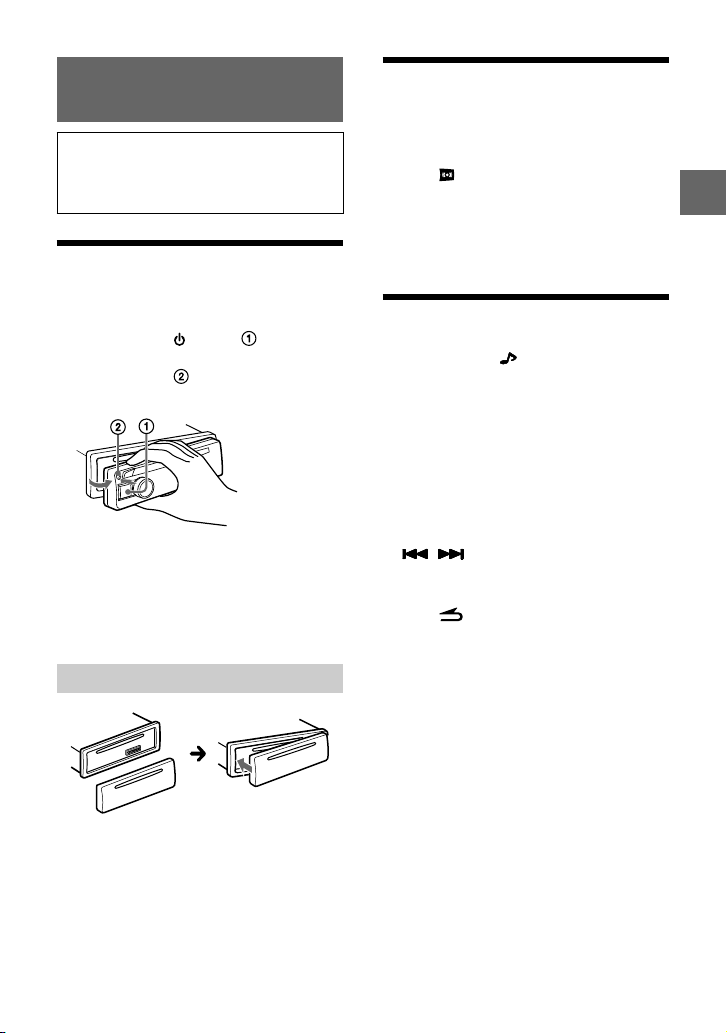
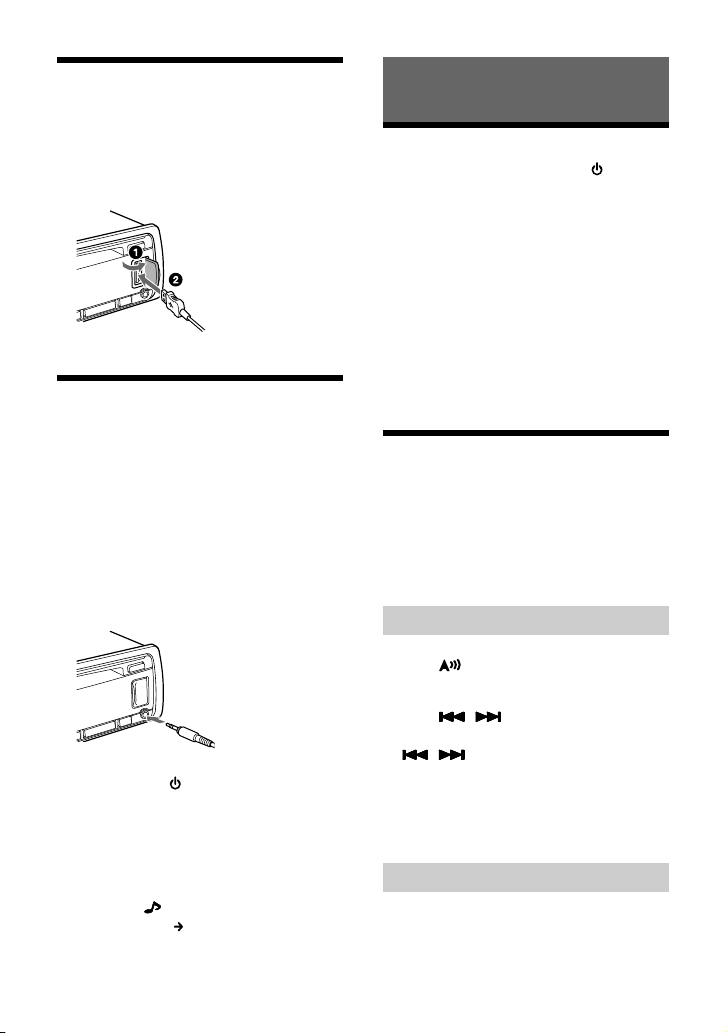
Detaching the Front Panel
You can detach the front panel of this unit to
prevent theft.
1 Press and hold (power) until the
unit turns off, press the front panel
release button
towards you to remove.
Caution alarm
If you turn the ignition switch to the OFF position
without detaching the front panel, the caution
alarm will sound for a few seconds. The alarm will
only sound if the built-in amplifier is used.
Attaching the front panel
, then pull the panel
Resetting the Unit
Before operating the unit for the first time, or
after replacing the car battery or changing
connections, you must reset the unit.
1 Press and Number button 6 for more
than 2 seconds.
Note
Resetting the unit will erase the clock setting and some
stored contents.
Setting the Clock
1 Press and hold /SETUP for at least 2
seconds, rotate the control dial to select
[GENERAL], then press it.
2 Rotate the control dial to select [CLOCK
ADJ], then press it.
The hour indication flashes.
3 Rotate the control dial to adjust the hour
and minute.
To move the digital indication, press
/ .
4 Press ENTER to set the hour and minute.
5 Press (back) twice.
The setup is complete.
To display the clock
Press VIEW.
9-EN
Page 10
Preparing a BLUETOOTH Device
(CDE-205DAB/ UTE-204DAB only)
You can enjoy music, or perform handsfree
calling depending on the BLUETOOTH
compatible device such as a smartphone, cellular
phone and audio device (hereafter “BLUETOOTH
device” if not otherwise specified). For details on
connecting, refer to the operating instructions
supplied with the device.
Before connecting the device, turn down the
volume of this unit; otherwise, loud sound may
result.
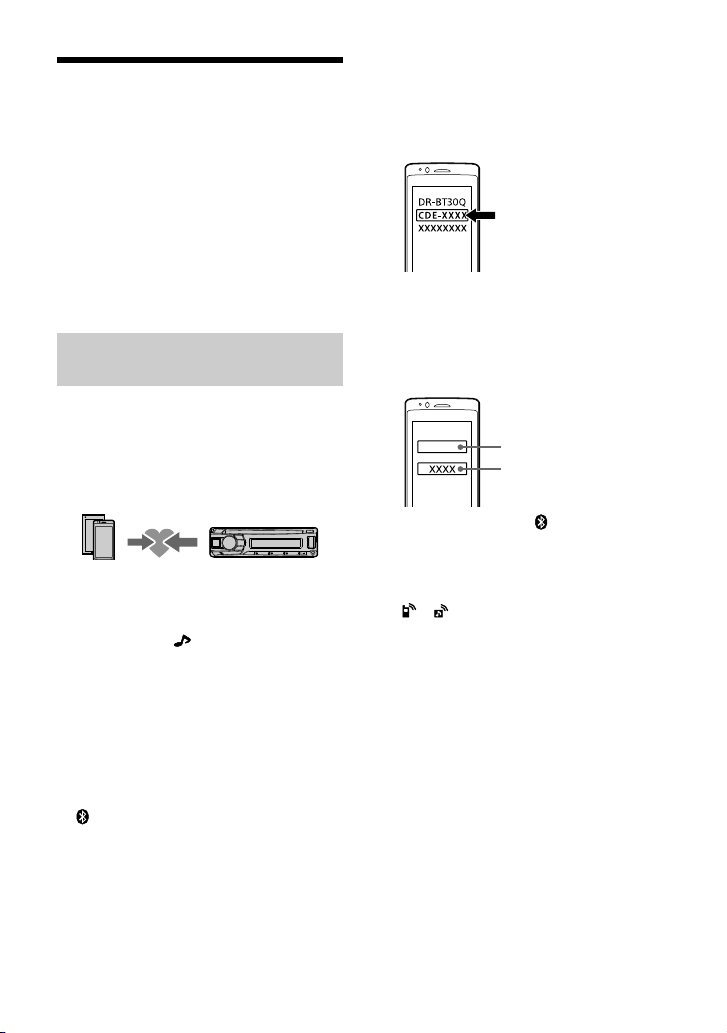
Pairing and connecting with a
BLUETOOTH device
When connecting a BLUETOOTH device for the
first time, mutual registration (called “pairing”) is
required. Pairing enables this unit and other
devices to recognize each other. This unit can
connect two BLUETOOTH devices (two cellular
phones, or a cellular phone and an audio device).
1 Place the BLUETOOTH device within
1 m (3 ft) of this unit.
2 Press and hold /SETUP for at least 2
seconds, rotate the control dial to select
[BLUETOOTH], then press it.
3 Rotate the control dial to select
[PAIRING], then press it.
4 Rotate the control dial to select [SET
DEVICE 1]* or [SET DEVICE 2]*, then press
it.
flashes while the unit is in pairing standby
mode.
* [SET DEVICE 1] or [SE T DEVICE 2] will be changed to
the paired device name after pairing is complete.
5 Perform pairing on the BLUETOOTH
device so it detects this unit.
6 Select [CDE-205DAB] [UTE-204DAB]
(your model name) shown in the display
of the BLUETOOTH device.
If your model name does not appear, repeat
from step 2.
7 If passkey* input is required on the
BLUETOOTH device, input [0000].
* Passkey may be called “Passcode,” “PIN code,” “PIN
number” or “Password,” etc., depending on the
device.
Input passkey
[0000]
When pairing is made, stays lit.
8 Select this unit on the BLUETOOTH
device to establish the BLUETOOTH
connection.
or lights up when the connection is
made.
Note
While connecting to a BLUETOOTH device, this unit
cannot be detected from another device. To enable
detection, enter the pairing mode and search for this unit
from another device.
To start playback
For details, see “Playing a BLUETOOTH Device
(CDE-205DAB/ UTE-204DAB only)” (page16).
To disconnect the paired device
Perform steps 2 to 4 to disconnect after this unit
and the BLUETOOTH device are paired.
10-EN
Page 11
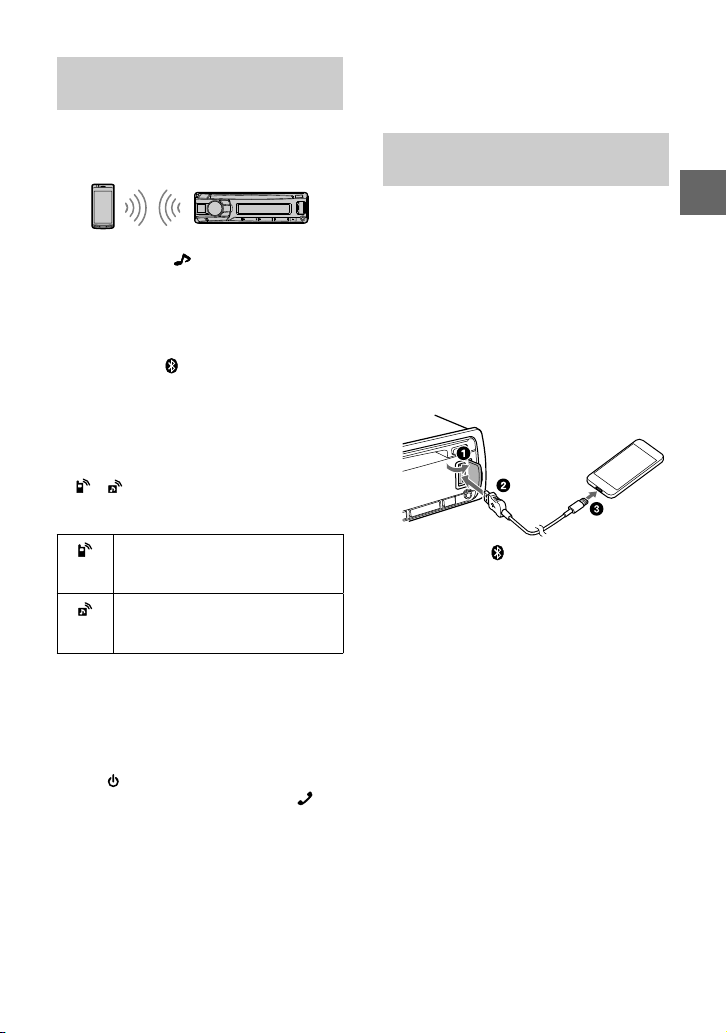
Connecting with a paired BLUETOOTH
device
To use a paired device, connection with this unit
is required. Some paired devices will connect
automatically.
1 Press and hold /SETUP for at least 2
seconds, rotate the control dial to select
[BLUETOOTH], then press it.
2 Rotate the control dial to select [BT IN],
then press it.
Make sure that lights up.
3 Activate the BLUETOOTH function on the
BLUETOOTH device.
4 Operate the BLUETOOTH device to
connect to this unit.
or lights up.
Icons in the display:
Lights up when handsfree calling is
available by enabling the HFP
(Handsfree Profile).
Lights up when the audio device is
playable by enabling the A2DP
(Advanced Audio Distribution Profile).
To connect the last-connected device from
this unit
Activate the BLUETOOTH function on the
BLUETOOTH device.
To connect with the audio device, press
SOURCE
To connect with the cellular phone, press
Note
While streaming BLUETOOTH audio, you cannot connect
from this unit to the cellular phone. Connect from the
cellular phone to this unit instead.
Tip
With BLUETOOTH signal on: when the ignition is turned
to on, this unit reconnects automatically to the lastconnected cellular phone.
to select [BT AUDIO].
.
To install the microphone
For details, see “Installing the microphone (CDE205DAB/ UTE-204DAB only)” (page39).
Connecting with an iPhone/iPod
(BLUETOOTH Auto Pairing)
When an iPhone/iPod with iOS5 or later installed
is connected to the USB port, the unit is paired
and connected with the iPhone/iPod
automatically.
To enable BLUETOOTH Auto Pairing, make sure
[AUTO PAIR] in [BLUETOOTH] is set to [ON] (page
24).
1 Activate the BLUETOOTH function on the
iPhone/iPod.
2 Connect an iPhone/iPod to the USB port.
Make sure that lights up on the display of
the unit.
Notes
• BLUETOOTH Auto Pairing is not possible if the unit is
already connected to two BLUETOOTH devices. In this
case, disconnect either device, then connect the
iPhone/iPod again.
• If BLUETOOTH Auto Pairing is not established, see
“Preparing a BLUETOOTH Device (CDE-205DAB/ UTE204DAB only)” (page10).
11-EN
Page 12
Connecting a USB Device
1 Turn down the volume on the unit.
2 Connect the USB device to the unit.
To connect an iPod/iPhone, use the USB
connection cable for iPod (not supplied).
Connecting Other Portable Audio
Device
1 Turn off the portable audio device.
2 Turn down the volume on the unit.
3 Connect the portable audio device to the
AUX input jack (stereo mini jack) on the
unit with a connecting cord (not
supplied)*.
* Be sure to use a straight type plug.
Listening to the Radio
Listening to the Radio
To listen to the radio, press SOURCE to select
[TUNER].
When the DAB band is selected for the first time
after replacing the car battery or changing the
connections, the initial scan starts automatically.
Allow the initial scan to finish. (If interrupted, the
initial scan will start again the next time you
select the DAB band.) If no DAB station is stored
by the initial scan, perform an auto scan (page
13).
Tip
Set [DAB ANT-PWR] to [ON] (default) or [OFF] depending
on the type of DAB antenna (aerial) (page 22).
Receiving DAB
DAB (Digital Audio Broadcasting) is a
transmission system on terrestrial networks. DAB
stations bundle radio programs (“services”) into
an ensemble, and each service contains one or
more components. The same service can
sometimes be received on different frequencies.
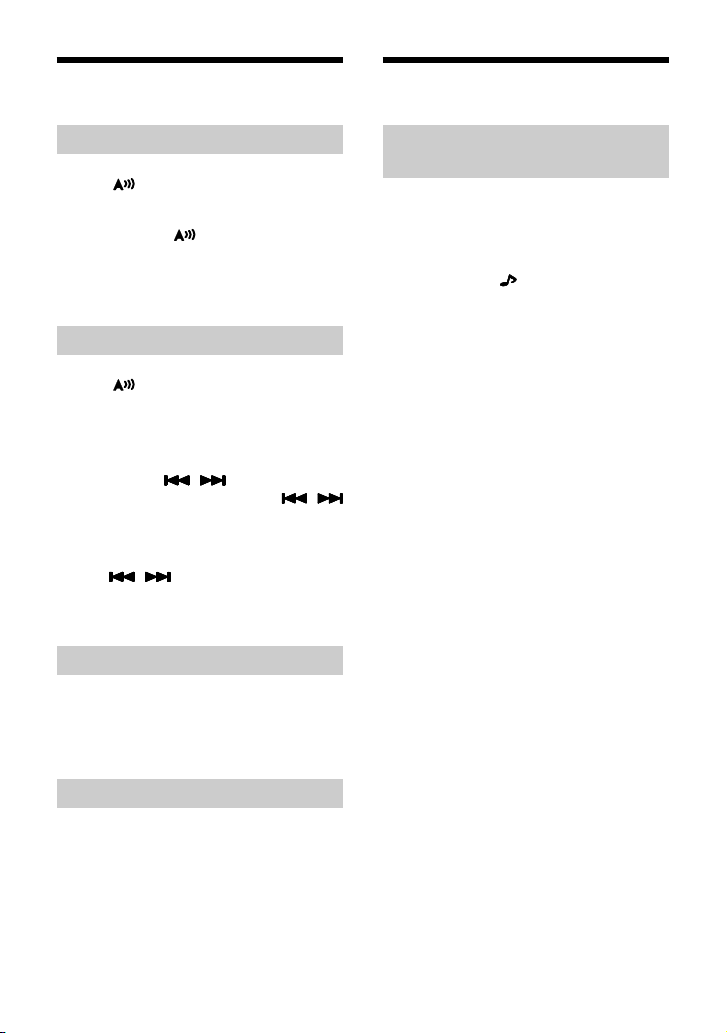
Searching for a service manually
4 Press SOURCE to select [AUX].
To match the volume level of the
connected device to other sources
Start playback of the portable audio device at a
moderate volume, and set your usual listening
volume on the unit.
Press and hold
then select [AUDIO]
12-EN
/SETUP for at least 2 seconds,
[AUX VOL] (page 23).
1 Press /A.ME to select [DB1], [DB2] or
[DB3].
2 Press / to search within an
ensemble for a service; press and hold
/ to search for different
ensembles.
Scanning stops when the unit receives a
service/ensemble. Search until the desired
service is received.
Storing a service manually
1 While receiving the service that you want
to store, press and hold a number button
(1 to 6) until [MEM] appears.
Page 13
Receiving stored services
1 After selecting the desired band, press a
number button (1 to 6).
Searching for a service by name
You can display a list of services for easy
searching.
1 Press (browse) to display the list of
services, then press it.
2 Rotate the control dial to select the
desired service, then press it.
Reception starts.
To exit the browse mode
Press (back).
Setting DAB announcements
If you enable DAB announcements, DAB
announcements can interrupt the currently
selected source.
1 Press and hold /SETUP for at least 2
seconds, rotate the control dial to select
[GENERAL], then press it.
2 Rotate the control dial to select [DAB
ANNOUNCE], then press it.
3 Rotate the control dial to select
[ANNOUNCE ON] or [ANNOUNCE OFF],
then press it.
Note
During a DAB announcement, the volume is adjusted to
the level set for TA in RDS (page 14).
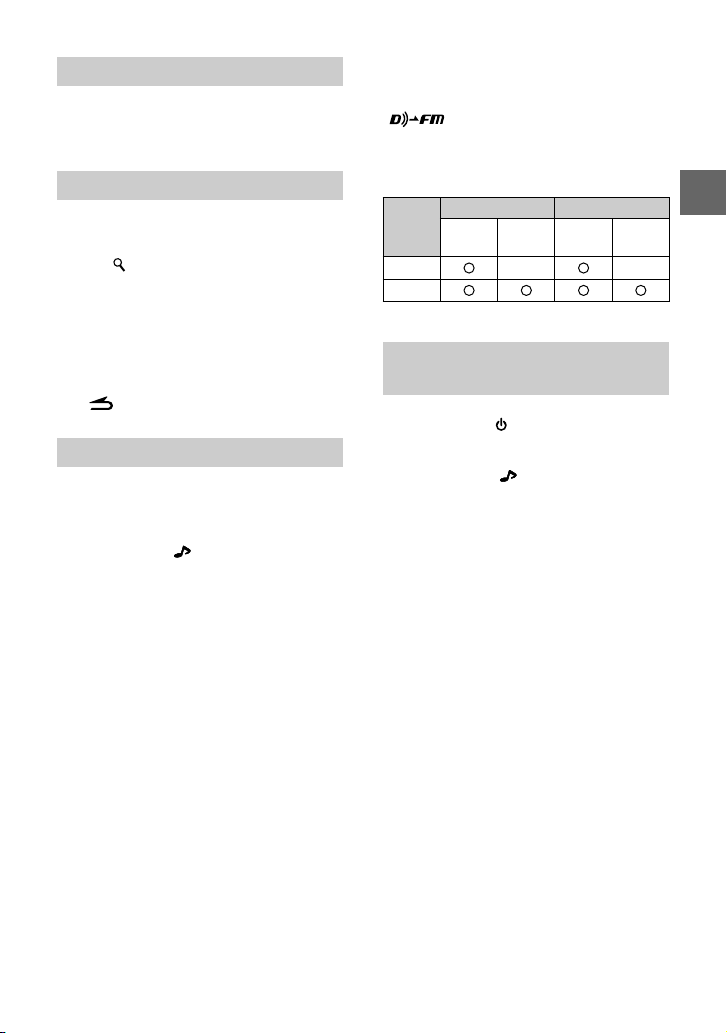
To listen to the same or similar program
even during weak reception
Set [DAB SOFTLINK] to [ON] (page 22).
[
FM program is being received.
“Hard Link” follows the same program, and “Soft
Link” follows a similar program.
] lights up when the corresponding
SOFT
LINK
OFF
ON
DAB FM
Hard
Soft
Link
Link
Hard
Link
Soft
Link
Updating the service list automatically
(Auto scan)
1 Press SOURCE to select [DB1], [DB2] or
[DB3].
2 Press and hold /SETUP for at least 2
seconds, rotate the control dial to select
[GENERAL], then press it.
3 Rotate the control dial to select [AUTO
SCAN], then press it.
The unit updates the list of services in browse
mode.
13-EN
Page 14
Using FM/MW/LW
Using Radio Data System (RDS)
Storing automatically
1 Press /A.ME to change the band (FM1,
FM2, FM3, MW or LW).
2 Press and hold /A.ME for at least 2
seconds.
The unit stores stations in order of frequency
on the number buttons.
Tuning
1 Press /A.ME to change the band (FM1,
FM2, MW or LW).
2 Perform tuning.
To tune manually
Press and hold
approximate frequency, then press
repeatedly to fine adjust to the desired
frequency.
To tune automatically
Press
Scanning stops when the unit receives a
station.
Storing manually
/ to locate the
/
/ .
1 While receiving the station that you want
to store, press and hold a number button
(1 to 6) until [MEM] appears.
Receiving the stored stations
1 Select the band, then press a number
button (1 to 6).
Setting alternative frequencies (AF)
and traffic announcement (TA)
AF continuously retunes the station to the
strongest signal in a network, and TA provides
current traffic information or traffic programs
(TP) if received.
1 Press and hold /SETUP for at least 2
seconds, rotate the control dial to select
[GENERAL], then press it.
2 Rotate the control dial to select [AF/TA],
then press it.
3 Rotate the control dial to select [AF ON],
[TA ON], [AF/TA ON] or [AF/TA OFF], then
press it.
To store RDS stations with the AF and TA
setting
You can preset RDS stations along with an AF/TA
setting. Set AF/TA, then store the station
automatically or manually. If you preset
manually, you can also preset non-RDS stations.
To receive emergency announcements
With AF or TA on, emergency announcements
will automatically interrupt the currently
selected source.
To adjust the volume level during a traffic
announcement
Level will be stored into memory for subsequent
traffic announcements, independently from the
regular volume level.
To stay with one regional program
(REGIONAL)
When the AF and REGIONAL functions are on,
you will not be switched to another regional
station with a stronger frequency. If you leave
this regional program’s reception area, set
[REGIONAL OFF] in [GENERAL] during FM
reception (page 22).
This function does not work in the UK and some
other areas.
14-EN
Page 15

Local Link function (UK only)
This function enables you to select other local
stations in the area, even if they are not stored on
your number buttons.
During FM reception, press a number button (1
to 6) on which a local station is stored. Within 5
seconds, press again a number button of the
local station. Repeat this procedure until the
local station is received.
Selecting program types (PTY )
Use PTY to display or search for a desired
program type.
1 Press (browse) to display the list of
program types.
If you press (browse) during DAB reception,
the list of services is displayed.
If you rotate the control dial while the list of
services is being displayed, the display is
switched to the list of program types.
2 Rotate the control dial until the desired
program type appears, then press it.
The unit starts to search for a station
broadcasting the selected program type.
Type of programs
NONE (No Program Type)*, NEWS (News),
AFFAIRS (Current Affairs), INFO (Information),
SPORT (Sports), EDUCATE (Education), DRAMA
(Drama), CULTURE (Culture), SCIENCE (Science),
VARIED (Varied), POP M (Pop Music), ROCK M
(Rock Music), EASY M (M.O.R. Music), LIGHT M
(Light classical), CLASSICS (Serious classical),
OTHER M (Other Music), WEATHER ( Weather),
FINANCE (Finance), CHILDREN (Children’s
program), SOCIAL A (Social Affairs), RELIGION
(Religion), PHONE IN (Phone In), TRAVEL (Travel),
LEISURE (Leisure), JAZZ (Jazz Music), COUNTRY
(Country Music), NATION M (National Music),
OLDIES (Oldies Music), FOLK M (Folk Music),
DOCUMENT (Documentary)
Setting clock time (RDS CT)
The CT data from the RDS transmission sets the
clock.
1 Set [RDS CT ON] in [GENERAL]
(page 22).
* May appear depending on the service during DAB
reception.
15-EN
Page 16

Playback
Playing a Disc (CDE-205DAB only)
1 Insert the disc (label side up).
Playback starts automatically.
Playing a USB Device
In these Operating Instructions, “iPod” is used as
a general reference for the iPod functions on an
iPod and iPhone, unless otherwise specified by
the text or illustrations.
For details on the compatibility of your iPod, see
“About iPod” (page26).
AOA (Android Open Accessory) 2.0, MSC (Mass
Storage Class) and MTP (Media Transfer Protocol)
type USB devices* compliant with the USB
standard can be used. Depending on the USB
device, the Android mode or MSC/MTP mode
can be selected on the unit.
Some digital media players or Android
smartphones may require setting to MTP mode.
* e.g., a USB flash drive, digital media player, Android
smartphone
Notes
• For details on the compatibility of your USB device,
consult your nearest Alpine dealer.
• Smartphones with Android OS 4.1 or higher installed
support Android Open Accessory 2.0 (AOA 2.0).
However, some smartphones may not fully support
AOA 2.0 even if Android OS 4.1 or higher is installed.
For details on the compatibility of your Android
smartphone, consult your nearest Alpine dealer.
• Playback of the following files is not supported.
MP3/WMA/FLAC/AAC:
– copyright-protected files
– DRM (Digital Rights Management) files
– Multi-channel audio files
MP3/WMA/AAC:
– lossless compression files
Before making a connection, select the USB
mode (Android mode or MSC/MTP mode)
depending on the USB device (page 22).
1 Connect a USB device to the USB port
(page 12).
Playback starts.
If a device is already connected, to start
playback, press SOURCE
([IPD] appears in the display when the iPod is
recognized).
to select [USB]
2 Adjust the volume on this unit.
To stop playback
Press and hold SLEEP for 2 seconds.
To remove the device
Stop playback, then remove the device.
Caution for iPhone
When you connect an iPhone via USB, phone call
volume is controlled by the iPhone, not the unit.
Do not inadvertently increase the volume on the
unit during a call, as a sudden loud sound may
result when the call ends.
Playing a BLUETOOTH Device
(CDE-205DAB/ UTE-204DAB only)
You can play contents on a connected device
that supports BLUETOOTH A2DP (Advanced
Audio Distribution Profile).
1 Make BLUETOOTH connection with the
audio device (page 10).
To select the audio device, press and hold /
SETUP for at least 2 seconds, then select
[BLUETOOTH]
[AUDIO DEVICE] (page 24).
16-EN
Page 17

2 Press SOURCE to select [BT AUDIO].
3 Operate the audio device to start
playback.
4 Adjust the volume on this unit.
Notes
• Depending on the audio device, information such as
title, track number/time and playback status may not
be displayed on this unit.
• Even if the source is changed on this unit, playback of
the audio device does not stop.
To match the volume level of the
BLUETOOTH device to other sources
Start playback of the BLUETOOTH audio device at
a moderate volume, and set your usual listening
volume on the unit.
Press and hold
then select [AUDIO]
/SETUP for at least 2 seconds,
[BTA VOL] (page 23).
Searching and Playing Tracks
Repeat play and shuffle play
Not available when a USB device in Android
mode is connected.
1 During playback, press (repeat) or
(shuffle) repeatedly to select the
desired play mode.
Playback in the selected play mode may take
time to start.
Available play modes differ depending on the
selected sound source.
Searching a track by name
Not available when a USB device in Android
mode or iPod is connected.
1 During CD or USB playback, press
(browse) to display the list of search
categories.
When the track list appears, press (back)
repeatedly to display the desired search
category.
2 Rotate the control dial to select the
desired search category, then press it to
confirm.
3 Repeat step 2 to search the desired track.
Playback starts.
Searching by skipping items
(Jump mode)
Not available when a USB device in Android
mode or iPod is connected.
1 Press (browse).
2 Press .
3 Rotate the control dial to select the item.
The list is jumped in steps of 10% of the total
number of items.
4 Press ENTER to return to the browse
mode.
The selected item appears.
5 Rotate the control dial to select the
desired item, then press it.
Playback starts.
17-EN
Page 18

Handsfree Calling (via
BLUETOOTH only) (CDE205DAB/ UTE-204DAB only)
To use a cellular phone, connect it with this unit.
You can connect two cellular phones to the unit.
For details, see “Preparing a BLUETOOTH Device
(CDE-205DAB/ UTE-204DAB only)” (page10).
Receiving a Call
1 Press when a call is received with a
ringtone.
The phone call starts.
Note
The ringtone and talker’s voice are output only from the
front speakers.
To reject the call
Press and hold SLEEP for 2 seconds.
To end the call
Press again.
2 Rotate the control dial to select [PHONE
BOOK], then press it.
3 Rotate the control dial to select an initial
from the initial list, then press it.
4 Rotate the control dial to select a name
from the name list, then press it.
5 Rotate the control dial to select a
number from the number list, then press
it.
The phone call starts.
From the call history
1 Press .
When two cellular phones are connected to
the unit, rotate the control dial to select
either phone, then press it.
2 Rotate the control dial to select
[HISTORY], then press it.
A list of the call history appears.
3 Rotate the control dial to select a name
or phone number from the call history,
then press it.
The phone call starts.
By phone number input
Making a Call
You can make a call from the phonebook or call
history when a cellular phone supporting PBAP
(Phone Book Access Profile) is connected.
When two cellular phones are connected to the
unit, select either phone.
From the phonebook
1 Press .
When two cellular phones are connected to
the unit, rotate the control dial to select
either phone, then press it.
18-EN
1 Press .
When two cellular phones are connected to
the unit, rotate the control dial to select
either phone, then press it.
2 Rotate the control dial to select [DIAL
NUMBER], then press it.
3 Rotate the control dial to enter the
phone number, and lastly select [ ]
(space), then press ENTER*.
The phone call starts.
* To move the digital indication, press / .
Note
[_] appears instead of [#] on the display.
Page 19

By redial
1 Press .
When two cellular phones are connected to
the unit, rotate the control dial to select
either phone, then press it.
2 Rotate the control dial to select [REDIAL],
then press it.
The phone call starts.
By voice tags
You can make a call by saying the voice tag
stored in a connected cellular phone that has a
voice dialing function.
1 Press .
When two cellular phones are connected to
the unit, rotate the control dial to select
either phone, then press it.
2 Rotate the control dial to select [VOICE
DIAL], then press it.
Alternatively, press VOICE.
3 Say the voice tag stored on the cellular
phone.
Your voice is recognized, and the call is made.
To cancel voice dialing
Press VOICE.
To reduce echo and noise (Echo Canceler/
Noise Canceler Mode)
Press and hold MIC.
Settable mode: [BTP EC/NC 1], [BTP EC/NC 2].
To switch between handsfree mode and
handheld mode
During a call, press /A.ME to switch the
phone call audio between the unit and cellular
phone.
Note
Depending on the cellular phone, this operation may not
be available.
Available Operations during Call
To adjust the ringtone volume
Rotate the control dial while receiving a call.
To adjust the talker’s voice volume
Rotate the control dial during a call.
To adjust the volume for the other party
(Mic gain adjustment)
Press MIC.
Adjustable volume levels: [MIC GAIN LOW], [MIC
GAIN MID], [MIC GAIN HI].
19-EN
Page 20

Useful Functions
Adjusting Bass Level/ Mid Level/
Tr
eble Level/ Subwoofer Level/
Balance (Between Left and
Right)/ Fader (Between Front
and Rear)
1 Press /SETUP.
2 Rotate the control dial to adjust the each
mode, then press it.
Each press changes the mode as follows:
MID TREBLE SUBW BALANCE
BASS
FADER
Bass Level -7 to +7
Mid Level -7 to +7
Treble Level -7 to +7
Subwoofer Level OFF to 0 to +15
Balance L15 to R15
Fader R15 to F15
3 Press /SETUP to return the normal
mode.
Notes
• If no operation is performed for 5 seconds, the unit
automatically returns to normal mode.
• When Bass/Mid/Treble/Subwoofer Level is adjusted,
BASS ENGINE SQ is set to [OFF] (page 20).
Setting the BASS ENGINE SQ
Creating the ideal Bass impact for your musical
taste using BASS ENGINE SQ.
1 Press .
2 Rotate the control dial to adjust [BASS
ENG], then press it.
Setting contents: [OFF], [1]-[6]
Note
When Bass/Mid/Treble/Subwoofer Level is adjusted, BASS
ENGINE SQ is set to [OFF] (page 20).
Using Siri Eyes Free (CDE205DAB/ UTE-204DAB only)
Siri Eyes Free allows you to use an iPhone
handsfree by simply speaking into the
microphone. This function requires you to
connect an iPhone to the unit via BLUETOOTH.
Availability is limited to iPhone 4s or later. Make
sure that your iPhone is running the latest iOS
version.
You must complete BLUETOOTH registration and
connection configurations for the iPhone with
the unit in advance. For details, see “Preparing a
BLUETOOTH Device (CDE-205DAB/ UTE-204DAB
only)” (page10). To select the iPhone, press
and hold
select [BLUETOOTH]
24).
1 Activate the Siri function on the iPhone.
2 Press VOICE.
3 After the iPhone beeps, speak into the
To deactivate Siri Eyes Free
Press VOICE.
Notes
• The iPhone may not recognize your voice depending
on usage conditions. (For example, if you are in a
moving car.)
• Siri Eyes Free may not function properly, or the
response time may lag in locations where iPhone
signals are difficult to receive.
• Depending on the iPhone’s operating condition, Siri
Eyes Free may not function properly, or may quit.
• If you play a track with an iPhone using the BLUETOOTH
audio connection, when the track starts playback via
BLUETOOTH, Siri Eyes Free automatically quits and the
unit switches to the BLUETOOTH audio source.
• When Siri Eyes Free is activated during audio playback,
the unit may switch to the BLUETOOTH audio source
even if you do not specify a track to play.
• When connecting the iPhone to the USB port, Siri Eyes
Free may not function properly, or may quit.
/SETUP for at least 2 seconds, then
[AUDIO DEVICE] (page
For details, refer to the operating instructions
supplied with the iPhone.
The voice command display appears.
microphone.
The iPhone beeps again, then Siri starts
responding.
20-EN
Page 21

• When connecting the iPhone to the unit via USB, do
not activate Siri with the iPhone. Siri Eyes Free may not
function properly, or may quit.
• There is no audio sound while Siri Eyes Free is activated.
21-EN
Page 22

Settings
Canceling the DEMO Mode
You can cancel the demonstration display which
appears when the source is off and the clock is
displayed.
1 Press and hold /SETUP for at least 2
seconds, rotate the control dial to select
[GENERAL], then press it.
2 Rotate the control dial to select [DEMO
MODE], then press it.
3 Rotate the control dial to select [DEMO
OFF], then press it.
The setting is complete.
4 Press (back) twice.
The display returns to normal reception/play
mode.
Basic Setting Operation
You can set items in the following setup
categories:
General setup (GENERAL), Audio setup (AUDIO),
Display setup (DISPLAY), BLUETOOTH setup
(BLUETOOTH)
1 Press and hold /SETUP for at least 2
seconds.
2 Rotate the control dial to select the setup
category, then press it.
The items that can be set differ depending on
the source and settings.
3 Rotate the control dial to select the
options, then press it.
To return to the previous display
Press (back).
22-EN
General Setup (GENERAL)
DEMO MODE (demonstration)
Activates the demonstration: [ON], [OFF].
CLOCK ADJ (clock adjust) (page 9)
CAUTION ALM (caution alarm)
Activates the caution alarm: [ON], [OFF] (page
9).
(Available only while the source is off and the
clock is displayed.)
BEEP
Activates the beep sound: [ON], [OFF].
AUTO OFF
Shuts off automatically after a desired time
when the unit is turned off: [ON] (30 minutes),
[OFF].
USB MODE
Changes the USB mode: [MSC/MTP],
[ANDROID].
(Available only when the USB source is
selected.)
RDS CT (clock time)
Activates the CT function: [ON], [OFF].
AF/TA (alternative frequencies/traffic
announcement)
Selects the alternative frequencies (AF) and
traffic announcement (TA) setting: [AF ON],
[TA ON], [AF/TA ON], [AF/TA OFF].
RDS REGIONAL
Restricts reception to a specific region: [ON],
[OFF].
(Available only when FM is received.)
DAB ANNOUNCE (DAB announcement)
Enables broadcast announcements: [ON],
[OFF].
DAB SOFTLINK
Searches for and tunes to the similar program
automatically when the signal of the current
program is too weak to receive: [ON], [OFF].
(Available only during DAB reception.)
DAB ANT-PWR (DAB antenna power)
Supplies power to the DAB antenna (aerial)
input terminal: [ON], [OFF]. (Available only
when the unit is turned off or during DAB
reception.)
Page 23

AUTO SCAN
Performs an auto scan to update the list of
services in browse mode. (Available only
during DAB reception.)
FIRMWARE
(Available only while the source is off and the
clock is displayed.)
Checks/updates the firmware version. For
details, consult your nearest Alpine dealer.
FW VERSION (firmware version)
Displays current firmware version.
FW UPDATE (firmware update)
Enters firmware update process: [YES], [NO].
Updating the firmware takes a few minutes to
complete. During the update, do not turn the
ignition to the OFF position, nor remove the
USB device.
Audio Setup (AUDIO)
This setup menu is not available when the source
is off and the clock is displayed.
EQ PRESET
Selects an equalizer curve from 10 equalizer
curves or off:
[USER], [FLAT](OFF), [POPS], [ROCK], [NEWS],
[JAZZ], [ELEC DANCE], [HIP HOP], [EASY LIS],
[COUNTRY], [CLASSICAL].
The equalizer curve setting can be memorized
for each source.
3BAND PEQ (3Band Parametric Equalizer)
Adjusts WIDTH, FREQUENCY and LEVEL for
each after BAND is selected.
BAND: [BASS], [MID], [TREBLE].
Setting contents: [WIDTH <Q>], [CENTER
FREQ], [LEVEL].
BALANCE
Adjusts the sound balance: [R 15] – [0] – [L 15].
FADER
Adjusts the relative level: [F 15] – [0] – [R 15].
SUBWOOFER
SUBW LEVEL (subwoofer level)
Adjusts the subwoofer volume level:
[OFF], [0] - [+15].
SUBW PHASE (subwoofer phase)
Selects the subwoofer phase: [NORMAL],
[REVERSE].
LPF FREQ (low pass filter frequency)
Selects the subwoofer cut-off frequency:
[80Hz], [100Hz], [120Hz].
HPF FREQ (high pass filter frequency)
Selects the front/rear speaker cut-off
frequency: [OFF], [80Hz], [100Hz], [120Hz].
AUX VOL (AUX volume level)
Adjusts the volume level for each connected
auxiliary device: [+18 dB] – [0 dB] – [-8 dB].
This setting negates the need to adjust the
volume level between sources.
(Available only when the AUX is selected.)
BTA VOL (BLUETOOTH audio volume level) (CDE205DAB/ UTE-204DAB only)
Adjusts the volume level for each connected
BLUETOOTH device: [+6 dB] – [0 dB] – [-6 dB].
This setting negates the need to adjust the
volume level between sources.
(Available only when the BT audio is selected.)
Display Setup (DISPLAY)
BLACK OUT
If no operation is performed for a while with
[ON] set, the display disappears automatically.
Activates the black out: [ON], [OFF].
DIMMER
Changes the display brightness:
[OFF], [ON], [AUTO], [CLOCK].
([AUTO] is available only when the
illumination control lead is connected, and
the head light is turned on.)
To set this function to be active only during a
fixed period, select [CLOCK], then set the start
and end times.
– To set the brightness when the dimmer
function is activated:
Set [DIMMER] to [ON], then adjust
[BRIGHTNESS].
– To set the brightness when the dimmer
function is deactivated:
Set [DIMMER] to [OFF], then adjust
[BRIGHTNESS].
23-EN
Page 24

The brightness setting is stored and applied
when the dimmer function is activated or
deactivated.
BRIGHTNESS
Adjusts the display brightness. The brightness
level is adjustable: [1] – [10].
KEY COLOR
Sets a preset color or customized color for the
buttons.
OPTION
Selects from 10 presets colors, 1 customized
color.
CUSTOMIZE
Registers a customized color for the buttons.
RGB RED, RGB GREEN, RGB BLUE
Adjustable color range: [0] – [32]
([0] cannot be set for all color ranges).
DISP COLOR (display color)
Sets a preset color or customized color for the
display.
OPTION
Selects from 10 presets colors, 1 customized
color.
CUSTOMIZE
Registers a customized color for the display.
RGB RED, RGB GREEN, RGB BLUE
Adjustable color range: [0] – [32] ([0]
cannot be set for all color ranges).
TEXT SCROLL
Scrolls long items automatically: [ON], [OFF].
(Not available when the AUX or tuner is
selected.)
AUDIO DEVICE
Selects the audio device.
[*] appears on the device paired with [DEVICE
1] or the current A2DP compatible audio
device .
RINGTONE
Selects whether this unit or the connected
cellular phone outputs the ringtone: [1] (this
unit), [2] (cellular phone).
AUTO ANSWER
Sets this unit to answer an incoming call
automatically: [OFF], [1] (about 3 seconds), [2]
(about 10 seconds) .
AUTO PAIR (auto pairing)
Starts BLUETOOTH pairing automatically
when iOS device version 5.0 or later is
connected via USB: [ON], [OFF].
BT IN (page 11)
Activates/deactivates the BLUETOOTH
function.
BT INITIAL (BLUETOOTH initialize)
Initializes all the BLUETOOTH related settings
(pairing information, preset number, device
information, etc.): [YES], [NO].
When disposing the unit, initialize all the
settings.
(Available only while the source is off and the
clock is displayed.)
BLUETOOTH Setup (BLUETOOTH)
(CDE-205DAB/ UTE-204DAB only)
PAIRING (page 10)
Connects up to two BLUETOOTH devices:
[DEVICE 1], [DEVICE 2].
[DEVICE 1] or [DEVICE 2] will be changed to
the paired device name after pairing is
complete .
24-EN
Page 25

Additional Information
Updating the Firmware
To update the firmware, visit the Alpine website.
http://www.alpine-europe.com
Notes
• Using a USB device (not supplied) is required for
updating the firmware. Store the updater in the USB
device, and connect the device to the USB port, then
perform the update operation.
• Updating the firmware takes a few minutes to
complete. During the update, do not turn the ignition
to the OFF position, nor remove the USB device.
Precautions
• Cool off the unit beforehand if your car has
been parked in direct sunlight.
• Do not leave the front panel or audio devices
brought in inside the car, or it may cause
malfunction due to high temperature in direct
sunlight.
• Power antenna (aerial) extends automatically.
Moisture condensation
Should moisture condensation occur inside the
unit, remove the disc and wait for about an hour
for it to dry out; otherwise the unit will not
operate properly.
To maintain high sound quality
Do not splash liquid onto the unit or discs.
• This unit is designed to play discs that conform
to the Compact Disc (CD) standard. DualDiscs
and some of the music discs encoded with
copyright protection technologies do not
conform to the Compact Disc (CD) standard,
therefore, these discs may not be playable by
this unit.
• Discs that this unit CANNOT play
– Discs with labels, stickers, or sticky tape or
paper attached. Doing so may cause a
malfunction, or may ruin the disc.
– Discs with non-standard shapes (e.g., heart,
square, star). Attempting to do so may
damage the unit.
– 8 cm (3 / in) discs.
Notes on CD-R/CD-RW discs
• If the multi-session disc begins with a CD-DA
session, it is recognized as a CD-DA disc, and
other sessions are not played.
• Discs that this unit CANNOT play
– CD-R/CD-RW of poor recording quality.
– CD-R/CD-RW recorded with an incompatible
recording device.
– CD-R/CD-RW which is finalized incorrectly.
– CD-R/CD-RW other than those recorded in
music CD format or MP3 format conforming
to ISO9660 Level 1/Level 2, Joliet/Romeo or
multi-session.
Playback order of audio files
Folder (album)
Audio file (track)
Notes on discs (CDE-205DAB only)
• Do not expose discs to direct sunlight or heat
sources such as hot air ducts, nor leave it in a
car parked in direct sunlight.
• Before playing, wipe the
discs with a cleaning
cloth from the center
out. Do not use solvents
such as benzine, thinner,
commercially available
cleaners.
25-EN
Page 26

About iPod
• You can connect to the following iPod models.
Update your iPod devices to the latest software
before use.
Compatible iPhone/iPod models
Compatible Model Bluetooth®* USB
iPhone 7
iPhone 7 Plus
iPhone SE
iPhone 6s
iPhone 6s Plus
iPhone 6
iPhone 6 Plus
iPhone 5s
iPhone 5c
iPhone 5
iPhone 4s
iPod touch
(6th generation)
iPod touch
(5th generation)
iPod nano
(7th generation)
* CDE-205DAB/ UTE-204DAB only
Maintenance
Clea ning the connectors
The unit may not function properly if the
connectors between the unit and the front panel
are not clean. In order to prevent this, detach the
front panel (page 9) and clean the connectors
with a cotton swab. Do not apply too much force.
Otherwise, the connectors may be damaged.
Notes
• For safety, turn off the ignition before cleaning the
connectors, and remove the key from the ignition
switch.
• Never touch the connectors directly with your fingers
or with any metal device.
• Use of the Made for Apple badge means that an
accessory has been designed to connect
specifically to the Apple product(s) identified in
the badge, and has been certified by the
developer to meet Apple performance
standards. Apple is not responsible for the
operation of this device or its compliance with
safety and regulatory standards.
Please note that the use of this accessory with
an Apple product may affect wireless
performance.
If you have any questions or problems
concerning your unit that are not covered in this
manual, consult your nearest Alpine dealer.
26-EN
Page 27

Specifications
Tuner section
DAB/DAB+/DMB-R
Tuning range: 174.928 MHz – 239.200 MHz
Antenna (aerial) terminal:
External antenna (aerial) connector
FM
Tuning range: 87.5 MHz – 108.0 MHz
Antenna (aerial) terminal:
External antenna (aerial) connector
Intermediate frequency:
FM CCIR: -1,956.5 kHz to -487.3 kHz and
+500.0 kHz to +2,095.4 kHz
Usable sensitivity: 7 dBf
Selectivity: 75 dB at 400 kHz
Signal-to-noise ratio: 73 dB
Separation: 50 dB at 1 kHz
Frequency response: 20 Hz – 15,000 Hz
MW/LW
Tuning range:
MW: 531 kHz – 1,602 kHz
LW: 153 kHz – 279 kHz
Antenna (aerial) terminal:
External antenna (aerial) connector
Sensitivity: MW: 26 V, LW: 50 V
CD Player section (CDE-205DAB only)
Signal-to-noise ratio: 95 dB
Frequency response: 20 Hz – 20,000 Hz
Wow and flutter: Below measurable limit
Maximum number*
Folders (albums)*
Files (tracks) and folders*
Displayable characters for a folder/file name:
32 (Joliet)/64 (Romeo)
Corresponding codec: MP3 (.mp3), WMA (.wma)
and AAC (.m4a)
*1 CD-R/CD-RW only
*2 including the root folder
*3 may be less than the measured value if folder/
file names contain many characters
1
of:
2
: 150
3
: 300
USB Player section
Interface: USB (Full-speed)
Maximum current: 1 A
The maximum number of recognizable tracks:
– folders (albums): 256
– files (tracks) per folder: 256
Compatible Android Open Accessory protocol
(AOA): 2.0
Corresponding codec:
MP3 (.mp3)
Bit rate: 8 kbps – 320 kbps (Supports VBR
(Variable Bit Rate))
Sampling rate: 16 kHz – 48 kHz
WMA (.wma)
Bit rate: 32 kbps – 192 kbps (Supports VBR
(Variable Bit Rate))
Sampling rate: 32 kHz, 44.1 kHz,
48 kHz
FLAC (.flac)
Bit depth: 16 bit, 24 bit
Sampling rate: 44.1 kHz, 48 kHz
AAC (.m4a)
Bit rate: 8 kbps – 320 kbps
Sampling rate: 11.025 kHz – 48 kHz
Wireless Communication (CDE-205DAB/ UTE204DAB only)
Communication System:
BLUETOOTH Standard version 3.0
Output:
BLUETOOTH Standard Power Class 2
(Conducted MAX +1 dBm)
Maximum communication range:
Line of sight approx. 10 m (33 ft)*
Frequency band:
2.4 GHz band
(2.4000 GHz – 2.4835 GHz)
Modulation method: FHSS
Compatible BLUETOOTH Profiles*
A2DP (Advanced Audio Distribution Profile)
1.3
AVRCP (Audio Video Remote Control Profile)
1.3
HFP (Handsfree Profile) 1.6
PBAP (Phone Book Access Profile)
SPP (Serial Port Profile)
1
2
:
27-EN
Page 28

Corresponding codec:
SBC (.sbc), AAC (.m4a)
*1 The actual range will vary depending on factors such
as obstacles between devices, magnetic fields around
a microwave oven, static electricity, reception
sensitivity, antenna (aerial)’s performance, operating
system, software application, etc.
*2 BLUETOOTH standard profiles indicate the purpose of
BLUETOOTH communication between devices.
CAUTION
(CDE-205DAB only)
Power amplifier section
Output: Speaker outputs
Speaker impedance: 4 – 8
Maximum power output: 50 W × 4 (at 4 )
General
Outputs:
Audio outputs terminal:
CDE-205DAB/ UTE-204DAB: FRONT, REAR,
SUB
UTE-202DAB: FRONT, SUB
Power requirements: 12 V DC car battery
(negative ground (earth))
Rated current consumption: 10 A
Dimensions:
Approx. 178 mm × 50 mm × 177 mm
(7 / in × 2 in × 7 in) (w/h/d)
Mounting dimensions:
Approx. 182 mm × 53 mm × 159 mm
(7 / in × 2 / in × 6 / in) (w/h/d)
Mass:
CDE-205DAB: Approx. 1.2 kg (2 lb 11 oz)
UTE-204DAB/ UTE-202DAB:
Approx. 0.8 kg (1 lb 12 oz)
Package contents:
Main unit (1)
Microphone (1) (CDE-205DAB/ UTE-204DAB
only)
Parts for installation and connections (1 set)
Your dealer may not handle some of the above
listed accessories. Please ask the dealer for
detailed information.
Design and specifications are subject to change
without notice.
Copyrights
The Bluetooth® word mark and logos are
registered trademarks owned by Bluetooth SIG,
Inc. and any use of such marks by Alpine
Electronics, Inc. is under license.
Windows Media and the Windows logo are
trademarks, or registered trademarks of
Microsoft Corporation in the United States and/
or other countries.
This product is protected by certain intellectual
property rights of Microsoft Corporation. Use or
distribution of such technology outside of this
product is prohibited without a license from
Microsoft or an authorized Microsoft subsidiary.
Apple, iPhone, iPod, iPod nano, iPod touch, and
Siri are trademarks of Apple Inc., registered in the
U.S. and other countries.
MPEG Layer-3 audio coding technology and
patents licensed from Fraunhofer IIS and
Thomson.
Google, Google Play and Android are trademarks
of Google LLC.
libFLAC
Copyright (C) 2000-2009 Josh Coalson
Copyright (C) 2011-2013 Xiph.Org Foundation
Redistribution and use in source and binary
forms, with or without modification, are
permitted provided that the following conditions
are met:
– Redistributions of source code must retain the
above copyright notice, this list of conditions
and the following disclaimer.
28-EN
Page 29

– Redistributions in binary form must reproduce
the above copyright notice, this list of
conditions and the following disclaimer in the
documentation and/or other materials
provided with the distribution.
– Neither the name of the Xiph.org Foundation
nor the names of its contributors may be used
to endorse or promote products derived from
this software without specific prior written
permission.
THIS SOFTWARE IS PROVIDED BY THE COPYRIGHT
HOLDERS AND CONTRIBUTORS “AS IS” AND ANY
EXPRESS OR IMPLIED WARRANTIES, INCLUDING,
BUT NOT LIMITED TO, THE IMPLIED WARRANTIES
OF MERCHANTABILITY AND FITNESS FOR A
PARTICULAR PURPOSE ARE DISCLAIMED. IN NO
EVENT SHALL THE FOUNDATION OR
CONTRIBUTORS BE LIABLE FOR ANY DIRECT,
INDIRECT, INCIDENTAL, SPECIAL, EXEMPLARY, OR
CONSEQUENTIAL DAMAGES (INCLUDING, BUT
NOT LIMITED TO, PROCUREMENT OF SUBSTITUTE
GOODS OR SERVICES; LOSS OF USE, DATA, OR
PROFITS; OR BUSINESS INTERRUPTION)
HOWEVER CAUSED AND ON ANY THEORY OF
LIABILITY, WHETHER IN CONTRACT, STRICT
LIABILITY, OR TORT (INCLUDING NEGLIGENCE OR
OTHERWISE) ARISING IN ANY WAY OUT OF THE
USE OF THIS SOFTWARE, EVEN IF ADVISED OF
THE POSSIBILITY OF SUCH DAMAGE.
Troubleshooting
The following checklist will help you remedy
problems you may encounter with your unit.
Before going through the checklist below, check
the connection and operating procedures.
For details on using the fuse and removing the
unit from the dashboard, see “Connection/
Installation” (page35).
If the problem is not solved, please contact your
authorized Alpine dealer for assistance.
General
No sound or the sound is very low.
The position of the fader control [FADER] is not
set for a 2-speaker system.
The volume of the unit and/or connected
device is very low.
– Increase the volume of the unit and
connected device.
No beep sound.
An optional power amplifier is connected and
you are not using the built-in amplifier.
The contents of the memory have been
erased.
The power supply lead or battery has been
disconnected or not connected properly.
Stored stations and correct time are erased.
The fuse has blown.
Makes a noise when the position of the
ignition is switched.
The leads are not matched correctly with the
car’s accessory power connector.
During playback or reception, the
demonstration mode starts.
If no operation is performed for 5 minutes
with [DEMO ON] set, the demonstration mode
starts.
– Set [DEMO OFF] (page 22).
29-EN
Page 30

The display disappears from/does not appear
in the display window.
The dimmer is set to [DIMMER ON] (page
23).
The display disappears if you press and hold
(power).
(power) on the unit until the display
– Press
appears.
The connectors are dirty (page 26).
The display/illumination flashes.
The power supply is not sufficient.
– Check that the car battery supplies enough
power to the unit. (The power requirement
is 12 V DC.)
The operation buttons do not function.
The disc will not eject.
Press and Number button 6 for more than 2
seconds to reset the unit.
The contents stored in memory are erased.
For your safety, do not reset the unit while you
are driving.
Radio reception
Stations cannot be received.
The sound is hampered by noises.
The connection is not correct.
– Check the connection of the car antenna
(aerial).
– If the auto antenna (aerial) will not extend,
check the connection of the power antenna
(aerial) control lead.
See [NO SERV] (page 33) for details when
the DAB signal cannot be received.
Preset tuning is not possible.
The broadcast signal is too weak.
PTY displays [- - - - - - - -].
The current station is not an RDS station.
RDS data has not been received.
The station does not specify the program type.
Program service name flashes.
There is no alternative frequency for the
current station.
– Press
/ while the program service
name is flashing. [PI SEEK] appears and the
unit starts searching for another frequency
with the same PI (program identification)
data.
CD playback
The disc does not play.
Defective or dirty disc.
The CD-R/CD-RW is not for audio use (page
25).
MP3/WMA/AAC files cannot be played.
The disc is incompatible with the MP3/WMA/
AAC format and version.
MP3/WMA/AAC files take longer to play than
others.
The following discs take a longer time to start
playback.
– A disc recorded with a complicated tree
structure.
– A disc recorded in Multi Session.
– A disc to which data can be added.
The sound skips.
Defective or dirty disc.
RDS
The SEEK starts after a few seconds of
listening.
The station is non-TP or has weak signal.
– Deactivate TA (page 14).
No traffic announcements.
Activate TA (page 14).
The station does not broadcast any traffic
announcements despite being TP.
– Tune in another station.
30-EN
Page 31

USB device playback
You cannot play items via a USB hub.
This unit cannot recognize USB devices via a
USB hub.
A USB device takes longer to play.
The USB device contains files with a
complicated tree structure.
The sound is intermittent.
The sound may be intermittent at a high-bit-
rate.
DRM (Digital Rights Management) files may
not be playable in some cases.
The audio file cannot be played.
USB devices formatted with file systems other
than FAT16 or FAT32 are unsupported.*
* This unit supports FAT16 and FAT32, but some USB
device may not support all of these FAT. For details,
refer to the operating instruction of each USB device or
contact the manufacturer.
Operations for skipping an album, skipping
items (Jump mode), and searching a track by
name cannot be performed.
These operations cannot be performed when
a USB device in Android mode or iPod is
connected.
– Set [USB MODE] to [MSC/MTP] (page 22).
– Remove the iPod.
The USB mode of the device is not set to the
appropriate mode.
– Make sure that the USB mode of the device
is set to MSC/MTP mode.
The sound cannot be output during playback
in Android mode.
While the unit is in ANDROID mode, the sound
outputs only from the Android smartphone.
– Check the status of the audio playback
application on the Android smartphone.
– Playback may not perform properly
depending on the Android smartphone.
BLUETOOTH function
The connecting device cannot detect this unit.
Before the pairing is made, set this unit to
pairing standby mode.
While connected to two BLUETOOTH devices,
this unit cannot be detected from another
device.
– Disconnect either connection and search for
this unit from another device.
When the device pairing is made, set the
BLUETOOTH signal output to on (page 11).
Connection is not possible.
The connection is controlled from one side
(this unit or BLUETOOTH device), but not both.
– Connect to this unit from a BLUETOOTH
device or vice versa.
The name of the detected device does not
appear.
Depending on the status of the other device, it
may not be possible to obtain the name.
No ringtone.
Adjust the volume by rotating the control dial
while receiving a call.
Depending on the connecting device, the
ringtone may not be sent properly.
– Set [RINGTONE] to [1] (page 24).
The front speakers are not connected to the
unit.
– Connect the front speakers to the unit. The
ringtone is output only from the front
speakers.
The talker’s voice cannot be heard.
The front speakers are not connected to the
unit.
– Connect the front speakers to the unit. The
talker’s voice is output only from the front
speakers.
A call partner says that the volume is too low
or high.
Adjust the volume accordingly using Mic gain
adjustment (page 19).
31-EN
Page 32

Echo or noise occurs in phone call
conversations.
Lower the volume.
Set EC/NC Mode to [BTP EC/NC 1] or [BTP EC/
NC 2] (page 19).
If the ambient noise other than the phone call
sound is loud, try reducing this noise.
E.g.: If a window is open and road noise, etc., is
loud, shut the window. If an air conditioner is
loud, lower the air conditioner.
The phone is not connected.
When BLUETOOTH audio is played, the phone
is not connected even if you press
– Connect from the phone.
The phone sound quality is poor.
Phone sound quality depends on reception
conditions of cellular phone.
– Move your car to a place where you can
enhance the cellular phone’s signal if the
reception is poor.
The volume of the connected audio device is
low (high).
Volume level will differ depending on the
audio device.
– Adjust the volume of the connected audio
device or this unit (page 23).
The sound skips during playback of a
BLUETOOTH audio device.
Reduce the distance between the unit and the
BLUETOOTH audio device.
If the BLUETOOTH audio device is stored in a
case which interrupts the signal, remove the
audio device from the case during use.
Several BLUETOOTH devices or other devices
which emit radio waves are in use nearby.
– Turn off the other devices.
– Increase the distance from the other devices.
The playback sound stops momentarily when
the connection between this unit and the
cellular phone is being made. This is not a
malfunction.
The connected BLUETOOTH audio device
cannot be controlled.
Check that the connected BLUETOOTH audio
device supports AVRCP.
.
Some functions do not work.
Check if the connecting device supports the
functions in question.
A call is answered unintentionally.
The connecting phone is set to answer a call
automatically.
Pairing failed due to a timeout.
Depending on the connecting device, the time
limit for pairing may be short.
– Try completing the pairing within the time.
BLUETOOTH function cannot operate.
Turn off the unit by pressing (power) for
more than 2 seconds, then turn the unit on
again.
No sound is output from the car speakers
during handsfree call.
If the sound is output from the cellular phone,
set the cellular phone to output the sound
from the car speakers.
Siri Eyes Free is not activated.
Perform the handsfree registration for an
iPhone that supports Siri Eyes Free.
Set the Siri function on the iPhone to on.
Cancel the BLUETOOTH connection with the
iPhone and the unit, and reconnect.
32-EN
Page 33

Messages
The following messages may appear or flash
during operation.
If these solutions do not help improve the
situation, consult your nearest Alpine dealer.
If you take the unit to be repaired because of CD
playback trouble, bring the disc that was used at
the time the problem began.
CD ERROR: The disc cannot be played. The disc
will be ejected automatically.
Clean or insert the disc correctly, or make sure
the disc is not blank or defective.
CD NO MUSIC: There is no playable file. The disc
will be ejected automatically.
Insert a disc containing playable files (page
27).
CD PUSH EJT: The disc could not be ejected
properly.
Press and hold (eject).
HUB NO SUPRT: USB hubs are not supported.
INVALID
The selected operation could be invalid.
[USB MODE] cannot be changed during iPod
playback.
IPD STOP: iPod playback has finished.
Operate your iPod/iPhone to start playback.
NO AF: No alternative frequencies.
Press / while the program service
name is flashing. The unit starts searching for
another frequency with the same PI (program
identification) data ([PI SEEK] appears).
NO DATA
There is no DAB service for the selected
program type.
– Press
NO INFO (no information)
There is no label information for the current
DAB service.
(back).
NO SERV (no service)
The DAB signal cannot be received.
Perform an auto scan (page 13).
Check the connection of the DAB antenna
(aerial).
Check that [DAB ANT-PWR] is set to [ON] (page
22).
NO TP: No traffic programs.
The unit will continue searching for available
TP stations.
NOT SUPPORT - ANDROID MODE
A USB device not supporting AOA (Android
Open Accessory) 2.0 is connected to the unit
while [USB MODE] is set to [ANDROID].
– Set [USB MODE] to [MSC/MTP] (page 22).
OVERLOAD: The USB device is overloaded.
Disconnect the USB device, then press
SOURCE
The USB device has a fault, or an unsupported
device is connected.
READ: Now reading information.
Wait until reading is complete and playback
starts automatically. This may take some time
depending on the file organization.
RECEIVING
The DAB band is selected and the unit is
waiting to receive a service.
USB ERROR: The USB device cannot be played.
Connect the USB device again.
USB NO DEV: A USB device is not connected or
recognized.
Make sure the USB device or USB cable is
securely connected.
USB NO MUSIC: There is no playable file.
Connect a USB device containing playable files
(page 27).
USB NO SUPRT: The USB device is not
supported.
For details on the compatibility of your USB
device, consult your nearest Alpine dealer.
to select another source.
33-EN
Page 34

or : The beginning or the end of
the disc has been reached.
(underscore): The character cannot be
displayed.
For BLUETOOTH function:
BTA NO DEV: The BLUETOOTH device is not
connected or recognized.
Make sure the BLUETOOTH device is securely
connected, or the BLUETOOTH connection is
established with the BLUETOOTH device.
ERROR: The selected operation could not be
performed.
Wait for a while, then try again.
UNKNOWN: A name or phone number cannot
be displayed.
WITHHELD: The phone number is hidden by the
caller.
34-EN
Page 35

Connection/Installation
Cautions
• Run all ground (earth) leads to a common
ground (earth) point.
• Do not get the leads trapped under a screw, or
caught in moving parts (e.g., seat railing).
• Before making connections, turn the car
ignition off to avoid short circuits.
• Connect the power supply lead
and speakers before connecting it to the
auxiliary power connector.
• Be sure to insulate any loose unconnected
leads with electrical tape for safety.
Precautions
• Choose the installation location carefully so
that the unit will not interfere with normal
driving operations.
• Avoid installing the unit in areas subject to
dust, dirt, excessive vibration, or high
temperature, such as in direct sunlight or near
heater ducts.
• Use only the supplied mounting hardware for a
safe and secure installation.
Note on the power supply lead (yellow)
When connecting this unit in combination with other
stereo components, the amperage rating of the car
circuit to which the unit is connected must be higher
than the sum of each component’s fuse amperage rating.
Mounting angle adjustment
Adjust the mounting angle to less than 30°.
to the unit
Parts List for Installation
× 2
For CDE-205DAB/ UTE-204DAB
• This parts list does not include all the package
contents.
• The bracket
attached to the unit before shipping. Before
mounting the unit, use the release keys
remove the bracket
details, see “Removing the protection collar and
the bracket” (page40).
• Keep the release keys
are also necessary if you remove the unit from
your car.
and the protection collar are
to
from the unit. For
for future use as they
35-EN
Page 36

Connection
CDE-205DAB/ UTE-204DAB
To DAB Antenna
Microphone*
1
(Red)
(Black)
(Blue)
(Orange)
(Yellow)
(Blue/White)
(Green)
(Green/Black)
(White)
(White/Black)
(Grey/Black)
(Grey)
(Violet/Black)
(Violet)
To amplifier
To power antenna
To the instrument cluster illumination lead
Ignition Key
Battery
Speakers
Rear Left
Front Left
Front Right
Rear Right
Amplifier
Amplifier Rear Speakers
Amplifier
Subwoofers
Front Speakers
*1 Whether in use or not, route the microphone input cord such that it does not interfere with driving operations. Secure
the cord with a clamp, etc., if it is installed around your feet. For details on installing the microphone, see “Installing the
microphone (CDE-205DAB/ UTE-204DAB only)” (page39).
36-EN
Page 37

UTE-202DAB
To DAB Antenna
(Red)
(Black)
(Blue)
(Orange)
(Yellow)
(Blue/White)
(Green)
(Green/Black)
(White)
(White/Black)
(Grey/Black)
(Grey)
(Violet/Black)
(Violet)
To amplifier
To power antenna
To the instrument cluster illumination lead
Ignition Key
Battery
Speakers
Rear Left
Front Left
Front Right
Rear Right
Amplifier
Amplifier
Subwoofers
Front Speakers
37-EN
Page 38

Fuse Holder (10A)
Fuse replacement:
When replacing the fuse, be sure to use one
matching the amperage rating stated on the
original fuse. If the fuse blows, check the
power connection and replace the fuse. If the
fuse blows again after replacement, there
may be an internal malfunction. In such a
case, consult your nearest Alpine dealer.
Fuse (10 A)
Power Supply Connector
MIC Input Connector (CDE-205DAB/ UTE-
204DAB only)
To Microphone.
Steering Remote Control Interface
Connector
To steering remote control interface box. For
details, contact your Alpine dealer.
Front Output RCA Connectors
RED is right and WHITE is left.
Rear Output RCA Connectors (CDE-
205DAB/ UTE-204DAB only)
RED is right and WHITE is left.
Subwoofer Output RCA Connectors
Antenna Receptacle
DAB Antenna Connector
To DAB Antenna (sold separately).
Remote Turn-On Lead (Blue/White)
Connect this lead to the remote turn-on lead
of your amplifier or signal processor.
Switched Power Lead (Ignition) (Red)
Connect this lead to an open terminal on the
vehicle’s fuse box or another unused power
source which provides (+) 12V only when the
ignition is turned on or in the accessory
position.
Ground Lead (Black)
Connect this lead to a good chassis ground
on the vehicle. Make sure the connection is
made to bare metal and is securely fastened
using the sheet metal screw provided.
38-EN
Power Antenna Lead (Blue)
Connect this lead to the +B terminal of your
power antenna, if applicable.
• This lead should be used only for controlling
the vehicle’s power antenna. Do not use this
lead to turn on an amplifier or a signal
processor, etc.
Dimmer Lead (Orange)
This lead may be connected to the vehicle’s
instrument cluster illumination lead.
• This will enable the vehicle’s dimmer control
to dim the backlighting of the unit.
Battery Lead (Yellow)
Connect this lead to the positive (+) post of
the vehicle’s battery.
ISO Power Supply Connector
ISO Connector (Speaker Output)
Left Rear (+) Speaker Output Lead (Green)
Left Rear (−) Speaker Output Lead (Green/
Black)
Left Front (+) Speaker Output Lead (White)
Left Front (−) Speaker Output Lead (White/
Black)
Right Front (−) Speaker Output Lead (Grey/
Black)
Right Front (+) Speaker Output Lead (Grey)
Right Rear (−) Speaker Output Lead
(Violet/Black)
Right Rear (+) Speaker Output Lead
(Violet)
RCA Extension Cable (not supplied)
Page 39

To prevent external noise from entering
the audio system.
• Locate the unit and route the leads at least
10 cm away from the car harness.
• Keep the battery power leads as far away
from other leads as possible.
• Connect the ground lead securely to a bare
metal spot (remove any paint, dirt or grease
if necessary) of the car chassis.
• If you add an optional noise suppressor,
connect it as far away from the unit as
possible. Your Alpine dealer carries various
noise suppressors, contact them for further
information.
• Your Alpine dealer knows best about noise
prevention measures so consult your dealer
for further information.
Installing the microphone (CDE205DAB/ UTE-204DAB only)
To capture your voice during handsfree calling,
you need to install the microphone
Clip (not supplied)
Cautions
• It is extremely dangerous if the cord becomes
wound around the steering column or shift
lever. Be sure to keep it and other parts from
interfering with your driving operations.
• If airbags or any other shock-absorbing
equipment is in your car, contact the store
where you purchased this unit, or the car
dealer, before installation.
Note
Before attaching the double-sided tape , clean the
surface of the dashboard with a dry cloth.
.
39-EN
Page 40

Installation
Removing the protection collar and the
bracket
Before installing the unit, remove the protection
and the bracket from the unit.
collar
1 Pinch both edges of the protection collar
, then pull it out.
Mounting the unit in the dashboard
Before installing, make sure the catches on both
sides of the bracket
(/ in).
are bent inwards 2 mm
1 Position the bracket inside the
dashboard, then bend the claws outward
for a tight fit.
182 mm (7 / in)
53 mm (2 / in)
Catch
2 Insert both release keys until they
click, and pull down the bracket
pull up the unit to separate.
Face the hook inwards.
, then
2 Mount the unit onto the bracket , then
attach the protection collar
Notes
• If the catches are straight or bent outwards, the unit will
not be installed securely and may spring out.
• Make sure the 4 catches on the protection collar
properly engaged in the slots of the unit.
Detaching and attaching the front
panel
For details, see “Detaching the Front Panel”
(page9).
Resetting the unit
For details, see “Resetting the Unit” (page9).
.
are
40-EN
Page 41

41-EN
Page 42

English
Hereby, Alpine Electronics (Europe) declares that the
radio equipment type CDE-205DAB, UTE-204DAB,
UTE-202DAB is in compliance with Directive 2014/53/EU.
The full text of the EU declaration of conformity is
available at the following internet address:
http://www.alpine.com/e/research/doc/
български [Bulgarian]
С настоящото Alpine Electronics (Europe) декларира, че
този тип радиосъоръжение CDE-205DAB, UTE-204DAB,
UTE-202DAB е в съответствие с Директива 2014/53/ЕС.
Цялостният текст на ЕС декларацията за съответствие
може да се намери на следния интернет адрес:
http://www.alpine.com/e/research/doc/
Cesky [Czech]
Tímto Alpine Electronics (Europe) prohlašuje, že typ
rádiového zařízení CDE-205DAB, UTE-204DAB,
UTE-202DAB je vsouladu se směrnicí 2014/53/EU.
Úplné znění EU prohlášení o shodě je k dispozici na této
internetové adrese:
http://www.alpine.com/e/research/doc/
Deutsch [German]
Hiermit erklärt Alpine Electronics (Europe), dass der
Funkanlagentyp CDE-205DAB, UTE-204DAB, UTE-202DAB
der Richtlinie 2014/53/EU entspricht.
Der vollständige Text der EU-Konformitätserklärung ist
unter der folgenden Internetadresse verfügbar:
http://www.alpine.com/e/research/doc/
Dansk [Danish]
Hermed erklærer Alpine Electronics (Europe), at radioudstyrstypen CDE-205DAB, UTE-204DAB, UTE-202DAB er
i overensstemmelse med direktiv 2014/53/EU.
EU-overensstemmelseserklæringens fulde tekst kan
findes på følgende internetadresse:
http://www.alpine.com/e/research/doc/
Eesti [Estonian]
Käesolevaga deklareerib Alpine Electronics (Europe), et
käesolev raadioseadme tüüp CDE-205DAB, UTE-204DAB,
UTE-202DAB vastab direktiivi 2014/53/EL nõuetele.
ELi vastavusdeklaratsiooni täielik tekst on kättesaadav
järgmisel internetiaadressil:
http://www.alpine.com/e/research/doc/
Espanol [Spanish]
Por la presente, Alpine Electronics (Europe) declara que el
tipo de equipo radioeléctrico CDE-205DAB, UTE-204DAB,
UTE-202DAB es conforme con la Directiva 2014/53/UE.
El texto completo de la declaración UE de conformidad
está disponible en la dirección Internet siguiente:
http://www.alpine.com/e/research/doc/
Suomi [Finnish]
Alpine Electronics (Europe) vakuuttaa, että
radiolaitetyyppi CDE-205DAB, UTE-204DAB, UTE-202DAB
on direktiivin 2014/53/EU mukainen.
EU-vaatimustenmukaisuusvakuutuksen täysimittainen
teksti on saatavilla seuraavassa internetosoitteessa:
http://www.alpine.com/e/research/doc/
Francais [French]
Le soussigné, Alpine Electronics (Europe), déclare que
l’équipement radioélectrique du type CDE-205DAB,
UTE-204DAB, UTE-202DAB est conforme à la directive
2014/53/UE.
Le texte complet de la déclaration UE de conformité est
disponible à l’adresse internet suivante :
http://www.alpine.com/e/research/doc/
ελληνικά [Greek]
Με την παρούσα ο/η Alpine Electronics (Europe), δηλώνει
ότι ο ραδιοεξοπλισμός CDE-205DAB, UTE-204DAB,
UTE-202DAB πληροί την οδηγία 2014/53/ΕΕ.
Το πλήρες κείμενο της δήλωσης συμμόρφωσης ΕΕ
διατίθεται στην ακόλουθη ιστοσελίδα στο διαδίκτυο:
http://www.alpine.com/e/research/doc/
Hrvatski [Croatian]
Alpine Electronics (Europe) ovime izjavljuje da je radijska
oprema tipa CDE-205DAB, UTE-204DAB, UTE-202DAB u
skladu s Direktivom 2014/53/EU.
Cjeloviti tekst EU izjave o sukladnosti dostupan je na
sljedećoj internetskoj adresi:
http://www.alpine.com/e/research/doc/
Magyar [Hungarian]
Alpine Electronics (Europe) igazolja, hogy a CDE-205DAB,
UTE-204DAB, UTE-202DAB típusú rádióberendezés
megfelel a 2014/53/EU irányelvnek.
Az EU-megfelelőségi nyilatkozat teljes szövege elérhető a
következő internetes címen:
http://www.alpine.com/e/research/doc/
Italiano [Italian]
Il fabbricante, Alpine Electronics (Europe), dichiara che il
tipo di apparecchiatura radio CDE-205DAB, UTE-204DAB,
UTE-202DAB è conforme alla direttiva 2014/53/UE.
Il testo completo della dichiarazione di conformità UE è
disponibile al seguente indirizzo Internet:
http://www.alpine.com/e/research/doc/
Liettuviy [Lithuanian]
Aš, Alpine Electronics (Europe), patvirtinu, kad radijo
įrenginių tipas CDE-205DAB, UTE-204DAB, UTE-202DAB
atitinka Direktyvą 2014/53/ES.
Visas ES atitikties deklaracijos tekstas prieinamas šiuo
interneto adresu:
http://www.alpine.com/e/research/doc/
Page 43

Latviski [Latvian]
Ar šo Alpine Electronics (Europe) deklarē, ka radioiekārta
CDE-205DAB, UTE-204DAB, UTE-202DAB atbilst Direktīvai
2014/53/ES.
Pilns ES atbilstības deklarācijas teksts ir pieejams šādā
interneta vietnē: http://www.alpine.com/e/research/doc/
Malti [Maltese]
B’dan, Alpine Electronics (Europe), niddikjara li dan it-tip
ta’ tagħmir tar-radju CDE-205DAB, UTE-204DAB,
UTE-202DAB huwa konformi mad-Direttiva 2014/53/UE.
It-test kollu tad-dikjarazzjoni ta’ konformità tal-UE huwa
disponibbli f’dan l-indirizz tal-Internet li ġej:
http://www.alpine.com/e/research/doc/
Dutch [Netherlands]
Hierbij verklaar ik, Alpine Electronics (Europe), dat het
type radioapparatuur CDE-205DAB, UTE-204DAB,
UTE-202DAB conform is met Richtlijn 2014/53/EU.
De volledige tekst van de EU-conformiteitsverklaring kan
worden geraadpleegd op het volgende internetadres:
http://www.alpine.com/e/research/doc/
Polski [Polish]
Alpine Electronics (Europe) niniejszym oświadcza, że typ
urządzenia radiowego CDE-205DAB, UTE-204DAB,
UTE-202DAB jest zgodny z dyrektywą 2014/53/UE.
Pełny tekst deklaracji zgodności UE jest dostępny pod
następującym adresem internetowym:
http://www.alpine.com/e/research/doc/
Portugues [Portuguese]
O(a) abaixo assinado(a) Alpine Electronics (Europe)
declara que o presente tipo de equipamento de rádio
CDE-205DAB, UTE-204DAB, UTE-202DAB está em
conformidade com a Diretiva 2014/53/UE.
O texto integral da declaração de conformidade está
disponível no seguinte endereço de Internet:
http://www.alpine.com/e/research/doc/
Românesc [Romanian]
Prin prezenta, Alpine Electronics (Europe) declară că tipul
de echipamente radio CDE-205DAB, UTE-204DAB,
UTE-202DAB este în conformitate cu Directiva 2014/53/UE.
Textul integral al declarației UE de conformitate este
disponibil la următoarea adresă internet:
http://www.alpine.com/e/research/doc/
Swenska [Swedish]
Härmed försäkrar Alpine Electronics (Europe) att denna
typ av radioutrustning CDE-205DAB, UTE-204DAB,
UTE-202DAB överensstämmer med direktiv 2014/53/EU.
Den fullständiga texten till EU-försäkran om
överensstämmelse finns på följande webbadress:
http://www.alpine.com/e/research/doc/
Slovensko [Slovenian]
Alpine Electronics (Europe) potrjuje, da je tip radijske
opreme CDE-205DAB, UTE-204DAB, UTE-202DAB skladen
z Direktivo 2014/53/EU.
Celotno besedilo izjave EU o skladnosti je na voljo na
naslednjem spletnem naslovu:
http://www.alpine.com/e/research/doc/
Slovensky [Slovak]
Alpine Electronics (Europe) týmto vyhlasuje, že rádiové
zariadenie typu CDE-205DAB, UTE-204DAB, UTE-202DAB
je v súlade so smernicou 2014/53/EÚ.
Úplné EÚ vyhlásenie o zhode je k dispozícii na tejto
internetovej adrese:
http://www.alpine.com/e/research/doc/
Norsk [Norvegian]
Herved erklærer Alpine Electronics (Europe) at
radiomodellene CDE-205DAB, UTE-204DAB, UTE-202DAB
overholder direktiv 2014/53 / EU.
Utfyllende dokument til EU-samsvarserklæringen er
tilgjengelig på følgende internettadresse:
http://www.alpine.com/e/research/doc/
Islenska [Icelandic]
Hér með staðfestir Alpine Electronics (Evrópa) að útvörpi
með eftirfarandi tegundarheitum CDE-205DAB,
UTE-204DAB, UTE-202DABeru í samræmi við Tilskipun
2014/53/EU.
Teksti EU yrilýsingarinnar um samræmi er tiltækur á
eftirfarandi verfslóð:
http://www.alpine.com/e/research/doc/
Page 44

(CDE-205DAB/UTE-204DAB) (CDE-205DAB)
ALPINE ELECTRONICS MARKETING, INC.
1-7, Yukigaya-Otsukamachi, Ota-ku,
Tokyo 145-0067, JAPAN
Phone: 03-5499-4531
ALPINE ELECTRONICS OF AMERICA, INC.
19145 Gramercy Place, Torrance,
California 90501, U.S.A.
Phone 1-800-ALPINE-1 (1-800-257-4631)
ALPINE ELECTRONICS OF AUSTRALIA PTY. LTD.
161-165 Princes Highway, Hallam
Victoria 3803, Australia
Phone 03-8787-1200
ALPINE ELECTRONICS GmbH
Wilhelm-Wagenfeld-Str. 1-3,
80807 München, Germany
Phone 089-32 42 640
ALPINE ELECTRONICS OF U.K. LTD.
Fletchamstead Highway, Coventry CV4 9TW, U.K.
ALPINE ELECTRONICS France S.A.R.L.
20090 Trezzano sul Naviglio MI, Italy
ALPINE ELECTRONICS DE ESPAÑA, S.A.
01013 Vitoria (Alava)-APDO 133, Spain
Alpine House
www.alpine.co.uk
184 allée des Erables
CS 52016 – Villepinte
95 945 Roissy CDG cedex
FRANCE
Phone : + 33(0)1 48 63 89 89
ALPINE ITALIA S.p.A.
Viale Cristoforo Colombo, 8
Phone +39 02 484781
Portal de Gamarra 36, Pabellón, 32
Phone 945-283588
 Loading...