

Owner's Manual
Contents
A - Z
Online Edition for Part no. 01 41 0 012 836 - © 08/06 BMW AG
for Vehicle
The Ultimate
Driving Machine

Online Edition for Part no. 01 41 0 012 836 - © 08/06 BMW AG

750i
Online Edition for Part no. 01 41 0 012 836 - © 08/06 BMW AG
750Li
760i
760Li
Owner's Manual for Vehicle
Congratulations, and thank you for choosing a BMW.
Thorough familiarity with your vehicle will provide you with
enhanced control and security when you drive it. We therefore
have this request:
Please take the time to read this Owner's Manual and familiarize
yourself with the information that we have compiled for you
before starting off in your new vehicle. It contains important data
and instructions intended to assist you in gaining maximum use
and satisfaction from your BMW's unique range of technical features. The manual also contains information on maintenance
designed to enhance operating safety and contribute to maintaining the value of your BMW throughout an extended service
life.
This manual is supplemented by a Service and Warranty Information Booklet for US models or a Warranty and Service Guide
Booklet for Canadian models.
We wish you an enjoyable driving experience.
BMW AG

© 2006 Bayerische Motoren Werke
Online Edition for Part no. 01 41 0 012 836 - © 08/06 BMW AG
Aktiengesellschaft
Munich, Germany
Reprinting, including excerpts,
only with the written consent of
BMW AG, Munich.
Order No. 01 41 0 012 836
US English VIII/06, 06 09 500
Printed in Germany
Printed on environmentally friendly paper,
bleached without chlorine, suitable for recycling.

Contents
Online Edition for Part no. 01 41 0 012 836 - © 08/06 BMW AG
The fastest way to find specific topics is to use
the index, refer to page 230.
Using this Owner's Manual
4 Notes
At a glance
10 Cockpit
16 iDrive
24 Voice command system
Controls
30 Opening and closing
43 Adjusting
54 Transporting children safely
57 Driving
75 Everything under control
86 Technology for comfort, convenience
and safety
100 Lamps
103 Climate
111 Practical interior accessories
Driving tips
122 Things to remember when driving
Communications
178 Telephone overview
181 Getting started
184 Using the phone
188 BMW Assist
Mobility
196 Refueling
198 Wheels and tires
206 Under the hood
210 Maintenance
212 Replacing components
218 Giving and receiving assistance
Reference
224 Technical data
228 Short commands of the voice command
system
230 Everything from A to Z
Navigation
130 Starting navigation system
131 Destination input
143 Route guidance
148 What to do if …
Entertainment
152 On/off and settings
156 Radio
163 CD player
165 CD changer
169 External audio device
170 DVD changer
Reference At a glanceControlsDriving tipsCommunications NavigationEntertainmentMobility

Notes
Online Edition for Part no. 01 41 0 012 836 - © 08/06 BMW AG
Using this Owner's Manual
Notes
In compiling this Owner's Manual we have
made every effort to furnish you with a convenient reference source affording quick access
to all the essentials. The fastest way to find
detailed information on any specific subject is
to turn to the comprehensive index at the back
of the manual. For a brief initial overview, please
refer to the first chapter.
Should the day come when you decide to sell
your BMW, please remember to make certain
that the new owner receives this Owner's Manual; it is an important part of the vehicle.
Additional sources of information
If you have any additional questions, your
BMW center will be glad to advise you.
You can find information on BMW, e.g. on technology, on the Internet at www.bmwusa.com.
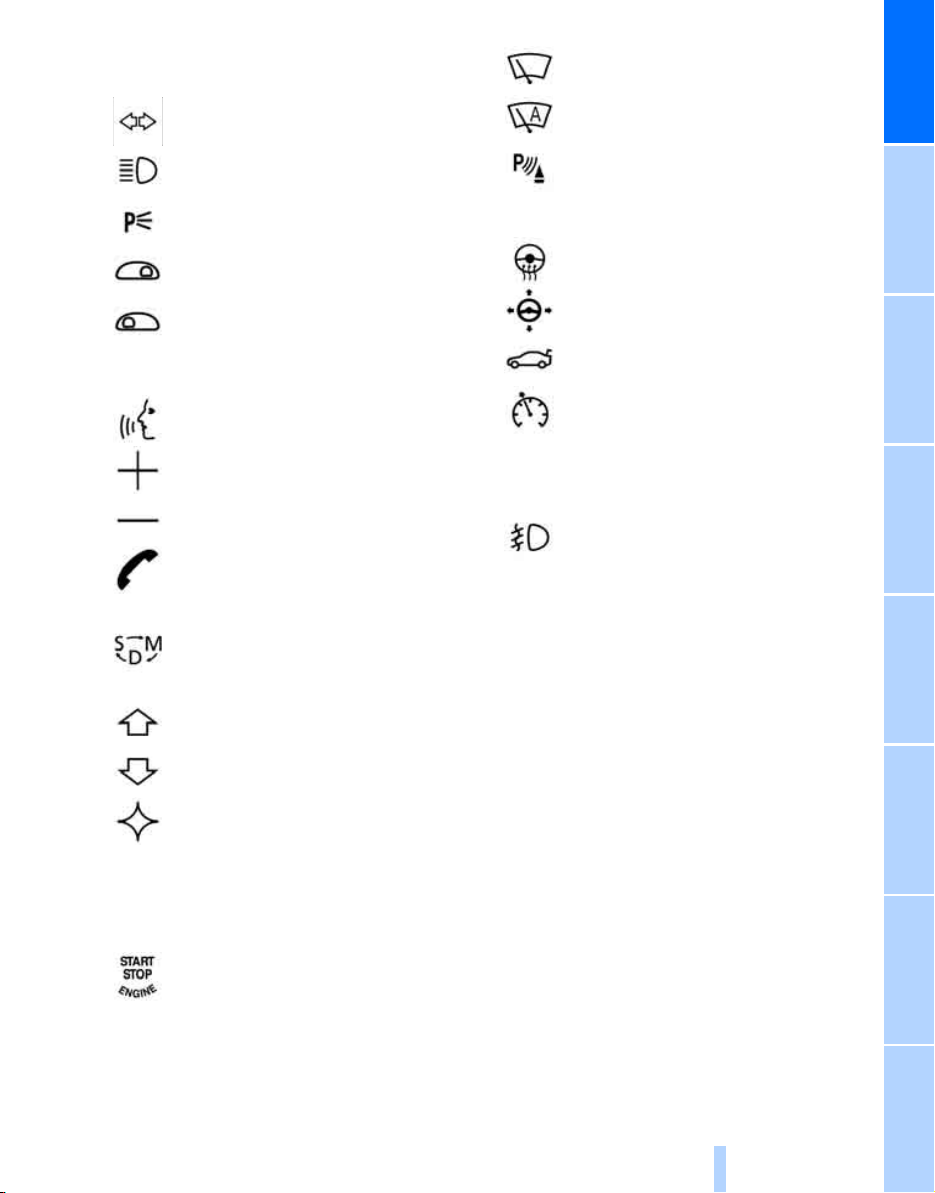
Symbols used
Indicates precautions that must be fol-
lowed precisely in order to avoid the possibility of personal injury and serious damage to
the vehicle.
Indicates information that will assist you
in gaining the optimum benefit from your
vehicle and enable you to care more effectively
for your vehicle.
Refers to measures that can be taken to
help protect the environment.
< Marks the end of a specific item of informa-
tion.
*
Indicates special equipment, country-specific equipment and optional extras, as well as
equipment and functions not yet available at the
time of printing.
"..." Identifies Control Display texts used to
select individual functions.
These sections contain information on
using the voice command system.
{...} Verbal instructions to use with the voice
command system.
{{...}} Identifies the answers generated by the
voice command system.
Symbols on vehicle components
Indicates that you should consult the relevant section of this Owner's Manual for
information on a particular part or assembly.
4

Your individual vehicle
Online Edition for Part no. 01 41 0 012 836 - © 08/06 BMW AG
In purchasing your BMW, you have decided in
favor of a model with individualized equipment
and features. This Owner's Manual describes
the entire array of options and equipment available with a specific BMW model.
Please bear in mind that the manual may contain information on accessories and equipment
that you have not specified for your own vehicle.
Sections describing options and special equip-
*
ment are marked by asterisks
identifying possible differences between the
descriptions in this manual and your own vehicle's equipment.
If equipment in your BMW is not described in
this Owner's Manual, please refer to the accompanying Supplementary Owner's Manuals.
to assist you in
Editorial notice
BMW pursues a policy of continuous, ongoing
development that is conceived to ensure that
our vehicles continue to embody the highest
quality and safety standards combined with
advanced, state-of-the-art technology. For this
reason, the features described in this Owner's
Manual may in rare cases differ from those on
your vehicle.
For your own safety
Maintenance and repairs
Advanced technology, e.g. the use of
modern materials and high-performance
electronics, requires specially adapted maintenance and repair methods. Therefore, have corresponding work on your BMW performed only
by your BMW center or a workshop that works
according to BMW repair procedures with correspondingly trained personnel. If this work is
not carried out properly, there is a danger of
subsequent damage and related safety hazards.<
Parts and accessories
For your own safety, use genuine parts
and accessories approved by BMW.
When you purchase accessories tested and
approved by BMW and Genuine BMW Parts,
you simultaneously acquire the assurance that
they have been thoroughly tested by BMW to
ensure optimum performance when installed
on your vehicle.
BMW warrants these parts to be free from
defects in material and workmanship.
BMW will not accept any liability for damage
resulting from installation of parts and accessories not approved by BMW.
BMW cannot test every product made by other
manufacturers to verify if it can be used on a
BMW safely and without risk to either the vehicle, its operation, or its occupants.
Genuine BMW Parts, BMW Accessories and
other products approved by BMW, together
with professional advice on using these items,
are available from all BMW centers.
Installation and operation of non-BMW
approved accessories such as alarms, radios,
amplifiers, radar detectors, wheels, suspension
components, brake dust shields, telephones,
including operation of any mobile phone from
within the vehicle without using an externally
mounted antenna, or transceiver equipment, for
instance, CBs, walkie-talkies, ham radios or
similar accessories, may cause extensive damage to the vehicle, compromise its safety, interfere with the vehicle's electrical system or affect
5
Reference At a glanceControlsDriving tipsCommunications NavigationEntertainmentMobility

the validity of the BMW Limited Warranty. See
Online Edition for Part no. 01 41 0 012 836 - © 08/06 BMW AG
your BMW center for additional information.<
Maintenance, replacement, or repair of
Notes
the emission control devices and systems may be performed by any automotive
repair establishment or individual using any certified automotive part.<
California Proposition 65 Warning
California laws require us to issue the following
warning:
Engine exhaust and a wide variety of
automobile components and parts,
including components found in the interior furnishings in a vehicle, contain or emit chemicals
known to the State of California to cause cancer
and birth defects and reproductive harm. In
addition, certain fluids contained in vehicles and
certain products of component wear contain or
emit chemicals known to the State of California
to cause cancer and birth defects or other
reproductive harm.
Battery posts, terminals and related accessories contain lead and lead compounds. Wash
your hands after handling. Used engine oil contains chemicals that have caused cancer in laboratory animals. Always protect your skin by
washing thoroughly with soap and water.<
Service and warranty
We recommend that you read this publication
thoroughly.
Your BMW is covered by the following warranties:
> New Vehicle Limited Warranty
> Rust Perforation Limited Warranty
> Federal Emissions System Defect Warranty
> Federal Emissions Performance Warranty
> California Emission Control System Limited
Warranty
Detailed information about these warranties is
listed in the Service and Warranty Information
Booklet for US models or in the Warranty and
Service Guide Booklet for Canadian models.
Reporting safety defects
For US customers
The following only applies to vehicles owned
and operated in the US.
If you believe that your vehicle has a defect
which could cause a crash or could cause injury
or death, you should immediately inform the
National Highway Traffic Safety Administration
(NHTSA) in addition to notifying BMW of North
America, LLC, P.O. Box 1227, Westwood,
New Jersey 07675-1227, Telephone
1-800-831-1117.
If NHTSA receives similar complaints, it may
open an investigation, and if it finds that a safety
defect exists in a group of vehicles, it may order
a recall and remedy campaign. However,
NHTSA cannot become involved in individual
problems between you and your dealer or
BMW of North America, LLC.
To contact NHTSA, you may call the Vehicle
Safety Hotline toll-free at 1-888-327-4236
(TTY: 1-800-424-9153); go to
http://www.safercar.gov; or write to: Administrator, NHTSA, 400 Seventh Street, SW.,
Washington, DC 20590. You can also obtain
other information about motor vehicle safety
from http://www.safercar.gov
6

For Canadian customers
Online Edition for Part no. 01 41 0 012 836 - © 08/06 BMW AG
Canadian customers who wish to report a
safety-related defect to Transport Canada,
Defect Investigations and Recalls, may call
1-800-333-0510 toll-free from anywhere in
Canada or 1-613-993-9851 from the Ottawa
region and from other countries, or contact
Transport Canada by mail at: Transport
Canada, ASFAD, Place de Ville, Tower C,
330 Sparks Street, Ottawa, ON, K1A 0N5.
You can also obtain other information about
motor vehicle safety from http://www.tc.gc.ca
7
Reference At a glanceControlsDriving tipsCommunications NavigationEntertainmentMobility

Online Edition for Part no. 01 41 0 012 836 - © 08/06 BMW AG

At a glance
Online Edition for Part no. 01 41 0 012 836 - © 08/06 BMW AG
At a glance
This overview of buttons, switches and displays
is intended to orient you in your vehicle's
operating environment. It will also assist you
in becoming acquainted with the control
concepts and options available for
operating the various systems.
Cockpit
Online Edition for Part no. 01 41 0 012 836 - © 08/06 BMW AG
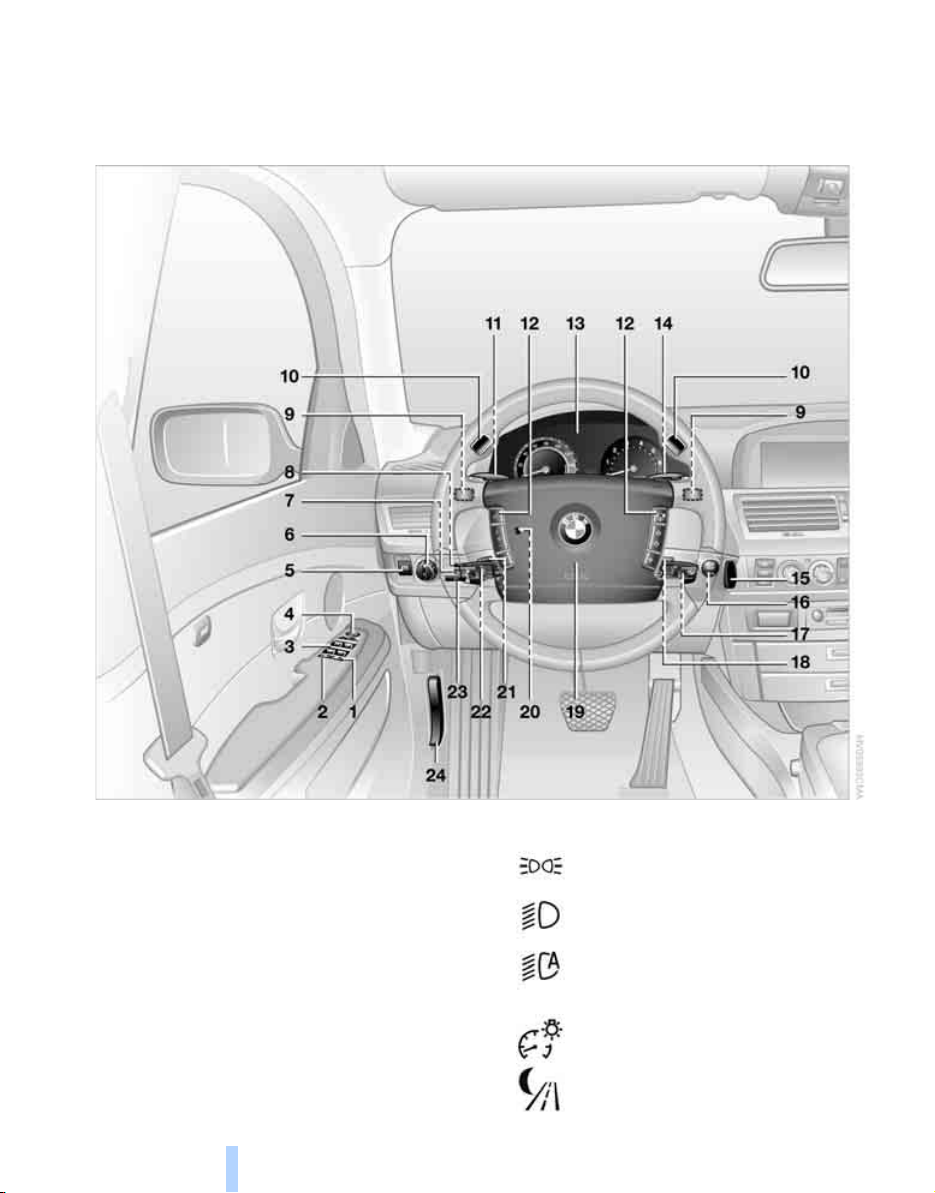
All around the steering wheel: controls and displays
Cockpit
1 Roller sun blind for rear window*112
2 Rear window safety switch 40
3 Power windows 40
4 Exterior mirrors 50
10
5 Parking brake 58
6 Parking lamps 100
Low beams 100
Daytime running lamps
Automatic headlamp control 100
Daytime running lamps
Adaptive Head Light*101
7 Instrument lighting 102
*
8 BMW Night Vision
96
*
101
*
101
9 Steptronic: upshifting 63
Online Edition for Part no. 01 41 0 012 836 - © 08/06 BMW AG
10 Steptronic: downshifting 63
11 Turn signals 65
High beams,
headlamp flasher 101
Roadside parking lamps 101
Computer 76
Check Control 80
Computer 76
12 Buttons on steering wheel
Voice command system
activation/deactivation 24
Entertainment volume,
increasing/decreasing 152
Volume of hands-free unit,
increasing/decreasing 179
Mobile phone:
Calling, redialing, accepting call or
ending call 184
Sport program and manual
operation of the automatic
transmission 63
Selecting radio station 156
Selecting music track 163, 166
Skipping chapter
*
172
17 Windshield wipers 65
Rain sensor 65
At a glance
*
18 PDC Park Distance Control
19 Horn, the entire surface
20 Steering wheel heater
Steering wheel adjustment 52
21 Opening luggage compartment
lid 36
*
22 Programmable cruise control 67
Active cruise control
23 Fog lamps 101
Front fog lamps
24 Unlocking hood 206
*
*
86
52
69
Programmable button 52
13 Info Display 12
14 Automatic transmission 62
15 Ignition lock 57
16 Switching ignition on/off 57
and Starting/stopping engine 57
11
Reference ControlsDriving tipsCommunications NavigationEntertainmentMobility
Info Display
Online Edition for Part no. 01 41 0 012 836 - © 08/06 BMW AG
Cockpit
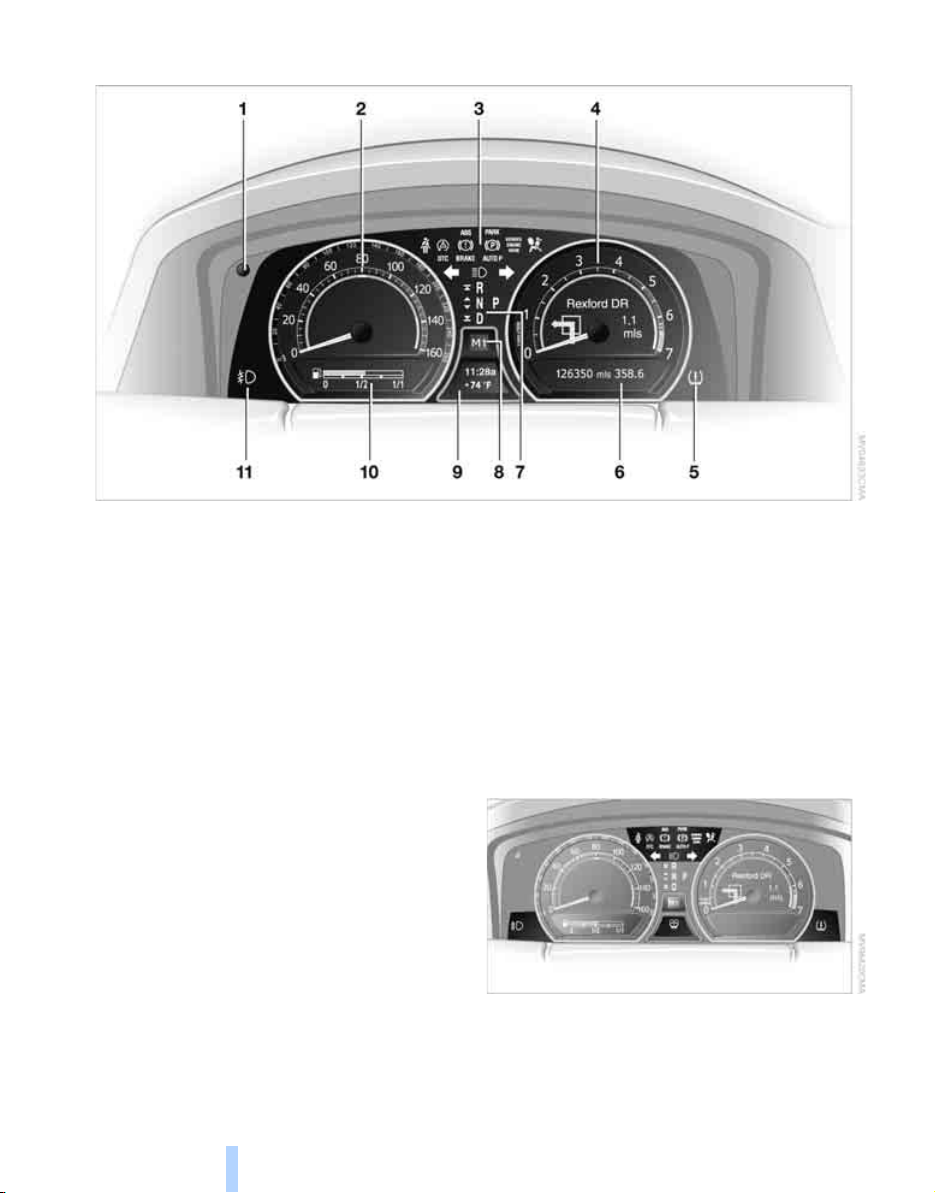
1 Resetting trip odometer to zero 75
2 Speedometer with display for
> Programmable cruise control 67
> Active cruise control
> Speed limit 82
3 Indicator and warning lamps 12
4 Tachometer 75
Route guidance of navigation
system
*
143
5 Display for
> Flat Tire Monitor
> Tire Pressure Monitor
6 Display for
> Voice command system
> Odometer and trip odometer 75
> Remaining driving distance for service
requirements 78
> Text messages in Check Control 80
> Computer 76
7 Transmission range selection 62
8 Automatic transmission program
display 62
*
69
*
91
*
93
*
24
9 Display for
> Outside temperature 75
> Clock 75
> Indicator and warning lamps 80
10 Computer with fuel gauge 76
11 Fog lamps 101
Indicator and warning lamps
The concept
Control and warning lamps can light up in various combinations and colors.
When the engine is started or the ignition is
switched on, some lamps are checked for
12
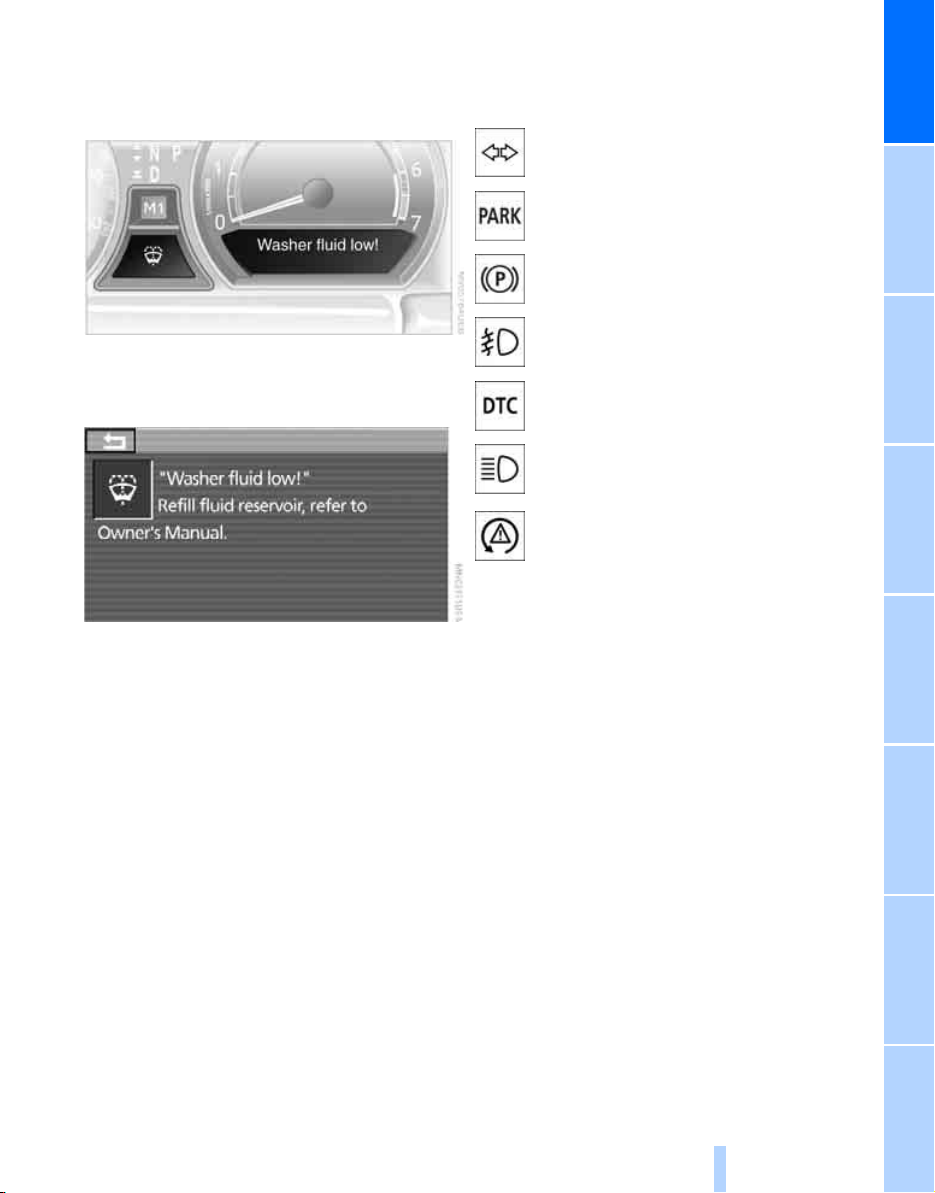
proper operation and light up briefly in the pro-
Online Edition for Part no. 01 41 0 012 836 - © 08/06 BMW AG
cess.
Explanatory text messages
Text messages on Info Display explain the
meaning of the indicator and warning lamps
shown.
Indicator lamps without text messages
The following indicator lamps indicate that the
particular functions are active:
Turn signals 65
With parking brake released 59
With parking brake set 59
Warning lamp on Canadian models
Front fog lamps 101
DTC Dynamic Traction Control 88
High beams/headlamp flasher 101
DSC Dynamic Stability Control,
flashes 88
At a glance
You can view additional information, e.g.
regarding the cause of a malfunction and the
corresponding action to take, in the Check Control, refer to page 80.
In urgent cases, this information will be shown
as soon as the corresponding lamp comes on.
13
Reference ControlsDriving tipsCommunications NavigationEntertainmentMobility
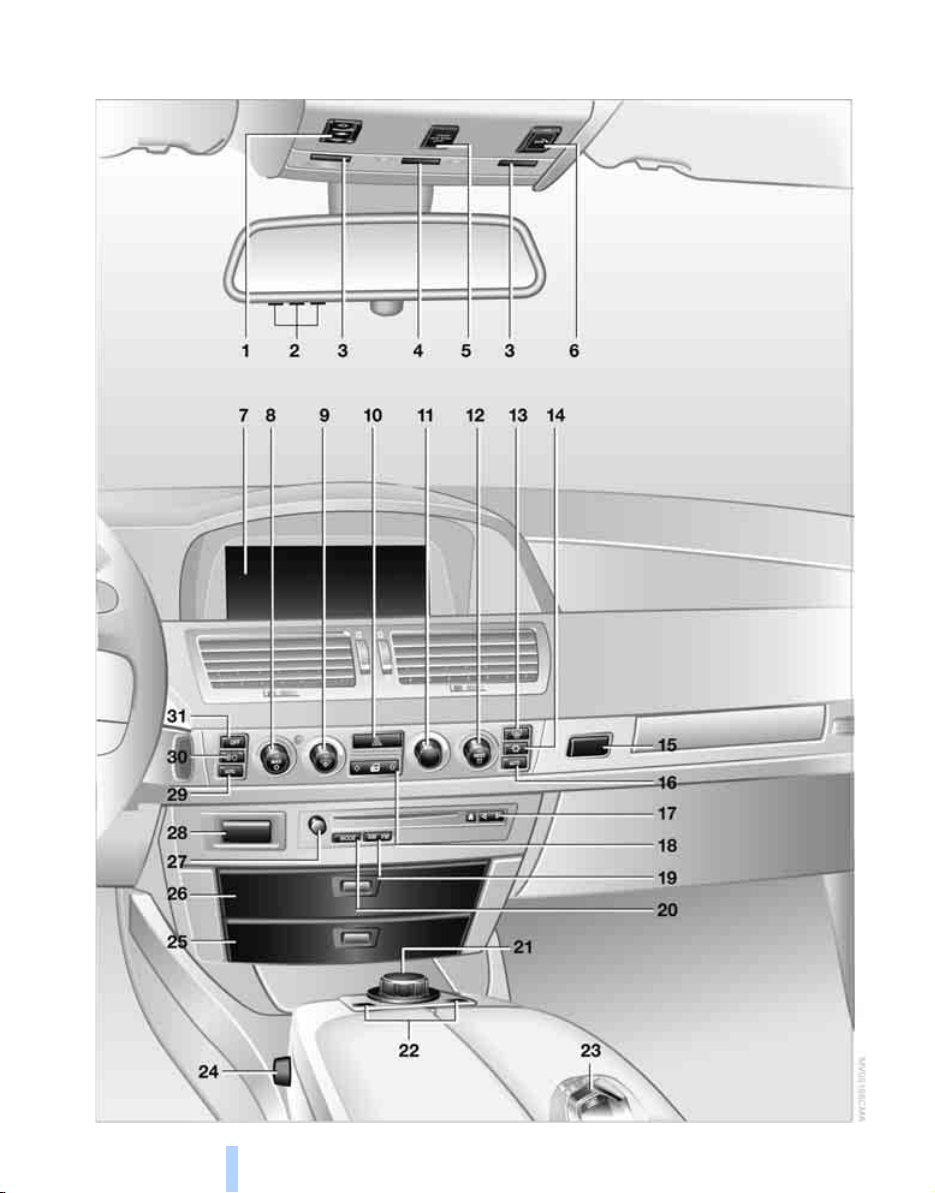
Comfort area: controls and displays
Online Edition for Part no. 01 41 0 012 836 - © 08/06 BMW AG
Cockpit
14
1 Glass sunroof, electric*41
Online Edition for Part no. 01 41 0 012 836 - © 08/06 BMW AG
2 Memory buttons for integrated universal
remote control
3 Reading lamps 102
4 Interior lamps 102
5 Passenger airbag status lamp 96
6 Initiating an emergency call
7 Control Display 16
8 Temperature, left side of passenger
compartment: turn,
maximum cooling: press 106
9 Air volume, left side of passenger
compartment: turn 106
Defrosting windows and removing
condensation: press 106
10 Hazard warning flashers
11 Air volume, right side of passenger
compartment 106
12 Temperature, right side of passenger
compartment: rotate,
residual heat: press 106
13 Rear window defroster
14 Air conditioner mode 107
15 Opening the glove compartment 113
16 Automatic air distribution and airflow as
well as intensity of the AUTO program,
right side of passenger compartment 104
17 Starting scan
> for stations 152
> for tracks 152
18 Central locking system 34
19 Selecting AM or FM waveband
20 Selecting radio, CD player, and CD changer
21 Controller 16
22 button and programmable
button 16
23 Snap-in adapter 181
*
111
*
218
24 Seat adjustment 44
Heated seats*49
Active seat ventilation
Active seat for driver
Seat, mirror and steering wheel
memory 46
25 Glasses compartment 115
26 Storage compartments 115
27 Switching audio sources on/off and
adjusting volume 153
28 Retracting telephone keypad 179
29 Automatic air distribution and airflow as
well as intensity of the AUTO program,
left side of passenger compartment 104
30 Outside air/AUC Automatic recirculated-air
control/recirculated air 105
31 Switching off automatic climate
control 105
*
50
*
50
At a glance
15
Reference ControlsDriving tipsCommunications NavigationEntertainmentMobility
iDrive
Online Edition for Part no. 01 41 0 012 836 - © 08/06 BMW AG
iDrive combines the functions of a multitude of
iDrive
switches. This allows these functions to be
operated from a central position. The following
introduction illustrates how easy iDrive is to
Controls
use. The control of individual functions is
described in connection with the relevant
equipment.
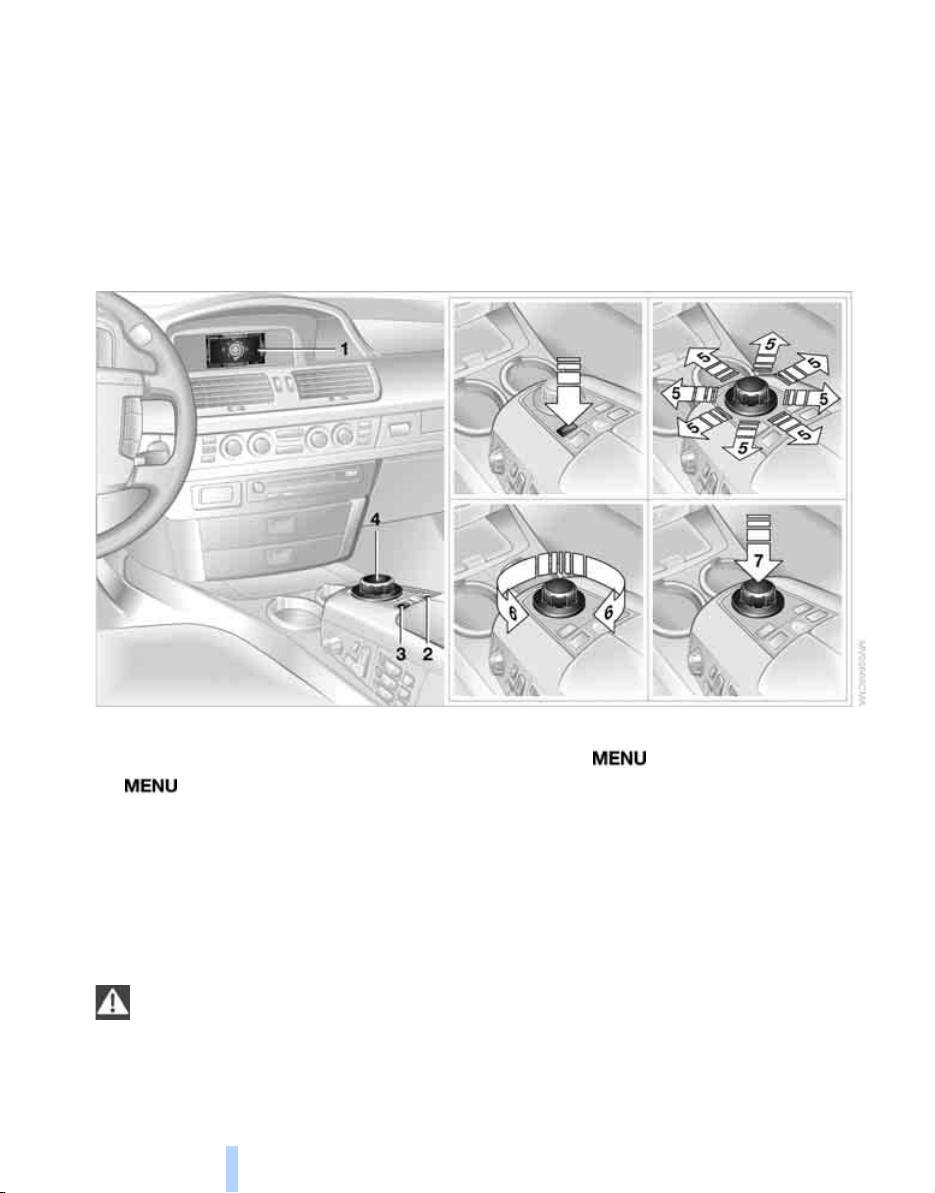
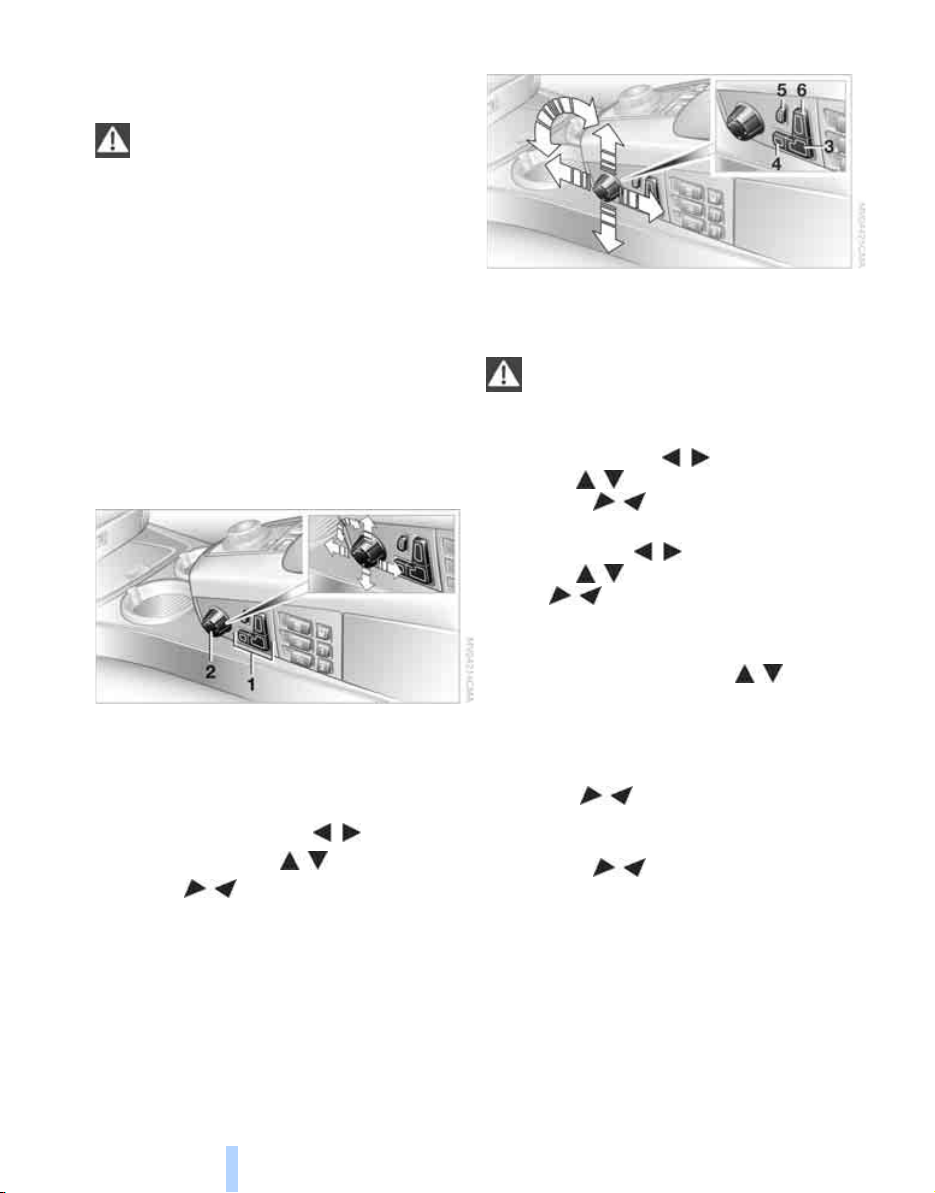
1 Control Display
2 Programmable button 52
3 button
Opening start menu
4 Controller
You can use the controller to select menu
items and make settings:
> move in four directions, arrows 5
> turn, arrow 6
> press, arrow 7
To avoid becoming distracted and posing
an unnecessary hazard, both to your own
vehicle's occupants and to other road users:
never attempt to use the controls or make
entries unless traffic and road conditions
allow.<
16
Switching Control Display off/on
1. Press the button to open the start
menu.
2. Press the controller.
Press the controller again to switch the screen
back on.
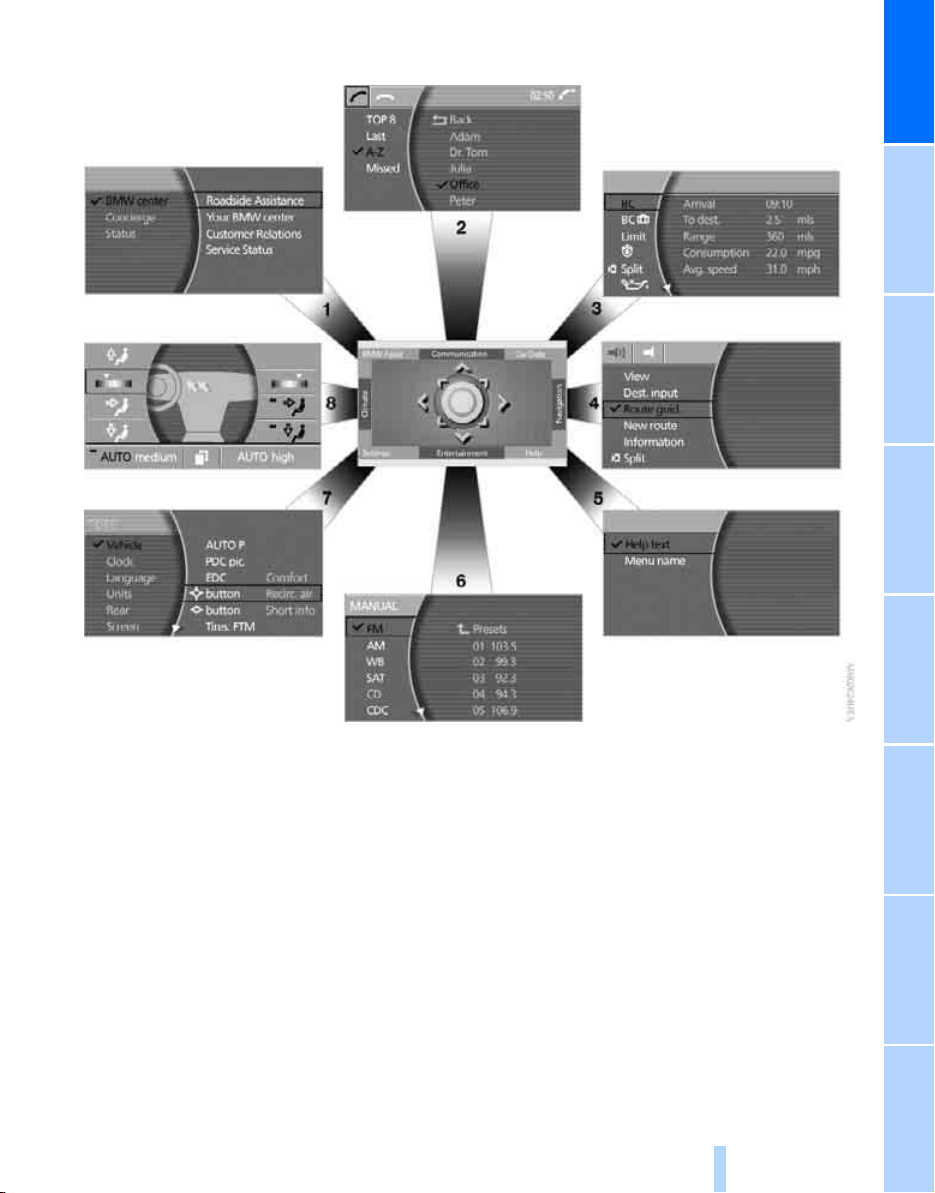
Menus on Control Display
Online Edition for Part no. 01 41 0 012 836 - © 08/06 BMW AG
At a glance
You can select from an extended range of
functions and setting options:
1 BMW Assist
2 Communication
> Using the phone 184
3 Car Data
> Computer 76
> Trip computer 78
> Speed limit 82
> Stopwatch 83
> Assistance window
> Engine oil level 207
> Service required 78
> Check Control messages 80
*
188
*
for onboard data 83
4 Navigation
> Destination input 131
> Route guidance 143
5 Help
> Brief help text displays 21
> Menu name for menu change 19
6 Entertainment
> Radio 156
> CD player
> CD changer
> External audio device 169
> DVD changer
*
130
*
163
*
165
*
170
17
Reference ControlsDriving tipsCommunications NavigationEntertainmentMobility
iDrive
Online Edition for Part no. 01 41 0 012 836 - © 08/06 BMW AG
DVDs can only be played on the rear
seat screen, refer to Rear seat
*
screen
7 Settings
> Parking brake 58
> PDC Park Distance Control 86
> EDC Electronic Damping Control 89
> Programmable buttons 52
> FTM Flat Tire Monitor
> TPM Tire Pressure Monitor
> Time and date 84
> Language 84
> Units of measure and display format 84
> Brightness 85
> Rear seat screen
> Logging on mobile phone in
8 Climate
> Intensity of AUTO program 104
> Air volume 106
> Heated seats
> Parked car ventilation 109
> Extra, e.g. rear air conditioner 108
on page 21.<
vehicle 182
*
90
*
91
*
21
*
49
The message automatically disappears after
approx. 25 seconds.
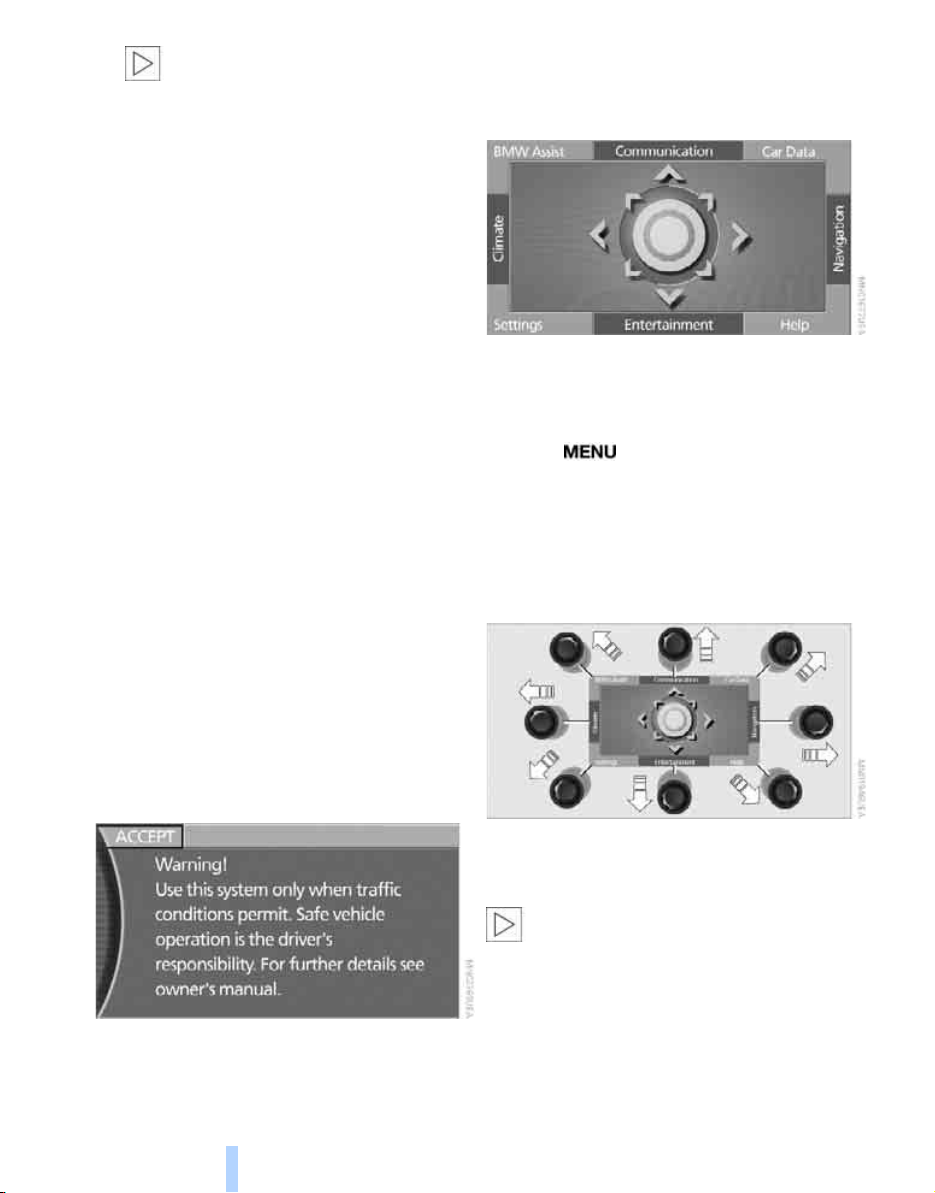
Start menu
You can access all functions of iDrive via eight
menu items.
Opening start menu
Press the button.
Opening the start menu from a menu:
> Move the controller toward the currently
active menu.
> Move the controller twice in one direction.
Selecting menu
Basic operation
Once the radio ready position is reached, the
following message appears on the Control Display:
To clear the message:
Press the controller.
This displays the start menu.
18
From the start menu, eight menus can be
accessed by moving the controller in the appropriate directions.
In a menu, you can change directly into a
new menu by moving in the corresponding direction, without having to open the start
menu first.
Moving in the direction that corresponds to the
last menu used brings you back to the last item
used in this menu.<
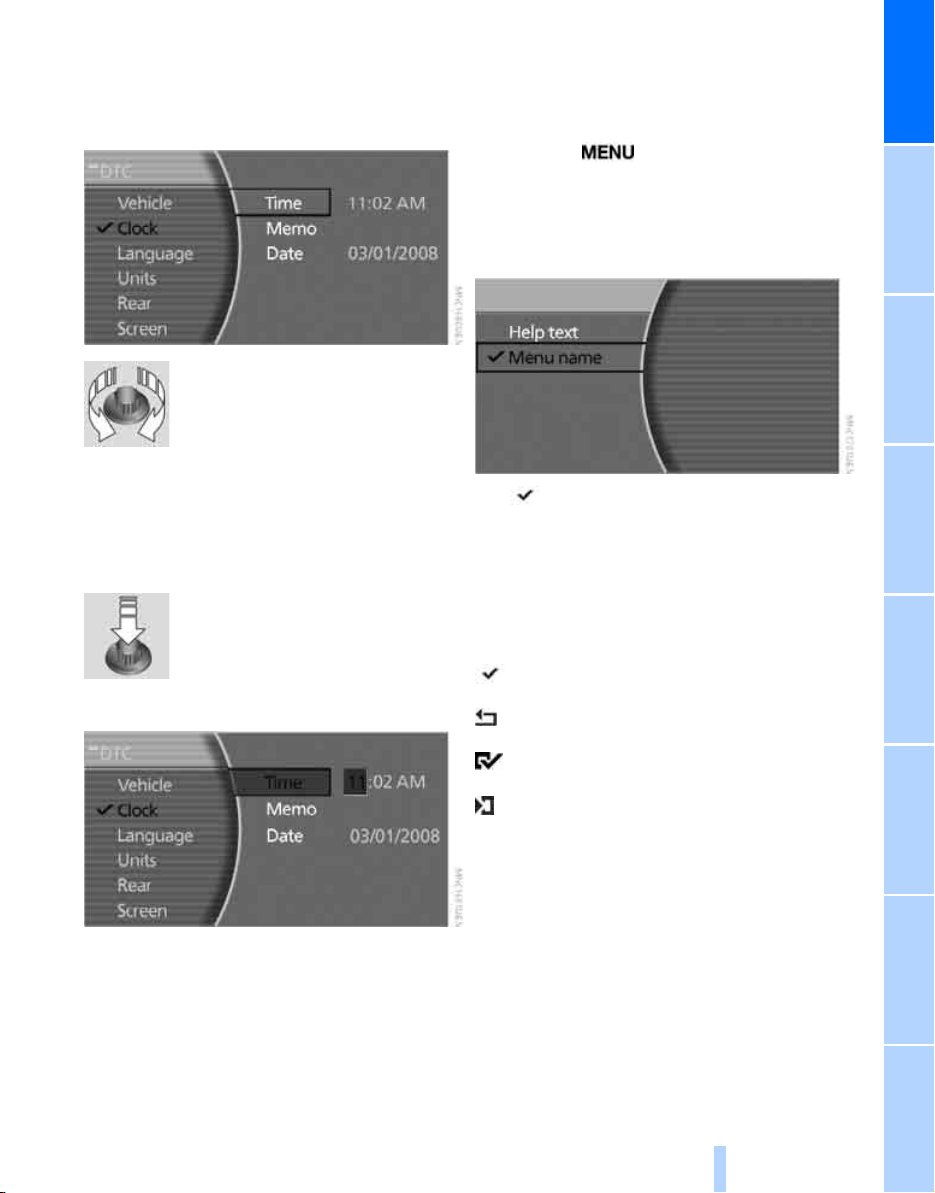
Selecting menu items
Online Edition for Part no. 01 41 0 012 836 - © 08/06 BMW AG
To edit a function, select the corresponding
menu item. Menu items shown in white can be
selected.
Turn the controller
The highlight moves.
To change between the menu
items on the left and right side of
the Control Display, continue to turn the controller at the beginning or end of a list. The highlight moves to the other side of the Control Display.
Displaying and hiding menu name
You can program the system to display the
menu name each time you proceed to a new
menu.
1. Press the button to open the start
menu.
2. Move the controller toward "Help".
3. Select "Menu name" and press the control-
ler.
The symbol indicates the menu that is currently activated. The menu name is displayed.
At a glance
Activating menu item
Press the controller.
Changing settings
1. Turn the controller to change the setting.
2. Press the controller to adopt the setting.
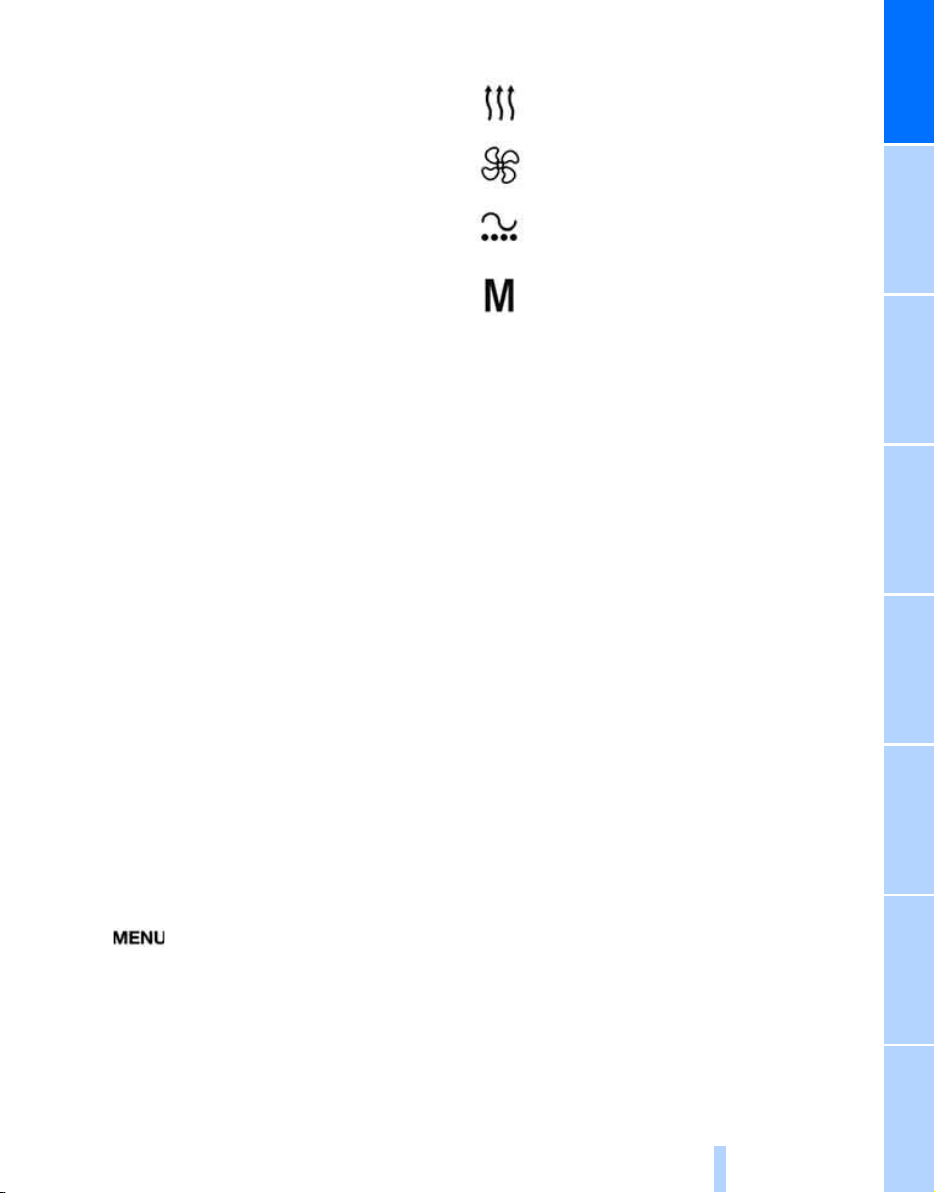
Symbols
Some functions and information are displayed
in the form of symbols:
The function is switched on
Back.
The function is switched on
"Split": to show the current display in the
assistance window.
19
Reference ControlsDriving tipsCommunications NavigationEntertainmentMobility
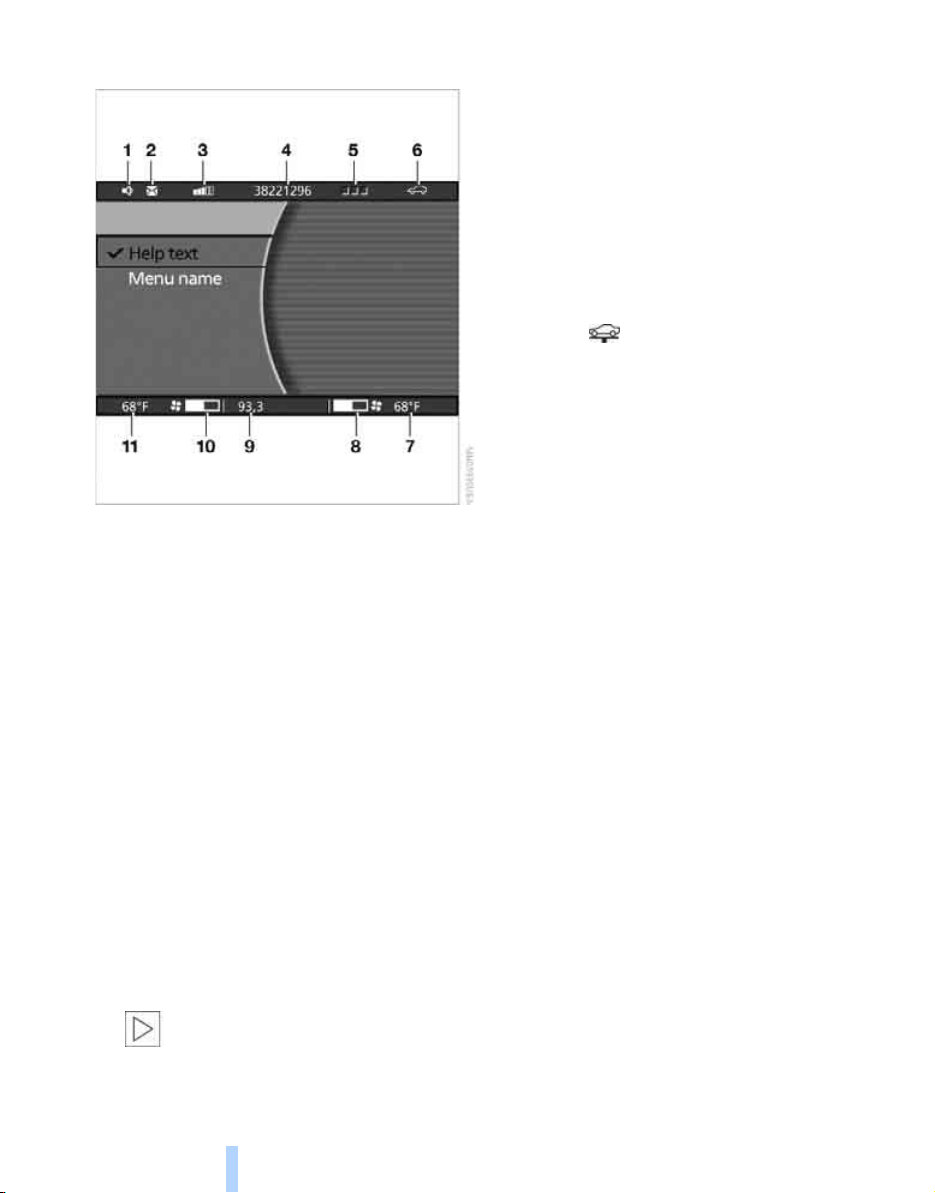
Status lines
Online Edition for Part no. 01 41 0 012 836 - © 08/06 BMW AG
iDrive
1 Hands-free mode active
2 Display field for missed calls
3 Signal strength, mobile radio network
4 Display field
> name of mobile phone logged on
> of the entered/dialed phone number
5 Telephone status
> Green, yellow and red flashing:
Linking of a mobile phone.
> Green:
Incoming or outgoing call.
> Red:
No network available.
> Yellow:
The network of another provider is being
used, partner network
> Flashing yellow:
The network of another provider is being
used, visited network
Roaming in a partner or external network incurs higher call charges than
in your home network.<
6 There is a Check Control message 82
> You can have additional information
shown on the Control Display by using
the "Car Data" menu under
"CHECK" 81
Status service requirement display 79
> Red:
At least one service interval has been
exceeded.
You can have more precise information
regarding the maintenance procedure
displayed by using the "Car Data" menu
under 79
7 Display of temperature selection and inten-
sity of the AUTO program, right side of passenger compartment
8 Air volume, right side of passenger com-
partment
9 Entertainment
Display for radio, CD, and DVD
With compressed audio files, the track
information is displayed 167
*
*
.
*
.
10 Air volume, left side of passenger compart-
ment
11 Display of temperature selection and inten-
sity of the AUTO program, left side of passenger compartment
20

Assistance window
Online Edition for Part no. 01 41 0 012 836 - © 08/06 BMW AG
Additional information can be displayed in the
assistance window:
> Short help and supplementary information
texts about selected menu items.
> A function selected from the "Car Data"
menu, refer to page 83.
> The route with a navigation system, refer to
page 130.
Status lines
At a glance
Showing/hiding help texts
You can display help texts and supplementary
information on selected menu items in the
assistance window.
1. Press the button to open the start
menu.
2. Move the controller toward "Help".
3. Select "Help text" and press the controller.
The symbol indicates the menu that is currently activated.
1 Outside temperature or destination of the
navigation system
2 Time
3 Date
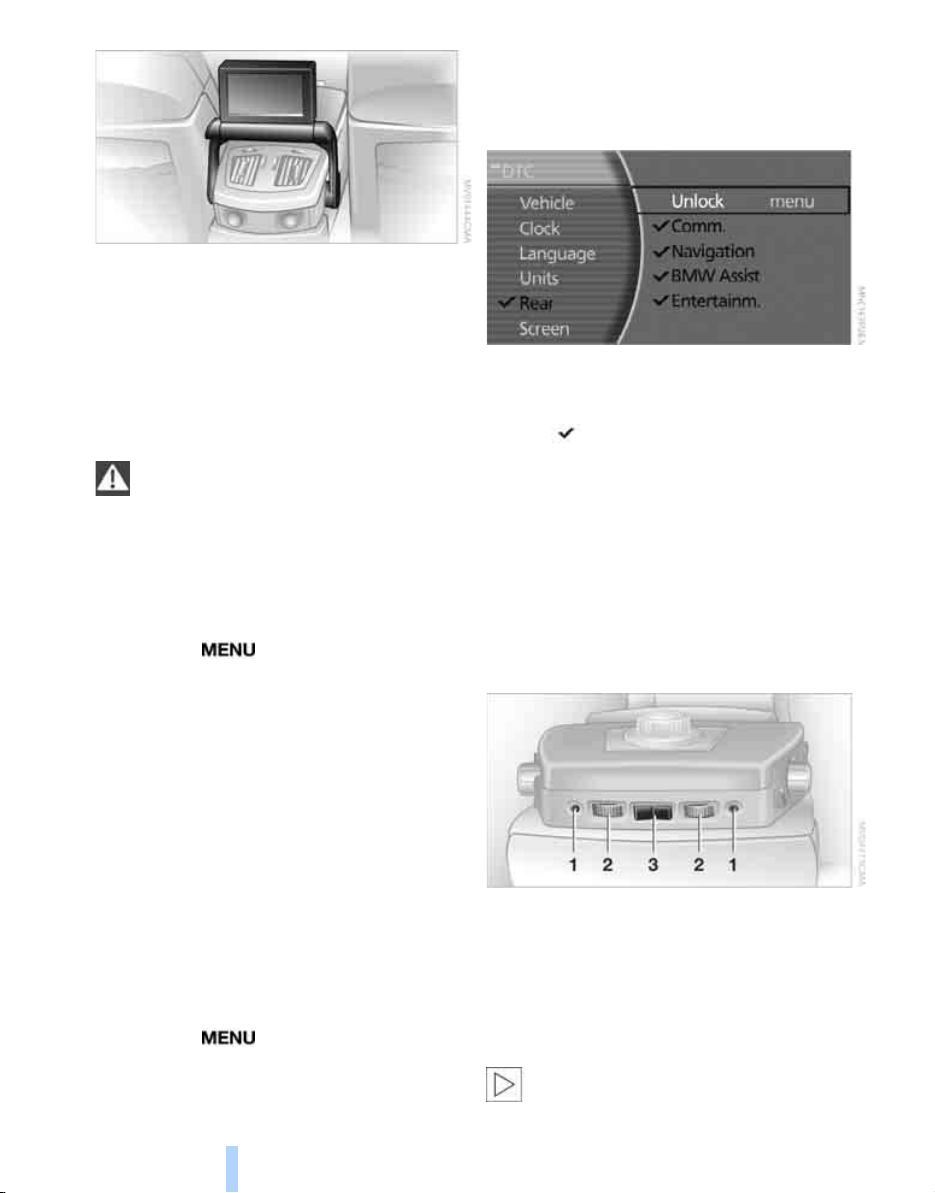
Rear seat screen*
Some of the functions of iDrive can also be
operated via the rear seat screen. Certain functions are only available via iDrive. These functions can only be operated to a limited degree
on the rear screen, e.g. the speed limit can only
be displayed. The settings are made via iDrive.
Deploying rear seat screen
1. Swing pivoting arm upward until it engages.
2. Fold rear seat screen upward.
21
Reference ControlsDriving tipsCommunications NavigationEntertainmentMobility
iDrive
Online Edition for Part no. 01 41 0 012 836 - © 08/06 BMW AG
The rear seat screen is ready for operation.
Stowing rear seat screen
1. Align rear seat screen so that it is straight.
2. Fold rear seat screen downward until pivot-
ing arm unlocks.
Pivoting arm swings downward.
The rear seat screen is switched off.
Pivot the rear seat screen completely
downward when the ski bag is being
used; otherwise, it could be damaged.
Do not pivot the rear seat screen up or down
with the cup holders open, as this can damage
it.<
Switching off rear seat screen
1. Press the button to open the start
menu.
2. Press the controller.
Press the controller again to switch the screen
back on.
3. Select "Rear" and press the controller.
4. Select "Unlock" and press the controller
repeatedly until the desired enabling of the
rear iDrive is set.
> "menu"
You can switch the offered menus on or off
by turning and pressing the controller.
The symbol indicates the menus that
are currently activated.
> "None"
Switches the rear screen off.
> "Full"
Releases all function locks.
> "Limited"
You disable the functions that are used on
the front Control Display.
Headphones
Controller/buttons
The controller and buttons are located on the
center armrest.
Rear lock
The available functions are operated with the
respective controller.
You can use iDrive to restrict operation in the
rear or to switch off the rear seat screen.
iDrive, for principle details, refer to page 16.
1. Press the button to open the start
menu.
2. Move the controller toward "Settings".
22
1 Headphone jack
2 Adjusting volume
3 Station scan/track search
> Station scan
> Search track for CD, search chapter for
DVD changer
With headphones connected, the sound
output for the Control Display and the rear

seat screen are played back separately. For
Online Edition for Part no. 01 41 0 012 836 - © 08/06 BMW AG
example, a radio station can be listened to while
a DVD is being played in the rear.<
Headphones are only intended for passengers
in the rear seats. Please check with local regulations regarding use of headphones.
At a glance
23
Reference ControlsDriving tipsCommunications NavigationEntertainmentMobility
Voice command system
Online Edition for Part no. 01 41 0 012 836 - © 08/06 BMW AG
*
The concept
The voice command system allows you to control operation of various vehicle systems without ever removing your hands from the steering
wheel. The system operates on the basis of
voice commands that you will learn easily after
using them a few times. In many cases, the
voice command system assists you with
announcements or questions while you are
making your entries.
The voice command system transforms your
oral commands and dialog answers into control
signals for the selected systems.
Voice command system
Please take the time to acquaint yourself
with how a particular system operates
before proceeding to control it using the voice
command system.<
Note
Use iDrive to set the language that will be used
so that the voice command system will be able
to identify the commands to be spoken. Setting
the language of iDrive, refer to page 84.
Symbols used
These sections contain information on
using the voice command system.
{...} Verbal instructions to use with the voice
command system.
{{...}} Identifies the answers generated by the
voice command system.
Systems available for use with voice
command
> {Navigation}, refer to page 130
> {Radio}, refer to page 156
> {Telephone}, refer to page 184
> {CD}, refer to page 163
> {CD changer}, refer to page 165
> {Notepad}, refer to page 26
> {DVD}, refer to page 170
The Info Display, refer to page 25, will display
either the equipment that you are now operating or any current error messages.
Voice commands
Voice command system activation
Briefly press the button on the steering
wheel.
An acoustic signal and the display "SVS active"
on the Info Display, refer to page 25, indicate
that the system is ready for operation. The system automatically starts in the main menu.
From here, you can call up all the equipment
that can be operated.
Canceling voice command
Briefly press the button on the steering
wheel
or
{Cancel}.
In dialogs in which any text can be spoken, e.g.
names, notes, canceling is only possible using
the button.
The system automatically switches over
to its telephone mode if you receive a call
during voice input. "SVS active" appears on the
Info Display, refer to page 25.<
Voice commands
The voice command system operates on the
basis of specific, predefined commands; these
commands should be spoken precisely as indicated. You can have the possible commands
read aloud at any point. To do so, say the command {Options}.
In addition to the commands described, there
are often other commands that run the same
function. Instead of {Options}, you can, for
example, also say {What now}. In addition,
24

numerous options are often available, such as
Online Edition for Part no. 01 41 0 012 836 - © 08/06 BMW AG
{Scale 100 miles} instead of {Scale}.
Displays on Info Display
Short commands
In the {Main menu} level, you can run certain
functions directly with brief commands, refer to
page 228, without having to open an equipme nt
level first.
For example, if you want to dial a phone number, you can directly
1. {Dial number}.
2. Enter the phone number.
without previously
{Telephone}
to call.
The Info Display shows you what the voice
command system has understood in line 2,
while also indicating which voice command or
question is currently active in line 1.
In addition, any error messages are also displayed.
Identification in Owner's Manual
Special commands are available for specific
systems. In this Owner's Manual you will find
these commands in the sections describing the
individual systems.
Operation with the voice command system
is always indicated with this symbol.
Changing map scale for navigation: an example
Starting the dialog
Briefly press the button on the steering
wheel.
At a glance
You say The voice command system replies Shown on Info Display
"SVS active"
{Change scale}{{Please enter the desired scale}} "scale?
change scale"
{Scale 400 feet} "ok
400 ft"
25
Reference ControlsDriving tipsCommunications NavigationEntertainmentMobility
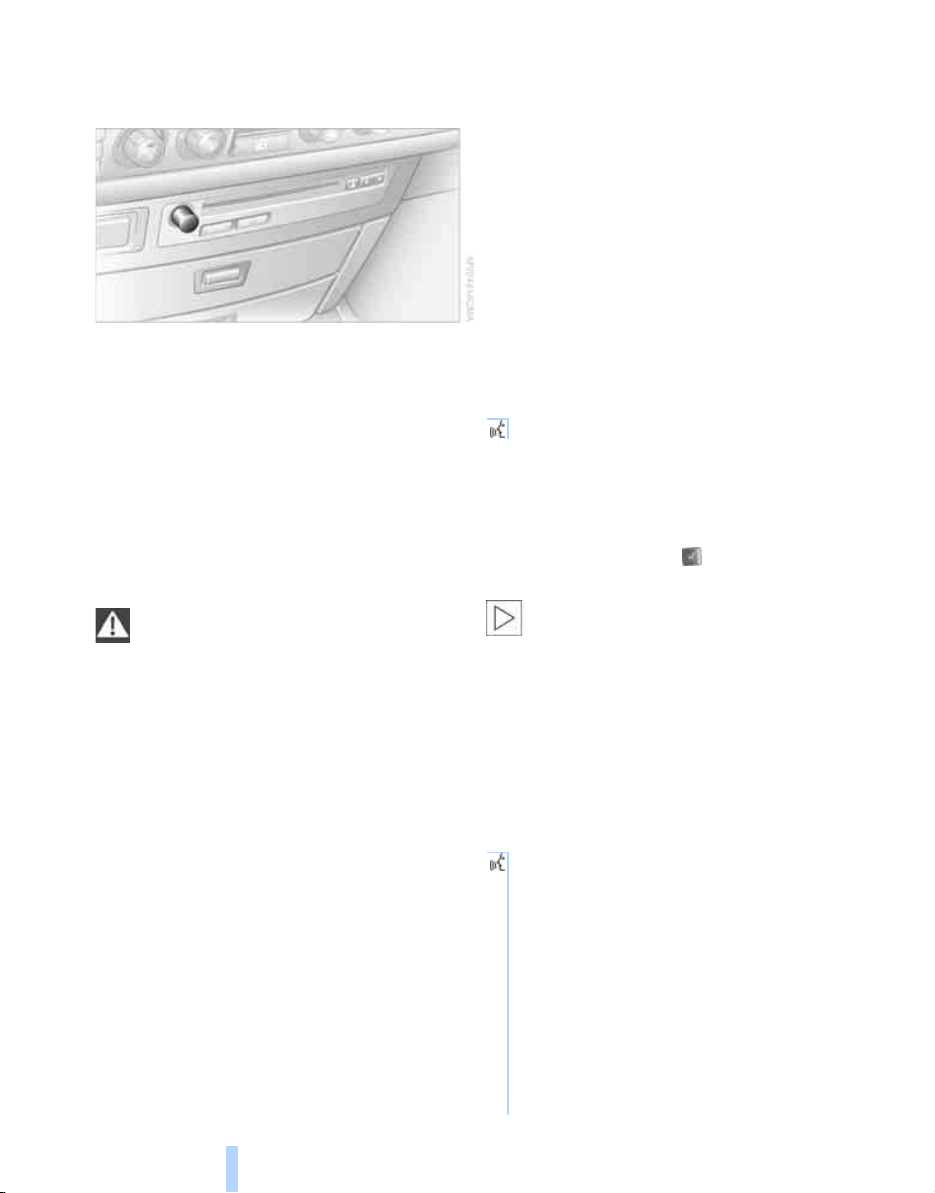
Adjusting volume
Online Edition for Part no. 01 41 0 012 836 - © 08/06 BMW AG
You can adjust the volume for the instructions
from the voice command system:
> Keep the doors, windows and glass sunroof
closed to prevent interference from ambient noise.
> Avoid other sources of noise in the vehicle
while speaking, and ask other vehicle occupants to refrain from talking while you are
using the system.
> The hands-free microphone is aimed
toward the driver. This means that the system might not be able to register the voices
of other vehicle occupants properly.
Turn the knob during an instruction/announcement to select the desired volume.
Instructions/announcements from the voice
command system will continue at this volume
level, even if the other audio sources are set to
Voice command system
minimum volume.
The volume setting is stored for the remote
control currently in use.
Notes
Do not use the voice command system to
make emergency calls. Your voice and
habitual tone could be affected by stressful situations, as a result of which the process of
establishing the telephone connection could be
unnecessarily delayed. Instead, use the emergency call button near the interior rearview mirror, refer to page 218.<
Environmental conditions
The voice command system uses a special
hands-free microphone located in the front of
your vehicle's headliner. Although the system is
designed to filter out ambient noise, you can
help ensure that your commands will be understood by observing the following instructions:
> Speak smoothly and clearly, at a normal vol-
ume. Avoid excessive emphasis and
pauses.
> Do not speak while the voice command sys-
tem is itself speaking.
The notepad
Recording a note
{Record note}.
You can store roughly ten minutes of spoken
text, either as a single entry or as multiple
entries of any desired length.
To stop recording:
Maintain pressure on the button for several
seconds.
When recording a note, the voice command system does not hear the com-
mand {Cancel} or {Exit}. The text checking
function for command words is deactivated in
this case so that you can speak any desired text
for your notes. This feature saves you from having to concentrate on avoiding any command
words.<
Listening to a notepad entry
To listen to recorded notepad entries:
1. {Read out}.
Approximately the first 3 seconds of
the first note are read aloud.
2. After the request {{Record note, read
out note, delete note.}} select the
desired function.
> To listen to the entire note:
{Read out}.
> To listen to the next note: {Next}.
> To listen to the note again:
{Back} or {Repeat}.
26

Deleting notes
Online Edition for Part no. 01 41 0 012 836 - © 08/06 BMW AG
1. {Edit}.
2. {Delete}.
Clearing notepad
To delete all contents from the notepad:
1. {Notepad}.
2. {Delete}.
Standard commands
The standard commands available for use with
all controlled systems are the same.
Function Command
To repeat last message issued by the voice command system
To switch off the voice command system {Cancel}
To set comprehensive instructions and error
reports
To set brief instructions and error reports {Short dialog}
To call up information on individual items of equipment
To have the system read aloud a list of the commands available for the selected system. This list
simultaneously appears on the Info Display, refer
to page 25
To open the main menu {Main menu}
On delivery, the {Standard dialog} is set
so as to simplify familiarization with the
voice command system.<
{Repeat}
{Standard dialog}
{Help}
{Options}
At a glance
27
Reference ControlsDriving tipsCommunications NavigationEntertainmentMobility
Online Edition for Part no. 01 41 0 012 836 - © 08/06 BMW AG
Controls
Online Edition for Part no. 01 41 0 012 836 - © 08/06 BMW AG
Controls
This chapter is intended to provide you with
information for complete control of your vehicle.
Its extensive array of features and accessories,
provided both for driving and for your own
safety, comfort and convenience,
are described here.

Opening and closing
Online Edition for Part no. 01 41 0 012 836 - © 08/06 BMW AG
Remote control/key
1 Remote control with integrated key
Opening and closing
2 Spare key
3 Adapter for spare key, in onboard tool kit,
refer to page 212
Remote control with integrated key
Each remote control contains a battery which is
automatically charged in the ignition lock while
driving. Use each remote control for an
extended drive at least twice a year to keep the
battery charged. For Comfort Access
remote control contains a replaceable battery,
refer to page 39.
Depending on which remote control is detected
by the vehicle during unlocking, different settings are called up and carried out in the vehicle,
refer to Key Memory on page 31.
Information on the required maintenance is also
stored in the remote control, refer to CBS Condition Based Service, page 210.
*
, the
Integrated key
Press button 1 to release the key.
You can use the integrated key to lock and
unlock the following:
> the storage compartment under the front
armrest
> the driver's door
> the luggage compartment lid
Inside the storage compartment, you will also
find the switch for locking the luggage compartment lid separately, refer to page 35.
If you then lock the storage compartment under
the center armrest, refer to page 114, and only
surrender the remote control, this will prevent
unauthorized access to the vehicle through the
luggage compartment lid. This is an advantage
in a hotel, for example.
New remote controls
New remote controls, additional or when lost,
can be obtained from your BMW center.
Spare key
Store the spare key in a safe place such as your
wallet. This key is not intended for constant
use.
The spare key and integrated key fit the same
locks.
30

Adapter for spare key
Online Edition for Part no. 01 41 0 012 836 - © 08/06 BMW AG
You will need the adapter to activate the ignition
and to start the vehicle with the spare key.
Take the adapter from the Onboard tool kit,
refer to page 212.
Press lock button 1, slide the cover open and
insert the spare key 2 into the adapter. Close
the cover and insert the adapter into the ignition
lock.
Key Memory
The concept
You can set a number of functions of your BMW
individually according to your preferences. Key
Memory ensures that most of these settings are
stored for the remote control currently in use
without you having to do anything. When the
vehicle is unlocked, the corresponding remote
control is detected and the settings stored for it
are called up and carried out.
This means that your BMW will return to your
personal settings even if it has in the meantime
been driven by another person with his/her own
remote control and settings. The individual settings are stored for a maximum of four remote
controls.
Key Memory
> Personal temperature distribution for seat
*
heating
> Personal setting for the programmable but-
ton on the steering wheel, refer to page 52.
> Personal setting of PDC Park Distance
Control
> Air distribution, temperature, and intensity
of the Automatic climate control, refer to
page 105.
> Settings for the displays on the Control Dis-
play:
> Units of measure for fuel consumption,
> Language on Control Display, refer to
> Display format of date and time, refer to
> Brightness of Control Display, refer to
> Personal settings for volume and tone of
the Entertainment sound output, refer to
page 153.
> Personal settings for the stored stations of
the radio, refer to page 158.
> Personal settings for the volume of the
hands-free telephone operation, refer to
page 179.
, refer to page 49.
*
, refer to page 86.
distance traveled, distances to go, temperature, and pressure, refer to page 84.
page 84.
page 84.
page 85.
Central locking system
The concept
The central locking system is ready for operation whenever the driver's door is closed. This
simultaneously engages and releases the locks
on the following:
> Doors
> Luggage compartment lid
> Fuel filler door
Controls
31
Reference At a glanceDriving tipsCommunications NavigationEntertainmentMobility

The central locking system can be operated
Online Edition for Part no. 01 41 0 012 836 - © 08/06 BMW AG
from the outside:
> via the remote control
> via the driver's door lock
> with Comfort Access
and from inside via the button for the central
locking system.
When the system is locked from inside, the fuel
filler door remains unlocked. Refer to page 34.
Each time the central locking system is locked
or unlocked from outside the vehicle, this simultaneously engages or disengages the anti-theft
system. The alarm system is also armed or disarmed. The remote control also switches the
interior lamps on and off.
Opening and closing
For additional details on alarm system
page 37.
In an accident of corresponding severity, the
central locking system automatically unlocks
the vehicle. In addition, the hazard warning
flashers and interior lamps switch on.
*
via the door handles
Opening and closing: from outside
Using remote control
Persons or animals left unattended in a
parked vehicle can lock the doors from
the inside. For this reason, bring the remote
control with you whenever you leave the vehicle
so that you will always be able to unlock the
vehicle from outside.<
refer to
2 Locking and securing, arming alarm sys-
tem, switching off tilt alarm sensor and interior motion sensor, switching on interior
lamps and perimeter lighting
3 Opening luggage compartment lid
4 Switching on interior lamps and pathway
*
lighting, activating panic mode
find details about pathway lighting on
page 100.
If it is no longer possible to lock the vehi-
cle with a remote control, its battery is
discharged. Use this remote control during an
extended drive; this will recharge the battery,
refer to page 30.
In the event of malfunctions, please contact
your BMW center. which is also your source for
replacement keys.<
. You can
Unlocking
1. Press the button. The hazard warning
flashers blink twice.
Driver's door and fuel filler door are
unlocked.
2. Press the button again.
All other doors and the luggage compartment lid are unlocked.
The interior lamps and the door-mounted
perimeter lamps come on.
Comfort opening
Press the button longer. The windows and
the glass sunroof open. The glass sunroof will
not move if it is already in its raised position.
Engaging locks
Press the button. The hazard warning
flashers blink once.
1 Unlocking, comfort opening, and deactivat-
ing alarm system
32
Switching on interior lamps and
perimeter lighting
Press the button if the vehicle is
locked.

Switching on interior lamps
Online Edition for Part no. 01 41 0 012 836 - © 08/06 BMW AG
Press the button.
You can also use this function to locate your
vehicle in parking garages etc.
Panic mode*
You can also trigger the alarm system in case of
danger:
Press the button for at least 3 seconds.
To deactivate the alarm: press any button
Opening luggage compartment lid
Press the button for approx. one second.
The luggage compartment lid opens, regardless of whether it was previously locked or
unlocked.
During opening, the luggage compart-
ment lid pivots back and up. Make sure
there is adequate clearance available before
opening.
To avoid being inadvertently locked out, never
set the remote control down in the luggage
compartment. A previously locked luggage
compartment lid is also locked again after closing.<
Automatic luggage compartment lid
operation*
Opening luggage compartment lid
Press the button for approx. one second.
The luggage compartment lid opens all the way,
regardless of whether it was previously locked
or unlocked.
To interrupt the opening process:
Press the button again while opening is in
progress.
During opening, the luggage compart-
ment lid pivots back and up. Make sure
there is adequate clearance available before
opening.
To avoid being inadvertently locked out, never
set the remote control down in the luggage
compartment. A previously locked luggage
compartment lid is also locked again after closing.<
Malfunction
Local radio waves can cause the remote control
to malfunction.
Should the remote control fail to operate due to
interference of this kind, the vehicle can be
opened and closed with a key via the door lock.
If it is no longer possible to lock the vehicle with
a remote control, then its battery is discharged.
Use this remote control during an extended
drive; this will recharge the battery, refer to
page 30.
For US owners only
The transmitter and receiver units comply with
part 15 of the FCC/Federal Communication
Commission regulations. Operation is governed by the following:
FCC ID:
> LX8766S
> LX8766E
> LX8CAS
> LX8CAS2
Compliance statement:
This device complies with part 15 of the FCC
Rules. Operation is subject to the following two
conditions:
> This device may not cause harmful interfer-
ence, and
> this device must accept any interference
received, including interference that may
cause undesired operation.
Any unauthorized modifications or
changes to these devices could void the
user's authority to operate this equipment.<
Controls
33
Reference At a glanceDriving tipsCommunications NavigationEntertainmentMobility

Using key
Online Edition for Part no. 01 41 0 012 836 - © 08/06 BMW AG
1. Turn key.
Driver's door and fuel filler door are
unlocked.
2. Turn key again.
Opening and closing
All other doors and the luggage compartment lid are unlocked.
Convenience operation
You also have the option of operating the windows and the glass sunroof from the driver's
door lock.
> To open:
With the door closed, turn the key to the
Unlock position and hold it there.
> To close:
With the door closed, turn the key to the
Lock position and hold it there.
Watch during the closing process to
be sure that no one is injured. Releas-
ing the key stops the operation.<
Manual operation
If an electrical malfunction occurs, you can
unlock or lock the driver's door with the key in
the end positions of the door lock.
Opening and closing: from inside
When the front doors are closed, use this button to unlock the doors and luggage compartment lid or to lock them without arming their
anti-theft sensors. The fuel filler door remains
unlocked.
If the remote control, refer to page 32, or
Comfort Access, refer to page 38, have
been used to unlock only the driver's door and
you press the button, then this unlocks all of
the other doors, the luggage compartment lid,
and the fuel filler door.
You can lock a closed driver's door by pressing .<
Unlocking and opening doors
> Either unlock the doors together with the
button for the central locking system and
then pull the release handle above the armrest
> or pull the release handle for each door
twice: the first pull unlocks the door, and the
second one opens it.
When the low beams are switched on, the
interior door handles are also lit. The
intensity of the lighting is adjusted using the
instrument lighting control, refer to page 102.<
Engaging locks
> Use the central locking button to lock all of
the doors simultaneously
> or press down the individual lock buttons of
the doors.
34

To prevent the driver from being inadvertently
Online Edition for Part no. 01 41 0 012 836 - © 08/06 BMW AG
locked out of the vehicle, the lock button on the
driver's door automatically extends again after a
brief period if the door remains open.
Persons or animals left unattended in a
parked vehicle can lock the doors from
the inside. For this reason, bring the remote
control with you whenever you leave the vehicle
so that you will always be able to unlock the
vehicle from outside.<
Doors
Automatic soft closing*
Apply gentle pressure to the door to close it.
The closing process will then be carried out
automatically.
To avoid injuries, make sure that the
door's travel path is completely free and
clear before closing.<
Luggage compartment lid
Opening from outside
The lock
All of the vehicle's keys fit the luggage compartment lid lock located in the license plate recess.
Opening separately
Insert the key into the luggage compartment
lid's lock and turn it all the way to the right – the
lid opens.
To avoid being inadvertently locked out,
never set the key or the remote control
down in the luggage compartment. The luggage compartment is locked again as soon as
you close the lid.
If you use the lock to unlock the luggage compartment lid while the alarm system is armed,
the alarm will be triggered. To avoid this, you
should unlock the vehicle first. If the alarm has
been triggered accidentally, switch off the
alarm, refer to page 37.<
Controls
Press the button on the luggage compartment
lid or the button on the remote control for
approx. 1 second: the luggage compartment lid
opens.
During opening, the luggage compartment lid pivots back and up. Make sure
there is adequate clearance available before
opening.<
Locking separately
The location of the switch varies, depending on
the individual vehicle's equipment.
1 Luggage compartment lid locked
2 Luggage compartment lid unlocked
Push the switch into position 1. This locks the
luggage compartment lid and disconnects it
from the central locking system.
35
Reference At a glanceDriving tipsCommunications NavigationEntertainmentMobility

If you then lock the storage compartment under
Online Edition for Part no. 01 41 0 012 836 - © 08/06 BMW AG
the front center armrest, refer to page 114, and
only surrender the remote control without the
key, refer to page 30, for example when leaving
the vehicle for valet parking, etc., this will prevent unauthorized access to the vehicle
through the luggage compartment lid. This is an
advantage in a hotel, for example.
Manual operation
If an electrical malfunction occurs, refer to
Opening separately on page 35.
Opening from inside
Opening and closing
You can use this button to open the luggage
compartment lid when the vehicle is stationary.
This is not possible if the luggage compartment
lid has been locked separately.
Make sure that the closing path of the
luggage compartment lid is clear; other-
wise, injuries may result.<
Automatic luggage compartment lid
operation*
Opening
The luggage compartment lid opens completely when you:
> Press the button next to the steering col-
umn.
> Press the button on the outside of the lug-
gage compartment lid, refer to page 35.
> Press the button on the remote control,
refer to page 33.
During opening, the luggage compartment lid pivots back and up. Make sure
there is adequate clearance available before
opening.<
Closing
Closing
A recess has been incorporated into the inside
trim on the luggage compartment lid to make it
easier to pull down.
Automatic soft closing
Apply gentle pressure to the luggage compartment lid to close it. The closing process will
then be carried out automatically.
36
The luggage compartment lid closes automatically when you:
> Press the button.
> Press the button on the outside of the lug-
gage compartment lid, refer to page 35.
The luggage compartment lid immediately stops opening or closing if you hold
it in place by hand.<
Make sure that the closing path of the
luggage compartment lid is clear; other-
wise, injuries may result.<

Manual operation
Online Edition for Part no. 01 41 0 012 836 - © 08/06 BMW AG
In the case of an electrical malfunction, you can
unlock the luggage compartment lid with the
key, refer to page 35, and slowly open and close
it without sudden movements.
Emergency release
Pull the lever inside the luggage compartment.
This unlocks the luggage compartment lid.
Alarm system
The concept
The vehicle alarm system responds to:
> opening of a door, the hood or the luggage
compartment lid
> movement in the vehicle interior: interior
motion sensor, refer to page 38
> changes in the vehicle's tilt if someone
attempts to steal the wheels or tow the
vehicle
> interruptions in battery voltage
The alarm system briefly indicates unauthorized tampering:
> with an acoustic alarm
> by switching on
> by flashing the high beams
Arming and disarming alarm system
When you lock or unlock the vehicle, either with
the remote control or at the door lock, the alarm
system is armed or disarmed at the same time.
When the alarm system is armed, you can also
open the luggage compartment lid with the
the hazard warning flashers
button on the remote control, refer to
page 33. When the luggage compartment lid is
closed, it is relocked and monitored again.
Unlocking via the door lock will trigger the
alarm on some national-market versions.
Pressing the 'Panic mode' button for a longer
period also triggers the alarm, refer to
page 33.<
Switching off alarm
> Unlock the vehicle using the remote control,
refer to page 32.
> Insert the remote control into the ignition
lock.
Indicator lamp displays
> The indicator lamp below the interior rear-
view mirror flashes continuously: the system is armed.
> The indicator lamp flashes after the vehicle
is locked: the doors or luggage compartment lid are not properly closed. Even if you
do not close the door involved, the system
begins to monitor the remaining areas, and
the indicator lamp flashes continuously
after 10 seconds. However, the interior
motion sensor is not activated.
> After the vehicle is unlocked, the indicator
lamp goes out: no manipulation or
attempted intrusions have been detected in
the period since the system was armed.
> After the vehicle is unlocked, the indicator
lamp flashes until the remote control is
inserted into the ignition lock, but for no
more than roughly 5 minutes: an attempted
entry has been detected in the period since
the system was armed.
Controls
37
Reference At a glanceDriving tipsCommunications NavigationEntertainmentMobility

Tilt alarm sensor
Online Edition for Part no. 01 41 0 012 836 - © 08/06 BMW AG
The tilt of the vehicle is monitored. The alarm
system reacts, e.g. in case of an attempted
wheel theft or towing.
Interior motion sensor
In order for the interior motion sensor to function properly, the windows and glass sunroof
must be completely closed.
Avoiding unintentional alarms
The tilt alarm sensor and interior motion sensor
may be switched off at the same time. This prevents unintentional alarms, e.g. in the following
situations:
Opening and closing
> In duplex garages
> During transport on car-carrying trains,
boats/ships or on a trailer
> When animals are to remain in the vehicle
Switching off tilt alarm sensor and
interior motion sensor
Press the button on the remote control
again as soon as the vehicle is locked.
The indicator lamp lights up briefly and then
flashes continuously. The tilt alarm sensor and
the interior motion sensor are switched off until
the next time the vehicle is unlocked and subsequently locked again.
Comfort Access*
With Comfort Access, you can have access to
your vehicle without having to hold the remote
control in your hand. It is sufficient to carry the
remote control on your person, e.g. in a jacket
pocket. The vehicle automatically detects the
associated remote control inside the vehicle or
in its immediate vicinity.
Comfort Access supports the following functions:
> Locking/unlocking the vehicle
> Unlocking the luggage compartment lid
separately
> Starting the engine
Functional requirements
> The vehicle can only be locked if the remote
control is outside the vehicle.
> The next unlocking and locking cycle is not
possible until after approx. 2 seconds.
> The engine can only be started if the remote
control is inside the vehicle.
Comparison to conventional remote
control
You can control the functions mentioned previously with the Comfort Access or by pressing
the buttons on the remote control. Therefore
please first familiarize yourself with the instructions for opening and closing, starting on
page 32.
The specific features involved in the use of
Comfort Access are described below.
If a short delay occurs when opening or
closing the windows and the glass sunroof, then this indicates that the system is
checking whether a remote control is located in
the vehicle. Please repeat opening or closing if
necessary.<
Unlocking
Pull a door handle. This corresponds to pressing the button.
Only the door of the door handle you have
pulled is unlocked.
You unlock the other doors from the inside,
using the central locking system button, refer to
page 34.<
Locking
Push a door handle. This corresponds to pressing the button.
Before locking, make sure that the igni-
tion and all current-consuming devices
are switched off in order to minimized the drain
on the battery.<
If a remote control is detected in the inte-
rior, the vehicle is unlocked again or not
locked in the first place.<
38

Unlocking the luggage compartment
Online Edition for Part no. 01 41 0 012 836 - © 08/06 BMW AG
lid separately
Press the button on the outside of the luggage
compartment lid, refer to page 35. This corresponds to pressing the button.
If a remote control accidentally left in the
luggage compartment is detected in the
locked vehicle, then the luggage compartment
lid opens again.<
Changing battery
The remote control for Comfort Access contains a battery that must be replaced when it
becomes discharged.
1. Remove the integrated key from the remote
control, refer to page 30.
2. Press in the detent catch, refer to arrow 1,
e.g. with the key.
Radio ready state
By briefly pressing the Start/Stop button, you
switch on the radio ready state, refer to
page 57.
When doing so, do not depress the brake
pedal; otherwise, the engine will start.<
Starting the engine
You can start the engine or switch on the ignition, as long as a remote control is in the passenger compartment. The remote does not
have to be inserted into the ignition lock, refer to
page 57.
Before driving into a car wash
1. Insert remote control into ignition lock.
2. Shift transmission into position N.
3. Switch engine off.
4. Leave the remote control in the ignition
lock.
The vehicle can roll.
Malfunction
Local radio waves can disrupt the function of
Comfort Access. Should the remote control fail
to operate due to interference of this kind, you
can respond by using the buttons on the remote
control or by using a key to unlock or lock your
vehicle at one of the doors. To start the engine
after this, insert the remote control into the ignition lock.
Controls
3. Remove the cover of the battery compart-
ment, refer to arrow 2.
4. Insert a battery of the same type with the
positive side facing upwards.
5. Press the cover to close it.
Return used battery to a recycling collection point or to your BMW center.<
Windows
To prevent bodily injuries, watch the win-
dow as it closes. Always take along the
remote control when you leave the vehicle; otherwise, children could, for example, operate the
windows and injure themselves.<
39
Reference At a glanceDriving tipsCommunications NavigationEntertainmentMobility

Opening, closing
Online Edition for Part no. 01 41 0 012 836 - © 08/06 BMW AG
> Press the switch down to the resistance
point:
The window continues to open as long as
you continue to hold the switch.
> Press the switch beyond the resistance
Opening and closing
point:
The window opens automatically. Press the
switch again to stop the opening movement.
You can close the windows in the same manner
by pulling the switch.
After switching off ignition
You can still operate the power windows:
> For an extended period in radio ready state.
> For approx. 1 minute when the ignition is
switched off or with the remote control disengaged.
To open, press the switch beyond the resistance point.
When you close the windows they will
slow down as they approach the end of
their travel; this is to allow the pinch protection
system to respond more precisely to any
obstructions encountered in this critical
range.<
Closing without the pinch protection
system
If danger outside the vehicle or a frozen window
prevents you from closing the windows normally, proceed as follows:
1. Pull the switch past the resistance point and
hold it there. The pinch protection system is
restricted and the window opens slightly
once the closing force exceeds a certain
value.
2. Pull the switch again beyond the resistance
point within approx. 4 seconds and hold it
there. The window closes without the pinch
protection system.
Safety switch
Pinch protection system
If the closing force exceeds a specific value as a
window closes, the closing action is interrupted
and the window reopens slightly.
Despite the presence of the pinch protec-
tion system, make sure to inspect the
window's travel path prior to closing it, as the
safety system might fail to detect certain kinds
of obstructions, such as very thin objects, and
the window would continue closing.
Do not install any accessories in the range of
movement of the windows; otherwise, the pinch
protection system will be impaired.<
40
With the safety switch, you can prevent the rear
windows from being opened or closed via the
switches in the rear passenger area, by children, for example.
The same is true for:
> the adjustment of the electrical rear seats,
refer to page 45
> the adjustment of the electrical head
restraints in the rear, refer to page 48
> the operation of the roller sun blind from the
rear, refer to page 112
The LED lights up when this safety feature is
activated.

Press the safety switch when children
Online Edition for Part no. 01 41 0 012 836 - © 08/06 BMW AG
ride in the rear; otherwise, unsupervised
closing of the windows could lead to injuries.<
In order to deactivate the function again,
you must insert the remote control into
the ignition lock or, with Comfort Access, you
must switch into radio ready state.<
Glass sunroof, electric*
To prevent bodily injuries, watch the
glass sunroof as it closes.
Always take along the remote control when you
leave the vehicle; otherwise, children could, for
example, operate the roof and injure themselves.<
Raising
Press the switch.
> The closed glass sunroof is raised and the
sliding visor opens slightly.
> An open glass sunroof automatically moves
into the raised position. The sliding visor
remains completely open.
Do not use force to close the sliding visor
when the sunroof is in its raised position,
as this could damage the mechanism.<
Opening, closing
> Slide switch back to the resistance point.
The glass sunroof and the sliding visor continue to open together for as long as you
maintain pressure on the switch.
> Press the switch back past the resistance
point.
The glass sunroof and the sliding visor open
automatically. Briefly press the switch again
to stop the opening movement.
Close the glass sunroof in the same way by sliding the switch toward the front. The sliding visor
remains open and can be closed by hand.
Automatic opening and closing
Press the switch beyond the resistance point.
The following movements are also automated:
> With the sunroof open, press the switch in
the raising direction: the sunroof is completely raised.
> With the sunroof raised, press the switch in
the opening direction: the sunroof is
opened completely.
Pressing the switch again stops the operation.
Pinch protection system
If the glass sunroof meets with resistance during closing after approximately the middle of the
roof opening or when closing from the raised
position, then the closing operation is interrupted and the glass sunroof opens again
somewhat.
Despite the presence of the pinch protec-
tion system, inspect the sunroof's travel
path prior to closing it, as the safety system
might fail to detect certain kinds of obstructions, such as very thin objects, and the sunroof
would continue closing.<
Closing without the pinch protection
system
If there is an external danger, push the switch
beyond the resistance point and hold it there.
The roof closes without the pinch protection
system.
Following interruptions in electrical
power supply
After an interruption in the power supply, it may
only be possible to raise the sunroof. The system must be initialized. BMW recommends
having this work carried out by your BMW center.
Controls
41
Reference At a glanceDriving tipsCommunications NavigationEntertainmentMobility

Moving manually
Online Edition for Part no. 01 41 0 012 836 - © 08/06 BMW AG
In the event of an electrical malfunction, you can
move the glass sunroof manually:
1. Take out the interior lamp, reach behind the
opening, press out the cover.
2. Insert the Allen wrench supplied with the
Opening and closing
onboard tool kit, refer to page 212, into the
opening provided. Turn to slide the glass
sunroof in the desired direction.
42

Adjusting
Online Edition for Part no. 01 41 0 012 836 - © 08/06 BMW AG
Sitting safely
The ideal sitting position can make a vital contribution to relaxed driving that is as fatigue-free
as possible. Together with the safety belts and
airbags, the sitting position plays an important
role in the event of an accident. To ensure that
the safety systems operate with optimized efficiency, we strongly urge you to follow the
instructions contained in the section below.
For additional information on transporting children safely, refer to page 54.
Airbags
Always maintain an adequate distance
between yourself and the airbags. Always
hold the steering wheel by its rim with hands at
the 9 o'clock and 3 o'clock positions to minimize the risk of injuries to your hands and arms
in the event of airbag deployment. No one and
nothing is to come between the airbags and the
seat occupant.
Do not use the cover of the front airbag on the
front passenger side as a storage area. Make
sure that the front passenger is sitting correctly
and does not rest feet or legs on the dashboard;
otherwise, leg injuries can occur if the front airbag is triggered. Make sure that occupants do
not rest their head against the side or head airbag; otherwise, injuries can occur if the airbags
are triggered.<
Even if you follow all of the instructions, injuries
resulting from contact with airbags cannot be
entirely ruled out, depending on the circumstances. The ignition and inflation noise may
provoke a mild – usually temporary – hearing
loss in extremely sensitive individuals.
For airbag locations and additional information
on airbags, refer to page 95.
Head restraint
A correctly adjusted head restraint reduces the
risk of injury to cervical vertebrae in the event of
an accident.
Adjust the head restraint so that its center
is approx. at ear level. Otherwise, there is
increased danger of injury in the event of an
accident.<
Adjusting the head restraint, refer to page 46.
Safety belt
Fasten safety belts on all occupied seats before
every trip. Although airbags enhance safety by
providing added protection, they are not a substitute for safety belts.
Your vehicle has five seats that are each
equipped with a safety belt.
Never allow more than one person to
wear a single safety belt. Never allow
infants or small children to ride on a passenger's lap. Make sure that the belt lies low around
the hips in the lap area and does not press on
the abdomen. The safety belt must not lie
across the neck, rub on sharp edges, be routed
over solid or breakable objects or be pinched.
Wear the safety belt without twisting, snugly
across the lap and shoulders, as close to the
body as possible. Otherwise, the belt can slip
over the hips in the lap area in a frontal impact
and injure the abdomen. Avoid wearing clothing
that prevents the belt from fitting properly and
pull the shoulder belt periodically to readjust
the tension across your lap in order to avoid a
reduction in the retention effect of the safety
belt.<
For instructions on operating safety belts, refer
to page 48.
Controls
43
Reference At a glanceDriving tipsCommunications NavigationEntertainmentMobility
Seats
Online Edition for Part no. 01 41 0 012 836 - © 08/06 BMW AG
Note before adjusting
Never attempt to adjust your seat while
operating the vehicle. The seat could
respond with unexpected movement and the
ensuing loss of vehicle control could lead to an
Adjusting
accident.
Also on the passenger side, do not recline the
backrest too far to the rear while the vehicle is
being driven; otherwise, there is a danger in the
event of an accident of 'sliding under' the safety
belt, eliminating the protection normally provided by the belt.<
Please note the information on damage to
safety belts provided on page 49 and the information on the active head restraints on
page 47.
The concept
Seat adjustment
You can use the control knob to adjust the settings after selecting the desired function with
the buttons.
To ensure that the safety systems continue to provide optimized protection,
please follow the adjustment instructions on
page 44.<
3 Forward and back:
Height:
Backrest:
This button is basically always active.
4 Thigh support:
Height:
Tilt:
5 Lumbar support
adjustment
6 Height of the head restraint:
*
, refer to Lumbar support
You adjust the seat in two stages:
1 Preselect the function: the button lights up
brightly
2 Adjustments: control knob
> slide forward or back
> slide up or down
> turn
44
Front comfort seat* adjustment
With this seat, you can also adjust:
5 Backrest width: increase or decrease lateral
support
6 Shoulder support, refer to Shoulder support
adjustment
Backrest:
Automatic backrest width adjustment
The backrest automatically moves to the widest
possible position to make it easier to enter and
exit the vehicle, before then returning to the
standard position or the stored memory setting.
This automatic system is influenced on each of
the two seats by their respective door, as well
as on the driver's seat, by the ignition and on the

front passenger's seat, by the safety belt
Online Edition for Part no. 01 41 0 012 836 - © 08/06 BMW AG
buckle.
Lumbar support adjustment
5 Lumbar support
You can also adjust the contour of the backrest
to obtain additional support in the lumbar
region.
The upper hips and spinal column receive supplementary support to help you maintain a
relaxed, upright sitting position.
> Increase or decrease curvature
> Shift curvature up or down
Shoulder support adjustment
6 Adjustment of the tilt angle of the shoulder
support:
The shoulder support provides support to your
back in the shoulder region as well. This provides a relaxed driving position and helps
relieve stress on the shoulder muscles.
Rear comfort seat* adjustment
It is not possible to adjust the comfort
seats if the safety switch for the power
windows has been pressed, refer to page 40.<
Adjusting passenger seat from rear
Controls
The front passenger's seat can be adjusted
from the rear sitting positions, for instance,
when a rear passenger desires more legroom.
Press the button to activate this function, refer
to arrow.
You can use the control knob to adjust the settings after selecting the desired function with
the buttons.
1 Forward and back:
Height:
Tilt:
2 Height of head restraint:
Backrest:
Press the button again, refer to arrow, to deactivate this function.
You can use the control knob to adjust the settings after selecting the desired function with
the buttons.
1 Forward and back:
Tilt:
Backrest:
This button is basically always active.
2 Lumbar support, refer to Lumbar support
adjustment
3 Shoulder support:
Height of head restraint:
Backrest:
Resetting to standard adjustment
position
You can use the button to return the rear seats
to their standard or default positions. Maintain
pressure on the button until the system completes the adjustment.
45
Reference At a glanceDriving tipsCommunications NavigationEntertainmentMobility

It will be necessary to return the rear seats
Online Edition for Part no. 01 41 0 012 836 - © 08/06 BMW AG
to their standard position before using a
child restraint system, for instance, refer to
page 54.<
Seat, mirror and steering
Adjusting
wheel memory
You can store and select two different adjustment settings for the driver's seat, exterior mirrors and steering wheel.
With comfort seats, you can also use the memory to store and recall two seat positions for
each additional seat.
The adjustment of the lumbar support is not
stored in the memory.
Storing
1. Switch on radio ready state or ignition, refer
to page 57.
2. Set desired seat position; for driver's seat
also set the exterior mirror and steering
wheel position.
3. Press
4. Press the desired memory button 1 or 2:
M
EMORY button:
The LED in the button lights up.
The LED goes out.
Comfort mode
1. With driver's door open after unlocking or
with radio ready state switched on.
2. Briefly press the desired memory button 1
or 2.
The adjusting procedure is immediately interrupted when you touch a seat adjustment
switch or one of the memory buttons.
Safety mode
1. With driver's door closed and ignition
switched either on or off.
2. Press the desired memory button 1 or 2
and maintain pressure until the adjustment
process has been completed.
M
If you press the
Press the button again; the LED goes out.
EMORY button accidentally:
Head restraints
A correctly adjusted head restraint reduces the
risk of injury to cervical vertebrae in the event of
an accident.
Adjust the head restraint so that its center
is approx. at ear level. Otherwise, there is
increased danger of injury in the event of an
accident. Only remove the head restraint if no
one will be sitting on the seat in question. Reinstall the head restraint before transporting anyone in the seat. Otherwise, the protective function of the head restraint is unavailable.<
Front: height adjustment
Call-up
Do not request a position from the memory while the vehicle is moving. There is a
risk of accident from unexpected movement of
the seat or steering wheel.<
46
1. Select head restraint, button 1.
2. Adjust height, arrow 2.

Removing
Online Edition for Part no. 01 41 0 012 836 - © 08/06 BMW AG
1. Raise head restraint all the way.
2. Pull out the head restraint all the way out
with a firm tug.
Installing
1. Press the button upward, refer to arrow 2,
for a max. of approx. 10 seconds, but if possible, only until there is a change in the
humming sound, indicating that an installed
head restraint would have been moved all
the way up.
2. Insert the head restraint and press down
until you hear and feel it engage on both
sides.
Front head restraints, active*
The comfort seats are equipped with an active
head restraint.
In the event of a rear-end collision of corresponding severity, the active head restraint
reduces the distance from the head.
Do not use seat or head restraint covers
and do not hang objects, e.g. clothes
hangers, on the head restraints or attach any
accessories to the seat or head restraint. Otherwise, the protective function of the active head
restraint will be impaired and personal safety
endangered.<
Rear: height adjustment
Controls
Front: tilt angle adjustment
Tilt the head restraint.
With the comfort seat, adjust the distance
to the back of the head via the shoulder
support, refer to page 45.<
Front: side extensions adjustment
Mechanically
> To raise: pull.
> To lower: press the button, arrow 1, and
slide the head restraint downward.
Removing:
1. Pull the head restraint upward till it reaches
the stop.
2. Press the button, arrow 1, and pull the head
restraint all the way out.
You can fold the side extensions on the head
restraint forward for increased lateral support in
the resting position.
47
Reference At a glanceDriving tipsCommunications NavigationEntertainmentMobility

Electrically*
Online Edition for Part no. 01 41 0 012 836 - © 08/06 BMW AG
Adjusting
The head restraints at the outer sitting positions extend automatically whenever a passenger in the rear seat fastens his safety belt. You
can also adjust the height of the head restraint
electrically.
To prevent possible personal injury and
property damage, always ensure that the
area above the head restraints is clear and
unobstructed before extending them upward.<
With the safety switch pressed, refer to
page 40, the height adjustment of the
head restraints is deactivated.<
Removal and installation: the same as with the
front head restraints.
Safety belts
To ensure that the safety systems continue to provide optimized protection,
please follow the adjustment instructions on
page 43.<
Fasten safety belts on all occupied seats before
every trip. Although airbags enhance safety by
providing added protection, they are not a substitute for safety belts.
Middle head restraint
Pull out the lowered head restraint until it
engages before the center rear seat is
occupied. Otherwise, the level of occupant protection can be reduced.<
Rear: side extension adjustment*
You can fold the side extensions on the head
restraint forward for increased lateral support in
the resting position.
48
Fastening
Make sure you hear the latch plate engage in
the belt buckle.
Releasing
1. Hold the belt firmly.
2. Press the red button in the belt buckle.
3. Guide the belt back into its reel.
The shoulder strap's anchorage point will be in
the correct position for adults of every build if
the seat is correctly adjusted, refer to page 44.
The two rear safety belt buckles integrated into
the rear seat are for passengers sitting on the
left and right. The belt buckle embossed with
the word CENTER is intended exclusively for
use by passengers riding in the center position.

Safety belt reminder for front seats
Online Edition for Part no. 01 41 0 012 836 - © 08/06 BMW AG
The indicator lamp flashes or lights up.
In addition, a signal sounds. Please
make sure that the safety belts are
positioned correctly.
The safety belt reminder is active at speeds
above approx. 5 mph/8 km/h. It can also be activated if objects are placed on the passenger's
seat.
Damage to safety belts
In case of strain due to an accident or
damage, replace the belt system including the safety belt tensioners and have the belt
anchor points checked. Have this work done
only by your BMW center or at a workshop that
works according to BMW repair procedures
with correspondingly trained personnel. Otherwise, there can be no guarantee that the safety
devices will function properly.<
Heated seats*
Front
Temperature distribution
The heating action in the seat cushion and
backrest can be distributed in different ways.
iDrive, for principle details, refer to page 16.
1. Press the button to open the start
menu.
2. Move the controller toward "Climate".
3. If need be, select the symbol and press
the controller to switch to the second page
of the menu.
4. Select "Seat temp." and press the control-
ler.
5. Select "Left" or "Right" and press the con-
troller.
Controls
The temperature setting progresses one step
through its control sequence each time you
press the button.
The maximum temperature is supplied when
three lights are lit.
To switch off:
Press and hold the button.
6. Turn to adjust the temperature distribution
in the seat cushion and backrest and press
the controller.
The setting is stored for the remote control currently in use.
49
Reference At a glanceDriving tipsCommunications NavigationEntertainmentMobility

Rear
Online Edition for Part no. 01 41 0 012 836 - © 08/06 BMW AG
Adjusting
Rear
Operates the same as front seat heating, but
without temperature distribution.
Active seat ventilation*
Front
The system progresses one step through the
control sequence each time you press the button.
To switch off:
Press and hold the button.
The maximum setting with three lights is
used for rapid cooling, e.g. if the vehicle
has been parked in the sun. After a short time,
the system automatically shifts down one step
in order to prevent excessive cooling.<
The operating concept is the same as for the
front seat ventilation.
Active seat for driver*
Active adjustment of the seat cushion's contours reduces muscular tension and fatigue to
help prevent lower back pain.
Press the button to switch on; the LED lights
up.
Mirrors
Exterior mirrors
The mirror on the passenger's side is more
curved than the driver's mirror.
Objects reflected in the mirror are closer
than they appear. Do not estimate the distance of following traffic based what you see in
the mirror, as this will increase your risk of accident.<
50

Tilting down passenger-side exterior
Online Edition for Part no. 01 41 0 012 836 - © 08/06 BMW AG
mirror – automatic curb monitor
Activating
1. Push the mirror selector switch into the
driver's mirror position, arrow 1.
1 Adjusting
2 Switching to the other mirror or automatic
curb monitor, refer to Tilting down passenger-side exterior mirror on page 51
3 Folding mirrors in and out
Storing the mirror positions, refer to Seat, mirror and steering wheel memory on page 46.
*
Adjusting manually
You can also adjust the mirrors manually by
pressing against the outer edges of their mirror
glass.
Folding mirrors in and out*
At driving speeds up to approx. 15 mph/
20 km/h, you can fold the mirrors in and out by
pressing button 3. This is an advantage, e.g. in
car washes and narrow streets, or for moving
mirrors that were manually folded in back into
the correct position.
Before entering an automatic car wash,
fold in the exterior mirrors by hand or with
button 3, to prevent them from being damaged
due to the width of the vehicle.<
Controls
2. Engage transmission position R.
The mirror glass tilts downward somewhat
on the passenger's side. This allows the
driver to see the area immediately adjacent
to the vehicle – such as a curb – when parking, etc.
Deactivating
Push the mirror selector switch into the passenger's mirror position, arrow 2.
Interior and exterior mirrors,
automatic dimming feature*
Automatic heating
Both exterior mirrors are automatically heated
whenever the ignition is switched on.
Two photocells in the interior rearview mirror
control this function. One is integrated into the
mirror's lens, the other is located offset from
this on the rear of the mirror housing.
For trouble-free operation, keep the photocells
clean and do not cover the area between the
interior rearview mirror and the windshield. Do
not attach any kind of stickers to the windshield
in front of the mirror either.
51
Reference At a glanceDriving tipsCommunications NavigationEntertainmentMobility

Illuminated vanity mirror in rear
Online Edition for Part no. 01 41 0 012 836 - © 08/06 BMW AG
1. Press button 1. The vanity mirror folds
down.
2. Pull the mirror downward slightly before
pivoting it.
Adjusting
Steering wheel heater*
Press the button.
When the steering wheel heater is operating,
the LED in the button lights up.
3. Before folding mirror in, straighten it out and
then press upward.
Steering wheel adjustment
In order to prevent the risk of accident
due to an unexpected movement, do not
adjust the steering wheel while the vehicle is
moving.<
The steering wheel can be adjusted in four
directions.
To save steering wheel positions, refer to Seat,
mirror and steering wheel memory on page 46.
Assistance getting in and out
To make it easier to enter and exit the vehicle,
the steering wheel temporarily moves into the
top and front position.
This automatic feature is governed by the
driver's door and the ignition switch.
Programmable buttons
You can individually program the button on the
steering wheel and the button next to the controller.
iDrive, for principle details, refer to page 16.
1. Press the button to open the start
menu.
2. Move the controller toward "Settings".
3. Select "Vehicle" and press the controller.
4. Select " button" or " button". Con-
tinue to press the controller until the
desired function appears.
> "Recirc. air"
The supply of outside air is shut off continuously, refer to Automatic recirculated air
control/recirculated air mode on page 105.
> "Navi info"
To repeat the most recent navigation system instruction, refer to Route guidance by
voice instructions on page 145.
52

> "Short info"
Online Edition for Part no. 01 41 0 012 836 - © 08/06 BMW AG
Display of the help and supplementary texts
of the active menu for approx. 10 seconds,
refer to page 21.
The " button" can also be programmed with
the following functions:
> "AUTO P"
Activation/deactivation, refer to page 59.
> "NIGHT VISION"
BMW Night Vision activation and deactivation, refer to page 98.
Rear seat screen
> "Mode"
You can choose between the output
sources radio, CD player, and CD changer.
It is necessary for one of these sources to
have been activated.
> "FM" and "AM"
Switching between the FM and AM wavebands, also refer to page 152.
*
:
Operating function
Press the button on the steering wheel or the
button next to the controller.
If you program the button on the steering
wheel with "AUTO P", you can conveniently activate and deactivate Automatic Hold
with the button, e.g. during parking.
Details on Automatic Hold are provided starting
on page 59.<
The setting of the button on the steering wheel
is stored for the remote control currently in use.
Controls
53
Reference At a glanceDriving tipsCommunications NavigationEntertainmentMobility

Transporting children safely
Online Edition for Part no. 01 41 0 012 836 - © 08/06 BMW AG
The right place for children
Do not leave children unattended in the
vehicle; otherwise, they could endanger
themselves and other persons, e.g. by opening
the doors.<
Children always in the rear
Accident research shows that the safest place
for children is in the back seat.
Children younger than 13 years of age or
with a height under 5 ft/150 cm may only
be transported in the rear in child restraint systems which correspond to the age, weight and
height of the child. Otherwise, there is an
increased danger of injury in an accident.<
Children 13 years of age or older must wear a
safety belt as soon as a suitable child restraint
Transporting children safely
system can no longer be used due to their age,
weight and size.
With the exception of the driver's seat, all seats
in your BMW comply with the recommendations of the standard SAE J1819 for the safe
securing of child restraint systems in motor
vehicles.
Installing child restraint systems
Follow the child restraint system manu-
facturer's instructions when selecting,
installing and using child restraint systems.
Otherwise the protective effect may be diminished.<
Backrest width* on front passenger's
seat
Before mounting a child restraint system
on the front passengers seat, the backrest width adjustment must be open completely. After installing the child's seat, no
memory position may be called up; otherwise,
the stability of the child's seat on the front passenger seat is reduced.<
1. Open backrest width completely, refer to
Front comfort seat adjustment on page 44.
2. Mount child's seat.
Child seat security
Exception for front passenger seat
Should it be necessary to use a child
restraint system on the front passenger
seat, the front, knee and side airbag on the front
passenger side must be deactivated. Otherwise, there is an increased risk of injury for the
child if the airbags are triggered, even with a
child restraint system. Your BMW center will be
glad to advise you.<
More information on Automatic deactivation of
front passenger airbags, refer to page 95.
54
All rear safety belts and the safety belt for the
front passenger can be locked against pulling
out to secure child restraint systems.
Locking safety belt
1. Pull out the belt webbing completely.
2. Secure the child restraint system with the
belt.
3. Allow the belt webbing to be pulled in and
pull taut against the child restraint system.
The safety belt is locked.

Unlocking safety belt
Online Edition for Part no. 01 41 0 012 836 - © 08/06 BMW AG
1. Open the belt buckle.
2. Remove the child restraint system.
3. Allow the belt webbing to be pulled in com-
pletely.
Child restraint system with tether strap
The attachment points for the upper
retaining strap are only for attaching child
restraint systems; other uses can damage the
attachment points.<
There are three additional mounting points for
child restraint systems with a tether strap, refer
to arrows.
Routing of the tether strap
1. Push the head restraint upward.
2. Guide the tether strap through the bracket
of the head restraint.
3. Slide the head restraint into the bottom
position.
4. Hook in the tether strap on the mounting
point.
LATCH child restraint fixing system*
LATCH: Lower Anchor and Tethers for CHildren.
To attach a LATCH child's seat, follow the
operating and safety instructions of the
child's seat manufacturer.<
If the vehicle is equipped with power seats in
the rear, return these to their standard adjustment setting before using a LATCH child's seat,
refer to page 45.
Rear seats
Controls
1 Direction of travel
2 Head restraint
3 Hook of the upper retaining strap
4 Attachment point
5 Rear shelf
6 Backrest
7 Upper retaining strap
Fold upward before using the mounting points.
The mountings for the LATCH child restraint
fixing system are located at the points marked
with the arrows. They are not visible from the
outside.
Before attaching the LATCH child's seat, pull
the belt away from the region of the child
restraint fixing system.
Installation guide
The installation guide makes it easier to install
the LATCH child's seat and at the same time
protects the surface of the seats.
The installation guide is available at your
BMW center. Always follow all instruc-
tions for operation and use provided by the
manufacturer in the installation guide.<
55
Reference At a glanceDriving tipsCommunications NavigationEntertainmentMobility

Firmly press the installation guide into the gap
Online Edition for Part no. 01 41 0 012 836 - © 08/06 BMW AG
between the upholstery on seat cushion and
backrest, continuing until the two funnelshaped guides snap into place in the LATCH
child restraint fixing system in the seat.
Pull the installation guide to remove.
During trips
If the vehicle is equipped with rear side
airbags, make sure that children riding in
the rear do not lean out of the child's seat
Transporting children safely
toward the door panels. Otherwise, injuries can
occur if the side airbags are triggered.<
Child-safety locks for rear doors
safety switch for the power windows, refer to
page 40.
This switch also disables the power rear seat
adjustment.
Incorrect or unsupervised adjustment of
the power seats in the rear could lead to
bodily injury or damage to the child restraint
system.<
Slide down the safety levers on the rear doors:
The door can now be opened from the outside
only.
Safety switch for power windows and
rear seats
If the vehicle is equipped with power seats in
the rear, return these to their standard adjustment setting before using a child restraint fixing
system, refer to page 45.
When children are riding in the back, press the
56

Driving
Online Edition for Part no. 01 41 0 012 836 - © 08/06 BMW AG
Ignition lock
Insert the remote control all the way into the
ignition lock. Radio ready state is switched on.
Individual electrical devices are ready for use.
Start/Stop button
current-consuming devices in order to minimize the drain on the battery.<
Ignition off
All of the indicator lamps on the Info Display go
out. Only the selector lever indicator of the
automatic transmission is still briefly displayed.
Starting engine
Do not run the engine in closed rooms;
otherwise, the inhalation of toxic exhaust
gases can cause unconsciousness and death.
The exhaust gases contain carbon monoxide,
an odorless and colorless, but highly toxic gas.
Never leave an unattended vehicle with the
engine running, as such a vehicle represents a
potential safety hazard.
To prevent the vehicle from rolling, always
move the selector lever into position P and
engage the parking brake before leaving the
vehicle with the engine running. Note the information provided on the Info Display.<
Controls
Briefly pressing the Start/Stop button several
times switches the radio ready state or the ignition on and off.
Briefly pressing the Start/Stop button
with the brake pedal depressed starts the
engine.<
Radio ready state
Individual electrical devices are ready for use.
The time and outside temperature appear on
the Info Display.
Ignition switched on
All vehicle systems are ready for operation.
When the engine is not running, please
switch off the ignition and nonessential
1. Depress brake pedal.
2. Briefly press the Start/Stop button.
When starting the engine, do not press the
accelerator pedal.
Do not allow the engine to warm up by leaving it
running while the vehicle remains stationary.
Instead, start driving right away, at a moderate
engine speed.
57
Reference At a glanceDriving tipsCommunications NavigationEntertainmentMobility

Special starting conditions
Online Edition for Part no. 01 41 0 012 836 - © 08/06 BMW AG
In the following situations, press the gas pedal
halfway down when starting:
> The engine fails to start on the first attempt,
Driving
for instance if it is very hot or cold.
> The engine is being started at extremely low
temperatures below +57/– 15 6, or at
high altitudes above 3,281 ft/1,000 m.
Avoid frequent starts in rapid succession
or repeated starting attempts in which the
engine does not start. Otherwise, the fuel is
either left unspent or is insufficiently burned
and there is a risk of overheating and damaging
the catalytic converter.<
Switching off engine
When leaving the vehicle, always take the
remote control with you.<
With the vehicle stationary, briefly press the
Start/Stop button. Radio ready state is switched
on.
The transmission automatically shifts to position P: interlock.
Before driving into a car wash
The transmission remains in position N and the
vehicle can roll when you perform the following
sequence:
1. With Comfort Access: insert remote control
into ignition lock.
2. With the engine running, shift transmission
into position N.
3. Switch engine off.
4. Leave the remote control in the ignition
lock.
The transmission will shift into position P:
> automatically after approx. 30 minutes
> if you remove the remote control from the
ignition lock
Pay attention to the messages on the Info Display.
Removing remote control from ignition
lock
Press in the remote control briefly; it pops partway out. This procedure will also switch off the
ignition if it is on.
Comfort function
To switch off the engine when the vehicle is stationary, press the Start/Stop button for longer
than approx. 2 seconds. The remote control
pops partway out.
Parking brake
The concept
Your BMW is equipped with an electromechanical parking brake.
The parking brake is primarily intended to prevent the vehicle from rolling while parked.
You can use the parking brake in two ways:
> Manually, by briefly pressing the button
> Automatically, by activating the Automatic
Hold mode, refer to page 59
An electrohydraulic mechanism then engages
the parking brake to prevent the rear wheels
from turning whenever you switch off the
engine.
When the engine is running, parking brake
engagement is controlled by the brake system's hydraulic circuits, which act on the disc
brakes in the front and rear wheels.
Brake pedal feel
The hydraulic brake system can produce a
slightly different braking feel. Engagement may
also be accompanied by activation noise – this
is normal.
58

Manual engagement
Online Edition for Part no. 01 41 0 012 836 - © 08/06 BMW AG
Briefly press the button, the word PARK
appears on the Info Display.
When the parking brake is engaged, the indicator lamp on the Info Display lights up red,
refer to page 12.
The remote control does not have to be
inserted into the ignition lock for the parking
brake to be set.
It is only possible to disengage the parking
brake with the ignition on.
If exceptional circumstances should make it
necessary to engage the parking brake while
the vehicle is in motion, maintain pressure on
the button.
The indicator lamp on the Info Display lights up
in red and a chime sounds, the brake lamps light
up.
The vehicle continues to brake forcefully for as
long as you maintain pressure on the button.
When you brake the vehicle almost to a stop,
i.e., down to a speed of approximately 2 mph/
3 km/h or below, the parking brake remains
engaged.
When leaving the vehicle, always bring
the remote control with you; this precau-
tion prevents children from disengaging the
parking brake, for example.<
Automatic Hold
You can activate the system after starting the
engine; it then remains operational until the
next time the engine is switched off.
This feature provides additional assistance during vehicle operation by automatically engaging
and releasing the parking brake during stops at
traffic lights, in stop-and-go traffic, etc. The
vehicle is automatically held in place so as to
suppress the tendency to creep when the
transmission is in drive.
It also prevents the vehicle from rolling backward during uphill starts.
The parking brake engages automatically when
you stop the vehicle and switch off the engine.
You can activate or deactivate Automatic Hold
via the "Settings" menu in iDrive.
Activation/deactivation
iDrive, for principle details, refer to page 16.
1. Press the button to open the start
menu.
2. Move the controller toward "Settings".
3. Select "Vehicle" and press the controller.
4. Select "AUTO P". Press the controller to
activate/deactivate the desired function.
Controls
Manual release
Briefly press the button with the ignition
switched on.
The indicator lamp on the Info Display goes
out.
As long as the remote control is inserted
into the ignition lock, you can also release
the parking brake after the engine has been
switched off. This function is useful, for example, in automatic car washes, refer to
page 123.<
> Automatic Hold is activated.
The green AUTO P status message on the
Info Display indicates that the system is
ready for operation.
59
Reference At a glanceDriving tipsCommunications NavigationEntertainmentMobility

> Automatic Hold is deactivated.
Online Edition for Part no. 01 41 0 012 836 - © 08/06 BMW AG
The green AUTO P status message disappears from the Info Display.
You can program the programmable but-
Driving
ton on the steering wheel with the Automatic Hold function, refer to page 52. This gives
you the option of being able to quickly activate
or deactivate Automatic Hold without distracting your attention from the road.<
Driving
The parking brake engages automatically when
the vehicle comes to a stop.
The indicator lamp on Info Display lights up
green.
To start off again, simply press the accelerator
pedal. The parking brake is released automatically; the indicator lamp goes out.
Do not drive through an automatic car
wash with the Automatic Hold on and the
engine running. Otherwise, the system will
engage the parking brake the moment the vehicle comes to a stop.<
Parking
The parking brake engages automatically when
you stop the vehicle and switch off the engine.
The indicator lamp changes from green to
red.
You can also release the parking brake
manually after the engine is switched off,
as long as the remote control is in the ignition
lock, refer to page 59. Y ou can use this function,
for example, in a car wash.
Automatic Hold is deactivated.<
When leaving the vehicle, release the
remote control from the detent in the ignition lock; this precaution prevents children from
disengaging the parking brake etc.<
For your safety
Automatic Hold is automatically deactivated
when:
> the engine is switched off
> the system detects that the driver's seat is
not occupied while the engine is running
> the hood is opened while the engine is run-
ning
> the luggage compartment is opened while
the engine is running and the transmission
is in reverse
> and when the parking brake is used to brake
the vehicle to a stop during driving
The indicator lamp changes from green to
red, and the indication AUTO P on the Info Display disappears.
Before starting off again, briefly press the button to disengage the parking brake manually,
refer to page 59, or reactivate Automatic Hold,
refer to page 59.
Before leaving the vehicle with the engine
running, always move the automatic
transmission's selector lever to position P and
make sure that the parking brake is engaged.
The vehicle could start to roll if you fail to take
these precautions.<
Automatic Hold is automatically deacti-
vated whenever the system detects any
tendency for the wheels to spin in response to
slippery road surfaces.
Pay attention to the messages on the Info Display. For additional information, refer to Check
Control on page 80.<
Releasing parking brake manually
In the event of an electrical power loss or electrical malfunction, you can release the parking
brake manually.
Before manually releasing the parking
brake and each time you park the vehicle
without engaging the parking brake, make sure
that the automatic transmission is in position P,
refer to page 62. Be sure to pay attention to the
information on the Info Display.
If circumstances should force you to park on a
steeply inclined road surface, it is essential to
take additional precautions against inadvertent
rolling, e.g. by using the chock, refer to
page 215. Otherwise, there is the danger of the
vehicle rolling, depending on the incline.<
60

If it becomes necessary to also unlock the
Online Edition for Part no. 01 41 0 012 836 - © 08/06 BMW AG
transmission lock of the automatic transmission, follow this sequence:
1. If necessary, start by releasing the parking
brake manually.
2. Then release the automatic transmission's
transmission lock manually, refer to
page 64.
Jump starting and tow starting information,
refer to page 219 and the pages that follow.
What you will need
1 Screwdriver handle
2 Unlocking tool
3 10 mm open-end wrench
You will find the required tools in the onboard
tool kit mounted on the inside of the luggage
compartment lid, refer to page 212.
Insert the release tool into the screwdriver handle as shown in the illustration.
Releasing
3. Fit the open-end wrench onto the hexago-
nal section of the release tool.
Insert the release tool counter to the spring
force until the stop is reached, press and
rotate in the arrow direction 2 until it noticeably engages and meets a perceptible
resistance.
4. Without releasing, continue to turn counter
to the mechanical resistance of the drive
unit in the arrow direction 2 until you can
feel a significant increase in the force of the
resistance.
To prevent possible damage to the
rear brakes, always make sure that
the parking brake is completely released
before driving the vehicle.<
5. Return the tools to their places.
6. Return the spare tire cover and the floor mat
to their original locations.
Have a malfunction corrected only by a
BMW center or a repair shop that works in
accordance with BMW guidelines and uses
appropriately trained personnel. Only technicians can return the parking brake to normal
operational status after it has been released
manually in response to a malfunction.<
Following manual release, the actual sta-
tus of the parking brake may deviate from
that displayed by the indicator lamp.<
Operation after interruptions in power
supply
The parking brake can only be used again
if it was manually released due to an interruption in the supply of electrical power. Otherwise, the function of the parking brake is not
guaranteed and there is a danger of the vehicle
rolling despite the parking brake being
engaged.<
Controls
1. Remove the floor mat and the cover above
the spare tire.
2. With the attached screwdriver handle,
insert the release tool into the opening,
arrow 1.
61
Reference At a glanceDriving tipsCommunications NavigationEntertainmentMobility

Once the electrical power supply has been
Online Edition for Part no. 01 41 0 012 836 - © 08/06 BMW AG
restored, you can again use the parking brake:
With the ignition on and the vehicle
stationary, briefly press the button
Driving
> Initializing the disengaged setting.
> Engaging: the system registers the new
status and the brake setting is initialized.
The indicator lamp on Info Display lights
up green.
> Releasing: the parking brake is ready for
operation.
The indicator lamp on the Info Display
goes out.
three times at intervals of approx.
5 seconds. This executes the following initialization sequence:
Automatic transmission with Steptronic
In addition to fully automatic operation, you can
also shift manually using the button on the
steering wheel, refer to page 63.
Transmission range selection
P R N D
Selecting transmission range
> Only engage transmission positions D, R,
or N when the engine is running: interlock.
> With the vehicle stationary, depress the
brake pedal before shifting out of P or N;
otherwise, the shift command will not be
executed: shiftlock.
To prevent the vehicle from creeping
after you select a driving position,
maintain pressure on the brake pedal until
you are ready to start off. Activate Automatic Hold to suppress the tendency to
creep, refer to page 59.<
Displays on Info Display
P R N D S or M1 to M6
The transmission range is indicated, and in the
manual mode, the gear currently engaged.
62
The engaged position is indicated on the Info
Display.
Selecting D, R or N
Lightly pull selector lever and engage desired
position:
> N Neutral:
To resistance point, arrows N.
> D Drive:
Downward past resistance point, arrow D.
> R Reverse:
Upward past resistance point, arrow R.

The selector lever immediately returns to the
Online Edition for Part no. 01 41 0 012 836 - © 08/06 BMW AG
center position when released.
Selecting P
Press button P.
P Park
Select only when the vehicle is stationary.
The rear wheels are locked.
Transmission automatically shifts into P
as soon as you switch off the engine
unless N is selected and the remote control is
in the ignition lock, refer to page 58.<
R Reverse
Select only when the vehicle is stationary.
N Neutral
You can select this position, for example, in car
washes. The vehicle can roll.
Transmission remains in N even after the
ignition is switched off whenever you
leave the remote control in the ignition lock.
This function is useful in automatic car washes,
etc.
After approx. 30 minutes the system automatically shifts into position P. Pay attention to the
messages on the Info Display.
Switching off engine, refer to page 58.<
D Drive, automatic position
This is the mode recommended for normal
vehicle operation. All forward gears are available.
Under normal operating conditions, the fuel
consumption is lowest when driving in position D.
Kick-down
The kick-down mode provides maximum acceleration.
Press the accelerator pedal beyond the fullthrottle resistance point.
Sport program and manual operation
Controls
Press button 1 on the steering wheel.
The sport program is activated and S appears
on the Info Display. This program is recommended for a performance-oriented driving
style.
Press button 1 again to switch into the manual
mode and then into the automatic program
again.
In the manual mode, the Steptronic changes
gears when one of the buttons 2 on the front or
back of the steering wheel is briefly pressed.
The Info Display shows the manual ranges M1
through M6.
Upshifts and downshifts are executed only
when they will result in a plausible combination
of engine and vehicle speed; thus, for example,
the system will not execute a downshift that
would cause the engine to overrev. In this case,
the requested gear appears briefly on the Info
Display, followed by the current gear.
Press button 1 again to switch back into the
automatic program.
63
Reference At a glanceDriving tipsCommunications NavigationEntertainmentMobility

Manually releasing transmission lock
Online Edition for Part no. 01 41 0 012 836 - © 08/06 BMW AG
In the event of a power supply interrup-
tion, e.g. with a drained or disconnected
battery or when there is an electrical malfunction, the transmission lock must be released
Driving
manually; otherwise, the rear wheels are locked
and the vehicle cannot be towed.<
When manually releasing the transmis-
sion lock, depress the brake pedal; otherwise, there is a danger of the vehicle rolling
when the transmission lock is manually
released.<
The transmission lock should only be released
for towing. Reengage the transmission lock
after parking the vehicle at its destination.
If it also becomes necessary to manually
release the parking brake, follow this sequence:
1. Start by manually releasing the parking
brake, refer to page 60.
2. Then proceed to manually releasing the
transmission lock.
Releasing
1. Use the vehicle key to release the cover
panel beneath the instrument panel by turning the lock counterclockwise, then fold
down the cover.
2. Pull out the release lever with the loop 1
until it locks into place: the transmission
lock is unlocked.
Reengage the transmission lock after
parking the vehicle at its destination. Oth-
erwise, there is a danger of the vehicle rolling.<
Engaging locks
1. Disengage the release lever by pressing it
together with the red locking lever, refer to
arrow.
2. Guide the release lever all the way back into
its original position – the transmission lock
is engaged once more.
3. Fold up and lock the cover panel again. Now
– and not before – the key may be removed.
Once the transmission lock has been
engaged, the message in the Info Display
should disappear, and the symbol on the Info
Display should change from N to P. Otherwise,
there is a danger of the vehicle rolling.<
Jump starting and tow starting information,
refer to section starting on page 219.
64

Turn signals/
Online Edition for Part no. 01 41 0 012 836 - © 08/06 BMW AG
headlamp flasher
1 High beams
2 Headlamp flasher
3 Turn signals
Using turn signals
Move the lever beyond the resistance point.
If you wish to manually control the shut-off of
the turn signal, then only push the lever to the
resistance point.
Atypically rapid flashing of the indicator
lamps signals the failure of a turn signal
lamp, possibly in the trailer when towing.<
Temporarily signaling
Push the lever to the resistance point and hold it
there for as long as you wish to signal.
Triple turn signal activation
Press the lever to the resistance point and
release; the turn signal flashes three times.
Wiper system
1 Switching on wipers
2 Switching off wipers or for brief wipe
3 Activating/deactivating rain sensor
4 Cleaning windshield, headlamps and
BMW Night Vision camera
5 Adjusting rain sensor sensitivity level
Switching on wipers
The lever automatically returns to its initial position when released.
Normal wiper speed
Press once.
The system reverts to operation in the intermittent mode when the vehicle is stationary.
Fast wiper speed
Press twice or press beyond the resistance
point.
The system reverts to normal speed when the
vehicle is stationary.
*
Controls
Rain sensor
The rain sensor controls the wiper operation as
a function of the rain intensity. It is located on
the windshield, directly in front of the inside
rearview mirror.
65
Reference At a glanceDriving tipsCommunications NavigationEntertainmentMobility

Activating rain sensor
Online Edition for Part no. 01 41 0 012 836 - © 08/06 BMW AG
Driving
Briefly press the button, arrow, the wipers move
once across the windshield. The LED lights up.
Adjusting rain sensor sensitivity level
Turn the knurled wheel 5.
Deactivating rain sensor
Briefly press the button again, arrow. The LED
goes out.
Deactivate the rain sensor when passing
through an automatic car wash. Failure to
do so could result in damage caused by undesired wiper activation.<
Cleaning windshield, headlamps and
BMW Night Vision camera*
The system sprays washer fluid against the
windshield and activates the wipers for a brief
period.
With the vehicle lighting switched on, the headlamps and the BMW Night Vision camera are
also cleaned simultaneously at suitable intervals.
Do not use the washers if there is any
danger that the fluid will freeze on the
windshield. If you do so, your vision could be
obscured. To avoid freezing, use a washer fluid
antifreeze, refer to Washer fluid.
Avoid using the washer when the reservoir is
empty. Otherwise, you could damage the
pump.<
Windshield washer nozzles
The windshield washer nozzles and the windshield itself in the area around the wipers are
heated automatically when the ignition is
switched on.
Pivoting wipers into folded-out
position
This position is important for changing wiper
blades or when folding wiper arms away from
windshield to prevent blades from sticking in
the event of frost.
1. Switch off the engine and remove the
remote control from the ignition lock.
2. Press the wiper lever upward past the resis-
tance point and maintain pressure for about
3 seconds until the wipers stop in a roughly
vertical position: pivot into the folded-out
position.
After folding the wipers back against the windshield you will need to reactivate the wiper system:
1. Switch on radio ready state.
2. Briefly press wiper lever downward. The
wipers return to their retracted position and
are ready for normal operation.
To prevent damage to the wipers, always
fold them back against the windshield
before switching on either the radio ready state
or the ignition.<
Washer fluid
Washer fluid antifreeze is flammable.
Always keep it well away from sparks and
open flames, and store it in tightly closed containers well out of the reach of children. Always
follow the instructions for use provided on the
containers.<
In order to maintain the mixture ratio, mix
the washer fluid before filling.<
66

Windshield and headlamp washer
Online Edition for Part no. 01 41 0 012 836 - © 08/06 BMW AG
system
One lever for all functions
Capacity: 6.3 US quarts/6 liters.
Fill with water and – if required – with a washer
antifreeze, according to manufacturer's recommendations.
Programmable cruise control
The concept
The programmable cruise control is available
for use at speeds of approx. 20 mph/30 km/h
and higher. The vehicle maintains and stores
the speed that you set using the lever mounted
on the steering column.
You can also use the multilevel preset mode to
store six desired speeds for later selection with
the lever, refer to page 67.
This feature assists you in quickly adapting the
vehicle speed to specific road conditions, e.g.
changes in speeds limits.
Do not use the programmable cruise con-
trol when unfavorable conditions do not
permit you to drive at a constant speed, e.g.
when driving on winding roads, in heavy traffic
or under poor road conditions such as snow,
rain, ice, or a loose road surface. If you do, you
could lose control of the vehicle and cause an
accident.<
1 Maintaining speed, storing, and accelerat-
ing
2 Maintaining speed, storing, and decelerat-
ing
3 Interrupt or deactivate cruise control
4 Resuming stored speed
Maintaining speed, storing, and
accelerating
Press lever to resistance point, arrow 1:
The system maintains and stores the current
vehicle speed. The pointer 5 in the speedometer indicates this speed, refer to Displays in
speedometer on page 68. Each time the lever is
pressed again briefly, the speed is increased by
approx. 1 mph or 1 km/h.
Push the lever to the resistance point for a
longer time:
The vehicle accelerates without pressure on
the accelerator pedal. The system maintains
and stores your current speed as soon as you
release the lever.
Press the lever past the resistance point if no
desired speeds 6 are stored:
The pointer 5 jumps to the next multiple of
5 mph or 10 km/h and then further, as long as
the lever is held. The speed then indicated is
reached and stored.
The vehicle may accelerate beyond the preset
speed on steep downhill stretches where the
engine's braking action alone may not be sufficient to slow the vehicle. Speed can drop on
uphill grades if the engine output is insufficient.
Controls
67
Reference At a glanceDriving tipsCommunications NavigationEntertainmentMobility

Maintaining speed, storing, and
Online Edition for Part no. 01 41 0 012 836 - © 08/06 BMW AG
decelerating
Pull the lever, arrow 2:
Functions in the same way as 1, except that the
vehicle speed is decreased.
Driving
Interrupting the cruise control
Briefly press the lever up or down, arrow 3.
In addition, cruise control is interrupted automatically:
> when you apply pressure to the brake pedal
> when you shift the automatic transmission
into position N
> when the DSC control is operative
lever until you have reached your desired
speed:
> Press or pull the lever to the resistance
point again: the pointer slowly moves.
> Press or pull the lever past the resis-
tance point again: the pointer jumps to
the next multiple of 5 mph or 10 km/h
and then further, as long as the lever is
held.
3. Press the button 4 for approx. 3 seconds.
The stored desired speed is indicated by a
mark 6.
If six desired speeds have already been stored,
please delete at least one of them before adding
another.
Resuming stored speed
Briefly press the button 4:
The vehicle accelerates back to and maintains
the stored speed.
Displays in speedometer
5 Pointer for stored speed
> Cruise control activated
> Cruise control deactivated
6 Mark for stored desired speed in the multi-
level function
Storing desired speeds
With vehicle stationary
1. Switch on the ignition.
2. Press, arrow 1, or pull, arrow 2, the lever
past the resistance point:
Now you can move the pointer 5 with the
While driving
1. Press, arrow 1, or pull, arrow 2, the lever
past the resistance point.
2. Press the button 4 for approx. 3 seconds.
The current speed is applied as the desired
speed and displayed with 6.
If all of the marks 6 flash twice, this indicates
that six desired speeds have already been
stored. You must then delete at least one of
them before adding another.
Deleting desired speeds
1. Select corresponding desired speed 6,
refer to section below.
2. Press button 4 for approx. 3 seconds.
Activating multilevel preset mode
Press, arrow 1, or pull, arrow 2, the lever past
the resistance point.
The current driving speed is maintained, stored
and displayed by the pointer 5.
Selecting desired speed
Press, arrow 1, or pull, arrow 2, the lever past
the resistance point:
The next desired speed is selected.
68

Deactivating system
Online Edition for Part no. 01 41 0 012 836 - © 08/06 BMW AG
> Press the lever up or down, arrow 3 for
approx. 3 seconds
> or switch off the ignition.
The stored speed 5 is deleted, however the
stored marks 6 are retained.
Active cruise control*
The concept
With active cruise control you can select a
desired speed which is not only automatically
maintained when driving on open roadways, but
also varied to maintain a selected distance setting as slower traffic is encountered.
Active cruise control represents a technological
advance over the familiar cruise control and is a
welcome relief from the constant adjustment of
speed that can accompany driving in traffic on
highways or other high-speed thoroughfares.
Especially on longer trips, the system can
reduce fatigue and tension, while increasing
your enjoyment of driving. Please use it safely
and responsibly.
In addition to holding a steady cruising speed,
if you encounter slower vehicles ahead, active
cruise control will, within the scope of given
possibilities, adjust your vehicle's speed automatically so that you can flow with the traffic
without having to make constant adjustments.
If, for example, while cruising at the selected
speed, you begin to approach a slower vehicle
ahead of you in the same lane, the system will
reduce your vehicle's speed to the same as that
of the vehicle ahead to maintain your selected
distance setting between your vehicle and the
vehicle ahead. You can vary the distance, which
is additionally speed-dependent. Based on
your selected distance setting, the system
automatically decreases the throttle setting and
lightly applies the brakes if necessary. The vehicle brake lamps will automatically illuminate to
signal a following driver to take action. In addition, it may be necessary for the vehicle to
downshift to maintain the distance setting
selected. If the vehicle ahead speeds up or
when the lane ahead becomes clear, your vehicle will accelerate to the speed you have
selected by increasing the throttle setting and
shifting gears as needed. This setting is also
maintained on steep stretches, but the vehicle
speed can fall below this on uphill grades if the
engine output is insufficient to maintain speed.
Active cruise control is not and must not
be used as a collision avoidance/warning
system.<
Since this active cruise control system is
a new technology and operates differently from conventional cruise control systems
to which you may be accustomed, you are
strongly urged to read all of the pages relating
to this system before use. Pay special attention
to the information contained in the Things to
know about active cruise control section beginning on page 72.<
Brake pedal feel
> When the system brakes and you also
depress the brake pedal, a somewhat different braking feeling results.
> Any noises produced during automatic
braking are normal.
Applications
As with conventional cruise control systems,
active cruise control in no way diminishes or
substitutes for the driver's own personal
responsibility, alertness and awareness in
adjusting speed, braking or otherwise controlling the vehicle. The driver should decide when
to use the system on the basis of road, traffic,
visibility, and weather conditions. Active cruise
control is intended for use on highway-type
roadways where traffic is moving relatively
smoothly. Do not use this system in city driving;
heavy traffic such as during rush hour; on curvy,
winding roads, slippery roads or roads with
sharp curves such as highway off-ramps; during
inclement weather such as snow, strong rain or
fog; or when entering interchanges, service/
parking areas or toll booths. It is also important
to regulate your vehicle's speed and distance
setting within applicable legal limits. Adapt the
Controls
69
Reference At a glanceDriving tipsCommunications NavigationEntertainmentMobility

desired speed to traffic conditions, control both
Online Edition for Part no. 01 41 0 012 836 - © 08/06 BMW AG
your driving speed and safe following distance,
and remain ready to brake at all times. Always
be ready to take action or apply the brakes if
necessary, especially when the system is
actively following a vehicle in front of you. Oth-
Driving
erwise driving situations can arise that constitute an accident hazard.
The minimum desired speed is 20 mph or
30 km/h, the maximum is 110 mph or 180 km/h.
One lever for all functions
Increasing desired speed
Press or tap the lever to the resistance point or
beyond, arrow 1, until the desired speed is displayed.
The speed then displayed is stored and
reached on clear roads.
> Each time the lever is briefly pressed to the
resistance point, the desired speed
increases by approx. 1 mph or 1 km/h.
> Each time the lever is briefly pressed past
the resistance point, the desired speed
increases to the next multiple of 5 mph or
10 km/h.
Decreasing desired speed
Pull the lever, arrow 2, until the desired speed is
displayed.
These functions are operated in the same manner as increasing your desired speed.
1 Store and increase desired speed
2 Store and decrease desired speed
3 Deactivate system, refer to page 71
4 Resume stored desired speed and dis-
tance, refer to page 71
5 Select distance to vehicle driving ahead,
refer to page 70
Maintaining current speed
Briefly press, arrow 1, or briefly pull, arrow 2,
lever.
The current driving speed is stored and maintained, and briefly displayed on the speedometer, refer to arrow.
Selecting distance
> Up:
To increase distance
> Down:
To decrease distance
The selected distance is displayed in the
speedometer.
Distance 1
Distance 2
70

Distance 3
Online Edition for Part no. 01 41 0 012 836 - © 08/06 BMW AG
This distance is always set when
the system is used for the first time
after starting the engine.
If the system is deactivated, then it is nec-
essary for the driver to actively intervene
by braking and possibly swerving. Otherwise,
there is the danger of an accident.<
Distance 4
Use good judgment to select the appro-
priate following distance given road conditions, traffic, applicable laws and driving recommendations for safe following distance;
failure to do so can constitute an accident hazard.<
Deactivating cruise control
Press the lever up or down. The displays in the
speedometer go out.
In addition, the system is automatically deactivated:
> when the speed is reduced to below 20 mph
or 30 km/h due to a traffic situation
> when DTC is activated or DSC is deacti-
vated
> when the system does not recognize any
objects for an extended period of time, e.g.
on infrequently traveled roads without a
shoulder or guard rails, or if the radar sensor
is covered with dirt, refer to page 72
> when you actuate the parking brake during
driving
> when you shift the transmission into posi-
tion N
Background lighting
You can switch off the backlighting of the
speedometer and tachometer when the system
is deactivated if no other functions are being
displayed, e.g. the advance warning field in the
tachometer, refer to page 75, or the route guidance of the navigation system.
To do so, press the lever up or down for approx.
1second.
Resuming stored desired speed and
distance
Press button 4:
The displays appear in the speedometer.
When you switch off the ignition, the stored
desired speed is deleted.
Info Display screen contents
1 Stored desired speed display
2 Lights up: vehicle detected ahead
3 Selected distance to vehicle driving ahead
4 The selected desired speed is displayed for
a short time, refer to page 70
If the display ACC --- mph/ACC --- km/h
appears briefly in the speedometer, then
conditions required for operation may not currently be fulfilled. Retrieving Check Control
messages, refer to page 81.<
Controls
71
Reference At a glanceDriving tipsCommunications NavigationEntertainmentMobility

Warning lamps
Online Edition for Part no. 01 41 0 012 836 - © 08/06 BMW AG
The display flashes and a chime
sounds.
The system asks you to intervene
Driving
maneuver. The active cruise control cannot
automatically restore the distance to the vehicle
driving ahead.
The display does not relieve you of the responsibility for adapting desired speed and driving
style to traffic conditions.
by braking or with an evasive
Automatic intervention by ABS or
DSC. The active cruise control
intervenes by braking until you
actively intervene.
Things to know about active cruise control
Radar sensor
Heavy rain and also dirt, snow, or ice can limit
the detection of vehicles ahead. If needed,
clean the radar sensor under the front bumper.
When doing so, be particularly careful in removing layers of snow and ice.
If the sensor is not aligned properly, the active
cruise control cannot be activated.
As with conventional cruise control sys-
tems, active cruise control in no way
diminishes or substitutes for the driver's own
personal responsibility, alertness and awareness in adjusting speed, braking or otherwise
controlling the vehicle. The driver should
decide when to use the system on the basis of
road, traffic, visibility, and weather conditions.
Active cruise control is intended for use on
highway-type roadways where traffic is moving
relatively smoothly. Do not use this system in
city driving; heavy traffic such as during rush
hour; on curvy, winding roads, slippery roads or
roads with sharp curves such as highway offramps; during inclement weather such as snow,
strong rain or fog; or when entering interchanges, service/parking areas or toll booths.
It is also important to regulate your vehicle's
speed and distance setting within applicable
72
legal limits. Always be ready to take action or
apply the brakes if necessary, especially when
the system is actively following a vehicle in front
of you.<
Always remember that the range and abil-
ity of the system do have physical limitations. It will not apply the brakes or decelerate
your vehicle when there is a slow-moving vehicle, stopped vehicle or stationary object ahead
of you, for example when approaching a traffic
light or a parked vehicle. Also, the system does
not react to oncoming traffic, pedestrians or
other types of potential traffic such as a rider on
horseback. It is also possible that the system
may not detect smaller moving objects such as
motorcycles or bicycles. Be especially alert
when encountering any of these situations as
the system will neither automatically brake, nor

provide a warning to you. Also, be aware that
Online Edition for Part no. 01 41 0 012 836 - © 08/06 BMW AG
every decrease in the distance setting allows
your vehicle to come closer to a vehicle in front
of you and requires a heightened amount of
alertness.<
When your vehicle is actively following a vehicle
in front of you, if the vehicle ahead speeds up or
the lane ahead becomes clear, then your vehicle will accelerate to the speed you have
selected. Be aware that changing to a clear,
unobstructed lane may also result in acceleration of your vehicle.
Be certain to deactivate the system when
you pull into an exit lane for a highway off-
ramp.<
Also, vehicles traveling in a staggered manner
on a highway may cause a delay in the system's
reaction to a vehicle in front of you or may cause
the system to react to a vehicle actually in the
lane next to you. Always be ready to take action
or apply the brakes if necessary.
Active cruise control can only decelerate the
vehicle to approx. 20 mph/30 km/h. If the system reduces vehicle speed below 20 mph/
30 km/h or if D SC/ABS is engag ed while driving ,
the system will automatically deactivate.
Remember, the system cannot stop your
vehicle. In addition, the system is deactivated whenever the driver applies the vehicle
brakes, shifts the transmission from drive/D to
neutral/N, or deactivates DSC. After any deactivation, the system will no longer automatically
activate the vehicle brakes, which means the
driver must intervene and resume manual braking. You should then reactivate the system only
when you are fully aware of the prior speed and
distance settings.<
Active cruise control may brake when you
reduce the stored desired speed; however, the
driver must constantly monitor traffic and intervene if necessary.
When you switch off the engine or ignition,
active cruise control is fully switched off, too,
and any settings you have selected are canceled.
Swerving vehicles
When a vehicle moves from an adjacent lane
into your lane, active cruise control will not
detect this vehicle until it is fully in your lane
ahead of your vehicle.
Behavior in curves
Because of the limited range of the system, it is
possible that in curves or on the peaks and valleys of hilly roads, a vehicle ahead may be recognized late, or not at all. Therefore, it is up to
the driver to select a speed that is prudent in
view of the curves and terrain of the roadway.
In approaching a curve, it is possible that active
cruise control might react briefly to a vehicle in
the adjacent lane. In addition, the system can
sense if your vehicle is in a curve and may not
accelerate. If your vehicle decelerates in either
Controls
73
Reference At a glanceDriving tipsCommunications NavigationEntertainmentMobility

case, you can choose to overcome the deceler-
Online Edition for Part no. 01 41 0 012 836 - © 08/06 BMW AG
ation by briefly pressing the accelerator pedal.
Driver interventions
Driving
Anytime the driver presses down on the
accelerator pedal, any automatic braking
action by the system is interrupted until the
pedal is fully released. After doing this, release
the accelerator and the system again controls
your cruising speed and distance setting. While
driving with the system activated, resting your
foot on the accelerator pedal will cause the system not to brake even if necessary. Be certain
that floormats or other objects on the vehicle
floor do not interfere with movement of the
accelerator pedal.<
While active cruise control is capable of
braking your vehicle automatically when
you approach a slower vehicle ahead, it is
important to be aware that the ability of the system to apply the brakes is also limited, e.g.
when you reduce your desired speed sharply.
The system cannot stop your vehicle. It uses
only a portion of braking system capacity and
does not utilize the full capacity of the vehicle
braking system. Therefore, the system cannot
decrease your speed for large differences in
speed between your vehicle and the vehicle
ahead. Examples: when you approach a vehicle
traveling at a much lower speed than your own
speed such as approaching a toll booth or when
a much slower vehicle cuts in front of you at
close range.<
74

Everything under control
Online Edition for Part no. 01 41 0 012 836 - © 08/06 BMW AG
Odometer, outside temperature display, clock
Controls
1 Outside temperature display, clock
2 Odometer
3 Trip odometer
4 Press button:
> with ignition switched on to reset trip
odometer
> with ignition switched off to briefly dis-
play odometer, outside temperature,
and time
Outside temperature display, clock,
date
The outside temperature and the time displays
are active with the ignition lock in radio ready
state or higher.
You can change the units of measure, 7/6,
in the "Settings" menu, refer to page 84.
Setting the clock, refer to page 84.
The date is displayed in the assistance window
*
, refer to page 21.
Setting date, refer to page 84.
Outside temperature warning
If the display drops to +377/+3 6, a signal
sounds and a message appears on the Info Display. There is an increased danger of ice.
Even at temperatures above +377/
+36, ice can form. Therefore, drive care-
fully, e.g. on bridges and shaded roadways; otherwise, there is an increased accident risk.<
Odometer and trip odometer
The display area is also used for the computer
and the Check Control.
Regardless of the current display, you can
briefly display the odometer for a short time by
briefly pressing button 4.
You also reset the displayed trip odometer to
zero by pressing and holding the button.
Check Control, refer to page 80.
Computer, refer to page 76.
Tachometer
The orange advance warning field, arrow, is displayed as a function of the engine temperature.
The segments disappear in sequence as the
engine temperature increases.
Avoid allowing the engine speed to rise as far as
the orange advance warning field whenever
possible.
75
Reference At a glanceDriving tipsCommunications NavigationEntertainmentMobility
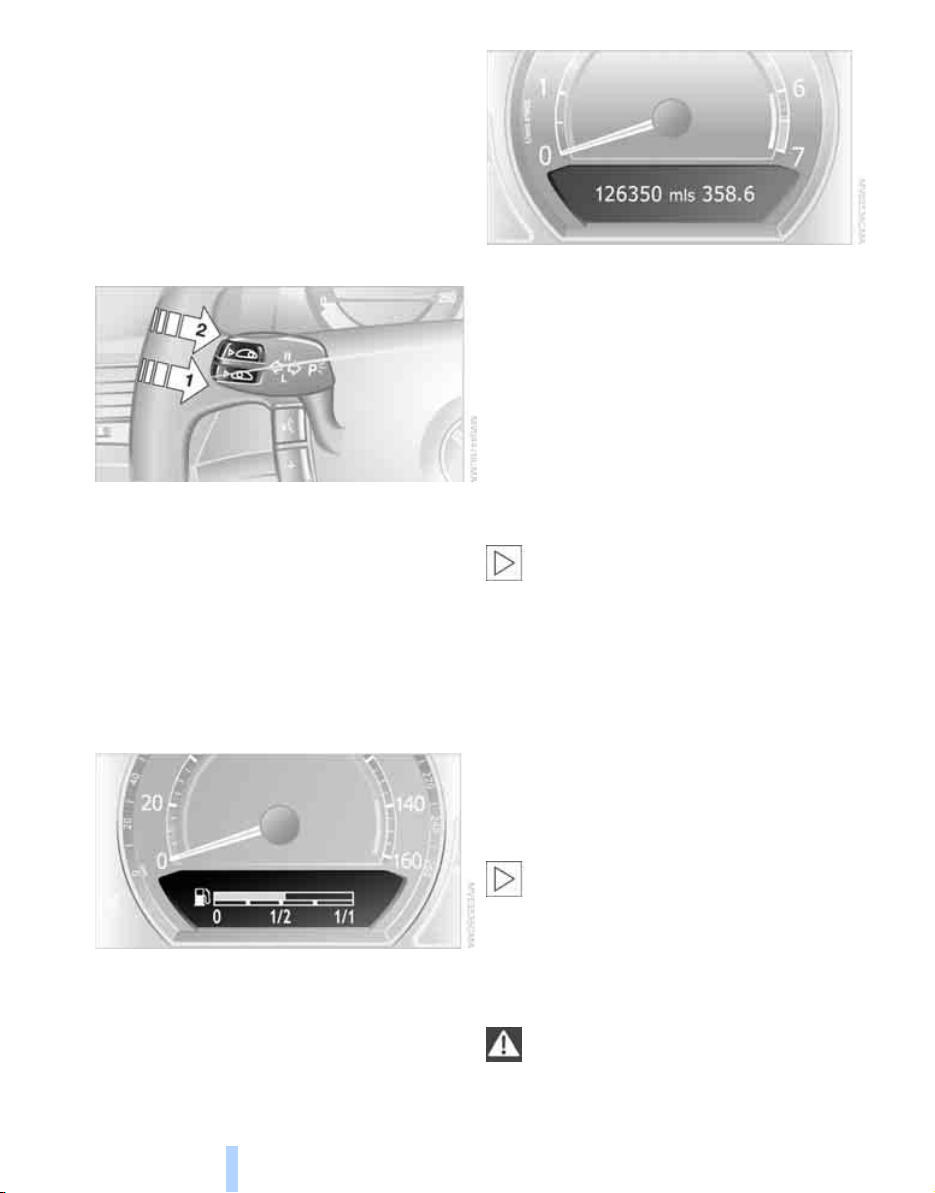
Coolant temperature
Online Edition for Part no. 01 41 0 012 836 - © 08/06 BMW AG
Should the coolant, and with it the engine
become too hot, a warning lamp lights up. In
addition, a message appears on the Control
Display.
Checking coolant level, refer to page 208.
Computer
Everything under control
Requesting functions
You can use the buttons in the turn signal lever
to display the computer information on the Info
Display.
1 Info Display on left
2 Info Display on right
A new function appears each time you briefly
press the button.
Displays on Info Display
The display sequence:
> Fuel gauge
> Range and distance to destination
The display sequence:
> Odometer
> Energy Control/current fuel consumption
> Average fuel consumption
> Average speed
> Time of arrival
Hiding messages
Maintain pressure on button 1 to hide the computer display. Briefly press the button again to
return to the last display.
It is not possible, though, to hide a Check
Control message.<
Fuel gauge
The fuel gauge mode appears automatically
once the fuel level falls into the reserve range.
The tanks still contains the following quantities
of fuel:
> 750i/Li: approx. 2.6 gallons/10 liters.
> 760i/Li: approx. 3.1 gallons/12 liters.
If the tilt of the vehicle varies, when you are driving in mountainous areas, for example, the indicator may fluctuate slightly.
After reaching the reserve quantity, the
Info Display can no longer be hidden.
However, you can still display the remaining
range.<
Fuel tank capacity: approx. 23.2 gallons/
88 liters. You can find information on refueling
on page 196.
Refuel well before the tank is empty. If
you drive down to the last drop, engine
functions are not assured and damage can
occur.<
76

Cruising range
Online Edition for Part no. 01 41 0 012 836 - © 08/06 BMW AG
Displays the estimated cruising range available
with the remaining fuel. It is projected by taking
into account the driving style over the last
20 miles/30 km.
When your cruising range falls below
30 miles/50 km, be sure to refuel. Other-
wise, engine functions are not assured and
damage can occur.<
The computer only registers refueling amounts
greater than approx. 1.3 gallons/5 liters.
Distance to destination
When you enter a destination into the navigation system, refer to page 131, or manually
enter a distance in the computer, refer to
page 78, prior to departure, then the system
displays the remaining distance to your destination.
The system automatically adopts the distance
to your destination on the route recommended
by the navigation system.
When you enter a destination into the
navigation system, any manual distance
entries will be overwritten once the vehicle has
traveled approx. 1,640 ft/500 m of the calculated distance.<
For different route segments
You can display the average speed and average
fuel consumption for two different route segments:
> refer to Displays on Control Display below
> refer to Trip computer on page 78
Time of arrival
A display of your estimated time of arrival is
available whenever you enter a destination into
the navigation system, refer to page 131, or
enter the distance manually into the computer,
refer to page 78, prior to departure.
A prerequisite for this is that you have the
time set correctly, refer to page 84.<
Displays on Control Display
You can also access the computer via iDrive, for
principle details, refer to page 16.
1. Press the button to open the start
menu.
2. Move the controller toward "Car Data".
3. Select "BC" and press the controller.
Controls
Energy Control/current fuel
consumption
Shows the current fuel consumption. This
allows you to see whether your current driving
style is conducive to fuel economy with minimum exhaust emissions.
Average fuel consumption
The average fuel consumption is determined
for the time during which the engine is running.
Average speed
Periods with the vehicle parked and the engine
off are not included in the calculations of average speed.
You can reset value for average fuel consumption and average speed, refer to Resetting values, page 78.
> Anticipated arrival time at destination and
remaining distance:
> To enter a distance into the computer
manually, refer to Entering a distance
manually
> To enter a destination into the naviga-
tion system, refer to page 131
> Cruising range
> Average fuel consumption
> Average speed
77
Reference At a glanceDriving tipsCommunications NavigationEntertainmentMobility

Resetting values
Online Edition for Part no. 01 41 0 012 836 - © 08/06 BMW AG
You can reset values for the average speed and
average fuel consumption:
1. Activate the relevant menu item and press
the controller.
2. Press the controller again to confirm your
selection.
This also resets the respective information
shown on the Info Display.
3. Select " BC" and press the controller.
Entering a distance manually
1. Select "To dest." and press the controller.
Everything under control
2. Turn the controller to set the distance to the
destination.
3. Press the controller to save the setting.
The distance to the destination is automatically
predetermined when using the navigation system route guidance, refer to page 143.
Using voice command system
{On-board computer}.
Trip computer
The trip computer can be used, e.g. for a vacation trip.
iDrive, for principle details, refer to page 16.
1. Press the button to open the start
menu.
2. Move the controller toward "Car Data".
> Departure time
> Driving time
> Distance traveled
> Average fuel consumption
> Average speed
To switch trip computer on/off and reset all values:
Select "START / RESET" and press the controller.
To deactivate trip computer:
Select "STOP" and press the controller.
Service required
The distance or time period remaining until your
next service briefly appears when you switch on
the ignition.
Your Service Advisor will determine your
vehicle's current service requirements by
reading out the data stored in the remote control.<
With BMW Assist enabled, information regarding maintenance status of your vehicle or information regarding legally mandated inspections
is automatically transmitted before the relevant
78

deadline, refer to Automatic service notification
Online Edition for Part no. 01 41 0 012 836 - © 08/06 BMW AG
on page 189.
Additional information
You can view additional information on service
and maintenance procedures on the Control
Display.
iDrive, for principle details, refer to page 16.
1. Press the button to open the start
menu.
2. Move the controller toward "Car Data".
3. Select and press the controller.
To exit the menu:
The arrow is selected. Press the controller.
Condition Based Service does not con-
tinue counting down to the next service
during periods when the vehicle is stored with
the battery disconnected or the battery switch
in the OFF position.
It is therefore important, independent of the display, to change the brake fluid at least every
2years.
The same is true for other time-dependent
maintenance procedures.<
Controls
The display shows a list of selected service and
maintenance procedures, as well as legallymandated inspections.
Symbols
No service is currently required.
The deadline for service or a legally-man-
dated inspection is approaching. Please
arrange for a service appointment at the earliest
available opportunity.
The service deadline has already passed.
You can view more detailed information about
every entry:
Select the entry and press the controller.
Deadlines for scheduled legally
mandated inspections, displaying and
entering
Make sure the date and time are always set correctly, refer to page 84; otherwise, CBS Condition Based Service cannot function correctly.
iDrive, for principle details, refer to page 16.
1. Press the button to open the start
menu.
2. Move the controller toward "Car Data".
3. Select and press the controller.
4. Select "State inspection" and press the
controller.
79
Reference At a glanceDriving tipsCommunications NavigationEntertainmentMobility

5. Turn the controller to select appointment
Online Edition for Part no. 01 41 0 012 836 - © 08/06 BMW AG
input.
6. Press the controller.
The month is highlighted.
7. Turn the controller to adjust the setting.
8. Press the controller to save the setting.
The year is highlighted.
9. Turn the controller to adjust the setting.
10. Press the controller to save the setting.
Everything under control
11. "STORE DATE" is selected. Press the con-
troller to save the setting.
The date entry is saved.
The list of entries is resorted by date.
Check Control
The concept
Check Control monitors functions in the vehicle
and generates a message if a malfunction
occurs in the monitored systems. A Check Control message of this kind includes indicator or
warning lamps on the Info Display and possibly
an acoustic signal and text messages on the
Info Display.
Indicator and warning lamps
Control and warning lamps can light up in various combinations and colors.
Display on Info Display
If the deadline for your next state vehicle
inspection is approaching, the remaining distance and time will appear briefly when you
switch on the ignition.
Your Service Advisor will determine your
vehicle's current service requirements by
reading out the data stored in the remote control.<
80
Explanatory text messages
Text messages on the Info Display explain the
meaning of the indicator and warning lamps
shown.

Viewing stored Check Control
Online Edition for Part no. 01 41 0 012 836 - © 08/06 BMW AG
messages
Using CHECK button
1. Press and hold:
The first stored message is displayed.
You can view additional information regarding
most Check Control messages, e.g. regarding
the cause of a malfunction and action required,
refer to Viewing additional information on
page 81.
In urgent cases, this information will be shown
as soon as the corresponding lamp comes on.
An acoustic signal sounds at the same time.
To exit the menu:
The arrow is selected. Press the controller.
Hiding Check Control messages
Press the button on the turn signal lever.
Some Check Control messages remain displayed until the related malfunction is rectified:
they cannot be hidden. If several malfunctions
occur simultaneously, then the Check Control
messages are displayed in sequence.
Other Check Control messages are hidden after
roughly 20 seconds, but remain stored in memory.
Controls
2. Briefly press the button:
A new message appears each time you
press the button.
Viewing additional information
iDrive, for principle details, refer to page 16.
1. Press the button to open the start
menu.
2. Move the controller toward "Car Data".
3. Select "CHECK" and press the controller.
The stored status reports appear on the
display.
81
Reference At a glanceDriving tipsCommunications NavigationEntertainmentMobility

4. Select a message and press the controller.
Online Edition for Part no. 01 41 0 012 836 - © 08/06 BMW AG
To exit the menu:
The arrow is selected. Press the controller.
Display of malfunction urgency
Depending on the status of the monitored
systems, the symbol in the status line is displayed in different colors.
Everything under control
Yellow or red
Malfunctions are present in the monitored systems. Depending upon how serious the problem is, a supplementary message may also
appear on the Control Display.
The symbol also indicates the status of the service requirements, refer to Symbols on
page 79.
Speed limit
You can enter a speed and a Check Control
message will indicate when you have reached
this speed. This enables you, for example, to
receive warnings if you exceed a speed limit in
an urban area.
You are only warned of reaching this speed a
second time if your speed has dropped to at
least 3 mph/5 km/h slower than this speed limit
since the last warning.
Displaying, adjusting, or changing limit
iDrive, for principle details, refer to page 16.
1. Press the button to open the start
menu.
2. Move the controller toward "Car Data".
3. Select "Limit" and press the controller.
4. Select "SET" and press the controller.
Displays after trip completion
Selected malfunction reports generated during
the trip are shown again consecutively when
you switch off the ignition.
Even with the ignition and display off, you can
display the messages on the Info Display:
Press the CHECK button for approx. 8 seconds,
refer to page 81. The stored status reports
appear again in the display. If several messages
are present, you can continue to briefly press
the CHECK button to view them in succession.
The Check Control function is terminated:
> automatically after a brief period
> if you press the CHECK button again for
approx. 8 seconds.
82
5. Turn the controller to adjust the limit.
6. Press the controller to save the setting.
Applying your current speed as limit
Select and press the controller.
The system applies your current speed as the
limit.
Activating/deactivating limit
Select "ON / OFF" and press the controller.
When the speed limit is switched on, "ON /
OFF" is highlighted.

Limit on Info Display
Online Edition for Part no. 01 41 0 012 836 - © 08/06 BMW AG
Taking an intermediate time reading
Select "INTERM. TIME" and press the controller. This intermediate time appears below the
ongoing primary stopwatch count.
Assistance window for onboard data
If, for instance, the advance warning field in the
tachometer is activated, refer to page 75, then
the speed limit will be indicated by a warning
field in the speedometer, refer to arrow.
Stopwatch
Starting and stopping
iDrive, for principle details, refer to page 16.
1. Press the button to open the start
menu.
2. Move the controller toward "Car Data".
3. Select and press the controller.
4. Select and press the controller. The stop-
watch is reset to 0 and starts.
5. Select and press the controller.
This stops the timer.
Press the controller again to reset the stopwatch to zero.
All of the remaining functions remain
available at all times while the stopwatch
is running. The stopwatch continues to run in
the background.<
Controls
You can select any of the following computer
functions for display in the assistance window:
> Computer
> Trip computer
> Speed limit
> Stopwatch
Adopting display
iDrive, for principle details, refer to page 16.
1. Press the button to open the start
menu.
2. Move the controller toward "Car Data".
3. Select "BC" and press the controller.
4. Select " Split" and press the controller.
The function appears in the assistance window.
You can also choose to view brief help texts
explaining selected menu items, refer to
page 21, or the travel route with a navigation
system, refer to page 130.
83
Reference At a glanceDriving tipsCommunications NavigationEntertainmentMobility

Settings on Control Display
Online Edition for Part no. 01 41 0 012 836 - © 08/06 BMW AG
Setting units of measure and display
format
You can change the units of measure used in
the displays of fuel consumption, distances and
temperatures as well as the display format for
the time and date.
iDrive, for principle details, refer to page 16.
1. Press the button to open the start
menu.
2. Move the controller toward "Settings".
3. Select "Units" and press the controller.
Everything under control
4. Select the menu item that you wish to
adjust. Press repeatedly to view a listing of
your selection options.
The setting is stored for the remote control currently in use.
3. Select "Language" and press the controller.
4. Select and activate the desired language.
The setting is stored for the remote control currently in use.
Time and date
iDrive, for principle details, refer to page 16.
1. Press the button to open the start
menu.
2. Move the controller toward "Settings".
3. Select "Clock" and press the controller.
Setting language
You can select a different language for the text
displays.
iDrive, for principle details, refer to page 16.
1. Press the button to open the start
menu.
2. Move the controller toward "Settings".
84
Setting time
1. Select "Time" and press the controller.
The first time setting is activated.
2. Turn to adjust the setting.
3. Press the controller to adopt the setting.
The next setting is selected.
4. Adjust the remaining settings. After the last
adjustment, the time is stored.
Setting date
1. Select "Date" and press the controller.
The first date display setting is activated.
2. Turn to adjust the setting.

3. Press the controller to adopt the setting.
Online Edition for Part no. 01 41 0 012 836 - © 08/06 BMW AG
The next setting is selected.
4. Adjust the remaining settings. After the last
adjustment, the date is stored.
The setting is stored for the remote control currently in use.
Hour signal activation
You will hear four tones just before the top of
each hour.
Select "Memo" and press the controller.
The symbol indicates the menu that is currently activated.
Setting brightness
You can set the brightness of the screen.
iDrive, for principle details, refer to page 16.
1. Press the button to open the start
menu.
2. Move the controller toward "Settings".
3. Select "Screen" and press the controller.
4. Select "Brightness" and press the control-
ler.
Controls
5. Turn the controller until you reach the
desired setting and press the controller to
accept the setting.
Under unfavorable conditions, e.g. in
bright surroundings, the brightness con-
trol of the screen might not be immediately recognizable.<
The setting is stored for the remote control currently in use.
85
Reference At a glanceDriving tipsCommunications NavigationEntertainmentMobility

Technology for comfort, convenience and
Online Edition for Part no. 01 41 0 012 836 - © 08/06 BMW AG
safety
PDC Park Distance Control*
The concept
The PDC assists you when you are parking.
Audible signals and an optical display indicate
that you are approaching an object in front of or
behind your vehicle. To measure the distance,
four ultrasonic sensors are provided in each
bumper. The range of these sensors is approx.
6 ft/2 m. However, an acoustic warning begins
to sound for the sensors at the front and at the
two rear corners at approx. 24 in/60 cm, and for
the center rear sensors at approx. 5 ft/1.50 m.
PDC is a parking aid that can indicate
objects when they are approached
slowly, as is usually the case when parking.
Avoid approaching an object at high speed; otherwise, the system may sound the warning of
physical obstacles too late.<
Automatically activating
The system starts to operate automatically
approx. 1 second after you engage the transmission position R with the engine running or
the ignition switched on.
Wait this short period before proceeding.
Manual activation
Technology for comfort, convenience and safety
Manual deactivation
Press the button again; the LED goes out.
After driving approx. 165 ft/50 m or at over
approx. 20 mph/30 km/h, the system switches
off and the LED goes out. You can reactivate the
system manually as needed.
Signal tones
An intermittent signal indicates the distance of
the vehicle from an object being approached.
Thus, an object detected to the left rear of the
vehicle will be indicated by a signal tone from
the left rear speaker, etc. As the distance
between vehicle and object decreases, the
intervals between the tones become shorter.
The signal tone becomes continuous once the
distance to the nearest object falls below
roughly 1 ft/30 cm.
An intermittent tone is interrupted after approx.
3seconds:
> if you remain in front of an object that was
only detected by one of the corner sensors
> if you drive parallel to a wall
Malfunction
The LED in the button flashes and a message
appears on the Info Display. PDC has failed.
Have the system checked.
To prevent this problem, keep the sensors
clean and free of ice or snow in order to ensure
that they will continue to operate effectively.
When using high-pressure washers, do not
spray sensors for long periods and keep the
sprayer at least 4 in/10 cm away from the sensors.
Press the button, the LED lights up.
86
PDC with visual warning
You can also have the system show distances
to objects on the Control Display. Objects that
are farther away are displayed there before a
signal tone begins to sound.

iDrive, for principle details, refer to page 16.
Online Edition for Part no. 01 41 0 012 836 - © 08/06 BMW AG
1. Press the button to open the start
menu.
2. Move the controller toward "Settings".
3. Select "Vehicle" and press the controller.
4. Select "PDC pic." and press the controller.
This activates the PDC display.
The display appears as soon as PDC is activated.
The setting is stored for the remote control currently in use.
To exit the menu:
Select the arrow and press the controller.
sors before or after a continuous audible signal
is given. Higher, protruding objects, such as
wall ledges, may not be detectable.
Loud noises from outside and inside the vehicle
may also prevent you from hearing the PDC's
signal tone.<
Driving stability control systems
Your BMW is equipped with an extended array
of systems designed to enhance and maintain
vehicle stability under extreme conditions.
ABS Antilock Brake System
ABS prevents the wheels from locking during
braking. Safe steering response is maintained
even during hard braking. This increases active
driving safety.
ABS is operational every time you start the
engine. For information on safe braking, refer to
page 123.
CBC Cornering Brake Control
This system provides further enhancements to
vehicle stability and steering response when
braking while cornering or when braking during
a lane change.
Electronic brake-force distribution
The system controls the brake pressure in the
rear wheels to ensure a stable braking behavior.
Controls
System limits
Even with PDC, final responsibility for
estimating the distance between the
vehicle and any objects always remains with the
driver. Even when sensors are involved, there is
a blind spot in which objects cannot be
detected. The system's detection of objects is
also subject to the physical limits that apply to
all forms of ultrasonic measurement, such as
those encountered with tow bars and trailer
couplings, as well as thin or wedge-shaped
objects. Low objects already indicated, such as
curb edges, may enter the blind spot of the sen-
DBC Dynamic Brake Control
When you apply the brakes rapidly, this system
automatically produces the maximum braking
force boost and thus helps to achieve the shortest possible braking distance during full braking. This system exploits all of the benefits provided by ABS.
Do not reduce the pressure on the brake pedal
for the duration of the full braking.
DSC Dynamic Stability Control
DSC prevents traction loss in the driving wheels
when starting off and accelerating. DSC also
87
Reference At a glanceDriving tipsCommunications NavigationEntertainmentMobility

detects unstable driving conditions such as
Online Edition for Part no. 01 41 0 012 836 - © 08/06 BMW AG
fishtailing or sliding of the vehicle's front
wheels. In these cases, DSC helps the vehicle
safely stay on course within the physical limits
by reducing the engine output and by applying
the brakes in the individual wheels.
The laws of physics cannot be repealed,
even with DSC. An appropriate driving
style always remains the responsibility of the
driver. Do not reduce the additional safety margin by taking unnecessary risks.<
Deactivating DSC
1. Press the button to open the start
menu.
2. Move the controller toward "Settings".
3. Select "DTC" and press the controller for at
least 3 seconds.
The indicator lamp comes on:
DSC is deactivated.
DTC Dynamic Traction Control
DTC is a version of DSC that is optimized for
forward momentum in special road conditions.
The system ensures maximum forward
momentum, but with limited driving stability.
Therefore, drive with appropriate caution.
You may find it useful to briefly activate DTC
under the following special circumstances:
> When driving on snow-covered uphill
grades, in slushy snow or on uncleared,
snow-covered roads
> When rocking a stuck vehicle free or when
starting off in deep snow or on loose ground
> When driving with snow chains
Activating DTC
iDrive, for principle details, refer to page 16.
1. Press the button to open the start
menu.
2. Move the controller toward "Settings".
3. Select "DTC" and press the controller.
The LED for "DTC" and the DSC indicator lamp
on the Info Display light up. DTC Dynamic Traction Control and DSC Dynamic Stability Control
are deactivated together. Interventions promoting stability and forward momentum will no
longer be carried out.
To promote enhanced operating stability, reactivate DSC again as soon as possible.
Technology for comfort, convenience and safety
Activating DSC
Select "DTC" and press the controller.
The LED on the Control Display and the DSC
indicator lamp on the Info Display go out.
For control purposes
The indicator lamp flashes:
DSC is controlling the drive forces and
brake forces.
88
The LED for "DTC" and the DTC indicator lamp
on the Info Display light up.
For control purposes
The indicator lamp flashes:
DTC is controlling the drive forces and
brake forces.
The indicator lamp comes on:
DTC is activated.

Deactivating DTC
Online Edition for Part no. 01 41 0 012 836 - © 08/06 BMW AG
Select "DTC" and press the controller.
The LED on the Control Display and the DTC
indicator lamp on the Info Display go out.
Dynamic Drive
The concept
Dynamic Drive minimizes body roll and optimizes vehicle stability during cornering and
evasive maneuvers.
Active stabilizers at the front and rear axles form
the basis for Dynamic Drive. Suspension compliance adapts to suit driving conditions, varying from performance-oriented during cornering to smooth and comfort-oriented when the
vehicle is traveling in a straight line. During vehicle operation, the system continuously runs
through closed-loop control cycles lasting only
fractions of a second.
The system assumes operational status each
time you start the engine.
Malfunction
The warning lamp lights up yellow and
a message appears on the Info Display.
A malfunction has occurred in the
Dynamic Drive system. Have the system
checked as soon as possible.
If a malfunction occurs, please remember
to adapt your speed accordingly, especially in curves.
The suspension will be noticeably softer and
the vehicle will display a greater tendency to tilt
during cornering and in crosswinds.<
If a Check Contro l message indicates an oil loss,
stop as soon as possible at a suitable location
and switch off the engine. Do not continue driving, contact your BMW center.
Self-leveling suspension*
Malfunction
The warning lamp for self-leveling suspension lights up yellow and a message
appears on the Info Display.
A malfunction has occurred in the level control
system.
Stop driving and check the vehicle:
> The vehicle is considerably lower at the rear
than at the front, possibly also on one side,
at the rear left compared to the rear right.
> The ground clearance is reduced or the
driving comfort is noticeably reduced.
> The position of the vehicle is normal, but a
malfunction is indicated.
Drive to the nearest BMW center or a workshop
that works in accordance with BMW guidelines
and uses appropriately trained personnel. Drive
with appropriate caution in the meantime.
EDC Electronic Damping Control*
If the influencing variables such as road surface
quality or operating conditions such as steering, braking etc. change, the damping automatically adjusts to the new conditions.
iDrive, for principle details, refer to page 16.
1. Press the button to open the start
menu.
2. Move the controller toward "Settings".
3. Select "Vehicle" and press the controller.
4. Select "EDC" and press the controller.
Controls
89
Reference At a glanceDriving tipsCommunications NavigationEntertainmentMobility

There are two programs.
Online Edition for Part no. 01 41 0 012 836 - © 08/06 BMW AG
With each press of the controller, you can
switch back and forth between "Comfort" and
"Sport".
Comfort program
The Comfort program is suitable for use
throughout the vehicle's entire speed range and
regardless of load.
Sport program
You should select the Sport program for consistently performance-oriented response from
shock absorbers and steering.
FTM Flat Tire Monitor*
The concept
The Flat Tire Monitor keeps track of the inflation pressures in the four mounted tires as you
drive. The system triggers an alert whenever
the inflation pressure drops significantly in relation to the pressure in another tire.
When a loss of pressure occurs, the rolling
radius changes and with it, the rotational speed
of the wheels. This change is detected and signaled as a flat tire.
Functional requirements
To ensure the reliable signaling of a flat tire, the
system must be initialized at the correct tire
inflation pressure.
The initialization must be repeated after
every correction of the tire inflation pres-
sure and after every tire or wheel change.<
Technology for comfort, convenience and safety
System limits
The Flat Tire Monitor cannot indicate
sudden severe tire damage caused by
outside factors and does not detect a natural,
even pressure drop in all four tires.<
In the following situations, the system could be
delayed or malfunction:
> When the system has not been initialized.
> When driving on snow-covered or slippery
road surfaces.
> Performance-oriented style of driving: slip
in the drive wheels, high lateral acceleration.
> When driving with snow chains
*
.
Initializing system
The initialization is completed during driv-
ing, which can be interrupted at any time.
The initialization automatically continues when
driving resumes. Do not initialize the system
*
when driving with snow chains
iDrive, for principle details, refer to page 16.
1. Select "Settings".
2. Select "Vehicle" and press the controller.
3. Select "Tires: FTM" and press the control-
ler.
The initialization menu appears.
4. Start the engine, but do not begin to drive.
5. Select "Reset tire pressure" and press the
controller.
During the initialization, "Reset will be completed while driving. A tire pressure loss
cannot be detected while resetting. Status:
resetting FTM…" appears on the Control
Display.
.<
90

6. Start driving.
Online Edition for Part no. 01 41 0 012 836 - © 08/06 BMW AG
It takes at least 10 minutes before the Flat
Tire Monitor is once again able to detect
and report a flat tire.
The initialization is completed during driving.
Then the message "1. Correctly adjust pressure in all tires (also after a tire change). 2.
Select "Reset" (while stopped, with ignition on
or engine running) Status: active" appears on
the Control Display again.
To exit the menu:
Select the arrow and press the controller.
Indication of a flat tire
The warning lamp lights up red and a
message appears on the Info Display. In
addition, a signal sounds. A flat tire or a
major air loss has occurred.
1. Reduce speed and stop the vehicle care-
fully. Avoid sudden braking and steering
maneuvers.
2. Identify the damaged tire.
If identification is not possible, contact your BMW center.<
3. Replace the damaged tire, refer to Chang-
ing wheels on page 214.
Run-flat tires*
1. Cautiously reduce the vehicle speed to
below 50 mph/80 km/h. Avoid sudden braking and steering maneuvers. Do not exceed
a vehicle speed of 50 mph/80 km/h.
If the vehicle is not equipped with runflat tires, refer to page 204, do not
continue to drive. Continued driving after a
flat tire can result in serious accidents.<
2. Check the air pressure in all four tires at the
next opportunity.
If the tire inflation pressure in all four
tires is correct, the Flat Tire Monitor
may not have been initialized. The system
must then be initialized.<
3. In the event of a total loss of inflation pres-
sure, 0 psi/kPa, or obvious tire damage, you
can estimate the possible distance for con-
tinued driving on the basis of the following
guide values:
> With low load:
1 to 2 persons without luggage:
approx. 155 miles/250 km.
> With medium load:
2 persons, luggage compartment full, or
4 persons without luggage:
approx. 95 miles/150 km.
> With full load:
4 or more persons, luggage compartment full:
approx. 30 miles/50 km.
Drive reservedly and do not exceed a
speed of 50 mph/80 km/h. In the event of
pressure loss, vehicle handling changes. This
includes reduced tracking stability in braking,
extended braking distances, and altered natural
steering characteristics.
If unusual vibrations or loud noises occur while
the vehicle is being driven, this can indicate final
failure of the damaged tire. Reduce speed and
stop at a suitable location as soon as possible;
otherwise, pieces of the tire could come off and
cause an accident. Do not continue driving,
contact your BMW center.<
Malfunction
The warning lamp lights up yellow and
a message appears on the Info Display.
The Flat Tire Monitor has failed. Have
the system checked as soon as possible.
TPM Tire Pressure Monitor*
The concept
TPM checks the tire inflation pressure in the
four mounted tires. The system indicates if the
tire inflation pressure has dropped considerably
in one or several tires.
Functional requirement
In order to assure the reliable reporting of a flat
tire, the system must have been reset with the
correct tire inflation pressure.
Controls
91
Reference At a glanceDriving tipsCommunications NavigationEntertainmentMobility

Always use wheels with TPM electronics; oth-
Online Edition for Part no. 01 41 0 012 836 - © 08/06 BMW AG
erwise, the system cannot be assured of functioning properly.
Reset the system again after each correction of the tire inflation pressure and after
every tire or wheel change.<
System limits
TPM cannot warn you of sudden serious
tire damage caused by external influ-
ences.<
The system does not work correctly if it has not
been reset; for example, a flat tire may be indicated even though the tire inflation pressures
are correct.
If a wheel without TPM electronics has been
mounted or if the TPM experiences temporary
interference from other systems or devices that
use the same radio frequency, then the system
is inactive and unable to report a flat tire.
Status display on Control Display
The tire and system status is indicated by the
color of the tires.
TPM takes into account the fact that the tire
pressure changes during driving. A correction is
only required if the color of the TPM display
indicates that it is necessary.
Gray
The system cannot detect a flat tire.
Reasons for this can include:
> TPM is in the process of being reset
> Temporary interference due to systems or
devices that use the same radio frequency
> Malfunction
Resetting system
Reset the system again after each correction of the tire inflation pressure and after
every tire or wheel change.<
The reset process is completed during driving
and can be interrupted at any time. When driving resumes, the process resumes automatically.
iDrive, for principle details, refer to page 16.
1. Press the button to open the start
menu.
2. Move the controller toward "Settings".
3. Select "Vehicle" and press the controller.
4. Select "Tires: TPM" and press the control-
ler.
Green
The tire pressure matches the learned set state.
"Status: TPM active" is displayed on the Control Display.
One wheel is yellow
There is a flat tire or a major drop in inflation
Technology for comfort, convenience and safety
pressure in the indicated tire. A message
appears on the Control Display.
All wheels are yellow
There is a flat tire or a major drop in inflation
pressure in several tires. A message appears on
the Control Display.
92
5. Start the engine, but do not begin to drive.
6. Select "RESET" and press the controller.

7. Select "YES" and press the controller.
Online Edition for Part no. 01 41 0 012 836 - © 08/06 BMW AG
8. Start to drive.
The tires are shown in gray and "Status:
Resetting TPM..." is displayed.
After a few minutes of driving, the newly corrected inflation pressures in the tires are
adopted as the set-point values to be monitored. The resetting process is completed during driving. The tires are shown in green on the
Control Display and "Status: TPM active" is displayed again.
If a flat tire is detected during the reset-
ting and adoption of the tire inflation pressures, all tires are shown in yellow on the Control Display. The message "Status: Tire low!" is
displayed.<
Low tire pressure message
The warning lamp lights up yellow. A
message appears on the Control Display. In addition, a signal sounds. A flat
tire or a major air loss has occurred.
1. Reduce speed and stop the vehicle care-
fully. Avoid sudden braking and steering
maneuvers.
2. Check whether your vehicle is equipped
with standard tires or run-flat tires.
You will recognize run-flat tires by a
circular symbol containing the letters
RSC on the side of the tire, refer to
page 204.<
Standard tires
1. If all four wheels are shown in yellow, iden-
tify the damaged tire on the vehicle.
2. Replace the damaged wheel or wheels,
refer to Changing wheels on page 214.
The spare wheel is equipped with the necessary TPM electronics and when mounted, will
also be monitored once the system has been
reset.
Have the tire replaced by a BMW center or a
workshop that is familiar with handling TPM and
works according to BMW repair procedures
with correspondingly trained personnel.
Run-flat tires*
1. Cautiously reduce speed to below 50 mph/
80 km/h. Avoid sudden braking and steering maneuvers. Do not exceed a speed of
50 mph/80 km/h.
If the vehicle is not equipped with runflat tires, refer to page 204, do not
continue to drive. Continued driving after a
flat tire can result in serious accidents.<
2. In the event of complete tire pressure loss,
0 psi/0 kPa, you can estimate the possible
distance for continued driving on the basis
of the following guide values:
> With a light load:
1 to 2 persons without luggage:
approx. 155 miles/250 km
> With a medium load:
2 persons, luggage compartment full, or
4 persons without luggage:
approx. 95 miles/150 km
> With a full load:
4 or more persons, luggage compartment full:
approx. 30 miles/50 km
Drive reservedly and do not exceed a
speed of 50 mph/80 km/h. In the event of
pressure loss, vehicle handling changes. This
includes reduced tracking stability in braking,
extended braking distance and altered natural
steering characteristics.
If unusual vibrations occur while the vehicle is
being driven, this can indicate final failure of the
damaged tire. Reduce speed and stop as soon
as possible; otherwise, pieces of the tire could
come loose and cause an accident. Do not continue driving, contact your BMW center.<
Malfunction
The yellow warning light flashes and
then lights up continuously. The tires
are shown in gray on the Control Display and a message is displayed. No flat tire can
be detected. Have system checked.
Controls
93
Reference At a glanceDriving tipsCommunications NavigationEntertainmentMobility
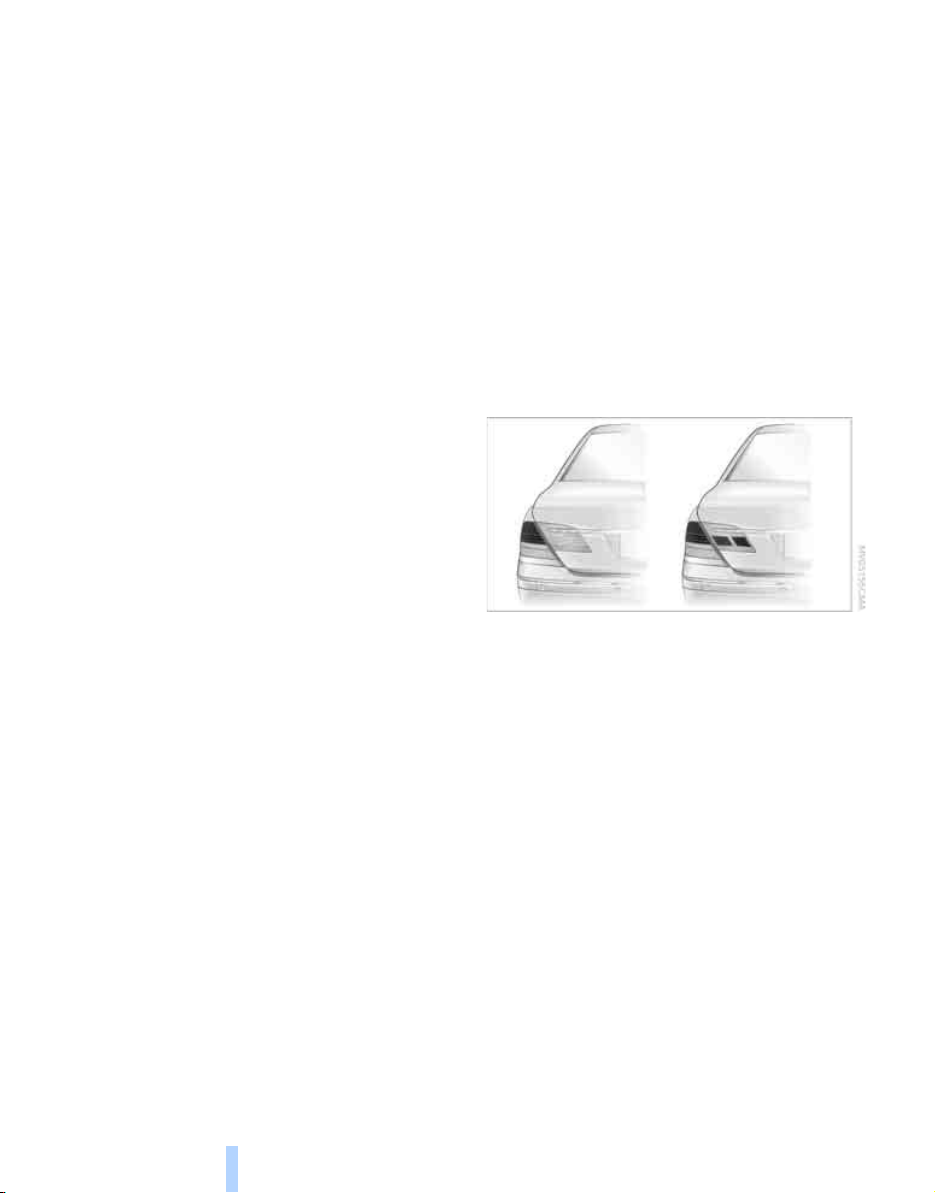
A message like this is displayed in the following
Online Edition for Part no. 01 41 0 012 836 - © 08/06 BMW AG
situations:
> When a malfunction is occurring.
Have the system checked.
> When a wheel without TPM electronics is
mounted.
> When TPM is experiencing temporary inter-
ference from other systems or devices that
use the same radio frequency.
Declaration according to NHTSA/
FMVSS 138 Tire Pressure Monitoring
Systems
Each tire, including the spare, should be
checked monthly when cold and inflated to the
inflation pressure recommended by the vehicle
manufacturer on the vehicle placard or tire inflation pressure label. If your vehicle has tires of a
different size than the size indicated on the
vehicle placard or tire inflation pressure label,
you should determine the proper tire inflation
pressure for those tires. As an added safety feature, your vehicle has been equipped with a tire
pressure monitoring system TPMS that illuminates a low tire pressure indicator lamp when
one or more of your tires are significantly
under-inflated. Accordingly, when the low tire
pressure indicator lamp comes on, you should
stop and check your tires as soon as possible,
and inflate them to the proper pressure. Driving
on a significantly under-inflated tire causes the
tire to overheat and can lead to tire failure.
Underinflation also reduces fuel efficiency and
tire tread life, and may affect the vehicle’s handling and stopping ability. Please note that the
TPMS is not a substitute for proper tire maintenance, and it is the driver’s responsibility to
Technology for comfort, convenience and safety
maintain correct tire pressure, even if underinflation has not reached the level to trigger illumination of the TPMS low tire pressure indicator
lamp.
The TPMS malfunction indicator is combined
with the low tire pressure indicator lamp. When
the system detects a malfunction, the indicator
lamp will flash for approximately one minute and
then remain continuously lit. This sequence will
continue upon subsequent vehicle startups as
long as the malfunction exists. When the malfunction indicator is illuminated, the system
may not be able to detect or signal low tire pressure as intended. TPMS malfunctions may
occur for a variety of reasons, including the
installation of replacement or alternate tires or
wheels on the vehicle that prevent the TPMS
from functioning properly. Always check the
TPMS malfunction indicator lamp after replacing one or more tires or wheels on your vehicle
to ensure that the replacement or alternate tires
and wheels allow the TPMS to continue to function properly.
Brake force display
Left: normal braking.
Right: heavy braking.
94

Airbags
Online Edition for Part no. 01 41 0 012 836 - © 08/06 BMW AG
The following airbags are located under the
marked covers:
1 Front airbags
2 Head airbags
3 Side airbags in front and rear
4 Knee airbags
Protective action
To ensure that the safety systems continue to provide optimized protection,
please follow the adjustment instructions on
page 43.<
The front airbags help protect the driver and
front passenger by responding to frontal
impacts in which safety belts alone cannot provide adequate restraint. When needed, the
head and side airbags help provide protection in
the event of side impact. The relevant side airbag supports the side upper body area. The
head air bag supports the head. The knee airbags help protect the legs against impact
against the cockpit.
The airbags are deliberately not triggered in
every impact situation, e.g. less severe accidents or rear-end collisions.
Do not apply adhesive materials to the
cover panels of the airbags, cover them or
modify them in any other way.
Do not attempt to remove the airbag retention
system from the vehicle. Never modify or
tamper with either the wiring or the individual
components in the airbag system. This category includes the upholstery in the center of the
steering wheel, on the instrument panel, the
doors and the roof pillars along with the sides of
*
Controls
the headliner. Do not attempt to remove or dismantle the steering wheel.
Do not touch the individual components
directly after the system has been triggered,
because there is a danger of burns. In the event
of malfunctions, deactivation, or triggering of
the airbag restraint system, have the testing,
repair, removal, and disposal of airbag generators executed only by a BMW center or a workshop that works according to BMW repair
procedures with correspondingly trained personnel and has the required explosives
licenses. Unprofessional attempts to service
the system could lead to failure in an emergency or undesired airbag activation, either of
which could result in personal injury.<
Warnings and information about the airbags is
also provided on the sun visors.
Automatic deactivation of front
passenger airbags
The occupation of the seat is detected by evaluating the impression on the occupied seat surface of the front passenger seat. The system
appropriately activates or deactivates the front,
knee, and side airbag on the front passenger
side.
The current status of the front passenger
airbag, i.e. deactivated or activated, is
indicated by the indicator lamp over the interior
rearview mirror, refer to Operating state of front
passenger airbags in the following.<
Before transporting a child on the front
passenger seat, pay attention to the
safety information and follow the handling
instructions under Transporting children safely,
95
Reference At a glanceDriving tipsCommunications NavigationEntertainmentMobility

refer to page 54.
Online Edition for Part no. 01 41 0 012 836 - © 08/06 BMW AG
In certain sitting positions, teenagers and adults
can deactivate the front, knee and side airbag
on the front passenger side; when this occurs,
the indicator lamp for the front passenger airbags lights up. In these cases, change the sitting position so that the front passenger airbags
are activated and the indicator lamp goes out.
If the desired status cannot be produced by
changing the sitting position, have the person
ride in the back. Do not place slip covers, seat
cushions, beaded mats, or other objects on the
passenger seat that are not specifically recommended by BMW. Do not lay objects under the
seat which could press against the seat from
below. Otherwise, a correct evaluation of the
occupied seat surface cannot be assured.<
> The indicator lamp does not light up when
the seat is empty.
The front, knee, and side airbags on the
front passenger side are not activated in
this case either.
Operational readiness of the airbag
system
Operating state of front passenger
airbags
The indicator lamp for the front passenger airbags indicates the operational status of the
front, knee and side airbag on the front passenger side depending on whether the seat is
occupied. The indicator lamp shows whether
the front passenger airbags are activated or
deactivated.
> The indicator lamp lights up when a child
Technology for comfort, convenience and safety
properly seated in a child restraint system
intended for the purpose is detected on the
seat.
Front, knee and side airbag on the front
passenger side are deactivated.
> The indicator lamp does not light up when,
for example, a correctly seated person of
sufficient height is detected on the seat.
Front, knee and side airbag on the front
passenger side are activated.
Once the radio ready position is reached, the
warning lamp lights up briefly, thus indicating
the operational readiness of the entire airbag
system and the safety belt tensioners.
Airbag system malfunction
> Warning lamp does not light up from radio
ready state.
> Warning lamp lights up continuously.
Have the airbag system checked immedi-
ately in case of a malfunction; otherwise,
there is a danger that the airbag system may not
respond in the expected manner in an accident
despite an impact of corresponding intensity.<
BMW Night Vision*
The concept
BMW Night Vision is a driver assistance system
that is designed to provide enhanced vision for
certain objects at night. This can be especially
helpful for detecting people and larger animals.
When objects are detected, the driver may be
able to take appropriate action sooner. For
example, the driver may identify and detect the
presence of persons or animals in the road
ahead or off to the sides and can be more alert,
slow down or stop, blow the horn, etc. The
96

driver can decide which actions are appropriate
Online Edition for Part no. 01 41 0 012 836 - © 08/06 BMW AG
and then react accordingly.
A certain area in front of the vehicle is viewed by
an infrared camera and a generated image is
shown on the Control Display. The resulting
thermal image shows the relative heat radiation
of the objects present in the camera's field of
view. Warmer objects appear brighter and
cooler objects appear darker. Contrast is
dependent on the temperature difference
between the objects and the background and
on the amount of heat radiation of the object
itself. As a result, it is quite possible that a person is not continually recognizable as a person
in shape, since the thermal radiation can be
affected by different clothing which blocks heat
loss. Objects with little temperature difference
to the surrounding area, or little heat radiation
are less noticeable, for example in cold weather.
Any improvement in detection depends on
many factors such as the object size and temperature compared to the surroundings, or
other nearby objects, the visual recognition
skills of the driver, weather conditions, and
other factors.
Driving hints
With the system active, periodically but briefly,
glance at the thermal image on the Control Display to notice objects that could be people or
larger animals. The glance should be similar to
glancing at the rear view mirror. Do not stare at
the image for long periods while driving, as this
will take your attention away from the road. If
you notice an object of interest ahead, be prepared to slow down or stop, blow the horn, or
take other appropriate action.
System limits
The system is designed to supplement but not
replace forward vision through the windshield.
The driver is responsible for safe driving at
night. BMW Night Vision is not designed to be
used as a continuous viewing window for driving at night.
No system, no matter how sophisticated, can
operate without limitations. BMW Night Vision
operation is subject to physical and environmental limitations that will reduce the ability of
the system to detect and display a clear thermal
image. Some of the situations in which these
limitations can occur are:
> on steep hilltops or depressions and in tight
curves
> in tunnels, as the contrast is inherently low
> when the camera lens is dirty
> in dense fog, heavy rain or snowfall
> when displaying very hot objects such as
transformers, car exhausts etc.
> when the image briefly freezes during nor-
mal system adjustment.
BMW Night Vision's potential benefits
can be limited by the driving style of the
driver, the size and relative temperature of the
detected objects, dirt or contamination on the
camera lens, adverse weather like snow, rain or
fog, and other factors not mentioned here. It will
always be the driver's responsibility to drive at a
speed and in a manner that recognizes potential
hazards and to adjust accordingly.
BMW Night Vision is not a substitute or replacement for driver responsibility or for adapting to
the visibility conditions and the traffic situation.
The forward view illuminated by the headlamps
must always be the basis for making safe driving decisions; otherwise, a safety risk will
result.<
Controls
97
Reference At a glanceDriving tipsCommunications NavigationEntertainmentMobility

Activating BMW Night Vision
Online Edition for Part no. 01 41 0 012 836 - © 08/06 BMW AG
1. Turn the light switch to position 2 or 3, refer
to page 100.
2. When the low beams are switched on:
> Press the button.
> Press the button.
Programming button on the steering
wheel, refer to page 52.
The image will be displayed on the Control Display after a few seconds. Depending on the last
mode selected, either the normal or full screen
image will be displayed.
Due to the system's need to adjust periodically,
a still image is displayed at certain intervals for
fractions of a second. This is normal and not an
indication of a problem.
To prevent driving without headlamps, at a
Technology for comfort, convenience and safety
speed of more than approx. 3 mph/5 km/h and
when dark, the thermal image on the Control
Display is only shown when the low beams are
on.
BMW Night Vision is not available on the
rear screen. When the system is active,
neither the navigation system nor BMW Assist
can be started from the rear screen.<
Deactivating BMW Night Vision
> Press the button.
> Press the button.
> Press the button.
> Make a selection with the controller, i.e.:
change the radio station or make a phone
call. For iDrive details, refer to page 16.
Selecting settings
1. Activate BMW Night Vision.
2. Press the controller to display the menu
items.
3. Select the menu item and press the control-
ler:
> "Zoom":
At higher speeds, the image is zoomed
in.
> "Curve mode":
Depending on the steering angle and
other parameters, the image section follows the course of the road to some
degree.
> "Full screen":
The image is shown on the entire Control Display.
> "Contrast":
The contrast of the screen can be
adjusted, refer to page 172.
> "Brightness":
The brightness of the screen can be
adjusted, refer to page 172.
The settings are stored for the remote control
currently in use.
98
 Loading...