


Burkard Bovensiepen GmbH+Co. KG
Alpenstraße 35-37,D-86807 Buchloe
Repair Instructions
BMW ALPINA B5 / B6
Repair Instructions
BMW ALPINA B5
BMW ALPINA B6
Dwg.-No. Page 1 of 20
88 03 357
Prepared by Date
Customer service 04.10.2005
Updated as of:
04.02.2008
Expert automotive knowledge is required.
These Repair Instructions are based on the BMW 545i/550i/650i TIS Repair Instructions.
If Nm torque settings are not shown, please see the BMW 545i/550i/650i
TIS Repair Instructions.
Burkard Bovensiepen GmbH+Co. KG
Alpenstraße 35-37,D-86807 Buchloe
Repair Instructions
BMW ALPINA B5 / B6
Dwg.-No. Page 2 of 20
88 03 357
Prepared by Date
Customer service 04.10.2005
Updated as of:
04.02.2008
OVERVIEW / TABLE of CONTENTS:
Page
Installing, removing and replacing the radial compressor 3
Checking the radial compressor’s clutch for wear / replacement 6
Installing, removing and replacing the radiator cooling package 9
Disassembly and assembly of the radiator cooling package 12
Disassembly and assembly of the catalytic converters 16
Disassembly and assembly of the DSC Hydro Unit 17
Disassembly and assembly of the automatic transmission 18
Renewing rear diff. oil 19
Exchange of spark plugs 20

Burkard Bovensiepen GmbH+Co. KG
Alpenstraße 35-37,D-86807 Buchloe
Repair Instructions
BMW ALPINA B5 / B6
Installing, removing and replacing the radial
compressor
WARNING!
Danger of burns! Perform the following job on the
vehicle only once it has completely cooled down.
ATTENTION!
The intercooler’s hoses could fail if not installed when
dry and free of any grease or oils. Please ensure a
grease-free and dry installation.
Dwg.-No. Page 3 of 20
88 03 357
Prepared by Date
Customer service 04.10.2005
Updated as of:
04.02.2008
2
1
Remove engine cover
(1), back out bolt (2) and loosen
clamps (3). Remove air intake tract and intercooler
3
Back out bolts (4) and remove belt cover.
hose.
ATTENTION! Bolts (4) have to be replaced by the
4
delivered ones ALPINA 11 65 701 and screwed in with
Loctite.
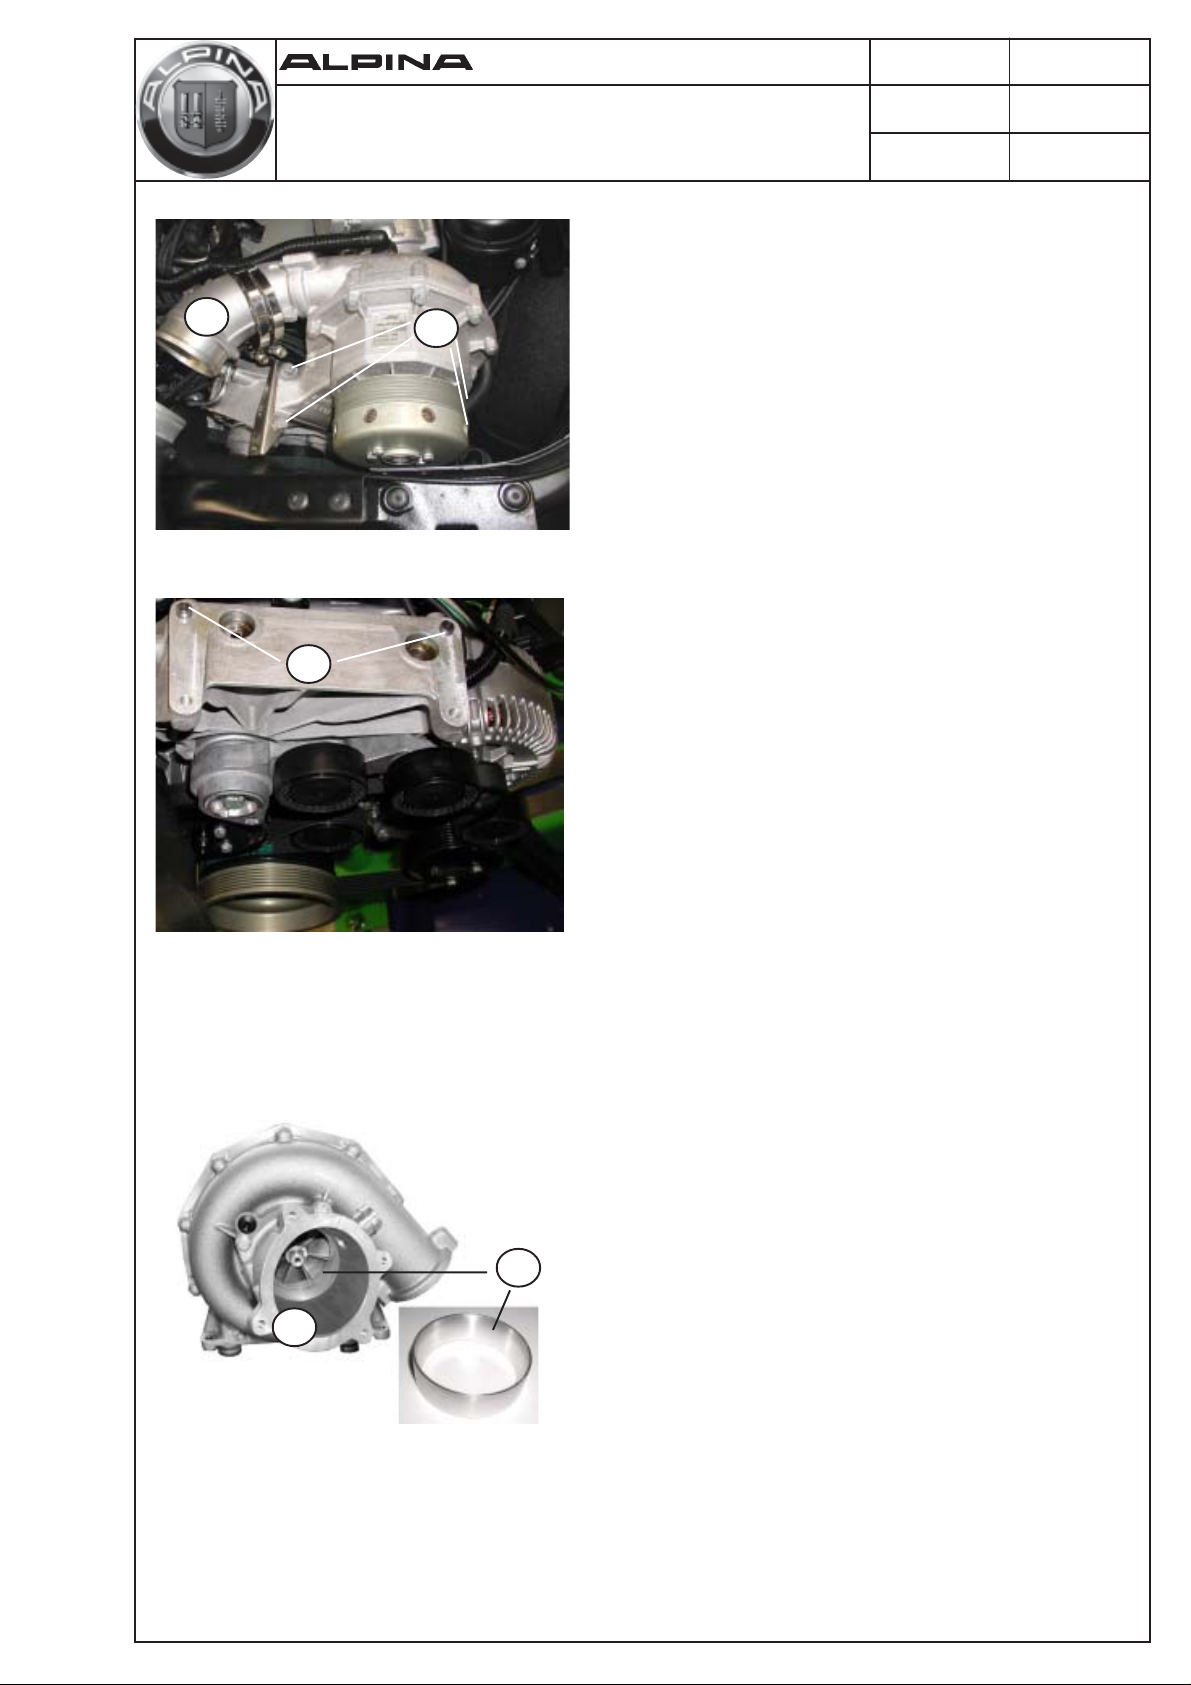
Unplug electrical connectors leading to the boost
1
pressure regulator (3) and the crankcase ventilator (1)
and open the cable ties (2).
3
ATTENTION! Don´t turn ignition on while the power
pressure regulator (3) is disconnected!
2
ATTENTION! During assembly: ensure the correct
mounting of the rubber seal within the black air intake
tract!
1
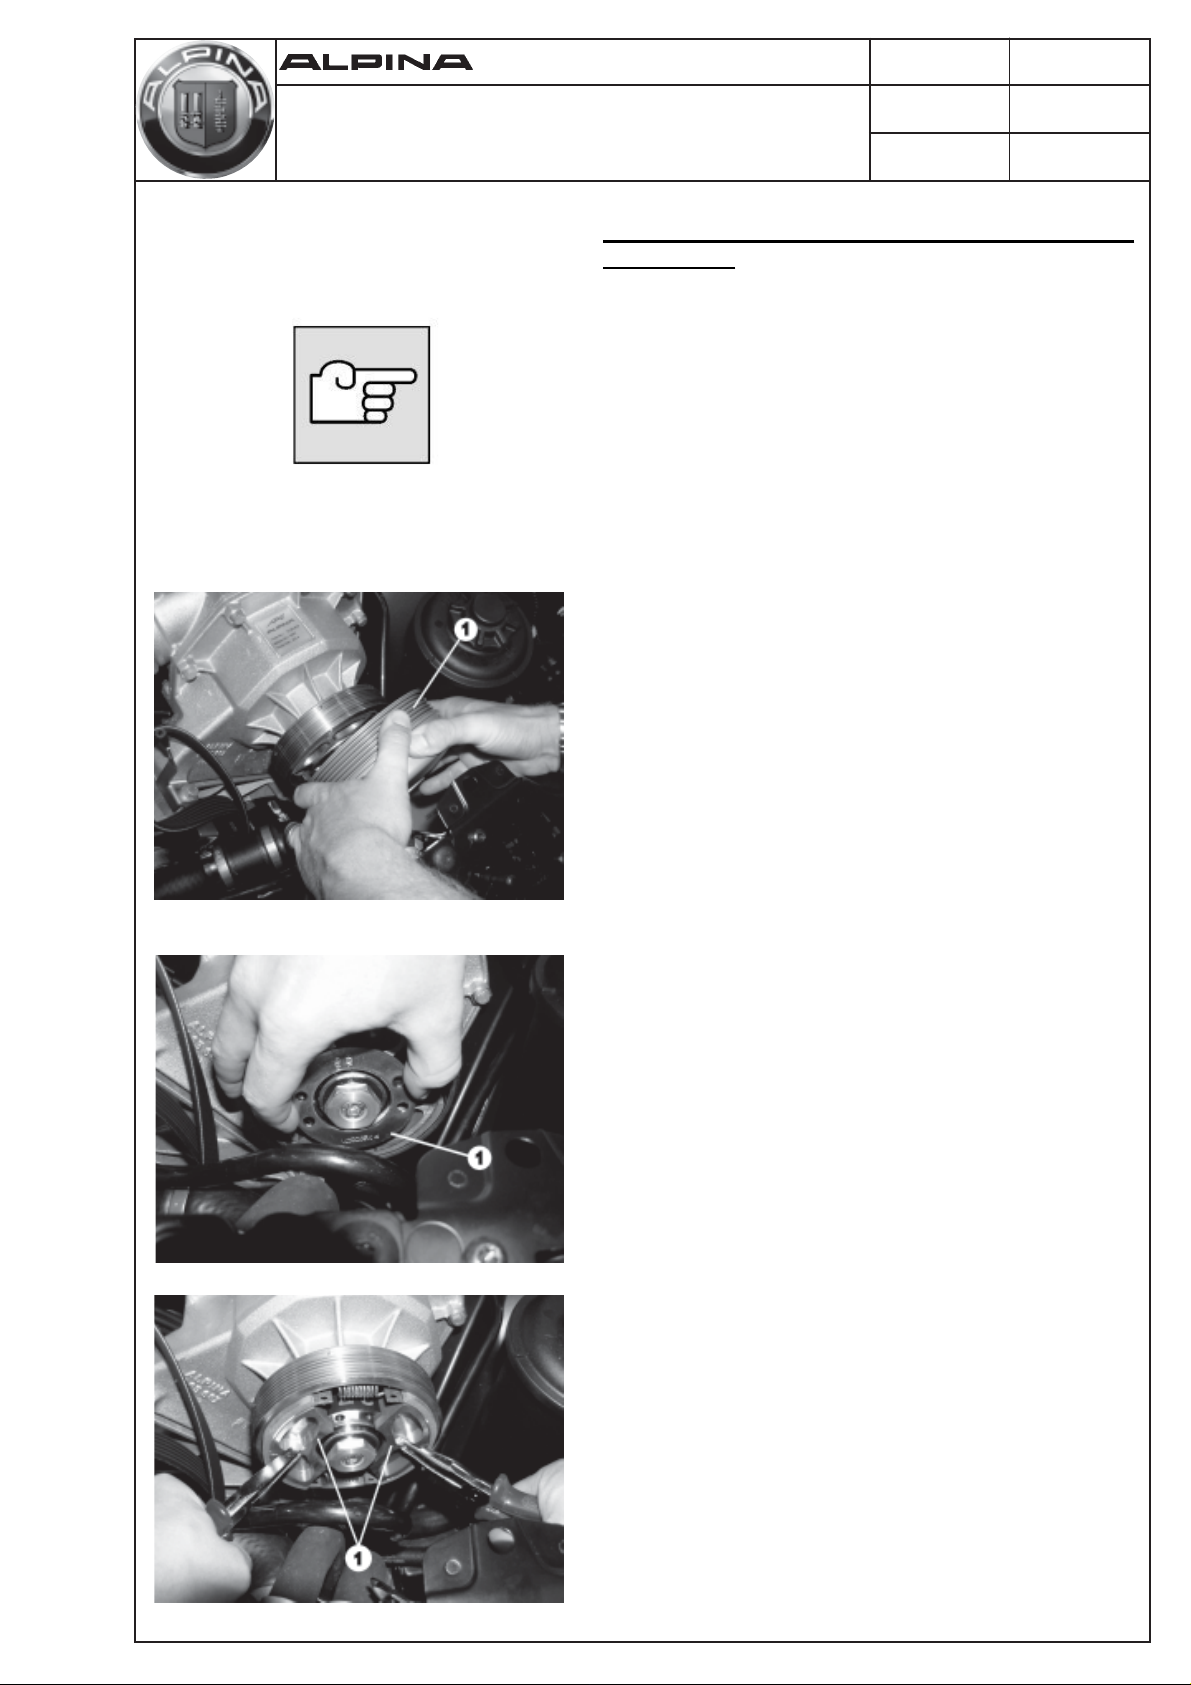
Press the belt tensioner (1) back to its stops using
ALPINA special tool 74 00 643 or 60 Torx Socket:
and remove the drive belt.
Burkard Bovensiepen GmbH+Co. KG
Alpenstraße 35-37,D-86807 Buchloe
Repair Instructions
BMW ALPINA B5 / B6
Dwg.-No. Page 4 of 20
88 03 357
Prepared by Date
Customer service 04.10.2005
Updated as of:
04.02.2008
Unscrew the radial compressor’s mounting bolts (2)
and remove the radial compressor.
1
2
Dismount pulley wheel.
Dismount tube (1) and screw it to the new radial
compressor.
Torque the screws to 8,8Nm.
ATTENTION: use new O-ring.
Pay careful attention that the positioning dowels (3) are
3
properly fitted, that the oil passages are clean.
Ensure that you don´t damage the oil passages while
remounting the radial compressor.
When exchanging the compressor, take over distance
spacer (1), tube (2) and a new O-ring into the
new radial compressor.
Tightening torque of tube screws: 8,8 Nm.
1
Dismount power pressure regulator.
2
Burkard Bovensiepen GmbH+Co. KG
Alpenstraße 35-37,D-86807 Buchloe
Repair Instructions
BMW ALPINA B5 / B6
Install spacer (1). Rotate the spacer such that the
1
holes in the spacer line up with the bore holes in
the clutch housing.
Check pulley disc for cracks and replace if
necessary.
Install the pulley disc.
Hand-tighten the bolts in a cross-wise pattern.
Check the belt housing to ensure it is running true
on centre.
ATTENTION! Tighten screws with torque wrench
after mounting the compressor´s belt (see below).
Dwg.-No. Page 5 of 20
88 03 357
Prepared by Date
Customer service 04.10.2005
Updated as of:
04.02.2008
Install the boost pressure regulator (2) and pay
attention to the correct position of the gasket.
Torque screws to 8,8 Nm.
2
Install radial compressor.
ATTENTION:
Mount the radial compressor straight on the
bracket, ensure the correct mounting of the belt
cover brackets and pay attention to the correct
lenght of the screws: 8x30 font; 8x35 rear
(mounting bolt torque: 21 Nm.)
Carefully push back the belt tightener to its stop,
mount the compressor belt and check that it is
properly seated.
Torque the belt housing screws cross-wise to
9 Nm.
Start the engine and check the belt drive.
ATTENTION: danger of injury from moving
parts.
Complete assembly.
ATTENTION:
the testdrive!
Erase the fault memory before
Burkard Bovensiepen GmbH+Co. KG
Alpenstraße 35-37,D-86807 Buchloe
Repair Instructions
BMW ALPINA B5 / B6
Checking the radial compressor’s clutch for wear /
replacement
Remove radial compressor (see ALPINA repair
instructions)
ATTENTION! Ensure that the oil passages stay
clean and that you don´t damage the oil
passages of the radial compressor.
Unscrew the bolts from the radial compressor’s
pulley disc and remove the pulley disc as shown
in picture (1).
Dwg.-No. Page 6 of 20
88 03 357
Prepared by Date
Customer service 04.10.2005
Updated as of:
04.02.2008
.
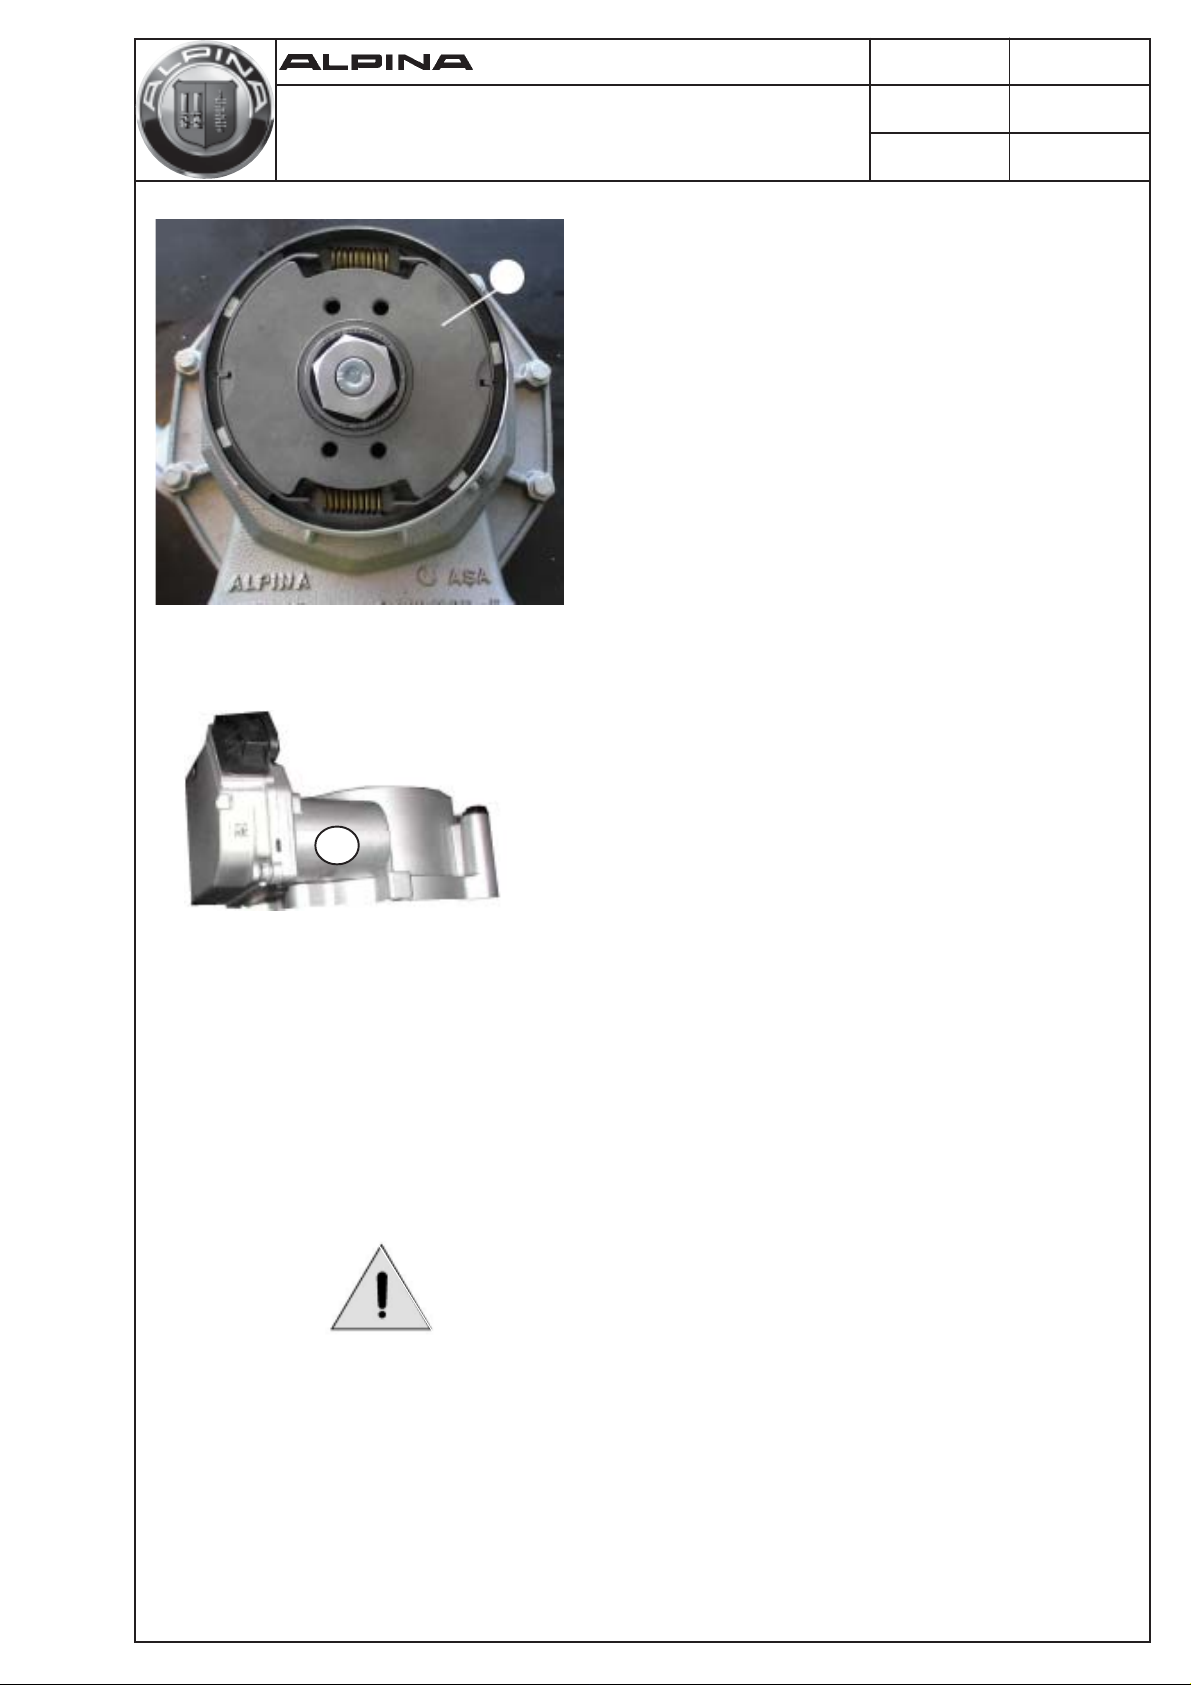
Remove spacer (1).
Pull the centrifugal clutch’s (1) weights and friction
pads out of the clutch housing using two needle
nose pliers.

Burkard Bovensiepen GmbH+Co. KG
Alpenstraße 35-37,D-86807 Buchloe
Repair Instructions
BMW ALPINA B5 / B6
Reassemble the clutch components with the new set
of pads if necessary. The complete clutch has to
beexchanged at 100.000km/60.000mls.
Clutch pads worn to less than 2mm thickness must
be replaced!
Please take care that the springs are hooked into the
centre holes in the friction pads and take care that the
coloured dots on the pads are visible (2) and ensure
that the pinballs face forward.
Dwg.-No. Page 7 of 20
88 03 357
Prepared by Date
Customer service 04.10.2005
Updated as of:
04.02.2008
Place the clutch components back into the clutch
housing as shown.
Ensure that the coloured dots on the pads are visible
(1) - the edges of the pads are bended differently (2)
1
2
and it is not allowed to mount them in a different way
as on the picture!
ATTENTION: the clutch pads are not to hang out over
the clutch bell housing at all.
Push the clutch plates into the clutch bell housing with
a screwdriver. Take care not to damage the clutch
pads.

Burkard Bovensiepen GmbH+Co. KG
Alpenstraße 35-37,D-86807 Buchloe
Repair Instructions
BMW ALPINA B5 / B6
Install spacer (1). Rotate the spacer such that the
1
holes in the spacer line up with the bore holes in
the clutch housing.
Check pulley disc for cracks and replace if
necessary.
Install the pulley disc.
Hand-tighten the bolts in a cross-wise pattern.
Check the belt housing to ensure it is running true
on centre.
Dwg.-No. Page 8 of 20
88 03 357
Prepared by Date
Customer service 04.10.2005
Updated as of:
04.02.2008
Carefully push back the belt tightener to its stop,
mount the compressor belt and check that it is
properly seated.
Torque the belt housing screws cross-wise to
9Nm.
Start the engine and check the belt drive.
ATTENTION: danger of injury from moving
parts.
Complete assembly.
ATTENTION: Please erase fault memory
before the testdrive!

Burkard Bovensiepen GmbH+Co. KG
Alpenstraße 35-37,D-86807 Buchloe
Repair Instructions
BMW ALPINA B5 / B6
Kühlerpaket aus- und einbauen / ersetzen
Remove front spoiler valance.
WARNING!
Danger of being scalded!
Perform this work only after engine has completely
cooled down. Pay attention to instructions for working
on cooling systems.
Recycling!
Dwg.-No. Page 9 of 20
88 03 357
Prepared by Date
Customer service 04.10.2005
Updated as of:
04.02.2008
Retain and dispose of discharged coolant. When oil
lines are loosened oil will leak out. Retain and
dispose of leaking oil. Please obey country-specific
requirement regarding recycling.
Evacuate air conditioning system as per BMW
instructions.
Remove aggregate lower cover.
2
1
clamps (3). Remove air intake tract and intercooler
hose.
Remove motor cover
(1), back out bolt (2) and loosen
Back out front structure connector bolts (4),
remove rubber bracket for radiator and back out
3
4
5
hood latch bolts. Remove complete front structure.
Remove hood catch end support (5).
ATTENTION! Remove / remount water hose bracket
and nut on the right side of Connect pcs. front structure.
6

Burkard Bovensiepen GmbH+Co. KG
Alpenstraße 35-37,D-86807 Buchloe
Repair Instructions
BMW ALPINA B5 / B6
Dwg.-No. Page 10 of 20
88 03 357
Prepared by Date
Customer service 04.10.2005
Updated as of:
04.02.2008
Remove front center bumper mount (1).
Disconnect water hose (2) from expansion tank.
2
1
5
Back out bolts (3), remove strut (4) and remove air
tracts. Remove air intake tract from air filter housing.
Remove V-Support (5).
4
3
Remove front air guide (6).
ATTENTION! During assembly: ensure correct position
of hooks - foam padding frontwards!
6
8
9
Loosen clamp (7) and remove hose from intercooler.
Back out bolt (8) and remove lines from engine oil
cooler.
ATTENTION! During assembly: Torque cooler line to
20,5Nm - renew gaskets!
7
Disconnect gtransmission oil cooler lines (9).
ATTENTION! During assembly: confirm proper
attachment of the transmission oil cooler lines.
Listen for the ”click“.
10
Remove power steering fluid cooler line
(10).
ATTENTION! During assembly:
Confirm proper attachment of the power steering fluid
cooler lines.
Listen for the ”click“.

Burkard Bovensiepen GmbH+Co. KG
Alpenstraße 35-37,D-86807 Buchloe
Repair Instructions
BMW ALPINA B5 / B6
Dwg.-No. Page 11 of 20
88 03 357
Prepared by Date
Customer service 04.10.2005
Updated as of:
04.02.2008
Loosen air intake hose clamp (1) and remove hose
1
downwards.
Unplug electric fan (2) and AUC-Sensor.
2
3
Remove the air conditioning lines (3).
Remove power steering fluid cooler line (10).
ATTENTION! During assembly:
Confirm proper attachment of the power steering fluid
4
cooler lines.
Listen for the ”click“.
Remove coolant and loosen coolant hoses.
Attach ALPINA Special Tool 74 00 166 (5):
to the radiator aggregate and lower it downward using
an engine hoist.
Assembly occurs in reverse fashion.
Fill coolant system, release trapped air, and check for
leaks.
Fill all fluids and set fluid levels based on BMW
regulations.
Fill air conditioning unit and check for leaks based on
BMW regulations. Check head light settings.

Burkard Bovensiepen GmbH+Co. KG
Alpenstraße 35-37,D-86807 Buchloe
Repair Instructions
BMW ALPINA B5 / B6
Dwg.-No. Page 12 of 20
88 03 357
Prepared by Date
Customer service 04.10.2005
Updated as of:
04.02.2008
Disassembly and assembly of the radiator cooling
package
Remove radiator aggregate as per B5 repair
instructions.
Unclip line (1), remove pop-rivets (2) and back out
bolts (3).
ATTENTION! During assembly: Torque the bolts to
3
5Nm!
Remove radiator cover (4) and electric fan (5) and pull
them upward to remove.
24
1
ATTENTION! During assembly: ensure that the rubber
5
fittings are in their proper position!
(Radiator cover: picture from below)
6
5
Back out bolts (5) and remove transmission oil cooler
lines (6) demontieren.
ATTENTION! During assembly: Torque of bracket-
7
screw 5Nm, torque of screw: lines to cooler 20,5Nm!
Dismount rubber bracket (7).
ATTENTION! During assembly: Fix rubber bracket with
adhesive tape in the correct position for mounting!
8
Remove upper front radiator cover (8).
ATTENTION! During assembly: ensure that the rubber
fittings are in their proper position!
ATTENTION! During assembly: torque the
screws to 5Nm!

Burkard Bovensiepen GmbH+Co. KG
Alpenstraße 35-37,D-86807 Buchloe
Repair Instructions
BMW ALPINA B5 / B6
4
2
1
Dwg.-No. Page 13 of 20
88 03 357
Prepared by Date
Customer service 04.10.2005
Updated as of:
04.02.2008
Back bolts (1) out of the power steering cooler (2),
warm the edge lightly with an industrial dryer and clip out
power steering cooler lines (3).
ATTENTION! During assembly: warm the edge lightly
with an industrial dryer to keep from breaking the plastic
edge.
ATTENTION! During assembly:
Torque screws to 5Nm
- ensure the correct mounting of the washer (4)!
3
If needed loosen the hose bracket (5) and remove the
ventilation hose.
5
6
Take radiator (6) out.

Burkard Bovensiepen GmbH+Co. KG
Alpenstraße 35-37,D-86807 Buchloe
Repair Instructions
BMW ALPINA B5 / B6
Dwg.-No. Page 14 of 20
88 03 357
Prepared by Date
Customer service 04.10.2005
Updated as of:
04.02.2008
Remove air conditioning radiator (1) by lifting
2
upward!
ATTENTION! During assembly: If necessary, attach a
new rubber strip to the intercooler (2)!
1
Back out bolts (3) left and right and demount frame.
ATTENTION! During assembly: Torque the
3
screws to 5Nm!
Back out bolts(4) and remove transmission oil cooler.
Remove clasps (5) and take out engine oil cooler by
pulling it downward and out.
4
ATTENTION! During assembly:
Torque the
screws to 9Nm!
5
Engine oil cooler and transmission oil cooler are
identical, and differ only in the position of their
mounting pins.
If the cooler is defective, re-use these mounting pins in
the new cooler.
Engine oil cooler and transmission oil cooler cannot be
switched (different types of oil)!

Burkard Bovensiepen GmbH+Co. KG
Alpenstraße 35-37,D-86807 Buchloe
Repair Instructions
BMW ALPINA B5 / B6
Dwg.-No. Page 15 of 20
88 03 357
Prepared by Date
Customer service 04.10.2005
Updated as of:
04.02.2008
Back out bolts (1) on the left and right and remove
frame.
ATTENTION! During assembly: Torque the bolts to
9Nm!
1
Remove bolts (2) from holder.
2
Assembly occurs in reverse order!

Burkard Bovensiepen GmbH+Co. KG
Alpenstraße 35-37,D-86807 Buchloe
Repair Instructions
BMW ALPINA B5 / B6
Disassembly and assembly of the catalytic
converters
Remove the exhaust system and catalytic convertors as
per BMW repair instructions.
Unplug exhaust gas temperature sensor (1).
Dwg.-No. Page 16 of 20
88 03 357
Prepared by Date
Customer service 04.10.2005
Updated as of:
04.02.2008
1
ATTENTION: There are exhaust gas temperature
sensors (2) built in ahead of the catalytic convertors that
are extremely sensitive to knocks or impacts and could
fail.
2
When installing new catalytic convertors, or when
removing exhaust gas temperature sensors from the
exhaust system, new exhaust gas temperature sensors
must be installed!
3
(Picture 3: Lamba sensor)

Burkard Bovensiepen GmbH+Co. KG
Alpenstraße 35-37,D-86807 Buchloe
Repair Instructions
BMW ALPINA B5 / B6
Disassembly and assembly of the DSC Hydro
Unit
Remove the wheel well housing as per BMW repair
instructions.
The DSC Hydro Unit (1) is mounted in the front wheel
well housing on the left side.
Dwg.-No. Page 17 of 20
88 03 357
Prepared by Date
Customer service 04.10.2005
Updated as of:
04.02.2008
1

Burkard Bovensiepen GmbH+Co. KG
Alpenstraße 35-37,D-86807 Buchloe
Repair Instructions
BMW ALPINA B5 / B6
Disassembly and assembly of the automatic
transmission
Dwg.-No. Page 18 of 20
88 03 357
Prepared by Date
Customer service 04.10.2005
Updated as of:
04.02.2008
Remove automatic transmission
as per BMW repair
instructions.
ATTENTION! When exchanging the transmission please
ensure installation of the current thermostat (1) into the
1
new transmission!

Burkard Bovensiepen GmbH+Co. KG
Alpenstraße 35-37,D-86807 Buchloe
Repair Instructions
BMW ALPINA B5 / B6
Renewing rear differential oil
Caution: Use only BMW recommended rear differential oil.
Failing to change oil can damage rear diff.!
Vehicles without limited slip differential:
CASTROL SAF XO
Vehicles with limited slip differential - sticker (4) on rear
axle housing: CASTROL SAF XJ
Recycling: Leaking oil has to be captured and disposed of
properly and in accordance with local statutes and
regulations.
Dwg.-No. Page 19 of 20
88 03 357
Prepared by Date
Customer service 04.10.2005
Updated as of:
04.02.2008
Topping up rear differential oil:
1. Use oil pan.
2. Unscrew filling screw (1).
1
3. Unscrew oil level screw (2).
4. Fill up until oil runs out of the oil level screw hole (2).
Oil level is correct when no more oil runs out of the oil level
screw hole (2).
2
3
Installation information:
a) Replace filling screw (1), Part number: 33 11 7 525 064,
Tighten to 60 Nm of torque
b) Replace oil level screw ring seal (2), Part number:
07 11 9 963 225, Tighten to 25 Nm of torque.
Changing rear differential oil:
Change oil only at normal oil operating temperature.
1. Use oil pan.
2. Unscrew drain screw (3).
4
3. Drain rear diff. oil and dispose of it properly and in
accordance with local statutes and regulations.
4. Replace drain screw.
5. Unsrew filling screw (1) and oil level screw (2)
6. Fill up rear diff. (ca. 1.4 ltr./ 1.5 quarts) until oil runs out
of the oil level screw (2).
Oil level is correct when no more oil runs out of the oil level
screw hole (2).
Installation information
a) Replace drain screw (3) and filling screw (1), Part
number: 33 11 7 525 064, Tighten to 60 Nm of torque.
b) Replace oil level screw ring seal (2), Part number:
07 11 9 963 225, Tighten to 25 Nm of torque.

Burkard Bovensiepen GmbH+Co. KG
Alpenstraße 35-37,D-86807 Buchloe
Repair Instructions
BMW ALPINA B5 / B6
Dwg.-No. Page 20 of 20
88 03 357
Prepared by Date
Customer service 04.10.2005
Updated as of:
04.02.2008
Exchange of spark plugs
WARNING!
Danger of burns! Perform the following job on the
vehicle only once it has completely cooled down.
2
1
Remove engine cover
(1). Remove air intake tract (2).
Remove boost pressure regulator (3).
3
Exchange spark plugs as per BMW repair instructions.
4
Install boost pressure regulator with included
gasket (4) .
 Loading...