

Page 1

USB MICROPHONE PODCASTING KIT
REFERENCE MANUAL
(ENGLISH) ::::: 1 – 15
MANUAL DE REFERENCIA
(ESPAÑOL) ::::: 17 – 31
GUIDE D’UTILISATION
(FRANÇAIS) ::::: 33 – 47
BEDIENUNGSANLEITUNG
(DEUTSCH) ::::: 49 – 63
MANUALE DI RIFERIMENTO
(ITALIANO) ::::: 65 – 79
Page 2

Page 3

TABLE OF CONTENTS
CONNECTING THE MICROPHONE.................................................................3
GENERAL SOFTWARE NOTES....................................................................... 3
AUDACITY SOFTWARE INSTALLATION .......................................................4
CONFIGURING YOUR PC TO WORK WITH THE USB MICROPHONE ........ 5
AUDACITY SOFTWARE CONFIGURATION ON PC .......................................6
CONFIGURING AUDACITY FOR MAC OS 10.4 AND ABOVE....................... 8
RECORDING INTO THE COMPUTER..............................................................9
ADJUSTING YOUR AUDIO LEVEL (optional) ..............................................10
EXPORTING YOUR RECORDING.................................................................. 11
LISTENING AND EXPORTING TO WAV/MP3 ...............................................11
UPLOADING YOUR PODCASTS ...................................................................12
TROUBLESHOOTING..................................................................................... 15
1
Page 4

This page has been intentionally left blank.
2
Page 5
CONNECTING THE MICROPHONE
The USB microphone is a Plug and Play device, which means that there are no
drivers to install. The first time you plug the microphone into your computer, it will
automatically install all the necessary driver components and will be ready to use
immediately.
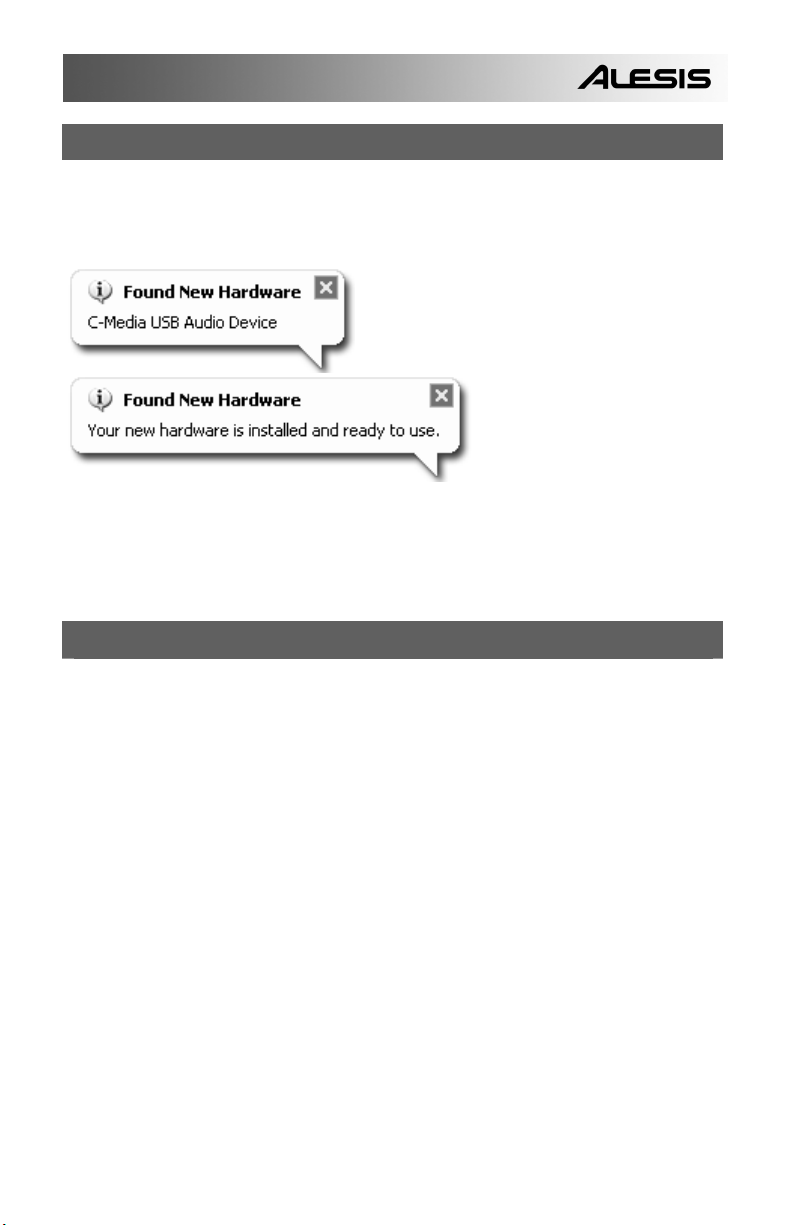
When you first connect the microphone, you
will see a few screens similar to the one on
the left.
Once the installation is
complete, you will see the
screen on the left:
Your microphone is now ready to be used.
Please note: If you subsequently connect the microphone to a different USB port,
this procedure may be repeated. This is normal.
GENERAL SOFTWARE NOTES
Your USB microphone is compatible with any recording software that supports USB
Audio devices. We have included Audacity, however you may prefer to use a
variety of 3
rd
party software packages.
Audacity is free software, distributed under the General Public License (GPL).
More information as well as open source code can be found on the CD included or
on the web at http://audacity.sourceforge.net
Audacity works on both Windows (98 and greater) as well as Mac OS (X and 9.2+).
Software for Linux can be found on the Audacity website.
Go to http://audacity.sourceforge.net/help/tutorials for additional tutorials.
The website also has information for separate add-ons to Audacity to enhance
performance and features.
3
Page 6

AUDACITY SOFTWARE INSTALLATION
Before Starting the Software
Make sure that your USB microphone is plugged into the computer with the
supplied USB cable, and that your computer is plugged in and turned on.
To Install Software (PC)
1. Connect the USB port on the USB microphone to the USB port of your
computer.
2. Turn your computer on and allow it to boot fully if it is not on already.
3. Your computer will say that Windows detects a new device and that it is
available to use.
4. Insert the CD that came with your USB microphone.
5. Double-click the Audacity Recording Software to open it.
6. Double-click the Windows folder to open it.
7. Double-click the Audacity folder to open it.
8. Double-click the audacity-win-1.2.4b.exe file to begin installing the
application.
9. Follow the on-screen instructions to install Audacity.
10. Once the installation has completed successfully, you can open the
Audacity application by clicking on Start, then going to All Programs ->
Audacity.
To Install Software (MAC)
1. Connect the USB port on the USB microphone to the USB port of your
computer.
2. Turn your computer on and allow it to boot fully if it is not on already.
3. Insert the included CD.
4. Open the CD icon on the desktop.
5. Double-click the Audacity Recording Software folder.
6. Double-click the Apple folder.
7. Drag the Audacity folder, located inside, to your hard drive. We
recommend that you move the folder to your Applications folder.
8. A window will come up which shows the files copying.
9. When copying has finished, EJECT the CD. Audacity is now installed.
10. To open the application, go to your Finder and click on Applications.
Then, double-click the Audacity folder to open it. Lastly, double-click the
Audacity icon to launch the application.
Note: if you copied the Audacity folder to a different location than your
Applications folder, simply find the Audacity folder and double-click on the
Audacity icon, located inside the folder, to launch the application.
4
Page 7

CONFIGURING YOUR PC TO WORK WITH THE USB MICROPHONE
1.) With no programs or windows
open, click on [START] –Settings Control Panel.
2.) In the Control Panel, double-click
on ‘Sounds and Audio Devices’.
3.) Ensure your computer’s soundcard
is shown in the ‘Volume’ tab.
4.) Click on the ‘Audio’ tab. Ensure
your computer’s soundcard is
listed as the default Sound
Playback Device, and ‘C-Media
USB Audio Device’ is listed as
your default Sound Recording
Device.
5
Page 8
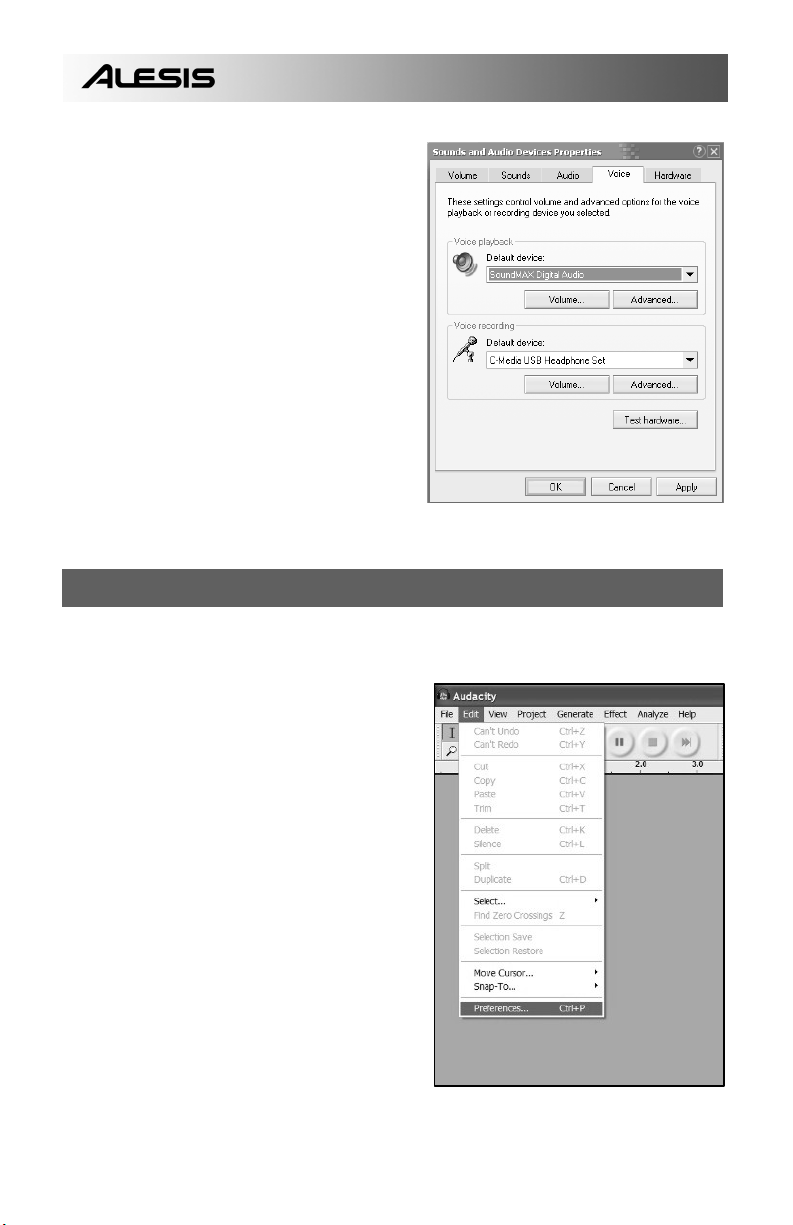
5.) Click on the ‘Voice’ tab. Ensure
your computer’s soundcard is
listed as the default Sound
Playback Device, and ‘C-Media
USB Audio Device’ is listed as
your default Sound Recording
Device.
6.) If active, press the [Apply] button
and then press [OK]. If the [Apply]
button is not active, simply press
[OK].
7.) Close the ‘Sounds and Audio
Device Properties’ window.
8.) Ensure your headphones or
speakers are plugged into your
computer’s soundcard’s output to
monitor your recordings and edits.
AUDACITY SOFTWARE CONFIGURATION ON PC
1. Go to [START] –> All Programs –>
Audacity to launch Audacity.
2. Select the “Edit” menu and then
“Preferences”.
6
Page 9

The “Audacity Preferences” window will come up. Select the C-Media USB Audio
Device under the “Recording” selection as shown. Select “Software Playthrough”
to hear the audio while recording.
Note: The USB microphone may show up with a different name in the preference
window. This may depend on your computer model and operating system. 99% of
the time it will contain “USB” in the Name.
Note: Please also make sure that your default sound card is selected in the
“Playback” section. Otherwise, you will not be able to hear any audio output from
the program.
Click ‘OK’.
Now that your preferences are set, you are ready to record.
If you are still having difficulty finding the USB microphone, try opening up your
system settings or control panel to adjust audio input settings from the sound
control panel. Also see the troubleshooting section at the end of this manual.
7
Page 10

CONFIGURING AUDACITY FOR MAC OS 10.4 AND ABOVE
When using Audacity with OS-10.4 and above, first open the Apple AUDIO MIDI SETUP
control panel which should be located in your UTILITIES folder. Using the buttons at the
top, select the AUDIO DEVICES window.
Connect your USB microphone, DO NOT open Audacity yet.
You will notice that some of the settings in the AUDIO MIDI SETUP window change to
reflect settings for the USB device. (If not, go to PROPERTIES FOR => and select CMEDIA USB AUDIO DEVICE in the pull down window.)
You can now open Audacity. When Audacity loads, you will again notice that the format
settings for both the inputs and outputs will change in the AUDIO MIDI SETUP window.
These settings will be in error, and will not give you proper audio performance. In fact,
each time Audacity is opened this reset will occur.
To work around this problem, wait until Audacity opens and performs the erroneous
format reset outlined above, then you simply have to select the desired format settings
manually in the AUDIO MIDI SETUP window.
1) FIRST make ALL of your desired format settings in Audacity. These are found under
AUDACITY MENU =>PREFERENCES => AUDIO I/O => Set Channels for 2 (Stereo),
and playthrough on or off (Choose “On” if you want to listen while recording.)
2) Next, while still in AUDACITY MENU =>PREFERENCES, click the QUALITY tab and
set the default Sample Rate and the default Sample Format (44100, 16-bit)
3) Click OK to save all of the preferences settings.
4) Next set the PROJECT RATE in the lower left corner of the Audacity window to match
your desired sample rate (usually 44100 or 48000).
5) In the AUDIO MIDI SETUP window on the input side, first select 2 ch-16 bit, then
select your sample rate. (Usually 44100 or 48000 Hz). Then do the same on the output
side.
NOTE: These settings must match exactly to the format settings in Audacity. If not, Audacity will perform
the same reset routine on the AUDIO MIDI SETUP window when you activate the recording function in
Audacity. If your settings match, then you are ready to begin recording.
The basic rule is, after Audacity is open, use the AUDIO MIDI SETUP utility to manually select format
settings that match the format settings in Audacity. If you make any format changes in Audacity, you need
to also go back to the AUDIO MIDI SETUP window and make the same changes. (It is usually easiest to
leave the AUDIO MIDI SETUP window open on the desktop.)
A NOTE FOR INTEL-BASED MAC USERS:
Please visit http://audacityteam.org/mac/ to download a version of Audacity for
Intel-based Mac.
8
Page 11

RECORDING INTO THE COMPUTER
1. Press the Record Button
2. Speak into the microphone.
3. Turn the VOL control up on the microphone until you are getting a good
signal reading in Audacity. Make sure that you are not reaching the red
on the level meters and “clipping” the signal.
4. You will see the waveform of the audio on the screen as it is recording.
You will hear the audio coming from the output of your computer’s
soundcard.
No Audio? - go back to the preference menu and make sure you have
“Software Playthrough” selected and the speaker volume up on your
computer. See troubleshooting at the end of this manual for more help.
5. Press Stop
when you have finished recording.
6. SAVE YOUR FILE NOW by clicking on ‘File’ -> ‘Save Project’. Select the
destination and file name for the project and click ‘Save’.
7. You have completed the recording process.
9
Page 12

ADJUSTING YOUR AUDIO LEVEL (optional)
1. Select your entire recording by selecting “Edit”, then “Select…”, then click
“All”. You can also use Ctrl+A on a PC or APPLE+A on a Macintosh to
quickly select all.
2. Select the “Effect” menu and choose the desired effect.
a. There are various types of effects which are described further in
the software’s help section as well as on the web.
b. Normalize should be used to have the correct volume on the
recording.
10
Page 13

EXPORTING YOUR RECORDING
This section explains how to export your recording to WAV format to burn to a CD.
You may also choose to convert to MP3 requiring 3
from the internet. Refer to the software help section for more information.
1. Now that you have finished recording
and editing your session, you have to
export the audio to your hard drive.
Please note that if you would like to
export to MP3, you may need to
download an MP3 codec from the
Internet – many are free and widely
available.
Please also note that if you are
recording for the purposes of
podcasting, you will need to export
your session as an MP3 file.
2. Select the “File” menu and then select
“Export As WAV…”.
3. Lastly, name your session and select
the destination folder for the file.
LISTENING AND EXPORTING TO WAV/MP3
To listen to your digitized audio, you will need a third party application that can play
WAV files. There are a variety of applications built into many operating systems as
well as free downloads on the internet. You can also use any standard audio CD
burning software to burn your WAV files to an audio CD.
There are many free software applications that can play, burn, as well as convert
WAV files to MP3. Once a file is in MP3 format it can be placed on any MP3
compatible mobile digital device.
rd
party software downloaded
As we already mentioned, if you are recording for the purposes of podcasting, you
will need to export your session to an MP3, or convert the exported WAV file to an
MP3. The reason for this is that MP3 files are considerably smaller in size than
WAV files and are, therefore, better suited for transmission and streaming over the
Internet. There are many MP3 codecs available on the Internet – many are free
and easily available.
11
Page 14

UPLOADING YOUR PODCASTS
As part of the Podcasting Kit, Alesis includes a free 30-day hosting of your podcast
through Cyberears.com. Once you have finished recording and saving your session as
an mp3, you will need to upload it to our custom Alesis website which will host and
promote your podcast to major podcast syndication websites.
ACTIVATING YOUR ACCOUNT:
1. Go to the Alesis Podcasting Center at www.alesispodcast.com
custom website that has been created to help you promote your podcasts.
2. Click on Register to create a user account. The registration process will
provide you with a secured login ID & password so that you can manage your
audio files that have been uploaded.
3. You will be prompted to fill out some information about yourself. Enter this
information and then type in a Login ID and password that you would like to
use with this account. Then click on Save & Next..
4. An email from service@cyberears.com will be sent to the address that you
provide with the sign-up information. You will need to open your email and
unlock the Cyber Ears account you just created. Just simply click on the link
that is included in the email.
5. Now you are ready to upload your podcasts!
Tip: Once you are logged in, you may wish to go through the available
tutorials on Podcasting.. These tutorials explain how to use the site in depth
and how to get the most out of your podcast experience. Click on Tutorials.
UPLOADING:
1. Once you have activated your account by clicking on the link provided in the
email that you received, go to www.cyberears.com and log in using your
Login ID and password that you created.
2. After you have successfully logged into Cyberears, you will be taken to the My
Audio section. This is where you will upload and manage your podcasts. In
addition other functions are provided to assist you with managing the
download statistics on your Podcasts, etc.
3. Then click on Upload to upload your audio files.
4. You will be asked “What type of audio is it?” – since you will be uploading an
audio file that is part of a Podcast, choose Podcast. Otherwise you might
wish to select another option. Then click Next.
5. Click Create to create a new podcast.
– this is the
12
Page 15

Tip: Your audio files are not Podcasts. They are episodes of a Podcast,
so if you haven’t created a Podcast yet, you can’t upload the audio files
until you do this. By clicking Create, you are creating a record of the
Podcast with all the necessary information needed to register it with the
search engines. Once its created, you then simply attach your audio file to
the Podcast. Since a Podcast typically has many episodes, subsequent
new audio files you create can easily be uploaded and associated with the
Podcast.
6. You will be asked to fill out information including the title, author, description
and category information of your podcast. You can optionally also upload a
photo image of the host, or some graphic about your Podcast. This image will
be included in search registries for your Podcast. Fill out this information and
then click Save & Next.
7. On the next page you will be given information to allow you to directly promote
your Podcast. Also, you can choose to have Cyberears.com register your
Podcast with numerous Podcast registries. Choose the registries that you
would like your Podcast automatically submitted to and once you are done,
click on Save & Next.
Note: Registries are databases which hold information about where the
podcast is located on the web, descriptions, and so on. Registries work
much in the same way as an Internet search engine (e.g. Google.com).
They don’t contain the audio files – they just register your Podcasts so
that others can find you. These registries are checked by programs
called aggregators (such as iTunes), which update their podcast listings
and make them available to the program’s listeners. Any podcast that a
listener is interested in can be ‘subscribed’ to which then tells the
aggregator to check for new episodes of the Podcast periodically.
Usually the aggregator programs check registries about once every hour
or so.
8. Now you can choose the file that you would like to upload. Click on File |
Select file(s) on the applet on the screen.
9. Find the mp3 that you recorded with Audacity and click Open..
10. The last step is to describe your episode. Type in the filename and a
description and click on Save & End.
Tip: MP3 files have embedded information in them (called ID3 tags) that
describe the audio file created. This includes information such as Artist, Track
Name, Album, etc. This information is automatically updated for you by
Cyberears.com so that any person downloading the audio file will get the
information ‘tagged’ on it that is consistent with the Podcast information you
have submitted.
13
Page 16

11. And you are all done! You have successfully published your podcast. Now
listeners around the world can check out your podcast and subscribe to it if
they wish.
Tip: Make sure that your podcast was properly uploaded and registered
by using an aggregator program such as iTunes to find your podcast.
Remember, however, that some aggregators might not be checking certain
registries. This is why it’s a good idea to familiarize yourself with the
different podcast registries and aggregators on the Internet in order for
your podcasts to reach the largest audience possible. Also keep in mind
that registries take some time to update their listings of new Podcasts. Its
not uncommon for registries such as iTunes to take weeks to add your
Podcast to their listing. Typically you will be sent an email letting you know
that they are reviewing your Podcast to see if it is acceptable to them
before they add it. Each registry has their own operational procedures for
this, and they change regularly. Make sure that you familiarize yourself
with their individual policies so that you know when to expect to see your
show appear on their listings.
Tip: Cyberears.com have bundled a free 30 day account with your Alesis
Podcasting Kit. At the end of this 30 day period, you will receive
notifications from Cyberears.com to allow you to purchase a subscription
account directly with them and extend your hosting while the subscription is
active. There are different levels of service subscriptions available. Check
with www.cyberears.com for more information on your subscription options.
14
Page 17

TROUBLESHOOTING
Please contact Alesis or your retailer before returning this product.
See the Safety Guide for more information.
• NO SOUND:
o If you are not getting any sound into the software application, go back to the
preferences as shown above and make sure you have selected the USB input
for the recording device.
o If you cannot hear the audio but you do see the waveform on the screen, open
your preferences and make sure that your “Playback Device” is set to your
internal computer soundcard.
o Power Cycle: Close Audacity and unplug the USB Cable. Then plug in the
USB Cable, and reopen Audacity.
o Check that the VOL control on the USB microphone is turned up to a suitable
level.
o Check the microphone slider in Audacity to make sure that it is at full volume,
all the way to the right as shown in the figure below:
• POOR SOUND Quality:
o If a recording sounds distorted or garbled during playback, you may need to
adjust the input volume in Audacity. Try moving the Input Level slider in
Audacity to the left to lower the input volume. You can use the normalize
effect as described above to bring the volume back up to normal after the
recording.
o If you experience any odd sounds coming from the recording, try closing all
applications, restarting the computer, and only run Audacity while recording.
For technical support, please contact
Alesis at (401) 658-5760
15
Page 18

16 17
Page 19

ÍNDICE
CÓMO CONECTAR EL MICRÓFONO......................................................................19
NOTAS GENERALES SOBRE EL SOFTWARE ......................................................19
INSTALACIÓN DEL SOFTWARE AUDACITY.........................................................20
CONFIGURACIÓN DE LA PC PARA FUNCIONAR CON EL MICRÓFONO USB..21
CONFIGURACIÓN DE AUDACITY EN PC............................................................... 22
CONFIGURACIÓN DE AUDACITY PARA MAC OS 10.4 Y SUPERIORES............24
GRABACIÓN EN LA COMPUTADORA ................................................................... 25
AJUSTE DEL NIVEL DE AUDIO (OPCIONAL) ........................................................26
EXPORTACIÓN .........................................................................................................27
ESCUCHA Y EXPORTACIÓN A WAV/MP3 .............................................................27
CARGA DEL PODCAST ...........................................................................................28
SOLUCIÓN DE PROBLEMAS ..................................................................................31
Page 20

18 19
Page 21

CÓMO CONECTAR EL MICRÓFONO
El micrófono USB es un dispositivo Plug and Play, lo que significa que no es
necesario instalar drivers. La primera vez que enchufe el micrófono en su
computadora, se instalarán automáticamente todos los componentes de drivers
necesario y estará listo para usar inmediatamente.
Cuando conecte el micrófono por primera
vez, verá algunas pantallas similares a la de
la izquierda.
Una vez terminada la
instalación, verá la pantalla
de la izquierda:
De esta forma, su micrófono está listo para usar:
Para tener en cuenta: Si posteriormente conecta el micrófono a un puerto USB
diferente, se puede repetir este procedimiento. Esto es normal.
NOTAS GENERALES SOBRE EL SOFTWARE
Su micrófono USB es compatible con cualquier software de grabación que soporte
dispositivos de audio USB. Hemos incluido a Audacity, pero no obstante ello
usted puede preferir usar una variedad de paquetes de software de terceros.
Audacity es un software gratuito, distribuido bajo General Public License (Licencia
pública general, GPL). Puede encontrar más información, así como el código
fuente abierto, en el CD incluido o en la web en http://audacity.sourceforge.net
Audacity funciona tanto en Windows (98 y superiores) como en Mac OS (X y 9.2+).
El software para Linux se puede encontrar en el sitio web de Audacity.
Visite http://audacity.sourceforge.net/help/tutorials para obtener tutoriales
adicionales.
El sitio web tiene también información de agregados (“add-ons” de Audacity para
mejorar su funcionamiento y características.
Page 22

INSTALACIÓN DEL SOFTWARE AUDACITY
Antes de arrancar el software
Asegúrese de que su micrófono USB esté enchufado a la computadora con el
cable USB suministrado y que la computadora esté enchufada y encendida.
Para instalar el software (PC)
1. Conecte el puerto USB del micrófono al puerto USB de la computadora.
2. Encienda la computadora y espere que arranque completamente si no estaba
encendida de antemano.
3. La computadora indicará que Windows detecta un nuevo dispositivo y que está
disponible para usar.
4. Inserte el CD que vino con su micrófono USB.
5. Haga doble clic en Audacity Recording Software (Software de grabación
Audacity) para abrirlo.
6. Haga doble clic en la carpeta Windows para abrirla.
7. Haga doble clic en la carpeta Audacity para abrirla.
8. Haga doble clic en el archivo audacity-win-1.2.4b.exe para comenzar a instalar la
aplicación.
9. Siga las instrucciones de la pantalla para instalar Audacity.
10. Una vez terminada exitosamente la instalación, puede abrir la aplicación Audacity
haciendo clic en Start (Inicio) y yendo luego a All Programs -> Audacity (Todos
los programas -> Audacity).
Para instalar el software (MAC)
1. Conecte el puerto USB del micrófono al puerto USB de la computadora.
2. Encienda la computadora y espere que arranque completamente si no estaba
encendida de antemano.
3. Inserte el CD incluido.
4. Abra el icono del CD del escritorio.
5. Haga doble clic en la carpeta Audacity Recording Software (Software de
grabación Audacity).
6. Haga doble clic en la carpeta Apple.
7. Arrastre la carpeta Audacity que se encuentra dentro de ella, a su disco duro.
Recomendamos que transfiera la carpeta a su carpeta Applications
(Aplicaciones).
8. Aparece una ventana que muestra que los archivos se están copiando.
9. Cuando termine de copiarse, EXPULSE el CD. De esta forma queda instalado
Audacity.
10. Para abrir la aplicación, vaya a su Finder (Buscador) y haga clic en Applications
(Aplicaciones). Luego, haga doble clic en la carpeta Audacity para abrirla.
Finalmente, haga doble clic en el icono de Audacity para lanzar la aplicación.
Nota: Si copió la carpeta de Audacity en un lugar distinto a la carpeta Applications,
busque simplemente la carpeta de Audacity y haga doble clic en el icono de Audacity
ubicado adentro de la carpeta para lanzar la aplicación.
20
Page 23

CONFIGURACIÓN DE LA PC PARA FUNCIONAR CON EL MICRÓFONO USB
1.) Sin programas o ventanas abiertas,
haga clic en [START] –Settings Control Panel (Inicio –
Configuración – Panel de control).
2.) En el panel de control, haga doble
clic en ‘Sounds and Audio Devices’
(Dispositivos de sonido y audio).
3.) Asegúrese de que la tarjeta de
sonido de la computadora
aparezca en la ficha ‘Volume’
(Volumen).
4.) Haga clic en la pestaña ‘Audio’.
Asegúrese de que la tarjeta de
sonido de la computadora esté
indicada como dispositivo de
reproducción de sonido por
defecto y que ‘C-Media USB
Audio Device’ (Dispositivo de
audio USB C-Media) esté
indicado como su dispositivo de
grabación de sonido por defecto.
21
Page 24

5.) Haga clic en la pestaña ‘Voice’
(Voz). Asegúrese de que la
tarjeta de sonido de la
computadora esté indicada como
dispositivo de reproducción de
sonido por defecto y que ‘CMedia USB Audio Device’
(Dispositivo de audio USB CMedia) esté indicado como su
dispositivo de grabación de
sonido por defecto.
6.) Si está activo, pulse el botón
[Apply] (Aplicar) y luego [OK]
(Aceptar). Si el botón [Apply] no
está activo, pulse simplemente
[OK].
7.) Cierre la ventana ‘Sounds and
Audio Device Properties’
(Propiedades de los dispositivos de sonido y audio).
8.) Asegúrese de que los auriculares o altavoces estén enchufados a la
salida de la tarjeta de sonido de la computadora para monitorear las
grabaciones y ediciones.
CONFIGURACIÓN DE AUDACITY EN PC
1. Vaya a [START] –> All Programs –
> Audacity (Inicio -> Todos los
programas -> Audacity) para
lanzar Audacity.
2. Seleccione el menú “Edit” (Editar)
y luego “Preferences”
(Preferencias).
22
Page 25

Aparece la ventana “Audacity Preferences” (Preferencias de Audacity). Seleccione
C-Media USB Audio Device bajo la selección “Recording” (Grabación) como se
muestra. Seleccione “Software Playthrough” (Reproducción simultánea por
software) para oír el audio durante la grabación.
Nota: El micrófono USB puede aparecer con un nombre diferente en la ventana de
preferencias. Esto puede depender del modelo y el sistema operativo de la
computadora. El 99% de las veces contendrá “USB” en el nombre.
Haga clic en ‘OK’.
Una vez configuradas sus preferencias, está listo para grabar.
Si aún tiene dificultades para encontrar el micrófono USB, pruebe abriendo la
configuración o el panel de control de su sistema para ajustar los parámetros de
entrada de audio desde el panel de control de sonido. Vea también la sección de
solución de problemas del final de este manual.
23
Page 26

CONFIGURACIÓN DE AUDACITY PARA MAC OS 10.4 Y SUPERIORES
Cuando use Audacity con OS-10.4 y superiores, abra primero el panel de control AUDIO
MIDI SETUP (Configuración de MIDI de audio) de Apple que debe encontrarse en la carpeta
UTILITIES (Utilidades). Usando los botones de la parte superior, seleccione la ventana
AUDIO DEVICES (Dispositivos de audio).
Conecte su micrófono USB, NO abra Audacity todavía.
Notará que algunos de los parámetros de la ventana AUDIO MIDI SETUP cambian para
reflejar los parámetros correspondientes al dispositivo USB. (En caso negativo, vaya a
PROPERTIES FOR => [Propiedades de] y seleccione C-MEDIA USB AUDIO DEVICE en la
ventana desplegable).
De esta forma, puede abrir Audacity v1.2.4. Cuando se carga Audacity, notará nuevamente
que los parámetros de formato de entradas y salidas cambian en la ventana AUDIO MIDI
SETUP. Estos parámetros son incorrectos y no le proporcionarán un funcionamiento
adecuado del audio. De hecho, cada vez que se abra Audacity v.1.2.4 se producirá esta
reiniciación.
Para soslayar este problema, espere hasta que se abra Audacity y realice la reiniciación del
formato erróneo arriba explicada y luego, simplemente deberá seleccionar manualmente los
parámetros de formato deseados en la ventana AUDIO MIDI SETUP.
1) PRIMERO, configure TODOS los parámetros de formato deseados en Audacity. Estos se
encuentran bajo AUDACITY MENU =>PREFERENCES => AUDIO I/O => Set Channels for 2
(Stereo), y reproducción simultánea (playthrough) “on” u “off” (elija “On” si desea escuchar
mientras graba).
2) Luego, mientras está todavía en AUDACITY MENU =>PREFERENCES, haga clic en la
ficha QUALITY (Calidad) y configure la Sample Rate (Velocidad de muestreo) y Sample
Format (Formato de muestreo) por defecto (44100, 16 bits).
3) Haga clic en OK para guardar todos los parámetros de preferencia.
4) A continuación configure la PROJECT RATE (Frecuencia de proyecto) en la esquina
inferior izquierda de la ventana de Audacity para que coincida con la frecuencia de muestreo
que desea (habitualmente 44100 ó 48000).
5) En la ventana AUDIO MIDI SETUP del lado de entrada, seleccione primero 2 ch-16 bit (2
canales, 16 bits) y luego su frecuencia de muestreo. (Habitualmente 44100 ó 48000 Hz).
Luego, haga lo mismo del lado de salida.
NOTA: Estos parámetros deben coincidir exactamente con los parámetros de formato
existentes en Audacity. En caso contrario, Audacity realizará la misma rutina de reiniciación
en la ventana AUDIO MIDI SETUP cuando usted active la función de grabación de dicho
programa. Si sus parámetros coinciden, está listo para comenzar a grabar.
La regla básica es, después de abrir Audacity, usar la utilidad AUDIO MIDI SETUP para
seleccionar manualmente los parámetros de formato que coincidan con los existentes en
Audacity. Si hace algún cambio de formato en Audacity, es necesario que vuelva también a
la ventana AUDIO MIDI SETUP y haga los mismos cambios. (Generalmente es más fácil
dejar la ventana AUDIO MIDI SETUP abierta en el escritorio).
24
Page 27

GRABACIÓN EN LA COMPUTADORA
1. Pulse el botón Record (Grabar)
2. Hable frente al micrófono.
3. Gire el control VOL del micrófono para aumentar el volumen hasta que
tenga una buena lectura de señal en Audacity. Asegúrese de no llegar a
la zona roja de los medidores de nivel puesto que se “recorta” la señal.
4. Verá la forma de onda del audio en la pantalla a medida que se graba.
Oirá el audio proveniente de la salida de la tarjeta de sonido de la
computadora.
¿No hay audio? - vuelva al menú de preferencias y asegúrese de tener
seleccionado “Software Playthrough” (Reproducción simultánea por
software) y que el volumen del altavoz de la computadora esté alto. Si
necesita más ayuda, vea la solución de problemas al final de este
manual.
5. Pulse el botón de Parar
6. GUARDE SU ARCHIVO AHORA haciendo clic en ‘File’ -> ‘Save Project’
(Archivo -> Guardar proyecto). Seleccione el destino y el nombre de
archivo del proyecto y haga clic en ‘Save’ (Guardar).
7. De esta forma se completa el proceso de grabación.
cuando termine de grabar.
25
Page 28

AJUSTE DEL NIVEL DE AUDIO (OPCIONAL)
1. Seleccione su grabación completa con “Edit” (Editar), luego “Select…”
(Seleccionar) y finalmente haga clic en “All” (Todo). También puede usar
Ctrl+A en una PC o APPLE+A en una Macintosh para seleccionar todo
rápidamente.
2. Seleccione el menú “Effect” (Efectos) y elija el efecto deseado.
a. Hay diversos tipos de efectos que se describen con más detalle
en la sección de ayuda del software y en la web.
b. Debe usarse Normalize (Normalizar) para tener volumen
correcto en la grabación.
26
Page 29

EXPORTACIÓN
Esta sección explica cómo exportar a formato WAV para grabarlos en un CD. Puede
elegir también convertirlos a MP3, lo que requiere descargar de Internet un software de
terceros. Para más información, consulte la sección de ayuda del software.
1. Una vez que terminó de grabar y editar
su sesión, tiene que exportar el audio a
ESCUCHA Y EXPORTACIÓN A WAV/MP3
Para escuchar su audio digitalizado, necesita una aplicación de terceros que puede
reproducir archivos WAV. Hay una variedad de aplicaciones embutidas en muchos
sistemas operativos, como también descargas gratuitas de Internet. Puede usar
también cualquier software de grabación de CD de audio estándar para grabar sus
archivos WAV en un CD.
Hay numerosas aplicaciones gratuitas de software que pueden reproducir, grabar y
convertir archivos WAV en MP3. Una vez que un archivo está en formato MP3, se
puede colocar en cualquier dispositivo digital móvil compatible con MP3.
Como ya dijimos, si está grabando para podcasting, debe exportar su sesión a MP3 o
convertir el archivo WAV exportado a MP3. La razón de esto es que los archivos MP3
son de tamaño considerablemente menor que los WAV y, por lo tanto, se adaptan mejor
para transmisión y streaming por Internet. Hay muchos códecs MP3 disponibles en
Internet —muchos son gratuitos y están ampliamente disponibles.
su disco duro.
Tenga en cuenta que si desea exportar a
MP3, es posible que necesite descargar
de Internet un códec MP3 —muchos son
gratuitos y están ampliamente
disponibles.
Tenga en cuenta también que si está
grabando para podcasting, debe exportar
su sesión como archivo MP3.
2. Seleccione el menú “File” (Archivo) y
luego “Export as WAV…” (Exportar como
WAV…”.
3. Por último, asigne nombre a su sesión y
seleccione la carpeta de destino del
archivo.
27
Page 30

CARGA DEL PODCAST
Como parte del kit de podcasting, Alesis incluye un alojamiento (hosting) gratuito
de su podcast por 30 días a través de Cyberears.com. Una vez que termine de
grabar y guardar su sesión como archivo mp3, deberá cargarlo en nuestro sitio
web de Alesis personalizado, que alojará y promoverá su podcast a los principales
sitios web de sindicación de podcasts.
CÓMO ACTIVAR SU CUENTA:
1. Acceda a Alesis Podcasting Center (Centro de podcasting de Alesis)
como www.alesispodcast.com —éste es el sitio web personalizado que
se creó para ayudarle a promover sus podcasts.
2. Haga clic en Register (Registro) para crear una cuenta de usuario. El
proceso de registro le proporcionará una identificación de inicio de sesión
y una contraseña seguras para que usted pueda manejar los archivos de
audio que cargó.
3. El sistema le solicitará que llene cierta información acerca suyo. Ingrese
esta información y luego escriba la identificación de inicio de sesión y la
contraseña que desea usar con esta cuenta. Finalmente haga clic en
Save & Next (Guardar y Siguiente).
4. Se enviará un mensaje de correo electrónico desde
service@cyberears.com a la dirección que usted indicó con la
información de registro. Deberá abrir su correo electrónico y desbloquear
la cuenta Cyber Ears que acaba de crear. Simplemente haga clic en el
vínculo que se incluye en el mensaje.
5. De esta forma, ¡está listo para cargar sus podcasts!
Consejo: Una vez que inicie la sesión, es conveniente que vea los tutoriales
sobre podcasting disponibles. Estos tutoriales explican en detalle cómo usar el
sitio y cómo obtener lo máximo de su experiencia de podcast. Haga clic en
CARGA:
Tutorials (Tutoriales).
1. Una vez que haya activado su cuenta haciendo clic en el vínculo provisto
en el mensaje de correo electrónico que recibió, vaya a
www.cyberears.com e inicie la sesión usando la identificación y la
contraseña que creó.
2. Después de iniciar sesión exitosamente en Cyberears, entrará a la
sección My Audio (Mi audio). Es aquí dónde cargará y manejará sus
podcasts. Además, se proporcionan otras funciones para asistirle en el
manejo de las estadísticas de descarga de su podcasts, etc.
28
Page 31

3. Luego, haga clic en Upload (Cargar) para “subir” sus archivos de audio.
4. El sistema le preguntará “What type of audio is it?” (¿Qué tipo de audio
es?) —puesto que va a cargar un archivo de audio que forma parte de un
podcast, elija Podcast. De lo contrario, debe seleccionar otra opción.
Luego, haga clic en “Next” (Siguiente).
5. Haga clic en Create (Crear) para crear un nuevo podcast.
Consejo: Sus archivos de audio no son podcasts. Son episodios de un
podcast, de modo que si aún no creó un podcast, no puede cargar los archivos
de audio hasta que lo cree. Al hacer clic en Create, usted está creando un
registro del podcast con toda la información necesaria para registrarlo en los
motores de búsqueda. Una vez creado, simplemente debe adjuntar su archivo
de audio al podcast. Puesto que típicamente un podcast tiene muchos
episodios, los archivos de audio nuevos subsiguientes que usted cree se
pueden cargar y asociar al podcast fácilmente.
6. El sistema le solicitará que ingrese información de título, autor,
descripción y categoría del podcast. Opcionalmente, puede cargar
también una imagen fotográfica del host o algún gráfico relativo al
podcast. Esta imagen se incluirá en los registros de búsqueda
correspondientes a su podcast. Ingrese esta información y luego haga
clic en Save & Next (Guardar y Siguiente).
7. En la página siguiente, se le dará información que le permitirá promover
directamente su podcast. Además, puede elegir que Cyberears.com
registre su podcast en numerosos registros de podcasts. Elija los
registros en los que desearía que su podcast se presenta
automáticamente y cuando termine haga clic en Save & Next.
Nota: Los registros son bases de datos que contienen información acerca de
la ubicación del podcast en la web, las descripciones, etc. Los registros
funcionan de manera muy parecida a los motores de búsqueda en Internet
(por ej. Google.com). No contienen los archivos de audio —sólo registran sus
podcasts de modo que otras personas puedan encontrarle. Estos registros
son verificados por programas llamadas agregadores (tales como iTunes) que
actualizan sus listas de podcast y los ponen a disposición de los escuchas del
programa. Un escucha interesado en un podcast puede ‘subscribirse’ al
mismo, lo que indica al agregador que verifique periódicamente los nuevos
episodios de ese podcast. Habitualmente, los programas agregadores
verifican los registros alrededor de una vez por hora o algo así.
8. Ahora puede elegir el archivo que desea cargar. Haga clic en File |
Select file(s) (Archivo | Seleccionar archivos) en el applet de la pantalla.
9. Busque el mp3 que grabó con Audacity y haga clic en Open (Abrir).
29
Page 32

10. El último paso es describir su episodio. Escriba el nombre del archivo y
una descripción y haga clic en Save & End (Guardar y terminar).
Consejo: Los archivos MP3 tienen información embutida en ellos (las
llamada etiquetas ID3) que describen el archivo de audio creado. Dicha
información incluye el artista, el nombre de la pista, el álbum, etc. y
Cyberears.com la actualiza automáticamente por usted, de modo que
cualquier persona que descargue el archivo de audio recibirá información
‘etiquetada’ consistente con la información de podcast que usted envió.
11. ¡Y ya está todo listo! Ha publicado exitosamente su podcast. Ahora, los
oyentes de todo el mundo podrán verificarlo y suscribirse al mismo si lo
desean.
.
Consejo: Asegúrese de que su podcast que haya cargado y registrado
correctamente usando un programa agregador tal como iTunes para
encontrarlo. Recuerde, no obstante, que algunos agregadores pueden no
verificar ciertos registros. Por eso, es una buena idea familiarizarse con los
diferentes registros y agregadores de podcast de Internet, a fin de llegar a la
mayor audiencia posible. Recuerde también que los registros demoran cierto
tiempo para actualizar sus listas de nuevos podcasts. No es extraño que
registros tales como iTunes demoren semanas en agregar su podcast a la lista.
Habitualmente, se le enviará un mensaje de correo electrónico que le hará
saber que están revisando su podcast para ver si es aceptable para ellos antes
de agregarlo. Cada registro tiene sus propios procedimientos operacionales
para ello, y los cambian regularmente. Asegúrese de familiarizarse con sus
políticas individuales de modo de saber cuándo esperar ver que su espectáculo
aparece en las listas.
Consejo: Cyberears.com incluye una cuenta gratuita por 30 días con su kit de
podcasting Alesis. Al final de este período, recibirá notificaciones de
Cyberears.com que le permitirán adquirir una cuenta de suscripción
directamente a ellos y extender su alojamiento mientras la suscripción esté
activa. Se dispone de diferentes niveles de suscripción al servicio. Para más
información sobre las opciones, visite www.cyberears.com.
30
Page 33

SOLUCIÓN DE PROBLEMAS
Antes de devolver este producto, comuníquese con Alesis o con su
vendedor minorista. Para más información, vea la Guía de seguridad.
• NO HAY SONIDO:
o Si no obtiene sonido en la aplicación de software, vuelva a las
preferencias como se muestra arriba y asegúrese de haber
seleccionado la entrada USB correspondiente al dispositivo de
grabación.
o
Si no puede oír el audio pero ve la forma de onda en la pantalla, abra sus
preferencias y asegúrese de que su “Playback Device” (Dispositivo de
reproducción) esté configurado como la tarjeta de sonido interna de su
computadora.
o Ciclo de encendido: Cierre Audacity y desenchufe el cable USB. Luego,
enchufe el cable USB y reabra Audacity.
o Verifique que el control VOL del micrófono USB esté ajustado a un nivel
adecuado.
o Verifique el cursor del micrófono en Audacity para asegurarse de que esté a
máximo volumen, totalmente hacia la derecha, como se muestra en la figura
de abajo:
• MALA CALIDAD DE SONIDO:
o Si una grabación suena distorsionada o ininteligible durante la reproducción,
es posible que deba ajustar el nivel de entrada en Audacity. Trate moviendo
el cursor Input Level (Nivel de entrada) en Audacity a la izquierda para reducir
el volumen. Puede usar el efecto de normalización como se explicó más
arriba para llevar el volumen de vuelta al normal después de la grabación.
o Si experimenta sonidos anormales provenientes de la grabación, pruebe
cerrando todas las aplicaciones, rearrancando la computadora y ejecute
Audacity sólo mientras graba
Para solicitar soporte técnico, comuníquese con
Alesis at (401) 658-5760
31
Page 34

32 33
Page 35

TABLE DES MATIÈRES
BRANCHEMENT DU MICROPHONE.............................................................35
REMARQUES GÉNÉRALES CONCERNANT LE LOGICIEL........................35
INSTALLATION DU LOGICIEL AUDACITY...................................................36
CONFIGURATION DE L’ORDINATEUR POUR LE MICROPHONE USB.....37
CONFIGURATION DU LOGICIEL AUDACITY POUR PC.............................38
CONFIGURATION DU LOGICIEL AUDACITY POUR MAC OS 10.4 ET
VERSIONS SUPÉRIEURES ...............................................................40
ENREGISTREMENT SUR L’ORDINATEUR................................................... 41
RÉGLAGE DU NIVEAU DE L’AUDIO (FACULTATIF)...................................42
EXPORTATION ...............................................................................................43
FAIRE L’ÉCOUTE ET L’EXPORTATION DES FICHIERS WAV ET MP3.....43
TÉLÉCHARGEMENT DE VOTRE BALADO VERS UN SERVEUR ..............44
DÉPANNAGE ..................................................................................................47
Page 36

34 35
Page 37

BRANCHEMENT DU MICROPHONE
Le microphone USB est un appareil prêt à utilisation, c'est-à-dire qu’il n’y a aucun
pilote à installer. La première fois que vous branchez le microphone à votre
ordinateur, il installera tous les composants de pilote nécessaires et sera prêt à
utiliser.
Lors que vous branchez le microphone pour
la première fois, des fenêtres semblables à
celle de gauche s’affichent
Une fois l’installation
terminée, une fenêtre comme
celle de gauche s’affiche :
Le microphone est maintenant prêt à utiliser.
Remarque : Si vous branchez ultérieurement le microphone dans un port USB
différent, il se peut que vous ayez à répéter cette procédure. Ceci est normal.
REMARQUES GÉNÉRALES CONCERNANT LE LOGICIEL
Le microphone USB est compatible avec tout logiciel d’enregistrement qui prend en
charge les appareils audio USB. Le logiciel Audacity est inclus, cependant il est
possible d’utiliser un logiciel tiers.
Audacity est un logiciel libre, distribué sous licence GPL (General Public License).
Vous pouvez trouver plus d’information, en plus du code source sur le CD inclus ou
sur le Web au http://audacity.sourceforge.net.
Audacity fonctionne sous les systèmes d’exploitation Windows (98 et ultérieure) et
Mac OS (X, 9.2 et ultérieure). Le logiciel pour Linux est disponible sur le site de
Audacity.
Allez au http://audacity.sourceforge.net/help/tutorials pour des tutoriels
supplémentaires.
Le site contient également des informations concernant des logiciels compagnons
pour améliorer la performance et ajouter des fonctionnalités.
Page 38

INSTALLATION DU LOGICIEL AUDACITY
Avant de lancer l’installation
Assurez-vous que le microphone USB soit branché à l’ordinateur à l’aide du câble
USB fourni, et que l’ordinateur soit branché et sous tension.
Installation PC
1.
Branchez le port USB du microphone au port USB de l’ordinateur.
2. Mettez l’ordinateur sous tension et attendez que le système d’exploitation soit
complètement chargé.
3. L’ordinateur vous avisera que Windows a détecté un nouvel appareil et qu’il
est prêt à l’utilisation.
4. Insérez le CD fourni avec le microphone USB.
5. Double-cliquez sur Audacity Recording Software pour l’ouvrir.
6. Double-cliquez sur le dossier Windows pour l’ouvrir.
7. Double-cliquez sur le dossier Audacity pour l’ouvrir.
8. Double-cliquez sur le fichier audacity-win-1.2.4b.exe pour lancer l’installation.
9. Suivez ensuite les instructions à l’écran pour faire l’installation d’Audacity.
10. Une fois l'installation complétée, vous pouvez lancer l’application en cliquant le
menu Démarrer et en pointant sur Tous les programmes -> Audacity.
Installation Mac
1. Branchez le port USB du microphone au port USB de l’ordinateur.
2. Mettez l’ordinateur sous tension et attendez que le système d’exploitation soit
complètement chargé.
3. Insérez le CD fourni.
4. Cliquez sur l’icône CD sur le bureau.
5. Double-cliquez sur le dossier Audacity Recording Software.
6. Double-cliquez sur le dossier Apple.
7. Faites glisser le dossier Audacity situé à l’intérieur, à votre disque dur. Nous
vous recommandons de déplacer le dossier dans le dossier « Applications ».
8. Une fenêtre s’ouvrira indiquant que les fichiers sont en cours de copie.
9. Lorsque l’ordinateur a terminé la copie, éjectez le CD. Audacity est
maintenant installé.
10. Pour lancer l’application, allez dans le Finder et cliquez sur Applications.
Ensuite, double-cliquez sur le dossier Audacity pour l’ouvrir. En dernier lieu,
double-cliquez sur l’icône Audacity pour lancer l’application.
Remarque : si vous avez copié le dossier Audacity à un autre emplacement
que le dossier Applications, vous n'avez qu'à simplement trouver le dossier
Audacity et double-cliquez sur l'icône située à l'intérieur pour lancer
l'application.
36
Page 39

CONFIGURATION DE L’ORDINATEUR POUR LE MICROPHONE USB
1.) Sans qu’il ait de fenêtre ou de
programme ouvert, cliquez sur
Démarrage – Paramètres –
Panneau de configuration.
2.) Dans le Panneau de configuration,
double-cliquez sur « Sons et
périphériques audio ».
3.) Assurez-vous que la carte de son
de votre ordinateur soit affichée
dans l’onglet « Volume ».
4.) Cliquez sur l‘onglet « Audio ».
Assurez-vous que la carte de son
de l‘ordinateur soit sélectionnée
comme périphérique de lecture
par défaut, et que « C-Media USB
Audio Device » soit sélectionné
comme périphérique
d‘enregistrement audio par défaut.
37
Page 40

5.) Cliquez sur l‘onglet « Voix ».
Assurez-vous que la carte de son
de l‘ordinateur soit sélectionnée
comme périphérique de lecture
par défaut, et que « C-Media USB
Audio Device » soit sélectionné
comme périphérique
d‘enregistrement audio par
défaut.
4.) S’il est activé, appuyez sur le
bouton [Appliquer] et ensuite sur
[OK]. Si le bouton [Appliquer]
n’est pas activé, appuyez sur
[OK].
5.) Fermez la fenêtre « Propriétés
de Sons et périphériques audio ».
6.) Assurez-vous que le casque
d’écoute ou les haut-parleurs
soient branchés dans la sortie de la carte de son afin d’entendre vos
enregistrements et vos modifications.
CONFIGURATION DU LOGICIEL AUDACITY POUR PC
1. Cliquez sur Démarrer –> Tous les
programmes –> Audacity pour
lancer le logiciel Audacity.
2. Sélectionnez le menu « Edit » puis
« Preferences ».
38
Page 41

La fenêtre « Audacity Preferences » s’affichera. Sélectionnez l’appareil audio USB
C-Media sous la rubrique « Recording » tel qu’indiqué. Sélectionnez « Software
Playthrough » pour entendre le signal audio durant l’enregistrement.
Remarque : Il se peut que le microphone USB apparaisse dans la fenêtre des
préférences sous un nom différent. Le nom varie selon le modèle de votre
ordinateur et la version du système d’exploitation. Mais dans 99 % des cas, le nom
contient le sigle « USB ».
Cliquez sur « OK »’.
Une fois vos préférences configurées, vous pouvez commencer à enregistrer.
Si le microphone USB ne se trouve pas dans les choix offerts, ouvrez les
paramètres système ou le panneau de configuration pour modifier les paramètres
d’entrée audio du panneau de configuration audio. Vous trouverez plus
d’information dans la section dépannage à la fin de ce guide.
39
Page 42

CONFIGURATION DU LOGICIEL AUDACITY POUR MAC
OS 10.4 ET VERSIONS SUPÉRIEURES
Lorsque vous utilisez Audacity v1.2.4 sous OS-10.4 ou une version ultérieure, ouvrez le
panneau de configuration des PARAMÈTRES MIDI dans le menu Pomme qui devrait se
trouver dans le dossier UTILITÉS. Utilisez les boutons du haut pour sélectionner la fenêtre
PÉRIPHÉRIQUES AUDIO.
Branchez le microphone USB, NE PAS lancer le logiciel Audacity tout de suite.
Vous remarquerez que certains des paramètres dans la fenêtre PARAMÈTRES MIDI ont été
modifiés en conséquence de l’appareil USB. (Si tel n’est pas le cas, allez à PROPRIÉTÉS
POUR => et sélectionnez « C-MEDIA USB AUDIO DEVICE » dans le menu déroulant.)
Vous pouvez maintenant ouvrir le logiciel Audacity v1.2.4.Lorsque Audacity est chargé, vous
remarquerez que les réglages format pour les entrées et les sorties changeront dans la
fenêtre PARAMÈTRES MIDI. Ces réglages seront erronés et vous offriront une piètre
performance audio. Malheureusement, ceci se produira chaque fois que Audacity v.1.2.4 se
chargera.
Pour contourner ce problème, il faut que vous attendiez que Audacity s’ouvre et effectue cette
réinitialisation des réglages, et qu’ensuite vous modifiez manuellement les réglages format à
partir de la fenêtre PARAMÈTRE MIDI.
1) PREMIÈREMENT, effectuer toutes les modifications aux réglages format dans Audacity.
Ceux-ci se trouvent sous le menu AUDACITY MENU =>PREFERENCES => AUDIO I/O =>
Set Channels for 2 (Stereo), et « playthrough » et sélectionnez « on » ou « off » (Sélectionnez
« On » si vous désirez écouter le signal durant l’enregistrement.).
2) Ensuite, toujours dans le menu AUDACITY MENU =>PREFERENCES, cliquez l’onglet
QUALITY et réglez la fréquence d’échantillonnage (Sample Rate) et le format
d’échantillonnage (Sample Format)(44100, 16 bits).
3) Cliquez sur OK pour sauvegarder les réglages des paramètres.
4) Réglez ensuite la fréquence du projet (PROJECT RATE) dans le coin inférieur gauche de
la fenêtre Audacity pour qu’elle soit identique à la fréquence d’échantillonnage
(habituellement 44100 Hz ou 48000 Hz).
5) Dans la fenêtre des PARAMÈTRES MIDI pour le signal d’entrée, sélectionnez « 2 ch-16
bit », puis la fréquence d’échantillonnage. (Habituellement 44100 Hz ou 48000 Hz). Faites la
même opération pour le signal de sortie.
REMARQUE : Ces réglages doivent être exactement comme ceux des réglages format dans
Audacity. Sinon, Audacity procédera à la réinitialisation de la fenêtre PARAMÈTRES MIDI
lorsque vous activerez la fonction d’enregistrement dans Audacity. Si vous réglages sont
identiques, vous êtes prêt pour commencer l’enregistrement.
La règle de base est que lorsque Audacity est ouvert, utilisez l’utilitaire PARAMÈTRE MIDI
pour sélectionner manuellement le réglage format identique à celui dans Audacity. Si vous
faites des modifications dans Audacity, vous devez également apporter les mêmes
modifications dans la fenêtre des PARAMÈTRES MIDI. (Il est souvent plus pratique de laisser
la fenêtre PARAMÈTRES MIDI ouverte sur le bureau.)
40
Page 43

ENREGISTREMENT SUR L’ORDINATEUR
1. Appuyer sur le bouton d'enregistrement .
2. Parlez dans le microphone.
3. Augmentez le volume du microphone jusqu’à ce que vous receviez un
bon signal dans Audacity. Assurez-vous que le signal n’atteint pas la
section rouge des vumètres et qu’il n’y a pas d’écrêtage.
4. Vous verrez la forme d’onde du signal audio sur l’écran durant
l’enregistrement. Vous entendrez le signal audio provenant de la carte de
son de votre ordinateur.
Aucun signal audio? - Si l’application logicielle ne reçoit aucun son,
retournez au menu préférence, et assurez-vous que vous avez bien
sélectionné l’option « Software Playthrough » et que le volume des hautparleurs de votre ordinateur est au maximum. Vous trouverez plus
d’information dans la section dépannage à la fin de ce guide.
5. Appuyer sur la touche d’arrêt
lorsque vous avez terminé
l’enregistrement.
6. SAUVEGARDEZ VOTRE FICHIER MAINTENANT en cliquant sur
« File » -> « Save Project ». Sélectionnez la destination et le nom du
fichier pour le projet et cliquez sur « Save ».
7. Vous avez terminé le processus d’enregistrement.
41
Page 44

RÉGLAGE DU NIVEAU DE L’AUDIO (FACULTATIF)
1. À partir du menu « Edit », choisissez « Select... », puis cliquez sur « All »
pour sélectionner tout votre enregistrement. Vous pouvez également
utiliser Ctrl+A sur un PC ou APPLE+A sur un Macintoch pour sélectionner
tout.
2. À partir du menu « Effect », sélectionnez les effets désirés.
a. Il y a plusieurs types d’effet sur lesquels vous trouverez plus
d’information dans la section d’aide du guide d’utilisation du
logiciel, ou encore sur le Web.
b. L’effet « Normalize » devrait être utilisé pour corriger le volume
de l’enregistrement.
42
Page 45

EXPORTATION
Cette section vous montre comment exporter les en format WAV afin de les graver
sur un CD. Vous pouvez également les convertir en format MP3 à l’aide de
logiciels tiers que vous pouvez télécharger du Web. Pour de plus amples
renseignements, veuillez vous référer au guide d’utilisation du logiciel.
1. Maintenant que vous avez terminé
d’enregistrer et d’éditer votre session,
vous devez l’exporter sur votre disque
dur.
Veuillez noter que si vous désirez le
convertir au format MP3, vous devez
télécharger un codec MP3 du Web, il y
a plusieurs gratuiciels qui sont
disponibles.
Si vous enregistrez pour la
baladodiffusion, vous devez exporter
votre session en fichier MP3.
2. Sélectionnez le menu « File » puis
« Export As WAV... ».
3. Nommez votre session et sélectionnez
le répertoire pour le fichier.
FAIRE L’ÉCOUTE ET L’EXPORTATION DES FICHIERS WAV ET MP3
Pour écouter vos fichiers numérisés, vous aurez besoin d’un logiciel tiers qui peut faire
la lecture de fichiers WAV. Il existe plusieurs applications qui sont intégrées aux
différents systèmes d’exploitation en plus de ceux qui sont offerts gratuitement sur
Internet. Vous pouvez également utiliser un logiciel de gravure standard pour graver
vos fichiers WAV sur un CD audio.
Il y a beaucoup de logiciels gratuits qui peuvent faire la lecture, graver et convertir les
fichiers WAV en fichiers MP3. Une fois que le fichier est converti en format MP3 il peut
être lu par tout appareil numérique portable compatible avec le format MP3.
Comme nous l’avons mentionné plus tôt, si vous enregistrez pour la baladodiffusion,
vous devrez exporter votre séance en fichier MP3, ou convertir le fichier WAV au format
MP3.La raison est simple, c’est que les fichiers MP3 sont considérablement plus petits
que les fichiers WAV, et donc, mieux adaptés pour la transmission sur Internet. Il y a
plusieurs codecs MP3 disponibles sur Internet – plusieurs sont gratuits et facilement
disponibles.
43
Page 46

TÉLÉCHARGEMENT DE VOTRE BALADO VERS UN SERVEUR
Avec votre trousse de baladodiffusion, Alesis vous offre un hébergement gratuit de
30 jours sur Cyberears.com pour vos balados. Une fois l’enregistrement terminé et
que vous avez sauvegardé votre session en format MP3, vous devrez la
télécharger vers le site Web d’Alesis qui hébergera et en fera la promotion aux
principaux sites Web RSS.
ACTIVATION DE VOTRE COMPTE :
1. Rendez-vous au portail de baladodiffusion d’Alesis au
www.alesispodcast.com
aider à faire la promotion de vos balados.
2. Cliquez sur Register pour créer un compte utilisateur. Le processus
d’inscription vous permettra d’obtenir un nom d’utilisateur et un mot de
passe sécurisé pour la gestion des fichiers audio qui ont été téléchargés.
3. Vous serez invité à remplir un formulaire. Remplissez le formulaire et
entrez le nom d’utilisateur et le mot de passe que vous désirez utiliser.
Cliquez ensuite sur Save & Next.
4. Vous recevrez un courriel de service@cyberears.com à l’adresse que
vous avez fournie lors de l’inscription. Vous devrez ouvrir le courriel et
activer votre compte Cyber Ears. Pour ce faire, cliquez sur le lien qui se
trouve dans le courriel.
5. Vous pouvez maintenant télécharger vos balados.
Conseil : Une fois que vous aurez ouvert une session, vous aurez accès à
différents tutoriels sur la baladodiffusion pour vous aider. Ces tutoriels vous
expliquent en détail le fonctionnement du site et comment profiter pleinement de
votre expérience de baladiffusion. Cliquez sur Tutorials.
TÉLÉCHARGEMENT :
1. Après avoir activé votre compte à l’aide du lien dans le courriel que vous
avez reçu, allez au www.cyberears.com et ouvrez une session en
entrant le nom d’utilisateur et le mot de passe que vous avez choisi.
2. Une fois la session ouverte, vous serez dirigé vers la section My Audio.
Ce à partir de cette section que vous pourrez télécharger et faire la
gestion de vos balados. De plus, d’autres fonctions sont fournies pour
vous aider à gérer les données telles que les statistiques sur vos balados.
3. Cliquez ensuite sur Upload pour télécharger vos fichiers audio vers le
serveur.
– le site Web créé tout spécialement pour vous
44
Page 47

4. L’on vous demandera de quel type d’audio s’agit-il, « What type of audio
is it? ». – puisque vous téléchargez un fichier audio qui fait partie d’un
balado, sélectionnez Podcast. Autrement, vous pourriez choisir une
autre option. Cliquez ensuite sur Next.
5. Cliquez sur Create pour créer un nouveau balado.
Conseil : Vos fichiers audio ne sont pas des balado. Ils sont des épisodes d’un
balado, alors si vous n’avez pas encore créé un balado, vous ne pourrez pas
télécharger les fichiers audio. En cliquant sur Create, vos créer une fiche du
balado avec toute l’information nécessaire pour l’inscrire dans tous les moteurs
de recherche. Une fois créé, vous n’avez qu’à joindre votre fichier audio au
balado. Comme un balado contient plusieurs épisodes, les fichiers audio
subséquents que vous créerez peuvent être téléchargés et associés avec le
balado.
6. Vous serez invité à fournir le titre, l’auteur, la catégorie et une description
de votre balado. Vous pouvez également télécharger une photo ou une
image pour votre balado. Cette image sera alors répertoriée dans les
registres. Entrez toutes les données et cliquez ensuite sur Save & Next.
7. Sur la page suivante, de l’information vous sera fournie pour que vous
puissiez faire directement la promotion de votre balado. Vous pourrez
également opter pour que Cyberears.com inscrive votre balado sur
plusieurs répertoires. Sélectionnez les répertoires dans les quels vous
désirez inscire automatiquement votre balado, une fois la sélection
terminée, cliquez sur Save & Next.
Remarque : Les répertoires sont des bases de données qui détiennent
l’information concernant l’emplacement des balados sur le Web, les
descriptions, etc. Les répertoires fonctionnent un peu de la même façon que
les moteurs de recherche sur Internet (c.-à-d. Google.com). Ils ne
contiennent pas de fichiers audio, ils répertorient vos balados pour que
d’autres personnes puissent les trouver. Ces répertoires sont mis à jours à
l’aide de programmes appelés agrégateurs, tels que iTunes, et mis à la
disposition de leurs abonnés. Tout balado auquel s’intéresse un auditeur peut
être inscrit à la liste d’un agrégateur afin qu’il vérifie si une mise à jour du
balado en question est disponible. Habituellement, le programme agrégateur
fait la mise à jour des répertoires une fois l’heure.
8. Vous pouvez maintenant sélectionner le fichier que vous désirez
télécharger. Cliquez sur File | Select file(s) sur l’applet apparaissant à
l’écran.
9. Trouvez le fichier MP3 que vous avez enregistré avec Audacity et cliquez
sur Open.
45
Page 48

10. Il ne vous reste qu’à fournir une description de l’épisode. Entrez le nom
du fichier et une description, puis cliquez sur Save & End.
Conseil : Les fichiers MP3 contiennent maintenant de l’information encodée
appelée balise ID qui décrit le fichier audio créé. Cette balise contient de
l’information concernant l’artiste, le numéro de piste, l’album, etc. Cette
information est mise à jour automatiquement pour vous par Cyberears.com afin que
les auditeurs qui téléchargent le fichier audio puissent avoir accès à l’information
encodée avec le balado, tel que vous l’avez soumis.
11. Vous avez maintenant terminé. Vous avez réussi votre baladodiffusion.
Des auditeurs de partout au monde peuvent écouter et s’abonner à votre
balado s’ils le désirent.
Conseil : Assurez-vous que vous avez bien téléchargé et inscrit votre balado à
l’aide d’un agrégateur, tel que iTunes afin que vous puissiez le trouver.
Souvenez-vous cependant que certains agrégateurs peuvent ne pas vérifier
tous les répertoires. C’est pour cette raison qu’il est préférable de vous
familiariser avec les différents répertoires et agrégateurs de baladodiffusion sur
le Web afin que vos balados soient disponibles à un grand nombre d’auditeurs.
Rappelez-vous que cela peut prendre quelque temps avant que les répertoires
fassent la mise à jour de leur liste de balados. Il n’est pas rare que les
répertoires tels que iTunes prennent jusqu’à deux semaines pour ajouter les
nouveaux balados à leur liste. Habituellement, vous recevrez un courriel vous
avisant qu’il passe en revue votre balado afin de déterminer s’il est approprié
pour leur répertoire. Chaque répertoire à ses propres procédures
opérationnelles qu’il change régulièrement. Assurez-vous de vous familiariser
avec les politiques de chaque répertoire afin de savoir quand vos balados
seront inscrits sur leur liste.
Conseil : Cyberears.com vous offre un essai gratuit de 30 jours avec l’achat
de votre trousse de baladodiffusion. À la fin des 30 jours d’essai, vous recevrez
un avis vous permettant de prolonger votre abonnement en effectuant le
règlement. Différents forfaits d’abonnement sont offerts. Pour plus
d’information sur les différentes options d’abonnement, visitez le
www.cyberears.com.
46
Page 49

DÉPANNAGE
Veuillez contacter Alesis ou votre détaillant avant de retourner ce
produit. Voir les Consignes de sécurité pour plus d’information.
• AUCUN SON :
o Si l’application logicielle ne reçoit aucun son, retournez au menu préférence,
tel qu’indiqué ci-dessus, et assurez-vous que vous avez bien sélectionné
l’option USB pour l’appareil d’enregistrement.
o Si vous ne pouvez entendre la musique, mais que vous pouvez la voir à
l’écran, retournez au menu préférence et assurez-vous que l’option
« Playback Device » soit bien réglée sur la carte de son de votre ordinateur.
o Période d’alimentation : Fermez Audacity et débranchez le câble USB.
Rebranchez le câble USB et relancez Audacity.
o Vérifiez que le volume (VOL) du microphone USB est activé et qu’il est réglé à
des niveaux adéquats.
o Vérifiez le potentiomètre du microphone pour vous assurer qu’il est au
maximum, c’est à dire, complètement à la droite, tel qu’indiqué à la figure cidessous :
• MAUVAISE QUALITÉ SONORE :
o Si l’enregistrement semble être déformé ou qu’il y a du gargouillement durant
la lecture, il se peut que vous ayez à ajuster les niveaux dans Audacity. Dans
Audacity, déplacez le potentiomètre vers la gauche pour diminuer les
niveaux.Vous pouvez utiliser l’effet de normalisation, tel que décrit plus haut,
pour ramener les niveaux à la normale après l’enregistrement.
o Si vous avez des sons bizarres provenant de vos enregistrements, essayez de
fermer toutes les applications et de redémarrer l’ordinateur, et en ouvrant
uniquement Audacity durant l’enregistrement.
Pour du soutien technique, veuillez contacter Alesis --(401) 658-5760
47
Page 50

48
Page 51

INHALTSVERZEICHNIS
ANSCHLUSS DES MIKROFONS ...................................................................51
ALLGEMEINE HINWEISE...............................................................................51
AUDACITY SOFTWARE INSTALLATION .....................................................52
KONFIGURATION DER AUDACITY SOFTWARE AM PC............................ 54
KONFIGURATION VON AUDACITY UNTER MAC OS 10.4 UND NEUER...56
AUFNAHME AUF DEM COMPUTER .............................................................57
EINSTELLEN DES AUDIOPEGELS (OPTIONAL)......................................... 58
EXPORTING YOUR RECORDING.................................................................. 59
LISTENING AND EXPORTING TO WAV/MP3 ...............................................59
HOCHLADEN IHRES PODCASTS .................................................................60
FEHLERHILFE................................................................................................. 63
49
Page 52

50 51
Page 53

ANSCHLUSS DES MIKROFONS
Das USB Mikrofon arbeitet nach dem Plug and Play Standard. Das bedeutet, dass
Sie keine Treiber installieren müssen. Wenn Sie das Mikrofon das erste Mal an
den Computer anstecken, werden automatisch alle benötigten
Treiberkomponenten geladen und das Mikrofon ist sofort einsatzbereit.
Beim ersten Anschluss des Mikrofons sehen
Sie ein paar Bildschirmanzeigen, wie diese
hier links.
Nach beendeter Installation
sehen Sie die hier
abgebildete Meldung:
Sie können Ihr Mikrofon nun verwenden.
Wichtiger Hinweis: Wenn Sie anschließend das Mikrofon mit einem anderen USB
Port verbinden, wird dieser Vorgang wiederholt, was nicht ungewöhnlich ist.
ALLGEMEINE HINWEISE
Wir haben dem USB turntable Audacity beigelegt, jedoch können auch andere
Programme von Drittanbietern verwenden.
Audacity ist eine kostenlose Software, die unter der General Public License (GPL)
vertrieben wird. Zusätzliche Informationen sowie den Open Source Code finden
Sie auf der beiliegenden CD oder im Internet unter http://audacity.sourceforge.net
Audacity kann sowohl unter Windows (98 und neuer) als auch unter Mac OS (X
und 9.2+) eingesetzt werden. Auf der Audacity Website ist Software für LinuxBetriebssysteme zum Herunterladen verfügbar.
Unter http://audacity.sourceforge.net/help/tutorials sind weitere Anleitungen
erhältlich.
Die Website verfügt zudem über weitere Informationen zu Erweiterungen, um die
Leistungsfähigkeit und die Funktionsvielfalt von Audacity zu erhöhen.
Page 54

AUDACITY SOFTWARE INSTALLATION
Vor dem Starten der Software
Achten Sie darauf, dass Ihr USB Mikrofon mit Hilfe des beiliegenden USB Kabels
an den Computer angeschlossen und eingeschaltet ist.
Software-Installation (PC)
1. Verbinden Sie den USB Port des USB Mikrofons mit dem USB Port Ihres
Computers.
2. Schalten Sie Ihren Computer ein und fahren Sie ihn vollständig hoch.
3. Ihr Computer meldet Ihnen, dass Windows ein neues Gerät erkannt hat und
Sie es nun verwenden können.
4. Legen Sie die dem USB Mikrofon beilegende CD in das CD Laufwerk des
Computers.
5. Klicken Sie Audacity Recording Software doppelt zum Öffnen an.
6. Klicken Sie den Windows Ordner doppelt an.
7. Klicken Sie den Audacity Ordner doppelt an, um ihn zu öffnen.
8. Die Installation der Software starten Sie mit einem Doppelklick auf audacity-
win-1.2.4b.exe.
9. Befolgen Sie zur Audacity Installation die Bildschirmanweisungen.
10. Nach der erfolgreichen Installation können Sie das Audacity Programm öffnen,
indem Sie auf Start und danach auf Alle Programme -> Audacity klicken.
Softwareinstallation (MAC)
1.
Verbinden Sie den USB Port des USB Mikrofons mit dem USB Port Ihres
Computers.
2. Schalten Sie Ihren Computer ein und fahren Sie ihn vollständig hoch.
3. Legen Sie die beiliegende CD ein.
4. Öffnen Sie die CD durch einen Doppelklick auf das CD Symbol auf dem
Desktop.
5. Klicken Sie den Audacity Recording Software Ordner doppelt an.
6. Öffnen Sie den Apple Ordner.
7. Ziehen Sie den Audacity Ordner auf Ihre festplatte. Wir empfehlen als
Ablageort den Ordner Programme.
8. Ein Fenster mit der Meldung, dass die Daten kopiert werden, erscheint.
9. Werfen Sie danach die CD aus. Audacity wurde installiert.
10. Öffnen Sie das Programm, indem Sie im Finder auf Programme klicken.
Suchen Sie danach den Audacity Ordner und öffnen Sie ihn mit einem
Doppelklick. Starten Sie nun mit einem Doppelklick auf das Audacity Symbol
die Software.
Hinweis: Wenn Sie den Audacity Ordner nicht im Programme Ordner abgelegt
haben, finden Sie ihn und klicken Sie das Audacity Symbol im innern dieses
Ordner doppelt an, um die Software zustarten.
52
Page 55

KONFIGURATION DES PCs ZUM BETRIEB MIT DEM USB MIKROFON
1.) Ohne dass ein Programm oder ein
Fenster geöffnet ist, klicken Sie
auf [START] – Einstellungen Systemsteuerung.
2.) Doppelklicken Sie dort auf
‘Sounds und Audiogeräte’.
3.) Überprüfen Sie, dass die
Soundkarte des Computers unter
dem ‘Volume’ Tab ausgewählt ist.
4.) Klicken Sie auf den ‘Audio’ Tab.
Überprüfen Sie, dass die
Soundkarte Ihres Computers als
Standard Wiedergabegerät sowie
‘C-Media USB Audio Device’ als
Sound Aufnahmegerät aufgeführt
sind.
53
Page 56

5.) Klicken Sie auf den ‘Voice’
Tab. Überprüfen Sie, dass auch
hier die Soundkarte Ihres
Computers als Standard
Wiedergabegerät sowie ‘C-Media
USB Audio Device’ als Sound
Aufnahmegerät aufgeführt sind.
6.) Drücken Sie den [Übernehmen]
Button, falls aktiv sowie [OK].
Falls der [Übernehmen] Button
inaktiv ist, klicken Sie einfach auf
[OK].
7.) Schließen Sie das ‘Sounds und
Audiogeräte’ Fenster.
8.) Überprüfen Sie, dass Ihre
Kopfhörer oder Lautsprecher mit
dem Ausgang der Soundkarte
des Computers verbunden sind,
KONFIGURATION DER AUDACITY SOFTWARE AM PC
damit Sie Ihre Aufnahmen und Bearbeitungen hören können.
1. Zum Starten der Audacity
Software klicken Sie auf
[START] -> Alle Programme ->
Audacity.
2. Wählen Sie im "Bearbeiten" Menü
den Punkt "Voreinstellungen".
54
Page 57

Das “Audacity Preferences” Fenster wird abgezeigt. Wählen Sie, wie gezeigt, das
C-Media USB Audiogerät im “Recording” Feld aus. Aktivieren Sie zum Abhören
des Signals während der Aufnahme die “Software Playthrough” Option.
Hinweis: Das USB Mikrofon könnte, je nach Computer Modell und Betriebssystem,
mit einem anderen Namen im Preference Fenster erscheinen. In 99% aller Fälle
sollte den Name aber “USB” enthalten.
Hinweis: Achten Sie darauf, dass Ihre Standard Soundkarte im "Wiedergabe"
Bereich ausgewählt ist, da Sie ansonsten keinen Audioausgang aus der Software
hören.
Klicken Sie auf "OK".
Nun, da Sie Ihre Voreinstellungen angepasst haben, sind Sie für die erste
Aufnahme gerüstet.
Falls Sie beim Auffinden Ihres USB-Mikrofons Schwierigkeiten haben, öffnen Sie
die Systemeinstellungen, um in den Audioeinstellungen die
Audioeingangsdefinition zu ändern. Beachten Sie dazu auch den Abschnitt zur
Fehlerhilfe am Ende dieser Anleitung.
55
Page 58

KONFIGURATION VON AUDACITY UNTER MAC OS 10.4 UND NEUER
Wenn Sie Audacity v1.2.4 mit OS 10.4 oder neuer verwenden, öffnen Sie zunächst die Apple
AUDIO MIDI KONFIGURATION, die Sie im „Dienstprogramme“ Ordner finden. Mit den
oberen Buttons wählen Sie das AUDIO-GERÄTE Fenster.
Schließen Sie Ihr USB Mikrofon an, öffnen Sie jedoch Audacity NOCH NICHT.
Wie Sie feststellen werden, ändern sich einige Einstellungen im Fenster AUDIO MIDI
KONFIGURATION, um die Einstellungen für das USB Gerät wiederzugeben. (Falls nicht
gehen Sie auf EINSTELLUNGEN FÜR => und wählen im Aufklappmenü den Eintrag CMEDIA USB AUDIO DEVICE aus.)
Nun können Sie Audacity v1.2.4 starten. Beim Laden des Programms werden Sie wieder
bemerken, dass sich die Format-Einstellungen für Ein- und Ausgänge in der AUDIO MIDI
KONFIGURATION ändern. Diese Einstellungen sind jedoch falsch und ermöglichen keine
ausreichende Audio-Performance. Jedes Mal, wenn Sie v.1.2.4 starten, werden diese Werte
eingestellt.
Um diesem Problem zu begegnen, warten Sie, bis Audacity geöffnet ist und diese falschen
Einstellungen gesetzt hat. Wählen Sie DANACH einfach die richtigen Einstellungen in der
AUDIO MIDI KONFIGURATION aus.
1) Definieren Sie ZUERST ALLE gewünschten Formateinstellungen in Audacity. Diese sind:
Unter AUDACITY MENÜ =>PREFERENCES => AUDIO I/O => 2 Kanäle (Stereo) und
Software Playthrough aktiviert (wenn Sie während der Aufnahme mithören möchten.)
2) Klicken Sie als nächstes in den AUDACITY MENÜ =>PREFERENCES auf den QUALITÄT
Tab und wählen Sie Sample Rate und Sample Format (44100, 16-Bit) aus
3) Bestätigen Sie durch Klicken auf „OK“ diese Einstellungen.
4) Definieren Sie nun die PROJECT RATE in der unteren linken Ecke des Audacity Fensters,
damit Sie mit Ihrer gewünschten Sample Rate übereinstimmen (normalerweise 44100 oder
48000).
5) Wählen Sie auf der Eingangsseite des AUDIO MIDI KONFIGURATIONs-Fensters 2 Kanäle
- 16 Bit aus und bestimmen Sie dann die Sample Rate. (normalerweise 44100 oder 48000
Hz). Führen Sie die gleichen Schritte für die Ausgangsseite durch.
HINWEIS: Diese Einstellungen müssen exakt mit den Format Einstellungen in Audacity
übereinstimmen. Wenn nicht, führt Audacity beim Aktivieren der Aufnahme den schon
beschriebenen Reset-Vorgang in der AUDIO MIDI KONFIGURATION durch. Wenn alles
übereinstimmt, sind Sie jetzt fertig für die erste Aufnahme.
Die grundlegende Vorgehensweise ist also nach dem Starten von Audacity mit der AUDIO
MIDI KONFIGURATION das Format manuell einzustellen, welches den Format Einstellungen
von Audacity entspricht. Wenn Sie das Format in Audacity ändern, müssen Sie zurück in die
AUDIO MIDI SETUP Konfiguration und die Format Einstellungen dort anpassen. (Es ist
normalerweise hilfreich, die AUDIO MIDI KONFIGURATION geöffnet zu lassen.)
56
Page 59

AUFNAHME AUF DEM COMPUTER
1. Drücken Sie die Aufnahmetaste
2. Sprechen Sie in das Mikrofon.
3. Drehen Sie den VOL Regler des Mikrofons auf, bis Audacity einen soliden
Eingangspegel anzeigt. Achten Sie darauf, dass Sie nicht in den roten
Bereich der Aussteuerungsanzeigen kommen und so das Signal
übersteuern.
4. Während der Aufnahme wird die Wellenform des Audiosignals im
Bildschirm angezeigt. Das Ausgangssignal sollten Sie am Ausgang des
Soundkarte Ihres Computers hören.
Kein Audiosignal? – gehen Sie zurück in das Preference Menü und
achten Sie darauf, dass “Software Playthrough” aktiviert wurde und die
Lautsprecher Ihrer Computerlautsprecher aufgedreht sind. Beachten Sie
dazu den Abschnitt über die Fehlerhilfe am Ende dieser Anleitung.
5. Drücken Sie Stop
wenn Sie die Aufnahme beenden möchten.
6. SPEICHERN SIE NUN IHRE DATEI, indem Sie auf ‘File’ -> ‘Save Project’
klicken. Wählen Sie ein Speicherziel und vergeben Sie einen Namen für
das Projekt. Klicken Sie dann auf ‘Save’.
7. Sie haben den Aufnahmevorgang abgeschlossen.
57
Page 60

EINSTELLEN DES AUDIOPEGELS (OPTIONAL)
1. Wählen Sie Ihre gesamte Aufnahme durch „Bearbeiten” => „Auswählen…”
=> „Alles.” Sie können dazu auch die Tastaturkürzel Strg+A (PC) oder
APFEL+A (Mac) verwenden.
2. Gehen Sie in das „Effekt” Menü und wählen Sie den gewünschten Effekt.
a. Es gibt verschiedene Effektarten, die im Softwareabschnitt oder
im Internet erklärt werden
b. Der Effekt „Normalisieren“ sollte für die richtige
Lautstärkeeinstellung der Aufnahme verwendet werden.
58
Page 61

EXPORTING YOUR RECORDING
1. Nun, nachdem Sie Ihre Aufnahme
beendet und bearbeitet haben, müssen
Sie das Audiosignal auf die Festplatte
exportieren.
Sie benötigen für den MP3-Export einen
MP3 Codec. Viele dieser Codecs sind
kostenlos im Internet verfügbar.
Wenn Sie die Aufnahme für einen
Podcast verwenden möchten, ist es
unbedingt notwendig sie als MP3 Datei
zu exportieren.
2. Wählen Sie, wie in Abbildung 15 gezeigt,
im “File” Menü die “Export As WAV…”
Option.
3. Benennen Sie die Aufnahme und geben
Sie eine Speicherposition für die Datei
an.
LISTENING AND EXPORTING TO WAV/MP3
Um das digitalisierte Audiosignal zu hören, benötigen Sie eine weitere
Softwareanwendung, die WAV Dateien abspielen kann. Es gibt eine Vielzahl von
kostenlosen Programmen im Internet, die beim Organisieren und Hören von
Audiodateien helfen. Sie können auch ein normales CD-Brennprogramm
verwenden, um Ihre WAV Dateien auf eine Audio-CD zu brennen.
Viele kostenlose Software-Anwendungen, die im Internet heruntergeladen werden
können, spielen, brennen und konvertieren WAV Dateien in das MP3-Format. Eine
MP3 Datei können Sie dann beispielsweise auf einen tragbaren MP3-Player
überspielen oder Sie können eine MP3-CD brennen.
Wie bereits gesagt, müssen Sie die Aufnahme in das MP3-Format exportieren oder
die WAV Datei später in das MP3-Format konvertieren, wenn Sie einen Podcast
erstellen möchten. MP3 Dateien sind sehr viel kleiner als WAV Dateien und eignen
sich deshalb besser für die Übertragung im Internet. Im Internet sind viele MP3
Codecs kostenlos erhältlich.
59
Page 62

HOCHLADEN IHRES PODCASTS
Teil des Podcasting Kits ist, dass Alesis ein kostenloses Bereitstellen Ihres
Podcasts auf Cyberears.com über 30 Tage übernimmt. Nach der Aufnahme und
dem Exportieren Ihrer MP3-Datei müssen Sie die Datei auf unsere eigens
eingerichtete Alesis Webseite hochladen, die Ihren Podcast bereitstellt und bei den
wichtigsten Podcast-Webseiten bewirbt.
AKTIVIERUNG IHRES ACCOUNTS:
1. Gehen Sie zum Alesis Podcasting Center unter www.alesispodcast.com
– das ist die eingerichtete Webseite, die wir für Ihre Podcasts angelegt
haben.
2. Klicken Sie auf Register, um ein neues Benutzerkonto (User Account)
einzurichten. Die Registrierung erzeugt eine ID und ein Kennwort, unter
der Sie sich anmelden können, um später Ihre Podcasts zu verwalten.
3. Sie werden aufgefordert, einige Informationen über sich selbst
einzugeben und sich für eine Login ID und ein Kennwort zu entscheiden.
Klicken Sie dann auch „Save & Next.“
4. Nun sendet service@cyberears.com eine Email an die von Ihnen in
der Anmeldung spezifizierte Email-Adresse. Darin finden Sie einen
Link zum Freischalten Ihres CyberEars Kontos. Klicken Sie dazu einfach
auf den Link.
5. Nun können Sie Ihre Podcasts hochladen.
Tipp: Wenn Sie sich einmal angemeldet haben, können Sie weitere Tutorials
zum Podcasting in englischer Sprache lesen. Diese Tutorials beschreiben den
Aufbau der Seite und geben Ratschläge zur Optimierung Ihrer Podcasts. Klicken
HOCHLADEN IHRES PODCASTS:
Sie dazu auf Tutorials.
1. Nach der Aktivierung Ihres Benutzerkontos durch Klicken des Links in der
empfangenen Email gehen Sie auf www.cyberears.com und melden Sie
sich mit Ihrer Login ID und Ihrem Kennwort an.
2. Wenn Sie sich erfolgreich angemeldet haben, gelangen Sie in den „My
Audio“ Bereich. Hier können Sie Ihre Podcasts hochladen und
verwalten. Zusätzlich finden Sie hier weitere Funktionen, die Sie
beispielsweise bei der Downloadstatistik und anderen Aufgaben
unterstützen.
3. Klicken Sie zum Hochladen Ihrer Audiodateien auf „Upload.“
60
Page 63

4. Sie werden nun nach der Art der Audiodatei gefragt („What type of audio
is it?”) – da Sie eine Audiodatei, die Teil eines Podcasts ist, hochladen,
wählen Sie „Podcast.“ Anderenfalls können Sie sich für eine andere
Option entscheiden. Klicken Sie danach auf „Next.“
5. Mit „Create“ erzeugen Sie einen neuen Podcast.
Hinweis: Ihre Audiodateien sind noch keine Podcasts. Sie sind bestenfalls
Episoden eines Podcasts. Wenn Sie noch keinen Podcast erzeugt haben,
können Sie noch keine Audiodateien hochladen. Wenn Sie Create anklicken,
erzeugen Sie eine Aufnahme Ihres Podcasts mit allen notwendigen
Informationen, um Ihren Podcast bei den Suchmaschinen zu registrieren. Nach
der Erzeugung verknüpfen Sie einfach Ihre Audiodatei mit dem Podcast. Da ein
Podcast oft aus mehreren Episoden besteht, können dazugehörige Audiodaten
hochladen und dem Podcast zuordnen.
6. Nun erhalten Sie die Aufforderung, Informationen zum Podcast, wie Autor,
Titel, Inhaltsbeschreibung und Kategorie zu geben. Sie können auch eine
Bilddatei zu Ihrem Podcast senden, welches dann in den Suchmaschinen
mit Ihrem Podcast erscheint. Geben Sie alle Informationen ein und
klicken Sie auf Save & Next.
7. Auf der nächsten Seite können Sie Informationen eingeben, die ein
direktes Bewerben Ihres Podcasts erleichtert. Zudem können Sie
definieren, ob Ihr Podcast bei Cyberears.com registriert wird. Wählen Sie
die möglichen Registrierungsoptionen aus und klicken Sie dann auf Save
& Next
.
Hinweis: Registrierungen sind Datenbanken, die Informationen darüber
enthalten wo Ihr Podcast im Web zu finden ist, was Ihr Podcast enthält, usw.
Diese Datenbanken funktionieren ähnlich wie Suchmaschinen (z.B.
Google.de). Sie enthalten nicht das Audiomaterial– sie registrieren nur Ihren
Podcasts, damit ihn andere finden können. Diese Datenbanken werden von
so genannten Podcatchern (wie iTunes) durchsucht. Diese Podcatcher
aktualisieren dann ihre Podcast-Listen und machen Sie dem Hörer verfügbar.
Jeder für den Hörer interessante Podcast kann von ihm abboniert werden.
Der Podcatcher teilt dem Hörer mit, wenn neue Episoden bereitstehen. Im
Normalfall überprüft so ein Programm die Datenbanken stündlich.
8. Nun können Sie die hochzuladene Datei auswählen. Klicken Sie auf File |
Select file(s) in der Bildschirmansicht.
9. Suchen Sie die MP3-Datei, die Sie mit Audacity aufgenommen haben und
klicken Sie auf Open.
10. Der letzte Schritt ist, Ihre Episode zu beschreiben. Geben Sie Dateiname
und Beschreibung ein und klicken Sie dann auf Save & End.
61
Page 64

Tipp: MP3-Dateien besitzen Informationen (so genannte ID3 Tags,) die
den Inhalt der Audiodatei beschreiben. Darunter fallen Informationen, wie
Künstler, Titelname, Album, usw. Diese Information wird durch
Cyberears.com automatisch aktualisiert, so dass jeder, der die Audiodatei
herunterlädt mit Hilfe der von Ihnen definierten Informationen über Ihren
Podcast informiert wird.
11. Sie haben es geschafft! Ihr Podcast wurde erfolgreich im Internet
veröffentlicht. Nun können Hörer weltweit Ihren Podcast hören und ihn
abbonieren
Hinweis: Überprüfen Sie mit einem Programm, wie iTunes, dass Ihr Podcast
richtig übertragen und registriert wurde. Einige Podcatcher-Programme können
bestimmte Datenbacken nicht überprüfen. Es ist also generell keine schlechte
Idee, wenn Sie sich selbst mit den verschiedenen Podcast-Datenbanken und
Podcatchern befassen, um die größtmögliche Hörerschaft zu erreichen.
Bedenken Sie auch, dass die Datenbanken manchmal etwas Zeit benötigen,
um ihre Listen mit den neuen Podcasts zu aktualisieren. Es ist nichts
ungewöhnliches, dass Programme wie iTunes manchmal Wochen brauchen,
um Ihren Podcast in ihre Datenbank aufzunehmen. Normalerweise werden Sie
per Email aufgefordert, Ihren Podcast noch einmal zu überprüfen, bevor er
bereitgestellt wird. Jede Datenbank verwendet dazu einen eigenen Prozess.
Machen Sie sich mit den verschiedenen Grundlinien dieser Datenbanken
vertraut, damit Sie wissen, wann Sie Ihren Podcast in den Listen der jeweiligen
Datenbank erwarten können.
Hinweis: Cyberears.com stellt Ihnen im Rahmen des Alesis Podcasting Kits
einen kostenlosen Benutzerzugang für 30 Tage bereit. Kurz vor dem Ablauf
dieser Periode werden Sie von Cyberears.com einen Hinweis erhalten, dass die
Frist endet und Sie Ihr Konto in einen kostenpflichtigen Account umwandeln
können. Es gibt verschiedene Kontoarten. Weitere Informationen hierzu finden
Sie auf www.cyberears.com.
.
62
Page 65

FEHLERHILFE
Bitte wenden Sie sich an Ihren Alesis Händler bevor Sie das Gerät
wegen eines Fehlers zurücksenden wollen. Beachten Sie auch die
• KEIN SOUND:
o Wenn Sie in der Software keinen Sound empfangen gehen Sie noch
o Wenn Sie kein Signal hören, jedoch die Wellenform auf dem Bildschirm
o Neustart: Schließen Sie Audacity und entfernen Sie das USB Kabel.
o Überprüfen Sie, dass der VOL Regler des USB Mikrofons auf eine
o Überprüfen Sie, dass der Mikrofon Schieberegler in Audacity auf der
Sicherheitsinformationen des Gerätes.
einmal in die Voreinstellungen (siehe Seite 4 und folgende) und
überprüfen Sie, dass das richtige USB Gerät ausgewählt wurde.
sehen, öffnen Sie Ihre Voreinstellungen (Abbildung 2) und definieren als
Wiedergabegeräte (Playback Device) die interne Soundkarte Ihres
Computers.
Schließen Sie dann das USB Kabel wieder an und öffnen Sie Audacity
neu.
ausreichende Lautstärke eingestellt ist.
Maximallautstärke steht. Er sollte auf der äußerst rechten Position sein,
wie in dieser Abbildung gezeigt:
• SCHLECHTE KLANGQUALITÄT:
o Wird ein aufgenommener Sound während der Wiedergabe verzerrt oder
zerhackt wiedergegeben, sollten Sie die Eingangslautstärke Audacity
anpassen. Bewegen Sie den Schieberegler nach links, um die Lautstärke
zu verringern. Verwenden Sie dann den „Normalisieren“ Effekt, um die
Lautstärke nach der Aufnahme wieder anzuheben.
o Wenn Sie Nebengeräusche hören, die aus der Aufnahme stammen,
schließen Sie alle Programme, starten Sie den Computer neu und lassen
Sie nur Audacity für die Aufnahme laufen.
Technische Unterstützung erhalten Sie unter der Emailadresse support@alesis.de
63
Page 66

64
Page 67

INDICE
COLLEGAMENTO DEL MICROFONO ................................................................67
NOTE GENERALI SUL SOFTWARE...................................................................67
INSTALLAZIONE DEL SOFTWARE AUDACITY................................................68
CONFIGURAZIONE DEL PC PER LAVORARE CON IL MICROFONO USB.... 69
CONFIGURAZIONE AUDACITY SU PC..............................................................70
CONFIGURAZIONE AUDACITY PER MAC OS 10.4 E SUPERIORI .................72
REGISTRAZIONE SU COMPUTER ..................................................................... 73
REGOLAZIONE DEL LIVELLO AUDIO (OPZIONALE)......................................74
ESPORTARE ........................................................................................................ 75
ASCOLTARE ED ESPORTARE IN WAV/MP3 ....................................................75
CARICARE IL PODCAST..................................................................................... 76
RISOLUZIONE DI PROBLEMI .............................................................................79
65
Page 68

66 67
Page 69

COLLEGAMENTO DEL MICROFONO
Il microfono USB è un dispositivo Plug and Play, ossia non richiede l’installazione
di driver. La prima volta che si inserisce il microfono nel computer, questo installerà
automaticamente tutti i driver necessari e sarà immediatamente pronto all’uso.
Al momento di collegare il microfono,
verranno visualizzate delle schermate simili
a quella a sinistra.
Una volta che l’installazione è
completa, verrà visualizzata
la schermata a sinistra:
Il microfono è ora pronto a essere usato.
Nota bene: se in seguito il microfono viene collegato ad una porta USB diversa,
questa procedura si potrebbe ripetere. Questo è normale.
NOTE GENERALI SUL SOFTWARE
Il microfono USB è compatibile con qualsiasi software di registrazione che supporti
dispositivi USB Audio. Noi abbiamo incluso Audacity al pacchetto, ma potreste
desiderare di servirvi di una serie di pacchetti software di terzi.
Audacity è un software gratuito, distribuito dietro GPL (General Public License,
ossia licenza pubblica generica). Ulteriori informazioni, oltre al codice open source,
si trovano nel CD incluso o in rete all’indirizzo http://audacity.sourceforge.net
Audacity funziona sia con Windows (98 e superiori) che con Mac OS (X e 9.2+).
Software for Linux can be found on the Audacity website.
Recarsi alla pagina http://audacity.sourceforge.net/help/tutorials per ulteriori
tutorial.
Il sito presenta inoltre informazioni in merito ad aggiunte separate di Audacity per
migliorare prestazioni e funzioni.
Page 70

INSTALLAZIONE DEL SOFTWARE AUDACITY
Prima di lanciare il Software
Assicurarsi che il microfono USB sia inserito nel computer con l’apposito cavo USB
in dotazione e che il computer sia collegato e acceso.
Installazione del Software (PC)
1. Collegare la porta USB del microfono USB alla porta USB del computer.
2. Accendere il computer e lasciare che si avvii completamente, nel caso in cui
non fosse ancora acceso.
3. Il computer riferirà che Windows ha individuato un nuovo dispositivo, che è
pronto all’uso.
4. Inserire il CD allegato al microfono USB.
5. Fare doppio clic su Audacity Recording Software (software di registrazione
Audacity) per aprirlo.
6. Fare doppio clic sulla cartella Windows per aprirla.
7. Fare doppio clic sulla cartella Audacity per aprirla.
8. Fare doppio clic sul file audacity-win-1.2.4b.exe per lanciare l’installazione
dell’applicativo.
9. Seguire le istruzioni che compariranno sullo schermo per installare Audacity.
10. Una volta completata l’installazione con successo, si può aprire l’applicativo
Audacity cliccando su Start, Tutti i programmi -> Audacity.
Installazione del Software (MAC)
1.
Collegare la porta USB del microfono USB alla porta USB del computer.
2. Accendere il computer e lasciare che si avvii completamente, nel caso in cui
non fosse ancora acceso.
3. Inserire il CD allegato.
4. Aprire l’icona CD sul desktop.
5. Fare doppio clic sulla cartella Audacity Recording Software.
6. Fare doppio clic sulla cartella Apple.
7. Trascinare la cartella Audacity, che si trova all’interno, sul disco rigido. Si
raccomanda di trasferire la cartella nella cartella Applicazioni.
8. Apparirà una finestra che mostra i file mentre vengono copiati.
9. Una volta terminata la copia, ESPELLERE il CD. Audacity è ora installato.
10. Per aprire l’applicazione, recarsi in Finder e cliccare su Applicazioni. Quindi,
fare doppio clic sulla cartella Audacity per aprirla. Infine, fare doppio clic
sull’icona di Audacity per lanciare l’applicazione.
Nota bene: se la cartella Audacity è stata copiata in una destinazione diversa
dalla cartella Applicazioni, trovare la cartella Audacity e fare doppio clic
sull’icona di Audacity, situata al suo interno, per lanciare l’applicazione.
68
Page 71

CONFIGURAZIONE DEL PC PER LAVORARE CON IL MICROFONO USB
1.) Senza programmi o finestre aperti,
cliccare su [START] –Impostazioni
– Pannello di controllo.
2.) In Pannello di controllo, fare doppio
clic su “Suoni e periferiche audio”.
3.) Verificare che la scheda audio del
computer appaia nella linguetta
“Volume”.
4.) Fare clic sulla linguetta ‘Audio’.
Assicurarsi che la scheda audio
del proprio computer sia elencata
come Dispositivo di riproduzione
sonora predefinito e che ‘C-Media
USB Audio Device’ sia indicato
come dispositivo di registrazione
sonora predefinito.
69
Page 72

5.) Fare clic sulla linguetta ‘Voce’.
Assicurarsi che la scheda audio
del proprio computer sia elencata
come Dispositivo di riproduzione
sonora predefinito e che ‘C-Media
USB Audio Device’ sia indicato
come dispositivo di registrazione
sonora predefinito.
6.) Se attivo, premere il tasto
[Applica], quindi premere [OK]. Se
il tasto [Applica] non è attivo,
premere [OK].
7.) Chiudere la finestra “Suoni e
periferiche audio”.
8.) Verificare che le cuffie o gli
altoparlanti siano collegati
all’uscita audio del computer per
monitorare le registrazioni e le modifiche.
CONFIGURAZIONE AUDACITY SU PC
1. Per lanciare Audacity, recarsi su
[START] –> Programmi –>
Audacity.
2. Selezionare il menu a discesa
“Edit” e quindi “Preferences”.
70
Page 73

Si aprirà la finestra “Audacity Preferences”. Scegliere C-Media USB Audio Device
sotto “Recording” (registrazione) come illustrato. Scegliere “Software Playthrough”
per poter ascoltare l’audio durante la registrazione.
Nota bene: il microfono USB potrebbe apparire con un nome diverso nella finestra
delle preferenze. Questo potrebbe dipendere dal modello di computer e dal
sistema operativo. Nel 99% dei casi, il nome conterrà la sigla “USB”.
Cliccare su ‘OK’.
Ora che sono state predisposte le preferenze, si è pronti a registrare.
Nel caso in cui vi fossero ancora difficoltà nel reperire il microfono USB, provare ad
aprire le impostazioni di sistema o il pannello di controllo per regolare le
impostazioni degli ingressi audio dal pannello di controllo del suono. Vedi inoltre il
paragrafo dedicato alla risoluzione di problemi che si trova alla fine del presente
manuale.
71
Page 74

CONFIGURAZIONE AUDACITY PER MAC OS 10.4 E SUPERIORI
Quando si utilizza Audacity v1.2.4 con OS-10.4 e superiori, aprire innanzitutto il pannello di
controllo Apple AUDIO MIDI SETUP che dovrebbe trovarsi nella cartella UTILITIES.
Servendosi dei pulsanti in alto, selezionare la finestra AUDIO DEVICES.
Collegare il microfono USB, NON aprire ancora Audacity.
Si noterà che alcune delle impostazioni a livello della finestra AUDIO MIDI SETUP
(impostazione audio Midi) cambieranno per riflettere le impostazioni apportate al dispositivo
USB. (In caso contrario, recarsi in PROPERTIES FOR => e selezionare C-MEDIA USB
HEADPHONE SET nel menu a tendina.)
Si può ora aprire Audacity v1.2.4. Quando Audacity viene caricato, si noterà nuovamente che
le impostazioni di formato degli ingressi e delle uscite cambieranno nella finestra AUDIO MIDI
SETUP. Queste impostazioni saranno sbagliate e non offriranno adeguate prestazioni audio.
Infatti questo resettaggio avrà luogo ogni volta che viene aperto Audacity v.1.2.4.
Per aggirare il problema, attendere l’apertura di Audacity e l’esecuzione del resettaggio
erroneo di cui sopra, quindi selezionare manualmente le impostazioni di formato desiderate
nella finestra AUDIO MIDI SETUP.
1) INNANZITUTTO procedere a TUTTE le impostazioni di formato desiderate in Audacity.
Queste si trovano in AUDACITY MENU =>PREFERENCES => AUDIO I/O => Impostare
Channels su 2 (Stereo), e playthrough on oppure off (Scegliere “On” se si desidera ascoltare
durante la registrazione.)
2) Quindi, sempre in AUDACITY MENU =>PREFERENCES, cliccare sulla linguetta QUALITY
ed impostare il Sample Rate ed il Sample Format (44100, 16-bit) predefiniti.
3) Cliccare su OK per salvare tutte le impostazioni.
4) In seguito, impostare la PROJECT RATE nell’angolo inferiore sinistro della finestra
dell’Audacity in modo che corrisponda al sample rate desiderato (solitamente 44100 o
48000).
5) Nella finestra AUDIO MIDI SETUP sul lato degli ingressi, selezionare innanzitutto 2 ch-16
bit, quindi il sample rate. (Solitamente 44100 o 48000 Hz). Quindi fare lo stesso per le uscite.
NOTA: queste impostazioni devono corrispondere esattamente alle impostazioni di formato in
Audacity. In caso contrario, Audacity effettuerà la stessa routine di resettaggio nella finestra
AUDIO MIDI SETUP al momento di attivare la funzione di registrazione di Audacity. Se le
impostazioni corrispondono, si può iniziare a registrare.
La regola fondamentale è, dopo aver aperto Audacity, servirsi della funzione AUDIO MIDI
SETUP per selezionare manualmente le impostazioni di formato in Audacity. Se si effettuano
cambiamenti di formato in Audacity, bisognerà tornare alla finestra AUDIO MIDI SETUP e
procedere alle stesse modifiche (Solitamente, la cosa più facile è quella di lasciare aperta la
finestra AUDIO MIDI SETUP sul desktop)
72
Page 75

REGISTRAZIONE SU COMPUTER
1. Premere il tasto Record
2. Parlare al microfono.
3. Alzare il VOL sul microfono fino a quando non si ottiene una buona lettura
del segnale da parte di Audacity. Assicurarsi di non raggiungere l’area
rossa dei misuratori di livello e di non “clippare” il segnale.
4. Sullo schermo si vedrà l’onda audio durante la registrazione. Si sentirà
l’audio provenire dall’uscita della scheda audio del computer.
Manca l’Audio? - Tornare al menu “preference” e assicurarsi che
“Software Playthrough” sia stato selezionato e che il volume degli
altoparlanti del computer sia acceso. Vedi la risoluzione di problemi alla
fine del manuale per ulteriore aiuto.
5. Una volta terminata la registrazione, premere Stop
.
6. PROCEDERE ORA AL SALVATAGGIO DEL FILE cliccando su ‘File’ ->
‘Save Project’ (salva progetto). Selezionare la destinazione e il nome del
file per il progetto e cliccare su ‘Save’ (salva).
7. Il processo di registrazione è completo.
73
Page 76

REGOLAZIONE DEL LIVELLO AUDIO (OPZIONALE)
1. Selezionare l’intera registrazione scegliendo “Edit”, quindi “Select…”,
quindi cliccare su “All” (tutti). Si può anche utilizzare Ctrl+A su un PC o
APPLE+A su un Macintosh per selezionare tutto rapidamente.
2. Selezionare il menu “Effect” e scegliere l’effetto desiderato.
a. Vi sono vari tipi di effetti descritti ulteriormente nella sezione di
aiuto del software oltre che in rete.
b. “Normalize” (normalizzare) va usato per ottenere il giusto volume
della registrazione.
.
74
Page 77

ESPORTARE
Questo paragrafo spiega come esportare in formato WAV per masterizzare un CD.
Si può anche scegliere di convertire i file in MP3 servendosi di un software di terzi
scaricato da internet. Fare riferimento alla
sezione di aiuto del software per ulteriori
informazioni.
1. Una volta terminato di registrare e di
modificare la sessione, bisogna
esportare l’audio sul disco rigido.
Se si desidera esportare in formato
MP3, potrebbe essere necessario
scaricare un codec MP3 da Internet:
molti sono gratuiti e ampiamente
disponibili.
È inoltre da notare che se si registra
allo scopo del podcast, sarà necessario
esportare la sessione sotto forma di file
MP3.
2. Selezionare il menu “File”, quindi
“Export As WAV…” (esporta come
WAV…).
3. Infine, nominare la sessione e selezionare la cartella di destinazione per il
file
ASCOLTARE ED ESPORTARE IN WAV/MP3
Per ascoltare il proprio audio digitalizzato, sarà necessario un dispositivo per la
riproduzione di file WAV. Vi sono molte applicazioni incluse nei sistemi operativi,
oltre che in rete da scaricare gratuitamente. Si può anche utilizzare un normale
software per la masterizzazione di CD audio per masterizzare i file WAV su CD.
Vi sono molte applicazioni software gratuite per riprodurre, masterizzare o
convertire i file WAV in MP3. Una volta in formato MP3, il file può essere inserito in
qualsiasi dispositivo digitale portatile compatibile MP3.
Come già detto, se si registra per il podcast, sarà necessario esportare la sessione
in formato MP3, oppure convertire il file WAV esportato in MP3. Il motivo è che i file
MP3 sono decisamente più piccoli dei file WAV e dunque più adatti alla
trasmissione e allo streaming in Internet. In rete sono disponibili molti codec MP3:
molti sono gratuiti e di facile accesso.
75
Page 78

CARICARE IL PODCAST
Come parte del Kit per il Podcasting, Alesis mette a disposizione 30 giorni di
hosting gratuito dei tuoi podcast tramite Cyberears.com. Una volta finito di
registrare e salvato la sessione come file mp3, dovrete caricarlo sul nostro sito
Alesis apposito che ospiterà e promuoverà i vostri podcast con i migliori siti del
settore
.
ATTIVAZIONE DEL CONTO:
1. Recarsi sull’Alesis Podcasting Center alla pagina www.alesispodcast.com:
questo è il sito che è stato creato appositamente per aiutarvi a promuovere i
vostri podcast.
2. Cliccare su Register (registra) per creare un conto utente. Il procedimento di
registrazione fornirà un ID per il login e una password in modo da poter gestire
i file audio che sono stati caricati.
3. Vi sarà richiesto di inserire alcune informazioni. Una volta inserite, digitare un
ID e una password che desiderate utilizzare con questo conto. Quindi cliccare
su Save & Next (salva e prosegui).
4. All’indirizzo fornito verrà inviata un’e-mail da service@cyberears.com con le
informazioni di registrazione. Dovrete aprire l’e-mail e sbloccare il conto Cyber
Ears appena creato. Basta cliccare sul link contenuto nell’e-mail.
5. Ora siete pronti a caricare i vostri podcast!
Suggerimento: una volta collegati, navigare nei tutorial disponibili in materia di
Podcasting. Questi tutorial spiegano come servirsi appieno del sito e come trarre
il massimo dalla propria esperienza di podcasting. Cliccare su Tutorials.
CARICAMENTO:
1. Una volta attivato il conto servendosi del link fornito nell’e-mail ricevuta, recarsi
alla pagina www.cyberears.com ed effettuare il log in servendosi dell’ID e
della password create.
2. Dopo essersi collegati a Cyberears, si viene trasportati nella sezione My
Audio. Qui è dove verranno caricati e gestiti i podcast. Inoltre sono fornite
altre funzioni di assistenza nella gestione delle statistiche di scaricamento dei
podcast, ecc.
3. Quindi cliccare su Upload per caricare i file audio.
4. Verrà chiesto “What type of audio is it?”("Di che tipo di audio si tratta?") –
poiché si sta caricando un file audio parte di un Podcast, scegliere Podcast.
Altrimenti, scegliere un’altra opzione. Quindi cliccare su Next.
5. Cliccare su Create per creare un nuovo podcast.
76
Page 79

Suggerimento: i vostri file audio non sono Podcast. Sono episodi di un
Podcast, quindi se non è stato ancora creato un Podcast, non è possibile
caricare i file audio fino a quando ciò non viene fatto. Cliccando su Create, si
crea una voce del Podcast con tutte le informazioni necessarie alla registrazione
sui motori di ricerca. Una volta creato, basterà allegare il file audio al Podcast.
Poiché un Podcast presenta tipicamente numerosi episodi, i nuovi file audio
successivi che vengono creati possono essere facilmente caricati e associati al
Podcast.
6. Vi verrà richiesto di inserire informazioni che comprendono il titolo, l’autore,
una descrizione e la categoria del vostro podcast. A scelta si può anche
caricare un’immagine fotografica dell’host, oppure della grafica sul proprio
Podcast. Questa immagine verrà inclusa nei registri di ricerca del Podcast.
Completare queste informazioni e cliccare su Save & Next.
7. Nella pagina successiva vengono fornite informazioni su come promuovere
direttamente il proprio Podcast. Inoltre, si può scegliere di fare in modo che
Cyberears.com registri il Podcast con numerosi registri di Podcast. Scegliere i
registri a cui si desidera che il Podcast venga automaticamente sottoposto e
una volta fatto, cliccare su Save & Next..
Nota: i registri sono database che contengono informazioni sull’ubicazione
del podcast sul web, descrizioni e così via. I registri lavorano un po’ come i
motori di ricerca di Internet (es. Google.com). Non contengono i file audio, si
limitano a registrare i vostri Podcast in modo che altri vi possano trovare.
Questi registri vengono verificati da programmi chiamati aggregatori (ad
esempio iTunes), che aggiornano i loro elenchi di podcast e li rendono
disponibili agli ascoltatori del programma. Se un ascoltatore è interessato ad
un qualsiasi podcast, vi si può “sottoscrivere”, facendo in modo che
l’aggregatore cerchi periodicamente nuovi episodi di quel Podcast. Di solito i
programmi aggregatori verificano i registri circa una volta all’ora.
8. Ora si può scegliere il file che si desidera caricare. Cliccare su File | Select
file(s) nella applet sullo schermo.
9. Trovare l’mp3 registrato con Audacity e cliccare su Open..
10. L’ultima fase consiste nella descrizione dell’episodio. Digitare il nome del file
ed una descrizione e cliccare su Save & End.
Suggerimento: i file MP3 contengono informazioni (chiamate tag ID3) che
descrivono il file audio creato. Queste includono dati quali Artista, Nome della
traccia, Album, ecc. Queste informazioni vengono aggiornate
automaticamente da Cyberears.com in modo tale che ogni persona che
scarichi il file audio riceva le informazioni in esso contenute coerenti con le
informazioni sul Podcast da voi inserite.
11. Ed ecco fatto! Avete pubblicato con successo il vostro podcast. Ora ascoltatori
di tutto il mondo possono guardarlo e sottoscriverlo, se desiderano.
77
Page 80

Suggerimento: assicurarsi che il podcast sia stato caricato e registrato in
maniera appropriata servendosi di un programma aggregatore quale iTunes per
trovarlo. Ricordate, tuttavia, che determinati aggregatori potrebbero non cercare
in determinati registri. Ecco perché è bene familiarizzarsi con i diversi registri di
podcast e con i diversi aggregatori presenti in rete, in modo che i propri Podcast
raggiungano un pubblico più ampio possibile. Bisogna inoltre ricordare che i
registri impiegano del tempo per aggiornare gli elenchi di nuovi Podcast.
Registri quali iTunes potrebbero facilmente impiegare settimane prima di
aggiungere il vostro Podcast ai loro elenchi. Di solito viene inviata un’e-mail in
cui si annuncia che stanno valutando il vostro Podcast per verificare se è
accettabile prima di aggiungerlo. Ogni registro presenta le proprie procedure
specifiche, che cambiano regolarmente. Assicuratevi di prendere conoscenza
delle varie linee guida in modo da sapere quando vi potete aspettare di vedere
il vostro spettacolo apparire nei loro elenchi.
Suggerimento: Cyberears.com offre un conto gratuito di 30 giorni in aggiunta al
vostro Kit Podcasting Alesis. Al termine di questo periodo di 30 giorni, verrà
ricevuta una notifica da parte di Cyberears.com che vi permette di acquistare
un’iscrizione direttamente con loro e di estendere il vostro hosting per il periodo
in cui è attiva la sottoscrizione. Vi sono diversi livelli di servizi di sottoscrizione
disponibili. Recarsi alla pagina www.cyberears.com per maggiori informazioni
sulle possibilità di sottoscrizione.
78
Page 81

RISOLUZIONE DI PROBLEMI
Prima di restituire il prodotto, contattare Alesis o il rivenditore. Vedi
la guida di sicurezza per maggiori informazioni.
• NESSUN SUONO:
o Se non si ottengono suoni nell’applicazione software, tornare alle preferenze
come illustrato in precedenza e assicurarsi di aver selezionato l’ingresso USB
per il dispositivo di registrazione.
o Se non si sente l’audio, ma si vede l’onda sonora sullo schermo, aprire
“preferences” e assicurarsi che il “Dispositivo di riproduzione” sia impostato
sulla scheda audio interna del computer.
o Ciclo di alimentazione: chiudere Audacity e scollegare il cavo USB. Inserire
quindi il cavo USB e riaprire Audacity.
o Verificare che il controllo VOL sul microfono USB sia impostato su un livello
accettabile.
o Verificare lo stato del cursore di Audacity per assicurarsi che si trovi a pieno
volume, all’estrema destra, come illustrato nella figura sottostante:
• SCARSA QUALITÀ SONORA:
o Se un suono registrato risulta distorto o alterato durante la riproduzione,
potrebbe essere necessario regolare il volume d’ingresso in Audacity.
Provare a spostare il cursore Input Level in Audacity verso sinistra per
abbassare il volume d’ingresso. Si può utilizzare l’effetto “normalize” come
descritto in precedenza per riportare il volume a livello normale dopo la
registrazione.
o Se si verificano suoni strani provenienti dalla registrazione, provare a chiudere
tutti i programmi, riavviare il computer e lanciare solo Audacity durante la
registrazione.
Per supporto tecnico, contattare
Alesis at (401) 658-5760
79
Page 82

Page 83

SPECIFICATIONS
capsule pattern: cardioid
sensitivity: -65+/-5dB @ 1k Hz; 3.0V, 680 ohm
frequency response: 50 - 18K Hz
S/N ration: more than 59dB
USB power: 5.0V
7-51-0232-A
Page 84

WWW.ALESIS.COM
 Loading...