


User Guide
English ( 3 – 11 )
Guía del usuario
Español ( 12 – 21 )
Guide d’utilisation
Français ( 22 – 31 )
Guida per l’uso
Italiano ( 32 – 41 )
Benutzerhandbuch
Deutsch ( 42 – 51 )
Appendix
English ( 53 )

2
User Guide (English)
Introduction
Box Contents
Melody 54
Microphone
Power Adapter
Music Rest
User Guide
Safety & Warranty Manual
Support
For the latest information about this product (system requirements, compatibility information, etc.)
and product registration, visit alesis.com.
For additional product support, visit alesis.com/support.
Setup
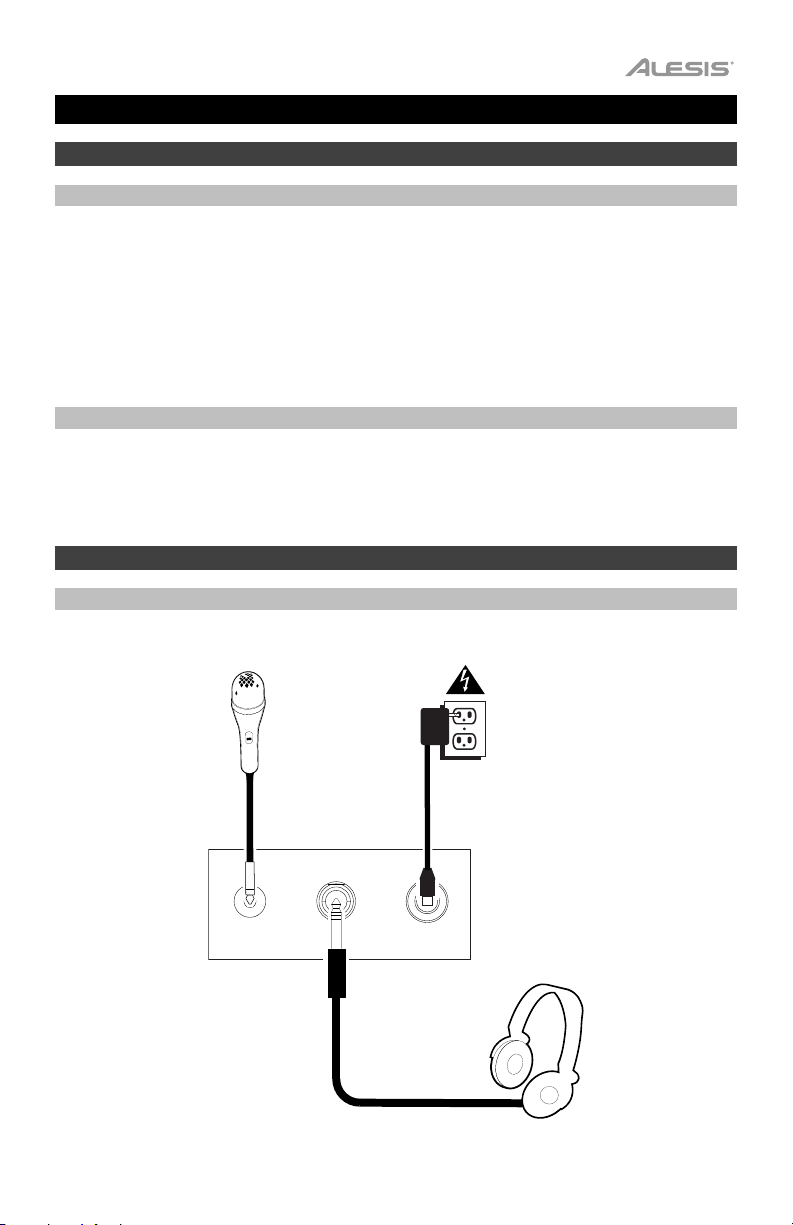
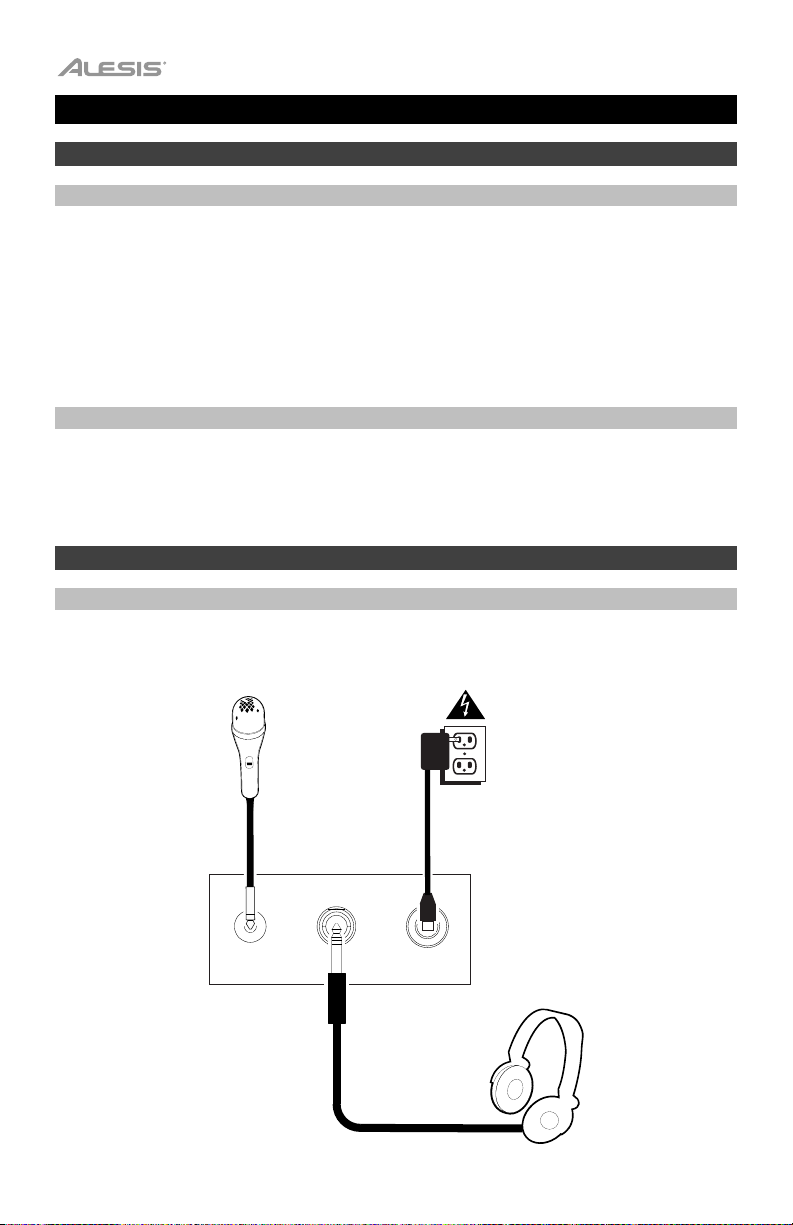
Connection Diagram
Items not listed in Introduction > Box Contents are sold separately.
Microphone
MIC
PHONES
DC 12V
DC 9V
Power
Headphones
(not included)
3

Features
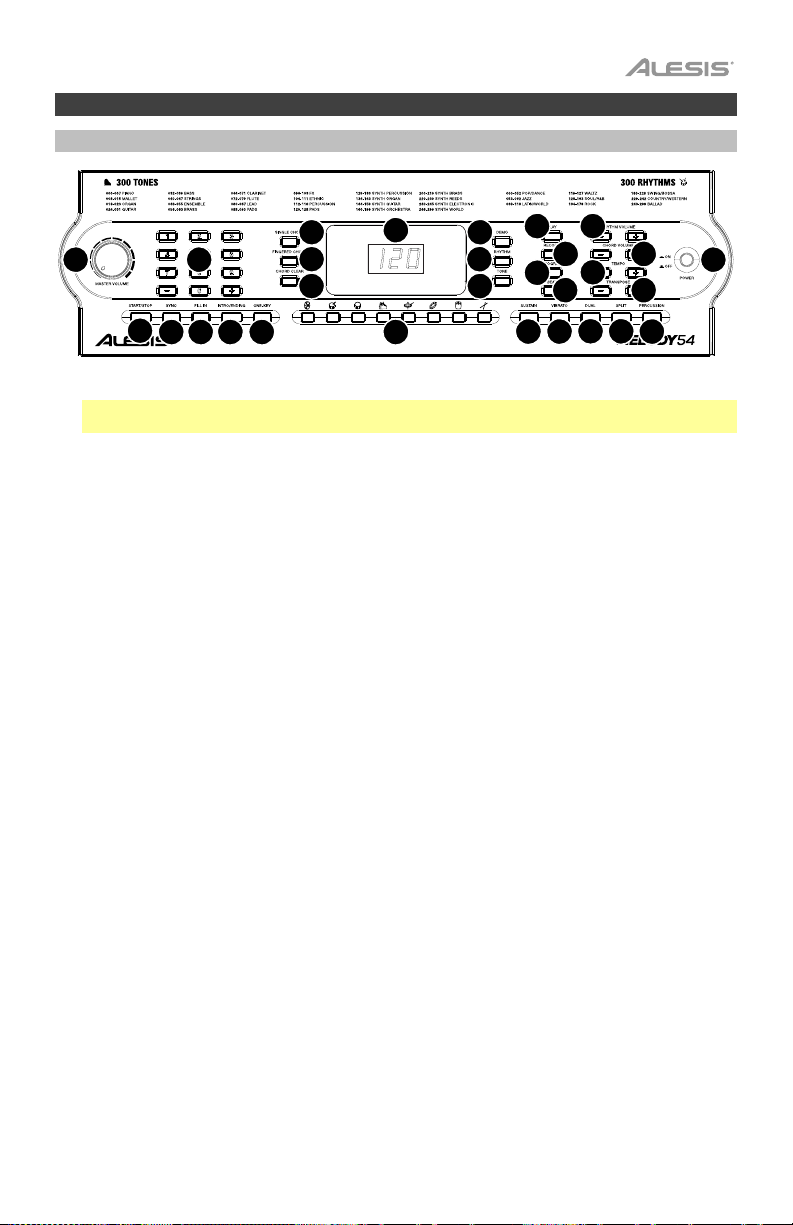
Top Panel
22
4
23
24
28
26
27
13
21
20
25
12
1 3
2
5
14
6
15
16
17 18
1. Power On/Off: Press this button to turn the keyboard on or off.
Note: After 5 minutes of inactivity, Melody 54 will power off. If you press any key, it will turn back on.
2. Display: This LED Display will update when you make changes to settings such as the tone, rhythm,
tempo, etc. Upon power up, the Display shows the currently selected tempo by default.
3. Master Volume: Tur n the Master Volume knob to increase or decrease the overall volume of the keyboard.
4. Number buttons and + / - buttons: Use these buttons to change the tone, accompaniment rhythm, or
demo song. Before using the Number or + / - buttons, press the button corresponding to the setting
that you would like to change.
5. Demo: Press this button to begin playback of one of the demonstration songs. See Operation > Demo
Songs for more information.
6. To ne : Press this button and then use the Number buttons or + / - buttons to select a tone. See
Operation > Choosing Your Keyboard Tone for more information.
7. Sustain: Press this button to activate or deactivate the sustain effect. See Operation > Choosing Your
Keyboard Tone for more information.
8. Vibrato: Press this button to activate or deactivate the vibrato effect. See Operation > Choosing Your
Keyboard Tone for more information.
9. Dual: Press this button to layer two tones together. See Operation > Choosing Your Keyboard Tone
for more information.
10. Split: Press this button to use one tone on one side of the keyboard and a separate tone and the other
side. See Operation > Choosing Your Keyboard Tone for more information.
11. Percussion: Press this button to play percussion sounds with the keys. On will temporarily appear on
the Display when the percussion sounds are activated. See the image above each key in order to know
what drum sound a key will play. Press the Percussion button again to disable this function. When
disabled, OFF will temporarily appear on the Display.
12. Transpose: Press the Transpose + or Transpose – button to increase or decrease the pitch of the
keyboard by a half-step. See Operation > Choosing Your Keyboard Tone for more information.
13. Beat: Press this button to cycle between the different metronome settings: 1/4, 2/4, 3/4, 4/4, and Off.
When you power on the keyboard, the metronome will be set to Off by default. When changing the
setting, the Display will show the selected setting temporarily. When the metronome is playing, the
Display will flash three dots for the first beat of every measure and a single dot for each remaining beat.
Use the Tempo + / - buttons to change the tempo of the metronome.
14. Rhythm: Press this button and then use the Number buttons or + / - buttons to select an
accompaniment rhythm. See Operation > Adding Background Music > Accompaniment Rhythms
for more information.
15. Start/Stop: Press this button to start or stop an accompaniment rhythm. See Operation > Adding
Background Music > Accompaniment Rhythms for more information.
16. Sync: Press this button to activate the Sync feature. When the Sync feature is activated, playing any
key below G2 will automatically start the currently selected accompaniment rhythm (so that you do not
have to press the Start/Stop button). See Operation > Adding Background Music >
Accompaniment Rhythms for more information.
4
19
29
7 8
9 10
11
1
1
2 3
17. Fill In: While an accompaniment rhythm is playing, press this button to make the keyboard temporarily
play a new rhythm or “drum fill.” See Operation > Adding Background Music > Accompaniment
Rhythms for more information.
18. Intro/Ending: Press this button to make the keyboard play either an introductory or ending drumbeat,
depending on whether an accompaniment rhythm is already playing. See Operation > Adding
Background Music > Accompaniment Rhythms for more information.
19. One-Key: Press this button to activate the one-key feature. When this feature is activated, you can play
one key at a time to perform a demo song. See Operation > Demo Songs for more information.
20. Tempo: Press the Tempo + or Tempo – button to change the keyboard’s BPM setting. This will affect
playback of the rhythm and chord accompaniments, demo songs, and metronome. Press the Tempo +
and Tempo – buttons simultaneously to reset to the default tempo (120 BPM).
21. Rhythm Volume: Press the Rhythm Vol + or Rhythm Vol – button to increase or decrease the
accompaniment rhythm volume. Press the Rhythm Vol + and Rhythm Vol – simultaneously to reset to
the default volume level (A07).
22. Single Chord: Press this button to enable the accompaniment chord feature. When this feature is
enabled, you can use the keys below G2 to produce chords that automatically play along with the
selected accompaniment rhythm. Pressing the Single Chord button (as opposed to Fingered Chord)
allows you to use condensed chord shapes instead of using all the keys normally required for a full
chord. See Operation > Adding Background Music > Accompaniment Chords for more information.
23. Fingered Chord: Press this button to enable the accompaniment chord feature. When this feature is
enabled, you can use the keys below G2 to produce chords that automatically play along with the
selected accompaniment rhythm. Pressing the Fingered Chord button (as opposed to Single Chord)
requires that you play full chord shapes instead of a condensed set of keys for each chord. See
Operation > Adding Background Music > Accompaniment Chords for more information.
24. Chord Clear: Press this button to turn the accompaniment chord feature off.
25. Chord Volume: Press the Chord Vol + or Chord Vol – button to increase or decrease the
accompaniment chord volume. Press the Chord Vol + and Chord Vol – buttons simultaneously to
reset the accompaniment chords to their default volume level (u07).
26. Program: Press this button to program a custom accompaniment rhythm. See Operation > Adding
Background Music > Rhythm Programming for more information.
27. Record: Press this button to record a song. See Operation > Recording for more information.
28. Play: Press this button to play a custom accompaniment rhythm or recorded song.
29. Drum Kit Buttons: Press these buttons to play percussion sounds. See the images on the buttons to
note which button plays which type of sound. The Drum Kit Buttons are particularly useful for the
Rhythm Programming feature. See Operation > Adding Background Music > Rhythm Programming
for more information.
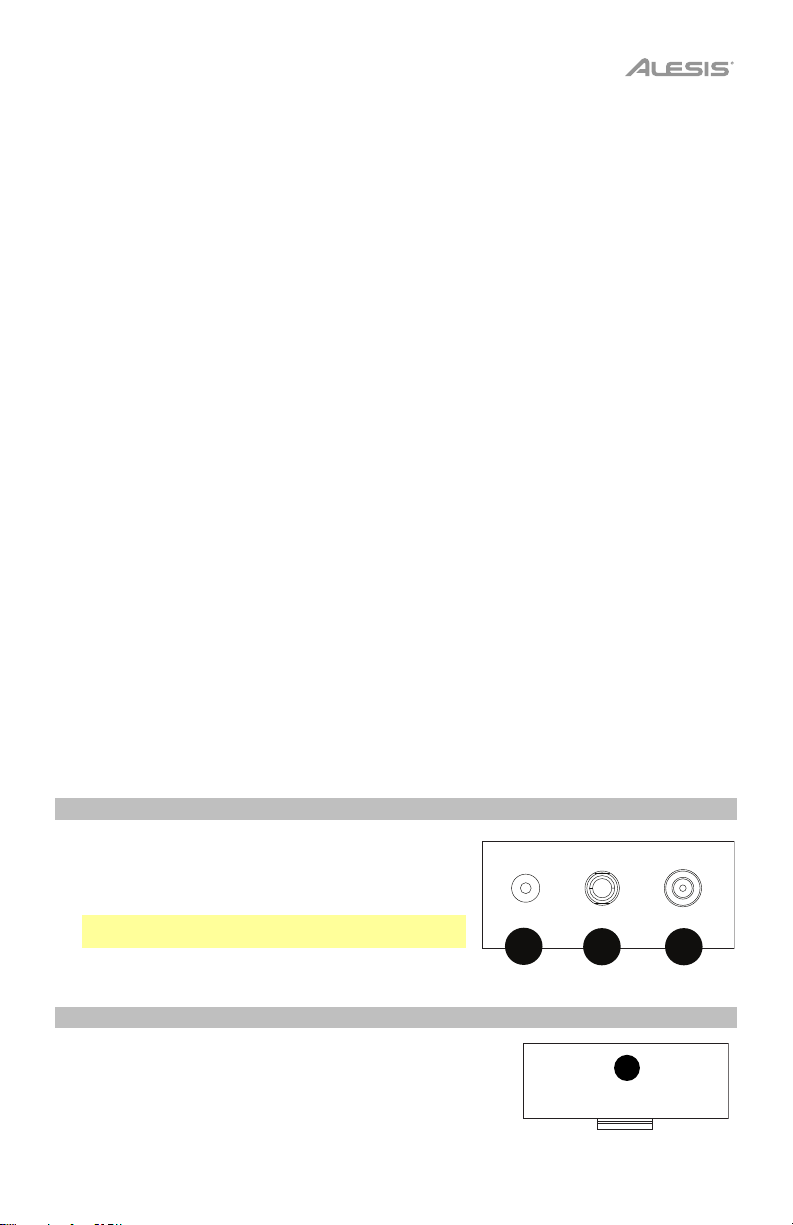
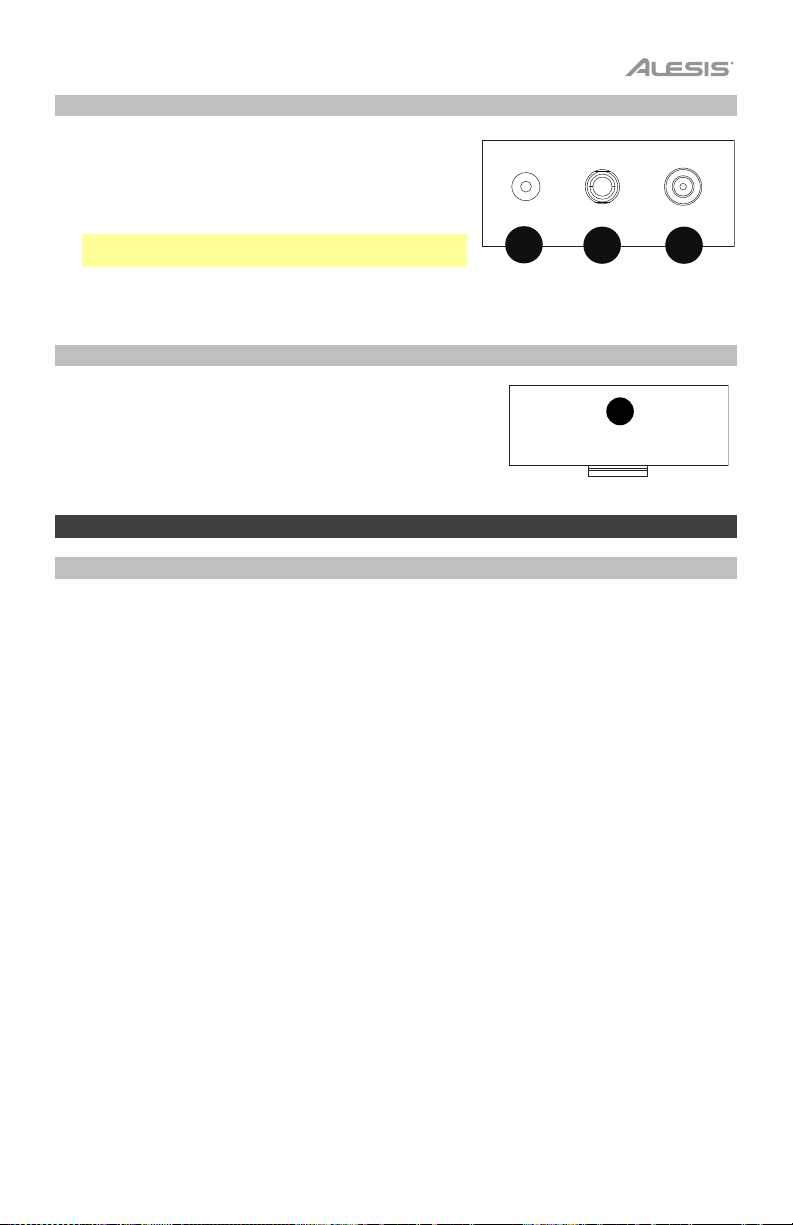
Rear Panel
1. Mic: Connect the included microphone here to sing while
playing the keyboard.
2. Phones (1/8” / 3.5 mm TRS): Connect headphones (not
included) to this output to hear the keyboard.
Note: Plugging into the Phones output will mute the
keyboard’s internal speakers.
3. Power Input: Connect the included power adapter here.
MIC
PHONES
DC 12V
DC 9V
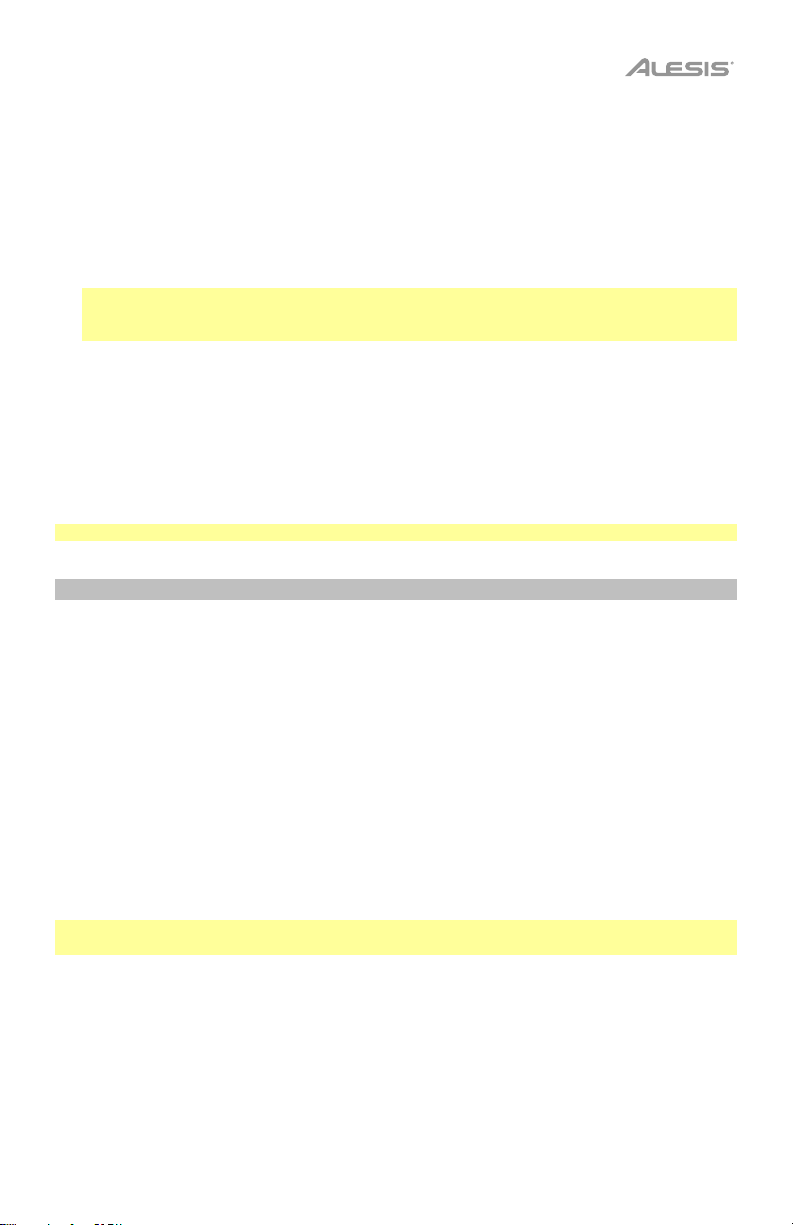
Bottom Panel
1. Battery Compartment: Install 6 AA batteries here to power the
keyboard when you are not using the power adapter.
5

Operation
Choosing Your Keyboard Tone
Melody 54 comes with 300 unique tones for you to choose from.
To select a tone for the keyboard:
1. Press the Tone button.
2. Use the Number buttons to pick a specific tone or use the + / – buttons to cycle through the
tones one-by-one. Follow the guide at the top of the keyboard to see which tones correspond to
which numbers. The number corresponding to the currently selected tone will update on the
keyboard’s Display.
3. Play the keyboard to hear the tone you selected.
To enhance the tone with the keyboard’s sustain effect, press the Sustain button. SUS will
temporarily appear on the Display. If this feature is activated, the keys will sound out longer when
played, mimicking the effect of an acoustic piano’s sustain pedal. This feature can be applied to any
of the keyboard’s 300 tones. To deactivate the effect, press the Sustain button again, and OFF will
temporarily appear on the Display.
To enhance the tone with the keyboard’s vibrato effect, press the Vibrato button. Vib will
temporarily appear on the Display. If this feature is activated, the pitch of the keys will be slight bent
up and down when they are played. This feature can be applied to any of the keyboard’s 300 tones.
To deactivate the effect, press the Vibrato button again, and OFF will temporarily appear on the
Display.
To increase or decrease the pitch of the keyboard by a half-step, press the Transpose + or
Transpose – button. The keyboard can be transposed up or down within six half-steps. The Display
will temporarily show the new setting once it is changed. Press the Transpose + and Transpose –
buttons simultaneously to reset the keyboard to its default pitch range of C1–F6 (indicated by the
numbers 00 on the Display).
Dual Mode
Dual Mode allows for two different tones to be layered together.
To layer two tones together:
1. Press the Dual button. dOU will temporarily appear on the Display. The tone that was selected
before you pressed the Dual button will automatically be used as the first tone in the layer.
2. To change the tone for the added layer, use the Number buttons to pick a specific tone or use
the + / – buttons to cycle through the tones one-by-one. Follow the guide at the top of the
keyboard to see which tones correspond to which numbers. The number corresponding to the
currently selected tone will update on the keyboard’s Display.
Note: When you reach Step 2, the tone that you most recently used for the added layer will be
automatically selected. If it is the first time you are entering Dual Mode since powering on the
keyboard, t48 (Ensemble) will be automatically selected.
3. Play the keyboard to hear the two tones at the same time.
To exit Dual Mode, press the Dual button again. OFF will temporarily appear on the Display.
6
Split Mode
Split Mode allows you to split the 54 keys into two zones so that you can have one tone for each
hand on the keyboard. For example, you may want one of the piano tones for your right hand and
one of the bass tones for your left hand.
To use Split Mode:
1. Press the Split button. SPL will temporarily appear on the Display. The tone that was selected
before you pressed the Split button will be applied to the left-hand zone of the keyboard.
Note: The left-hand zone of the keyboard will be raised one octave, while the right-hand zone of
the keyboard will be lowered one octave. This means that, if the keyboard is set to its default
transposition, the left-hand zone will be C2–B3, and the right-hand zone will be C2–F4.
2. To select the tone for the right-hand zone of the keyboard, use the Number buttons to pick a
specific tone or use the + / – buttons to cycle through the tones one-by-one. Follow the guide at
the top of the keyboard to see which tones correspond to which numbers. The number
corresponding to the currently selected tone will update on the keyboard’s Display.
3. Play the keyboard to hear the tones you selected.
To exit Split Mode, press the Split button again. OFF will temporarily appear on the Display.
Note: Split Mode and Dual Mode cannot be used at the same time.
Adding Background Music
Accompaniment Rhythms
If you would like to have a drum loop accompany you while you’re playing the keyboard, Melody 54
comes with 300 unique rhythms that you can choose from.
To select an accompaniment rhythm:
1. Press the Rhythm button.
2. Use the Number buttons to pick a specific rhythm or use the + / – buttons to cycle through the
rhythms one-by-one. Follow the guide at the top of the keyboard to see which rhythm styles
correspond to which numbers. The number corresponding to the currently selected rhythm will
update on the keyboard’s Display.
To start or stop playing the currently selected accompaniment rhythm, press the Start/Stop
button.
Tip: To observe the timing of the accompaniment rhythm, look at the Display, which will flash three
dots for the first beat of every measure and a single dot for each remaining beat.
To change the tempo of the accompaniment rhythm, press the Tempo + button or Tempo button to increase or decrease the tempo. Press the Tempo + and Tempo - buttons simultaneously
to reset to the default tempo (120 BPM).
To adjust the volume of the accompaniment rhythm, press the Rhythm Vol + or Rhythm Vol –
button. Press the Rhythm Vol + and Rhythm Vol – buttons simultaneously to reset to the default
volume level (indicated on the Display as A07).
7

To insert a drum fill into the accompaniment rhythm, press the Fill In button while the
accompaniment rhythm is playing. The accompaniment rhythm will automatically return to its regular
pattern after the fill. The drum fill will vary depending on when you press the Fill In button.
To play an introductory drumbeat for the selected accompaniment rhythm, press the
Intro/Ending button while the accompaniment rhythm is not playing. The introductory drum beat
will be two bars long, and then the accompaniment rhythm will automatically begin playing.
To play an ending drumbeat for the selected accompaniment rhythm, press the Intro/Ending
button while the accompaniment rhythm is playing. After you press the button, the ending drumbeat
will play for two bars, after which the accompaniment rhythm will automatically stop.
To make the accompaniment rhythm automatically start when you play the keys:
1. Select the desired accompaniment rhythm (as described earlier in this section of the manual).
2. Press the Sync button. To indicate that Sync is activated, a dot on the Display will pulse in time
with the currently selected tempo.
3. Play any of the keys below G2. As soon as you play the key(s), the currently selected
accompaniment rhythm will automatically start (without you having to press the Start/Stop
button).
4. When you are finished with the accompaniment rhythm, press the Start/Stop button to stop it. If
you want to use the Sync feature again, repeat Steps 1–2.
Accompaniment Chords
If you would like to have both a drumbeat and chordal harmonies accompany you while you’re
playing the keyboard, you can use the accompaniment chord feature.
With this feature activated, the keyboard will automatically play music centered on a specific piano
chord, which may be arpeggiated and/or joined by other instruments (such as a bass guitar). The
music played will match the style of the currently selected accompaniment rhythm. The music will
also adjust when a drum fill or introductory/ending drumbeat is selected.
You need to use the keys below G2 to produce the accompaniment chord. There are four options: a
major, minor, dominant seventh, or minor seventh chord.
To use the accompaniment chord feature:
1. Select the desired accompaniment rhythm (as described in the previous section of this manual).
2. Press the Single Chord button or the Fingered Chord button. The Display will temporarily
update to show which option was selected. Read further for more information on these two
options.
3. Press the Start/Stop button to begin playing the accompaniment rhythm.
Note: It does not matter in which order you perform Steps 2 and 3.
4. Play the keys required to produce the desired accompaniment chord. What keys you need to
play depend on whether you used the Single Chord or Fingered Chord button. Read further for
more details.
8
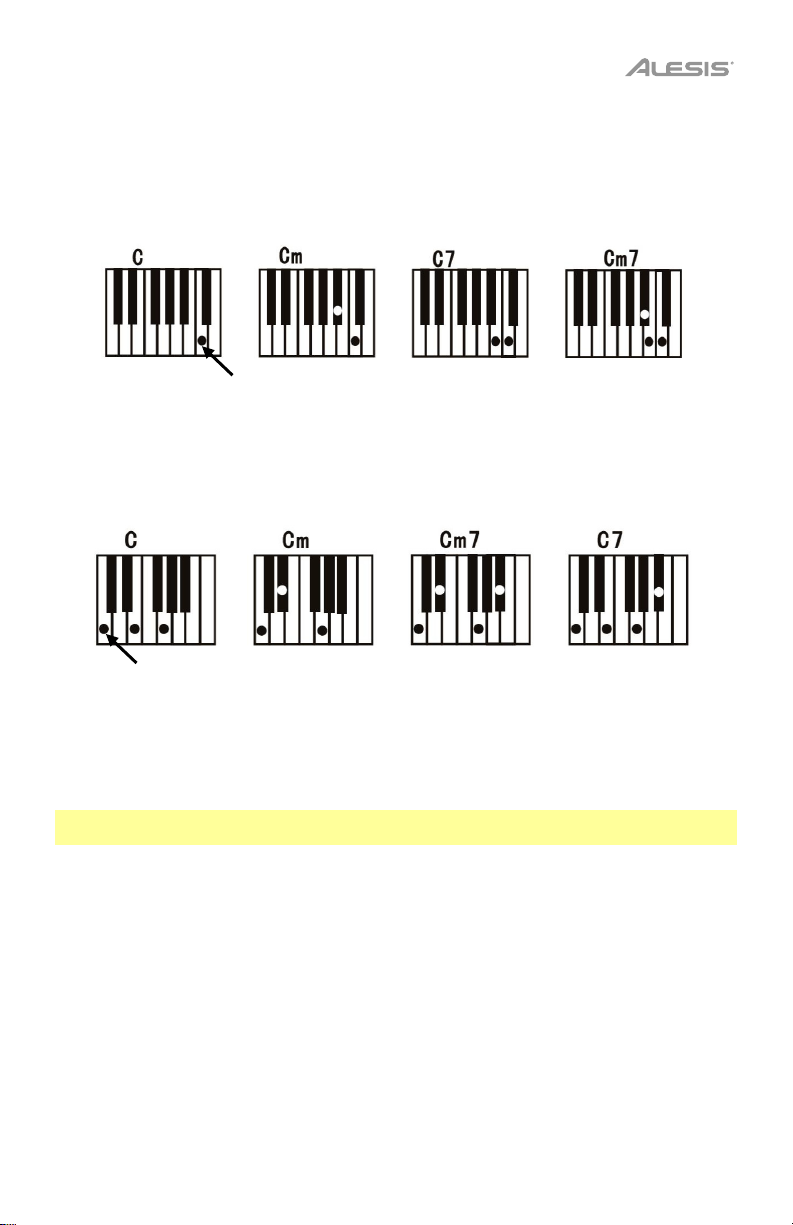
Single Chord:
If you press the Single Chord button, you can use a condensed set of keys to quickly produce an
accompaniment chord.
To produce a chord, press the keys corresponding to the chord that you want to play (as
diagrammed below). The dots in the diagrams show the keys you would play for a C chord, but the
same overall shapes can be applied to any root note. Remember that you need to be using the keys
below G2.
Root Note (C)
Fingered Chord:
If you press the Fingered Chord button, you need to play a full major, minor, dominant seventh, or
minor seventh chord in order to hear it play in time with the accompaniment rhythm.
To produce a chord, play the full major, minor, dominant seventh, or minor seventh chord shape. For
example, the four C chords are pictured below, with dots on each key in the chord. Remember that
you need to be using the keys below G2.
Root Note (C)
To adjust the volume of the accompaniment chord, press the Chord Vol + or Chord Vol –
button. Press the Chord Vol + and Chord Vol – buttons simultaneously to reset to the default
volume level (indicated on the Display as u07).
To stop the accompaniment chord from automatically playing, press the Chord Clear button.
Note: With the accompaniment chord feature activated, you can use Dual Mode but not Split Mode.
Pressing the Split button while the accompaniment chords are playing will stop the chords.
To make both the accompaniment rhythm and the accompaniment chord automatically start
when you play the keys:
1. Select the desired accompaniment rhythm (as described in the previous section of this manual).
2. Press the Sync button. To indicate that Sync is activated, a dot on the Display will pulse in time
with the currently selected tempo.
3. Press the Single Chord or Fingered Chord button to activate the accompaniment chord feature.
4. Play the keys required to produce the desired accompaniment chord. As soon as you play the
key(s), the currently selected accompaniment rhythm and accompaniment chord will
automatically start (without you having to press the Start/Stop button).
5. When you are finished with the accompaniment rhythm and chord, press the Start/Stop button
to stop them.
9

Rhythm Programming
You can use the rhythm programming feature to create your own custom drum rhythm to
accompany you while you play the keys.
To create a custom accompaniment rhythm:
1. Press the Program button to enter Programming Mode. Prg will appear on the Display, and the
keys will automatically shift to percussion sounds.
2. Program the rhythm by playing each drum sound in the order that you want to hear them repeat
in the rhythmic pattern. You can play the drum sounds with the keys or with the Drum Kit
buttons. If using the keys, see the image above each key in order to know what drum sound a
key will play. The programmed rhythm can contain up to 32 drum sounds. Each drum sound in
the pattern will be the length of a quarter note.
Note: You cannot program two percussion sounds to play at the same time.
3. Press Play to stop programming and hear the rhythm play on a loop. Ply will appear on the
Display.
4. After pressing Play, the keys will automatically switch back to the last selected tone, and you
can play along to your custom rhythm.
To change the tempo of the custom rhythm, press the Tempo + button or Tempo - button.
Press the Tempo + and Tempo - buttons simultaneously to reset to the default tempo (120 BPM).
To adjust the volume of the custom rhythm, press the Rhythm Vol + or Rhythm Vol – button.
Press the Rhythm Vol + and Rhythm Vol – buttons simultaneously to reset to the default volume
level (indicated on the Display as A07).
To stop the custom rhythm from playing, press the Play button again. The keyboard will re-enter
Programming Mode, and you can program a new rhythm or press the Play button to start the
previously programmed rhythm. Alternatively, you can stop a custom rhythm from playing by
pressing the Program button, which will make the keyboard exit Programming Mode and erase the
rhythm that was playing. When you exit Programming Mode, OFF will temporarily appear on the
Display.
Note: If you turn off the keyboard while using a custom rhythm, the custom rhythm will be erased.
Tip: With Programming Mode activated, press the Single chord button while a custom rhythm is
playing or stopped. This will allow you to use the abbreviated chord shapes (pictured in the previous
section) on the keys below G2 to play full chords. The chords will not automatically play along with
the custom rhythm; they will stop ringing out after you release the keys. However, you will still have
the ability to play full chords at the quick touch of 1-3 adjacent keys.
10
Recording
You can use the recording feature on Melody 54 to record yourself playing the piano.
To record your playing:
1. Press the Record button to enter Recording Mode. REC will remain on the Display.
2. When you are finished playing what you wanted to record, press the Play button to stop the
recording and automatically hear it play back. Ply will remain on the Display.
3. After the recording finishes playing, the keyboard will re-enter Recording Mode. You can then
make a new recording by playing the keys or press Play to hear the previous recording again.
Note: If a recording is still playing, you can press the Play button to stop it and re-enter
Recording Mode.
Note: If the keyboard’s memory fills up while you are recording, the Display will read FUL, and
the keyboard will re-enter Recording Mode. You can then press Play to hear the recording or
overwrite it by playing the keys.
To exit Recording Mode, press the Record button. This will erase the recording.
Note: If you turn off the keyboard while in Recording Mode, any recording will be erased.
Note: In Recording Mode, you cannot use Split Mode, Dual Mode, or the accompaniment
rhythms/chords.
Demo Songs
Melody 54 comes with 40 demo songs for you to choose from and play.
To begin playback of a demo song, press the Demo button. The currently selected demo song will
remain on the Display and begin playing.
To change the demo song, use the Number buttons or the + / - buttons while a demo song is
playing. The Display will update as you select a new song.
To stop a currently playing demo song, press the Demo button again.
One-Key
The One-Key feature allows you to play a demo song using Melody 54’s keys. Each time you press
any single key, a short segment of the demo song will play. By repeatedly pressing any of the keys in
time, you can play the full demo song. This feature is especially good for beginner pianists, since it
allows them to experience what it's like to play a song on the keyboard without requiring that they
know the right keys to play.
To use the keys to play a demo song:
1. Press the One Key button. The currently selected demo song (as shown on the Display) will
automatically start playing. If you’d like to change the song, use the Number buttons or + / -
buttons.
2. Press and release any key, which will stop the demo song from automatically playing.
3. Repeatedly press any of the keys in time to play the demo song.
4. When you are finished, press the One Key button again to exit this mode.
11
Guía del usuario (Español)
Introducción
Contenido de la caja
Melody 54
Micrófono
Adaptador de corriente
Atril
Guía del usuario
Manual sobre la seguridad y garantía
Soporte
Para obtener la información más reciente acerca de este producto (requisitos de sistema,
información de compatibilidad, etc.) y registrarlo, visite alesis.com.
Para obtener soporte adicional del producto, visite alesis.com/support.
Instalación
Diagrama de conexión
Los elementos que no se enumeran en Introducción > Contenido de la caja se venden por
separado.
12
Micrófono Suministro
eléctrico
MIC
PHONES
DC 12V
DC 9V
Auriculares
(no incluidos)
Características
Panel superior
4
22
23
24
28
26
27
13
21
20
25
12
1 3
2
5
14
6
15
16
17 18
1. Power (Encendido/apagado): Pulse este botón para encender y apagar el teclado.
Nota: Tras 5 minutos de inactividad, el Melody 54 se apagará. Si pulsa cualquier tecla, volverá a
encenderse.
2. Pantalla: Esta pantalla de LED se actualizará cuando realice cambios a los ajustes tales como el tono,
ritmo, tempo, etc. Al encenderse, la pantalla muestra por defecto el tempo seleccionado actualmente.
3. Master Volume (Volumen principal): Gire la perilla Master Volume para aumentar o disminuir el
volumen general del teclado.
4. Botones numéricos y botones + / - : Utilice estos botones para cambiar el tono, ritmo del
acompañamiento o canción demo. Antes de usar los botones numéricos o + / -, pulse el botón
correspondiente al ajuste que desea modificar.
5. Demo: Pulse este botón para comenzar a reproducir una de las canciones de demostración. Consulte
Funcionamiento > Canciones de demostración (demo) para obtener más información.
6. Tone: Pulse este botón y luego utilice los botones numéricos o + / - para seleccionar un tono.
Consulte Funcionamiento > Selección del tono del teclado para obtener más información.
7. Sustain: Pulse este botón para activar o desactivar el efecto de sostenido. Consulte Funcionamiento
> Selección del tono del teclado para obtener más información.
8. Vibrato: Pulse este botón para activar o desactivar el efecto de vibrato. Consulte Funcionamiento >
Selección del tono del teclado para obtener más información.
9. Dual: Pulse este botón para disponer dos tonos en capas. Consulte Funcionamiento > Selección del
tono del teclado para obtener más información.
10. Split: Pulse este botón para utilizar un tono de un lado del teclado y otro tono diferente del otro lado.
Consulte Funcionamiento > Selección del tono del teclado para obtener más información.
11. Percussion: Pulse este botón para reproducir sonidos de percusión con las teclas. Aparecerá On en la
pantalla momentáneamente cuando se activen los sonidos de percusión. Vea la imagen sobre cada
tecla para saber qué sonido de tambor tocará una tecla. Pulse el botón Percussion nuevamente para
desactivar esta función. Una vez desactivada, aparecerá OFF momentáneamente en la pantalla.
12. Transpose: Pulse el botón Transpose + o Transpose – para aumentar o disminuir en medio tono el
tono del teclado. Consulte Funcionamiento > Selección del tono del teclado para obtener más
información.
13. Beat: Pulse este botón para alternar entre los diferentes ajustes del metrónomo: 1/4, 2/4, 3/4, 4/4 y
apagado. Cuando enciende el teclado, el metrónomo se ajustará a apagado por defecto. Al modificar
el ajuste, la pantalla mostrará el ajuste seleccionado momentáneamente. Cuando el metrónomo se
está reproduciendo, la pantalla hará parpadear tres puntos en el primer tiempo de cada compás y un
solo punto por cada uno de los tiempos restantes. Utilice los botones Tempo + / - para modificar el
tempo del metrónomo.
14. Rhythm: Pulse este botón y luego utilice los botones numéricos o + / - para seleccionar un ritmo de
acompañamiento. Consulte Funcionamiento > Agregado de música de fondo > Ritmos de
acompañamiento para obtener más información.
19
29
7 8
9 10
11
13

15. Start/Stop: Pulse este botón para iniciar o detener un ritmo de acompañamiento. Consulte
Funcionamiento > Agregado de música de fondo > Ritmos de acompañamiento para obtener más
información.
16. Sync: Pulse este botón para activar la característica de sincronización. Cuando la característica de
sincronización está activada, al tocar cualquier tecla debajo de G2 se iniciará el ritmo de
acompañamiento actualmente seleccionado de forma automática (de manera que no tendrá que pulsar
el botón Start/Stop). Consulte Funcionamiento > Agregado de música de fondo > Ritmos de
acompañamiento para obtener más información.
17. Fill In: Cuando se esté reproduciendo un ritmo de acompañamiento, pulse este botón para hacer que
el teclado reproduzca momentáneamente un nuevo ritmo o "rulo de tambores". Consulte
Funcionamiento > Agregado de música de fondo > Ritmos de acompañamiento para obtener más
información.
18. Intro/Ending: Pulse este botón para hacer que el teclado reproduzca un ritmo de introducción o
finalización, dependiendo de si ya se está reproduciendo un ritmo de acompañamiento o no. Consulte
Funcionamiento > Agregado de música de fondo > Ritmos de acompañamiento para obtener más
información.
19. One-Key: Pulse este botón para activar la característica de reproducción con una sola tecla. Cuando
esta característica está activada, puede tocar una tecla por vez para interpretar una canción demo.
Consulte Funcionamiento > Canciones de demostración (demo) para obtener más información.
20. Tempo: Pulse el botón Tempo + o Tempo – para modificar el ajuste de BPM del teclado. Esto afectará
la reproducción del ritmo y los acordes de acompañamiento, las canciones demo y el metrónomo.
Pulse los botones Tempo + y Tempo – simultáneamente para restaurar el tempo predeterminado (120
BPM).
21. Rhythm Volume: Pulse el botón Rhythm Vol + o Rhythm Vol – para aumentar o disminuir el volumen
del ritmo de acompañamiento. Pulse los botones Rhythm Vol + y Rhythm Vol – simultáneamente para
restaurar el nivel predeterminado (A07).
22. Single Chord: Pulse este botón para activar la característica de acordes de acompañamiento. Cuando
esta característica está activada, puede usar las teclas debajo de
G2 para generar acordes que se
reproducirán automáticamente junto con el ritmo de acompañamiento seleccionado. Al pulsar el botón
Single Chord (a diferencia de Fingered Chord) podrá utilizar acordes en formato condensado en lugar
de tener que utilizar todas las teclas que se requieren normalmente para un acorde completo. Consulte
Funcionamiento > Agregado de música de fondo > Acordes de acompañamiento para obtener
más información.
23. Fingered Chord: Pulse este botón para activar la característica de acordes de acompañamiento.
Cuando esta característica está activada, puede usar las teclas debajo de G2 para generar acordes que
se reproducirán automáticamente junto con el ritmo de acompañamiento seleccionado. Pulsar el botón
Fingered Chord (a diferencia de Single Chord) requiere que usted interprete acordes en su forma
completa en lugar de un conjunto condensado de teclas para cada acorde. Consulte Funcionamiento
> Agregado de música de fondo > Acordes de acompañamiento para obtener más información.
24. Chord Clear: Pulse este botón para desactivar la característica de acordes de acompañamiento.
25. Chord Volume: Pulse el botón Chord Vol + o Chord Vol – para aumentar o disminuir el volumen del
ritmo de acompañamiento. Pulse los botones Chord Vol + y Chord Vol – simultáneamente para volver
los acordes del acompañamiento a su nivel de volumen predeterminado (u07).
26. Program: Pulse este botón para programar un ritmo personalizado. Consulte Funcionamiento >
Agregado de música de fondo > Programación de ritmos para obtener más información.
27. Record: Pulse este botón para grabar una canción. Consulte Funcionamiento > Grabación para
obtener más información.
28. Play: Pulse este botón para reproducir un ritmo de acompañamiento personalizado o una canción
grabada.
29. Botones de Batería: Pulse estos botones para reproducir sonidos de percusión. Vea las imágenes en
los botones para saber qué botón reproduce qué tipo de sonido. Los botones de Batería son
particularmente útiles para la característica de programación de ritmos. Consulte
Funcionamiento >
Agregado de música de fondo > Programación de ritmos para obtener más información.
14
1
1
2 3
Panel trasero
1. Mic: Conecte aquí el micrófono incluido para cantar
mientras interpreta el teclado.
2. Auriculares (TRS de 1/8 pulg. / 3.5 mm): Conecte
auriculares (no incluidos) a esta salida para escuchar el
teclado.
Nota: Al enchufar los auriculares a la salida se silenciarán
los altavoces internos del teclado.
3. Entrada de corriente: Conecte aquí el adaptador de
corriente incluido.
MIC
PHONES
DC 12V
DC 9V
Panel inferior
1. Compartimiento para pilas: Instale aquí 6 baterías "AA" para
alimentar el teclado cuando no esté utilizando el adaptador de
corriente.
Funcionamiento
Selección del tono del teclado
El Melody 54 viene con 300 tonos únicos para elegir.
Como seleccionar un tono para el teclado:
1. Pulse el botón Tone.
2. Utilice los botones numéricos para seleccionar un tono específico o utilice los botones + / – para
recorrer los tonos uno por uno. Siga la guía en la parte superior del teclado para averiguar qué tonos
corresponden a qué números. El número correspondiente al tono actualmente seleccionado se
actualizará en la pantalla del teclado.
3. Toque el teclado para escuchar el tono seleccionado.
Para mejorar el tono con el efecto de sostenido del teclado, pulse el botón Sustain. Aparecerá SUS
momentáneamente en la pantalla. Cuando esta característica está activada, las teclas durarán más tiempo
al tocarlas, imitando el efecto del pedal de sostenido de un piano acústico. Esta característica se puede
aplicar a cualquiera de los 300 tonos del teclado. Para desactivar el efecto, pulse nuevamente el botón
Sustain y aparecerá OFF momentáneamente en la pantalla.
Para mejorar el tono con el efecto de vibrato del teclado, pulse el botón Vibrato. Aparecerá Vib
momentáneamente en la pantalla. Cuando esta característica está activada, el tono de las teclas se
desplazará levemente hacia arriba y hacia abajo al tocarlas. Esta característica se puede aplicar a
cualquiera de los 300 tonos del teclado. Para desactivar el efecto, pulse nuevamente el botón Vibrato y
aparecerá OFF momentáneamente en la pantalla.
Para aumentar o disminuir el tono del teclado en medio paso, pulse el botón Transpose + o
Transpose –. El teclado se puede transponer en seis medios pasos hacia arriba o hacia abajo. La pantalla
mostrará momentáneamente el nuevo ajuste una vez modificado. Presione el botón Transpose + y
Transpose – simultáneamente para regresar el teclado a su rango de tono predeterminado de C1–F6
(indicado por los números 00 en la pantalla).
15
Modo dual
El modo dual permite disponer dos tonos diferentes juntos en capas.
Cómo superponer dos tonos:
1. Pulse el botón Dual. Aparecerá dOU momentáneamente en la pantalla. El tono que estaba
seleccionado antes de pulsar el botón Dual se usará automáticamente como el primer tono de la capa.
2. Para modificar el tono de la capa añadida, utilice los botones numéricos para seleccionar un tono
específico o utilice los botones + / – para recorrer los tonos uno por uno. Siga la guía en la parte
superior del teclado para averiguar qué tonos corresponden a qué números. El número
correspondiente al tono actualmente seleccionado se actualizará en la pantalla del teclado.
Nota: Cuando llegue al paso 2, el tono que utilizó más recientemente para la capa añadida se
seleccionará automáticamente. Si es la primera vez que está entrando al modo dual desde que se
encendió el teclado, se seleccionará automáticamente t48 (Ensemble).
3. Toque el teclado para escuchar los dos tonos al mismo tiempo.
Para salir del modo dual, pulse nuevamente el botón Dual. Aparecerá OFF momentáneamente en la
pantalla.
Modo de división
El modo de división le permite dividir las 54 teclas en dos zonas para que pueda tener un tono en cada
mano en el teclado. Por ejemplo, puede querer tener uno de los tonos de piano para su mano derecha y
uno de los tonos de bajo para su mano izquierda.
Cómo utilizar el modo de división:
1. Pulse el botón Split. Aparecerá SPL momentáneamente en la pantalla. El sonido que se estaba
utilizando antes de pulsar el botón Split se aplicará a la zona de la mano izquierda del teclado.
Nota: La zona del teclado correspondiente a la mano izquierda se subirá una octava mientras que la
zona del teclado correspondiente la mano derecha se disminuirá en una octava. Esto significa que, si el
teclado se encuentra ajustado en su posición predeterminada, la zona correspondiente a la mano
izquierda será C2–B3 y la correspondiente a la mano derecha será C2–F4.
2. Para seleccionar el tono de la zona del teclado correspondiente la mano derecha, utilice los botones
numéricos para seleccionar un tono específico o utilice los botones + / – para recorrer los tonos uno
por uno. Siga la guía en la parte superior del teclado para averiguar qué tonos corresponden a qué
números. El número correspondiente al tono actualmente seleccionado se actualizará en la pantalla del
teclado.
3. Toque el teclado para escuchar los tonos seleccionados.
Para salir del modo de división, pulse nuevamente el botón Split. Aparecerá OFF momentáneamente en
la pantalla.
Nota: Los modos dual y de división no se pueden utilizar al mismo tiempo.
16
Agregado de música de fondo
Ritmos de acompañamiento
Si desea tener un rulo de tambores como acompañamiento mientras toca el teclado, el Melody 54 viene
con 300 ritmos únicos para elegir.
Cómo seleccionar un ritmo de acompañamiento:
1. Pulse el botón Rhythm.
2. Utilice los botones numéricos para seleccionar un ritmo específico o utilice los botones + / – para
recorrer los ritmos uno por uno. Siga la guía en la parte superior del teclado para averiguar qué estilos
de ritmos corresponden a qué números. El número correspondiente al ritmo actualmente seleccionado
se actualizará en la pantalla del teclado.
Para comenzar o detener la reproducción del ritmo de acompañamiento actualmente seleccionado,
pulse el botón Start/Stop.
Consejo: Para observar la velocidad del ritmo de acompañamiento, vea la pantalla, la cual hará parpadear
tres puntos en el primer tiempo de cada compás y un solo punto por cada uno de los tiempos restantes.
Para cambiar el tempo del ritmo de acompañamiento, pulse el botón Tempo + o Tempo - a fin de
aumentar o disminuir el tempo. Pulse los botones Tempo + y Tempo - simultáneamente para regresar al
tiempo predeterminado (120 BPM).
Para ajustar el volumen del ritmo de acompañamiento, pulse el botón Rhythm Vol + o Rhythm Vol –.
Pulse los botones Rhythm Vol + y Rhythm Vol – simultáneamente para restaurar el nivel de volumen
predeterminado (indicado en la pantalla comoA07).
Para insertar un rulo de tambores en el ritmo de acompañamiento, pulse el botón Fill In mientras se
está reproduciendo el ritmo de acompañamiento. El ritmo de acompañamiento volverá automáticamente a
su patrón normal al finalizar el rulo. El rulo de tambores varía en función del momento en el que pulsa el
botón Fill In.
Para reproducir un rulo de tambores como introducción al ritmo de acompañamiento seleccionado,
pulse el botón Intro/Ending cuando no se esté reproduciendo el ritmo de acompañamiento. El rulo de
tambores introductorio será de dos compases de duración y luego comenzará a reproducirse el ritmo de
acompañamiento de forma automática.
Para reproducir un rulo de tambores como finalización del ritmo de acompañamiento seleccionado,
pulse el botón Intro/Ending cuando se esté reproduciendo el ritmo de acompañamiento. Una vez pulsado
el botón, el rulo de tambores de finalización se reproducirá durante dos compases, luego de los cuales el
ritmo de acompañamiento se detendrá de forma automática.
Cómo hacer que el ritmo de acompañamiento comience de forma automática al tocar las teclas:
1. Seleccione el ritmo de acompañamiento deseado (como se describe anteriormente en esta sección del
manual).
2. Pulse el botón Sync. Para indicar que la sincronización se encuentra activada, habrá un punto
intermitente en la pantalla el cual pulsará de forma sincronizada con el tempo actualmente
seleccionado.
3. Pulse cualquier tecla debajo de G2. Tan pronto como reproduzca la(s) tecla(s), el ritmo de
acompañamiento actualmente seleccionado comenzará de forma automática (sin que tenga que pulsar
el botón Start/Stop).
4. Una vez que desee finalizar el ritmo de acompañamiento, pulse el botón Start/Stop para detenerlo. Si
desea utilizar la característica de sincronización nuevamente, repita los pasos 1–2.
17

Acordes de acompañamiento
Si desea tener tanto un ritmo como acordes armónicos que lo acompañen mientras toca el teclado, puede
utilizar la característica de acordes de acompañamiento.
Con esta característica activada, el teclado comenzará de forma automática a tocar música centrándose en
un acorde específico del piano, el cual puede ser arpegiado y/o interpretado por otros instrumentos (tales
como un bajo). La música reproducida coincidirá con el estilo del ritmo de acompañamiento actualmente
seleccionado. La música también se ajustará cuando se seleccione un rulo de tambores o un rulo de
introducción/finalización.
Debe utilizar teclas debajo de G2 para tocar el acorde de acompañamiento. Existen cuatro opciones:
acordes mayores, menores, de séptima dominante o de séptima disminuida.
Cómo utilizar la característica de acorde de acompañamiento:
1. Seleccione el ritmo de acompañamiento deseado (como se describe en la sección anterior de este
manual).
2. Pulse el botón Single Chord o el botón Fingered Chord. La pantalla se actualizará
momentáneamente para indicar la opción seleccionada. Continúe leyendo para obtener más
información sobre estas dos opciones.
3. Pulse el botón Start/Stop para comenzar a reproducir el ritmo de acompañamiento.
Nota: No importa el orden en el que efectúe los pasos 2 y 3.
4. Toque las teclas requeridas para producir el acorde de acompañamiento deseado. Las teclas
necesarias para reproducir el acorde dependen de si utilizó el botón Single Chord o Fingered Chord.
Siga leyendo para obtener más detalles.
Single Chord (Acordes condensados):
Si pulsa el botón Single Chord, puede utilizar un conjunto condensado de teclas para producir
rápidamente un acorde de acompañamiento.
Para tocar un acorde, use las teclas correspondientes al acorde que desea tocar (tal como se diagrama a
continuación). Los puntos en los diagramas muestran las teclas que deberá tocar para un acorde en C,
pero las mismas formas generales puede aplicarse a cualquier nota raíz. Recuerde que debe utilizar las
teclas por debajo de G2.
Fingered Chord (Acordes digitados):
Si pulsa el botón Fingered Chord, deberá tocar un acorde mayor, menor, séptima dominante o séptima
disminuida en su formato completo a fin de poder escucharlo en sincronización con el ritmo de
acompañamiento.
Para tocar un acorde, toque el acorde mayor, menor, séptima dominante o séptima disminuida en su forma
completa. Por ejemplo, a continuación, se muestran los cuatro acordes en C, con puntos en cada una de
las teclas que componen el acorde. Recuerde que debe utilizar las teclas por debajo de G2.
18
Nota raíz (C)
Nota raíz (C)

Para ajustar el volumen del acorde de acompañamiento, pulse el botón Chord Vol + o Chord Vol –.
Pulse los botones Chord Vol + y Chord Vol – simultáneamente para restaurar el nivel de volumen
predeterminado (indicado en la pantalla como u07).
Para evitar que el acorde de acompañamiento se reproduzca de forma automática, pulse el botón
Chord Clear.
Nota: Con la característica de acorde de acompañamiento activada, puede utilizar el modo dual pero no el
modo de división. Al pulsar el botón Split mientras se están reproduciendo los acordes de
acompañamiento, los mismos se detienen.
Cómo hacer que el ritmo y los acordes de acompañamiento comiencen de forma automática al tocar
las teclas:
1. Seleccione el ritmo de acompañamiento deseado (como se describe en la sección anterior de este
manual).
2. Pulse el botón Sync. Para indicar que la sincronización se encuentra activada, habrá un punto
intermitente en la pantalla el cual pulsará de forma sincronizada con el tempo actualmente
seleccionado.
3. Pulse el botón Single Chord o Fingered Chord para activar la característica de acorde de
acompañamiento.
4. Toque las teclas requeridas para producir el acorde de acompañamiento deseado. Tan pronto como
toque la(s) tecla(s), el ritmo y los acordes de acompañamiento actualmente seleccionados comenzarán
de forma automática (sin que tenga que pulsar el botón Start/Stop).
5. Una vez que desee finalizar el ritmo y los acordes de acompañamiento, pulse el botón Start/Stop para
detenerlos.
19

Programación de ritmos
Puede utilizar la característica de programación de ritmos para crear un propio ritmo de percusión que lo
acompañe mientras toca el teclado.
Cómo crear un ritmo de acompañamiento personalizado:
1. Pulse el botón Program para entrar al modo de programación. Aparecerá Prg en la pantalla y las
teclas cambiarán automáticamente a sonidos de percusión.
2. Programe el ritmo tocando cada sonido de percusión en el orden en el que desea que suenen en el
patrón rítmico. Puede reproducir los sonidos de percusión con las teclas o con los botones de Batería.
Si utiliza las teclas, vea la imagen sobre cada tecla para saber qué sonido de tambor tocará una tecla.
El ritmo programado puede contener hasta 32 sonidos de percusión. Cada sonido de percusión en el
patrón tendrá la duración de una negra.
Nota: No es posible programar dos sonidos de percusión para que suenen al mismo tiempo.
3. Pulse Play para detener la programación y escuchar el ritmo en un bucle. Aparecerá Ply en la pantalla.
4. Una vez pulsado Play, las teclas regresarán automáticamente al último tono seleccionado y podrá
tocar sobre su ritmo personalizado.
Para cambiar el tempo del ritmo personalizado, pulse el botón Tempo + o Tempo -. Pulse los botones
Tempo + y Tempo - simultáneamente para regresar al tempo predeterminado (120 BPM).
Para ajustar el volumen del ritmo personalizado, pulse el botón Rhythm Vol + o Rhythm Vol –. Pulse los
botones Rhythm Vol + y Rhythm Vol – simultáneamente para restaurar el nivel de volumen
predeterminado (indicado en la pantalla como A07).
Para detener la reproducción de un ritmo personalizado, pulse nuevamente el botón Play. El teclado
volverá a entrar al modo de programación y podrá programar un ritmo nuevo o pulse el botón Play para
que comience el ritmo anteriormente programado. Como alternativa, puede detener la reproducción de un
ritmo personalizado pulsando el botón Program, el cual hará que el teclado salga del modo de
programación y borre el ritmo que se estaba reproduciendo. Al salir del modo de programación, aparecerá
OFF momentáneamente en la pantalla.
Nota: Si apaga el teclado mientras se está utilizando un ritmo personalizado, este será eliminado.
Consejo: Con el modo de programación activado, pulse el botón Single Chord mientras el ritmo
personalizado se esté reproduciendo o esté detenido. Esto le permitirá utilizar acordes en formatos
abreviados (ilustrados en la sección anterior) en las teclas por debajo de G2 para tocar acordes completos.
Los acordes no se reproducirán automáticamente junto con el ritmo personalizado; dejarán de sonar una
vez que suelte las teclas. Sin embargo, usted aún conserva la capacidad de tocar acordes completos con la
pulsación rápida de 1-3 teclas adyacentes.
20

Grabación
Puede utilizar la característica de grabación del Melody 54 para grabarse a usted mismo mientras toca el
piano.
Cómo grabar su interpretación:
1. Pulse el botón Record para entrar al modo de grabación. REC permanecerá en la pantalla.
2. Una vez que termine de tocar lo que desea grabar, pulse el botón Play para detener la grabación y
escuchar su reproducción automáticamente. Ply permanecerá en la pantalla.
3. Una vez que la grabación termine de reproducirse, el teclado volverá a entrar al modo de grabación.
Entonces podrá realizar una nueva grabación tocando las teclas o pulse Play para escuchar
nuevamente la grabación anterior.
Nota: Si se está reproduciendo una grabación, puede pulsar el botón Play para detenerla y volver a
entrar al modo de grabación.
Nota: Si se llena la memoria del teclado mientras está grabando, aparecerá FUL en la pantalla y el
teclado volverá a entrar al modo de grabación. Entonces podrá pulsar Play para escuchar la grabación
o sobrescribirla tocando las teclas.
Para salir del modo de grabación, pulse el botón Record. Esto borrará la grabación.
Nota: Si apaga el teclado estando en modo de grabación, toda grabación realizada será eliminada.
Nota: En modo de grabación, no se pueden utilizar el modo de división, el modo dual o los ritmos/acordes
de acompañamiento.
Canciones de demostración (demo)
El Melody 54 viene con 40 canciones demo para elegir y reproducir.
Para comenzar la reproducción de una canción demo, pulse el botón Demo. La canción demo
actualmente seleccionada permanecerá en la pantalla y comenzará a reproducirse.
Para cambiar la canción demo, utilice los botones numéricos o los botones + / - mientras se reproduce
una canción demo. La pantalla se actualizará cuando seleccione una canción nueva.
Para detener una canción demo que se está reproduciendo actualmente, pulse nuevamente el botón
Demo.
Reproducción con una sola tecla
La característica de reproducción con una sola tecla le permite tocar una canción demo utilizando las teclas
del Melody 54. Cada vez que toque una sola tecla, se reproducirá un fragmento corto de la canción demo.
Al tocar repetidamente cualquiera de las teclas a tiempo, puede reproducir la canción demo completa. Esta
característica es especialmente conveniente para pianistas principiantes ya que les permite experimentar lo
que se siente al tocar una canción en el teclado sin que tengan que saber cuáles son las teclas correctas a
tocar.
Cómo usar las teclas para reproducir una canción demo:
1. Pulse el botón One Key. La canción demo actualmente seleccionada (tal como se muestra en la
pantalla) comenzará a reproducirse automáticamente. Si desea cambiar de canción, utilice los
botones numéricos o los botones + / -
2. Pulse y suelte cualquier tecla; esto evitará la reproducción automática de la canción demo.
3. Toque repetidamente cualquiera de las teclas a tiempo para reproducir la canción demo.
4. Al finalizar, pulse nuevamente el botón One Key para salir de este modo.
21

Guide d’utilisation (Français)
Présentation
Contenu de la boîte
Melody 54
Microphone
Câble d’alimentation
Pupitre
Guide d'utilisation
Consignes de sécurité et informations concernant la garantie
Assistance technique
Pour les toutes dernières informations concernant la configuration système requise, la compatibilité,
etc., et l’enregistrement du produit, veuillez visiter alesis.com.
Pour de l’assistance supplémentaire, veuillez visiter alesis.com/support.
Installation
Schéma de connexion
Les éléments qui ne figurent pas dans la section Présentation > Contenu de la boîte sont vendus
séparément.
22
Microphone Alimentation
MIC
PHONES
DC 12V
DC 9V
Casque d’écoute
(non inclus)

Caractéristiques
Panneau supérieur
4
22
23
24
28
26
27
13
21
20
25
12
1 3
2
5
14
6
15
16
17 18
1. Interrupteur Power : Cette touche permet de mettre le clavier sous et hors tension.
Remarque : Après 5 minutes d'inactivité, le Melody 54 se met automatiquement en mode veille. Si
vous appuyez sur une des touches, il se rallumera.
2. Écran : Cet écran à DEL se met à jour lorsque vous modifiez des paramètres tels que la sonorité, le
rythme, le tempo, etc. Lors de la mise sous tension, l’écran indique par défaut le tempo sélectionné.
3. Master Volume : Ce bouton permet d’augmenter ou de diminuer le volume général du clavier.
4. Touches numériques et touches +/- : Ces touches permettent de modifier le son, le rythme
d’accompagnement ou la piste de démonstration. Avant d’utiliser les touches numériques ou les
touches +/-, vous devez appuyer sur la touche correspondant au paramètre que vous souhaitez modifier.
5. Demo : Cette touche permet de lancer la lecture d’une des chansons de démonstration. Veuillez
consulter la section Fonctionnement > Chansons de démonstration afin d’en savoir plus.
6. Tone : Appuyer sur cette touche puis utiliser les touches numériques ou les touches +/– permet de
sélectionner une sonorité. Veuillez consulter la section Fonctionnement > Sélection de la sonorité du
clavier afin d’en savoir plus.
7. Sustain : Cette touche permet d’activer et de désactiver l’effet de maintien de la note. Veuillez
consulter la section Fonctionnement > Sélection de la sonorité du clavier afin d’en savoir plus.
8. Vibrato : Cette touche permet d’activer et de désactiver l’effet de vibrato. Veuillez consulter la section
Fonctionnement > Sélection de la sonorité du clavier afin d’en savoir plus.
9. Dual : Cette touche permet de superposer deux sonorités. Veuillez consulter la section
Fonctionnement > Sélection de la sonorité du clavier afin d’en savoir plus.
10. Split : Cette touche permet d’utiliser une sonorité d’un côté du clavier et une autre sonorité de l'autre
côté. Veuillez consulter la section Fonctionnement > Sélection de la sonorité du clavier afin d’en
savoir plus.
11. Percussion : Cette touche permet d’utiliser les touches pour jouer des sons de percussion. On
s’affiche temporairement à l'écran lorsque les sons de percussion sont activés. Voyez l’image audessus de chaque touche afin de savoir quel son de batterie une touche va jouer. Appuyer de nouveau
sur la touche Percussion
lorsque les sons de percussion sont désactivés.
12. Transpose : Les touches Transpose + et Transpose – permettent d'augmenter et de diminuer la
hauteur tonale du clavier en demi-tons. Veuillez consulter la section Fonctionnement > Sélection de la
sonorité du clavier afin d’en savoir plus.
13. Beat : Cette touche permet de parcourir les différents réglages du métronome : 1/4, 2/4, 3/4, 4/4 et
désactivé. Lors de la mise sous tension du clavier, le métronome est désactivé par défaut. Lorsque le
réglage est modifié, l’écran affiche temporairement le réglage sélectionné. Lorsque le métronome est
activé, trois points clignotent à l’écran pour indiquer le premier temps de chaque mesure et un point
pour chaque temps restant. Les touches Tempo +/- permettent de modifier le tempo du métronome.
14. Rhythm : Appuyer sur cette touche puis utiliser les touches numériques ou les touches +/– permet de
sélectionner un rythme d’accompagnement. Veuillez consulter la section Fonctionnement > Ajouter
de la musique de fond > Rythme d’accompagnement afin d’en savoir plus.
19
permet de désactiver cette fonction. OFF s’affiche temporairement à l'écran
29
7 8
9 10
11
23

15. Start/Stop : Cette touche permet de lancer ou d’arrêter un rythme d’accompagnement. Veuillez
consulter la section Fonctionnement > Ajouter de la musique de fond > Rythme
d’accompagnement afin d’en savoir plus.
16. Sync : Cette touche permet d'activer la fonction de synchronisation. Lorsque la fonction de
synchronisation est activée, jouer une touche à gauche de G2 déclenche automatiquement le rythme
d’accompagnement sélectionné (de sorte que vous n’ayez pas à appuyer sur la touche Start/Stop).
Veuillez consulter la section Fonctionnement > Ajouter de la musique de fond > Rythme
d’accompagnement afin d’en savoir plus.
17. Fill In : Durant la lecture d’un rythme d’accompagnement, appuyer sur cette touche permet de faire
jouer temporairement un nouveau rythme ou un « rythme de fond de batterie ». Veuillez consulter la
section Fonctionnement > Ajouter de la musique de fond > Rythme d’accompagnement afin d’en
savoir plus.
18. Intro/Ending : Cette touche permet de faire jouer l’introduction ou la conclusion d’un rythme de
batterie, selon qu'un rythme d’accompagnement joue ou pas. Veuillez consulter la section
Fonctionnement > Ajouter de la musique de fond > Rythme d’accompagnement afin d’en savoir plus.
19. One-Key : Cette touche permet d'activer la fonction One-key. Lorsque cette fonction est activée, vous
pouvez faire jouer une piste de démonstration en appuyant sur une touche à la fois. Veuillez consulter la
section Fonctionnement > Chansons de démonstration afin d’en savoir plus.
20. Tempo : Les touches Tempo + et Tempo – permettent de modifier le réglage BPM du clavier. Cela
modifie la façon dont sont joués les rythmes et les accords d’accompagnements, les chansons de
démonstration et le métronome. Appuyer simultanément sur les touches Tempo + et Tempo – permet
de réinitialiser la valeur par défaut du tempo (120 BPM).
21. Rhythm Volume : Les touches Rhythm Vol + et Rhythm Vol – permettent d'augmenter et de diminuer
le volume du rythme d’accompagnement. Appuyer simultanément sur les touches Rhythm Vol + et
Rhythm Vol – permet de réinitialiser la valeur par défaut du volume (A07
).
22. Single Chord : Cette touche permet d’activer la fonction d'accords d’accompagnement. Lorsque cette
fonction est activée, vous pouvez utiliser les touches à gauche de G2 afin de générer des accords
automatiques pour le rythme d’accompagnement sélectionné. Appuyer sur la touche Single
Chord (par
opposition à la touche Fingered Chord) permet d’utiliser des formes d’accord abrégées au lieu
d’utiliser toutes les notes normalement requises pour obtenir un accord complet. Veuillez consulter la
section Fonctionnement > Ajouter de la musique de fond > Accords d’accompagnement afin d’en
savoir plus.
23. Fingered Chord : Cette touche permet d’activer la fonction d'accords d’accompagnement. Lorsque
cette fonction est activée, vous pouvez utiliser les touches à gauche de G2 afin de générer des accords
automatiques pour le rythme d’accompagnement sélectionné. Appuyer sur la touche Fingered Chord
(par opposition à la touche Single Chord), exige de jouer toutes les touches normalement requises au
lieu d’utiliser des formes d’accord abrégées pour obtenir un accord complet. Veuillez consulter la
section Fonctionnement > Ajouter de la musique de fond > Accords d’accompagnement afin d’en
savoir plus.
24. Chord Clear : Cette touche permet de désactiver la fonction d’accord d’accompagnement.
25. Chord Volume : Les touches Chord Vol + et Chord Vol – permettent d'augmenter et de diminuer le
volume de l’accord d’accompagnement. Appuyer simultanément sur les touches Chord Vol + et Chord
Vol – permet de réinitialiser la valeur par défaut du volume des accords d’accompagnement (u07).
26. Program : Cette touche permet de créer un rythme d’accompagnement personnalisé. Veuillez
consulter la section Fonctionnement > Ajouter de la musique de fond > Programmation d’un
rythme d’accompagnement afin d’en savoir plus.
27. Record : Cette touche permet d’enregistrer une chanson. Veuillez consulter la section
Fonctionnement > Enregistrement afin d’en savoir plus.
28. Play : Cette touche permet de lancer un rythme d’accompagnement personnalisé ou une chanson
enregistrée.
29. Touches de Batterie : Ces touches permettent de lancer des sonorités de percussion. L’image sur
chaque touche correspond au type de sonorité déclenché. Les touches de Batterie sont
particulièrement utiles pour la programmation d’un rythme d’accompagnement. Veuillez consulter la
section Fonctionnement > Ajouter de la musique de fond > Programmation d’un rythme
d’accompagnement afin d’en savoir plus.
24

1
1
2 3
Panneau arrière
1. Microphone : Cette entrée permet de brancher le
microphone fourni afin de chanter tout en jouant du clavier.
2. Sortie casque (TRS 3,5 mm) : Cette sortie permet de
brancher un casque d’écoute (non inclus) afin d’écouter les
sons du clavier.
Remarque : Lorsque la sortie casque est utilisée, les hautparleurs intégrés du clavier sont désactivés.
3. Entrée d'alimentation : Cette entrée permet de brancher
l’adaptateur secteur fourni.
MIC
PHONES
DC 12V
DC 9V
Panneau inférieur
1. Compartiment des piles : Insérer 6 piles de type AA dans ce
compartiment permet d’alimenter le clavier sans utiliser
l'adaptateur secteur.
Fonctionnement
Sélection de la sonorité du clavier
Le clavier Melody 54 dispose de 300 sonorités uniques.
Pour sélectionner la sonorité du clavier :
1. Appuyez sur la touche Tone.
2. Utilisez les touches numériques pour sélectionner une sonorité ou utilisez les touches +/- pour
parcourir les sonorités une par une. Le guide au-dessus du clavier indique les numéros des différentes
sonorités. Le numéro correspondant à la nouvelle sonorité sélectionnée s’affichera sur l'écran du
clavier.
3. Jouez les touches du clavier pour entendre la sonorité sélectionnée.
Pour enrichir la sonorité avec un effet de maintien de la note, appuyez sur la touche Sustain. SUS
s’affichera temporairement à l'écran. Lorsque cette fonction est activée, les notes jouées sont tenues plus
longtemps, simulant l’effet de la pédale de sustain d’un piano acoustique. Cette fonction peut être
appliquée à n’importe laquelle des 300 sonorités du clavier. Pour désactiver l'effet, appuyez de nouveau sur
la touche Sustain. OFF s’affichera temporairement à l'écran.
Pour enrichir la sonorité avec un effet de vibrato, appuyez sur la touche Vibrato. Vib s’affichera
temporairement à l'écran. Lorsque cette fonction est activée, la sonorité des notes jouées fluctue en
augmentant et en diminuant. Cette fonction peut être appliquée à n’importe laquelle des 300 sonorités du
clavier. Pour désactiver l'effet, appuyez de nouveau sur la touche Vibrato. OFF s’affichera temporairement
à l'écran.
Pour augmenter ou diminuer la hauteur tonale du clavier d’un demi-ton, appuyez sur la touche
Transpose + ou Transpose –. Le clavier peut être transposé de six demi-tons vers le haut ou le bas. Le
nouveau réglage s’affichera temporairement à l'écran. Appuyez simultanément sur les touches Transpose
+ et Transpose – pour réinitialiser la plage de la hauteur tonale par défaut C1 – F6 (indiquée par les
chiffres 00 à l'écran) du clavier.
25

Superposition
Le mode de superposition permet de superposer deux sonorités différentes.
Pour superposer deux sonorités :
1. Appuyez sur la touche Dual. dOU s’affichera temporairement à l'écran. La sonorité sélectionnée avant
d’appuyer sur la touche Dual sera automatiquement sélectionnée comme sonorité principale pour
créer la superposition.
2. Pour modifier la sonorité à ajouter à la superposition, utilisez les touches numériques pour
sélectionner une sonorité ou utilisez les touches +/- pour parcourir les sonorités une par une. Le guide
au-dessus du clavier indique les numéros des différentes sonorités. Le numéro correspondant à la
nouvelle sonorité sélectionnée s’affichera sur l'écran du clavier.
Remarque : Lorsque vous atteignez l'étape 2, la dernière sonorité utilisée pour la superposition sera
automatiquement sélectionnée. Si vous accédez au mode de superposition pour la première fois depuis
la mise sous tension du clavier, la sonorité t48 (Ensemble) est automatiquement sélectionné.
3. Jouez les touches du clavier pour entendre les deux sonorités sélectionnées.
Pour désactiver le mode de superposition, appuyez de nouveau sur la touche Dual. dOU s’affichera
temporairement à l'écran.
Mode de séparation du clavier
Le mode de séparation du clavier permet de diviser le clavier de 54 touches en deux zones afin que vous
puissiez utiliser deux sonorités différentes pour chacune de vos mains. Par exemple, vous pourriez utiliser
les sonorités de piano avec la main droite et les sonorités de basse avec la main gauche.
Pour activer le mode de séparation du clavier :
1. Appuyez sur la touche Split. SPL s’affichera temporairement à l'écran. La sonorité sélectionnée avant
d’appuyer sur la touche Split sera utilisée pour le côté gauche du clavier.
Remarque : La hauteur tonale du côté gauche du clavier augmentera d'une octave, alors que la
hauteur tonale du côté droit du clavier diminuera d'une octave. Cela signifie que si la transposition par
défaut est utilisée, le côté gauche du clavier sera C2–B3, alors que le côté droit du clavier C2–F4.
2. Pour sélectionner la sonorité du côté droit du clavier, utilisez les touches numériques pour
sélectionner une sonorité ou utilisez les touches +/- pour parcourir les sonorités une par une. Le guide
au-dessus du clavier indique les numéros des différentes sonorités. Le numéro correspondant à la
nouvelle sonorité sélectionnée s’affichera sur l'écran du clavier.
3. Jouez les touches du clavier pour entendre les sonorités sélectionnées.
Pour désactiver le mode de séparation du clavier, appuyez de nouveau sur la touche Split. OFF
s’affichera temporairement à l'écran.
Remarque : Les modes de séparation du clavier et de superposition ne peuvent être utilisés en même
temps.
26

Ajouter de la musique de fond
Rythme d'accompagnement
Si vous souhaitez vous accompagner d'une boucle de batterie, vous pouvez choisir parmi l’un des 300
rythmes uniques du Melody 54.
Pour sélectionner un rythme d’accompagnement :
1. Appuyez sur la touche Rhythm.
2. Utilisez les touches numériques pour sélectionner un rythme ou utilisez les touches +/- pour parcourir
les rythmes un par un. Le guide au-dessus du clavier indique les numéros des différents styles de
rythme. Le numéro correspondant au nouveau rythme sélectionné s’affichera sur l'écran du clavier.
Pour lancer ou arrêter le rythme d’accompagnement sélectionné, appuyez sur la touche Start/Stop.
Astuce : Pour contrôler le rythme du rythme d’accompagnement, regardez l’écran, trois points clignotent
pour indiquer le premier temps de chaque mesure et un point pour chaque temps restant.
Pour augmenter ou diminuer le tempo du rythme d’accompagnement, utilisez les touches Tempo + et
Tempo +. Appuyez simultanément sur les touches Tempo + et Tempo – pour réinitialiser la valeur par
défaut du tempo (120 BPM).
Pour augmenter ou diminuer le volume du rythme d’accompagnement, utilisez les touches Rhythm
Vol + et Rhythm Vol – . Appuyer simultanément sur les touches Rhythm Vol + et Rhythm Vol – pour
réinitialiser la valeur par défaut du volume (l’écran affiche A07).
Pour ajouter un rythme de batterie au rythme d’accompagnement, appuyez sur la touche Fill In alors
que le rythme d’accompagnement joue. Le rythme d’accompagnement revient automatiquement à la
normal une fois le rythme de batterie terminé. Le rythme de batterie varie en fonction du moment où vous
appuyez sur la touche Fill In.
Pour ajouter une introduction de batterie au rythme d’accompagnement, appuyez sur la touche
Intro/Ending alors que le rythme d’accompagnement ne joue pas. Après avoir appuyé sur la touche,
l’introduction de batterie joue deux mesures, puis le rythme d’accompagnement commence
automatiquement.
Pour ajouter une conclusion de batterie au rythme d’accompagnement, appuyez sur la touche
Intro/Ending alors que le rythme d’accompagnement joue. Après avoir appuyé sur la touche, la conclusion
de batterie joue deux mesures, puis le rythme d’accompagnement s’arrête automatiquement.
Pour que le rythme d’accompagnement soit automatiquement lancé lorsque vous jouez les touches :
1. Sélectionnez un rythme d’accompagnement (comme décrit précédemment dans cette section).
2. Appuyez sur la touche Sync. Afin d’indiquer que la synchronisation est activée, un point sur l'écran
clignote en fonction du tempo sélectionné.
3. Jouez sur l’une des touches situées à gauche de G2. Dès que vous appuyez sur l’une des touches, le
rythme d’accompagnement sélectionné est automatiquement lancé (sans que vous ayez à appuyer sur
la touche Start/Stop).
4. Lorsque vous avez terminé avec le rythme d’accompagnement, appuyez sur la touche
l’arrêter. Si vous désirez utiliser la fonction de synchronisation de nouveau, répétez les étapes 1-2.
Start/Stop pour
27

Accords d'accompagnement
Si vous souhaitez vous accompagner d'un rythme de batterie et d’accord d’accompagnement, vous pouvez
utiliser la fonction d’accord d’accompagnement.
Lorsque cette fonction est activée, le clavier joue automatiquement de la musique centrée sur un accord de
piano spécifique, qui peut être arpégé et/ou accompagné d’autres instruments (comme une guitare basse).
La musique jouée correspond au style du rythme d’accompagnement sélectionné. La musique s'ajuste
également lorsqu'un rythme de batterie ou une introduction/conclusion de batterie est sélectionné.
Vous devez utiliser les touches à gauche de G2 afin de générer l’accord d’accompagnement. Il y a quatre
options possibles : un accord majeur, mineur, de septième ou de septième mineur.
Pour activer la fonction d'accords d’accompagnement :
1. Sélectionnez un rythme d’accompagnement (comme décrit dans la section précédente de ce guide).
2. Appuyez sur la touche Single Chord ou la touche Fingered Chord. L’écran affichera temporairement l’option sélectionnée. Veuillez consulter les sections suivantes afin d’en savoir plus sur ces deux options.
3. Appuyez sur la touche Start/Stop pour lancer le rythme d’accompagnement.
Remarque : L’ordre dans lequel vous effectuez les étapes 2 et 3 n’a pas d’importance.
4. Jouez les notes nécessaires pour générer l’accord d’accompagnement souhaité. Les touches dont
vous devez jouer varient selon que vous utilisiez la touche Single Chord ou la touche Fingered
Chord. Veuillez consulter les sections suivantes afin d’en savoir plus.
Single Chord :
Si vous appuyez sur la touche Single Chord, vous pouvez utiliser des formes d’accord abrégées afin de
générer un accord d’accompagnement.
Pour générer un accord, appuyez sur les touches correspondant à l’accord que vous voulez jouer
(diagramme ci-dessous). Les points dans les diagrammes indiquent les touches que vous joueriez pour un
accord en do, mais les mêmes formes globales peuvent être appliquées à n'importe quelle note
fondamentale. Rappelez-vous que vous devez utiliser les touches à gauche de G2.
Fingered Chord :
Si vous appuyez sur la touche Fingered Chord, vous devez jouer un accord majeur, mineur, de septième
ou de septième mineur complet afin de l’entendre jouer en même temps que le rythme d’accompagnement.
Pour générer un accord, jouez les formes d’accord majeur, mineur, de septième de dominante ou de
septième mineur complet. Par exemple, les quatre accords en do illustrés ci-dessous, avec des points sur
chaque touche de l'accord. Rappelez-vous que vous devez utiliser les touches à gauche de G2.
28
Note fondamentale (do)
Note fondamentale (do)

Pour régler le volume de l’accord d’accompagnement, utilisez les touches Chord Vol + et Chord Vol –.
Appuyez simultanément sur les touches Chord Vol + et Chord Vol – pour réinitialiser la valeur par défaut du
volume (l’écran affiche u07).
Pour que l'accord d'accompagnement ne joue pas automatiquement, appuyez sur la touche Chord
Clear.
Remarque : Lorsque la fonction d'accord d'accompagnement est activée, vous pouvez utiliser le mode de
superposition, mais pas le mode de séparation du clavier. Appuyez sur la touche Split lorsque les accords
d’accompagnement jouent pour arrêter les accords.
Pour que le rythme d’accompagnement et l’accord d’accompagnement soient automatiquement
lancés lorsque vous jouez les touches :
1. Sélectionnez un rythme d’accompagnement (comme décrit dans la section précédente de ce guide).
2. Appuyez sur la touche Sync. Afin d’indiquer que la synchronisation est activée, un point sur l'écran
clignote en fonction du tempo sélectionné.
3. Appuyez sur la touche Single Chord ou la touche Fingered Chord pour activer la fonction d’accord
d’accompagnement.
4. Jouez les notes nécessaires pour générer l’accord d’accompagnement souhaité. Dès que vous
appuyez sur l’une des touches, le rythme d’accompagnement et l’accord d’accompagnement
sélectionnés sont automatiquement lancés (sans que vous ayez à appuyer sur la touche Start/Stop).
5. Lorsque vous avez terminé avec le rythme d’accompagnement et l’accord d’accompagnement,
appuyez sur la touche Start/Stop pour les arrêter.
29

Programmation d’un rythme d’accompagnement
Vous pouvez utiliser la fonction de programmation d’un rythme pour créer votre propre rythme de batterie et
vous accompagner pendant que vous jouez.
Pour créer un rythme d’accompagnement personnalisé :
1. Appuyez sur la touche Program afin de passer en mode de programmation d’un rythme. Prg s'affiche
à l'écran et les touches passeront automatiquement aux sons de percussion.
2. Programmez le rythme en jouant chaque son de batterie dans l’ordre dans lequel vous souhaitez les
répéter, en suivant l’enchaînement rythmique. Vous pouvez jouer les sons de batterie avec les touches
ou avec les touches de Batterie. Si vous utilisez les touches, voyez l’image au-dessus de chaque
touche afin de savoir quel son de batterie une touche va jouer. Le rythme programmé peut contenir
jusqu'à 32 sons de batterie. Chaque son de batterie de l’enchaînement rythmique aura la durée d’une
noire.
Remarque : Vous ne pouvez pas programmer deux sons de percussion à jouer en même temps.
3. Appuyez sur la touche Play pour arrêter la programmation et écouter en boucle le rythme programmé.
Ply s'affiche à l'écran.
4. Après avoir appuyé sur la touche Play, les touches reviendront automatiquement à la dernière sonorité
sélectionnée et vous pourrez jouer et vous accompagner de votre rythme personnalisé.
Pour modifier le tempo du rythme personnalisé, utilisez les touches Tempo + et Tempo +. Appuyez
simultanément sur les touches Tempo + et Tempo – pour réinitialiser la valeur par défaut du tempo (120
BPM).
Pour modifier le volume du rythme personnalisé, utilisez les touches Rhythm Vol + et Rhythm Vol – .
Appuyez simultanément sur les touches Rhythm Vol + et Rhythm Vol – pour réinitialiser la valeur par
défaut du volume (l’écran affiche A07).
Pour arrêter la lecture du rythme personnalisé, appuyez sur la touche Play. Le clavier passe de nouveau
en mode de programmation et vous permet de programmer un nouveau rythme, ou appuyer sur la touche
Play pour lancer le rythme précédemment programmé. Vous pouvez également arrêter un rythme
personnalisé en appuyant sur la touche Program, ce qui forcera le clavier à quitter le mode de
programmation et à supprimer le rythme en cours. Lorsque vous quittez le mode de programmation, OFF
s’affiche temporairement à l'écran.
Remarque : Si vous mettez le clavier hors tension lorsqu'un rythme personnalisé joue, ce dernier sera
supprimé.
Astuce : Alors que le mode de programmation est activé, appuyez sur la touche Single Chord pendant
qu'un rythme personnalisé joue ou est arrêté. Cela vous permettra d'utiliser les formes d'accords abrégées
(illustrées dans la section précédente) sur les touches situées à gauche de G2 afin de jouer des accords
complets. Les accords ne joueront pas automatiquement en même temps que le rythme personnalisé ; ils
s’arrêteront une fois que vous aurez relâché les touches. Cependant, vous aurez toujours la possibilité de
jouer des accords complets en touchant rapidement une des trois touches adjacentes.
30

Enregistrement
Vous pouvez utiliser la fonction d'enregistrement du Melody 54 pour vous enregistrer en train de jouer du piano.
Pour enregistrer votre performance :
1. Appuyez sur la touche Record pour passer en mode d’enregistrement. REC reste affiché à l'écran.
2. Lorsque vous avez terminé de jouer ce que vous vouliez enregistrer, appuyez sur la touche Play pour
arrêter d’enregistrer et lancer automatiquement la lecture. Ply reste affiché à l'écran.
3. Une fois la lecture de l'enregistrement terminé, le clavier passe de nouveau en mode d'enregistrement.
Vous pouvez ensuite effectuer un nouvel enregistrement en jouant les touches ou appuyer sur la
touche Play pour écouter de nouveau l’enregistrement.
Remarque : Si un enregistrement est toujours en cours de lecture, vous pouvez appuyer sur la touche
Play pour l’arrêter et repasser en mode d’enregistrement.
Remarque : Si la mémoire du clavier devient pleine durant l'enregistrement, l'écran affiche FUL, et le
clavier passe de nouveau en mode d'enregistrement. Vous pouvez ensuite appuyer sur la touche Play
pour écouter l’enregistrement ou l’écraser en jouant les touches.
Pour désactiver le mode d’enregistrement, appuyez sur la touche Record. Cela supprimera
l'enregistrement.
Remarque : Si vous mettez le clavier hors tension en mode d’enregistrement, tout enregistrement sera
supprimé.
Remarque : Lorsque le mode d’enregistrement est activé, vous ne pouvez utiliser les modes de
superposition et de séparation du clavier, ou les rythmes et accords d’accompagnement.
Chansons de démonstration
Le clavier Melody 54 dispose de 40 chansons de démonstration.
Pour lancer la lecture d’une chanson de démonstration, appuyez sur la touche Demo. La chanson de
démonstration sélectionnée restera affichée à l’écran et commencera à jouer.
Pour sélectionner une autre chanson de démonstration, utilisez les touches numériques ou les
touches +/– alors qu’une chanson de démonstration joue. L’écran affichera la nouvelle chanson
sélectionnée.
Pour arrêter la lecture de la chanson de démonstration, appuyez de nouveau sur la touche Demo.
One-Key
La fonction One-Key vous permet de jouer une chanson de démonstration à l’aide des touches du clavier
du Melody 54. Chaque fois que vous appuyez sur une touche, un court extrait de la chanson de
démonstration joue. En appuyant plusieurs fois sur n'importe laquelle des touches au rythme, vous pouvez
faire jouer toute la chanson de démonstration. Cette fonction est particulièrement utile pour les pianistes
débutants, car elle leur permet de faire l'expérience de jouer une chanson sans qu’ils aient besoin de
connaître les touches à jouer.
Pour utiliser les touches pour faire jouer une chanson de démonstration :
1. Appuyez sur la touche One-Key. La chanson de démonstration sélectionnée (comme affichée à
l’écran) commencera à jouer automatiquement. Pour sélectionner une autre chanson, utilisez les
touches numériques ou les touches +/–.
2. Appuyez et relâchez n’importe quelle touche afin d’arrêter la lecture automatique de la chanson de
démonstration.
3. Appuyez plusieurs fois sur n'importe laquelle des touches au rythme pour faire jouer la chanson de
démonstration.
4. Lorsque vous avez terminé, appuyez de nouveau sur la touche One-Key pour désactiver cette
fonction.
31

Guida per l'uso (Italiano)
Introduzione
Contenuti della confezione
Melody 54
Microfono
Adattatore di alimentazione
Leggio
Guida per l'uso
Istruzioni di sicurezza e garanzia
Assistenza
Per le ultime informazioni in merito a questo prodotto (requisiti di sistema, informazioni sulla
compatibilità, ecc.) e per la registrazione del prodotto, recarsi alla pagina alesis.com.
Per ulteriore assistenza sul prodotto, recarsi alla pagina alesis.com/support.
Configurazione
Schema dei collegamenti
Elementi non elencati sotto Introduzione > Contenuti della confezione sono venduti
separatamente.
32
Microfono Alimentazione
MIC
PHONES
DC 12V
DC 9V
Cuffie
(non in dotazione)

Caratteristiche
Pannello superiore
4
22
23
24
28
26
27
13
21
20
25
12
1 3
2
5
14
6
15
16
17 18
1. Power On/Off (accensione/spegnimento): premere questo tasto per accendere e spegnere la tastiera.
Nota bene: dopo 5 minuti d’inattività, il Melody 54 si spegnerà. Premendo qualsiasi tasto, tornerà in
funzione.
2. Display: questo display a LED si aggiorna quando si apportano modifiche alle impostazioni quali
tonalità, ritmo, tempo, ecc. Al momento dell'accensione, il Display mostra il tempo attualmente
selezionato in via predefinita.
3. Master Volume: Girare la manopola Master Volume per alzare o abbassare il volume della tastiera.
4. Tasti numerici e tasti + / - : Servirsi di questi tasti per cambiare la tonalità, il ritmo di
accompagnamento o la canzone demo. Prima di utilizzare i tasti Number o + / -, premere il tasto
corrispondente all’impostazione che si desidera modificare.
5. Demo: premere questo tasto per avviare la riproduzione di una delle canzoni demo. Per maggiori
informazioni, si veda Operazione > Canzoni demo.
6. Tone: premere questo tasto quindi servirsi dei tasti numerici o +/- per selezionare una tonalità. Si veda
Operazione > Scegliere la tonalità della tastiera.
7. Sustain: premere questo tasto per attivare o disattivare l’effetto di sostegno (sustain). Per maggiori
informazioni, si veda Operazione > Scegliere la tonalità della tastiera.
8. Vibrato: premere questo tasto per attivare o disattivare l’effetto vibrato. Per maggiori informazioni, si
veda Operazione > Scegliere la tonalità della tastiera.
9. Dual: premere questo tasto per sovrapporre due tonalità. Si veda Operazione > Scegliere la tonalità
della tastiera.
10. Split: premere questo tasto per utilizzare una tonalità su un lato della tastiera e una tonalità distinta
sull’altro. Si veda Operazione > Scegliere la tonalità della tastiera.
11. Percussion: premere questo tasto per riprodurre suoni di percussioni con i tasti. On compare
temporaneamente a
ogni tasto al fine di sapere che suono tamburo un tasto suonerà. Premere nuovamente il tasto
Percussion per disattivare questa funzione. Quando disattivato, OFF comparirà temporaneamente a Display.
12. Transpose: premere il tasto Transpose + o Transpose – per aumentare o ridurre il pitch della tastiera
di un semitono. Si veda Operazione > Scegliere la tonalità della tastiera.
13. Beat: premere questo tasto per commutare tra le diverse impostazioni del metronomo: 1/4, 2/4, 3/4,
4/4 e Off. Quando si accende la tastiera, il metronomo sarà impostato in via predefinita su Off. Quando
si cambia l’impostazione, a Display compare temporaneamente l’impostazione selezionata. Quando il
metronomo è attivato, a Display lampeggiano tre puntini per il primo battito di ogni misura e un puntino
per ciascun battito rimanente. Servirsi dei tasti Tempo + / - per modificare il tempo del metronomo.
14. Rhythm: premere questo tasto, quindi servirsi dei tasti numerici o +/- per selezionare un ritmo di
accompagnamento. Per maggiori informazioni, si veda Operazione > Aggiungere musica di
sottofondo > Ritmi di accompagnamento.
19
Display quando i suoni di percussione vengono attivati. Vedere l'immagine sopra
29
7 8
9 10
11
33

15. Start/Stop: premere questo tasto per avviare o interrompere un ritmo di accompagnamento. Per
maggiori informazioni, si veda Operazione > Aggiungere musica di sottofondo > Ritmi di
accompagnamento.
16. Sync: premere questo tasto per attivare la funzione di sincronizzazione (Sync). Quando la funzione di
sincronizzazione Sync è attiva, suonando qualsiasi tasto al di sotto di G2 si avvia automaticamente il
ritmo di accompagnamento attualmente selezionato (quindi non occorre premere il tasto Start/Stop).
Per maggiori informazioni, si veda Operazione > Aggiungere musica di sottofondo > Ritmi di
accompagnamento.
17. Fill In: quando viene riprodotto un ritmo di accompagnamento, premere questo tasto per far suonare
temporaneamente alla tastiera un nuovo ritmo o un “fill di batteria”. Per maggiori informazioni, si veda
Operazione > Aggiungere musica di sottofondo > Ritmi di accompagnamento.
18. Intro/Ending: premere questo tasto per fare in modo che la tastiera suoni un beat di batteria
introduttivo o finale, a seconda se un ritmo di accompagnamento sta già suonando o meno. Per
maggiori informazioni, si veda Operazione > Aggiungere musica di sottofondo > Ritmi di
accompagnamento.
19. One-Key: premere questo tasto per attivare la funzione one-key. Quando questa funzione è attivata è
possibile suonare un tasto alla volta per eseguire una canzone demo. Per maggiori informazioni, si veda
Operazione > Canzoni demo.
20. Tempo: premere il tasto Tempo + o Tempo – per modificare l’impostazione BPM della tastiera. Questo
influirà sulla riproduzione del ritmo e degli accordi di accompagnamento, delle canzoni demo e del
metronomo. Premere contemporaneamente i tasti Tempo + e Tempo – per ritornare al tempo
predefinito (120 BPM).
21. Rhythm Volume: Premere il tasto Rhythm Vol + o Rhythm Vol – per alzare o abbassare il volume del
ritmo di accompagnamento. Premere contemporaneamente Rhythm Vol + e Rhythm Vol – per
ripristinare il livello di volume predefinito (A07).
22. Single Chord: premere questo tasto per attivare la funzione di accordo di accompagnamento. Quando
questa funzione è attivata, è possibile usare le note al di sotto di G2 per produrre accordi che suonano
automaticamente al ritmo di accompagnamento selezionato. La pressione del
tasto Single Chord (o
Fingered Chord) consente di utilizzare forme di accordi condensati anziché utilizzare tutti i tasti
normalmente necessari per suonare un accordo completo. Per maggiori informazioni, si veda
Operazione > Aggiungere musica di sottofondo > Accordi di accompagnamento.
23. Fingered Chord: premere questo tasto per attivare la funzione di accordo di accompagnamento.
Quando questa funzione è attivata, è possibile usare le note al di sotto di G2 per produrre accordi che
suonano automaticamente al ritmo di accompagnamento selezionato. La pressione del tasto Fingered
Chord (o Single Chord) richiede che si suonino accordi completi anziché un set di tasti condensati per
ciascun accordo. Per maggiori informazioni, si veda Operazione > Aggiungere musica di sottofondo
> Accordi di accompagnamento.
24. Chord Clear: premere questo tasto per disattivare la funzione di accordo di accompagnamento.
25. Chord Volume: Premere il tasto Chord Vol + o Chord Vol – per alzare o abbassare il volume
dell’accordo di accompagnamento. Premere i tasti Chord Vol + e Chord Vol – simultaneamente per
riportare gli accordi di accompagnamento al loro volume predefinito (u07).
26. Program: premere questo tasto per programmare un ritmo di accompagnamento personalizzato. Si
veda Operazione > Aggiungere musica di sottofondo > Programmazione del ritmo per maggiori
informazioni.
27. Record: premere questo tasto per registrare una canzone. Per maggiori informazioni, si veda
Operazione > Registrazione.
28. Play: premere questo tasto per riprodurre un ritmo di accompagnamento personalizzato o una canzone
registrata.
29. Tasti di Batteria: premere questi tasti per riprodurre suoni di percussioni. Si vedano le immagini sui
tasti per capire quale tasto suona quale tipo di suono. I tasti di Batteria sono particolarmente utili per
la funzione di programmazione ritmo. Per maggiori informazioni, si veda Operazione > Aggiungere
musica di sottofondo > Programmazione del ritmo.
34

1
1
2 3
Pannello posteriore
1. Mic: collegare il microfono in dotazione a questo livello per
cantare mentre si suona la tastiera.
2. Cuffie (1/8” / 3,5 mm TRS): collegare le cuffie (non in
dotazione) a questa uscita per sentire la tastiera.
Nota bene: collegandole all’uscita cuffie si silenziano gli
altoparlanti interni della tastiera.
3. Ingresso di alimentazione: collegare a questo livello
l'adattatore di alimentazione in dotazione.
MIC
PHONES
DC 12V
DC 9V
Pannello inferiore
1. Scomparto batterie: inserire 6 batterie AA a questo livello
per alimentare la tastiera quando non si utilizza l'adattatore
di alimentazione.
Operazione
Scegliere la tonalità della tastiera
Il Melody 54 è dotato di 300 tonalità uniche tra cui scegliere.
Per selezionare una tonalità per la tastiera:
1. Premere il tasto Tone.
2. Servirsi dei tasti numerici per scegliere una tonalità specifica o servirsi dei tasti + / – per scorrere da
una tonalità all’altra. Seguire la guida in cima alla tastiera per vedere quali tonalità corrispondono a quali
numeri. Il numero corrispondente alla tonalità attualmente selezionata si aggiorna sul Display della
tastiera.
3. Suonare la tastiera per sentire la tonalità selezionata.
Per migliorare la tonalità con l'effetto sustain della tastiera, premere il tasto Sustain. Sul Display
appare la scritta SUS. Se questa funzione è attivata, i tasti suoneranno più a lungo quando vengono
suonati, imitando l’effetto del pedale sustain di un pianoforte acustico. Questa funzione può essere
applicata a uno qualsiasi delle 300 tonalità della tastiera. Per disattivare l’effetto, premere nuovamente il
tasto Sustain: a display comparirà temporaneamente la scritta OFF.
Per migliorare la tonalità con l'effetto vibrato della tastiera, premere il tasto Vibrato. Sul Display appare
temporaneamente la scritta Vib. Se questa funzione è attivata, il pitch dei tasti sarà leggermente piegato
verso l’alto e verso il basso quando vengono suonati. Questa funzione può essere applicata a uno qualsiasi
delle 300 tonalità della tastiera. Per disattivare l’effetto, premere nuovamente il tasto Vibrato: a display
comparirà temporaneamente la scritta OFF.
Per alzare o abbassare il pitch della tastiera di un semitono, premere il tasto Transpose + o Transpose
–. La tastiera può essere trasposta verso l’alto o verso il basso di sei semitoni. Il Display mostrerà
temporaneamente le nuove impostazioni una volta cambiate. Premere contemporaneamente i tasti
Transpose + e Transpose – per riportare la tastiera al suo intervallo di pitch predefinito di C1–F6 (indicato
dai numeri 00
a Display).
35

Modalità doppia (Dual)
La modalità Dual consente la stratificazione di due tonalità diverse.
Per sovrapporre due tonalità:
1. Premere il tasto Dual. A Display appare temporaneamente la scritta dOU. La tonalità selezionata prima
di premere il tasto Dual verrà utilizzata automaticamente come prima tonalità nello strato.
2. Per modificare la tonalità dello strato aggiunto, servirsi dei tasti numerici per scegliere una tonalità
specifica o servirsi dei tasti + / – per scorrere da una tonalità all’altra. Seguire la guida in cima alla
tastiera per vedere quali tonalità corrispondono a quali numeri. Il numero corrispondente alla tonalità
attualmente selezionata si aggiorna sul Display della tastiera.
Nota bene: quando si raggiunge la Fase 2, la tonalità utilizzata più di recente per lo strato aggiunto
verrà selezionata automaticamente. Se è la prima volta che si entra in modalità Dual dall'accensione
della tastiera, t48 (Ensemble) verrà selezionato automaticamente.
3. Suonare la tastiera per sentire le due tonalità contemporaneamente.
Per uscire dalla modalità Dual, premere nuovamente il tasto Dual. Sul Display appare temporaneamente
la scritta OFF.
Modalità Split
La modalità Split consente di dividere i 54 tasti in due zone in modo da poter avere una tonalità per
ciascuna mano sulla tastiera. Ad esempio, si può volere una delle tonalità del piano per la mano destra e
una delle tonalità del basso per la mano sinistra.
Per utilizzare la modalità Split:
1. Premere il tasto Split. Sul Display appare temporaneamente la scritta SPL. La tonalità selezionata
prima di premere il tasto Split verrà applicata alla zona sinistra della tastiera.
Nota bene: la zona sinistra della tastiera si alzerà di un’ottava, mentre la zona destra della tastiera sarà
abbassata di un’ottava. Ciò significa che, se la tastiera è impostata sulla sua trasposizione predefinita,
la zona sinistra sarà C2–B3, e quella destra sarà C2–F4.
2. Per selezionare la tonalità della zona destra della tastiera, servirsi dei tasti numerici per scegliere una
tonalità specifica o servirsi dei tasti + / – per scorrere da una tonalità all’altra. Seguire la guida in cima
alla tastiera per vedere quali tonalità corrispondono a quali numeri. Il numero corrispondente alla
tonalità attualmente selezionata si aggiorna sul Display della tastiera.
3. Suonare la tastiera per sentire le tonalità selezionate.
Per uscire dalla modalità Split, premere nuovamente il tasto Split. Sul Display appare temporaneamente
la scritta OFF.
Nota bene: la modalità Split e la modalità Dual non possono essere utilizzate contemporaneamente.
36

Aggiungere musica di sottofondo
Ritmi di accompagnamento
Se si desidera essere accompagnati da un loop di batteria mentre si suona la tastiera, il Melody 54 è dotato
di 300 ritmi unici tra cui scegliere.
Per selezionare un ritmo di accompagnamento:
1. Premere il tasto Rhythm.
2. Servirsi dei tasti numerici per scegliere un ritmo specifico o servirsi dei tasti + / – per scorrere da un
ritmo all’altro. Seguire la guida in cima alla tastiera per vedere quali stili di ritmo corrispondono a quali
numeri. Il numero corrispondente al ritmo attualmente selezionato si aggiorna sul Display della tastiera.
Per avviare o interrompere la riproduzione del ritmo di accompagnamento attualmente selezionato,
premere il tasto Start/Stop.
Suggerimento: per osservare il tempo del ritmo di accompagnamento, guardare il Display, dove
lampeggiano tre puntini per il primo battito di ogni misura e un puntino per ciascun battito rimanente.
Per modificare il tempo del ritmo di accompagnamento, premere il tasto Tempo + o Tempo - per far
aumentare o diminuire tempo. Premere contemporaneamente i tasti Tempo + e Tempo - per ritornare al
tempo predefinito (120 BPM).
Per regolare il volume del ritmo di accompagnamento, premere il tasto Rhythm Vol + o Rhythm Vol –.
Premere contemporaneamente i tasti Rhythm Vol + e Rhythm Vol – per ripristinare il livello di volume
predefinito (indicato a Display come A07).
Per inserire un fill di batteria nel ritmo di accompagnamento, premere il tasto Fill In mentre il ritmo di
accompagnamento viene riprodotto. Il ritmo di accompagnamento tornerà automaticamente al suo pattern
regolare in seguito al fill. Il fill di batteria varierà a seconda di quando si preme il tasto Fill In.
Per suonare un beat di batteria introduttivo per il ritmo di accompagnamento selezionato, premere il
tasto Intro/Ending quando il ritmo di accompagnamento stesso non sta suonando. Il beat di batteria
introduttivo sarà lungo due battute; quindi il ritmo di accompagnamento inizierà automaticamente a
suonare.
Per suonare un beat di batteria conclusivo per il ritmo di accompagnamento selezionato, premere il
tasto Intro/Ending quando il ritmo di accompagnamento stesso sta suonando. Dopo aver premuto il tasto,
il beat di batteria conclusivo verrà riprodotto per due battute, quindi si fermerà automaticamente.
Per far partire automaticamente il ritmo di accompagnamento quando si suonano i tasti:
1. Selezionare il ritmo di accompagnamento desiderato (come descritto in precedenza in questa sezione
del manuale).
2. Premere il tasto Sync. Per indicare che Sync è attivato, un puntino a Display pulserà a tempo con il
tempo attualmente selezionato.
3. Premere qualsiasi tasto al di sotto di G2. Non appena si suonano i tasti, il ritmo di accompagnamento
attualmente selezionato si avvierà automaticamente (senza dover premere il tasto Start/Stop).
4. Una volta finito con il ritmo di accompagnamento, premere il tasto Start/Stop per fermarlo. Se si
desidera utilizzare nuovamente la funzione Sync, ripetere i passaggi 1-2.
37

Accordi di accompagnamento
Se si desidera avere un accompagnamento con un beat di batteria e con accordi armonici mentre si suona
la tastiera, è possibile utilizzare la funzione di accordo di accompagnamento.
Con questa funzione attivata, la tastiera riprodurrà automaticamente musica centrata su uno specifico
accordo di pianoforte, che può essere arpeggiato e/o accompagnato da altri strumenti (quali un basso). Lo
stile della musica riprodotta sarà abbinato a quello del ritmo di accompagnamento selezionato. La musica
verrà regolata anche quando viene selezionato un fill di batteria o un beat di batteria introduttivo/conclusivo.
Per produrre l’accordo di accompagnamento occorre utilizzare i tasti al di sotto di G2. Ci sono quattro
opzioni: un accordo maggiore, minore, di settima o di settima minore.
Per utilizzare la funzione di accordo di accompagnamento:
1. Selezionare il ritmo di accompagnamento desiderato (come descritto nella sezione precedente del
manuale).
2. Premere il tasto Single Chord o il tasto Fingered Chord. Il Display si aggiornerà temporaneamente
per mostrare quale opzione è stata selezionata. Leggere oltre per maggiori informazioni su queste due
opzioni.
3. Premere il tasto Start/Stop per iniziare a suonare il ritmo di accompagnamento.
Nota bene: non importa l’ordine in cui vengono eseguiti i passaggi 2 e 3.
4. Suonare i tasti necessari per produrre l’accordo di accompagnamento desiderato. Quali tasti suonare
dipende dal fatto se sia stato utilizzato il tasto Single Chord o il tasto Fingered Chord. Leggere
ancora per maggiori dettagli.
Single Chord (Accordo singolo):
Se si preme il tasto Single Chord, si può utilizzare un set di tasti abbreviato per produrre rapidamente un
accordo di accompagnamento.
Per produrre un accordo, premere i tasti corrispondenti all’accordo che si desidera riprodurre (come
indicato nel diagramma in basso). I puntini presenti nei diagrammi mostrano i tasti da suonare per un
accordo di DO, ma le stesse forme complessive possono essere applicate a qualsiasi nota radice. Devono
essere utilizzati i tasti al di sotto di G2.
Accordo Fingered:
Se si preme il tasto Fingered Chord, occorre suonare un accordo maggiore, minore, di settima o di settima
minore per sentirlo suonare a tempo con il ritmo di accompagnamento.
Per produrre un accordo, suonare la forma dell’accordo maggiore, minore, di settima o di settima minore.
Ad esempio, qui di seguito sono illustrati i quattro accordi di DO, con puntini su ciascun tasto nell'accordo.
Devono essere utilizzati i tasti al di sotto di G2.
38
Nota radice (DO)
Nota radice (DO)

Per regolare il volume dell'accordo di accompagnamento, premere il tasto Chord Vol + o Chord Vol –.
Premere contemporaneamente i tasti Chord Vol + e Chord Vol – per ripristinare il livello di volume
predefinito (indicato a Display come u07).
Per fermare la riproduzione automatica dell’accordo di accompagnamento, premere il tasto Chord
Clear.
Nota bene: Con la funzione di accordo di accompagnamento attivato, si può utilizzare la modalità Dual, ma
non la modalità Split. La pressione del tasto Split durante la riproduzione degli accordi di
accompagnamento fermerà gli accordi.
Per far partire automaticamente il ritmo di accompagnamento e l'accordo di accompagnamento
quando si suonano i tasti:
1. Selezionare il ritmo di accompagnamento desiderato (come descritto nella sezione precedente del
manuale).
2. Premere il tasto Sync. Per indicare che Sync è attivato, un puntino a Display pulserà a tempo con il
tempo attualmente selezionato.
3. Premere il tasto Single Chord o Fingered Chord per attivare la funzione di accordo di
accompagnamento.
4. Suonare i tasti necessari per produrre l’accordo di accompagnamento desiderato. Non appena si
suonano i tasti, il ritmo di accompagnamento e l'accordo di accompagnamento attualmente selezionati
si avvieranno automaticamente (senza dover premere il tasto Start/Stop).
5. Una volta finito con il ritmo e l’accordo di accompagnamento, premere il tasto Start/Stop per fermarli.
39

Programmazione del ritmo
Si può utilizzare la funzione di programmazione del ritmo per creare il proprio ritmo di batteria
personalizzato per accompagnarsi mentre si suonano i tasti.
Per creare un ritmo di accompagnamento personalizzato:
1. Premere il tasto Program per entrare in modalità di programmazione. Prg appare a Display, e i tasti
passano automaticamente ai suoni di percussione.
2. Programmare il ritmo suonando ciascun suono di batteria nell’ordine che si desidera per sentirlo
ripetuto nel pattern ritmico. Si possono riprodurre i suoni di batteria con i tasti o con i tasti di Batteria.
Se si usano i tasti, vedere l'immagine sopra ogni tasto al fine di sapere che suono tamburo un tasto
suonerà. Il ritmo programmato può contenere fino a 32 suoni di batteria. Ciascun suono di batteria nel
pattern sarà della lunghezza di un quarto di nota.
Nota bene: non è possibile programmare la riproduzione di due suoni di percussioni
contemporaneamente.
3. Premere Play per interrompere la programmazione e sentire la riproduzione di un ritmo su un loop. Ply
compare a Display.
4. Dopo aver premuto Play, i tasti torneranno automaticamente all’ultima tonalità selezionata ed è
possibile suonare con il proprio ritmo personalizzato.
Per modificare il tempo del ritmo personalizzato, premere il tasto Tempo + o Tempo -. Premere
contemporaneamente i tasti Tempo + e Tempo - per ripristinare il tempo predefinito (120 BPM).
Per regolare il volume del ritmo personalizzato, premere il tasto Rhythm Vol + o Rhythm Vol –. Premere
contemporaneamente i tasti Rhythm Vol + e Rhythm Vol – per ripristinare il livello di volume predefinito
(indicato a Display come A07).
Per interrompere la riproduzione del ritmo personalizzato, premere nuovamente il tasto Play. La tastiera
rientrerà in modalità di Programmazione e sarà possibile programmare un nuovo ritmo o premere il tasto
Play per avviare il ritmo programmato in precedenza. Alternativamente, è possibile interrompere la
riproduzione di un ritmo personalizzato premendo il tasto Program; questo farà uscire la tastiera dalla
modalità di Programmazione e cancellerà il ritmo che era in corso di riproduzione. Quando si esce dalla
modalità di Programmazione, OFF comparirà temporaneamente a Display.
Nota bene: se si spegne la tastiera mentre si utilizza un ritmo personalizzato, questo verrà cancellato.
Suggerimento: con la modalità di programmazione attivata, premere il tasto Single Chord mentre un ritmo
personalizzato sta suonando o è fermo. Ciò consentirà di utilizzare l’accordo abbreviato (descritto nella
sezione precedente) sui tasti al di sotto di G2 per suonare accordi interi. Gli accordi non verranno riprodotti
automaticamente con il ritmo personalizzato; questi smetteranno di suonare quando vengono rilasciati i
tasti. Tuttavia, sarà ancora possibile suonare accordi completi con il tocco rapido di 1-3 tasti adiacenti.
40

Registrazione
Si può utilizzare la funzione di registrazione del Melody 54 per registrarsi mentre si suona il piano.
Per registrare la propria esibizione:
1. Premere il tasto Record per entrare in modalità di registrazione. REC rimarrà a Display.
2. Una volta finito di suonare ciò che si desidera registrare, premere il tasto Play per fermare la
registrazione e, automaticamente, sentirne la riproduzione. Ply rimane a Display.
3. Una volta finita la riproduzione della registrazione, la tastiera rientrerà in modalità di registrazione. Si
può effettuare una nuova registrazione suonando i tasti o premendo Play per sentire nuovamente la
registrazione precedente.
Nota bene: Se una registrazione è ancora in corso di riproduzione, è possibile premere il tasto Play per
fermarla e rientrare in modalità di registrazione.
Nota bene: se la memoria della tastiera si riempie mentre si sta registrando, a Display compare FUL, e
la tastiera entrerà nuovamente in modalità di registrazione. Si può quindi premere Play per ascoltare la
registrazione o sovrascriverla suonando i tasti.
Per uscire in modalità di registrazione, premere il tasto Record. Questo cancellerà la registrazione.
Nota bene: se si spegne la tastiera quando ci si trova in modalità di registrazione, qualsiasi registrazione
verrà cancellata.
Nota bene: in modalità di registrazione, non è possibile utilizzare la modalità Split, la modalità Dual o i
ritmi/gli accordi di accompagnamento.
Canzoni demo
Il Melody 54 è dotato di 40 canzoni demo tra cui scegliere e da suonare.
Per avviare la riproduzione di una canzone demo, premere il tasto Demo. La canzone demo attualmente
selezionata rimarrà a Display e inizierà a essere riprodotta.
Per cambiare la canzone demo, servirsi dei tasti numerici o dei tasti + / - durante la riproduzione di una
canzone demo. Quando viene selezionata una nuova canzone, il Display si aggiorna.
Per fermare una canzone demo in corso di riproduzione, premere nuovamente il tasto Demo.
One-Key
La funzione One-Key consente di riprodurre una canzone demo servendosi dei tasti del Melody 54. Ogni
volta in cui viene premuto un singolo tasto, verrà riprodotto un breve segmento della canzone demo.
Premendo ripetutamente uno qualsiasi dei tasti a tempo, è possibile suonare l’intera canzone demo. Questa
funzione è particolarmente utile per i pianisti principianti, in quanto consente loro di sperimentare cosa
significhi suonare una canzone sulla tastiera senza dover conoscere i tasti giusti da suonare.
Per utilizzare i tasti per riprodurre una canzone demo:
1. Premere il tasto One Key. La canzone demo attualmente selezionata (così come illustrata a Display) e
inizierà automaticamente a essere riprodotta. Se si desidera cambiare canzone, servirsi dei tasti
numerici o dei tasti + / -.
2. Premere e rilasciare qualsiasi tasto; questo fermerà la canzone demo dalla sua riproduzione
automatica.
3. Premere ripetutamente uno qualsiasi dei tasti a tempo per suonare la canzone demo.
4. Una volta finito, premere nuovamente il tasto One Key per uscire da questa modalità.
41

Benutzerhandbuch (Deutsch)
Einführung
Lieferumfang
Melody 54
Mikrofon
Netzteil
Notenständer
Benutzerhandbuch
Sicherheitshinweise und Garantieinformationen
Kundendienst
Für die neuesten Informationen zu diesem Produkt (Systemanforderungen, Informationen zur
Kompatibilität etc.) und für die Produktregistrierung besuchen Sie alesis.com.
Für zusätzlichen Produkt-Support besuchen Sie alesis.com/support.
Setup
Anschlussdiagramm
Teile, die nicht unter Einführung > Lieferumfang angegeben sind, sind separat erhältlich.
42
Mikrofon Stromversorgung
MIC
PHONES
DC 12V
DC 9V
Kopfhörer
(separat erhältlich)

Funktionen
Oberseite
28
26
27
13
21
20
25
12
1 3
22
4
23
24
2
5
14
6
15
16
17 18
1. Power Ein/Aus: Drücken Sie diese Taste, um das Keyboard ein-/auszuschalten.
Hinweis: Nach 5 Minuten Inaktivität schaltet sich Melody 54 aus. Wenn Sie eine beliebige Taste
drücken, schaltet sich das Gerät wieder ein.
2. Display: Diese LED-Anzeige wird aktualisiert, wenn Sie Einstellungen wie Klangfarbe, Rhythmus, Tempo
usw. ändern. Nach dem Einschalten zeigt das Display standardmäßig das aktuell ausgewählte Tempo an.
3. Master Volume: Drehen Sie den Master Volume -Regler, um die Gesamtlautstärke des Keyboards zu
erhöhen oder zu verringern.
4. Zifferntasten und + / - Tasten: Verwenden Sie diese Tasten, um den Klang, den Begleitrhythmus oder
den Demo-Song zu ändern. Drücken Sie vor der Verwendung der Ziffern- oder + / - Tasten die Taste,
die der Einstellung entspricht, die Sie ändern möchten.
5. Demo: Drücken Sie diese Taste, um die Wiedergabe eines Demo-Songs zu starten. Weitere
Informationen finden Sie unter Betrieb > Demo-Songs.
6. To ne : Drücken Sie diese Taste und wählen Sie mit den Zifferntasten oder den Tasten + oder - einen
Tone aus. Weitere Informationen finden Sie unter Betrieb > Auswählen des Keyboard-Tone.
7. Sustain: Drücken Sie diese Taste, um den Sustain-Effekt zu aktivieren oder zu deaktivieren. Weitere
Informationen finden Sie unter Betrieb > Auswählen des Keyboard-Tone.
8. Vibrato: Drücken Sie diese Taste, um den Vibrato-Effekt zu aktivieren oder zu deaktivieren. Weitere
Informationen finden Sie unter Betrieb > Auswählen des Keyboard-Tone.
9. Dual: Drücken Sie diese Taste, um zwei Tones übereinander zu legen. Weitere Informationen finden Sie
unter Betrieb > Auswählen des Keyboard-Tone.
10. Split: Drücken Sie diese Taste, um einen Tone auf einer Seite der Keyboards und einen separaten Tone
auf der anderen Seite zu verwenden. Weitere Informationen finden Sie unter Betrieb > Auswählen des
Keyboard-Tone.
11. Percussion: Drücken Sie diese Taste, um mit den Tasten Percussion-Sounds zu spielen. On erscheint
vorübergehend auf dem Display, wenn die Percussion-Sounds aktiviert sind. Sehen Sie sich das Bild
über jeder Taste an, um zu erfahren, welchen Schlagzeugton eine Taste spielt. Drücken Sie erneut auf
die Percussion -Taste, um diese Funktion zu deaktivieren. Bei Deaktivierung wird vorübergehend OFF
auf dem Display angezeigt.
12. Transpose: Drücken Sie die Transpose + oder Transpose – Ta s te , um die Tonhöhe des Keyboards
um einen Halbton zu erhöhen oder zu verringern. Weitere Informationen finden Sie unter Betrieb >
Auswählen des Keyboard-Tone.
13. Beat: Drücken Sie diese Taste, um zwischen den verschiedenen Metronomeinstellungen umzuschalten:
1/4, 2/4, 3/4, 4/4 und Aus. Wenn Sie das Keyboard einschalten, ist das Metronom standardmäßig auf
Aus eingestellt. Beim Ändern der Einstellung zeigt das Display die ausgewählte Einstellung
vorübergehend an. Während das Metronom spielt, blinken am Display drei Punkte für den ersten
Taktschlag eines Taktes und ein einzelner Punkt für jeden verbleibenden Taktschlag. Verwenden Sie die
Te mp o / - Tasten, um das Tempo des Metronoms zu ändern.
19
29
7 8
9 10
11
43

14. Rhythm: Drücken Sie diese Taste und verwenden Sie die Zifferntasten oder + / - Tasten, um einen
Begleitrhythmus auszuwählen. Weitere Informationen finden Sie unter Betrieb > Hinzufügen von
Hintergrundmusik > Begleitrhythmen.
15. Start/Stop: Drücken Sie diese Taste, um einen Begleitrhythmus zu starten oder zu stoppen. Weitere
Informationen finden Sie unter Betrieb > Hinzufügen von Hintergrundmusik > Begleitrhythmen.
16. Sync: Drücken Sie diese Taste, um die Sync-Funktion zu aktivieren. Wenn die Sync-Funktion aktiviert
ist, startet das Spielen einer beliebigen Taste unterhalb von G2 automatisch den aktuell ausgewählten
Begleitrhythmus (damit Sie nicht die Start/Stop-Taste drücken müssen).Weitere Informationen finden
Sie unter Betrieb > Hinzufügen von Hintergrundmusik > Begleitrhythmen.
17. Fill In: Drücken Sie diese Taste während ein Begleitrhythmus wiedergegeben wird, damit das Keyboard
vorübergehend einen neuen Rhythmus oder „Drum-Fill“ spielt. Weitere Informationen finden Sie unter
Betrieb > Hinzufügen von Hintergrundmusik > Begleitrhythmen.
18. Intro/Ending: Drücken Sie diese Taste, um das Keyboard entweder als Intro- oder End-Drumbeat zu
spielen, je nachdem, ob bereits ein Begleitrhythmus gespielt wird. Weitere Informationen finden Sie
unter Betrieb > Hinzufügen von Hintergrundmusik > Begleitrhythmen.
19. One-Key: Drücken Sie diese Taste, um die One-Key-Funktion zu aktivieren. Wenn diese Funktion
aktiviert ist, können Sie jeweils eine Taste spielen, um einen Demo-Song abzuspielen. Weit ere
Informationen finden Sie unter Betrieb > Demo-Songs.
20. Tempo: Drücken Sie die Tempo + oder Tempo – Tas t e, um die BPM-Einstellung des Keyboards zu
ändern. Dies beeinflusst die Wiedergabe der Rhythmus- und Akkordbegleitungen, Demo-Songs und
des Metronoms. Drücken Sie gleichzeitig die Tempo + und Tempo – Tas te n , um das Tempo auf den
Standardwert (120 BPM) zurückzusetzen.
21. Rhythm Volume: Drücken Sie die Taste Rhythm Vol + oder Rhythm Vol – Taste, um die Lautstärke der
Begleitung zu erhöhen oder zu verringern. Drücken Sie gleichzeitig Rhythm Vol + und
Rhythm Vol –,
um die Standardlautstärke (A07) wiederherzustellen.
22. Single Chord: Drücken Sie diese Taste, um die Begleit-Akkordfunktion zu aktivieren. Wenn diese
Funktion aktiviert ist, können Sie die Tasten unter G2 verwenden, um Akkorde zu erzeugen, die
automatisch mit dem ausgewählten Begleitrhythmus gespielt werden. Durch Drücken der Single Chord
-Taste (im Gegensatz zu Fingered Chord) können Sie komprimierte Akkordformen verwenden, anstatt
alle Tasten zu verwenden, die normalerweise für einen vollen Akkord erforderlich sind. Weitere
Informationen finden Sie unter Betrieb > Hinzufügen von Hintergrundmusik > Begleitakkorde.
23. Fingered Chord: Drücken Sie diese Taste, um die Begleit-Akkordfunktion zu aktivieren. Wenn diese
Funktion aktiviert ist, können Sie die Tasten unter G2 verwenden, um Akkorde zu erzeugen, die
automatisch mit dem ausgewählten Begleitrhythmus gespielt werden. Wenn Sie die Fingered Chord -
Ta st e drücken (im Gegensatz zu Single Chord), müssen Sie für jeden Akkord vollständige
Akkordformen anstelle eines komprimierten Tastensatzes spielen. Weitere Informationen finden Sie
unter Betrieb > Hinzufügen von Hintergrundmusik > Begleitakkorde.
24. Chord Clear: Drücken Sie diese Taste, um die Akkordfunktion für die Begleitung auszuschalten.
25. Chord Volume: Drücken Sie Chord Vol + oder Chord Vol –, um die Lautstärke der Begleitung zu
erhöhen oder zu verringern. Drücken Sie die Tasten Chord Vol + und Chord Vol – gleichzeitig, um die
Akkorde der Begleitung auf ihre Standardlautstärke (u07) zurückzusetzen.
26. Program: Drücken Sie diese Taste, um einen benutzerdefinierten Begleitrhythmus zu programmieren.
Weitere Informationen finden Sie unter Betrieb > Hinzufügen von Hintergrundmusik >
Rhythmusprogrammierung.
27. Record: Drücken Sie diese Taste, um einen Song aufzunehmen. Siehe Betrieb > Aufnahme für
nähere Informationen.
28. Play: Drücken Sie diese Taste, um einen benutzerdefinierten Begleitrhythmus oder aufgezeichneten
Song abzuspielen.
29. Schlagzeug-Tasten: Drücken Sie diese Tasten, um Percussion-Sounds abzuspielen. Sehen Sie sich
die Bilder auf den Tasten an, um festzustellen, welche Taste welchen Soundtyp spielt. Die Schlagzeug-
Ta st e n sind besonders nützlich für die Rhythmus-Programmierungsfunktion. Weitere Informationen
finden Sie unter Betrieb > Hinzufügen von Hintergrundmusik > Rhythmusprogrammierung.
44

1
1
2 3
Rückseite
1. Mic: Schließen Sie hier das inkludierte Mikrofon an, um Ihr
Spiel am Keyboard mit Gesang zu begleiten.
2. Kopfhörer (1/8” / 3,5 mm TRS): Schließen Sie Kopfhörer
(nicht im Lieferumfang enthalten) an diesen Ausgang an, um
das Keyboard zu hören.
Hinweis: Wenn Sie den Phones-Ausgang verwenden,
werden dabei die internen Lautsprecher des Keyboards
stummgeschaltet.
3. Netzeingang: Schließen Sie das mitgelieferte Netzteil hier
an.
MIC
PHONES
DC 12V
DC 9V
Unterseite
1. Batteriefach: Legen Sie hier 6 AA-Batterien ein, um das
Keyboard mit Strom zu versorgen, wenn Sie kein Netzteil
verwenden.
Betrieb
Auswählen des Keyboard-Tone
Melody 54 verfügt über 300 einzigartige Töne, aus denen Sie wählen können.
So wählen Sie einen Ton für die Tastatur aus:
1. Drücken Sie die Tone-Taste.
2. Verwenden Sie die Zifferntasten, um einen bestimmten Tone auszuwählen, oder verwenden Sie die
Tasten + / –, um die Sounds nacheinander zu durchlaufen. Folgen Sie der Anleitung am oberen Rand
des Keyboards, um zu sehen, welche Tones welchen Nummern entsprechen. Die Nummer, die dem
aktuell ausgewählten Tone entspricht, wird auf dem Display des Keyboards aktualisiert.
3. Spielen Sie das Keyboard, um den ausgewählten Tone zu hören.
Um den Tone mit dem Sustain-Effekt der Tastatur zu erweitern, drücken Sie die Sustain-Taste. SUS
wird vorübergehend auf dem Display angezeigt. Wenn diese Funktion aktiviert ist, klingen die Noten beim
Spielen länger aus und ahmen den Effekt des Sustain-Pedals eines akustischen Pianos nach. Diese
Funktion kann auf alle 300 Tones des Keyboards angewendet werden. Um den Effekt zu deaktivieren,
drücken Sie erneut die Sustain -Taste. Auf dem Display erscheint vorübergehend OFF.
Um den Tone mit dem Vibrato-Effekt der Tastatur zu erweitern, drücken Sie die Vibrato-Taste. Vib wird
vorübergehend auf dem Display angezeigt. Wenn diese Funktion aktiviert ist, wird die Tonhöhe der Noten
beim Spielen leicht nach angehoben und abgesenkt. Diese Funktion kann auf alle 300 Tones des Keyboards
angewendet werden. Um den Effekt zu deaktivieren, drücken Sie erneut die Vibrato -Taste. Auf dem
Display erscheint vorübergehend OFF.
Drücken Sie die Transpose + oder Transpose – Taste, um die Tonhöhe des Keyboards um einen Halbton
nach oben oder unten zu bewegen. Das Keyboard kann sechs Halbtöne nach oben oder unten transponiert
werden. Das Display zeigt vorübergehend die neue Einstellung an, sobald diese geändert wurde. Drücken
Sie die Tasten Transpose + and Transpose – gleichzeitig, um das Keyboard auf den voreingestellten
Tonhöhenbereich von C1–F6 (angezeigt durch die Ziffern 00 im Display) zurückzusetzen.
45

Dual-Modus
Im Dual-Modus können zwei verschiedene Tones zusammengelegt werden.
So legen Sie zwei Tones übereinander:
1. Drücken Sie die Dual-Taste. dOU wird vorübergehend auf dem Display angezeigt. Der vor dem
Drücken der Dual-Taste ausgewählte Tone wird automatisch als erster Tone in der Ebene verwendet.
2. Um den Tone für die hinzugefügte Ebene zu ändern, wählen Sie mit den Zifferntasten einen
bestimmten Tone aus oder verwenden die + / – Tasten, um die Tones nacheinander zu durchlaufen.
Folgen Sie der Anleitung am oberen Rand des Keyboards, um zu sehen, welche Tones welchen
Nummern entsprechen. Die Nummer, die dem aktuell ausgewählten Tone entspricht, wird auf dem
Display des Keyboards aktualisiert.
Hinweis: Wenn Sie zu Schritt 2 gelangen, wird automatisch der Tone ausgewählt, den Sie zuletzt für
die hinzugefügte Ebene verwendet haben. Wenn Sie nach dem Einschalten des Keyboards zum ersten
Mal in den Dual-Modus wechseln, wird automatisch t48 (Ensemble) ausgewählt.
3. Spielen Sie das Keyboard, um die zwei Tones gleichzeitig zu hören.
Um den Dual-Modus zu verlassen, drücken Sie erneut die Dual-Taste. OFF wird vorübergehend auf dem
Display angezeigt.
Split-Modus
Im Split-Modus können Sie die 54 Tasten in zwei Zonen aufteilen, so dass Sie für jede Hand auf der Tastatur
einen Tone einstellen können. Zum Beispiel können Sie einen der Pianotöne für Ihre rechte Hand und einen
der Basstöne für Ihre linke Hand einstellen.
So verwenden Sie den Split-Modus:
1. Drücken Sie die Split-Taste. SPL wird vorübergehend auf dem Display angezeigt. Der vor dem
Drücken der Split-Taste ausgewählte Tone wird dem linken Bereich des Keyboards zugeordnet.
Hinweis: Der linke Bereich des Keyboards wird um eine Oktave angehoben, während der rechte
Bereich um eine Oktave abgesenkt wird. Das heißt, wenn die Tastatur auf die Standardtransposition
eingestellt ist, ist die linke Zone C2–B3 und die rechte Zone C2–F4.
2. Um den Tone für die rechte Zone des Keyboards auszuwählen, wählen Sie einen bestimmten Klang mit
den Zifferntasten, den Tasten + / – oder gehen die Töne nacheinander durch. Folgen Sie der Anleitung
am oberen Rand des Keyboards, um zu sehen, welche Tones welchen Nummern entsprechen. Die
Nummer, die dem aktuell ausgewählten Tone entspricht, wird auf dem Display des Keyboards
aktualisiert.
3. Spielen Sie das Keyboard, um die ausgewählten Tones zu hören.
Um den Split-Modus zu beenden, drücken Sie erneut die Split-Taste. OFF wird vorübergehend auf dem
Display angezeigt.
Hinweis: Split- und Dual-Modus können nicht gleichzeitig verwendet werden.
46

Hinzufügen von Hintergrundmusik
Begleitrhythmen
Wenn Sie einen Drumloop während des Klavierspiels begleiten möchten, bietet Melody 54 300 einzigartige
Rhythmen, aus denen Sie wählen können.
So wählen Sie einen Begleitrhythmus aus:
1. Drücken Sie die Rhythm-Taste.
2. Verwenden Sie die Zifferntasten, um einen bestimmten Rhythmus auszuwählen, oder verwenden Sie
die Tasten + / –, um die Rhythmen nacheinander zu durchlaufen. Folgen Sie der Anleitung am oberen
Rand des Keyboards, um zu sehen, welche Rhythmusstile welchen Nummern entsprechen. Die
Nummer, die dem aktuell ausgewählten Rhythmus entspricht, wird auf dem Display des Keyboards
aktualisiert.
Um den aktuell ausgewählten Begleitrhythmus zu starten oder zu stoppen, drücken Sie die Start/Stop
-Taste.
Tipp: Um das Timing des Begleitrhythmus zu sehen, werfen Sie einen Blick auf das Display, auf dem drei
Punkte für den ersten Schlag eines Taktes und ein einzelner Punkt für jeden verbleibenden Schlag blinken.
Um das Tempo des Begleitrhythmus zu ändern, drücken Sie die Taste Tempo + oder die Tempo -, um
das Tempo zu erhöhen oder zu verringern. Drücken Sie gleichzeitig die Tasten Tempo + und Tempo -, um
das Tempo auf den Standardwert (120 BPM) zurückzusetzen.
Um die Lautstärke des Begleitrhythmus einzustellen, drücken Sie die Taste Rhythm Vol + oder Rhythm
Vol –. Drücken Sie gleichzeitig die Tasten Rhythm Vol + und Rhythm Vol –, um die Standardlautstärke (auf
dem Display als A07 angezeigt) wiederherzustellen.
Um einen Drum-Fill in den Begleitrhythmus einzufügen, drücken Sie die Taste Fill In, während der
Begleitrhythmus spielt. Der Begleitrhythmus kehrt nach dem Fill automatisch zu seinem regulären Muster
zurück. Der Drum-Fill hängt davon ab, wann Sie auf Fill In drücken.
Um einen Intro-Drumbeat für den ausgewählten Begleitrhythmus zu spielen, drücken Sie die Taste
Intro/Ending, während der Begleitrhythmus nicht abgespielt wird. Der Intro-Drum-Beat ist zwei Takte lang,
anschließend beginnt der Begleit-Rhythmus automatisch zu spielen.
Um einen Outro-Drumbeat für den ausgewählten Begleitrhythmus zu spielen, drücken Sie die Taste
Intro/Ending, während der Begleitrhythmus abgespielt wird. Nachdem Sie die Taste gedrückt haben, wird
der Outro-Drumbeat zwei Takte lang gespielt und der Begleitrhythmus stoppt automatisch.
So starten Sie den Begleitrhythmus automatisch, wenn Sie auf den Tasten spielen:
1. Wählen Sie den gewünschten Begleitrhythmus (wie zuvor in diesem Abschnitt des Handbuchs
beschrieben).
2. Drücken Sie die Sync-Taste. Um anzuzeigen, dass Sync aktiviert ist, pulsiert ein Punkt auf dem
Display mit dem aktuell ausgewählten Tempo.
3. Spielen Sie eine der Tasten unter G2. Sobald Sie auf die Taste(n) drücken, startet automatisch der
aktuell ausgewählte Begleitrhythmus (ohne dass Sie die Start/Stop Taste drücken müssen).
4. Wenn Sie mit dem Begleitrhythmus fertig sind, drücken Sie die Start/Stop Taste, um ihn zu stoppen.
Wenn Sie die Synchronisierungsfunktion erneut verwenden möchten, wiederholen Sie die Schritte 1 bis
2.
47

Begleitakkorde
Wenn Sie sowohl einen Drumbeat als auch Akkordharmonien beim Begleiten des Keyboards haben
möchten, können Sie die Akkordfunktion für die Begleitung verwenden.
Wenn diese Funktion aktiviert ist, spielt das Keyboard automatisch Musik, die auf einen bestimmten PianoAkkord ausgerichtet ist, der arpeggiert und oder von anderen Instrumenten (z. B. einer Bassgitarre) begleitet
werden kann. Die abgespielte Musik entspricht dem Stil des aktuell ausgewählten Begleitrhythmus. Die
Musik passt sich auch an, wenn ein Drum-Fill oder Intro-/Outro-Drumbeat ausgewählt wird.
Sie müssen die Tasten unter G2 verwenden, um den Begleitungsakkord zu erzeugen. Es gibt vier Optionen:
Dur-, Moll-, Dominantseptakkord oder kleine Septime.
So verwenden Sie die Begleitakkordfunktion:
1. Wählen Sie den gewünschten Begleitrhythmus (wie im vorigen Abschnitt des Handbuchs beschrieben).
2. Drücken Sie die Single Chord-Taste oder die Fingered Chord-Taste. Das Display wird
vorübergehend aktualisiert, um anzuzeigen, welche Option ausgewählt wurde. Lesen Sie weiter für
nähere Informationen zu diesen beiden Optionen.
3. Drücken Sie die Start/Stop-Taste, um den Begleitrhythmus zu spielen.
Hinweis: Es ist egal, in welcher Reihenfolge Sie die Schritte 2 und 3 ausführen.
4. Spielen Sie die Tasten, um den gewünschten Begleitakkord zu erzeugen. Welche Tasten Sie spielen
müssen, hängt davon ab, ob Sie die Taste Single Chord oder Fingered Chord verwendet haben.
Lesen Sie weiter für mehr Details.
Single Chord:
Wenn Sie die Single Chord-Taste drücken, können Sie mit wenigen Tasten schnell einen Begleitakkord
erzeugen.
Um einen Akkord zu erzeugen, drücken Sie die Tasten, die dem Akkord entsprechen, den Sie spielen
möchten (siehe Abbildung unten). Die Punkte in den Diagrammen zeigen die Tasten, die Sie für einen CAkkord spielen würden. Das gleiche Prinzip kann auf jede Grundnote angewendet werden. Denken Sie
daran, dass Sie die Tasten unterhalb von G2 verwenden müssen.
Fingered Chord:
Wenn Sie die Fingered Chord-Taste drücken, müssen Sie einen vollen Dur-, Moll-, Dominantseptakkord
oder eine kleine Septime spielen, um ihn im Rhythmus der Begleitung zu hören.
Um einen Akkord zu erzeugen, spielen Sie den vollen Dur-, Moll-, Dominantseptakkord oder eine kleine
Septime. Die vier C-Akkorde sind beispielsweise unten abgebildet, mit Punkten auf jeder Note im Akkord.
Denken Sie daran, dass Sie die Tasten unterhalb von G2 verwenden müssen.
48
Grundnote (C)
Grundnote (C)

Um die Lautstärke des Begleitakkords einzustellen, drücken Sie Chord Vol + oder Chord Vol – Taste.
Drücken Sie gleichzeitig die Chord Vol + und Chord Vol – Tasten, um den Standardlautstärkepegel
zurückzusetzen (am Display als u07 angezeigt).
Drücken Sie die Chord Clear-Taste, um die automatische Wiedergabe des Begleitakkords zu stoppen.
Hinweis: Wenn die Begleit-Akkordfunktion aktiviert ist, können Sie den Dual-Modus, aber nicht den Split-
Modus verwenden. Die Akkorde werden gestoppt, wenn Sie die Split-Taste drücken, während die
Begleitakkorde gespielt werden.
Damit sowohl Begleitrhythmus als auch der Begleitakkord automatisch zu spielen beginnen, wenn
Sie die Klaviatur betätigen, gehen Sie wie folgt vor:
1. Wählen Sie den gewünschten Begleitrhythmus (wie im vorigen Abschnitt des Handbuchs beschrieben).
2. Drücken Sie die Sync-Taste. Um anzuzeigen, dass Sync aktiviert ist, pulsiert ein Punkt auf dem
Display mit dem aktuell ausgewählten Tempo.
3. Drücken Sie die Taste Single Chord oder Fingered Chord, um die Begleit-Akkordfunktion zu
aktivieren.
4. Spielen Sie die Tasten, um den gewünschten Begleitakkord zu erzeugen. Sobald Sie auf die Taste(n)
drücken, startet der aktuell ausgewählte Begleitrhythmus und der Begleitakkord automatisch (ohne
dass Sie die Start/Stop-Taste drücken müssen).
5. Wenn Sie Begleitrhythmus und Akkord beenden möchten, drücken Sie die Start/Stop-Taste, um sie zu
stoppen.
49

Rhythmusprogrammierung
Sie können die Rhythmus-Programmierfunktion verwenden, um Ihren eigenen benutzerdefinierten DrumRhythmus zu erstellen, der Sie beim Spielen der Tasten begleitet.
So erstellen Sie einen benutzerdefinierten Begleitrhythmus:
1. Drücken Sie die Program-Taste, um den Programmiermodus aufzurufen. Auf dem Display wird Prg
angezeigt, und die Tasten wechseln automatisch zu den Percussion-Sounds.
2. Programmieren Sie den Rhythmus, indem Sie jeden Drum-Sound in der Reihenfolge spielen, in der Sie
ihn im Rhythmus-Pattern wiederholen möchten. Sie können die Drum-Sounds mit den Tasten oder mit
den Schlagzeug-Tasten spielen. Wenn Sie die Tasten verwenden, sehen Sie sich das Bild über jeder
Taste an, um zu erfahren, welchen Schlagzeugton eine Taste spielt. Der programmierte Rhythmus kann
bis zu 32 Drum-Sounds enthalten. Jeder Drum-Sound im Pattern hat die Länge einer Viertelnote.
Hinweis: Sie können nicht zwei Percussion-Sounds gleichzeitig programmieren.
3. Drücken Sie Play, um die Programmierung zu beenden und den Rhythmus in einem Loop zu hören. Ply
erscheint auf dem Display.
4. Nach dem Drücken von Play kehren die Tasten automatisch zum zuletzt ausgewählten Ton zurück, und
Sie können zu Ihrem eigenen Rhythmus spielen.
Um das Tempo des benutzerdefinierten Rhythmus zu ändern, drücken Sie die Taste Tempo + oder
Tempo -. Drücken Sie gleichzeitig die Tasten Tempo + und Tempo -, um das Tempo auf den Standardwert
(120 BPM) zurückzusetzen.
Um die Lautstärke des erstellten Rhythmus einzustellen, drücken Sie die Taste Rhythm Vol + oder
Rhythm Vol –. Drücken Sie gleichzeitig die Tasten Rhythm Vol + und Rhythm Vol –, um die
Standardlautstärke (auf dem Display als A07 angezeigt) wiederherzustellen.
Um die Wiedergabe des benutzerdefinierten Rhythmus zu stoppen, drücken Sie erneut die Taste Play.
Das Keyboard wechselt wieder in den Programmiermodus und Sie können einen neuen Rhythmus
programmieren oder die Play-Taste drücken, um den zuvor programmierten Rhythmus zu starten. Alternativ
können Sie auch den Rhythmus eines benutzerdefinierten Rhythmus stoppen, indem Sie die Program-
Ta st e drücken. Dadurch verlässt das Keyboard den Programmiermodus und löscht den gespielten
Rhythmus. Wenn Sie den Programmiermodus verlassen, erscheint vorübergehend OFF auf dem Display.
Hinweis: Wenn Sie das Keyboard ausschalten, während Sie einen benutzerdefinierten Rhythmus
verwenden, wird dieser Rhythmus gelöscht.
Tipp: Wenn der Programmiermodus aktiviert ist, drücken Sie die Single Chord-Taste, während ein
benutzerdefinierter Rhythmus abgespielt oder angehalten wird. Auf diese Weise können Sie die reduzierten
Akkordformen (im vorherigen Abschnitt dargestellt) auf den Tasten unter G2 verwenden, um volle Akkorde
zu spielen. Die Akkorde werden nicht automatisch mit dem benutzerdefinierten Rhythmus mitgespielt. Sie
verklingen, wenn Sie die Tasten loslassen. Sie haben jedoch immer noch die Möglichkeit, volle Akkorde zu
spielen, indem Sie schnell 1-3 benachbarte Tasten drücken.
50

Aufnahme
Sie können die Aufnahmefunktion von Melody 54 verwenden, um sich selbst am Klavier aufzunehmen.
So nehmen Sie Ihr eigenes Spiel auf:
1. Drücken Sie erneut die Record-Taste, um in den Aufnahmemodus zu gelangen. REC wird weiterhin auf
dem Display angezeigt.
2. Wenn Sie mit dem gewünschten Lied fertig sind, drücken Sie die Play-Taste, um die Aufnahme zu
stoppen und die Wiedergabe automatisch zu hören. Ply wird weiterhin auf dem Display angezeigt.
3. Wenn die Wiedergabe der Aufnahme beendet ist, wechselt das Keyboard wieder in den
Aufnahmemodus. Sie können dann eine neue Aufnahme erstellen, indem Sie die Tasten spielen oder
Play drücken, um die vorherige Aufnahme wiederzugeben.
Hinweis: Wenn noch eine Aufnahme läuft, können Sie die Play-Taste drücken, um die Aufnahme zu
stoppen und in den Aufnahmemodus zurückzukehren.
Hinweis: Wenn der Keyboard-Speicher während der Aufnahme zu voll wird, zeigt das Display FUL an
und das Keyboard wechselt wieder in den Aufnahmemodus. Sie können dann auf Play drücken, um die
Aufnahme anzuhören oder sie durch Spielen der Tasten zu überschreiben.
Um den Aufnahmemodus zu verlassen, drücken Sie die Record-Taste. Dadurch wird die Aufnahme
gelöscht.
Hinweis: Wenn Sie das Keyboard im Aufnahmemodus ausschalten, werden jegliche Aufnahmen gelöscht.
Hinweis: Im Aufnahmemodus können Sie den Split-Modus, den Dual-Modus oder die
Begleitrhythmen/Akkorde nicht verwenden.
Demo-Songs
Melody 54 enthält 40 Demo-Songs, aus denen Sie auswählen und spielen können.
Um die Wiedergabe eines Demo-Songs zu starten, drücken Sie die Demo-Taste. Der aktuell ausgewählte
Demo-Song bleibt auf dem Display und beginnt zu spielen.
Um den Demo-Song zu ändern, verwenden Sie die Zifferntasten oder die + / - Tasten, während ein
Demo-Song abgespielt wird. Das Display wird aktualisiert, wenn Sie einen neuen Titel auswählen.
Um einen gerade laufenden Demo-Song zu stoppen, drücken Sie erneut die Demo-Taste.
One-Key
Mit der One-Key-Funktion können Sie einen Demo-Song mit den Tasten von Melody 54 abspielen. Bei
jedem Tastendruck wird ein kurzer Abschnitt des Demo-Songs abgespielt. Durch wiederholtes Drücken
einer beliebigen Taste können Sie den vollständigen Demo-Song abspielen. Diese Funktion ist besonders
für Anfänger geeignet, da sie auf diese Weise das Spielen eines Songs auf der Tastatur erleben können,
ohne dass sie die richtigen Tasten zum Spielen kennen müssen.
So verwenden Sie die Tasten zum Abspielen eines Demo-Songs:
1. Drücken Sie die One Key-Taste. Der aktuell ausgewählte Demo-Song (wie im Display angezeigt) wird
automatisch abgespielt. Wenn Sie den Song ändern möchten, verwenden Sie die Zifferntasten oder
die + / - Tasten.
2. Drücken Sie eine beliebige Taste, und lassen Sie sie wieder los. Dadurch wird die automatische
Wiedergabe des Demo-Songs gestoppt.
3. Durch wiederholtes Drücken einer beliebigen Taste können Sie den vollständigen Demo-Song
abspielen.
4. Wenn Sie fertig sind, drücken Sie erneut die One Key-Taste, um diesen Modus zu verlassen.
51

52

Appendix (English)
Tones
000–007 Piano 072–079 Flute 144–159 Synth Guitar
008–015 Mallet 080–087 Lead 160–199 Synth Orchestra
016–023 Organ 088–095 Pads 200–219 Synth Brass
024–031 Guitar 096–103 FX 220–239 Synth Reeds
032–039 Bass 104–111 Ethnic 240–245 Synth Electronic
040–047 Strings 112–119 Percussion 246–299 Synth World
048–055 String Ensemble 120–128 Pads
056–063 Brass 129–133 Synth Percussion
064–071 Clarinet 134–143 Synth Organ
Rhythms
000–052 Pop/Dance
053–062 Jazz
063–118 Latin/World 180–228 Swing/Bossa
119–127 Waltz 229–242 Country/Western
Technical Specifications
Power
128–163 Soul/R&B
243–299 Ballad
164–179 Rock
6 “AA” batteries or included power adapter (9V DC, 500 mA)
Dimensions
(width x depth x height)
Weight
12.8” x 32.68” x 3.27”
32.5 x 83 x 8.3 cm
7.7 lbs.
3.5 kg
Specifications are subject to change without notice.
Trademarks & Licenses
Alesis is a trademark of inMusic Brands, Inc., registered in the U.S. and other countries.
All other product or company names are trademarks or registered trademarks of their
respective owners.
53

54

55

alesis.com
Manual Version 1.5
 Loading...