

Page 1

24-BIT USB RECORDING INTERFACE
QUICKSTART GUIDE
ENGLISH ( 1 – 3 )
MANUAL DE INICIO RÁPIDO
ESPAÑOL ( 4 – 6 )
GUIDE D'UTILISATION RAPIDE
FRANÇAIS ( 7 – 9 )
GUIDA RAPIDA
ITALIANO ( 10 – 12 )
KURZANLEITUNG
DEUTSCH ( 13 – 15 )
Page 2

Page 3
REGISTRATION
Please go to http://www.alesis.com
your iO2 EXPRESS. Registering your product
ensures that we can keep you up-to-date with
any new product developments and provide you
with world-class technical support, should you
run into any problems.
to register
BOX CONTENTS
y iO2 EXPRESS
y USB cable
y Software CD
y Quickstart Guide
y Safety Instructions & Warranty Information booklet
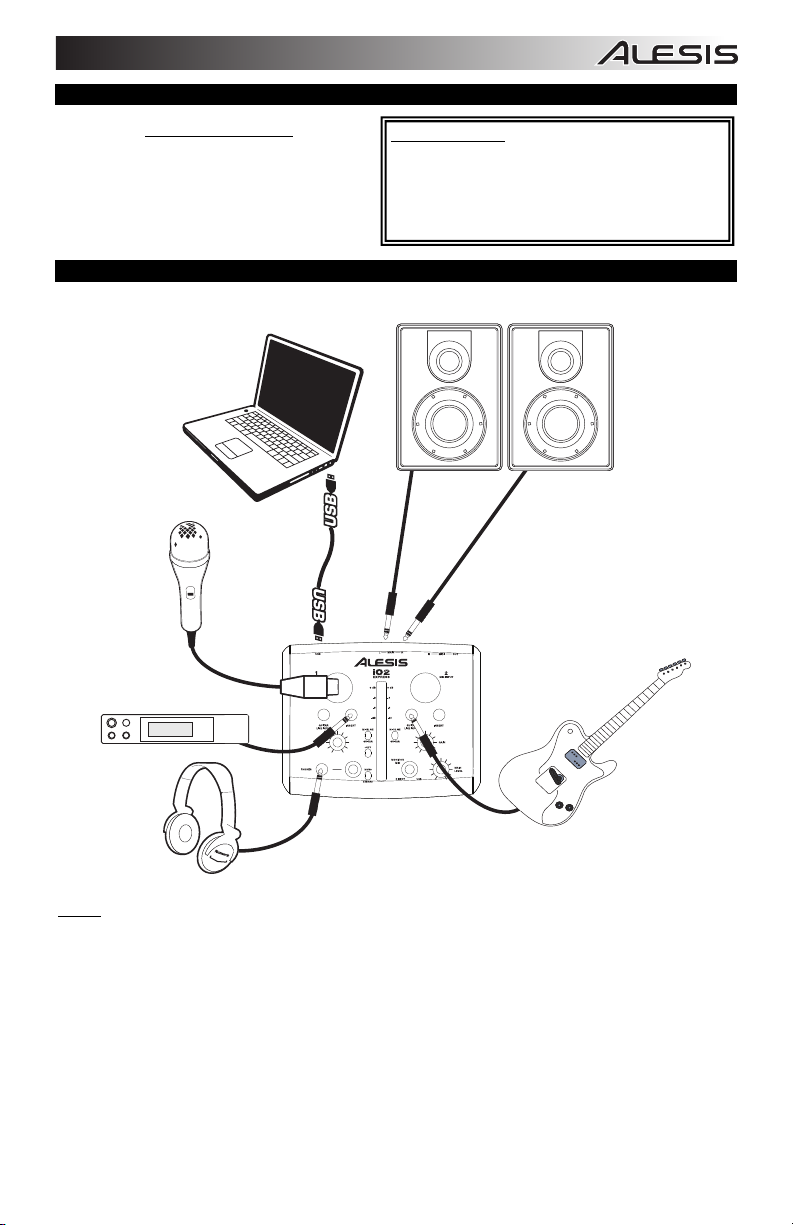
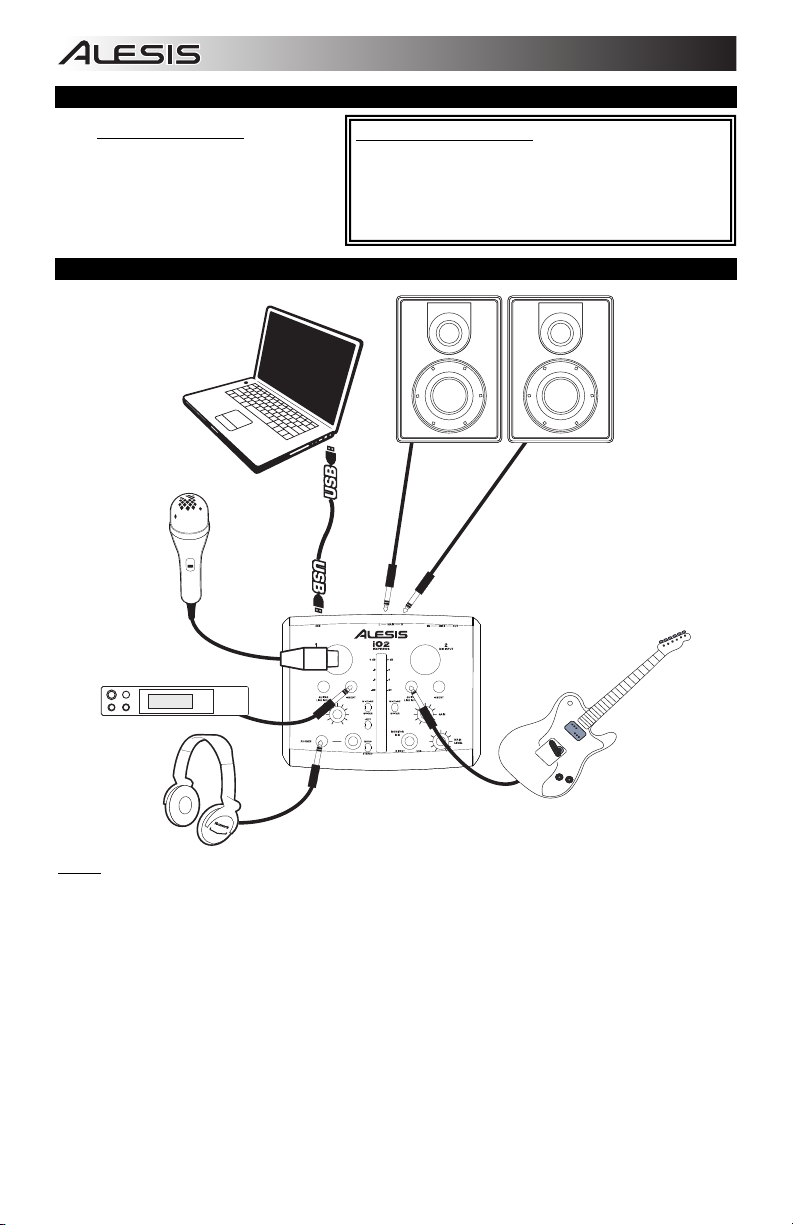
CONNECTION DIAGRAM
Notes:
y When recording a guitar or bass with an active pickup, set the iO2 EXPRESS's MIC/LINE / GUITAR
SWITCH to "MIC/LINE." If your instrument uses a passive pickup, set the switch to "GUITAR."
y Do not use the MIC INPUT and GUITAR/LINE INPUT at the same time on one channel. This may
overload the channel and cause distortion.
y Plug the iO2 EXPRESS directly into your computer, and avoid using a USB hub. Hubs can interfere with
the iO2 EXPRESS's audio and MIDI timing signals.
y To reduce electrical hum at high gain settings, keep the iO2 EXPRESS's power supply away from your
guitar cable and the iO2 EXPRESS's channel inputs.
1
Page 4
SYSTEM REQUIREMENTS
Minimum PC Requirements:
• Pentium III 450 MHz Processor
• 128 MB RAM
• Available USB 1.1 Port
• Windows XP (with Service Pack 2 installed)
Recommended PC Requirements:
• Pentium 4 or Athlon Processor
• 512 MB RAM
• 7,200 RPM Hard Disk Drive
• Available USB 1.1 Port
• Windows XP (with Service Pack 2 installed)
Minimum Macintosh Requirements:
• Any Apple computer with native USB support
• Mac OS X "Jaguar" version 10.2 or later
• 128 MB RAM
Recommended Macintosh Requirements:
• G4 733-MHz Processor or faster
• 7,200 RPM Hard Disk Drive
• Mac OS X "Jaguar" version 10.2 or later
• 512 MB RAM
AUDIO SETUP
The iO2 EXPRESS is a class-compliant device that can be
used with any digital audio workstation or recording software
that supports USB audio. To enable your iO2 EXPRESS to
send and receive audio to and from your computer, follow the
instructions below for your computer's operating system:
WINDOWS 7:
1. Use the included cable to connect the iO2 EXPRESS to your
computer.
2. Go to Start Menu Control Panel Hardware and
Sound Sound.
3. Click the Playback tab and select USB Audio Codec* as the
default device.
4. Click the Recording tab and select USB Audio Codec* as
the default device.
5. Click Properties in the lower right-hand corner.
6. In the new window, click the Advanced tab and select 2-
channel, 16-bit, 44100 Hz (CD Quality) as the default
format.
7. Uncheck both boxes under Exclusive Mode.
8. Click the Levels tab and set the slider to "4."
9. Click OK to close the Properties window.
10. Click OK to close the Sound control panel.
WINDOWS VISTA:
1. Use the included cable to connect the iO2 EXPRESS to your
computer.
2. Go to Start Menu Control Panel Sound. (If you don't see Sound, select Switch to Classic View, and
the Sound Control Panel should become available.)
3. Click the Playback tab and select USB Audio Codec* as the default device.
4. Click the Recording tab and select USB Audio Codec* as the default device.
5. Click Properties in the lower right-hand corner.
6. In the new window, click the Advanced tab and select 2-channel, 16-bit, 44100 Hz (CD Quality) as the
default format.
7. Uncheck both boxes under Exclusive Mode.
8. Click OK to close the Properties window.
9. Click OK to close the Sound control panel.
WINDOWS XP:
1. Use the included cable to connect the iO2 EXPRESS to your computer.
2. Go to Start Menu Control Panel Sounds and Audio Devices.
3. Click the Audio tab.
4. Under Sound Playback and Sound Recording, select USB Audio Codec* as the default device.
5. Click OK.
MAC:
1. Use the included cable to connect the iO2 EXPRESS to your computer.
2. Go to Applications Utilities Audio MIDI Setup.
3. In the Audio Devices tab under System Settings, select USB Audio Codec* as your Default Input and
Default Output.
4. Close the window.
Be sure your audio software program is
set up to receive audio via the iO2
EXPRESS. This can usually be done in
your software's "Preferences" or
"Device Setup." Please consult your
software manual for more information.
* If you have other USB audio devices
connected to your computer, which may
have identical names, you may need to
try selecting each one until the iO2
EXPRESS is recognized.
If you experience too much latency
after adjusting your software latency
settings, we recommend the free
ASIO4ALL (Audio Stream Input/Output)
driver for PC at www.asio4all.com
.
ASIO drivers generally perform better
and with lower latency since they create
a more efficient communication
between audio devices and software.
2
Page 5
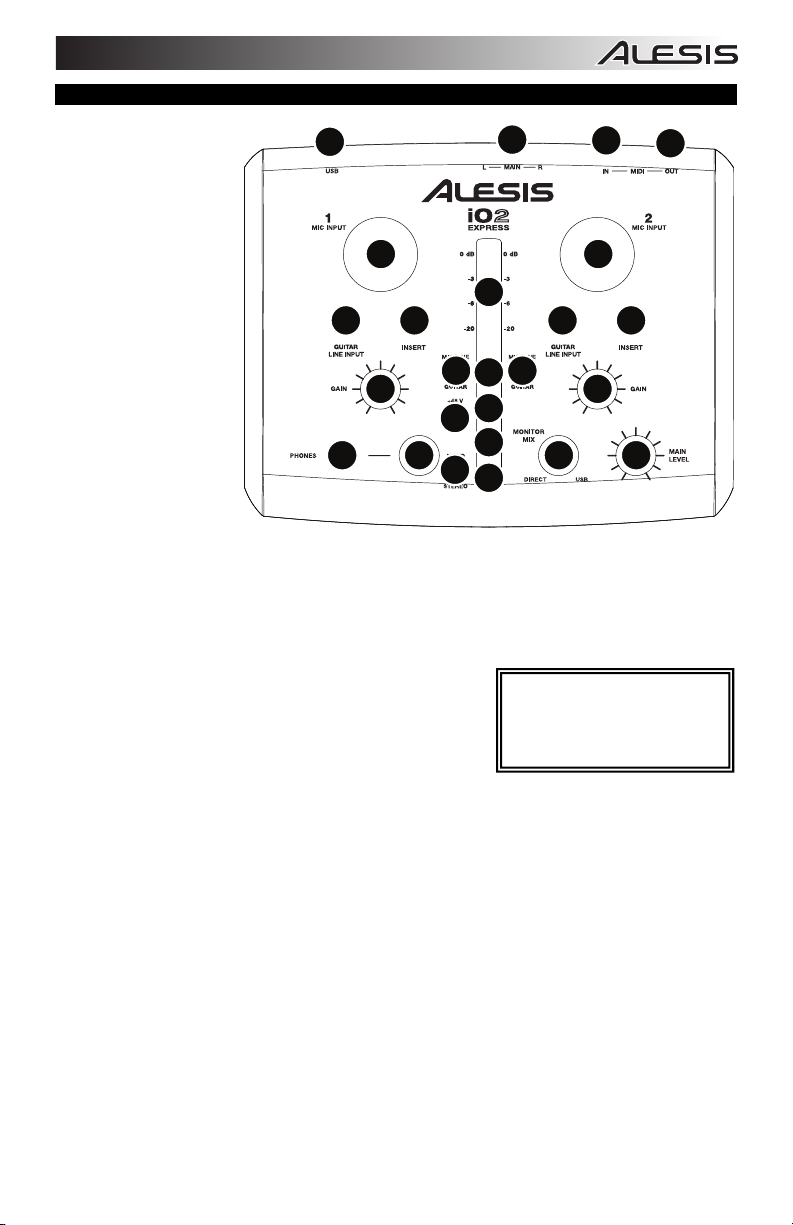
FEATURES
1. USB PORT – Use
the included cable to
connect the iO2
EXPRESS to a
computer. iO2
EXPRESS requires a
USB 1.1 or higher
(e.g. USB 2.0)
connection.
2. MAIN OUT – Use
standard 1/4" cables
to connect this
output to a speaker
or amplifier system.
The level of this
output is controlled
by the MAIN VOL
knob.
3. MIDI IN – Use a
standard five-pin
MIDI cable to
connect this input to
the MIDI OUT of an
external MIDI device.
4. MIDI OUT – Use a
standard five-pin MIDI cable to connect this output to the MIDI IN of an external MIDI device.
5. PHANTOM POWER LED – Lights up when phantom power is engaged.
6. MIDI OUT LED – Flashes whenever MIDI data is sent out of the iO2 EXPRESS.
7. MIDI IN LED – Flashes whenever MIDI data is received from an external MIDI controller.
8. USB LED – Lights up when a USB connection has been established with your computer.
9. LED METERS – Monitors the audio level of the MAIN OUT.
10. MIC INPUT – Connect a microphone to this input with an XLR
cable.
11. GUITAR / LINE INPUT – Connect a line-level device or guitar
to this input with a 1/4" cable.
12. MIC/LINE / GUITAR SWITCH – When this switch is in the
"GUITAR" position, the channel will serve as a highimpedance input for connecting guitar or bass instruments.
When the switch is in the "MIC/LINE" position, the channel will accept mic or line-level signals.
13. GAIN – Adjusts the channel audio pre-fader and pre-EQ gain level.
14. INSERT – The insert jack allows you to insert a compressor, EQ, or any other signal processor in
between the iO2 EXPRESS's preamplifier and A/D converter.
15. PHANTOM POWER SWITCH – This switch activates and deactivates phantom power. When
activated, phantom power supplies +48V to both XLR mic inputs. Please note that most dynamic
microphones do not require phantom power, while most condenser microphones do. Consult your
microphone's documentation to find out whether it needs phantom power.
16. MONO / STEREO – Adjusts the headphone mix for mono or stereo operation.
17. MONITOR MIX – Blend in any amount of zero-latency signal from your inputs with the output of your
computer.
18. MAIN VOLUME – Adjusts the output volume of the MAIN OUT.
19. HEADPHONES – Connect your 1/4" headphones to this output.
20. HEADPHONE VOLUME – Adjusts the volume level of the headphone output.
1
10 10
11
14 14
12 12
13
15
16
2
3
4
9
11
8
13
7
6
17 182019
5
NOTE: Do not use the MIC INPUT
and GUITAR/LINE INPUT at the
same time on one channel. This
may overload the channel and
cause distortion.
3
Page 6
REGISTRO
Visite http://www.alesis.com
iO2 EXPRESS. El registro de su producto
asegura que podamos mantenerle
actualizado con los nuevos desarrollos de
productos y brindarle apoyo técnico de
categoría mundial en caso de que tenga
algún problema.
y registre su
CONTENIDO DE LA CAJA
y iO2 EXPRESS
y Cable USB
y CD software
y Guía de inicio rapido
y Folleto de información sobre la seguridad y la garantía
DIAGRAMA DE CONEXIÓN
Notas:
y Cuando grabe una guitarra o bajo con captor activo, ajuste el CONMUTADOR MICROFÓNO/LÍNEA /
GUITARRA de iO2 EXPRESS a "MIC/LINE". Si su instrumento usa un captor pasivo, ajuste el
conmutador a "GUITAR".
y No utilice la ENTRADA DE MICROFONO (Microphone) y la ENTRADA DE GUITARRA / LÍNEA (Guitar /
Line) al mismo tiempo en el mismo canal. Esto puede saturar el canal y causar distorsión.
y Enchufe la iO2 EXPRESS directamente a su computador y evite usar un hub USB. Los hubs pueden
interferir con las señales de sincronización de audio y MIDI de la interfaz iO2 EXPRESS.
y Para reducir el zumbido eléctrico cuando se usan ajustes altos de ganancia, mantenga la fuente de
alimentación de iO2 EXPRESS alejada del cable de su guitarra y de las entradas de los canales del
equipo.
4
Page 7

REQUISITOS DE SISTEMA
Requisitos mínimos de PC:
• Procesador Pentium III de 450 MHz
• 128 MB de RAM
• Puerto USB 1.1 disponible
• Windows XP (con Service Pack 2 instalado)
Requisitos de PC recomendados:
• Procesador Pentium 4 o Athlon
• 512 MB de RAM
• Disco duro de 7,200 RPM
• Puerto USB 1.1 disponible
• Windows XP (con Service Pack 2 instalado)
CONFIGURACIÓN DE AUDIO
iO2 EXPRESS es un dispositivo que cumple especificaciones de clase y que se
puede usar con cualquier estación de trabajo o software de grabación de audio digital
compatible con el audio USB. Para permitir que iO2 EXPRESS envíe y reciba audio
hacia y desde la computadora, siga las instrucciones de más abajo correspondientes
al sistema operativo de la misma:
WINDOWS 7:
1. Use el cable incluido para conectar el iO2 EXPRESS a su computadora.
2. Vaya al menú Start Control Panel Hardware and Sound Sound (Inicio >
Panel de control > Hardware y Sonido > Sonido).
3. Haga clic en la pestaña Playback (Reproducción) y seleccione USB Audio
Codec* (Códec de audio USB) como dispositivo predeterminado.
4. Haga clic en la pestaña Recording (Grabación) y seleccione USB Audio Codec*
(Códec de audio USB) como dispositivo predeterminado.
5. Haga clic en Properties (Propiedades) en la esquina inferior derecha.
6. En la nueva ventana, haga clic en la pestaña Advanced (Avanzadas) y
seleccione 2-channel, 16-bit, 44100 Hz (CD Quality) [2 canales, 16 bits, 44100
Hz (calidad de CD)] como formato predeterminado.
7. Deseleccione ambas casillas debajo de Exclusive Mode (Modo exclusivo).
8. Haga clic en la pestaña Levels (Niveles) y ajuste el deslizador a "4".
9. Haga clic en OK (Aceptar) para cerrar las ventana Properties.
10. Haga clic en OK para cerrar el panel de control Sound.
WINDOWS VISTA:
1. Use el cable incluido para conectar el iO2 EXPRESS a su computadora.
2. Vaya al menú Start Control Panel Sound (Inicio > Panel de control >
Sonido). (Si no ve Sound, seleccione Switch to Classic View (Cambiar a vista
clásica) —el panel de control Sound debe aparecer.)
3. Haga clic en la pestaña Playback (Reproducción) y seleccione USB Audio
Codec* (Códec de audio USB) como dispositivo predeterminado.
4. Haga clic en la pestaña Recording (Grabación) y seleccione USB Audio Codec*
(Códec de audio USB) como dispositivo predeterminado.
5. Haga clic en Properties (Propiedades) en la esquina inferior derecha.
6. En la nueva ventana, haga clic en la pestaña Advanced (Avanzadas) y
seleccione 2-channel, 16-bit, 44100 Hz (CD Quality) [2 canales, 16 bits, 44100 Hz (calidad de CD)] como formato
predeterminado.
7. Deseleccione ambas casillas debajo de Exclusive Mode (Modo exclusivo).
8. Haga clic en OK (Aceptar) para cerrar las ventana Properties.
9. Haga clic en OK para cerrar el panel de control Sound.
WINDOWS XP:
1. Use el cable incluido para conectar el iO2 EXPRESS a su computadora.
2. Vaya al menú Start Control Panel Sounds and Audio Devices (Inicio > Panel de control > Dispositivos de sonido y
audio).
3. Haga clic en la pestaña Audio.
4. En Sound Playback (Reproducción de sonido) y Sound Recording (Grabación de sonido) seleccione USB Audio Codec*
(Códec de audio USB) como dispositivo predeterminado.
5. Haga clic en OK (Aceptar).
MAC:
1. Use el cable incluido para conectar el iO2 EXPRESS a su computadora.
2. Vaya a Applications Utilities Audio MIDI Setup (Aplicaciones > Utilidades > Configuración de audio MIDI).
3. En la pestaña Audio Devices (Dispositivos de audio), bajo System Settings (Configuración del sistema), seleccione USB
Audio Codec* (Códec de audio USB) como Default Input (Entrada predeterminada) y Default Output (Salida
predeterminada).
4. Cierre la ventana.
Requisitos mínimos de Macintosh:
• Cualquier computadora Apple con soporte de USB nativo
• Mac OS X "Jaguar" versión 10.2 o posterior
• 128 MB de RAM
Requisitos de Macintosh recomendados:
• Procesador G4 de 733 MHz o más rápido
• Disco duro de 7,200 RPM
• Mac OS X "Jaguar" versión 10.2 o posterior
• 512 MB de RAM
Asegúrese de que su programa
de software de audio esté
configurado para recibir audio por
iO2 EXPRESS. Esto se puede
hacer habitualmente en
"Preferences" o "Device Setup"
(Configuración de dispositivos) de
su software. Para más
información, consulte el manual
de su software.
* Si tiene conectados a su
computadora otros dispositivos
de audio USB que puedan tener
nombres idénticos, puede ser
necesario que pruebe a
seleccionar cada uno hasta que
se reconozca el iO2 EXPRESS.
Si sigue experimentando latencia
después de ajustar los
parámetros de latencia de su
computadora, recomendamos
gratuitamente el driver ASIO4ALL
(Entrada/salida de corriente de
audio) para PC de
www.asio4all.com. En general,
los drivers ASIO funcionan mejor
y con menor latencia, dado que
crean una comunicación más
eficiente entre los dispositivos de
audio y el software.
5
Page 8

n
CARACTERÍSTICAS
1. PUERTO USB – Use
el cable incluido para
conectar el iO2
EXPRESS a una
computadora. iO2
EXPRESS requiere
una conexión USB
1.1 o superior (por
ej. USB 2.0).
2. MAIN OUT (salida
principal) – Use
cables 1/4" estándar
para conectar esta
salida maestra a un
sistema de altavoces
o amplificador. El
nivel de esta salida
se controla con la
perilla MAIN VOL
(volumen principal).
3. ENTRADA MIDI –
Use un cable MIDI
estándar de cinco
pines para conectar
esta entrada a la
SALIDA MIDI de un dispositivo MIDI externo.
4. SALIDA MIDI – Use un cable MIDI estándar de cinco pines para conectar esta salida a la ENTRADA
MIDI de un dispositivo MIDI externo.
5. LED DE PHANTOM POWER – Se enciende cuando se acopla la alimentación fantasma.
6. LED DE MIDI SALIDA – Destella toda vez que se envían datos hacia afuera de la interfaz iO2
EXPRESS.
7. LED DE MIDI ENTRADA – Destella toda vez que se reciben datos MIDI desde un controlador MIDI
externo.
8. LED DE USB – Se enciende cuando se establece una conexión USB con su computadora.
9. INDICADOR DE NIVEL ESTÉREO – Monitorea el volumen de MAIN OUT (salida principal).
10. ENTRADA DE MICRÓFONO – Conecte a esta entrada un
micrófono con un cable XLR.
11. ENTRADA DE GUITARRA / LÍNEA – Esta entrada se usan
para conectar un dispositivo de nivel de línea o guitarra con un
cable 1/4".
12. CONMUTADOR MICRÓFONO/LÍNEA / GUITARRA – Cuando
este conmutador está hacia "GUITAR," el canal sirve como
entrada de alta impedancia para conectar guitarras o bajos.
Cuando está hacia "MIC/LINE", el canal acepta señales de micrófono o de nivel de línea.
13. GANANCIA – Ajusta el nivel de ganancia preecualización y pre-fader del audio del canal.
14. INSERCIÓN – Este conector permite insertar un compresor, un ecualizador o cualquier otro
procesador de señal entre el preamplificador y el conversor A/D de la interfaz iO2 EXPRESS.
15. PHANTOM POWER INTERRUPTOR – Este interruptor activa y desactiva la alimentación fantasma.
Cuando se activa, la alimentación fantasma suministra +48 V a ambas entradas de micrófono XLR.
Tenga en cuenta que la mayoría de los micrófonos dinámicos no requieren alimentación fantasma,
mientras que la mayoría de los micrófonos de condensador la requieren. Consulte la documentación
de su micrófono para averiguar si necesita alimentación fantasma.
16. MONO / ESTÉREO – Ajusta la mezcla de auriculares para operación mono o estéreo.
17. PERILLA DE MEZCLA DE MONITOR – Combine cualquier valor de señal de latencia cero de sus
entradas con la salida de su computadora.
18. MAIN VOL (volumen principal) – Ajusta el volumen de MAIN OUT (salida principal).
19. AURICULARES – Conecte sus auriculares de 1/4" a esta salida.
20. VOLUMEN DE AURICULARES – Ajusta el nivel de volumen de la salida para auriculares.
1
10 10
11
14 14
12 12
13
15
16
2
3
9
11
8
13
7
6
17 182019
5
NOTA: No utilice la ENTRADA
DE MICROFONO (Microphone) y
la ENTRADA DE GUITARRA /
LÍNEA (Guitar / Line) al mismo
tiempo en el mismo canal. Esto
puede saturar el canal y causar
distorsió
.
4
6
Page 9

ENREGISTREMENT
Veuillez visiter le site internet
http://www.alesis.com
nouveau iO2 EXPRESS. L'enregistrement des
produits vous permet d'être informé sur les
nouveautés concernant les produits et de vous
offrir un soutien technique de niveau
international, si vous en aviez besoin.
pour enregistrer votre
CONTENU DE LA BOÎTE
y iO2 EXPRESS
y Câble USB
y CD logiciel
y Guide d'utilisation rapide
y Le livret des consignes de sécurité et des
informations concernant la garantie
SCHÉMA DE CONNEXION
Notes:
y Lors de l'enregistrement d'une guitare ou d'une basse dotée de micros actifs, réglez le SÉLECTEUR
MIC/LINE / GUITAR du iO2 EXPRESS à « MIC/LINE ». Si vous utilisez un instrument équipé de micros
passifs, réglez le sélecteur à « GUITAR».
y Ne pas utiliser l'ENTRÉE MIC et l'ENTRÉE GUITAR / LINE en même temps sur un canal. Ceci pourrait
surcharger le canal et créer de la distorsion.
y Branchez l'iO2 EXPRESS directement à votre ordinateur, et éviter l'utilisation d'un répéteur USB. Les
répéteurs peuvent brouiller les signaux de synchronisation audio et MIDI de l'iO2 EXPRESS.
y Afin de réduire le ronflement électrique à des réglages élevés, gardez le câble d'alimentation du iO2
EXPRESS éloigné du câble de la guitare et des canaux d'entrées du iO2 EXPRESS.
7
Page 10

g
*
CONFIGURATION NÉCESSAIRE
Configuration minimale requise pour PC:
• Processeur Pentium III 450 MHz
• 128 Mo de mémoire vive
• Port USB 1.1
• Windows XP (Service Pack 2 installé)
Configuration recommandée pour PC:
• Processeur Pentium 4 ou Athlon
• 512 Mo de mémoire vive
• Disque dur 7,200 tr/min
• Port USB 1.1
• Windows XP (Service Pack 2 installé)
CONFIGURATION AUDIO
Vous pouvez utiliser l'iO2 EXPRESS avec tout poste audio numérique
logiciel ou logiciel d'enregistrement qui prend en charge les périphériques
audio USB.
WINDOWS 7 :
1. Utilisez le câble inclus pour brancher l'iO2 EXPRESS à votre
ordinateur.
2. Cliquez sur Démarrer Panneau de configuration Hardware
et Son Son.
3. Cliquez sur l'onglet Lecture et sélectionnez USB audio codec*
comme l'appareil par défaut.
4. Cliquez sur l'onglet Enregistrement et sélectionnez USB audio
codec* comme l'appareil par défaut.
5. Cliquez sur Propriétés dans le coin inférieur droit.
6. À partir de la nouvelle fenêtre, cliquez sur l'onglet Advancé et
sélectionnez l'option 2 canaux, 16 bits, 44 100 Hz (Qualité CD)
comme le format par défaut.
7. Décochez les deux options sous Mode exclusif.
8. Cliquez sur l'onglet Niveaux et positionnez le curseur à 4.
9. Cliquez OK pour fermer la fenêtre Propriétés.
10. Cliquez OK pour fermer le panneau de configuration Son.
WINDOWS VISTA :
1. Utilisez le câble inclus pour brancher l'iO2 EXPRESS à votre
ordinateur.
2. Cliquez sur Démarrer Panneau de configuration Son. (Si
vous ne voyez pas Son, sélectionnez « Basculer vers l'affichage
classique » et le panneau de configuration Son devrait s'afficher.)
3. Cliquez sur l'onglet Lecture et sélectionnez USB audio codec*
comme l'appareil par défaut.
4. Cliquez sur l'onglet Enregistrement et sélectionnez USB audio
codec* comme l'appareil par défaut.
5. Cliquez sur Propriétés dans le coin inférieur droit.
6. À partir de la nouvelle fenêtre, cliquez sur l'onglet Advancé et
sélectionnez l'option 2 canaux, 16 bits, 44 100 Hz (Qualité CD) comme le format par défaut.
Configuration minimale requise pour Mac:
• Tout ordinateur Mac avec support USB
• Mac OS X Jaguar, version 10.2 ou supérieur
• 128 Mo de mémoire vive
Configuration recommandée pour Mac:
• Processeur G4 733 MHz ou plus rapide
• Disque dur 7,200 tr/min
• Mac OS X Jaguar, version 10.2 ou supérieur
• 512 Mo de mémoire vive
Assurez-vous que le logiciel est
configuré de manière à recevoir de
l'audio via le iO2 EXPRESS.
Vérifiez dans les paramètres
« Préférences » ou « Installation du
périphérique ». Pour de plus
amples informations, veuillez
consulter le guide d'utilisation du
iciel.
lo
Si vous avez d'autres
périphériques audio USB branchés
à votre ordinateur, qui pourraient
avoir des noms identiques, il se
peut que vous ayez à les
sélectionner un à la suite de l'autre
jusqu'à ce que le iO2 EXPRESS
soit reconnu.
S'il y a de la latence après avoir
modifié les paramètres de latence
du logiciel, nous vous
recommandons gratuitement le
pilote ASIO4ALL (Audio Stream
Input/Output) pour PC de
www.asio4all.com
ASIO permettent de meilleures
performances avec moins de
latence puisqu’ils créent une
communication plus efficace entre
les appareils audio et les logiciels.
. Les pilotes
7. Décochez les deux options sous Mode exclusif.
8. Cliquez OK pour fermer la fenêtre Propriétés.
9. Cliquez OK pour fermer le panneau de configuration Son.
WINDOWS XP :
1. Utilisez le câble inclus pour brancher l'iO2 EXPRESS à votre ordinateur.
2. Cliquez sur Démarrer Panneau de configuration Sons et périphériques audio.
3. Cliquez sur l'onglet Audio.
4. Sous Lecture audio et Enregistrement audio, sélectionnez USB audio codec* comme l'appareil par défaut.
5. Cliquez sur OK.
MAC :
1. Utilisez le câble inclus pour brancher l'iO2 EXPRESS à votre ordinateur.
2. Allez à Applications Utilitaires Configuration audio et MIDI.
3. Dans l'onglet Sons et périphériques audio sous Réglages du système, sélectionnez USB audio codec*
comme Entrée par défaut et Sortie par défaut.
4. Fermez la fenêtre.
8
Page 11

CARACTÉRISTIQUES
1. PORT USB – Utilisez le
câble inclus pour brancher
l'iO2 EXPRESS à un
ordinateur pour une
communication audio
numérique bidirectionnelle
16 bits. L'iO2 EXPRESS
requiert une connexion
USB 1.1 ou supérieur
(p. ex.USB 2.0).
2. MAIN OUT (sortie
principale) – Utilisez des
câbles 1/4" standards afin
de brancher cette sortie à
un haut-parleur ou à un
système de sonorisation.
Le niveau du signal de
cette sortie est commandé
par le bouton MAIN VOL
(volume principale).
3. MIDI IN – Vous pouvez
brancher un câble MIDI à
cinq broches à cette entrée
et à la sortie MIDI OUT d'un appareil MIDI externe.
4. MIDI OUT – Vous pouvez brancher un câble MIDI à cinq broches à cette sortie et à l'entrée MIDI IN
d'un appareil MIDI externe.
5. DEL DE PHANTOM POWER (alimentation fantôme) – S'allume lorsque l'alimentation fantôme est
activée.
6. DEL DE MIDI OUT – Clignote lorsque des données MIDI sont transmises à partir de l'iO2 EXPRESS.
7. DEL DE MIDI IN – Clignote lorsque des données MIDI sont transmises à partir d'un contrôleur MIDI
externe.
8. DEL DE USB – S'allume lorsque qu'une connexion est établit avec votre ordinateur.
9. INDICATEUR DU NIVEAU STÉRÉO – Indique le niveau stéréo de MAIN OUT (sortie principale).
10. ENTRÉE MIC – Permet de brancher un microphone à l'aide
d'un câble XLR.
11. ENTRÉE GUITAR / LINE – Cette entrée permette de
brancher un appareil à niveau ligne ou un guitare avec un
câble 1/4".
12. SÉLECTEUR MIC/LINE / GUITAR – Lorsque ce sélecteur est
réglé sur
instruments à à grande impédance pour guitare ou basse. Lorsqu'il est réglé sur
accepte les signaux micro et à niveau ligne.
13. GAIN – Permet d'ajuster le niveau du signal audio pré-atténuateur et pré-égalisation.
14. CONNECTEUR – Le connecteur permet de brancher un compresseur, égaliseur ou tout autre
processeur de signaux entre le préamplificateur de l'iO2 EXPRESS et le convertisseur A/N.
15. PHANTOM POWER INTERRUPTEUR – Cet interrupteur permet d'activer et de désactiver
l'alimentation fantôme. Lorsqu'elle est activée, l'alimentation fantôme fournit +48 V aux deux entrées
micro XLR. Veuillez noter que la plupart des microphones électrodynamiques ne nécessitent pas
d'alimentation fantôme, alors que les microphones à condensateur en ont besoin. Consultez la
documentation fournie avec votre microphone pour savoir si vous devez utiliser l'alimentation fantôme.
16. MONO / STÉRÉO – Permet de régler le mix de casque d'écoute au mode mono ou stéréo.
17. CONTRÔLE DU MIX DE PRÉ-ÉCOUTE – Permet d'ajouter un signal d'entrée sans latence à partir des
entrées et le signal provenant de votre ordinateur.
18. MAIN VOL (volume principal) – Ajuste les niveaux de MAIN OUT (sortie principale).
19. CASQUE D'ÉCOUTE – Permet de brancher un casque d'écoute 1/4 po.
20. VOLUME DE CASQUE D'ÉCOUTE – Ce bouton ajuste les niveaux de la sortie du casque d'écoute.
« GUITAR », le canal peut servir pour brancher des
1
10 10
11
14 14
13
2
3
9
11
12 12
8
7
15
6
16
5
NOTE : Ne pas utiliser l'ENTRÉE
MIC et l'ENTRÉE GUITAR / LINE
en même temps sur un canal.
Ceci pourrait surcharger le canal
et créer de la distorsion.
13
17 182019
« MIC/LINE », le canal
4
9
Page 12

REGISTRAZIONE
Recarsi alla pagina http://www.alesis.com
registrare il iO2 EXPRESS. La registrazione del
prodotto garantisce che possiamo tenervi aggiornati
con tutti gli ultimissimi sviluppi del prodotto e offrirvi
assistenza tecnica di livello mondiale, in caso di
eventuali problemi.
per
CONTENUTI DELLA CONFEZIONE
y iO2 EXPRESS
y Cavo USB
y CD software
y Guida rapida
y Libretto di istruzioni di sicurezza e garanzia
SCHEMA DE COLLAGEMENTI
Notas:
y Al momento di registrare una chitarra o un basso con un pickup attivo, impostare l'INTERRUTTORE
MIC/LINE / GUITAR (microfono/linea / chitarra) del iO2 EXPRESS su "MIC/LINE" (microfono/linea). Se il
vostro strumento impiega un pickup passivo, impostate l'interruttore su "GUITAR" (chitarra).
y Non utilizzare l'INGRESSO MICROFONO e l'INGRESSO CHITARRA / LINEA dello stesso canale allo
stesso tempo. Cio`potrebbe saturare il canale in questione causando distorsione.
y Collegare l'iO2 EXPRESS direttamente al computer, ed evitare l'uso di un hub USB. Gli hub possono
interferire con i segnali di temporizzazione dell'audio e MIDI dell'iO2 EXPRESS.
y Per ridurre il ronzio elettrico che si verifica con impostazioni elevate di guadagno, tenere l'alimentazione
del iO2 EXPRESS lontana dal cavo della chitarra e dagli ingressi canale del iO2 EXPRESS.
10
Page 13

REQUISITI DI SISTEMA
Requisiti minimi per PC:
• Processore Pentium III 450 MHz
• 128 MB RAM
• Porta USB 1.1 disponibile
• Windows XP (con Service Pack 2 instalato)
Requisiti per PC raccomandati:
• Processore Pentium 4 o Athlon
• 512 MB RAM
• Drive disco rigido 7,200 RPM
• Porta USB 1.1 disponibile
• Windows XP (con Service Pack 2 installato)
CONFIGURAZIONE AUDIO
Il iO2 EXPRESS è un dispositivo compatibile che può essere utilizzato con
qualsiasi workstation audio digitale o software di registrazione che supporta
audio USB. Per abilitare il iO2 EXPRESS per inviare e ricevere audio da e
verso il computer, seguire le istruzioni di cui sotto per il sistema operativo del
computer di cui si dispone:
WINDOWS 7:
1. Servirsi del cavo in dotazione per collegare il iO2 EXPRESS ad un
computer.
2. Recarsi su Start Pannello di controllo Hardware e Audio
Audio.
3. Cliccare sulla linguetta Riproduzione e selezionare USB Audio
CODEC* come periferica predefinita.
4. Cliccare sulla linguetta Registrazione e selezionare USB Audio
CODEC* come periferica predefinita.
5. Cliccare su Proprietà nell'angolo inferiore destro.
6. Nella nuova finestra, cliccare sulla linguetta Avanzate e selezionare 2
canali, 16-bit, 44100 Hz (qualità da CD) come formato predefinito.
7. Togliere il segno di spunta da entrambe le caselle in Modalità
esclusiva.
8. Cliccare sulla linguetta Livelli e impostare il cursore su 4.
9. Cliccare su OK per chiudere la finestra Proprietà.
10. Cliccare su OK per chiudere il pannello di controllo Audio.
WINDOWS VISTA:
1. Servirsi del cavo in dotazione per collegare il iO2 EXPRESS ad un
computer.
2. Recarsi su Start Pannello di controllo Audio. (Se non viene visualizzato Audio, selezionare "Visualizzazione
classica" ed il Pannello di controllo Audio dovrebbe diventare disponibile.)
3. Cliccare sulla linguetta Riproduzione e selezionare USB Audio CODEC* come periferica predefinita.
4. Cliccare sulla linguetta Registrazione e selezionare USB Audio CODEC* come periferica predefinita.
5. Cliccare su Proprietà nell'angolo inferiore destro.
6. Nella nuova finestra, cliccare sulla linguetta Avanzate e selezionare 2 canali, 16-bit, 44100 Hz (qualità da CD) come
formato predefinito.
7. Togliere il segno di spunta da entrambe le caselle in Modalità esclusiva.
8. Cliccare su OK per chiudere la finestra Proprietà.
9. Cliccare su OK per chiudere il pannello di controllo Audio.
WINDOWS XP:
1. Servirsi del cavo in dotazione per collegare il iO2 EXPRESS ad un computer.
2. Recarsi su Start Pannello di controllo Suoni e periferiche audio.
3. Fare clic sulla linguetta "Audio".
4. Sotto Riproduzione suoni e Registrazione suoni selezionare USB Audio CODEC* come periferica predefinita.
5. Cliccare su "OK".
MAC:
1. Servirsi del cavo in dotazione per collegare il iO2 EXPRESS ad un computer.
2. Recarsi su Applicazioni Utilità Audio MIDI Setup.
3. Nella linguetta Dispositivi Audio sotto Impostazioni di sistema, selezionare USB Audio Codec* come Ingresso
predefinito e come Uscita predefinita.
4. Chiudere la finestra.
Requisiti minimi Macintosh:
• Qualsiasi computer Apple con supporto USB originale
• Mac OS X "Jaguar" versione 10.2 o successiva
• 128 MB RAM
Requisiti per Macintosh raccomandati:
• Processore G4 733-MHz o superiore
• Drive disco rigido 7,200 RPM
• Mac OS X "Jaguar" versione 10.2 o successiva
• 512 MB RAM
Assicuratevi che il vostro programma
audio sia configurato per ricevere audio
da iO2 EXPRESS. Questo può essere
fatto solitamente a livello delle
"Preferenze" o della "Configurazione
periferica". Per maggiori informazioni,
consultate il manuale del vostro software.
* Qualora fossero presenti altri dispositivi
audio USB collegati al computer, che
potrebbero avere nomi identici, provare a
selezionarli a uno a uno fino a quando il
iO2EXPRESS non viene riconosciuto.
Qualora si dovesse verificare
un’eccessiva latenza dopo averne
sistemato la configurazione a livello del
vostro software, si consiglia il driver
gratuito ASIO4ALL (Audio Stream
Input/Output) per PC alla pagina
www.asio4all.com. Solitamente, i driver
ASIO hanno prestazioni migliori e con
una minore latenza, in quanto creano
una comunicazione più efficiente tra
dispositivi audio e software.
11
Page 14

CARATTERISTICHE
1. PORTA USB – Servirsi
del cavo in dotazione per
collegare il iO2
EXPRESS ad un
computer per una
comunicazione audio
digitale a 2 vie, a 16 bit.
Il iO2 EXPRESS richiede
una porta USB 1.1 o
superiore (es. USB 2.0).
2. MAIN OUT (uscita
principale) – Servirsi di
cavi standard 1/4" per
collegare questa uscita
Master ad una cassa o
ad un sistema di
amplificatori. Il livello di
questa uscita è
controllato tramite la
manopola MAIN VOL
(volume principale).
3. INGRESSO MIDI –
Servirsi di un cavo MIDI
standard a cinque poli
per collegare questo ingresso all'uscita MIDI di un dispositivo MIDI esterno.
4. USCITA MIDI – Servirsi di un cavo MIDI standard a cinque poli per collegare questa uscita all'ingresso
MIDI di un dispositivo MIDI esterno.
5. LED DI ALIMENTAZIONE PHANTOM – Si accende quando è attivata l'alimentazione phantom.
6. LED DELL'USCITA MIDI – Lampeggia ogniqualvolta vengono inviati dati MIDI fuori dal.
7. LED DELL'INGRESSO MIDI – Lampeggia ogniqualvolta vengono ricevuti dati MIDI da un controller
MIDI esterno.
8. LED DELL'USB – Si accende quando viene stabilito un collegamento USB con il computer.
9. INDICATORE DI LIVELLO STEREO – Monitora il livello audio di uscita MAIN OUT (uscita principale).
10. INGRESSO MICROFONO – Collegare un microfono a
questo ingresso servendosi di un cavo XLR.
11. INGRESSO DI CHITARRA / LINEA – Collegare un
dispositivo a livello di linea o una chitarra servendosi di i
cavi 1/4".
12. INTERRUTTORE MIC/LINE / GUITAR (Microfono/Linea /
Chitarra) – Quando questo interruttore è impostato su
"MIC/LINE" (microfono/linea), il Canale fungerà da ingresso
ad elevata impedenza per il collegamento di chitarre o bassi. Quando l'interruttore è impostato su
"GUITAR" (chitarra), il Canale accetterà segnali mic o a livello di linea.
13. GAIN – Regola il livello di guadagno audio pre-fader e pre EQ del canale.
14. INSERTO – Questo jack permette l'inserimento di un compressore, di un EQ, o di qualsiasi altro
processore di segnali tra il preamplificatore dell'iO2 EXPRESS e il convertitore A/D.
15. ALIMENTAZIONE PHANTOM – Questo interruttore attiva e disattiva l'alimentazione phantom. Quando
attivata, l'alimentazione phantom fornisce +48V a entrambi gli ingressi mic XLR. Va notato che la
maggior parte dei microfoni dinamici non richiede alimentazione phantom, mentre la maggior parte dei
microfoni a condensatore sì. Consultare la documentazione del microfono per scoprire se necessita di
alimentazione phantom.
16. MONO / STEREO – Regola il mix cuffie per mono o stereo.
17. MANOPOLA MONITOR MIX – mescola qualsiasi quantità di segnale a latenza zero dagli ingressi con
l'uscita del computer.
18. MAIN VOL (VOLUME PRINCIPALE) – Regola il volume di uscita MAIN OUT (uscita principale).
19. CUFFIE – Collegare le cuffie da 1/4" a questa uscita.
20. VOLUME CUFFIE – Regola il livello del volume dell'uscita cuffie.
1
10 10
11
14 14
12 12
13
15
16
2
3
4
9
11
8
13
7
6
17 182019
5
NOTA: Non utilizzare l'INGRESSO
MICROFONO e l'INGRESSO
CHITARRA / LINEA dello stesso
canale allo stesso tempo.
Cio`potrebbe saturare il canale in
questione causando distorsione.
12
Page 15

REGISTRIERUNG
Registrieren Sie Ihren iO2 EXPRESS bitte
auf http://www.alesis.de
Sie uns die Möglichkeit, Ihnen
Informationen bei Produktaktualisierungen
zukommen zu lassen und um Ihnen die
bestmögliche technischen Support zu
bieten.
. Dadurch geben
INHALT DER VERPACKUNG
y iO2 EXPRESS
y USB-Kabel
y Software-CD
y Kurzanleitung
y Broschüre mit den Sicherheits- und Garantierichtlinien
ANSCHLUSSÜBERSICHT
Notes:
y Wenn Sie eine Gitarre oder einen Bass mit einem aktiven Tonabnehmer aufnehmen, setzen Sie den
MIKROPHONE/LINE / GITARRE SCHALTER des iO2 EXPRESS auf "MIC/LINE." Falls Ihr Instrument
einen passiven Tonabnehmer verwendet, setzen Sie den Schalter auf "GUITAR."
y Verwenden Sie die MIKROPHONEINGÄNG und GUITAR / LINE EINGÄNG eines Kanals nicht
gleichzeitig. Dadurch könnten Sie den Kanal übersteuern, wodurch es zu Verzerrungen kommt.
y Stellen Sie eine direkte Verbindung zwischen dem iO2 EXPRESS und Ihrem Computer her und
verwenden Sie zum Anschluss keinen USB Hub. Hubs können die Audio- und MIDI-Clock des iO2
EXPRESS stören.
y Um elektrische Brummgeräusche bei hohen Gain-Einstellungen zu vermeiden, halten Sie das Netzteil des
iO2 EXPRESS vom Gitarrenkabel und den Kanaleingängen des iO2 EXPRESS fern.
13
Page 16

SYSTEMANFORDERUNGEN
Mindestanforderungen an einen PC:
• Pentium III 450 MHz Prozessor
• 128 MB RAM
• Freier USB 1.1
• Port Windows XP (mit installiertem Service Pack 2)
Empfohlene PC Ausstattung:
• Pentium 4 oder Athlon Prozessor
• 512 MB RAM
• 7.200 RPM Festplatte
• Freier USB 1.1 Port
• Windows XP (mit installiertem Service Pack 2)
AUDIO SETUP
The Der iO2 EXPRESS ist ein klassenkonformes Gerät, das mit jeder
DAW oder Aufnahmesoftware, die USB Audio unterstützt, verwendet
werden kann. Um Ihr iO2 EXPRESS zu aktivieren, um Audio an Ihren
Computer zu senden und von Ihrem Computer zu empfangen, folgen Sie
untenstehenden Anweisungen für das Betriebssystem Ihres Computers:
WINDOWS 7:
1. Verwenden Sie das beiliegende Kabel, um den iO2 EXPRESS an
2. Gehen Sie auf Start Menü Systemsteuerung Hardware
3. Klicken Sie auf den Reiter Wiedergabe und wählen Sie USB
4. Klicken Sie auf den Reiter Aufnahme und wählen Sie USB Audio
5. Kicken Sie Eigenschaften in der rechten unteren Ecke.
6. Im neuen Fenster klicken Sie den Reiter Erweitert und wählen 2-
7. Entfernen Sie das Häkchen in beiden Kästen unter
8. Klicken Sie auf den Reiter Pegels und setzen Sie den
9. Klicken Sie OK, um das Eigenschaftenfenster zu schließen.
10. Klicken Sie OK, um das Sound Bedienfeld zu schließen.
WINDOWS VISTA:
1. Verwenden Sie das beiliegende Kabel, um den iO2 EXPRESS an
2. Gehen Sie auf Start Menü Systemsteuerung Sound (Falls Sie Sound nicht sehen, wählen Sie Auf klassische
3. Klicken Sie auf den Reiter Wiedergabe und wählen Sie USB Audio Codec* als Standardgerät.
4. Klicken Sie auf den Reiter Aufnahme und wählen Sie USB Audio Codec* als Standardgerät.
5. Kicken Sie Eigenschaften in der rechten unteren Ecke.
6. Im neuen Fenster klicken Sie den Reiter Erweitert und wählen 2-Kanal, 16-bit, 44100 Hz (CD Qualität) als
7. Entfernen Sie das Häkchen in beiden Kästen unter Exklusivmodus.
8. Klicken Sie OK, um das Eigenschaftenfenster zu schließen.
9. Klicken Sie OK, um das Sound Bedienfeld zu schließen.
WINDOWS XP:
1. Verwenden Sie das beiliegende Kabel, um den iO2 EXPRESS an einen Computer.
2. Gehen Sie zu Start Menü Systemsteuerung Sounds und Audiogeräte.
3. Klicken Sie den Reiter Audio.
4. Unter Soundwiedergabe und Soundaufnahme wählen Sie USB Audio Codec* als Standardgerät.
5. Klicken Sie OK.
MAC:
1. Verwenden Sie das beiliegende Kabel, um den iO2 EXPRESS an einen Computer.
2. Gehen Sie zu Anwendungen Dienstprogramme Audio MIDI Konfiguration.
3. Im Reiter Audiogeräte unter Systemeinstellungen, wählen Sie USB Audio Codec* als Ihren Standard-Input und
4. Schließen Sie das Fenster.
einen Computer.
und Sound Sound
Audio Codec* als Standardgerät.
Codec* als Standardgerät.
Kanal, 16-bit, 44100 Hz (CD Qualität) als Standardformat.
Exklusivmodus.
Schieberegler bis 4.
einen Computer.
Ansicht wechseln und das Sound Bedienfeld sollte verfügbar sein.)
Standardformat.
Standard-Output.
Mindestanforderungen Macintosh:
• Jeder Apple Computer mit nativem USB Support
• Mac OS X Jaguar Version 10.2 oder neuer
• 128 MB RAM
Empfohlene Macintosh Ausstattung:
• G4 733-MHz Prozessor oder schneller
• 7.200 RPM Festplatte
• Mac OS X Jaguar Version 10.2 oder neuer
• 512 MB RAM
Achten Sie darauf, dass Ihre Audiosoftware
auf den Empfang von Audio über iO2
EXPRESS konfiguriert ist. Dazu öffnen Sie
normalerweise die "Voreinstellungen" oder die
"Gerätekonfiguration" der Software. Beachten
Sie bitte auch die Hinweise in der
Bedienungsanleitung der Software für weitere
Informationen.
* Falls Sie andere USB Audiogeräte an Ihren
Computer angeschlossen haben, die
möglicherweise identische Namen haben,
versuchen Sie jedes einzelne zu selektieren,
bis der iO2 EXPRESS erkannt wird.
Wenn es zu viel Verzögerung nach
Anpassung der Software Latenzeinstellungen,
laden Sie sich den kostenlosen ASIO4ALL
(Audio Stream Input/Output) Treiber für von
der Webseite www.asio4all.com herunter.
ASIO Treiber besitzen im Allgemeinen eine
bessere Performance und eine niedrigere
Latenz, da sie auf effizientere Kommunikation
zwischen Audiogeräten und Software
ermöglichen.
14
Page 17

g
ÜBERSICHT
1. USB-ANSCHLUSS –
Verwenden Sie das
beiliegende Kabel, um den
iO2 EXPRESS an einen
Computer für eine Zweiweg-,
16-bit digitale Tonverbindung
an. Der iO2 EXPRESS
benötigt zur Verbindung USB
1.1 oder höher (z.B. USB 2.0).
2. MAIN OUT (Hauptausgang)
– Verbinden Sie diesen
Ausgang mit einem PA
System, Aktivmonitoren oder
einer HiFi Anlage. Die
Lautstärke dieses Ausgangs
wird mit dem MAIN VOL
(Hauptvolume) Regler.
3. MIDI IN – Mit einem
gewöhnlichen fünfpoligen
MIDI-Kabel diesen Eingang
mit dem MIDI AUSGANG
eines externen MIDI-Geräts
verbinden.
4. MIDI OUT – Mit einem gewöhnlichen fünfpoligen MIDI-Kabel diesen Ausgang mit dem MIDI EINGANG
eines externen MIDI-Geräts verbinden.
5. PHANTOMSPEISUNG LED – Leuchtet bei aktivierter Phantomspeisung.
6. MIDI OUT LED – Blinkt, wenn MIDI-Daten den iO2 EXPRESS verlassen.
7. MIDI IN LED – Blinkt, wenn MIDI-Daten von einem externen MIDI-Gerät eintreffen.
8. USB LED – Leuchtet, wenn eine USB-Verbindung zwischen iO2 EXPRESS und Computer besteht.
9. STEREOPEGELANZEIGE – Zur visuellen Kontrolle des Audiopegels MAIN OUT (Hauptausgang).
10. MIKROPHONEINGANG – Zum Anschluss eines Mikrofons
mit einem XLR-Kabel.
11. GUITAR / LINE EINGÄNG – Zum Anschluss eines Gerät
mit Linepegelsignalen oder Gitarre mit einem 1/4"-Kabel.
12. MIKROPHONE/LINE / GITARRE SCHALTER – Wenn
dieser Schalter auf "GUITAR" gesetzt ist, fungiert der
Kanal als hochohmiger Eingang, um Gitarren oder Bässe
anzuschließen. Wenn dieser Schalter auf "MIC/LINE" gesetzt ist, nimmt der Kanal Mikrophon oder
Line-Signale auf.
13. KANAL-GAIN – Justiert die Audio Pre-Fader und Pre-EQ Pegel im entsprechenden Kanal ein.
14. INSERT – Über die Insertbuchsen können Sie einen Compressor, einen EQ oder jeden anderen
Signalprozessor zwischen die iO2 EXPRESS Vorverstärker und die A/D Wandler einschleifen.
15. PHANTOMSPEISUNG SCHALTER– Dieser Schalter aktiviert/deaktiviert Phantomspeisung. Ist dies
aktiviert, liefert die Phantomspeisung +48V an beide XLR-Mikrophoneingänge. Bitte beachten Sie,
dass die meisten dynamischen Mikrophone keine Phantomspeisung benötigen, das aber bei den
meisten Kondensatormikrophonen der Fall ist. Sehen Sie in der Anleitung Ihres Mikrophons nach, ob
Ihr Mikrophon Phantomspeisung benötigt oder nicht.
16. MONO / STEREO – Zur Einstellung des Kopfhörer-Mix auf Mono oder Stereo.
17.
MONITOR MIX REGLER – Hiermit blenden Sie einen Anteil des Zero-Latency Signals der Eingänge in
das Ausgangssignal Ihres Computers ein.
18. MAIN VOL (Hauptvolume) – Steuert die Ausgangslautstärke des MAIN OUT (Hauptausgang).
19. KOPFHÖRER – Schließen Sie hier Ihren Kopfhörer mit 6,3 mm Klinkenstecker an.
20. KOPFHÖRERVOLUME – Stellt die Lautstärke des Kopfhörerausgangs ein.
1
10 10
11
14 14
13
2
3
4
9
11
12 12
8
7
15
6
16
5
HINWEIS: Verwenden Sie die
MIKROPHONEINGANG und GUITAR
/ LINE EINGÄNG eines Kanals nicht
gleichzeitig. Dadurch könnten Sie
den Kanal übersteuern, wodurch es
zu Verzerrun
13
17 182019
en kommt.
15
Page 18

TECHNICAL SPECIFICATIONS
Interface: iO2 EXPRESS 24-bit audio / MIDI interface
Features: Stereo, 24-bit inputs/outputs
Audio I/O: Mic inputs:
Power: USB bus power
Dimensions: 6.1" x 4.9" x 2" / 155 mm x 124mm x 51 mm
Weight (net): .85 lbs / 0.39 kg
* Specifications are subject to change without notice.
Sample-rate adjustable up to 48 kHz
Separate gain knob and mic/line / guitar switch for each input
All balanced inputs and outputs
Stereo 1/4" headphone jack
MIDI I/O
SNR: 95dB (A-weighted) minimum – 97dB typical
THD+N: 0.007% maximum – 0.005% typical
Frequency Response: ±0.35dB typical
1/4" guitar/line inputs:
SNR: 94dB (A-weighted) minimum – 96dB typical
THD+N: 0.05% maximum – 0.034% typical
Frequency Response: ±1.2dB typical
Analog outputs:
SNR: 95dB (A-weighted) minimum – 97dB typical
THD+N: 0.007% maximum – 0.005% typical
Frequency Response: ±0.35dB typical
7-51-0311-A
16
Page 19

Page 20

www.alesis.com
 Loading...