

Page 1

OmniAccessTM 512
Getting Started Guide
May, 2002
Page 2

Safety Information:
OmniAccess™ 512 hardware installation and maintenance is to be provided by Customer Support
personnel, or equivalent, knowledgeable in basic electrical and mechanical safety procedures.
Safety Information for Rack Mounting:
Switches should be installed in a maximum 40˚ C environment. To ensure proper air
flow, it is recommended that the switches have at least two inches of clear space on all sides. To ensure stability, precautions should
be taken to prevent uneven loading of the rack. Loading of the rack should begin at the bottom. When multiple components are
installed, precautions should be taken to prevent overloading of power outlets. The switches should always be properly grounded.
Lithium Batteries Caution:
There is a danger of explosion if the Lithium battery in your chassis is incorrectly replaced.
Replace the battery only with the same or equivalent type of battery recommended by the manufacturer. Dispose of used
batteries according to the manufacturer’s instructions. The manufacturer’s instructions are as follows:
Return the module with the Lithium battery to Alcatel. The Lithium battery will
be replaced at Alcatel’s factory.
All-In-OneSM Service Programs:
An Alcatel service agreement brings your company the assurance of 7x24 no-excuses
technical support. You’ll also receive regular software updates to maintain and maximize your Alcatel product’s features and
functionality and on-site hardware replacement through our global network of highly qualified service delivery partners.
Additionally, with 24-hour-a-day access to Alcatel’s Service and Support web page, you’ll be able to view and update any case
(open or closed) that you have reported to Alcatel’s technical support, open a new case or access helpful release notes,
technical bulletins, and manuals. For more information on Alcatel’s Service Programs, see our web page at
www.ind.alcatel.com, call us at 1-800-995-2696, or email us at support@ind.alcatel.com.
The features and specifications described in this manual are subject to change without notice.
Alcatel Internetworking
26801 West Agoura Road
Calabasas, CA 91301
(818) 880-3500 FAX (818) 880-3505
info@ind.alcatel.com
US Customer Support: (800) 995-2696
International Customer Support: (818) 878-4507
Internet–http://www.ind.alcatel.com
Copyright
document may not be reproduced in whole or in part without the express
written permission of Alcatel Internetworking, Inc.
Alcatel
OmniSwitch
Alcatel Internetworking, Inc. AutoTracker™, OmniAccess™, OmniCore™,
Omni Switch/Router™, OmniVista™, PizzaPort™, PolicyView™,
RouterView™, SwitchManager™, SwitchStart™, VoiceView™, WANView™,
WebView™, X-Cell™, X-Vision™ and the Xylan logo are trademarks of Alcatel
Internetworking, Inc. All-In-One
Internetworking, Inc. All other brand and product names are trademarks of
their respective companies.
©
2002 by Alcatel Internetworking, Inc. All rights reserved. This
®
and the Alcatel logo are registered trademarks of Alcatel. Xylan®,
®
, PizzaSwitch® and OmniStack® are registered trademarks of
SM
is a service mark of Alcatel
Page 3

Table of Contents
Introduction
Unpack the Switch . . . . . . . . . . . . . . . . . . . . 2
Find a Secure, Well-Ventilated Location . . . . 2
Rack-Mount the OmniAccess (Optional) . . . . 2
. . . . . . . . . . . . . . . . . . . . . . . . . . 1
Installing an OmniAccess
Install an Uplink Submodule . . . . . . . . . . . . 3
Connect to a Power Source . . . . . . . . . . . . . 3
Turn the Power On . . . . . . . . . . . . . . . . . . . 3
Verify the Management LEDs . . . . . . . . . . . . 4
Connect External Devices . . . . . . . . . . . . . . . 4
Connect the Console Port . . . . . . . . . . . . . . . 5
Access your Terminal Emulation Software . . . 5
Log In to the Command Line Interface (CLI) . 5
Setting Up Software
Set up a Password . . . . . . . . . . . . . . . . . . . . 7
Set the System Time and System Date . . . . . . 8
Enter a System Description (Optional) . . . . . 8
Assign an IP Address to the Default Group . 11
Log Out . . . . . . . . . . . . . . . . . . . . . . . . . . . 11
. . . . . . . . . . . . . . . . . . . 5
. . . . . . . . . . . . . 2
OmniAccess Basics
OA-512 Slot Numbering . . . . . . . . . . . . . . . 13
OA-512 Rear Panel . . . . . . . . . . . . . . . . . . . 14
OA-512 Management and Port LEDs . . . . . . 15
. . . . . . . . . . . . . . . . . . . 12
The User Manual on CD
. . . . . . . . . . . . . . 16
Table of Contents
iii
Page 4

Introduction
The OmniAccess™ 512 (OA-512) switch connects
branch offices to WAN and Voice networks, thus offering “edge of network” connectivity solutions.
The OA-512 provides branch access to an enterprise
backbone. This switch combines LAN switching, WAN
routing, and Service Level Management in a single
platform.
The OA-512 supports up to two wide-area uplinks.
User-installable USP, T1/E1, and ISDN submodules
provide flexibility. VoIP (Voice Over IP) uplink
submodules and compression/encryption SIMMs are
also supported on the OA-512. Virtual Private Network
(VPN) software is also supported if the compression/
encryption SIMM is installed.
♦
Note
The OA-512 supports a maximum of
one ISDN module per switch chassis.
Refer to the
Manual
OmniAccess 512 User
for more information.
♦
This Getting Started Guide walks you through installation and startup procedures for your switch. Steps
include:
• Installing and connecting your OmniAccess 512
switch
• Logging in to the switch and configuring basic
system software parameters, including defining
an IP address
This guide also includes sections on OmniAccess 512
basics. Refer to these sections for general OmniAccess
chassis and LED information.
The
CD
that accompanies this Getting Started Guide
contains OmniAccess 512 user manuals. These user
manuals provide information on OmniAccess switches
and OA-512 uplink submodules, as well as comprehensive networking information. Refer to the user manuals when you require more detailed information about
your switch.
Introduction
1
Page 5
Installing an OmniAccess
This section covers procedures for:
• Unpacking the switch
• Finding a secure, well-ventilated location
• Rack-mounting the switch (optional)
• Installing uplink submodules
• Connecting to a power source
• Verifying management LED status
• Connecting external devices
1. Unpack the Switch
Remove the switch and accessories from their packing
box and inspect each item to ensure there has been no
damage during shipping.
If you discover or suspect any damage, contact your
OmniAccess 512 distributor immediately.
2. Find a Secure, Well-Ventilated Location
Find a secure, flat surface for the switch—preferably on
a desk or in a wiring closet. For proper cooling, the
sides of the switch should have at least two inches of
clearance. Be sure that the switch is within reach of all
necessary connections (e.g., power source, external
devices, etc.).
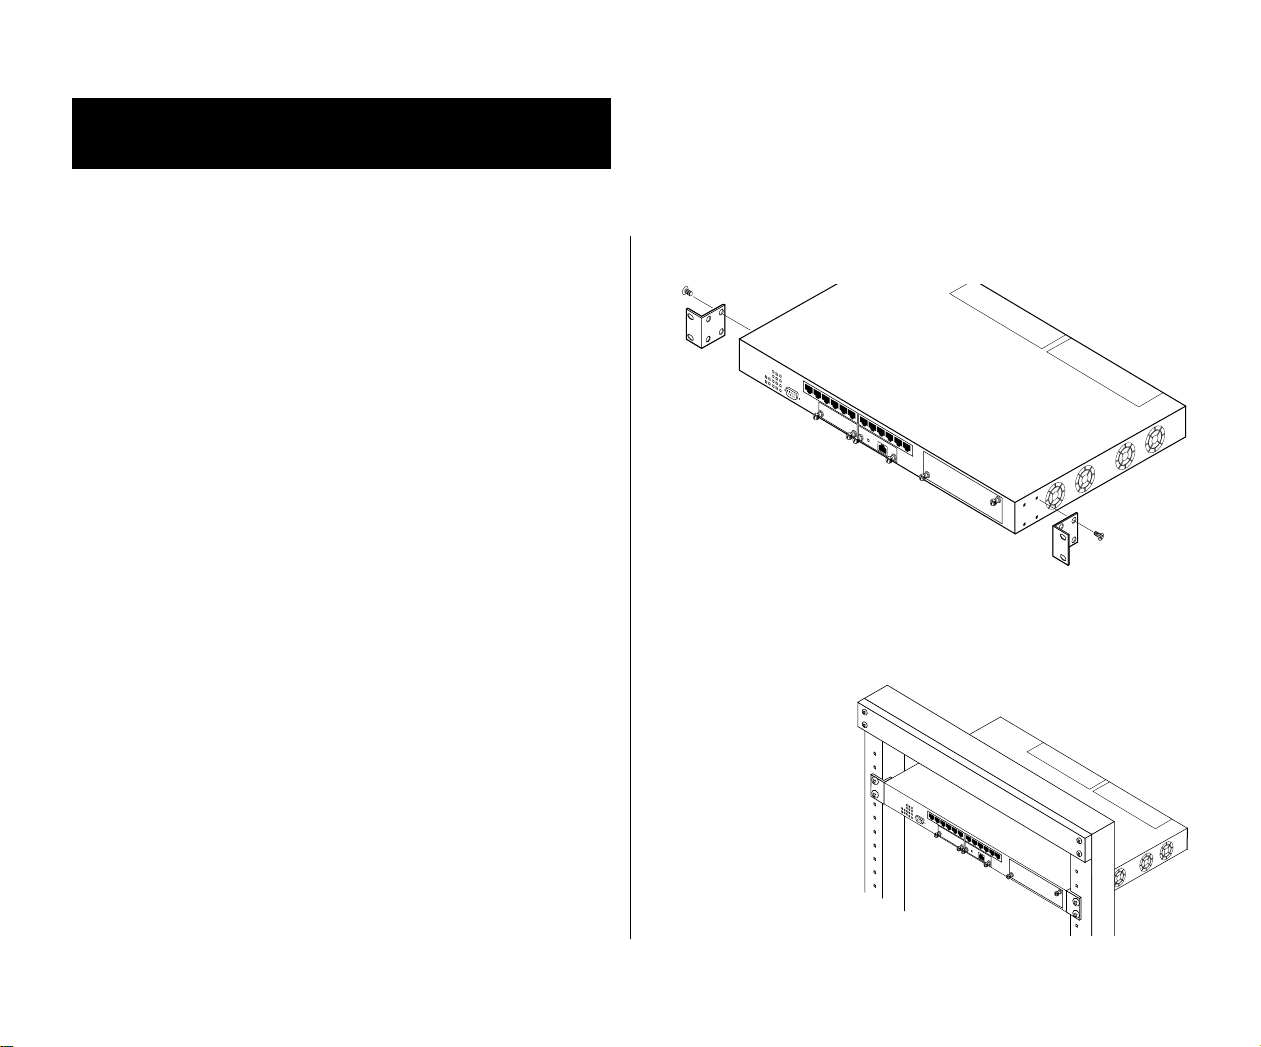
3. Rack-Mount the OmniAccess (Optional)
a. Select a shelf on the rack
that allows easy access
to all necessary connections.
b. Attach one rack-mounting bracket to the side of the switch
using Phillips-head screws shipped with your switch.
c. Attach the second bracket to the opposite side of the switch
using the remaining screws.
d. Carefully lift the
switch and insert
it into the rack.
e. Attach both brack-
ets to the rack
with the screws
provided by your
rack vendor.
2 Installing an OmniAccess
Page 6

4. Install an Uplink Submodule
Skip this step if:
• you are not installing an uplink submodule, or
• an uplink submodule was installed for you at
the factory.
♦
Caution
Do not attempt to install or remove an
uplink module while the switch’s
power is on. Verify that the switch is
powered off before proceeding.
♦
b. Insert the uplink submodule into the uplink submodule
slot. Uplink submodules have an “up” and a “down”
side. Use the printing on the submodule’s front panel as
a reference for orienting the submodule—if the printing
is right-side up, you are installing the submodule correctly.
c. Slide the uplink submodule in until it rests against the
connector, then press firmly until it seats into the connector. Once installed, tighten the screws by hand or
with a flat blade screwdriver. Ensure that the screws are
completely screwed down, but do not overtighten.
5. Connect to a Power Source
All OmniAccess switches are powered by an internal
AC
power supply. The AC power connector can be
found on the rear panel of all OA-512 switches.
♦
Note
OmniAccess switches do not support
the Alcatel Backup Power System
(BPS).
♦
a. Use a screwdriver to remove the blank uplink sub-
module cover plate on the OA-512 front panel.
Connect the provided power cord to the AC power
connector on the OmniAccess. Then plug the power
cord into a properly grounded AC electrical outlet.
6. Turn the Power On
Move the ON/
AC
power connector) to the ON (|) position.
OFF
power switch (located next to the
Installing an OmniAccess 3
Page 7

7. Verify the Management LEDs
Verify that the management
indicate normal operation.
TP Off
LED
s on the front panel
If you power up the switch and the
LED
results are
different from those listed above, contact Alcatel
Customer Support personnel for assistance:
- US Customer Support: (800) 995-2696
- International Customer Support: (818) 878-4507
10/100
9
OK1 Solid Green
OK2 Blinking Green
PS Solid Green
OmniAccess
512
OK1
OK2
15
TP
PS
48
CONSOLE
12
When the OmniAccess 512 is powered up, extensive
power-on diagnostics are performed. As a result, you
should allow the switch time to perform preliminary
s. While diagnostics are
tests before evaluating the
LED
running, the
•
OK1
will blink amber and/or green
LED
OK2
•
•PS
•
TP
LED
will blink amber and/or green
LED
will display solid green
will be off
LED
After diagnostics are complete, the
OK1
•
•
OK2
will display solid green
LED
LED
will blink green
8. Connect External Devices
Connect any external devices (e.g., computers, phones,
printers, servers) to the appropriate OmniAccess ports.
♦
Note
Until you configure your OmniAccess
512 switch via the built-in software,
the attached devices will not be accessible from the network. Refer to the
next section,
Setting Up Software
page 5, for information on configuring your switch.
♦
on
LED
•PS
TP
•
4 Installing an OmniAccess
will display solid green
will be off
LED
Page 8

Setting Up Software
This section covers procedures for setting up your
OmniAccess 512 software. Procedures include
• Connecting a workstation to the console port
• Accessing terminal emulation software
• Logging in to the switch’s Command Line
Interface (
CLI
)
• Setting a password
• Setting basic system parameters, including date,
time, system description, and IP address
• Logging out
By the end of this section, you will be ready to use the
switch’s software to begin configuring and monitoring
your branch office network connections. For detailed
information on how to accomplish these tasks, refer to
your switch user manual.
1. Connect the Console Port
Attach a serial cable to the console port connector on
the switch’s front panel. The console port is a female
DB-9 serial connector that conforms to the
serial port specification.
IBM AT
Connect the other end of the serial cable to a PC or
workstation equipped with terminal emulation software. You will use this connection to enter initial
configuration values on the switch.
2. Access your Terminal Emulation Software
Use your computer’s terminal emulation software to
initiate a session with the switch. Set your terminal
emulation software parameters to: 9600 baud, 8 data
bits, 1 stop bit, and no parity. If you are using
Windows 95 or later, turn hardware flow control off.
3. Log In to the Command Line Interface (CLI)
After your terminal emulation software package establishes a connection, the following prompt will be
displayed:
Welcome to the Alcatel OmniAccess 512! Version x.x.x
login :
Initially, there are three login accounts available:
diag
and
user
. The
admin
and
diag
accounts allow full
access to all functions, with the
diag
account additionally supports a set of switching module tests (see the
“Running Hardware Diagnostics” chapter in your
OmniAccess User Manual
for details). The
user
supports read-only privileges. All three accounts use
switch
as the default password.
admin
account
,
Setting Up Software
5
Page 9

♦
Important Note
♦
If you have Administrative (WRITE)
privileges on the switch, you can
create or delete logins and new user
accounts with administrative privileges.
a. Enter
admin
at the login prompt and press
The following prompt displays:
password:
<Enter>
switch
at the password prompt and press
. When you have successfully logged in, the
b. Enter
screen will display similar to the following:
<Enter>
.
About Partition Management
Partition Management allows you to
restrict access to particular switch
features on a per user basis. See the
“Switch Security” chapter in your
OmniAccess User Manual
The following procedure uses the
for details.
login account
admin
as an example. Complete the following steps to log in
to the switch.
♦
Caution
♦
If the system displays the following
prompt:
Please Standby, chassis configuration changing
(Hit ^C to abort)...
you are attempting to access the
switch before it has completed initialization or processing a previous
command. Wait for the switch to
initialize before entering any
commands.
***********************************************************
Welcome to the Alcatel OmniAccess 512!
Press ENTER to start
The OmniAccess 512 is factory-configured to boot up
CLI
in
(Command Line Interface) mode. The
CLI
allows
you to enter single-line commands through the local
console. (For more information on
Based Configuration Reference Manual
To start the Command Line Interface, press
The following message and
CLI
displayed, to indicate that you are in
Entering Command Line Interface
->
CLI
, see your
Text-
.)
<Enter>
prompt (->) will be
CLI
mode.
.
6 Setting Up Software
Page 10

♦ Configuration Modes ♦
You can configure your OmniAccess
512 through the User Interface (
UI). To
enter the UI, type ui at the CLI prompt
(->) and press <Enter>. The UI prompt
(/=>) will be displayed, indicating that
you are in UI mode. From here, you
can type ? and press <Enter> to view
the Main Menu.
For more information on using the
UI,
refer to the OmniAccess 512 User
Manual
To return to
.
CLI mode from UI mode,
type either cli or exit at the UI prompt
(/=>) and press <Enter>.
a. Type
password admin <old_password >
<new_password>
<Enter>. For example, to change the factory
at the CLI prompt and press
default password (switch) to a new password
(lahaina), enter the following:
-> password admin switch lahaina
b. No confirmation message will appear onscreen.
Only the system prompt (
->) will appear.
♦ Important Note ♦
To create an all-numeric password (for
example,
7654321), you must enter
quotation marks before and after the
password 7654321.
4. Set up a Password
Before you begin configuring your switch, you should
change the password for the admin login account. The
admin login account provides full access to all switch
management functions.
The factory default password for the
switch. Use the following procedure to change the
password for the admin account:
admin account is
All new passwords take effect at your next login
session.
♦ Note ♦
If the switch will be managed via
SNMP, refer to your switch’s user
manual for instructions on setting
SNMP passwords.
Setting Up Software 7
Page 11

♦ Caution ♦
Your password is stored (encrypted)
in the
mpm.cnf configuration file. If
you remove this file and reboot the
switch, your login password (as well
as all user-configured data) will automatically reset to the factory default. In
this event, you must start over from
Step
a (see preceding page) to change
the password.
c. To view the system date, enter system date at the
CLI prompt and press <Enter>. The system date
will be displayed, as shown here:
-> system date
06/11/02
d. To change the system date, enter system date
mm/dd/yyyy
at the CLI prompt and press <Enter>.
The system date will be displayed, as shown
here:
5. Set the System Time and System Date
Complete the following steps to set the system time
and system date:
a. To view the system time, type
CLI prompt and press <Enter>. The system time
will be displayed, as shown in the example
below:
-> system time
10:53:19
b. To set the system time, type system time
hh:mm:ss
at the CLI prompt and press <Enter>.
The new system time will be displayed, as
shown in the example below:
-> system time 11:53:19
New time: 11:53:19
system time at the
-> system date 06/12/2002
6. Enter a System Description (Optional)
You can use the following CLI commands to view or
specify a contact person for the switch, a switch name,
its location, a description of the switch, and the
switch’s MAC aging timer value. Although this information is not required, you may find it helpful for managing the switch. Follow the steps below:
a. To view the department or network administrator
for the switch, type
CLI prompt and press <Enter>. If no network
administrator has been specified, Unset will be
displayed, as shown in the example below:
-> system admin-contact
Unset
system admin-contact at the
8 Setting Up Software
Page 12

b. To specify the department or network adminis-
trator for the switch, type system admin-contact
followed by a text-string name you want to use
at the CLI prompt and press <Enter>. For example, to specify Networking Corp Customer Service
(800-555-6000)
, type the following at the CLI
prompt and press <Enter>:
d. To specify a system name, type system name
followed by a text-string name at the CLI prompt
and press <Enter>. For example, to specify Sales
as the system name, type the following at the
CLI prompt and press <Enter>:
-> system name Sales
-> system admin-contact “Networking Corp
Customer Service (800-555-6000)”
♦ Important Notes ♦
To add spaces between words, you
must include quotation marks (
“ ”)
around the text string when entering
the admin-contact information.
No confirmation message will appear
onscreen. To verify that the system
admin-contact information has been
set, type
CLI prompt and press <Enter>.
c. To view the system name, type
system admin-contact at the
system name at
the CLI prompt and press <Enter>. If no name
has been specified, the following will display:
-> system name
Unset
♦ Important Notes ♦
The system name must be a single
word or hypenated text string. Do not
use commas, quotation marks or
underscores.
No confirmation message will appear
onscreen. To verify that the system
name has been set, type system name
at the CLI prompt and press <Enter>.
e. To view the system location, type
location
at the CLI prompt and press <Enter>. If
system
no location has been specified, the following
will display:
-> system location
Unset
Setting Up Software 9
Page 13

f. To specify the system location, type system
location
followed by text-string name at the CLI
prompt and press <Enter>. For example, to specify Calabasas Test Lab as the system location,
type the following at the CLI prompt and press
<Enter>:
-> system location “Calabasas Test Lab”
♦ Important Notes ♦
To add spaces between words, you
must include quotation marks (
“ ”)
around the text string for system
location
.
No confirmation message will appear
onscreen. To verify that the system
location has been set, type
location
<Enter>.
at the CLI prompt and press
g. To view the system description, type
description
at the CLI prompt and press <Enter>.
system
system
If no description has been specified, an error
message will appear, as shown below:
-> system description
DESCRIPTION NOT SET.
h. To specify the system description, type system
description
followed by a text-string name you
want to use at the CLI prompt and press <Enter>.
For example, to specify
Engineering #2 as the
system description, type the following at the CLI
prompt and press
<Enter>:
♦ Important Notes ♦
Any text-string name that includes
spaces must be enclosed in quotes
(e.g.,
“Test Lab”).
No confirmation message will appear
onscreen. To verify that the system
description has been set, type
description
<Enter>.
i. The
MAC aging timer indicates how many
at the CLI prompt and press
system
seconds any duplicate MACs can remain in the
switch’s CAM (Content Addressable Memory) if
there is no traffic from those MACs. After the
specified time has expired, inactive MACs age
out of the CAM. To view the switch’s MAC aging
timer value (default=0), type system dup-mac-
timer
at the CLI prompt and press <Enter>. the
following will display:
-> system dup-mac-timer
0
j. To specify the switch’s MAC aging timer value in
seconds, type system dup-mac-timer followed by a
number of seconds (the valid range is 10
through 1000000 seconds) at the CLI prompt and
press <Enter>. For example, to specify 5000 as
the MAC aging timer value, type the following at
the CLI prompt and press <Enter>:
-> system dup-mac-timer 5000
-> system description “Engineering #2”
10 Setting Up Software
Page 14

♦ Important Notes ♦
Do not use commas when specifying a
MAC aging timer value. For example,
the entry 63,000 will result in an error.
b. No confirmation message will appear onscreen.
Only the system prompt (
->) will appear.
See your switch manual to set other parameters.
If you want to use the Group aging
timer, enter
0 as the value for the MAC
aging timer.
If you entered a new
dup-mac-timer
value, you must reboot the switch
before the changes will take effect.
No confirmation message will appear onscreen. To
verify that the switch’s
MAC aging timer has been set,
type system dup-mac-timer at the CLI prompt and press
<Enter>.
7. Assign an IP Address to the Default Group
Your switch is configured with a default Group and
VLAN. You can add Groups and VLANs later through
the switch software. To get started, you can use the
default group and default VLAN to configure the IP
address for this switch. (The default IP address is
192.168.10.1.) To modify Group IP routing parameters,
complete the following steps:
a. To assign or modify the default Group and
Address, type the following at the CLI prompt
and press <Enter>:
VLAN
You have now set up all of the basic software parameters you need to begin managing your switch. Once
your switch is connected to the network, you can use
Telnet or
FTP to access the switch software through
your network.
More Information on Switch Commands?
At this point, you can begin configuring other switch parameters. See your
OmniAccess 512 User Manual and any
supplements for information on all
switch commands.
8. Log Out
You have now completed the initial software set-up.
You can exit the switch by typing logout or exit and
pressing <Enter>.
-> group 1 router ip <ip-address>
where 1 is the default group and VLAN, and
<ip-address> is the IP Address for a specific virtual
router port (for example,
168.23.9.100).
Setting Up Software 11
Page 15

OmniAccess Basics
This section provides general information on the
OA-512 chassis and LEDs. For more detailed information, refer to the OmniAccess 512 User Manual.
Management LEDs
Each OA-512 chassis provides
four Management LEDs. Refer to
page 15 for detailed information
on LED functions.
OmniAccess
512
10/100
15
9
OK1
TP
PS
48
OK2
12
S2
CONSOLE
Port Status LEDs
Each OA-512 chassis provides
twelve Port LEDs. Refer to page 15
for detailed information on LED
functions.
OA-512 switches provide twelve 10/100
Ethernet ports. Each port will automatically
configure itself to match the data speed of
attached devices.
Each port can use unshielded twisted pair
(UTP) or shielded twisted pair (STP) cable
to connect to a device.
7X 8X 9X 10X 11X 12X1X 2X 3X 4X 5X 6X
T1/E1
S3/1
STA
Console Management Port
This connector allows you to
access the UI and CLI via a PC
or workstation.
Slot for VoIP Uplink SubmoduleEthernet Port Connectors
OA-512 switches provide a slot for a Voice over
IP (VoIP) uplink submodule. Contact your Alcatel supplier for information on VoIP uplink submodules.
S4
S3/2
Slot for WAN Uplink Submodules
OA-512 switches provide a slot that
supports up to two user-installable
WAN uplinks (T1/E1 uplink shown).
12 OmniAccess Basics
Page 16

OA-512 Slot Numbering
The front panel of an OA-512 is divided into several
areas labeled S2, S3/1, S3/2, S/4, etc. Think of these
areas as a division of the switch into several modules,
or slots. The UI and CLI, accessible via the front panel
console port, rely on these slot designations for many
of their management and configuration commands.
.
OmniAccess
512
CONSOLE represents Slot 1 and contains
the equivalent of a management module.
The UI refers to the management module
as the MPM.
CONSOLE
S2
T1/E1
S3/1
STA
10/100
15
9
OK1
TP
PS
48
OK2
12
The OA-512’s WAN uplink slot is labeled S3 for
Slot 3. This slot contains two separate uplink port
positions:
S3/1 and S3/2. (An OA-512-FT1/FE1
uplink is shown at position S3/1.)
The Ethernet port connectors
are labeled S2 for Slot 2.
7X 8X 9X 10X 11X 12X1X 2X 3X 4X 5X 6X
S3/2
The slot reserved for the OA-512’s
VoIP uplink is labeled S4 for Slot 4.
S4
OmniAccess Basics 13
Page 17

OA-512 Rear Panel
The figure below illustrates the rear panel of an OmniAccess 512.
.
SIMM Memory Access Panel. This
panel may be used to access the
switch’s internal SIMM memory
daughtercard (MEM512-FLSH-16M).
Compression/Encryption Access Panel.
This panel is reserved for use with a
compression/encryption SIMM (OA-512HWE). A compression/encryption SIMM
is required to run Virtual Private network
(VPN) software.
AC Power Connector. Plug the sup-
plied AC power cord into this connector. Please refer to the
OmniAccess 512 User Manual for
information on the DC version (OA512-DC) of the OA-512.
Power Switch. To turn the switch on,
move the power switch to the on (I) position. To turn the switch off, move the
switch to the off (O) position.
14 OmniAccess Basics
Page 18

OA-512 Management and Port LEDs
OK1 (Hardware Status). This LED displays
Green when the switch has successfully
passed power-on hardware diagnostics. It
displays Amber if the hardware has failed
diagnostic tests. If it is alternating Green and
Amber, file system compaction is in
progress.
Important
Do not power down the switch
while the OK1 LED is alternating
Green and Amber.
OK2 (Software Status). This LED blinks
Green when software has successfully loaded and the switch is ready to execute commands. It blinks Amber when the switch is
in a transitional state, such as when it first
boots up. If it blinks Amber for an extended
period of time (i.e., more than a minute),
reboot the switch. If the software was not
loaded successfully, the LED will display
solid Amber.
PS (Power Supply Status). This LED displays
Green when the switch is connected to an
AC power source. It is off when the switch
is not receiving power from an AC power
source.
OmniAccess
512
TP (Temperature). If the internal switch
temperature is approaching maximum
operating limits, this LED will display
Green. Note that this LED comes on before
the temperature limit is reached.
10/100
15
9
OK1
TP
PS
OK2
48
10/100 Each LED is associated with a corresponding Ethernet
CONSOLE
12
port located at slot 2 (S2). In this figure, the LED labeled 1
(located at top left of the 10/100 LED bank) reports the status
of Ethernet port 1X at slot S2. The LED located immediately
below LED 1 is LED 2 and reports the status of Ethernet port
2X at slot S2, etc. Refer to page 13 for slot locations.
An LED displays Green continuously when a good cable connection exists on the corresponding port. The LED then flashes Green when traffic is detected on the port. If the LED is off,
a cable is not connected to the corresponding port or the connected cable does not have link integrity.
OmniAccess Basics 15
Page 19

Alca tel
268 0 1 W est Agoura Road
C a la ba sa s, C A 9 13 0 1 USA
Contact Center
(80 0 ) 9 9 5-26 1 2 US/ C ana da
(81 8 ) 8 8 0-35 0 0 O utside US
www.alca tel. com/ enterprise
Product specific ations contained in this docume nt a re subject to change w ithout notice. Contact
your loc al A lcatel repre sentative for the most current information. Copyright © 20 03 Alc atel
Internetworking, Inc. All ri ghts reserved. This do cument may not be reproduced in whole or in
part without the expressed written permission of Alca tel Internetworking, Inc. Alcatel
Alca tel log o are re gistered tra demarks of Alc atel. A ll other trademarks a re the prope rty of their
respective owners.
¨ and the
 Loading...