


Alaris®GP Volumetric Pump
Technical Service Manual

This manual has been prepared for use by qualified service personnel only. Cardinal Health cannot accept any liability for any breakdown or deterioration in performance of parts or equipment resulting from unauthorised repair or modification.
t Cardinal Health, 1180 Rolle, Switzerland
Alaris®, IVAC®, Guardrails® and Asena® are registered trademarks of Cardinal Health, Inc. or one of its subsidiaries. All other trademarks belong to their respective owners.
© 2006-2008. Cardinal Health, Inc. or one of its subsidiaries All rights reserved.
This product uses zlib (http://www.zlib.net/) © 1995-2005 Jean-loup Gailly and Mark Adler Technician Mode uses the lwIP communication stack (http://www.sics.se/~adam/lwip/) © 2001, 2002 Swedish Institute of Computer Science. All rights reserved.
Redistribution and use in source and binary forms, with or without modification, are permitted provided that the following conditions are met:
1.Redistributions of source code must retain the above copyright notice, this list of conditions and the following disclaimer.
2.Redistributions in binary form must reproduce the above copyright notice, this list of conditions and the following disclaimer in the documentation and/or other materials provided with the distribution.
3.The name of the author may not be used to endorse or promote products derived from this software without specific prior written permission.
THIS SOFTWARE IS PROVIDED BY THE AUTHOR “AS IS” AND ANY EXPRESS OR IMPLIED WARRANTIES, INCLUDING, BUT NOT LIMITED TO, THE IMPLIED WARRANTIES OF MERCHANTABILITY AND FITNESS FOR A PARTICULAR PURPOSE ARE DISCLAIMED. IN NO EVENT SHALL THE AUTHOR BE LIABLE FOR ANY DIRECT, INDIRECT, INCIDENTAL, SPECIAL, EXEMPLARY, OR CONSEQUENTIAL DAMAGES (INCLUDING, BUT NOT
LIMITED TO, PROCUREMENT OF SUBSTITUTE GOODS OR SERVICES; LOSS OF USE, DATA, OR PROFITS; OR BUSINESS INTERRUPTION) HOWEVER CAUSED AND ON ANY THEORY OF LIABILITY, WHETHER IN CONTRACT, STRICT LIABILITY, OR TORT (INCLUDING NEGLIGENCE OR OTHERWISE) ARISING IN ANY WAY OUT OF THE USE OF THIS SOFTWARE, EVEN IF ADVISED OF THE POSSIBILITY OF SUCH DAMAGE.
Alaris® GP Volumetric Pump |
2/84 |
1000SM00013 Issue 3 |

Contents
Chapter |
|
1. General Information |
4 |
2. Configuration & Calibration |
8 |
3. Preventative Maintenance |
19 |
4. Troubleshooting |
39 |
5. Circuit Descriptions |
44 |
6. Corrective Maintenance |
48 |
Appendix |
|
A. Electromagnetic Compatibility |
68 |
B. Disposal |
73 |
C. Spare Parts Listings |
75 |
D. Service Contacts |
81 |
E. Document History |
83 |
Alaris® GP Volumetric Pump |
3/84 |
1000SM00013 Issue 3 |
Chapter 1
General Information
In this chapter
Introduction |
5 |
Features of the Pump |
6 |
General Precautions |
7 |

General Information
Introduction
The Alaris® GP Volumetric Pump and the Alaris® GP Guardrails® Volumetric Pump (hereinafter referred to as 'Pump') is a small lightweight volumetric infusion pump that provides accurate and reliable infusions over a range of rates.
The pump is designed to meet the infusion requirements as specified in the Directions For Use (DFU) for all hospital departments including general wards, critical and intensive care, operating rooms and accident and emergency rooms.
This pump is suitable for use by appropriately trained clinicians or nurses. This pump can be used for intravenous infusion modes. Supporting fluid & drug therapy, blood transfusions and parenteral feeding.
Product Familiarity
Ensure that you are fully familiar with the pump by carefully studying the Directions for Use (DFU) prior to operation and prior to attempting any repairs or servicing. As part of continuous improvement, product enhancements and changes are introduced from time to time.
Purpose of this Manual
This Technical Service Manual describes how to set up, test and maintain the Alaris® GP Volumetric Pump and the Alaris® GP Guardrails® Volumetric Pump.
This manual is intended for use by personnel experienced in medical equipment testing and maintenance procedures.
Conventions Used in this Manual
|
BOLD |
Used for Display names, self-test codes, controls and indicators referenced in this manual, for |
|
|
|
|
example, Battery Indicator, access code 212, ON/OFF button. |
|
|
|
|
|
'Single quotes' |
Used to indicate cross-references made to another section of this manual. For example, see |
|
|
|
|
Chapter 2, 'Configuration & Calibration'. |
|
|
|
|
|
underline |
Used to indicate a link to another section within this manual. |
|
|
|
|
|
|
Italics |
Used to refer to other documents or manuals. For example, refer to the relevant Directions for Use |
|
|
|
|
(DFU) for further information. Also used for emphasis, for example, ...if the gap still measures less |
|
|
|
than... |
|
|
|
|
|
|
|
Wherever this symbol is shown a Hints & Tips note is found. These notes provide useful advice or |
|
|
|
information that may help to perform the task more effectively. |
|
|
|
|
|
|
|
Wherever this symbol is shown a Toolbox note is found. These notes highlight an aspect of test |
|
|
|
or maintenance that is important to know about. A typical example is drawing attention to a |
|
|
|
software upgrade that you should check has been installed. |
|
|
|
|
Alaris® GP Volumetric Pump |
5/84 |
1000SM00013 Issue 3 |

General Information
Features of the Pump
Alarm indicator
 Alaris®
GP
Display
Run
Bolus
Hold
Options
AC power indicator
Release lever for rotating cam 
Rotating cam to lock onto horizontal rectangular bars.
Mains fuses
Mains inlet
IR communications port
Potential Equalisation (PE)
Connector
Door
Softkeys
Chevrons
Mute
Pressure
Battery indicator
On/Off
Door Lever
Handle
Flow sensor connector (cover removed for clarity) RS232/Nursecall connector (cover removed for clarity)
Folded pole clamp
 Medical device interface (MDI)
Alaris® GP Volumetric Pump |
6/84 |
1000SM00013 Issue 3 |

General Information
General Precautions
w V B
Attention consult accompanying documents: Prior to using this pump, carefully read the Operating Precautions described in the Directions for Use (DFU).
This pump contains static-sensitive components. Observe strict precautions for the protection of static sensitive components when attempting to repair and service the pump.
An explosion hazard exists if the pump is used in the presence of flammable anaesthetics. Exercise care to locate the pump away from any such hazardous sources.
Dangerous Voltage. An electrical shock hazard exists if the casing of the pump is opened or removed. Refer all servicing to qualified service personnel.
M This pump is protected against the effects of high energy radio frequency emissions and is designed to be fail safe if extremely high levels of interference are encountered. Should false alarm conditions be encountered, either remove the source of the interference or regulate the infusion by another appropriate means.
If the pump is dropped, subjected to excessive moisture, humidity or high temperature, or otherwise suspected to have been damaged, remove it from service for inspection by qualified service personnel.
When connected to an external power source, a three-wire (Live, Neutral, Earth) supply must be used. If the integrity of the external protective conductor in the installation or its arrangement is in doubt, the pump should be operated from the battery.
Alaris® GP Volumetric Pump |
7/84 |
1000SM00013 Issue 3 |
Chapter 2
Configuration and Calibration
In this Chapter
Entering Service Mode |
9 |
Service Mode - Factory Defaults |
10 |
Service Mode - Configuration |
11 |
Service Mode - Data Set Transfer |
14 |
Service Mode - Calibration |
15 |
Configuration and Calibration
Entering Service Mode
Warning -
At no time should Service Mode be entered while the pump is connected to a patient. Service Mode should only be accessed by qualified and trained personnel.
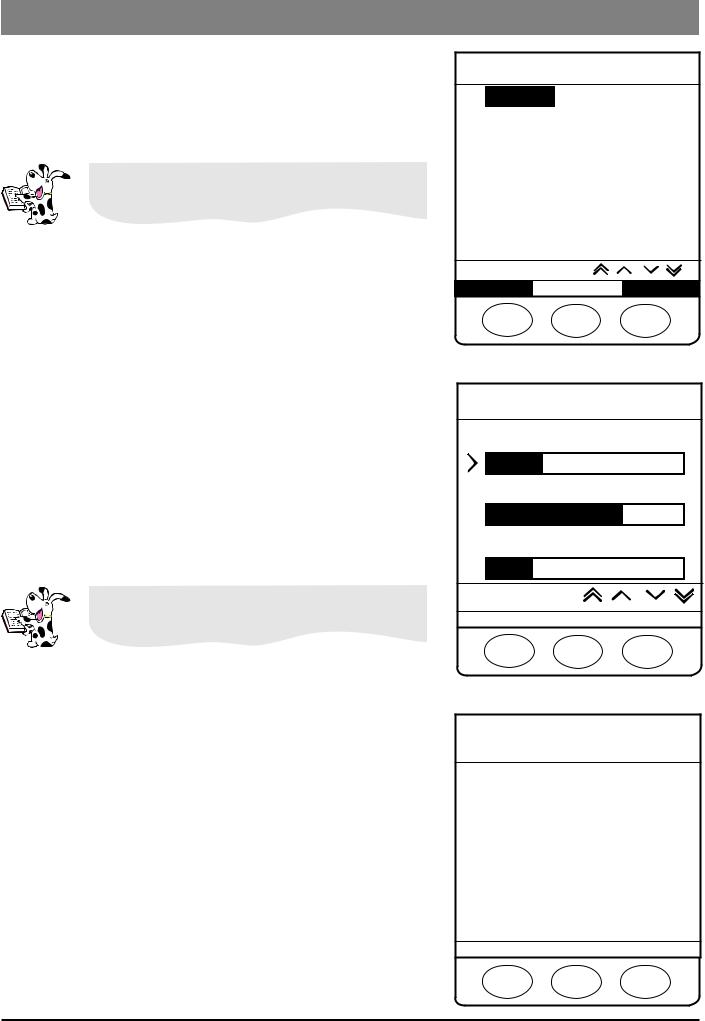
Service Mode can be accessed via a three-digit access code that is entered using the following procedure:
1.Hold down band turn the pump ON a.
2.Enter the access code 212 using the fkeys and the NEXT softkey.
3.When the code shows on screen, press OK to confirm.
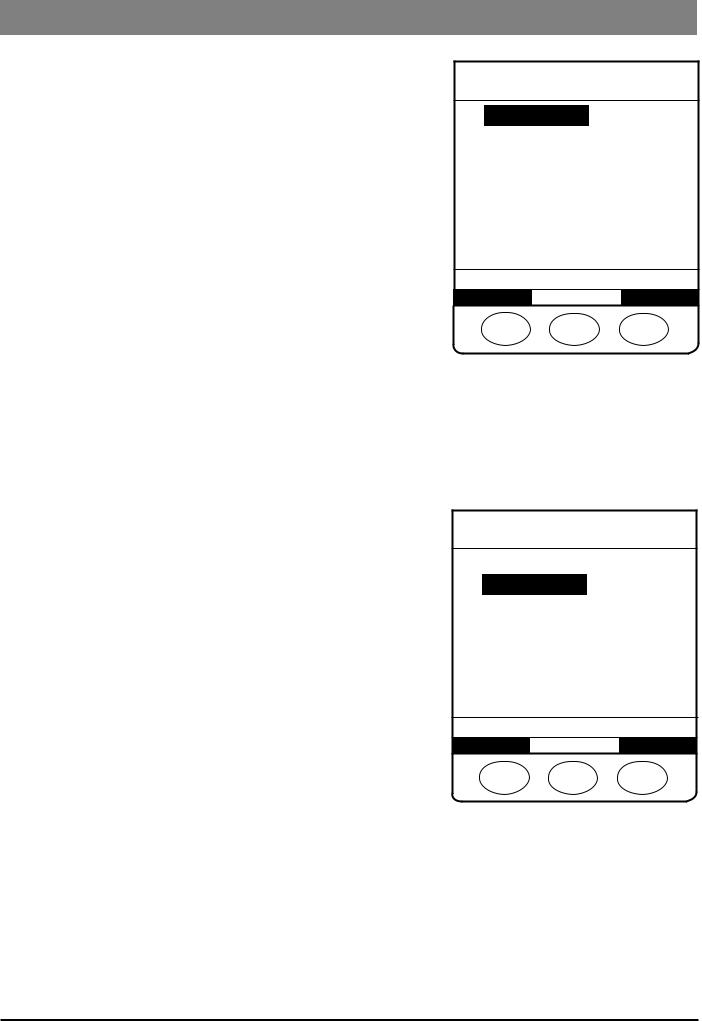
Select the required option using the fkeys and the OK softkey. For the Alaris® GP Volumetric Pump the options will be as follows:
Factory Defaults |
Load a default data set. Confirm to perform a |
|
cold start. |
Configuration |
This menu comprises a list of options which are |
|
configurable by the user. |
Data Set Transfer |
Upload a data set to pump. |
Calibration |
This menu comprises a list of calibrations which |
|
can be performed by the user. |
Test Verification/PVP |
Performance Verification Procedure Tests. |
For the Alaris® GP Guardrails® Volumetric Pump the options will be as follows:
CQI Events Download |
For future implementation |
Data Set Transfer |
Upload a data set to pump. |
Configuration |
This menu comprises a list of options which are |
|
configurable by the user. |
Calibration |
This menu comprises a list of calibrations which |
|
can be performed by the user. |
Test Verification/PVP |
Performance Verification Procedure Tests. |
Factory Defaults |
Load a default data set. Confirm to perform a |
|
cold start. |
SERVICE
Factory Defaults
Configuration
Data Set Transfer
Calibration
Test Verification/PVP
SELECT WITH
QUIT OK
SERVICE
CQI Events Download
Data Set Transfer
Configuration
Calibration
Test Verification/PVP
Factory Defaults
SELECT WITH
QUIT OK
Alaris® GP Volumetric Pump |
9/84 |
1000SM00013 Issue 3 |
Configuration and Calibration
Service Mode - Factory Defaults
Factory Defaults
Select the required option using the fkeys and the OK softkey.
Default Data Set Replace the current data set with a default data set.
Cold Start Confirm Confirm clearing and resetting the data set and calibration data to the factory defaults.
Clear CQI Log File* Confirm clearing all pump history and resetting the data set to the factory default.
* Alaris® GP Guardrails® Volumetric Pump only.
FACTORY DEFAULTS
Default Data Set
Cold Start Confirm
Clear CQI Log File
SELECT WITH 
QUIT OK
Default Data Set
1. Press OK to confirm loading the default data set.
DEFAULT DATA SET
****** WARNING! ******
Restoring factory default data set will delete the clinically approved data set installed.
Delete approved and restore factory default?
QUIT OK
Cold Start Confirm
1. Press OK to confirm performing a cold start.
COLD START CONFIRM
****** WARNING! ******
All data set and cal data will be reset to default!
The pump will require a full calibration before returning to clinical use.
QUIT |
|
OK |
Alaris® GP Volumetric Pump |
10/84 |
1000SM00013 Issue 3 |
Configuration and Calibration
Service Mode - Factory Defaults (continued)
Clear CQI Log File
1. Press OK to confirm clearing the CQI Log File.
CLEAR CQI LOG FILE
****** WARNING! ******
This will remove all instrument history and will restore the factory default data set by deleting the clinically approved installed data set.
Clear current log?
QUIT OK
Service Mode - Configuration
Select the required option using the fkeys and the OK softkey.
Date/Time |
Sets the current date and time used for event |
|
logging. |
Software Versions |
Displays the pump software versions. |
Serial Number |
Configure the displayed serial number. |
Pump Reference |
Pump specific text to be displayed in user |
|
mode at start up. (20 characters max.) |
Language |
Configure the Language used for display |
|
messages. |
Backlight & Contrast |
Adjust the Backlight and Contrast values |
Current Data Set File |
Displays the current data set file details. |
Date/Time
1.Set the correct date and time using the fkeys.
2.Press NEXT to continue to next item to change.
3.Press OK to confirm.
SERVICE CONFIGURATION
Date/Time
Software Versions
Serial Number
Pump Reference
Language
Backlight & Contrast
Current Data Set File
SELECT WITH 
QUIT OK
DATE / TIME
AUG–04–2006 09:48
ADJUST WITH
QUIT |
|
NEXT |
|
OK |
Alaris® GP Volumetric Pump |
11/84 |
1000SM00013 Issue 3 |
Configuration and Calibration
Service Mode - Configuration (continued)
Software Versions
1.Press OK to exit after verifying Software Version fitted, display will vary depending on software version fitted.
SOFTWARE VERSIONS
SRP 001.005.004
MP 001.005.004
FDP 001.005.004
SP 001.005.004
QUIT |
|
OK |
SOFTWARE VERSIONS
SWV |
001.009.000 |
||
PKG |
001.009.000 |
||
MPU |
001.009.000 |
||
MPT |
001.009.000 |
||
FDP |
001.007.016 |
||
SP |
001.005.000 |
||
LANGUAGE |
001.004.005 |
||
|
|
|
|
QUIT |
|
|
OK |
Serial Number
1.Set the serial number required (maximum 9 characters) using the fkeys.
2.Press NEXT to continue to next item to change.
3.Press OK to confirm.
SERIAL NUMBER
8026 - 00000
Write Success: .
ADJUST WITH
QUIT |
|
NEXT |
|
OK |
Pump Reference
1.Set the Pump Reference required using the fkeys.
2.Press NEXT to continue to next item to change.
3.Press OK to confirm.
PUMP REFERENCE
---------------------
ADJUST WITH
QUIT |
|
NEXT |
|
OK |
Alaris® GP Volumetric Pump |
12/84 |
1000SM00013 Issue 3 |
Configuration and Calibration
Service Mode - Configuration (continued)
Language
1.Select the required Language using the fkeys.
2.Press OK to confirm.
Languages available will be dependant on the pump software version.
LANGUAGE
ENGLISH
NORSK - NORWEGIAN
DEUTSCH - GERMAN
FRANCAIS - FRENCH
NEDERLANDS - DUTCH
SVENSKA - SWEDISH
ESPAñOL - SPANISH
ITALIANO - ITALIAN
NONE - VANILLA
SELECT WITH
QUIT OK
Backlight & Contrast
1.Use the fkeys to adjust Backlight and Contrast to required setting.
2.Press PARAM to change between Backlight and Contrast.
3.Press OK to confirm.
Select the Dimming parameter to see what the display would look like when dimmed.
Current Data Set File
1. Press OK to exit after verifying current data set information.
BACKLIGHT & CONTRAST
Backlight = 30%
Contrast = 70%
Dimming = 25%
ADJUST WITH
QUIT |
|
PARAM |
|
OK |
CURRENT DATA SET
Data Set ID: ABCD Name:
Data_set_EXAMPLE Version: 2
Last update: 01-Jun-2006 12:34
Hospital name: Basingstoke General
QUIT |
|
OK |
Alaris® GP Volumetric Pump |
13/84 |
1000SM00013 Issue 3 |

Configuration and Calibration
Service Mode - Data Set Transfer
Upload data set to an Alaris® GP Volumetric Pump
Equipment required:
•Alaris® GP Editor Software Kit (1000SP01310) - includes the Alaris® GP Transfer Tool
•RS232 cable (1000SP01183)
•USB to RS232 Converter cable (1000EL00979) - optional
•USB to RS232 converter 4 way hub (1000EL00980) - optional
•PC - for requirements see Upgrading Firmware PC requirements
Using the Alaris® GP Transfer Tool allows a released data set to be uploaded to an Alaris® GP Volumetric Pump.
Warning -
At no time should the Alaris® GP Transfer Tool be used to upload to an Alaris®
GP Volumetric Pump while the pump is connected to a patient.
In Service Mode select Data Set Transfer using the fkeys and the OK softkey.
1.Using the Alaris® GP Transfer Tool select data set to be uploaded.
2.Press the RS232 or IrDA softkey to select the Comms mode being used.
3.Connect the pump to PC.
4.Press the START softkey to begin transfer.
5.Please ensure the data set ID shown on the pump is identical to the one transferred.
6.Press PASS softkey to confirm correct transfer and exit.
7.To transfer the data set to another pump repeat steps 2 to 6.
Upload data set to an Alaris® GP Guardrails® Volumetric Pump
Equipment required:
•Guardrails® Editor V3.1 Software Kit (1000SP01389) or Guardrails® Editor V3.1 Transfer Tool Software Kit (1000SP01390)
•RS232 cable (1000SP01183)
•USB to RS232 Converter cable (1000EL00979)
•USB to RS232 converter 4 way hub (1000EL00980) - optional
•PC - for requirements see Upgrading Firmware PC requirements
Using the Guardrails® Editor V3.1 Transfer Tool allows an approved data set to be uploaded to an Alaris® GP Guardrails® Volumetric Pump.
Warning -
At no time should the Guradrails® Editor V3.1 Transfer Tool be used to upload to an Alaris® GP Guardrails® Volumetric Pump while the pump is connected to a patient.
In Service Mode select Data Set Transfer using the fkeys and the OK softkey.
1.Using the Guardrails® Editor V3.1 Transfer Tool Transfer Tool select data set to be uploaded.
2.Connect the pump to PC.
3.Press the START softkey to begin transfer.
4.Please ensure the data set ID shown on the pump is identical to the one transferred.
5.Press ACCEPT softkey to confirm correct transfer and exit.
6.To transfer the data set to another pump repeat steps 2 to 5.
Caution: Loading the Data Set Transfer Tool software is considered a non-clinical service activity. Interconnecting the pump with a PC may cause the safety or electromagnetic environment to change while the connection exists. The threat of higher leakage currents or EMI disturbances may be present. Disconnect the IrDA or RS232 cable connection at both ends following software upload activities.
For more information relating to the Alaris® GP Editor Software or the Guardrails® Editor V3.1 Software refer to the relevant Directions For Use supplied with the software.
Alaris® GP Volumetric Pump |
14/84 |
1000SM00013 Issue 3 |
Configuration and Calibration
Service Mode - Calibration
Zero Point Calibration
Select the required option using the fkeys and the OK softkey.
1.Wait for the pressure sensors to park.
2.Ensure that an infusion set is not installed.
3.Press the START softkey.
4.Pump will countdown for 15 seconds.
5.Press the ACCEPT softkey.
6.Press the PASS softkey.
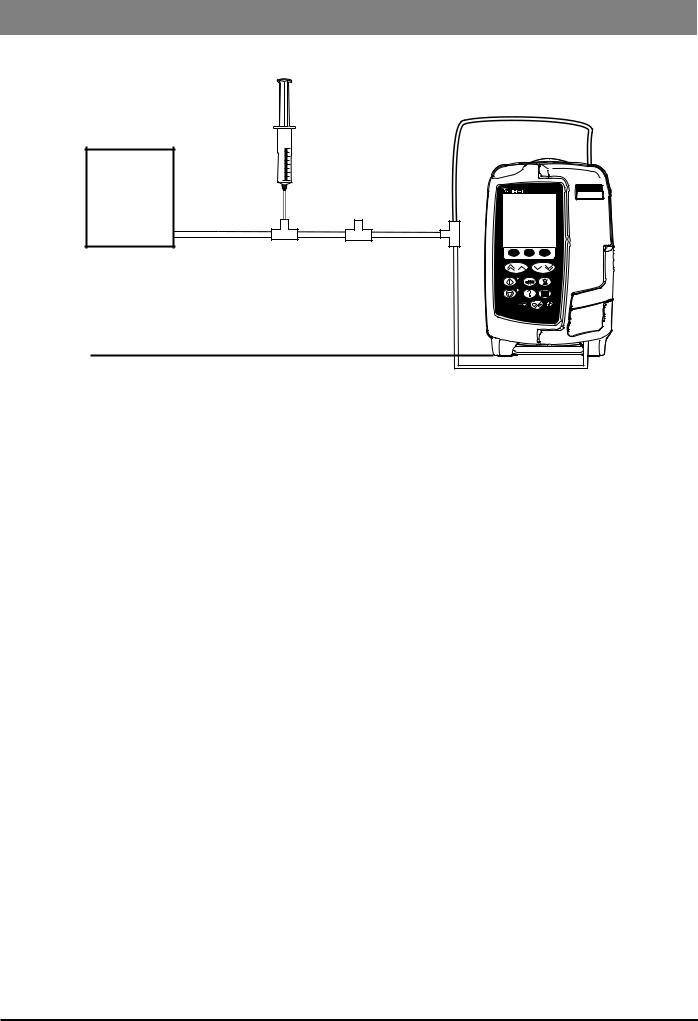
Pressure Calibration
Equipment required:
•Calibrated Pressure Gauge, minimum specification of
•Accuracy = 0.10% of full scale
•Full scale = 1500mmHg
•Pressure Calibration Set (1000SP01422) Use to calibrate 10 pumps and then change
Set up equipment as per figure 2-1 and allow 30 seconds before proceeding.
Select the required option using the fkeys and the OK softkey.
CALIBRATION
Zero Point Cal
Pressure Cal
Volumetric Cal
Battery Cal
SELECT WITH 
QUIT OK
CALIBRATION
Zero Point Cal
Pressure Cal
Volumetric Cal
Battery Cal
SELECT WITH 
QUIT OK
Alaris® GP Volumetric Pump |
15/84 |
1000SM00013 Issue 3 |
Configuration and Calibration
Service Mode - Calibration (continued)
Pressure Calibration continued
Pressure source (50ml/100ml syringe or similar device)
Pressure |
|
Gauge |
Vent to |
|
atmosphere |
Figure 2 - 1 Pressure Calibration Equipment Set Up
Alaris®
GP
1.Turn 3-way tap to close from atmosphere.
2.Press the START softkey.
3.Apply a pressure of 200mmHg and pump will countdown for 15 seconds.
4.Press the ACCEPT softkey.
5.Apply a pressure of 800mmHg and pump will countdown for 15 seconds.
6.Press the ACCEPT softkey.
7.Turn 3-way tap to vent to atmosphere.
8.Turn 3-way tap to close from atmosphere.
9.Press the NEXT softkey to proceed to Verification Procedure.
Verification Procedure
Software version v1.7.x and below
10.Apply a pressure of 200mmHg and wait for 5 seconds.
11.Press the NEXT softkey.
12.Apply a pressure of 400mmHg and wait for 5 seconds.
13.Press the NEXT softkey.
14.Apply a pressure of 600mmHg and wait for 5 seconds.
15.Press the NEXT softkey.
16.Apply a pressure of 800mmHg and wait for 5 seconds.
17.Press the NEXT softkey.
18.Turn 3-way tap to vent to atmosphere.
19.Press the PASS softkey.
Software version v1.9.0 and above
10.Apply a pressure of 500mmHg and wait for 5 seconds.
11.Press the NEXT softkey.
12.Turn 3-way tap to vent to atmosphere.
13.Press the PASS softkey.
Alaris® GP Volumetric Pump |
16/84 |
1000SM00013 Issue 3 |
Configuration and Calibration
Service Mode - Calibration (continued)
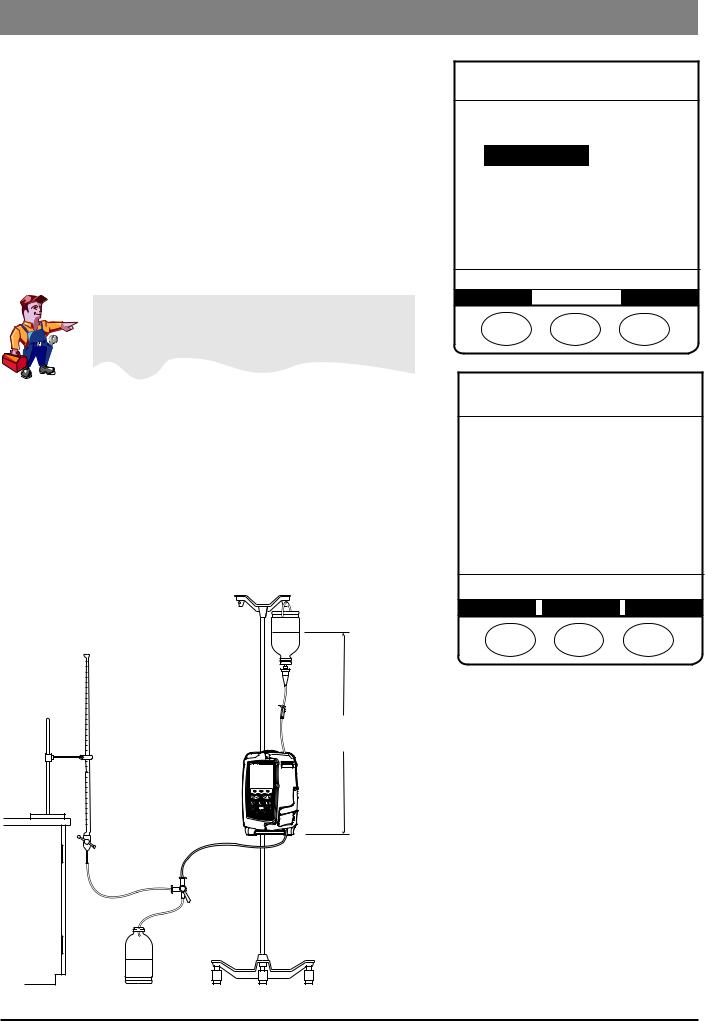
Volumetric Calibration
Select the required option using the fkeys and the OK softkey.
1.Load the primed Infusion Set (60793) into the Pump and set-up as shown in Figure 2-2 below and adjust the fluid level so that the meniscus is level with the zero mark.
2.Press START to begin. Test will run and fluid will be delivered into the burette.
3.When Volume delivered! is displayed, check accumulated air in line value is less than 100µl then enter the volume delivered into the burette using the fkeys and the OK softkey. If
accumulated air in line value is greater than 100µl then repeat test.
If measured value is 19.3ml or less then enter 19.2ml and if value is 20.6ml or higher then enter 20.7ml.
4.If no calibration is required (Volume delivered within limits of 19.4ml to 20.5ml) then press PASS to confirm and exit.
5.If the Calibration value is changed automatically then press VERIFY and repeat steps 2 to 4.
6.If the pump still fails replace the Platen and Fingers then repeat the calibration procedure.
CALIBRATION
Zero Point Cal
Pressure Cal
Volumetric Cal
Battery Cal
SELECT WITH 
QUIT OK
VOLUMETRIC CALIBRATION
Rate |
125ml/h |
VTBI |
20.0ml |
Cal Value |
920 |
Acc’d Air |
0μl |
START to begin...
QUIT DETAILS START
450mm
± 20mm
Alaris®
GP
Figure 2 - 2 Volumetric Calibration Equipment Set Up
Alaris® GP Volumetric Pump |
17/84 |
1000SM00013 Issue 3 |
Configuration and Calibration
Service Mode - Calibration (continued)
Battery Calibration
Select the required option using the fkeys and the OK softkey.
1.Connect AC Mains to the Pump and press CAL to begin.
2.When calibration is complete it will display CALIBRATION SUCCESS or CALIBRATION FAILURE. Press PASS to confirm successful calibration or REPEAT to perform calibration again.
CALIBRATION
Zero Point Cal
Pressure Cal
Volumetric Cal
Battery Cal
SELECT WITH 
QUIT OK
BATTERY CALIBRATION
Serial No |
12345 |
Current |
0mA |
FCC |
2502mAh |
Chrg Remain |
2453mAh |
Rel Chrg |
98% |
Temperature |
22°C |
Calibration |
|
CAL to calibrate!
CAL can exceed 10 hrs!
QUIT DETAILS CAL
BATTERY CALIBRATION
Serial No |
12345 |
Current |
-340mA |
FCC |
2502mAh |
Chrg Remain |
2453mAh |
Rel Chrg |
98% |
Temperature |
22°C |
Calibration |
|
CALIBRATING . . .
Discharge 89%
QUIT DETAILS CAL
BATTERY CALIBRATION
Serial No |
12345 |
Current |
0mA |
FCC |
2335mAh |
Chrg Remain |
2332mAh |
Rel Chrg |
100% |
Temperature |
26°C |
Calibration |
|
CALIBRATION SUCCESS
QUIT REPEAT PASS
BATTERY CALIBRATION
Serial No |
12345 |
Current |
0mA |
FCC |
2502mAh |
Chrg Remain |
2453mAh |
Rel Chrg |
100% |
Temperature |
22°C |
Calibration |
X |
CALIBRATION FAILURE
QUIT REPEAT
Alaris® GP Volumetric Pump |
18/84 |
1000SM00013 Issue 3 |
Chapter 3
Preventative Maintenance
In this chapter
Preventative Maintenance |
20 |
Visual Inspection |
20 |
Recommended Cleaning and Storage |
21 |
Updates |
23 |
Battery Test and Replacement |
25 |
Service Mode - Test Verification/PVP |
25 |
Performance Verification Procedure |
38 |

Preventative Maintenance
Preventative Maintenance
To ensure the pump remains in good operating condition, routine and preventative maintenance inspections are required. Routine maintenance inspections should be performed by hospital/facility before each use, see Directions For Use for details.
Preventative maintenance inspections should be performed at least every year.
For the preventative maintenance inspection the following should be performed:
•Full visual inspection of the pump, internal and external
•Fitting of all updates required
•Battery test and/or replacement
•Clean the pump
•Performance Verification Procedures
Following all spare part replacement and repair activities, testing must be performed in accordance with the Performance Verification Procedure (PVP). Additional testing and calibration may be required after certain repairs are completed, see table in Chapter 6 ‘Corrective Maintenance’ for more information.
Visual Inspection
Open the pump, as per Chapter 6 ‘Corrective Maintenance’ and visually inspect the interior of the pump. Visually inspect the exterior of the pump checking the following:
•Labels should be replaced as required if not flat, legible or fully adhered.
•Check Keypad for any sign of wear and replace as required.
•Case components must be checked for damage and replaced if necessary.
•Check the pole clamp is not damaged and that it functions correctly.
•Inspect the AC power supply plug and cable for damage.
•The case should be clean and free from IV solution residue, especially near moving parts.
•Check for dried solution deposits on accessible areas of pumping mechanism.
Alaris® GP Volumetric Pump |
20/84 |
1000SM00013 Issue 3 |
Preventative Maintenance
Recommended Cleaning and Storage
Cleaning the Pump: -
Before the transfer of the Pump to a new patient and periodically during the use, clean the Pump by wiping over with a lint-free cloth lightly dampened with warm water and a standard disinfectant / detergent solution.
Recommended cleaners are:
Brand |
Concentration |
Hibiscrub |
20% (v/v) |
Virkon |
1% (w/v) |
Do not use the following disinfectant types:
-NaDcc (such as PRESEPT)
-Hypochlorites (such as CHLORASOL)
-Aldehydes (such as CIDEX)
-Cationic Surfactants (such as Benzalkonium Chloride)
-Iodine (such as Betadine)
-Concentrated Isopropyl alcohol based cleaners will degrade plastic parts.
Before cleaning always switch OFF and disconnect from the AC power supply. Never allow fluid to enter the casing and avoid excess fluid build up on the Pump.
Do not use aggressive cleaning agents as these may damage the exterior surface of the Pump.
Do not steam autoclave, ethylene oxide sterilise or immerse this Pump in any fluid.
Storing the Pump: -
If the Pump is to be stored for an extended period it should be first cleaned and the internal battery fully charged. Store in a clean, dry atmosphere at room temperature and, if available, employ the original packaging for protection.
Once every 3 months during storage, carry out functional tests as described in this technical service manual and ensure that the internal battery is fully charged.
Cleaning and storing the Infusion Set: -
The Infusion Set is a disposable single use item and should be discarded after use according to hospital protocol.
Alaris® GP Volumetric Pump |
21/84 |
1000SM00013 Issue 3 |
Preventative Maintenance
Recommended Cleaning and Storage (continued)
Cleaning the door: -
Periodically during use (as per hospital policy), clean the door by wiping over with a lint-free cloth, lightly dampened with warm water and a standard disinfectant / detergent solution. Dry door before use.
To aid cleaning of a door which has been heavily soiled, contaminated or if the door operation is not free moving, then the door may be removed (see procedure below) then immersed and soaked in warm water with a standard disinfectant / detergent.
The door should be allowed to dry fully prior to use.
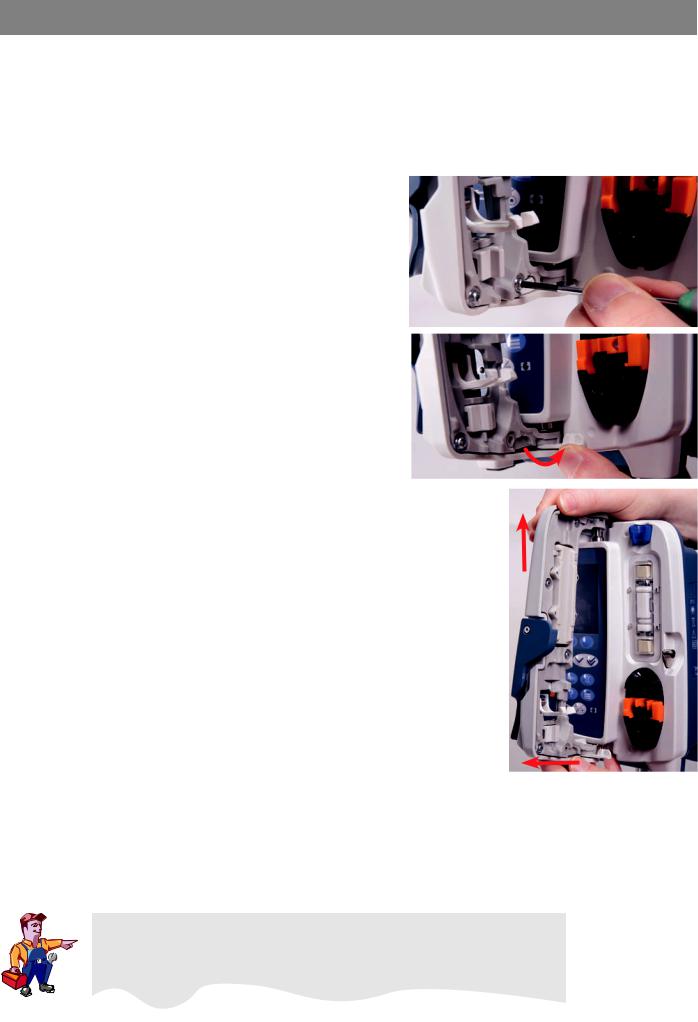
Door Removal
1. Remove the screw securing the lower hinge lock.
2. Open the lower hinge lock.
3. Pull the door away from lower hinge pin and lift up to remove the door.
4.Clean the door.
5.Refit door in reverse order. Ensure screw is refitted with a torque of 70cNm.
Cleaning the Flow Sensor: -
Before the transfer of the flow sensor to a new infusion set and periodically during use, clean the flow sensor by wiping over with a lint-free cloth lightly dampened with warm water and a standard disinfectant / detergent solution. Ensure the connector does not get wet. Dry flow sensor before use.
To aid cleaning of flow sensors which have been heavily soiled, contaminated or if the handle operation is not free moving, then the flow sensor may be immersed and soaked in clean soapy water (see note below). The inside of the spring mechanism can be cleaned by activating it whilst submerged in the water.
After cleaning, the sensor should be allowed to dry fully prior to use.
Warning -
The plug of the flow sensor must not be immersed in water as damage will occur.
Alaris® GP Volumetric Pump |
22/84 |
1000SM00013 Issue 3 |
Preventative Maintenance
Updates
Upgrading firmware
Requirements
•PC
•Minimum hardware system requirements:
• |
1GHz Pentium processor |
• |
512MB RAM |
• 1GB of free space on the system hard |
• |
CD ROM drive |
|
|
drive |
|
|
• |
Available configurable RS232 9 pin serial |
• |
Keyboard |
|
or USB communications ports |
|
|
Software requirements:
•Microsoft Windows 2000 (service pack 4), or XP (service pack 2)
• Video resolution of 1024 X 768 pixels |
• Mouse |
and 16 bit colour depth |
|
•The Software Maintenance Utility (SMU) (1000CD00028)
•RS232 cable (1000SP01183)
•USB to RS232 Converter cable (1000EL00979) - optional
•USB to RS232 converter 4 way hub (1000EL00980) - optional
•Firmware CD
Preparation
•Load the SMU software onto the PC
•Connect RS232 connector (using USB to RS232 converter if required) to each pump being updated
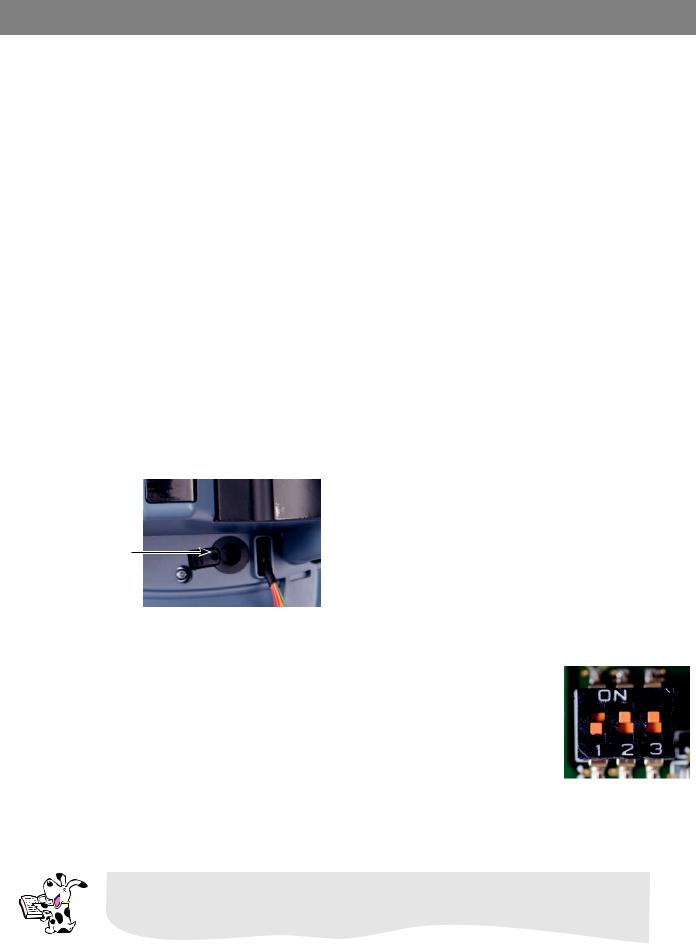
•Disconnect the Battery
•Remove the Battery Compartment Plug
Battery
Compartment
Plug
Software Upload
1.Through the Rear Case, there is a set of three dip switches on the bottom of the Control PCB. Switch 1 should be ON and switches 2 and 3 should be OFF.
2.Using a small flat blade screwdriver or round ended tweezers configure the dip switch settings to:
a.Switch 1 = OFF
b.Switch 2 = ON
c.Switch 3 = ON
3.Start the SMU facility to upload the software.
4.Select the Firmware zip file.
5.Select the Comm settings - Comm Port and Baud rate of 460800 (USB to RS232 converter) or 115200 (RS232).
6.Connect the Battery to the Battery Cable.
7.Press Start.
Switch 1 turns the safety battery circuit on but is not required for programming.
Switch 2 forces the pump to turn on.
Switch 3 turns the pump into ‘Boot Mode’, this is only used for programming.
Alaris® GP Volumetric Pump |
23/84 |
1000SM00013 Issue 3 |

Preventative Maintenance
Updates (continued)
Upgrading firmware continued
8.Once the green bar has reached the far right hand side and the time has reached 0:00 and the flashing green light is a steady green light, the RS232 connector can be removed from the pump.
9.Disconnect the Battery and turn OFF all dip switches.
10.Wait 5 seconds then reconnect the Battery.
11.Configure the Dip Switches to:
a.Switch 1 = ON
b. Switch 2 = ON then OFF
c.Switch 3 = OFF
12.Refit the Battery Compartment Plug, this prevents fluid ingress.
13.Power up the pump in Service Mode, enter access code 212, then select Configuration > Date/Time and set the current date and time.
If the Control, Interface or RS232 PCB is replaced, the pump must be re-programmed.
Alaris® GP Volumetric Pump |
24/84 |
1000SM00013 Issue 3 |
Preventative Maintenance
Battery Test and Replacement
To test the battery perform the battery calibration, as outlined in the procedure in Chapter 2 ‘Configuration and Calibration’, and verify that all pass criteria are met. If pass criteria are not met then replace the battery.
Battery charge retention will eventually degrade. So where retention is critical the internal battery should be replaced every three years.
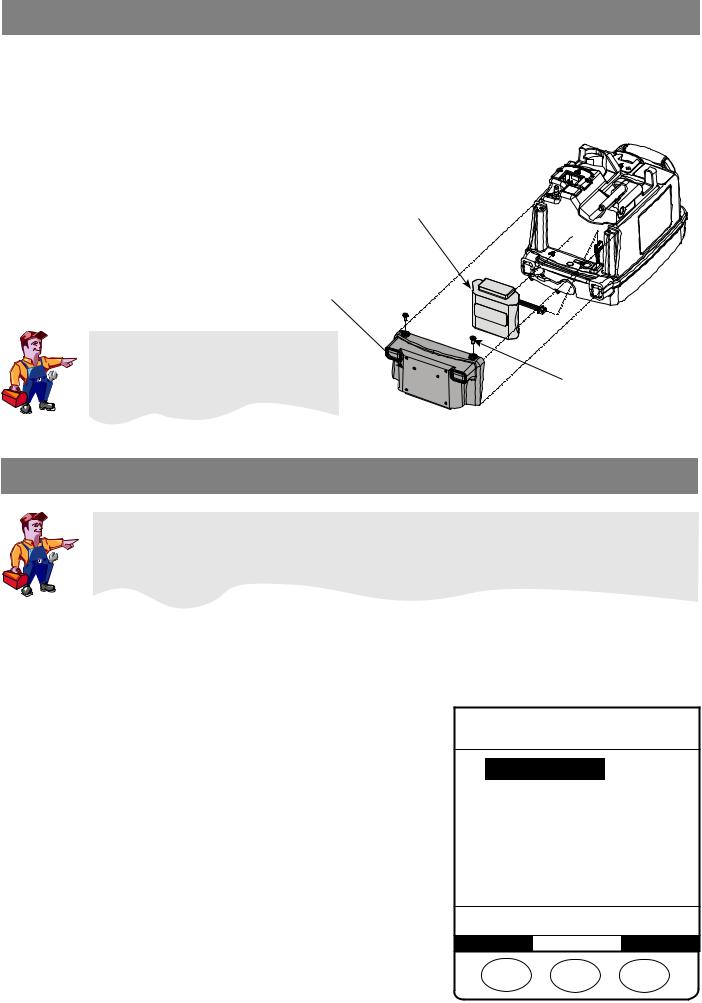
Replace the Main Battery
1. Remove the two case screws in battery cover, remove cover and battery.
Battery pack
2. Fit new battery.
3. Replace battery cover and secure with 2 screws.
Battery Cover |
|
It is essential that the battery pack is |
|
calibrated after fitting as failure to do |
|
so will degrade the quoted auxiliary |
|
battery power on this product. |
Screw/Washer (x2) 40cNm |
Service Mode - Test Verification/PVP
Warning -
At no time should Service Mode be entered while the pump is connected to a patient.
Service Mode should only be accessed by qualified and trained personnel.
Enter access code 212 to view the Service Mode menu (see 'Entering Service Mode' in Chapter 2 for instructions).
Select the Test Verification/PVP option using the fkeys and the OK softkey. Press the Quit softkey to return the pump to the access code screen.
Select the required option using the fkeys and the OK softkey.
PVP Work Flow |
Performance Verification Procedure (PVP) tests. |
Alarms Functionality |
Test the Alarms function correctly. |
User Interface |
Display, Keypad, LEDs and Audio Tests. |
Power Supplies |
Test AC Mains and Battery operation. |
Sensor Tests |
Perform tests on the pump sensors. |
Comms Tests |
RS232, IrDA and Nurse Call Tests. |
TEST/VERIFY
PVP Work Flow
Alarms Functionality
User Interface
Power Supplies
Sensor Tests
Comms Tests
SELECT WITH 
QUIT OK
Alaris® GP Volumetric Pump |
25/84 |
1000SM00013 Issue 3 |

Preventative Maintenance
Service Mode - Test Verification/PVP (continued)
PVP Work Flow
This test is used to confirm that the Pump is functioning correctly. Press the START softkey to begin.
The PVP Work Flow will iterate through the following tests:
•Software Versions
•Date/Time (read only)
•Serial Number (read only)
•Door Frame
•Safety Clamp
•Sear
•Audio Test
•Chequerboard
•LED’s
•Keypad
•Nurse Call
•RS232 Loop Back
•Pumping Efficiency Test
•Downstream Occlusion Pressure Test
•Alarms Functionality
•Volumetric (Accuracy Test) Calibration
See individual test details in this chapter or in Chapter 2 'Configuration and Calibration' for instructions.
PVP WORK FLOW
PVP Work Flow Test
QUIT |
|
START |
Alaris® GP Volumetric Pump |
26/84 |
1000SM00013 Issue 3 |
 Loading...