


|
|
|
|
|
|
English |
HEXACOMP C2M |
|
|||||
|
|
|
|
|
T |
|
|
|
|
|
|
U |
|
|
|
|
|
|
P |
|
|
|
|
|
|
IN |
|
|
|
|
|
7 |
10 |
|
|
|
|
|
9 |
|
|
|
|
|
|
8 |
|
|
|
|
|
|
LEVEL |
7 |
|
|
|
|
|
6 |
|
|
|
|
IN |
5 |
|
||
|
|
C |
|
4 |
|
|
|
9V |
D |
MIX |
|
3 |
|
|
DC |
|
|
2 |
|
|
|
|
|
|
|
1 |
|
|
|
|
|
|
0 |
|
|
|
|
|
|
H |
|
T |
|
|
|
|
HIG |
|
|
|
|
|
|
|
|
U |
|
|
|
|
|
|
P |
10 |
|
|
|
|
|
T |
|
|
|
|
10 |
|
U |
9 |
|
|
|
|
|
O |
8 |
|
|
|
|
9 |
N |
7 |
|
|
|
COMPRESSION |
8 |
O |
6 |
|
|
|
7 |
|
|
5 |
|
|
|
6 |
|
|
4 |
|
|
|
5 |
|
|
3 |
|
|
|
4 |
|
OUTPUT |
2 |
|
|
3 |
||
|
1 |
|
|
2 |
||
|
0 |
|
|
1 |
||
|
|
LOW |
|
|
0 |
|
|
|
|
|
|
||
|
|
|
|
|
|
H |
|
|
|
|
|
|
HIG |
|
|
|
10 |
|
|
|
|
|
|
9 |
|
|
|
|
|
|
8 |
|
|
|
|
|
|
7 |
|
|
|
|
|
|
|
6 |
|
|
|
|
|
|
5 |
|
|
|
INPUT |
|
|
4 |
|
|
|
|
|
3 |
|
|
|
|
|
|
2 |
|
|
|
|
|
|
1 |
|
|
|
|
|
|
|
0 |
|
|
|
|
|
|
|
W |
|
|
|
|
|
|
LO |
|
|
|
|
|
|
|
COMPRESSOR |
|
|
|
|
|
|
-BAND |
|
|
|
|
|
MULTI |
|
|
|
|
|
|
|
English |
WARNING |
|
|
|
|
|
|
The C2M HEXACOMP is designed to be used in a standard household environment.
PROTECTING YOURSELF AND THE C2M HEXACOMP
•Allow only an AKAI professional dealer or qualified professional engineer to repair or reassemble the C2M HEXACOMP.
•Do not put, or allow anyone to put any object, especially metal objects, into the C2M HEXACOMP.
•Use only the DC power supply specified. Never use an AC power supply directly.
•If water or any other liquid is spilled into or onto the C2M HEXACOMP, disconnect the power and/ or battery, and call your dealer.
•Make sure that the unit is well-ventilated, and away from direct sunlight.
•To avoid damage to internal circuitry, as well as the external finish, keep the C2M HEXACOMP away from sources of direct heat (stoves, radiators, etc.).
•Avoid using aerosol insecticides, etc. near the C2M HEXACOMP. They may damage the surface, and may ignite.
•Do not use denaturated alcohol, thinner or similar chemicals to clean the C2M HEXACOMP. They will damage the finish.
•Modification of this equipment is dangerous, and can result in the functions of the C2M HEXACOMP being impaired. Never attempt to modify the equipment in any way.
•Make sure that the C2M HEXACOMP is always well-supported when in use on a firm level surface.
•In order to assure optimum performance of your C2M HEXACOMP, select the setup location carefully, and make sure the equipment is used properly. Avoid setting up the C2M HEXACOMP in the following locations:
1.In a humid or dusty environment
2.In a room with poor ventilation
3.On a surface which is not horizontal
4.Inside a vehicle such as a car, where it will be subject to vibration
5.In an extremely hot or cold environment
•Be sure to wait for a few seconds before tuning the unit on again after the power has been turned off to ensure proper operation.
•When the battery becomes low, the unit will not operate properly. In this case, please replace the battery with a new one.
•When you insert or replace the batteries, please turn off the power before connecting this unit to other equipment in order to prevent malfunction or damage to speakers.
•When you connect this unit to other equipment, make sure that all of the other equipment is turned off in order to prevent malfunction or damage to speakers.
English
CHANGES OR MODIFICATIONS NOT EXPRESSLY APPROVED BY THE MANUFACTURER FOR COMPLIANCE COULD VOID THE USER’S AUTHORITY TO OPERATE THE EQUIPMENT.
32-En
CAUTION
RISK OF ELECTRIC SHOCK
DO NOT OPEN
CAUTION: TO REDUCE THE RISK OF ELECTRIC SHOCK
DO NOT REMOVE COVER (OR BACK).
NO USER-SERVICEABLE PARTS INSIDE.
REFER SERVICING TO QUALIFIED SERVICE PERSONNEL.
THE SYMBOLS ARE RULED BY UL STANDARDS (U.S.A.)
The lightning flash with arrowhead symbol, within an equilateral triangle, is intended to alert the user to the presence of uninsulated “dangerous voltage” within the product’s enclosure; that may be of sufficient magnitude to constitute a risk of electric shock to persons.
The exclamation point within an equilateral triangle is intended to alert the user to the presence of important operating and maintenance (servicing) instructions in the literature accompanying the appliance.
5B-En
Leisten Sie einen Beitrag Zum Umweltschutz
Verbrauchte Alt-Batterien die mit dem ISO-Symbolfür
Recycling gekennzeichnet sind, sowie Kein-Akkumul-atoren (wideraufladbare Batterien), Knopfzellen und Starterbatterien, gehören nicht in den Hausmüll. Geben Sie diese Batterien bei entsprechenden Samm-elstellen ab.
29A-G
WARNING!
To prevent fire or shock hazard, do not expose this appliance to rain or moisture.
1-En
English
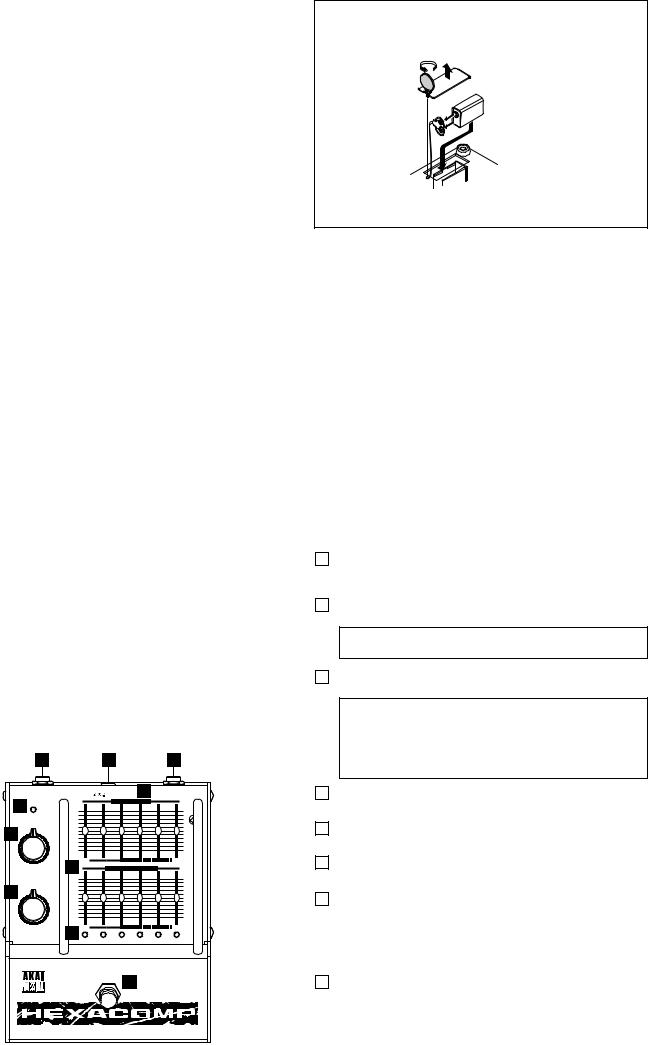
I n s e r t i n g t h e b a t t e r y :
Battery: 9V 006P / 6F22 / 6LR61/ 6LF22
Loosen the screw and remove the cover.
– |
|
+ |
Attach the snap fit terminal firmly |
|
|
|
to the battery in correct polarity |
|
as illustrated and place it in the |
|
compartment. |
|
Replace the cover and tighten |
|
the screw. |
•Do not charge, heat or disassemble the battery. Do not put it in fire or water, either. The battery may leak the electrolyte, heat up or explode.
•Take the battery out of the unit when the unit is not used for a long time.
The gas released from the battery may cause the leakage of electrolyte or may damage the unit.
•Do not mix it with other batteries or metal objects when carried, stored or discarded.
The battery may get short-circuited causing the leakage of electrolyte, heating or explosion.
•When the electrolyte gets into your eyes, as you may lose your eye sight, wash your eyes thoroughly with clean water and see the doctor immediately. When the electrolyte gets on your skin or cloths,
as it may harm your skin, wash it off with lots of clean water.
English
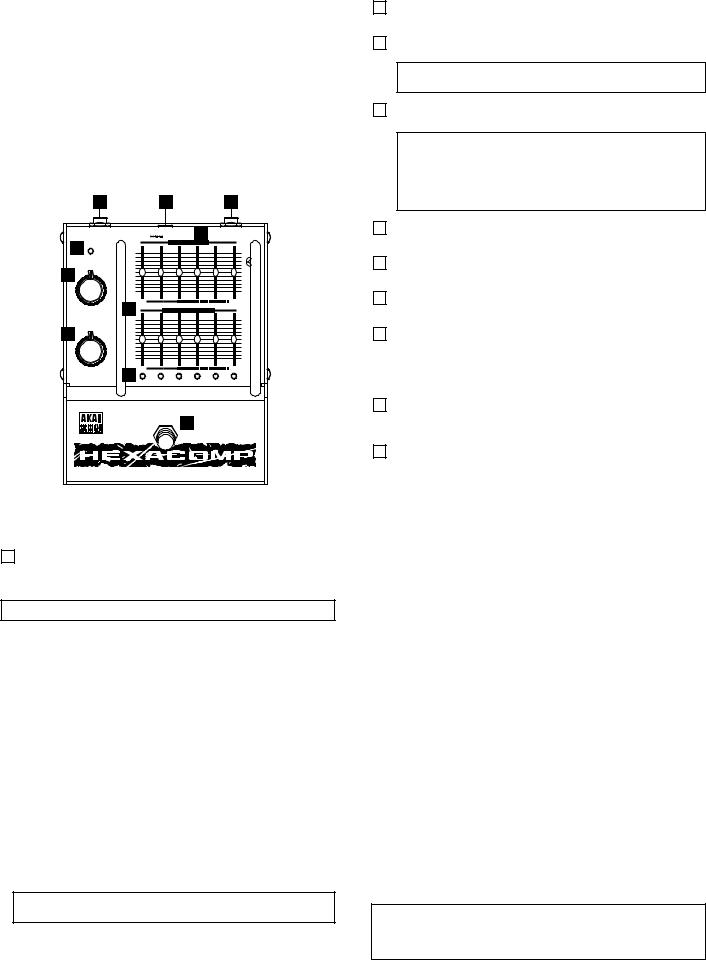
The C2M ‘Hexacomp’ is actually six compressors in one convenient effects pedal in a sturdy retro-styled stomp box. Unlike other compressor pedals that affect the full frequency range, each compressor in the Hexacomp is tuned to a specific frequency allowing you control the depth of compression for different frequencies. Thus, for example, you can apply more compression to high or mid frequency components in the sound whilst leaving the low end less affected. This is particularly useful for bassists as higher frequencies can be heavily compressed without the low notes losing their ‘punch’. The Hexacomp can also be used to control your sound in ways not possible with conventional compressor pedals.
Also, the Hexacomp’s ‘true’ bypass system completely switches out the internal circuitry via a special relay ensuring that your original signal comes out clean and without any coloration of its tonal quality when the effect is bypassed.
|
OUTPUT |
|
DC 9V DC IN |
7 |
INPUT |
|
4 ON |
10 |
MIX LEVEL |
10 |
|
|
|
9 |
|
|
9 |
|
OUTPUT |
8 |
|
|
8 |
|
7 |
|
|
7 |
|
|
5 |
6 |
|
|
6 |
|
5 |
|
|
5 |
|
|
3 |
|
|
3 |
|
|
|
4 |
|
|
4 |
|
|
2 |
|
|
2 |
|
|
1 |
|
|
1 |
|
|
0 |
|
|
0 |
|
|
LOW |
|
|
HIGH |
|
|
8 |
COMPRESSION |
|
|
|
INPUT |
10 |
|
|
10 |
|
9 |
|
|
9 |
|
|
6 |
8 |
|
|
8 |
|
6 |
|
|
6 |
|
|
|
7 |
|
|
7 |
|
|
5 |
|
|
5 |
|
|
4 |
|
|
4 |
|
|
3 |
|
|
3 |
|
|
2 |
|
|
2 |
|
|
1 |
|
|
1 |
|
|
0 |
|
|
0 |
|
|
LOW |
|
|
HIGH |
|
|
9 |
|
|
|
|
|
|
|
10 |
|
|
|
|
|
|
English |
10 |
FOOTSWITCH |
|
|
|
|
|
Switches the effect on and off. When the effect is switched off, the input |
||||
|
signal comes out clean without any coloration as the ‘true’ bypass system |
||||
|
ensures that the input signal is not routed through the internal effect circuit. |
||||
NOTE: The battery case is located at the bottom.
OPERATION
1.Connect the OUTPUT jack to your amp or the input of another effect unit.
2.Connect your guitar or bass (or the output of another effects pedal) to the
INPUT jack.
3.Turn your system on.
4.Press the footswitch to switch the effect on (the ON LED will illuminate).
5.While playing your guitar or bass, adjust the output level with the OUTPUT control.
•The INPUT control sets the input signal level.
•The COMPRESSION sliders set the gain (depth) of compression for each of the frequency ranges. The LED indicator illuminates when the compression effect is applied at each frequency. If you don’t want a particular frequency to have compression, move the appropriate COMPRESSION slider down so that the LED does not illuminate.
•The MIX LEVEL sliders set the output level of each compressor unit. When the depth of compression is increased using the COMPRESSION sliders, the output level for each frequency is raised. Use the MIX LEVEL sliders to compensate for this.
NOTE: The sound may distort and/or excessive compression may be applied if the input level is set too high.
PHASING EFFECT
As the Hexacomp allows the setting of compression gain/depth individually for each compressor unit, the decay time becomes different depending on the frequency component of the input signal. This allows you to create a unique phase effect that changes its characteristic according to the sound or the way guitar/bass is played.
Since the setting of sliders and the tone of input signal change the result of this phase effect, try the various combinations to find your favorite settings.
English
1OUTPUT
This connects to your amp or the input of another effect unit.
2DC IN
Plug the MP-9 9-volt AC adaptor in here (sold separately).
NOTE: The use of an AC adaptor is highly recommended if you plan using the Hexacomp for prolonged periods of time.
3INPUT
Plug your guitar or bass in here.
NOTE: This unit does not have a power switch. The unit is turned on while the plug is connected to the INPUT jack even when the effect is bypassed.
When being used with a battery, to prevent unnecessary battery consumption, you should unplug your guitar/bass from the INPUT jack when not in use.
4ON Indicator
This illuminates when the effect is switched on.
5OUTPUT control
This sets the overall output level of the effect.
6INPUT control
This sets the input signal’s level.
7MIX LEVEL sliders
These set the output level of each compression frequency.
Since the output level increases when COMPRESSION gain/depth is increased in each frequency band, the MIX LEVEL sliders can be used to compensate for this and to balance the different compressors’ outputs.
8COMPRESSION sliders
These set the gain/depth of each compressor unit. The higher the slider is moved, the more the compression.
9LED (red) indicators
These light up when compression is applied at the various frequency ranges. When you don’t want compression to be applied to a particular frequency, set its COMPRESSION gain low so that the LED indicator do not light.
English |
|
|
SPECIFICATIONS |
|
|
Functions: |
Effect On/Off |
|
Connectors: |
INPUT |
(Input impedance: 300k ohms or |
|
|
more/Effect On, True Bypass/ |
|
|
Effect Off) |
|
OUTPUT |
(Output impedance: 1k ohms or |
|
|
less/Effect On, True Bypass/Effect |
|
|
Off) |
|
DC IN |
(9 Volts) |
Controls: |
INPUT |
|
|
OUTPUT |
|
|
COMPRESSION x 6 |
|
|
MIX LEVEL x 6 |
|
|
Footswitch |
(Effect On/Off) |
Indicators: |
LED x 7 |
(Effect ON, compression x 6) |
Power requirements: |
9V DC/80mA |
9V Alkaline battery, AC adaptor |
|
|
MP-9 (optional) |
Dimensions: |
134 (W) x 175 (D) x 77 (H) mm |
|
Weight: |
1,350g |
|
Accessories: |
Operator’s Manual, Battery (9V) |
|
Options: |
AC adaptor MP-9 |
|
NOTE: The battery included is for trial purposes only and it may not last long. The average lifetime of a battery in the Hexacomp varies according to conditions but is about 3 hours with a fresh alkaline battery. The MP-9 AC adaptor is therefore recommended.
• The specifications are subject to change without prior notice.
Français
Avertissement
Le C2M HEXACOMP est conçu pour être utilisé dans un environnement domestique normal.
Pour votre protection et celle du C2M HEXACOMP
•Ne confiez les réparations ou installations sur votre C2M HEXACOMP qu’aux revendeurs AKAI professional ou à des ingénieurs qualifiés.
•Ne laissez aucun objet métallique sur le C2M HEXACOMP ou tomber dedans.
•N'utiliser qu'une source d'alimenation CC spécifiée. Ne jamais utiliser une source d'alimentation CA directement.
•Si de l'eau ou tout autre liquide est répandu sur ou dans le C2M HEXACOMP, déconnecter l'alimentation et/ou la batterie, et contactez votre revendeur.
•Vérifiez si l’unité est bien aérée et qu’elle n’est pas exposée au soleil.
•Pour éviter d’endommager les circuits internes, ainsi que la finition du boîtier, éloignez le C2M HEXACOMP des sources directes de chaleur (poêles, radiateurs, etc.).
•Evitez d’utiliser des insecticides en aérosol, etc., à proximité du C2M HEXACOMP. Ils pourraient endommager la finition et s’enflammer.
•N’utilisez pas d’alcool à brûler, de diluant, de solvant ou tout produit chimique équivalent pour nettoyer le C2M HEXACOMP. Ils pourraient endommager la finition.
•Il est dangereux de modifier cet équipement qui pourrait mal fonctionner par la suite. N’essayez jamais de modifier votre C2M HEXACOMP, de quelque manière que ce soit.
•Assurez-vous que le C2M HEXACOMP repose toujours sur une surface stable.
•Pour assurer la performance optimisée de votre C2M HEXACOMP, choisissez soigneusement son emplacement. Evitez les endroits suivants:
1.Les endroits humides ou poussiéreux
2.Une pièce mal aérée
3.Une surface qui n’est pas horizontale
4.L’intérieur d’un véhicule comme une voiture, ou il serait soumis aux vibrations
5.Les endroits très chauds ou très froids
•Assurez-vous d’attendre quelques secondes avant de rallumer l’unite apres que l’alimentation ait ete coupee pour assurer un fonctionnement correct.
•Lorsque la pile est a plat, l’unite ne fonctionnera pas correctement. Dans ce cas veuillez remplacer la pile par une nouvelle.
•Quand vous insérez ou remplacez les piles, veuillez couper l'alimentation avant de connecter cet appareil à un autre équipement afin d'empêcher tout dysfonctionnement ou dégât des enceintes.
•Lorsque vous connecter cet appareil à un autre équipement, assurez-vous que tout soit éteint dans l'autre équipement afin d'empêcher tout dysfonctionnement ou dégât des enceintes.
Français
Insérer la batterie :
Batterie : 9V 006P/ 6F22/ 6LR61/ 6LF22
Desserrez la vis et retirez le couvercle.
 –
–
 +
+
Fixez fermement le connecteur encliquetable sur la pile en respectant les polarités comme sur l'illustration et placez-la dans le compartiment.
Remettez le couvercle en place et serrez la vis.
•Ne pas recharger, chauffer ou ouvrir la pile. Ne pas non plus la jeter au feu ou à l'eau. La pile risque perdre son électrolyte, de chauffer ou d'exploser.
•Retirez la pile lorsque l'appareil ne doit pas être utilisé pendant une longue période de temps.
Les gaz libérés par la pile peuvent causer une fuite de l'electrolyte ou endommager l'unité.
•Ne pas mêler piles et objets métalliques lors du transport, du stockage ou de la mise au rebut.
La pile risque d'être court-circuitée et de causer la fuite de l'electrolyte, sa surchauffe ou son explosion.
•Si de l'electrolyte est projeté dans vos yeux, vous risquez de perdre la vue, lavez-les à grande eau et consultez immédiatement un médecin. Lors de projection d'electrolyte
sur la peau ou les vêtements, lavez-les aussitôt à grande eau pour éviter toute brûlure.
Français
Le ‘Hexacomp’ C2M est en fait six compresseurs en un se présentant sous la forme d'une pédale d'effet pratique et très robuste de style rétro. Contrairement aux autres pédales de compression qui travaillent sur la totalité de la gamme de fréquence, chaque compresseur de l'Hexacomp est réglé sur une fréquence spécifique pour vous permettre de contrôler la profondeur de compression pour les différentes fréquences. Vous pouvez donc par exemple, appliquez plus de compression aux composantes de hautes ou moyennes fréquences du son sans pratiquement affecter les basses fréquences. Cela est particulièrement utile aux bassistes puisque les plus hautes fréquences peuvent être fortement compressées sans que les notes graves perdent leur ‘punch’. L'Hexacomp peut aussi être utilisé pour contrôler le son de façon impossible avec les pédales de compression traditionnelles.
De plus, son vrai système bypass permet à l'Hexacomp de contourner totalement les circuits internes à l'aide d'un relais spécial et d'assurer que votre signal original est reproduit avec clarté et sans coloration de ses qualités tonales.
|
OUTPUT |
|
DC 9V |
DC IN |
7 |
INPUT |
4 |
ON |
10 |
|
MIX LEVEL |
10 |
|
|
|
9 |
|
|
|
9 |
OUTPUT |
8 |
|
|
|
8 |
|
7 |
|
|
|
7 |
||
5 |
|
6 |
|
|
|
6 |
|
5 |
|
|
|
5 |
|
|
4 |
|
|
|
4 |
|
|
3 |
|
|
|
3 |
|
|
|
2 |
|
|
|
2 |
|
|
1 |
|
|
|
1 |
|
|
0 |
|
|
|
0 |
|
|
LOW |
|
|
|
HIGH |
|
|
8 |
|
COMPRESSION |
|
|
|
|
|
|
|
|
|
|
INPUT |
10 |
|
|
|
10 |
|
9 |
|
|
|
9 |
|
6 |
|
8 |
|
|
|
8 |
|
7 |
|
|
|
7 |
|
|
6 |
|
|
|
6 |
|
|
|
5 |
|
|
|
5 |
|
|
4 |
|
|
|
4 |
|
|
3 |
|
|
|
3 |
|
|
2 |
|
|
|
2 |
|
|
1 |
|
|
|
1 |
|
|
0 |
|
|
|
0 |
|
|
LOW |
|
|
|
HIGH |
|
|
9 |
|
|
|
|
|
|
|
|
|
10 |
|
Français
1OUTPUT (Sortie)
S'utilise pour le raccordement à votre amplificateur ou à l'entrée d'une autre unité d'effets sonores.
2DC IN (Entrée DC)
Branchez ici l'adaptateur secteur MP-9 de 9 volts (vendu séparément).
Remarque : Il est recommandé d'utiliser l'adaptateur secteur pour toute utilisation prolongée du Hexacomp.
3INPUT (Entrée)
Branchez ici votre guitare ou votre basse.
Remarque : Cet appareil ne possède pas de commutateur d'alimentation. Il est alimenté tant que la guitare est connectée au jack INPUT, même lorsque l'effet est contourné.
Pour éviter toute consommation inutile en marche sur pile, débranchez votre guitare/basse du jack INPUT quand vous ne l'utilisez pas.
4ON (Marche) Indicateur S'allume lorsque l'effet est activé.
5OUTPUT (Sortie) commande
Règle le niveau de sortie général de l'effet.
6INPUT (Entrée) commande Règle le niveau du signal d'entrée.
7MIX LEVEL (Niveau du mélange) potentiomètres à glissière Règle le niveau de sortie de chaque fréquence de compression.
Puisque le niveau de sortie augmente lorsque le gain/profondeur de COMPRESSION est augmenté dans chaque bande de fréquence, les potentiomètres à glissière MIX LEVEL peuvent être utilisés comme compensation et pour équilibrer les différentes sorties des compresseurs.
8COMPRESSION potentiomètres à glissière
Règle le gain/profondeur de chaque unité de compression. Plus le potentiomètre à glissière est réglé vers le haut, plus la compression est importante.
 Loading...