

Page 1
PORTABLE DVD PLAYER
ACVDS940UCX
OPERATION MANUAL
Page 2
PLEASE READ THE INSTRUCTIONS CAREFULLY BEFORE OPERATING THIS UNIT.
THIS PRODUCT IS SOLD WITH AN AC ADAPTER AND A CAR ADAPTER
AC Adapter Car Adapter
1. Input : AC100-240V~ 0.5A 50/60Hz 1. Input : DC 12V
2. Output: DC 12V / 1500mA 2. Output : DC 12V 2A
WARNING
To prevent fire or shock hazard, do not expose this appliance to rain or moisture. The apparatus
should not be exposed to dripping or slashing and no objects filled with liquids, such as vases,
shall be placed on the apparatus. Ventilation should not be impeded by covering the ventilation
openings with items, such as newspapaers, tablecloths, curtains, etc.
No naked flame sources, such as lighted candles, should be placed on the apparatus.
Car Adapter Fuse Replacement
Should the player fail to operate with the DC car adapter/cord, check the fuse (UL 2A 250V, CUL
T2AL 250V). If blown, check all connections and inspect the adapter cord for any damage. Always
replace the fuse with the same type and rating. If the fuse blows again after replacement, a
potential problem is indicated. DO NOT replace fuse with a higher rating, as doing so may cause
damage to the player.
CAUTION
Since the CD circuitry may cause interference to other radio tuners nearby, switch this unit off when
not in use or move it away from the affected radio tuner.
RISK OF ELECTRIC SHOCK
DO NOT OPEN
The lightning flash with an arrowhead
symbol, within an equilateral triangle,
is intended to alert the user to the
presence of an uninsulated "dangerous voltage" within the product's
enclosure that may be of sufficient
magnitude to constitute a risk of
electric shock to persons.
WARNING: TO REDUCE THE
RISK OF ELECTRIC SHOCK,
DO NOT REMOVE COVER
(OR BACK). NO USERSERVICEABLE PARTS
INSIDE, REFER SERVICING
TO QUALIFIED SERVICE
PERSONNEL.
The exclamation point within an
equilateral triangle is intended
to alert the user to presence of
important operating and maintenance (servicing) instructions
in the literature accompanying
the appliance.
DANGER
LASER SAFETY
This unit employs an optical laser beam system in the CD mechanism, designed with
INVISIBLE LASER
RADIATION WHEN
OPEN AND INTERLOCK
FAILS OR IS DEFEATED.
AVOID DIRECT EXPOSURE
TO THE LASER BEAM.
built-in safeguards. Do not attempt to disassemble; refer to qualified service
personnel. Exposure to this invisible laser light beam may be harmful to the human eye.
THIS IS A CLASS-1 LASER PRODUCT. USE OF CONTROLS, OR
ADJUSTMENTS OR PROCEDURES OTHER THAN THOSE SPECIFIED
HEREIN, MAY RESULT IN HAZARDOUS LASER LIGHT BEAM EXPOSURE.
This device complies with Part 15 of the FCC Rules. Operation is subject to
the following two conditions: (1) This device may not cause harmful
interference, and (2) this device must accept any interference received,
including interference that may cause undesirable operation.
This Class B digital apparatus complies with Canadian ICES-003.
GB-2
Page 3

Getting Started
Before attempting to connect, operate or adjust this product, please read these
instruction completely and keep this manual for future reference.
Dear Customers :
May we take this opportunity to thank you for purchasing this DVD Player.
We strongly recommend that you carefully study the operating instructions before
operating the unit.
Main Features
Front loading DVD / MP3 / CD player / USB Port / SD Card.
Standards
Video: NTSC or PAL
Audio: LT/RT stereo
GB-3
Page 4
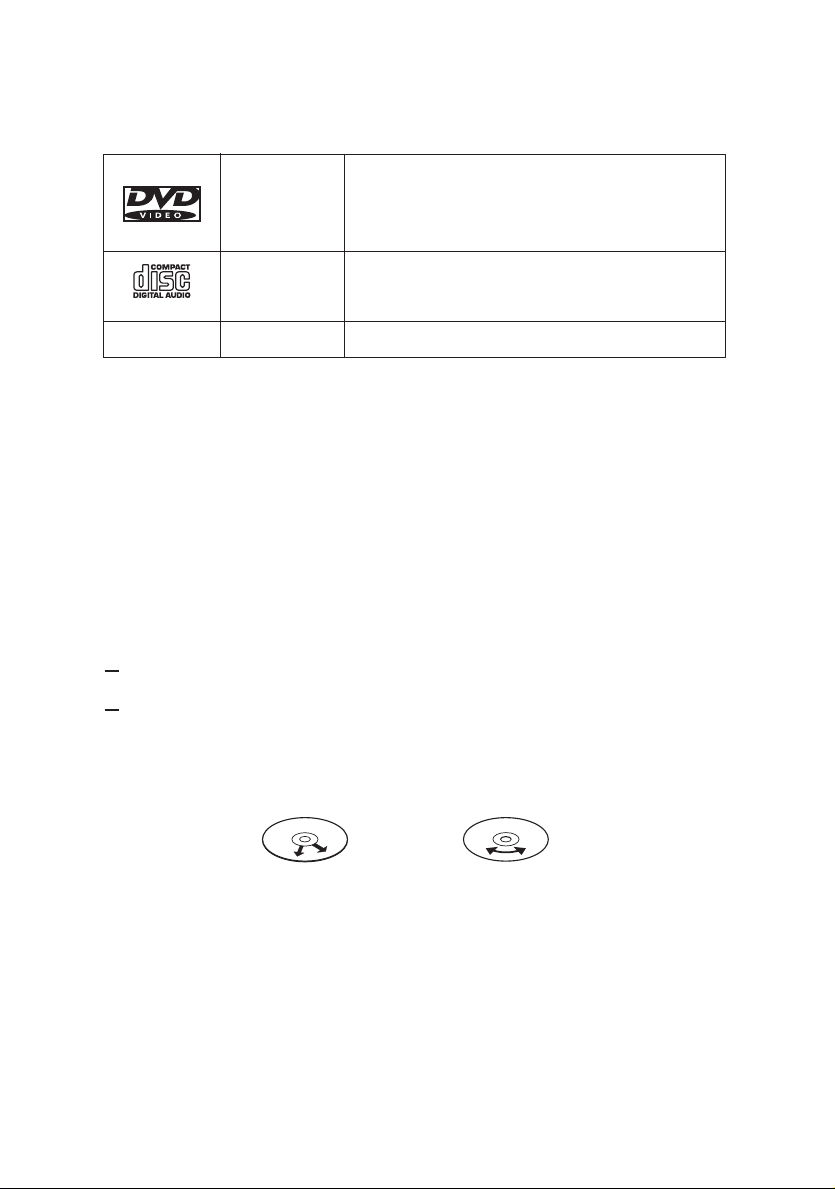
Disc types
Audio & Video
Disc size 12cm
single side, single layer / single side, double layer
PAL and NTSC DVD disc
Playback time 135min / 240min max.
Audio
Disc size 12cm / 8cm
CD disc
Playback time 74min/20min max.
CD-G
Audio & Video
CD-G format disc
* Player is CD-R, CD-RW compatible.
Note: CD-R, CD-RW discs recorded with writing device can only be used when they are
correctly treated.
Region Management Information
This DVD Player is designed and manufactured to respond to the Region Management
Information that is recorded on a DVD disc. If the Region number described on the DVD
disc does not correspond to the Region number of this DVD Player, this DVD player cannot play that disc.
Disc maintenance
Before playback, wipe the disc from the center hole toward the outer edge with a clean
cloth.
Never use bezine, thinner, cleaning fluid, static electricity prevention liquids or any
other solvent.
Note : Dirty disc may cause bad picture.
Correct
Incorrect
From the center to the edge
GB-4
Page 5
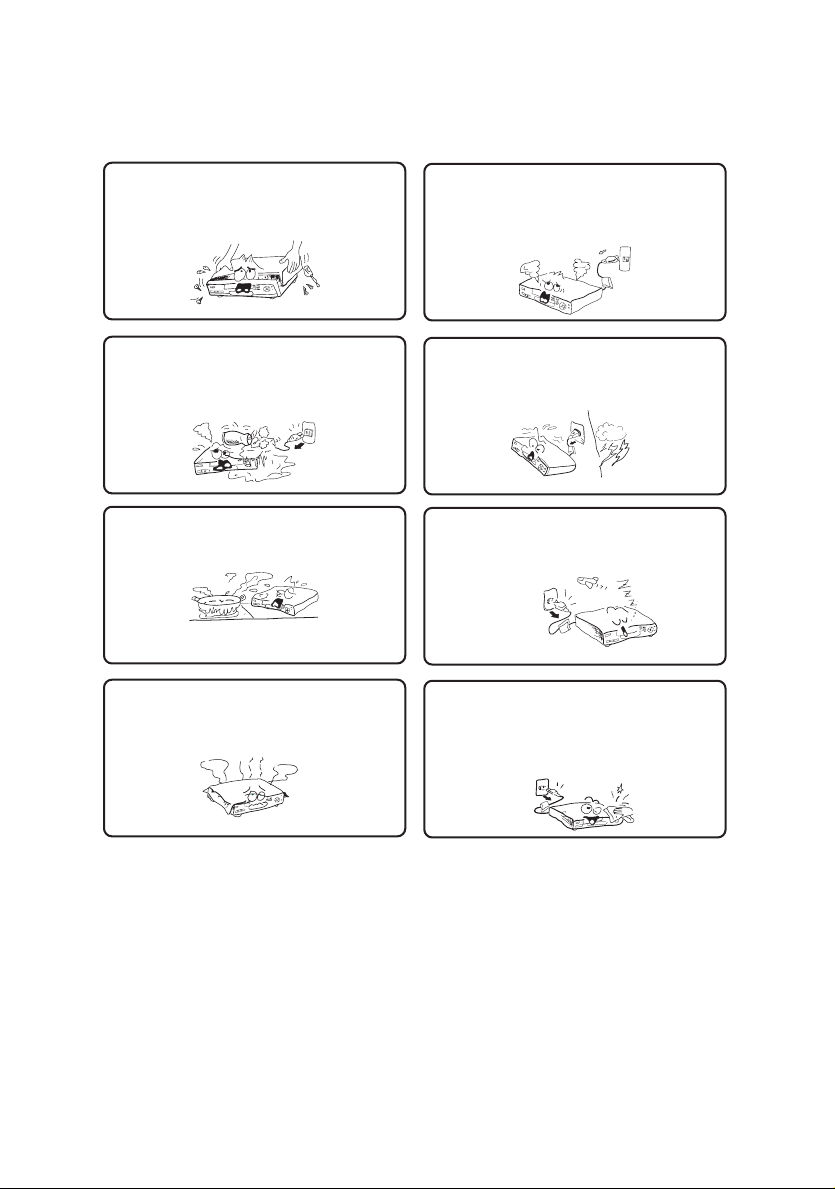
Safety precautions
Warning
To avoid electrical shock, do not open the
cabinet, refer servicing to qualified personnel only.
Warning
Keep the unit away from flower vases, tubs,
sinks, etc. If liquids are spilt into the unit,
serious damage could occur.
Warning
Do not expose this equipment to rain or
moisture.
Warning
Do not block ventilation holes of the unit so
that air can circulate freely.
Attention
If smoke, malodor or unrelated noise are
emitted from the unit, turn off the power and
disconnect the AC power cord.
Attention
Touching the unit is dangerous especially
if during thunder.
Attention
When left unused for a long period of time,
the unit should be unplugged from the household AC outlet.
Attention
Be sure to turn the unit off and disconnect the AC
power cord before cleaning the unit surface. If the
surface is dirty, wipe clean with a cloth which has
been dipped in a weak soap and water solution and
wrung out thoroughly, and then wipe again with a
dry cloth.
Note: This unit is a class 1 laser product and uses a visible laser beam which
could cause hazardous radiation exposure if directed. Be sure to operate it
correctly as instructed.
GB-5
Page 6
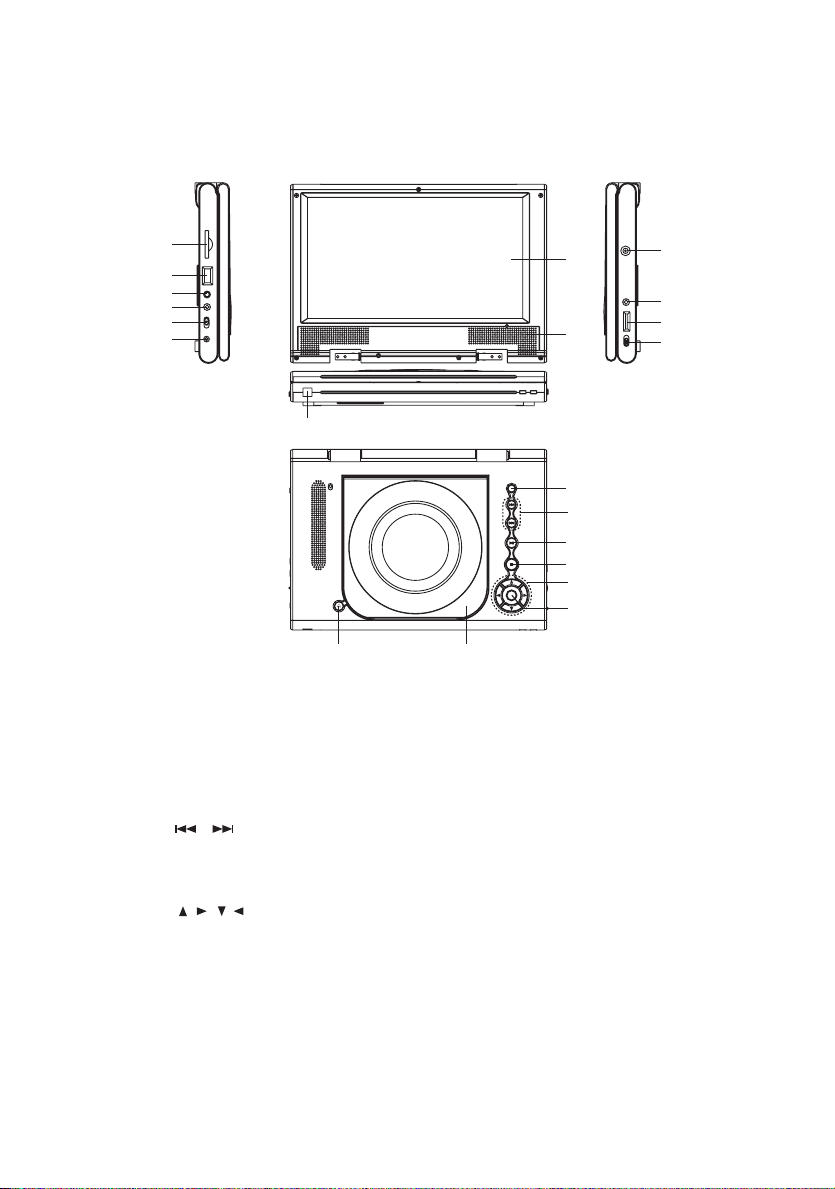
Location of Controls
21
20
19
18
17
16
LCD Panel
1.
2.
Speaker
3.
Remote Sensor
4.
Setup Button
5.
Skip Buttons
,
( )
6.
Play / Pause Button
7.
Stop Button
8. Direction Buttons
( )
,,,
9.
Enter/Menu Button
10.
Disc Cover
11.
Open Button
12.
Power Switch
13.
Volume Control
3
11 10
1
2
4
5
6
7
8
9
14.
Headphones Output Jack
15.
DC IN :12V
16.
S-Video Output
17.
Line In/Out Switch Selector
Note:When using the LINE IN
setting of the selector switch,
the LCD screen will be blank if
there is no video input present
at the A/V Input Jack(16)
18.
A/V Output Jack
19.
A/V Input Jack
20.
USB Jack
21.
SD Card
15
14
13
12
GB-6
Page 7

Corrosion, oxidation, battery-leakage and any other gradually acidic defect of this
nature will invalidate the guarantee.
Page 8

GETTING STARTED
The following steps will help you to get your Player ready for use.
CHARGING THE BATTERY
1.
Begin by locating the Battery Pack and the Power Supply Switching Adapter.
2.
Plug the adapter’s circular connector into the battery’s connector labeled “DC IN
12V” found on its side. Do NOT attempt to plug the adapter’s connector into the
battery’s “pigtail” lead on the opposite side of the battery.
3.
Plug the adapter into a convenient electrical outlet.
Confirm that the battery’s CHR (Charging) LED, located a convenient to its “DC IN
4.
12V” connector) is also lit. If RED, the battery is in need of a charge and is being
charged. If GREEN, the battery is fully charged, and further charging is not
necessary, although no harm will be done to the battery if charging is continued.
5.
You cannot over charge the battery. If you prefer, you may keep the battery charged,
whether separated or attached to the DVD player (see below).
NOTE: For extended periods of non-use, however, store the battery, disconnected
from its charger, in a cool and dry place.
USINGTHE THE PLAYER WITHOUT THE BATTERY
The unit can be used without the battery. Turn the unit off and remove the battery as
1.
described above.
2.
Plug the AC adapter's circular connector into the unit's DC IN 12V jack (item 15 on
page 6).
3.
If necessary, plug the other end of the AC adapter into a working wall outlet.
GB-8
Page 9

OPERATION
PLAYING DISCS
1.
If necessary, turn the unit ON with the Power Switch. The unit’s Power LED should be
GREEN, indicating that the battery is not in need of a charge. The unit will attempt to
load a disc if one is present under the disc cover. Press the PUSH TO OPEN button
(item 11 on page 6), on the left side of the front panel to open the DVD door and put a
disc on the loader, with the label side facing up. For double-sided DVD discs, mount
the disc with the "A1" label (the Side 1 equivalent label) facing up.
2. ClosetheDVDdoor,andthediscwillbeloadedautomatically.Onceloaded,
if it is a DVD disc, it will start playing automatically, typically showing either the
Menu/Title Page on the screen or previews of coming attractions.
if it is a CD, it will play the first track directly.
PRE-STOP [ ]
3.
Press the STOP button (item 7 on page 6 / item 18 on page 7) once if you want invoke the
PRE-STOP mode. PRE-STOP stops the playback, displays the manufacturer’s logo, and
allows playback to be resumed from the point at which STOP was pressed--simply by
pressing the ENTER button (item 9 on page 6 / item 4 on page 7). PRE-STOP is
very similar to PAUSE, except that PAUSE freezes the existing video on the screen, while
PRE-STOP replaces it with the aforementioned logo.
4.
Pressing the STOP button twice completely stops the disc, and causes the unit to enter the
STOP mode, where the disc ceases to spin, and playback can no longer be resumed from
the point at which the STOP button was pressed.
(PAUSE) STEP [ ]
5. The PAUSE function is applicable to both DVDs and CD audio discs:
a.
The PAUSE function (II) isinitiated by pressing the PAUSE button (item 7 on page 6
/ item 17 on page 7).
b.
For DVDs, pressing PAUSE causes the picture to freeze and the sound to cease.
c.
For CD audio discs, pressing PAUSE causes the sound to pause and bemuted.
d.
Press the PLAY/ENTER button again to resume normal play.
The STEP function (available only on the remote control (item 17 on page 7) is
6.
activated only after PAUSE is invoked.
a.
Each press of this key advances the video content by a small interval. The audio is
silent.
b.
Cancel the PAUSE or STEP function by pressing PLAY.
DVD SETUP MODE
Setup Mode provides the menus for the configuration of the SYSTEM SETUP,
7.
LANGUAGE SETUP, VIDEO SETUP, and SPEAKER SETUP categories.
a.
Press the SETUP button (item 4 on page 6 / item 6 on page 7) to display the Setup
Menu.
b.
Along the top of the initial display are four icons, each representing one of the four
categories listed above. By using the left [ ] or right [ ] direction keys ( item 8
on page 6 / item 5 on page 7) , it is possible to highlight the desired category,
whose name will also be displayed in yellow type below the icons.
The following section will cover all four configuration categories and their settings.
c.
GB-9
Page 10

To exit the Setup Menu, press the SETUP button again or scroll down to EXIT
8.
SETUP (use the down [ ] direction key to highlight the phrase, and the
PLAY/ENTER key to select EXIT SETUP,after which, the unit was display its logo,
and wait for the next command.
SENDING OUTPUT SIGNALS FROM YOUR PLAYER TO AN EXTERNAL DEVICE
Your player can send its video and audio content to an external device (typically a TV),
in order to be viewed on a larger screen, and heard on bigger speakers. There are two
ways that your player supplies these external signals. The first, called "composite"
video, combines video and audio content into a single “composite” cable, which is
supplied with your player. On one end of the cable, here is a 1/8” (3.5mm) miniature
phone plug for connection to your player's A/V out jack. On the other end of this cable,
there are three RCA-type connectors, consisting of a YELLOW Video connector, and
two Audio connectors, one being WHITE (to carry left channel audio), and the other
RED (for right channel audio). When used only with an external TV, all three RCA
connectors plug into the TV, but when the TV is used in combination with an audio
system (for better sound), the two Audio connectors must be plugged into the
appropriate sounds ystem inputs.
To achieve the same results, you can connect an S-VIDEO cable (not included)
between your player's S-VIDEO jack, and an external TV equipped with an S-VIDEO
input connector (and, if desired, an external audio system, as well). In either case,
inaddition to the S-Video cable you will have to use the supplied Audio cable to provide
sound to the TV, or to the sound system (since the S-Video cable carries only video
signals).
In some cases, you may want to VCR to record DVD images being played on your
player. In such cases, your cabling would be the same as shown on the Quick Guide’s
first two examples, but you must be aware that only non copy-protected DVDs will
record properly ony our VCR. Attempting to record copy protected DVD video material is
illegal and will likely produce unsatisfactory results.
RECEIVING INPUT SIGNALS FROM EXTERNAL DEVICES AT YOUR PLAYER
Your player is also capable of receiving and playing content from external devices like
VCRs, game consoles, audio systems, and portable CD players, using the player's LCD
screen and speakers as the means for viewing the resulting images and its audio
content.
The Quick Guide contains an illustration of the proper techniques to do this in its third
example.
FINALLY, REMEMBER THE LINE SELECT SWITCH
Be sure that the player's LINE SELECT switch (item 17 on page 6) is placed in the OUT
position when you want the unit’s A/V output signals to be sent to the external device(s).
Similarly, the switch must be placed in the IN position to properly receive all A/V input
signal sent by the external device(s).
GB-10
Page 11
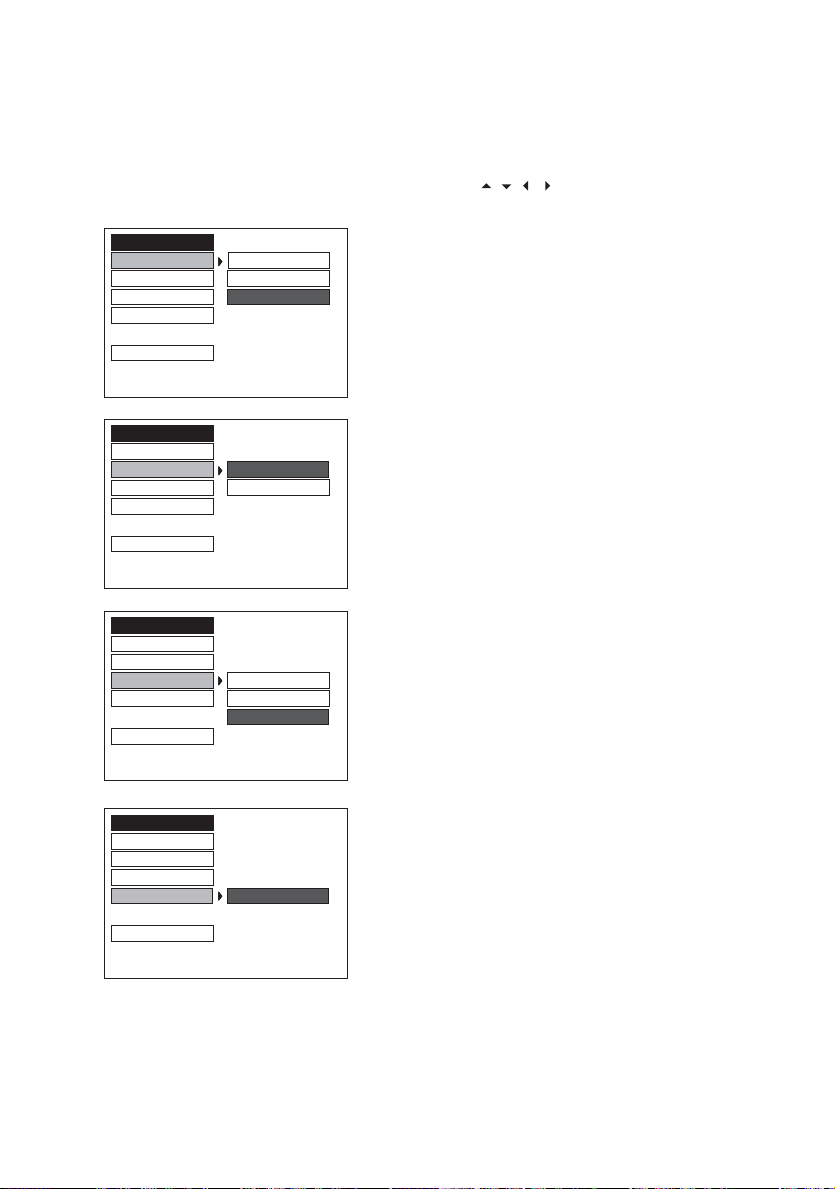
SYSTEM SETUP
In STOP mode, press the SETUP button and highlight SYSTEM setup with remote control.
Once done, press the ENTER button to confirm.
To select the desired item, use the direction buttons ( , , , ), then press the ENTER
button to confirm the selection.
SYSTEM SETUP
TV SYSTEM
SCREEN SAVER PAL
TV TYPE
DEFAULT
EXIT SETUP
SYSTEM SETUP
TV SYSTEM
SCREEN SAVER
OFF
TV TYPE
DEFAULT
EXIT SETUP
SYSTEM SETUP
TV SYSTEM
SCREEN SAVER
TV TYPE
DEFAULT
EXIT SETUP
NTSC
AUTO
ON
4:3 PS
4:3 LB
16:9
TV SYSTEM
- NTSC
-PAL
-AUTO
(default)
SCREEN SAVER
-ON (default)
- OFF
TV TYPE
- 4:3 PS (Pan Scan)
- 4:3 LB (Letter Box)
- 16:9 (wide screen) (default)
SYSTEM SETUP
TV SYSTEM
SCREEN SAVER
TV TYPE
DEFAULT
EXIT SETUP
RESTORE
DEFAULT: RESTORE
Choose this option to restore all
the choosen setup options to
their default (factory) settings.
GB-11
Page 12

LANGUAGE SETUP
In the STOP mode, press the SETUP button and then the direction ( and ) to highlight
LANGUAGE SETUP. Once done, press ENTER.
LANGUAGE SETUP
OSD LANGUAGE
AUDIO LANG
SUBTITLE LANG
MENU LANG
EXIT SETUP
ENGLISH
GERMAN
SPANISH
FRENCH
PORTUGUESE
DUTCH
OSD LANGUAGE
(ON SCREEN DISPLAY) LANGUAGE
Press the UP/DOWN direction buttons ( / ) to
highlight the OSD LANGUAGE. Press ENTER to
move the cursor to the column of choices. Use
the ( / ) buttons to select the desired OSD
Language, and press ENTER:
- ENGLISH (default)
- GERMAN - FRENCH
- SPANISH - PORTUGUESE
- DUTCH
LANGUAGE SETUP
OSD LANGUAGE
AUDIO LANG
SUBTITLE LANG
MENU LANG
EXIT SETUP
ENGLISH
GERMAN
SPANISH
FRENCH
PORTUGUESE
DUTCH
AUDIO LANGUAGE
Press the direction ( / ) buttons to highlight the
AUDIO LANG and press ENTER. Use the ( / )
button to select the desired AUDIO Language,
and press ENTER:
- ENGLISH (default)
- GERMAN - FRENCH
- SPANISH - PORTUGUESE
- DUTCH
LANGUAGE SETUP
OSD LANGUAGE
AUDIO LANG
SUBTITLE LANG
MENU LANG
EXIT SETUP
ENGLISH
GERMAN
SPANISH
FRENCH
PORTUGUESE
DUTCH
SUBTITLE LANGUAGE
Press the direction ( / ) buttons to highlight the
SUBTITLE LANG and press ENTER.
Use the ( / ) buttons to select the desired
SUBTITLE Language, (or OFF to select none)
and press ENTER:
- ENGLISH (default) - FRENCH
- GERMAN - PORTUGUESE
- SPANISH - OFF
- DUTCH
LANGUAGE SETUP
OSD LANGUAGE
AUDIO LANG
SUBTITLE LANG
MENU LANG
EXIT SETUP
ENGLISH
GERMAN
SPANISH
FRENCH
PORTUGUESE
DUTCH
MENU LANGUAGE
Press the direction ( / ) button to highlight the
MENU LANG and press ENTER.
Use the ( / ) buttons to select the desired
MENU Language, and press ENTER:
- ENGLISH (default)
- GERMAN - FRENCH
- SPANISH - PORTUGUESE
- DUTCH
GB-12
Page 13

VIDEO SETUP
In the STOP mode, press SETUP button and press direction / buttons to highlight
VIDEO setup. Then press ENTER button to confirm.
VIDEO SETUP
BRI ––12
CON – – 10
HUE – – 8
SATURATION – – 6
EXIT SETUP – – 2
VIDEO SETUP
CONT ––10
HUE – – 8
SATURATION – – 6
EXIT SETUP – – 2
VIDEO SETUP
HUE – – + 2
SATURATION – – 0
EXIT SETUP – – - 4
VIDEO SETUP
HUE – – 8
SATURATION –– 6
EXIT SETUP – – 2
–– 4
–– 0
––12BRI
–– 4
–– 0
– – + 6BRI
– – + 4CON
– – - 2
– – - 6
––12BRI
––10CON
–– 4
–– 0
• BRIGHTNESS
Using direction / button to move the scroll bar and
adjust the brightness.
• CONTRAST
Using direction / button to move the scroll bar and
adjust the contrast.
•HUE
Using direction / button to move the scroll bar and
adjust the hue.
• SATURATION
Using direction / button to move the scroll bar and
adjust the sauration.
SPEAKER SETUP
In the STOP mode, press SETUP button and highlight SPEAKER setup. Then press
ENTER button to confirm.
SPEAKER SETUP
DOWNMIX
EXIT SETUP
LT/RT
STEREO
• DUAL MONO
- LT/RT
-
STEREO (default)
GB-13
Page 14

DVD OPERATION
DVD Menu Play
The DVD Menu Play function is only applicable for DVD movie. User can access the Casting
information, Production History, Movie Introduction etc. directly through this function.
Press the DVD MENU key on the remote control to enter the Root Menu.
1.
2.
Use the direction button ( / / / ) or input the item index through the Number keys
(0-9) to do the selection.
3.
Press ENTER to confirm the selection.
Audio
This function is applicable for DVD and CD audio but with different effects.
- Pressing the AUDIO key will change the Audio channel.
Note :
• When AV is ON, this key has no function.
Scan
This function is applicable for DVD and CD audio but with different effects. The FAST
FORWARD and FAST BACKWARD keys are used to achieve fast play function.
•
For DVD, there are 4 different levels of speed (x2, x4, x8, x20) available. Press the
FAST button to cycle speed.
•
For CD audio, the FORWARD / BACKWARD keys will play at high speed.
Note :
•
Press PLAY key at any stage will resume to normal speed.
•
This function is not available when playing CD-G discs.
PREV. / Next
During playback, press PREV or NEXT key :
•
When the PREV. key is pressed once, playback returns to the beginning of the
PREVIOUS playing chapter or track.
•
When the NEXT key is pressed once, playback starts at the beginning of next
chapteror track.
Slow Play
The Slow Forward is only available for DVD. There are 6 steps of slow motion speed: 1/2,
1/3, 1/4, 1/5, 1/6, 1/7. Press SLOW key to cycle playback speeds.
Note :
•
Press PLAY key to resume normal playback speed.
•
This function is not available for CD-G.
Repeat Mode
This function is applicable for DVD and CD audio but with different effects.
•
For DVD disc playback, user can choose to repeat the current chapter, current title and
disc. Subsequent button press of the REPEAT button can change between these
threeoptions.
•
For CD, user can choose to repeat the current track or the whole disc (Repeat All).
Subsequent button press of the REPEAT button can change between these two
options.
GB-14
Page 15

Repeat AB
User can specify the repeating interval by marking the starting point and the end point.
1.
Press the REPEAT A-B button to mark the starting point (Playback will continue).
2.
Press the REPEAT A-B button to mark the end point (The marked part will be repeated
automatically.)
Note :
•
Press the REPEAT A-B button during repetition will disable the Repeat mode.
•
This function is not available for CD-G.
Subtitle
This function is only applicable for DVD disc. It can change the subtitle language shown
on the screen.
Note :
•
Number of subtitle available depends on the DVD disc.
•
This function is not available for CD-G.
Angle
Some discs may have multiple viewing angles during production. The ANGLE button is to
select the viewing angle shown on the screen.
Note : The number of Angle of View depends on the disc.
Search
The user can access a specific location or a specific track by keying in the target time or
the track number.
1.
Press the SEARCH button to enter to search mode.
2.
Input the target time to the number button (0-9) and press the ENTER button. The
player will jump to the target location immediately.
Display
This funciton is to show the time and status information on the screen.
Resume Play
This function is in playback mode. When the STOP button is pressed once, the player will
enter the Resume Play mode. At this time, if the PLAY button is pressed, the player will
resume playback at the location when the STOP button is pressed. If the STOP button is
pressed a second time, resume mode cancels.
m
Zoo
This function will enlarge or reduce a still picture or a moving picture by pressing the
ZOOM button to select the levels of zooming (2, 3, 4, 1/2, 1/3, 1/4)
Note :
•
Use the direction buttons ( / / / ) to navigate within the image.
•
This function is not available for CD-G.
GB-15
Page 16

Picture CD
Load a picture CD into the tray, sothe disc can be identified. The player will start
showing each picture (JPG) in sequence (in a slide show format).
Operation
During Slide Show Mode:
Press the STOP button.It will shift to the Digest Mode in which 6 pictures will be
•
shown on the screen at a time.
Press the PAUSE button.It will freeze the screen so that the current picture can be
•
held for a long time. To resume the slide show mode, press thePLAY button.
Press the NEXT button on the remote control to skip to the next picture.
•
Press the PREVIOUS button on the remote control to repeat the current picture.
•
Pressing the PROGRAM button will change the picture effect as indicated below:
•
1) EXTEND FROM CENTER H
2) EXTEND FROM CENTER V
3) NONE
GB-16
Page 17
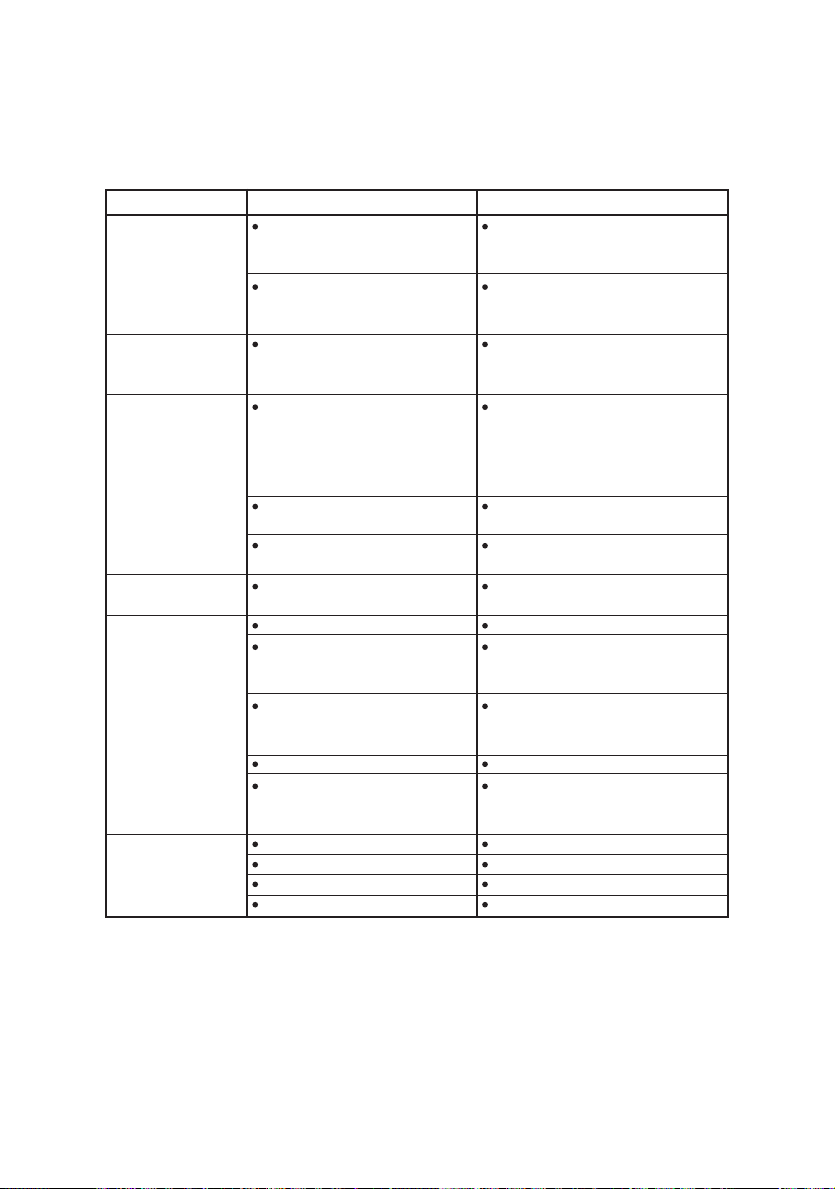
TROUBLESHOOTING
Check the following guide for the possible cause of a problem before contacting service.
Symptom
The unit is NOT
receiving power
The power is ON,
but the unit does
not operate
There is no picture
(and/or sound), and
the Power LED is lit
in AMBER, rather
than GREEN
Poor picture and/or
audio quality.
The DVD player
does not start
playback
The remote control
does not work
properly
Cause
The AC adapter is disconnected
from the wall outlet or is not
connected to the unit.
The battery is depleted.
No disc is inserted.
The "Line Select" switch is set to
IN, but there is no external video
input available (see page 6).
The external video/audio cable(s)
are not connected securely.
The external video/audio
equipment is powered off.
A dirty or scratched disc is
being played.
No disc is inserted.
An unplayable disc is inserted.
The disc is placed in the unit
upside down or misaligned with
the guides.
The disc is dirty.
A menu is still on the screen
Not pointed at the unit.
Operated too far away.
Obstacle in remote's path.
Batteries in remote are low.
Correction
Plug the AC adapter securely into
the wall outlet and securely into the
unit, as well.
Be sure the battery is fully charged.
If unable to be charged, the battery
will have to be replaced.
Insert a disc.
Set the "Line Select" switch
appropriately, for either an external
video source (IN) or for internal disc
usage (OUT). Refer to page 6 for
additional information on this switch.
Check the unit for the proper
external connections.
Turn on the externally connected
equipment.
Clean the disc by following the
procedure on page 4.
Insert a disc
Insert a playable disc. (Check the
disc type, the TV System menu, and
the Regional Code).
Place the disc on the disc tray with
the proper orientation.
Clean the disc.
Press the SETUP button on the unit
or remote control to close the menu
screen.
Point remote at unit's sensor.
Operate with 23 feet (7m).
Remove the obstacle.
Replace the batteries.
GB-17
Page 18

Cleaning and Maintenance
Many plastic parts are used in this DVD player casing. Do not use volatile chemicals
such as benzene or thinner. This might damage the finish.
Wipe the casing with a soft, dry cloth. For excessive dirt, use a cloth dampened in a
diluted neutral detergent and wipe again with soft, dry cloth.
Wipe off fingerprints or dirt on the LCD screen using a soft, dry cloth.
SPECIFICATIONS
GENERAL
Power source
Power consumption
External dimensions (WxHxD)
Operating conditions
Operation status
Operating humidity
SYSTEM
Laser
Signal system
S/N
Dynamic Range
INPUT
Composite video
Audio
OUTPUT
Composite video
S-Video
Audio output (Digital)
Audio output (Analog)
AC Input (via Adapter)
* Power consumption Standby power consumption Design and specifications are
subject to change without notice.
DC 12V
15W
238mm x 168mm x 33mm
Temperature:5°C to 35°C
Horizontal
5% to 90%
Semiconductor laser wave length 650nm
PAL/NTSC
more than 90db
more than 90db
1.0VP-P 75ohm negative sync.
0.5Vrms 47Kohm
1.0VP-P 75ohm negative sync.
(Y)1.0VP-P 75ohm negative sync.
(C)0.3VP-P 75ohm negative sync.
0.5V PP 75ohm
0.5Vrms 600ohm
AC100V~240V@ 50/60Hz
Disposal of Used Electrical & Electronic Equipment The meaning of the symbol on
the product, its accessory or packaging indicates that this product shall not be
treated as household waste. Please, dispose of this equipment at your applicable
collection point for the recycling of electrical & electronic equipments waste. In the
European Union and Other European countries which there are separate
collection systems for used electrical and electronic product. By ensuring the
correct disposal of this product, you will help prevent potentially hazardous to the
environment and to human health, which could otherwise be caused by unsuitable
waste handling of this product. The recycling of materials will help conserve
natural resources. Please do not therefore dispose of your old electrical and
electronic equipment with your household waste. For more detailed information
about recycling of this product, please contact your local city office, your
household waste disposal service or the shop where you purchased the product.
For more information and warranty conditions, please visit : www.akai.eu
GB-18
 Loading...