

Page 1
Page 2

Welcome:
Dear user, thanks for purchasing this product.
Much investment in time and effort has gone into its development, and it is our hope
that it will give you many years of trouble-free service.
Safety Notice:
1. Do not drop, puncture or disassemble the camera; otherwise the warranty will be voided.
2. Avoid all contact with water, and dry hands before using.
3. Do not expose the camera to high temperature or leave it in direct sunlight. Doing so may
damage the camera.
4. Use the camera with care. Avoid pressing hard on the camera body.
5. For your own safety, avoid using the camera when there is a storm or lightning.
6. Do not use batteries of different specications. Doing so may lead to the potential for serious
damage.
7. Remove the battery during long periods between usage, as a deteriorated battery may affect
the functionality of the camera.
8. Remove the battery if it shows signs of leaking or distortion.
9. Use only the accessories supplied by the manufacturer.
10. Keep the camera out of the reach of infants.
FCC Compliance Statement:
This device complies with Part 15 of the FCC Rules. Operation is
subjected to the following two conditions: (1) this device may not cause
harmful interference, and (2) this device must accept any interference
received, including interference that may cause undesired operation.
This equipment has been tested and found to comply with limits for a
Class B digital device, pursuant to Part 15 of the FCC rules. These limits
are designed to provide reasonable protection against harmful interference in residential
installations. This equipment generates, uses, and can radiate radio frequency energy, and if
not installed and used in accordance with the instructions, may cause harmful interference to
radio communications.
However, there is no guarantee that interference will not occur in a particular installation. If this
equipment does cause interference to radio or television equipment reception, which can be
determined by turning the equipment off and on, the user is encouraged to try to correct the
interference by one or more of the following measures:
-Reorient or relocate the receiving antenna.
-Move the equipment away from the receiver.
-Plug the equipment into an outlet on a circuit different from that to which the receiver is
connected.
-Consult the dealer or an experienced radio/television technician for additional suggestions.
You are cautioned that any change or modications to the equipment not expressly approved
by the party responsible for compliance could void Your authority to operate such equipment.
Do not throw the appliance away with
the normal household waste at the end
of its life, but hand it in at an ofcial
collection point for recycling. By doing
this you will help to preserve the
environment.
Page 3

Table of Contents
Getting Started ................................................................ 1
Knowing your camcorder parts ............................................................. 1
Installing the battery.............................................................................. 2
Charging the battery ............................................................................. 2
Inserting a memory card (optional) ....................................................... 3
Turning on/off your camcorder .............................................................. 3
Setting language ................................................................................... 4
Setting time ........................................................................................... 4
Reading LCD indicators ........................................................................ 5
Basic Operations ............................................................ 6
Recording a video clip ..........................................................................6
Taking a still picture ..............................................................................7
Playing back your recordings................................................................ 8
Playing back your recordings on PC..................................................... 9
Connecting the camcorder to TV .......................................................... 10
Advanced Operations ....................................................12
Menu operation ..................................................................................... 12
Menu items in Camera mode................................................................ 12
Menu items in Playback mode .............................................................. 13
Menu items in Setting mode ................................................................. 14
Battery Life Indicator ............................................................................. 15
Battery Life............................................................................................ 16
Storage Capacity .................................................................................. 16
Specications........................................................................................ 17
System Requirements ..........................................................................18
Page 4

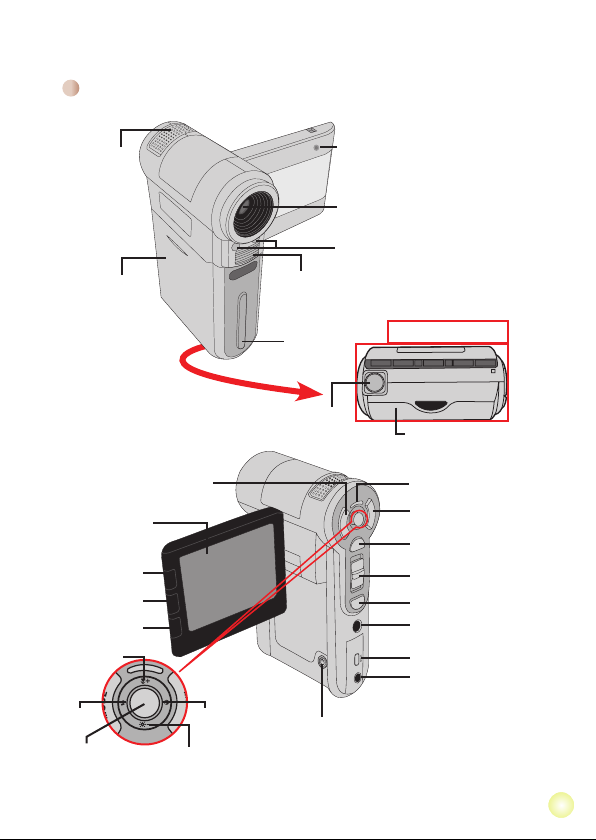
Getting Started
Knowing your camcorder parts
Speaker
Battery cover
LCD monitor
Previous button/
Fast backward button
Play/Pause button
Next button/
Fast forward button
Macro mode
switch
Flash switch
OK key/
Joystick 5-way
MODE button
LED lights switch
White balance switch
Flash strobe
Strap hook
Tripod socket
Power button
Microphone
Lens
LED lights
Bottom view
SD card slot
(inside the battery cover)
Status LED (left) /
Charging LED (right)
MENU button
Shutter button
Zoom (in/out) button
Record button
AV OUT connector
USB connector *
HD OUT *
* inside the cover
1
Page 5
2
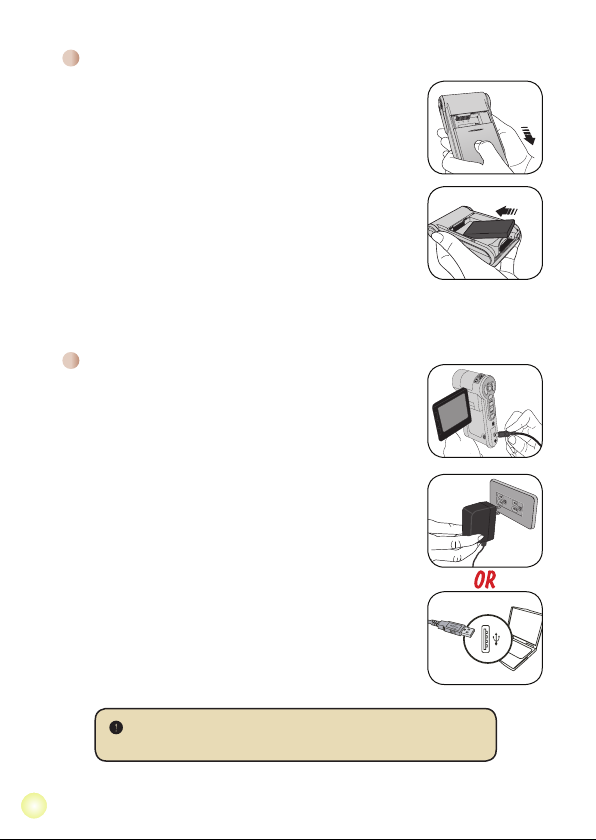
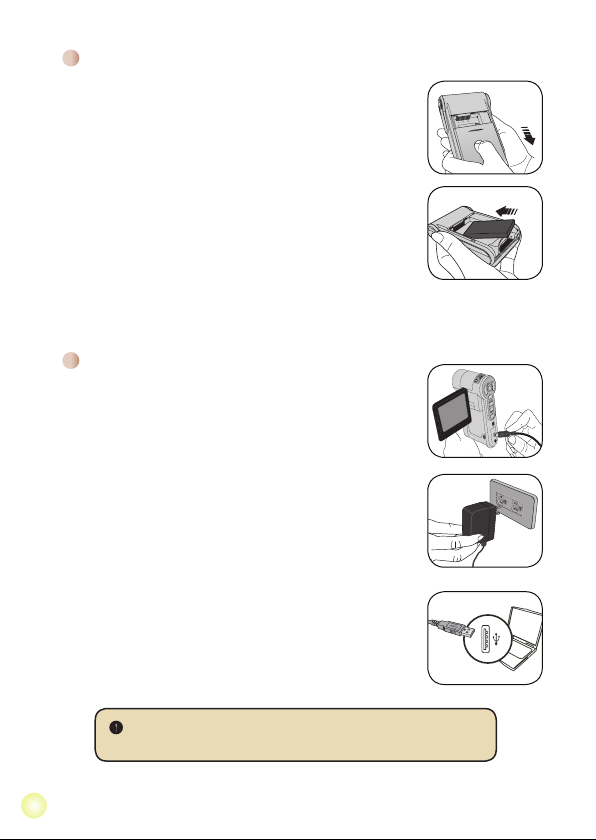
Installing the battery
1. Slide the battery cover open as indicated.
2. Place the accessory Li-Ion battery into the compartment.
Note that the metallic contacts must be aligned with the
contacts in the compartment.
3. After the battery is properly installed, replace the battery
cover.
Charging the battery
Please charge the battery at least 8 hours for rst time use.
1. Connect the cable.
Connect one end of the supplied AC adapter to the USB port
of the camcorder and the other end to a wall outlet.
OR
Connect one end of the supplied USB cable to the USB port
of the camcorder and the other end to a powered PC. Make
sure the camcorder is powered off.
2. The charging LED turns red and the charge starts.
3. When the charging is interrupted or the battery pack is fully
charged, the charging LED will turn green.
When using a PC to charge the battery, do not power on the
camcorder, or the charge will stop.
Page 6
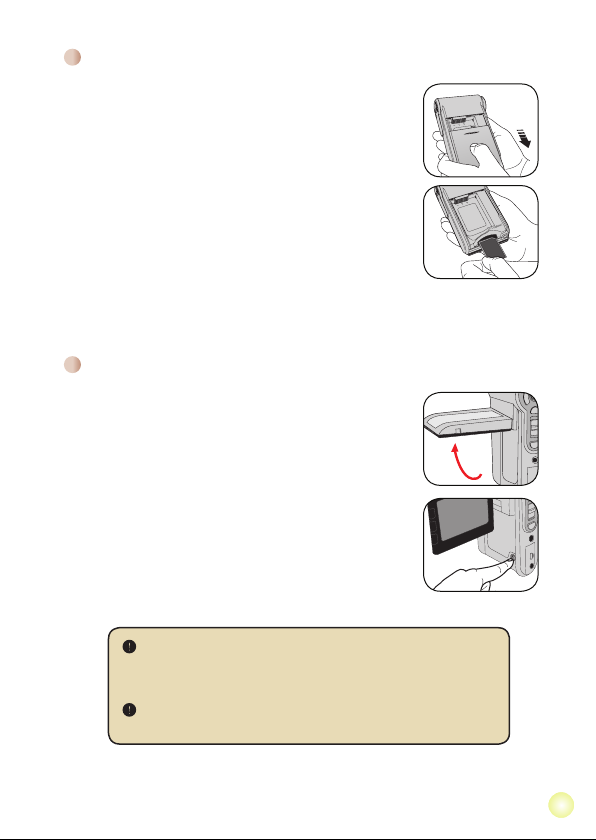
Inserting a memory card (optional)
To insert a memory card, do the followings:
(1) Open the battery cover.
(2) Gently push the card as indicated until the card
reaches the bottom of the slot.
To remove the memory card, gently push the card and it
will pop up. Then pull the card out of the slot.
Turning on/off your camcorder
Open the LCD monitor or press and hold down the Power
button for 1 second to turn on the camcorder.
To turn off the camcorder, press and hold down the Power
button for 1 ~ 3 seconds or close the LCD monitor.
If the camcorder is not turned on after pressing the Power button,
please check:
1. The battery pack is well installed in the camcorder.
2. The battery pack has enough power left.
If the camcorder stays inactive for a long period of time, it may
automatically shut down due to the Auto-Off setting.
3
Page 7

4
Setting language
1. Power on the camcorder.
2. Press the MODE key to enter the MODE menu.
3. Use the Joystick switch to select the Setting
mode and press OK to enter the menu screen.
4. Use the Joystick to select the Language item,
and then Press OK to conrm.
5. Move the Joystick up/down to select a language.
6. When done, press OK to conrm the setting.
Setting time
1. Power on the camcorder.
2. Press the MODE key to enter the MODE menu.
3. Use the Joystick switch to the Setting mode and press
OK to enter the menu screen.
4. Use the Joystick to select the Date & Time item, and
then Press OK to conrm.
5. Move the Joystick up/down to adjust value. Move the
Joystick left/right to shift between elds.
6. When done, press OK to conrm the setting.
Page 8
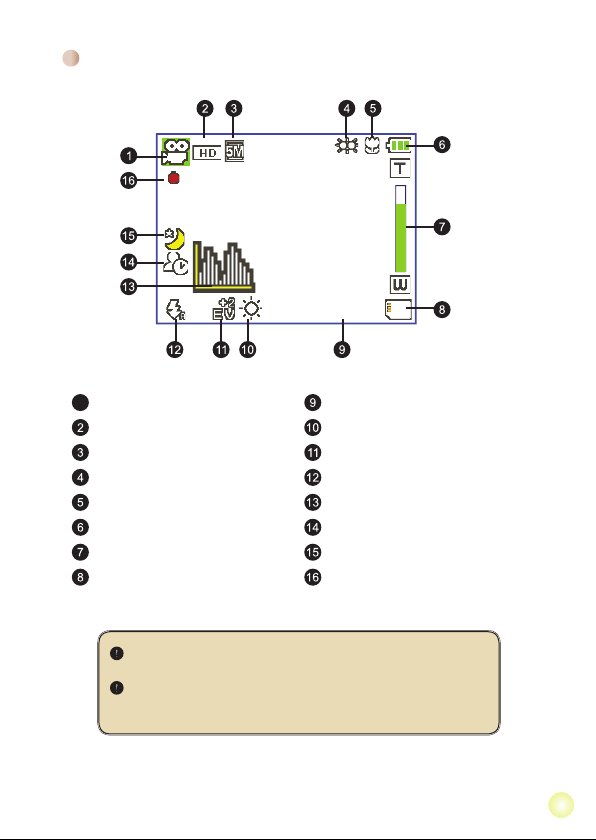
Reading LCD indicators
1
00:06:40
00:00:05
Mode icon Remaining recordable time
Video resolution While Balance mode
Picture resolution Exposure mode
LED lights mode Flash mode
Macro mode Histogram mode
Battery life Selftimer mode
Zoom ratio indicator NightShot mode
SD card inserted Recording time
The LCD will display 16:9 ratio while setting as HD (720P) video
resolution.
The LCD will display 4:3 ratio while setting as D1 (480P) or CIF
video resolution. (Please refer to the page 7 for more detailed
instructions.)
5
Page 9
6
Basic Operations
Recording a video clip
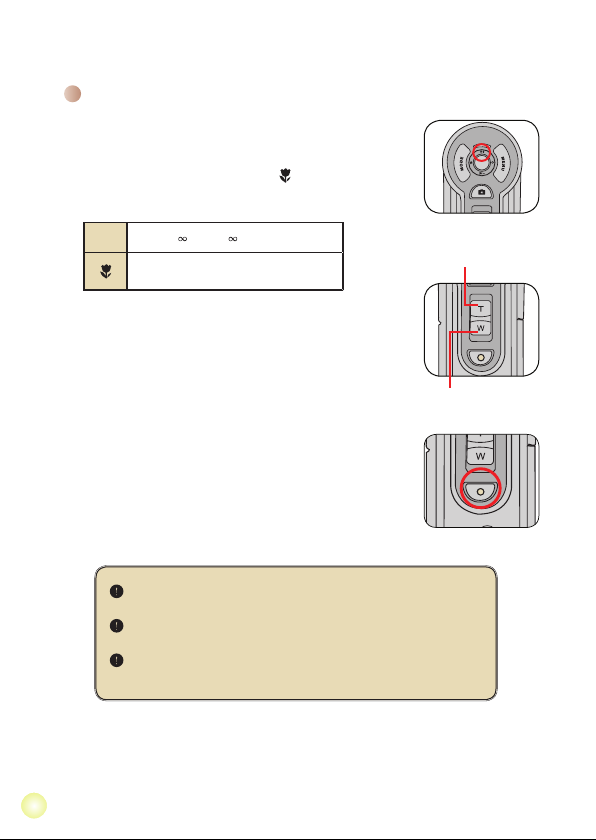
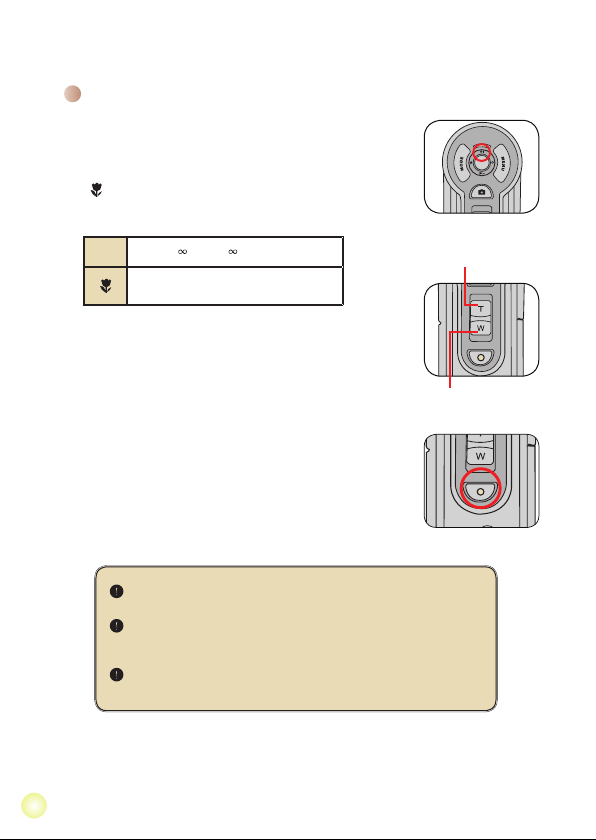
1. Adjust the focus:
Normally the camcorder can auto focus without adjusting
focus. If you want to take close-up pictures, you can push the
Up button to switch to Macro mode ( ).
Note: Please make sure your memory is inserted before
recording.
-
30cm ~ (12” ~ )
5cm ~ 30cm (2” ~ 12”)
* At 1.5X xed zoom
2. Zooming:
Move the Zoom button up or down to zoom in or zoom out the
screen. The optical magnication is 3X.
Zoom in
3. Press the Record button to start recording.
4. Press the Record button again to stop recording.
The zoom function is also available during recording (except in
macro mode).
If the surroundings are dark, you can switch the LED lights mode
to On or Auto to help focus and lighting.
It’s normal that the camcorder will feel slightly warm with
continuous use / recording due to its high performance.
Zoom out
Page 10
Taking a still picture
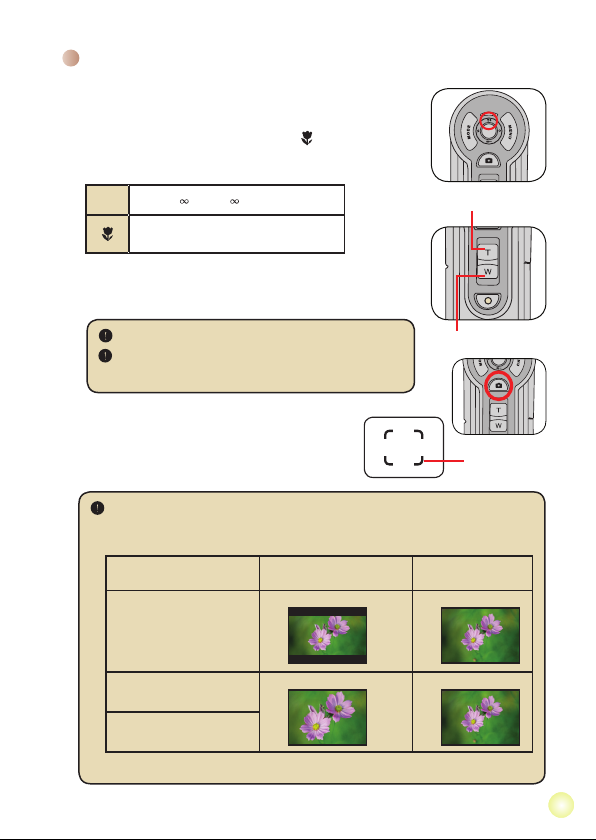
1. Adjust the focus:
Normally the camcorder can auto focus without adjusting
focus. If you want to take close-up pictures, you can push
the Up button to switch to Macro mode ( ).
Note: Please make sure your memory is inserted before
recording.
-
30cm ~ (12” ~ )
5cm ~ 30cm (2” ~ 12”)
* At 1.5X xed zoom
2. Zooming:
Move the Zoom button up or down to zoom in or
zoom out the screen. The optical magnication is 3X.
Adjust other advanced settings if necessary.
If the surroundings are dark, you can switch the LED
lights mode to On or Auto to help focus and lighting.
3. Press the Shutter button half way down and
hold for the camcorder to auto focus. When the
focus frame turns green, press the button fully
down to take a still picture.
Due to the sensor capture feature, the LCD preview and ratio of still picture
capture will vary depending upon different video resolution settings.
The image capture of the camera is set where as video resolutions are different.
Video resolution Preview
HD(1280x720) 16:9 ratio 4:3 ratio
Zoom in
Zoom out
Taking pictures
and focusing
focus frame
D1(720x480) 4:3 ratio 4:3 ratio
CIF(352x288)
7
Page 11
8
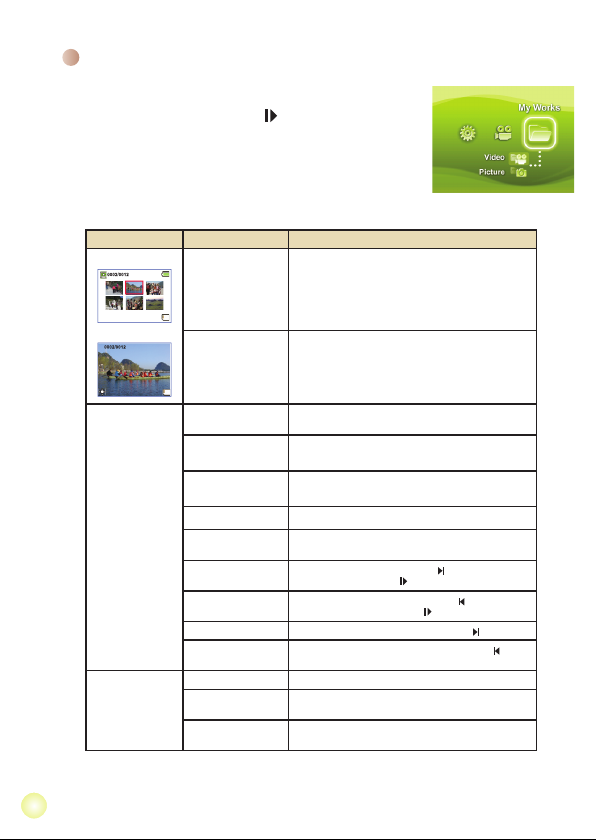
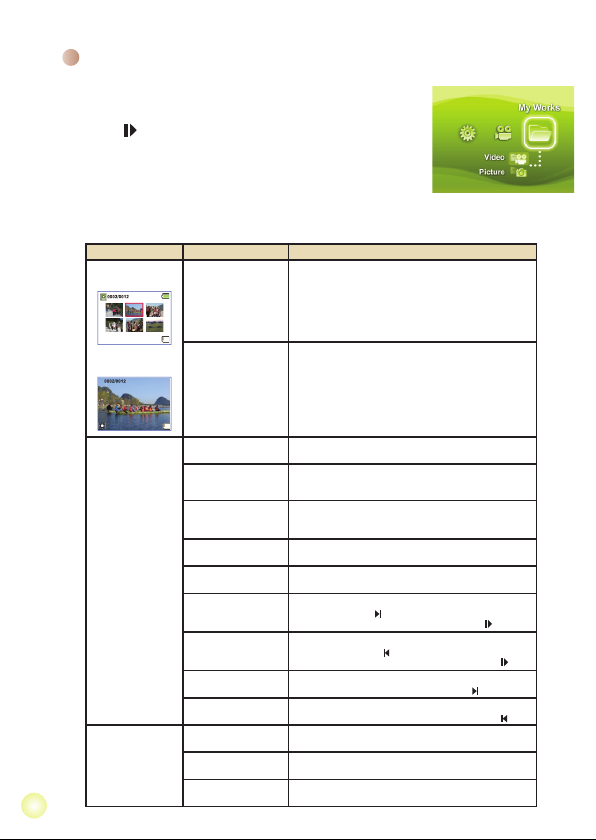
Playing back your recordings
1. Press the MODE button and use the Joystick to switch to
“My Works” mode.
Or press the Play/Pause button ( ) on the left side of the
LCD monitor.
2. There are two folders below My works: Video and Picture.
Select Video or Picture, and then press the OK key to enter
the index mode.
3. Operations in playback mode:
File type How to... Action
Index mode
Full-screen mode
Video
Picture
Shift between Index
mode and Fullscreen mode
Shift between les
Start playing
Pause/Resume
playing
Adjust the volume
level
Stop playing During playing, press the MENU button.
Return to the
preview screen
Fast forward
Fast backward
Select the next le While paused/stopped, press the Next ( ) button.
Select the previous
le
Zoom in/out Use the Joystick to move up or down.
Lock/Release zoom
ratio
Browse the enlarged
picture
In Index mode, press the OK key to switch to Fullscreen mode. In Full-screen mode, press the MENU
button to switch to Index mode.
1. In Index mode: Use the Joystick to move the
highlight box.
2. In Full-screen mode: Use the Joystick to move
left or right.
When selected (in full-screen mode), the le
automatically starts playing.
During playing/While paused, press the OK key.
During playing, use the Joystick to move up or
down.
Press the Shutter button.
During playing, press the Next ( ) button. To stop,
press the Play/Pause ( ) button.
During playing, press the Previous ( ) button. To
stop, press the Play/Pause ( ) button.
While paused/stopped, press the Previous ( )
button.
When the zoom ratio is greater than 1.0x, press
the OK key.
When the zoom ratio is locked, use the Joystick to
browse the picture.
Page 12

Playing back your recordings on PC
Installing software
Please notice that the recorded videos are .mov format. So you need some
special programs to view the recordings on PC. For rst time use, please make
sure you have QuickTime 7.0 player on your PC. If not, Please follow the below
instructions to install the software rst.
Please download the QuickTime 7.0 player from the below website:
http://www.apple.com/quicktime/download/win.html
OR
Please install the HD-DV DECODER program on the bundled CD.
(* HD-DV DECODER is designed for playing back the .mov les recorded by our
camcorder with Windows Media Player 10 & 11.)
Connecting PC and Save les
After the software is properly installed on your PC, please follow below
procedures.
1. Turn on the camcorder.
2. Connect the camcorder (with SD card inserted) to your computer with the USB
cable.
3. A dialogue window will appear automatically. Please select the item “Open
folder to view les” and click “OK”.
4. If the dialogue window does not appear automatically, you may double click on
“My computer” and open the “Removable Drive”.
5. Double-click on the DCIM le folder.
6. Double-click on the 100MEDIA le folder.
7. Copy the les you wish to keep and save them to the desired location on your
computer.
9
Page 13
10
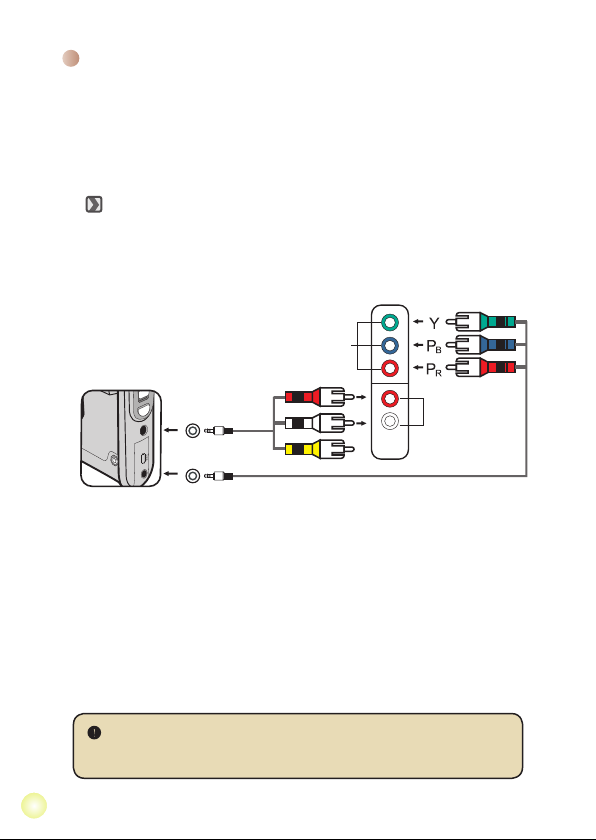
Connecting the camcorder to TV
AV OUT
HD OUT
HD TV
Component Audio in
Component Video in
<Component Video cable>
<AV cable>
(red)
(yellow)
(white)
(green)
(red)
(blue)
(Do not plug in Yellow Cable)
Please follow the below instructions to connect your camcorder and
TV via accessory AV cables for real-time display. You can display your
video clips and still pictures on your TV, sharing them with your friends
and family.
Connecting the camcorder to HDTV
HD TV hereby means the HDTV built-in component input ports, thus can perform
HD (720P) high resolution quality while connected.
1. Turn on your HD TV.
2. Turn on the Camcorder.
3. Plug one end of the component video cable into the (Component
Video IN) port on the HDTV and the other end into the (HD OUT) port
on Camcorder.
4. Plug one end of the other AV cable into the (Component Audio IN) port
on the HDTV and the other end into the (AV OUT) port on Camcorder.
(Please do not plug in the yellow connector to HDTV’s AV-IN.)
5. Press the input switch mode on HD TV and select “Component Input”.
If you record an HD resolution clip while connected to your HD TV, the TV
display video resolution will down size to D1 (480P) resolution due to data
bit rate, but the recorded le will remain HD (720P) with no change.
Page 14
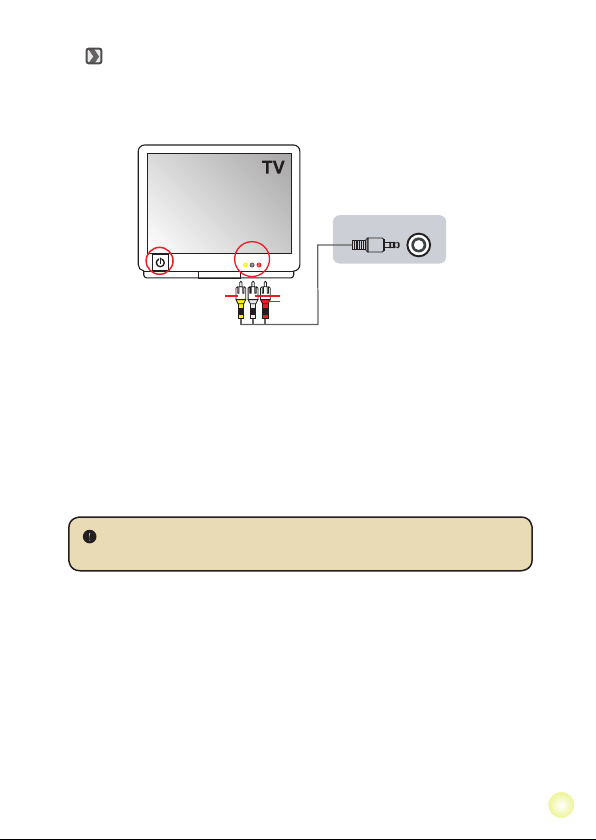
Connecting the camcorder to Standard TV
TV = Traditional CRT TV
AV mode
Video
AV-IN
Audio
AV cable
AV Out
1. Power on the camcorder.
2. Press the MODE key to enter the Mode menu.
3. Use the Joystick switch to the Setting mode and press OK to enter
the menu screen.
4. Use the Joystick to select the TV-out item, and then press OK to
conrm.
5. Move the Joystick up/down to select NTSC or PAL.
NTSC or PAL system is different across countries, please refer to
page 14 for the Flicker Setting table.
6. When done, press OK to conrm the setting.
7. Press the Shutter key to return to the preview screen.
8. Connect the audio and video ends of the AV cable (yellow/white/red
color) to the TV “AV-IN” jacks.
9. Connect the other end of the AV cable to the “AV out” port on your
camcorder.
11
Page 15
12
Advanced Operations
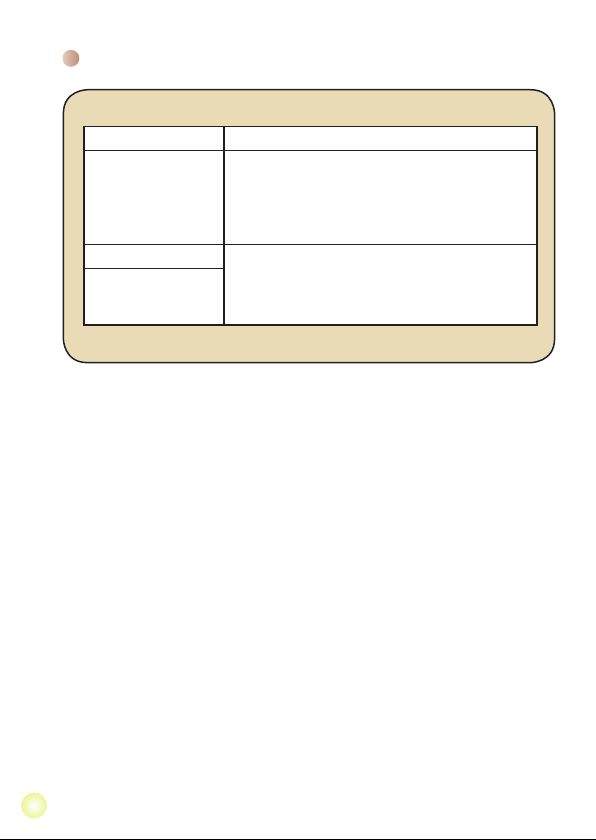
Menu operation
The menu items provide several options for you to ne-tune your camera functions.
The following table gives details on menu operations.
How to... Action
Bring up the menu Press the MENU button.
Move the highlight bar Use the Joystick to move up or down.
Enter sub-menu/Conrm an item Press the OK key.
Exit menu/Go back to upper menu Press the MENU button (when in sub-menu).
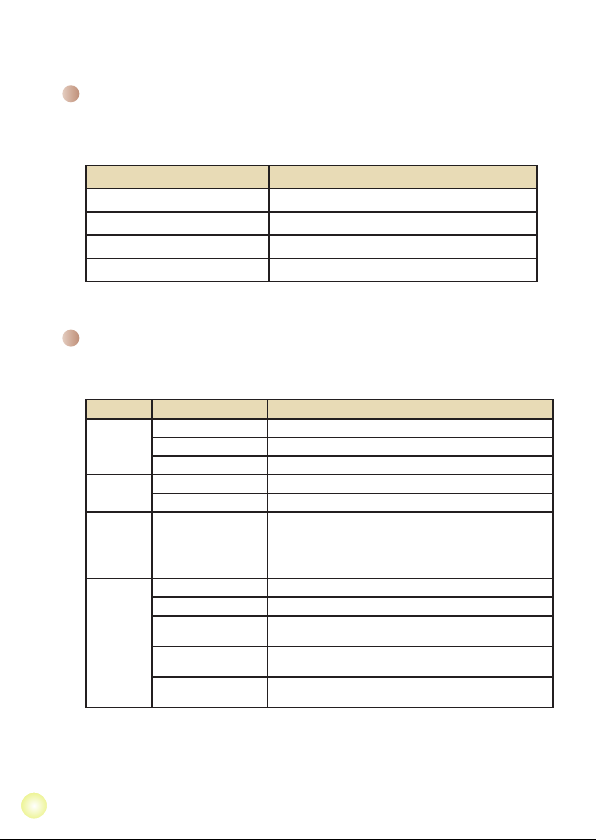
Menu items in Camera mode
Power-on → Press the Menu button.
Item Option Description
Video
resolution
Picture
Resolution
NightShot
WB
HD Set the video resolution to HD (1280x720 pixels).
D1 Set the video resolution to D1 (720x480 pixels).
CIF Set the video resolution to CIF (352x288 pixels).
3M Set picture resolution to 3 mega pixels.
5M Set picture resolution to 5 mega pixels.
On/Off
Auto The camera automatically adjusts white balance.
Sunny This setting is suitable for outdoor recording in sunny weather.
Cloudy
Fluorescent
Tungsten
Enabling this setting allows you to take a photograph with
a dark background. Since the shutter speed will slow down
when taking photographs at a dark place, we recommend
using a tripod to eliminate blurring from hand shake.
Warning: Noise increases when Night Shot is enabled.
This setting is suitable for recording in cloudy weather or
shady environments.
This setting is suitable for indoor recording with uorescent
lamp lighting, or environments with high color temperature.
This setting is suitable for indoor recording with incandescent
lamp lighting, or environments with low color temperature.
Page 16
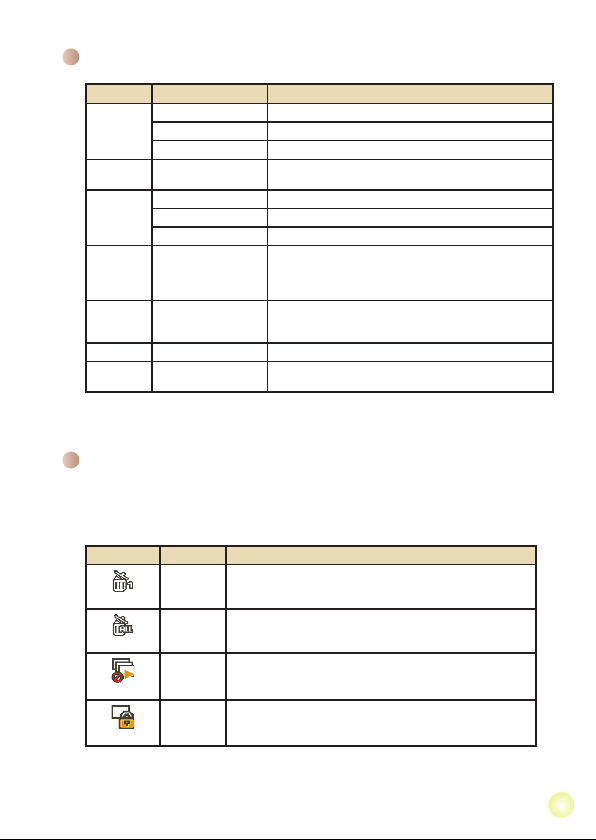
Menu items in Camera mode (continued)
Item Option Description
Flashlight
Video light On/Auto/Off
Effect
Exposure -2~+2
Selftimer On/Off
Histogram On/Off Enable/Disable image histogram display on the screen.
Icon On/Off
On The ash is forced to re in every shot.
Auto The ash automatically res when the lighting is insufcient.
Off The ash is disabled.
Normal Make recordings in natural color.
B&W Make recordings in black and white.
Classic Make recordings in sepia-toned color.
This setting allows you to add extra light when the lighting is
insufcient during recording video clips.
Manually adjust the exposure to gain better effect when the
preview image appears too bright or too dark. A positive
value indicates the image will be brighter than usual; while a
negative value makes the image dimmer.
Enable/Disable the selftimer. After the selftimer is turned on,
the camera will have ten seconds delay before recording
when the Shutter button is pressed.
Enable/Disable OSD (on screen display) icons to display on
the screen.
Menu items in Playback mode
Power-on → Press the MODE button → Use the Joystick to switch to My Works
mode → Select Video or Picture folder→ Press the OK button → Press the MENU
button.
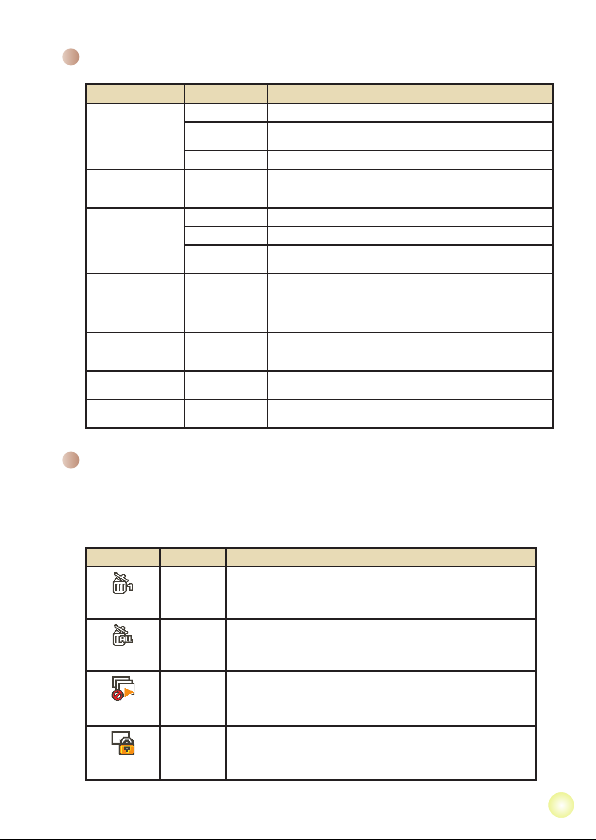
Item Option Description
Delete One
Delete All
Slide Show
Lock
* If there are no les in the camera, no items will be seen.
Yes/No Delete current le.
Yes/No
Delete all pictures and video/audio les stored in the memory.
The camera displays images in sequence. Only JPEG pictures and
-
the rst frames of MPEG les will be displayed. You can press the
Menu button to stop the slide show.
Single, multiple, or all les can be locked. A locked le cannot be
Yes/No
erased by a delete function. While the formatting function will erase
all locked/unlocked les.
13
Page 17
14
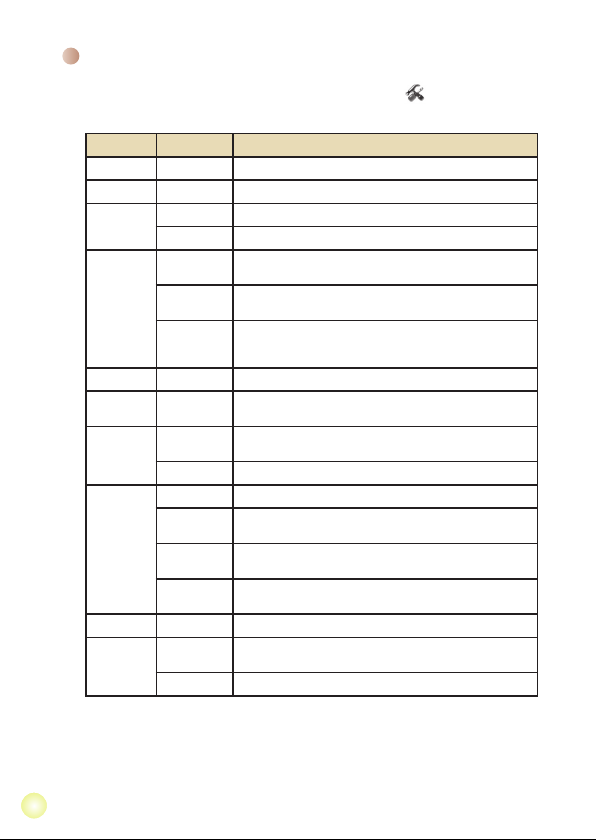
Menu items in Setting mode
Power-on → Press the MODE button → Enter the Setting ( ) mode → Press
the MENU button.
Item Option Description
Date & Time -
Beep
Flicker
TV-out
Icon
LCD Bright
Format
Auto Off
Language
Default
Set date and time.
On/Off
Enable/Disable beep sound.
50Hz
Set icker frequency to 50Hz*.
60Hz
Set icker frequency to 60Hz*.
Set TV system compatibility to HDTV. This option is suitable
HDTV
for HDTV.
Set TV system compatibility to NTSC. This option is suitable for
NTSC
America, Taiwan, Japan, and Korea areas.
Set TV system compatibility to PAL. This option is suitable for
PAL
Germany, England, Italy, Netherlands, China, Japan, and Hong
Kong.
On/Off
Enable/Disable OSD icons to display on the screen.
Set LCD brightness. A positive value makes the LCD brighter;
-2~+2
while a negative value makes the LCD dimmer.
Format the storage medium. Note that all les stored in the
Yes
medium will be gone.
No
Cancel action.
Off
Disable Auto-off function.
The camera automatically shuts down when staying inactive for
1 min
over 1 minute.
The camera automatically shuts down when staying inactive for
3 min
over 3 minutes.
The camera automatically shuts down when staying inactive for
5 min
over 5 minutes.
-
Lets you select the language used for OSD.
Restore factory defaults. Note that your current settings will be
Yes
overridden.
No
Cancel action.
Page 18
Menu items in Setting mode (continued)
* Flicker settings table:
Region England Germany France Italy Spain
Setting 50Hz 50Hz 50Hz 50Hz 50Hz 50Hz 50Hz
Region Portugal America Taiwan China Japan Korea Thailand
Setting 50Hz 60Hz 60Hz 50Hz 50/60Hz 60Hz 50Hz
Netherlands
Russia
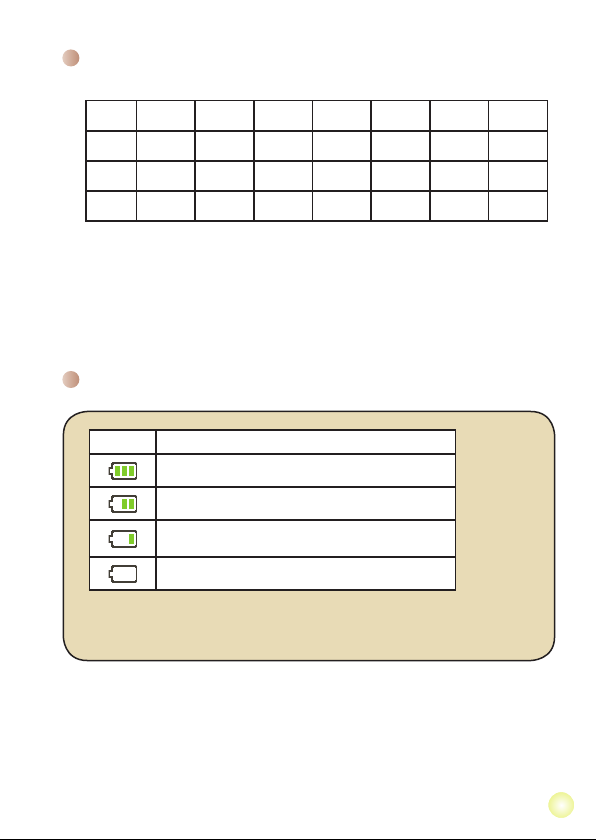
Battery Life Indicator
Icon Description
Full battery life
Moderate battery life
Low battery life
* The ash strobe and the LED lights will be disabled.”
Empty battery life
Note: To avoid sudden outage of power supply, you are recommended to replace the battery
when the icon indicates low battery life.
15
Page 19

16
Battery Life
Still picture Video clip
Number of shots Recording time (minute)
110 30
* shoot every 30 seconds
** ash is off
*** resolution is set to 5M (2560x1920)
Note: This table is for your reference only. The actual battery life depends on your battery
type and recharge level.
* resolution is set to HD (1280x720 pixels)
Storage Capacity
Memory
SD card (256MB) 7 18 40 230 145
SD card (512MB) 15 36 80 460 290
SD card (1GB) 30 72 160 920 580
SD card (2GB) 60 144 320 1840 1160
SD card (4GB)
Note: The actual value of capacity may vary (up to ± 30%) depending on the color saturation
and complexity of your subject and surroundings.
Video (min.) Still picture
HD D1 CIF 3M 5M
120 288 640 3680 2320
Page 20

Specications
Item Description
Model 5 Mega-pixel camera
Image sensor 5 Mega (2592x1944 pixels)
Still image: 3M/5M
Resolution
Lens 3X optical zoom lens
File format MOV, JPEG
Video frame rate
External memory SD (256MB ~ 4GB), speed rate 12X above
LCD display 2.4” LCD
TV out Component out, NTSC/PAL system supported
Interface USB 2.0
Microphone Yes
Speaker Yes
Night shot Yes (both in still image and video modes)
Battery NP60 compatible Li-ion rechargeable battery
Note: Specications are subject to change without notication.
1280x720 (HD)
720x480 (D1)
352x288 (CIF)
1280x720, up to 30fps
720x480, up to 30fps
352x288, up to 30fps
17
Page 21
System Requirements
System requirements are different in different video resolution settings:
Video Resolution PC system requirements
OS = Windows XP SP2 or above (QuickTime 7.0 or above)
HD (1280x720) @30fps
D1 (720x480) @30fps OS = Windows 2000/XP or above (QuickTime 7.0 or above)
CIF (352x288) @30fps
CPU = Pentium 4 3.0GHz or above
System RAM = 512MB (1GB recommended)
Display card = nvidia Geforece 7600 or ATI X1600 or above
with 256MB of RAM
CPU = Pentium 4 1.5GHz or above
System RAM = 256MB (512MB or above recommended)
Display card = 64MB (128MB or above recommended)
18
Page 22
82-441-90010v1.0
Page 23

Inhalt
Erste Schritte .................................................................. 1
Die Komponenten Ihres Camcorders ...................................................1
Akku einlegen ....................................................................................... 2
Akku laden ............................................................................................ 2
Einlegen einer Speicherkarte (optional) ............................................... 3
Ein-/Ausschalten des Camcorders .......................................................3
Einstellen der Sprache.......................................................................... 4
Zeit einstellen........................................................................................ 4
LCD-Anzeigen ablesen ......................................................................... 5
Grundfunktionen ............................................................6
Videoclip aufzeichnen ........................................................................... 6
Fotos aufnehmen ................................................................................. 7
Aufzeichnungen wiedergeben ..............................................................8
Aufnahmen auf dem PC wiedergeben .................................................. 9
Camcorder an ein Fernsehgerät anschließen ......................................10
Erweiterte Funktionen .................................................... 12
Menübedienung .................................................................................... 12
Menüpunkte im Kameramodus ............................................................. 12
Menüpunkte im Wiedergabemodus ...................................................... 13
Akkuladestandanzeige.......................................................................... 15
Akkuladestand ...................................................................................... 16
Speicherkapazität ................................................................................. 16
Technische Daten ................................................................................. 17
Systemvoraussetzungen ......................................................................18
Page 24
Erste Schritte
Die Komponenten Ihres Camcorders
Lautsprecher
Akkufachdeckel
LCD-Bildschirm
Rückwärtstaste/
Schneller Rücklauf
Wiedergabe-/
Pause-Taste
Vorwärtstaste/
Schneller Vorlauf
Makromodusschalter
Blitzschalter
OK-Taste/
5-Wege-Joystick
Modustaste
WeißabgleichSchalter
LED-Leuchtenschalter
Blitz
Riemenöse
Stativgewinde
Ein-/Austaste
Mikrofon
Objektiv
LED-Leuchten
Ansicht von unten
SD-Kartensteckplatz
(im Akkufach)
Status-LED (links) /
Lade-LED (rechts)
Menütaste
Auslöser
Zoomtaste (ein-/auszoomen)
Aufnahmetaste
AV-Ausgang
USB-Anschluss *
HD-Ausgang *
* hinter der Abdeckung
1
Page 25
2
Akku einlegen
1. Ziehen Sie den Akkufachdeckel wie abgebildet auf.
2. Legen Sie den mitgelieferten, wiederauadbaren
Lithium-Ionen-Akku in das Akkufach ein. Bitte beachten
Sie, dass die Metallkontakte mit den Kontakten im
Akkufach auszurichten sind.
3. Bringen Sie den Akkufachdeckel nach dem
ordnungsgemäßen Einlegen des Akkus wieder an.
Akku laden
Laden Sie den Akku vor dem ersten Gebrauch mindestens 8
Stunden lang auf.
1. Schließen Sie das Kabel an.
Verbinden Sie ein Ende des mitgelieferten Netzteils mit
dem USB-Anschluss und das andere Ende mit einer
Wandsteckdose.
ODER
Verbinden Sie ein Ende des mitgelieferten USB-Kabels mit
dem USB-Anschluss am Camcorder und das andere Ende
mit einem eingeschalteten PC. Der Camcorder muss dabei
ausgeschaltet sein.
2. Die Lade-LED leuchtet rot, der Ladevorgang beginnt.
3. Wenn der Ladevorgang unterbrochen wird oder der Akku voll
geladen ist, leuchtet die Lade-LED grün.
ODER
Wenn Sie den Akku über einen PC auaden, dürfen Sie den
Camcorder nicht einschalten, da sonst der Ladevorgang stoppt.
Page 26

Einlegen einer Speicherkarte (optional)
Legen Sie eine Speicherkarte folgendermaßen ein:
(1) Öffnen Sie den Akkufachdeckel.
(2) Drücken Sie die Karte behutsam hinein, bis sie das
Ende des Einschubs erreicht.
Um die Speicherkarte zu entnehmen, drücken Sie
behutsam auf die Karte, woraufhin sie ein Stück
herausspringt. Ziehen Sie die Karte anschließend aus
dem Einschub heraus.
Ein-/Ausschalten des Camcorders
Klappen Sie den LCD-Monitor auf oder drücken und halten
Sie die Ein-/Aus-Taste 1 Sekunde lang, um den Camcorder
einzuschalten.
Um den Camcorder auszuschalten, drücken und halten Sie
die Ein-/Austaste 1 bis 3 Sekunden lang oder klappen den
LCD-Monitor zu.
Falls der Camcorder sich durch Drücken der Ein-/Aus-Taste nicht
einschaltet, prüfen Sie bitte, ob:
1. der Akku ordnungsgemäß in den Camcorder eingelegt ist.
2. der Akku ausreichend geladen ist.
Falls der Camcorder längere Zeit inaktiv ist, schaltet er, je nach
Einstellung der Funktion Auto-Aus, automatisch aus.
3
Page 27

4
Einstellen der Sprache
1. Schalten Sie den Camcorder ein.
2. Rufen Sie das MODE (Modus)-Menü mit der
Modustaste auf.
3. Wählen Sie den Setting (Einstellungen)-Modus
mit dem Joystick aus, rufen Sie das Menü mit
der OK-Taste auf.
4. Wählen Sie die Option Language (Sprache) mit
dem Joystick, drücken Sie zur Bestätigung auf
OK.
5. Wählen Sie durch Auf- oder Abwärtsbewegungen
des Joysticks eine Sprache aus.
6. Zum Abschluss bestätigen Sie die Einstellung mit
der OK-Taste.
Zeit einstellen
1. Schalten Sie den Camcorder ein.
2. Rufen Sie das MODE (Modus)-Menü mit der
Modustaste auf.
3. Wählen Sie den Setting (Einstellungen)-Modus mit
dem Joystick aus, rufen Sie das Menü mit der OKTaste auf.
4. Wählen Sie die Option Date & Time (Datum/Zeit) mit
dem Joystick, drücken Sie zur Bestätigung auf OK.
5. Stellen Sie die gewünschten Werte ein, indem Sie den
Joystick nach oben oder unten bewegen. Durch Links/Rechtsbewegungen des Joysticks bewegen Sie sich
zu den verschiedenen Feldern.
6. Zum Abschluss bestätigen Sie die Einstellung mit der
OK-Taste.
Page 28

LCD-Anzeigen ablesen
1
00:06:40
00:00:05
Modussymbol Verbleibende Aufnahmezeit
Videoauösung Weißabgleichmodus
Bildauösung Belichtungsmodus
LED-Leuchtenmodus Blitzmodus
Makromodus Histogrammmodus
Akkuladestand Selbstauslösermodus
Zoomanzeige Nachtaufnahmemodus
SD-Karte eingelegt Aufnahmezeit
Wird eine HD-Videoauösung (720P) eingestellt, so wird das Bild
im 16:9-Format auf dem LCD-Bildschirm dargestellt.
Wird eine D1-(480P) oder eine CIF-Videoauösung eingestellt, so
wird das Bild im 4:3-Format auf dem LCD-Bildschirm dargestellt.
(Detaillierte Hinweise dazu nden Sie auf Seite 7.)
5
Page 29
6
Grundfunktionen
Videoclip aufzeichnen
1. Scharfstellen:
Normalerweise stellt der Camcorder die Schärfe (den Fokus)
automatisch ein. Wenn Sie jedoch Nahaufnahmen machen
möchten, drücken Sie die Aufwärtstaste, um zum Makromodus
( ) zu wechseln.
Hinweis: Bitte achten Sie darauf, eine Speicherkarte
einzulegen, ehe Sie mit der Aufnahme beginnen.
- 30cm ~ (12” ~ )
5cm ~ 30cm (2” ~ 12”)
* bei auf 1,5X xiertem Zoom
2. Zoomen:
Bewegen Sie die Zoomtaste zum Ein- oder Auszoomen nach
oben oder unten. Der optische Zoom kann auf bis zu 3 x
eingestellt werden.
3. Drücken Sie die Record (Aufnahmetaste), um mit der
Aufzeichnung zu beginnen.
4. Drücken Sie die Record (Aufnahmetaste) erneut, um die
Aufzeichnung zu beenden.
Die Zoomfunktion steht auch während des Aufzeichnens zur
Verfügung (außer im Makromodus).
Bei einer dunklen Umgebung können Sie den LED-
Leuchtenmodus als Fokus- und Beleuchtungshilfe auf Ein oder
Auto setzen.
Eine Erwärmung des Camcorders nach längerem Betrieb ist völlig
normal.
Einzoomen
Auszoomen
Page 30

Fotos aufnehmen
1. Scharfstellen:
Normalerweise stellt der Camcorder die Schärfe (den
Fokus) automatisch ein. Wenn Sie jedoch Nahaufnahmen
machen möchten, drücken Sie die Aufwärtstaste, um zum
Makromodus ( ) zu wechseln.
Hinweis: Bitte achten Sie darauf, eine Speicherkarte
einzulegen, ehe Sie mit der Aufnahme beginnen.
- 30cm ~ (12” ~ )
5cm ~ 30cm (2” ~ 12”)
* bei auf 1,5X xiertem Zoom
2. Zoomen:
3.
Bewegen Sie die Zoomtaste zum Ein- oder Auszoomen nach
oben oder unten. Der optische Zoom kann auf bis zu 3X
eingestellt werden.
Nehmen Sie gegebenenfalls andere, erweiterte
Einstellungen vor.
Bei einer dunklen Umgebung können Sie den LED-
Leuchtenmodus als Fokus- und Beleuchtungshilfe auf
Ein oder Auto setzen.
Drücken Sie den Sutter (Auslöser) halb
herunter und warten Sie, bis der Camcorder
den Fokus automatisch einstellt. Wenn der
Fokusrahmen grün wird, drücken Sie den
Auslöser ganz hinab, um ein Foto machen.
Je nach eingestellter Videoauösung kann das Bildseitenverhältnis von Fotos
in der LCD-Vorschau variieren.
Bildaufnahme und -darstellung hängen von der jeweiligen Videoauösung ab.
Videoauösung Vorschau
HD(1280x720) Bildseitenverhältnis 16:9 Bildseitenverhältnis 4:3
Bildaufnahme und
Fokussierung
Einzoomen
Auszoomen
Fokusrahmen
D1(720x480) Bildseitenverhältnis 4:3 Bildseitenverhältnis 4:3
CIF(352x288)
7
Page 31
8
Aufzeichnungen wiedergeben
1. Drücken Sie die Modustaste, wählen Sie dann den Modus
„My Works“ (Meine Aufnahmen) mit dem Joystick.
Oder drücken Sie die Play/Pause (Wiedergabe-/Pause)-
Taste ( ) links neben dem LCD-Bildschirm.
2. Im Ordner My works (Meine Aufnahmen) benden sich zwei
weitere Ordner: Video und Picture (Foto). Wählen Sie Video
oder Foto aus, wechseln Sie dann mit der OK-Taste in den
Indexmodus.
3. Funktionen im Wiedergabemodus:
Dateityp Funktion... Bedienschritte
Index mode
(Indexmodus)
Full-screen mode
(Vollbildansicht)
Umschalten
zwischen
Indexmodus und
Vollbildmodus
Wechseln zwischen
Dateien
Drücken Sie im Indexmodus die OK-Taste, um zur
Vollbildansicht zu wechseln. Drücken Sie in der
Vollbildansicht die Menu (Menü)taste, um zum
Indexmodus zu wechseln.
1. Im Indexmodus: Verwenden Sie den Joystick, um
den Markierungsrahmen zu verschieben.
2.
In der Vollbildansicht: Verwenden Sie den Joystick,
um nach links oder nach rechts zu gelangen.
Wiedergabe
beginnen
Anhalten/Fortsetzen
der Wiedergabe
Einstellen der
Lautstärke
Wiedergabe
beenden
Video
Picture
(Foto)
Rückkehr zum
Vorschau-Bildschirm
Schneller Vorlauf
Schneller Rücklauf
Wählen der
nächsten Datei
Wählen der
vorherigen Datei
Ein-/Auszoomen
Zoomverhältnis
sperren/freigeben
Schwenken des
vergrößerten Fotos
Wenn (im Vollbildmodus) eine Datei gewählt wird,
beginnt ihre Wiedergabe automatisch.
Drücken Sie während der Wiedergabe/Pause die
OK-Taste.
Verwenden Sie während der Wiedergabe den
Joystick, um nach oben oder nach unten zu
gelangen.
Drücken Sie während der Wiedergabe die Menu
(Menü)taste.
Drücken Sie den Shutter (Auslöser).
Drücken Sie während der Wiedergabe die Next
(Vorwärtstaste) ( ). Zum Stoppen drücken Sie die
Play/Pause (Wiedergabe-/Pause)-Taste ( ).
Drücken Sie während der Wiedergabe die Previous
(Rückwärtstaste) ( ). Zum Stoppen drücken Sie
die Play/Pause (Wiedergabe-/Pause)-Taste ( ).
Drücken Sie bei angehaltener/gestoppter
Wiedergabe die Next (Vorwärtstaste) ( ).
Drücken Sie bei angehaltener/gestoppter
Wiedergabe die Previous (Rückwärtstaste) ( ).
Navigieren Sie mit dem Joystick nach oben oder
nach unten.
Drücken Sie bei einem Zoomverhältnis von mehr als
1,0 die OK-Taste.
Verwenden Sie bei gesperrtem Zoomverhältnis den
Joystick, um das Foto zu schwenken.
Page 32

Aufnahmen auf dem PC wiedergeben
Software installieren
Bitte beachten Sie, dass die Videos im MOV-Format aufgezeichnet werden.
Daher brauchen Sie spezielle Programme, um die Aufnahmen am PC
wiederzugeben. Wenn Sie diese Möglichkeit zum ersten Mal nutzen, achten
Sie bitte darauf, dass der Quicktime 7.0-Player auf Ihrem PC installiert ist.
Falls nicht, installieren Sie die Software bitte zunächst über die nachstehenden
Schritte.
Laden Sie den Quicktime 7.0-Player über die folgende Webseite herunter:
http://www.apple.com/quicktime/download/win.html
ODER
Installieren Sie das HD-DV (MOV) DECODER-Programm von der mitgelieferten
CD.
Installieren Sie das HD-DV DECODER-Programm von der mitgelieferten CD.
(* HD-DV DECODER dient zum Abspielen von mit Ihrem Camcorder
aufgenommenen MOV-Dateien über den Windows Media Player 10 und 11.)
PC anschließen und Dateien kopieren
Nachdem die Software auf Ihrem PC installiert wurde, führen Sie bitte die
folgenden Schritte aus.
1. Schalten Sie den Camcorder ein.
2. Verbinden Sie den Camcorder (mit eingesteckte SD-Karte) über das USB-Kabel
mit Ihrem Computer.
3. Ein Dialogfenster öffnet sich automatisch. Bitte wählen Sie den Menüpunkt
„Open folder to view les (Ordner zum Anzeigen der Dateien öffnen)“ und
klicken Sie auf „OK“.
4. Falls das Dialogfenster nicht automatisch erscheinen sollte, klicken Sie bitte auf
„Arbeitsplatz“ und öffnen den „Wechseldatenträger“.
5. Doppelklicken Sie auf den Dateiordner DCIM.
6. Doppelklicken Sie auf den Dateiordner 100MEDIA.
7. Kopieren Sie wichtige Dateien und speichern Sie diese an einem beliebigen Ort
in Ihrem Computer.
9
Page 33

10
Camcorder an ein Fernsehgerät anschließen
AV-Ausgang
HD-Ausgang
HD TV
ComponentAudioeingang
Component-Videoeingang
<Component-Videokabel>
<AV-Kabel>
(rot)
(gelb)
(weiß)
(grün)
(rot)
(blau)
(Schließen Sie das gelbe Kabel nicht an.)
Mit Hilfe der folgenden Schritte schließen Sie Ihren Camcorder über ein
zusätzliches A/V-Kabel zur Echtzeit-Wiedergabe an ein Fernsehgerät an.
Sie können Ihre Videoclips und Fotos über ein Fernsehgerät darstellen,
um sie so mit Freunden und Familienangehörigen gemeinsam
anschauen zu können.
Camcorder an ein HDTV-Fernsehgerät anschließen
Ein HDTV-Fernsehgerät verfügt über Component-Eingänge und ermöglicht HDDarstellung (720p) in hoher Auösung.
1. Schalten Sie Ihr HD-Fernsehgerät ein.
2. Schalten Sie den Camcorder ein.
3. Verbinden Sie ein Ende des Component-Videokabels mit dem
Component-Eingang (Component-Videoeingang) am HDTVGerät, verbinden Sie das andere Ende mit dem (HD-Ausgang) des
Camcorders.
4. Verbinden Sie ein Ende des weiteren AV-Kabels mit dem ComponentAudioeingang (Component-Audioeingang) am HDTV-Gerät, verbinden
Sie das andere Ende mit dem (AV-Ausgang) des Camcorders.
(Schließen Sie das gelbe Kabel nicht an den (AV-Eingang) des HDTVGerätes an.)
5. Schalten Sie das HD-Fernsehgerät auf „Component Input“
(Component-Eingang) um.
Wenn Sie ein Video in HD-Auösung aufnehmen, während das Gerät mit
dem HDTV-Gerät verbunden ist, wird die Anzeigeauösung auf D1 (480P)
herabgestuft; die Auösung des aufgenommenen Videos bleibt dabei
jedoch unverändert HD (720P).
Page 34

Camcorder an ein normales Fernsehgerät
anschließen
TV = Normales Röhrenfernsehgerät
AV-Modus
Video
AV-
Eingang
Audio
AV-Kabel
AV-Ausgang
1. Schalten Sie den Camcorder ein.
2. Rufen Sie das Modus-Menü mit der
3. Wählen Sie den
Setting (Einstellungen)-Modus mit dem Joystick
Modustaste auf.
aus, rufen Sie das Menü mit der OK-Taste auf.
4. Wählen Sie die Option TV-Ausgang mit dem
Joystick, drücken Sie
zur Bestätigung auf OK.
5. Wählen Sie durch Auf- oder Abwärtsbewegungen des
Joystick
entweder NTSC oder PAL aus.
Die Fernsehnormen NTSC und PAL werden in verschiedenen
Ländern eingesetzt; Hinweise zur Unterdrückung von Flimmern
nden Sie auf Seite 14.
6. Zum Abschluss bestätigen Sie die Einstellung mit der OK-Taste.
7. Mit dem
Shutter (Auslöser) kehren Sie wieder zum
Vorschaubildschirm zurück.
8. Verbinden Sie die Audio- und Videostecker des AV-Kabels (gelb, weiß,
rot) mit den „AV-Eingängen“ des Fernsehgerätes.
9. Schließen Sie das andere Ende des AV-Kabels an den „AV-Ausgang“
des Camcorders an.
11
Page 35

12
Erweiterte Funktionen
Menübedienung
Die Menüs bieten einige Optionen, mit denen Sie Feineinstellungen der Funktionen Ihrer
Kamera vornehmen können.
Die nachstehende Tabelle enthält Einzelheiten über die Menübedienung.
Funktion... Bedienschritte
Aufrufen des Menüs Drücken Sie die Menu (Menü)taste.
Verschieben des Markierungsrahmens Navigieren Sie mit dem Joystick nach oben oder nach unten.
Aufrufen von Untermenüs / Bestätigen
einer Eingabe
Beenden des Menüs / Rückkehr zum
übergeordneten Menü
Menüpunkte im Kameramodus
Einschalten → Menu (Menü)- taste drücken.
Drücken Sie die OK-Taste.
Drücken Sie die Menu (Menü)taste (vom Untermenü aus).
Menüpunkt Optionen Beschreibung
Video resolution
(Video-
auösung)
Picture
Resolution
(Bild-auösung)
NightShot
(Nachtaufnahme)
WB
(Weißabgleich)
HD Stellt die Videoauösung auf HD (1280 x 720 Pixel) ein.
D1 Stellt die Videoauösung auf D1 (720 x 480 Pixel) ein.
CIF Stellt die Videoauösung auf CIF (352 x 288 Pixel) ein.
3M Stellt die Fotoauösung auf 3 Megapixel ein.
5M Stellt die Fotoauösung auf 5 Megapixel ein.
Ist diese Einstellung aktiviert, können Sie Fotos bei einem
dunklen Hintergrund machen. Da die Verschlusszeit beim
On/Off
(Ein/Aus)
Auto Die Kamera passt den Weißabgleich automatisch an.
Sunny (Sonnig)
Cloudy (Wolkig)
Fluorescent
(Leuchtstoff)
Tungsten
(Glühlampe)
Aufnehmen von Fotos in dunkler Umgebung wesentlich
länger ist, empfehlen wir die Verwendung eines Stativs, um
Unschärfen aufgrund von Verwackeln zu vermeiden.
Achtung: Das Bildrauschen nimmt zu, wenn die
Nachtaufnahme aktiviert ist.
Diese Einstellung eignet sich für Außenaufnahmen bei
Sonnenschein.
Diese Einstellung eignet sich für Außenaufnahmen bei
Bewölkung oder in schattiger Umgebung.
Diese Einstellung eignet sich für Aufnahmen in Räumen,
die mit Leuchtstoffröhren ausgeleuchtet sind, oder in
Umgebungen mit hoher Farbtemperatur.
Diese Einstellung eignet sich für Aufnahmen in Räumen, die
mit Glühlampen ausgeleuchtet sind, oder in Umgebungen mit
geringer Farbtemperatur.
Page 36

Menüpunkte im Kameramodus (Fortsetzung)
Menüpunkt Optionen Beschreibung
Flashlight (Blitz)
Video light
(Videoleuchte)
Effect (Effekt)
Exposure
(Belichtung)
Selftimer
(Selbstauslöser)
Histogram
(Histogramm)
Icon (Symbol)
On (Ein) Der Blitz wird bei jeder Aufnahme ausgelöst.
Auto
Off (Aus) Der Blitz ist deaktiviert.
On/Auto/Off
(Ein/Auto/Aus)
Normal Für Aufnahmen mit natürlichen Farben.
B&W (SW) Für Aufnahmen in Schwarzweiß.
Classic (Klassisch) Für Aufnahmen in Brauntönen.
-2 bis +2
On/Off
(Ein/Aus)
On/Off
(Ein/Aus)
On/Off
(Ein/Aus)
Der Blitz wird bei unzureichender Beleuchtung automatisch
ausgelöst.
Mit dieser Einstellung können Sie zusätzliches Licht
hinzuschalten, wenn die Beleuchtung während der Aufnahme
von Videoclips nicht ausreicht.
Sie können die Belichtung manuell einstellen, um eine
bessere Einstellung zu erzielen, wenn das Vorschaubild zu
hell oder zu dunkel wirkt. Ein positiver Wert bedeutet, dass
das Bild heller als gewöhnlich wird; ein negativer Wert lässt
das Bild dunkler erscheinen.
Aktiviert/deaktiviert den Selbstauslöser. Wenn der
Selbstauslöser aktiviert ist, wartet die Kamera nach dem
Drücken der Auslösertaste zehn Sekunden, bis die Aufnahme
erfolgt.
Aktiviert/deaktiviert die Bildhistogrammanzeige auf dem
Bildschirm.
Aktiviert/deaktiviert die Anzeige der Bildschirmsymbole (OSD).
Menüpunkte im Wiedergabemodus
Einschalten → MODE (Modus)taste drücken → Mit Joystick zu My Works (Meine
Aufnahmen) umschalten → Video- oder Picture (Foto-Ordner) auswählen→ OK-Taste
drücken → Menu (Menü)taste drücken.
Menüpunkt Optionen Beschreibung
Yes/No
Delete One
(Eins löschen)
Delete All
(Alles löschen)
Slide Show
(Diaschau)
Lock (Schützen)
(Ja/Nein)
* Falls sich keine Dateien in der Kamera benden, werden keine Menüpunkte angezeigt.
Löscht die aktuelle Datei.
Yes/No
Löscht alle Fotos und Video-/Audiodateien, die sich im Speicher
(Ja/Nein)
benden.
Die Kamera zeigt Fotos nacheinander an. Nur JPEG-Bilder und
-
das jeweils erste Bild von MPEG-Dateien werden angezeigt. Sie
können die Menütaste drücken, um die Diavorführung zu beenden.
Sie können einzelne, mehrere oder alle Dateien vor dem Löschen
Yes/No
schützen. Eine geschützte Datei kann nicht über die Löschen-
(Ja/Nein)
Funktion entfernt werden. Beim Formatieren jedoch werden
sämtliche Dateien entfernt; auch geschützte Dateien.
13
Page 37

14
Menüpunkte im Einstellungsmodus
Einschalten →MODE (Modus)taste drücken → Setting (Einstellungsmodus)
( ) aufrufen → Menu (Menü)taste drücken
Menüpunkt Optionen Beschreibung
Date & Time
(Datum/Zeit)
Beep
(Signalton)
Flicker
(Frequenz)
TV-out
(TV-Ausgang)
Icon (Symbole)
LCD Bright
(LCD-Helligkeit)
Format
(Formatieren)
Auto Off
(Auto-Aus)
Language
(Sprache)
Default
(Standard)
- Stellt das Datum und die Uhrzeit ein.
On/Off
(Ein/Aus)
50Hz Stellt die Frequenz auf 50 Hz ein*.
60Hz Stellt die Frequenz auf 60 Hz ein*.
HDTV
NTSC
On/Off
(Ein/Aus)
-2 bis +2
Yes (Ja)
No (Nein) Bricht den Vorgang ab.
Off (Aus) Deaktiviert die automatische Abschaltfunktion.
1 min (1 Min.)
3 min (3 Min.)
5 min (5 Min.)
Yes (Ja)
No (Nein) Bricht den Vorgang ab.
Aktiviert/deaktiviert die Ausgabe von Signaltönen.
Stellt die TV-Systemkompatibilität auf HDTV ein. Diese
Option ist ausschließlich für HDTV vorgesehen.
Stellt die TV-Systemkompatibilität auf NTSC ein. Diese
Option eignet sich für Taiwan, Japan, Korea und Amerika.
Stellt die TV-Systemkompatibilität auf PAL ein. Diese Option
PAL
eignet sich für Deutschland, Italien, die Niederlande, China,
Japan, Hongkong und Großbritannien.
Aktiviert/deaktiviert die Anzeige der OSD-Symbole auf dem
Bildschirm.
Stellt die LCD-Helligkeit ein. Durch einen positiven Wert
wird der LCD-Bildschirm heller; durch einen negativen Wert
wird der LCD-Bildschirm dunkler.
Formatiert das Speichermedium. Bitte beachten Sie,
dass sämtliche auf dem Medium gespeicherten Dateien
unwiederbringlich gelöscht werden.
Die Kamera schaltet sich automatisch aus, wenn sie länger
als 1 Minute inaktiv ist.
Die Kamera schaltet sich automatisch aus, wenn sie länger
als 3 Minuten inaktiv ist.
Die Kamera schaltet sich automatisch aus, wenn sie länger
als 5 Minuten inaktiv ist.
- Ermöglicht Ihnen die Auswahl der Menüsprache.
Stellt die werkseitigen Standardeinstellungen wieder
her. Bitte beachten Sie, dass dadurch alle von Ihnen
vorgenommenen Einstellungen zurückgesetzt werden.
Page 38

Menüpunkte im Einstellungsmodus (Fortsetzung)
* Tabelle mit Frequenzeinstellungen:
Region Großbritannien Deutschland Frankreich Italien Spanien Niederlande Russland
Einstellung
Region Portugal Amerika Taiwan China Japan Korea Thailand
Einstellung
50Hz 50Hz 50Hz 50Hz 50Hz 50Hz 50Hz
50Hz 60Hz 60Hz 50Hz 50/60Hz 60Hz 50Hz
Akkuladestandanzeige
Symbol Beschreibung
Akku voll geladen
Akku halbvoll
Akku fast leer
* Blitz und LED-Beleuchtung werden deaktiviert.
Akku ist leer
Hinweis: Um einen plötzlichen Ausfall der Stromversorgung zu vermeiden, wird empfohlen,
den Akku zu wechseln, sobald ein geringer Akkuladestand angezeigt wird.
15
Page 39

16
Akkuladestand
Foto Video
Anzahl der Aufnahmen Aufnahmezeit (Minuten)
110 30
* Aufnahme alle 30 Sekunden
** Blitz ist ausgeschaltet
*** Auösung ist auf 5 M (2560 x 1920)
eingestellt
Hinweis: Diese Tabelle dient lediglich als Übersicht. Die tatsächliche Akkubetriebsdauer
hängt vom jeweiligen Akkutyp und vom Ladestand ab.
* Auösung ist auf HD (1280 x 720 Pixel)
eingestellt.
Speicherkapazität
Speicher
SD-Karte (256MB) 7 18 40 230 145
SD-Karte (512MB) 15 36 80 460 290
SD-Karte (1GB) 30 72 160 920 580
SD-Karte (2GB) 60 144 320 1840 1160
SD-Karte (4GB)
Hinweis: Die tatsächliche Kapazität kann je nach Farbsättigung und Komplexität Ihres
Aufnahmeobjekts und der Umgebung variieren (bis zu ± 30 %).
Video (Min.) Foto
HD D1 CIF 3M 5M
120 288 640 3680 2320
Page 40

Technische Daten
Element Beschreibung
Modell 5 Megapixel-Kamera
Bildsensor 5 Megapixel (2592 x 1944 Pixel)
Foto: 3M/5M
Auösung
Objektiv 3-facher optischer Zoom
Dateiformate MOV, JPEG
Videobildrate
Externer Speicher SD (256 MB bis 4 GB), Geschwindigkeit 12 x oder mehr
LCD-Anzeige LCD-Bildschirm, 6 cm
TV-Ausgang Componenent-Ausgang, PAL/NTSC unterstützt
Schnittstelle USB 2.0
Mikrofon Ja
Lautsprecher Ja
Nachtaufnahmen Ja (sowohl Foto als auch Video)
Akku NP60-kompatibler Lithium-Ionen-Akku
Hinweis: Änderungen der technischen Daten sind vorbehalten.
1280 x 720 (HD)
720 x 480 (D1)
352 x 288 (CIF)
1280 x 720, bis zu 30 BpS
720 x 480, bis zu 30 Bp
352 x 288, bis zu 30 BpS
17
Page 41

Systemvoraussetzungen
Die Systemvoraussetzungen sind bei verschiedenen
Videoauösungen unterschiedlich:
Videoauösung PC-Systemvoraussetzungen
Betriebssystem: Windows XP SP2 oder aktueller (QuickTime
HD (1280 x 720) @30fps
D1 (720x480) @30fps Betriebssystem: Windows 2000/XP oder aktueller
CIF (352 x 288) @30fps
CPU: Pentium 4 / 3,0 GHz oder besser
System-RAM: 512 MB (1 GB empfohlen)
Grakkarte: Nvidia Geforce 7600 oder ATI X1600 oder
CPU: Pentium 4 / 1,5 GHz oder besser
System-RAM: 256 MB (256 MB oder mehr empfohlen)
Grakkarte: 64 MB (128 MB oder mehr empfohlen)
7.0 oder aktueller)
besser, mit 256 MB RAM
(QuickTime 7.0 oder aktueller)
18
Page 42

Table des matières
Démarrage ....................................................................... 1
Connaître les parties de votre caméscope ........................................... 1
Installer la batterie ................................................................................2
Charger la batterie ................................................................................ 2
Insérer une carte mémoire (facultatif) ................................................... 3
Allumer/éteindre le caméscope ............................................................3
Régler la langue.................................................................................... 4
Réglage de l'heure ................................................................................4
Lire les indicateurs LCD........................................................................ 5
Utilisation de base .......................................................... 6
Enregistrer un clip vidéo ....................................................................... 6
Prendre une pthoto ............................................................................... 7
Lire vos enregistrements ......................................................................8
Lire vos enregistrements sur PC ..........................................................9
Relier le caméscope à un téléviseur ..................................................... 10
Utilisation avancée ......................................................... 12
Utilisation du menu ............................................................................... 12
Les éléments de menu du mode caméra .............................................12
Les éléments de menu du mode Lecture .............................................13
Les éléments de menu du mode réglage .............................................14
Indicateur d’autonomie batterie ............................................................15
Autonomie de la batterie ....................................................................... 16
Capacité de stockage ........................................................................... 16
Spécications........................................................................................ 17
Conguration système requise ............................................................. 18
Page 43

Démarrage
Connaître les parties de votre caméscope
Haut-parleur
Couvercle de la pile
Bouton avance
rapide/retour rapide
Bouton Lecture/Pause
Bouton suivant/
avance rapide
électeur de
mode macro
Sélecteur de ash
Touche OK /
Joystick 5 directions
Moniteur LCD
Bouton MODE
Bouton de balance
des blancs
Bouton d’éclairage à LED
Flash
Crochet pour
dragonne
Embase pour trépied
Bouton d’alimentation
Microphone
Objectif
Témoins LED
Vue de dessous
Slot carte SD
ca pot le (sous batterie)
LED d’état (gauche) /
LED de charge (droite)
Bouton MENU
Déclencheur
Bouton Zoom (+/-)
Bouton d’enregistrement
Connecteur sortie AV OUT
Connecteur USB *
SORTIE HD*
* sous le capot
1
Page 44

2
Installer la batterie
1. Faites coulisser le capot batterie pour l’ouvrir comme
indiqué.
2. Placez la batterie accessoire Li-Ion dans le logement.
Notez que les contacts métalliques doivent être alignés
avec ceux du logement.
3. Une fois la batterie correctement installée, remettez en
place le capot batterie.
Charger la batterie
Veuillez charger la batterie pendant au moins 8 heures avant
la première utilisation.
1. Branchez le câble.
Branchez une extrémité de l’adaptateur AC fourni sur le port
USB du caméscope et l’autre extrémité sur la prise secteur.
OU
Branchez une extrémité du câble USB fourni sur le port USB
du caméscope et l’autre extrémité sur un PC sous tension.
Assurez vous que le caméscope est éteint.
2. La LED de charge devient rouge et la charge démarre.
3. Lorsque le charge est interrompue ou que le pack batterie est
complètement chargé, la LED de charge devient verte.
OU
Lorsque vous utilisez un PC pour charger la batterie, n’alimentez
pas le caméscope, sinon la charge s’arrête.
Page 45

Insérer une carte mémoire (facultatif)
Pour insérer une carte mémoire, procédez comme suit:
(1) Ouvrez le capot batterie.
(2) Poussez doucement la carte comme indiqué jusqu’à
atteigne le fond de la fente.
Pour enlever la carte mémoire, enfoncez doucement la
carte jusqu’à ce qu’elle sorte. Retirez ensuite la carte de
la fente.
Allumer/éteindre le caméscope
Ouvrez le moniteur LCD et maintenez enfoncé le bouton
d’Alimentation pendant 1 seconde pour allumer le
caméscope.
Pour éteindre le caméscope, maintenez enfoncé le bouton
d’Alimentation pendant 1~3 secondes ou fermez le moniteur
LCD.
Si le caméscope ne s’allume pas avoir avoir appuyé sur le bouton
d’alimentation, veuillez vérier:
1. Le pack batterie est bien installé dans le caméscope.
2. Le pack batterie est toujours sufsamment chargé.
Si le caméscope reste inactif pendant une période prolongée, il
peut s'éteindre automatiquement en raison du réglage d'arrêt auto.
3
Page 46

4
Régler la langue
1. Allumez le caméscope.
2. Appuyez sur la touche MODE pour entrer dans le
menu de MODE.
3. Utilisez le Joystick pour sélectionner le mode
Setting (Réglages) et appuyez sur OK pour
entrer dans l’écran de menu.
4. Utilisez le pour choisir l’élément Language
(langue),et appuyez sur le bouton OK pour
conrmer.
5. Déplacez le Joystick vers le haut/bas pour choisir
une langue.
6. Lorsque vous avez terminé, appuyez sur le bouton
OK pour conrmer le réglage.
Réglage de l'heure
1. Allumez le caméscope.
2. Appuyez sur la touche MODE pour entrer dans le menu
de MODE.
3. Utilisez le Joystick pour sélectionner le mode Setting
(Réglages) et appuyez sur OK pour entrer dans l’écran
de menu.
4. Utilisez le Joystick pour choisir l’élément Date & Time
(Date & Heure), et appuyez sur le bouton OK pour
conrmer.
5. Déplacez le Joystick vers le haut/bas pour ajuster la
valeur. Déplacez le Joystick vers la droite/gauche pour
passer d’un champ à l’autre.
6. Lorsque vous avez terminé, appuyez sur le bouton OK
pour conrmer le réglage.
Page 47

Lire les indicateurs LCD
1
00:06:40
00:00:05
Icône de mode Durée d'enregistrement restante
Résolution vidéo Mode balance des blancs
Résolution image Mode d’exposition
Mode d'éclairage à LED Mode de ash
Mode macro Mode histogramme
Autonomie batterie Mode retardateur
Indicateur de taux de zoom Mode photos de nuit
Carte SD insérée Durée d’enregistrement
Le LCD afche le ratio 16:9 quand il est réglé sur une résolution
vidéo HD (720P).
Le LCD afche le ratio 4:3 quand il est réglé sur une résolution
vidéo D1 (480P) ou CIF. (Veuillez vous référer à la page 7 pour des
instructions plus détaillées.)
5
Page 48

6
Utilisation de base
Enregistrer un clip vidéo
1. Réglez la mise au point:
Le caméscope peut normalement faire la mise au point
automatiquement sans réglage. Si vous voulez faire des gros
plans, vous pouvez appuyez sur le bouton haut pour basculer
en mode macro ( ).
Remarque: Veuillez vous assurer que votre mémoire est
insérée avant enregistrement.
-
30cm ~ (12” ~ )
5cm ~ 30cm (2” ~ 12”)
* A zoom xe 1.5X
2. Zoomer:
Utilisez les boutons de Zoom vers le haut ou vers le bas pour
zoomer ou dézoomer l’écran. Le grossissement optique est
de 3X.
3. Appuyez sur le bouton Record (Enregistrement) pour
commencer à enregistrer.
4. Appuyez à nouveau sur le bouton Record (Enregistrement)
pour arrêter d’enregistrer.
La fonction de zoom est également disponible pendant
l’enregistrement (sauf en mode macro).
Si l’environnement est sombre, vous pouvez allumer la lumière à
LED en la passant sur Marche ou Auto et aider ainsi l’éclairage et
la mise au point.
Il est normal que le caméscope soit légèrement chaud en
utilisation / enregistrement continu en raison de ses performances
élevées.
Zoomer
Dézoomer
Page 49

Prendre une pthoto
1. Réglez la mise au point:
Le caméscope peut normalement faire la mise au point
automatiquement sans réglage. Si vous voulez faire des
gros plans, vous pouvez appuyez sur le bouton haut pour
basculer en mode macro ( ).
Remarque: Veuillez vous assurer que votre mémoire est
insérée avant enregistrement.
-
30cm ~ (12” ~ )
5cm ~ 30cm (2” ~ 12”)
* A zoom xe 1.5X
2. Zoomer:
3.
Utilisez les boutons de Zoom vers le haut ou vers le bas pour
zoomer ou dézoomer l’écran. Le grossissement optique est
de 3X.
Ajustez les autres réglages avancés si nécessaire.
Si l’environnement est sombre, vous pouvez allumer
la lumière à LED en la passant sur Marche ou Auto et
aider ainsi l’éclairage et la mise au point.
Appuyez sur le Shutter (déclencheur) à
mi-course et maintenez le bouton pour que le
caméscope fasse la mise au point. Lorsque le
cadre de mise au point devient vert, enfoncez
complètement le bouton pour prendre une photo.
En raison de la fonction de capture du capteur, la prévisualisation LCD et le
ratio de la capture d’image varient selon les différents réglages de résolution
vidéo.
La capture d’image de la caméra est xe alors que les résolutions vidéo sont
différentes.
Résolution vidéo Aperçu
HD(1280x720)
ratio 16:9 ratio 4:3
Zoomer
Dézoomer
Cadre de mise au point
Prise vue et mise
au point
D1(720x480)
CIF(352x288)
ratio 4:3 ratio 4:3
7
Page 50

8
Lire vos enregistrements
1. Appuyez sur le bouton MODE et utilisez le Joystick pour
basculer vers le mode pour sélectionner le mode “My Works
(Mes travaux)”.
Ou appuyez sur le bouton Play/Pause (Lecture/Pause) ( )
sur le côté gauche du moniteur LCD.
2.
Il y a deux dossiers sous My works (Mes travaux): Video
(Vidéo) et Picture (Image). Sélectionnez Vidéo ou Image, puis
appuyez sur la touche OK pour entrer dans le mode index.
3. Utilisation du mode Lecture:
Type de chier Comment... Action
Index mode
(Mode index)
Full-screen mode
(Mode plein écran)
Basculer entre le
mode index et le
mode plein écran
Basculer entre les
chiers
En mode index, appuyez sur la touche OK pour
basculer en mode plein écran. En mode plein écran,
appuyez sur le bouton de MENU pour basculer en
mode index.
1. En mode index: Utilisez le Joystick pour déplacer
la boîte de sélection.
2. En mode plein écran: Utilisez le Joystick pour
vous déplacer de droite à gauche.
Démarrer la lecture
Pause/Reprendre la
lecture
Règle le niveau du
volume
Arrêter la lecture Pendant la lecture, appuyez touche sur la MENU.
Video
(Vidéo)
Picture (Image)
Revenir à l’écran
précédent
Avance rapide
Retour rapide
Sélectionner le chier
suivant
Sélectionner le chier
précédent
Zoomer/dézoomer
Verrouiller/libérer le
taux de zoom
Naviguer dans l’image
agrandie
Une fois sélectionné (en mode plein écran), la lecture
du chier démarre automatiquement.
Pendant la lecture/en pause, appuyez sur la touche
OK.
Pendant la lecture, utilisez le Joystick pour vous
déplacer de haut en bas.
Appuyez sur le Shutter (déclencheur).
Pendant la lecture, appuyez sur le bouton Next
(Suivant) ( )
Play/Pause (Lecture/pause) ( ) .
Pendant la lecture, appuyez sur le bouton Previous
(Précédent) ( ) Pour arrêter, appuyez sur le bouton
Play/Pause (Lecture/pause) ( ) .
Pendant la lecture/pause, appuyez sur le bouton
Next (Suivant)
Pendant la lecture/pause, appuyez sur le bouton
Previous (Précédent) ( ) .
Utilisez le Joystick pour vous déplacer vers le haut
ou le vers bas.
Lorsque le taux de zoom est supérieur à 1.0x,
appuyez sur la touche OK.
Lorsque le taux de parcourir est verrouillé, utilisez
zoom le pour Joystick l'image.
Pour arrêter, appuyez sur le bouton
( ).
Page 51

Lire vos enregistrements sur PC
Installation du logiciel
Veuillez noter que les vidéos sont enregistrées au format .mov. Il vous faut donc
un programme spécique pour lire les enregistrements sur PC. Pour la première
utilisation, veuillez vous assurer que vous avez le player QuickTime 7.0 sur votre PC.
Sinon, veuillez suivre les instructions ci-dessous pour installer d’abord le logiciel.
Veuillez télécharger le player QuickTime 7.0 depuis le site Web suivant:
http://www.apple.com/quicktime/download/win.html
OU
Veuillez installer le programme HD-DV DECODER sur CD fourni.
(* HD-DV DECODER est conçu pour la lecture avec Windows Media Player 10
& 11 de chiers .mov enregistrés par votre caméscope.)
Connecter au PC et enregistrer des
chiers
Une fois le logiciel correctement installé sur votre PC, veuillez suivre les
procédures suivantes.
1. Allumez le caméscope.
2. Connectez le caméscope (avec la carte SD insérée) à votre ordinateur avec le
câble USB.
3. Une fenêtre de dialogue apparaît automatiquement. Veuillez sélectionner
l’élément “Open folder to view les (Ouvrir le dossier pour visualiser les
chiers)” et cliquez sur “OK”.
4. Si la fenêtre de dialogue n’apparaît pas automatiquement, vous pouvez double
cliquer sur “Poste de travail” et ouvrir le “Disque amovible”.
5. Double cliquez sur le dossier de chiers DCIM.
6. Double cliquez sur le dossier de chiers 100MEDIA.
7. Copiez les chiers que vous voulez conserver et enregistrez les sur
l’emplacement souhaité de votre ordinateur.
9
Page 52

10
Relier le caméscope à un téléviseur
Sortie AV OUT
Sortie HD OUT
HD TV
Entrée audio
composante
Entrée vidéo composante
<Câble vidéo composante>
<Câble AV>
(Rouge)
(Jaune)
(blanche)
(Verte)
(Rouge)
(Bleue)
(Ne branchez pas le câble Jaune)
Veuillez suivre les instructions ci-dessous pour relier votre caméscope à
votre téléviseur via le câble AV accessoire pour un afchage en temps réel.
Vous pouvez lire vos clips vidéo et vos photos sur votre téléviseur pour les
partager en famille et avec vos amis.
Relier le caméscope à un téléviseur HDTV
HD TV fait ici référence aux ports d’entrée du composant HDTV intégré, et peut
donc obtenir une qualité haute résolution HD (720P) une fois connecté.
1. Allumez votre HD TV.
2. Allumez le caméscope.
3. Branchez une extrémité du câble vidéo composante sur le port
(Entrée vidéo composante) sur le HDTV et l’autre extrémité sur le port
(sortie Sortie HD OUT) du caméscope.
4. Branchez une extrémité ou l’autre du câble AV sur le port (Entrée
audio composante) sur le HDTV et l’autre extrémité sur le port (sortie
AV OUT) du caméscope. (Veuillez ne pas branchez le connecteur
jaune sur l’entrée AV-IN du HDTV.)
5. Appuyez sur le commutateur de mode d’entrée de la HD TV et
sélectionnez “Component Input” (Entrée composante).
Si vous enregistrez un clip en résolution HD tout en étant connecté à la HD
TV, la résolution d’afchage vidéo du téléviseur est réduite à la résolution
D1 (480P) en raison de débit de données, mais le chier d’enregistrement
sauvegardé reste en HD (720P) sans modication.
Page 53

Relier le caméscope à un téléviseur standard
TV = Téléviseur cathodique (CRT) traditionnel
Mode AV
Vidéo
Entrée
AV-IN
Audio
Câble AV
Sortie AV OUT
1. Allumez le caméscope.
2. Appuyez sur la touche MODE pour entrer dans le menu de MODE.
3. Utilisez le Joystick pour sélectionner le mode Setting (Réglages) et
appuyez sur OK pour entrer dans l’écran de menu.
4. Utilisez le Joystick pour choisir l’élément sortie TV-out, et appuyez
sur le bouton OK pour conrmer.
5. Déplacez le Joystick vers le haut/bas pour choisir NTSC ou PAL.
Le standard NTSC ou PAL varie d’un pays à l’autre, veuillez vous
référer à la page 14 pour le tableau de réglage des fréquences.
6. Lorsque vous avez terminé, appuyez sur le bouton OK pour conrmer
le réglage.
7. Appuyez sur le Shutter (déclencheur) pour revenir à l’écran de
prévisualisation.
8. Connectez les extrémités audio et vidéo du câble AV (couleurs jaune/
blanche/rouge) aux prises d’entrée “AV-IN” du téléviseur.
9. Branchez l’autre extrémité du câble AV sur le port de sortie “AV out”
de votre caméscope.
11
Page 54

12
Utilisation avancée
Utilisation du menu
Les éléments de menu offrent plusieurs options pour afner les fonctions de votre caméra.
Le tableau suivant donne les détails de l’utilisation des menus.
Comment... Action
Afcher le menu Appuyez sur le bouton de Menu.
Déplacer la barre de sélection
Entrer dans le sous-menu ou la
conrmation d’un élément
Quitter le menu/ Revenir au menu
supérieur
Les éléments de menu du mode caméra
Mettez en marche → Appuyez sur le bouton de Menu.
Utilisez le Joystick pour vous déplacer vers le haut ou
le vers bas.
Appuyez sur le bouton OK.
Appuyez sur le bouton de MENU (quand vous êtes dans
un sous menu).
Élément Option Description
Video resolution
(Résolution vidéo)
Picture Resolution
(Résolution image)
Night Shot
(Photos nuit)
WB
(BAL. BLANCS)
HD Règle la résolution vidéo sur HD (1280x720 pixels).
D1 Règle la résolution vidéo sur D1 (720x480 pixels).
CIF Règle la résolution vidéo sur CIF (352x288 pixels).
3M Règle la résolution sur 3 méga pixels.
5M Règle la résolution sur 5 méga pixels.
Activer ce réglage vous permet de prendre une photo sur
un fond sombre. Etant donné que la vitesse d'obturation
On/Off
(Marche/Arrêt)
Sunny
(Ensoleillé)
Cloudy
(Nuageux)
Fluorescent
Tungsten
(Tungstène)
diminue lors de la prise de vue dans un lieu sombre, nous
recommandons l'utilisation d'un trépied pour éviter les ous
de bougé.
Avertissement: Le bruit augmente lorsque Photos nuit
est activé.
Auto Le caméscope règle automatiquement la balance des blancs.
Ce réglage convient pour les enregistrements en extérieur par
temps ensoleillé.
Ce réglage convient pour les enregistrements en extérieur par
temps nuageux ou dans des environnement ombragés.
Ce réglage convient pour les enregistrements en intérieur
sous éclairage uorescent, ou dans des environnements à
température de couleurs élevée.
Ce réglage convient pour les enregistrements en intérieur
sous éclairage incandescent, ou dans des environnements à
température de couleurs faible.
Page 55
Les éléments de menu du mode caméra (suite)
Élément Option Description
Flashlight
(Flash)
Video light
(Lumière vidéo)
Effect
(Effets)
Exposure
(Exposition)
Selftimer
(Retardateur)
Histogram
(Histogramme)
Icon
(Icône)
On (Allumé) Le ash est forcé à se déclencher à chaque prise de vue.
Off (Arrêt) Le ash est désactivé.
On/Auto/Off
(Marche/Auto/
Normal Effectue les enregistrements en couleurs naturelles.
B&W (N&B) Effectue les enregistrements en noir et blanc.
Classic
(Classique)
On/Off
(Marche/Arrêt)
On/Off
(Marche/Arrêt)
On/Off
(Marche/Arrêt)
Le ash se déclenche automatiquement lorsque l’éclairage
Auto
est insufsant.
Ce réglage vous permet d’ajouter une lumière supplémentaire
lorsque l’éclairage est insufsant pendant l’enregistrement
Arrêt)
de clips vidéo.
Effectue les enregistrements en couleurs de tonalité sépia.
Règle manuellement l’exposition pour obtenir un meilleur effet
lorsque l’image prévisualisée apparaît trop sombre ou trop
-2~+2
claire. Une valeur positive indique que l'image sera plus claire
que de normale tandis qu'une valeur négative rendra l'image
plus sombre.
Active/désactive le retardateur. Une fois le retardateur activé,
la caméra attend dix secondes avant d'enregistrer lorsque le
déclencheur est enfoncé.
Active/désactive l’afchage de l’histogramme image à l’écran.
Active/désactive l’afchage à l’écran des icônes de l’OSD (on
screen display).
Les éléments de menu du mode Lecture
Mettez en marche → Appuyez sur le bouton de MODE → Utilisez le Joystick pour
basculer vers le mode My Works (Mes travaux) → Sélectionnez le dossier Video
(Vidéo) ou Picture (Image) → Appuyez sur le bouton OK → Appuyez sur le bouton
MENU.
Élément Option Description
Yes/No
Supprime le chier en cours.
Yes/No
Supprime toutes les images et chiers vidéo/audio stockés dans
la mémoire.
Le caméscope afche les images dans l’ordre. Seules les images
-
JPEG et les premières vues des chiers MPEG s'afchent. Vous
pouvez appuyer sur le bouton de menu pour arrêter le diaporama.
Un chier, plusieurs ou tous les chiers peuvent être verrouillés.
Yes/No
Un chier verrouillé ne peut pas être effacé par la fonction de
suppression. Cependant la fonction de formatage efface tous les
chiers verrouillé/déverrouillés.
13
Lock
(Oui/Non)
(Oui/Non)
(Oui/Non)
Delete One
(Supprimer)
Delete All
(Suppr. tous)
Slide Show
(Diaporama)
(Verrouillé)
* S’il n’y a aucun chier dans la caméra, aucun élément ne s’afche.
Page 56

14
Les éléments de menu du mode réglage
Mettez en marche → Appuyez sur le bouton de MODE → Entrez dans le mode
Setting (Réglages) ( ) → Appuyez sur le bouton MENU .
Élément Option Description
Date & Time
(Date & Heure)
Beep (Bip)
Flicker
(Fréquence)
TV-out
(SORTIE TV)
Icon
(Icône)
LCD Bright
(Luminosité)
Format
(Formater)
Auto Off
(Arrêt auto)
Language
(Langue)
Default
(Défaut)
-
On/Off
(Marche/Arrêt)
50Hz
60Hz
HDTV
NTSC
PAL
On/Off
(Marche/Arrêt)
-2~+2
Yes (Oui)
No (Non)
Off (Arrêt)
1 min
3 min
5 min
-
Yes (Oui)
No (Non)
Règle la date et l’heure.
Active/désactive le bip sonore.
Règle la fréquence de scintillement sur 50Hz*.
Règle la fréquence de scintillement sur 60Hz*.
Règle la compatibilité avec le standard HDTV. L'option
convient pour HDTV.
Règle la compatibilité avec le standard TV NTSC. Cette option
convient pour les zones États-Unis, Taiwan, Japon, et Corée.
Règle la compatibilité avec le standard TV PAL. Cette option
convient pour l'Allemagne, l'Angleterre, l'Italie, les Pays Bas,
la Chine, le Japon et Hongkong.
Active/désactive l’afchage des icônes OSD à l’écran.
Règle la luminosité du LCD. Une valeur positive rend le LCD
plus brillant, alors qu'une valeur négative le rend plus sombre.
Formate le support de stockage. Notez que les chiers
stockés sur le support disparaissent.
Annule l’action.
Désactive la fonction Arrêt auto.
La caméra s’arrête automatiquement au bout d’1 minute
d’inactivité.
La caméra s’arrête automatiquement au bout de 3 minutes
d’inactivité.
La caméra s’arrête automatiquement au bout de 5 minutes
d’inactivité.
Vous laisse choisir la langue utilisée par l’OSD.
Restaure les réglages d’usine par défaut. Notez que vos
réglages en cours sont écrasés.
Annule l’action.
Page 57

Les éléments de menu du mode réglage (suite)
* Tableau des réglages de fréquence:
Zone
Angleterre
Allemagne
Réglage 50Hz 50Hz 50Hz 50Hz 50Hz 50Hz 50Hz
Zone Portugal
Réglage 50Hz 60Hz 60Hz 50Hz 50/60Hz 60Hz 50Hz
États-Unis
France Italie Espagne
Taiwan Chine Japon Corée
Hollande
Russie
Thaïlande
Indicateur d’autonomie batterie
Icône Description
Batterie à pleine charge
Batterie à charge moyenne
Batterie faible
* L'éclair du ash et les témoins à LED sont désactivés.
Batterie vide
Pour éviter une panne subite d’alimentation, il vous est recommandé de
Remarque:
remplacer la batterie lorsque l’icône indique une batterie faible.
15
Page 58
16
Autonomie de la batterie
Photo Clip vidéo
Nombre de prises de vues Durée d’enregistrement (minutes)
110 30
* cliché toutes les 30 secondes
** ash éteint
*** résolution réglée sur 5M (2560x1920)
Ce tableau n’est donné qu’à titre indicatif. La véritable autonomie de la batterie
Remarque:
dépend du type de votre batterie et de son niveau de charge.
* résolution réglée sur HD (1280x720
pixels)
Capacité de stockage
Mémoire
Carte SD (256MB) 7 18 40 230 145
Carte SD (512MB) 15 36 80 460 290
Carte SD (1GB) 30 72 160 920 580
Carte SD (2GB) 60 144 320 1840 1160
Carte SD (4 GB)
La valeur réelle de capacité peut varier (jusqu’à ± 30%) selon la saturation des
Remarque:
couleurs et la complexité de votre sujet et de son environnement.
Vidéo (min.) Photo
HD D1 CIF 3M 5M
120 288 640 3680 2320
Page 59
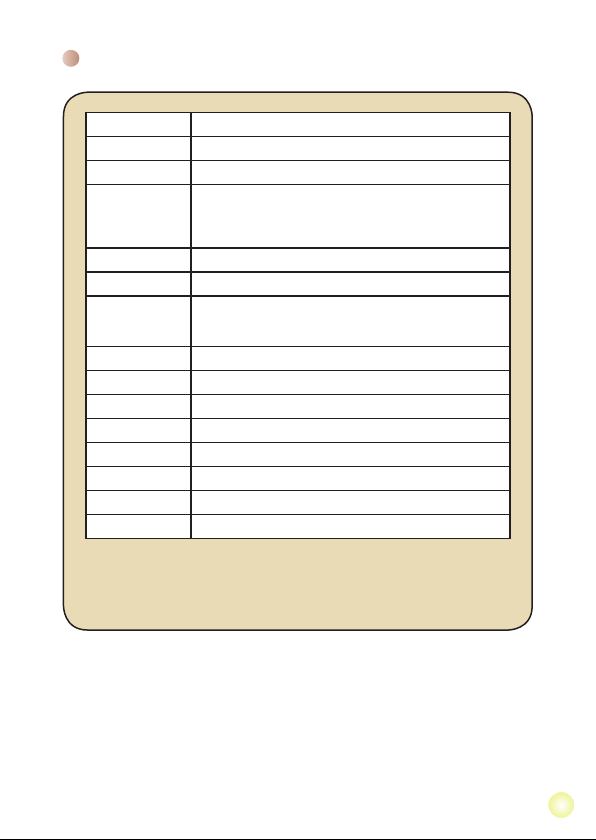
Spécications
Élément Description
Modèle Caméra 5 Méga pixels
Capteur d’image 5 Méga (2592x1944 pixels)
Photos: 3M/5M
Résolution
Objectif Objectif à zoom optique 3X
Format chier MOV, JPEG
Débit d’images
vidéo
Mémoire externe SD (256MB ~ 4GB), niveau de vitesse 12X et supérieur
Afchage LCD LCD 2.4”
SORTIE TV Sortie composante, prise en charge des standards NTSC/PAL
Interface USB 2.0
Microphone Oui
Haut-parleur Oui
Photos nuit Oui (à la fois en mode photo et en mode vidéo)
Batterie Batterie rechargeable Li-ion compatible NP60
Remarque: Les spécications sont sujettes à modications sans préavis.
1280x720 (HD)
720x480 (D1)
352x288 (CIF)
1280x720, jusqu’à 30 im/s
720x480, jusqu'à 30 im/s
352x288, jusqu'à 30 im/s
17
Page 60

Conguration système requise
Les congurations systèmes requises varient selon les réglages de
résolution vidéo:
Résolution vidéo Conguration système PC requise
OS = Windows XP SP2 ou supérieur (QuickTime 7.0 ou
supérieur)
HD (1280x720) @30fps
D1 (720x480) @30fps OS = Windows 2000/XP ou supérieur (QuickTime 7.0 ou
CIF (352x288) @30fps
CPU = Pentium 4 3.0GHz ou supérieur
RAM système = 512MB (1GB recommandé)
Carte graphique = nvidia Geforece 7600 ou ATI X1600 ou
supérieur)
CPU = Pentium 4 1.5GHz ou supérieur
RAM système = 256MB (512MB ou supérieur recommandé)
Carte graphique = 64MB (128MB ou supérieur
supérieur avec 256MB de RAM
recommandé)
18
Page 61

Sommario
Preparazione ................................................................... 1
Conoscere la parti della videocamera ..................................................1
Inserimento della batteria .....................................................................2
Caricamento della batteria .................................................................... 2
Inserimento di una scheda memoria (optional) .................................... 3
Accendere e spegnere la videocamera ................................................ 3
Impostazione della lingua ..................................................................... 4
Impostazione dell’ora ............................................................................ 4
Lettura degli indicatori del display LCD ................................................5
Operazioni di base.......................................................... 6
Registrazione di una sequenza video ................................................... 6
Fotografare ........................................................................................... 7
Riproduzione delle registrazioni............................................................ 8
Riproduzione delle registrazioni sul PC ................................................ 9
Collegamento della videocamera al televisore ..................................... 10
Operazioni avanzate ....................................................... 12
Funzionamento dei menu ..................................................................... 12
Voci del menu in modalità Fotocamera.................................................12
Voci del menu in modalità Riproduzione ..............................................13
Voci del menu in modalità Impostazioni ...............................................14
Indicatore di carica della batteria .......................................................... 15
Durata della batteria .............................................................................16
Capacità d’archiviazione ....................................................................... 16
Speciche ............................................................................................. 17
Requisiti del sistema ............................................................................ 18
Page 62

Preparazione
Conoscere la parti della videocamera
Altoparlante
Coperchio scomparto battere
Display LCD
Tasto Precedente /
Indietro veloce
Tasto Esecuzione/
Tasto Successivo /
Avanti veloce
Interruttore modalità
Interruttore Flash
Pausa
Macro
Tasto OK /
Joystick 5 vie
Tasto MODE
(Modalità)
Interruttore
Bilanciamento del
bianco
Interruttore luci LED
Flash
Aggancio
cinturino
Aggancio treppiede
Tasto
alimentazione
Microfono
Obiettivo
Luci LED
Veduta inferiore
Alloggio scheda SD
(All’interno dello scomparto
batterie)
LED di Stato (sinistra) /
LED di carica (destra)
Tasto MENU
Tasto Otturatore
Tasto Zoom (ingrandimento/
riduzione)
Tasto Registrazione
Connettore AV OUT (Output AV)
Connettore USB *
HD OUT (Output HD) *
* Sotto il coperchio
1
Page 63

2
Inserimento della batteria
1. Far scorrere, come mostrato, il coperchio dello
scomparto batterie per aprirlo.
2. Inserire nello scomparto la batteria agli ioni di Litio
fornita. Notare che i contatti metallici devono essere
allineati con i contatti nello scomparto.
3. Dopo avere inserito la batteria in modo appropriato,
rimettere il coperchio dello scomparto batterie.
Caricamento della batteria
Caricare la batteria almeno 8 ore prima dell’uso iniziale.
1. Collegare il cavo.
Collegare una estremità dell’adattatore CA fornito in
dotazione alla porta USB della videocamera, e l’altra
estremità ad una presa a muro.
OPPURE
Collegare una estremità del cavo USB fornito in dotazione
alla porta USB della videocamera, e l’altra estremità ad un
PC acceso. Assicurarsi che la videocamera sia spenta.
2. Il LED di carica diventa di colore rosso e la ricarica si avvia.
3. Quando il caricamento è interrotto, oppure il pacco batteria
è completamente carico, il LED di carica diventa di colore
verde.
OPPURE
Non accendere la videocamera quando si usa il PC per caricare la
batteria, diversamente la procedura sarà arrestata.
Page 64

Inserimento di una scheda memoria (optional)
Fare come segue per inserire la scheda memoria:
(1) Aprire il coperchio dello scomparto batterie.
(2) Spingere con delicatezza la scheda, come mostrato,
nché raggiunge il fondo dell’alloggio.
Per rimuovere la scheda memoria, spingerla con
delicatezza ed uscirà. Quindi estrarre la scheda
dall’alloggio.
Accendere e spegnere la videocamera
Per accendere la videocamera aprire il display LCD, oppure
tenere premuto per 1 secondo il tasto Alimentazione.
Per spegnere la videocamera chiudere il display
LCD, oppure tenere premuto per 1-3 secondi il tasto
Alimentazione.
Se la videocamera non si accende dopo avere premuto il tasto
Alimentazione, controllare che:
1. Il pacco batteria sia inserito in modo appropriato nella
videocamera.
2. Il pacco batteria abbia carica sufciente.
Se la videocamera resta inattiva per un periodo prolungato,
potrebbe spegnersi automaticamente in seguito all’impostazione
della funzione di Spegnimento automatico.
3
Page 65

4
Impostazione della lingua
1. Accendere la videocamera.
2. Premere il tasto MODE (Modalità) per accedere
al menu MODE (Modalità).
3. Usare il Joystick per selezionare la modalità
Setting (Impostazioni) e premere OK per
accedere al menu.
4. Usare il Joystick per selezionare la voce
Language (Lingua) e poi premere OK per
confermare.
5. Spostare il Joystick verso l’alto/il basso per
selezionare una lingua.
6. Al termine, premere OK per confermare
l’impostazione.
Impostazione dell’ora
1. Accendere la videocamera.
2. Premere il tasto MODE per accedere al menu MODE
(Modalità).
3. Usare il Joystick per selezionare la modalità Setting
(Impostazioni) e premere OK per accedere al menu.
4. Usare il Joystick per selezionare la voce Date & Time
(Data e Ora) e poi premere OK per confermare.
5. Spostare il Joystick verso l’alto/il basso per regolare
il valore. Spostare il Joystick verso sinistra/destra per
passare tra i campi.
6. Al termine, premere OK per confermare l’impostazione.
Page 66

Lettura degli indicatori del display LCD
1
00:06:40
00:00:05
Icona della modalità Tempo di registrazione disponibile
Risoluzione video Modalità Bilanciamento del bianco
Risoluzione d’immagine Modalità d’esposizione
Modalità luce LED Modalità Flash
Modalità Macro Modalità Istogramma
Durata della batteria Modalità Autoscatto
Indicatore Zoom Modalità Scatto notturno
Scheda SD inserita Durata registrazione
Il display LCD visualizzerà il rapporto 16:9 quando la risoluzione
video è impostata su HD (720P).
Il display LCD visualizzerà il rapporto 4:3 quando la risoluzione
video è impostata su D1 (480P) o CIF. (Fare riferimento a pagina 7
per altre istruzioni dettagliate.)
5
Page 67

6
Operazioni di base
Registrazione di una sequenza video
1. Regolare il fuoco:
Di solito la videocamera regola automaticamente la messa a
fuoco, quindi la regolazione manuale non è necessaria. Per
acquisire primi piani, spingere il tasto Su per impostare la
modalità Macro ( ).
Nota: assicurarsi di avere inserito la memoria prima della
registrazione.
-
30cm ~ (12” ~ )
5cm ~ 30cm (2” ~ 12”)
* A zoom sso 1.5X
2. Zoomare:
Spostare il tasto Zoom verso l’alto o il basso per ingrandire o
ridurre lo schermo. L’ingrandimento ottico è 3X.
3. Premere il tasto Record (Registrazione) per avviare la
registrazione.
4. Premere di nuovo il tasto Record (Registrazione) per
terminare la registrazione.
La funzione zoom è disponibile anche durante la registrazione
(fatta eccezione per la modalità Macro).
Se le condizioni di luce sono mediocri, si può attivare o impostare
su automatica la modalità luci LED per supportare la messa a
fuoco e compensare l’illuminazione.
È normale che la videocamera diventi calda in seguito all’uso /
registrazione continuata a causa delle sue alte prestazioni.
Ingrandimento
Riduzione
Page 68

Fotografare
1. Regolare il fuoco:
Di solito la videocamera regola automaticamente la messa a
fuoco, quindi la regolazione manuale non è necessaria. Per
acquisire primi piani, spingere il tasto Su per impostare la
modalità Macro ( ).
Nota: assicurarsi di avere inserito la memoria prima della
registrazione.
-
30cm ~ (12” ~ )
5cm ~ 30cm (2” ~ 12”)
* A zoom sso 1.5X
2. Zoomare:
3. Eseguire una mezza pressione del tasto
Spostare il tasto Zoom verso l’alto o il basso per ingrandire o
ridurre lo schermo. L’ingrandimento ottico è 3X.
Regolare altre impostazioni avanzate, se necessario.
Se le condizioni di luce sono mediocri, si può attivare
o impostare su automatica la modalità luci LED
per supportare la messa a fuoco e compensare
l’illuminazione.
Sutter (Otturatore) e tenere la posizione per
permettere alla videocamera di mettere a fuoco
automaticamente. Quando la cornice di fuoco
diventa di colore verde, premere completamente
il tasto per acquisire la foto.
A causa della funzione d’acquisizione del sensore, l’anteprima del display
LCD e le proporzioni dell’immagine acquisita varieranno in base alle diverse
impostazioni della risoluzione video.
L’acquisizione dell’immagine della videocamera è impostata mentre le
risoluzioni sono diverse.
Risoluzione video Anteprima
HD(1280x720) Rapporto 16:9 Rapporto 4:3
Ingrandimento
Riduzione
Cornice di fuoco
Fotografare e
mettere a fuoco
D1(720x480) Rapporto 4:3 Rapporto 4:3
CIF(352x288)
7
Page 69

8
Riproduzione delle registrazioni
1. Premere il tasto MODE (Modalità) ed usare il Joystick per
passare alla modalità “My Works” (I miei lavori).
Oppure premere il tasto Play/Pause (Esecuzione/Pausa)
( ) sulla sinistra del display LCD.
2. Sotto My works (I miei lavori) ci sono due cartelle: Video e
Picture (Immagini). Selezionare Video o Picture (Immagini) e
poi premere il tasto OK per accedere alla modalità Indice.
3. Operazioni in modalità di riproduzione:
Tipo di le Come fare per... Azione
Index mode
(Modalità Indice)
Full-screen mode
(Modalità Schermo
intero)
Permette di passare
tra la modalità
Indice e la modalità
Schermo intero
Passare tra i vari le
In modalità Indice, premere il tasto OK per passare
alla modalità schermo intero. In modalità schermo
intero, premere il tasto MENU per passare alla
modalità Indice.
1. In modalità Indice: Usare il Joystick per spostare
la casella evidenziata.
2. In modalità Schermo intero: Usare il Joystick per
spostarsi verso sinistra o destra.
Avviare l’esecuzione
Mettere in pausa /
riprendere
l’esecuzione
Regolazione del
volume
Terminare
l’esecuzione
Video
Picture
(Immagine)
Tornare alla
schermata
d’anteprima
Avanti veloce
Indietro veloce
Selezionare il le
successivo
Selezionare il le
precedente
Ingrandimento/
Riduzione
Bloccare / sbloccare
il quoziente zoom
Navigare all’interno
di un’immagine
ingrandita
L’esecuzione è avviata automaticamente quando il
le è selezionato (in modalità schermo intero).
Premere il tasto OK durante l’esecuzione / durante
la pausa.
Durante l’esecuzione, usare il Joystick per spostarsi
verso l’alto o il basso.
Premere il tasto MENU durante l’esecuzione.
Premere il tasto Shutter (Otturatore) .
Durante l’esecuzione, premere il tasto Next
(Successivo) ( ) Per terminare, premere il tasto
Play/Pause (Esecuzione/Pausa) ( ).
Durante l’esecuzione, premere il tasto Previous
(Precedente) ( ) Per terminare, premere il tasto
Play/Pause (Esecuzione/Pausa) ( ).
In stato di pausa o di fermo, premere il tasto Next
(Successivo) ( ).
In stato di pausa o di fermo, premere il tasto
Previous (Precedente) ( ).
Usare il Joystick per spostarsi verso l’alto o il basso.
Quando il rapporto zoom è superiore a 1.0x, premere
il tasto OK.
Quando il rapporto zoom è bloccato, usare il
Joystick per spostarsi nell’immagine.
Page 70

Riproduzione delle registrazioni sul PC
Installazione del software
Si prega di notare che i video registrati sono in formato .mov. Quindi, sono
necessari dei programmi speciali per visualizzare le registrazioni sul PC. Al
primo utilizzo, assicurarsi di avere QuickTime 7.0 sul PC. In caso contrario,
seguire le istruzioni che seguono per installare il software.
Scaricare QuickTime 7.0 dal seguente sito:
http://www.apple.com/quicktime/download/win.html
OPPURE
Installare il programma HD-DV DECODER del CD fornito in dotazione.
(* HD-DV DECODER è progettato per riprodurre con Windows Media Player 10
e 11 i le .mov registrati dalla videocamera.)
Collegamento al PC e salvare i le
Dopo avere installato in modo appropriato il software sul PC, attenersi alle
procedure che seguono.
1. Accendere la videocamera.
2. Collegare la videocamera (con la scheda SD inserita) al computer usando il
cavo USB.
3. Apparirà automaticamente una nestra di dialogo. Selezionare la voce “Open
folder to view les” (Apri cartella per visualizzare i le) e gare clic su “OK”.
4. Se la nestra di dialogo non appare automaticamente, fare doppio clic su
“Risorse del computer” ed aprire il “Disco rimovibile”.
5. Fare doppio clic sulla cartella DCIM.
6. Fare doppio clic sulla cartella 100MEDIA.
7. Copiare i le che si vogliono conservare e salvarli nella posizione desiderata sul
computer.
9
Page 71

10
Collegamento della videocamera al televisore
OUTPUT AV
OUTPUT HD
HD TV
Input audio
componente
Input video componente
<Cavo video componente>
<Cavo AV>
(Rosso)
(Giallo)
(Bianco)
(Verde)
(Rosso)
(Blu)
(Non collegare il cavo giallo)
Attenersi alle fasi che seguono per collegare la videocamera ed il
televisore usando i cavi AV fornito in dotazione per la visualizzazione
in tempo reale. Si possono visualizzare le sequenze video e le
fotograe sul televisore e condividerle con amici e famigliari.
Collegamento della videocamera al televisore HDTV
Per HDTV qui si intendono le porte d’input integrate del televisore che
consentono l’esecuzione di risoluzione ad alta qualità HD (720P) quando è
eseguito il collegamento.
1. Accendere il televisore HDTV.
2. Accendere la videocamera.
3. Collegare una estremità del cavo video componente alla porta (Input
video componente) del televisore HDTV e l’altra estremità alla porta
(OUTPUT HD) della videocamera.
4. Collegare una estremità del cavo AV alla porta (Input audio
componente) del televisore HDTV e l’altra estremità alla porta
(OUTPUT AV) della videocamera. (Non collegare il connettore giallo
alla porta AV-IN del televisore HDTV.)
5. Premere l’interruttore modalità del televisore HDTV e selezionare
“Component Input” (Input Componente).
Se si registra una sequenza con risoluzione HD mentre è collegato il
televisore HDTV, lo schermo TV abbasserà la risoluzione video a D1
(480P) a causa della velocità bit dei dati, però i le registrati manterranno la
risoluzione HD (720P) senza alcuna modica.
Page 72

Collegamento della videocamera al televisore
standard
TV = Televisore tradizionale CRT
Modalità AV
INGRESSO
AV
Video
1. Accendere la videocamera.
2. Premere il tasto MODE (Modalità) per accedere al menu MODE
(Modalità).
3. Usare il Joystick per selezionare la modalità Setting (Impostazioni) e
premere OK per accedere al menu.
4. Usare il Joystick per selezionare la voce TV-out (Output TV) e poi
premere OK per confermare.
5. Spostare il Joystick verso l’alto/il basso per selezionare NTSC o PAL.
Il sistema NTSC o PAL è diverso nei vari paesi, fare riferimento a
pagina 14 alla tabella d’impostazione della frequenza.
6. Al termine, premere OK per confermare l’impostazione.
7. Premere il tasto Shutter (Otturatore) per tornare alla schermata
precedente.
8. Collegare le estremità audio e video del cavo AV (di colore giallo/
bianco/rosso) ai connettori “INGRESSO AV” del televisore.
9. Collegare l’altra estremità del cavo AV alla porta “Output AV” della
videocamera.
Audio
Cavo AV
Output AV
11
Page 73
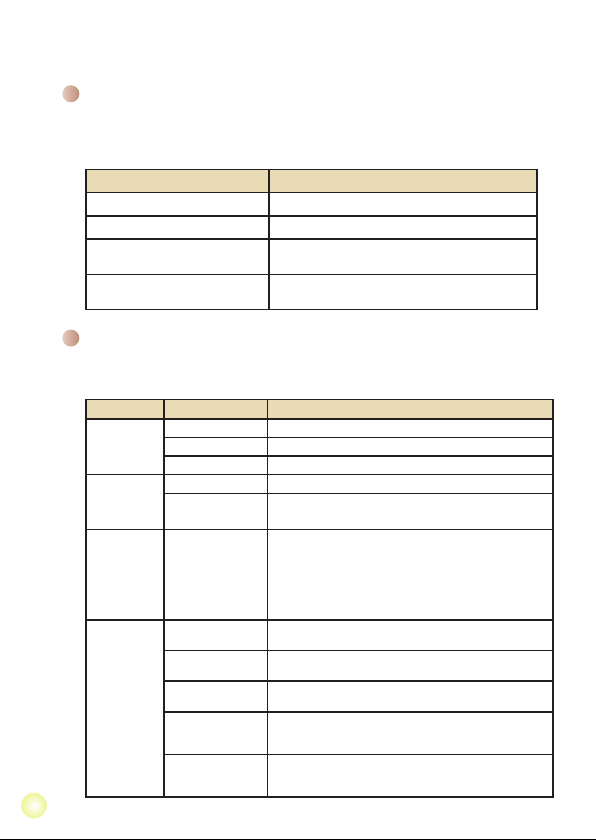
12
Operazioni avanzate
Funzionamento dei menu
Le voci del menu forniscono varie opzioni che permettono di sintonizzare con
precisione le funzioni della videocamera.
La tavola che segue illustra i dettagli sulle operazioni dei menu.
Come fare per... Azione
Fare apparire il menu Premere il tasto MENU.
Spostare l’evidenziatore Usare il Joystick per spostarsi verso l’alto o il basso.
Accedere ai menu secondari /
Confermare una voce
Uscire dal menu / Tornare al menu
precedente
Voci del menu in modalità Fotocamera
Accendere → Premere il tasto Menu.
Premere il tasto OK.
Premere il tasto MENU (quando si è nel menu
secondario).
Voce Opzione Descrizione
Video
resolution
(Risoluzione
video)
Picture
Resolution
(Risoluzione
d’immagine)
NightShot
(Scatto
notturno)
WB
(Bilanciamento
del bianco)
HD Imposta la risoluzione video HD (1280x720 pixel).
D1 Imposta la risoluzione video su D1 (720x480 pixel).
CIF Imposta la risoluzione video su CIF (352x288 pixel).
3M Imposta la risoluzione d’immagine su 3 megapixel.
5M Imposta la risoluzione d’immagine su 5 megapixel.
Questa impostazione consente di scattare fotograe con uno
sfondo scuro. Poiché la velocità dell’otturatore diminuisce
On/Off
(Attiva/Disattiva)
Auto (Automatico)
Sunny (Sole)
Cloudy (Nuvoloso)
Fluorescent
(Fluorescente)
Tungsten
(Tungsteno)
quando di fotografa in ambienti bui, si raccomanda di usare
un treppiede per eliminare sfocature provocate dal movimento
delle mani.
Avviso: i disturbi aumentano quando è abilitata la
funzione Scatto notturno.
La macchina regola automaticamente il bilanciamento del
bianco.
Questa impostazione è adatta per registrazione in esterni con
tempo soleggiato.
Questa impostazione è adatta per registrazione in esterni con
condizioni di tempo nuvoloso o in zone d’ombra.
Questa impostazione è adatta per registrazione in interni con
illuminazione a lampade uorescenti, oppure in ambienti con
temperatura colore alta.
Questa impostazione è adatta per registrazione in interni con
illuminazione a lampade incandescenti, oppure in ambienti
con temperatura colore bassa.
Page 74
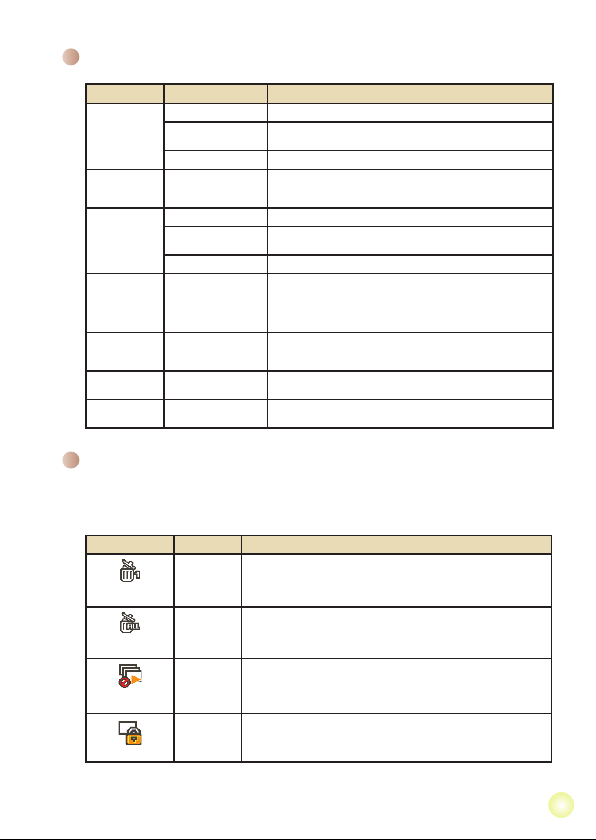
Voci del menu in modalità Fotocamera (segue)
Voce Opzione Descrizione
Flashlight
(Flash)
Video light
(Luce ausiliaria
video)
Effect (Effetti)
Exposure
(Esposizione)
Selftimer
(Autoscatto)
Histogram
(Istogramma)
Icon (Icona)
On (Attiva) Il ash è attivato forzatamente ad ogni scatto.
Auto (Automatico)
Off (Disattiva) Il ash è disabilitato.
On/Auto/Off
(Attiva/Automatico/
Disattiva)
Normal (Normale) Acquisisce le registrazioni con i colori naturali.
B&W
(Bianco e Nero)
Classic (Classico) Acquisisce le registrazioni con colori nei toni seppia.
-2~+2
On/Off
(Attiva/Disattiva)
On/Off
(Attiva/Disattiva)
On/Off
(Attiva/Disattiva)
Il ash si attiva automaticamente quando la luce è
insufciente.
Questa impostazione consente di avere più luce quando
l’illuminazione è insufciente durante la registrazione di
sequenze video.
Acquisisce le registrazioni in bianco e nero.
Regolare manuale dell’esposizione per ottenere effetti migliori
quando l’immagine precedente appare troppo chiara o troppo
scura. Un valore positivo indica che l’immagine apparirà
più chiara del normale, mentre un valore negativo indica
l’opposto.
Abilita/disabilita l’autoscatto. Dopo avere attivato l’autoscatto,
ed avere premuto il tasto Otturatore, la videocamera
attenderà dieci secondi prima di registrare.
Abilita/disabilita la visualizzazione su schermo
dell’istogramma.
Abilita/disabilita la visualizzazione delle icone OSD (On
Screen Display) sullo schermo.
Voci del menu in modalità Riproduzione
Accendere → Premere il tasto MODE (Modalità) → Usare il Joystick per passare
alla modalità My Works (I miei lavori) → Selezionare la cartella Video o Picture
(Immagini) → Premere il tasto OK → Premere il tasto MENU.
Voce Opzione Descrizione
Yes/No
Elimina il le corrente.
Delete One
(Elimina uno)
Delete All
(Elimina tutto)
Slide Show
(Presentazione)
Lock (Blocca)
* Se nella videocamera non ci sono le, non sarà visualizzata alcuna voce.
(Sì/No)
Yes/No
Elimina tutte le immagini ed i le video/audio archiviati nella
(Sì/No)
memoria.
La videocamera visualizza le immagini in sequenza. Saranno
visualizzate solamente le immagini JPEG ed il primo fotogramma
-
dei le MPEG. Premere il tasto MENU per terminare la
presentazione.
Possono essere bloccati le singoli multipli oppure tutti i le. Un
Yes/No
le bloccato non può essere cancellato usando le funzioni di
(Sì/No)
eliminazione. D’altra parte, la funzione di formattazione cancellerà
tutti i le bloccati e non bloccati.
13
Page 75

14
Voci del menu in modalità Impostazioni
Accendere → Premere il tasto MODE (Modalità) → Accedere alla modalità Setting
(Impostazioni) ( ) → Premere il tasto MENU.
Voce Opzione Descrizione
Date & Time
(Data e Ora)
Beep (Avviso)
Flicker
(Frequenza)
TV-out
(Output TV)
Icon (Icone)
LCD Bright
(Luminosità
LCD)
Format
(Formattazione)
Auto Off
(Spegnimento
automatico)
Language
(Lingua)
Default
(Predeniti)
-
On/Off
(Attiva/Disattiva)
50Hz
60Hz
HDTV
NTSC
PAL
On/Off
(Attiva/Disattiva)
-2~+2
Yes (Sì)
No
Off (Disattiva)
1 min
3 min
5 min
-
Yes (Sì)
No
Imposta data e ora.
Abilita/disabilita l’avviso sonoro.
Imposta la frequenza su 50Hz*.
Imposta la frequenza su 60Hz*.
Imposta la compatibilità del sistema TV su HDTV. Questa
opzione è adatta per televisori HDTV.
Imposta la compatibilità del sistema TV su NTSC. Questa
opzione è adatta per le zone dell’America, Taiwan,
Giappone e Corea.
Imposta la compatibilità del sistema TV su PAL. Questa
opzione è adatta per le zone della Germania, Inghilterra,
Italia, Olanda, Cina, Giappone ed Hong Kong.
Abilita/disabilita la visualizzazione delle icone OSD sullo
schermo.
Imposta la luminosità del display LCD. Un valore positivo
rende più luminoso il display LCD; un valore negativo rende
più scuro il display LCD.
Formatta il supporto d’archiviazione. Notare che tutti
i le archiviati nel supporto saranno eliminati in modo
irrecuperabile.
Annulla l’azione.
Disabilita la funzione di Spegnimento automatico.
La videocamera si spegne automaticamente quando resta
inattiva per più di 1 minuto.
La videocamera si spegne automaticamente quando resta
inattiva per più di 3 minuti.
La videocamera si spegne automaticamente quando resta
inattiva per più di 5 minuti.
Permette di selezionare la lingua usata per l’OSD.
Ripristina le impostazioni predenite. Notare che le
impostazioni correnti saranno sovrascritte.
Annulla l’azione.
Page 76

Voci del menu in modalità Impostazioni (segue)
* Tabella d’impostazione della frequenza:
Zona Inghilterra Germania Francia Italia Spagna Olanda Russia
Impostazione
Zona Portogallo America Taiwan Cina Giappone Corea Tailandia
Impostazione
50Hz 50Hz 50Hz 50Hz 50Hz 50Hz 50Hz
50Hz 60Hz 60Hz 50Hz 50/60Hz 60Hz 50Hz
Indicatore di carica della batteria
Icona Descrizione
Batteria completamente carica
Durata media della batteria
Batteria scarica
* Il ash e le luci LED saranno disabilitate.
Batteria esaurita
per evitare l’ammanco improvviso di alimentazione, si raccomanda di sostituire la
Nota:
batteria quando l’icona indica che la batteria è scarica.
15
Page 77
16
Durata della batteria
Fotograa Sequenza video
Numero di scatti Tempo di ripresa (minuti)
110 30
* Scatto ogni 30 secondi
** Il ash è disattivo
*** La risoluzione è impostata su 5M
(2560 x 1920)
questa tavola è solo per riferimento. La durata effettiva della batteria dipende dal tipo
Nota:
di batteria e dal livello di carica.
* La risoluzione è impostata su HD
(1280x720 pixel)
Capacità d’archiviazione
Memoria
Scheda SD (256MB)
Scheda SD (512MB)
Scheda SD (1GB)
Scheda SD (2GB)
Scheda SD (4GB)
il valore attuale della capacità può variare (no al ± 30%) in base alla saturazione del
Nota:
colore ed alla complessità del soggetto e di ciò che lo circonda.
Video (min.) Fotograa
HD D1 CIF 3M 5M
7 18 40 230 145
15 36 80 460 290
30 72 160 920 580
60 144 320 1840 1160
120 288 640 3680 2320
Page 78
Speciche
Voce Descrizione
Modello Videocamera 5 Megapixel
Sensore
immagine
Risoluzione
Obiettivo Zoom ottico 3X
Formato le MOV, JPEG
Velocità
fotogrammi video
Memoria esterna Scheda SD (256MB ~ 4GB), velocità superiore a 12X
Display LCD LCD 2.4”
Output TV Output componente, sistema NTSC/PAL supportato
Interfaccia USB 2.0
Microfono Sì
Altoparlante Sì
Scatto notturno Sì (in modalità fotograa e video)
Batteria Batteria ricaricabile agli ioni di Litio compatibile NP60
Nota:
le speciche sono soggette a modica senza preavviso.
5 Mega (2592 x 1944 pixel)
Fotograa: 3M/5M
1280x720 (HD)
720x480 (D1)
352x288 (CIF)
1280 x 720 no a 30fps
720 x 480 no a 30fps
352 x 288 no a 30fps
17
Page 79
Requisiti del sistema
I requisiti del sistema sono diversi in base alle varie impostazioni di
risoluzione video:
Risoluzione video Requisiti del sistema PC
Sistema operativo: Windows XP SP2 o superiore (QuickTime
HD (1280 x 720) @30fps
D1 (720x480) @30fps Sistema operativo: Windows 2000/XP o superiore
CIF (352 x 288) @30fps
CPU: Pentium 4, 3.0GHz o superiore
RAM di sistema: 512MB (1GB raccomandato)
Scheda video: nvidia Geforece 7600 o ATI X1600, o
CPU: Pentium 4, 1.5GHz o superiore
RAM di sistema: 256MB (512MB o più raccomandati)
Scheda video: 64MB (128MB o più raccomandati)
7.0 o superiore)
superiore con 256MB di RAM
(QuickTime 7.0 o superiore)
18
Page 80

Inhoudsopgave
Aan de slag .....................................................................1
Kennismaken met de onderdelen van uw camcorder .......................... 1
De batterij plaatsen ............................................................................... 2
De batterij opladen................................................................................ 2
Een geheugenkaart plaatsen (optioneel) .............................................. 3
Uw camera in-/uitschakelen.................................................................. 3
De taal instellen .................................................................................... 4
De tijd instellen .....................................................................................4
LCD-indicators aezen .........................................................................5
Basisbediening ............................................................... 6
Een videoclip opnemen ........................................................................6
Een foto maken..................................................................................... 7
Uw opnamen afspelen .......................................................................... 8
Uw opnamen afspelen op een pc ......................................................... 9
De camcorder aansluiten op een tv ...................................................... 10
Geavanceerde bewerkingen .......................................... 12
Menubediening ..................................................................................... 12
Menu-items in de cameramodus ..........................................................12
Menu-items in de weergavemodus ....................................................... 13
Menu-items in de instellingsstand......................................................... 14
Indicator levensduur batterij.................................................................. 15
Levensduur batterij ............................................................................... 16
Opslagcapaciteit ................................................................................... 16
Specicaties.......................................................................................... 17
Systeemvereisten ................................................................................. 18
Page 81

Aan de slag
Kennismaken met de onderdelen van uw camcorder
Luidspreker
LCD-scherm
Knop Vorige /
Knop Snel
terugspoelen
Knop Afspelen/
Pauzeren
Knop Volgende/
Knop Snel
vooruitspoelen
Flitserschakelaar
Knop OK /
5-weg joystick
Batterijklep
Knop MODUS
Macromodusschakelaar
Schakelaar witbalans
Schakelaar LED-lampen
Flitserlamp
Riemhaakje
Statiefbevestiging
Voedingsknop
Microfoon
Lens
LED-lampen
Onderaanzicht
SD-kaartsleuf
(in de batterijklep)
Status-LED (links) /
Laad-LED (rechts)
Knop MENU
Ontspanknop
Knop (in-/uit)zoomen
Opnameknop
AV-UITGANG
USB-aansluiting *
HD-UITGANG *
* in de klep
1
Page 82
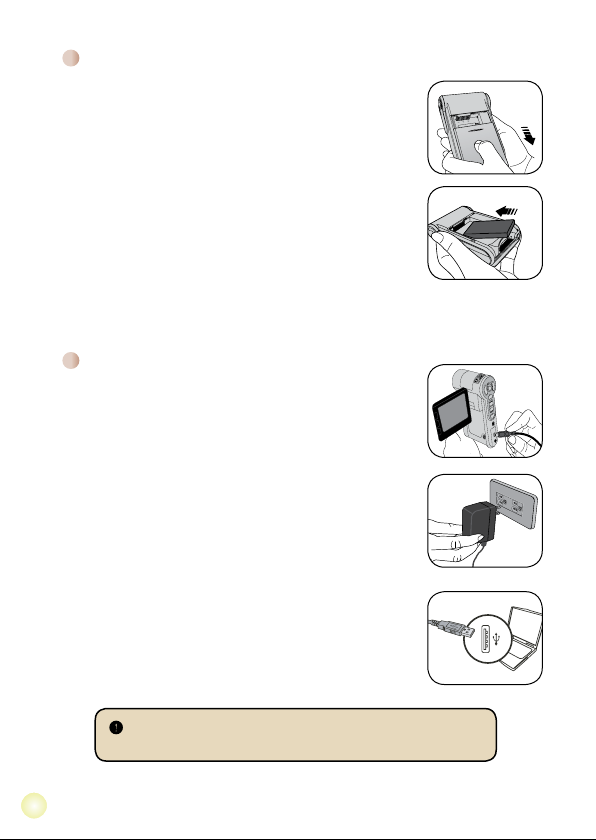
2
De batterij plaatsen
1. Schuif de batterijklep open zoals weergegeven.
2. Plaats de meegeleverde li-ion-batterij in het batterijvak.
Zorg ervoor dat de metalen contacten uitgelijnd zijn met
de contacten in het batterijvak.
3. Sluit de klep van het batterijvak nadat u de batterijen
correct hebt geïnstalleerd.
De batterij opladen
Laat de batterij gedurende minstens 8 uur opladen voordat u
deze voor de eerste keer gebruikt.
1. De kabel aansluiten.
Sluit het ene uiteinde van de bijgeleverde
wisselstroomadapter aan op de USB-poort van de camcorder
en het andere uiteinde op het stopcontact.
OF
Sluit het ene uiteinde van de bijgeleverde USB-kabel aan
op de USB-poort van de camcorder en het andere uiteinde
op een ingeschakelde pc. Zorg ervoor dat de camcorder is
uitgeschakeld.
2. De laad-LED licht rood op en het opladen wordt gestart.
3. Wanneer het opladen wordt onderbroken of de batterijdoos
volledig is opgeladen, wordt de laad-LED groen.
OF
Als u een pc gebruikt om de batterij op te laden, mag u de
camcorder niet inschakelen, anders wordt het opladen gestopt.
Page 83

Een geheugenkaart plaatsen (optioneel)
Om een geheugenkaart te plaatsen, gaat u als volgt te
werk:
(1) Open de batterijklep.
(2) Duw de kaart zoals aangegeven voorzichtig naar
binnen tot de kaart de onderkant van de sleuf bereikt.
Om de kaart te verwijderen, duwt u voorzichtig tegen de
kaart tot deze uit de sleuf springt. Trek vervolgens de
kaart uit de sleuf.
Uw camera in-/uitschakelen
Open het LCD-scherm of houd de voedingsknop gedurende
1 seconde ingedrukt om de camcorder in te schakelen.
Houd de voedingsknop gedurende 1 tot 3 seconden
ingedrukt of sluit het LCD-scherm om de camcorder uit te
schakelen.
Als de camcorder niet wordt ingeschakeld nadat u op de
voedingsknop hebt gedrukt, controleer dan of:
1. de batterijdoos correct in de camcorder is geïnstalleerd.
2. de batterijdoos voldoende vermogen heeft.
Als de camcorder gedurende een langere periode inactief blijft,
kan het toestel automatisch uitschakelen door de instelling voor
het Automatisch uitschakelen.
3
Page 84

4
De taal instellen
1. Schakel de camcorder in.
2. Druk op de knop MODE (MODUS) om het menu
MODE (MODUS) te openen.
3. Gebruik de Joystick-schakelaar om de modus
Setting (Instelling) te selecteren en druk op OK
om het menuscherm te openen.
4. Gebruik de Joystick om het item Language
(Taal) te selecteren en druk vervolgens op OK om
te bevestigen.
5. Beweeg de Joystick omhoog of omlaag om een
taal te selecteren.
6. Druk op OK wanneer u klaar bent om de instelling
te bevestigen.
De tijd instellen
1. Schakel de camcorder in.
2. Druk op de knop MODE (MODUS) om het menu MODE
(MODUS) te openen.
3. Gebruik de Joystick-schakelaar om naar de modus
Setting (Instelling) te schakelen en druk op OK om het
menuscherm te openen.
4. Gebruik de Joystick om het item Date & Time (Datum
& tijd) te selecteren en druk vervolgens op OK om te
bevestigen.
5. Verplaats de Joystick omhoog/omlaag om de waarde
aan te passen. Verplaats de Joystick naar links/rechts
om te schakelen tussen de velden.
6. Druk op OK wanneer u klaar bent om de instelling te
bevestigen.
Page 85
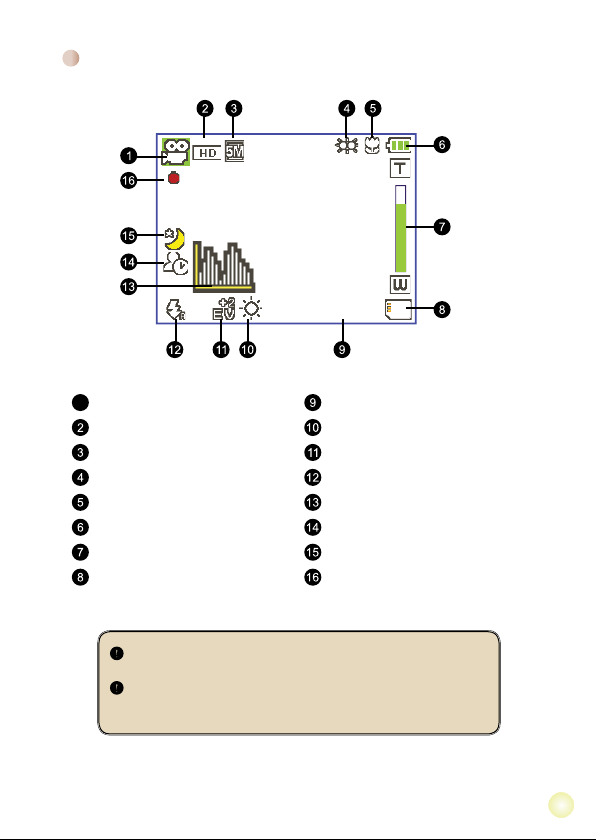
LCD-indicators aezen
1
00:06:40
00:00:05
Moduspictogram Resterende opnameduur
Videoresolutie Modus Witbalans
Beeldresolutie Belichtingsmodus
Modus LED-lampen Flitsermodus
Macrostand Histogrammodus
Levensduur batterij Zelfontspannermodus
Indicator zoomverhouding Nachtopnamemodus
SD-kaart geplaatst Opnameduur
Het LCD zal een verhouding van 16:9 weergeven terwijl HD (720P)
wordt ingesteld als videoresolutie.
Het LCD zal een verhouding van 4:3 weergeven terwijl D1 (480P)
of CIF wordt ingesteld als videoresolutie. (Zie pagina 7 voor meer
gedetailleerde richtlijnen.)
5
Page 86

6
Basisbediening
Een videoclip opnemen
1. De scherpstelling aanpassen:
De camcorder kan normaal automatisch scherpstellen zonder
dat u de scherpstelling hoeft aan te passen. Als u closeupfoto’s wilt maken kunt u op de knop Omhoog drukken om te
schakelen naar de Macromodus ( ).
Opmerking: Zorg ervoor dat uw geheugen is geplaatst
voordat u de opname staart.
-
30cm ~ (12” ~ )
5cm ~ 30cm (2” ~ 12”)
* bij een vaste zoom van 1,5x
Inzoomen
2. Zoomen:
3. Druk op de Record (Opnameknop) om de opname te starten.
4. Druk opnieuw op de Record (Opnameknop) om de opname
Verplaats de knop Zoom omhoog of omlaag om in of uit te
zoomen op het scherm. De optische vergrotingsfactor is 3x.
te stoppen.
De zoomfunctie is ook beschikbaar tijdens de opname (behalve in
de macromodus).
Als de omgeving donker is, kunt u de modus LED-lampen instellen
op Aan of Auto om het scherpstellen en de belichting te helpen.
Het is normaal dat de camcorder iets warmer aanvoelt na
doorlopend gebruik / langdurige opnamen. Dit is te wijten aan de
hoge prestaties.
Uitzoomen
Page 87

Een foto maken
1. De scherpstelling aanpassen:
De camcorder kan normaal automatisch scherpstellen zonder
dat u de scherpstelling hoeft aan te passen. Als u closeupfoto’s wilt maken kunt u op de knop Omhoog drukken om
te schakelen naar de Macromodus ( ).
Opmerking: Zorg ervoor dat uw geheugen is geplaatst
voordat u de opname staart.
-
30cm ~ (12” ~ )
5cm ~ 30cm (2” ~ 12”)
* bij een vaste zoom van 1,5x
2. Zoomen:
3. Houd de Shutter (ontspanknop) halverwege
Verplaats de knop Zoom omhoog of omlaag om in of uit te
zoomen op het scherm. De optische vergrotingsfactor is 3x.
Indien nodig kunt u andere geavanceerde instellingen
aanpassen.
Als de omgeving donker is, kunt u de modus
LED-lampen instellen op On (Aan) of Auto om het
scherpstellen en de belichting te helpen.
ingedrukt zodat de camcorder automatisch kan
scherpstellen. Druk de knop volledig in wanneer
het scherpstelkader groen wordt, om een foto te
maken.
Door de sensoropnamefunctie, zullen het LCD-voorbeeld en de hoogte-
breedteverhouding van foto’s verschillen afhankelijk van de verschillende
videoresolutie-instellingen.
De beeldopname van de camera is ingesteld, terwijl de videoresoluties
verschillen.
Videoresolutie Voorbeeld
HD(1280x720) Verhouding 16:9 Verhouding 4:3
Inzoomen
Uitzoomen
scherpstelkader
Foto’s maken en
scherpstellen
D1(720x480) Verhouding 4:3 Verhouding 4:3
CIF(352x288)
7
Page 88

8
Uw opnamen afspelen
1. Druk op de knop MODE (MODUS) en gebruik de Joystick
om te schakelen naar de modus “My Works” (Mijn werken).
U kunt ook aan de linkerzijde van het LCD-scherm drukken op
de knop Play/Pause (Afspelen/Pauzeren) ( ).
2. Er zijn twee mappen onder My works (Mijn werken): Video
en Picture (Foto). Selecteer Video of Picture (Foto) en druk
vervolgens op de knop OK om de indexmodus te openen.
3. Bewerkingen in de weergavemodus:
Bestandstype Hoe kan ik... Actie
Index mode
(Indexmodus)
Full-screen
mode (Volledige
schermweergave)
Schakelen
tussen de
miniatuurweergave
en volledige
schermweergave
Schakelen tussen
bestanden.
Druk in de indexmodus op de knop OK om te
schakelen naar de volledige schermweergave. Druk
in de volledige schermweergave op de knop Menu
om te schakelen naar de miniatuurweergave.
1. In de indexmodus: Gebruik de Joystick om het
selectievenster te verplaatsen.
2. In volledige schermweergave: Gebruik de
Joystick om naar links of rechts te verplaatsen.
Het afspelen starten
Het afspelen
pauzeren/hervatten.
Met deze toetsen
stelt u het
volumeniveau in
Het afspelen
Video
Picture
(Foto)
stoppen
Terug naar het
voorbeeldscherm
Snel vooruitspoelen
Snel terugspoelen
Het volgende
bestand selecteren
Het vorige bestand
selecteren
In-/uitzoomen
Zoomfactor
vergrendelen/
ontgrendelen
Verschuiven binnen
de ingezoomde foto
Wanneer deze actie wordt geselecteerd (in
volledige schermweergave), wordt het afspelen van
het bestand automatisch gestart.
Druk op OK tijdens de weergave/tijdens de pauze.
Gebruik de Joystick om omhoog of omlaag te
verplaatsen tijdens de weergave.
Druk tijdens de weergave op de knop MENU.
Druk op de Shutter (ontspanknop).
Druk tijdens het afspelen op de knop Next
(Volgende) ( ) Druk op de knop Play/Pause
(Afspelen/Pauzeren) ( ) om te stoppen.
Druk tijdens het afspelen op de knop Previous
(Vorige) ( ) Druk op de knop Play/Pause
(Afspelen/Pauzeren) ( ) .
Druk tijdens de pauze of nadat het afspelen is
gestopt op de knop Next (Volgende) ( )
Druk tijdens de pauze of nadat het afspelen is
gestopt op de knop Previous (Vorige) ( ) button.
Gebruik de Joystick om omhoog of omlaag te
verplaatsen.
Druk op OK wanneer de zoomfactor groter is
dan 1.0x.
Wanneer de zoomverhouding is vergrendeld,
gebruik dan de Joystick om door de foto te
bladeren.
Page 89

Uw opnamen afspelen op een pc
De software installeren
Opgenomen video’s krijgen de indeling .mov. U hebt dus enkele speciale
programma’s nodig om de opnamen op uw pc te bekijken. Controleer of
QuickTime 7.0 op uw pc is geïnstalleerd voordat u het afspelen start. Als dat
niet het geval is, volg dan de onderstaande instructies om eerst de software te
installeren.
Download QuickTime 7.0 player van de onderstaande website:
http://www.apple.com/quicktime/download/win.html
OF
Installeer het programma HD-DV DECODER van de bijgeleverde cd.
(* HD-DV-DECODER is ontworpen voor het afspelen van de mov-bestanden die
met onze camcorder zijn opgenomen met Windows Media Player 10 &11.)
De pc aansluiten en bestanden opslaan
Nadat de software correct is geïnstalleerd op uw pc, moet u de onderstaande
procedures volgen.
1. Schakel de camcorder in.
2. Sluit de camcorder (met geplaatste SD-kaart) aan op uw computer via de USBkabel.
3. Er wordt onmiddellijk een dialoogvenster weergegeven. Selecteer het item
“Open folder to view les” (Map openen om bestanden weer te geven) en
klik op “OK”.
4. Als het dialoogvenster niet automatisch wordt geopend, kunt u dubbelklikken op
“Deze computer” en het “Verwisselbaar station” openen.
5. Dubbelklik op de bestandsmap DCIM.
6. Dubbelklik op de bestandsmap 100MEDIA.
7. Kopieer de bestanden die u wilt bewaren en sla ze op naar de gewenste locatie
op uw computer.
9
Page 90

10
De camcorder aansluiten op een tv
AV-UITGANG
HD-UITGANG
HD TV
Component
audio-ingang
Component video-ingang
<Component video-kabel>
<AV-kabel>
(rood)
(geel)
(wit)
(groen)
(rood)
(blauw)
(Do not plug in Yellow Cable)
Volg de onderstaande richtlijnen om uw camcorder en tv aan te sluiten
via extra AV-kabels voor weergave in real time. U kunt uw videoclips
en foto’s op uw tv weergeven en ze delen met uw vrienden en familie.
De camcorder aansluiten op HDTV
Met HD TV worden de ingebouwde componentingangen van de tv bedoeld, zodat
beelden kunnen worden weergegeven met een hoge resolutie van HD (720P)
wanneer ze zijn aangesloten.
1. Schakel uw HD TV in.
2. Schakel de camcorder in.
3. Sluit het ene uiteinde van de component video-kabel aan op de poort
(Component video-ingang) op de HDTV en het andere uiteinde op de
poort (HD-UITGANG) op de camcorder.
4. Sluit het ene uiteinde van de andere AV-kabel aan op de poort
(Component audio-ingang) op de HDTV en het andere uiteinde op de
poort (AV-UITGANG) op de camcorder. (Sluit de gele connector niet
aan op de AV-ingang van de HDTV.)
5. Druk op de ingangsschakelaar op de HD TV en selecteer “Component
Input” (Componentingang).
Als u een clip met HD-resolutie opneemt terwijl u verbonden bent met uw
HD TV, zal de videoresolutie van het tv-scherm verlaten naar de resolutie
D1 (480P) door de gegevensbitsnelheid, maar de resolutie van het
opgenomen bestand blijft ongewijzigd op HD (720P).
Page 91

De camcorder aansluiten op een standaard tv
TV = Traditionele CRT-TV
AV-modus
AV-ingang
Video
Audio
AV-kabel
AV-uitgang
1. Schakel de camcorder in.
2. Druk op de knop MODE (MODUS) om het menu Mode (Modus) te
openen.
3. Gebruik de Joystick-schakelaar om naar de modus Setting
(Instelling) te schakelen en druk op OK om het menuscherm te
openen.
4. Gebruik de Joystick om het item TV-out (Tv-uitgang) te selecteren en
druk vervolgens op OK om te bevestigen.
5. Beweeg de Joystick omhoog/omlaag om NTSC of PAL te selecteren.
Het NTSC- of PAL-systeem verschilt afhankelijk van het land.
Raadpleeg pagina 14 voor de tabel met de ikkerinstellingen.
6. Druk op OK wanneer u klaar bent om de instelling te bevestigen.
7. Druk op de Shutter (ontspanknop) om terug te keren naar het
voorbeeldscherm.
8. Sluit de audio- en video-uiteinden van de AV-kabel (geel/wit/rood) aan
op de “AV-ingang”-aansluitingen op de tv.
9. Sluit het andere uiteinde van de AV-kabel aan op de “AV-uitgang” op
uw camcorder.
11
Page 92

12
Geavanceerde bewerkingen
Menubediening
De menu-onderdelen bieden u verschillende opties waarmee u de camerafuncties jn
kunt afstellen. In de volgende tabel vindt u details over het gebruik van het menu.
Hoe kan ik... Actie
Het menu openen Druk op de knop MENU.
De selectiebalk verplaatsen
Het submenu openen/een item bevestigen Druk op de knop OK.
Menu afsluiten/terugkeren naar het
bovenliggende menu
Menu-items in de cameramodus
Inschakelen → Druk op de knop Menu.
Gebruik de joystick om omhoog of omlaag te
verplaatsen.
Druk op de knop MENU (wanneer u in het submenu
bent).
Item Optie Beschrijving
Video resolution
(Videoresolutie)
Picture
Resolution
(Beeldresolutie)
NightShot
(Nachtopname)
WB
HD Stel de videoresolutie in op HD (1280x720 pixels).
D1 De videoresolutie instellen op D1 (720x480 pixels).
CIF De videoresolutie instellen op CIF (352x288 pixels).
3M Stel de beeldresolutie in op 3 megapixels.
5M Stel de beeldresolutie in op 5 megapixels.
Wanneer u deze instelling inschakelt, kunt u een foto
maken met een donkere achtergrond. Aangezien de
On/Off
(Aan/uit)
Auto De camera past de witbalans automatisch aan.
Sunny
(Zonnig)
Cloudy
(Bewolkt)
Fluorescent
(TL)
Tungsten
(Gloeilamp)
ontspansnelheid zal vertragen wanneer u foto’s maakt in
een donkere ruimte. Wij raden u aan een statief te gebruiken
om wazige foto’s door het schudden van de hand te
vermijden. Waarschuwing: de ruis vermeerdert wanneer
Nachtopname is ingeschakeld.
Deze instelling is geschikt voor opnamen buitenshuis bij
zonnig weer.
Deze instelling is geschikt voor opnamen bij bewolkt weer of
in schaduwrijke omgevingen.
Deze instelling is geschikt voor opnamen binnenshuis bij TL-
verlichting of in omgevingen met een hoge kleurtemperatuur.
Deze instelling is geschikt voor opnamen binnenshuis
bij gloeilampverlichting of in omgevingen met een lage
kleurtemperatuur.
Page 93

Menu-items in de camerastand (vervolg)
Item Optie Beschrijving
Flashlight
(Flitser)
Video light
(Videolamp)
Effect
Exposure
(Belichting)
Selftimer
(Zelfontspanner)
Histogram
Icon (Pictogram)
On (Aan)
Auto
Off (Uit) De itser is uitgeschakeld.
On/Auto/Off
(Aan/Auto/Uit)
Normal (Normaal) Opnamen maken in natuurlijke kleuren.
B&W (Z&W) Opnamen maken in zwart-wit.
Classic (Klassiek) Opnamen maken in sepiatinten.
-2~+2
On/Off
(Aan/uit)
On/Off
(Aan/uit)
On/Off
(Aan/uit)
De itser zal altijd bij elke opname geforceerd worden
gebruikt.
De itser gaat automatisch af wanneer de belichting
onvoldoende is.
Met deze instelling kunt u extra licht toevoegen wanneer de
belichting niet voldoet tijdens het opnemen van videoclips.
U kunt de belichting handmatig aanpassen voor een beter
effect wanneer de beeldweergave te helder of te donker is.
Een positieve waarde geeft aan dat het beeld helderder zal
zijn dan normaal, terwijl een negatieve waarde het beeld
donkerder maakt.
Schakel de zelfontspanner in/uit. Nadat de zelfontspanner is
ingeschakeld, zal de camera tien seconden wachten voordat
de ontspanknop wordt ingedrukt.
De weergave van het beeldhistogram op het scherm
inschakelen/uitschakelen.
De OSD (on screen display)-pictogrammen in-/uitschakelen
voor weergave op het scherm.
Menu-items in de weergavemodus
Inschakelen → Druk op de knop MODE (MODUS) → Gebruik de joystick om naar
de modus My Works (Mijn werken) te schakelen → Selecteer de map Video of
Picture (Foto) → Druk op de knop OK → Druk op de knop MENU.
Item Optie Beschrijving
Yes/No
Huidig bestand wissen
Delete One
(1 wissen)
Delete All
(Alles wissen)
Slide Show
(Diavoorstelling)
Lock
(Vergrendelen)
* Als er geen bestanden in de camera zijn, worden geen items weergegeven.
(Ja/Nee)
Yes/No
Alle foto’s en video-/audiobestanden die in het geheugen zijn
(Ja/Nee)
opgeslagen, wissen.
De camera geeft de foto’s achtereenvolgens weer. Alleen
JPEG-foto’s en de eerste beelden van MPEG-bestanden
worden weergegeven. Druk op de knop Menu om de
diavoorstelling te stoppen.
U kunt één, meerdere of alle bestanden vergrendelen. Een
Yes/No
vergrendeld bestand kan niet worden verwijderd met de functie
(Ja/Nee)
Wissen. De functie Formatteren zal echter alle vergrendelde/
ontgrendelde bestanden wissen.
13
Page 94
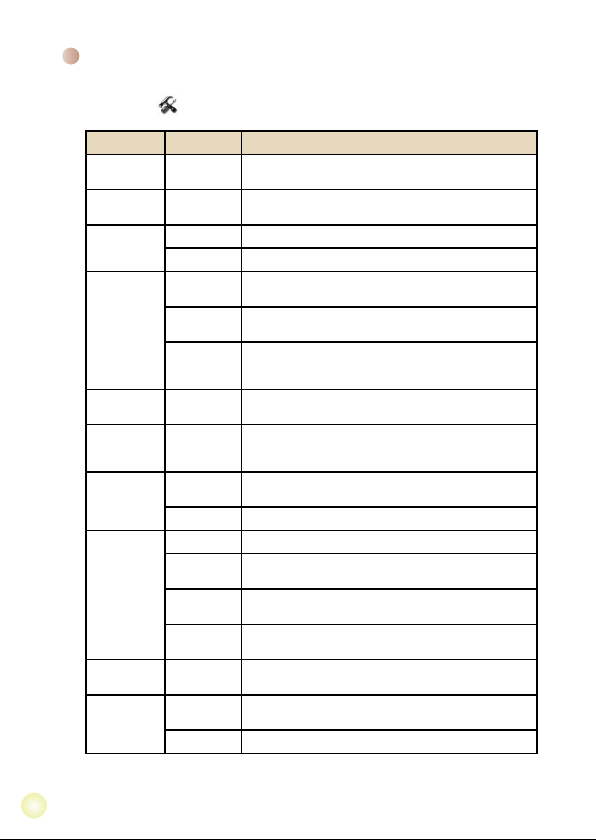
14
Menu-items in de instellingsstand
Inschakelen → Druk op de knop MODE (MODUS) → Open de modus Setting
(Instelling) ( )→ druk op de knop MENU.
Item Optie Beschrijving
Date & Time
(Datum & Tijd)
Beep (Piep)
Flicker
(Flikkering)
TV-out (TV-
uitgang)
Icon
(Pictogram)
LCD Bright
(LCD-
helderheid)
Format
(Formatteren)
Auto Off (Auto
uit)
Language
(Taal)
Default
(Standaard)
-
On/Off
(Aan/uit)
50Hz
60Hz
HDTV
NTSC
PAL
On/Off
(Aan/uit)
-2~+2
Yes (Ja)
No (Nee)
Off (Uit)
1 min.
3 min.
5 min.
-
Yes
(Ja)
No (Nee)
Hiermee stelt u de datum en tijd in.
De pieptoon in-/uitschakelen.
Stel de ikkerfrequentie in op 50Hz*.
Stel de ikkerfrequentie in op 60Hz*.
Stel de compatibiliteit van het tv-systeem in op HDTV. Deze
instelling is geschikt voor HDTV.
Stel de compatibiliteit van het tv-systeem in op NTSC. Deze
optie is geschikt voor Amerika, Taiwan, Japan en Korea.
Stel de compatibiliteit van het tv-systeem in op PAL. Deze optie
is geschikt voor Duitsland, Engeland, Italië, Nederland, China,
Japan en Hong Kong.
Schakel de OSD-pictogrammen in/uit voor weergave op het
scherm.
Stel LCD-helderheid in. Een positieve waarde maakt het
LCD-scherm helderder, terwijl een negatieve waarde het LCDscherm donkerder maakt.
Het opslagmedium formatteren. Houd ermee rekening dat alle
bestanden in het medium zullen verloren gaan.
De actie annuleren.
De functie Auto-uit uitschakelen.
De camera wordt automatisch uitgeschakeld na een inactiviteit
van meer dan 1 minuut.
De camera wordt automatisch uitgeschakeld na een inactiviteit
van meer dan 3 minuten.
De camera wordt automatisch uitgeschakeld na een inactiviteit
van meer dan 5 minuten.
Hiermee kunt u de taal voor het OSD-menu selecteren.
Fabrieksinstellingen herstellen. Denk eraan dat uw huidige
instellingen hiermee worden overschreven.
De actie annuleren.
Page 95

Menu-items in de instellingsstand (vervolg)
* Tabel ikkerinstellingen:
Regio Engeland Duitsland Frankrijk Italië Spanje
Instelling 50Hz 50Hz 50Hz 50Hz 50Hz 50Hz 50Hz
Regio Portugal Amerika Taiwan China Japan Korea Thailand
Instelling 50Hz 60Hz 60Hz 50Hz 50/60Hz 60Hz 50Hz
Nederland
Rusland
Indicator levensduur batterij
Pictogram Beschrijving
Volledig batterijvermogen
Gemiddeld batterijvermogen
Laag batterijvermogen
* De itserlamp en de LED-lampen worden uitgeschakeld.
Lege batterij
Opmerking:
Om te vermijden dat de voeding plotseling uitvalt, raden wij u aan de batterij te
vervangen wanneer het pictogram een laag batterijvermogen aangeeft.
15
Page 96

16
Levensduur batterij
Foto Videoclip
Aantal foto’s Opnameduur (minuten)
110 30
* opname elke 30 seconden
** de itser is uit
*** de resolutie is ingesteld op 5M
(2560x1920)
Opmerking:
Deze tabel is uitsluitend bedoeld voor uw referentie. De werkelijke levensduur
van de batterij is afhankelijk van uw batterijtype en het laadniveau.
Opslagcapaciteit
* Stel de resolutie in op HD (1280x720
pixels).
Geheugen
SD-kaart (256MB) 7 18 40 230 145
SD-kaart (512MB) 15 36 80 460 290
SD-kaart (1GB) 30 72 160 920 580
SD-kaart (2GB) 60 144 320 1840 1160
SD-kaart (4GB)
Opmerking: De werkelijke waarde van de capaciteit kan variëren (tot ± 30%) afhankelijk
van de kleurverzadiging en de complexiteit van uw onderwerp en de omgeving.
Video (min.) Foto
HD D1 CIF 3M 5M
120 288 640 3680 2320
Page 97

Specicaties
Item Omschrijving
Model Camera 5 megapixels
Beeldsensor 5 megapixels (2592x1944 pixels)
Foto: 3M/5M
kennisgeving.
1280x720 (HD)
720x480 (D1)
352x288 (CIF)
1280x720, tot 30fps
720x480, tot 30fps
352x288, tot 30fps
Resolutie
Lens 3x optische zoomlens
Bestandsindeling MOV, JPEG
Videobeeldsnelheid
Extern geheugen SD (256MB ~ 4GB), snelheid 12X en hoger
LCD-scherm 2,4” LCD
TV-uitgang Component-uitgang NTSC/PAL-systeem ondersteund
Interface USB 2.0
Microfoon Ja
Luidspreker Ja
Nachtopname Ja (in foto- en videostand)
Batterij NP60 compatibele Li-ion oplaadbare batterij
Opmerking: De specicaties zijn onderhevig aan wijzigingen zonder voorafgaande
17
Page 98

Systeemvereisten
De systeemvereisten verschillen afhankelijk van de verschillende
videoresolutie-instellingen:
Videoresolutie Vereisten pc-systeem
Besturingssysteem = Windows XP SP2 of hoger (QuickTime
HD (1280x720) @30fps
D1 (720x480) @30fps Besturingssysteem = Windows 2000/XP of hoger (QuickTime
CIF (352x288) @30fps
CPU = Pentium 4 3.0GHz of hoger
Systeem-RAM= 512 MB (1GB aanbevolen)
Grasche kaart= Nvidia Gforce 7600 of ATI X1600 of hoger
CPU = Pentium 4 1,5GHz of hoger
Systeem-RAM = 256MB (512MB of hoger aanbevolen)
Grasche kaart = 64MB (128MB of hoger aanbevolen)
7.0 of hoger)
met 256 MB RAM
7.0 of hoger)
18
Page 99

Tabla de contenido
Procedimientos iniciales ..............................................1
Introducción a las partes de la videocámara ........................................ 1
Instalar la batería .................................................................................. 2
Cargar la batería ................................................................................... 2
Insertar una tarjeta de memoria (opcional) ........................................... 3
Encender y apagar la videocámara ...................................................... 3
Establecer el idioma .............................................................................4
Establecer la hora ................................................................................. 4
Leer los indicadores LCD .....................................................................5
Funcionamiento básico .................................................6
Grabar un clip de vídeo ........................................................................6
Capturar una imagen estática............................................................... 7
Reproducir las grabaciones .................................................................. 8
Reproducir las grabaciones en PC ....................................................... 9
Conectar la videocámara a un televisor ...............................................10
Funcionamiento avanzado ............................................12
Uso de los menús ................................................................................. 12
Elementos de menú en el modo Cámara ............................................. 12
Elementos de menú en el modo Reproducción .................................... 13
Elementos de menú en el modo Conguración .................................... 14
Indicador de carga de la batería ........................................................... 15
Vida de la batería .................................................................................. 16
Capacidad de almacenamiento ............................................................ 16
Especicaciones ................................................................................... 17
Requisitos del sistema .......................................................................... 18
Page 100

Procedimientos iniciales
Introducción a las partes de la videocámara
Tapa de las pilas
Botón Anterior/
Retroceso rápido
Botón Reproducir/
Botón Siguiente/
Avance rápido
Conmutador de
modo Macro
Conmutador
de Flash
Botón Aceptar/
Joystick de 5
direcciones
Altavoz
Monitor LCD
Pausa
Botón MODO
Conmutador de
indicadores LED
Conmutador de
balance de blanco
Micrófono
Objetivo
Indicadores LED
Lámpara de ash
Gancho para
la correa
Toma para
trípode
Botón de
encendido
Vista inferior
Ranura para tarjeta SD
(dentro de la tapa de la
batería)
LED de estado (izquierda) /
LED de carga (derecha)
Botón MENÚ
Disparador
Botón Zoom (acercar y alejar)
Botón Grabar
Conector SALIDA DE AV
Conector USB *
SALIDA HD *
* dentro de la tapa
1
 Loading...