


JP-4MED
Thank you for selecting Aiphone for your communication and security needs. Please read this manual carefully before using this
system.
Please make sure to read this manual for safe and correct use of the system, and keep it in a safe place for future reference.
*
Please note that images and illustrations depicted in this manual may differ from the actual product.
JP-4MED
HANDS-FREE COLOR VIDEO INTERCOM MASTER STATION
OPERATION MANUAL
PART NAMES USING THE SYSTEM APPENDIX
SETTING AND ADJUSTMENT

2
CONTENTS
PRECAUTIONS ........................... 4
WARNING ........................................... 4
CAUTION ............................................ 4
GENERAL PRECAUTIONS ............... 4
NOTICES ............................................ 5
PART NAMES .................................. 6
Front panel ........................................ 6
Screen ................................................ 7
SETTING AND ADJUSTMENT ....... 8
SETTING LIST ............................. 8
INITIAL SET-UP ........................... 9
Setting the current date and time
[GENERAL] - [DATE/TIME] ............... 9
Changing the display language
[GENERAL] - [LANGUAGE] .............. 9
Setting the PIN
[GENERAL] - [PIN SETTING] .......... 10
SETTING AND ADJUSTMENT
DETAILS .....................................11
Call settings [CALL] .........................11
■
Designate door stations allowed to call-in
to this station
[DOOR STATION SETTINGS] ...............11
■
Designate sub master station(s)
to receive a call from this station
[ROOM STATION CALL SETTINGS] .....11
■
Setting incoming call tones
[CALL TONE] .........................................12
■
Setting the call duration time
[DOOR CALL DURATION] .....................12
Talk settings [TALK] ........................ 12
■
Setting the microphone on/off for a call
from a sub master station
[PRIVACY MODE] ..................................12
■
Automatic night volume adjustment
[AUTO NIGHT VOLUME] .......................12
■
Night illumination of when talking
[VIDEO DOOR LED] ..............................12
Monitor settings [MONITOR] .......... 13
■
Settings for indoor monitoring
[ROOM MONITOR] ................................13
■
Night illumination when monitoring door
stations [VIDEO DOOR LED] .................13
■
Setting the duration time of entrance
monitoring
[DOOR MONITOR DURATION] .............13
■
Setting the duration time of indoor
monitoring
[ROOM MONITOR DURATION].............13
Enabling/Disabling the operation
sound
[GENERAL] - [SOUND SETTING] -
[AUDIBLE TOUCH TONE] ............... 13
Enabling/Disabling voice guidance
on a door station
[GENERAL] - [SOUND SETTING] -
[VOICE GUIDANCE
(JP-DVF-L ONLY)] ............................ 13
Enabling/Disabling door release
[GENERAL] - [DOOR RELEASE] .... 14
Security settings
[GENERAL] - [ALARM SETTING] -
[SECURITY SETTING] ..................... 14
■
Setting the EXIT DELAY SETTING and
RETURN DELAY SETTING ...................14
■
Setting the ALARM PIN ..........................14
Settings for external alarm/external
device
[GENERAL] - [ALARM SETTING] -
[UTILITY SETTING].......................... 15
■
Enabling/Disabling ALARM AT DOOR ....15
■
Setting the duration time of sounding
alarm [ALARM DURATION] ...................15
Formatting an SD (or SDHC) card
[GENERAL] - [SD CARD] ................ 15
Naming master station and sub
master stations [GENERAL] -
[ROOM STATION NAME] ................. 16
Adjusting brightness and volume
[ADJUST] ......................................... 16

3
Recording settings [RECORD] ...... 17
■
Camera setting during automatic
recording
[SELECT RECORD SETTINGS] ...........17
■
Erasing all the recorded images
[ERASE ALL RECORDED IMAGES] .....17
USING THE SYSTEM .................... 18
ANSWERING A CALL ............... 18
Answering a call from a door
station .............................................. 18
■
Receiving a call while talking with
another door station ...............................19
■
Receiving a call while talking with
a sub master station ...............................19
Answering a call from a sub
master station ................................. 19
■
When PRIVACY MODE is set to
“ENABLE” ...............................................19
Adjusting the display mode for
viewing images at a video door
station .............................................. 19
■
Switching Zoom/Wide .............................19
■
Pan & Tilt ................................................20
Adjusting images [IMAGE] ............. 20
■
Adjusting screen brightness [
]...........20
■
Adjusting viewability of images
[ADJUST] ...............................................21
Adjusting the speaker or handset
volume [VOLUME] ........................... 21
Door release [DOOR RELEASE] .... 22
Transferring a door call to a sub
master station [ROOM CALL] ....... 22
CALLING/MONITORING
OTHER STATIONS .................... 23
Calling all sub master stations
simultaneously ............................... 23
Calling a single sub master
station .............................................. 23
Monitoring ....................................... 24
■
Monitoring door station (entrance) .........24
■
Monitoring sub master station
(Audio only) ............................................24
RECORDING AND PLAYING
IMAGES ..................................... 25
Recording ........................................ 25
■
Automatic recording ................................25
■
Manual recording ....................................25
Viewing images .............................. 26
Locking recorded images ............. 27
Erasing recorded images .............. 27
Copying images from built-in
memory onto SD (or SDHC) card
... 28
USING THE SECURITY
FUNCTION
................................ 29
FUNCTIONS COMBINED WITH
EXTERNAL DEVICES .............. 30
Triggering an alarm by using an
external device ................................ 30
Releasing a door with another
door release button ........................ 30
Activating an external device ........ 30
Using a foot switch ......................... 30
APPENDIX ..................................... 31
TECHNICAL PRECAUTIONS ... 31
SPECIFICATIONS ..................... 31
WARRANTY ................ Back cover
Term defi nition
This manual uses "residential station" as the
common term for "master station" and "sub master
station".

4
PRECAUTIONS
Prohibited
Do not dismantle unit
Keep unit away from water
General precautions
WARNING
Negligence could result in death or serious injury.
1. Do not dismantle or alter the unit. Fire or electric shock could
result.
2. Keep the unit away from water or any other liquid.
Fire or electric shock could result.
3. High voltage is present internally. Do not open the case.
Electric shock could result.
4. Do not connect any non-specifi ed power source to the +, -
terminals. Also, do not install two power supplies in parallel to a
single input. Fire or damage to the unit could result.
5. Do not use power supply with a voltage other than specifi ed.
Fire or electric shock could result.
6. Do not put any metal or fl ammable material into the unit
through the openings. Fire, electric shock, or unit trouble could
result.
CAUTION
Negligence could result in injury or damage to property.
1. For power supply, use Aiphone power supply model specifi ed
for use with system. If non-specifi ed product is used, fi re or
malfunction could result.
2. Do not put anything on the unit or cover the unit with cloth, etc.
Fire or unit trouble could result.
3. Do not install the unit in any of the following locations. Fire,
electric shock, or unit trouble could result.
Places under direct sunlight or near heating equipment that *
varies in temperature.
Places subject to dust, oil, chemicals, hydrogen sulfi de (hot *
spring).
Places subject to moisture and humidity extremes, such as *
bathrooms, cellars, greenhouses, etc.
Places where the temperature is quite low, such as inside a *
refrigerated area or in front of an air conditioner.
Places subject to steam or smoke (near heating or cooking *
surfaces).
Where noise generating devices such as dimmer switches or *
inverter electrical appliances are closeby.
Locations subject to frequent vibration or impact.*
4. Do not apply high pressure on the screen. If fractured, injury
could result.
5. If the LCD is punctured, do not touch the liquid crystal inside.
Infl ammation could result. If contact should occur, fl ush or rinse
area with water thoroughly and consult your doctor.
6. Do not use the handset when you perform a call test, otherwise
it may cause damage to your ear. Be sure to use the built-in
speaker.
7. Be sure to perform a call test with the handset on the hook. If
you operate the hook switch with the handset on your ear, a
sudden call etc. may arrive causing damage to your ear.
8. Do not perform a touchscreen operation with a sharp
instrument such as a ballpoint pen or other metal objects. The
touchscreen may get broken causing leakage of the liquid
crystal inside the screen. If you get the liquid crystal in your eye
or mouth, wash it away immediately.
GENERAL PRECAUTIONS
1. Keep the unit more than 1m (3.3') away from radio or TV set.
2. Comply with all third party manufacturing specifi cations that will be
used with this system (sensors, door releases, etc.).
3. If the unit is down or does not operate properly, unplug the power
supply or turn off the POWER switches.
4. When wall-mounted, the top of the unit may darken. This does not
indicate a malfunction.
5. The unit case may become warm with use, but this is not a unit
malfunction.
6. If it is used close to a cellular phone, the unit may malfunction.
7. The unit can be damaged if dropped. Handle with care.
8. The unit will not work during power failure.
9. In areas where broadcasting station antennas are close by, the
intercom system may be affected by radio frequency interference.
10. All the units, except for door stations, are designed for indoor use
only. Do not use at outdoor locations.
11. Please note the LCD panel, though manufactured with very high
precision techniques, inevitably will have a very small portion of its
image elements always lit or not lit at all. This is not considered a
unit malfunction.
12. Environmental sound around the unit may hinder smooth
communication, but this is not a malfunction.
13. The unit has audio monitoring function between residential
stations. When using this function for baby monitoring, never
install the unit within reach of children to prevent strangulation with
coil cord or wires.
14. Refrain from using the color monitor station in sunlit areas.
15. At night, due to reduced lighting on the object, the screen sees
more noise and faces become more diffi cult to see, but this is not
a malfunction.
16. For hands-free communication:
If you stand too far away, it may be diffi cult for the other person to
hear the communication.
17. If there are loud noises around the unit (such as music playing or
children crying), the sound may break up and be diffi cult to hear.
18. During communication, if you speak before the other person
has fi nished talking, your voice may not come through clearly.
Communication will proceed smoothly if you wait until the other
person has fi nished before speaking.
19. At a gate or porch illuminated by a fl uorescent lamp, the image
may vary, but this is not a malfunction.
20. The outline of video images displayed by the video door station
may differ from that of the actual person(s) or background, but this
is not a malfunction.
21. If the screen of a video door station freezes during wintertime, the
image may become diffi cult to see or the call button (including the
call button of audio door station) may not move, but this is not a
malfunction.

5
22. Aiphone assumes no responsibility for corruption of saved
information (such as changes to or deletion of saved information).
Please be aware of this in advance.
23. Warm-color lighting shining on the video door station may change
the tint of the image on the screen.
24. When outside temperature lowers sharply after rainfall, etc., the
inside of the camera may fog up slightly, causing a blurry images,
but this is not a malfunction. Normal operation will be restored
when moisture evaporates.
25. When the unit's screen is illuminated with strong light, the image
looks white or silhouetted, but this is not a malfunction.
26. When putting a hearing aid into T-mode and approaching the
unit, the intercom system may be affected by radio frequency
interference etc., depending on the installation environment.
27. The handset may get warm, but this is not a malfunction.
NOTICES
We will under no conditions be liable for damage occurring due
•
to the inability to communicate due to malfunctions, problems, or
operational errors in this product.
We will under no conditions be liable for any damages or losses
•
resulting from this product's contents or specifi cations.
This manual was created by Aiphone Co., Ltd., all rights reserved.
•
Copying, in part or in whole, this manual without prior permission
from Aiphone Co., Ltd. is strictly forbidden.
Please note that images and illustrations depicted in this manual
•
may differ from the actual ones.
Please note that this manual may be revised or changed without
•
prior notice.
Please note that product specifi cations may be changed for the sake
•
of improvement without prior notice.
This system is not intended for life support or crime prevention. It is
•
a supplementary means of conveying information. Aiphone will under
no conditions be liable for loss of life or property which occurs while
the system is being operated.
The discrimination between day and night is performed automatically
•
by the door station. Though the discrimination result may vary
depending on the installation environment, it is not a malfunction.
6
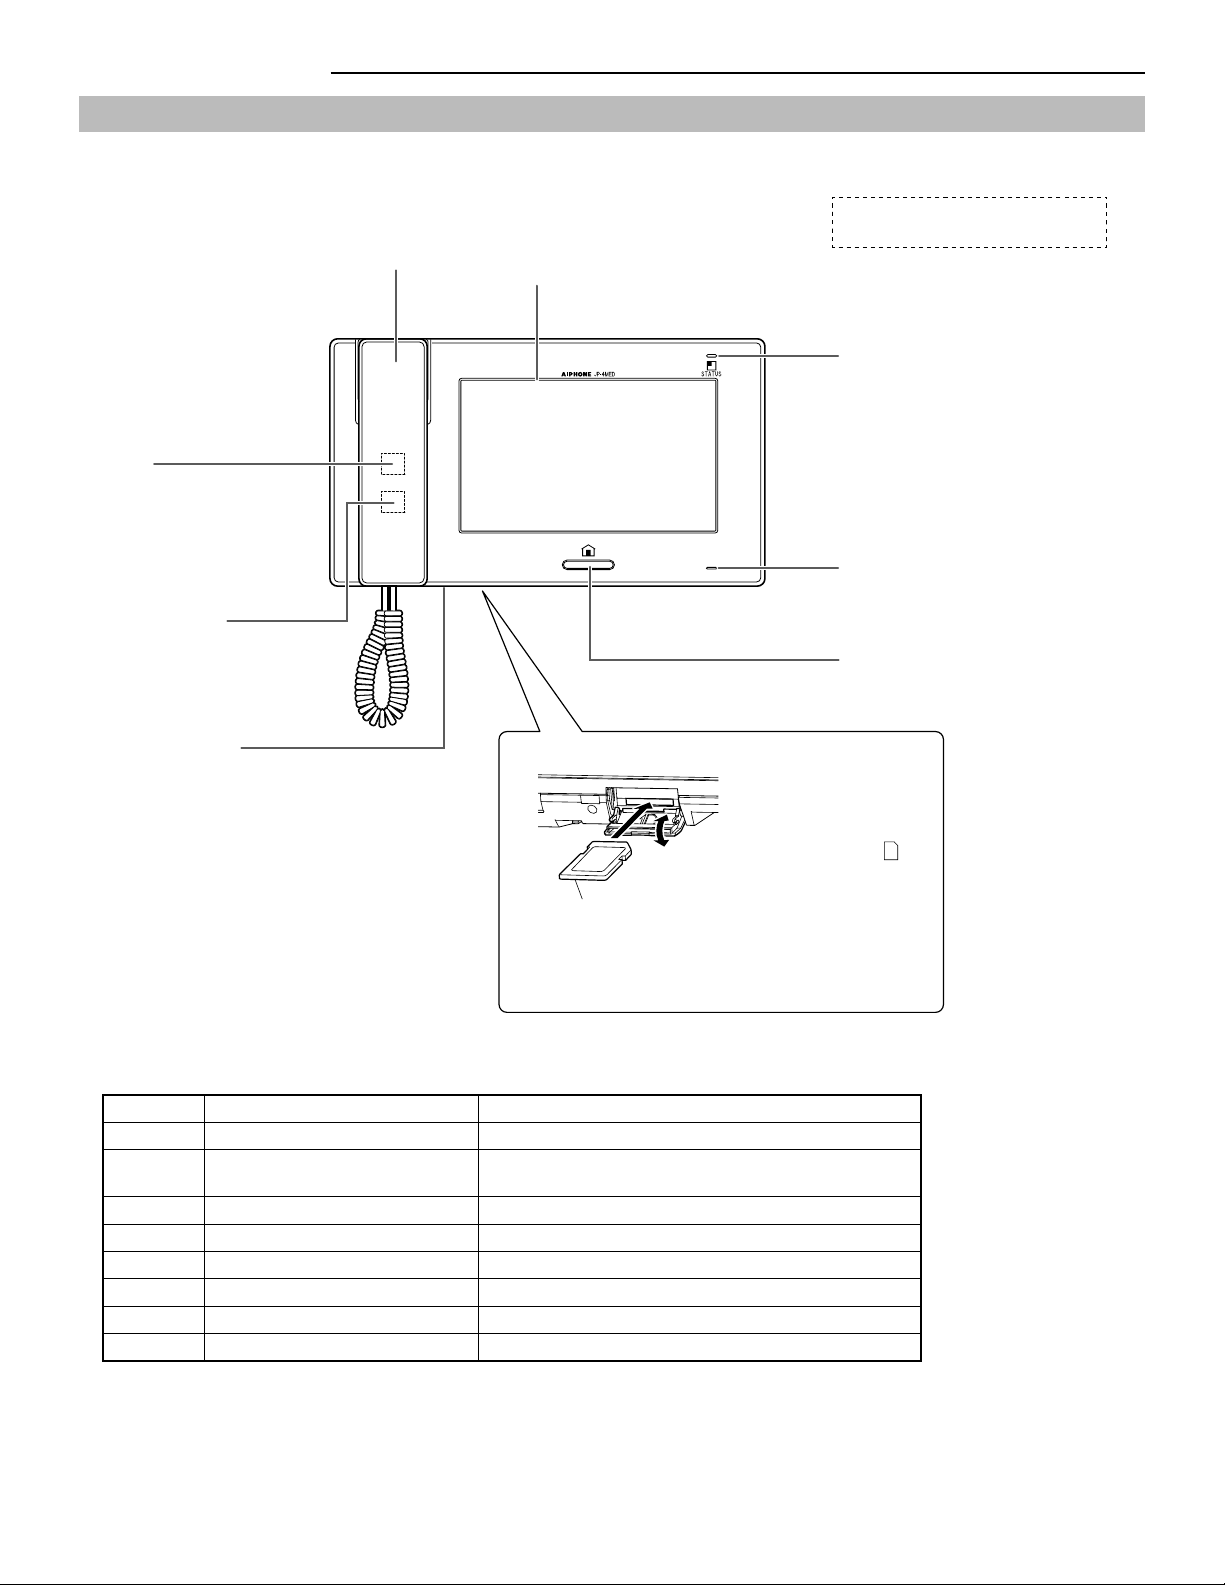
PART NAMES
Front panel
Status LED table
Color Indication pattern Station status
Orange Blinking every 0.5 seconds Incoming call from door station
Orange Blinking every 0.5 seconds Calling a single or all sub master stations or being called
from a sub master station.
Green Solid light Communicating with a door station or a sub master station.
Green Solid light Monitoring a door station or a sub master station.
Blue Blinking every 2 seconds Recorded images have not been viewed.
Red Solid light Security mode is active.
Red Blinking every 0.5 seconds Sounding the security alarm.
Light blue Blinking every 0.5 seconds Rebooting.
SD card slot
SD (or SDHC) card
(not included)
Insert an SD (or SDHC)
card in this slot with the
label side facing front.
After inserting the *
card, confi rm that
SD
is
displayed on the screen.
When the card has an *
erasure-prevention
switch, be sure to set the
switch to the "unlocked"
position before inserting
the card.
Handset
Speaker
Call tones, audio from a station,
and alarms are heard from here.
Color LCD touchscreen
See the next page for
details.
Status LED
Indicates current status of this
station by lighting up or blinking.
See the table below for details.
Remove protective fi lm from screen
before use.
Reset button
Press this button to reboot this
station when this station gets out
of commission etc.
While being rebooted, the *
status LED blinks.
Microphone
Sends audio from this station to
other stations.
HOME button
Turns on the color LCD screen.
Hearing aid T-mode
compatibility symbol

7
PART NAMES USING THE SYSTEM APPENDIX
SETTING AND ADJUSTMENT
Screen
This station features a touchscreen. Simply touch the icons or buttons displayed on the screen.
The following are examples of typical windows and icons.
The displayed windows and icons may differ depending on the devices connected to this system.
*
HOME window
This window appears when the screen is turned on.
While communicating with a video door station
Frequently-used icons
/
Scrolls the window up and
down to display more options.
BACK
Touch to return to previous window.
ENTER
Touch to select item or value.
NOTE:
The above example may differ from actual product.
Indicates when an SD (or SDHC)
card has been installed and is
available.
Current date and time
is displayed when a backlight
adjustment is performed during the day.
is displayed when an adjustment is
performed during the night.
Switches the display mode between
zoom and wide.
Moves the images from right to left
or up and down.
<Up>, <Right>
<Down>, <Left>
Shows the status (calling, talking,
etc.) of this station.
Displays which door station is calling.
Zoom mode
Blinks while recording.
Appears when
1
or
2
is
touched to release the corresponding
door.
ROOM CALL (→P. 23)
Touch this to call a single sub master
station or all sub master stations
simultaneously.
MONITOR (→P. 24)
Touch this to monitor a door station or sub
master station.
PLAY (→P. 26)
Touch this to play recorded
images from door stations.
SETTINGS (→P. 8)
Touch this to program settings and
adjustments.
SECURITY (→P. 29)
Touch this to activate the security
mode or to change security
settings.
OFF
Touch this to turn screen off and set
this station in standby mode.
OPTION (→P. 30)
Touch this to activate the connected
external device(s).
Depending on settings, this button may *
not be displayed.
Indicates when an SD (or SDHC)
card has been installed and is
available.
Current date and time

8
SETTING AND ADJUSTMENT
NOTE:
First set the current date and time, and change the display language for the screen to the language you need. (
→
P. 9)
SETTING LIST
To begin, touch
SETTINGS
from HOME window to program the settings before using this station for the fi rst time.
Category Item Sub item Setting range Default
CALL
DOOR STATION
SETTINGS *
1
DOOR1/DOOR2/DOOR3/
DOOR4
ENABLE/DISABLE ENABLE
(for each)
ROOM STATION CALL
SETTINGS *
1
ID2/ID3/ID4/ID5/ID6/ID7/ID8 ENABLE/DISABLE ENABLE
(for each)
CALL TONE DOOR1/DOOR2/DOOR3/
DOOR4/
INTERNAL ROOM CALL
1 – 8 DOOR1: 1
DOOR2: 2
DOOR3: 3
DOOR4: 4
INTERNAL
ROOM CALL: 5
DOOR CALL DURATION - 45 sec./90 sec. 45 sec.
TALK
PRIVACY MODE - ENABLE/DISABLE DISABLE
AUTO NIGHT VOLUME - ENABLE/DISABLE DISABLE
VIDEO DOOR LED - ENABLE/DISABLE ENABLE
MONITOR
ROOM MONITOR - ENABLE/DISABLE ENABLE
VIDEO DOOR LED - ENABLE/DISABLE DISABLE
DOOR MONITOR DURATION - 30 sec./60 sec./120 sec./CONTINUOUS 30 sec.
ROOM MONITOR DURATION - 10 min./CONTINUOUS CONTINUOUS
GENERAL
SOUND
SETTING
AUDIBLE TOUCH TONE - ENABLE/DISABLE ENABLE
VOICE GUIDANCE
(JP-DVF-L ONLY)
DOOR1/DOOR2/DOOR3/
DOOR4
ENABLE/DISABLE ENABLE
(for each)
DOOR
RELEASE *
1
- DOOR1/DOOR2/DOOR3/
DOOR4
ENABLE/DISABLE ENABLE
(for each)
PIN SETTING - CURRENT PIN/NEW PIN (Select four numbers from 0 – 9) 1111
DATE/TIME - (MONTH/DAY/YEAR/HOUR/
MINUTE)
- Jan/1/2012
00:00
ALARM
SETTING
SECURITY SETTING EXIT DELAY SETTING 0 sec./30 sec./60 sec./120 sec./
300 sec./600 sec.
60 sec.
RETURN DELAY SETTING 0 sec./30 sec./60 sec./120 sec./
300 sec./600 sec.
60 sec.
ALARM PIN ENABLE (Select four numbers from 0 – 9)/
DISABLE
DISABLE
UTILITY SETTING ALARM AT DOOR ENABLE/DISABLE DISABLE
ALARM DURATION 10 sec./1 min./10 min./1 hr. 10 min.
SD CARD EXPORT RECORDED
IMAGES
- YES/NO -
FORMAT SD CARD - YES/NO -
ROOM STATION
NAME
- ID1 - ID8 - 1 - 8
LANGUAGE - - ENGLISH/DEUTSCH/FRANÇAIS/
ITALIANO/ESPAÑOL/NEDERLANDS/
NORSKE/
繁體中文
/
中文(简体)
ENGLISH
ADJUST
- 1 - 10 6
VOLUME
/ / /
0 (mute), 1 - 10 6 (for each)
RECORD
SELECT RECORD
SETTINGS
- ZOOM > WIDE/WIDE > ZOOM/
ZOOM/WIDE
ZOOM > WIDE
ERASE ALL RECORDED
IMAGES
- YES/NO -
NOTES:
The screen will turn off if approx. one minute elapses with no operation on this station. When it occurs, if the setting is not complete, start from
•
the beginning.
The above list is a brief overview of the setting items available on this station. The descriptions, and the style and order of descriptions do not
•
necessarily equate with the actual displays.
*
1
: It is required to enter PIN before programming can begin.
Program system settings using this station after all devices are installed. Program individual device settings on all master and sub
master stations separately.
9
PART NAMES USING THE SYSTEM APPENDIX
SETTING AND ADJUSTMENT
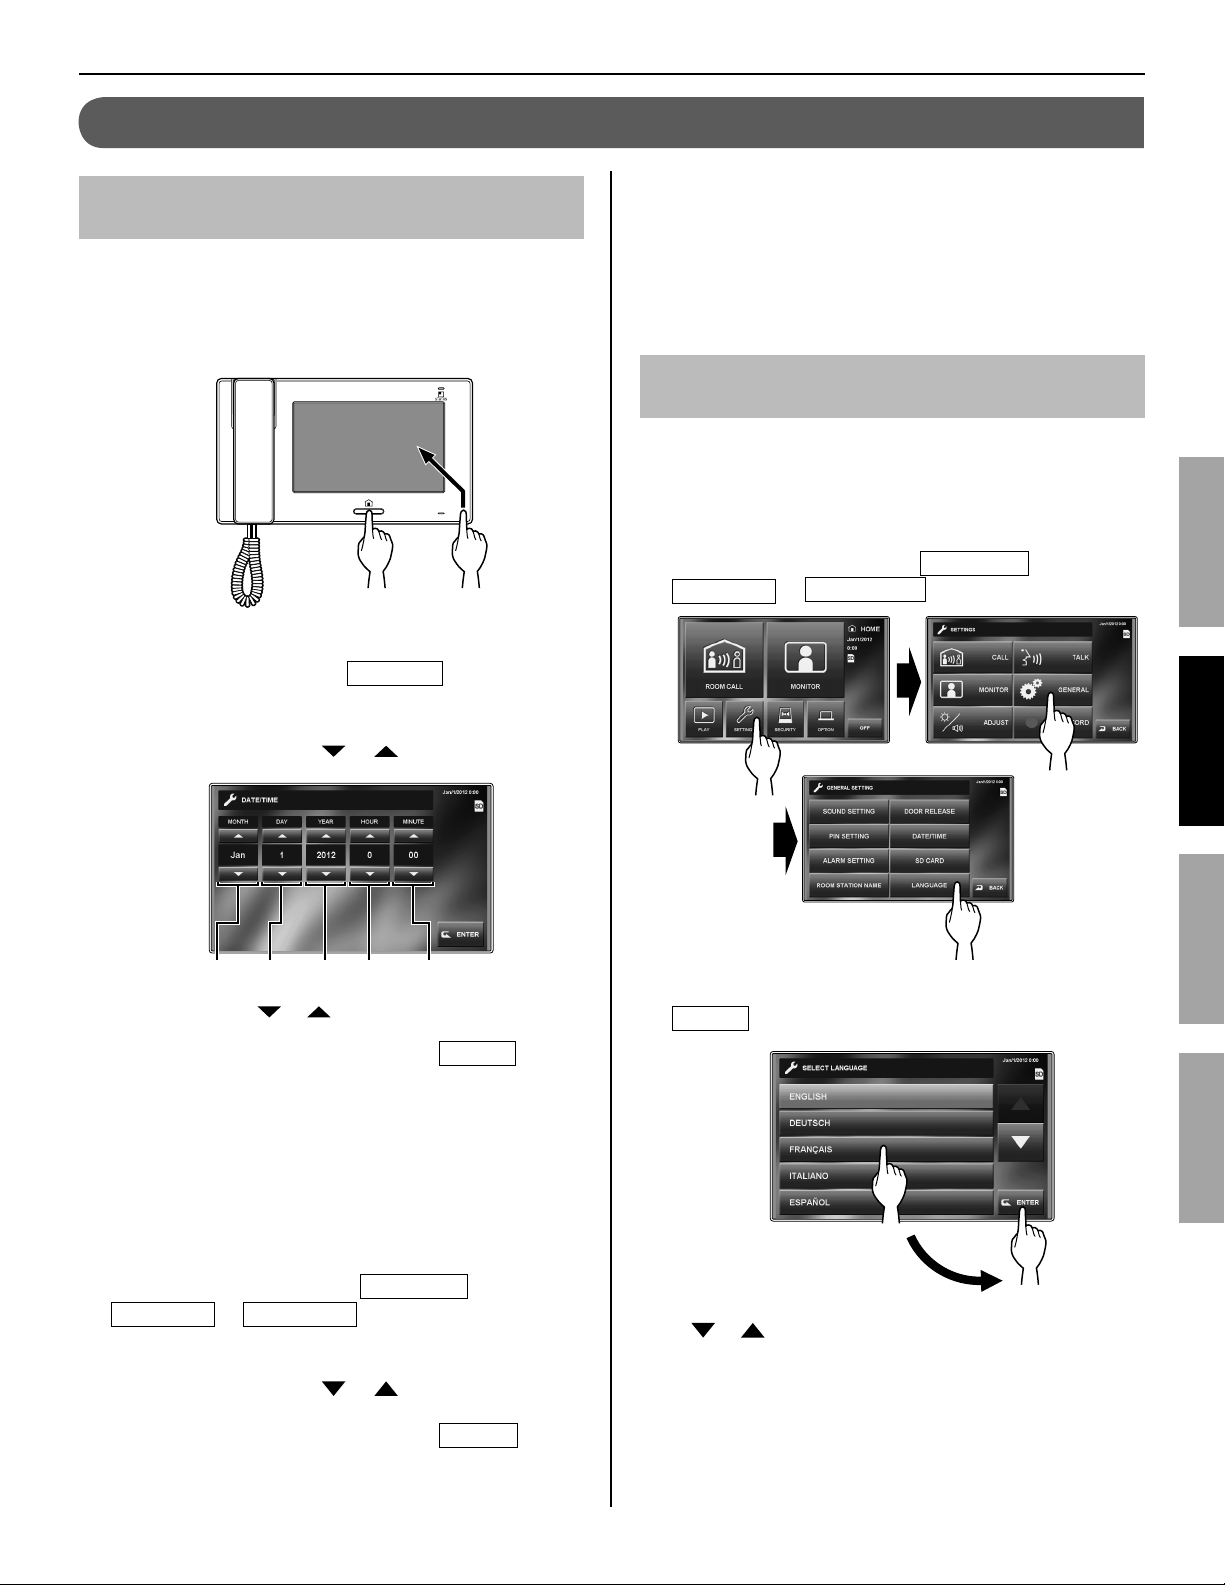
Setting the current date and time
[GENERAL] - [DATE/TIME
]
When this station is powered up for the fi rst time or after this
station is rebooted, set the current date and time.
If screen is off, press the [HOME] button, or touch
1
screen to turn it on.
When the message, "SET CURRENT DATE AND
2
TIME." is displayed, touch
SETTING
.
Set the month, date, year, hour, and minute
3
individually by touching or .
Touch and hold
*
or to increase speed.
When the setting has fi nished, touch
4
ENTER
.
Press the [HOME] button to display the HOME
5
window.
To correct date and time
You can correct the current date and time any time by following
the procedue below.
From HOME window, touch
1
SETTINGS
→
GENERAL
→
DATE/TIME
.
Set the month, date, year, hour and minute
2
individually by touching or .
When the setting has fi nished, touch
3
ENTER
.
NOTES:
A maximum of 60 seconds time gain/loss can occur in the
•
displayed time over a month. It is recommended to correct the
time periodically.
If there is no power supply for 30 minutes or more, the date and
•
time return to default.
Changing the display language
[GENERAL] - [LANGUAGE]
The display language for the screen is set to English as default.
First change it to the language you need as follows.
This setting is also applied to all sub master stations in this
*
system.
From HOME window,
1
touch
SETTINGS
→
GENERAL
→
LANGUAGE
.
Touch desired language until highlighted and select
2
ENTER
.
If the target language is not found in the window, touch
*
or .
INITIAL SET-UP
Month Date Year Hour Minute
or
10
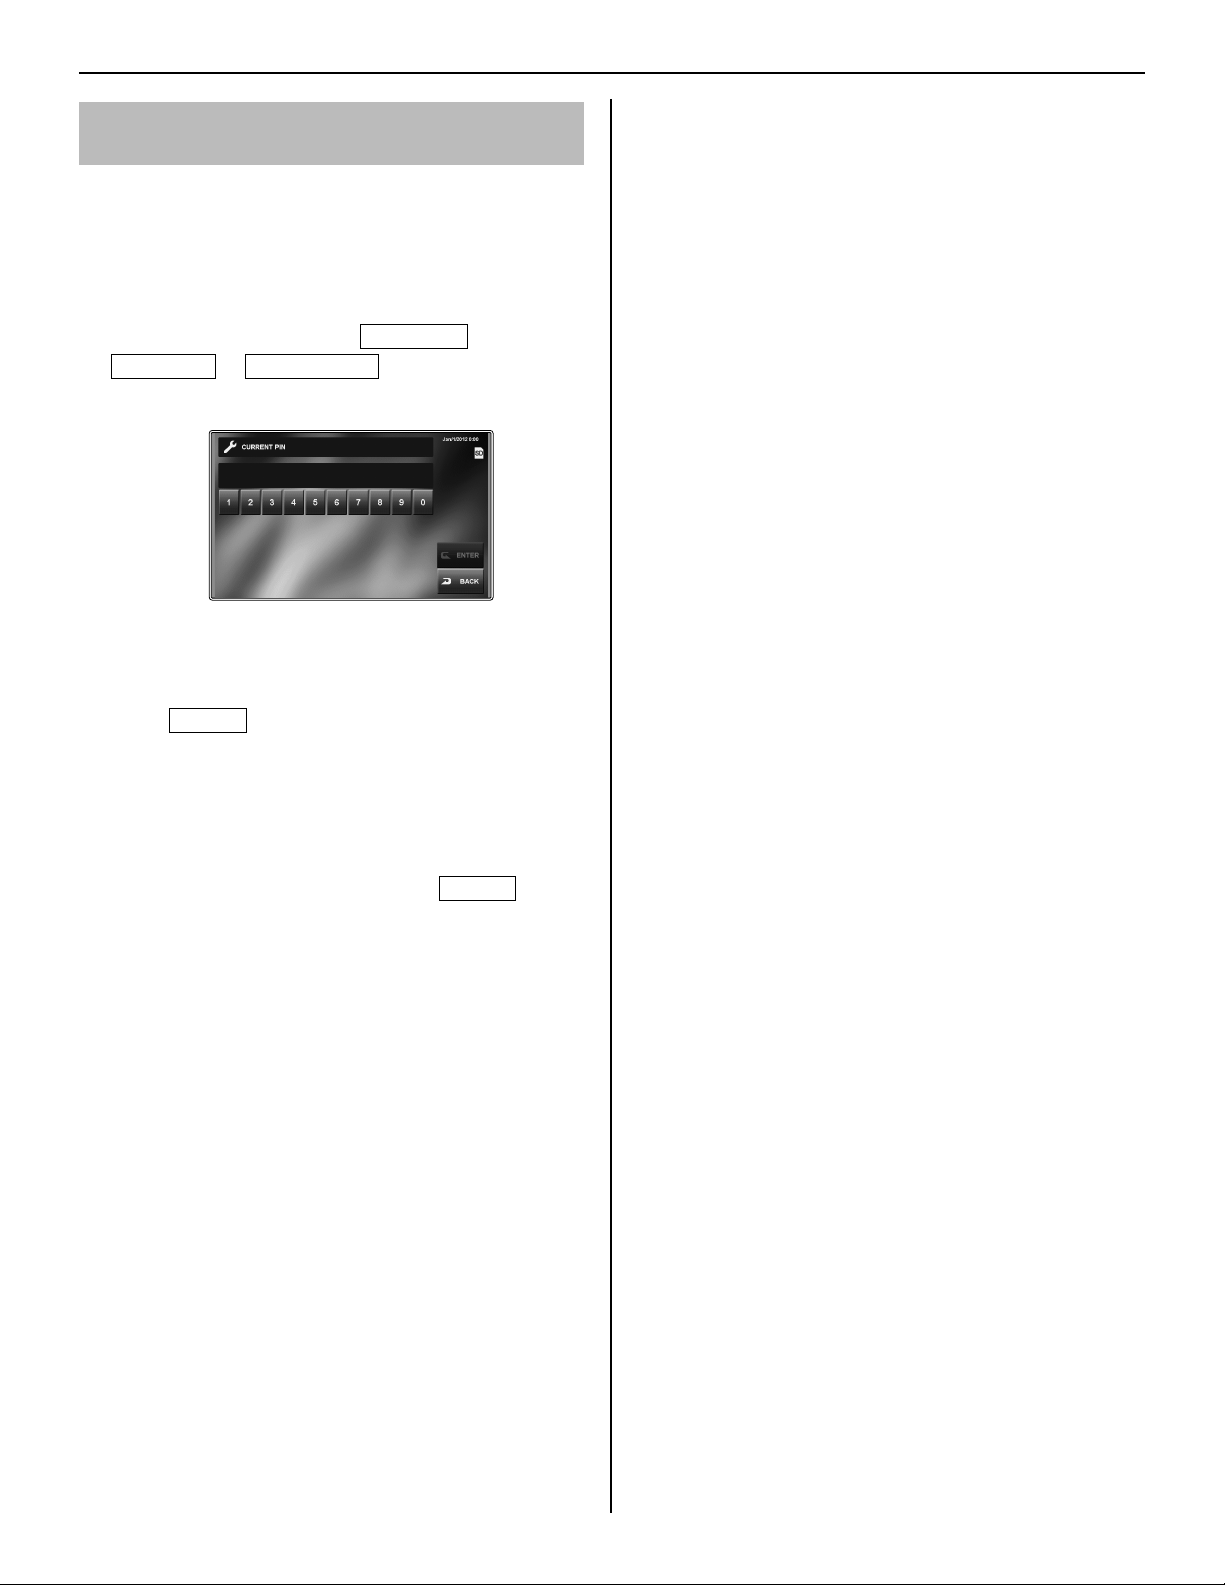
Setting the PIN
[GENERAL] - [PIN SETTING]
Some settings require a PIN to prevent content from being
altered by unauthorized individuals.
Create a unique PIN to properly secure settings.
The factory default is "1111".
*
From HOME window, touch
1
SETTINGS
→
GENERAL
→
PIN SETTING
.
The current PIN entry window is displayed.
Enter the current 4-digit PIN. (For fi rst time users,
2
default is "1111").
Touch
3
ENTER
.
The new PIN entry window is displayed.
If a wrong PIN is entered, an error message will be
*
displayed requesting the correct PIN.
Enter the new 4-digit PIN.
4
When the setting has fi nished, touch
5
ENTER
.
The new PIN is now stored.
You can change the PIN any time by following the above
procedure.
NOTES:
When this station is initialized by the [INSTALL] menu, the PIN
•
returns to "1111" (default).
You must keep the PIN without fail. If you forget the PIN, you
•
must initialize this station by the [INSTALL] menu, thus all the
setting contents return to default.
 Loading...