

Page 1
ePhoto CL30
User’s Guide
Page 2

2
ePhoto CL30 User’s Guide
FCC Information Test
FCC WARNING:
to Part 15 of FCC Rules. Only the power pack and cable supplied with the camera
should be used. Operation with other power packs and cables is likely to result in interference to radio and TV reception and could void the user’s authorization to operate this
equipment.
This device complies with Part 15 of the FCC Rules. Operation is subject to the following two conditions:
1. This device may not cause harmful interference.
2. This device must accept any interference received, including interference that may
Changes or modifications not expressly approved by the manufacturer may void the
user’s authority to operate this equipment.
This equipment meets the limits for a Class B digital device, pursuant
cause undesired operation.
User Information
NOTE:
This equipment has been tested and found to comply with the limits for a Class
B digital device, pursuant to Part 15 of the FCC Rules. These limits are designed to provide reasonable protection against harmful interference in a residential installation. This
equipment generates, uses and can radiate radio frequency energy and, if not installed
and used in accordance with the instructions, may cause harmful interference to radio
communications. However, there is no guarantee that interference will not occur in a
particular installation. If this equipment does cause harmful interference to radio or
television reception, which can be determined by turning the equipment off and on, the
user is encouraged to try to correct the interference by one or more of the following
measures:
Reorient or relocate the receiving antenna.
◗
Increase the separation between the equipment and receiver.
◗
Connect the equipment into an outlet on a circuit different from that to which the
◗
receiver is connected.
Canadian Radio Interference Regulations
Statement
This Class B digital device meets all the requirements of the Canadian InterferenceCausing Equipment Regulations.
Cet appareil numérique de la Classe B respecte toutes les exigences du Réglement sur
le matériel brouilleur du Canada.
Page 3

ePhoto CL30 User’s Guide
1-Year Limited Hardware Warranty
Agfa warrants this product to be free from defects of material and workmanship for one
(1) year from the date of purchase. During the warranty period, Agfa will repair or
replace, at its option, the product at no charge to the customer. The replacement unit
may be a remanufactured unit or a unit of equal or greater functionality. After one (1)
year, Customer shall pay for all parts, labor and service.
Agfa warrants that software products will conform to published specifications in effect
at the time of delivery for 90 days after purchase. Customer acknowledges that the
Software may have inherent defects because of its complexity. The warranty applies
only to the media on which the software is recorded.
If a unit is replaced during the warranty period, the original warranty shall remain in
effect until the end of the one (1) year period or shall be 30 days, whichever is longer.
This warranty is transferable with new owner notification to Agfa.
This warranty shall not apply if Customer:
1. abuses or modifies Product or Software;
2. operates the system in an environment with excessive dirt, moisture, chemical
fumes, extremes of temperature or other improper conditions. The camera is not
impermeable to water, dust or sand.
3. supplies other Software or Interfacing.
4. Uses any adapter other than the Agfa ePhoto AC adapter.
Warranty service is excluded if the serial number of the product has been tampered
with or removed.
THE PARTIES AGREE THAT ALL OTHER WARRANTIES, EXPRESS OR IMPLIED,
INCLUDING WARRANTIES OF FITNESS FOR A PARTICULAR PURPOSE, MERCHANTABILITY AND NON-INFRINGEMENT, ARE EXCLUDED.
3
Page 4

4
ePhoto CL30 User’s Guide
Page 5

ePhoto CL30 User’s Guide
C
ONTENTS
5
FCC Information Test
User Information
Canadian Radio Interference Regulations Statement
1-Year Limited Hardware Warranty
Contents
Introduction
Camera Parts
Memory Cards
Batteries
Controlling the Camera
Status Display
Taking Pictures
Changing Basic Settings
Changing Advanced Settings
. . . . . . . . . . . . . . . . . . . . . . . . . . . . . . . . . . . . . . . . . . . . . . . . 5
. . . . . . . . . . . . . . . . . . . . . . . . . . . . . . . . . . . . . . . . . . . . . 7
Inserting a Memory Card . . . . . . . . . . . . . . . . . . . . . . . . . 10
Memory Card Capacity . . . . . . . . . . . . . . . . . . . . . . . . . . . 10
. . . . . . . . . . . . . . . . . . . . . . . . . . . . . . . . . . . . . . . . . . . . . . . 12
Battery Conditions . . . . . . . . . . . . . . . . . . . . . . . . . . . . . . . 12
Mode Switch . . . . . . . . . . . . . . . . . . . . . . . . . . . . . . . . . . . 13
EasyPilot Button . . . . . . . . . . . . . . . . . . . . . . . . . . . . . . . . 13
LCD Switch . . . . . . . . . . . . . . . . . . . . . . . . . . . . . . . . . . . . 13
Shutter Button . . . . . . . . . . . . . . . . . . . . . . . . . . . . . . . . . . 14
Resolution . . . . . . . . . . . . . . . . . . . . . . . . . . . . . . . . . . . . . 18
Flash . . . . . . . . . . . . . . . . . . . . . . . . . . . . . . . . . . . . . . . . . 18
Digital Zoom . . . . . . . . . . . . . . . . . . . . . . . . . . . . . . . . . . . 19
Focus . . . . . . . . . . . . . . . . . . . . . . . . . . . . . . . . . . . . . . . . 19
Preview . . . . . . . . . . . . . . . . . . . . . . . . . . . . . . . . . . . . . . . 20
Tips on Using the Advanced Menu . . . . . . . . . . . . . . . . . . 21
Advanced Settings Icons . . . . . . . . . . . . . . . . . . . . . . . . . 22
QuickReview . . . . . . . . . . . . . . . . . . . . . . . . . . . . . . . . . . . 22
Self Timer . . . . . . . . . . . . . . . . . . . . . . . . . . . . . . . . . . . . . 23
Exposure . . . . . . . . . . . . . . . . . . . . . . . . . . . . . . . . . . . . . . 23
White Point . . . . . . . . . . . . . . . . . . . . . . . . . . . . . . . . . . . . 24
External Flash . . . . . . . . . . . . . . . . . . . . . . . . . . . . . . . . . . 25
Automatic . . . . . . . . . . . . . . . . . . . . . . . . . . . . . . . . . . . . . 26
Video Out . . . . . . . . . . . . . . . . . . . . . . . . . . . . . . . . . . . . . 26
Preferences . . . . . . . . . . . . . . . . . . . . . . . . . . . . . . . . . . . . 26
. . . . . . . . . . . . . . . . . . . . . . . . . . . . . . . . . 2
. . . . . . . . . . . . . . . . . . . . . . . . . . . . . . . . . . . . . . . . . 2
. . . . . . . . . . . . . . . . . . . . . . . . 3
. . . . . . . . . . . . . . . . . . . . . . . . . . . . . . . . . . . . . . . . . . . . 8
. . . . . . . . . . . . . . . . . . . . . . . . . . . . . . . . . . . . . . . . . . 10
. . . . . . . . . . . . . . . . . . . . . . . . . . . . . . . . . 13
. . . . . . . . . . . . . . . . . . . . . . . . . . . . . . . . . . . . . . . . . . 15
. . . . . . . . . . . . . . . . . . . . . . . . . . . . . . . . . . . . . . . . . 16
. . . . . . . . . . . . . . . . . . . . . . . . . . . . . . . . . 17
. . . . . . . . . . . . . . . . . . . . . . . . . . . . . 21
. . . . . . . . 2
Contents
Page 6

6
Date & Time . . . . . . . . . . . . . . . . . . . . . . . . . . . . . . . . . . .27
RS232 Speed . . . . . . . . . . . . . . . . . . . . . . . . . . . . . . . . . .27
Working with Captured Images
Using Single-Image View . . . . . . . . . . . . . . . . . . . . . . . . .28
Using Multi-Image View . . . . . . . . . . . . . . . . . . . . . . . . . . 31
Using the Camera with a TV
Changing the Type of Video Connection . . . . . . . . . . . . . .34
Using the Camera with a Computer
System Requirements . . . . . . . . . . . . . . . . . . . . . . . . . . . . 35
IBM PCs and Compatibles . . . . . . . . . . . . . . . . . . . . . . . .35
Installing PhotoWise Software . . . . . . . . . . . . . . . . . . . . .35
Connecting to Your Computer . . . . . . . . . . . . . . . . . . . . . .36
Transferring Images into Your Computer . . . . . . . . . . . . .36
Creating Installation Diskettes for PhotoWise . . . . . . . . . .37
Care and Maintenance
Camera . . . . . . . . . . . . . . . . . . . . . . . . . . . . . . . . . . . . . . .38
AC Adapter . . . . . . . . . . . . . . . . . . . . . . . . . . . . . . . . . . . .38
Batteries . . . . . . . . . . . . . . . . . . . . . . . . . . . . . . . . . . . . . . 38
Memory Cards . . . . . . . . . . . . . . . . . . . . . . . . . . . . . . . . . . 39
Cleaning the Camera . . . . . . . . . . . . . . . . . . . . . . . . . . . . .39
Troubleshooting
Camera Specifications
. . . . . . . . . . . . . . . . . . . . . . . . . . . . . . . . . . . . . . . . 40
. . . . . . . . . . . . . . . . . . . . . . . . . . . 28
. . . . . . . . . . . . . . . . . . . . . . . . . . . . . . 34
. . . . . . . . . . . . . . . . . . . . . . . . . . . . . . . . . . . 38
. . . . . . . . . . . . . . . . . . . . . . . . . . . . . . . . . . . 45
ePhoto CL30 User’s Guide
. . . . . . . . . . . . . . . . . . . . . . . . 35
Contents
Page 7

ePhoto CL30 User’s Guide
7
I
NTRODUCTION
Your ePhoto CL30 takes high quality digital pictures— and it’s easy
to use. Just point and click, like a conventional camera. You can
quickly change the camera settings, too, with the EasyPilot button.
But the CL30 is more than a conventional camera. You can:
◗
Check the camera settings on the status display
Frame pictures with the optical viewfinder or color LCD screen
◗
Take pictures and immediately review them on the color LCD
◗
screen or a TV
Store images on a removable, reusable CompactFlash™ mem-
◗
ory card—up to 36 images, depending on the resolution.
Keep only your best shots and delete the rest immediately.
◗
Quickly load pictures into a computer and print them, or use
◗
them on the Web, in email or multimedia. No need to scan pictures.
◗
Transfer your pictures to a computer with a serial connection or
with the newer, faster USB connection (requires Windows 98
and a computer with a USB connection)
◗
Take pictures in black and white text mode and use the documents in an electronic database and with OCR software
Introduction
Page 8
8
C
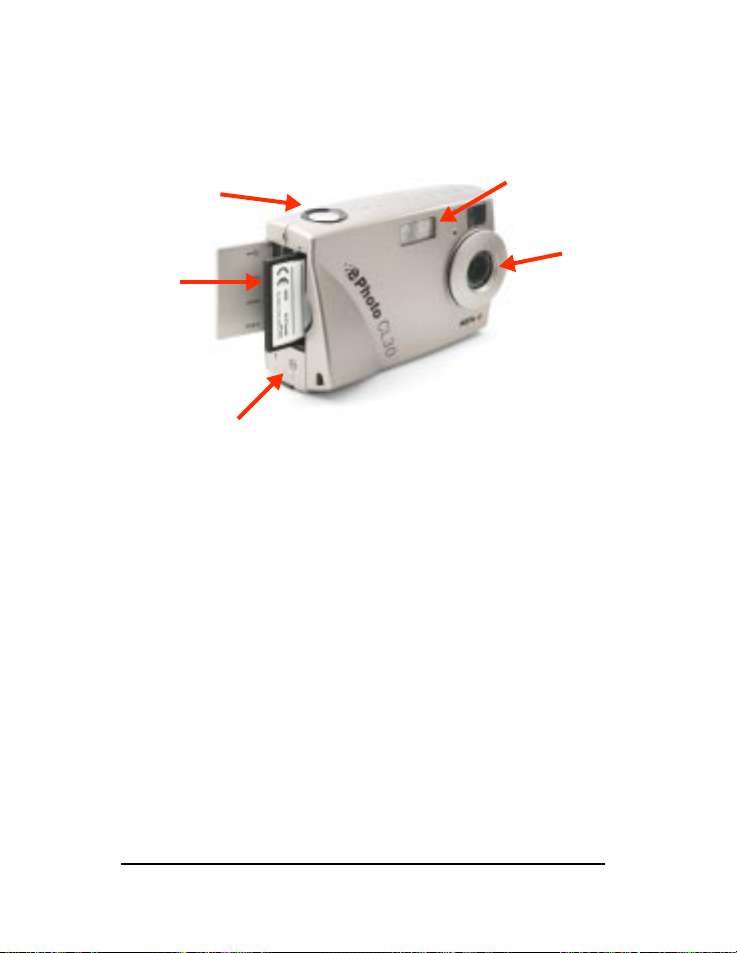
AMERA PARTS
ePhoto CL30 User’s Guide
1
2
5
4
Shutter Button:
1.
Built-in Flash:
2.
off).
Auto-focus Lens:
3.
Battery Compartment:
4.
ium or rechargeable NiMH batteries.
Memory Card/Port Compartment:
5.
Flash memory card and the USB, SERIAL, POWER (AC adapter)
and VIDEO OUT ports.
takes pictures.
with 4 settings (automatic, fill-in, “red-eye” and
glass, 43mm
holds 4 size AA alkaline (included), lith-
holds a removable Compact-
3
Camera Parts
Page 9
ePhoto CL30 User’s Guide
7
9
8
6
11
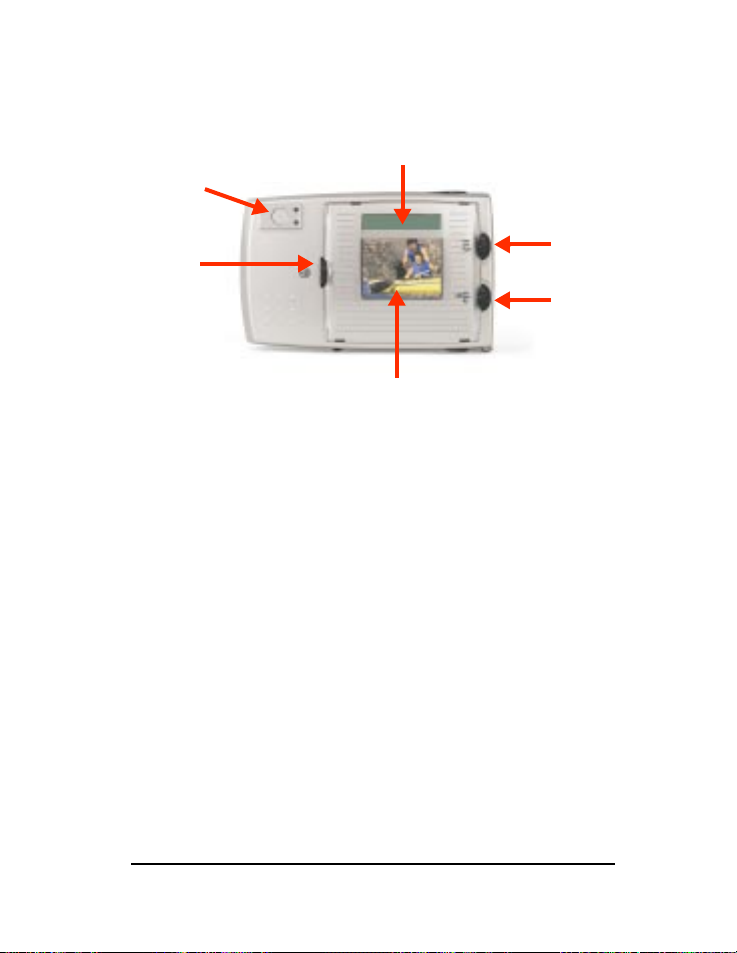
6.
EasyPilot™ Button:
turned) and makes a selection (when pressed).
Optical Viewfinder:
7.
LCD to conserve battery power.
Status Display: displays information about the memory card,
8.
batteries, the number of pictures remaining, and the camera
settings.
9.
Mode Switch:
PLAY to view stored images) and OFF.
LCD Switch: turns the color LCD screen ON and OFF, or selects
10.
the PC mode, which you use when you connect your camera to
a computer.
11.
Color LCD:
tured images, and the camera’s built-in menu system.
scrolls through menu options (when
frames pictures. Use instead of the color
turns the camera on (REC to take pictures or
displays the live image (like the viewfinder), cap-
9
10
Camera Parts
Page 10

10
M
EMORY CARDS
The ePhoto CL30 has no internal memory. All pictures are stored on
removable CompactFlash™ memory cards. These cards are available in 2 - 96 MB sizes.
You can only use only CompactFlash memory cards.
ePhoto CL30 User’s Guide
Inserting a Memory Card
To insert a memory card:
1. Open the door of the memory card/port compartment.
2. Insert the memory card (included) and push it all the way into
the slot. The card can only be inserted one way.
3. Close the door.
Memory Card Capacity
Your camera comes with one 4 MB CompactFlash card, whose storage capacity depends on the resolution of the images. For more
information, see
Memory Card Conditions
Certain memory card conditions are indicated on the color LCD and
on the Status Display from time to time. On the color LCD, you may
see a message such as
On the Status Display, you’ll see a memory card icon. When the icon
is flashing, it indicates that:
◗
The memory card is full. To take more pictures, do one of the
following:
◗
Insert a new memory card.
Resolution
Memory cards can store images in any combination of
resolutions.
on page 18.
No card!
Memory Cards
Page 11

ePhoto CL30 User’s Guide
11
Lower the resolution. See
◗
◗
Transfer the pictures to your computer. See
Your Computer
◗
Delete some or all of the images. See
page 29.
No memory card has been inserted.
◗
The memory card is the wrong type or is unreadable. To refor-
◗
mat the card, press the EasyPilot button, turn it to select YES
and then press it in to begin the reformatting process.
Selecting YES erases all data stored on the memory card.
on page 36.
Resolution
on page 18.
Connecting to
Deleting Images
on
Memory Cards
Page 12
12
ePhoto CL30 User’s Guide
B
ATTERIES
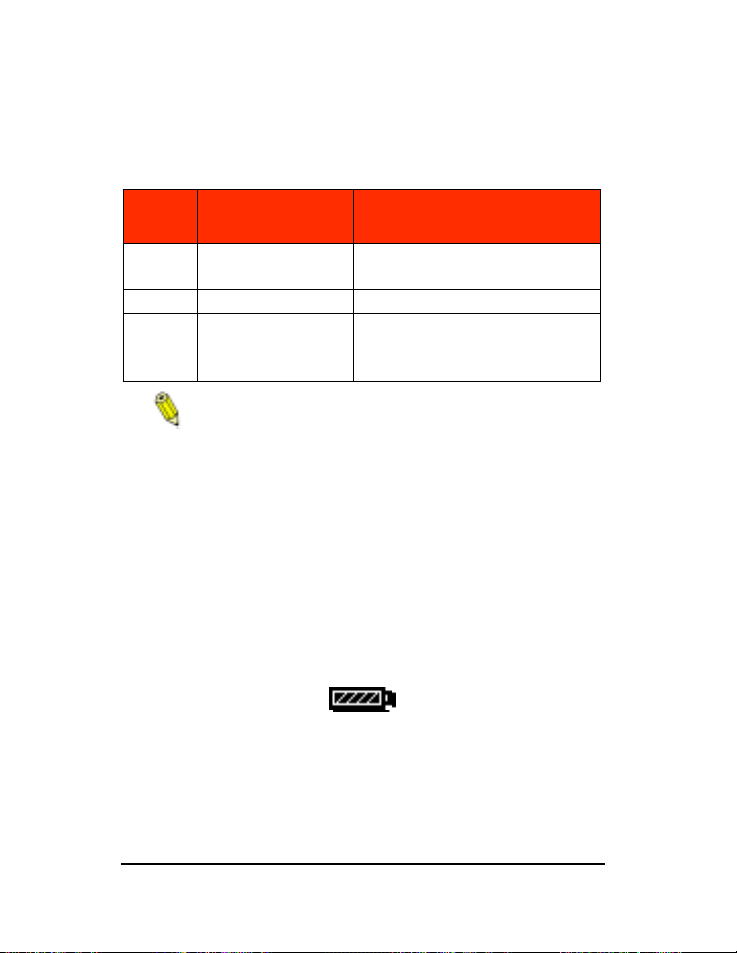
For best results, use batteries of the following types:
Battery
Type
Lithium 300 Recommended: Energizer® Hi
NiMH 600 Rechargeable.
Alkaline 200 Use only brands specifically
To install the batteries:
Slide the Mode switch to OFF.
◗
◗
Unlock the door of the battery compartment.
Press down on the door and slide it, in the direction of the
◗
arrow, until it releases.
Lift up the door and insert the four batteries as shown in the
◗
battery compartment and on the compartment door.
Press down on the door, slide it into place and lock it.
◗
Average Pictures
Per Charge
Energy Lithium.
made for “high-drain” devices
(such as Duracell ULTRA®).
Battery life can be greatly extended by using the optional
Agfa AC adapter to power the camera indoors.
Notes
Battery Conditions
A battery icon is displayed on the Status Display. Segments disappear as power is used. When only an outline displays, replace the
batteries. A flashing icon indicates that the batteries are empty. You
cannot use the camera until you replace the batteries.
Batteries
Page 13

ePhoto CL30 User’s Guide
C
ONTROLLING THE CAMERA
13
Mode Switch
Slide the Mode switch to select:
REC
— to turn on the camera and take pictures.
◗
PLAY
◗
◗
When the ePhoto CL30 is not connected to a computer, the camera
powers down automatically after 60 seconds (REC or PLAY) of inactivity. To turn the camera back on, press the EasyPilot button.
— to turn on the camera and view or delete stored
images.
OFF
— to turn off the camera.
When the camera is using batteries, turn off the camera when
it is idle to conserve the life of the batteries.
EasyPilot Button
Use the EasyPilot button to navigate the menus. To:
Display
◗
◗
◗ Scroll — Turn the button in either direction to move from one
— Press the button to display a menu.
Select
— Press the button to select the highlighted icon or the
setting indicated by the arrow.
menu option or icon to another.
LCD Switch
When you want to use the color LCD as a viewfinder in REC mode,
slide the LCD switch to ON. When you connect the camera to a
computer, slide the switch to PC.
Controlling the Camera
Page 14

14 ePhoto CL30 User’s Guide
Shutter Button
The shutter button has two positions. Press the shutter button:
◗ Halfway — to lock the camera’s focus and calculate the
exposure.
◗ All the way — to take a picture.
The camera sets the autofocus and calculates exposure,
so there may be a slight delay before the picture is taken.
Controlling the Camera
Page 15

ePhoto CL30 User’s Guide 15
STATUS DISPLAY
The Status Display is the black and white LCD on top of the camera.
Using icons, it displays information about your camera and some of
the settings that you selected, including the following:
◗ Status of the batteries. See Batteries on page 12.
◗ Status of the CompactFlash memory card. See Memory Card
Conditions on page 10.
◗ Number of pictures that can still be taken at the current resolu-
tion setting. (3 ▼)
◗ Resolution setting. See Resolution on page 18.
◗ Flash setting. See Flash on page 18.
◗ Focus setting. See Focus on page 19.
◗ Exposure setting. See Exposure on page 23.
◗ Self-timer setting. See Self Timer on page 23.
◗ External flash setting. See External Flash on page 25.
Status Display
Page 16

16 ePhoto CL30 User’s Guide
TAKING PICTURES
Like a conventional camera, the ePhoto CL30 has a viewfinder. You
can also frame the image on the color LCD. Before you can take pictures, install the batteries and a CompactFlash memory card.
To take pictures:
1. Slide the Mode switch to REC.
2. If you want to view the image on the color LCD, slide the LCD
switch to ON. The LCD displays the Agfa logo briefly and then
the live image.
3. Select your settings. See Changing Basic Settings on page 17.
4. Frame the picture in the viewfinder or on the color LCD.
5. Press the shutter button halfway to lock the focus and calculate
the exposure. Press it all the way down to take the picture.
The camera processes the image. The green Ready light, on the
front of the camera, blinks. If the color LCD is on, the image is
“drawn” on the screen. After a few seconds, the live image
appears on the LCD and the camera is ready for the next shot.
If the QuickReview option is on, the color LCD displays a
menu as the image is processed. See QuickReview on
page 22.
Taking Pictures
Page 17

ePhoto CL30 User’s Guide 17
CHANGING BASIC SETTINGS
You can change the basic camera settings with the icon menu that
displays on the color LCD. The basic settings are:
◗ Resolution
◗ Flash
◗ Digital zoom
◗ Focus
◗ Preview
You can also access Advanced settings from this menu. See Changing Advanced Settings on page 21.
The resolution, flash, and QuickReview settings remain in
effect until you change them, even after you turn the cam-
era off.
To change a basic setting:
1. Slide the Mode switch to REC.
2. Press the EasyPilot button. A row of icons appears on the color
LCD.
You do not have to turn on the color LCD to display the
menu.
3. Turn the EasyPilot button to highlight an icon.
4. Press the EasyPilot button to select the icon. A column of icons
or a text menu appears.
5. Turn the EasyPilot button to highlight an icon or option.
6. Press the EasyPilot button to select the setting.
Changing Basic Settings
Page 18

18 ePhoto CL30 User’s Guide
Resolution
The ePhoto CL30 provides the following JPEG resolution settings:
Setting Description
P-Genie: 1440 x 1080, pixels: highest image quality
and lowest compression. Utilitizes PhotoGenie™ technology during download (ideal for printing photo-quality images)
Maximum 4 MB card capacity: 6 images*
High: 1152 x 864 pixels, low compression
Maximum 4 MB card capacity: 12 images*
Medium: 1024 x 768 pixels.
Maximum 4 MB card capacity: 16 images*
Low: 640 x 480 pixels, normal compression (ideal for
posting images on the Web)
Maximum 4 MB card capacity: 36 images*
Black & white text mode: optimal compression for
saving text-based documents.
Maximum 4 MB card capacity: 30 images*
* Depending on the complexity of the images stored, the memory
card capacity may be up to 20% higher.
Flash
The ePhoto CL30 provides the following flash settings:
Setting Description
Automatic: the camera determines when to use the
flash
Changing Basic Settings
Page 19

ePhoto CL30 User’s Guide 19
Setting Description
Fill-in: flash is always used
Off: no flash is used
Red-eye: controlled pre-flashing is used to reduce the
“red-eye” effect
Digital Zoom
The digital zoom feature lets you zoom into the center of the picture.
Setting Description
1x: digital zoom is off (default).
2x: digital zoom is applied. This option automatically
sets the resolution to LOW.
Focus
This option allows you to choose a focal distance manually for your
shots. For best results, the setting should match the distance of the
subject from the lens.
Icon Setting Selected
Automatic
Changing Basic Settings
Page 20

20 ePhoto CL30 User’s Guide
Icon Setting Selected
a fixed distance mode, for subjects more than 16 ft
(5m) away
a fixed distance mode, for subjects about 16 ft (5 m)
away
a fixed distance mode, for subjects about 7 ft (2 m)
away
a fixed distance mode, for subjects about 3 ft (1 m)
away
Macro, an automatic focus mode for subjects 8" to 3 ft (20
to 90 cm) away
To select a focus setting:
1. Select Focus in the Advanced menu.
2. Select a focal distance in the FOCUS menu, and exit the menu.
Preview
The ePhoto CL30 provides two preview settings:
Setting Description
Normal: shows the lighting conditions as seen through
the lens (default).
Low light: increases the contrast on the LCD screen.
Displays dark scenes more brightly on the color LCD
(only) so you can better see the details. The actual
image you capture may look different, depending on
which flash and other settings you use.
Changing Basic Settings
Page 21

ePhoto CL30 User’s Guide 21
CHANGING ADVANCED SETTINGS
You can change advanced settings with the icon menu that displays
on the color LCD. The Advanced Settings are:
◗ QuickReview
◗ Self Timer
◗ Exposure
◗ White Point
◗ External Flash
◗ Automatic
◗ Video Out
◗ Preferences
◗ Automatic
◗ Date & Time
◗ RS232 speed
For information on how to change the basic settings, see Changing
Basic Settings on page 17.
To change an advanced setting:
1. Slide the Mode switch to REC.
2. Press the EasyPilot button. A row of icons appears on the LCD.
3. Turn the EasyPilot button until the icon is highlighted.
4. Press the EasyPilot button. The first part of the Advanced menu
appears. Turn the EasyPilot button to see more options.
Tips on Using the Advanced Menu
◗ The Automatic option restores the automatic settings.
Changing Advanced Settings
Page 22

22 ePhoto CL30 User’s Guide
◗ Use the Exit option to leave the menu system without making
any changes.
◗ You can set the camera to remember all advanced settings after
the camera is powered off. See Preferences on page 26.
Advanced Settings Icons
For some of the manual settings, a small icon displays on the Status
Display or on the menu as a reminder
QuickReview
QuickReview lets you to decide whether to keep or erase a photo
immediately after you capture it. You can delete a picture before it
has finished processing.
To select QuickReview:
1. Select QuickReview on the Advanced menu. The QuickReview
menu appears.
2. Select On
3. Frame the picture and press the shutter button. The image dis-
plays on the LCD with the option to Discard (delete) or Share
(keep the picture on the LCD) the photo.
4. Turn the EasyPilot button to select an option, and press the button.
5. If you select Share, the LCD displays the options Discard or
Cont. (save the image).
6. Turn the EasyPilot button to select an option, and press the button.
Changing Advanced Settings
Page 23

ePhoto CL30 User’s Guide 23
Self Timer
The self timer delays the shutter after you press the shutter button
(for example, so you can set the camera and join the picture).
Icon Setting Selected
Delays the shutter for 10 seconds after
you press the shutter button
To turn on the self timer:
1. Select Self timer in the Advanced menu. The SELF TIMER
menu appears.
2. Select On or Off.
3. Frame the picture and press the shutter button. The green
Ready light on the front of the camera blinks as the it saves the
picture.
The self timer applies only to the next picture. Set the self
timer for each picture individually.
Exposure
Use this option to manually adjust the lightness or darkness of an
image.
Before you take a picture, the ePhoto CL30 alerts you of a
possible overexposure or underexposure .
You can, however, still take the picture.
To set the exposure manually:
1. Select Exposure in the Advanced menu. The EXPOSURE screen
appears with a vertical scale. The settings on the scale are automatic or manual, in 0.5 f-stops that range from +4 to -4.
2. Scroll the EasyPilot button up (+) to increase the exposure or
down (–) to decrease it.
Changing Advanced Settings
Page 24

24 ePhoto CL30 User’s Guide
3. Press the EasyPilot button to set the exposure you want to use.
White Point
This option lets you manually adjust the color balance of an image
so that the colors appear natural in any light.
Icon Setting Selected
Manual white point
To set the white point manually:
1. Select White point in the Advanced menu.
2. Select Set white bal. A message prompts you to aim the cam-
era at the desired white point and press the EasyPilot button.
3. Aim the camera at a white area, and press the EasyPilot button.
A confirmation screen appears.
For best results, use a reflective white surface, such as a
card.
4. To save the white point, select Yes. To ignore the white point
and return to the camera’s automatic white balance, select No.
The image on the LCD changes to reflect the new white point.
Changing Advanced Settings
Page 25

ePhoto CL30 User’s Guide 25
External Flash
Your ePhoto CL30 can be used with any external flash equipped
with a white light slave sensor. Whenever a picture is taken, the
external flash is triggered by a low-power burst of light from the
camera’s built-in flash.
Icon Setting Selected
External flash
The external flash settings are:
◗ Small 1/200
◗ Large 1/200
◗ Small 1/100
◗ Large 1/100
◗ Off
The sizes refer to the aperture size, and the times (in seconds) indicate the shutter speed (in seconds).
To use an external flash:
1. Select Ext. flash in the Advanced menu.
2. Select a large or small aperture based on these ranges:
Large: f/2.8 – 3.5, wide – telephoto
Small: f/8.0 – 9.1, wide – telephoto
Changing Advanced Settings
Page 26

26 ePhoto CL30 User’s Guide
3. Select your shutter speed based on these criteria:
1/100: High-energy type external flash (typically over 1500
watts)
1/200: Low-energy type external flash (typically under 1500
watts)
4. Adjust the power settings of the external flash power supply
while taking pictures to find the proper exposure.
For best results with your equipment, experiment with different
aperture, shutter speed, and external flash settings.
Automatic
Select the Automatic option in the Advanced menu to restore the
camera’s advanced settings to their automatic defaults.
Video Out
Use the Video option on the Advanced menu to select the type of
video format you need to connect your camera to a TV. The options
are NTSC or PAL. In general, NTSC is used in the United States and
Japan; PAL is used in Europe.
Preferences
This option lets you save the advanced settings, even after the camera is turned off.
To save your Advanced settings:
1. Set your advanced settings.
2. Select Preferences in the Advanced menu.
3. Select Yes to save the settings.
Changing Advanced Settings
Page 27

ePhoto CL30 User’s Guide 27
Date & Time
Each image is tagged electronically with the date and time it was
taken so it is important to make sure that the date and time are set
properly.
The date is shown in the following format: mm/dd/yyyy
(month/day/year). The time uses a 24-hour clock.
To set the date and time:
1. Select Date & Time in the Advanced menu. The SET DATE &
TIME screen appears with the arrow pointing to the date.
2. If you want to change the time on the next line, turn the EasyPilot button to move the arrow down.
3. Press the EasyPilot button to underline the first item in the line.
4. If you want to change the value, turn the EasyPilot button.
5. Press the EasyPilot button to select the value.
6. Continue to turn and press the EasyPilot button to set the date
and time (using a 24-hour clock).
7. Select Set to confirm the date and time or Exit to leave them
unchanged.
RS232 Speed
If you have problems transferring images to your computer, it may
be that your computer cannot handle the speed at which the camera
transfers images. You can use this option to change the transfer
speed of the camera. The RS232 speeds available are:
◗ 9600
◗ 19200
◗ 38400
◗ 115200 (the default)
Changing Advanced Settings
Page 28

28 ePhoto CL30 User’s Guide
WORKING WITH CAPTURED IMAGES
You can use the ePhoto CL30 to view and work with captured
images in two different views:
◗ Single-image view
◗ Multi-image view.
To select a view:
1. Slide the Mode switch to PLAY. The color LCD displays the last
picture taken, in single-image view.
2. To select another view, press the EasyPilot button. A row of
icons appears on the LCD with the icon highlighted.
3. Press the EasyPilot button. Up to nine thumbnail images display
on the LCD.
If no images are stored, you see the message No Picture!
You can reformat the memory card at this point or switch
to REC to take a picture. To reformat, press the EasyPilot button
and select Yes in the confirmation screen.
4. To return to single-image view, press the EasyPilot button again
and select the icon.
Using Single-Image View
Scrolling through the Images
To scroll through captured images:
1. Scroll through the images by turning the EasyPilot button.
If you are viewing one image at a time, it is helpful to
display the image counters and the date and time.
See Displaying Information on page 31..
Working with Captured Images
Page 29

ePhoto CL30 User’s Guide 29
2. When you reach the last image, as indicated by the counter
(e.g., 3/3), you can scroll further to go back to the first image.
You may scroll this way in a continuous loop.
Deleting Images
To delete images:
1. Press the EasyPilot button. A row of icons appears on the LCD.
2. Turn the EasyPilot button to highlight the icon.
3. Press the EasyPilot button. The DELETE PICTURES menu
appears.
4. Select the desired option:
◗ Current — to delete a single image.
◗ All — to delete all images.
◗ Reformat — to delete all images and reformat the memory
card.
◗ Exit — to leave the menu without deleting any images.
5. If you select Current or All, a confirmation screen appears.
Select Yes to delete the image(s), No to return to the DELETE
PICTURES menu, or Exit to leave the menu without deleting any
images.
If the image is locked against accidental deletion (marked
with the icon), you cannot delete the image until you
unlock it. To unlock it, see the next section.
Locking/Unlocking Images
To lock/unlock images in single-image mode:
1. Press the EasyPilot button. A row of icons appears on the LCD.
2. Turn the EasyPilot button to highlight the icon. The LOCK/
UNLOCK menu appears.
Working with Captured Images
Page 30

30 ePhoto CL30 User’s Guide
3. Select the desired option:
◗ Lock/Unlock — to lock/unlock the current image.
This option immediately locks ( icon) or unlocks (no
icon) the current image.
◗ Lock all — to lock all images.
◗ Unlock all — to unlock all locked images.
◗ Exit — to leave the menu without locking/unlocking any
images.
4. If you selected Lock all or Unlock all, select Yes in the confir-
mation screen to lock/unlock the images and exit the system, or
No to leave the menu system without locking/unlocking any
images.
Zooming in on an Image Digitally
The camera’s digital 2x zoom allows you select part of an image and
zoom in on it.
To zoom in on an image digitally:
1. Press the EasyPilot button. A row of icons appears on the LCD.
2. Turn the EasyPilot button to highlight the icon.
3. Press the EasyPilot button. Vertical crop lines frame the middle
of the image.
4. If you want to select an area to the left or right of the vertical
crop lines, turn the EasyPilot button to move the lines.
5. Press the EasyPilot button. Horizontal crop lines frame the middle of the image.
6. If you want to select an area above or below the horizontal crop
lines, turn the EasyPilot button to move the lines.
Working with Captured Images
Page 31

ePhoto CL30 User’s Guide 31
7. Press the EasyPilot button to zoom in the part of the image that
you selected. You can also turn the EasyPilot button to view
other parts of the image.
8. To return to normal view, press the EasyPilot button.
Displaying Information
You can display the image counters and the date and time in singleimage view.
To display information for each image:
1. Press the EasyPilot button. A row of icons appears on the LCD.
2. Turn the EasyPilot button to highlight the icon. The INFO.
LEVEL menu appears.
3. Select the desired option:
◗ No. Info — to display no information.
◗ Level 1 — to display the image counters.
◗ Level 1 — to display the date and time.
◗ Exit — to leave the menu without making any changes.
Using Multi-Image View
Viewing Images
To view multiple images at one time:
1. Press the EasyPilot button. A row of icons appears on the LCD
with the icon highlighted.
2. Press the EasyPilot button. The LCD displays up to 9 numbered
thumbnail images, with the current image selected (outlined by
a white frame).
You cannot display the image counters and date and time
in multi-image mode.
Working with Captured Images
Page 32

32 ePhoto CL30 User’s Guide
3. Turn the EasyPilot button in either direction to scroll through
the thumbnails. When you reach the last thumbnail on the
screen, you can scroll further to add a new row of thumbnails to
the screen (if there are more than 9 images). You can scroll this
way in a continuous loop.
Deleting Images
You can mark one image at a time and then delete the marked
image(s), or you can delete all of the images at once.
To delete images in multi-image mode:
1. Press the EasyPilot button. A row of icons appears on the LCD.
2. Turn the EasyPilot button to highlight the icon.
3. Press the EasyPilot button. The DELETE PICTURES menu
appears.
4. Select the desired option:
◗ Mark & Delete — to select individual image(s) to be
deleted.
◗ All — to delete all images.
◗ Exit — to leave the menu without deleting any images.
5. If you selected Mark & Delete, the Select image screen
appears. Turn the EasyPilot button to scroll to the image you
want to delete and press the button. The DELETE PICTURES
menu appears.Select the desired option:
◗ Mark/Unmark. — to mark an image for deletion with a red
X or to remove the deletion mark from the image.
If you see the word Protected instead of Mark, the image
is locked. To unlock the image, see the next section.
◗ Next — to select another image for deletion.
Working with Captured Images
Page 33

ePhoto CL30 User’s Guide 33
◗ Done — to exit the menu. If you marked images for dele-
tion, a confirmation screen appears. Select Yes to delete all
of the images marked for deletion, No to mark an additional
image
Locking/Unlocking Images
To lock/unlock images:
1. Press the EasyPilot button. A row of icons appears on the LCD.
2. Turn the EasyPilot button to highlight the icon.
3. Press the EasyPilot button. The LOCK/UNLOCK menu appears.
4. Select the desired option:
◗ Lock/Unlock — to lock/unlock one or more images.
◗ Lock all — to lock all images.
◗ Unlock all — to unlock all locked images.
Selecting Lock all or Unlock all brings up a confirmation
screen. Select Yes to lock/unlock the images and exit the
menu system, or No to return to the LOCK/UNLOCK menu.
◗ Exit — to leave the menu without locking/unlocking any
images.
5. If you selected Lock/Unlock, the Select image screen appears.
Turn the EasyPilot button to select the image to be locked/
unlocked.
6. In the LOCK/UNLOCK menu that appears, select Lock. The
option changes to Unlock.
7. To lock/unlock more images, select Next and repeat steps 5 and 6.
8. When you are finished locking/unlocking, select Done.
Working with Captured Images
Page 34

34 ePhoto CL30 User’s Guide
USING THE CAMERA WITH A TV
You can connect the ePhoto CL30 to a television via the video cable
(included) so that you can view captured images or take pictures.
The video cable works with any type of television.
To conserve batteries, use the optional AGF A AC adapter when
you connect the camera to a TV.
Changing the Type of Video Connection
When you connect your camera to a TV, you may need to change
the type of video connection. The options are:
◗ NTSC, generally used in the United States and Japan
◗ PAL, used in Europe
To change the type of video connection:
1. Press the EasyPilot button. A row of icons appears on the LCD.
2. Turn the Easy Pilot button to highlight the icon.
3. Turn the EasyPilot to Video out and press the button. The VIDEO
OUT menu appears.
4. Select NTSC or PAL.
To view images on a TV:
1. Plug one end of the video cable into the VIDEO OUT port on the
camera.
2. Plug the other end of the video cable into the video input jack on
the TV.
3. Slide the Mode switch to REC or PLAY. The TV screen now takes
the place of the camera’s LCD.
For information on using external devices with your TV,
refer to the documentation for your television set.
Using the Camera with a TV
Page 35

ePhoto CL30 User’s Guide 35
USING THE CAMERA WITH A COMPUTER
Before you can transfer images to your computer, you install the
Agfa PhotoWise software and then connect the ePhoto CL30 to your
computer. The software and cables are included with your camera.
System Requirements
IBM PCs and Compatibles
◗ 486 processor or later (Pentium® recommended)
◗ Windows 95/98 or Windows NT (3.51 or later)
◗ 16 MB RAM
◗ 50 MB available hard disk space
◗ VGA monitor with support for at least 256 colors
◗ 2x CD-ROM drive (required for installation)
◗ 9-pin RS-232C serial port or USB port
Installing PhotoWise Software
Place the Agfa PhotoWise CD in the CD-ROM drive of your computer. The installation begins automatically. Follow the prompts to
complete the installation.
If you install PhotoWise on a Windows 98 computer and
want to use the USB port to transfer images, answer Yes
when prompted to install USB support for the camera. For more
information on using USB, see USB Notes, which was shipped
in the box with your camera.
Using the Camera with a Computer
Page 36

36 ePhoto CL30 User’s Guide
Connecting to Your Computer
Your ePhoto CL30 comes with a serial cable and a USB (Universal
Serial Bus) cable. The cable you use depends on the type of connection that your computer supports.
Use these guidelines to select a cable:
Cable
Serial Windows 95,
USB Windows 98 Transfers images at about 100 MB/sec.
Operating
System
Windows NT
Comments
Supported by most PC computers.
Transfers images at about 115 kb/sec.
Using the Serial Cable
To use the serial cable to connect the camera to your computer:
1. Plug the one end of the serial cable (included) into the SERIAL
port on your camera.
2. Plug the other end of the cable into a serial port on your computer.
Using the USB Cable
You can use the USB cable on a computer that has a USB port, USB
software support, and runs Windows 98.
Before you can use the USB connection, you need to
install the USB support from the PhotoWise CD. For
details, see Installing PhotoWise Software on page 35 and USB
Notes, which was shipped in the box with your camera.
Transferring Images into Your Computer
You can use PhotoWise to transfer images from the ePhoto CL30 to
your computer. See PhotoWise Tips or on-line help for details. As
Using the Camera with a Computer
Page 37

ePhoto CL30 User’s Guide 37
you transfer images to the computer, the images taken with the
PhotoGenie resolution are enhanced to true 1600 x 1200 resolution.
Creating Installation Diskettes for PhotoWise
Use this procedure to create diskettes so you can install PhotoWise
on systems that do not have a CD-ROM drive.
Use blank, formatted diskettes when prompted and label
them by number (i.e., Disk 1, 2, 3, 4).
To create PhotoWise installation floppy disks:
Windows
1. Place the PhotoWise CD in the CD-ROM drive of your computer.
2. In the Start menu, select Run.
3. In the dialog window that appears, type:
d:mkfloppy.exe
where d is the letter of your CD-ROM drive.
4. Click on OK.
5. Follow the prompts.
Using the Camera with a Computer
Page 38

38 ePhoto CL30 User’s Guide
CARE AND MAINTENANCE
Camera
To avoid the risk of electric shock, do not disassemble
the camera. Refer all servicing to qualified service personnel.
To avoid the risk of fire or electric shock, do not expose
the camera to rain or moisture.
◗ Avoid leaving the camera in the sun or in a very warm location
(beach, car, etc.) for prolonged periods.
◗ Do not wrap the camera in cloth or plastic while it is on (heat
and moisture may be trapped and damage the camera).
◗ Avoid using the camera in excessively cold (below 32°F/0°C)
or excessively warm (above 104°F/40°C) conditions.
◗ When you bring the camera from a cold to a warm location,
allow the camera to reach room temperature before you use it.
◗ If condensation develops inside the camera, stop using it imme-
diately. Leave the camera at room temperature for a few hours
to allow the condensation to evaporate.
AC Adapter
Use only the optional Agfa ePhoto AC adapter with your
camera. Use of any other adapter will void your warranty
and may damage the camera.
Batteries
◗ Before installing the batteries, slide the Mode switch to OFF.
◗ Use only size AA alkaline, lithium or NiMH batteries.
Care and Maintenance
Page 39

ePhoto CL30 User’s Guide 39
◗ Do not use batteries that show signs of leakage, corrosion or
swelling, or batteries that are excessively warm.
◗ If necessary, clean battery contacts with a dry cloth before
installation.
◗ Always replace all four batteries with four identical, new (or fully
charged) ones.
◗ Dispose of used batteries promptly in a manner that complies
with applicable laws.
◗ Keep all batteries away from children.
◗ To conserve the batteries, use the viewfinder (not the color
LCD) to frame an image
Memory Cards
Keep memory cards away from sources of heat, moisture and static
electricity, as well as magnetic fields generated by electrical appliances such as TVs, VCRs and microwave ovens.
Cleaning the Camera
◗ To clean the camera lens or LCD, blow away any surface dust or
dirt. Then breathe on the surface to form a mist and gently wipe
it with a soft, lint-free cloth or lens cleaning tissue.
◗ To avoid scratching the lens, use a gentle, circular motion when
wiping.
◗ Never use harsh or abrasive cleaners on the outside surfaces of
the camera. Wipe off dust with a clean, dry cloth.
Care and Maintenance
Page 40

40 ePhoto CL30 User’s Guide
TROUBLESHOOTING
If you have a problem using your ePhoto CL30, review this section
first. If you cannot find the solution to your problem here, visit Agfa
on-line at www.agfahome.com/ephoto or check with your dealer.
Problem Possible Cause/Solution
The camera has
no power.
The shutter button doesn’t work.
The camera is turned off. Slide the Mode
switch to REC or PLAY.
The camera is inactive due to the automatic
power down feature. Press the EasyPilot button to turn it back on.
The camera is connected to a computer (the
light next to the lens is blinking). The camera
has power, but can be controlled only from
the computer.
The batteries are too weak. Replace them. If
you are using the optional Agfa AC adapter,
make sure it is securely plugged into a working outlet.
The camera is still saving a picture. Wait for
the live image to appear on the LCD.
The camera is in PLAY. Turn the Mode switch
to REC.
The memory card is full (flashing card icon
on the Status Display). Download the images
to your computer, delete some or all of the
images, insert a different memory card or
lower the resolution.
The camera is connected to a computer. The camera can be controlled only in PhotoWise.
Troubleshooting
Page 41

ePhoto CL30 User’s Guide 41
Problem Possible Cause/Solution
The LCD doesn’t
turn on.
The live image on
the LCD appears
jerky.
The live image
on the LCD looks
brighter than it
should be.
The built-in flash
doesn’t work.
The camera is connected to a computer. Disconnect the camera or use the camera controls in PhotoWise.
The camera is connected to a TV. Disconnect
the camera or view the images on your TV
set.
The batteries are too weak. Replace them.
The subject is in low light. The ePhoto CL30
automatically adjusts exposure to the light
conditions.
The low light preview setting is selected. This
setting is used to display a dark scene more
brightly on the LCD to help you frame the
shot. Use the setting to take a dark picture,
or restore the normal preview setting.
You have selected an incorrect advanced
exposure setting.
displayed, adjust the exposure setting or set
it to automatic.
The flash is off. Check the flash setting.
If the or icon is
Troubleshooting
Page 42

42 ePhoto CL30 User’s Guide
Problem Possible Cause/Solution
The recorded
image is blurry.
The recorded
image is too
dark.
The subject moved while you were taking the
picture. Hold the camera steady and take the
picture again.
You moved the camera while you were taking
the picture. Take the picture again and hold
the camera steady as you depress the shutter
button.
You used the wrong focus setting.
the subject’s distance from the lens and the
focus setting match. The flash illuminates
subjects up to a distance of only about 10
feet (2.6 m).
You manually set the shutter speed too low.
Increase the shutter speed manually.
There was not enough light. Set the flash to
the Auto or Fill-in setting.
The subject was too far away for the flash.
The flash illuminates subjects up to a distance of only about 10 feet (2.6 m).
You selected an incorrect advanced setting.
Readjust the setting or set it to automatic.
You can also use PhotoWise to adjust the
brightness and contrast of your image.
Make sure
Troubleshooting
Page 43

ePhoto CL30 User’s Guide 43
Problem Possible Cause/Solution
The recorded
image is too
bright.
The wrong date
and/or time are
displayed.
PhotoWise can’t
find the camera.
If the flash was in the Fill-in mode, there was
too much light.
Auto.
The camera was pointed directly at a bright
light. Take the picture from a different angle.
You can also use PhotoWise to adjust the
brightness and contrast of your image.
You selected an incorrect advanced setting.
Readjust the setting or set it to automatic.
You were too close to the subject (i.e.,
Macro) to use the flash.
and take the picture again.
The date and time are incorrectly set. Set the
correct date and time.
The camera is off. Slide the Mode switch to
PLAY or REC.
The serial cable is connected incorrectly.
Check the cable and connections.
The batteries are too weak. Replace them.
The serial port setting is incorrect. Your PC’s
serial port should be dedicated to the ePhoto
CL30. If your computer is running other software packages in the background that periodically check the serial port (e.g., personal
digital assistants), turn those programs off.
There is an internal device conflict in your
computer. Check the documentation that
came with your computer and/or Windows.
Change the flash setting to
Turn off the flash
Troubleshooting
Page 44

44 ePhoto CL30 User’s Guide
Problem Possible Cause/Solution
An image can’t be
deleted.
The image is locked. Unlock the image.
Troubleshooting
Page 45

ePhoto CL30 User’s Guide 45
CAMERA SPECIFICATIONS
Parameter Specifications
Physical
Dimensions 1.45" H x 5" W x 3.16" D
Weight 9.4 oz or 265 g (without batteries)
Other Tripod mountable (1/4" x 20, standard 35
Lens Aperture f/2.8 – 8.0
Focal Range 50 cm – infinity
Macro Focal
Distance
Focal Length 43.44 mm equivalent
Shutter Speed 1/30 – 1/700 seconds, automatic
ISO Rating ISO 100
CCD Image
Sensor
Flash Auto, Fill-in, Redeye, Off
LCD Screen 1.8" TFT LCD
Compression JPEG (internal)
(37 x 127.5 x 80.3 mm)
mm photo/video)
Optics
20cm – 50cm
CCD, 1 million (1152 x 864) pixels
Images
Camera Specifications
Page 46

46 ePhoto CL30 User’s Guide
Parameter Specifications
Resolution
— P-Genie, 1400 x 1080 pixels, lowest
compression
— High, 1152 x 864 pixels, low com-
pression
— Medium, 1024 x 768 pixels.
— Low, 640 x 480 pixels, normal com-
pression
— Black & white document mode, 1152
x 864 pixels
Storage removable CompactFlash memory cards
Storage Capacity
(2 MB – 8 MB), no internal memory
— 30 images
— 16 images
— 36 images
— 12 images
— 6 images
Power
Source 4 AA alkaline, lithium, or NiMH batteries
Battery Life
(NiMH)
Other Source Optional Agfa AC adapter
Continuous play: approx. 1 hour
Continuous record: approx. 30 minutes
Operation
Startup Time < 8 seconds
Shutter Delay
Time
Approx. 1000 ms, including auto-focus
Camera Specifications
Page 47

ePhoto CL30 User’s Guide 47
Parameter Specifications
Average Image
Processing Time
(REC)
Computer
Interface
Transmission
Speed
Video Output NTSC or PAL. Switch in menu system.
Power Down
Timer
Self Timer 10 seconds, Off
Exposure 1/2, 1/4, 1/8, 1/15, 1/30, 1/60, 1/125, 1/250,
— 11 seconds
— 6 seconds
Serial, RS-232C
USB
Serial: 115 kb/sec
USB: 100 MB/sec
REC: 60 seconds
PLAY: 60 seconds
1/500
Environment
Levelness Can be operated at all angles
Altitude Up to 11,800 ft (3,600 m) above sea level
Temperature Operating: 32 – 104°F (0 – 40°C)
Relative Humidity 10 – 90%, non-condensing
Storage: 4 – +140°F (-20 – +60°C)
Camera Specifications
Page 48

For more information about the Agfa ePhoto CL30 digital camera,
visit the Agfa Web site at www.agfahome.com/ephoto.
© 1998 Agfa Corporation. All Rights Reserved.
 Loading...