


FAVORIT 55210 |
EN |
DISHWASHER |
USER MANUAL |
2 |
|
EL |
ΠΛΥΝΤΉΡΙΟ ΠΙΆΤΩΝ |
ΟΔΗΓΊΕΣ ΧΡΉΣΗΣ |
24 |

2
FOR PERFECT RESULTS
Thank you for choosing this AEG product. We have created it to give you impeccable performance for many years, with innovative technologies that help make life simpler – features you might not find on ordinary appliances. Please spend a few minutes reading to get the very best from it.
ACCESSORIES AND CONSUMABLES
In the AEG webshop, you’ll find everything you need to keep all your AEG appliances looking spotless and working perfectly. Along with a wide range of accessories designed and built to the high quality standards you would expect, from specialist cookware to cutlery baskets, from bottle holders to delicate laundry bags…
Visit the webshop at:
www.aeg-electrolux.com/shop

Contents 3
CONTENTS
4 Safety information
5 Product description
6 Control panel
8 Use of the appliance
8 Setting the water softener
9 Use of dishwasher salt
10 Use of rinse aid
11 Loading cutlery and dishes
13 Use of detergent
14 Washing programmes
15 Setting and starting a washing programme
17 Care and cleaning
18 What to do if…
20 Technical data
20 Installation
21 Water connection
23 Electrical connection
23 Environment concerns
The following symbols are used in this user manual:
Important information concerning your personal safety and information on how to avoid damaging the appliance.
General information and tips
Environmental information
Subject to change without notice

4 Safety information
SAFETY INFORMATION
For your safety and correct operation of the appliance, read this manual carefully before installation and use. Always keep these instructions with the appliance even if you move or sell it. Users must fully know the operation and safety features of the appliance.
Correct use
•The appliance is designed exclusively for domestic use.
•Only use the appliance to clean household utensils that are applicable for dishwashers.
•Do not put solvents in the appliance. Risk of explosion.
•Put the knives and all items with sharp points in the cutlery basket with their points down. If not, put in a horizontal position in the main basket.
•Use only branded products for dishwashers (detergent, salt, rinse aid).
•If you open the door while the appliance is in operation, hot steam can escape. Risk of skin burns.
•Do not remove dishes from the dishwasher before the end of the washing programme.
•When the washing programme is completed, disconnect the mains plug from the mains socket and close the water tap.
•Only an authorised service engineer can repair this appliance. Use only original spare parts.
•Do not do repairs yourself to prevent injury and damage to the appliance. Always contact your local Service Force Centre.
General safety
•Persons (including children) with reduced physical sensory, mental capabilities or lack of experience and knowledge must not use the appliance. They must have supervision or instruction for the operation of the appliance by a person responsible for their safety.
•Obey the safety instructions from the manufacturer of the dishwasher detergent to prevent burns to eyes, mouth and throat.
•Do not drink the water from the dishwasher. Detergent residues can stay in your appliance.
•Always close the door when you do not use the appliance to prevent injury and not to stumble over the open door.
•Do not sit or stand on the open door.
Child safety
•Only adults can use this appliance. Children must get supervision to make sure that they do not play with the appliance.
•Keep all the packaging away from children. There is a risk of suffocation.
•Keep all detergents in a safe area. Do not let children touch the detergents.
•Keep children away from the appliance when the door is open.

Product description |
|
5 |
|
|
|
Installation
•Make sure that the appliance is not damaged because of transport. Do not connect a damaged appliance. If necessary, contact the supplier.
•Remove all packaging before first use.
•A qualified and competent person must do the electrical installation.
•A qualified and competent person must do the plumbing installation.
•Do not change the specifications or modify this product. Risk of injury and damage to the appliance.
•Do not use the appliance:
–if the mains cable or water hoses are damaged,
–if the control panel, worktop or plinth area are damaged, that you can get access to the inner side of the appliance.
Contact your local Service Force Centre.
•Do not drill into the sides of the appliance to prevent damage to hydraulic and electrical components.
WARNING!
Carefully obey the instructions for electrical and water connections.
PRODUCT DESCRIPTION
6Control panel
1 Spray arm
2 Microfilter
3 Detergent dispenser
4 Rinse aid dispenser
5 Flat filter
6 Salt container
The rating label is on the back of appliance.
CONTROL PANEL
6 5
|
|
|
|
|
|
|
|
|
|
|
|
|
|
|
|
|
|
|
|
|
|
|
|
|
|
|
|
|
|
|
|
|
|
|
|
|
|
|
1 |
|
|
2 |
|
|
3 |
|
4 |
||||
A B C
7
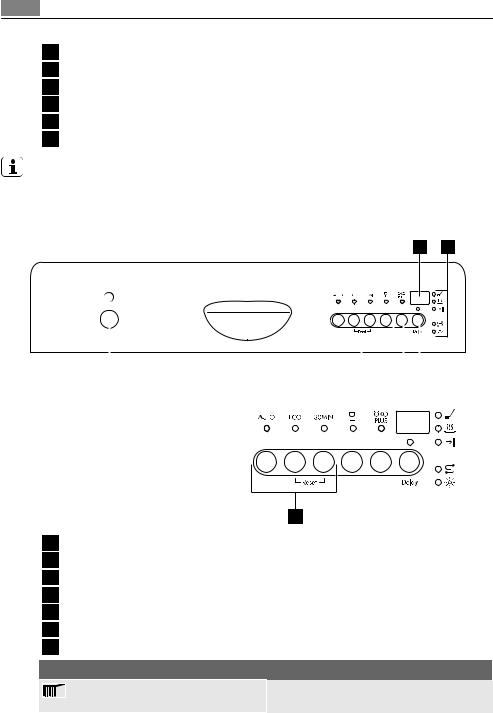
1On/off button
2Programme selection buttons
3Save energy button /(ÖKO PLUS)
4Delay start button
5Indicator lights
6Digital display
7Function buttons
Indicator lights
The indicator light comes on when the washing phase or the rinsing phase operates.

Control panel |
|
7 |
|
|
|
Indicator lights
1) |
1)
The indicator light comes on when the drying phase operates.
The indicator light comes on when the washing programme is completed.
The indicator light comes on when it is necessary to fill the salt container. Refer to the chapter 'Use of dishwasher salt'.
The salt indicator light can stay on for some hours, but it does not have an unwanted effect on the operation of the appliance.
The indicator light comes on when it is necessary to fill the rinse aid. Refer to the chapter 'Use of rinse aid'.
1) The indicator light is off when a washing programme operates.
Delay start button
Use the delay start button to delay the start of the washing programme with an interval between 1 and 19 hours. Refer to the chapter 'Setting and starting a washing programme'.
Digital display
The display shows:
•Adjusted level of the water softener.
•Programme duration.
•Remaining time to the end of the programme.
•End of a washing programme.
•Number of hours in delay start.
•Fault codes.
Save energy button
This function decreases the temperature in the drying phase. Saved energy is between 10% and 25%.
If dishes at the end of the programme are wet, keep the door ajar to let the dishes dry naturally.
This function is available with all washing programmes. The related indicator light comes on when you press the button.
The save energy function has no effect on some programmes. Refer to the chapter 'Washing programmes' for the list of programmes where save energy has or not an effect.
Function buttons
Use the function buttons for these operations:
•To set the water softener. Refer to the chapter 'Setting the water softener'.
•To cancel the washing programme in progress or a delay start in progress. Refer to the chapter 'Setting and starting a washing programme'.

8 Use of the appliance
Setting mode
The appliance is in setting mode when all programme indicator lights are on. The appliance must be in setting mode for these operations:
–To set a washing programme.
–To set the water softener level.
If a programme indicator light is on, cancel the programme to go back to the setting mode. Refer to the chapter "Setting and starting a washing programme".
USE OF THE APPLIANCE
Refer to the following instructions for each step of procedure:
1.Make a check if the water softener level is correct for the water hardness in your area. If necessary set the water softener.
2.Fill the salt container with dishwasher salt.
3.Fill the rinse aid dispenser with rinse aid.
4.Load cutlery and dishes into the dishwasher.
5.Set the correct washing programme for the type of load and soil.
6.Fill the detergent dispenser with the correct quantity of detergent.
7.Start the washing programme.
If you use detergent tablets, refer to the chapter 'Use of detergent'.
SETTING THE WATER SOFTENER
The water softener removes minerals and salts from the water supply. Minerals and salts can have bad effect on the operation of the appliance.
Water hardness is measured in equivalent scales:
•German degrees (dH°).
•French degrees (°TH).
•mmol/l (millimol per litre - international unit for the hardness of water).
•Clarke.
Adjust the water softener to the water hardness in your area. If necessary, contact your local water authority.
|
Water hardness |
|
Water hardness |
Digital display |
|
°dH |
mmol/l |
°TH |
Clarke |
setting |
level |
>24 |
>4.2 |
>40 |
> 28 |
5 |
|
1824 |
3.2- 4.2 |
3240 |
2228 |
4 |
|
1218 |
2.1- 3.2 |
1932 |
1322 |
3 |
|
4- 12 |
0.7- 2.1 |
7- 19 |
5 -13 |
2 |
|
|
|
|
|
|
|
Use of dishwasher salt |
|
|
||
|
|
|
|
|
|
|
9 |
|||
|
|
|
|
|
|
|
|
|
|
|
|
|
|
|
|
|
|
|
|
|
|
|
|
Water hardness |
|
Water hardness |
|
Digital display |
||||
|
|
|
|
|
|
setting |
|
level |
|
|
|
°dH |
mmol/l |
|
°TH |
Clarke |
|
|
|||
|
< 4 |
< 0.7 |
|
< 7 |
< 5 |
11) |
|
|
|
|
1) No use of salt required.
Electronic adjustment
The water softener is set at the factory at level 3.
1.Switch on the appliance.
2.Make sure that the appliance is in setting mode.
3.Press and hold function buttons B and C until the indicator lights of function buttons A, B and C start to flash.
4.Release function buttons B and C.
5.Press function button A.
–The indicator lights for function buttons B and C go off.
–The indicator light for function button A continues to flash.
–The digital display shows the current level.
Example: digital display shows 
 = level 3.
6.Press the function button A one time to increase the water softener level by one step.
7.Press the on/off button to save the operation.
USE OF DISHWASHER SALT
CAUTION!
Only use dishwashers salt. Types of salt that are not applicable for dishwashers cause damage to the water softener.
CAUTION!
Grains of salt and salty water on the bottom of the appliance can cause corrosion. Fill the appliance with salt before you start a washing programme to prevent corrosion.
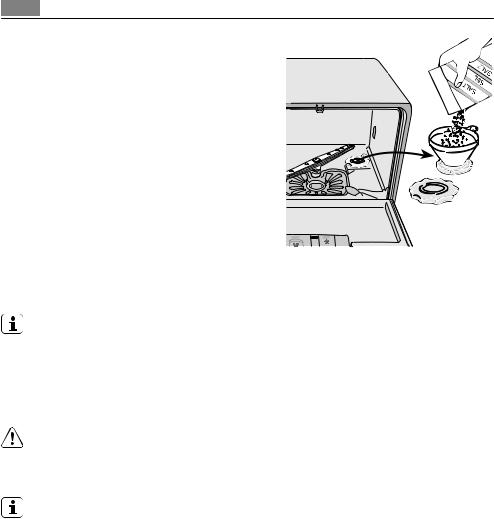
Do these steps to fill the salt container:
1.Turn the cap anticlockwise to open the salt container.
2.Fill the salt container with 1 litre of water (only the first operation).
10 Use of rinse aid
3. Use the funnel to fill the salt container with salt.
4.Remove the salt around the opening of the salt container.
5.Turn the cap clockwise to close the salt container.
It is normal that water overflows from the salt container when you fill it with salt.
When you set the water softener to level 1, the salt indicator light does not stay on.
USE OF RINSE AID
CAUTION!
Only use branded rinse aid for dishwashers.
Do not fill the rinse aid dispenser with other products (e.g. dishwasher cleaning agent, liquid detergent). This can cause damage to the appliance.
Rinse aid gives spot and streak free dry.
Rinse aid is automatically added in the last rinse.
Loading cutlery and dishes |
|
11 |
|
|
|
Do these steps to fill the rinse aid dispenser:
1.Press the release button (A) to open the rinse aid dispenser.
2.Fill the rinse aid dispenser with rinse aid. The maximum level is shown by "max".
3.Remove the spilled rinse aid with an absorbent cloth to prevent too much foam during the subsequent washing programme.
4.Close the rinse aid dispenser.
The capacity of the rinse aid dispenser is approximately 150 ml. The quantity of rinse aid is sufficient for approximately 60 washing programmes.
Adjust the dosage of rinse aid
The appliance is set at the factory at level 1.
You can set the dosage between 1 - 6 (1- 6 ml of the rinse aid).
To adjust the dosage of rinse aid, refer to the washing results ("What to do if..."). Start with the lowest dosage.
Turn the arrow clockwise to increase the dosage.
Increase the dose if there are water droplets or limescale on the dishes.
LOADING CUTLERY AND DISHES
Helpful hints and tips
CAUTION!
Only use the appliance for household utensils that are applicable for dishwashers.
Do not use the appliance to clean objects that can absorb water (sponges, household cloths, etc.).
•Before you load cutlery and dishes, do these steps:
– Remove all food remainings and debris.
12Loading cutlery and dishes
–Make burnt, remaining food in pans soft.
•While you load cutlery and dishes, do these steps:
–Load hollow items (e.g. cups, glasses and pans) with the opening down.
–Make sure that water does not collect in the container or in a deep base.
–Make sure that cutlery and dishes do not lie inside one another.
–Make sure that cutlery and dishes do not cover other cutlery and dishes.
–Make sure that glasses do not touch other glasses.
–Put small objects in the cutlery basket.
•Plastic items and pans with non-stick coatings can keep water droplets.
•Plastic items do not dry as well as porcelain and steel items.
•Put light items in the main basket. Make sure that the items do not move.
CAUTION!
Make sure that the spray arm can move freely before you start a washing programme.
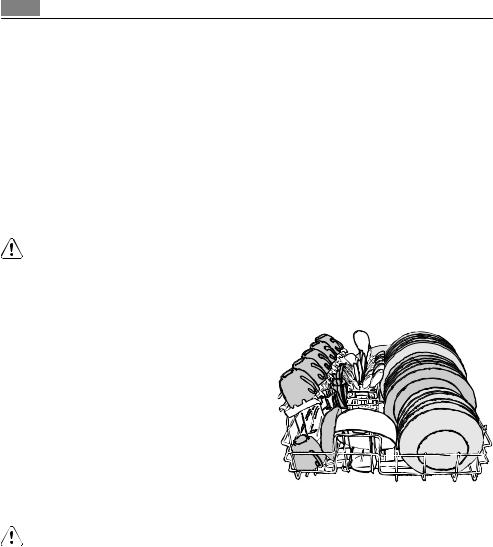
Primary basket
Arrange the deep dishes and large lids around the edge of the basket. Arrange items on and below the cup racks. The water must come to all parts of the dishes.
You can fold the cup racks to clean high items.
Cutlery basket
WARNING!
Do not put long-bladed knives in a vertical position to prevent injury.
Arrange long and/or sharp items of cutlery horizontally in the primary basket. Be careful with sharp items such as knives.
Use the cutlery basket for:
• forks and spoons with the handles down.

Use of detergent |
|
13 |
|
|
|
• knives with the handles up.
The cutlery basket has a cutlery grid that you can remove.
Do not let the cutlery bond together.
Make sure that the spray arm can move freely before you close the door.
USE OF DETERGENT
Only use detergents (powder, liquid or tablet) that are applicable for dishwashers. Follow the data on the packaging:
•Dosage recommended by the manufacturer.
•Storage recommendations.
The instructions on the packaging usually refer to large dishwashers (12 settings).
Do not use more than the correct quantity of detergent to save an environment.
Fill with detergent
Do these steps to fill the detergent dispenser:
1.Open the lid of the detergent dispenser.
2.Fill the detergent dispenser (A) with detergent.
3.If you use a washing programme with prewash phase, put more detergent in the prewash detergent compartment (B).
A 


 B
B 

The detergent is removed during the prewash phase. 4. Close the lid of the detergent dispenser.
Use of detergent tablets
Put the detergent tablet in the detergent dispenser (A). Detergent tablets contain:
•detergent
•rinse aid
•other cleaning agents.
Do these steps to use detergent tablets:

14Washing programmes
1.Make sure that the detergent tablets are applicable for your water hardness. Refer to the instructions from the manufacturer.
2.Set the lowest levels of water hardness and rinse aid dosage.
It is not necessary to fill the salt container and the rinse aid dispenser.
Do these steps when the drying results are not satisfactory:
1.Fill the rinse aid dispenser with rinse aid.
2.Set the rinse aid dosage to position 2.
Do these steps to use the detergent powder again:
1.Fill the salt container and the rinse aid dispenser.
2.Set the water softener to the highest level.
3.Do a washing programme without dishes.
4.Adjust the water softener. Refer to the chapter 'Setting the water softener'.
5.Adjust the rinse aid dosage.
Different brands of detergent dissolve in different times. Some detergent tablets do not have the best cleaning results during short washing programmes. Use long washing programmes when you use detergent tablets to fully remove the detergent.
WASHING PROGRAMMES
Washing programmes |
|
|
|
|
|
|
|
|
|
|
|
|
Degree |
|
Type of |
|
Energy |
Programme |
|
Programme description |
Save op- |
||
of soil |
|
load |
|||
|
|
|
tion1) |
||
|
|
|
|
|
|
|
|
|
|
|
|
|
Mixed |
|
Crockery, |
Prewash |
Selectable, |
|
|
Main wash up to 45°C or 70°C |
impact on |
||
2) |
normal |
|
cutlery, |
||
|
1 or 2 intermediate rinses |
washing |
|||
and light |
|
pots and |
|||
|
|
Final rinse |
pro- |
||
|
soil |
|
pans |
||
|
|
Drying |
gramme. |
||
|
|
|
|
||
|
|
|
|
|
|
|
|
|
Crockery |
Prewash |
Selectable, |
3) |
Normal |
|
Main wash up to 55°C |
impact on |
|
|
and cut- |
1 intermediate rinse |
washing |
||
soil |
|
||||
|
|
lery |
Final rinse |
pro- |
|
|
|
|
|||
|
|
|
|
Drying |
gramme. |
|
|
|
|
|
|
|
Normal |
|
Crockery |
Main wash up to 50°C |
Selectable, |
30 MIN |
|
no impact |
|||
or light |
|
and cut- |
1 intermediate rinse |
on washing |
|
|
soil |
|
lery |
Final rinse |
pro- |
|
|
|
|
|
gramme. |
|
|
|
|
|
|
|
|
|
|
Setting and starting a washing programme |
15 |
||
|
|
|
|
|
|
|
|
|
|
|
|
|
|
|
|
|
|
Degree |
|
Type of |
|
Energy |
|
|
Programme |
|
Programme description |
Save op- |
|||
|
of soil |
|
load |
||||
|
|
|
|
tion1) |
|||
|
|
|
|
|
|
||
|
|
|
|
Crockery |
Prewash |
Selectable, |
|
|
|
|
|
||||
|
|
Normal |
|
no impact |
|||
|
|
|
Main wash up to 40°C |
||||
|
|
|
and cut- |
on washing |
|||
|
|
soil |
|
1 intermediate rinse |
|||
|
|
|
lery |
pro- |
|
||
|
|
|
|
Final rinse |
|
||
|
|
|
|
|
gramme. |
||
|
|
|
|
|
|
||
|
|
|
|
|
|
|
|
1)For programmes where the option has an impact, the energy saving is between 10% and 25%.
2)During the 'Auto' washing programme the level of soiling on the dishes is determined by how cloudy the water is. The programme duration, water and energy consumption levels can vary; this depends upon if the appliance is fully or partially loaded and if the dishes are lightly or heavily soiled. The temperature of the water is automatically adjusted between 45°C and 70°C.
3)Test programme for test institutes. Please refer to separate leaflet supplied, for test data.
Consumption values
Programme |
Programme duration |
Energy consumption |
Water consumption |
|
(in minutes) |
||
|
(in kWh) |
(in litres) |
|
|
1) |
||
|
|
|
|
|
- |
0,5-0,8 |
5-9 |
|
- |
0,63 |
7 |
30 MIN |
- |
0,45 |
6 |
|
- |
0,4 |
6 |
1) The digital display shows the programme duration.
The pressure and temperature of the water, the variations of power supply and the quantity of dishes can change these values.
SETTING AND STARTING A WASHING PROGRAMME
Set the washing programme with the door ajar. The washing programme only starts after you close the door. Until then it is possible to modify the settings.
Do these steps to set and start a washing programme:
1.Switch on the appliance.
2.Make sure that the appliance is in setting mode.
3.Press one of the programme buttons. Refer to the chapter 'Washing programmes'.
–The programme indicator light comes on.
–All other programme indicator lights go off.
–The digital display shows in flashing the programme duration.
–The phase indicator light for the washing programme starts to flash.
4.Close the door.
–The washing programme starts automatically.
–The phase indicator light for the washing programme is on.

16 Setting and starting a washing programme
When the washing programme operates, you cannot change the programme. Cancel the washing programme.
WARNING!
Only interrupt or cancel a washing programme if necessary.
CAUTION!
Open the door carefully. Hot steam can come free.
Cancelling a washing programme
1.Press and hold function buttons B and C until all the programme lights come on.
2.Release function buttons B and C to cancel the washing programme.
At this time you can do these steps:
1.Switch off the appliance.
2.Set a new washing programme .
Fill the detergent dispenser with detergent before you set a new washing programme.
Interrupting a washing programme
Open the door.
•The programme stops. Close the door.
•The programme continues from the point of interruption.
Setting and starting a washing programme with delay start
1.Press the on/off button.
2.Set a washing programme.
3.Press the delay start button until the display shows on flashing the necessary delay start of the washing programme.
–The delay start indicator light comes on.
4.Close the door.
–The number on the display comes on with fixed light.
–The countdown of the delay start starts.
–The countdown of the delay start decreases with steps of 1 hour.
–When the countdown is completed, the washing programme starts automatically.
Do not open the door during the countdown to prevent interruption of the countdown. When you close the door again, the countdown continues from the point of interruption.
Cancelling a delay start:
1.Press and hold function buttons B and C until all the programme lights come on.
– When you cancel a delay start, you also cancel the washing programme.
2.Set a new washing programme.
 Loading...