


fridge-freezer / frigorífico / congélador
INSTRUCTION BOOKLET INSTRUCCIONES DE USO INSTRUÇÕNES DE USO
ER8912B |
GB |
ES
PO
818 17 52--00/0
Safety instructions GB
Carefully read these instructions to learn how the appliance works and how to care for it. Keep the instruction booklet. It will come in handy if you later sell the cabinet or give it to somebody else.
These warnings are provided in the interests of your safety. Ensure that you understand them all before installing or using the appliance. Your safety is of paramount importance. If you are insure about any of the meanings or warnings contact the Customer Care Department.
For the User |
· The cabinet is heavy. The edges and projecting |
· The cabinet is intended for keeping foodstuff in a |
parts of the cabinet may be sharp. Be careful |
normal household as explained in this instruction |
when moving the cabinet and always use gloves. |
booklet. |
Child Safety |
· Do not keep explosive gases or liquids in the |
|
refrigerator or freezer compartment. They may |
· Pay attention so that small children do not gain |
explode and cause injury and material damage. |
access to the operating controls or the inside of |
· Do not let sharp objects come into contact with |
the cabinet. |
the refrigerating system on the back of and inside |
|
the cabinet. If the refrigerating system is |
Scrapping old cabinets |
punctured, the cabinet will be damaged and |
|
foodstuff inside may spoil. |
When discarding the cabinet, hand it over to a |
· Do not keep carbonised drinks or bottles in the |
recycling station. For more information, call your |
freezer compartment. The glass bottles may |
local city office or your dealer. |
break. |
|
Contents |
GB |
Safety instructions . . . . . . . . . . . . . . . . . 2
Scrapping old cabinets . . . . . . . . . . . . . . . . . . . . . . . 2
Contents . . . . . . . . . . . . . . . . . . . . . . . . . . 2
Description of the Appliance . . . . . . . . 3
Control Panel . . . . . . . . . . . . . . . . . . . . . . . . . . . . . . 3
Before use . . . . . . . . . . . . . . . . . . . . . . . . . 4
Using the fridge . . . . . . . . . . . . . . . . . . . . 4
To start the fridge and set the correct temperature . 4 Temperature inside the fridge . . . . . . . . . . . . . . . . . 4 Measuring the temperature . . . . . . . . . . . . . . . . . . . 5 Switching off . . . . . . . . . . . . . . . . . . . . . . . . . . . . . . 5 Alarms and other features . . . . . . . . . . . . . . . . . . . . 5 Cabinet interior . . . . . . . . . . . . . . . . . . . . . . . . . . . . 6
Hints and Tips . . . . . . . . . . . . . . . . . . . . . 9
Saving energy . . . . . . . . . . . . . . . . . . . . . . . . . . . . . 9 Food Storage . . . . . . . . . . . . . . . . . . . . . . . . . . . . . . 9 Protect the environment . . . . . . . . . . . . . . . . . . . . . . 10
Maintenance and Cleaning . . . . . . . . . . 10
Removing the ventilation grille . . . . . . . . . . . . . . . . 10 Cleaning . . . . . . . . . . . . . . . . . . . . . . . . . . . . . . . . . . 10 Defrosting the fridge . . . . . . . . . . . . . . . . . . . . . . . . 10 Defrosting the freezer . . . . . . . . . . . . . . . . . . . . . . . 11 To Change the Light Bulb . . . . . . . . . . . . . . . . . . . . 11 When the appliance is not in use . . . . . . . . . . . . . . . 11
Something Not Working . . . . . . . . . . . . 12
Guarantee Conditions . . . . . . . . . . . . . . . . . . . . . . . 13
Service and Spare Parts . . . . . . . . . . . . . . . . . . . . . . 13
Customer Care Department . . . . . . . . . . . . . . . . . . . 13
Using the freezer . . . . . . . . . . . . . . . . . . . 6
To start the freezer and set the correct temperature |
6 |
Temperature inside the freezer . . . . . . . . . . . . . . . . |
7 |
Switching off . . . . . . . . . . . . . . . . . . . . . . . . . . . . . . |
7 |
Alarms and other features . . . . . . . . . . . . . . . . . . . . |
7 |
Freezing . . . . . . . . . . . . . . . . . . . . . . . . . . . . . . . . . . |
8 |
Suitable storage periods . . . . . . . . . . . . . . . . . . . . . . |
8 |
Thawing . . . . . . . . . . . . . . . . . . . . . . . . . . . . . . . . . . |
8 |
Cabinet interior . . . . . . . . . . . . . . . . . . . . . . . . . . . . |
9 |
Technical specification . . . . . . . . . . . . . 14
Installation . . . . . . . . . . . . . . . . . . . . . . . . 14
Unpacking . . . . . . . . . . . . . . . . . . . . . . . . . . . . . . . . 14 Before installing the cabinet . . . . . . . . . . . . . . . . . . 14 Remove the transport supports . . . . . . . . . . . . . . . . 14 Cleaning . . . . . . . . . . . . . . . . . . . . . . . . . . . . . . . . . . 14 Installing the cabinet . . . . . . . . . . . . . . . . . . . . . . . . 15 Electrical connection . . . . . . . . . . . . . . . . . . . . . . . . 15 Door Reversal . . . . . . . . . . . . . . . . . . . . . . . . . . . . . 16
Electrolux 818 17 52--00/0
2
Description of the Appliance |
GB |
|
1 |
|
4 |
|
|
|
|
|
2 |
6 |
6 |
|
|
|
5 |
|
1 |
7 |
|
|
|
|
5 |
|
1 |
|
|
3 |
3 |
|
2 |
|
9 |
|
11 |
|
|
|
|
|
8 |
|
|
|
9 |
|
|
9
9
10
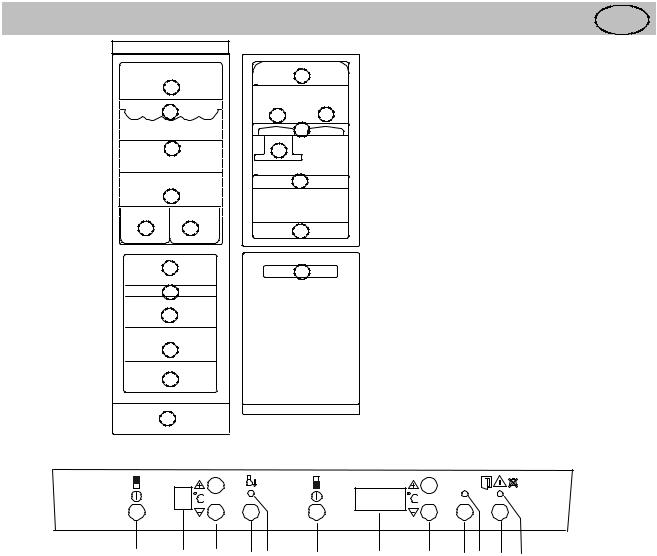
Control Panel
5 |
ACTION COOL |
A B C D E F
A.Refrigerator power switch
Switches the refrigerator on and off.
B.Temperature display
Shows the average temperature inside the refrigerator.
C.Temperature adjustment buttons/thermostat
Used to set the temperature in the refrigerator.
D.ACTION COOL button
Used to switch the Action Cool feature on and off.
E. Yellow indicator lamp
Lights when Action Cool is operating.
F. Freezer power switch
Switches the freezer on and off.
Model ER8912B
1.Glass shelf
2.Bottle shelf
3.Vegetable drawer
4.Butter compartment
5.Door shelf
6.Egg holder
7.Sliding shelf
8.Freezer plate
9.Freezer drawer
10.Ventilation grille
11.Freezer calendar
-- 18 |
* |
|
ACTION FREEZE |
||
|
G H I J K L
G. Temperature display
Shows the highest temperature inside the freezer.
H.Temperature adjustment buttons/thermostat
Used to set the temperature in the freezer.
I.FAST FREEZE button
Used to switch the fast Freeze feature on and off.
J. Yellow indicator lamp
Lights when fast Freeze is operating.
K. Alarm shut-off button
Used to turn the audible alarm off.
L. Red warning lamp
Flashes when one of the alarms in the cabinet has been triggered.
Electrolux 818 17 52--00/0
3

Before use |
GB |
Position and clean the cabinet as explained in the section "Installation".
Check that the drain hose at the rear of the cabinet discharges into the drip tray.
Before inserting the power plug into the outlet and switching on the cabinet for the first time, leave it standing upright for about 30 minutes, or for 4 hours if it was transported horizontally. Otherwise the compressor may sustain damage. This time will allow the oil sufficient time to return to the compressor.
Using the fridge |
|
GB |
To start the fridge and set the |
5 |
- 18 |
correct temperature |
||
Switching on: |
|
|
Switch on the fridge by pressing the power switch. |
|
|
Setting the temperature |
|
|
Press the buttons until the desired temperature |
|
|
flashes in the temperature display (The temperature |
|
|
can be set between +1°C and +9°C.) |
|
|
"+" raises the temperature. |
|
|
"-" lowers the temperature. |
|
|
A setting of 5°C is usually suitable for normal |
|
|
operation. |
|
|
Once set, the temperature display shows "-" until the |
|
|
temperature inside the fridge reaches +9°C or below. |
|
|
Allow the cabinet to run for a period of 24 hours |
|
|
whenever the temperature setting is changed. This |
5 |
- 18 |
will allow the temperature to stabilise inside the |
||
cabinet. |
|
|
It is not necessary to reset the temperature when the |
|
|
cabinet is switched on after it has been out of use. |
|
|
The thermostat recalls the previously set |
|
|
temperature. |
|
|
Temperature inside the fridge
A suitable temperature inside the fridge is approx. +5°C. If the thermostat control is set to a too cold temperature, food with a high water content may start to freeze if it has been placed in the coldest places in the fridge. The picture shows the coldest and warmest places inside the fridge.
(+ warm, - cold)
Meat, fish and milk should be put in the coldest part of the cabinet.
The temperature will be affecteed by:
·How often the door is opened
·How much food is stored
·Position of the appliance (See chapter Installation)
|
+ |
+ |
|
-- |
|
|
-- |
-- |
|
-- |
|
+ |
+ |
+ |
4 |
|
Electrolux 818 17 52--00/0 |
|
|

Measuring the temperature
If the temperature is measured using a standard, single thermometer, this should be put in a glass of water centrally placed inside the cabinet. This will reflect the temperature inside the food products. Do not place the thermometer hanging or lying directly on the shelf.
Hints:
·Distribute foodstuffs to allow cold air to circulate freely between the products.
·Do not place food products directly against the cooling plate on the rear wall since they may freeze in this case.
·Also never put warm products into the cabinet. Wait until they have cooled down.
·Cover all foods properly to avoid odours and flavours from tainting other food.
Switching off
Switch off the cabinet by pressing the power switch. Keep the button pressed for approx. 1 second.
Power to the cabinet is completely interrupted only when the power plug is disconnected or the fuse is removed.
Alarms and other features
Door open alarm
If the fridgedoor remains open for more than 5 minutes, the red warning lamp starts flashing and an audible alarm sounds.
To switch off the alarm:
Press the "alarm shut-off button". The red warning lamp goes out when the door is closed.
Action cool
Use Action Cool to refrigerate a large quantity of products. When Action Cool is switched on, the temperature is automatically set to +2°C.
"A" is then displayed in the temperature display and the yellow indicator lamp lights. After about 6 hours, Action Cool is switched off and the temperature gradually returns to the previously set temperature. It is possible to switch off Action Cool manually by pressing the Action Cool button once more.
5 |
- 18 |
5 |
- 18 |
A 
 - 18
- 18
Electrolux 818 17 52--00/0
5

Cabinet interior
The shelves and door compartments are removable and can easily be re-arranged.
Certain shelves must be lifted up by the rear edge to enable them to be removed.
The lower door compartment and the glass shelf above the vegetable drawer must not be moved. They are required for proper air circulation inside the cabinet.
Shelves with a raised edge should be placed with the raised edge facing the rear wall of the cabinet, and thus prevent food products from touching the cooling plate.
The vegetable drawer has a removable plate to separate different vegetables.
Hanging half-shelf
The half-shelf can be moved sideways. It can be hung under all door shelves, except the lowest one.
Using the freezer |
GB |
To start the freezer and set the correct temperature
Switching on:
Switch on the freezer by pressing the power switch. The alarm sounds if the temperature inside the freezer reaches room temperature. Turn off the alarm by pressing the switch-off button.
Setting the temperature
Press the buttons until the desired temperature blinks on the temperature display. (The temperature can be set between -15°C and -24°C.)
"+" increases the temperature. "-" decreases the temperature.
Once set, the temperature display shows the current temperature inside the freezer.
Allow the cabinet to run for a period of 24 hours whenever the temperature setting is changed. This will allow the temperature to stabilise inside the cabinet.
It is not necessary to reset the temperature when the cabinet is switched on after it has been out of use. The thermostat recalls the previously set temperature.
5 |
- 18 |
5 |
20 |
5 |
- 18 |
Electrolux 818 17 52--00/0
6
 Loading...