

Page 1
USER GUIDE
CORDLESS
TELEPHONE
Voxtel Smart 3
UK
Page 2

WELCOME
1 WELCOME
Thank you for purchasing our product!
You can use the Smart 3 to:
• Make and receive calls
• Receive telephone messages and record memos using the digital answer machine
• Send and receive Emails via wireless connection
• Make Audio Calls over the Internet via wireless connection
• Surf the web via wireless connection
• Listen to music via loud speaker or earphones
• View pictures and slideshows
• Listen to Internet radio broadcasts
• Read and download eBooks
• Check Stock Prices and Stock Information
• Check current weather and weather forecast
• Read News with RssFeed
• Check Calendar and Agenda
• Set alarm
• Perform simple Calculations
1
Page 3

IMPORTANT
2IMPORTANT
Your Smart 3 is not designed for making emergency calls in the event of power failure.
Alternative arrangements should be made for access to Emergency services during such
events. (You are advised to keep a basic phone that does not require mains power for
operation.)
Use only the power adaptor, battery pack and telephone line cord provided in the box.
2
Page 4
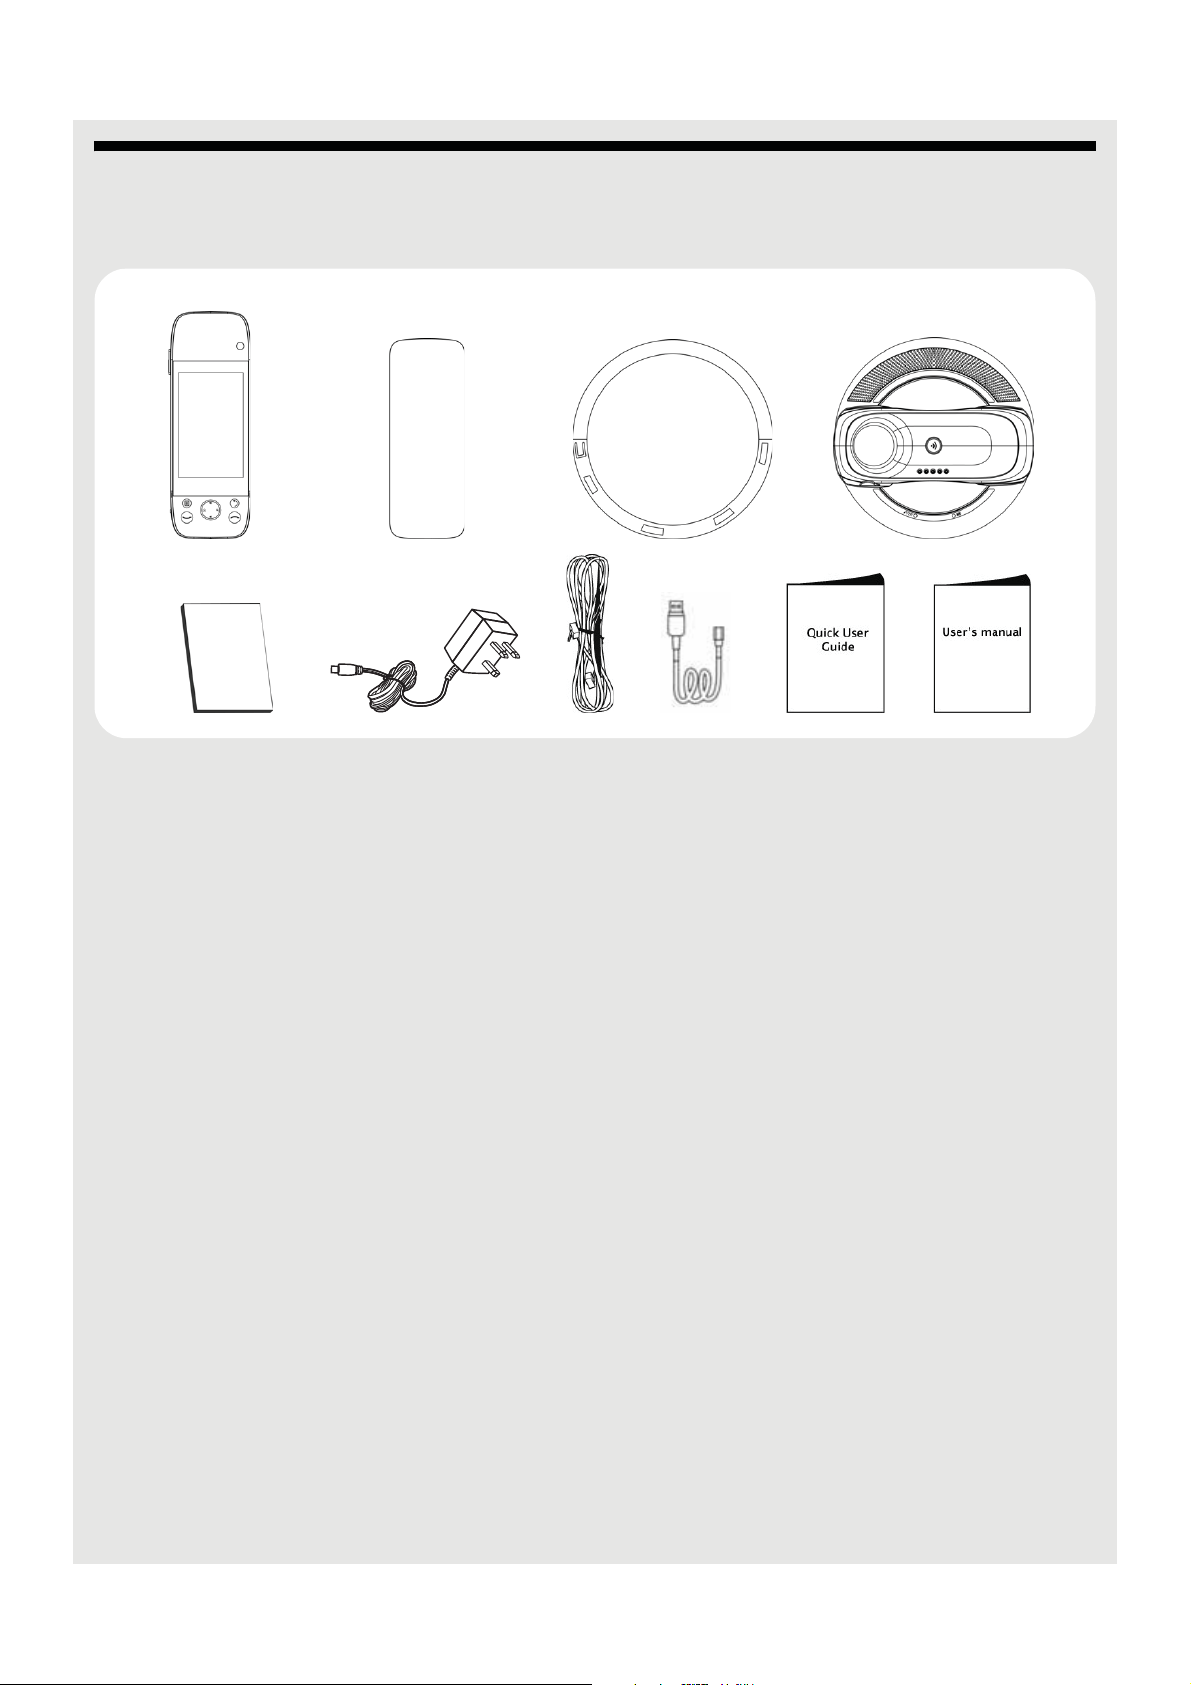
3 WHAT'S IN THE BOX?
The product pack includes:
Li-ion
battery
WHAT'S IN THE BOX?
• 1 x Handset
• 1 x Battery cover
• 1 x Li-ion Rechargeable Battery Pack
• 1 x Base station
• 1 x Stand for Base station
• 1 x Mains power adapter
• 1 x Telephone line cord
• 1 x USB - Micro USB Cable
• 1 x User Guide
• 1 x Quick Start Guide
Note
Keep all components and the packaging in a secure place in case you need to transport
the unit later. Retain original dated sales receipt for warranty service.
3
Page 5
OVERVIEW OF SMART 3
4 OVERVIEW OF SMART 3
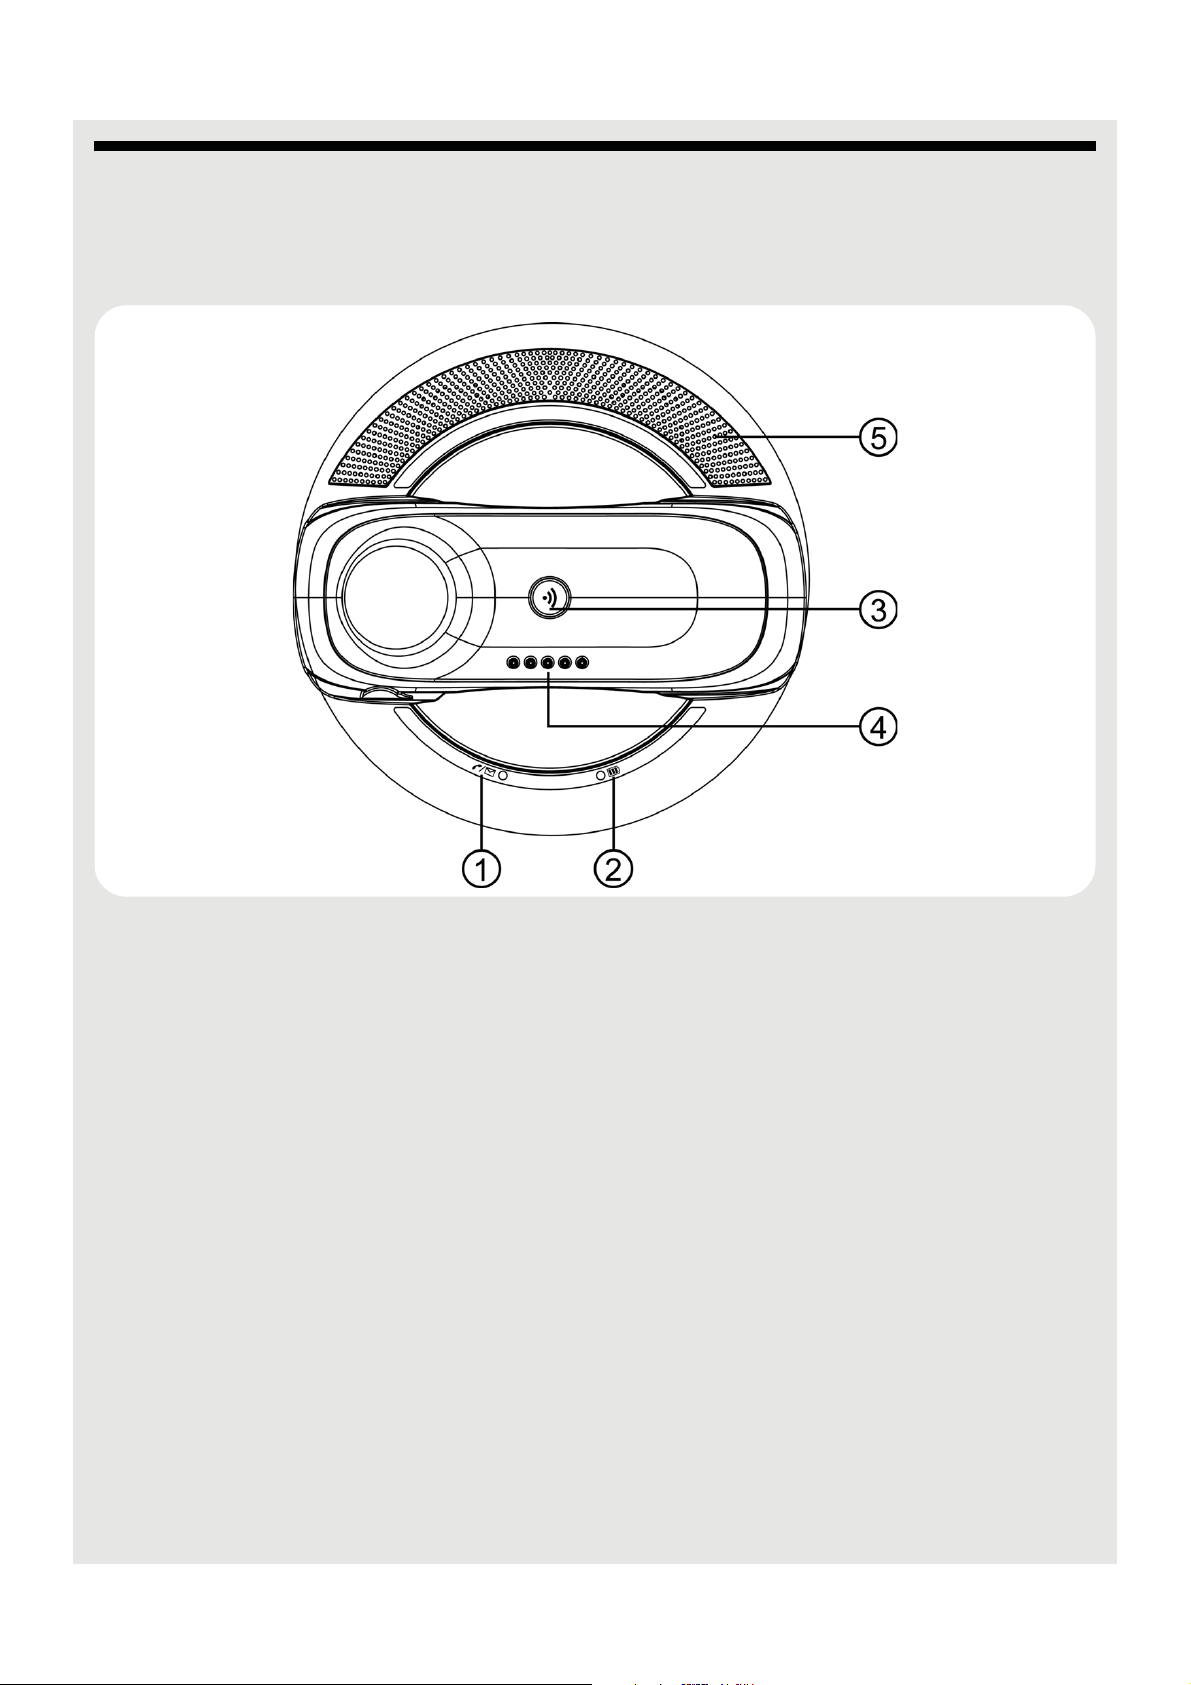
4.1 Base station
1 Charge LED - RED Turns on when the handset is put into the base cradle
for charging.
2 In Use / Message LED -
BLUE
3
N Page Press to find / page all registered handsets. Press the
4 Charge and Audio Input
Contact
5 Loudspeakers
Turns on when the handset is in use or blinks when a
new message is received.
button again, or any key on the handset to turn off the
page signal.
For charging the handset battery and receiving audio to
play through the loudspeakers.
4
Page 6
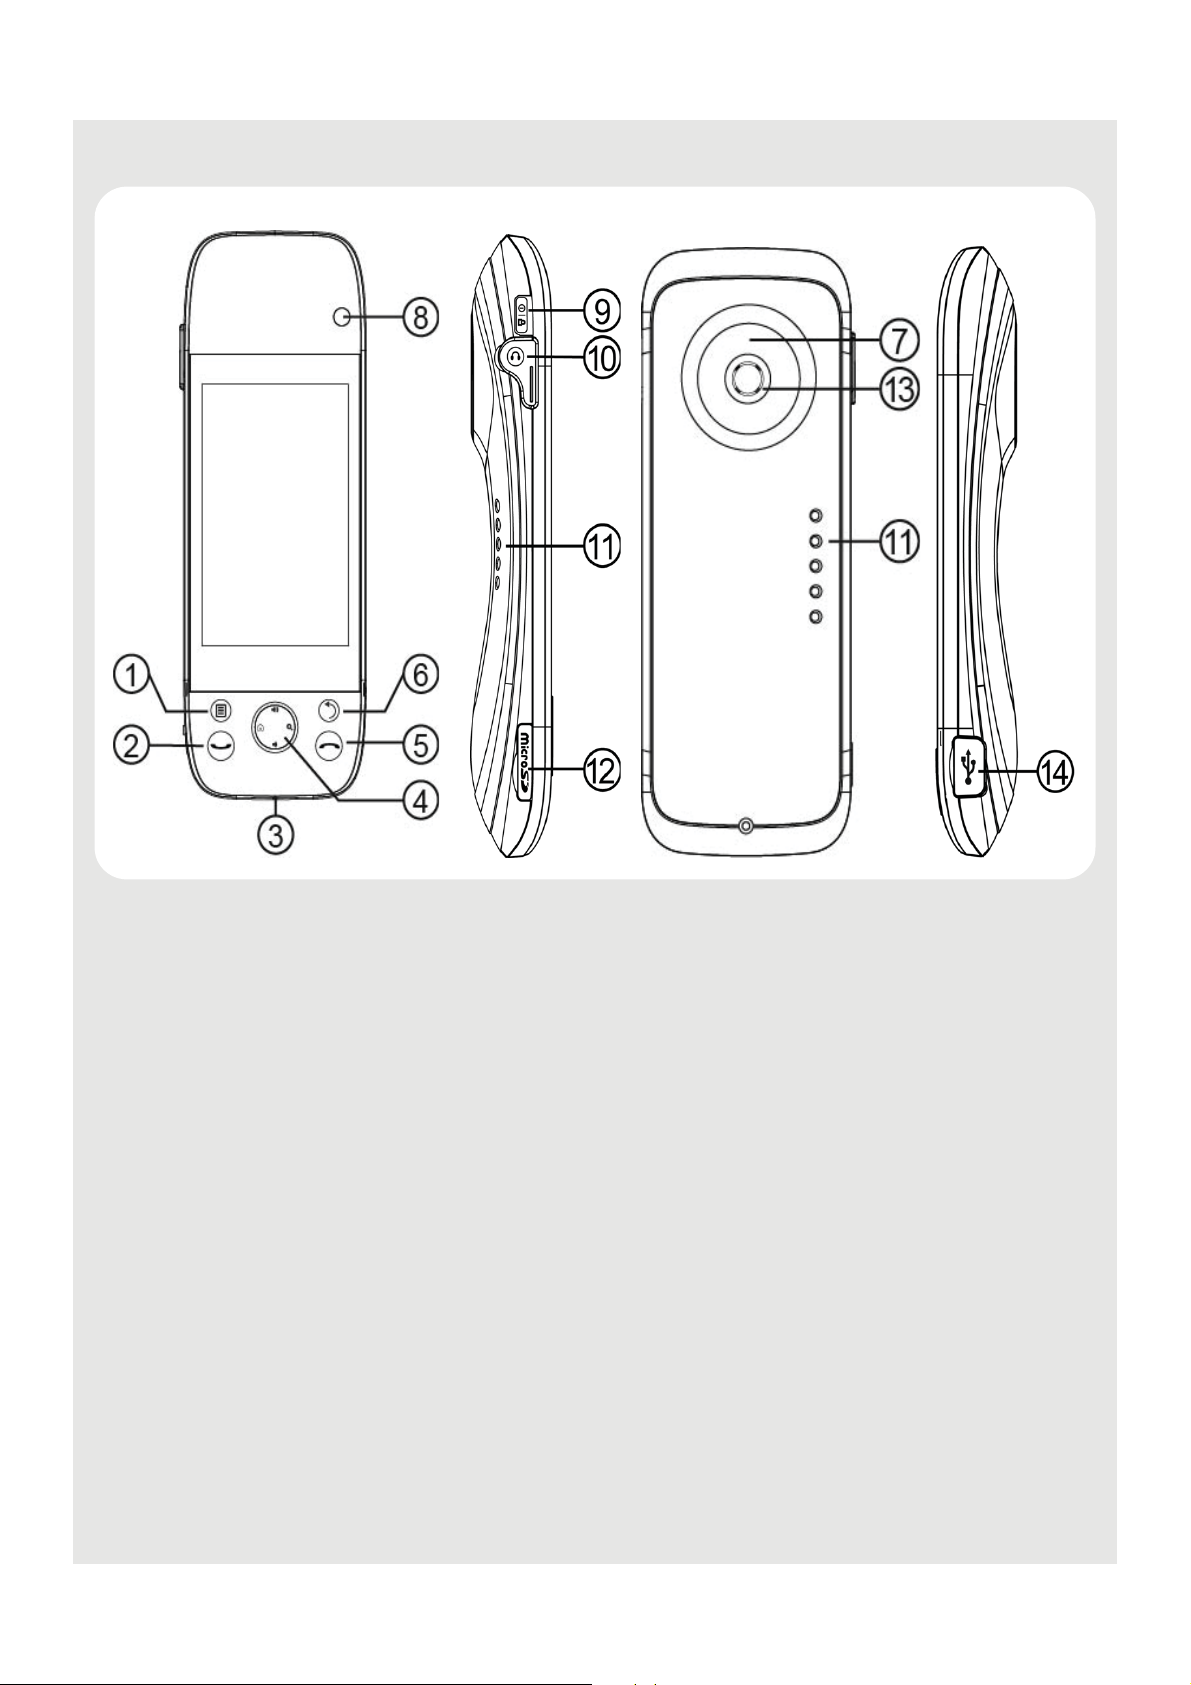
4.2 Handset
<
>
OVERVIEW OF SMART 3
1 H MENU key • Press once to access the menu options
2
C PHONE ON key • Press once to access the Dialler.
• Press once to make or answer a call.
3 Microphone
4 FUNCTION buttons
HOME key Press to return to the home screen.
SEARCH key • On the homescreen: Open google search for
searching on your phone or the web
• In other applications: Open a search box for
searching within the application
5
Page 7

OVERVIEW OF SMART 3
+ / -
VOLUME UP/DOWN keys
5
D PHONE OFF key • Press once to end a call.
B BACK key • Press to return to the previous screen.
6
7Earpiece
8 Camera Lens
9
L
Lock / Unlock / Power On
& Off key
• On the homescreen: Press to increase/decrease
ringtone volume; press and hold to increase/
decrease ringtone volume quickly
• When a call is in progress: Press to increase/
decrease volume during a call
• In other applications: Press to increase/decrease
media volume
• Press to hide the onscreen keyboard, dialogue box,
options menu or notifications panel.
• When the handset is off, press and hold for 2
seconds to turn on the handset
• When the handset is in operation, press and hold for
2 seconds to activate Phone options menu to set
Silent Mode or to power off the phone.
• During operation, press briefly to lock or unlock the
handset.
10
E Earphone Jack Plug in a 3.5mm headset for listening to music.
11 Charge and Audio Output
Contacts
12
S Micro SD
card slot
13 Handset Speaker
14
U Micro USB port For handset charging, internal storage and Micro-SD
card access.
4.3 Status Icons
The Status bar at the top of the screen displays the time, status of your phone, and
notifications that you've received.
Icon Description
Battery is fully charged
Battery low
6
Page 8
H
Battery is charging
SD card is inserted
Wireless connection is on, and the signal stren gth
DECT signal strength
Alarm Clock is set
Earphone is connected
Speaker is on
Silent mode is activated
Missed call
Call in progress
OVERVIEW OF SMART 3
Call on hold
Call is muted
Digital Answer Machine is on
New answer machine message is received
Music or radio is playing
1 Handset number
Network Voice Mail
4.4 Notifications panel
When the status bar displays a STATUS icon, tap and hold the status bar and slide
downward to open the notifications panel.
You can also press
To hide the notifications panel, press
notifications panel and then slide upward.
and tap Notifications to access the notifications panel.
B or tap and hold the bottom bar of the
7
Page 9
OVERVIEW OF SMART 3
4.5 U sing the touchscreen
Action Function Operations
Tap • Select onscreen items such as
applications and settings icons
• Select onscreen buttons
• Type using the onscreen keyboard
Tap and
hold
Drag Move items on the screen or shift the
Slide Quickly move vertically or
Open the available options for an
item, for example, tap and hold a
contact or a link on a web page.
Think of this as using the right-click
button on a mouse.
view on the screen.
horizontally across the screen.
Gently tap an item on the screen to
select the item that you wish to
activate.
Tap an item on the screen and hold
in place for 2-3 seconds.
Apply light pressure against an item
on the screen then, without raising
your finger, mo ve it across the
screen until you have reached the
target position.
Flick Quickly browse a list of items in a
vertical direction.
Flick is similar to slide, except that
flick involves swiping the screen in
lighter and quicker strokes.
4.6 U sing the onscreen keyboard
Your Voxtel Smart 3 features a Qwerty keyboard, which has the same key arrangement
as that of a standard computer keyboard.
The onscreen keyboard lets you enter text, such as contact information, email messages,
etc. It appears automatically when you launch certain applications or when you tap on a
text or number field.
To hide the onscreen keyboard, press
4.6.1 Enter text and numbers
• Tap on a text or number field to bring up the keyboard.
When entering texts or numbers, each letter or number will appear above the key you
have pressed.
B.
8
Page 10

OVERVIEW OF SMART 3
4.6.2 Switch between input modes
• Tap ABC / ?123 to switch between letters and numbers or symbols, and tap to switch
between upper and lower case letters, or tap ALT to switch between different symbol
sets.
4.6.3 Change the display language
1 From the home screen, press H.
2 Tap Settings > Language & keyboard > Select language.
3 Scroll to your preferred display language and tap to select.
The display will return to the previous menu screen, but in the selected language.
4.6.4 Modify keyboard settings
1 From the home screen, press H.
2 Tap Settings > Language & keyboard > An droid keyboard.
3 Tap to select or de-select the options and settings, and press
previous menu screen.
B to return to the
4.6.5 Add words to User dictionary
1 From the home screen, press H.
2 Tap Settings > Language & keyboard > Us er dictionary.
3 Press
4 Enter the word in the edit box and tap OK, then press
menu screen.
5 To edit or delete a word in the User Dictionary, tap and hold the word, then tap Edit to
modify the word, or tap Delete to remove it.
H and tap Add.
B to return to the previous
4.6.6 Accept or Reject Dictionary Suggestions
Depending on the application you are using, the Voxtel Smart 3 uses a dictionary to
suggest corrections or complete the word you are typing.
• To accept the suggested word, simply tap on the suggested entry.
• To reject the suggested word, simply continue typing.
Note
Words in your User Dictionary are included in this function, and can be add ed or
removed in Language & keyboard > User dictionary in the Settings menu.
4.6.7 Edit text
• Tap and hold on the word you have typed to activate Edit text options and tap to select
an option.
9
Page 11

Table of contents
1 WELCOME........................................................................................1
2 IMPORTANT.....................................................................................2
3 WHAT'S IN THE BOX?.....................................................................3
4 OVERVIEW OF SMART 3................................................................4
4.1 Base station.......................................................................................4
4.2 Handset.............................................................................................5
4.3 Status Icons.......................................................................................6
4.4 Notifications panel.............................................................................7
4.5 Using the touchscreen..............................................................................8
4.6 Using the onscreen keyboard............................................................8
5 GETTING STARTED ........................................................................1
5.1 Care and maintenance.... ... ... ... .... ... ... ... .... ............................. ... ... ... ..1
5.2 Handset range...................................................................................1
5.3 Signal strength ............................. ... ... ... .... ... ... ............................. ... ..1
5.4 Battery low warning................................... ... ... ... ... .... ... .....................2
5.5 Attaching the stand to the base station .............................................2
5.6 Connecting the power cable and telephone line cord .......................3
5.7 Removing back cover.. .............................. ... ... ... ... .... ... ... ..................3
5.8 Installing the battery pack..................................................................4
5.9 Charging the battery................. .... ... ... ... .... ... ............................. ........4
5.10 Inserting and mounting a memory card.............................................5
5.11 Unmounting and Removing a memory card......................................5
5.12 Switching on your Voxtel Smart 3 .....................................................6
5.13 Switching off your Voxtel Smart 3 .....................................................6
5.14 Home Screen ....................................................................................6
5.15 Extended Home Screen.................. ... ... .... ............................. ... ... ... ..6
5.16 Wake up the phone...........................................................................7
5.17 Lock the screen of your Voxtel Smart 3 ............................. .... ... ... ... ..7
5.18 Screen Rotation..... ............................................................................8
5.19 Recalibrate the touch screen.............................................................8
5.20 Set Date and Time ............................................................................8
5.21 Applications on your Voxtel Smart 3 ...............................................10
6 Set up your Voxtel Smart 3 with Welcome Wizard..................... 11
6.1 Wi-Fi settings...................................................................................11
6.2 Date & time settings ........................................................................12
6.3 Display.............................................................................................12
6.4 Sound settings.................................................................................13
14
Page 12

7 Personalising your Voxtel Smart 3..............................................14
7.1 Display Settings...............................................................................14
7.2 Sound Settings................................................................................16
8 DECT Settings ............................................................................... 19
8.1 Handset Settings.............................................................................19
8.2 Base Settings ..................................................................................20
9 Voicemail........................................................................................ 21
9.1 Listen to Voicemail ..........................................................................21
10 Using the Phone Functions..........................................................22
10.1 Call another handset registered to the same base station (Intercom).
22
10.2 Make an external call ...................................... ... ... ..........................22
10.3 Make an external call from Call Log................................................23
10.4 Clear call log....................... ... ... .... ... ............................. ... ... .... .........23
10.5 Make an external call from Contacts list.................... ... ... ... .... ... ... ...23
10.6 Make an external call from Favorites ........................................ ... ...23
10.7 Answer a call in earpiece mode ......................................................24
10.8 Answer a Call in Speakerphone mode............................................24
10.9 Reject a call.....................................................................................24
10.10 End a Call........................................................................................24
10.11 Adjust volume level during a call.....................................................24
10.12 Mute the microphone during a call............................ ... ... ... .... ... ... ...24
10.13 Caller Identity Delivery (CID)...........................................................24
10.14 Caller ID Directory Matching ........................ ... ... ... .... ... ... ... .... ... ... ...25
11 Using the Answer Machine...........................................................26
11.1 Open Digital Answer Machine.........................................................26
11.2 Switch Digital Answer Machine off ..................................................26
11.3 Set Number of Rings.......... ............................. ... ... .... ......................27
11.4 Set Remote Pin...............................................................................27
11.5 Playback recorded messages................... ... ... ... ... .... ... ... ... .... ... ... ...27
11.6 Delete recorded messages .............................................................28
11.7 Memo Recording...... ... .... ... ... ............................. ... .... ... ...................28
11.8 Outgoing Message Setting..............................................................29
11.9 Remote Operation...........................................................................30
12 Contacts List..................................................................................31
12.1 Open Contacts list...........................................................................31
12.2 Search for a contact in Contacts list................................................31
12.3 Add an entry to Contacts list ...........................................................31
15
Page 13

12.4 Assign Ringtone to a Contact.......... ... ... .... ... ... ... ... .... ... ... ... .... ... ... ...32
12.5 Import/Export Contacts............. .......................... ... .... ... ... ... .... ... ... ...32
12.6 Enable forwarding of calls to voicemail ...........................................33
12.7 Add a Contact as a Favourite..........................................................33
12.8 Edit a Contact in Contacts list .........................................................33
12.9 Set display options..........................................................................33
12.10 Delete a Contact from Contacts list.................................................34
12.11 Link Picture to a Contact.................................................................34
13 Internet Function...........................................................................36
13.1 Register your Voxtel Smart 3 to a Wi-Fi Network............................36
13.2 Set Number of Wi-Fi Network Channels ................................ ... ... ...37
13.3 Select Wi-Fi Sleep Policy................... ... ............................. .... ... ... ...37
13.4 Check Voxtel Smart 3 MAC Address ..............................................38
13.5 Configure Static IP Settings ............................................................38
14 Using the Web Browser................................................................39
14.1 Open Browser .................................................................................39
14.2 Setting your home page.................. ... ... .... ... ... ... ... ..........................39
14.3 Open a web page............................................................................39
14.4 Automatic screen rotation................................................................39
14.5 Display web page in landscape only...............................................39
14.6 Zoom in and out of a webpage........... ... .... ... ... ... ... .... ......................40
14.7 Open a new browser window..........................................................40
14.8 Finding text within a webpage.........................................................40
14.9 Selecting links in web pages...........................................................40
14.10 Downloading web applications........................................... .... ... ... ...41
14.11 Manage bookmarks..... .... ... ... ... .... ... ... ... .... ... ... ... ... .... ... ... ... .............41
14.12 Customise Browser Options.................. .... ... ... ... ... .... ... ... ... .... ... ......42
15 Email...............................................................................................43
15.1 Open Email......................................................................................43
15.2 Set up the first email account..........................................................43
15.3 Set up another email account..........................................................44
15.4 Combined Inbox..............................................................................44
15.5 Account settings....... ... .............................. ... ... ... ... .... ......................44
15.6 Compose and send email messages................. ... .... ... ... ... .... ... ......45
15.7 Read messages ..............................................................................45
15.8 Open an attached file......................................................................46
15.9 Check for new messages................................................................46
15.10 Reply to an email message.............................................................46
15.11 Delete an email message................................................................46
15.12 Forward an email message.............................................................47
16
Page 14

15.13 Mark message as unread................................................................47
15.14 Delete an email account..................................................................47
16 TuneIn Radio..................................................................................48
16.1 Open TuneIn Radio.........................................................................48
16.2 Listen to a Radio Broadcast ............................................................48
16.3 Search Station by Name .................................... ... ..........................49
16.4 Search Station by Location .......................................... ... ... .... ... ... ...49
16.5 Search Station by Language..................................... ... ... ... .... ... ... ...49
17 RssFeed ......................................................................................... 50
17.1 Open RssFeed................................................................................50
17.2 Add a category to the RssFeed Reader..........................................50
17.3 Selecting a Category for the Widget................................................50
17.4 Adding an RSS Feed into a Category............................. ................50
18 Stock...............................................................................................51
18.1 Open Stock......................................................................................51
18.2 Add a stock to the Portfolio list........................................................51
18.3 Delete a stock from the portfolio list ................................................51
18.4 View more information about a stock in your portfolio.....................51
18.5 Get more information about a stock................................................52
19 Weather..........................................................................................53
19.1 Open Weather Application ..............................................................53
19.2 Check the current weather of a city.................................................53
19.3 Display the weather forecast of a city.... .... ... ... ... ... .... ......................53
19.4 Change Temperature Unit...............................................................53
19.5 Delete a city.....................................................................................53
20 Take photos and record videos...................................................54
20.1 Open Camera..................................................................................54
20.2 Switch between camera and camcorder mode...............................54
20.3 Take picture.....................................................................................54
20.4 Camera options........................................................................................ 55
20.5 View photos.............. ............................. .... ... ... ............................. ...55
20.6 Record video................... ... ... ... .... ... ... ... .... ............................. .........55
20.7 Video options............................................................................................ 56
20.8 Play videos......................................................................................56
21 Music..............................................................................................57
21.1 Listen to Music on your Voxtel Smart 3...........................................57
21.2 Open Music application...................................................................57
21.3 Music Library............ ... .... ............................. ... ... ... .... ... ... ... .... .........57
17
Page 15

21.4 Search for a song............................................................................58
21.5 Party Shuffle all songs.............. .... ... ... ... .... ... ............................. ... ...58
21.6 Turn party shuffle off .......................................................................58
21.7 Create playlists................................... ... ............................. .... .........58
21.8 Set song as ringtone .......................................................................60
21.9 Set sound effects.............................................................................60
21.10 Delete current song.........................................................................60
21.11 Set current song as ringtone...........................................................60
22 Gallery............................................................................................61
22.1 Open Gallery...................................................................................61
22.2 View pictures................................... ... ... .... ... ... ............................. ...61
23 Clock...............................................................................................62
23.1 Open Clock......................................................................................62
23.2 Set an alarm....................................................................................62
23.3 Activate an alarm setting.................................................................62
23.4 Deactivate an alarm setting.............................................................63
23.5 Activate alarm in silent mode ..........................................................63
23.6 Other Alarm Clock Settings.............................................................63
24 Calendar.........................................................................................64
24.1 Open Calendar................................................................................64
24.2 View Agenda for the day.................................................................64
24.3 Go to Today's date..........................................................................64
24.4 Change Calendar view....................................................................64
24.5 Modify Calendar Settings................................................................64
24.6 Add new event.................................................................................64
24.7 View, dismiss, or snooze a reminder...............................................65
25 Performing Calculations...............................................................66
25.1 Open Calculator ..............................................................................66
25.2 Perform Calculations.......................................................................66
26 Downloading and Reading eBooks.............................................67
26.1 Downloading and Reading eBooks .................................................67
26.2 Open Aldiko.....................................................................................67
26.3 Start reading................ .... ... ... ... .... ... ... ... .... ... ............................. ... ...67
26.4 Buy Books.......................................................................................68
26.5 Download Free Books.....................................................................68
26.6 Add eBooks from your SD card into your Library............................68
27 ES FILE EXPLORER...................................................................... 69
27.1 Open ES File Explorer.....................................................................69
18
Page 16

27.2 Open file as.....................................................................................69
27.3 Select all files in a directory.............................................................69
27.4 Create a new folder..... .... ... ... ... .... ... ... ... .... ... ... ... ... .... ......................69
27.5 Rename a file..................................................................................70
27.6 Copy a file to another location......................... ... ... .... ... ... ... .... ... ... ...70
27.7 Move a file to another location ........................................................70
27.8 Delete a file .....................................................................................70
27.9 Compress a file .................................. ... .... ... ... ... ... .... ... ... ... .............70
27.10 View file details............ .... ... ... ... .... ... ... ... .... ... ... ... ... .... ......................71
27.11 Modify View Settings in ES File Explorer ........................................71
28 Install apps.....................................................................................72
29 Connect your handset to a computer..........................................73
30 ES Task Manager...........................................................................74
30.1 Open ES Task Manager..................................................................74
31 Settings..........................................................................................75
32 HELP...............................................................................................76
32.1 Guarantee and Service ...................................................................78
32.2 Technical Specifications......................................................................... 79
32.3 CE Declaration ...............................................................................80
19
Page 17
GETTING STARTED
5 GETTING STARTED
WARNING
• Do not place your Voxtel Smart 3 in the bathroom or other humid areas.
• Do not place your V oxtel Smart 3 near sources of heat and extreme temperatures, such
as fluorescent lighting, microwave ovens, heating appliances and direct sunlight.
• Do not disassemble your Voxtel Smart 3; there are no user-serviceable parts inside.
• If the LCD screen breaks, do not touch the glass or liquid. Contact customer support for
assistance.
• Use only the power adapter supplied with your Voxtel Smart 3.
5.1 C are and maintenance
• Wipe the LCD screen gently with a soft, clean, dry cloth.
• To remove fingerprints on the LCD screen, wipe gently with a soft, lint-free cloth.
Do not use cleaning solutions unless they are designed specifically for LCD screens.
IMPORTANT!
Always switch off and disconnect the power adapter before cleaning the Voxtel Smart 3.
5.2 Handset range
The Voxtel Smart 3 has a range of up to 300 metres for telephone calls, when there is a
clear line of sight between the base and handset. Any obstruction between the base and
handset will reduce the range significantly. With the base indoors and handset either
indoors or outdoors, the range will normally be up to 50 metres. Thick stone walls can
severely affect the range, and large metal objects, such as refrigerators, mirrors or filing
cabinets, or other electrical equipment may cause interference and/or affect the range.
5.3 Signal strength
The icon on your handset indicates when you are in range of the base for telephone
or answering machine access.
When out of range of the base, the signal strength indicator will show no ba rs, and if you
are on a call, the line will hang up. Move back within range. The handset will automatically
re-connect to the base.
1
Page 18
GETTING STARTED
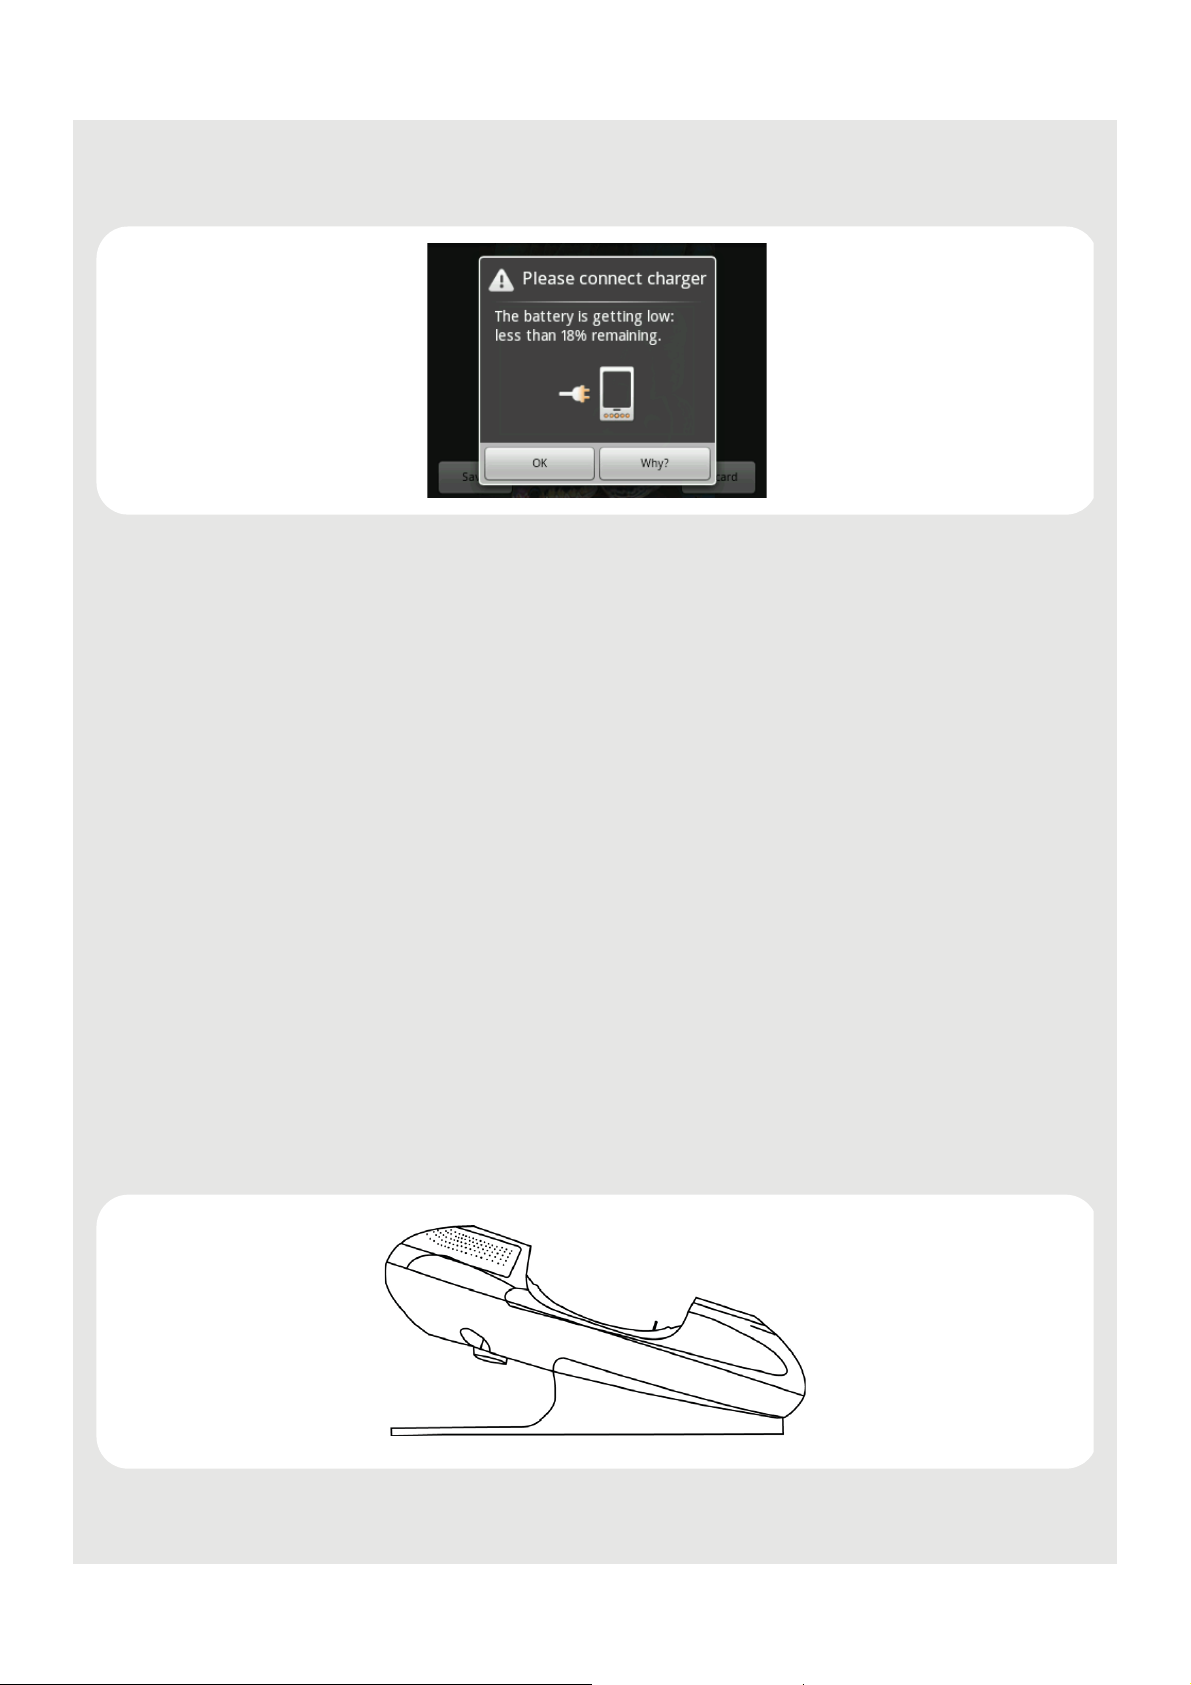
5.4 Battery low warning
If the following appears on the display, you will need to charge the handset.
5.4.1 Battery performance
Note that a new battery will not reach full capacity until it has been discharged and
charged in normal use for several days.
To keep your battery in the best condition, leave the handset off the base for a few hours
at a time.
Draining the battery completely each month before charging will help to prolong battery
life.
The charge capacity of a rechargeable battery will reduce with time as it wears out, giving
the handset a reduced talk/standby time. Eventually it will need to be replaced.
After charging your handset for the first time, subsequent charging time will be about 6
hours a day. The battery and handset may become warm during charging. This is normal.
5.5 Attaching the stand to the base station
Follow the steps below to attach the stand to the base station.
1 Insert the stand into the locking grooves at the bottom of the base station.
2 Twist the stand slightly until it is firmly secured to the base station.
2
Page 19
GETTING STARTED
5.6 Connecting the power cable and telephone line
cord
1 Plug one end of the power cable and telephone line cord to the power jack and phone
jack respectively on the bottom of the base station.
2 Plug the other end into a power and telephone wall socket.
5.6.1 If you have a Broadband line
If you connect your telephone to a line with a broadband connection, you will need to
insert a micro-filter between the telephone and the telephone line, otherwise you may get
interference between the telephone and the broadband, which could cause problems. In a
home with broadband, every telephone must have a micro-filter connected, not just the
one at the telephone point that your modem is connected to. If you need more broadband
micro-filters, contact your broadband supplier.
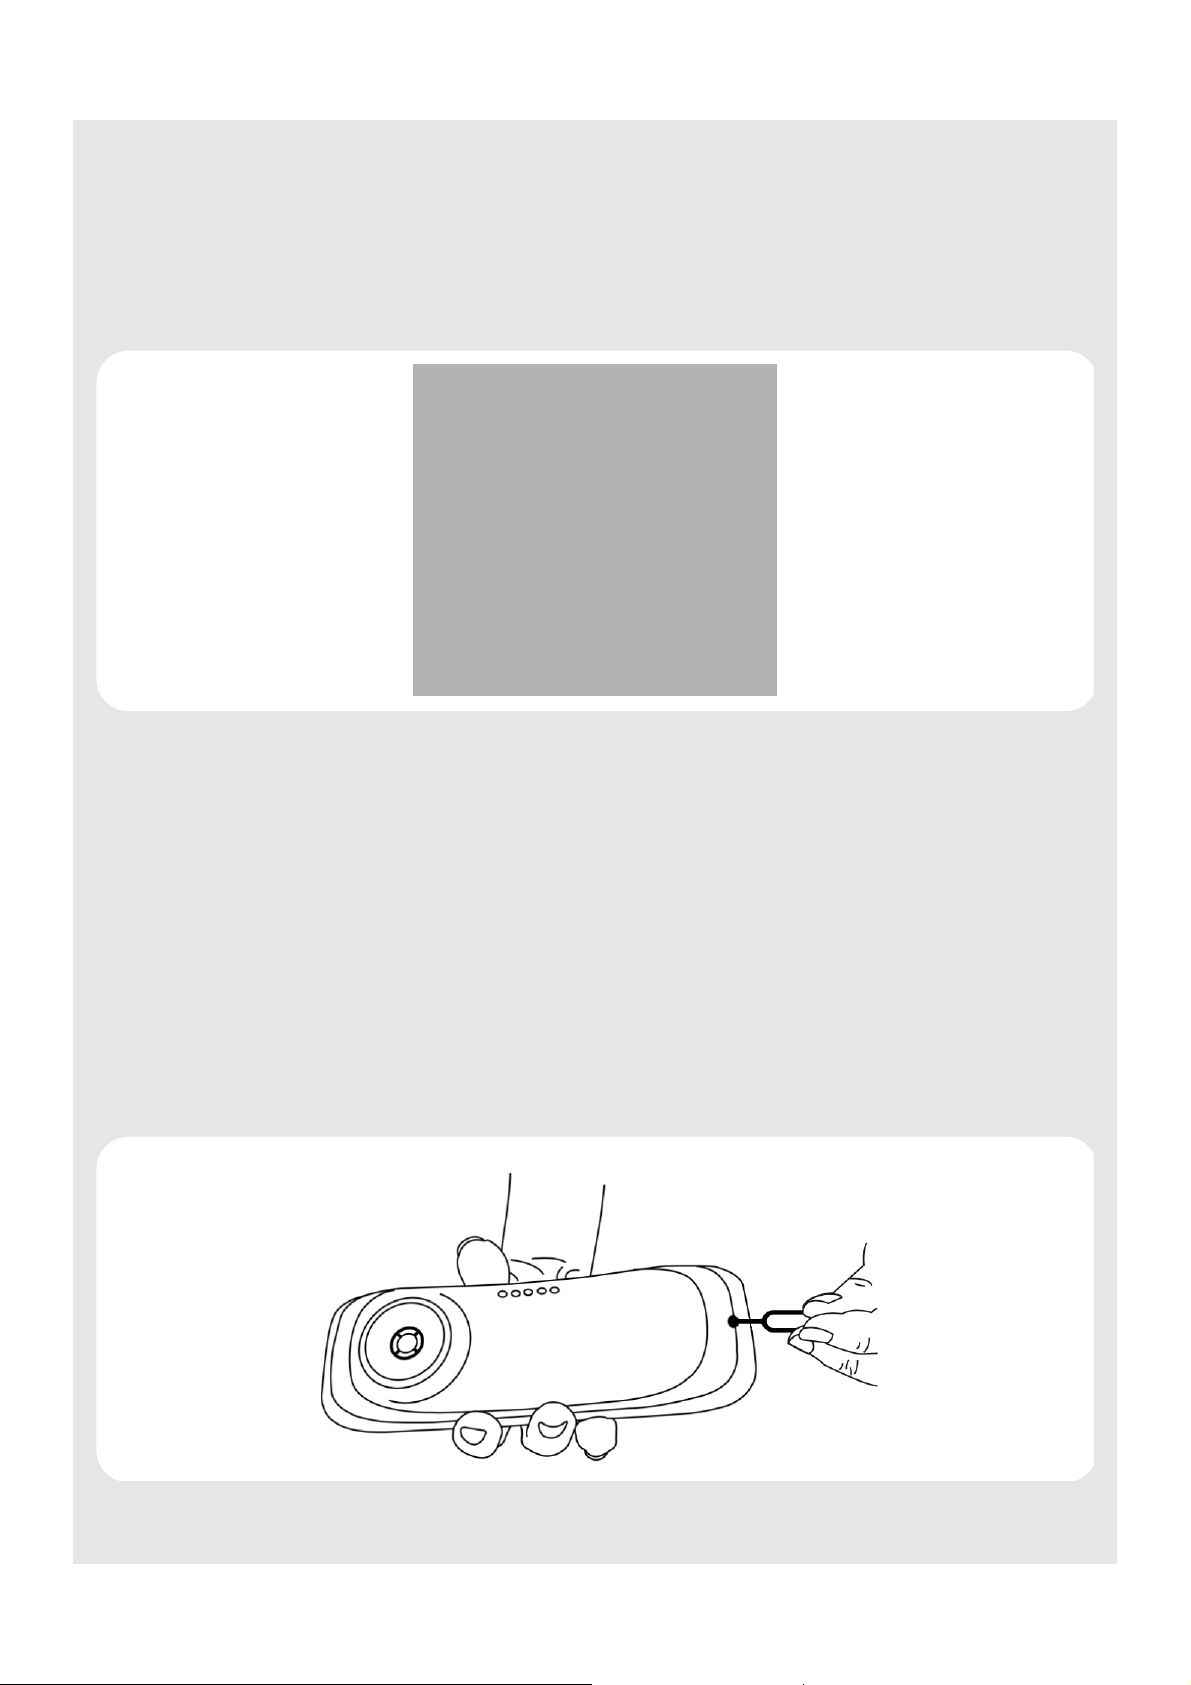
5.7 Removing back cover
1 Use a small screwdriver or a pen/pencil tip to gently press the small button to release
the spring lock. The bottom edge of the back cover will disengage from the handset..
2 Remove the back cover completely.
3
Page 20
GETTING STARTED
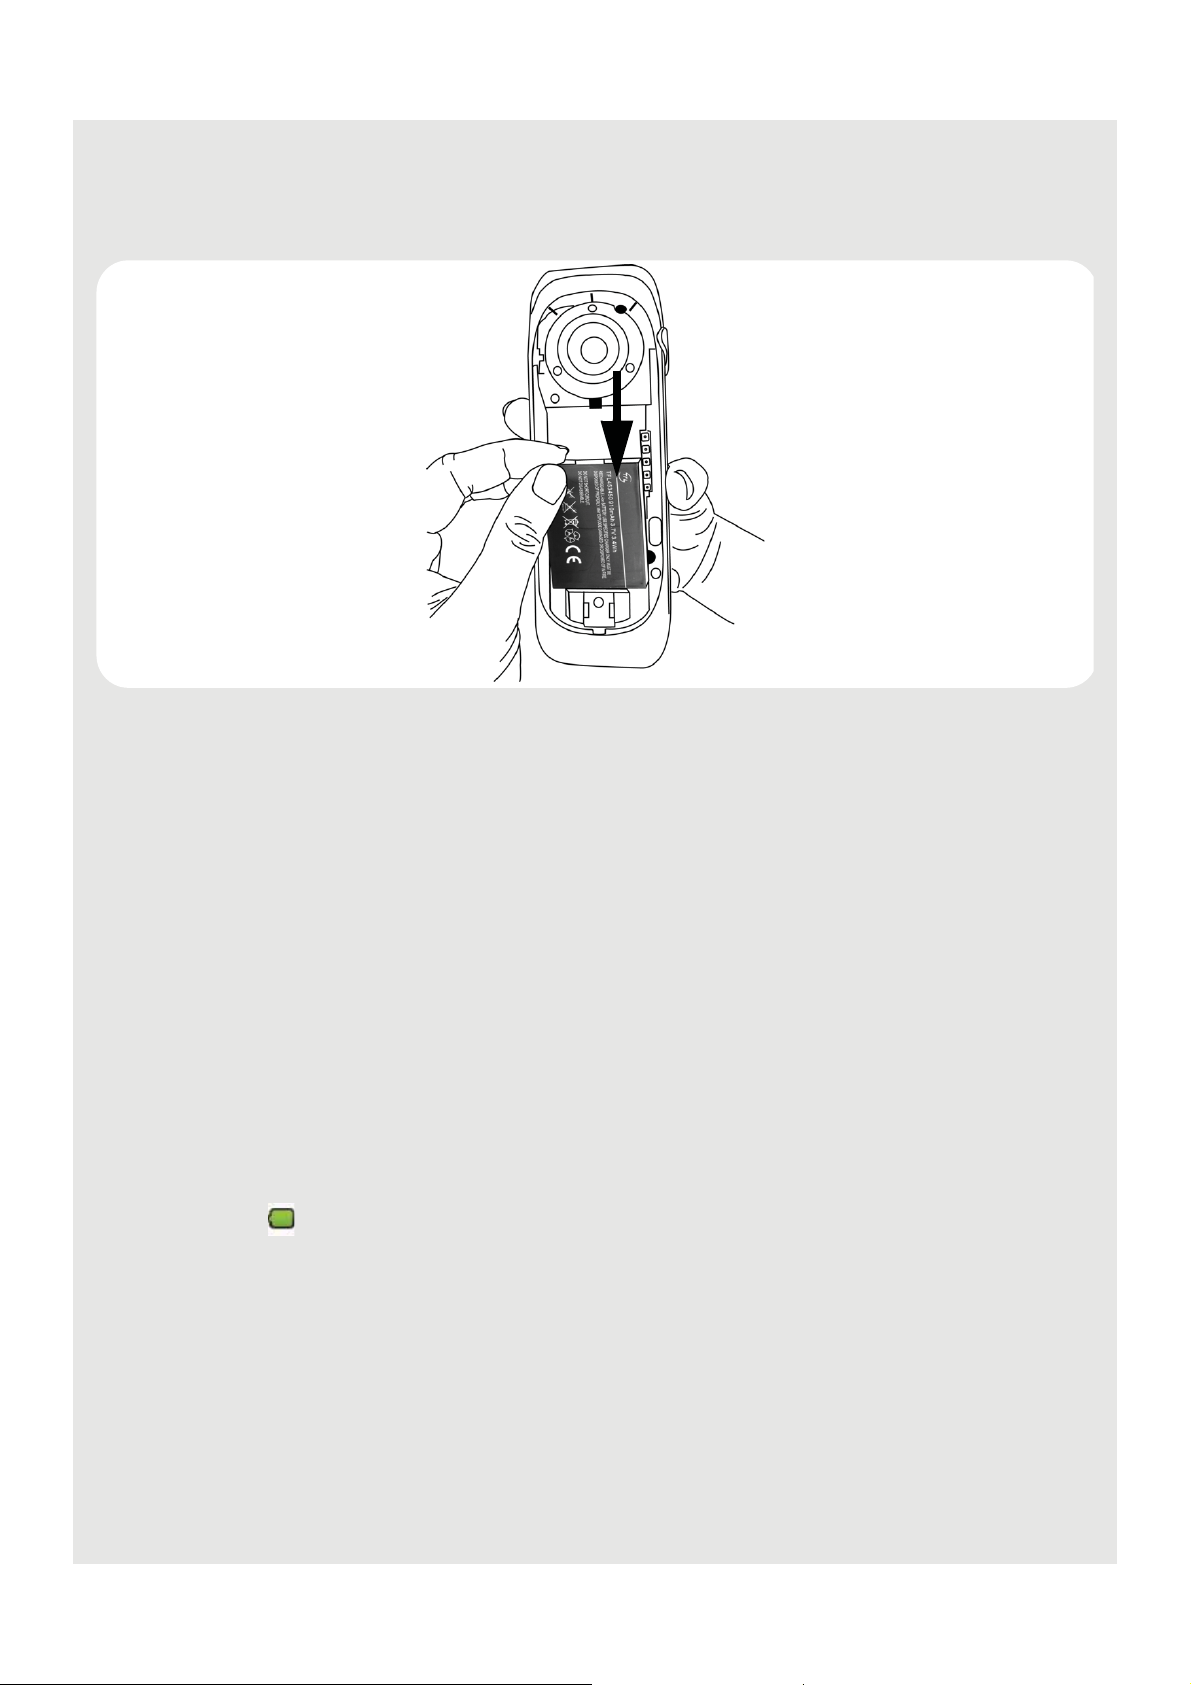
5.8 Installing the battery pack
1 Place the supplied rechargeable battery pack into the battery compartment, and slide
the battery down into the recess, as shown.
2 Install the back cover by aligning the back cover tabs with the notches located at the
top of the back panel.
3 Push down the back cover until it clicks into place.
IMPORTANT!
Use only the rechargeable battery pack supplied with the product.
Risk of explosion if battery is replaced by an incorrect type.
Dispose of used batteries according to the instructions.
5.9 Charging the battery
New batteries are not charged when shipped. Before you start using your phone, you will
need to charge the battery.
Place the handset on the base station to charge for at least 6 hours. The Red charging
LED will light up.
Once charged, will appear to indicate that the handset is fully charged.
Note
If the Red Charging LED did not light up, you need to re-align the Voxtel Smart 3 to get a
good charging contact with the base station.
If your Voxtel Smart 3 battery is totally flat, it may take a while before you can po wer up
the phone.
Battery performance depends on your usage patterns.
4
Page 21
GETTING STARTED
IMPORTANT!
Use only the rechargeable battery that is provided with your Voxtel Smart 3.
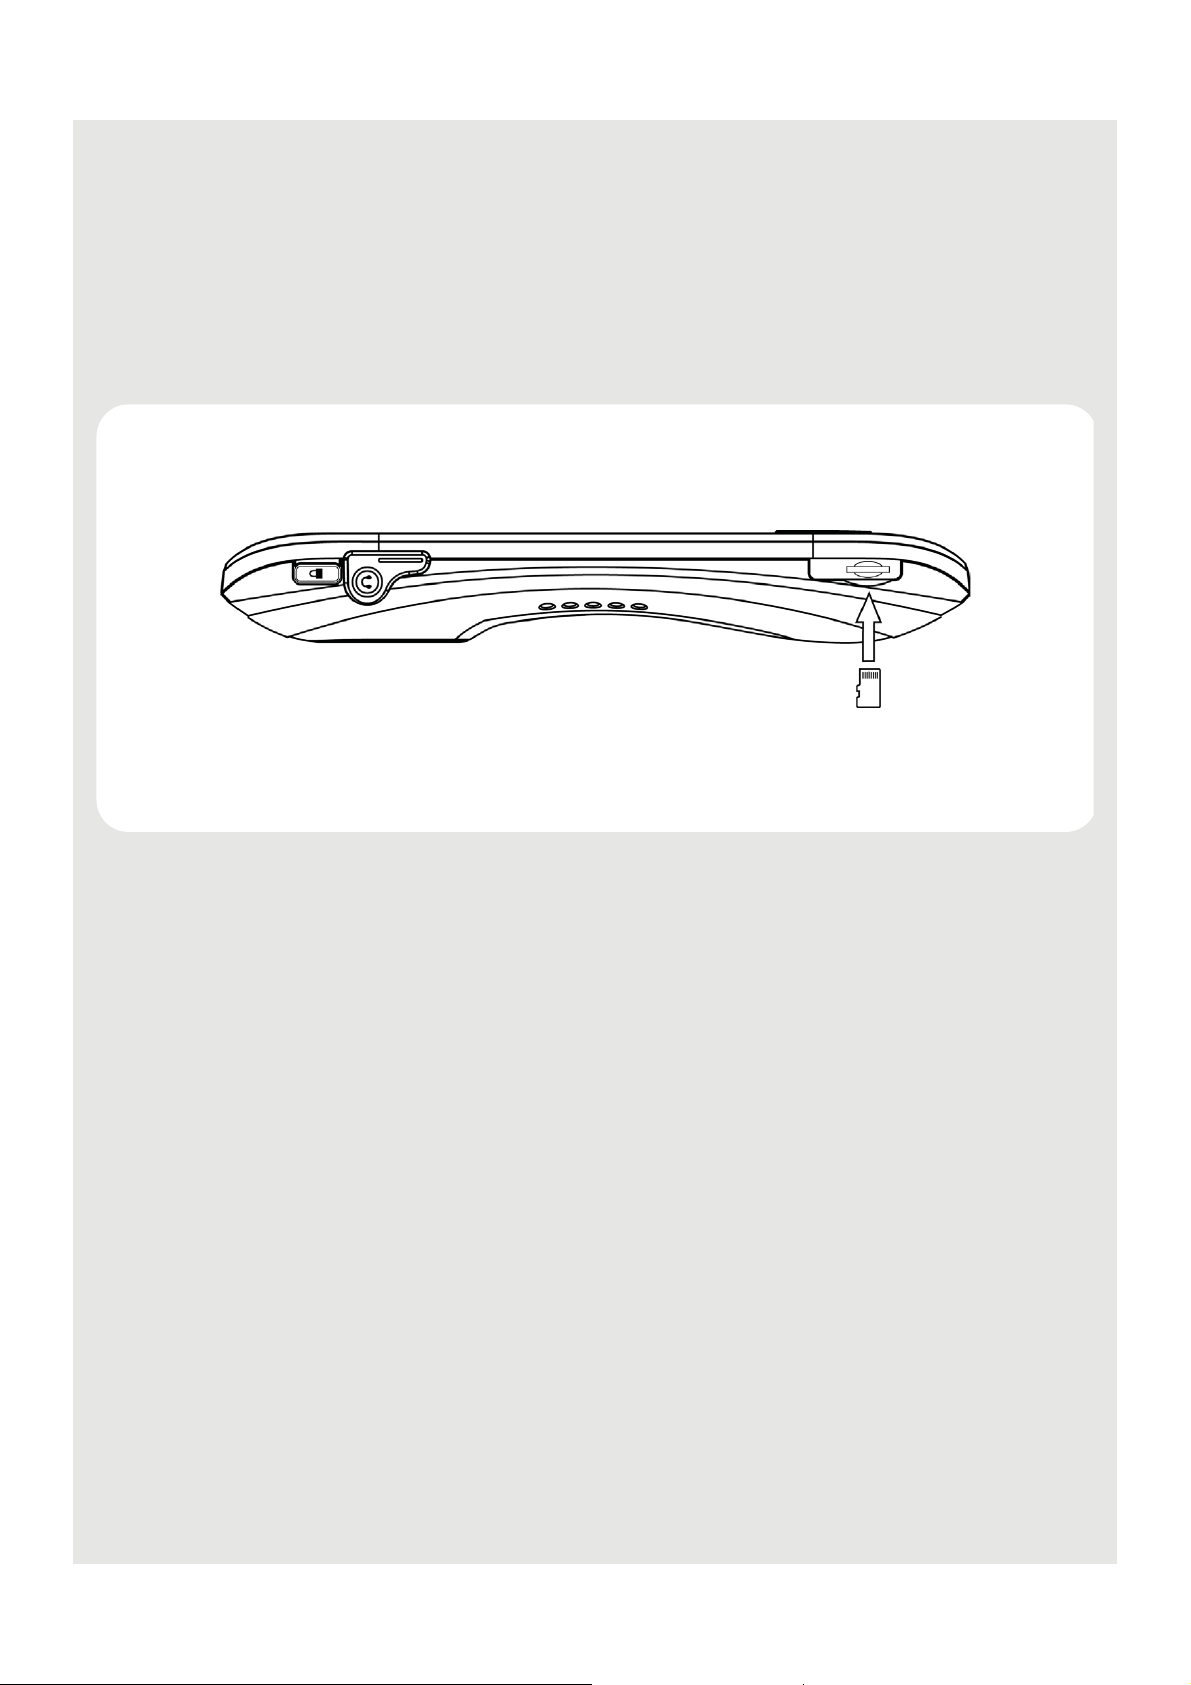
5.10 Inserting and mounting a memory card
The Voxtel Smart 3 su pports micro SD cards, of up to 32GB..
You can store music, pictures, files and applications on a memory card and access them
on your Voxtel Smart 3.
Insert the memory card by pushing the card firmly into the slot with the metal contacts
facing up, and in the direction as indicated above.
- The phone will prepare the SD card for mounting and perform media scanning.
If the SD card fails to mount on the phone, press
Card Settings > Mount SD card.
H and tap Settings > Storage > SD
5.11 Unmounting and Removing a memory card
If the Voxtel Smart 3 is powered of f
Push the card gently inwards to eject the memory card.
If the Voxtel Smart 3 is powered on
1 Press
2 Remove the SD card by pushing the card gently inwards to eject it.
H and tap Settings > Storage > SD Card Settings > Unmount SD card.
5
Page 22

GETTING STARTED
5.12 Switching on your Voxtel Smart 3
Press and hold L on the side panel of the handset until the LCD screen starts to
display the Android logo.
- It takes about 1 minute for the phone to power up completely.
- The home screen is displayed.
• The Home screen provides access to all the features on your Voxtel Smart 3. It displays
application icons, widgets, shortcuts, and other features. Y ou can also customise the
Home screen with different wallpaper and display the items you want ("Display
Settings" on page 14).
• Tap
applications.
Note
If your Voxtel Smart 3 battery is totally flat, it may take a while to charge before you can
power up the phone.
(Program Launcher) at the bottom of the screen to view all installed
5.13 Switching off your Voxtel Smart 3
1 Press and hold L on the side panel of the handset to activate the Phone options
menu.
2 Tap to select Power off.
3 Tap OK to confirm or press
B or Cancel to cancel.
5.14 Home Screen
To return to the home screen at anytime, press <.
5.15 Extended Home Screen
The extended home screen lets you add more shortcuts and widgets on your Voxtel Smart
3 so that you can access the widgets and applications conveniently from the home screen.
• Slide horizontally across the screen to go to the left or right side of the extended home
screen.
• Small dots at the bottom left or right of the screen indicate which screen you are
viewing. Tap and hold the small dots to view thumbnails of the home screen and the
extended home screens. Tap to open them.
6
Page 23

GETTING STARTED
5.16 Wake up the phone
The LCD screen dims to conserve battery when you don’t use it for a while.
1 Press any key to turn on the screen.
2 Drag the lock icon to the right.
- The last screen you were viewing opens.
or
If you have locked your LCD screen with a pattern, PIN or password, you must draw an
unlock pattern or enter a PIN or password to unlock it. See “Lock the screen of your
Voxtel Smart 3” below.
- The last screen you were viewing opens.
5.17 Lock the screen of your Voxtel Smart 3
1 You can lock the screen of your phone such that onscreen functions will not be
accessed accidentally.
2 Press
L on the side of the handset to lock the screen. Press again to unlock.
5.17.1 Lock with a pattern, PIN or password
1 Press H.
2 Tap Settings > Security > Set up scree n lock (or > Change screen lock, then follow
the onscreen instructions.)
3 Tap to select Pattern, PIN or Password.
4 Follow the onscreen instructions to set up the screen lock.
Note
If you set up screen lock with a pattern, PIN or password, you need to draw the pattern, or
enter the PIN or password each time you unlock the screen. See “Wake up the phone”
above.
W ARNING!
Do not forget your screen lock pattern, PIN or password if you set one, otherwise you will
not be able to use your handset.
5.17.2 Disable screen unlock security
1 Press H.
2 Tap Settings > Security > Set up screen lock, or > Change screen lock and follow
the onscreen instructions.
3 Tap to select None.
7
Page 24

GETTING STARTED
5.18 Screen Rotation
The Voxtel Smart 3 has a tilt/orientation sensor, which dete cts if you are holding it in
Portrait or Landscape mode. The screen will be adjusted accordingly.
Tip
Automatic screen rotation is enabled by default.
To disable automatic screen rotation, press
rotate screen.
- Automatic screen rotation is disabled when the
To enable automatic screen rotation, press
rotate screen again.
- Automatic screen rotation is enabled when the
H and then tap Settings > Display > Auto-
✓
disappears.
H and then tap Settings > Display > Auto-
✓
is shown.
5.19 Recalibrate the touch screen
The Vo xtel Smart 3 uses a built-in G-Sensor that changes the screen orientation based on
the way you hold the phone. If you feel that the screen orientation does not respond
properly to the way you hold the phone, you can recalibrate the screen as follows:
Press
onscreen instructions.
H and then tap Settings > Display > G-Sensor Calibration, and follow the
5.20 Set Date and Time
Note
If you remove the battery of your Voxtel Smart 3, you may need to set the date and time
again.
5.20.1 Set Date
1 Press H and tap Settings > Date & time.
2 Tap Set date and then tap + or - on each date field to change the Month, Day and Year.
3 Tap Set to confirm the date setting.
8
Page 25

GETTING STARTED
5.20.2 Set Time
1 Press H and tap Settings > Date & time.
2 Tap Set time and then tap + or - on each time field to change Hours and Minutes.
3 Tap AM/PM to select AM (morning) or PM (afternoon).
- This option is not available if 24-hour format is activated (see “Set Time Format”
below).
4 Tap Set to confirm the time setting.
5.20.3 Set Time Zone
1 Press H and tap Settings > Date & time.
2 Tap Select time zone.
3 Scroll to your location and tap to select.
5.20.4 Set Time Format
1 Press H and tap Settings > Date & time.
2 Tap Use 24-hour format to activate or deactivate it.
- 24-hour format is activated when
12-hour format.
✓
appears next to the option, otherwise it will be in
5.20.5 Set Date Format
1 Press H and tap Settings > Date & time.
2 Tap Select date format.
3 Tap to select your preferred date format.
9
Page 26

GETTING STARTED
5.21 Applications on your Voxtel Smart 3
The following applications are included with your Voxtel Smart 3. Tap (Program
Launcher) on the home screen and then tap any application icon to launch the
application.
Aldiko Download and read eBooks Page 67
Answer
Machine
Browser Browse any website over a Wi-Fi network. Page 39
Clock Set one or more alarms to remind you of your appointments. Page 62
ES File
Explorer
ES Task
Manager
Calendar Create events and set alerts to remind you of events,
Contacts Create and store a list of contacts like a phonebook. Page 31
Calculator Perform simple arithmetical calculations.
Email Send and receive email using your existing email accounts over
Gallery A library of all the pictures or images on your Voxtel Smart 3. Page 61
Answer and record phone messages and memos Page 26
A free file manager for Android devices. It allows you to browse
files and folders stored on your Voxtel Smart 3, memory card,
LAN and FTP.
Helps you save battery, free memory, kill tasks, close all the
running applications, uninstall applications and speed up your
Voxtel Smart 3.
appointments, etc.
a Wi-Fi network.
Page 69
Page 74
Page 64
Page 43
Music Listen to music stored on your phone or SD card. Page 54
Phone Make calls, with quick access to intercom, call log, contact s and
favourites.
RssFeed Read RssFeed links over a Wi-Fi network. Page 50
Settings Adjust all settings of the Voxtel Smart 3 in one convenient
place. Set your ringtone, wallpaper, screen brightness, and
settings for network, phone, mail, web, music, photos, and
more. Set auto-lock and a passcode for security.
Stock Check the prices of your favourite stocks updated automatically
from the Internet over a Wi - Fi network.
TuneIn Radio Listen to Internet radio broadcasts via a Wi-Fi network. Page 48
Weather Get current weather conditions and a four-day forecast via a
Wi-Fi network. Store your favourite cities for a quick weather
report anytime.
Page 22
Page 75
Page 51
Page 52
10
Page 27

Set up your Voxtel Smart 3 with Welcome Wizard
6 Set up your Voxtel Smart 3 with
Welcome Wizard
When you first power up the phone or after doing a factory data reset, the Welcome
Wizard will help you set up and personalise your phone, such as language, date, time, Wi-
Fi setting, etc.
To start, tap Language, and then select your preferred language and then tap Next to
begin phone setup.
Note
If the Welcome Wizard did not appear when you power up the phone, press
Settings > Privacy > Factory data reset to reset the phone.
6.1 Wi-Fi settings
H and tap
1 Tap Wi-Fi settings.
2 Tap Turn on Wi-Fi.
3 Under Network notification, tap to enable Notify me when an open network is
available.
- If enabled,
- The screen displays a list of available Wi-Fi networks.
4 Tap to select the network you want to connect.
- If the network is secured, you will be prompted to enter the password.
- If you cannot find your favourite Wi-Fi network name, press
5 Tap on the Password edit box to launch the onscreen keyboard.
6 Enter password and tap Done.
7 Tap Connect.
- The phone will start to obtain the IP address of the network you have selected.
✓
appears next to the option.
H and then tap Scan.
- This may take a few minutes.
- When connected, appears on the status bar of the handset.
8 Tap Next to proceed with date & time settings.
11
Page 28

Set up your Voxtel Smart 3 with Welcome Wizard
6.2 Date & time settings
1 Tap Date & time.
2 Tap Set date.
3 Tap + or - to set Month, Day and Y ear.
4 Tap Set to confirm.
6.2.1 Set time zone
1 Tap Select time zone.
2 Scroll to your time zone and tap to select.
6.2.2 Set time
1 Tap Set time.
2 Tap + or - to set hour and minutes.
3 Tap to select AM or PM.
Note
This option is not available if Use 24-hour format is activated. See “Set time format”
below for details.
4 Tap Set to confirm.
6.2.3 Set time format
1 Tap Use 24-hour format to enable it. Tap again to disable.
- 24-hour format is activated when
✓
appears next to the option.
6.2.4 Select date format
1 Tap to select your preferred date format.
2 Tap Next to proceed to Display settings.
6.3 Display
1 Tap Brightness.
2 Slide the brightness control bar right or left to increase to decrease screen brightness.
3 Tap OK to confirm.
12
Page 29

Set up your Voxtel Smart 3 with Welcome Wizard
6.4 Sound settings
6.4.1 Phone ringtone
1 Tap Phone ringtone.
2 Scroll through the list and tap to select a ringtone.
- The ringtone is played.
3 Tap OK to confirm.
6.4.2 Volume
1 Tap Volume.
2 Slide the volume bars right or left to increase or decrease the volumes.
3 Tap to enable or disa ble Use incoming call volume for notifica tions.
- If enabled,
4 Tap OK to confirm.
5 Tap Finish to complete the set up.
You can configure your phone more thoroughly via the Settings menu (see "Settings" on
page 75).
Your phone is now ready for use.
✓
appears next to the option.
13
Page 30

Personalising your Voxtel Smart 3
7 Personalising your Voxtel Smart 3
7.1 Display Settings
7.1.1 Change Wallpaper
1 From the home screen, press H.
2 Tap Wallpaper.
3 Tap to select Gallery, Live wallpapers or Wallpapers.
- If you select Live wallpapers or Wallpapers, simply tap to select a wallpaper from
the list and tap Set wallpaper.
4 If you select Gallery, tap to select your desired picture.
- An image position box will appear at the centre of the picture.
- To resize the picture, tap and hold the edge of the box, and drag inward or outward.
- T o move the box to another area on the picture, tap and hold inside the box, then drag
it to the desired position.
5 Tap Save to set the picture as wallpaper.
- You will see that the background image is now changed to the picture you have
selected.
7.1.2 Adjust Screen Brightness
1 From the home screen, press H.
2 Tap Settings > Display > Brightness.
3 Drag the slider left or right to reduce or increase the screen brightness and tap OK to
confirm.
7.1.3 Set screen timeout
This option lets you adjust the delay before the screen automatically turns off.
1 From the home screen, press
H.
2 Tap Settings > Display > Screen timeout.
3 Tap to select 15 secon ds, 30 seconds, 1 minute, 2 minutes, 10 minutes or 30
minutes.
14
Page 31

Personalising your Voxtel Smart 3
H
7.1.4 Add apps to your home screen
1 Tap (Program Launcher) to open the launcher and view all your applications.
2 Tap and hold an application icon until it turns bigger.
- The application icon will be placed on the home screen.
Note
You can also add a shortcut or widget by pressing
Add > Shortcuts or Widgets or tap and hold any empty spot on the homescreen and
then select Shortcuts or Widgets.
from the homescreen and then tap
7.1.5 Remove an item from your home screen
1 Tap and hold the item that you wish to remove until it turns bigger.
- A recycle bin appears at the bottom of the screen.
2 Drag and drop item into the trash bin.
- The item will be trashed.
7.1.6 Add Folders to your home screen
Folders allow you to organise your Home screen items, and they can also contain all your
contacts, contacts with phone numbers, or starred contacts. The folder contents are kept
up to date automatically.
1 From the home screen, press
2 Tap Add > Folders.
3 Tap to select New folder, All contacts, Contacts with phone numbers or Starred
contacts.
- A new folder will be added to your home screen.
Tip
You can also tap and hold any empty spot on the homescreen and then select Folders.
H.
7.1.7 To rename a folder
1 Tap the folder to open it.
2 Tap and hold the folder’s title bar.
3 Enter a new name in the dialogue box that appears.
4 Tap OK.
7.1.8 Add items to the folders on your home screen
1 Tap and hold the item until it turns bigger.
2 Drag the item to the folder in which you wish to place it.
15
Page 32

Personalising your Voxtel Smart 3
7.2 Sound Settings
7.2.1 Set silent mode
This option enables you to mute all sounds except media and alarms.
1 From the home screen, press
2 Tap Settings > Sound > Silent mode.
-
✓ appears next to the option to indicate that silent mode is activated.
3 To turn silent mode off, tap Silent mode option again.
H.
7.2.2 Set volume
This option enables you to set Ringtone, Media and Alarm volume on your Voxtel Smart
3.
1 From the home screen, press
2 Tap Settings > Sound > Volume.
3 Drag the slider to the left or right to decrease or increase each of the volumes and tap
OK to confirm.
- If you wish to use the incoming call volume for notifications as well, tap to select the
option.
-
✓ appears to indicate that the option is selected.
H.
7.2.3 Set Phone ringtone
This option enables you to set the ringtone on your Voxtel Smart 3.
1 From the home screen, press
2 Tap Settings > Sound > Phone ringtone.
3 Tap to select a rington e from the list.
- The ringtone is played.
4 Tap OK to confirm.
H.
7.2.4 Set Intercom ringtone
This option enables you to set the incoming intercom ringtone on your Voxtel Smart 3.
1 From the home screen, press
2 Tap Settings > Sound > Intercom ringtone.
3 Tap to select a rington e from the list.
- The ringtone is played.
H.
4 Tap OK to confirm.
16
Page 33

Personalising your Voxtel Smart 3
7.2.5 Set Paging ringtone
This option enables you to set the incoming paging ringtone on you r Voxtel Smart 3.
1 From the home screen, press
2 Tap Settings > Sound > Paging ringtone.
3 Tap to select a rington e from the list.
- The ringtone is played.
4 Tap OK to confirm.
H.
7.2.6 Set notification ringtone
This option enables you to set the notification ringtone on your Voxtel Smart 3.
1 From the home screen, press
2 Tap Settings > Sound > Notification ringtone.
3 Tap to select a rington e from the list.
- The ringtone is played.
4 Tap OK to confirm.
H.
7.2.7 Enable or Disable Audible Touch tones
This option lets you enable or disable the playing of touch tones on your phone when
using the dial pad.
1 From the home screen, press
2 Tap Settings > Sound > Audible touch tones.
-
✓ appears next to the option to indicate that audible touch tone is enabled.
3 To disable, tap Audible touch tones again.
H.
7.2.8 Enable or Disable Audible Selection
This option lets you enable or disable the playing of sounds on your phone when making
screen selection.
1 From the home screen, press
2 Tap Settings > Sound > Audible selection.
-
✓ appears next to the option to indicate that audible selection is enabled.
3 To disable, tap Audible selection again.
H.
17
Page 34

Personalising your Voxtel Smart 3
7.2.9 Enable or Disable screen lock sounds
This option lets you enable or disable the playing of sounds when locking or unlocking the
screen.
1 From the home screen, press
2 Tap Settings > Sound > Screen lock sounds.
-
✓ appears next to the option to indicate that screen lo ck sound is enabled.
3 To disable, tap Screen lock sounds again.
H.
18
Page 35

DECT Settings
8 DECT Settings
8.1 Handset Settings
Handset settings allows you to view and modify the settings of your handset.
8.1.1 Registering your Voxtel Smart 3 to the base station
Your Voxtel Smart 3 handset has been pre-registered to the Base station by factory
default. If you have another Voxtel Smart 3 handset, you can follow the procedures here
to register it to the same Base station to form a multiple handset network.
1 Press and hold
LED light turns on.
2 Release
3 On your Voxtel Smart 3, press
4 Tap Settings > Dect Settings > Handset Settings > Registration.
5 Tap Base 1 and tap Register.
- The Voxtel Smart 3 will start to search for the base station.
6 Tap on Enter Pin box to launch the onscreen keyboard.
7 Enter the PIN code of the base station and tap Register.
- If successful, “Success” is displayed.
Note
If the PIN for the base station is set as "0000" (default), the V oxtel Smart 3 will register to
the base station without prompting for the PIN.
N.
N on the base station for about 4 seconds until the In Use / Message
H.
8.1.2 Registering your Voxtel Smart 3 to another base station
Y ou can register your V oxtel Smart 3 handset to more than one base, and the base station
to which you wish to register the Voxtel Smart 3 must have a FREE handset location. You
must also know the PIN code of the base.
1 Press and hold
LED light turns on.
2 Release
3 On your Voxtel Smart 3, press
4 Tap Settings > Dect Settings > Handset Settings > Registration.
5 Tap to select the base number and tap Register.
- The Voxtel Smart 3 will start to search for the base station.
19
N.
N on the base station for about 4 seconds until the In Use / Message
H.
Page 36

DECT Settings
6 Tap on Enter Pin box to launch the onscreen keyboard.
7 Enter the PIN code of the base station and tap Register .
- If successful, “Success” is displayed.
Note
If the PIN of the base station is set as "0000" (default), the Voxtel Smart 3 will register to
the base station without prompting for the PIN.
8.2 Base Settings
Base settings allows you to view and modify the settings on Voxtel Smart 3 base.
8.2.1 Reset Base Settings to Default
1 On your Voxtel Smart 3, press H.
2 Tap Settings > Dect Settings > Base Settings.
3 Tap Reset to Default.
4 Tap Reset to confirm.
8.2.2 Set Flash Duration
The Recall (Flash) time is set to Short (100ms) for the UK, but can be changed if you
connect your phone to a system that requires a different break period, with Medium
(300ms) or Long (600ms), are also available.
1 On your Voxtel Smart 3, press
2 Tap Settings > Dect Settings > Base Settings.
3 Tap Flash Duration.
4 Tap to select Short, Medium or Long.
H.
20
Page 37

Voicemail
9 Voicemail
If you have access to a voicemail service on your telephone line, you can program its
number into the Voxtel Smart 3 to make it easier to call when you want to listen to any
messages.
1571 is the most common UK voicemail number, but otherwise contact your telephone
service provider to check which number their service uses.
1 On your Voxtel Smart 3, press
2 Tap Settings > Call Settings > Voicemail settings > Voicemail number.
3 Enter the voicemail number and tap OK.
H.
9.1 Listen to Voicemail
You can access your voicemail through your Voxtel Smart 3 handset.
1 From the home screen, press
2 Tap Phone to access the phone tab.
3 Tap the voicemail icon and the stored Voicemail Number will dial out. Then follow
the instructions given by your voicemail service.
C.
21
Page 38

Using the Phone Functions
10 Using the Phone Functions
10.1 Call another handset registered to the same base
station (Intercom)
1 From the home screen, press C.
2 Tap Intercom tab.
3 Tap to select a Handset Number (0 to 5) to call.
4 Press
D to end the call.
10.2 Make an external call
Placing an external call using the Vo xtel Smart 3 is similar to dialling with a mobile phone.
1 From the home screen, press
2 Tap Phone tab to access the dial pad.
3 Enter the phone number.
4 Tap to dial the number.
Note
Tap “Use by default for this action” if you wish to set the selected option as the default
call mode.
5 Press
Tip
If you enter a wrong number , tap to delete the number one by one. Tap and hold to
erase the entire numb e r.
D to end the call.
C.
I
I
10.2.1 In-call options
During a call, press H to access the following options:
Show dialpad Displays the dialpad
End call End the current call
Mute Mute the handset microphone
Speaker Switch to speaker mode
Swap call Swap between 2 calls
Merge call Merg e 2 calls to hold a conference call
Add call Put the current call on hold and call another handset
Hold Put the current call on hold
Flash Make a recall (for PBX and some network functions)
22
Page 39

Using the Phone Functions
10.3 Make an external call from Call Log
The call log contains details of dialled, missed and received calls.
1 From the home screen, press
2 Tap Call log tab to access the list of numbers and contacts in the call log.
3 Tap next to the call log entry to call that number again.
4 Press
D to end the call.
C.
10.4 Clear call log
1 From the home screen, press C.
2 Tap Call log tab.
3 Press
H and tap Clear call log, to erase all dialled, missed and received calls.
10.5 Make an external call from Contacts list
The Contacts list is like a phonebook that stores the name, telephone numbers and other
information of your contacts on the Voxtel Smart 3. The person you want to call must have
the telephone number stored in the Contacts list. (See "Add an entry to Contacts list" on
page 31 for more information on how to add contacts to the Contacts list)
1 From the home screen, press
2 Tap Contacts tab.
3 Select the contact in the contacts list.
4 Tap to dial the number.
5 Press
D to end the call.
C.
10.6 Make an external call from Favorites
The Favorites list stores the name, telephone numbers and other information of your
favourite contacts on the Voxtel Smart 3. (See "Add a Contact as a Favourite" on page 33
for more information on how to add contacts to the Favorites list.)
1 From the home screen, press
2 Tap Favorites tab.
3 Tap next to the favorite contact to dial the number.
4 Press
D to end the call.
C.
23
Page 40

Using the Phone Functions
10.7 Answer a call in earpiece mode
When the phone rings, press C to accept the call and listen through the earpiece of the
Voxtel Smart 3.
10.8 Answer a Call in Speakerphone mode
1 When the Voxtel Smart 3 rings, press C to accept the call.
2 Press
H, then tap Speaker.
10.9 Reject a call
Press D to reject a call and stop the ringing.
10.10 End a Call
Press D to end the call.
10.11 Adjust volume level during a call
During a call, press + or - to increase or decrease the volume.
10.12 Mute the microphone during a call
During a call, press H, then tap Mute.
10.13 Caller Identity Delivery (CID)
The Caller Identity Delivery (CID) feature lets you see who is calling on the line. It also lets
you know who called you in your absence. Both answered and missed calls are saved in
the Call Log.
If you have subscribed to the Caller ID service with your network service provider, and
provided the identity of the caller is not withheld or unavailable, the number of the caller
will be displayed together with the date and time of the call (if provided by the network).
Note
• If the telephone number is unavailable for incoming calls (e.g. from a private exchange
or an international call), the handset will display Unavailable.
• If the incoming call is from a withheld telephone number (e.g. by dialling 141, or from an
ex-directory number), the handset will display Withheld.
• Information about incoming calls will vary by country and network operator. Some
operators may charge a subscription for their Caller ID service.
24
Page 41

Using the Phone Functions
10.14 Caller ID Directory Matching
If you have subscribed to Caller ID and the caller's number matches the telephone
number you have stored in your Contacts list, it will display the name of the Contact as
well as the telephone number when it is received and when you review the Call Log.
25
Page 42

Using the Answer Machine
11 Using the Answer Machine
Y our V o xtel Smart 3 comes with a Digital Answer Machine that is switched on by default to
enable callers to leave you a message when you are not available to answer the call.
Callers will be prompted to leave a message or call back later if a call is not answered
after a preset number of rings. Each message can be up to 2 minutes. The total recording
time available for all messages (including voice prompts) is about 15 minutes.
The Digital Answer Machine is operated through the handset, which can be docked with
the base station or used remotely.
The Message LED on the base station blinks if there are new unread messages.
11.1 Open Digital Answer Machine
Tap > Answering Machine.
or
Tap the Answering Machine application if it is on your home screen.
Under ICM INFORMATION, the number of New Messages and Total Messages are
displayed.
11.2 Switch Digital Answer Machine off
When the Digital Answer Machine is on, will appear on the status bar. In the Digital
Answer Machine screen, you will see the icon indication DTAM Off.
1 Tap > Answering Machine.
2 Tap DTAM Off to turn off Digital Answer Machine function.
3 Tap DTAM On to turn it on again.
- The status bar shows .
26
Page 43

Using the Answer Machine
11.3 Set Number of Rings
You can customise the number of times (2 to 9 times) the phone will ring before the Digital
Answer Machine answers the call and callers are greeted with the outgoing message.
Alternatively , you can choose the Toll Saver option such that the phone will ring 5 times if
there is no new message and only 2 times if there are new messages on the Digital
Answer Machine.
1 In the Digital Answer Machine screen, press
2 Tap DTAM Settings > Number of Rings.
3 Choose the number of times you would like the phone to ring or select Toll Saver.
4 If you do not wish to make any changes to the current setting, simply tap Cancel to
exit.
IMPORTANT
If your network voice messaging system (e.g. the 1571 service) is enabled, you must set
the number of rings to less than 6 rings, otherwise the network service will answer any
calls before the Digital Answer Machine of your Voxtel Smart 3, and prevent it from
recording any messages.
H.
11.4 Set Remote Pin
You can set a remote pin code for your Voxtel Smart 3 to improve the security of your
personal messages. Once enabled, users will need to enter the pin code to access
recorded messages on the Digital Answer Machine.
1 In the Digital Answer Machine screen, press
H.
2 Tap DTAM Settings > Set Remote Pin.
3 Enter the old pin code under Enter OLD Pin. (Note: The default PIN code is 0000)
4 Enter your new pin code in Enter New Pin.
5 Enter your new pin code again in Retype New Pin to verify the pin.
6 Tap OK to confirm the PIN change.
11.5 Playback recorded messages
When a new message is received, the Message LED on the base station will blink and
appears on the status bar.
Tap > Answering Machine.
Tap to play message. Th e answer machine will play all the new
messages followed by old messages.
During playback, tap once to repeat the current message, or tap
twice to play the previous message.
27
Page 44

Using the Answer Machine
During playback, tap to go to the next message
Tap to record a memo
Tap to stop playing messages
Tap to delete the current message pl aying.
DTAM On/Off
Delete All
You can choose to playback the messages through the handset earpiece or speaker.
1 During message playback, tap
2 Select Handset or Speaker playback.
Tap to turn the Digital Answer Machine on or off
Tap to delete all played messages
H.
11.6 Delete recorded messages
1 Tap > Answering Machine.
2 Tap to start message playback.
3 To delete current message, during playback tap .
4 To delete all old recorded messages, while messages are not playing, tap Delete All
and then tap OK to confirm.
- There will be a voice and message notification once all the old messages have been
deleted.
11.7 Memo Recording
You can record a memo that can be played back later. This is useful when you wish to
leave a message for other users of the Voxtel Smart 3.
Note
A memo will be played back along with other recorded messages from external callers.
1 Tap > Answering Machine.
2 Tap .
3 Record the memo you wish to leave for other users of the Voxtel Smart 3 when
prompted.
4 When you are done with the recording, tap .
- The Digital Answer Machine will playback your memo once to confirm that all
essential information has been recorded.
28
Page 45

Using the Answer Machine
11.8 Outgoing Message Setting
External callers are greeted with an outgoing message when the call is answe red by the
Digital Answer Machine.
The Digital Answer Machine has pre-recorded default messages for this purpose. Y ou can
also record a personalised outgoing message.
11.8.1 Select OGM Option
You can set the Digital Answer Machine to greet unanswered calls with either an Answer
& Record OGM or Answer Only OGM. With Answer & Record OGM, callers will be
asked to leave a message after the prompt. However, with Answer Only OGM, callers
will be asked to call back and will not be allowed to leave a message.
1 Tap > Answering Machine.
2 Tap
3 Select Answer & Record or Answer Only.
Note
When the answer machine memory is full and cannot record any more new messages, it
will automatically switch to the Answer Only OGM.
H > OGM Settings > Select OGM Option.
11.8.2 Record Personalised Outgoing Message
1 Tap > Answering Machine.
2 Tap
3 Choose to record a personalised message for Answer & Record or Answer Only.
4 Record your personalised outgoing message when prompted.
5 When you are done with the recordin g, tap Stop OGM. If you are not satisfied with the
6 The Digital Answer Machine will repeat your outgoing message which you can save by
H > OGM Settings > Record OGM.
recorded message, tap Delete OGM and repeat fro m step 2.
pressing Stop OGM or letting it finish playing, or delete it by pressing Delete OGM.
11.8.3 Playback Your Outgoing Message
1 Tap > Answering Machine.
2 Tap
3 Choose to play the message for Answer & Record or Answer Only.
4 Tap Stop OGM when you are done or let the message play until the end.
H > OGM Settings > Playback OGM.
11.8.4 Delete Personalised Outgoing Message
1 Tap > Answering Machine.
2 Tap
29
H > OGM Settings > Playback OGM.
Page 46

Using the Answer Machine
3 Choose to play the personalised message for Answer & Record or Answer Only.
4 While the message is playing, tap Delete OGM to delete the personalised outgoing
message and return it to the default OGM.
Note
The default outgoing messages cannot be deleted.
11.9 Remote Operation
You can access your answer machine remotely from any touchtone telephone. This
allows you to listen to your messages even when you are away from your phone.
To begin remote access, dial your telephone number. When the answer machine answers
and begins to play the OGM, press * to stop the OGM and the phone will announce
"Please enter your security code". Enter your Remote PIN. When remote access is
successful, the phone will announce "T o hear main menu, press 1".
You can perform the following functions using the dialling keys on your keypad:
Dialling Key Function
1 Playback the Voice Prompt Help menu
2 Play or stop message playback
4 Repeat the current message, or press twice to play the previous
message.
5 Delete the current message
6 Go to the next message
7 Turn On the Answer Machine
9 Turn Off the Answer Machine
30
Page 47

Contacts List
12 Contacts List
The Contacts list is like a Phonebook that stores the name, telephone numbers and
other information of your contacts.
12.1 Open Contacts list
From the home screen, press C and tap Contacts tab.
12.2 Search for a contact in Contacts list
1 From the home screen, press C and tap Contacts.
2 Press
3 Enter the name of the contact in the Search contacts box and tap Done.
4 Press
H and tap Search.
B to return to the previous menu level.
12.3 Add an entry to Contacts list
1 From the home screen, press C and tap Contacts tab.
2 Press
3 Tap on First name input box, enter the first name and tap Next.
4 Enter the Surname of the contact and tap Next.
5 Proceed to enter the following information, if required:
• Phone (tap Home label and select from Home, Mobile, Work, Work fax, Home fax,
• Email (tap Home label and select from Home, Work, Other, Mobile or Custom), then
• Postal address (tap Home label and select from Home, Work, Other or Custom),
• Organisation (tap Organisation, then the Work label and select from Work, Other
Tip
• To add an input field, tap +
• To close an input field, tap -
• Press
H and tap New contact.
Pager, Other, Custom, etc), then enter the phone number and tap Next.
enter the Email address and tap Done.
then tap on each line of the address and enter the information, closing the keyboard
at each step, if necessary to select the next field.
or Custom), then tap on Company/Title and enter the information, closing the
keyboard at each step, if necessary to select the next field.
B to hide the onscreen keyboard.
31
Page 48

Contacts List
6 Tap More to add more information about the contact, such as IM, Notes, Website,
Internet call.
7 Tap Done when finished.
- The new contact will be stored in your Contacts list.
12.4 Assign Ringtone to a Contact
1 From the home screen, press C and tap Contacts tab.
2 Tap to select the contact from the contacts list.
3 Press
4 Tap to select a rington e.
- The ringtone is played.
5 Tap OK to confirm.
Note
The default ringtone will be used if a specific ringtone is not assigned to a contact.
H and tap Options > Ringtone.
12.5 Import/Export Contacts
1 From the home screen, press C and tap Contacts tab.
2 Press
3 Select Import from SD card, Export to SD card or Share visible contacts.
(a) If Import from SD card is selected, the handset will search the SD card for any vCard
data files and copy them into the Contacts list.
(b) If Export to SD card is selected, press OK to confirm the export of your Contact list to
the SD card.
H and tap Import/Export.
(c) If Share visible contacts is selected, enter the Email address where you want to send
your whole Contact list, and press Send.
Note
The handset must have a WiFi connection and Email account set up in order to send the
Email.
If you only want to send the details for one contact, tap to select the contact from the
contacts list, then press
Contacts can only be imported or exported in .vcf Vcard file format.
H and tap Share, enter the Email address and tap Send.
32
Page 49

Contacts List
12.6 Enable forwarding of calls to voicemail
1 From the home screen, press C and tap Contacts tab.
2 Tap to select the contact from the contacts list.
3 Press
- Calls from the contact will be forwarded directly to the Digital Answer Machine.
4 To cancel forwarding, tap Options > Incoming calls again.
H and tap Options > Incoming calls.
12.7 Add a Contact as a Favourite
1 From the home screen, press C and tap Contacts tab.
2 Tap and hold a contact from the contacts list.
- A list of options appear on the screen.
3 Tap Add to favourites.
- The contact is saved to your favourites list.
12.8 Edit a Contact in Contacts list
1 From the home screen, press C and tap Contacts tab.
2 Tap to select the contact from the contacts list.
3 Press
4 Go to the information field you wish to edit or tap + to add an input field, and enter or
modify the data.
5 Tap Done when you are done with the changes.
Note
To discard the changes you have made, tap Revert.
H and tap Edit contact.
12.9 Set display options
1 From the home screen, press C and tap Contacts tab.
2 Press
3 You can then choose the following:
Only contacts with phones This will only display contacts with phone numbers
Sort list by Sort contacts list by First name or Surname
View contact names as View contact names as First name first or Surname first
H and tap Display options.
33
Page 50

12.10 Delete a Contact from Contacts list
1 From the home screen, press C and tap Contacts tab.
2 Tap to select the contact from the contacts list.
Contacts List
3 Press
4 Tap OK to confirm.
H and tap Delete contact.
12.11 Link Picture to a Contact
You can link a picture to your contact so that you can see the picture of the contact when
you search for the contact from the Contacts list or when the contact calls you.
You can either take a photo or select it from the Gallery.
12.11.1Take photo
1 From the home screen, press C and tap Contacts tab.
2 Tap to select a contact from the contacts list.
3 Press
4 Tap on the contact icon and tap Take photo.
- The camera is activated.
5 Tap to take a picture and tap OK.
H and then tap Edit contact.
- An image position box will appear at the centre of the picture.
- To resize the picture, tap and hold the edge of the box, and drag inward or outward.
- T o move the crop box to another area on the picture, tap and hold inside the box, then
drag it to the desired position.
6 Tap Save to link the picture to the contact.
7 Tap Done to save or Revert to cancel.
12.11.2Select from the Gallery
1 From the home screen, press C and tap Contacts tab.
2 Tap to select a contact from the contacts list.
3 Press
4 Tap on the contact icon and tap Select photo from Gallery.
5 Tap to select a picture from the Gallery.
- An image position box will appear at the centre of the picture.
H and then tap Edit contact.
34
Page 51

Contacts List
- To resize the picture, tap and hold the edge of the box, and drag inward or outward.
- T o move the crop box to another area on the picture, tap and hold inside the box, then
drag it to the desired position.
6 Tap Save to link the picture to the contact.
7 Tap Done to save or Revert to cancel.
12.11.3Change picture of a Contact
1 From the home screen, press C and tap Contacts tab.
2 Tap to select a contact from the contacts list.
3 Press
4 Tap on the contact icon and then tap Change icon.
5 Follow steps 5 and 6 of sections 12.11.1 Take photo or 12.11.2 Select from the Gallery
to take photo or select photo from the gallery.
6 Tap Done to save or Revert to cancel.
H and tap Edit contact.
12.11.4Remove picture of a Contact
1 From the home screen, press C and tap Contacts tab.
2 Tap to select a contact from the contacts list.
3 Press
4 Tap on the contact icon and then tap Remove icon .
5 Tap Done to save or Revert to cancel.
H and tap Edit contact.
12.11.5Call a contact from contacts list
1 From the home screen, press C and tap Contacts tab.
2 Tap to select the contact from the contacts list.
3 Tap next to the number you want to call.
35
Page 52

Internet Function
13 Internet Function
Before you can surf the Internet, send and receive emails, listen to Internet radio
broadcasts, check weather, stock prices, etc., you must be joined to a Wi-Fi network that
is connected to the Internet.
For Wi-Fi networks that are not secured with a PIN code, you can easily connect to them
and access the Internet freely. However, for Wi-Fi networks that are secured with a
wireless password/key, you need to have the wireless password/key to access the
Internet.
13.1 Register your Voxtel Smart 3 to a Wi-Fi Network
1 Press H.
2 Select Settings > Wireless & networ ks.
- Tap Wi-Fi to activate Wi-Fi connection.
✓
appears to indicate that it is activated.
-
3 Tap Wi-Fi settings > Network notification to activate notification.
-
✓
appears to indicate that it is activated.
- The screen displays a list of available Wi-Fi networks.
4 Tap the Wi-Fi ne twork that you want the Voxtel Smart 3 to be connected to. If you
cannot find your favourite Wi-Fi network name, press
- If the network is not secured with a wireless password/key, the Voxtel Smart 3 will
start to establish a link with it.
- If it is a secured network, you will be prompted to enter the wireless password/key.
5 Tap on the password edit box to launch the onscreen keyboard. Enter the wireless
password/key and tap Done.
6 Tap Connect.
H and then tap Scan.
- Yo ur V oxtel Smart 3 will start to est ablish a link to the network. Once it is established,
appears on the status bar of your home screen, and “Connected” is shown
against your selected Wi-Fi network.
You can now use the Internet function.
36
Page 53

Internet Function
Note
The connection speed is dependent on the capability of the Wi-Fi netwo r k.
Once you have joined a Wi-Fi network manually, the Voxtel Smart 3 will automatically
connect to it whenever the network is in range. If more than one previously used network
is in range, the Voxtel Smart 3 will join the one last used.
If you encounter problems connecting to the Wi-Fi network using preconfigured settings,
try to tap on the network and select Forget to forget the “Remembered” network, then
perform setup again.
13.2 Set Number of Wi-Fi Network Channels
Different regions utilise different channel schemes for their Wi-Fi networks. For example,
North America uses 11 channels, Europe (ETSI) uses 13 channels while Japan uses 14
channels. It is recommended that you set up your Voxtel Smart 3 according to your
country’s network scheme to achieve optimum connection.
1 Press
2 Select Settings > Wireless & networ ks > Wi-Fi settings.
3 Press H.
4 Tap Advanced > Regulatory domain.
5 Select from 11 channels, 13 channels or 14 channels.
H.
13.3 Select Wi-Fi Sleep Policy
You can specify when to put the Wi-Fi connection to sleep, but the V oxtel Smart 3 cannot
switch to mobile data.
1 Press
2 Select Settings > Wireless & networ ks > Wi-Fi settings.
3 Press H.
4 Select Advanced > Wi-Fi sleep policy.
5 Select When screen turns off, Never when plugged in or Never.
H.
37
Page 54

Internet Function
13.4 Check Voxtel Smart 3 MAC Address
For secured Wi-Fi networks with MAC address filtering, you will need to include the MAC
address of your Voxtel Smart 3 into the filter list befo re a connectio n can be established.
To check the MAC address of your Voxtel Smart 3:
1 Press
2 Select Settings > Wireless & networ ks > Wi-Fi settings.
3 Press
H.
H and tap Advanced.
13.5 Configure Static IP Settings
Most Wi-Fi networks will dynamically set the IP address for your Voxtel Smart 3 when
they link together, but a Static IP address can be set manually if your network requires it.
1 Press
2 Select Settings > Wireless & networ ks > Wi-Fi settings.
3 Press
4 Select Advanced > Use Static IP
5 Enter the Static IP Settings.
H.
H.
38
Page 55

Using the Web Browser
14 Using the Web Browser
YOU MUST JOIN A WI-FI NETWORK THAT IS CONNECTED TO THE INTERNET
BEFORE YOU CAN SURF THE WEB VIA THE BROWSER APPLICATION.
SEE PAGE 36 ON HOW TO JOIN A WI-FI NETWORK.
You can use the Browser to surf the web. The Browser is fully optimised and comes with
advanced features that let you enjoy Internet browsing on your Voxtel Smart 3.
By default, the home page is www.google.com
14.1 Open Browser
Tap > Browser.
14.2 Setting your home page
1 In the Browser window, press H and tap More.
2 Tap Settings > Set home page.
3 Enter the home page address in the Set home page input box and tap OK.
14.3 Open a web page
1 In the Browser window, enter the web address in the address bar and tap Go.
Note
As you enter the address, matching web page addresses will appear on the screen. Tap
to select an address to go directly to the web page or continue to enter the complete web
page address and tap Go.
14.4 Automatic screen rotation
The phone automatically changes the screen orientation depending on how you are
holding your phone.
Note
To enable/disable automatic screen orientation, from the home screen, press
Settings > Display > Auto-rotate screen.
H and tap
14.5 Display web page in landscape only
1 When viewing a webpage, press H and tap More.
2 Tap Settings > Landscape-only display.
39
Page 56

Using the Web Browser
14.6 Zoom in and out of a webpage
When viewing a webpage, double tap on the screen to zoom in and out, or launch the
zoom control by sliding your finger across the screen in one direction and tap + to zoom in
and - to zoom out.
14.7 Open a new browser window
You can open multiple browser windows and switch between different web pages.
1 In the Browser window, press
- A new browser window opens and enters the home page.
H and tap New window.
14.7.1 Switch between browser windows
1 In the Browser window, press H and tap Windows.
2 Tap to select the browser win dow you wish to display.
14.7.2 Close a browser window
1 In the Browser window, press H and tap Windows.
2 Tap the X against the browser window you wish to close.
14.8 Finding text within a webpage
1 When viewing a webpage, press H and tap More > Find on page.
2 Enter the text in the input box using the onscreen keyboard and tap Next.
- Matching texts are highlighted on the screen.
3 Tap < or > to go to the previous or next matching text.
4 Tap x to close the search box.
14.9 Selecting links in web pages
14.9.1 Web page links
1 Tap to go to the link directly or tap and hold the link.
- A pop-up menu opens.
2 Tap to select Open, Open in new window, Bookmark link, Save link or Copy link
URL.
40
Page 57

Using the Web Browser
14.9.2 Email links
1 Tap on the link.
- The Email application will launch automatically.
2 Enter the subject using the onscreen keyboard, tap Next.
3 Enter the message and then tap Send to send the email, Save as draft or Discard (for
more information on how to use the email application, see page 43).
14.10 Downloading web applications
Before you can download web applications, you must first enable downloading from the
phone settings.
1 From the home screen, press
2 Tap to select Unknown sources check box and tap OK.
Note
All downloaded applications are saved to the storage card. Befo re you downlo ad an
application from the web, make sure that you have installed a storage card on yo ur p hone.
W ARNING!
Applications downloaded from the web can be from unknown sources. To protect your
phone and personal data, download applications only from trusted sources such as
Android Market.
H, and then select Settings > Applications.
14.10.1View your downloads
In the Browser window, press H and then select More > Downloads.
14.11 Manage bookmarks
You can store as many bookmarks as you want on your phone.
14.11.1To bookmark a web page
1 In the Browser window, go to the web page you want to book mark.
2 Press
- The bookmark window opens.
3 Tap Add and OK to confirm, or edit the bookmark name and tap Next.
4 Edit the location if needed, tap Done and OK.
H and then tap Bookmarks.
14.11.2To open a bookmark
1 In the Browser window, press H and then tap Bookmarks.
- The bookmark window opens.
2 Tap to select the bookmark to open it.
41
Page 58

Using the Web Browser
14.12 Customise Browser Options
You can customise th e Browser to suit your browsing preferences by setting the display,
privacy, and security options.
In the Browser window, press
settings according to your preference.
- When ✓ appears next to the option, the setting is enabled. To disable, tap the option
again.
H, and then tap More > Settings to modify the browser
42
Page 59

Email
15 Email
YOU MUST JOIN A WI-FI NETWORK THAT IS CONNECTED TO THE INTERNET
BEFORE YOU CAN SETUP, SEND AND RECEIVE EMAILS. SEE PAGE 36 ON HOW
TO JOIN A WI-FI NETWORK.
IT IS IMPORTANT TO SET THE CORRECT DATE AND TIME INFORMATION BEFORE
YOU SET UP YOUR FIRST EMAIL ACCOUNT AND START TO ACCESS YOUR
EMAILS.
The Email application lets you send and receive emails and it works with most popular
email systems such as Google mail, Hotmail as well as POP3 and IMAP accounts.
Free email accounts such as www.google.com/mail, www.aol.com, etc. are available
online if you do not have an email account.
15.1 Open Email
Tap > Email.
15.2 Set up the first email account
1 Tap > Email.
2 Enter your Email address and tap Next.
3 Enter Password and tap Done.
4 Tap Next to proceed to the next step.
Note
If the account type you want to set up is not in the phone database, you will be asked to
enter more details. It is recommended that you get all the necessary information for the
email account such as incoming/outgoing server settings before you proceed.
For example, you need to enter the following to set up a Gmail account:
POP3 server = pop.gmail.com
Port = 995
Security = SSL (if available)
SMTP server = smtp.gmail.com
Port = 465
Security = SSL (if available)
Authentication = Yes
5 Tap OK.
- The email application will check your incoming and outgoing server settings. It might
take a few minutes.
43
Page 60

6 Enter the Account name (optional) and tap Done.
7 Enter Your name (optional) to be displayed on outgoing messages, and then tap
Done.
- The email application will start to load your messages. It might take a few minutes for
the messages to load completely.
15.3 Set up another email account
1 Press H, and then tap Accounts to go to the email accounts window.
Email
2 In the Accounts window, press
3 Follow the onscreen instructions to set up your email account.
Note
If you have set up more than one email account, your email accounts will appear in the
Accounts window. Your email messages from the different accounts will be consolidated
into a Combined Inbox.
Tap to select the email account you wish to access.
H, and then tap Add account.
15.4 Combined Inbox
If you have set up more than one email account, your unread email messages from the
different accounts will be integrated into a Combined Inbox in the email accounts
window.
Press
H, and then tap Accounts to go to the email accounts window.
15.5 Account settings
15.5.1 Edit Account name
1 Tap > Email.
2 Tap to select an email account from the Accounts window.
3 Press
• Account name • Email notifications
• Your name • Select ringtone
• Signature • Inbox check frequency
• Incoming settings • Outgoing settings
• Default account
H and tap Account settings to modify the following settings:
44
Page 61

Email
15.6 Compose and send email messages
You can send an email message to anyone who has an email address. You can send the
message to one person or to a group of people.
1 Tap > Email.
2 Tap to select an email account from the Accounts window.
3 Press
4 Enter the message recipient's email address in To field.
Tip
If you are sending the email to several recipients, separate the email addresses with a
comma. You can add as many message recipients as you want.
If you want to send a carbon copy (Cc) or a blind carbon copy (Bcc) of the email to other
recipients, press
5 Enter the subject in the Subject field, tap Next, and then compose your message.
6 Tap Send.
Note
Tap Save as draft to save the message as a draft or tap Discard to delete the message
you have just composed.
Tip
If you exit the email application without saving the messa ge you have composed, the
message will be automatically saved as a draft in the Drafts folder of your email account.
H and tap Compose.
H and then tap Add Cc/Bcc:.
15.7 Read messages
1 Tap > Email.
2 In the Accounts window, tap on the folder icon next to the email account you want to
access.
- The available mailboxes are displayed:
3 Tap to select the folder you wan t to view.
- The messages are displayed.
4 Tap to select the message you want to view.
5 Tap < or > at the top of the message window to go to the previous or next message.
45
Page 62

Email
15.8 Open an attached file
You can open and view some types of files and images attached to messages you
receive. Tap the attachment. It downloads to the Voxtel Smart 3 and then opens.
If the format of an attached file is not supported by the Voxtel Smart 3, you can see the
name of the file but you can't open it.
15.9 Check for new messages
In the mailbox window, press H and tap Refresh.
15.10 Reply to an email message
1 Tap > Email.
2 In the Accounts window, tap on the folder icon next to the email account you want to
access.
- The available folders are displayed.
3 Tap to select the folder you want to check.
- The messages are displayed.
4 Tap to select the message you want to reply.
5 Tap Reply or Reply all.
6 Compose your message and tap Send.
15.11 Delete an email message
1 Tap > Email.
2 In the Accounts window, tap on the folder icon next to the email account you want to
access.
- The available folders are displayed.
3 Tap to select the folder you want to check.
- The messages are displayed.
4 Tap to select the messa ge you want to delete.
5 Tap Delete to delete the message.
46
Page 63

Email
15.12 Forward an email message
1 Tap > Email.
2 In the Accounts window, tap on the folder icon next to the email account you want to
access.
- The available folders are displayed.
3 Tap to select the folder you want to check.
- The messages are displayed.
4 Tap to select the messagel you want to forward.
5 Press
6 Enter the message recipient's email address in To field.
7 Enter the subject in the Subject field, tap Next, and then compose your message.
8 Tap Send.
H and tap Forward to forward the message.
15.13 Mark message as unread
1 Tap > Email.
2 In the Accounts window, tap on the folder icon next to the email account you want to
access.
- The available folders are displayed.
3 Tap to select the folder you want to check.
- The messages are displayed.
4 Tap to select the messa ge you want to mark as unread.
5 Press
H and tap Mark as unread to mark the message.
Tip
To go to the previous or next message, tap < or > at the top of the message screen.
15.14 Delete an email account
1 Tap > Email.
2 From the Accounts window, t ap and hold the email account you wish to delete until an
option box appears.
3 Tap Remove Account and OK to delete the email account.
47
Page 64

TuneIn Radio
16 TuneIn Radio
YOU MUST JOIN A WI-FI NETWORK THAT IS CONNECTED TO THE INTERNET
BEFORE YOU CAN LISTEN TO RADIO BROADCASTS FROM THE INTERNET.
SEE PAGE 36 ON HOW TO JOIN A WI-FI NETWORK.
TuneIn Radio is an audio service transmitted via the Internet. With this application, you
can listen live to your favorite radio stations and programs as well as find new ones by
genre, language or location.
TuneIn Radio also lists available podcasts from popular stations such as the BBC, so you
can catch up with programs you missed on the live stream.
Note
Occasionally, the radio stations cannot be accessed if the server or stations are not
available.
16.1 Open TuneIn Radio
Tap > TuneIn Radio.
The screen displays a list of options by which you can search for a radio station by genre,
location, language etc.
16.2 Listen to a Radio Broadcast
1 Tap > TuneIn Radio.
- The screen displays a list of options by which you can search for a radio station by
genre, location, language etc.
2 Tap to select an option.
- The screen displays a list of stations under the option you have selected.
3 Tap to select a station and listen to the station broadcast.
• To add a station to the favorites list for easy access in future, tap .
- The station is added to presets and you can access it by tapping My Presets tab.
• Tap or at the bottom of the screen to stop or resume playback.
• Press
• Press
• Press
+ or - to increase to decrease volume.
B
to return to the previous menu.
H, tap Exit and select OK to stop and exit.
48
Page 65

TuneIn Radio
16.3 Search Station by Name
1 Tap and tap TuneIn Radio.
- The screen displays a list of options for you to search for a radio station by genre,
location, language etc.
2 Press
3 Enter the station name and tap Done.
- The screen displays the search results.
4 Tap to select a station and listen to the station broadcast.
>.
16.4 Search Station by Location
1 Tap and tap TuneIn Radio.
- The screen displays a list of options by which you can search for a radio station by
genre, location, language etc.
2 Tap By Location.
3 Follow the onscreen instructions to select the country or region.
- The screen displays a list of options based on the selected country or region.
4 Tap to select an option or station and listen to the station broadcast.
16.5 Search Station by Language
1 Tap and tap TuneIn Radio.
- The screen displays a list of options by which you can search for a radio station by
genre, location, language etc.
2 Tap By Language.
3 Follow the onscreen instructions to select a language.
- The screen displays a list of options based on the selected language.
4 Tap to select an option or station and listen to the station broadcast.
49
Page 66

RssFeed
17 RssFeed
YOU MUST JOIN A WI-FI NETWORK THAT IS CONNECTED TO THE INTERNET
BEFORE YOU CAN RECEIVE AND READ RSSFEED.
SEE PAGE 36 ON HOW TO JOIN A WI-FI NETWORK.
RSS Feed is a web feed used to publish frequently updated works such as blog entrie s,
news headlines and audio.
You can subscribe to timely updates from your favorite websites by entering the Feed's
URL or by clicking an RSS icon in a web browser that initiates the subscription process.
The RSS Feed reader checks your subscribed feeds regularly for new works, downloads
any updates that it finds, and provides a user interface to monitor and read the feeds.
17.1 Open RssFeed
Tap > RssFeed.
17.2 Add a category to the RssFeed Reader
1 In the RssFeed window, tap Add Category and tap on the inp ut box to launch the
onscreen keyboard.
2 Enter the new category in the input box, tap Done and then tap Add.
17.3 Selecting a Category for the Widget
Adding a RssFeed widget lets you view RSS Feeds of your choice straight on your home
screen. You can change the RSS feed category which is shown on the home screen wid get.
1 In the RssFeed window, tap Settings and select a category for the widget.
17.4 Adding an RSS Feed into a Category
Follow the steps below to search and save the real Feed path into the Category of your
choice.
1 In the RssFeed window , t ap to select a category from the list.
2 Tap Search Feed.
3 Enter the key words to search for relevant Rss Feeds on the web, for example, News,
Sports etc, tap Done and then tap Search.
4 Tap Save Feed to save the selected feed into the category.
Note
If you want to view or delete a Feed that you have saved previously, simply tap and hold
the selected feed in the list and select View Feed or Delete Feed.
50
Page 67

Stock
18 Stock
YOU MUST JOIN A WI-FI NETWORK THAT IS CONNECTED TO THE INTERNET
BEFORE YOU CAN CHECK STOCK PRICES.
SEE PAGE 36 ON HOW TO JOIN A WI-FI NETWORK.
The Stock reader shows updated quotes for the stocks in your portfolio list. Quotes are
updated every time you open the Stock reader while connected to the Internet.
Note
Quotes may be delayed by up to 20 minutes.
18.1 Open Stock
Tap and tap Stock.
- The Portfolio list is opened by default.
- To get updated stock prices in your portfolio list, tap Refresh.
18.2 Add a stock to the Portfolio list
1 In the Stock window, tap to select Portfolio List.
2 Tap on the input box to launch the onscreen keyboard.
3 Enter the name of the stock you wish to add and tap Add.
- A list of query results appears.
4 Tap to select the stock you wish to add.
18.3 Delete a stock from the portfolio list
Tap x next to the stock in the portfolio list.
18.4 View more information about a stock in your
portfolio
1 In the Stock window, tap to select Portfolio List.
2 Tap on a stock symbol to enter the Get Quote tab to view more information about the
stock.
51
Page 68

18.5 Get more information about a stock
1 In the Stock window, tap to select Get Quote.
2 Tap on the Search input box to launch the onscreen keyboard.
3 Enter the name of the stock you wish to check and tap Search.
- A list of query results appears.
4 Tap to select the stock you wish to view more information.
Stock
52
Page 69

Weather
19 Weather
YOU MUST JOIN A WI-FI NETWORK THAT IS CONNECTED TO THE INTERNET
BEFORE YOU CAN CHECK WEATHER.
SEE PAGE 36 ON HOW TO JOIN A WI-FI NETWORK.
The Weather application lets you view the current weather as well as the weather
forecast for the next four days of the week. Y ou can display the weather conditions in your
current location and the weather in up to ten cities.
19.1 Open Weather Application
Tap > Weather.
- The Current weather list is opened by default.
- To get updated weather condition, tap Refresh.
19.2 Check the current weather of a city
1 In Weather window, tap Current.
2 Enter the city in the input box and tap Search.
- The current weather of the city appears on the screen.
19.3 Display the weather forecast of a city
1 In Weather window, tap Forecast.
2 Enter the city in the input box and tap Search.
- The 4-day weather forecast of the city appears on the screen.
19.4 Change Temperature Unit
1 In Weather window, press H and tap Setting.
2 Tap to select Celsius or Fahrenheit and tap OK to confirm.
Note
The temperature unit will change only when you tap Refresh.
19.5 Delete a city
In Weather window, tap x next to the city to delete it.
53
Page 70

Take photos and record videos
20 Take photos and record videos
Note
To get clear photographs, wipe the lens clean with a soft, dry cloth before you take photo.
20.1 Open Camera
Tap > Camera.
20.2 Switch between camera and camcorder mode
Drag slider to camera or camcorder icon to switch mode.
20.3 Take picture
Tap .
- A thumbnail of the photo you have just taken is shown.
- Tap on the thumbnail to view it in full screen.
Delete photo
• Tap Delete > Confirm Delete.
Share photo via email
• Tap Share > Email.
Set photo as wallpaper or contact icon
• Tap More > Set as > Wallpaper or Contact icon.
• For more options such as Rotate, Crop, etc, tap More.
• Press
B to return to viewfinder.
54
Page 71

Take photos and record videos
20.4 Camera options
Drag slider to select zoom factor from 1x to 4x
Tap to select white balance: Auto, Incandescent, Daylight, Fluorescent,
Cloudy
Select Incandescent or Fluorescent for indoor lighting or Daylight or Cloudy for
outdoor lighting.
Shows thumbnail
of last photo
Drag up to switch
to camcorder
Tap to take photo
Tap to select exposure: +2, +1, 0, -1 or -2
20.5 View photos
In the viewfinder, press H and tap Gallery.
- Thumbnail images of the photos you have taken are displayed.
- Tap on a thumbnail to view it in full screen.
- Tap Delete to delete the photo.
- Tap Share to send the photo via email
- Tap More for other photo options such as rotate, crop, set as wallpaper, etc.
Press
B to return to viewfinder.
20.6 Record video
Drag slider to camcorder icon.
1 Tap to start/stop video recording.
- A recording timer appears on the top left of the screen.
- A thumbnail of the video you have just recorded is shown.
- Tap on the thumbnail to view it in full screen.
- Tap > and then tap ES Video Player or Movies to play it.
55
Page 72

- Tap Delete to delete the video.
- Tap Share to send the video via email
- Tap More for other video options.
Take photos and record videos
Press
B to return to viewfinder.
20.7 Video options
Tap to select video quality: High, Low, MMS, YouTube
Select Low if sending the video via MMS, High if storing the video on an SD card.
Ta p to select white balance: Auto, Incandescent, Daylight, Fluorsecent,
Cloudy
Select Incandescent or Fluorescent for indoor lighting or Daylight or Cloudy for
outdoor lighting.
Tap to select color effect: None, Mono, Sepia, Negative, Posterise, Aqua
Select Sepia for an "antique" look, Mono for black and white, Negative to invert
the video image, etc.
20.8 Play videos
1 In the viewfinder, press H and tap Gallery.
- Thumbnail images of the photos and videos you have taken are displayed.
2 Tap on a video thumbnail and then tap ES Video Player or Movies to play it.
Press
B to return to Gallery .
56
Page 73

Music
21 Music
The Music application lets you play digital audio files stored in a memory card. You must
copy your audio files to a memory card and insert it into the Voxtel Smart 3 before you
launch the music application. See "Inserting and mounting a memory card" on page 5.
21.1 Listen to Music on your Voxtel Smart 3
21.1.1 Using earphones
You can insert earphones (not included) into the Voxtel Smart 3 earphone jack to listen to
music.
21.1.2 Using the speaker on the base station
You can also listen to music using the speaker on the base station of your Voxtel Smart 3.
• Place the Voxtel Smart 3 on the cradle of the base station
21.2 Open Music application
Tap > Music.
21.3 Music Library
Your music is organised into different categories such as Artists, Albums, Songs and
Playlists. Tap to select a category and tap a song in the category to play it back.
Tap to select songs from the list.
Tap to tu rn shuffle on and off. (Shuffle is off when button is gray)
Tap to cycl e through the repeat modes: Repeating all songs, Repeating
current song, Repeat is off.
Tap to pause or to resume playing the song.
Tap to rewind.
Tap to forward.
Note
Press
+ or - to adjust the playback volume
If you do not see the playback controls, tap on the screen to display the playback controls.
Tip
To return to the Music Library during music playback, press
To return to the playback window from the Music Library, tap Now playing or the green
playback button.
57
H and tap Library.
Page 74

21.4 Search for a song
1 Press >.
2 Enter the song name and tap Go.
- A list of songs related to the song name is displayed.
- Tap to select and playback the song.
Tip
Press
B to hide keyboard.
21.5 Party Shuffle all songs
Press H and tap Party shuffle.
21.6 Turn party shuffle off
Press H and tap Party shuffle off.
Music
21.7 Create playlists
You can use playlists to organise your music files. You can create as many playlists as
you want on your V oxtel Smart 3.
1 In the playback window, press
2 Tap Add to playlist.
3 Tap to select New.
4 Enter playlist name, tap Done and Save.
21.7.1 Add songs to current playlist
1 In the playback window, press H.
2 Tap Add to playlist.
3 Tap to select Current playlist.
21.7.2 Play songs in a playlist
1 From the main music library, tap Playlists.
H.
2 Tap and hold the playlist that you wish to play.
- A pop-up options menu appears.
3 Tap Play.
58
Page 75

Music
21.7.3 Add songs to a playlist
1 From the main music library , tap to select a category from which you wish to add songs
to a playlist.
Tip
Go to Songs category to show all the available songs.
2 Tap and hol d the song you wish to add to playlist.
- A pop-up options menu appears.
3 Tap Add to playlist.
4 Tap to select the playlist.
- The song is added to the selected playlist.
21.7.4 Remove a song from playlist
1 From the main music library, tap Playlists.
2 Tap to select the playl ist from which you wish to remove a song.
3 Tap and hol d the song you wish to remove.
- A pop-up options menu appears.
4 Tap Remove from playlist to remove the song from the playlist.
21.7.5 Delete a playlist
1 From the main music library, tap Playlists.
2 Tap and hold the playlist that you wish to delete.
- A pop-up options menu appears.
3 Tap Delete to delete the playlist.
21.7.6 Rename a playlist
1 From the main music library, tap Playlists.
2 Tap and hold the playlist that you wish to rename.
- A pop-up options menu appears.
3 Tap Rename.
4 Enter playlist name and tap Save.
59
Page 76

Music
21.8 Set song as ringtone
You can use songs as your phone ringtone.
1 From the main music library, tap to select a category from which you wish to use song
as ringtone.
Tip
Go to Songs category to show all the available songs.
2 Tap and hold the song you wish to use as ringtone.
- A pop-up options menu appears.
3 Tap Use as phone ringtone.
- The song is set as phone ringtone.
Note
To learn how to set phone ringtone, see "Set Phone ringto ne" on page 16.
21.9 Set sound effects
1 In the Playback window, press H and then tap Sound effects.
2 Tap EQ preset or Bass boost and adjust the settings accordingly.
21.10 Delete current song
1 In the Playback window, press H and then tap Delete.
2 Tap OK to confirm.
W ARNING!
The song will be permanently deleted from the SD card.
21.11 Set current song as ringtone
In the Playback window, press H and th en tap Use as ringtone.
- The song is set as phone ringtone.
60
Page 77

Gallery
22 Gallery
The Gallery application lets you view photos and videos on the phone. It presents the
pictures and videos on your SD card, including those you have taken with the Camera
and those you have downloaded from the web or other locations.
22.1 Open Gallery
Tap > Gallery.
If you have stored your files in folders on the memory card, the Gallery application will
display these folders as separate albums.
Note
Depending on the number of pictures stored on the memory card, it may take a while for
the application to load the pictures on the screen.
22.2 View pictures
• When viewing pictures in Gallery, slide your finger up, down, left or right across the
screen to view more albums. Tap to open an album.
• Return to the main Gallery screen at any time, tap at the top left of the screen.
• Drag the Album View switch to the right to view th e contents of the album in
stacks.
22.2.1 View pictures in full screen
Tap on a thumbnail to view the picture in full screen.
Tap on the picture in full screen to launch the navigation and zoom cont ro ls
The zoom control buttons appear when you view a picture in full screen. When viewing
pictures in full screen, you can:
• Swipe left or right to view the previous or next picture in the album.
• Tap + to zoom in or - zoom out.
• Tap Slideshow to view the pictures in the album as a slideshow.
• Tap More to access more options such as Crop, Rotate, etc.
61
Page 78

23 Clock
23.1 Open Clock
Tap > Clock.
23.2 Set an alarm
1 Tap > Clock.
2 Tap .
3 Tap Add alarm.
4 Tap + or - or the hour and minute fields to set the alarm time.
5 Tap to select AM or PM.
Clock
Note
This option is not available if Use 24-hour format is activated. See "Set Time Format" on
page 9 for details.
6 Tap Set.
7 Tap Repeat to select the days of the week that you want the alarm to ring and tap OK.
8 Tap Ringtone to select the alarm ringtone and tap OK.
9 Tap Label to enter a name for the alarm and tap OK.
10Tap Done to confirm setting.
23.3 Activate an alarm setting
1 Tap > Clock.
2 Tap .
- A list of alarm settings is displayed.
3 Tap on the alarm icon to activate an alarm setting.
- The alarm icon is underlined in green.
Note
When the alarm rings, tap Snooze or Dismiss to snooze or dismiss the alarm.
62
Page 79

Clock
23.4 Deactivate an alarm setting
1 Tap > Clock.
2 Tap .
- A list of alarm settings is displayed.
3 Tap on the alarm icon to deactivate an alarm setting.
- The alarm icon is not underlined in green.
23.5 Activate alarm in silent mode
You can set your alarm clock to sound an alarm even when the phone is in silent mode.
1 Tap > Clock.
2 Tap .
3 Press
4 Tap Alarm in silent mode.
-
H and tap Settings.
✓ appears next to the option. To disable alarm in silent mode, tap the option again.
23.6 Other Alarm Clock Settings
1 Tap > Clock.
2 Tap .
3 Press
Alarm volume Slide the volume bar left or right to decrease or increase
Snooze duration Select from 5 minutes, 10 minutes, 15 minutes, 20
Volume and Camera Set the desired behaviour of the buttons when pressed
H and tap Settings.
alarm volume.
minutes, 25 minutes and 30 minutes.
during an alarm. Select from None, Snooze and Dismiss.
63
Page 80

Calendar
24 Calendar
You can use the Calendar to create and manage events, meetings, and appointments.
24.1 Open Calendar
Tap > Calendar.
Note
The last Calendar view opens by default.
24.2 View Agenda for the day
In any Calendar view, press H and tap Agenda.
24.3 Go to Today's date
In any Calendar view, press H and tap Today.
24.4 Change Calendar view
You can display the Calendar in daily, weekly, monthly, or agenda view. To change
Calendar view, press
H, then tap Day, Week, Agenda, or Month.
24.5 Modify Calendar Settings
In any Calendar view, press H and tap More > Settings.
You can then modify the following calendar view and reminder settings:
Hide declined events Tap to enable or disable
Set alerts & notification Select from Alert, Status bar notification and Off
Select ringtone Select a ringtone and tap OK.
Default reminder time Select from 10 minutes, 15 minutes, 20 minutes, 25
minutes, etc.
24.6 Add new event
1 In any Calendar view, press H and then tap More > New event to open event details
screen.
2 Tap on Event name edit box to launch the onscreen keyboard an d enter event name.
3 If there is a time frame for the event, tap From and To to set the date and time.
64
Page 81

Calendar
4 If it is a special occasion such as a birthday or a whole-day event, tap From to set
date, and then select All day check box.
5 Enter Event location and description.
6 If you have more than one calendar, tap the down arrow on the right of L-Calendar to
select the Calendar where you want to save the event.
7 Enter email addresses of Guests.
8 Select the frequency of event recurrence in Repetition and then select the event
reminder time in Reminders.
Note
To add another reminder, tap Add reminder +.
9 When finished, tap Done.
24.7 View, dismiss, or snooze a reminder
1 Tap on the status bar, then slide your finger down the screen to open the Notifications
panel.
2 Tap the upcoming event name to display the event.
Note
If you have other pending event reminders, these events will also appear on the screen.
3 Tap Snooze all to snooze all event reminders for five minutes.
4 Tap Dismiss all to dismiss all event reminders.
5 Press
B to keep the reminders pending in the notifications area of the status bar.
65
Page 82

Performing Calculations
25 Performing Calculations
You can use the Calculator to perform simple and advanced arithmetical calculations.
25.1 Open Calculator
Tap > Calculator.
25.2 Perform Calculations
• Tap on the numbers and mathematical operators to perform simple calculations.
• Press
tan, log etc.
• Press
• To clear calculation histories, press
H and tap Advanced panel to access advanced operators such as sin, cos,
H and tap Basic panel to return to basic numbers and mathematical operators.
H and tap Clear history.
66
Page 83

Downloading and Reading eBo oks
26 Downloading and Reading eBooks
Aldiko is an e-book reader application for Android devices. You can browse, shop,
download, read and organise eBooks right from the application.
The e-book reader supports Adobe DRMed ePub and PDF as well as non-encrypted
ePub and PDF formats.
26.1 Downloading and Reading eBooks
W ARNING!
Some books available for download contain subject matters that are not suitable for
children. Parental guidance is strongly advised for children under 18.
26.2 Open Aldiko
Tap > Aldiko.
- You will be presented with an opening message and tips on Aldiko when you open it
for the first time. Otherwise, Aldiko keeps the last open book and the last read
positions for all opened books.
26.3 Start reading
• Tap to select a book from the bookshelf to start reading.
• You can scroll through the pages by swiping your finger left to go to the next page and
swiping right to go to the previous page.
• You can also simply tap on the right side of the page to move forward and the left side
to move back.
• Alternatively, you can use the volume keys on your device to scroll through the pages.
Tap on the centre of the page to launch a series of options.
<: Tap < on the top left of the screen to return to the "home screen" of Aldiko where
you can access St ore, Bookshelf, SD card etc.
>: Tap >on the top right of the screen to search for words or phrases in the book you
are currently reading.
Location Bar: The location bar at the bottom of the page shows you how many pages
into the book you have read. You can move the bar to scroll through the book you are
reading.
Go To: Tap to jump to a particular point in the book.
67
Page 84

Downloading and Reading eBooks
Day/Night: Tap to toggle between Day view and Night view. It alternates the color of the
text and the color of the background depending on your preference.
Settings: Tap to adjust font, screen brig htness, orientation, etc.
More: Tap to share the book or access Help.
26.4 Buy Books
To browse the eBook store, select Store from the "home screen" of Aldiko.
Note
You will need to create an Aldiko account before you can purchase a book. You will also
presumably have to provide credit card details.
26.5 Download Free Books
To browse an eBook store, select Store from the "home screen" of Aldiko.
1 Tap to select your desired category.
2 Tap to select a book and tap Download.
- Your Voxtel Smart 3 begins to download the book in the background. Once the
download is complete, it will appear as New content in your Aldiko library.
26.6 Add eBooks from your SD card into your Library
1 Tap < and then select SD card.
2 Scroll through your SD card and select the checkbox next to the eBook you would like
to add. Then select Import to Aldiko (1).
Note
If you are importing Adobe DRM protected ePub and PDF files, you need to authorise
your Android Homephone with an Adobe ID before import. T o learn more about Adobe ID,
visit: http://www.adobe.com/products/digitaleditions/help/http://www . adob e. com/
products/digitaleditions/help/
68
Page 85

ES FILE EXPLORER
27 ES FILE EXPLORER
ES File Explorer is a free file manager for Android devices. It allows you to browse files
and folders stored on your Voxtel Smart 3, memory card, LAN and FTP.
You can also copy/paste, rename, delete, create folder, send file as email attachment
features using ES File Explorer.
27.1 Open ES File Explorer
Tap > ES File Explorer.
Tap to browse the files and folders in your Voxtel Smart 3 or memory card.
Tap to go to the root directory.
Tap to search for files or folders.
Tap to go to the previous directory or folder.
For more information on the short cut keys, tap for help.
27.2 Open file as
1 Tap and hold the file you wish to open.
- A pop-up menu appears.
2 Tap Open As and select Text, Audio, Video or Image.
27.3 Select all files in a directory
1 Go to the directory that you want to select all files.
2 Press
H, tap Operations > Select All.
27.4 Create a new folder
1 In the SD card directory, go to the location that you wish to create a new directory.
2 Press
H, then tap New.
3 Tap to select Folder.
4 Enter Folder Name and tap OK.
Note
You can only create new folders in the SD card directory.
69
Page 86

ES FILE EXPLORER
27.5 Rename a file
1 Tap and hold the file you wish to rename.
- A pop-up menu appears.
2 Tap Rename.
3 Enter the new file name and tap OK.
27.6 Copy a file to another location
1 Tap and hold the file you wish to copy.
- A pop-up menu appears.
2 Tap Copy to copy the file.
3 Go to another folder or directory that you wish to place a copy of the file.
4 Press
H and tap Operations > Paste to paste the fi le into the new location.
27.7 Move a file to another location
1 Tap and hold the file you wish to move.
- A pop-up menu appears.
2 Tap Cut.
3 Go to the folder or directory that you wish to place the file.
4 Press
H and tap Operations > Paste to paste the fi le into the new location.
27.8 Delete a file
1 Tap and hold the file you wish to delete.
- A pop-up menu appears.
2 Tap Delete and tap OK to delete the file.
27.9 Compress a file
1 Tap and hold the file you wish to compress.
- A pop-up menu appears.
2 Tap Compress.
3 Enter a name for the compress file, select the compression mode and tap OK.
70
Page 87

ES FILE EXPLORER
27.10 View file details
1 Tap and hold the file you wish to view details.
- A pop-up menu appears.
2 Tap Properties.
3 Tap OK to close the information box.
27.11 Modify View Settings in ES File Explorer
1 In ES File Explorer window, press H and tap Settings.
2 You can then modify the follow settings:
• Theme Settings
• Layout Settings
• File Settings
• View
• Size
• Sort By
• Home Directory
• App Backup Directory
71
Page 88

Install apps
28 Install apps
You can install Apps (usually in .apk format) into your Voxtel Smart 3 with a Micro-SD
Card.
1 Copy the Apps files into a Micro-SD card
2 Insert the Micro-SD card into the card slot of the handset
3 Run ES File Explorer.
4 Select the Apps inside the SD card and tap twice to run the Installation.
Note
You may be prompted to enable Unknown sources in Settings > Applications. Tap
Unknown sources to enable downloading of non-Market applications (see "Downloading
web applications" on page 41 for details).
5 Tap Install to install the application.
72
Page 89

Connect your handset to a computer
29 Connect your handset to a computer
You can transfer you pictures, videos, music, ringtones and application from your
computer to either the Micro-SD card or Internal Phone Memory.
WARNING
When connecting your phone to a computer and mounting its SD card, you must follow
your computer’s instructions for connecting and disconnecting USB devices to avoid
damaging or corrupting the files on your SD card.
1 Connect one end of the Micro-USB cable to the handset and the other end to the USB
port on your Computer.
- A pop up window appears on the screen.
- If the window did not appear, drag down the status bar and then tap USB Conn ected.
2 Tap Turn on USB Storage.
- After a few seconds, USB storage in use appears.
3 On My Computer windows, a new device NANDStorage is displayed. This is the
internal Phone memory.
- You can store data in the Android folder of NANDStorage.
- If a Micro-SD card is inserted into the handset, you will find another device
Removable Disk in My Computer windows.
4 After you have finished the data transfer/access, tap Turn off USB storage on the
handset to disconnect.
73
Page 90

ES Task Manager
30 ES Task Manager
This Android program helps you free memory, kill task, close all the running applications,
and speed up your Voxtel Smart 3.
30.1 Open ES Task Manager
1 Tap > ES Task Manager.
- A list of current tasks is displayed.
2 To clear a selected task, tap on the task and then tap Kill Selected button.
3 Tap Refresh to display all current tasks again.
4 Tap Kill All to clear all current tasks.
74
Page 91

Settings
31 Settings
From the home screen, press H and then tap Settings. You can modify the different
settings of your Voxtel Smart 3.
Wireless &
networks
Call settings Set up voicemail.
Dect Settings View and configure base station and handset settings.
Sound Set the phone and notification ring tones, silent mode, etc.
Display Set screen calibration, brightness and screen timeout, etc.
Security Set screen unlock pattern or manage the phone's credential
Applications Manage applications and install new programs.
Accounts & sync Select background data, auto-sync and add sync accounts.
Privacy Factory data reset
Storage Check the available storage card and phone memory, mount or
Language &
keyboard
Voice input &
output
Configure your phone's wireless connections, such as Wi-Fi.
storage lock.
unmount SD card.
Select locale (language and region), text input and auto-
correction, etc.
Configure Text-to-speech settings
Dock Enable or disable dock insertion sound.
Date & time Set date, time, time zone & formats.
About phone Select this if you want to upgrade Firmware through memory
Card and view legal info, phone status and software version.
75
Page 92

HELP
32 HELP
My Voxtel Smart 3 does not turn on.
• Make sure the power adapter is securely connected
• Make sure you are using the power adapter that was included with your Voxtel Smart 3.
• Make sure the Voxtel Smart 3 is turn ed on .
My Voxtel Smart 3 does not recog nise the memory card.
• Make sure you have inserted a certified memory card.
• Make sure you have inserted the memory card correctly.
• See page 5 on how to insert a memory card.
My Voxtel Smart 3 shows a low-battery warning
• The Voxtel Smart 3 is low on power and needs to be charged before you can use it.
• See page 4 on how to charge your Voxtel Smart 3.
I cannot send or receive emails or access the web
• Check the wireless signal indicator in the status bar at the top of the screen. If there is
no signal, you are not connected.
I cannot make or receive calls
• You r Voxtel Smart 3 may not be registered to a base station.
• Check if the telephone cord and power adaptor are connected properly.
The display freezes or does not respond
• Turn the Voxtel Smart 3 off and turn it on again.
is not scrolling when the handset is placed on the base station
• Incomplete battery contact - adjust the handset on the base station.
• Dirty contact - clean the battery contact by wiping with an alcohol moistened cloth.
• Battery is full - charging is not necessary at this time.
There is no sound when the headset is connected to the Voxtel Smart 3
• Unplug and reconnect the headset. Make sure that the connector is pushed in all the
way.
• The volume may be deactivated or set too low.
76
Page 93

HELP
I cannot register my Voxtel Smart 3 to the base station
Try resetting the base station. You can do this by:
• Holding the Page button on the base station for about 9 seconds until the T alk/Message
LED blinks.
• Release the Page button and press it again immediately.
• The Talk/Message LED light should light up once more.
• Register your Voxtel Smart 3 to the base station. See page 19 on how to register your
Voxtel Smart 3 to the base station.
My email could not be delivered due to connection to the server on port 25 timed
out
• You may need to change the port setting on an outgoing mail server for one of your
email accounts.
I cannot access Internet radio broadcast
• Your Voxtel Smart 3 must join a Wi-Fi network that is connected to the Internet.
• For information about joining a Wi-Fi network, see page 36.
Interference
• Noise interference on your radio or television
• Your base station may be too close. Move it as far away as possible.
There is no dial tone
• You r Voxtel Smart 3 may not be registered to a base station.
There is no ring tone
• The ring tone is deactivated.
• Increase the volume.
Caller ID does not work
• Check your subscription with your network operator.
• If you subscribe to high-speed Internet service (Digital Subscriber Line - DSL) through
your telephone lines, you must install a DSL filter between the base and the telephone
wall jack. The filter will prevent noise and caller ID problems caused by DSL
interference. Please contact your DSL service provider for more information about DSL
filters.
A new contact cannot be stored
• The contacts list is full. Delete an entry to free memory.
77
Page 94

HELP
If the handset disconnects from the base during a phone call
• Check that the power adapter is connected properly into the electrical outlet.
• You may have moved out of range of the base. Move closer to the base.
32.1 Guarantee and Service
The phone is guaranteed for 24 months from the date of purchase shown on your sales
receipt. This guarantee does not cover any faults or defects caused by accidents, misuse,
fair wear and tear, neglect, faults on the telephone line, lightning, tampering with the
equipment, or any attempt at adjustment or repair other than through approved agents.
Please keep your sales (till) receipt this is your proof of guarantee.
32.1.1 While the unit is under Guarantee
1 Disconnect the base unit from the telephone line and the mains electricity supply.
2 Pack up all parts of your phone system, using the original package.
3 Return the unit to the shop where you bought it, making sure you take your sales
receipt.
4 Remember to include the mains adapter.
32.1.2 After the Guarantee has expired
If the unit is no longer under Guarantee, contact us via: www.aegtelephones.eu
This product works with rechargeable batteries only. If you put nonrechargeable batteries
in the handset and place it on the base, the handset will be damag ed and this in NOT
covered under the warranty conditions.
78
Page 95

HELP
32.2 Technical Specifications
DECT frequency band 1880 MHz - 1900 MHz
Channels 120
Operating Temperature 5ºC to 45ºC
Storage
Temperature
Power Adaptor Input : 200-240VAC 50Hz 0.3A
Handset Battery 3.7V 910mAh Li-ion Rechargeable Battery Pack
Screen Size 3.2"
Backlight LED
Panel Resolution 400 x 240
Supported Memory Card
Type
Micro-USB Port Included
Headphone 3.5mm jack
Handset Speaker 1W 8ohm
Base Speaker Stereo system with 2pcs of 1.5W 8ohm speakers
Wi-Fi connection 802.11b/g/n
-20ºC to 60ºC
Output 1 : 5.8VDC 600mA
Output 2 : 5.8VDC 1000mA
Micro-SD
79
Page 96

32.3 CE Declaration
This product is in compliance with the essential requirements and other relevant
provisions of the R&TTE directive 1999/5/EC.
The Declaration of conformity can be found on: www.aegtelephones.eu
HELP
80
Page 97

© 2012 Binatone Electronics International Limited
All rights reserved
Subject to avaibility. Rights of modification reserved.
AEG is a registered trademark used under license from AB Electrolux (publ)
www.aegtelephones.eu
 Loading...