

Page 1
QUICK USER GUIDE
UK DE FR NL
CORDLESS
TELEPHONE
Voxtel D555
Voxtel D555 twin
Voxtel D555 triple
V4
Page 2
2
P1 P2
1
2 6
3 7
4
5
10
11
8
9
P3
P4 P5
15 16
12
13
14
17
18
Page 3

1 BECAUSE WE CARE
3
Thank you for purchasing this product. This product has been designed
and assembled with utmost care for you and the environment. This is
why we supply this product with a quick installation guide to reduce
the number of paper (pages) and therefor save trees to be cut for
making this paper. A full and detailed user guide with all the features
descripted can be found on our website www.aegtelephones.eu.
Please download the full user guide in case you want to make use of
all the advanced features of your product. To save the environment we
ask you not to print this full user guide. Thank you for supporting us to
protect our environment.
2 IMPORTANT SAFETY INSTRUCTIONS
When using your telephone equipment, basic safety precautions
should always be followed to reduce the risk of fire, electric shock and
UK
injury, including the following:
1. Read and understand all the instructions.
2. Follow all warnings and instructions marked on the product.
3. Unplug this product from the wall outlet before cleaning. Do
not use liquid cleaners or aerosol cleaners. Use a damp cloth for
cleaning.
4. Keep your phone away from hot, humid conditions or strong
sunlight, and don‘t let it get wet or use this product near water (for
example, near a bath tub , kitchen sink, swimming pool).
5. Do not overload wall outlets and extension cords as this can result
in the risk of fire or electric shock.
6. Unplug this product from the wall outlet and refer servicing to our
Repair Centre under the following conditions:
tWhen the power supply cord or plug is damaged.
tIf the product does not operate normally by following the
operating instructions.
tIf the product has been dropped and the cabinet has been
damaged.
tIf the product exhibits a distinct change in performance.
7. NEVER use your phone outdoors during a thunderstorm-unplug
the base from the telephone line and the mains socket when there
Page 4

4
are storms in your area. Damage caused by lightning is not covered
by the guarantee.
8. Do not use the telephone to report a gas leak in the vicinity of the
leak.
9. Use only the supplied NiMH (Nickel Metal Hydride) batteries! The
operation periods for the handsets are only applicable with the
default battery capacities
10. The use of other battery types or non-rechargeable batteries/
primary cells can be dangerous. These may cause interference
and/or damage to the unit or surroundings. The manufacturer will
not be held liable for damage arising from such non-compliance.
11. Do not use third party charging bays. Damage may be caused to
the batteries.
12. Please ensure the batteries are inserted in the correct polarity.
13. Dispose of batteries safely. Do not immerse them in water, burn
them, or put them where they could get punctured.
3 INTENDED USE
This telephone is intended to be connected to a public analogue
telephone network or to an analogue extension of a compatible PBX
system.
4 UNPACKING YOUR PHONE
The package contains the following items:
t1 Handset
t1 Base station
t1 Mains power adapter
t1 Telephone line cord
t2 Rechargeable batteries
t1 User manual
Note:
If you have a Twin, Triple or Quad system, you will also have the extra
handset(s), batteries and a charger pod for each extra handset.
Page 5
5
K
K
K
K
Handset - Base connection
tWhen purchased, all handset are already registered to the base unit..
tTo use your handset and base together, you must be able to establish
a radio link between them. The signal between the handset and the
base is in accordance with the normal standards for a DECT phone:
Maximum range up to 300 metres outdoors or 50 metres indoors.
tThe signal range may decrease if there is any large metal object
between the handset and the base, such as a refrigerator, a mirror,
a filing cabinet, metallic doors or reinforced concrete. The signal
strength may also be reduced by other solid structures like walls, or
by other radio or electrical interference.
tDo not place the handset or base close to another telephone, a TV
or audio equipment - they may cause interference.
UK
5 SET THE HANDSET LANGUAGE
tPress
tPress
tPress
tPress
and / to select “HS SETTINGS”.
O
and / to select “LANGUAGE”.
O
and / to select the desired language.
O
to confirm.
O
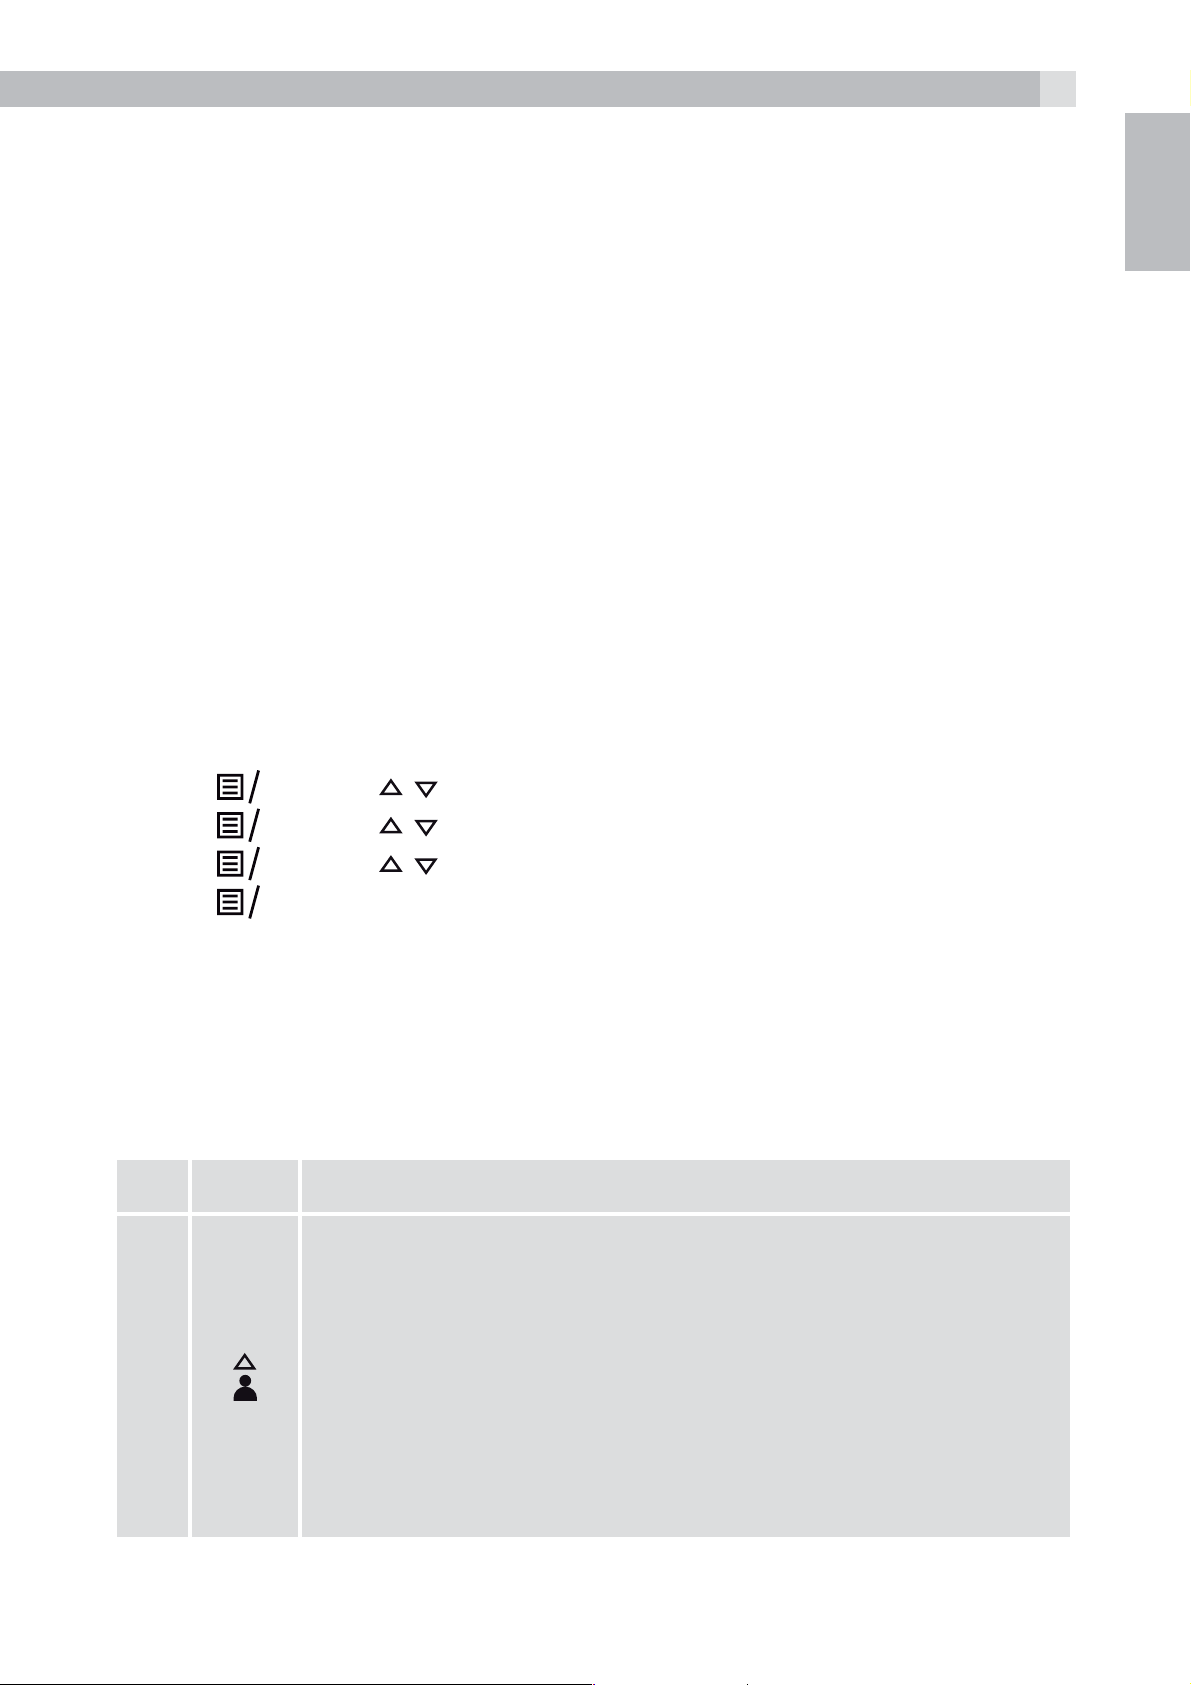
6 GETTING TO KNOW YOUR PHONE
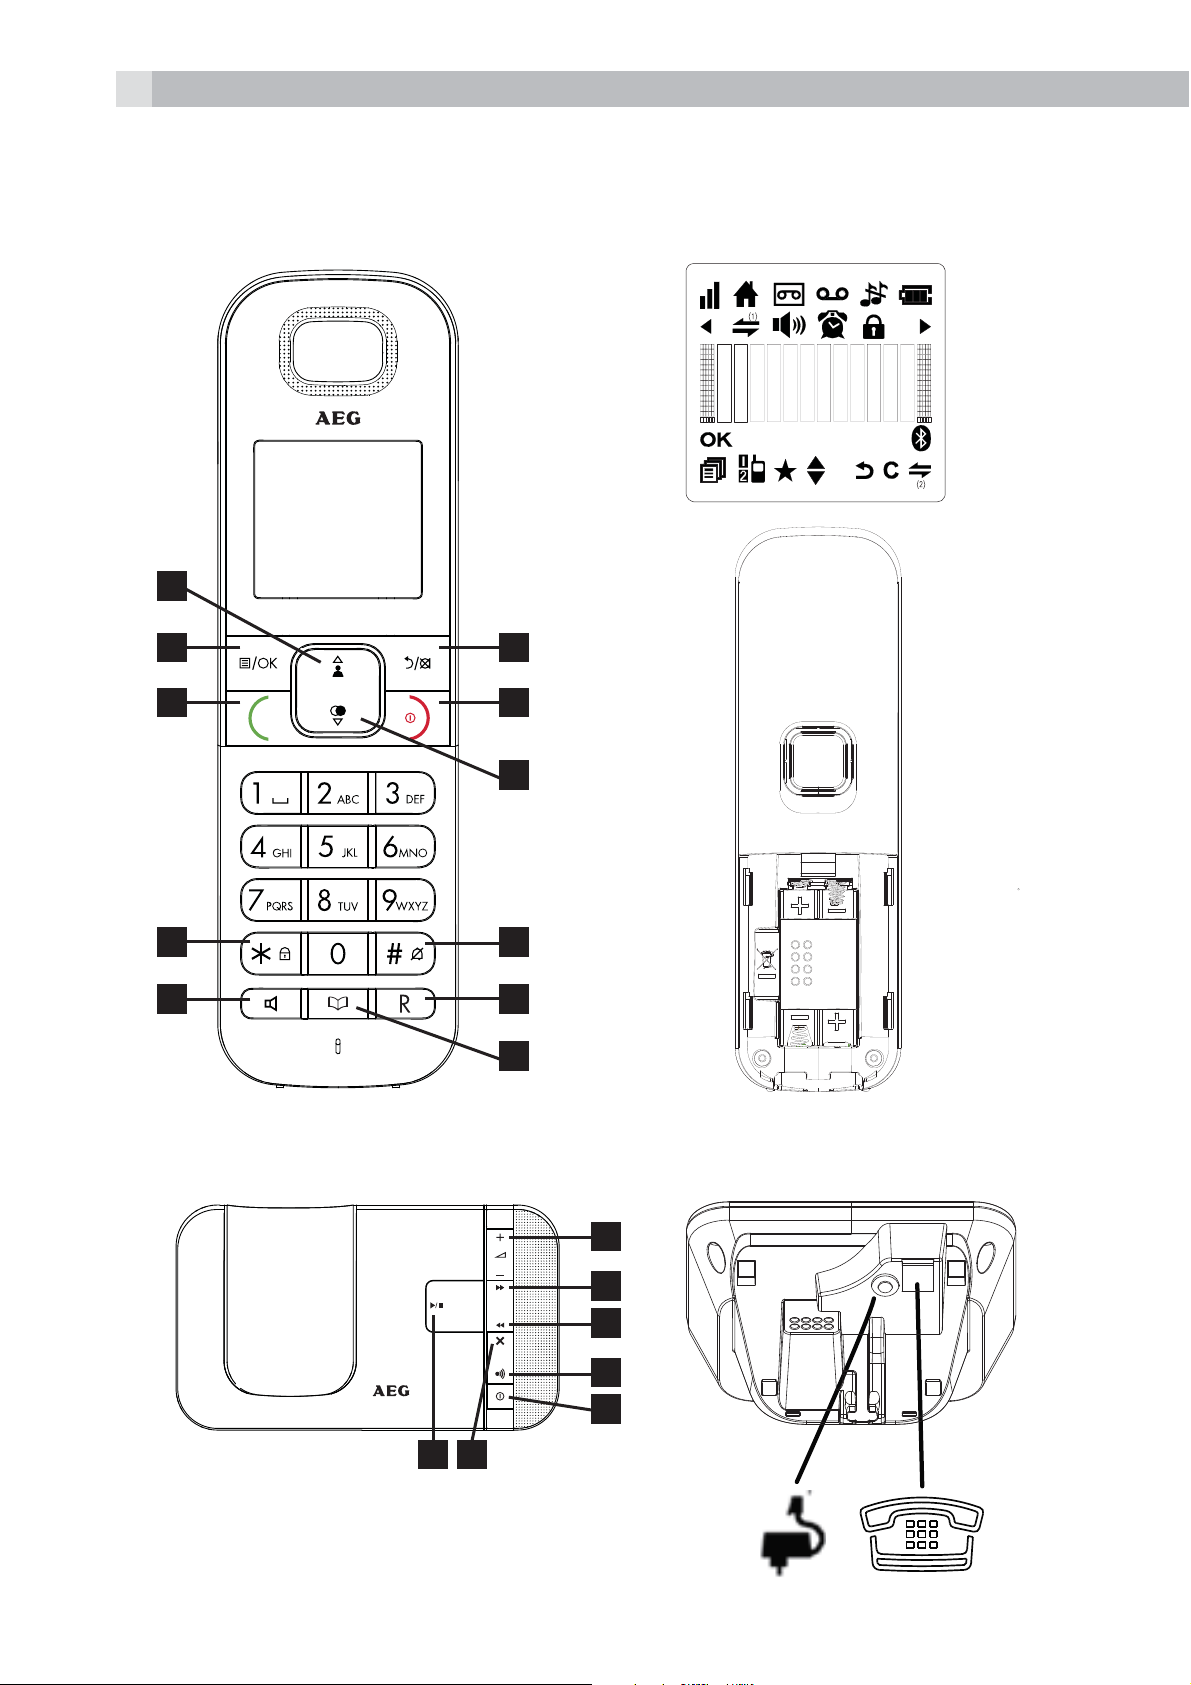
6.1 Handset overview (see P1)
# Meaning
Up
tIn idle mode: Press to access the call list
tIn menu mode: Press to scroll up the menu items
tIn Phonebook list / Redial list / Call List: Press to
1
scroll up the list
tDuring a call: Press to increase the earpiece or
speaker volume
tDuring ringing: Press to increase the ringer volume
Page 6

6
K
Left soft key (Menu/OK)
tIn idle mode: Press to access the main menu
2
3
4
O
tIn sub-menu mode: Press to confirm the selection
tDuring a call: Press to access Intercom/Phonebook/
Redial List/ Call List
Off Hook
tIn idle / predialling mode: Press to make a call
tIn Redial list / Call List / Phonebook list: Press to
make a call to the displayed entry.
tDuring ringing: Press to answer a call
Keypad Lock
tPress and hold to lock/unlock keypad.
tPress and hold to conference between the external
and internal calls when both are set up.
Speakerphone
tDuring a call: Press to turn on / off the speakerphone.
5
6
tCall List / Phonebook entry : Press to make a call
with speakerphone
tDuring ringing: Press to answer a call with
speakerphone
Right soft key (clear/back/mute/intercom)
tIn main menu mode: Press to go back to idle screen
tIn sub-menu mode: Press to go back to previous
level
tIn sub-menu mode: Press and hold to go back to
idle screen
tIn editing / predialling mode: Press to clear a
character / digit
tIn editing / predialling mode: Press and hold to
delete all the characters / digits
tDuring a call: Press to mute/unmute the microphone
tIn idle mode:Press to intercom another handset
Page 7
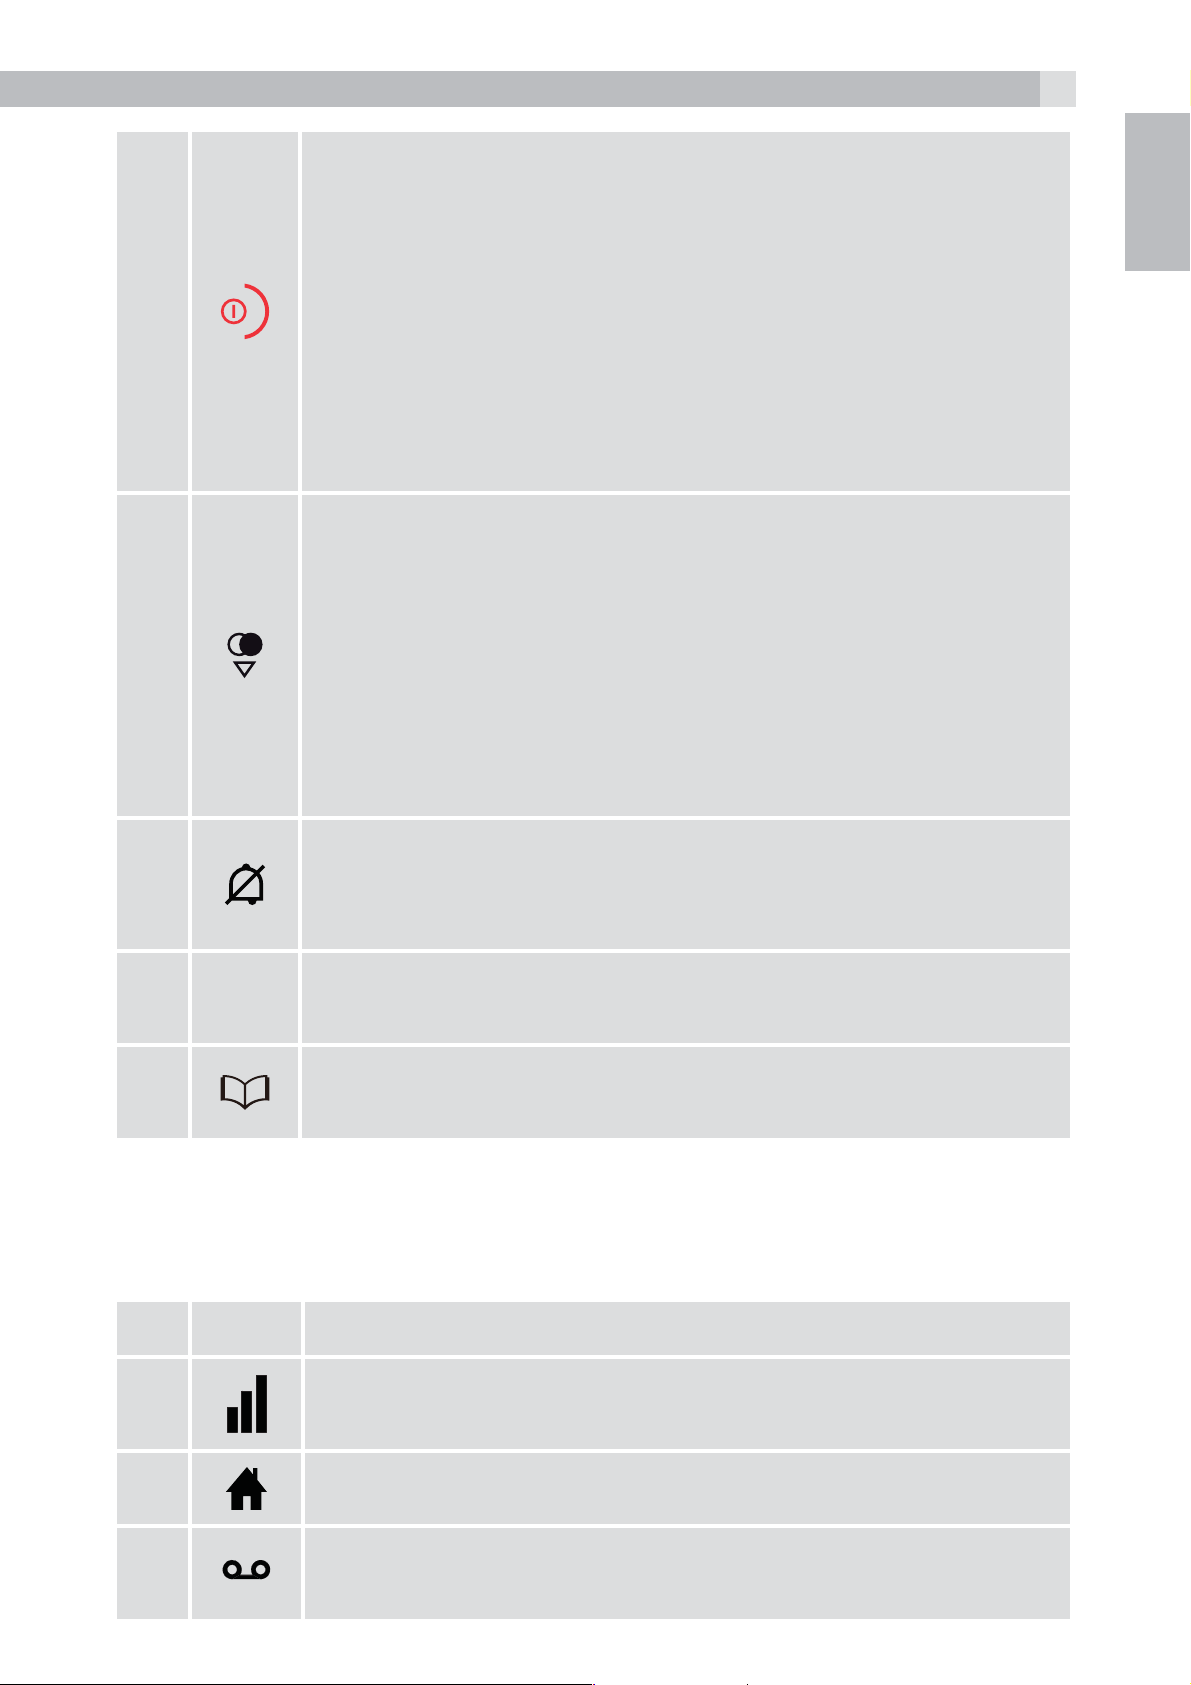
On Hook / ON
7
7
8
tDuring a call: Press to end a call and go back to idle
screen
tIn menu / editing mode: Press to go back to
previous menu
tIn idle mode: Press and hold to power off the
handset
tIn idle mode (when the handset is powered off):
Press and hold to power on the handset.
Down/Redial list
tIn idle mode: Press to access the redial list
tIn menu mode: Press to scroll down the menu items
tIn Phonebook list / Redial list / Call List: Press to
scroll down the list
tDuring a call: Press to decrease the earpiece or
speaker volume
UK
tDuring ringing: Press to decrease the ringer volume
Ringer Off
9
10
11
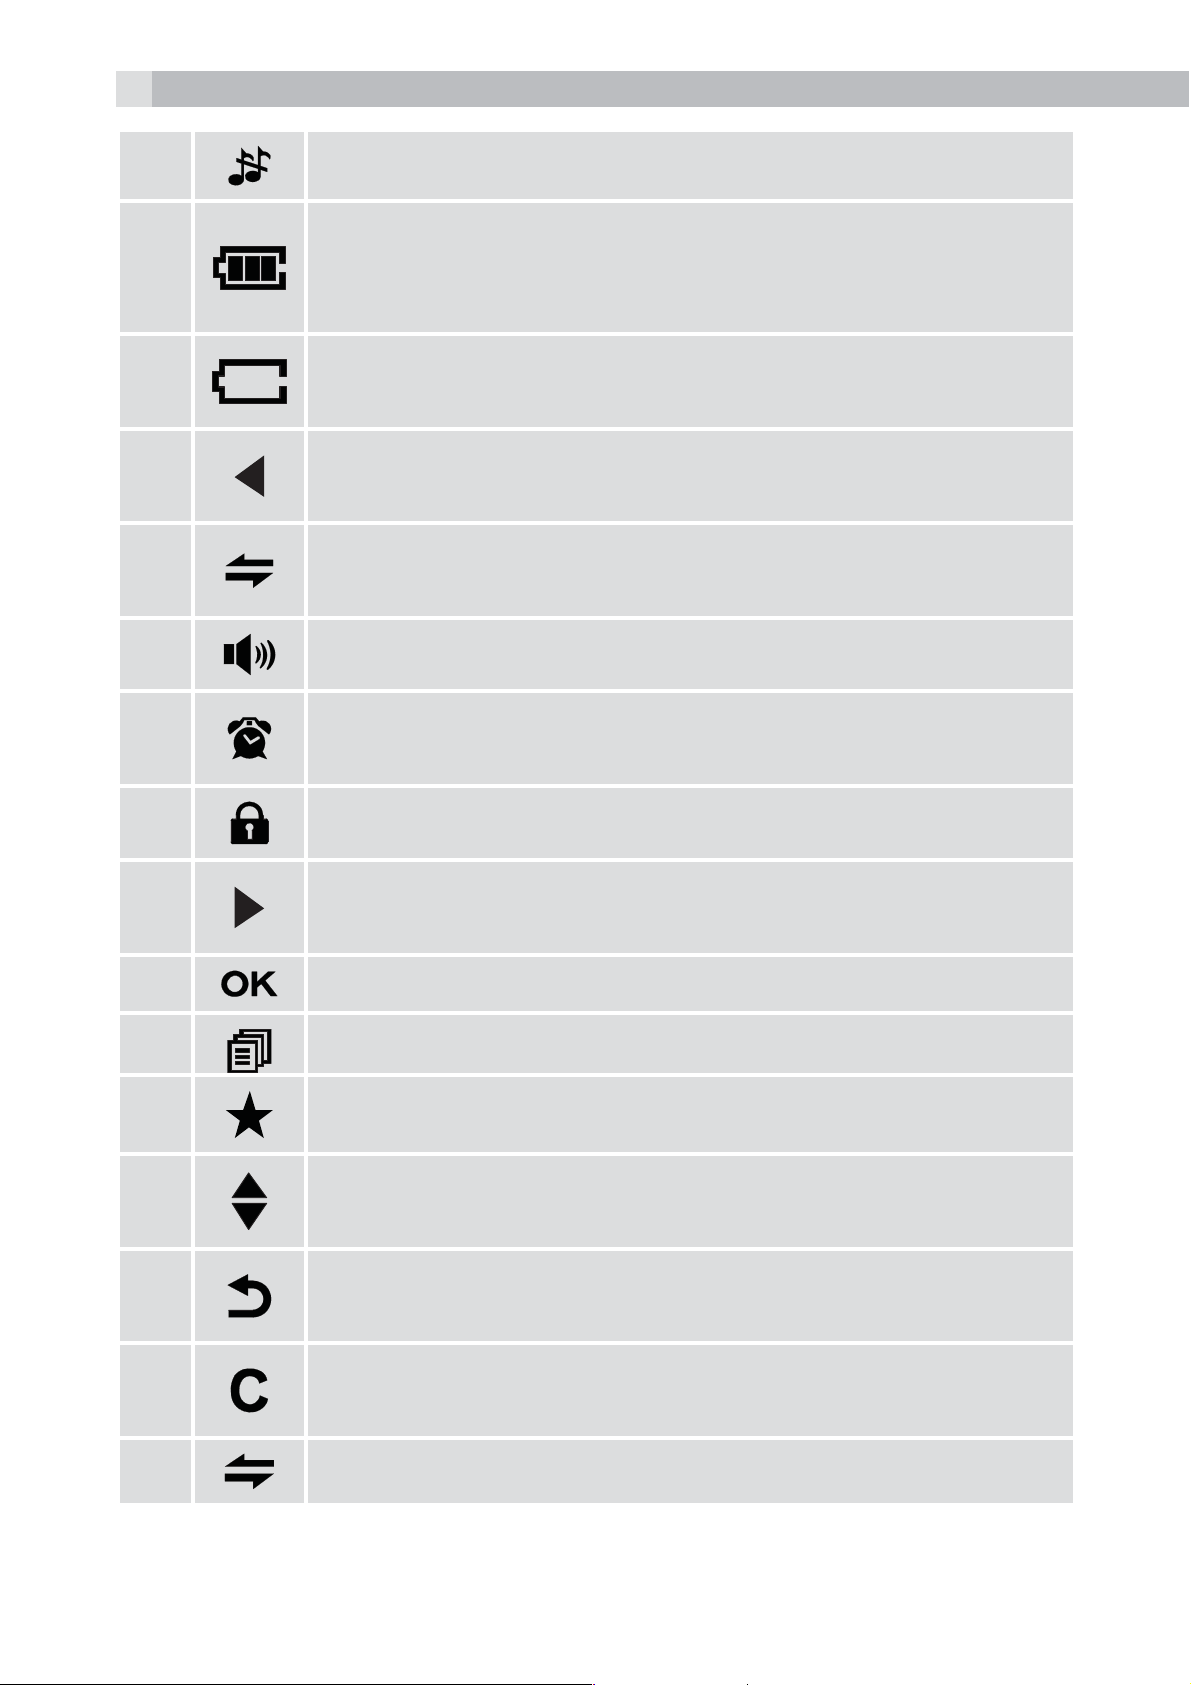
6.2 Cordless handset display (see P2)
The LCD display gives you information on the current status of the
telephone.
# Meaning
R
tPress and hold to turn the handset ringer off or back
on.
Flash key
tDuring a call: press to generate flash signal
Phonebook / Contacts List
tPress to access the contacts list.
Steadily on when the handset is in range of the base.
More bars indicate a stronger signal.
Indicates a call is in progress on that handset.
Indicates when you have a new Voice Mail message.
This is a network service please check with operator.
Page 8
8
Indicates that the handset ringer is switched off.
Indicates when the battery is fully charged.
The internal segments cycle when the battery is
charging.
Indicates when the battery needs charging.
Flashes when low battery power level is detected.
Indicates when there are more characters or numbers
in front of those being displayed.
(1) Steadily on when an intercom is in progress.
Flashes when there is an incoming internal call.
Indicates the handsfree/speakerphone mode
Steadily on when an alarm is set.
Flashes when the alarm is sounding.
Indicates that the keypad is locked.
Indicates when there are more characters or numbers
after those being displayed.
Press to confirm the current selection if applicable.
Press to access the main menu.
Indicates new call in the call list.
Indicates more options available in lists, above or
below.
Press to go back to previous menu level or cancel the
current action if applicable.
Press to clear a character, stop the alarm if applicable
or to mute / unmute the microphone during a call.
(2) Press to start an intercom call.
Page 9
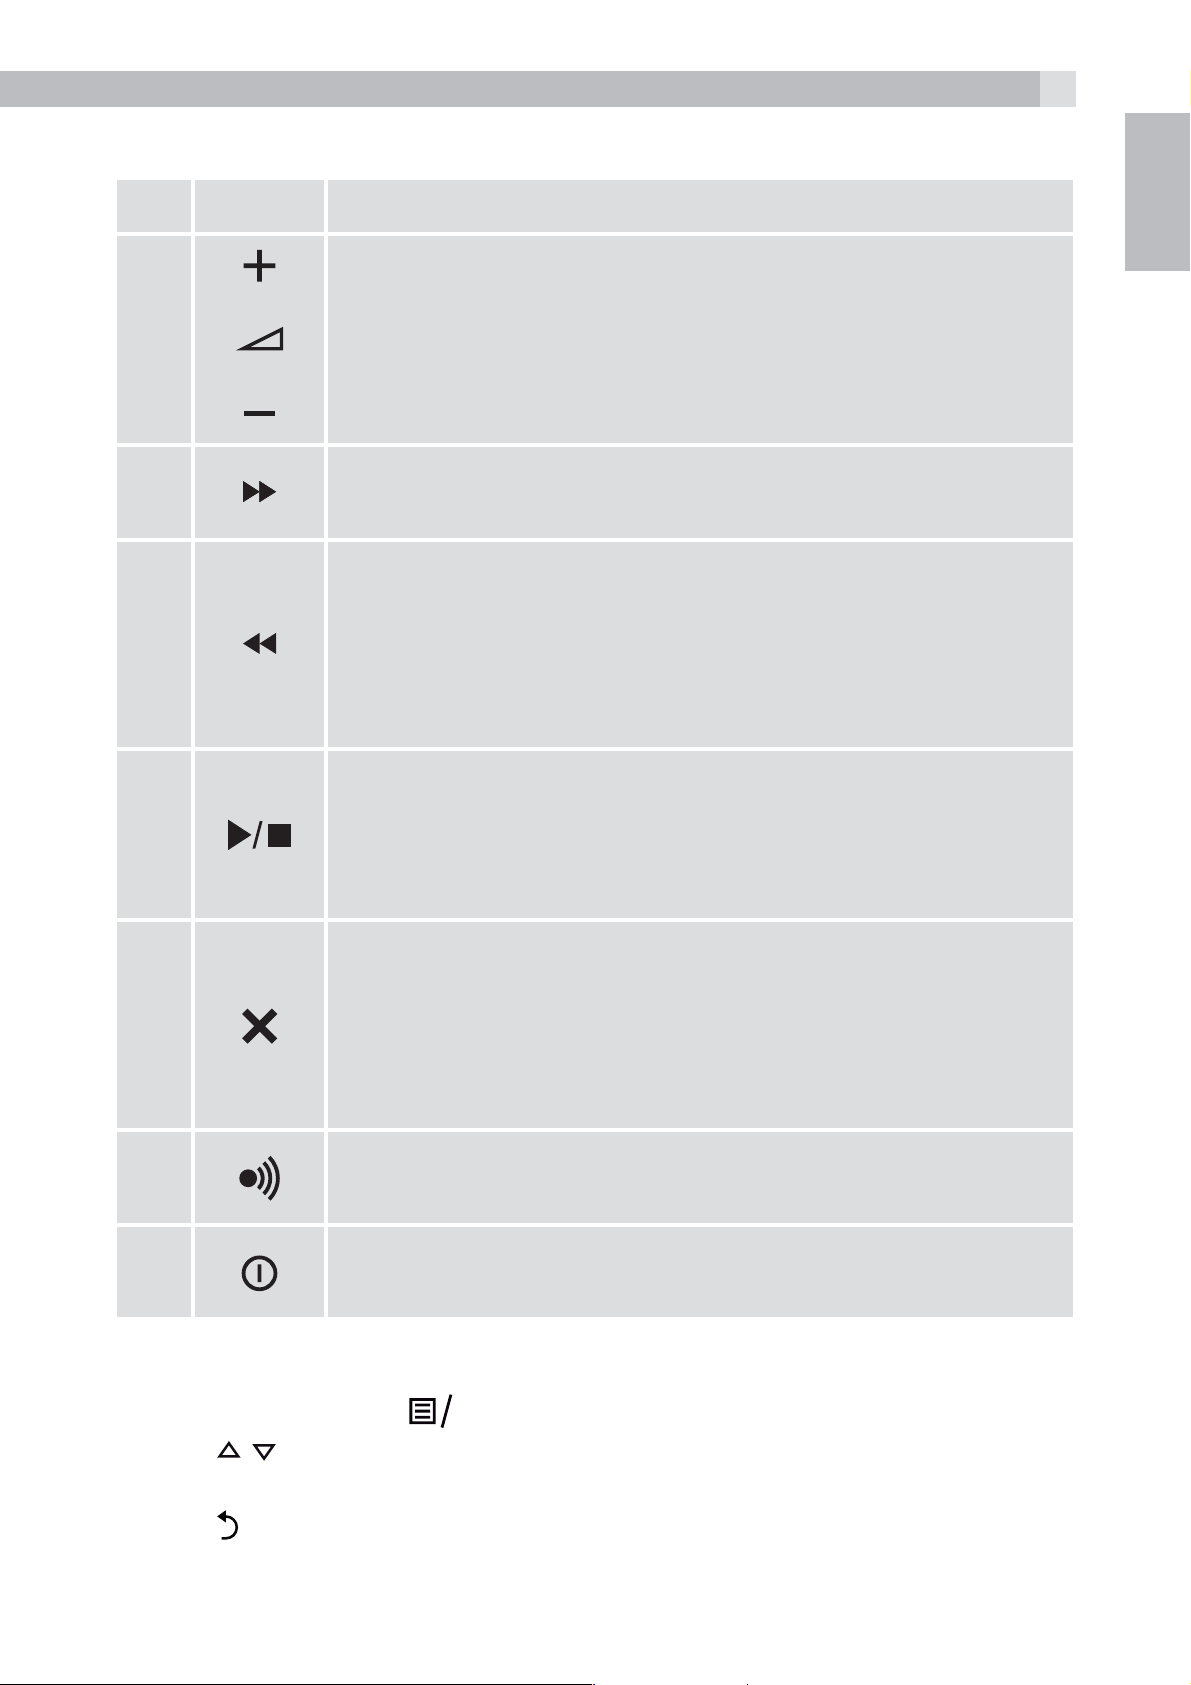
6.3 Corded base station
K
9
# Meaning
Vol - / Vol +
Press to decrease or increase the speaker volume
12
13
14
during voice message playback.
Skip forward
Press to skip to a message during playback.
Skip backward
Press once to repeat playing the current message
from the beginning.
Press twice to skip backward to play the previous
message.
Play/Stop
UK
15
16
17
18
6.4 Menu structure
Press to play the messages.
During message playback, press to stop the
playback.
Delete
Press once to delete the voice message during
playback.
Press and hold to delete all old messages in idle.
mode
Page
Press to page all the registered handsets.
On/off
Press to turn on the answering machine ON/OFF.
tIn idle mode, press
tPress
tPress
tPress
/ to go to other options in the menu list.
to enter a sub-menu or function.
to go back to the previous level
to go t in the menu list.
O
Page 10

10
6.5 Text and digit entry
In editing mode, a cursor is displayed to indicate the current text entry
position. It is positioned at the right of the last character entered.
Writing tips:
tOnce a character is selected, the cursor will move to the next
position after a short pause.
tYou can move the cursor within the text with the
the text entry.
tPress
tPress and hold
to delete the last character.
to delete the entire text string.
/ keys to amend
7 INSTALLING YOUR PHONE
7.1 Connecting the base station (see P5)
tPlug the power supply and line cord into the base station.
tPlug the power adapter into a 100 - 240V, 50 - 60Hz mains socket and
the line cord into your telephone line socket.
tAlways use the cables provided in the box
Warning:
Use only the provided adaptor, using other power supplies may cause
a hazard.
Install the base unit in a position where the mains adapter plug will
reach an easily accessible mains socket. Never try to lengthen the
mains power cable.
Note:
The base unit needs mains power for normal operation, not just for
charging the handset batteries.
7.2 Installing and charging the batteries (see P3)
tPlace the 2 supplied batteries into the battery compartment with the
polarity markings as shown. Use only the NiMH rechargeable battery
type provided.
tPosition the battery compartment cover over the batteries and slide
up to click into place.
Page 11
11
K
K
tPut the handset on the base and charge for 15 hours before using
the handset for the first time. The handset will give a beep when it is
properly placed on the base or charger.
8 USING YOUR PHONE
8.1 Make a call
8.1.1 Preparatory dialing
UK
Enter the phone number (up to 24 digits) and press
to line and dial the number. When entering the number, if you make a
mistake, press
8.1.2 Direct dialling
Press
Note:
If you enter a wrong digit, you cannot correct it with the
8.1.3 Call from the phonebook
tPress
desired phonebook entry.
tPress
Notes:
or to connect to the line and then enter the phone number.
to access the phonebook and press / to select the
or to dial out the selected phonebook entry.
>You can also access the phonebook by pressing
to delete digits.
or to connect
key.
, ,
O
.
>The alphanumeric keys provide a short-cut to find entries
beginning with the corresponding letters.
8.1.4 Call from the call list (only available with Caller Display)
tPress
call list entry.
tPress
Note:
You can also access the Call List by pressing
to access the call list and then press / to select the desired
or to dial out the selected call list entry.
twice
O
Page 12

12
8.1.5 Call from the redial list
tPress
desired redial number.
tPress
8.1.6 Call timer
Your handset automatically times the duration of every call.
The call timer is displayed as soon as you answer a call or press the
key and remains on the screen for 5 seconds after the end of the call. It
is shown in hours, minutes and seconds format (HH:MM:SS).
8.2 Answer a call
If handset is not on the charging cradle:
tWhen the phone rings, press
Note:
If AUTO ANSWER is set to ON, then lifting the handset off the base or
to access the redial list and then press / to select the
or to dial out the selected redial number.
or to answer a call:
charger will answer the call automatically, and no buttons need to be
pressed.
8.3 End a call
tDuring a call press
OR
tPut the handset on the base station or charger to end the call.
8.4 Handset speakerphone
During a call, you can press
speakerphone and normal handset use.
8.5 Adjust the earpiece or speakerphone volume
There are 5 levels (VOLUME 1 to VOLUME 5) to choose from for each
of the earpiece and speakerphone volumes.
to end the call.
to alternate between hands-free
During a call:
tPress
When you end the call, the setting will remain at the last selected level.
8.6 Turn off the handset ringer
tIn idle, press
appears on the display.
/ to select volume 1-5. The current setting is shown.
and hold to turn off the handset ringer. The icon
Page 13
13
Note:
The display will still flash the Call icon and show Incoming call or the
Caller Display number, when there is an incoming call, even if the
ringer is turned off.
UK
tTo turn the ringer back on, press and hold
8.7 Turn on the keypad lock
In idle, press and hold
appears on the display.
Note:
You can still use
To turn the keypad lock off, press and hold
8.8 Redial the last number
You can redial any of the 10 last numbers called. If you have stored
a name in the phonebook to go with the number, the name will be
displayed instead.
The most recent last number will display at the top of the redial list.
to answer a call when the handset is ringing.
to turn off the keypad lock. The icon
again.
again.
8.8.1 Redial a number from the redial list
tIn idle mode, press
Note:
If the redial list entry shows a name, press #
this entry.
tPress
tPress
Note:
If there are no numbers in the redial list, the display shows “EMPTY”.
8.9 Find the handset
You can locate the handset by pressing
handsets registered to the base will produce the paging tone and
/ to browse the redial list.
to dial to the selected redial number.
to access the redial list.
to view the number of
on the base station. All the
show “PAGING” on the display. You can stop the paging by pressing
/ / on any handset or on the base again.
Page 14

14
K
Note:
If there is an incoming call during paging, the phone will ring with the
incoming call instead of paging.
9 PRIVATE PHONEBOOK
Each handset can store up to 50 private phonebook entries with
names and numbers. Each phonebook entry can have a maximum of
24 digits for the phone number and 14 characters for the name. You
can also select different ringtones for your phonebook entries.
Note:
The different ringtones only play when you receive a call if you
subscribe to Caller Display and the incoming number matches the
stored number.
Phonebook entries are stored alphabetically by name.
9.1 Add a new phonebook entry
In idle:
tPress
tPress
tPress
tPress
tPress
phonebook entry from the 10 ringtones available.
tPress
9.2 Search for a phonebook entry
In idle:
tPress
to access the phonebook
to show “ADD”.
OK
and then enter the name.
OK
and then enter the number.
OK
and / to select the desired ringtone for your
O
to store the phonebook entry.
OK
to access the phonebook.
OR
tPress
to access the phonebook.
tEnter the first letter of the name using the alphanumeric keys (e.g. if
it begins with C, press the 2 key three times), and then
to the entry you want.
and / to select “CONTACTS” and then press
OK
/ to scroll
OK
Page 15
9.3 Edit a phonebook entry
K
K
K
K
15
In idle:
tPress
tPress
tPress
tPress
tEdit the name and press
tEdit the number and press
tPress
9.4 Delete a phonebook entry
In idle:
tPress
tPress
tPress
tPress
to access the phonebook.
/ to select the desired phonebook entry.
and then / to select “EDIT“.
O
to display the current name.
O
.
OK
.
OK
/ to change the ringtone and press
to access the phonebook.
to select the desired phonebook entry.
and then / to select “DELETE“.
O
to confirm, and the entry will be deleted.
O
to confirm.
OK
UK
10 CALLER DISPLAY (NETWORK DEPENDENT)
This feature is available if you have subscribed to the Calling Line
Identification service with your network service provider. Your phone
can store up to 20 received calls with date/time information in the
Call List. The number will be shown on the handset display when the
phone is ringing. If the number matches with one of the entries in your
Private Phonebook, the caller’s name stored in the private phonebook
will be displayed alternately with the number, and the handset will ring
with the ringtone associated with that phonebook entry.
If the call is from someone who withheld their number, “WITHHELD”
will display.
If the call is from someone whose number is unavailable, e.g. an
international call or from a private exchange, “UNAVAILABLE” will
display.
If you’ve got new Caller Display records, the handset will display “1
NEW CALL” or “X NEW CALLS” ( for x=2 to 20) in standby mode.
The New Calls indication will remain until all the new call records have
been viewed on that handset.
Page 16

16
K
K
K
10.1 View the call list
All received calls are saved in the Call List with the latest call at the
top of the list. When the call list is full, the oldest call will be replaced
by a new call. Any unanswered calls which have not been viewed are
marked with a
tPress
tPress
tPress # to view the caller’s number if applicable.
tPress
the date and time of the call with the name or number. Press # to see
more of the name or number, if necessary. Press
to the previous screen.
10.2 Delete an entry in the call list
tFollow Steps 1 and 2 in Section 10.1.
tPress
tPress
to access the call list.
/ to select the desired entry.
OK
OK
OK
icon at the centre of the bottom line of the display.
, / to show “DETAILS”, and then
O
and / to select “DELETE“.
to confirm and delete the entry.
to display
O
to go back
11 PHONE SETTINGS
Your phone comes with a selection of settings that you can change to
personalise your phone the way you like it to work.
11.1 Date and time settings
If you subscribe to Caller Display the time and date settings will be
automatically updated by the network when you receive an incoming
call.
The Caller Display service only sends the month and date, not the
year, so you may need to set the year.
11.1.1 Change the date format
tPress
tPress
tPress
tPress
and / to select “HS SETTINGS“.
OK
and / to select “DATE AND TIME“.
OK
to show “DATE FORMAT“.
OK
and / to select your desired date format (DD-MM-
O
tPress
YY or MM-DD-YY).
to confirm.
OK
Page 17
11.1.2 Change the time format
K
K
K
K
K
K
K
K
K
K
K
K
K
17
tPress
tPress
tPress
tPress
24 HR).
tPress
11.1.3 Set the time
tPress
tPress
tPress
tPress
tPress
Note:
If a time was set previously, the current time is shown, otherwise
and / to select “HS SETTINGS“.
O
and / to select “DATE AND TIME“.
O
and / to select “TIME FORMAT“.
O
and / to select your desired time format (12 HR or
OK
to confirm.
O
and / to select “HS SETTINGS“.
O
and / to select “DATE AND TIME“.
O
and / to select “SET TIME“.
O
and then enter the time information in 24 hour format.
O
to confirm.
O
UK
“HH:MM” is shown.
11.1.4 Set the date
tPress
tPress
tPress
tPress
in Section 10.1.1.
tPress
Note:
If a date was set previously, the current date is shown, otherwise
01/01/13 is shown.
11.2 Alarm settings
You can set an alarm time on this phone. When an alarm is set, the
and / to select “HS SETTINGS“.
O
and t / o select “DATE AND TIME“.
O
and t / o select “SET DATE“.
O
and then enter the date information in the format set
OK
to confirm.
O
icon is shown on the handset display. When the alarm time is reached,
the
alarm tone rings for 45 seconds. You can press any key to disable the
alarm. If the snooze function is activated, the alarm will sound again at
the end of the snooze period of seven minutes. You can also press and
hold
snooze function.
icon and “ALARM ON” flash on the handset display, and the
while the alarm is sounding, to stop the alarm and turn off the
Page 18

18
Note:
>A key press will still disable the alarm even if the handset keypad is
locked when the alarm rings.
>The alarm volume level is the same as the settings of the handset
ringer volume. If the handset ringer is set to “VOLUME OFF“, the
alarm still sounds at “VOLUME 1“ level.
>During an external call or internal call, if an alarm is set and the
alarm time is reached, the icon
An alarm tone will be emitted the earpiece to alert the user the
alarm time is reached. Once the user presses any key or presses
and holds
duration.
>During paging or ringing, the alarm will not sound when the alarm
time is reached. However, if the snooze function is enabled and
there is no paging or ringing the alarm will sound again at the end
of the snooze period.
11.2.1 Turn on/off the alarm
tPress
tPress
tPress
tPress
OK
OK
OK
OK
to disable the alarm, the display will revert to the call
and then / to select “HS SETTINGS“.
to show “ALARM“.
and then / to select “ON“ or “OFF“.
to confirm.
and “ALARM ON” will still flash.
Note:
If ON is selected, you will be prompted to set the alarm time.
11.2.2 Set the alarm time
tFollow Steps 1 to 4 in Section 11.2.1.
tEnter the alarm time in 24 hour format.
tPress
tPress
tPress
11.3 Handset settings
11.3.1 Set the ringer melody for external calls
tPress
tPress
tPress
/ to select snooze “ON“ or “OFF“.
to display “SNOOZE”.
OK
to confirm the alarm setting.
OK
and then / to select “HS SETTINGS“.
OK
and then / to select “RINGER“.
OK
and then / to select “EXTERNAL RING“.
OK
Page 19
19
K
K
K
K
K
K
K
K
K
K
K
K
K
K
tPress
for external calls.
tPress
11.3.2 Set the ringer volume
tPress
tPress
tPress
tPress
tVOLUME OFF or Volumes 1 to 5.
Note:
The ringer volume plays for each selection. If Volume off is selected,
the
tPress
icon will be displayed.
and then / to select the melody you want to hear
O
to confirm your choice.
O
and then / to select “HS SETTINGS“.
O
and then / to select “RINGER“.
O
and then / to select “RING VOLUME“.
O
and then / to select the desired ringer volume from
O
to confirm your choice.
O
UK
11.3.3 Set the auto answer
If you turn on the Auto Answer, you can answer a call automatically
by just lifting the handset off the base or charger, without having to
press any key.
tPress
tPress
tPress
tPress
11.4 Base Settings
11.4.1 Change the Flash time
You may need to change the flash time if your phone is connected to
a PBX (Private Exchange) that requires a different recall timing. The
flash time options are Short (the default value of 100ms), Mid (300ms)
or Long (600ms).
and / to select “HS SETTINGS”.
O
and / to select “AUTO ANSWER”.
O
and / to turn on or off the auto answer feature.
O
to confirm.
O
tPress
tPress
tPress
tPress
and then / to select “BS SETTINGS“.
O
and then / to select “FLASH TIME“.
O
and then / to select your desired flash time (SHORT,
OK
MID, LONG, with the current setting indicated by an asterisk to the
right).
to confirm the setting.
O
Page 20

20
K
K
K
K
K
K
11.5 Registration
Important:
When you purchase your phone system, all handsets are already
registered to your base, so you do not need to register them.
Handset registration is only necessary when you buy extra handsets or
if a handset has become faulty.
You can register additional handsets to have up to five handsets per
base unit, with each handset’s number (1 to 5) shown on its display.
To register a new handset to your base:
tPress and hold
put the base station into registration mode. It will stay in registration
mode for about 1 minute, so the following handset sequence must
be completed within this time.
tPress
tPress
tEnter the 4-digit system PIN (default 0000).
tPress
If the handset registration is successful, you will hear a confirmation
tone and the display will go to idle mode with the new handset
number shown. The handset will automatically be allocated the next
available handset number.
tIf the handset registration is unsuccessful, the display will return to
show ”REGISTER HANDSET”.
11.6 Reset your phone
and / to select “REGISTRATION”.
O
to display “ENTER PIN”.
O
to confirm, and the display will flash “PLEASE WAIT”.
O
on the base station for more than five seconds, to
You can reset your phone to the default settings . After a reset, all your
personal settings, call list entries and redial list entries will be deleted
but your phonebook remains unchanged.
tPress
tPress
tEnter the 4-digit system PIN (default 0000).
tPress
tPress
settings.
and / to select “RESET“.
O
to display “ENTER PIN”.
O
to display “CONFIRM?“
O
to confirm, and the phone will be reset to its default
OK
Page 21

12 ANSWERING MACHINE
K
K
K
K
21
Your phone includes a telephone answering machine that records
unanswered calls when it is on.The answering machine can store up
to 59 messages within the maximum recording time of approximately
15 minutes. As well as recording incoming messages, you can record
memos for other users of your phone.
If the answering machine memory is full, the Handset will display “TAM
FULL” alternately with the handsets name or time, depending on the
handset standby display mode set. You will have to delete some
messages before any new ones can be recorded.
Some answering machine functions can be operated from the base,
including playing messages and turning the answering machine on or
off. The answering machine can also be controlled and set up using
the handset menu functions, as below.
12.1 Turn on/off the answering machine
You can turn the answering machine on or off using the handset.
UK
When the answering machine is set to “ON”, calls will be answered
after the set answer delay and the caller can then leave you a message.
When the answering machine is set to “OFF”, calls will be answered
after 14 rings and the answer only message will be played to your
callers. They will not be able to leave you a message.
Using the base:
tPress
or off.
Using the handset:
tPress
tPress
tPress
tPress
>If answering machine is set to “ON”,
on the telephone base to turn the answering machine on
and / to select “ANS. MACHINE”.
O
and / to select “TAM ON/OFF”.
O
and / to select “ON” or “OFF”.
O
to confirm.
O
displays on the handset
LCD.
>If answering machine is set to “OFF”,
handset LCD.
will not display on the
Page 22

22
K
K
K
12.2 Listen to the messages in the answering machine
When new messages are recorded on the answering machine, the
flashes on the handset display until all the new messages are played.
After a new message is played it will be saved as an old message
automatically unless it is deleted.
Old messages will be played after all new messages are all played.
tPress
tPress
tPress
the screen displays the date and time information of the message
received.
Note:
A
indicate that it is a new message.
When a message has been played, the
be shown when you listen to this message again.
is placed at the centre of the bottom of the handset display to
and / to select “ANS. MACHINE”.
O
and / to select “MSG PLAYBACK”.
O
to start message playback through the earpiece and
O
will disappear and will not
Note:
If there are no messages, the handset display will briefly show “00-00
00-00“ then return to “MSG PLAYBACK”.
tDuring message playback, press
message playback volume respectively.
tPress
“DELETE” to perform the following functions during message
playback.
STOP Stop the current message playback and return to the
FORWARD Skip to play the next message. The date and time
and / to select “STOP”, “FORWARD”, “PREVIOUS”,
OK
ANS. MACHINE menu.
information of the next message will display if there
is another message.
/ to increase or decrease the
PREVIOUS Repeat playing the current message from the
beginning. The date and time information of the
current message will display.
DELETE Delete the current message and the next message
will be played.
Page 23
23
K
K
K
K
K
K
K
K
K
Note:
Alternatively, you can use the keys on the base to control different
operations during message playback.
UK
tPress
tPress
beginning. Press twice to skip backward to play the previous
message.
tPress
tPress
12.3 Delete all messages in the answering machine
tPress
tPress
tPress
tPress
Note:
If there are no more messages in the answering machine, “EMPTY”
will display and return back to “ANS. MACHINE” menu.
to stop message playback.
once to repeat playing the current message from the
to skip to play next message.
to delete the current message playback.
and / to select “ANS. MACHINE”.
O
and / to select “DELETE ALL”.
O
to display “CONFIRM?”.
O
to delete all old messages.
O
12.4 Answering machine settings
You can use the “TAM SETTINGS” menu through the handset to
change the settings of your answering machine.
12.4.1 Set the answer mode
By default, the answer machine is set in “ANS & REC” mode which
allows callers to leave a message. This mode can be changed to
“ANSWER ONLY” which does not allow callers to leave a message. In
that case, your callers will be prompted to call back later.
tPress
tPress
tPress
tPress
tPress
When your answering machine memory is full and it is in “ANS
& RECORD”, the answer mode will change to “ANSWER ONLY”
and / to select “ANS. MACHINE”.
O
and / to select “TAM SETTINGS”.
O
and / to select “ANSWER MODE”.
O
and / to select “ANS & REC” or “ANSWER ONLY”.
O
to confirm.
O
automatically. It will return to “ANS & RECORD” mode automatically
after some messages have been deleted.
Page 24
24
K
K
K
K
K
K
K
K
K
K
K
12.4.2 Set the outgoing message (OGM) language.
The answering machine announces the outgoing message when it
answers a call. There is a pre-set OGM for each of “ANS & RECORD”
mode or “ANSWER ONLY” mode.
tPress
tPress
tPress
tPress
tPress
12.4.3 Record Your Own Outgoing Message (OGM)
You can record your own OGM for ANS & REC mode or ANSWER
ONLY mode. When you record your own OGM, it will be used when
the answering machine answers the call. If your personalised OGM is
deleted, the pre-set OGM will be restored automatically.
tPress
tPress
tPress
tPress
and / to select “ANS. MACHINE”.
O
and / to select “TAM SETTINGS”.
O
and / to select “TAM LANGUAGE”.
O
and / to select your desired OGM language.
O
to confirm.
O
and / to select “ANS. MACHINE”.
O
and / to select “TAM SETTINGS”.
O
and / to select “OGM SETTINGS”.
O
and / to select “ANS & RECORD” or “ANSWER
O
ONLY”.
tPress
tPress
“RECORDING” is displayed on the screen.
tPress
>Your newly saved OGM will playback automatically.
tAlternatively, press
the personalised OGM
and / to select “RECORD MESS”.
O
to start recording your personalised OGM and
OK
to stop and save your personalised OGM.
O
to return to previous screen without saving
Page 25
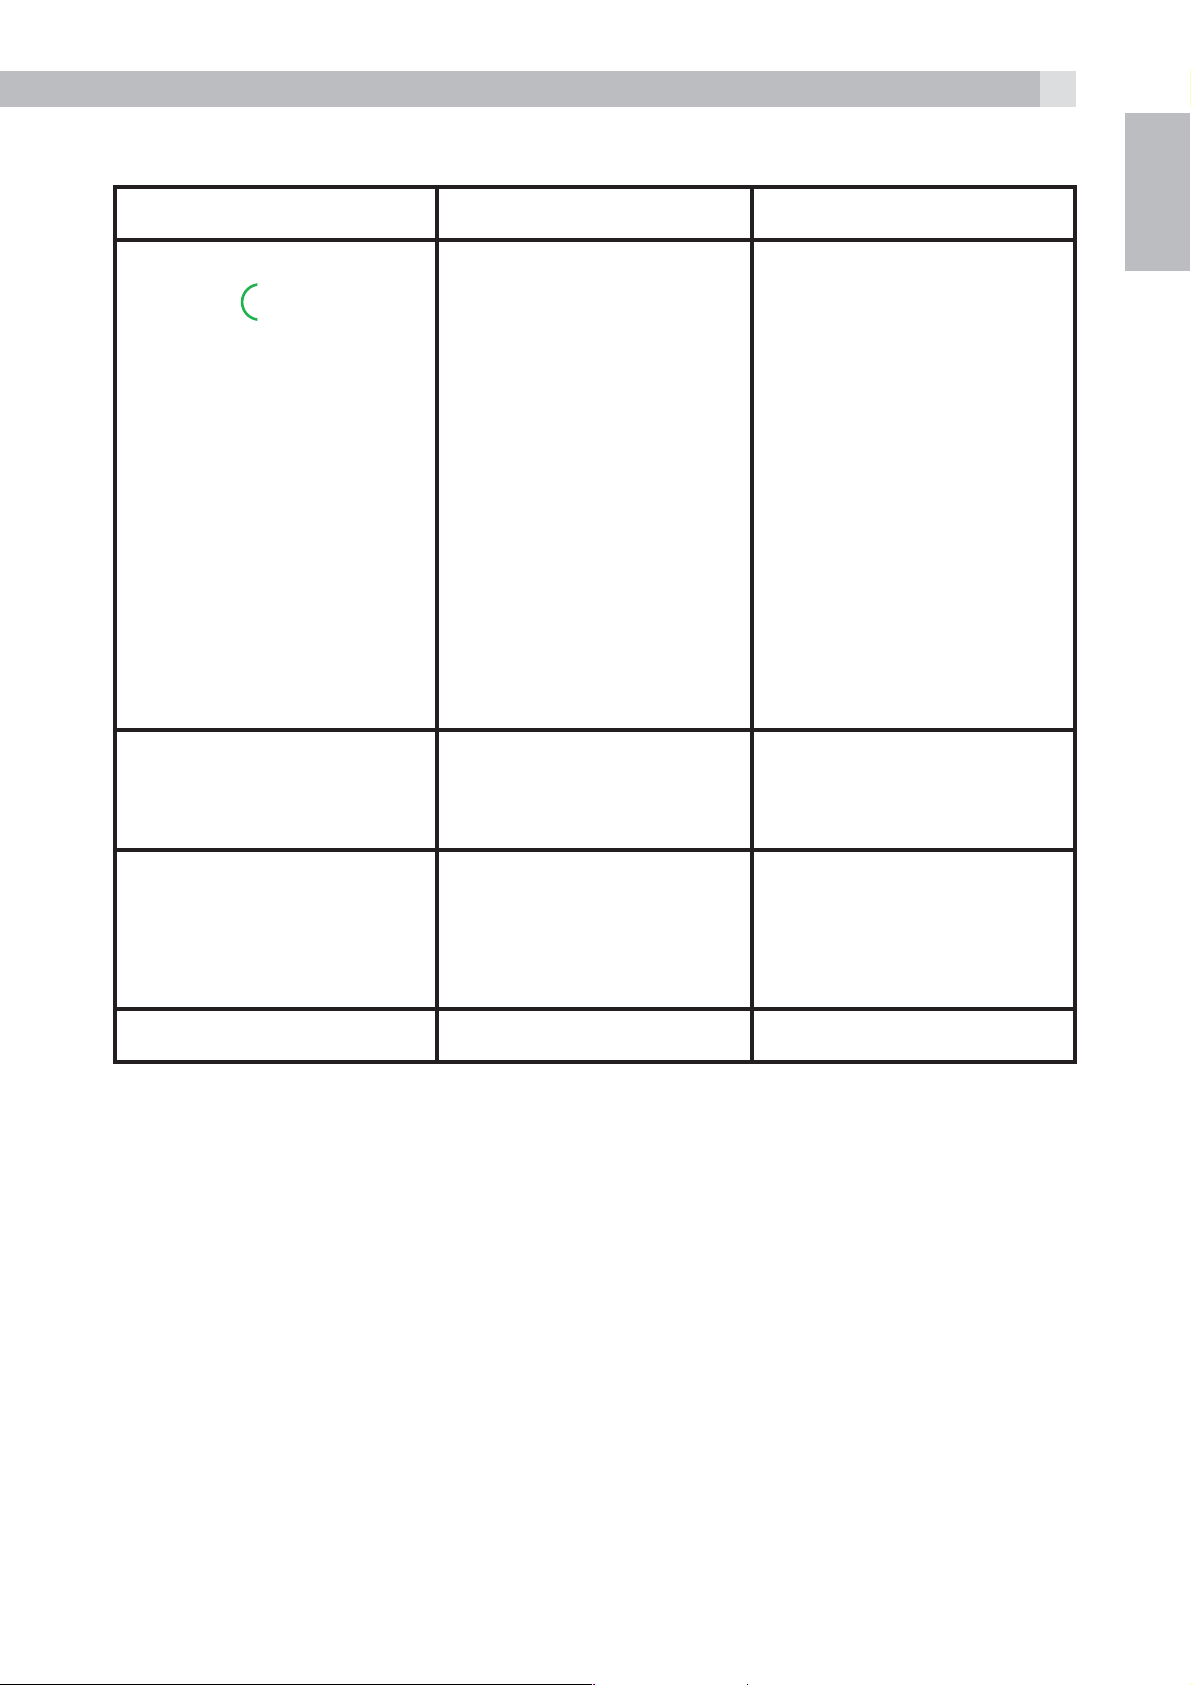
13 TROUBLESHOOTING
25
Problem Causes Solutions
No dialling tone when
pressing
When connect to a PBX,
no/or wrong connection
after dialling.
t The connection cord
of the base station is
not plugged in.
t The adapter cord
is not plugged in
correctly in the base
station.
t Another handset is
using the base to
make a call.
t Wrong telephone
line cord.
Dialling prefix is
needed.
t Check the
t Check the base
t Wait until the line is
Insert the dialling prefix.
connections. Unplug
and plug back in the
mains. Check that the
telephone cord has
been plugged into
the base station and
the phone socket.
station plug and the
230V plug (remove
and plug-in).
unoccupied.
UK
“OUT OF RANGE“
is displayed.
No Display Empty Battery Recharge Battery
t Base station out of
range.
t Base station not
connected to mains
t Reduce the range.
t Connect base station
to mains.
.
Page 26

26
14 GUARANTEE AND SERVICE
The phone is guaranteed for 24 months from the date of purchase
shown on your sales receipt. This guarantee does not cover any faults
or defects caused by accidents, misuse, fair wear and tear, neglect,
faults on the telephone line, lightning, tampering with the equipment,
or any attempt at adjustment or repair other than through approved
agents.
Please keep your sales (till) receipt this is your proof of guarantee.
14.1 While the unit is under Guarantee
tDisconnect the base unit from the telephone line and the mains
electricity supply.
tPack up all parts of your phone system, using the original package.
tReturn the unit to the shop where you bought it, making sure you
take your sales receipt.
tRemember to include the mains adapter.
14.2 After the Guarantee has expired
If the unit is no longer under Guarantee, contact us via
www.aegtelephones.eu
This product works with rechargeable batteries only. If you put
nonrechargeable batteries in the handset and place it on the base, the
handset will be damaged and this in NOT covered under the warranty
conditions.
Page 27

15 TECHNICAL DETAILS
27
Standard Digital Enhanced Cordless (DECT)
Frequency range 1.88 to 1.9 GHz (bandwidth = 20 MHz)
Channel bandwidth 1.728 MHz
Operating range Up to 300m outdoors; Up to 50m indoors
Operating time Standby: 200 hours, Talking: 14 hours
Battery charge time: 15 hours
Temperature range Operating 0° C to 40° C, Storage -20° C to
60° C
Electrical power Ten Pao - S003IB0600045 / S003IV0600045
100-240VAC 50/60Hz 50mA, 6VDC 450mA
VTPL – VT04EEU06045 / VT04EUK06045
100-240VAC 50/60Hz 150mA, 6VDC 450mA
UK
Ruijing - RJ-AS060450B001 /
RJ-AS060450E002 100-240VAC
50/60Hz 150mA, 6VDC 450mA
Battery information:
Type Ni-MH (Rechargeable battery)
Voltage Rating 600mAh, 1.2V AAA Size
Port specifications:
The port (connected to the mains power supply) is a SELV port with
respect to EN41003.
The port (connected to the telephone line) is a TNV port with respect
to EN41003.
Page 28

28
16 CE DECLARATION
This product is in compliance with the essential requirements
and other relevant provisions of the R&TTE directive 1999/5/EC.
The Declaration of conformity can be found on:
www.aegtelephones.eu
17 DISPOSAL OF THE DEVICE
(ENVIRONMENT)
At the end of the product lifecycle, you should not throw this
product into the normal household garbage but bring the product
to a collection point for the recycling of electrical and electronic
equipments. The symbol on the product, user guide and/or box
indicate this. Some of the product materials can be re-used if you bring
them to a recycling point. By reusing some parts or raw materials from
used products you make an important contribution to the protection
of the environment. Please contact your local authorities in case you
need more information on the collection points in your area.
Batteries must be removed before disposing of the device.
Dispose of the batteries in an environmental manner according to
your country regulations.
18 CLEANING AND CARE
Do not clean any part of your phone with benzene, thinners or other
solvent chemicals as this may cause permanent damage which is not
covered by the Guarantee.
When necessary, clean it with a damp cloth.
Keep your phone system away from hot, humid conditions or strong
sunlight, and don‘t let it get wet.
Page 29

29
1 UNSER EINSATZ FÜR DIE UMWELT
Vielen Dank, dass Sie sich für dieses Produkt entschieden haben. Dieses
Gerät wurde mit größter Sorgfalt entwickelt und zusammengebaut,
um Ihnen ein exzellentes Produkt zu bieten und gleichzeitig die
Umwelt zu schonen. Deshalb liegt diesem Produkt eine Kurzanleitung
bei, um die Papiermenge zu reduzieren. So müssen weniger Bäume
für die Herstellung von Papier abgeholzt werden. Eine vollständige
und ausführliche Bedienungsanleitung finden Sie auf unserer Website
www.aegtelephones.eu. Downloaden Sie bitte die vollständige
Bedienungsanleitung, wenn Sie alle fortschrittlichen Funktionen Ihres
Produkts nutzen möchten. Zum Schutz der Umwelt bitten wir Sie, die
vollständige Bedienungsanleitung nicht auszudrucken. Vielen Dank,
dass Sie uns beim Umweltschutz unterstützen.
2 WICHTIGE SICHERHEITSANWEISUNGEN
Beim Gebrauch Ihres Telefons sollten die grundlegenden
Sicherheitsvorkehrungen befolgt werden, um das Risiko von Feuer,
Stromschlag und Verletzungen zu vermeiden. Dies gilt einschließlich
dem Folgenden:
DE
1. Lesen Sie sich die Anleitung aufmerksam durch damit Sie alle
Anweisungen verstehen.
2. Befolgen Sie alle auf dem Produkt markierten Warnungen und
Anweisungen.
3. Ziehen Sie vor der Reinigung den Stecker des Geräts aus der
Steckdose. Benutzen Sie keine flüssigen Reinigungsmittel oder
Sprühreiniger. Benutzen Sie zum Reinigen ein feuchtes Tuch.
4. Setzen Sie Ihr Telefon weder Hitze, feuchten Bedingungen noch
starkem Sonnenlicht aus und lassen Sie es nicht nass werden.
Benutzen Sie es auch nicht in der Nähe von Wasser (zum Beispiel
in der Nähe einer Badewanne, einer Küchenspüle oder eines
Swimming-Pools).
5. Überlasten Sie die Steckdosen und Verlängerungskabel nicht, weil
dies zum Risiko eines Feuers oder eines Stromschlags führen kann.
6. Ziehen Sie den Netzstecker bei den folgenden Umständen aus der
Steckdose:
tWenn das Netzkabel oder der Netzstecker beschädigt sind.
Page 30

30
tWenn das Produkt bei Befolgung der Bedienungsanweisungen
nicht ordnungsgemäß funktioniert.
tWenn das Produkt herunter gefallen ist und das Gehäuse
beschädigt wurde.
tWenn bei dem Produkt eindeutige Leistungsänderungen
auftreten.
7. Benutzen Sie das Telefon NIEMALS während eines Gewitters.
Trennen Sie die Basisstation vom Telefonnetz und ziehen Sie den
Netzstecker aus der Steckdose, wenn in Ihrer Umgebung Gewitter
auftreten. Durch Blitzschlag verursachte Schäden werden nicht von
der Garantie abgedeckt.
8. Verwenden Sie das Telefon nicht in der Nähe des Gaslecks, wenn
Sie ein Gasleck melden wollen.
9. Benutzen Sie ausschließlich die mitgelieferten NiMH (NickelMetallhydrid)-Akkus! Die Betriebsdauerzeiten der Mobilteile sind
nur mit den Standardakkus gegeben.
10. Die Verwendung von anderen Akku-Typen oder nicht
wiederaufladbaren Batterien/Primärzellen kann gefährlich
sein. Dies könnte Störungen verursachen und/oder das Gerät
beschädigen oder die Umgebung beeinflussen. Der Hersteller
haftet nicht für Schäden, die durch eine solche Nichtbeachtung
verursacht wurden.
11. Verwenden Sie keine Basisstationen/Ladegeräte von anderen
Herstellern. Die Akkus könnten beschädigt werden.
12. Stellen Sie sicher, dass die Akkus mit der richtigen Polarität
eingelegt sind.
13. Entsorgen Sie die Akkus sicher. Tauchen Sie sie nicht in Wasser ein,
verbrennen Sie diese nicht oder legen Sie sie nicht an einen Ort,
wo diese durchstochen werden könnten.
3 BESTIMMUNGSGEMÄSSE VERWENDUNG
Dieses Telefon ist für den Betrieb am öffentlichen analogen
Telefonnetz oder für den Betrieb an einer analogen Nebenstelle einer
kompatiblen PBX-Telefonanlage vorgesehen.
Page 31

4 LIEFERUMFANG
Im Lieferumfang ist enthalten:
t1 Mobilteil
t1 Basisstation
t1 Netzteil
31
t1 Telefonanschlusskabel
t2 Akkus
t1 Benutzerhandbuch
Hinweis:
Wenn Sie eine Twin oder Triple set haben, erhalten Sie auch
die zusätzlichen Mobilteile, Akkus und Ladestationen für jeden
zusätzlichen Anschluss.
Mobilteil – Basisstation
tBeim Kauf des Telefons sind alle Mobilteile bereits an der Basisstation
angemeldet.
tUm Mobilteil und Basisstation zusammen zu nutzen, müssen sie per
Funk eine Verbindung zueinander aufbauen können. Das Funksignal
zwischen Mobilteil und Basisstation entspricht den üblichen
Normen für DECT-Telefone: Die maximale Reichweite beträgt im
DE
Außenbereich bis zu 300 Metern und in Gebäuden bis zu 50 Metern.
tDer Signalbereich kann kleiner sein, wenn sich zwischen dem
Mobilteil und der Basisstation ein größerer Metallgegenstand, wie z.
B. ein Kühlschrank, Spiegel oder Aktenschrank, eine Metalltür oder
Stahlbeton befindet. Auch durch andere massive Gebäudeteile,
wie etwa Wände, oder sonstige Funkstörungen oder elektrische
Störungen kann die Signalstärke beeinträchtigt werden.
5 DIE SPRACHE DES MOBILTEILS EINSTELLEN
tDrücken Sie
auszuwählen.
tDrücken Sie
auszuwählen.
tDrücken Sie
und / , um „MT-EINSTEL.“ (HS SETTINGS)
OK
und / , um „SPRACHE“ (LANGUAGE)
OK
und / , um die gewünschte Sprache
OK
auszuwählen.
tDrücken Sie
zur Bestätigung.
OK
Page 32

32
6 EINFÜHRUNG
6.1 Überblick Mobilteil (siehe Abb. 1)
# Symbol- und Zeichenerklärung
Up
tIm Ruhezustand: Drücken, um zur Anrufliste
zu gelangen.
tIm Menümodus: Drücken, um die Menüpunkte
nach oben zu durchsuchen.
1
2
tIn der Telefonbuchliste/Wahlwiederholungsliste/
Anrufliste: Drücken, um die Liste
nach oben zu durchsuchen.
tWährend eines Anrufs: Drücken, um die Lautstärke
der Höreinheit oder der Lautsprecher zu erhöhen.
tWährend dem Klingeln: Drücken, um die
Lautstärke des Ruftons zu erhöhen.
Linke Softtaste (Menü/OK)
tIm Ruhezustand: Drücken, um zum
Hauptmenü zu gelangen.
tIm Untermenü-Modus: Drücken, um die Auswahl
OK
zu bestätigen
tWährend eines Anrufs: Drücken, um zur
Intercom-Funktion/zum Telefonbuch/zur
Wahlwiederholungsliste/Anrufliste zu gelangen
3
Abheben
tIm Ruhezustand/Wählvorbereitungsmodus:
Drücken, um einen Anruf zu tätigen
tIn der Wahlwiederholungsliste/Anrufliste/
Telefonbuchliste: Drücken, um den
angezeigten Eintrag anzurufen.
tWährend dem Klingeln: Drücken, um einen Anruf
entgegenzunehmen.
Page 33

Tastensperre
tGedrückt halten, um die Tastensperre ein- oder
33
4
5
auszuschalten.
tGedrückt halten, um zwischen internen und
externen Anrufen in Konferenz zu telefonieren,
wenn beide eingerichtet sind.
DE
Freisprechfunktion
tWährend eines Anrufs: Drücken, um die
Freisprechfunktion an-/auszuschalten.
tAnrufliste/Telefonbucheinträge: Drücken, um einen
Anruf mit Freisprechfunktion zu tätigen.
tWährend dem Klingeln: Drücken, um einen Anruf
mit Freisprechfunktion entgegenzunehmen
rechte Softtaste (Eingabe löschen/
zurück/stumm/interne Anrufe)
tIm Hauptmenümodus: Drücken, um zurück zum
Ruhezustand zu gelangen.
6
tIm Untermenü-Modus: Drücken, um zur vorigen
Menüebene zu gelangen.
tIm Untermenü-Modus: Gedrückt halten, um zurück
zum Ruhemodus zu gelangen.
tIm Bearbeitungs-/Wählvorbereitungsmodus:
Drücken, um einen eingegebenen Buchstaben/
eine eingegebene Ziffer zu löschen.
tIm Bearbeitungs-/Wählvorbereitungsmodus:
Gedrückt halten, um alle eingegebenen
Buchstaben/Ziffern zu löschen.
tWährend eines Anrufs: Drücken, um den
Lautsprecher stumm/laut zu schalten.
tIm Ruhezustand: Drücken, um eine
Intercom-Verbindung zu einem
anderen Mobilteil herzustellen.
Page 34

34
Auflegen / EIN
tWährend eines Anrufs: Drücken, um einen Anruf
zu beenden und zurück in den Ruhezustand
zu gelangen.
7
8
tIm Menü-/Bearbeitungsmodus: Drücken, um zum
vorigen Menü zu gelangen.
tIm Ruhezustand: Gedrückt halten, um
das Mobilteil auszuschalten.
tIm Ruhezustand (Mobilteil ist ausgeschaltet):
Gedrückt halten, um das Mobilteil anzuschalten.
Abwärts-Taste/Wahlwiederholungsliste
tIm Ruhezustand: Drücken, um zur
Wahlwiederholungsliste zu gelangen.
tIm Menümodus: Drücken, um die Menüpunkte
abwärts zu durchsuchen.
tIn der Telefonbuchliste/Wahlwiederholungsliste/
Anrufliste: Drücken, um die Liste
abwärts zu durchsuchen.
tWährend eines Anrufs: Drücken, um die Lautstärke
der Höreinheit oder des
Lautsprechers zu reduzieren.
tWährend dem Klingeln: Drücken, um die Lautstärke
des Ruftons zu reduzieren.
Wecker aus
9
10
11
6.2 Mobilteil-Display (siehe P2)
R
tGedrückt halten, um den Rufton des Mobilteils
aus- bzw. wieder einzuschalten.
Flash-/Rückruf-Taste
tWährend eines Anrufs: Drücken, um ein Rückruf-/
Flash-Signal zu bekommen.
Telefonbuch / Kontaktliste
tDrücken, um zum Telefonbuch zu gelangen.
Die LCD-Anzeige zeigt Ihnen Informationen über den aktuellen
Zustand des Telefons.
Page 35

# Symbol- und Zeichenerklärung
Konstant, wenn das Mobilteil in Reichweite der
Basisstation ist.
Mehr Striche zeigen ein stärkeres Netzwerksignal an.
Zeigt an, dass mit diesem Mobilteil im Moment
telefoniert wird.
Zeigt an, dass Sie eine neue Nachricht in der Mailbox
haben. Das sind Dienste Ihres Netzanbieters. Bitte
wenden Sie sich an Ihren Netzbetreiber.
Zeigt an, dass der Klingelton des Mobilteils
ausgeschaltet ist.
Zeigt an, dass der Akku vollständig geladen ist.
35
DE
Interne Segmente zeigen den Batterieladevorgang an.
Zeigt an, dass der Akku geladen werden muss.
Blinkt bei schwachem Ladezustand des Akkus.
Zeigt an, wenn mehr Zeichen oder Zahlen vor denen
stehen, die angezeigt werden.
(1) Konstant, wenn ein interner Ruf stattfindet.
Blinkend, wenn ein interner Anruf eingeht.
Zeigt den Freisprechmodus an
Konstant, wenn eine Weckzeit eingestellt ist.
Blinkt, wenn der Wecker klingelt.
Zeigt an, dass das Tastenfeld gesperrt ist.
Zeigt an, wenn mehr Zeichen oder Zahlen nach denen
stehen, die angezeigt werden.
Drücken, um die aktuelle Auswahl zu bestätigen
(wenn verfügbar).
Drücken, um zum Hauptmenü zu gelangen.
Zeigt einen neuen Anruf in der Anrufliste an.
Page 36

36
Zeigt weitere Optionen in Listen an, abwärts bzw.
aufwärts.
Drücken, um eine Ebene zurück zu gelangen oder die
aktuelle Aktion abzubrechen (wenn verfügbar).
Drücken, um ein Zeichen zu löschen oder den Wecker
auszuschalten (wenn verfügbar). Drücken, um während
eines Anrufes das Mikrofon stumm/laut zu stellen.
(2) Drücken, um einen internen Anruf zu tätigen.
6.3 Basisstation (mit Anschlusskabel)
# Symbol- und Zeichenerklärung
12
13
14
Lautstärke -/Lautstärke +
Diese Tasten drücken, um während des Abspielens
von Sprachnachrichten die Lautsprecherlautstärke
zu verringern oder zu erhöhen.
Vorwärts
Drücken, um während der Wiedergabe eine
Nachricht zu überspringen.
Zurück
Einmal drücken, um die aktuelle Nachricht nochmals
von Beginn abzuspielen.
Durch zweimaliges Drücken spielen Sie die
vorherige Nachricht ab.
Play/Stop
15
Drücken, um die Nachrichten abzuspielen.
Während des Abspielens von Nachrichten drücken,
um die Wiedergabe zu stoppen.
Page 37

37
Löschen
Einmal drücken, um die Sprachnachricht während
16
17
18
6.4 Menüstruktur
tDrücken Sie im Ruhemodus
tDrücken Sie
gelangen.
tDrücken Sie
gelangen.
des Abspielens zu löschen.
Gedrückt halten, um alle alten Nachrichten im
Ruhezustand zu löschen.
Page
Drücken, um alle angemeldeten Mobilteile zu
finden (Paging).
Ein/aus
Drücken, um den AB ein-/auszuschalten.
/ , um zu den anderen Optionen der Menüleiste zu
, um in ein Untermenü oder zu einer Funktion zu
, um zur Menüliste zu gelangen.
OK
DE
tDrücken Sie
6.5 Text- und Zifferneingabe
Im Bearbeitungsmodus wird mit einem Cursor die aktuelle
Eingabeposition für den Text angezeigt. Der Cursor steht dabei rechts
vom letzten eingegebenen Zeichen.
Tipps zum Schreiben:
tSobald ein Buchstabe ausgewählt ist, springt der Cursor nach einer
kurzen Pause zur nächsten Stelle.
tSie können den Cursor mit den Tasten
um Texteinträge zu berichtigen.
tDrücken Sie
tHalten Sie die Taste
zu löschen.
, um zur vorigen Menüebene zu gelangen.
/ durch den Text bewegen,
, um das letzte Zeichen zu löschen.
gedrückt, um die gesamte Textzeichenfolge
Page 38

38
7 INSTALLATION IHRES TELEFONS
7.1 Die Basisstation anschließen (siehe P5)
tVerbinden Sie den Netzadapter und das Telefonanschlusskabel mit
der Basisstation.
tStecken Sie das Netzteil in eine Steckdose mit 100 - 240V und
50 - 60Hz und das Telefonanschlusskabel in den Telefonwandanschluss.
tBenutzen Sie immer die mitgelieferten Kabel.
Achtung:
Verwenden Sie ausschließlich den mitgelieferten Netzadapter. Wenn
Sie andere Netzadapter verwenden, könnte dies zu Gefahren führen.
Installieren Sie die Basisstation an einer Stelle, bei der die
Netzsteckdose für das Netzteil leicht zugänglich ist. Versuchen Sie
niemals, das Netzadapterkabel zu verlängern.
Hinweis:
Die Basisstation benötigt Netzspannung für den normalen Betrieb
und nicht nur zum Aufladen der Akkus des Mobilteils.
7.2 Installieren und Laden der Akkus (siehe Abb. 3)
tLegen Sie die beiden mitgelieferten Akkus in das Akkufach mit den
Polaritätsmarkierungen ein. Verwenden Sie ausschließlich Akkus
vom Typ der mitgelieferten NiMH-Akkus.
tHalten Sie die Abdeckung des Akkufachs über die Akkus und
schieben Sie sie nach unten, bis sie einrastet.
tStellen Sie das Mobilteil auf die Basisstation und laden Sie es vor
dem ersten Gebrauch 15 Stunden auf. Das Mobilteil wird einen
Piepton abgeben, wenn es auf der Basisstation oder auf dem
Ladegerät ordnungsgemäß aufliegt.
Page 39

39
K
8 TELEFON BENUTZEN
8.1 Anrufen
8.1.1 Wählvorbereitung
Geben Sie die Telefonnummer (bis zu 24 Stellen) ein und drücken Sie
oder , um die Verbindung zum Telefonnetz herzustellen und die
Nummer zu wählen. Wenn Ihnen beim Eingeben der Nummer ein
DE
Fehler unterläuft, drücken Sie
8.1.2 Direktruf
Drücken Sie
und geben Sie die Telefonnummer ein.
Hinweis:
Wenn Sie eine falsche Ziffer eingeben, können Sie sie mit der Taste
korrigieren.
8.1.3 Anruf aus dem Telefonbuch
tDrücken Sie
dann
tDrücken Sie
Telefonbucheintrags anzurufen.
Hinweise:
oder , um die Verbindung zum Telefonnetz herzustellen
, um zum Telefonbuch zu gelangen und drücken Sie
/ , um den gewünschten Eintrag auszuwählen.
oder , um die Nummer des ausgewählten
, um Ziffern zu löschen.
>Zum Telefonbuch gelangen Sie auch über
>Die alphanumerischen Tasten ermöglichen eine Kurzwahl, um
Einträge mit den entsprechenden Anfangsbuchstaben zu finden.
8.1.4 Anruf von der Anrufliste (nur verfügbar mit
Rufnummernanzeige)
tDrücken Sie
um den gewünschten Eintrag auszuwählen.
tDrücken Sie
der Anrufliste anzurufen.
Hinweis:
Sie können auch zur Anrufliste gelangen, indem Sie zweimal
drücken.
, um zur Anrufliste zu gelangen und drücken Sie / ,
oder , um die Nummer des ausgewählten Eintrags
, ,
O
.
OK
Page 40

40
8.1.5 Anruf aus der Wahlwiederholungsliste
tDrücken Sie
drücken Sie
tDrücken Sie
Wahlwiederholungsnummer anzurufen.
8.1.6 Gesprächsdaueranzeige
Ihr Mobilteil erfasst automatisch die Dauer von jedem Anruf.
Die Gesprächsdaueranzeige erscheint sofort, wenn Sie einen Anruf
entgegennehmen oder die
nach Beendigung eines Telefonats sichtbar. Die Dauer wird in Stunden,
Minuten und Sekunden in diesem Format angezeigt: HH:MM:SS.
8.2 Anrufe annehmen
Wenn das Mobilteil nicht in der Ladestation ist.
tWenn das Telefon klingelt, drücken Sie
entgegenzunehmen.
, um zur Wahlwiederholungsliste zu gelangen und
/ , um den gewünschten Eintrag auszuwählen.
oder , um die ausgewählte
-Taste drücken und bleibt für 5 Sekunden
oder , um den Anruf
Hinweis:
Wenn „DIREKTANTWORT“ (AUTO ANSWER) auf „EIN“ (ON) gestellt
ist, dann können Sie den Anruf entgegennehmen, indem Sie das
Mobilteil von der Basisstation abnehmen; der Anruf wird automatisch
entgegengenommen, Sie müssen keine Taste drücken.
8.3 Anrufe beenden
tDrücken Sie während eines Gespräches
beenden.
ODER
tStellen Sie das Mobilteil auf die Basisstation, um den Anruf zu
beenden.
8.4 Freisprechfunktion des Mobilteils
Während eines Anrufes können Sie
Freisprechfunktion und dem normalen Betrieb des Mobilteils zu
drücken, um zwischen der
, um den Anruf zu
wechseln.
Page 41

41
8.5 Lautstärke der Höreinheit oder der Freisprecheinrichtung
einstellen
Es gibt jeweils 5 wählbare Lautstärke-Einstellungen („LAUTST 1“ bis
„LAUTST 5“, VOLUME 1 to VOLUME 5) für die Höreinheit und die
Freisprecheinrichtung.
Während eines Anrufs:
DE
tDrücken Sie
auszuwählen. Die aktuelle Einstellung wird angezeigt.
Wenn Sie den Anruf beenden, bleibt die Lautstärke bei der zuletzt
gewählten Einstellung.
8.6 Das Mobilteil für eingehende Anrufe stumm stellen
tHalten Sie im Ruhezustand die Rautetaste
Mobilteil für eingehende Anrufe stumm zu stellen. Das
erscheint auf dem Display.
Hinweis:
Auch bei stumm gestelltem Mobilteil wird ein eingehender Anruf
durch das blinkende Anrufsymbol oder die Anrufernummer angezeigt.
tSie können die Stumm-Funktion deaktivieren, indem Sie erneut die
Rautetaste
/ um eine Lautstärke-Einstellung zwischen 1 und 5
gedrückt, um das
-Symbol
gedrückt halten.
8.7 Tastensperre aktivieren
Halten Sie im Ruhezustand
deaktivieren. Das
Hinweis:
Sie können weiterhin
wenn das Mobilteil klingelt.
Um die Tastensperre zu deaktivieren, halten Sie wieder die Sterntaste
gedrückt.
8.8 Wahlwiederholung der zuletzt gewählten Nummern
Sie können jede der 10 zuletzt gewählten Nummern erneut wählen.
Wenn Sie zu einer Nummer einen Namen im Telefonbuch eingetragen
haben, wird dieser Name statt der Nummer angezeigt.
-Symbol erscheint auf dem Display.
verwenden, um einen Anruf entgegenzunehmen,
gedrückt, um die Tastensperre zu
Page 42

42
Die zuletzt gewählte Nummer wird in der Wahlwiederholungsliste an
erster Stelle angezeigt.
8.8.1 Eine Nummer aus der Wahlwiederholungsliste erneut
anrufen
tIm Ruhezustand: Drücken Sie
gelangen.
Hinweis:
Wenn die Wahlwiederholungsliste einen Namen anzeigt, drücken Sie
die Raute-Taste #
tDrücken Sie
tDrücken Sie
anzurufen.
Hinweis:
Wenn keine Einträge in der Wahlwiederholungsliste vorhanden sind,
wird „LEER“ (EMPTY) angezeigt.
8.9 Das Mobilteil finden
, um die Nummer des Eintrages zu sehen.
/ , um die Wahlwiederholungsliste zu durchsuchen.
, um die ausgewählte Wahlwiederholungsnummer
, um zur Wahlwiederholungsliste zu
Sie können das Mobilteil finden, indem Sie
drücken. Alle zur Basisstation gehörigen Mobilteile geben einen Ton
aus, und auf dem Display wird „PAGING“ (PAGING) angezeigt. Sie
können die Suchfunktion stoppen, indem Sie
Mobilteil oder
Hinweis:
Wenn während der Suchfunktion ein Anruf eingeht, dann klingelt das
Telefon mit dem normalen Rufton.
auf der Basisstation drücken.
auf der Basisstation
/ / auf dem
9 PRIVATES TELEFONBUCH
Jedes Mobilteil kann bis zu 50 private Telefonbucheinträge mit Namen
und Nummern speichern. Jeder dieser Einträge kann maximal 24
Ziffern für die Nummer und 14 Zeichen für den Namen enthalten.
Sie können auch verschiedene Ruftöne für Ihre verschiedenen
Telefonbucheinträge auswählen.
Page 43

43
K
K
K
Hinweis:
Die Funktion für verschiedene Ruftöne bei eingehenden Anrufen ist
nur dann möglich, wenn Sie die Rufnummernanzeige freigeschaltet
haben und die Nummer des eingehenden Anrufes der gespeicherten
Nummer zugeordnet ist.
Die Telefonbucheinträge sind alphabetisch nach Namen geordnet.
9.1 Einen neuen Telefonbucheintrag hinzufügen
Im Ruhezustand:
DE
tDrücken Sie
tDrücken Sie
tDrücken Sie
tDrücken Sie
tDrücken Sie
den gewünschten Rufton für Ihren Telefonbucheintrag auszuwählen.
tDrücken Sie
9.2 Suche nach einem Telefonbucheintrag
Im Ruhezustand:
tDrücken Sie
ODER
tDrücken Sie
auszuwählen und drücken Sie dann
gelangen.
tGeben Sie den ersten Buchstaben des Namens über die
, um zum Telefonbuch zu gelangen
, um „HINZU“ (ADD) anzuzeigen.
OK
und geben Sie dann den Namen ein.
OK
und geben Sie dann die Nummer ein.
OK
und / , um aus den 10 verfügbaren Ruftönen
O
, um den neuen Telefonbucheintrag zu speichern.
OK
, um zum Telefonbuch zu gelangen.
und / , um „TELEFONBUCH“ (CONTACTS)
OK
, um zum Telefonbuch zu
O
alphanumerischen Tasten ein (wenn der Name z. B. mit „C“ beginnt,
dann drücken Sie die Taste „2“ drei Mal) und dann drücken Sie
um zum gewünschten Eintrag zu gelangen.
9.3 Einen Telefonbucheintrag bearbeiten
Im Ruhezustand:
tDrücken Sie
tDrücken Sie
auszuwählen.
tDrücken Sie
auszuwählen.
tDrücken Sie
tBearbeiten Sie den Namen und drücken Sie
, um zum Telefonbuch zu gelangen.
/ , um den gewünschten Telefonbucheintrag
und dann / , um „ÄNDERN“ (EDIT)
OK
, um den aktuellen Namen anzuzeigen.
OK
O
/ ,
.
Page 44

44
K
tBearbeiten Sie die Nummer und drücken Sie
tDrücken Sie
zur Bestätigung
9.4 Einen Telefonbucheintrag löschen
Im Ruhezustand:
tDrücken Sie
tDrücken Sie
auszuwählen.
tDrücken Sie
auszuwählen.
tDrücken Sie
/ , um den Rufton zu ändern und drücken Sie dann
.
OK
, um zum Telefonbuch zu gelangen.
, um den gewünschten Telefonbucheintrag
und dann / , um „LÖSCHEN“ (DELETE)
OK
zur Bestätigung, der Eintrag wird gelöscht.
O
10 RUFNUMMERNANZEIGE
OK
.
Diese Funktion ist nur möglich, wenn Sie bei Ihrem Telefonanbieter
die Rufnummernerkennung freigeschaltet haben. Ihr Telefon kann
bis zu 20 eingegangene Anrufe mit Datums- und Zeitanzeige in der
Anrufliste speichern. Die Nummer wird auf dem Mobilteil angezeigt,
wenn das Telefon klingelt. Stimmt die Nummer mit einem Eintrag
in Ihrem privaten Telefonbuch überein, dann wird abwechselnd der
Name des Anrufers und seine Nummer angezeigt. Dabei ertönt der
dem Anrufer zugewiesene Rufton.
Handelt es sich um einen Anruf mit Rufnummernunterdrückung, dann
erscheint im Display „RUFNR. ANONYM“ (WITHHELD).
Handelt es sich um einen Anruf, dessen Nummer nicht verfügbar ist, z.
B bei privaten Telefonen oder internationalen Anrufen, wird auf dem
Display „OHNE RUFNR.“ (UNAVAILABLE) angezeigt.
Wenn Sie neue Anrufe erhalten, werden diese auf dem Mobilteil im
Standby-Zustand durch „1 NEUER ANRUF“ (1 NEW CALL) oder “X
NEUE ANRUFE“ (X NEW CALLS) (für x=2 bis 20) angezeigt. Die Liste
der Anrufe in Abwesenheit wird solange angezeigt, bis alle Anrufe auf
diesem Mobilteil gesehen wurden.
Page 45

45
K
10.1 Anrufliste einsehen
Alle eingegangenen Anrufe sind in der Anrufliste gespeichert, wobei
der letzte Anruf an oberster Stelle der Liste steht. Ist die Anrufliste voll,
wird der älteste Anruf durch einen neuen ersetzt. Alle unbeantworteten
Anrufe, die noch nicht angesehen wurden, sind mit einem
in der unteren Mitte des Displays markiert.
tDrücken Sie
tDrücken Sie
tDrücken Sie die Raute-Taste #, um die Nummer des Anrufers zu
sehen (wenn möglich).
tDrücken Sie
dann drücken Sie
anzuzeigen. Drücken Sie #, um bei Bedarf weitere Details zum
Namen oder der Rufnummer anzuzeigen. Drücken Sie
zurück zur vorigen Ansicht zu gelangen.
10.2 Einträge in der Anrufliste löschen
tBefolgen Sie die Schritte 1 und 2 in Kapitel 10.1.
tDrücken Sie
auszuwählen.
, um zur Anrufliste zu gelangen.
/ , um den gewünschten Eintrag auszuwählen.
, / , um „DETAILS“ (DETAILS) anzuzeigen,
O
, um Datum und Uhrzeit des Anrufes
OK
und / um „LÖSCHEN“ (DELETE)
OK
-Symbol
, um
OK
DE
tDrücken Sie
, um den Eintrag zu bestätigen und zu löschen.
OK
11 TELEFONEINSTELLUNGEN
Ihr Telefon verfügt über einige Voreinstellungen, die Sie Ihren
persönlichen Erfordernissen anpassen können.
11.1 Datums- und Uhrzeiteinstellungen
Wenn Sie die Rufnummeranzeige freigeschaltet haben, werden bei
einem eingehenden Anruf Zeit und Datum automatisch aktualisiert.
Die Rufnummernanzeige aktualisiert nur Tag und Monat, Sie müssen
also eventuell noch das Jahr einstellen.
11.1.1 Das Datumsformat ändern
tDrücken Sie
und / , um „MT-EINSTEL.“ (HS SETTINGS)
OK
auszuwählen.
tDrücken Sie
TIME) auszuwählen.
und / , um „DATUM & ZEIT“ (DATE AND
OK
Page 46

46
K
K
K
K
K
K
K
K
K
K
K
tDrücken Sie
anzuzeigen.
tDrücken Sie
(„TT-MM-JJ“ oder „MM-TT-JJ“) auszuwählen.
tDrücken Sie
11.1.2 Zeitformat ändern
tDrücken Sie
auszuwählen.
tDrücken Sie
TIME) auszuwählen.
tDrücken Sie
auszuwählen.
tDrücken Sie
STD oder 24 STD) auszuwählen.
tDrücken Sie
O
O
O
OK
O
, um „DATUMSFORMAT“ (DATE FORMAT)
O
und / , um Ihr gewünschtes Datumsformat
OK
zur Bestätigung.
und / , um „MT-EINSTEL.“ (HS SETTINGS)
und / , um „DATUM & ZEIT“ (DATE AND
und / , um „ZEITFORMAT“ (TIME FORMAT)
und / , um Ihr gewünschtes Zeitformat (12
OK
zur Bestätigung.
11.1.3 Die Zeit einstellen
tDrücken Sie
auszuwählen.
tDrücken Sie
TIME) auszuwählen.
tDrücken Sie
tDrücken Sie
Format ein.
tDrücken Sie
Hinweis:
Wurde die Zeit schon voreingestellt, wird die aktuelle Zeit, ansonsten
„HH:MM“ (HH:MM) angezeigt.
11.1.4 Das Datum einstellen
tDrücken Sie
auszuwählen.
und / , um „MT-EINSTEL.“ (HS SETTINGS)
O
und / , um „DATUM & ZEIT“ (DATE AND
O
und / , um „ZEIT“ (SET TIME) auszuwählen.
O
und geben Sie dann die Uhrzeit im 24-Stunden-
OK
zur Bestätigung.
O
und / , um „MT-EINSTEL.“ (HS SETTINGS)
O
tDrücken Sie
TIME) auszuwählen.
tDrücken Sie
auszuwählen.
tDrücken Sie
ein, wie Sie es in Kapitel 10.1.1 ausgewählt haben.
und / , um „DATUM & ZEIT“ (DATE AND
O
und / , um „DATUM“ (SET DATE)
OK
und geben Sie dann das Datum in dem Format
OK
Page 47

47
K
K
tDrücken Sie
Hinweis:
Wurde das Datum schon voreingestellt, wird das aktuelle Datum,
ansonsten 01/01/13 angezeigt.
11.2 Weckereinstellungen
Sie können auf diesem Telefon eine Weckzeit einstellen. Wenn eine
Weckzeit eingestellt ist, erscheint in der Anzeige das
Wenn die Weckzeit erreicht ist, blinken das Symbol
EIN“ (ALARM ON) auf dem Display des Mobilteils und der Weckton
erklingt 45 Sekunden lang. Sie können eine beliebige Taste drücken,
um den Wecker abzuschalten. Wenn die Snooze-Funktion aktiviert ist,
ertönt der Weckton nach Ablauf der Snoozedauer von sieben Minuten
erneut. Sie können ebenfalls bei Ertönen des Weckzeichens gedrückt
halten, um den Wecker abzuschalten und die Schlummerfunktion
zur Bestätigung.
O
-Symbol.
und „WECKER
DE
(Snooze) zu deaktivieren.
Hinweis:
>Ein Tastendruck wird auch dann den Wecker abschalten, wenn die
Tastatur des Mobilteils gesperrt ist und der Weckton erklingt.
>Die Lautstärke des Wecktons ist die gleiche wie für den Rufton.
Wenn der Rufton des Mobilteils auf „RUFTON AUS“ (VOLUME
OFF) eingestellt ist, ertönt der Wecker weiterhin mit „LAUTST. 1“
(VOLUME 1).
>Wenn bei eingestelltem Wecker während eines externen oder
internen Anrufs die Weckzeit erreicht ist, blinken auch dann das
-Symbol und die Anzeige „WECKER EIN“ (ALARM ON).
Der Weckton ertönt im Hörer, um darauf hinzuweisen, dass die
Weckzeit erreicht ist. Sobald eine Taste gedrückt oder
gehalten wird, um den Wecker abzustellen, wird im Display wieder
die Anrufdauer angezeigt.
gedrückt
>Während des Pagings oder Klingelns wird der Weckton nicht
ertönen, wenn die Weckzeit erreicht ist. Wenn die Snooze-Funktion
eingeschaltet ist und kein Paging oder Klingeln aktiv sind, ertönt
der Weckton erneut nach Ablauf der Snoozedauer.
11.2.1 Wecker ein- und ausschalten
tDrücken Sie
SETTINGS) auszuwählen.
und dann / , um „EINSTELLUNG MT“ (HS
O
Page 48

48
K
K
K
K
K
K
K
K
tDrücken Sie
tDrücken Sie
(OFF) auszuwählen.
tDrücken Sie
Hinweis:
Wenn „EIN“ (ON) ausgewählt ist, werden Sie aufgefordert, die
Weckzeit einzustellen.
11.2.2 Einstellen der Weckzeit
tBefolgen Sie die Schritte 1 bis 4 in Kapitel 11.2.1.
tGeben Sie die Weckzeit im 24-Stunden-Format ein.
tDrücken Sie
tDrücken Sie
auszuwählen.
tDrücken Sie die Taste
, um „WECKER“ (ALARM) anzuzeigen.
O
und dann / , um „EIN“ (ON) oder „AUS“
O
zur Bestätigung.
O
, um „SNOOZE“ (SNOOZE) anzuzeigen.
O
/ , um Snooze „EIN“ (ON) oder „AUS“ (OFF)
, um die Weckereinstellungen zu
OK
bestätigen.
11.3 Mobilteil-Einstellungen
11.3.1 Die Ruftonmelodie für externe Anrufe einstellen
tDrücken Sie
SETTINGS) auszuwählen.
tDrücken Sie
auszuwählen.
tDrücken Sie
(EXTERNAL RING) auszuwählen.
tDrücken Sie
externen Anrufen hören wollen, auszuwählen.
tDrücken Sie
11.3.2 Die Ruftonlautstärke einstellen
und dann / , um „EINSTELLUNG MT“ (HS
O
und dann / , um den „RUFTON“ (RINGER)
OK
und dann / , um „RUFTON EXTERN“
OK
und dann / um die Melodie, die Sie bei
OK
, um Ihre Auswahl zu bestätigen.
O
tDrücken Sie
SETTINGS) auszuwählen.
tDrücken Sie
auszuwählen.
tDrücken Sie
VOLUME) auszuwählen.
tDrücken Sie
für den Rufton auszuwählen.
und dann / , um „EINSTELLUNG MT“ (HS
O
und dann / , um den „RUFTON“ (RINGER)
OK
und dann / , um „RUFTON-LAUTST.“ (RING
OK
und dann / , um die gewünschte Lautstärke
O
Page 49

49
K
K
K
K
K
tRUFTON AUS (VOLUME OFF) oder Lautstärkeeinstellung 1 bis 5.
Hinweis:
Die Ruftonlautstärke wird jeweils bei der Auswahl abgespielt. Wenn
„Rufton aus“ (Volume off) ausgewählt ist, wird das
angezeigt.
tDrücken Sie
11.3.3 Antwort-Modus einstellen
Wenn Sie den Auto-Antwort-Modus aktivieren, können Sie Anrufe
automatisch durch das bloße Abnehmen des Mobilteils von der
Basisstation annehmen. Sie müssen keine Taste drücken.
tDrücken Sie
auszuwählen.
tDrücken Sie
ANSWER) auszuwählen.
tDrücken Sie
auszuschalten.
tDrücken Sie
, um Ihre Auswahl zu bestätigen.
O
und / , um „MT-EINSTEL.“ (HS SETTINGS)
O
und / , um „AUTO-RUFAN.“ (AUTO
OK
und / , um den Antwort-Modus ein- bzw.
OK
zur Bestätigung.
O
-Symbol
DE
11.4 Einstellungen der Basisstation
11.4.1 Die Flashzeit ändern
Wenn Ihr Telefon mit einer PBX-Telefonanlage verbunden ist, die eine
andere Rückrufzeit erfordert, müssen Sie ggf. die Flashzeit ändern.
Die Optionen für die Flashzeit sind Kurz (Short) (Vorgabewert von
100ms), Mittel (Mid) (300ms) und Lang (Long) (600ms).
tDrücken Sie
SETTINGS) auszuwählen.
tDrücken Sie
auszuwählen.
tDrücken Sie
(SHORT), „MITTEL“ (MID), „LANG“ (LONG)) auszuwählen. Dabei
ist die aktuell ausgewählte Zeit rechts mit einem * gekennzeichnet.
tDrücken Sie
und dann / , um „EINSTELLUNG BS“ (BS
OK
und dann / , um „FLASHZEIT“ (FLASH TIME)
OK
und / , um die gewünschte Flashzeit („KURZ“
O
, um die Einstellung zu bestätigen.
O
Page 50

50
K
K
11.5 Anmeldung
Wichtig:
Beim Kauf des Telefons sind alle Mobilteile schon bei der Basisstation
registriert, Sie müssen also nichts mehr tun.
Die Anmeldung von Mobilteilen ist nur dann notwendig, wenn Sie
zusätzliche Mobilteile benötigen oder ein Original-Mobilteil fehlerhaft
ist.
Sie können bis zu 5 zusätzliche Mobilteile pro Basisstation registrieren,
wobei die Nummer jedes einzelnen Mobilteils (1-5) auf dem Display
angezeigt wird.
Um ein neues Mobilteil bei Ihrer Basisstation anzumelden:
tHalten Sie
gedrückt. Die Basisstation ist jetzt im Registriermodus. Sie bleibt für
etwa 1 Minute im Anmeldemodus, so dass die folgenden Schritte
innerhalb dieser Zeit am Mobilteil ausgeführt werden müssen.
tDrücken Sie
auszuwählen.
tDrücken Sie
tGeben Sie die vierstellige PIN ein (Voreinstellung 0000).
tDrücken Sie
(PLEASE WAIT) blinken.
Bei erfolgreicher Anmeldung hören Sie einen Bestätigungston
und das Display wechselt auf den Ruhezustand und zeigt die neue
Mobilteil-Nummer an. Dem Mobilteil wird automatisch die nächste
verfügbare Mobilteil-Nummer zugewiesen.
tWenn die Anmeldung nicht erfolgreich war, zeigt das Display wieder
„ANMELDEN“ (REGISTER HANDSET) an.
an der Basisstation für mindestens 5 Sekunden
und / , um „ANMELDEN“ (REGISTRATION)
OK
, um „PIN :“ (ENTER PIN) anzuzeigen.
O
und auf dem Display wird „BITTE WARTEN“
OK
11.6 Das Telefon auf Voreinstellungen zurücksetzen
Sie können Ihr Telefon auf die Voreinstellungen zurücksetzen. Nach
dem Zurücksetzen werden alle Ihre persönlichen Einstellungen,
Anruflisteneinträge und Wahlwiederholungslisteneinträge gelöscht,
nur das Telefonbuch bleibt unverändert.
tDrücken Sie
auszuwählen.
tDrücken Sie
O
und / , um „RÜCKSETZEN“ (RESET)
OK
, um „PIN :“ (ENTER PIN) anzuzeigen.
Page 51

tGeben Sie die vierstellige PIN ein (Voreinstellung 0000).
K
K
51
tDrücken Sie
tDrücken Sie
Voreinstellungen zurückgesetzt.
, um „BESTÄTIGEN?“ (CONFIRM?) anzuzeigen
O
zur Bestätigung und das Telefon wird auf seine
O
12 AUTOMATISCHER ANRUFBEANTWORTER
Ihr Telefon verfügt über einen automatischen Anrufbeantworter, der
Anrufe in Abwesenheit entgegen nimmt (wenn er eingeschaltet ist).
Er kann bis zu 59 Nachrichten mit einer maximalen Gesamtdauer von
ca. 15 Minuten aufzeichnen. Sie können neben eingehenden Anrufen
auch Kurznachrichten für andere Nutzer des Telefons aufnehmen.
Wenn der Speicher des Anrufbeantworters voll ist, zeigt ihr Mobilteil
abwechselnd “AB VOLL (TAM FULL)” und den Mobilteil-Namen oder
die Uhrzeit an (je nach eingestelltem Standby-Modus). Um neue
Nachrichten aufzuzeichnen, müssen zunächst einige ältere gelöscht
DE
werden.
Einige der Anrufbeantworter-Funktionen können von der Basisstation
aus gesteuert werden, inklusive dem Abspielen von Nachrichten
und dem Ein- und Ausschalten des Anrufbeantworters. Der
Anrufbeantworter kann auch über die Funktionen des Mobilteils
eingestellt und bedient werden:
12.1 Ein- / Ausschalten des Anrufbeantworters
Sie können den Anrufbeantworter mit dem Mobilteil ein- bzw.
ausschalten.
Ist der Anrufbeantworter auf “ON” gestellt, werden Anrufe nach der
eingestellten Wartezeit entgegen genommen und der Anrufer kann
Ihnen eine Nachricht hinterlassen.
Ist der Anrufbeantworter auf “OFF” gestellt, werden Anrufe nach einer
Wartezeit von 14 Klingelzeichen mit der von Ihnen aufgezeichneten
Sprachnachricht entgegen genommen. Anrufer können keine
Nachricht auf den Anrufbeantworter sprechen.
Verwendung der Basisstation:
tDrücken Sie auf der Basisstation
oder auszuschalten.
Verwendung des Mobilteils:
, um den Anrufbeantworter ein-
Page 52

52
K
K
tDrücken Sie
MACHINE)” auszuwählen.
tDrücken Sie
auszuwählen.
tDrücken Sie
auszuwählen.
tDrücken Sie
>Ist der Anrufbeantworter auf “AN (ON)” gestellt, wird
Mobilteil angezeigt.
>Ist der Anrufbeantworter auf “AUS (OFF)” gestellt, wird
auf dem Mobilteil angezeigt.
12.2 Nachrichten abspielen
Befinden sich neue Nachrichten auf dem Anrufbeantworter, blinkt
solange
worden sind. Nach dem Abspielen einer neuen Nachricht wird sie
auf dem Mobilteil, bis alle neuen Nachrichten abgespielt
OK
O
O
und / , um “ANRUFBEANTW, (ANS
OK
und / , um “AB AN/AUS (TAM ON/OFF)”
und / , um “AN (ON)” oder “AUS (OFF)”
zur Bestätigung.
auf dem
nicht
automatisch als alte Nachricht gespeichert, es sei denn, sie wird
gelöscht.
Nach allen neuen Nachrichten werden die alten Nachrichten
abgespielt.
tDrücken Sie
MACHINE)” auszuwählen.
tDrücken Sie
PLAYBACK)” auszuwählen.
tDrücken Sie
Es werden Datum und Uhrzeit der empfangenen Nachrichten auf
dem Mobilteil angezeigt.
Hinweis:
Mit
dass es sich um eine neue Nachricht handelt.
Nach dem Abspielen einer Nachricht verschwindet
in der unteren Mitte des Mobilteil-Displays wird angezeigt,
OK
und / , um “ANRUFBEANTW. (ANS
OK
und / , um “NACHR. ABSPIEL. (MSG
OK
, um über die Höreinheit Nachrichten anzuhören.
und wird bei
erneutem Abspielen der Nachricht nicht mehr angezeigt.
Hinweis:
Sind keine Nachrichten vorhanden, zeigt das Mobilteil kurz “00-00
00-00” an und wechselt dann wieder zu “NACHR. ABSPIEL. (MSG
PLAYBACK)”.
Page 53

53
K
K
K
K
tWährend dem Abspielen einer Nachricht können Sie bei Bedarf /
drücken, um die Abspiellautstärke zu erhöhen bzw. zu reduzieren.
tDrücken Sie
(FORWARD)”, “ZURUECK (PREVIOUS)”, “LOESCHEN (DELETE)”
auszuwählen. Damit können folgende Funktionen während des
Abspielens genutzt werden.
STOP
(STOP)
VORWÄRTS
(FORWARD)
ZURÜCK
(PREVIOUS)
LÖSCHEN
Unterbricht das aktuelle Abspielen einer Nachricht
und geht zurück zum ANS MACHINE- Menü.
Überspringen, um zur nächsten Nachricht zu
gelangen. Datum und Zeit der nächsten Nachricht
werden angezeigt, wenn es eine nächste Nachricht
gibt.
Spielt die aktuelle Nachricht erneut von Beginn ab.
Datum und Zeit der aktuellen Nachricht werden
angezeigt.
Löscht die aktuelle Nachricht und die folgende wird
und / , um “STOPP (STOP)”, “VORWAERTS
O
DE
(DELETE)
Hinweis:
Alternativ können Sie auch über die Tasten auf der Basisstation
verschiedene Funktionen während des Abspielens steuern.
tDrücken Sie
tDrücken Sie einmal
Beginn abzuspielen. Durch zweimaliges Drücken spielen Sie die
vorherige Nachricht ab.
tDrücken Sie
tDrücken Sie
12.3 Alle Nachrichten vom Anrufbeantworter löschen
tDrücken Sie
MACHINE)” auszuwählen.
tDrücken Sie
abgespielt.
, um das Abspielen einer Nachricht zu unterbrechen.
, um die aktuelle Nachricht nochmals von
, um die nächste Nachricht abzuspielen.
, um die aktuell abgespielte Nachricht zu löschen.
und / , um “ANRUFBEANTW, (ANS
O
und / , um “ALLE LOESCH, (DELETE ALL)”
O
auszuwählen.
tDrücken Sie
tDrücken Sie
, um “BESTAETIGEN? (CONFIRM?)” anzuzeigen.
O
, um alle alten Nachrichten zu löschen.
OK
Page 54

54
K
K
K
Hinweis:
Befinden sich keine weiteren Nachrichten auf dem Anrufbeantworter,
wird zunächst “LEER (EMPTY)” und anschließend wieder “ANS
MACHINE”-Menü angezeigt.
12.4 Anrufbeantworter-Einstellungen
Sie können mit dem Mobilteil das “AB-EINST. (TAM SETTINGS)”Menü verwenden, um die Einstellungen des Anrufbeantworters zu
ändern.
12.4.1 Anrufbeantwortermodus einstellen
Der Anrufbeantworter ist auf “ANTW+AUFNEH. (ANS & REC)”Modus voreingestellt. So können Anrufer Nachrichten hinterlassen.
Sie können den Modus auf “NUR ANTW, (ANSWER ONLY)” umstellen.
So können Anrufer keine Nachrichten hinterlassen. In diesem Fall wird
der Anrufer aufgefordert, später erneut anzurufen.
tDrücken Sie
MACHINE)” auszuwählen.
tDrücken Sie
auszuwählen.
tDrücken Sie
MODE)” auszuwählen.
tDrücken Sie
oder “NUR ANTW, (ANSWER ONLY)” auszuwählen.
tDrücken Sie
Ist der Anrufbeantworter im “ANTW+AUFNEH, (ANS & RECORD)”Modus und sein Speicher voll, dann wechselt er automatisch in den
“NUR ANTW, (ANSWER ONLY)”-Modus. Er wechselt automatisch in
den “ANTW+AUFNEH, (ANS & RECORD)”-Modus zurück, sobald
OK
O
O
O
und / , um “ANRUFBEANTW, (ANS
OK
und / , um “AB-EINST, (TAM SETTINGS)”
und / , um “ANTW,-MODUS (ANSWER
und / , um“ANTW+AUFNEH, (ANS & REC)”
zur Bestätigung.
einige Nachrichten gelöscht werden.
12.4.2 Die Sprache der automatischen AnrufbeantworterAnsage einstellen
Der Anrufbeantworter spielt die Ansage ab, wenn er einen Anruf
entgegen nimmt. Es gibt jeweils eine automatische Ansage für den
“ANTW+AUFNEH, (ANS & RECORD)”-Modus und den “NUR ANTW,
(ANSWER ONLY)”-Modus.
Page 55

55
K
K
tDrücken Sie
MACHINE)” auszuwählen.
tDrücken Sie
auszuwählen.
tDrücken Sie
auszuwählen.
tDrücken Sie
automatischen Ansage auszuwählen.
tDrücken Sie
12.4.3 Eigene Ansage aufnehmen
Sie können Ihre eigene Ansage für den “ANTW+AUFNEH, (ANS &
REC)”-Modus oder für den “NUR ANTW. (ANSWER ONLY)”-Modus
aufnehmen. Wenn Sie eine eigene Ansage aufnehmen, wird diese
vom Anrufbeantworter bei einem eingehenden Anruf abgespielt.
Wird die persönliche Ansage gelöscht, wird die automatische Ansage
OK
OK
OK
O
und / , um “ANRUFBEANTW, (ANS
OK
und / , um “AB-EINST, (TAM SETTINGS)”
und / , um “AB-SPRACHE (TAM LANGUAGE)”
und / , um die gewünschte Sprache ihrer
zur Bestätigung.
DE
wieder hergestellt.
tDrücken Sie
MACHINE)” auszuwählen.
tDrücken Sie
auszuwählen.
tDrücken Sie
SETTINGS)” auszuwählen.
tDrücken Sie
RECORD)” oder “NUR ANTW, (ANSWER ONLY)” auszuwählen.
tDrücken Sie
MESS)” auszuwählen.
tDrücken Sie
der Aufnahme wird “AUFNAHME (RECORDING)” angezeigt.
tDrücken
speichern.
OK
OK
OK
OK
OK
, um Ihre eigene Ansage zu beenden und zu
O
und / , um “ANRUFBEANTW, (ANS
OK
und / , um “AB-EINST. (TAM SETTINGS)”
und / , um “ANSAGE-EINSTELL (OGM
und / , um “ANTW+AUFNEH, (ANS &
und / , um “ANSAGE AUFN, (RECORD
, um Ihre eigene Ansage aufzunehmen. Während
>Ihre neu gespeicherte Ansage wird automatisch nach der
Aufnahme abgespielt.
tUm einen Schritt zurück zu gehen, drücken Sie
Ansage wird nicht gespeichert.
. Ihre eigene
Page 56

56
13 FEHLERSUCHE
Problem Ursachen Lösungen
Kein Freizeichen,
wenn
wird
gedrückt
t Das
Verbindungsnetzkabel
der Basisstation ist
nicht angeschlossen.
t Das Adapternetzkabel
ist nicht
ordnungsgemäß
an die Basisstation
angeschlossen.
t Ein anderes Mobilteil
nutzt derzeit die
Basisstation zur
Tätigung eines Anrufs.
t Falsches
Telefonanschlusskabel.
t Überprüfen Sie die
Verbindungen. Ziehen
Sie das Kabel aus
der Netzsteckdose
und schließen
Sie es erneut an.
Überprüfen Sie, ob das
Telefonanschlusskabel an
die Basisstation und die
Telefonanschlussbuchse
angeschlossen ist.
t Überprüfen Sie
den Stecker der
Basisstation und den
230V-Stecker (abziehen
und anschließen).
t Warten Sie, bis die
Telefonleitung frei wird.
Bei Anschluss
an eine PBXTelefonanlage
keine bzw.
nur schlechte
Verbindung nach
dem Wählen.
„AUSSER
REICHW.“
(OUT OF
RANGE)
angezeigt.
Kein Display Leerer Akku Akku aufladen
wird
Vorwahl ist erforderlich. Geben Sie die Vorwahl ein.
t Basisstation ist
außer Reichweite.
t Basisstation ist nicht
an das Stromnetz
angeschlossen
.
t Reduzieren Sie
die Reichweite.
t Schließen Sie die
Basisstation an das
Stromnetz an.
Page 57

57
14 GARANTIE UND SERVICE
Die Garantiefrist für das Gerät beträgt 24 Monate ab dem Datum
des Kaufbeleges. Diese Garantie deckt keine Fehlfunktionen oder
Defekte ab, die durch Unfälle, Missbrauch, normalen Verschleiß,
Nachlässigkeit, Defekte im Telefonnetz, Blitzeinschlag, jeglichen
Versuch zur Modifikation/Reparatur des Geräts seitens des Kunden
oder nicht autorisierten Servicepersonals entstanden sind.
Bitte bewahren Sie Ihren Kaufbeleg (Kassenbon) auf; dieser gilt
als Garantiebeweis.
14.1 Während der Garantielaufzeit
tTrennen Sie die Basisstation von der Telefonleitung und dem
Stromnetz.
tVerpacken Sie alle Teile des Telefons in der Originalverpackung.
tBringen Sie das Gerät zu dem Händler, bei dem Sie es gekauft
haben. Vergessen Sie nicht, Ihren Kaufbeleg mitzunehmen.
tDenken Sie daran, das Netzteil ebenfalls einzupacken.
14.2 Nach Ablauf der Garantielaufzeit
Wenn für das Gerät keine Garantie mehr besteht, wenden
Sie sich bitte an uns über www.aegtelephones.eu.
DE
Dieses Gerät arbeitet ausschließlich mit nachladbaren Akkus. Wenn
Sie keine wiederaufladbaren Batterien verwenden und das Mobilteil
auf die Basisstation stellen, wird das Mobilteil beschädigt und die
Garantie erlischt.
Page 58

58
15 TECHNISCHE DATEN
Standard Digital Enhanced Cordless
Telecommunication (DECT)
Frequenzbereich 1,88–1,9 GHz (Bandbreite = 20 MHz)
Kanalbandbreite 1,728 MHz
Betriebsbereich Bis zu 300 m im Freien; Bis
zu 50 m in Gebäuden
Betriebsdauer Standby: 200 Stunden,
Gespräch: 14 Stunden
Akkuladezeit: ca. 15 Stunden
Temperaturbereich in Betrieb: 0° C - 40° C, Lagerung
(ausgeschaltet): -20° C - 60° C
Stromversorgung Ten Pao - S003IB0600045 / S003IV0600045
100-240VAC 50/60Hz 50mA, 6VDC 450mA
VTPL – VT04EEU06045 / VT04EUK06045
100-240VAC 50/60Hz 150mA, 6VDC 450mA
Ruijing - RJ-AS060450B001 /
RJ-AS060450E002 100-240VAC
50/60Hz 150mA, 6VDC 450mA
Informationen zum Akku:
Typ Ni-MH (nachladbarer Akku)
Betriebsspannung 600 mAh,
1,2 V Größe AAA
Anschlussspezifikationen:
Bei dem (mit der Stromversorgung verbundenen) Anschluss handelt
es sich um einen SELV-Anschluss gemäß EN41003.
Bei dem (mit der Telefonleitung verbundenen) Anschluss handelt es
sich um einen TNV-Anschluss gemäß EN41003.
Page 59

59
16 CE-KONFORMITÄTSERKLÄRUNG
Dieses Produkt entspricht den maßgeblichen Anforderungen und
anderen relevanten Bestimmungen der FuTKEE-Richtlinie 1999/5/EG.
Die Konformitätserklärung liegt vor unter: www.aegtelephones.eu
17 ENTSORGUNG DES GERÄTS
(UMWELTSCHUTZ)
Am Ende des Produktlebenszyklus sollten Sie dieses Gerät nicht über
den normalen Hausmüll entsorgen, sondern es zu einer Sammelstelle
für das Recycling von elektrischen und elektronischen Geräten
bringen. Das Symbol auf dem Produkt, auf der Bedienungsanleitung
DE
und/oder der Verpackung weist darauf hin. Einige der Materialien
können wiederverwendet werden, wenn diese an einer Recyclingstelle
abgegeben werden. Mit der Verwertung einiger Teile oder Rohstoffe
aus gebrauchten Produkten leisten Sie einen wichtigen Beitrag zum
Umweltschutz. Bitte setzen Sie sich mit Ihren örtlichen Behörden in
Verbindung, falls Sie mehr Informationen zu den Sammelstellen in
Ihrer Gegend benötigen.
Die Akkus müssen entfernt werden, bevor das Gerät entsorgt
wird. Die Akkus sind umweltschonend und gemäß den nationalen
Bestimmungen an Ihrem Wohnort zu entsorgen.
18 REINIGUNG UND PFLEGE
Reinigen Sie keine Teile Ihres Telefons mit Benzin, Verdünnungsmitteln
oder Chemikalien auf Lösungsmittelbasis, da dies zu bleibenden
Schäden führen kann, die nicht von der Garantie abgedeckt werden.
Reinigen Sie das Gerät, falls notwendig, mit einem feuchten Tuch.
Halten Sie Ihr Telefon von Hitze, Feuchtigkeit / Nässe oder starker
Sonneneinstrahlung fern.
Page 60

60
1 NOTRE ENGAGEMENT
Merci d‘avoir fait l‘acquisition de ce produit. Lors de la conception et
de l‘assemblage de ce produit, nous avons tout mis en œuvre afin de
vous protéger vous, ainsi que l‘environnement. C‘est la raison pour
laquelle nous accompagnons ce produit d‘un guide d‘installation
rapide visant à réduire le nombre de pages et ainsi à faire en sorte que
moins d‘arbres soient abattus pour fabriquer ce papier. Un guide de
l‘utilisateur complet et détaillé, décrivant toutes les fonctions, se trouve
sur notre site Web à l‘adresse suivante: www.aegtelephones.eu. Si
vous souhaitez utiliser l‘ensemble des fonctions avancées de votre
produit, veuillez télécharger le guide de l‘utilisateur complet. Pour
protéger l‘environnement, nous vous demandons de ne pas l‘imprimer
dans son intégralité. Merci de nous aider à protéger l‘environnement.
2 INSTRUCTIONS DE SÉCURITÉ IMPORTANTES
Afin de réduire le risque d‘incendie, de choc électrique et de blessures
lorsque vous utilisez votre téléphone, les précautions de sécurité de
base doivent toujours être respectées, y compris les mises en garde
suivantes:
1. Veillez à avoir lu et compris toutes les instructions.
2. Respectez tous les avertissements et les instructions figurant sur
le produit.
3. Débranchez ce produit de la prise murale avant le nettoyage.
N‘utilisez pas de produits de nettoyage liquides ou sous forme
d‘aérosol. Utilisez un chiffon humide pour le nettoyage.
4. Maintenez votre téléphone à l‘abri des conditions chaudes et
humides, ou ne l‘exposez pas à un fort ensoleillement et évitez de
le mouiller. Ne l‘utilisez pas à proximité d‘une source d‘eau (par
exemple, près d‘une baignoire, d‘un évier, d‘une piscine).
5. Ne surchargez pas les prises murales et rallonges, car cela
entraînerait un risque d‘incendie ou de choc électrique.
6. Débranchez ce produit de la prise murale et prenez contact avec
notre centre de réparation dans les conditions suivantes :
tle cordon d‘alimentation électrique ou la prise sont endommagés ;
tle produit ne fonctionne pas normalement lorsque vous respectez
les instructions de fonctionnement ;
Page 61

61
tle produit est tombé et le boîtier a été endommagé ;
tle produit montre une baisse indéniable de performances.
7. N‘utilisez JAMAIS votre téléphone à l‘extérieur pendant un orage.
Débranchez la base de la ligne téléphonique et de la prise secteur
en cas d‘orage à proximité. Les dommages causés par la foudre ne
sont pas couverts par la garantie.
8. N‘utilisez pas le téléphone pour signaler une fuite de gaz lorsque
vous vous trouvez vous-même à proximité de la fuite.
9. Utilisez uniquement les piles NiMH (Nickel-métal hydrure)
fournies ! Les durées d‘utilisation des combinés sont uniquement
applicables en cas d‘utilisation des piles installées par défaut.
10. L‘utilisation d‘autres types de piles ou de piles non rechargeables/
cellules primaires peut s‘avérer dangereuse. Cela peut entraîner
des interférences et/ou des dommages pour l‘unité ou les environs.
Le fabricant ne pourra être tenu responsable des dommages issus
de cette non-conformité.
11. N‘utilisez jamais de baies de chargement tierces. Les piles
pourraient s‘en trouver endommagées.
12. Veillez à ce que la polarité soit respectée lors de l‘insertion des
piles.
13. Mettez les piles au rebut en toute sécurité. Vous ne devez en aucun
cas les immerger dans de l‘eau, les brûler ou les placer quelque
part où elles risqueraient d‘être percées.
FR
3 UTILISATION CONFORME
Ce téléphone est destiné à être raccordé à un réseau téléphonique
analogique public ou à l‘extension analogique d‘un standard
téléphonique compatible.
4 DÉBALLAGE DE VOTRE TÉLÉPHONE
Le carton d‘emballage contient les éléments suivants :
t1 combiné
t1 station de base
t1 adaptateur secteur
t1 cordon pour la ligne téléphonique
Page 62

62
K
t2 piles rechargeables
t1 manuel de l‘utilisateur
Remarque:
Si vous avez un système Twin, Triple ou Quad, vous disposerez
également d‘un ou de plusieurs combiné(s) supplémentaire(s), d‘une
batterie et d‘un socle chargeur en plus pour chacun d‘entre eux.
Connexion du combiné à la base
tLors de l‘achat, tous les combinés sont déjà enregistrés sur l‘unité
de base.
tPour utiliser le combiné et la base conjointement, vous devez pouvoir
établir une connexion radio entre eux. Le signal entre le combiné
et la base est conforme aux normes habituelles d‘un téléphone
DECT: portée maximale jusqu‘à 300 mètres en extérieur et jusqu‘à
50 mètres en intérieur.
tLa plage de signaux peut diminuer si des objets métalliques
volumineux se trouvent entre le combiné et la base, par exemple,
un réfrigérateur, un miroir, une armoire d‘archives, des portes
métalliques ou du béton armé. La puissance du signal peut
également diminuer en présence d‘autres structures solides comme
des murs ou d‘autres interférences radio ou électriques.
tNe placez pas le combiné ou la base près d‘un autre téléphone, d‘un
téléviseur ou d‘un appareil audio, car ils pourraient provoquer des
interférences.
5 RÉGLAGE DE LA LANGUE DU COMBINÉ
tAppuyez sur
COMBINÉ» (HS SETTINGS).
et sur / pour sélectionner « RÉGL.
OK
tAppuyez sur
(LANGUAGE).
tAppuyez sur
tAppuyez sur
et sur / pour sélectionner « LANGUE»
OK
et sur / pour sélectionner la langue souhaitée.
O
pour confirmer.
OK
Page 63

6 DESCRIPTION DE VOTRE TÉLÉPHONE
6.1 Présentation du combiné (voir P1)
# Légende
Touche Haut
tEn mode inactif : appuyez pour accéder au journal.
tEn mode menu : appuyez pour faire défiler les
éléments du menu vers le haut.
63
1
2
OK
tDans le répertoire/la liste bis/le journal : appuyez
pour faire défiler la liste vers le haut.
tPendant un appel : appuyez pour augmenter le
volume de l‘écouteur ou du haut-parleur.
tPendant que la sonnerie retentit : appuyez pour
augmenter le volume de la sonnerie.
Touche de fonction gauche (Menu/OK)
tEn mode inactif : appuyez pour accéder au menu
principal.
tEn mode sous-menu : appuyez pour confirmer la
sélection.
tPendant un appel : appuyez pour accéder à
l‘interphone/le répertoire/le journal/la liste bis.
Décrocher
tEn mode inactif/numérotation préalable : appuyez
FR
3
4
pour passer un appel.
tDans la liste bis/le journal/le répertoire : appuyez
pour appeler l‘entrée affichée.
tPendant que la sonnerie retentit : appuyez pour
répondre à un appel.
Verrouillage clavier
tAppuyez sur cette touche et maintenez-la enfoncée
pour activer/désactiver le clavier.
tAppuyez sur cette touche et maintenez-la enfoncée
pour passer d‘un appel interne à un appel externe
lorsqu‘ils se produisent simultanément.
Page 64

64
Haut-parleur
tPendant un appel : appuyez pour activer/désactiver
le haut-parleur.
5
6
tEntrée du journal/du répertoire : appuyez pour
passer un appel avec le haut-parleur.
tPendant que la sonnerie retentit : appuyez pour
répondre à un appel avec le haut-parleur.
Touche de fonction droite (effacer/retour/muet/
interphone)
tEn mode menu principal : appuyez pour revenir à
l‘écran inactif.
tEn mode sous-menu : appuyez pour revenir au
niveau précédent.
tEn mode sous-menu : appuyez et maintenez
enfoncé pour revenir à l‘écran inactif.
tEn mode modification/numérotation préalable :
appuyez pour effacer un caractère/chiffre.
tEn mode modification/numérotation préalable :
7
appuyez et maintenez enfoncé pour supprimer tous
les caractères/chiffres.
tPendant un appel : appuyez pour activer/désactiver
le mode muet du microphone.
tAppuyez pour utiliser un autre combiné en tant
qu‘interphone
Raccrocher/On
tPendant un appel : appuyez pour mettre fin à un
appel et revenir à l‘écran inactif.
tEn mode menu/modification : appuyez pour revenir
au menu précédent.
tEn mode inactif : appuyez et maintenez enfoncé
pour arrêter le combiné.
tEn mode inactif (lorsque le combiné est arrêté) :
appuyez et maintenez enfoncé pour activer le
combiné.
Page 65

65
Touche Bas/Liste bis
tEn mode inactif : appuyez pour accéder à la liste bis.
tEn mode menu : appuyez pour faire défiler les
éléments du menu vers le bas.
8
9
10
11
R
tDans le répertoire/la liste bis/le journal : appuyez
pour faire défiler la liste vers le bas.
tPendant un appel : appuyez pour réduire le volume
de l‘écouteur ou du haut-parleur.
tPendant que la sonnerie retentit : appuyez pour
réduire le volume de la sonnerie.
FR
Désactiver la sonnerie
tAppuyez sur cette touche et maintenez-la enfoncée
pour activer/désactiver la sonnerie du combiné.
Touche Flash
tPendant un appel : appuyez pour générer un signal
de flash..
Répertoire
tAppuyez pour accéder au répertoire.
6.2 Écran du combiné sans fil (voir P2)
L‘écran LCD fournit des informations sur l‘état actuel du téléphone.
# Légende
Allumé fixe lorsque le combiné se trouve à portée de
la base.
Davantage de barres indiquent un signal réseau plus
puissant.
Indique qu‘un appel est en cours sur ce combiné.
Vous signale lorsque vous avez reçu un nouveau
message vocal. Étant donné qu‘il s‘agit d‘un service
réseau, veuillez contacter votre opérateur.
Indique que la sonnerie du combiné est désactivée.
Page 66

66
Indique lorsque le chargement de la pile est terminé.
Les segments se remplissent en alternance lorsque la
batterie est en cours de chargement.
Indique que la pile a besoin d‘être chargée.
Clignote lorsque le niveau de charge détecté est
faible.
Indique lorsqu‘il y a d‘autres caractères ou chiffres
devant ceux affichés.
(1) Allumé fixe lorsqu‘un appel de type interphone est
en cours.
Clignote lors de la réception d‘un appel entrant
interne.
Indique le mode mains libres/haut-parleur.
Allumé fixe lorsqu‘une alarme est activée.
Clignote lorsque l‘alarme retentit.
Indique que le clavier est verrouillé.
Indique lorsqu‘il y a d‘autres caractères ou chiffres
après ceux affichés.
Appuyez pour confirmer la sélection actuelle, le cas
échéant.
Appuyez pour accéder au menu principal.
Indique qu‘un nouvel appel se trouve dans la liste
d‘appels.
Indique que d‘autres options sont disponibles dans
les listes, au-dessus ou au-dessous.
Appuyez pour revenir au niveau de menu précédent
ou annuler l‘action en cours, le cas échéant.
Appuyez pour effacer un caractère, arrêter l‘alarme le
cas échéant ou activer/désactiver le mode muet du
microphone pendant un appel.
Page 67

(2) Appuyez pour passer un appel de type interphone.
6.3 Station de base filaire
# Légende
Vol - / Vol +
Appuyez dessus pour augmenter ou réduire le
67
12
13
14
15
volume du haut-parleur pendant la lecture du
message.
FR
Suivant
Appuyez dessus pour passer à un autre message
pendant la lecture.
Retour
Appuyez une fois dessus pour répéter la lecture du
message actuel depuis le début.
Appuyez deux fois dessus pour revenir à la lecture
du message précédent.
Lecture/pause
Appuyez dessus pour lire les messages.
Pendant la lecture d‘un message, appuyez sur cette
16
17
18
touche pour arrêter la lecture.
Effacer
Appuyez une fois dessus pour supprimer le message
pendant la lecture.
Appuyez sur cette touche et maintenez-la enfoncée
pour supprimer tous les anciens messages en mode
inactif.
Page
Appuyez dessus pour passer en revue tous les
combinés enregistrés.
Marche/Arrêt
Appuyez dessus pour activer/désactiver le
répondeur.
Page 68

68
6.4 Structure du menu
tEn mode inactif, appuyez sur
tAppuyez sur
menu.
tAppuyez sur
tAppuyez sur
6.5 Saisie de texte et de chiffres
En mode modification, un curseur apparaît pour indiquer la position
actuelle de saisie de texte. Il se trouve à la droite du dernier caractère
saisi.
Conseils d‘écriture:
tUne fois un caractère sélectionné, le curseur se déplace jusqu‘à la
position suivante après une brève pause.
tVous pouvez déplacer le curseur dans le corps du texte à l‘aide des
touches
/ pour modifier la saisie de texte.
/ pour accéder aux autres options de la liste du
pour accéder à un sous-menu ou à une fonction.
K
pour revenir au niveau précédent.
pour accéder à la liste du menu.
OK
tAppuyez sur
tAppuyez sur la touche
l‘ensemble de la chaîne de texte.
pour supprimer le dernier caractère.
et maintenez-la enfoncée pour supprimer
7 INSTALLATION DE VOTRE TÉLÉPHONE
7.1 Raccordement de la station de base (voir P5)
tBranchez le cordon d‘alimentation et celui de la ligne téléphonique
sur la station de base.
tBranchez l‘adaptateur secteur sur une prise secteur 100-240 V/50-
60 Hz et le cordon de la ligne téléphonique sur votre prise
téléphonique murale.
tUtilisez toujours les câbles fournis dans la boîte.
Avertissement:
Utilisez uniquement l‘adaptateur fourni. Le recours à d‘autres
alimentations électriques peut entraîner des dangers.
Installez l‘unité de base dans une position permettant à la fiche de
l‘adaptateur secteur d‘accéder facilement à une prise de courant. Ne
tentez jamais de rallonger le câble d‘alimentation secteur.
Page 69

69
Remarque :
L‘unité de base nécessite une alimentation secteur pour fonctionner
normalement et pas seulement pour charger les piles du combiné.
7.2 Mise en place et chargement des piles (voir P3)
tPlacez les 2 piles fournies dans le logement en respectant les repères
de polarité. Utilisez uniquement des piles rechargeables NiMH du
type fourni.
tPositionnez le couvercle du logement sur les piles et faites-le glisser
jusqu‘à ce qu‘il s‘enclenche.
tPlacez le combiné sur la base et laissez-le charger pendant 15 heures
avant de l‘utiliser pour la première fois. Le combiné émet un bip
lorsqu‘il est placé correctement sur la base ou le chargeur.
8 UTILISATION DE VOTRE TÉLÉPHONE
8.1 Passage d‘un appel
8.1.1 Numérotation préalable
Saisissez le numéro de téléphone (jusqu‘à 24 chiffres) et appuyez sur
ou sur pour vous connecter à la ligne téléphonique et composer
le numéro. Si vous commettez une erreur lors de la saisie du numéro,
appuyez sur
pour supprimer des chiffres.
FR
8.1.2 Numérotation directe
Appuyez sur
le numéro de téléphone.
Remarque :
Si vous insérez un chiffre erroné, vous ne pouvez pas le corriger avec
la touche
8.1.3 Appel depuis le répertoire
tAppuyez sur
pour sélectionner l‘entrée de répertoire souhaitée.
tAppuyez sur
sélectionnée.
ou sur pour vous connecter à la ligne, puis saisissez
.
pour accéder au répertoire, puis appuyez sur /
ou sur pour composer l‘entrée de répertoire
Page 70

70
K
K
Remarques
>Vous pouvez également accéder au répertoire en appuyant sur
,
.
O
>Les touches alphanumériques servent de raccourci pour rechercher
les entrées commençant par les lettres correspondantes.
8.1.4 Appel à partir du journal (uniquement disponible avec la
fonction d‘affichage du numéro de l‘appelant)
tAppuyez sur
sélectionner l‘entrée de journal souhaitée.
tAppuyez sur
journal sélectionnée.
Remarque :
Vous pouvez également accéder au journal en appuyant deux fois sur
.
O
8.1.5 Appel à partir de la liste bis
pour accéder au journal, puis appuyez sur / pour
ou sur pour composer le numéro de l‘entrée de
,
tAppuyez sur
pour sélectionner le numéro bis souhaité.
tAppuyez sur
8.1.6 Minuterie
Votre combiné décompte automatiquement la durée de chaque appel.
La minuterie apparaît dès que vous répondez à un appel ou appuyez
sur la touche
l‘appel terminé. Elle est exprimée au format heures, minutes et
secondes (HH:MM:SS).
8.2 Réponse à un appel
Si le combiné ne se trouve pas sur le réceptacle de chargement :
tLorsque le téléphone sonne, appuyez sur
à l‘appel.
pour accéder à la liste bis, puis appuyez sur /
ou sur pour composer le numéro bis sélectionné.
, et demeure à l‘écran pendant 5 secondes une fois
ou sur pour répondre
Remarque :
Si la fonction «DÉCR.AUTO.» (AUTO ANSWER) est définie sur «ON»
(ON), soulevez le combiné de la base ou du chargeur pour répondre
automatiquement à l‘appel sans devoir appuyer sur aucune touche.
Page 71

8.3 Fin d‘un appel
71
tPendant un appel, appuyez sur
OU
tPlacez le combiné sur la station de base ou sur le chargeur pour
mettre fin à l‘appel.
8.4 Combiné et haut-parleur
Pendant un appel, vous pouvez appuyer sur
mains libres à une utilisation normale du combiné et inversement.
8.5 Réglage du volume de l‘écouteur ou du haut-parleur
Vous pouvez faire votre choix parmi 5 niveaux (VOLUME 1 à VOLUME
5), tant pour le volume de l‘écouteur que celui du haut-parleur.
Pendant un appel :
tAppuyez sur
actuel est affiché.
Lorsque vous mettez fin à l‘appel, le réglage demeure au dernier
/ pour sélectionner le volume 1 à 5. Le paramètre
pour mettre fin à l‘appel.
pour passer du mode
FR
niveau sélectionné.
8.6 Désactivation de la sonnerie du combiné
tEn mode inactif, appuyez sur la touche
pour désactiver la sonnerie du combiné. L‘icône
l‘écran.
Remarque :
À l‘écran, l‘icône d‘appel clignote et la mention « Appel entrant »
(Incoming call) apparaît ou le numéro de l‘appelant s‘affiche en cas de
réception d‘un appel même si la sonnerie est désactivée.
tPour réactiver la sonnerie, appuyez à nouveau sur la touche
maintenez-la enfoncée.
8.7 Activation du verrouillage du clavier
et maintenez-la enfoncée
apparaît à
et
En mode inactif, appuyez sur la touche
pour activer le verrouillage du clavier. L‘icône
Remarque :
Vous pouvez toujours utiliser
combiné sonne.
pour répondre à un appel lorsque le
et maintenez-la enfoncée
apparaît à l‘écran.
Page 72

72
Pour désactiver le verrouillage du clavier, appuyez à nouveau sur la
touche
8.8 Rappel du dernier numéro
Vous pouvez rappeler n‘importe lequel des 10 derniers numéros
appelés. Si vous avez enregistré ce numéro sous un nom dans le
répertoire, le nom en question apparaît à la place de celui-ci.
Le dernier numéro apparaît en premier dans la liste bis.
8.8.1 Rappel d‘un numéro à partir de la liste bis
tEn mode inactif, appuyez sur
Remarque :
Si l‘entrée de liste bis indique un nom, appuyez sur #
le numéro correspondant.
tAppuyez sur
et maintenez-la enfoncée.
pour accéder à la liste bis.
pour afficher
/ pour parcourir la liste bis.
tAppuyez sur
Remarque :
Si la liste bis ne contient aucun numéro, l‘écran affiche la mention
«VIDE» (EMPTY).
8.9 Recherche du combiné
Vous pouvez localiser le combiné en appuyant sur la touche
station de base. Tous les combinés enregistrés sur la base émettent la
tonalité de recherche de base et affichent la mention «RECH. BASE»
(PAGING) à l‘écran. Vous pouvez interrompre la tonalité de recherche
de base en appuyant sur
nouveau sur
Remarque :
Si un appel entrant intervient pendant la recherche de base, le
pour composer le numéro de rappel sélectionné.
sur la
/ / sur n‘importe quel combiné ou à
sur la base.
téléphone fait retentir la sonnerie d‘appel entrant au lieu de la tonalité
de recherche de base.
Page 73

73
K
K
K
K
K
9 RÉPERTOIRE PRIVÉ
Chaque combiné peut stocker jusqu‘à 50 entrées de répertoire privé
regroupant des noms et des numéros. Chaque entrée de répertoire
peut comporter 24 chiffres au maximum pour le numéro de téléphone
et 14 caractères pour le nom. Vous pouvez également sélectionner
différentes sonneries pour vos entrées de répertoire.
Remarque :
Les différentes sonneries ne se font entendre à la réception d‘un appel
que si vous souscrivez à un service d‘affichage du numéro de l‘appelant
et que le numéro entrant correspond à un numéro enregistré.
Les entrées de répertoire sont enregistrées par nom, dans l‘ordre
alphabétique.
9.1 Ajout d‘une nouvelle entrée de répertoire
En mode inactif :
tAppuyez sur
tAppuyez sur
tAppuyez sur
tAppuyez sur
tAppuyez sur
souhaitée pour votre entrée de répertoire parmi les 10 sonneries
disponibles.
tAppuyez sur
9.2 Recherche d‘une entrée de répertoire
pour accéder au répertoire.
pour afficher «AJOUTER» (ADD).
O
, puis saisissez le nom.
O
, puis saisissez le numéro.
O
et sur / pour sélectionner la sonnerie
OK
pour enregistrer l‘entrée de répertoire.
O
FR
En mode inactif :
tAppuyez sur
OU
tAppuyez sur
(CONTACTS), puis appuyez sur
tSaisissez la première lettre du nom à l‘aide des touches
alphanumériques (par exemple, s‘il débute par C, appuyez trois
fois sur la touche 2), puis appuyez sur
jusqu‘à l‘entrée souhaitée.
pour accéder au répertoire.
et sur / pour sélectionner «RÉPERTOIRE»
O
pour accéder au répertoire.
OK
/ pour faire défiler la liste
Page 74

74
K
9.3 Modification d‘une entrée de répertoire
En mode inactif :
tAppuyez sur
tAppuyez sur
tAppuyez sur
(EDIT).
tAppuyez sur
tModifiez le nom et appuyez sur
tModifiez le numéro et appuyez sur
tAppuyez sur
pour confirmer.
9.4 Suppression d‘une entrée de répertoire
En mode inactif :
tAppuyez sur
tAppuyez sur
tAppuyez sur
(DELETE).
pour accéder au répertoire.
/ pour sélectionner l‘entrée de répertoire souhaitée.
, puis sur / pour sélectionner «MODIFIER»
OK
pour afficher le nom actuel.
OK
.
O
.
OK
/ pour modifier la sonnerie, puis appuyez sur
pour accéder au répertoire.
pour sélectionner l‘entrée de répertoire souhaitée.
, puis sur / pour sélectionner «SUPPRIMER»
OK
OK
tAppuyez sur
pour confirmer : l‘entrée est supprimée.
OK
10 AFFICHAGE DU NUMÉRO DE L‘APPELANT
(DÉPENDANT DU RÉSEAU)
Cette fonction est disponible si vous avez souscrit au service
d‘identification de l‘appelant auprès de votre prestataire de services
réseau. Votre téléphone peut mémoriser jusqu‘à 20 appels reçus
avec horodatage dans le journal. Le numéro apparaît sur l‘écran du
combiné lorsque le téléphone sonne. Si le numéro correspond à l‘une
des entrées de votre répertoire privé, le nom d‘appelant mémorisé
dans le répertoire privé apparaît en alternance avec le numéro et le
combiné fait retentir la sonnerie associée à cette entrée.
Si l‘appel provient de quelqu‘un ayant masqué son numéro, la mention
«MASQUÉ» (WITHHELD) apparaît.
Page 75

75
K
K
K
Si l‘appel provient de quelqu‘un dont le numéro n‘est pas disponible,
par exemple, un appel international ou provenant d‘un échange privé,
la mention «INDISPONIBLE» (UNAVAILABLE) apparaît.
Si vous avez des enregistrements de nouveaux appels, le combiné
affiche la mention « 1 NV APPEL» (1 NEW CALL) ou « X NVX
APPELS» (X NEW CALLS) (x = 2 à 20) en mode veille. L‘indication
NVX APPEL demeure affichée jusqu‘à ce que tous les enregistrements
de nouveaux appels aient été visualisés sur ce combiné.
10.1 Affichage du journal
Tous les appels reçus sont enregistrés dans le journal. Le dernier en
date apparaît en haut de la liste. Lorsque le nombre maximal d‘appels
du journal est atteint, l‘appel le plus ancien est remplacé par le
nouveau. Tout appel manqué n‘ayant pas été visualisé est marqué de
l‘icône
tAppuyez sur
tAppuyez sur
tAppuyez sur # pour afficher le numéro de l‘appelant s‘il y a lieu.
tAppuyez sur
(DETAILS), puis appuyez sur
de l‘appel ainsi que le nom ou le numéro. Appuyez sur # pour
visualiser la suite du nom ou du numéro, si nécessaire. Appuyez sur
OK
10.2 Suppression d‘une entrée du journal
au centre en bas de l‘écran.
pour accéder au journal.
/ pour sélectionner l‘entrée souhaitée.
, / pour afficher la fonction « DÉTAILS»
OK
pour afficher la date et l‘heure
O
pour revenir à l‘écran précédent.
FR
tSuivez les étapes 1 et 2 de la section 10.1.
tAppuyez sur
(DELETE).
tAppuyez sur
et sur / pour sélectionner «SUPPRIMER»
O
pour confirmer la suppression de l‘entrée.
O
Page 76

76
K
K
K
K
K
11 PARAMÈTRES DU TÉLÉPHONE
Votre téléphone est fourni avec un ensemble de paramètres que vous
pouvez modifier afin de personnaliser votre téléphone à votre guise.
11.1 Paramètres de date et d‘heure
Si vous souscrivez à un service d‘affichage du numéro de l‘appelant,
les paramètres de date et d‘heure sont mis à jour automatiquement
par le réseau lorsque vous recevez un appel entrant.
Le service d‘affichage du numéro de l‘appelant envoie uniquement le
mois et la date, mais sans l‘année. Par conséquent, vous pouvez être
amené à définir l‘année.
11.1.1 Modification du format de la date
tAppuyez sur
COMBINÉ» (HS SETTINGS).
tAppuyez sur
(DATE AND TIME).
tAppuyez sur
FORMAT).
tAppuyez sur
souhaité, JJ-MM-AA (DD-MM-YY) ou MM-JJ-AA (MM-DD-YY).
tAppuyez sur
11.1.2 Modification du format de l‘heure
tAppuyez sur
COMBINÉ» (HS SETTINGS).
tAppuyez sur
(DATE AND TIME).
tAppuyez sur
O
O
OK
O
et sur / pour sélectionner « RÉGL.
OK
et sur / pour sélectionner «DATE & HEURE»
pour afficher « FORMAT DATE» (DATE
OK
et sur / pour sélectionner le format de date
pour confirmer.
et sur / pour sélectionner « RÉGL.
OK
et sur / pour sélectionner «DATE & HEURE»
et sur / pour sélectionner « FORMAT
O
HEURE» (TIME FORMAT).
tAppuyez sur
souhaité (12 HEURES ou 24 HEURES).
tAppuyez sur
11.1.3 Réglage de l‘heure
tAppuyez sur
COMBINÉ» (HS SETTINGS).
tAppuyez sur
(DATE AND TIME).
et sur / pour sélectionner le format d‘heure
OK
pour confirmer.
OK
OK
et sur / pour sélectionner «DATE & HEURE»
O
et sur / pour sélectionner « RÉGL.
Page 77

77
K
K
K
K
K
tAppuyez sur
HEURE» (SET TIME).
tAppuyez sur
tAppuyez sur
Remarque :
Si l‘heure a été définie au préalable, l‘heure actuelle apparaît. Sinon, la
mention «Hh:mm» (HH:MM) s‘affiche.
11.1.4 Réglage de la date
tAppuyez sur
COMBINÉ» (HS SETTINGS).
tAppuyez sur
(DATE AND TIME).
tAppuyez sur
(SET DATE).
O
O
OK
OK
et sur / pour sélectionner « RÉGLER
OK
, puis saisissez l‘heure au format 24 heures.
pour confirmer.
et sur / pour sélectionner « RÉGL.
O
et sur / pour sélectionner «DATE & HEURE»
et sur / pour sélectionner «RÉGLER DATE»
FR
tAppuyez sur
section 10.1.1.
tAppuyez sur
Remarque :
Si la date a été définie au préalable, la date du jour apparaît. Sinon, la
date 01/01/13 s‘affiche.
11.2 Réglages du réveil
Il est possible sur ce téléphone de régler une heure de réveil. Le cas
échéant, l‘icône
du réveil est atteinte, l‘icône
(ALARM ON) s‘affichent en clignotant sur l‘écran du combiné, lequel
émet également une alarme pendant 45 secondes. Vous pouvez
appuyer sur n‘importe quelle touche pour désactiver l‘alarme. Si la
fonction Snooze est activée, l‘alarme retentira à nouveau au terme
O
, puis saisissez la date au format défini à la
O
pour confirmer.
s‘affiche sur l‘écran du combiné. Lorsque l‘heure
et la mention «ALARME ACTIVÉE»
d‘une période de sept minutes. Lorsque le réveil sonne, vous pouvez
également appuyez sur la touche
arrêter l‘alarme et désactiver la fonction Snooze.
Remarque :
>Pour arrêter la sonnerie, vous pouvez appuyer sur n‘importe quelle
touche du clavier, même si celui-ci est verrouillé.
et la maintenir enfoncée pour
Page 78

78
K
>Le volume de la sonnerie de l‘alarme est identique à celui de la
sonnerie du combiné. Si celui-ci est réglé en «VOLUME OFF»
(VOLUME OFF), l‘alarme sonnera toutefois au «VOLUME 1»
(VOLUME 1).
>Si l‘alarme est réglée et que l‘heure de réveil est atteinte, l‘icône
et la mention «ALARME ACTIVÉE» (ALARM ON) s‘afficheront
en clignotant même durant un appel interne ou externe. Le
téléphone émettra un son d‘alarme dans l‘écouteur pour informer
l‘utilisateur que l‘heure de réveil est atteinte. Dès que l‘utilisateur
appuie sur n‘importe quelle touche ou appuie sur la touche
la maintient enfoncée pour désactiver l‘alarme, l‘écran affiche à
nouveau la durée de l‘appel.
>L‘alarme ne retentit pas à l‘heure de réveil lorsque le téléphone
sonne ou pendant la recherche de base. Cependant, si la fonction
Snooze est activée et en l‘absence d‘appel entrant ou de recherche
de base, elle retentira à nouveau au terme d‘une période de sept
minutes.
11.2.1 Activation/désactivation du réveil
tAppuyez sur
COMBINÉ» (HS SETTINGS).
tAppuyez sur
tAppuyez sur
«OFF» (OFF).
tAppuyez sur
OK
O
OK
, puis sur / pour sélectionner « RÉGL.
OK
pour afficher «ALARME» (ALARM).
, puis sur / pour sélectionner «ON» (ON) ou
pour confirmer.
et
Remarque :
Après avoir sélectionné «On», vous êtes invité(e) à régler l‘heure du
réveil.
11.2.2 Réglage de l‘heure du réveil
tSuivez les étapes 1 à 4 de la section 11.2.1.
tSaisissez l‘heure du réveil au format 24 heures.
tAppuyez sur
tAppuyez sur
(OFF).
tAppuyez sur
/ pour sélectionner Snooze «ON» (ON) ou «OFF»
pour afficher «SNOOZE» (SNOOZE).
OK
pour confirmer le réglage du réveil.
OK
Page 79

79
K
K
K
K
K
K
K
11.3 Réglages du combiné
11.3.1 Réglage de la mélodie de la sonnerie pour les appels
externes
tAppuyez sur
COMBINÉ» (HS SETTINGS).
tAppuyez sur
(RINGER).
tAppuyez sur
EXT» (EXTERNAL RING).
tAppuyez sur
vous souhaitez entendre en recevant des appels externes.
tAppuyez sur
11.3.2 Réglage du volume de la sonnerie
tAppuyez sur
COMBINÉ» (HS SETTINGS).
tAppuyez sur
(RINGER).
tAppuyez sur
OK
OK
OK
O
OK
, puis sur / pour sélectionner « RÉGL.
O
, puis sur / pour sélectionner «SONNERIES»
, puis sur / pour sélectionner «SONNERIE
, puis sur / pour sélectionner la mélodie que
pour confirmer votre choix.
, puis sur / pour sélectionner « RÉGL.
O
, puis sur / pour sélectionner «SONNERIES»
, puis sur / pour sélectionner « VOL.
O
FR
SONNERIE» (RING VOLUME).
tAppuyez sur
sonnerie souhaité parmi
tVOLUME OFF ou Volumes de 1 à 5.
Remarque :
Le volume de sonnerie est émis lors de chaque sélection. Après avoir
sélectionné Volume off (Volume off), l‘icône
tAppuyez sur
11.3.3 Réglage du mode réponse auto
Si vous activez la réponse automatique, vous pouvez automatiquement
répondre à un appel en soulevant le combiné de la base ou du
chargeur, sans devoir appuyez sur aucun bouton.
tAppuyez sur
, puis sur / pour sélectionner le volume de
O
apparaît à l‘écran.
pour confirmer votre choix.
OK
et sur / pour sélectionner « RÉGL.
O
COMBINÉ» (HS SETTINGS).
tAppuyez sur
(AUTO ANSWER).
et sur / pour sélectionner «DÉCR.AUTO.»
O
Page 80

80
tAppuyez sur
réponse automatique.
tAppuyez sur
11.4 Réglages de base
11.4.1 Modifier le délai de rappel
Il est possible que vous deviez modifier le délai de rappel si votre
téléphone est connecté à standard téléphonique qui requiert un
délai de rappel différent. En matière de délai de rappel, les options
existantes sont «Court» (Short) (par défaut: 100ms), «Medium»
(Mid) (300ms) ou «Long» (Long) (600ms).
tAppuyez sur
BASE» (BS SETTINGS).
tAppuyez sur
(FLASH TIME).
et sur / pour activer ou désactiver la fonction
OK
pour confirmer.
OK
, puis sur / pour sélectionner « RÉGLAGE
OK
, puis sur / pour sélectionner « DÉLAI R»
OK
tAppuyez sur
souhaité (COURT (SHORT), MEDIUM (MID) ou LONG (LONG) – le
réglage actuel étant indiqué à l‘aide d‘un astérisque à droite).
tAppuyez sur
11.5 Enregistrement
Important :
Lorsque vous achetez votre système téléphonique, tous les combinés
sont déjà enregistrés sur votre base. Par conséquent, vous n‘avez pas
besoin de les enregistrer.
L‘enregistrement du combiné n‘est nécessaire que si vous achetez des
combinés supplémentaires ou si un combiné tombe en panne.
Vous pouvez enregistrer des combinés supplémentaires jusqu‘à un
maximum de 5 combinés par unité de base. Le numéro de chaque
combiné (1 à 5) apparaît sur son écran.
, puis sur / pour sélectionner le délai de rappel
OK
pour confirmer le réglage.
OK
Pour enregistrer un nouveau combiné sur votre base :
tAppuyez sur la touche
la enfoncée pendant plus de 5 secondes pour faire passer la
station de base en mode enregistrement. Elle demeure en mode
d‘enregistrement pendant env. 1 minute. La séquence suivante
devra être réalisée dans ce délai.
sur la station de base et maintenez-
Page 81

81
tAppuyez sur
(REGISTRATION).
tAppuyez sur
tSaisissez le code PIN du système à 4 chiffres (par défaut : 0000).
tAppuyez sur
«ATTENDEZ» (PLEASE WAIT).
Si l‘enregistrement du combiné a réussi, vous entendez un bip de
confirmation et l‘écran passe en mode inactif en affichant le nouveau
numéro du combiné. Le combiné est automatiquement associé au
numéro de combiné disponible suivant.
tSi l‘enregistrement du combiné a échoué, l‘écran affiche à nouveau
«ENREGISTRER COMBINÉ» (REGISTER HANDSET).
11.6 Réinitialisation de votre téléphone
Vous pouvez réinitialiser les réglages par défaut de votre téléphone.
Après une réinitialisation, tous vos réglages personnels, entrées du
et sur / pour sélectionner «ASSOCIATION»
OK
pour afficher «PIN:» (ENTER PIN).
OK
pour confirmer. L‘écran indique alors la mention
OK
FR
journal, entrées de liste bis et messages de répondeur sont effacés
mais votre répertoire reste inchangé.
tAppuyez sur
(RESET).
tAppuyez sur
tSaisissez le code PIN du système à 4 chiffres (par défaut : 0000).
tAppuyez sur
tAppuyez sur
téléphone sont réinitialisés.
OK
OK
et sur / pour sélectionner « DÉFAUT»
OK
pour afficher «PIN:» (ENTER PIN).
pour afficher «CONFIRMER?» (CONFIRM?).
pour confirmer et les réglages par défaut du
OK
12 RÉPONDEUR
Votre téléphone comprend un répondeur qui enregistre les appels
manqués lorsqu‘il est en marche. Le répondeur peut enregistrer
jusqu‘à 59messages dans le délai d‘enregistrement maximal d‘environ
15 minutes. Outre l‘enregistrement des messages entrants, vous
pouvez enregistrer des mémos pour les autres utilisateurs de votre
téléphone.
Si la mémoire du répondeur est saturée, le combiné affiche la mention
MEM REP SAT (TAM FULL) en alternance avec le nom des combinés
ou l‘heure selon le mode d‘affichage de veille du combiné défini. Vous
Page 82

82
K
K
devrez supprimer certains messages avant de pouvoir en enregistrer
d‘autres.
Certaines fonctions du répondeur peuvent être commandées à
partir de la base, y compris la lecture des messages et l‘activation ou
la désactivation du répondeur. Le répondeur peut également être
commandé et configuré à l‘aide des fonctions du menu du combiné
comme indiqué ci-dessous.
12.1 Activation/désactivation du répondeur
Vous pouvez activer ou désactiver le répondeur à l‘aide du combiné.
Lorsque le répondeur est configuré sur ON (ON), les appels font
l‘objet d‘une réponse à l‘issue de la temporisation définie et l‘appelant
peut vous laisser un message.
Lorsque le répondeur est configuré sur OFF (OFF), les appels font
l‘objet d‘une réponse après 14sonneries et le message REP. SEUL
(ANSWER ONLY) est diffusé à vos appelants. Ils ne seront pas en
mesure de vous laisser un message.
À l‘aide de la base :
tAppuyez sur
le répondeur.
À l‘aide du combiné :
tAppuyez sur
MACHINE).
tAppuyez sur
(TAM ON/OFF).
tAppuyez sur
(OFF).
tAppuyez sur
sur la base du téléphone pour activer ou désactiver
et sur / pour sélectionner REPONDEUR (ANS
OK
et sur / pour sélectionner REP. ON/OFF
O
et sur / pour sélectionner ON (ON) ou OFF
O
pour confirmer.
OK
>Si le répondeur est configuré sur ON (ON),
LCD du combiné.
>Si le répondeur est configuré sur OFF (OFF),
l‘écran LCD du combiné.
12.2 Écoute des messages du répondeur
Lorsque de nouveaux messages sont enregistrés sur le répondeur,
la mention
les nouveaux messages aient été écoutés. Une fois qu‘un nouveau
clignote sur l‘écran du combiné jusqu‘à ce que tous
apparaît sur l‘écran
n‘apparaît pas sur
Page 83

83
K
g
message a été écouté, il est automatiquement enregistré en tant
qu‘ancien message jusqu‘à sa suppression.
Les anciens messages sont lus à la suite des nouveaux.
tAppuyez sur
MACHINE).
tAppuyez sur
PLAYBACK).
tAppuyez sur
L‘écran affiche les informations de date et d‘heure concernant le
message reçu.
Remarque :
apparaît au centre en bas de l‘écran du combiné pour indiquer
qu‘il s‘agit d‘un nouveau message.
Lorsqu‘un message a été lu,
vous réécoutez ce message.
Remarque :
En l‘absence de messages, l‘écran du combiné indique brièvement
et sur / pour sélectionner REPONDEUR (ANS
OK
et sur / pour sélectionner LIRE MSG (MSG
OK
pour lancer la lecture du message via l‘écouteur.
O
disparaît et n‘apparaît pas lorsque
FR
00-00 00-00 avant de revenir à LIRE MSG (MSG PLAYBACK).
tPendant la lecture du message, appuyez sur
ou réduire respectivement le volume de lecture du message.
tAppuyez sur
TRANSFÉRER (FORWARD), PRÉCÉDENT (PREVIOUS) ou
SUPPRIMER (DELETE) pour exécuter les fonctions suivantes pendant
la lecture du message.
STOP (STOP) Arrête la lecture du message actuel et revient au
menu REPONDEUR.
TRANSFÉRER
(FORWARD)
Passe à la lecture du message suivant. Les
informations de date et d‘heure du message
suivant apparaissent en l‘absence d‘un autre
message.
et sur / pour sélectionner STOP (STOP),
OK
/ pour augmenter
PRÉCÉDENT
(PREVIOUS)
SUPPRIMER
(DELETE)
Répète la lecture du message actuel depuis le
début. Les informations de date et d‘heure du
message actuel s‘affichent.
Supprime le message actuel et le message suivant
est lu.
Page 84

84
Remarque :
Sinon, vous pouvez utiliser les touches de la base pour commander les
différentes opérations pendant la lecture des messages.
tAppuyez sur
tAppuyez une fois sur
depuis le début. Appuyez deux fois dessus pour revenir à la lecture
du message précédent.
tAppuyez sur
tAppuyez sur
12.3 Suppression de tous les messages du répondeur
tAppuyez sur
MACHINE).
tAppuyez sur
(DELETE ALL).
tAppuyez sur
tAppuyez sur
Remarque :
pour arrêter la lecture du message.
pour répéter la lecture du message actuel
pour passer à la lecture du message suivant.
pour supprimer le message actuellement lu..
et sur / pour sélectionner REPONDEUR (ANS
OK
et sur / pour sélectionner SUPPRIM.TOUT
OK
pour afficher CONFIRM? (CONFIRM?).
OK
pour supprimer tous les anciens messages.
OK
S‘il ne reste plus de messages sur le répondeur, la mention VIDE
(EMPTY) apparaît, puis le menu REPONDEUR (ANS MACHINE)
réapparaît.
12.4 Paramètres du répondeur
Vous pouvez utiliser le menu REGLAGES REP (TAM SETTINGS) du
combiné pour modifier les paramètres de votre répondeur.
12.4.1 Réglage du mode de réponse
Par défaut, le répondeur est configuré en mode REP. ENREG. (ANS
& REC) qui permet aux appelants de laisser un message. Ce mode
peut être changé en REP. SEUL (ANSWER ONLY) ne permettant pas
aux appelants de laisser un message. Dans ce cas, vos appelants sont
invités à rappeler ultérieurement.
tAppuyez sur
MACHINE).
et sur / pour sélectionner REPONDEUR (ANS
OK
tAppuyez sur
(TAM SETTINGS).
tAppuyez sur
(ANSWER MODE).
et sur / pour sélectionner REGLAGES REP
OK
et sur / pour sélectionner MODE REP.
OK
Page 85

85
K
K
tAppuyez sur
& REC) ou REP. SEUL (ANSWER ONLY).
tAppuyez sur
Lorsque la mémoire de votre répondeur est saturée et se trouve en
mode REP. ENREG. (ANS & RECORD), le mode de réponse passe
automatiquement à REP. SEUL (ANSWER ONLY). Le mode REP. ENREG.
(ANS & RECORD) est automatiquement réactivé lorsque certains
messages ont été supprimés.
12.4.2 Réglage de la langue de l‘annonce
Lorsqu‘il répond à l‘appel, le répondeur diffuse votre annonce. Une
annonce est prédéfinie pour chacun des modes REP & ENREG (ANS
& RECORD) ou REP. SEUL (ANSWER ONLY).
tAppuyez sur
MACHINE).
et sur / pour sélectionner REP. ENREG. (ANS
O
pour confirmer.
OK
et sur / pour sélectionner REPONDEUR (ANS
OK
FR
tAppuyez sur
(TAM SETTINGS).
tAppuyez sur
(TAM LANGUAGE).
tAppuyez sur
pour votre annonce.
tAppuyez sur
12.4.3 Enregistrement de votre propre annonce
Vous pouvez enregistrer votre propre annonce pour le mode REP &
ENREG (ANS & REC) ou REP. SEUL (ANSWER ONLY). Lorsque vous
enregistrez votre propre annonce, elle est utilisée lorsque le répondeur
répond à l‘appel. Si votre annonce personnalisée est supprimé,
l‘annonce prédéfinie est restaurée automatiquement.
tAppuyez sur
et sur / pour sélectionner REGLAGES REP
OK
et sur / pour sélectionner LANGUE REP
OK
et sur / pour sélectionner la langue souhaitée
O
pour confirmer.
OK
et sur / pour sélectionner REPONDEUR (ANS
OK
MACHINE).
tAppuyez sur
(TAM SETTINGS).
tAppuyez sur
(OGM SETTINGS).
tAppuyez sur
(ANS & RECORD) ou REP. SEUL (ANSWER ONLY).
et sur / pour sélectionner REGLAGES REP
OK
et sur / pour sélectionner ANNONCES
OK
et sur / pour sélectionner REP & ENREG
OK
Page 86

86
K
tAppuyez sur
et sur / pour sélectionner ENR MSG
OK
(RECORD MESS).
tAppuyez sur
pour lancer l‘enregistrement de votre annonce
OK
personnalisée. La mention ENREG (RECORDING) apparaît à l‘écran.
tAppuyez sur
pour arrêter et enregistrer votre annonce
O
personnalisée.
>L‘annonce que vous venez d‘enregistrer est lue automatiquement.
tSinon, appuyez sur
pour revenir à l‘écran précédent sans
enregistrer l‘annonce personnalisée.
13 RÉSOLUTION DES PROBLÈMES
Problème Causes Solutions
Pas de tonalité en
appuyant sur
t Le câble de
connexion de la
station de base
n‘est pas branché.
t L‘adaptateur
n‘est pas branché
correctement sur la
station de base.
t Un autre combiné
utilise la base pour
passer un appel.
t Cordon de la ligne
téléphonique
incorrect.
t Vérifiez les
connexions.
Débranchez et
rebranchez sur le
secteur. Vérifiez si le
cordon téléphonique
est bien branché
sur la station de
base et dans la prise
téléphonique.
t Vérifiez la prise de
la station de base
et celle de 230V
(débranchez, puis
rebranchez).
t Attendez que la ligne
ne soit plus occupée.
En me connectant à un
standard téléphonique,
aucune ou mauvaise
connexion après avoir
composé le numéro.
«HORS PORTÉE»
(OUT OF RANGE)
s‘affiche à l‘écran.
Il faut entrer un préfixe. Introduisez le préfixe
de numérotation.
t La station de base
est hors de portée.
t La station ne base
n‘est pas branchée
sur secteur
.
t Réduisez la portée.
t Branchez la station
de base sur secteur.
Page 87

87
Problème Causes Solutions
Rien ne s‘affiche. La pile est déchargée. Rechargez la pile.
14 GARANTIE ET SERVICE
Le téléphone est garanti 24 mois à compter de la date d‘achat indiquée
sur votre facture. Cette garantie ne couvre pas les défaillances
ou défauts dus à des accidents, à une utilisation non conforme,
à l‘usure ordinaire, à une négligence, à des défaillances de la ligne
téléphonique, à la foudre, à une altération de l‘équipement ou à toute
tentative de réglage ou de réparation qui ne serait pas réalisée par
des agents agréés.
Conservez bien votre facture : elle constitue votre garantie.
FR
14.1 Pendant que l‘unité est sous garantie
tDébranchez l‘unité de base de la ligne téléphonique et du secteur.
tEmballez l‘ensemble des pièces de votre téléphone en les replaçant
dans l‘emballage d‘origine.
tRetournez l‘unité au magasin où vous l‘avez achetée et veillez à
apporter votre facture.
tN‘oubliez pas d‘inclure l‘adaptateur secteur dans l‘emballage.
14.2 Une fois la garantie expirée
Si l‘unité n‘est plus sous garantie, contacteznous via www.aegtelephones.eu.
Ce produit fonctionne uniquement avec des piles rechargeables. Si
vous insérez des piles non rechargeables dans le combiné et que vous
le placez sur la base, le combiné sera endommagé et ces dommages
ne sont PAS couverts par la garantie.
Page 88

88
15 CARACTÉRISTIQUES TECHNIQUES
Standard Digital Enhanced Cordless (DECT)
Gamme de
fréquences
Largeur de
bande du canal
Plage de
fonctionnement
Temps de
fonctionnement
Plage de
température
Puissance
électrique
1,88 à 1,9 GHz (largeur de
bande = 20 MHz)
1,728 MHz
Jusqu‘à 300 m en extérieur ;
jusqu‘à 50 m en intérieur
En veille : 200 heures, en
conversation : 14heures
Délai de chargement des piles : 15 heures
En fonctionnement de 0°C à 40°C,
en rangement de -20°C à 60°C
Ten Pao - S003IB0600045 / S003IV0600045
100-240VAC 50/60Hz 50mA, 6VDC 450mA
VTPL – VT04EEU06045 / VT04EUK06045
100-240VAC 50/60Hz 150mA, 6VDC 450mA
Ruijing - RJ-AS060450B001 /
RJ-AS060450E002 100-240VAC
50/60Hz 150mA, 6VDC 450mA
Informations sur les piles:
Type Ni-MH (pile rechargeable)
Tension nominale 600mAh, 2 x 1,2VAAA
Caractéristiques du port:
Le port (connecté à l‘alimentation secteur) est un port SELV conforme
à la norme EN41003.
Le port (connecté à la ligne téléphonique) est un port TNV conforme
à la norme EN41003.
Page 89

89
16 DÉCLARATION CE
Ce produit est conforme aux exigences essentielles et à d‘autres
dispositions applicables de la directive R&TTE 1999/5/CE.
La déclaration de conformité se trouve sur
le site : www.aegtelephones.eu.
17 MISE AU REBUT DE L‘APPAREIL
(RESPECT DE L‘ENVIRONNEMENT)
Lorsque le produit est usagé, ne le jetez pas dans les ordures
ménagères: apportez-le à un point de collecte où ses composants
électriques et électroniques pourront être recyclés. Le symbole
figurant sur le produit, dans le guide de l‘utilisateur et/ou sur
l‘emballage l‘indique. Certains matériaux du produit sont réutilisables
si vous l‘apportez à un point de recyclage. En permettant la
réutilisation de certaines pièces ou matières premières de ces produits
usagés, vous apportez une contribution importante à la protection de
l‘environnement. Veuillez contacter les autorités locales si vous avez
besoin de davantage d‘informations concernant les points de collecte
de votre région.
La batterie doit être retirée avant la mise au rebut de
l‘appareil. Jetez la batterie en respectant l‘environnement et la
réglementation de votre pays.
FR
18 NETTOYAGE ET ENTRETIEN
Vous ne devez nettoyer aucune pièce de votre téléphone avec du
benzène, des diluants ou d‘autres produits chimiques solvants car
cela risque d‘entraîner des dommages irréversibles qui ne sont pas
couverts par la garantie.
Au besoin, nettoyez le téléphone avec un chiffon humide.
Faites en sorte que votre téléphone ne soit pas soumis à des
conditions chaudes et humides, ni à un fort ensoleillement et
évitez de le mouiller.
Page 90

90
1 ONZE ZORG
Wij willen u bedanken voor de aankoop van dit product. Bij
de ontwikkeling en montage van dit product stonden u en het
milieu centraal. Daarom krijgt u bij dit product een verkorte
installatiehandleiding, zodat er minder papier wordt gebruikt en
er dus minder bomen moeten worden gekapt. Een volledige,
gedetailleerde gebruikershandleiding met beschrijvingen van alle
functies vindt u op onze website, www.aegtelephones.eu. Hier
kunt u de gebruikershandleiding integraal downloaden zodat u alle
geavanceerde functies van uw product kunt gebruiken. Met het oog
op het milieu zouden wij u evenwel willen verzoeken om de volledige
handleiding niet af te drukken. Bedankt dat u ons steunt in onze zorg
voor het milieu.
2 BELANGRIJKE VEILIGHEIDSINSTRUCTIES
Wanneer u uw telefoon gebruikt, dient u steeds enkele fundamentele
veiligheidsvoorschriften in acht te nemen om het risico op brand,
elektrische schokken en letsel te beperken:
1. Lees alle instructies en zorg dat u ze begrijpt.
2. Houd rekening met alle waarschuwingen en instructies die op het
product zijn vermeld.
3. Verwijder de stekker van dit product uit het stopcontact voordat
u het reinigt. Gebruik geen vloeibare reinigingsmiddelen of
spuitbussen. Gebruik een vochtige doek om het toestel te reinigen.
4. Houd uw telefoon uit de buurt van warme, vochtige omgevingen
of direct zonlicht, maak het toestel niet nat en gebruik het niet in de
buurt van water (bad, gootsteen, zwembad enz.).
5. Zorg dat u de stopcontacten en verlengkabels niet overbelast om
brand en elektrische schokken te vermijden.
6. Haal dit product in de volgende omstandigheden uit het
stopcontact en raadpleeg ons servicecentrum:
tBij schade aan het netsnoer of de stekker.
tAls het product niet normaal werkt bij toepassing van de
gebruiksinstructies.
tAls men het product heeft laten vallen en de behuizing
beschadigd is.
tAls de prestaties van het product drastisch gewijzigd zijn.
Page 91

91
7. Gebruik uw telefoon NOOIT buiten tijdens een onweersbui.
Koppel het toestel los van de telefoonlijn en het stopcontact
wanneer het onweert in uw omgeving. Schade door blikseminslag
wordt niet gedekt door de garantie.
8. Gebruik de telefoon niet om een gaslek te melden wanneer u zich
in de buurt van het lek bevindt.
9. Gebruik alleen de meegeleverde NiMH-batterijen (nikkelmetaalhydride)! De gebruikstijden voor de handsets zijn alleen van
toepassing bij gebruik van batterijen met een standaardcapaciteit.
10. Het gebruik van andere batterijtypes of niet-oplaadbare batterijen/
primaire cellen kan gevaarlijk zijn. Dat kan leiden tot interferentie
en/of schade aan het toestel of de omgeving. De fabrikant kan niet
aansprakelijk worden gesteld voor schade door het niet-naleven
van deze voorschriften.
11. Gebruik geen laders van andere fabrikanten. Zij kunnen de
batterijen beschadigen.
12. Zorg dat de batterijen volgens de juiste polariteit zijn geplaatst.
13. Doe batterijen veilig weg. U mag ze niet onderdompelen in water,
verbranden of achterlaten op plaatsen waar ze mogelijk doorboord
worden.
3 BEDOELD GEBRUIK
Deze telefoon is bedoeld voor aansluiting op een openbaar analoog
telefoonnetwerk of een analoge verlenging van een compatibel PBXsysteem.
NL
4 DE VERPAKKING VAN UW
TELEFOON VERWIJDEREN
De verpakking bevat het volgende:
t1 handset
t1 basisstation
t1 netvoedingsadapter
Page 92

92
t1 telefoonsnoer
t2 oplaadbare batterijen
t1 handleiding
Opmerking:
Als u een Twin, Triple of Quad-systeem hebt, hebt u ook extra
handset(s), batterijen en een lader voor elke extra handset.
Handset - Verbinding met het basisstation
tBij aankoop van het toestel zijn alle handsets al bij de basiseenheid
aangemeld.
tAls u de handset en de basiseenheid samen wilt gebruiken, moet er
een radioverbinding tussen beide toestellen gemaakt worden. Het
signaal tussen de handset en het basisstation is in overeenstemming
met de normale normen voor een DECT-telefoon: maximaal bereik
buiten tot 300 meter en binnen tot 50 meter.
tHet signaalbereik kan afnemen als er grote voorwerpen tussen
de handset en de basiseenheid staan, zoals een koelkast, spiegel,
archiefkast, metalen deuren of gewapend beton. De sterkte van het
signaal kan ook worden beperkt door andere massieve structuren
zoals muren of door andere radio- of elektrische signalen.
tZet de handset of het basisstation niet vlak bij een andere telefoon,
een televisie of audioapparatuur - deze apparaten kunnen storing
veroorzaken.
5 DE TAAL VAN DE HANDSET INSTELLEN
tDruk op
selecteren.
tDruk op
en / om “HANDSET INST” (HS SETTINGS) te
OK
en / om “TAAL” (LANGUAGE) te selecteren.
OK
tDruk op
tDruk op
en / om de gewenste taal in te stellen.
OK
om te bevestigen.
OK
Page 93

6 UW TELEFOON
6.1 Overzicht handset (zie P1 op pagina 2)
# Betekenis
Omhoog
tIn de stand-bymodus: indrukken om de oproeplijst
te openen
tIn menumodus: indrukken om omhoog te gaan in
het menu
93
1
2
OK
tIn telefoonboek / herhaallijst / oproeplijst: indrukken
om omhoog te gaan in de lijst
tTijdens een telefoongesprek: indrukken om
het volume van de handset of de luidspreker te
verhogen
tTijdens het rinkelen: indrukken om het belvolume te
verhogen
Softtoets links (Menu/OK)
tIn de stand-bymodus: indrukken om het hoofdmenu
te openen
tIn submenumodus: indrukken om de selectie te
bevestigen
tTijdens een telefoongesprek: indrukken om de
intercom / het telefoonboek / de herhaallijst / de
oproeplijst te gebruiken
NL
3
Van de haak
tIn de stand-by-/voorkiesmodus: indrukken om een
oproep te maken
tIn de herhaallijst / de oproeplijst / het telefoonboek:
indrukken om een oproep te maken naar het
weergegeven nummer
tTijdens het rinkelen: indrukken om een oproep te
beantwoorden
Page 94

94
Toetsenvergrendeling
tIngedrukt houden om het toetsenbord te
4
5
vergrendelen/ontgrendelen.
tIngedrukt houden om te wisselen tussen externe en
interne oproepen als beide zijn ingesteld.
Handenvrije modus
tTijdens een telefoongesprek: indrukken om de
handenvrije modus in/uit te schakelen.
tContactpersoon in oproeplijst / telefoonboek:
indrukken om een oproep te maken met de
handenvrije modus
tTijdens het rinkelen: indrukken om een oproep met
de handenvrije modus te beantwoorden
Softtoets rechts (wissen/terug/microfoon
uitschakelen/intern gesprek)
tIn hoofdmenumodus: indrukken om naar het
standby-display te gaan
6
tIn submenumodus: indrukken om naar het vorige
niveau te gaan
tIn submenumodus: ingedrukt houden om terug te
keren naar het standby-display
tIn de bewerkings-/voorkiesmodus: indrukken om
een teken/cijfer te wissen
tIn de bewerkings-/voorkiesmodus: ingedrukt
houden om alle tekens/cijfers te wissen
tTijdens een telefoongesprek: indrukken om de
microfoon uit te schakelen/te activeren
tIn standby-modus: indrukken om een intern gesprek
met een andere handset te voeren
Page 95

95
Op de haak / AAN
tTijdens een telefoongesprek: indrukken om het
gesprek te beëindigen en om terug te gaan naar
het standby-display
7
8
tIn de menu-/bewerkingsmodus: indrukken om terug
te gaan naar het vorige menu
tIn de stand-bymodus: ingedrukt houden om de
handset uit te schakelen
tAls de handset is uitgeschakeld: Ingedrukt houden
om de handset in te schakelen
Omlaag/Herhaallijst
tIn de stand-bymodus: indrukken om de herhaallijst
te openen
tIn menumodus: indrukken om omlaag te gaan in het
menu
tIn telefoonboek / herhaallijst / oproeplijst: indrukken
om omlaag te gaan in de lijst
tTijdens een telefoongesprek: indrukken om het
volume van de handset of luidspreker te verlagen
NL
tTijdens het rinkelen: indrukken om het belvolume te
verlagen
Beltoon uit
9
10
11
6.2 Display draadloze handset (zie P2 op pagina 2)
Het lcd-scherm geeft informatie over de huidige status van de
telefoon.
R
tIngedrukt houden om de beltoon van de handset
uit of weer in te schakelen.
Flash-toets
tTijdens een telefoongesprek: indrukken om een
flashsignaal te genereren
Telefoonboek
tIndrukken om het telefoonboek te openen.
Page 96

96
# Betekenis
Is opgelicht wanneer de handset binnen bereik van
het basisstation is.
Hoe meer balkjes, hoe sterker het signaal.
Geeft aan dat er een gesprek wordt gevoerd met die
handset.
Geeft aan dat u een nieuw voicemailbericht hebt. Dit
is een netwerkdienst, neem hiervoor contact op met
uw aanbieder.
Geeft aan dat de beltoon van de handset is
uitgeschakeld.
Geeft aan dat de batterij volledig is opgeladen.
De interne segmenten bewegen tijdens opladen van
de batterij.
Geeft aan dat de batterij moet worden opgeladen.
Knippert bij een laag batterijniveau.
Geeft aan dat er meer tekens of cijfers staan vóór de
tekens/cijfers die worden weergegeven.
(1) Is opgelicht wanneer er een intern gesprek wordt
gevoerd. Knippert bij een inkomende interne oproep.
Geeft de handenvrije modus aan.
Is opgelicht wanneer er een alarm is ingesteld.
Knippert wanneer het alarm weerklinkt.
Geeft aan dat het toetsenbord is vergrendeld.
Geeft aan dat er meer tekens of cijfers staan na de
tekens/cijfers die worden weergegeven.
Indrukken om de huidige selectie te bevestigen, waar
van toepassing.
indrukken om het hoofdmenu te openen.
Page 97

97
Geeft een nieuwe oproep in de oproeplijst aan.
Geeft aan dat er hoger of lager in de lijst nog meer
opties zijn.
Indrukken om terug te gaan naar het vorige
menuniveau of de huidige handeling te annuleren,
waar van toepassing.
Indrukken om een teken te wissen, het alarm te
stoppen, waar van toepassing, of de microfoon
tijdens een gesprek uit/in te schakelen.
(2) Indrukken om een intern gesprek te starten.
6.3 Basisstation
# Betekenis
Vol - / Vol +
Indrukken om het volume van de luidspreker
12
13
14
tijdens het afspelen van berichten te verhogen of te
verlagen.
Snel vooruit
Indrukken om naar een bericht te gaan tijdens het
afspelen.
Snel achteruit
Eén keer indrukken om het huidige bericht opnieuw
vanaf het begin af te spelen.
NL
15
Druk twee keer om terug te gaan naar het vorige
bericht.
Afspelen/stoppen
Indrukken om berichten af te spelen.
Druk tijdens het afspelen van berichten op deze
toets om het afspelen stop te zetten.
Page 98

98
Wissen
Eén keer indrukken om het spraakbericht te wissen
16
17
18
6.4 Menustructuur
tDruk in de stand-bymodus op
tDruk op
tDruk op
tDruk op
/ om naar andere opties in de menulijst te gaan.
om naar het vorige niveau te gaan.
tijdens het afspelen.
Ingedrukt houden om alle oude berichten te wissen
in de stand-bymodus.
Paging
Indrukken om alle geregistreerde handsets te
pagen.
Aan/uit
Indrukken om het antwoordapparaat IN/UIT te
schakelen.
om een submenu of functie te openen.
K
om naar de menulijst te gaan.
OK
6.5 Tekst en cijfers invoeren
In de bewerkingsmodus wordt er een cursor weergegeven op de
huidige invoerpositie voor tekst. Deze staat rechts van het laatste
teken dat u hebt ingevoerd.
Schrijftips:
tAls er een teken geselecteerd is, gaat de cursor na een korte pauze
naar de volgende positie.
tU kunt de cursor binnen de tekst verplaatsen met de toetsen
om de ingevoerde tekst aan te passen.
tDruk op
tHoud
om het laatste teken te wissen.
ingedrukt om de hele tekstreeks te wissen.
/
Page 99

99
7 UW TELEFOON INSTALLEREN
7.1 Het basisstation aansluiten (zie P5 op pagina 2)
tSluit het netsnoer en telefoonsnoer aan op het basisstation.
tSteek de netvoedingsadapter in een stopcontact van 100 - 240 V /
50 - 60 Hz en het telefoonsnoer in de telefooncontactdoos.
tGebruik altijd de kabels die in de doos worden meegeleverd
Waarschuwing:
Gebruik alleen de meegeleverde adapter. Andere adapters kunnen
risico‘s inhouden.
Plaats het basisstation op een plek waar u de netsnoerstekker kunt
aansluiten op een gemakkelijk toegankelijk stopcontact. Probeer
nooit het netsnoer te verlengen.
Opmerking:
Het basistoestel heeft een stopcontact nodig om normaal te
functioneren, niet alleen om de batterijen van de handset op te laden.
7.2 De batterijen plaatsen en opladen (zie P3 op pagina 2)
tPlaats de 2 meegeleverde batterijen conform de
polariteitsaanduidingen in het batterijcompartiment (zie afbeelding).
Gebruik alleen de meegeleverde, oplaadbare NiMH-batterijen.
tPlaats de afdekking van het batterijcompartiment over de batterijen
en schuif ze omhoog tot ze klikt.
tPlaats de handset op het basisstation en laad deze gedurende 15 uur
op alvorens u de handset voor het eerst gebruikt. De handset piept
kort wanneer hij correct op het basisstation of de lader is geplaatst.
NL
8 UW TELEFOON GEBRUIKEN
8.1 Een oproep maken
8.1.1 Voorkiezen
Voer het telefoonnummer in (maximaal 24 cijfers) en druk op
verbinding te maken en het nummer te bellen. Als u bij de invoer van
het nummer een fout maakt, druk dan op
om cijfers te wissen.
of om
Page 100

100
K
8.1.2 Direct kiezen
Druk op
of om verbinding te maken en voer vervolgens het
telefoonnummer in.
Opmerking:
Als u een verkeerd cijfer hebt ingevoerd, kunt u dit niet corrigeren
met de toets
.
8.1.3 Een nummer uit het telefoonboek bellen
tDruk op
om het telefoonboek te openen en druk op / om de
gewenste contactpersoon te selecteren.
tDruk op
of om de geselecteerde contactpersoon te bellen.
Opmerkingen:
>U kunt het telefoonboek ook openen door op
, ,
te drukken.
O
>De alfanumerieke toetsen fungeren als snelkoppeling naar
contactpersonen met de overeenkomstige letters.
8.1.4 Een nummer van de oproeplijst bellen (alleen
beschikbaar met nummerweergave)
tDruk op
om de oproeplijst te openen en druk op / om het
gewenste nummer in de oproeplijst te selecteren.
tDruk op
of om het geselecteerde nummer in de oproeplijst te
bellen.
Opmerking:
U kunt de oproeplijst ook openen door twee keer op
te drukken.
OK
8.1.5 Nummerherhaling
tDruk op
om de herhaallijst te openen en druk op / om het
gewenste nummer in de herhaallijst te selecteren.
tDruk op
of om het geselecteerde nummer te bellen.
8.1.6 Gesprekstimer
Uw handset registreert automatisch de duur van elk gesprek.
De timer wordt weergegeven zodra u een oproep beantwoordt of als
u op de toets
drukt. De timer blijft 5 seconden na het einde van
het gesprek op het display staan. De tijd wordt weergegeven in uren,
minuten en seconden (UU:MM:SS).
 Loading...