

Page 1

HC452020EB
EN
HOB USER MANUAL
ET PLIIDIPLAAT KASUTUSJUHEND 18
FI
KEITTOTASO KÄYTTÖOHJE
FR
TABLE DE CUISSON NOTICE D'UTILISATION
34
50
2
Page 2
2
FOR PERFECT RESULTS
Thank you for choosing this AEG product. We have
created it to give you impeccable performance for many
years, with innovative technologies that help make life
simpler – features you might not find on ordinary
appliances. Please spend a few minutes reading to get the
very best from it.
ACCESSORIES AND CONSUMABLES
In the AEG webshop, you’ll find everything you need to
keep all your AEG appliances looking spotless and
working perfectly. Along with a wide range of accessories
designed and built to the high quality standards you
would expect, from specialist cookware to cutlery baskets,
from bottle holders to delicate laundry bags…
Visit the webshop at:
www.aeg-electrolux.com/shop
Page 3

CONTENTS
4 Safety information
5 Installation instructions
9 Product description
10 Operating instructions
14 Helpful hints and tips
15 Care and cleaning
16 What to do if…
17 Environment concerns
Contents
3
The following symbols are used in this user
manual:
Important information concerning your
personal safety and information on how to
avoid damaging the appliance.
General information and tips
Environmental information
Subject to change without notice
Page 4
4 Safety information
SAFETY INFORMATION
For your safety and correct operation of the appliance, read this manual carefully before
installation and use. Always keep these instructions with the appliance even if you move or
sell it. Users must fully know the operation and safety features of the appliance.
General safety
WARNING!
Persons (including children) with reduced physical sensory, mental capabilities or lack of experience and knowledge must not use the appliance. They must have supervision or instruction for the operation of the appliance by a person responsible for their safety.
Child safety
• Only adults can use this appliance. Children must get supervision to make sure that they
do not play with the appliance.
• Keep all packaging away from children. There is a risk of suffocation.
• Keep children away from the appliance when it is on.
WARNING!
Start the child safety device to prevent small children and pets from an accidental activation of the appliance.
Safety during operation
• Remove all packaging, stickers and layers from the appliance before the first use.
• Set the cooking zones to "off" after each use.
• Risk of burns! Do not put cutlery or saucepan lids on the cooking surface, as they can
become hot.
WARNING!
Fire danger! Overheated fats and oils can ignite very quickly.
Correct operation
• Always monitor the appliance during operation.
• Only use the appliance for domestic cooking tasks!
• Do not use the appliance as a work or a storage surface.
• Do not put or keep very flammable liquids and materials, or fusible objects (made of
plastic or aluminium) on or near the appliance.
• Be careful when you connect the appliance to the near sockets. Do not let electricity
bonds touch the appliance or hot cookware. Do not let electricity bonds tangle.
How to prevent a damage to the appliance
• If the objects or cookware fall on the glass ceramic, the surface can be damaged.
• Cookware made of cast iron, cast aluminium or with damaged bottoms can scratch the
glass ceramic if you move them on the surface.
Page 5

Installation instructions
• Do not let cookware boil dry to prevent the damage to cookware and glass ceramics.
• Do not use the cooking zones with empty cookware or without cookware.
• Do not cover any part of the appliance with aluminium foil.
WARNING!
If there is a crack on the surface, disconnect power supply to prevent the electric shock.
INSTALLATION INSTRUCTIONS
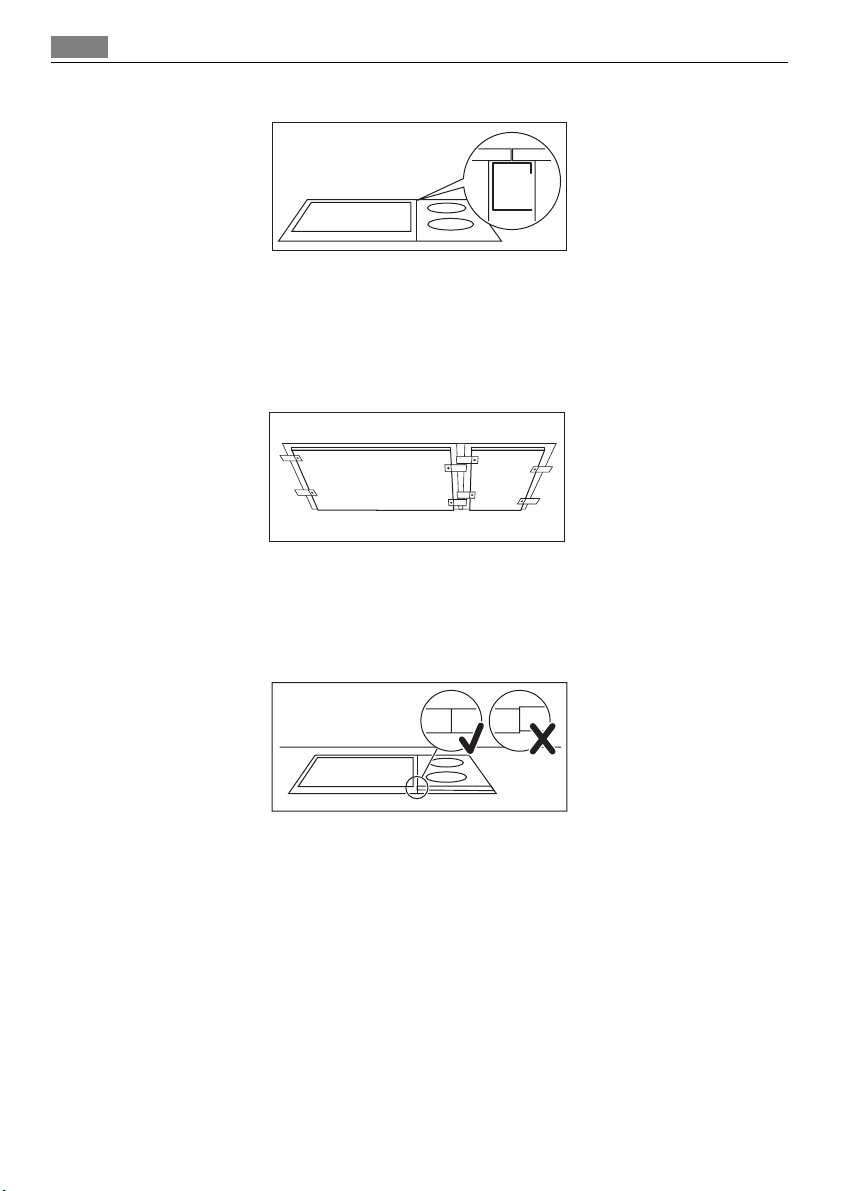
Before the installation , note down the serial number (Ser. Nr.) from the rating plate. The
rating plate of the appliance is on its lower casing.
Made in Switzerland
220-240V ~50/60Hz
3,5 kW
Typ: 55FED02BO
Safety instructions
WARNING!
You must read these!
Make sure that the appliance is not damaged because of transportation. Do not connect a
damaged appliance. If it is necessary, speak to the supplier.
Only an authorised service technician can install, connect or repair this appliance. Use only
original spare parts.
Only use built-in appliances after you assemble the appliance into correct built-in units and
work surfaces that align to the standards.
Do not change the specifications or modify this product. Risk of injury and damage to the
appliance.
Fully obey the laws, ordinances, directives and standards in force in the country where you
use the appliance (safety regulations, recycling regulations, electrical safety rules etc.)!
Keep the minimum distances to other appliances and units!
Install anti-shock protection, for example install the drawers only with a protective floor
directly below the appliance!
Protect the cut surfaces of the worktop against moisture with a correct sealant!
Seal the appliance to the work top with no space left with a correct sealant!
Protect the bottom of the appliance from steam and moisture, e.g. from a dishwasher or
oven!
Do not install the appliance adjacent to doors and below windows! If not, hot cookware can
be hit off the hob when you open doors or windows.
PNC: 941 560 803/00
Serie:
HC452020EB
5
WARNING!
Risk of injury from electrical current. Carefully obey the instructions for electrical connections.
• The electrical mains terminal is live.
• Make electrical mains terminal free of voltage.
Page 6
6 Installation instructions
• Install correctly to give anti-shock protection.
• Loose and incorrect plug and socket connections can make the terminal become too hot.
• A qualified electrician must install the clamping connections correctly.
• Use a strain relief clamp on cable.
• Use the correct mains cable of type H05BB-F Tmax 90°C (or higher) for a single-phase.
• Replace the damaged mains cable with a special cable (type H05BB-F Tmax 90°C; or
higher). Speak your local Service Force Centre.
The appliance must have the electrical installation which lets you disconnect the appliance
from the mains at all poles with a contact opening width of minimum 3 mm.
You must have correct isolation devices: line protecting cut-outs, fuses (screw type fuses
removed from the holder), earth leakage trips and contactors.
If, you use the accessory frame C-FRAME, first read the instruction supplied with the frame
before you install the appliance.
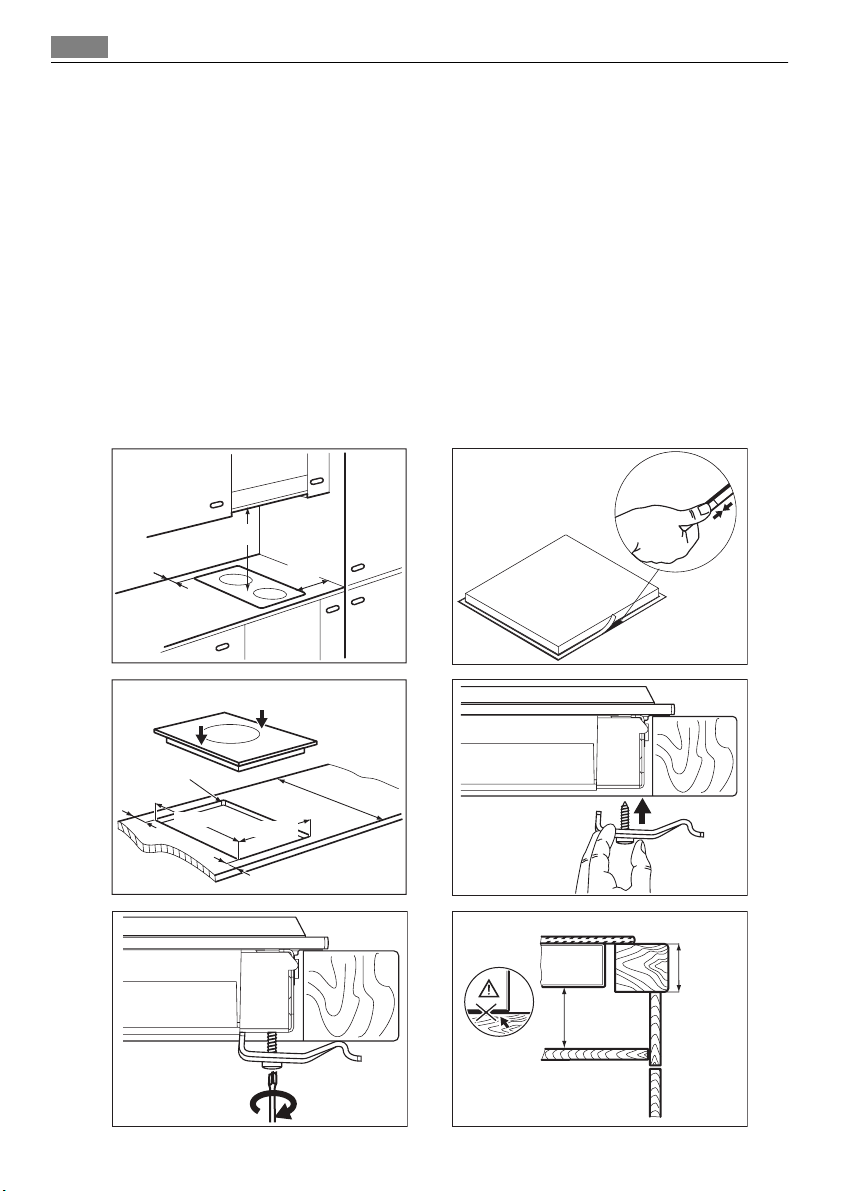
Assembly
min. 500mm
min.
50mm
min. 50mm
=
R 5mm
490
+1
mm
=
340+1mm
600mm
min.
20 mm
min.
25 mm
Page 7
Installation instructions 7
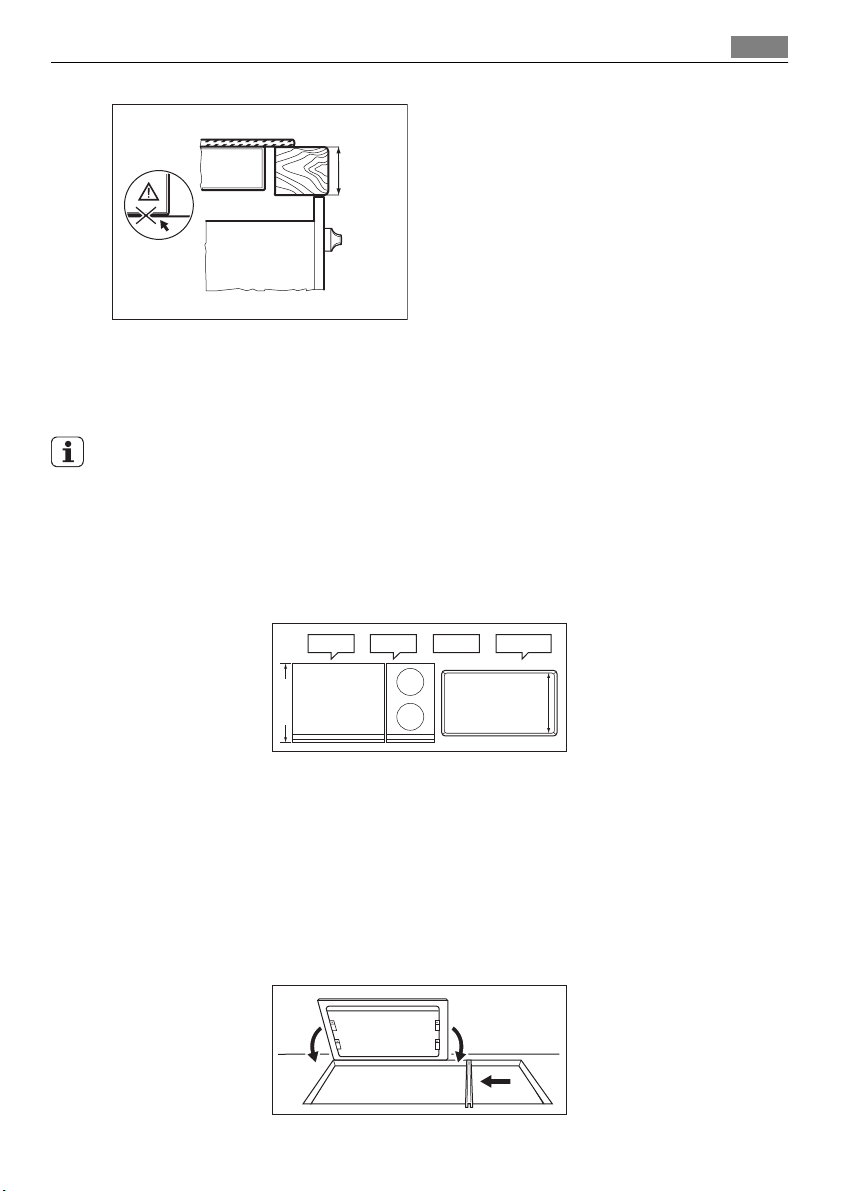
min.
28 mm
The installation of more than one appliance
Added parts: connection bar(s), heat resistant silicon, rubber shape, sealing strap.
Only use special a heat - resistant silicon.
The worktop cut out
Distance from the wall : minimum 50 mm
Depth : 490 mm
Width : sum widths of all the appliances to be built-in and subtract 20 mm (see also "Overview of all appliance widths" )
Example :
+-=
580 mm
360 mm
20 mm 920 mm
520 mm
490 mm
The installation of more than one appliance
1. Put down the dimension of the worktop cut out and saw it out.
2. Put the appliances one at time on some soft surface, a blanket for example, with the
bottom side up.
3. Put the seal stripe around the lower edge of the appliance along the outer edge of the
glass ceramic.
4. Loosely screw the fixing plates into the appropriate holes in the protective casing.
5. Put the first appliance in the worktop cut out. Put the connection bar in the worktop
cut out and push up half of the width against the appliance.
Page 8
8 Installation instructions
6. Loosely turn in fixing plates from below on the worktop and on the connection bar.
7. Put the subsequent appliance in the worktop cut out . Make sure that the front ends
of the appliances are on the same level.
8. Tighten the fixing plate / retaining grip screws.
9. Put the silicon into the space between the appliances.
10. Put some soapy water on the silicon.
11. Press the rubber shape with some strength against the glass ceramic and move it
slowly along the space.
12. Do not touch the silicon until it become hard, it can last about a day.
13. Carefully remove silicon that came out with a shaving blade.
14. Clean glass ceramic fully.
Page 9
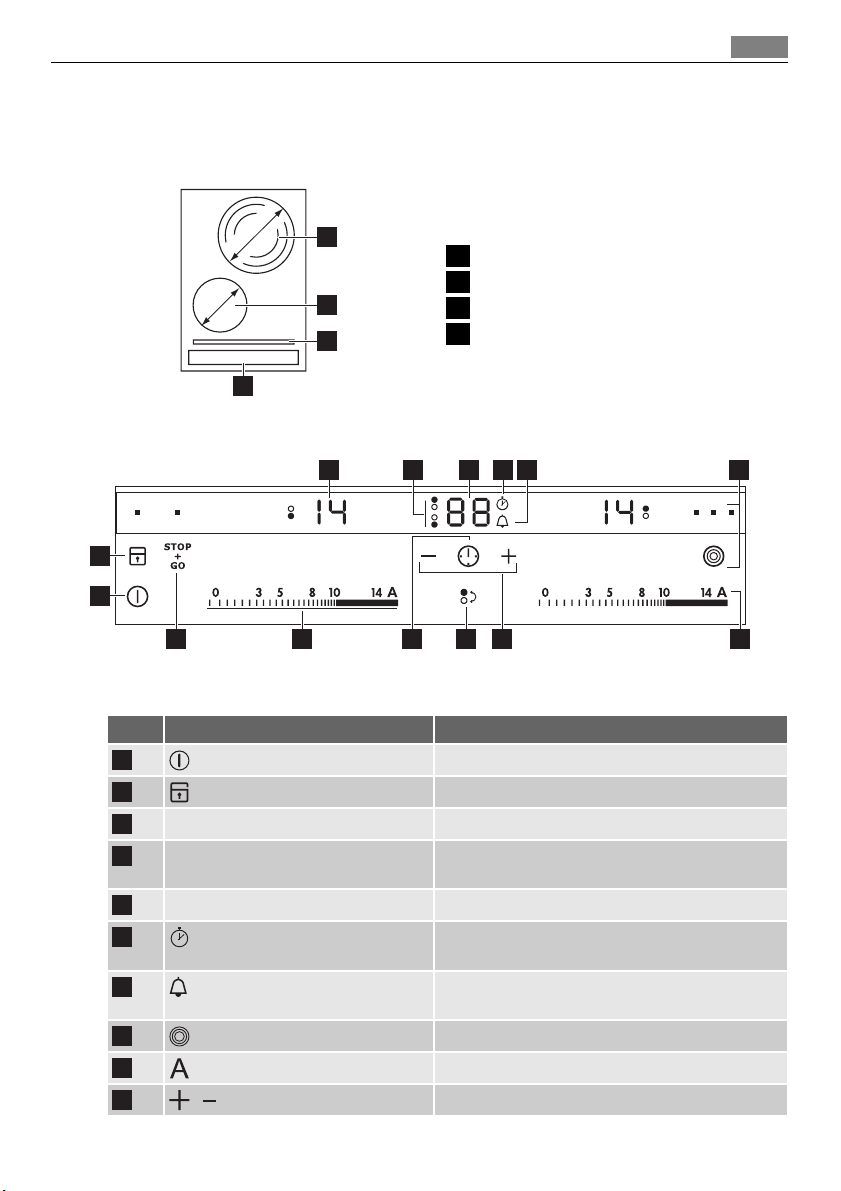
PRODUCT DESCRIPTION
General overview
Product description 9
mm
120/175/210
1
1 Triple cooking zone 800/1600/2300W
2 Cooking zone 1200W
145
mm
4
2
3
3 Glass bar
4 Control panel
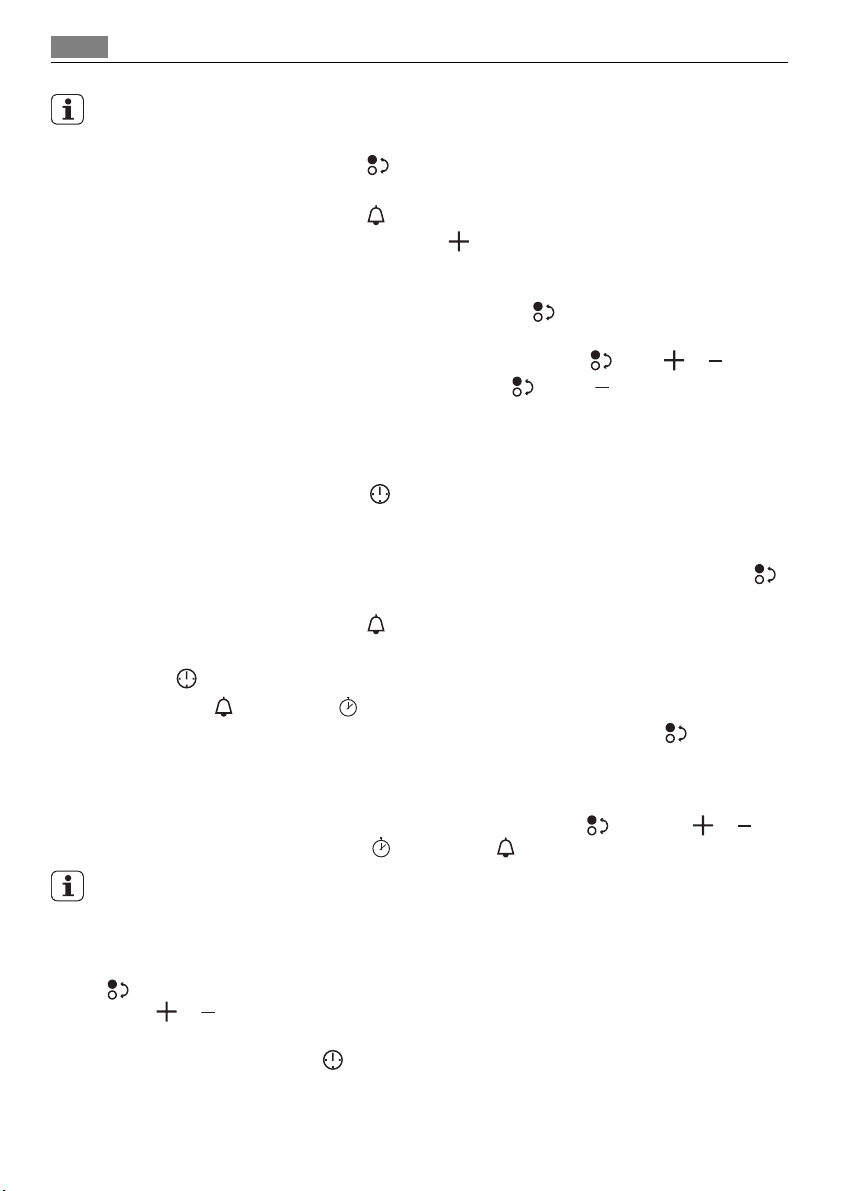
Control panel layout
5 63
7 84
2
1
1014 1113 912
Use the sensor fields to operate the appliance. The displays, indicators and sounds tell which
functions operate.
sensor field function
1
2
A heat setting display. It shows the heat setting.
3
Cooking zones' indicators of timer. It shows for which of the cooking zones you set
4
The timer display. It shows the time in minutes.
5
6
7
8
9
10
/
It activates and deactivates the appliance.
It locks/unlocks the control panel.
the time.
It shows that the CountUp Timer function operates.
It shows that the Minute minder / the CountDown
Timer function operates.
It activates and deactivates the outer rings.
It activates the Automatic Heat Up function.
It increases or decreases the time.
Page 10
10 Operating instructions
sensor field function
11
12
a control bar To set the heat setting.
13
14
Heat setting displays
Display Description
-
+ digit
/ /
It sets the cooking zone.
It sets the Timer function.
It activates and deactivates the STOP+GO function.
The cooking zone is off
The cooking zone operates
Keep Warm / function is on
The automatic heat-up function is on
There is a malfunction
OptiHeat Control (3 step Residual heat indicator): still cooking / keep
warm / residual heat
Lock/Child safety function is on
The automatic switch off is on
OptiHeat Control (3 step Residual heat indicator)
WARNING!
/ / Risk of burns from residual heat!
OptiHeat Control indicates the level of the residual heat.
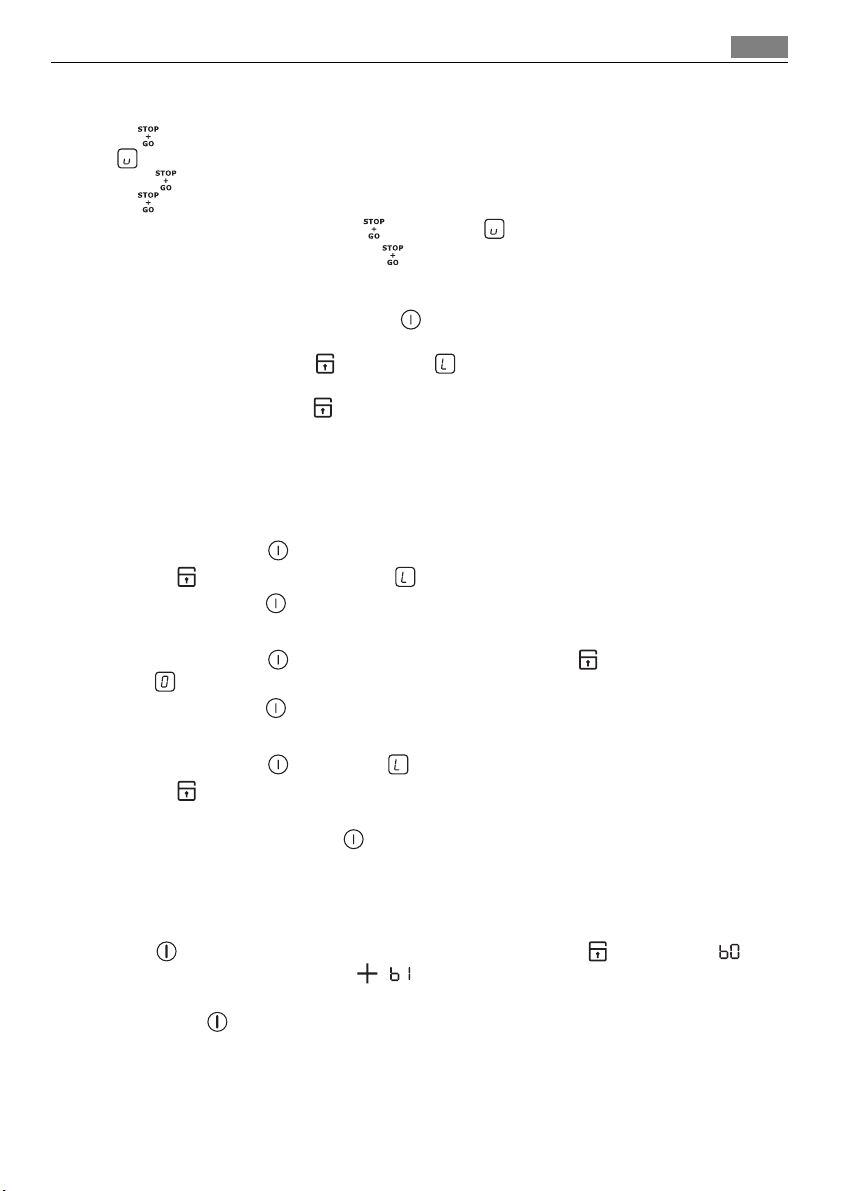
OPERATING INSTRUCTIONS
On and Off
Touch for 1 second to start or stop the appliance.
Automatic Switch Off
The function stops the hob automatically if:
• all cooking zones are off.
• you do not set the heat setting after you start the hob.
• you cover a sensor field with an object (a pan, a cloth, etc.) for longer than 10 seconds.
The sound operates until you remove the object.
• the hob gets too hot (e.g. when a saucepan boils dry). Before you use the hob again, the
cooking zone must be cool.
• you do not stop a cooking zone or change the heat setting. After some time
on and the hob stops. See the table.
comes
Page 11
Operating instructions 11
Automatic Switch Off times
Heat setting
- - - -
Stops after 6 hours 5 hours 4 hours 1.5 hours
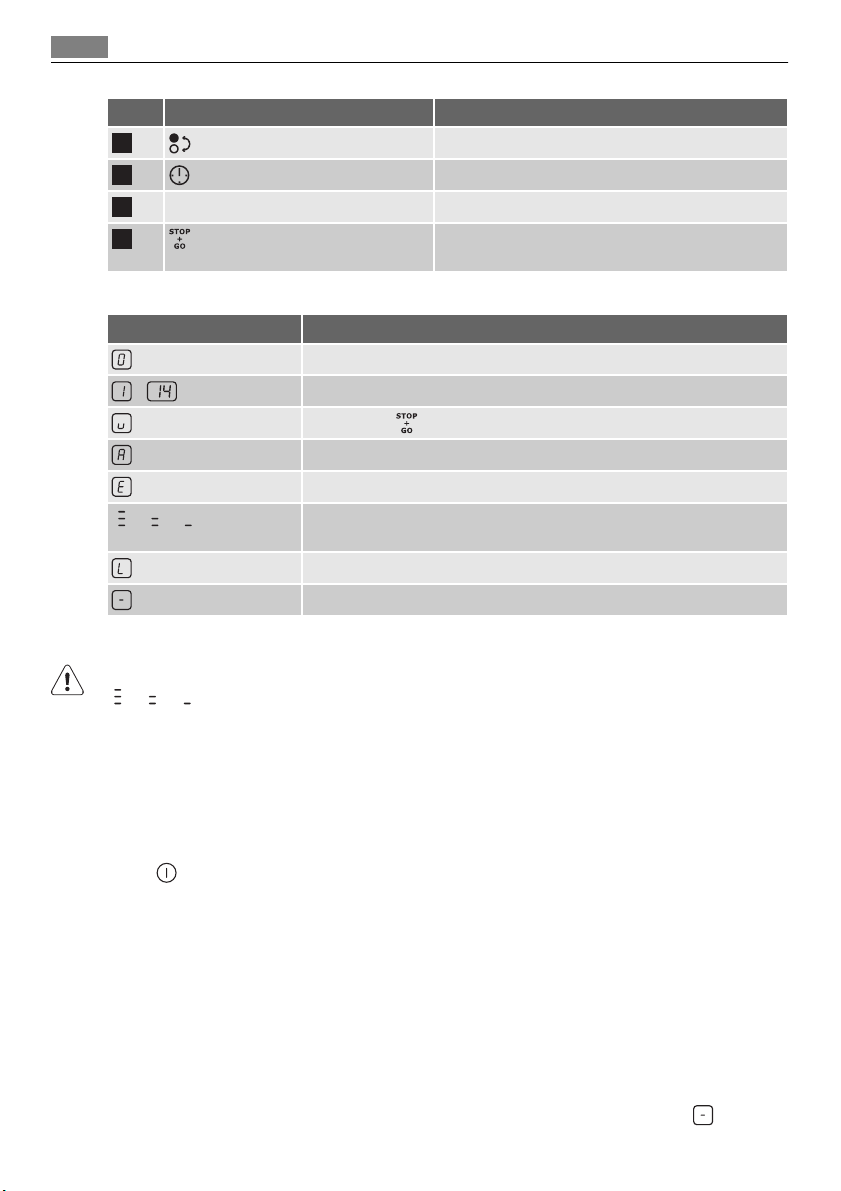
The heat setting
Touch the control bar at the heat setting. Change
to the left or the right, if it is necessary. Do not
release before you have a correct heat setting. The
display shows the heat setting.
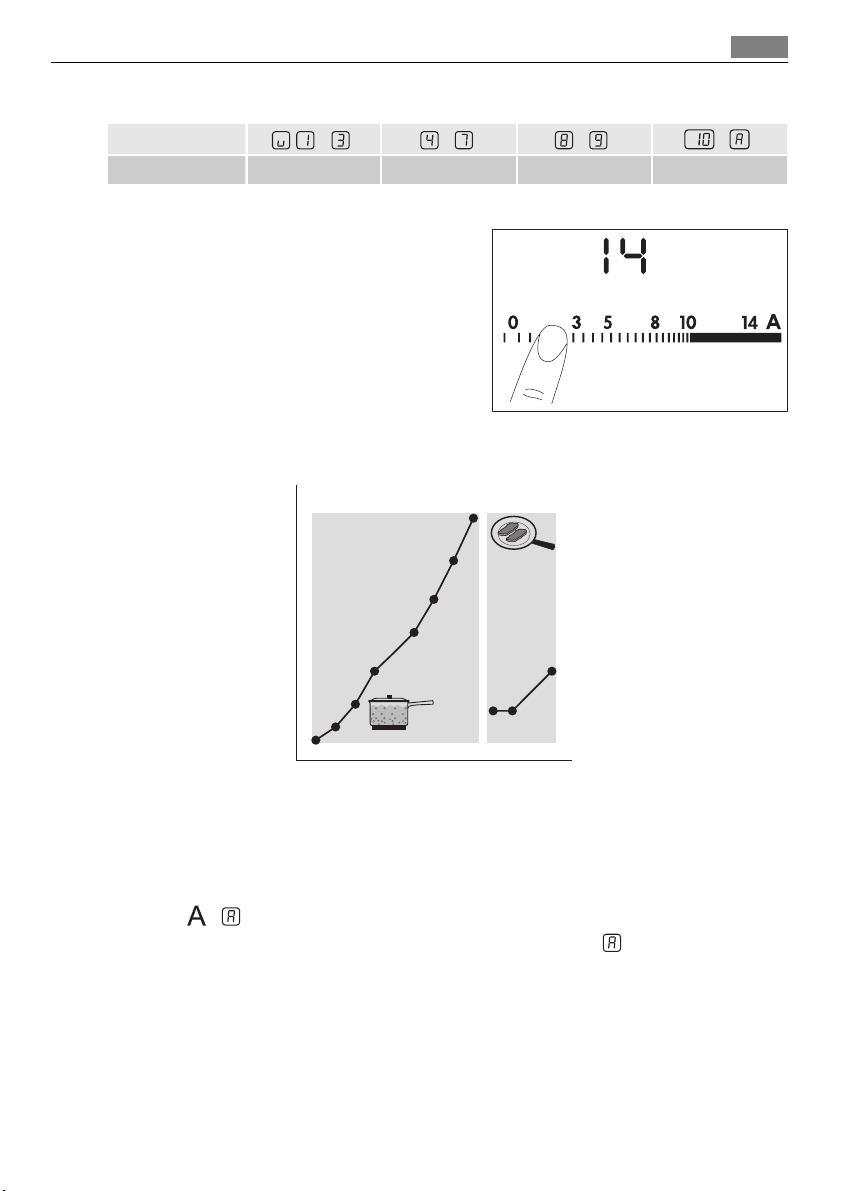
Automatic Heat Up
14
13
12
11
10
9
8
7
6
5
4
3
2
1
MIN.
0
1234567891011121314
TEM.
You can get a necessary heat setting in a shorter time if you activate the Automatic Heat
Up function. This function sets the highest heat setting for some time (see the graphic), and
then decreases to the necessary heat setting.
To start the Automatic Heat Up function for a cooking zone:
1. Touch
2. Immediately touch the necessary heat setting. After 3 seconds
play.
To stop the function change the heat setting.
( comes on in the display).
comes on in the dis-
The Timer
The Count Down Timer.
Use the Count Down Timer to set how long the cooking zone operates for only this one
time.
Set the Count Down Timer after the selection of the cooking zone.
Page 12
12 Operating instructions
The selection of Timer function is possible for cooking zones that are active and the heat
setting is set.
• To set the cooking zone: touch
cooking zone comes on.
When this function is activated,
• To activate the Count Down Timer: touch
minutes). When the indicator of the cooking zone starts to flash slow, the time counts
down.
• To see the remaining time: set the cooking zone with
zone starts to flash quickly. The display shows the remaining time.
• To change the Count Down Timer: set the cooking zone with
• To deactivate the timer: set the cooking zone with
counts back to
When the timer countdown comes to an end, the sound operates and
cooking zone deactivates.
• To deactivate the sound: touch
CountUp Timer (The Count up timer).
Use the CountUp Timer to monitor how long the cooking zone operates.
• The selection of the cooking zone (if more than 1 cooking zone operates) : touch
again and again until the indicator of a necessary cooking zone comes on.
When this function is activated,
• To activate the CountUp Timer:
Touch
The symbol goes out and comes on.
• To see how long the cooking zone operates: set the cooking zone with
tor of the cooking zone starts to flash quickly. The display shows the time that the zone
operates. The display shows the time of the cooking zone that operates for longer period
of time.
• To deactivate the CountUp Timer: set the cooking zone with
deactivate the timer. the symbol
When the two Timer functions operate at the same time, the display shows the CountUp
Timer first.
. The indicator of the cooking zone goes out.
00
again and again until the indicator of a necessary
comes on.
of the timer to set the time ( 00 -
. The indicator of the cooking
. Touch . The remaining time
comes on.
goes out and comes on.
touch or .
flashes. The
00
and touch or to
99
. The indica-
The Minute minder.
You can use the timer as a minute minder while the cooking zones do not operate. Touch
Touch or of the timer to set the time. When the time comes to an end, the sound
operates and
• To stop the sound: touch
00
flashes.
Page 13
Operating instructions
STOP+GO
The function sets all cooking zones that operate to the lowest heat setting - Keep Warm
).
(
When
The
• To activate this function touch
• To deactivate this function touch
operates, you cannot change the heat setting.
function does not stop the timer function.
. The symbol comes on.
. The heat setting that you set before comes on.
Lock
You can lock the control panel, but not . It prevents an accidental change of the heat
setting.
To start this function touch
The Timer stays on.
To stop this function touch
When you stop the appliance, you also stop this function.
. The symbol comes on for 4 seconds.
. The heat setting that you set before comes on.
The child safety device
This function prevents an accidental operation of the hob.
Starting the child safety device
• Start the hob with
• Touch
• Stop the hob with
Switching off the child safety device
• Start the hob with
bol
• Stop the hob with
Overriding the child safety device for one cooking session
• Start the hob with
• Touch
the hob.
• When you stop the hob with
for 4 seconds. The symbol comes on.
comes on.
for 4 seconds. Set the heat setting in less than 10 seconds. You can operate
. Do not set the heat settings .
.
. Do not set the heat settings . Touch for 4 seconds. The sym-
.
. The symbol comes on.
, the child safety device operates again.
13
OffSound Control (Deactivation and activation of the sounds)
Deactivation of the sounds
Deactivate the appliance.
Touch
comes on, the sound is on. Touch , comes on, the sound is off.
When this function operates, you can hear the sounds only when:
• you touch
• the Minute Minder comes down
• the Count Down Timer comes down
• you put something on the control panel.
for 3 seconds. The displays come on and go out. Touch for 3 seconds.
Page 14
14 Helpful hints and tips
Activation of the sounds
Deactivate the appliance.
Touch
for 3 seconds. The displays come on and go out. Touch for 3 seconds.
comes on, because the sound is off. Touch , comes on. The sound is on.
HELPFUL HINTS AND TIPS
Cookware
• The bottom of the cookware must be as thick and flat as possible.
• Cookware made of enamelled steel and with aluminium or copper bottoms can cause
discoloration on glass ceramic surface.
Energy saving
• If possible, always put the lids on the cookware.
• Put cookware on a cooking zone before you start it.
• Stop the cooking zones before the end of the cooking time to use residual heat.
• The bottom of pans and cooking zones must have the same dimension.
Öko Timer (Eco Timer)
To save the energy, the heater of the cooking zone switches itself off earlier than count
down timer signal. The heating time reduction depends on cooking level and cooking time.
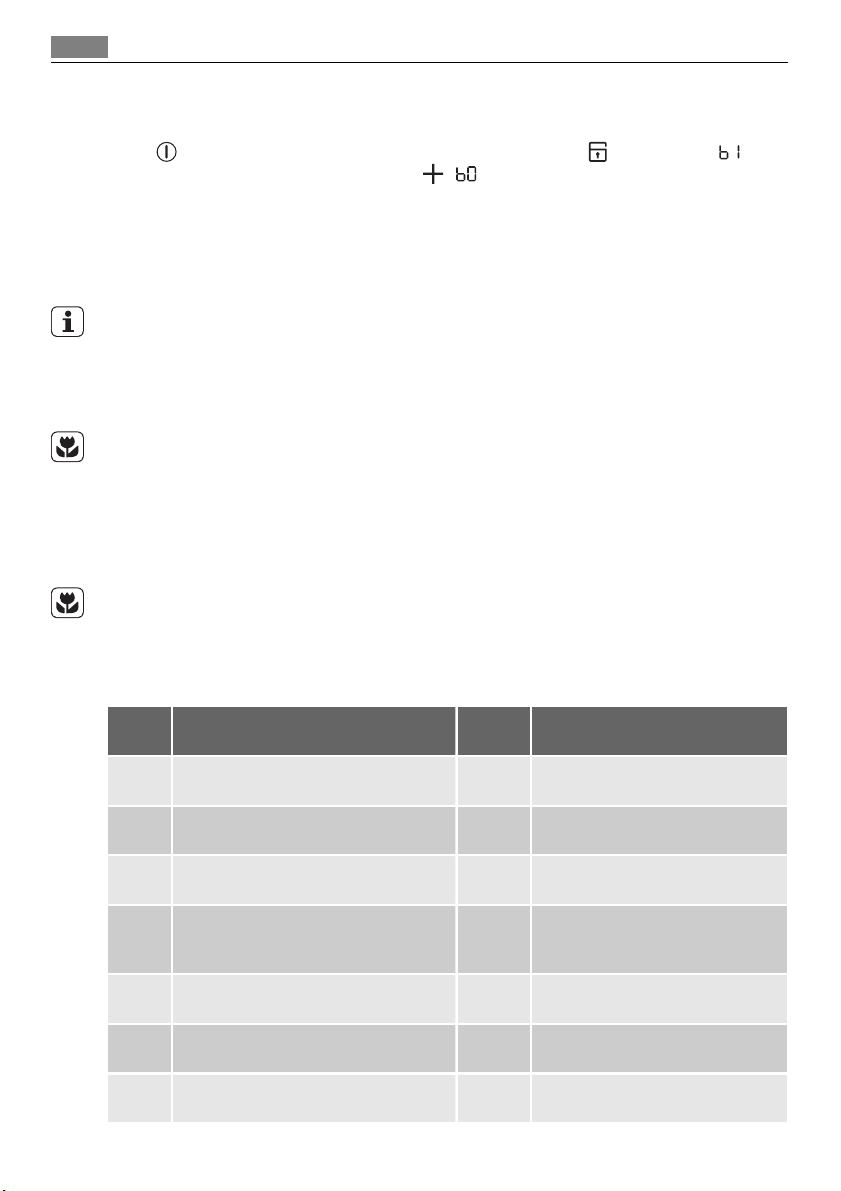
Examples of cooking applications
The data in the table is for guidance only.
Heat
setting
1 Keep cooked foods warm as re-
1-3 Hollandaise sauce, melt: butter, choco-
late, gelatine
1-3 Solidify: fluffy omelettes, baked eggs 10-40
3-5 Simmer rice and milkbased dishes, heat-
ing up ready-cooked meals
5-7 Steam vegetables, fish, meat 20-45
7-9 Steam potatoes 20-60
7-9 Cook larger quantities of food, stews
and soups
Use to: Time Hints
quired
5-25
min
min
25-50
min
min
min
60-150
min
Cover
Mix occasionally
Cook with a lid on
Add at least twice as much liquid as
rice, stir milk dishes part way
through
Add a few tablespoons of liquid
Use max. ¼ l water for 750 g of potatoes
Up to 3 l liquid plus ingredients
Page 15
Care and cleaning
15
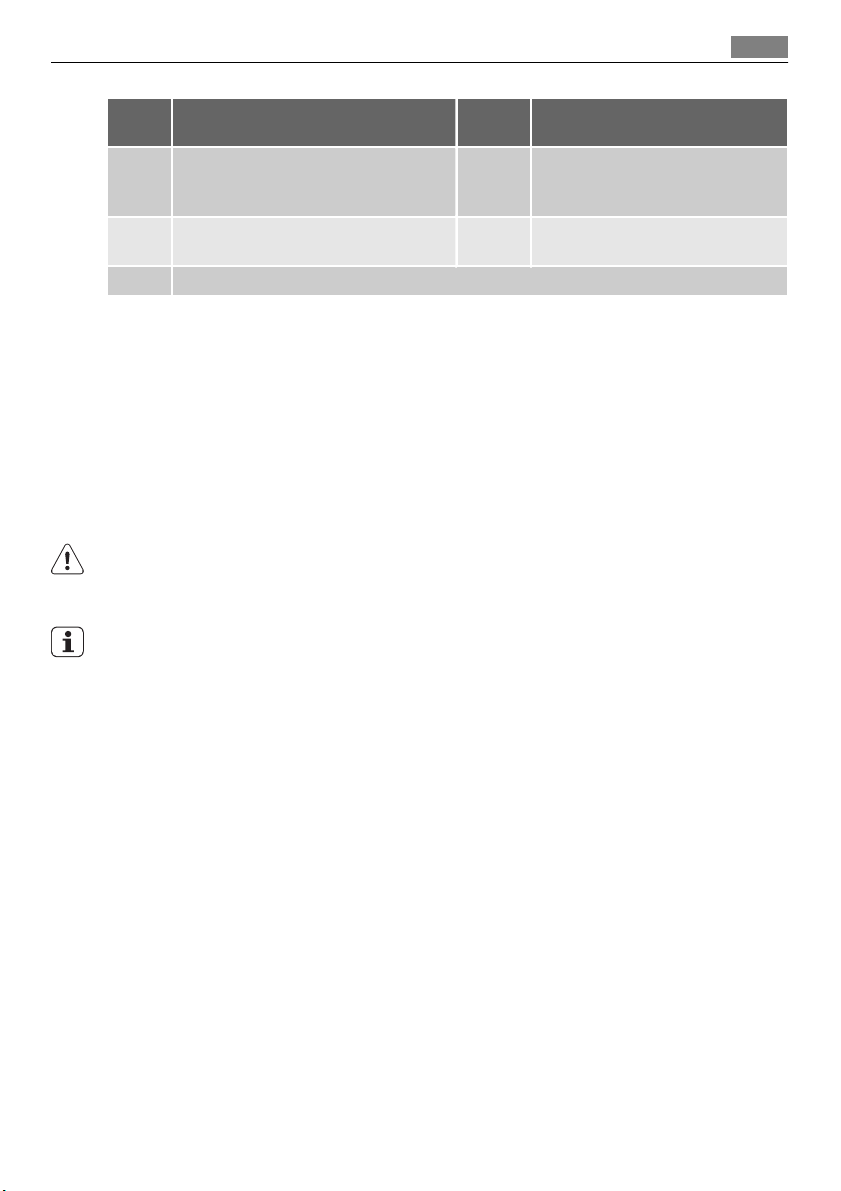
Heat
setting
9-12 Gentle fry: escalope, veal cordon bleu,
cutlets, rissoles, sausages, liver, roux,
eggs, pancakes, doughnuts
12-13 Heavy fry, hash browns, loin steaks,
steaks
14 Boil large quantities of water, cook pasta, sear meat (goulash, pot roast), deep fry chips
Use to: Time Hints
as required
5-15
min
Turn halfway through
Turn halfway through
Information on acrylamides
Important! According to the newest scientific knowledge, if you brown food (specially the
one which contains starch), acrylamides can pose a health risk. Thus, we recommend that
you cook at the lowest temperatures and do not brown food too much.
CARE AND CLEANING
Clean the appliance after each use.
Always use cookware with clean bottom.
WARNING!
Sharp objects and abrasive cleaning agents will damage the appliance.
For your safety, do not clean the appliance with steam blasters or high-pressure cleaners.
Scratches or dark stains on the glass ceramic have no effect on how the appliance operates.
To remove the dirt:
1. – Remove immediately: melted plastic, plastic foil, and food with sugar. If not, the dirt
can cause damage to the appliance. Use a special scraper for the glass . Put the scraper on the glass surface at an acute angle and move the blade on the surface .
– Remove after the appliance is sufficiently cool: limescale rings , water rings, fat
stains, shiny metallic discolorations. Use a special cleaning agent for glass ceramic or
stainless steel.
2. Clean the appliance with a moist cloth and some detergent.
3. At the end rub the appliance dry with a clean cloth.
Page 16
16 What to do if…
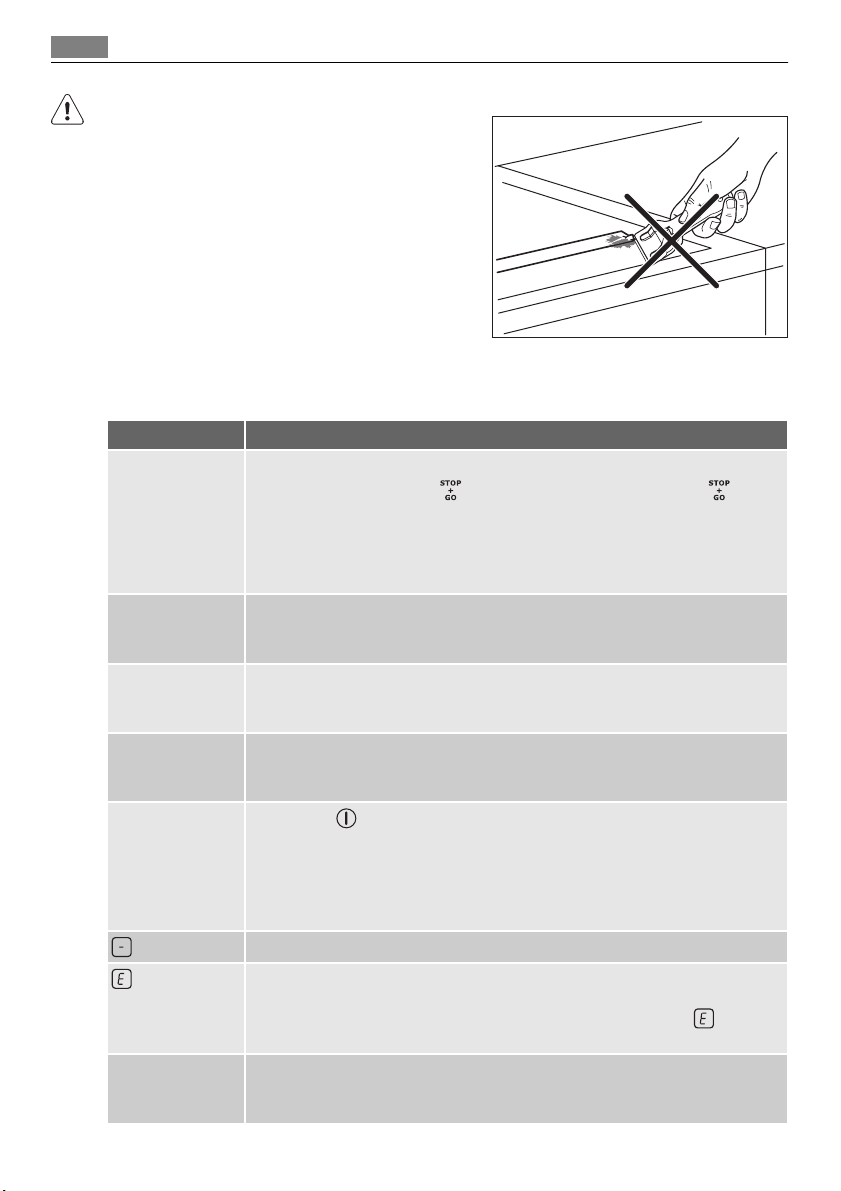
WARNING!
• Do not use the scraper or sharp objects to clean
the glass bar and the space between it and
glass ceramic. Glass bar is attached to the ceramic plate.
• Do not put the pots on the glass bar.
• Make sure that the pans and pots do not touch
the glass bar.
WHAT TO DO IF…
Problem Possible cause and remedy
You cannot start
the appliance or
operate it.
A sound operates
when the appliance is off.
The residual heat
indicator does not
come on.
You cannot
switch on the
outer rings.
A sound operates
and appliance
starts and stops
again. After 5 seconds one more
sound operates.
comes on
and number
come on.
There is no signal
when you touch
panel keys
• Start the appliance again and set the heat setting in 10 seconds.
•
The child safety device or
the section “Child safety device” or "Stop and go".
• You touched 2 or more sensor fields at the same time. Only touch one sensor field.
• There is water or fat stains on the control panel. Clean the control panel
You covered one or more sensor fields. Uncover the sensor fields. Clean the
control panel.
The cooking zone is not hot because it operated only for a short time. If the
cooking zone must be hot, speak to the after sales service.
Switch on the inner ring first.
You covered . Uncover the sensor field.
The automatic switch off operates. Stop the appliance and start it again.
There is an error in the appliance.
Disconnect the appliance from the electrical supply for some time. Disconnect
the fuse from the electrical system of the house. Connect again. If
on again, speak to the after sales service.
The signals are off.
Switch on the signals.
operates. Stop child safety device or . See
comes
Page 17
Environment concerns 17
If you tried the above solutions and cannot repair the problem, speak to your dealer or the
Customer Care Department. Give the data from the rating plate, three-digit-letter code for
the glass ceramic (it is in the corner of the cooking surface) and an error message that
comes on.
If you operated the appliance incorrectly, the servicing by a customer service technician or
dealer will not be free of charge, even during the warranty period. The instructions about
the customer service and conditions of guarantee are in the guarantee booklet.
ENVIRONMENT CONCERNS
The symbol on the product or on its packaging indicates that this product may not be
treated as household waste. Instead it should be taken to the appropriate collection point
for the recycling of electrical and electronic equipment. By ensuring this product is
disposed of correctly, you will help prevent potential negative consequences for the
environment and human health, which could otherwise be caused by inappropriate waste
handling of this product. For more detailed information about recycling of this product,
please contact your local council, your household waste disposal service or the shop where
you purchased the product.
Packaging material
The packaging materials are friendly to the environment and can be recycled. The plastic
components are identified by marking: >PE<,>PS<, etc. Discard the packaging materials as
household waste at the waste disposal facilities in your municipality.
Page 18
18
PARIMATE TULEMUSTE SAAVUTAMISEKS
Täname teid selle AEG toote valimise eest. Lõime toote,
mis tagab teile aastateks laitmatu toimimise ning lisasime
teie elu lihtsamaks ja kergemaks muutvaid innovaatilisi
tehnoloogiaid – omadusi, mida te tavaliste seadmete
juures ei pruugi leida. Leidke mõni minut aega ning
lugege, kuidas seadmega parimaid tulemusi saavutada.
LISASEADMED JA KULUTARVIKUD
AEG veebipoest leiate kõik vajaliku, mida te oma AEG
seadmete laitmatu väljanägemise ja heas töökorras
hoidmise jaoks vajate. Koos laia valiku
kvaliteedistandarditele vastavate lisatarvikutega, alates
spetsialistidele mõeldud kööginõudest kuni söögiriistade
korvideni, pudelihoidjatest kuni õrnade pesuesemete
pesukottideni...
Külastage veebipoodi aadressil
www.aeg-electrolux.com/shop
Page 19

SISUKORD
20 Ohutusinfo
21 Paigaldusjuhised
25 Seadme kirjeldus
26 Käitusjuhised
30 Vihjeid ja näpunäiteid
31 Puhastus ja hooldus
32 Mida teha, kui...
33 Jäätmekäitlus
Sisukord
19
Käesolevas kasutusjuhendis on kasutatud
järgmisi hoiatusmärke:
Tähtis info teie isikliku ohutuse kohta ja info
seadme kahjustamise vältimise kohta.
Üldine info ja nõuanded
Keskkonnainfo
Jäetakse õigus teha muutusi
Page 20
Ohutusinfo
20
OHUTUSINFO
Teie turvalisuse huvides ning tagamaks õiget kasutamist lugege kasutusjuhend hoolikalt lä‐
bi, enne kui paigaldate seadme ja kasutate seda esimest korda. Hoidke need juhised alati
masina juures, ka siis, kui muudate selle asukohta või müüte masina maha. Kasutajad pea‐
vad olema hästi tuttavad masina töö ja ohutusfunktsioonidega.
Üldine ohutus
HOIATUS
Isikud (sh lapsed), kellel on vähenenud füüsilised, sensoorsed, vaimsed võimed või kellel
puuduvad vastavad kogemused ja teadmised, ei tohi masinat kasutada. Seadet kasutades
peab neid juhendama või kontrollima isik, kes vastutab nende turvalisuse eest.
Lapselukk
• Seadet tohivad kasutada ainult täiskasvanud. Laste üle peab olema järelvalve tagamaks,
et nad ei mängiks seadmega.
• Hoidke pakend lastele kättesaamatus kohas. Esineb lämbumisoht.
• Hoidke lapsed töötavast masinast eemal.
HOIATUS
Kasutage lapselukku, et väikesed lapsed ja loomad ei saaks seadet kogemata tööle panna.
Ohutu töö
• Enne esmakordset kasutamist eemaldage seadmelt kogu pakend, kleebised ja kattekihid.
• Lülitage keedutsoonid pärast iga kasutamist välja.
• Põletusoht! Ärge pange pliidipinnale söögiriistu ega potikaasi, sest need võivad tuliseks
minna.
HOIATUS
Tuleoht! Ülekuumenenud rasvad ja õli võivad väga kergesti süttida.
Nõuetekohane töö
• Kui seade töötab, tuleb seda pidevalt jälgida.
• Kasutage seadet ainult koduseks toiduvalmistamiseks!
• Ärge kasutage seadet tööpinnana ega hoiukohana.
• Ärge asetage seadmele ega selle lähedusse ega hoidke seal väga kergestisüttivaid ve‐
delikke, materjale või sulavaid esemeid (plastmasse, alumiiniumi).
• Olge ettevaatlik, kui ühendate seadme lähedalasuvatesse pistikupesadesse. Vältige elek‐
trijuhtmete kokkupuudet seadme või tuliste nõudega. Vältige elektrijuhtmete sassimine‐
kut.
Kuidas vältida seadme kahjustamist
• Kui klaaskeraamilisele pinnale kukub esemeid või nõusid, võivad need pinda vigastada.
• Valurauast, alumiiniumvalust või rikutud põhjaga nõud võivad klaasikeraamikat kriimusta‐
da, kui neid klaaskeraamilisel pinnal liigutatakse.
Page 21
Paigaldusjuhised
• Vältimaks nõude ja klaaskeraamilise pinna kahjustamist ei tohi lasta nõudel tühjaks kee‐
da.
• Ärge kasutage keedutsoone tühjade keedunõudega või ilma nendeta.
• Ärge katke seadme pindu alumiiniumfooliumiga.
HOIATUS
Kui pind on mõranenud, siis ühendage seade vooluvõrgust lahti, et vältida elektrilööki.
PAIGALDUSJUHISED
Enne paigaldamist kirjutage üles andmeplaadil olev seerianumber (Ser. Nr.). Seadme and‐
meplaat asub korpuse alaosal.
Made in Switzerland
220-240V ~50/60Hz
3,5 kW
Typ: 55FED02BO
Ohutusjuhised
HOIATUS
Alustage lugemist siit.
Veenduge, et seade ei ole transportimisel viga saanud. Vigastatud seadet ei tohi vooluvõrku
ühendada. Vajadusel konsulteerige tarnijaga.
Seadet võib paigaldada, ühendada või remontida ainult volitatud hooldustehnik. Kasutage
ainult originaalvaruosi.
Sisseehitatud seadmeid võib kasutada alles pärast seda, kui need on paigutatud sobivates‐
se sisseehitatud mööbliesemetesse ja tööpindadesse, mis vastavad standarditele.
Ärge muutke seadme parameetreid ega muutke seda toodet. Seadme vigastamise või kah‐
justamise oht!
Järgida tuleb seadme kasutuskoha riigis kehtivaid seadusi, määrusi, direktiive ja standar‐
deid (ohutuseeskirjad, materjalide korduvkasutamist puudutavad määrused, elektriohutuse
reeglid jne)!
Järgida tuleb minimaalset kaugust teistest seadmetest ja moodulitest!
Paigaldamisel tuleb tagada elektriohutus, näiteks tohib sahtleid paigutada ainult seadmest
eraldava vaheplaadi alla!
Kaitske tööpinna lõikepindu niiskuse eest nõuetekohase tihendi abil!
Tihendage seadme ja tööpinna üleminekukoht nii, et sellesse ei jääks vahesid. Kasutage
selleks nõuetekohast tihendit.
Kaitske seadme alakülge nt nõudepesumasinast või ahjust tuleva auru ja niiskuse eest!
Ärge paigaldage seadet uste lähedale ega akende alla! Vastasel korral võite ust või akent
avades tulised nõud pliidilt maha lükata.
PNC: 941 560 803/00
Serie:
HC452020EB
21
HOIATUS
Elektrivoolust lähtuv vigastusoht. Järgige hoolikalt elektriühenduste teostamise juhiseid.
• Toiteklemm on voolu all.
• Vabastage toiteklemm voolu alt.
Page 22

Paigaldusjuhised
22
• Teostage nõuetekohane paigaldamine, et kaitsta seadet põrutuste eest.
• Lahtiste ja sobimatute pistikühenduste korral võib klemm üle kuumeneda.
• Ühenduste nõuetekohane kinnitamine tuleb jätta kvalifitseeritud elektriku hooleks.
• Paigaldage kaablile tõmbetõkis.
• Ühefaasilise ühenduse puhul tuleb kasutada sobivat toitekaablit tüüp H05BB-F Tmax
90°C (või üle selle).
• Kui seadme toitekaabel on kahjustatud, tuleb see asendada spetsiaalse kaabliga (tüüp
H05BB-F Tmax 90°C või üle selle). Pöörduge kohalikku teeninduskeskusse.
Seadme võib ühendada toiteliiniga, mille lahklüliti võimaldab katkestada kõik poolused vä‐
hemalt 3 mm suuruse kontaktide vahega.
Kasutada tuleb nõuetekohaseid isolatsiooniseadiseid: kaitselüliteid, kaitsmeid (keermega
kaitsmed tuleb pesast eemaldada), maalekkevoolu kaitsmeid ja kontraktoreid.
Kui kasutate raami C-FRAME, lugege enne seadme paigaldamist läbi raamiga kaasasolev
kasutusjuhend.
Kokkupanek
min. 500mm
min.
50mm
min. 50mm
=
R 5mm
490
+1
mm
=
600mm
340+1mm
Page 23

min.
28 mm
Enam kui ühe seadme paigaldamine
Lisaosad: ühendusriba(d), kuumakindel silikoon, kummiriba, kinnitusriba.
Kasutage ainult spetsiaalset kuumakindlat silikooni.
Paigaldusjuhised
min.
20 mm
min.
25 mm
23
Valmislõigatud tööpind
Kaugus seinast: vähemalt 50 mm
Sügavus: 490 mm
Laius : liitke kõigi integreeritavate seadmete laiused ja lahutage 20 mm (vt ka "Ülevaade
kõigi seadmete laiusest")
Näide:
+-=
580 mm
520 mm
360 mm
20 mm 920 mm
490 mm
Enam kui ühe seadme paigaldamine
1. Märkige ära väljalõigatava tööpinna mõõdud ja saagige see välja.
2. Paigutage seadmed ükshaaval pehmele alusele, näiteks tekile, alumine külg ülespoole.
3. Asetage tihendiriba seadme klaaskeraamilise pinna alumise serva ümber.
4. Kruvige kinnitusplaadid / kinnitusdetailid kaitsekorpuse vastavatesse aukudesse poole‐
nisti kinni.
Page 24

Paigaldusjuhised
24
5. Asetage esimene seade tööpinna väljalõikesse. Seadke ühendusriba tööpinna väljalõi‐
kele ja suruge poole laiuse ulatuses vastu seadet.
6. Keerake poolenisti kinni kinnitusplaadid tööpinna ja ühendusriba all.
7. Asetage järgmine seade tööpinna väljalõikesse. Jälgige, et seadmete esiservad oleksid
samal tasemel.
8. Kinnitage lõplikult kinnitusplaadi / kinnitusdetaili kruvid.
9. Pange silikoon seadmete vahele jäävasse prakku.
10. Niisutage silikooni vähese seebiveega.
11. Suruge kummiriba kerget survet rakendades klaaskeraamilise pinna vastu ja viige see
aeglaselt mööda pinda edasi.
12. Ärge katsuge silikooni enne, kui see on kõvaks muutunud (umbes üks päev).
13. Eemaldage väljasopistunud silikoon ettevaatlikult žileti abil.
14. Puhastage keraamiline pind täielikult.
Page 25

SEADME KIRJELDUS
Ülevaade
Seadme kirjeldus
25
mm
120/175/210
1
1 Kolmeringiline keeduväli 800/1600/2300 W
2 Keeduväli 1200 W
145
mm
4
2
3
3 Klaasriba
4 Juhtpaneel
Juhtpaneeli skeem
5 63
7 84
2
1
1014 1113 912
Kasutage seadmega töötades sensorvälju. Näidikud, indikaatorid ja helid näitavad, millised
funktsioonid on sees.
sensorväli funktsioon
1
2
Kuumusastme näit. Näitab määratud kuumusastet.
3
Keeduväljade taimeri indikaatorid. Näitab keeduvälju, millele aja määrasite.
4
Taimeri ekraan. Näitab aega minutites.
5
6
7
8
9
10
/
Seadme sisse- ja väljalülitamiseks.
Lukustab/avab juhtpaneeli.
Näitab, et ülesloenduse taimeri funktsioon on sisse
lülitatud.
Näitab, et alarmkella / pöördloenduse taimeri
funktsioon on sisse lülitatud.
Väliste ringide sisse- ja väljalülitamiseks.
Automaatse kiirsoojenduse funktsiooni käivitami‐
seks.
Pikendab või lühendab aega.
Page 26

Käitusjuhised
26
sensorväli funktsioon
11
12
juhtriba Soojusastme määramiseks.
13
14
Määrab keeduvälja.
Määrab taimeri funktsiooni.
Funktsiooni STOP+GO sisse ja välja lülitamiseks.
Soojusastme näit
Ekraan Kirjeldus
Keeduväli on väljas
-
+ number
/ /
Keeduväli töötab
Soojashoidmise / funktsioon on sisse lülitatud
Automaatne kiirsoojenduse funktsioon on sisse lülitatud
Tegemist on rikkega
OptiHeat Control (3-astmeline jääkkuumuse näit): keedab / soojas‐
hoid / jääkkuumus
Lukk/lapselukk on sees
Automaatne väljalülitus on sees
OptiHeat Control (3-astmeline jääksoojuse indikaator)
HOIATUS
/ / Põletusoht jääksoojuse tõttu!
OptiHeat Control näitab jääksoojuse taset.
KÄITUSJUHISED
Sisse ja välja
Seadme käivitamiseks või seiskamiseks puudutage 1 sekundi vältel .
Automaatne väljalülitus
Funktsioon lülitab pliidi automaatselt välja, kui:
• kõik keeduväljad on väljas.
• te pärast pliidi käivitamist soojusastet ei määra.
• sensorväli kaetakse rohkem kui 10 sekundiks mõne esemega (nõu, lapp vm). Objekti ee‐
maldamiseni kõlab helisignaal.
• pliidiplaat läheb liiga kuumaks (nt pott on kuivaks keenud). Enne pliidi uuesti kasutamist
peab keeduväli piisavalt jahtuma.
• te pole keeduvälja välja lülitanud või muutnud soojusastet. Mõne aja möödudes süttib
ja pliit lülitub välja. Vaadake tabelit.
Page 27

Käitusjuhised
Automaatse väljalülituse ajad
Kuumusaste
- - - -
Seiskub pärast 6 tundi 5 tundi 4 tundi 1,5 tundi
Soojusaste
Vajutage juhtriba soojusastme juures. Vajadusel
korrigeerige vasakule või paremale. Ärge laske
lahti, enne kui soovitud soojusaste on saavutatud.
Ekraanile kuvatakse soojusaste.
Automaatne soojenemine
14
13
12
11
10
9
8
7
6
5
4
3
2
1
MIN.
0
1234567891011121314
TEM.
Automaatse soojenemise funktsiooni abil saavutate kiiremini soovitud soojustaseme. Selle
funktsiooni puhul rakendatakse mõnda aega kõrgeimat soojusastet (vt joonist) ning seejärel
kuumust vähendatakse, kuni jõutakse sobiva tasemeni.
Automaatse soojenemise funktsiooni käivitamiseks:
1. Puudutage
2. Puudutage kohe sobivat soojusastet. 3 sekundi pärast süttib
Funktsiooni seiskamiseks muutke soojusastet.
( ekraanil süttib ).
.
27
Taimer
Pöördloenduse taimer.
Kasutage pöördloenduse taimerit, et määrata, kui kaua keeduväli sellel korral töötab.
Seadke pöördloendustaimer pärast keeduvälja valimist.
Taimerifunktsiooni saab valida sisse lülitatud keeduväljadele, mille soojusaste on määratud.
Page 28

Käitusjuhised
28
• Keedutsooni valimine: vajutage ikka uuesti , kuni süttib vajaliku keedutsooni indikaa‐
tor.
Kui see funktsioon on aktiveeritud, süttib
• Pöördloendustaimeri aktiveerimiseks: puudutage taimeri nuppu
- 99 minutit). Kui keeduvälja indikaator hakkab vilkuma aeglasemalt, toimub aja pöörd‐
loendus.
• Järelejäänud aja kontrollimine: valige keeduväli, kasutades
hakkab kiiresti vilkuma. Ekraanil kuvatakse järelejäänud aeg.
• Pöördloendustaimeri muutmiseks: valige keeduväli, kasutades
.
• Taimeri väljalülitamiseks: valige keeduväli, kasutades
loetakse maha kuni näiduni
Kui taimeri pöördloendus jõuab lõpule, kostab helisignaal ja
lülitatud.
• Heli väljalülitamiseks: puudutage
CountUp Timer (Ülesloenduse taimer).
Et vaadata, kui kaua keeduväli töötab, kasutage CountUp Timer.
• Keedutsooni valimiseks (kui töötab rohkem kui 1 keedutsoon): vajutage ikka uuesti
kuni süttib vajaliku keedutsooni indikaator.
Kui see funktsioon on aktiveeritud, süttib .
• Et aktiveerida CountUp Timer:
Puudutage
Sümbol kustub ja süttib.
• Et näha, kui kaua keeduväli töötab: valige keeduväli, kasutades
tor hakkab kiiresti vilkuma. Ekraanile kuvatakse keeduvälja tööaeg. Ekraanil kuvatakse
kauem töötava keeduvälja tööaeg.
• Et CountUp Timer välja lülitada: valige keeduväli, kasutades
et taimer välja lülitada. Sümbol
Kui samal ajal töötab kaks taimerifunktsiooni, kuvab ekraan esimesena pöördloendustaime‐
ri.
. Keeduvälja indikaator kustub.
00
kustub ja süttib.
.
, et määrata aeg (
. Keeduvälja indikaator
ja puudutage või
. Vajutage . Järelejäänud aeg
vilgub. Keeduväli on välja
00
. Keeduvälja indikaa‐
ja puudutage või ,
00
,
Alarmkell.
Taimerit võib kasutada alarmkellana , kui keeduväljad ei tööta. Puudutage
Aja valimiseks vajutage taimeri nuppu või . Kui aeg jõuab lõpule, kostab helisignaal ja
vilgub.
00
• Heli peatamine: puudutage
STOP+GO
Funktsiooniga määratakse kõik keeduväljad madalaima soojusastme - soojashoidmise
seadele (
Kui
Funktsioon
• Selle funktsiooni aktiveerimiseks puudutage
).
töötab, ei saa soojusastet muuta.
ei peata taimerifunktsiooni.
. Süttib sümbol .
Page 29

Käitusjuhised
• Selle funktsiooni deaktiveerimiseks puudutage . Süttib soojusaste, mille enne määra‐
site.
Lukustamine
Lukustada saab juhtpaneeli, mitte . See hoiab ära soojusastme kogemata muutmise.
Selle funktsiooni käivitamiseks puudutage
Taimer jääb sisselülitatuks.
Selle funktsiooni peatamiseks puudutage
Seadme väljalülitamisel lülitub välja ka see funktsioon.
. Sümbol süttib 4 sekundiks.
. Süttib soojusaste, mille enne määrasite.
Lapselukk
See funktsioon hoiab ära pliidi juhusliku sisselülitamise.
Lapseluku käivitamine
• Käivitage pliit
• Puudutage
• Lülitage pliit välja abil
Lapseluku väljalülitamine
• Käivitage pliit
sümbol
• Lülitage pliit välja
Lapseluku võib deaktiveerida ühekordseks toiduvalmistamiseks
• Käivitage pliit
• Puudutage
saab kasutada.
• Kui lülitate pliidi
abil. Ärge määrake soojusastet .
4 sekundi vältel. Süttib sümbol .
.
abil. Ärge määrake soojusastet . Puudutage 4 sekundi vältel. Süttib
.
abil.
abil. Süttib sümbol .
4 sekundi vältel. Määräake vähem kui 10 sekundi jooksul soojusaste. Pliiti
abil välja, töötab lapselukk uuesti.
29
OffSound Control (Helide sisse ja välja lülitamine)
Helide välja lülitamine
Lülitage seade välja.
Puudutage
süttib, heli on sees. Puudutage , süttib, heli on välja lülitatud.
Kui see funktsioon on aktiveeritud, kuulete te helisid ainult järgmistel juhtudel:
• puudutades
• kui minutilugeja jõuab lõpule
• kui pöördloendus jõuab lõpule
• kui juhtpaneelile midagi asetatakse.
Helide sisse lülitamine
Lülitage seade välja.
Puudutage
süttib, sest heli on väljas. Puudutage , süttib. Heli on sees.
3 sekundi vältel. Näidikud süttivad ja kustuvad. Puudutage 3 sekundit.
3 sekundi vältel. Näidikud süttivad ja kustuvad. Puudutage 3 sekundit.
Page 30

Vihjeid ja näpunäiteid
30
VIHJEID JA NÄPUNÄITEID
Küpsetusnõud
• Nõu põhi peab olema võimalikult paks ja tasane.
• Terasemail- või alumiiniumnõud või vaskpõhjaga nõud võivad jätta klaaskeraamilisele
pinnale plekke.
Energia kokkuhoid
• Võimaluse korral pange nõudele alati kaas peale.
• Pange keedunõud keedutsoonile enne selle sisselülitamist.
• Lülitage keedutsoonid enne toiduvalmistamisaja lõppu välja, et kasutada ära jääksoojus.
• Keedunõu põhi ja keedutsoon peaksid olema ühesuurused.
Öko Timer (Ökotaimer)
Energia säästmieks lülitub keedutsooni soojendus välja varem, kui kostab mahalugemise
taimeri signaal. Soojendamise aja vähenemine oleneb toiduvalmistamise tasemest ja ajast.
Näiteid pliidi kasutamise kohta
Tabelis toodud andmed on ainult orientiirid.
Kuu‐
musas‐
te
1 Valmistatud toidu soojashoidmiseks vasta‐
1-3 Hollandi kaste, sulatamiseks: või, šoko‐
laad, želatiin
1-3 Kalgendamine: kohevad omletid, küpse‐
tatud munad
3-5 Riisi ja piimatoitude keetmiseks vaiksel
tulel, valmistoidu soojendamiseks
5-7 Köögivilja, kala, liha aurutamiseks 20-45
7-9 Kartulite aurutamiseks 20-60
7-9 Suuremate toidukoguste, hautiste ja
suppide valmistamiseks
Kasutamine: Kellaaeg Näpunäited
valt va‐
jadusele
5-25 min Segage aeg-ajalt
10-40
min
25-50
min
min
min
60-150
min
Hoidke kaane all
Valmistage kaane all
Vedeliku kogus peab olema riisi ko‐
gusest vähemalt kaks korda suu‐
rem, piimatoite tuleb valmistamise
ajal segada
Lisage mõni supilusikatäis vedelik‐
ku
Kasutage maks. ¼ l vett 750 g kar‐
tulite kohta
Kuni 3 l vedelikku pluss komponen‐
did
Page 31

Puhastus ja hooldus
31
Kuu‐
musas‐
te
9-12 Õrnalt praadimiseks: eskalopp, vasikali‐
harull juustuga, kotletid, lihapallid, vors‐
tid, maks, keedutainas, munad, pann‐
koogid, sõõrikud
12-13 Tugevaks praadimiseks, praetud kartu‐
lid, ribiliha, praetükid
14 Suurte koguste vee ja pasta keetmiseks, liha pruunistamiseks (guljašš, pajapraad), friikar‐
tulite valmistamiseks
Kasutamine: Kellaaeg Näpunäited
vasta‐
valt va‐
jadusele
5-15 min Pöörake poole valmistusaja möödu‐
Pöörake poole valmistusaja möödu‐
des
des
Teave akrüülamiidide koht
Tähtis Uusimate teaduslike andmete kohaselt on toidu pruunistamisel (eriti tärklist
sisaldavate toiduainete puhul) tekkivad akrüülamiidid tervisele ohtlikud. Seetõttu soovitame
valmistada toitu võimalikult madalal temperatuuril ning toitu mitte liialt pruunistada.
PUHASTUS JA HOOLDUS
Puhastage seadet pärast igakordset kasutamist.
Kasutage alati puhta põhjaga keedunõusid.
HOIATUS
Teravad objektid ja abrasiivsed puhastusvahendid kahjustavad seadet.
Turvakaalutlustel ei tohi seadet puhastada aurupuhastite või kõrgsurvepuhastitega.
Kriimustused või tumedad plekid klaaskeraamikal ei mõjuta seadme tööd.
Mustuse eemaldamiseks:
1. – Eemaldage kohe: sulav plast, plastkile ja suhkrut sisaldava toidu jäägid. Vastasel kor‐
ral võib mustus seadet kahjustada. Kasutage spetsiaalset klaasikaabitsat. Pange
kaabits õige nurga all klaaspinnale ja liigutage tera pliidi pinnal.
– Eemaldage pärast seadme piisavat mahajahtumist: katlekivirõngad, veerõngad, ras‐
vajäägid, metalse läikega värvimuutusega plekid. Kasutage spetsiaalset klaaskeraa‐
mika või roostevaba terase puhastusvahendit.
2. Puhastage seadet niiske lapi ja vähese koguse pesuainega.
3. Lõpuks hõõruge seade puhta lapiga kuivaks.
Page 32

Mida teha, kui...
32
HOIATUS
• Ärge kasutage klaasriba või klaasriba ja keraa‐
milise pinna vahele jääva vao puhastamiseks
kaabitsaid ega teravaid esemeid. Klaasriba on
kinnitatud keraamilise plaadi külge.
• Ärge asetage potte klaasribale.
• Jälgige hoolikalt, et potid ja pannid vastu klaas‐
riba ei puutuks.
MIDA TEHA, KUI...
Probleem Võimalik põhjus ja lahendus
Seadet ei saa
käivitada või ka‐
sutada.
Kui seade on väl‐
jas, kostab heli‐
signaal.
Jääkkuumuse in‐
dikaator ei lülitu
sisse.
Välimine ring ei
hakka tööle.
Kostab helisig‐
naal ja seade
käivitub ning lüli‐
tub uuesti välja.
Viie sekundi pä‐
rast kostab uues‐
ti helisignaal.
süttib
ja number
süttivad.
• Käivitage seade uuesti ja määrake 10 sekundi jooksul kuumusaste.
•
Lapselukk või
tist „Lapselukk“ või „Lülita välja ja mine“.
• Puudutasite korraga 2 või enamat sensorvälja. Puudutage ainult üht sensor‐
välja.
• Juhtpaneelil on vett või juhtpaneel on kaetud rasvapritsmetega. Pühkige juht‐
paneel puhtaks
Katsite kinni ühe või mitu sensorvälja. Vabastage sensorväljad. Pühkige juhtpa‐
neel puhtaks.
Keeduväli ei ole kuum, sest see töötas vaid lühikest aega. Kui keeduväli peab
olema kuum, siis pöörduge müügijärgsesse teenindusse.
Lülitage kõigepealt sisse sisemine ring.
Katsite kinni . Vabastage sensorväli.
Automaatne väljalülitus on sees. Lülitage seade välja ja käivitage uuesti.
Seadmel ilmes tõrge.
Ühendage seade mõneks ajaks vooluvõrgust lahti. Lülitage maja elektrisüstee‐
mi kaitse välja. Lülitage see uuesti sisse. Kui
järgsesse teenindusse.
on sisse lülitatud. Lülitage lapselukk või välja. Vt alajao‐
süttib uuesti, pöörduge müügi‐
Page 33

Jäätmekäitlus
Probleem Võimalik põhjus ja lahendus
Kui puudutate
paneeli klahve,
puudub signaal
Kui ülalkirjeldatud meetmete abil ei olnud võimalik probleemi kõrvaldada, pöörduge müügie‐
sindaja või klienditeeninduse osakonna poole. Esitage andmeplaadi andmed, kolmekohaline
numbritest ja tähtedest koosnev klaaskeraamika kood (selle leiate keedupinna nurgast) ja
kuvatud veateade.
Kui seadet on valesti kasutatud, ei tarvitse klienditeeninduse tehniku või edasimüüja töö ise‐
gi garantiiajal tasuta olla. Klienditeenindust ja garantiitingimusi puudutavad juhised leiate ga‐
rantiibrošüürist.
Signaalid on välja lülitatud.
Lülitage signaalid sisse.
JÄÄTMEKÄITLUS
Tootel või selle pakendil asuv sümbol näitab, et seda toodet ei tohi kohelda
majapidamisjäätmetena. Selle asemel tuleb toode anda taastöötlemiseks vastavasse
elektri- ja elektroonikaseadmete kogumise punkti. Toote õige utiliseerimise kindlustamisega
aitate ära hoida võimalikke negatiivseid tagajärgi keskkonnale ja inimtervisele, mida võiks
vastasel juhul põhjustada selle toote ebaõige käitlemine. Lisainfo saamiseks selle toote
taastöötlemise kohta võtke ühendust kohaliku omavalitsuse, oma majapidamisjäätmete
käitlejaga või kauplusega, kust te toote ostsite.
Pakkematerjal
33
Pakkematerjalid on keskkonnasõbralikud ja need saab suunata korduvkasutusse. Plastmas‐
sist komponente tuvastatakse markeeringu järgi: >PE<,>PS<, jne. Viige pakkematerjalid ko‐
halikku jäätmejaama majapidamisjäätmetena.
Page 34

34
TÄYDELLISTEN TULOKSIEN SAAVUTTAMISEKSI
Kiitämme teitä tämän AEG-tuotteen valitsemisesta.
Olemme kehittäneet tämän tuotteen tarjotaksemme teille
huipputason suorituskyvyn moneksi vuodeksi. Laitteen
innovatiiviset teknologiat tekevät elämästänne
yksinkertaisempaa – kyseisiä ominaisuuksia ei välttämättä
löydy tavallisista laitteista. Käyttäkää muutama minuutti
lukemiseen, jotta voitte hyödyntää laitteen ominaisuudet
parhaalla mahdollisella tavalla.
LISÄVARUSTEET JA KULUTUSHYÖDYKKEET
AEG-verkkomyymälästä löydätte kaiken tarvitsemanne
kaikkien AEG-laitteidenne ulkonäön ja toiminnan
säilyttämiseksi huippukunnossa. Korkeiden
laatustandardien mukaan suunniteltujen ja valmistettujen
lisävarusteiden lisäksi löydätte myymälästämme erityisiä
keittoastioita, ruokailuvälinekoreja, pullon pidikkeitä,
erityisiä pyykinpesupusseja, jne.
Vieraile verkkokaupassamme sivulla
www.aeg-electrolux.com/shop
Page 35

SISÄLLYS
Sisällys
36 Turvallisuusohjeet
37 Asennusohjeet
41 Laitteen kuvaus
42 Käyttöohjeet
46 Hyödyllisiä neuvoja ja vinkkejä
47 Hoito ja puhdistus
48 Käyttöhäiriöt
49 Ympäristönsuojelu
35
Tässä käyttöohjeessa käytetään
seuraavanlaisia symbolimerkkejä:
Tärkeitä turvallisuuteen ja laitteen
asianmukaiseen käyttöön liittyviä ohjeita.
Yleistietoja ja vinkkejä
Ympäristönsuojeluohjeita
Oikeus muutoksiin pidätetään
Page 36

36 Turvallisuusohjeet
TURVALLISUUSOHJEET
Lue tämä käyttöohje huolellisesti ennen laitteen asentamista ja käyttöä, jotta osaat käyttää
sitä turvallisesti ja oikein. Pidä käyttöohjeet aina laitteen mukana esimerkiksi muuton yhteydessä tai jos myyt laitteen toiselle. Käyttäjien tulee hallita täydellisesti laitteen käyttö ja
tuntea sen turvallisuusominaisuudet.
Yleiset turvallisuusohjeet
VAROITUS!
Laite ei ole tarkoitettu fyysisesti tai aisteiltaan rajoittuneiden tai muulla tavalla taitamattomien tai kokemattomien henkilöiden (ei myöskään lasten) käyttöön, ellei heidän turvallisuudestaan vastuussa oleva henkilö valvo ja opasta heitä laitteen käytössä.
Lasten turvallisuus
• Tämä laite on tarkoitettu vain aikuisten käyttöön. Pikkulapsia on valvottava, eikä heidän
pidä antaa leikkiä laitteella.
• Pidä kaikki pakkausmateriaalit poissa lasten ulottuvilta. Ne voivat aiheuttaa tukehtumisvaaran.
• Pidä lapset poissa laitteen luota silloin, kun se on toiminnassa.
VAROITUS!
Kytke lapsilukko toimintaan, jotta pikkulapset tai kotieläimet eivät voi vahingossa kytkeä
laitetta toimintaan.
Käyttöturvallisuus
• Poista kaikki pakkausmateriaalit, tarrat ja suojamuovit laitteesta ennen sen ensimmäistä
käyttöä.
• Kytke keittoalueet aina pois toiminnasta käytön jälkeen.
• Palovammojen vaara! Älä laita keittotasolle ruokailuvälineitä tai kattilankansia, sillä ne
voivat kuumentua.
VAROITUS!
Tulipalon vaara! Ylikuumentunut rasva tai öljy syttyy herkästi palamaan.
Asianmukainen käyttö
• Valvo laitteen toimintaa aina käytön aikana.
• Laite on tarkoitettu ainoastaan kotitalouskäyttöön.
• Älä käytä keittotasoa työtasona tai laskualustana.
• Älä laita tulenarkoja nesteitä, helposti syttyviä tai sulavia esineitä (esimerkiksi muovi- tai
alumiiniesineitä) laitteen päälle tai sen lähelle.
• Ole varovainen kytkiessäsi muita laitteita keittotason lähellä olevaan pistorasiaan. Älä anna niiden virtajohtojen koskettaa keittotasoa tai kuumia astioita. Varo, että virtajohdot
eivät takerru kiinni mihinkään.
Page 37

Asennusohjeet
Laitteen vaurioitumisen välttäminen
• Jos keraamiselle pinnalle putoaa esineitä tai keittoastioita, pinta voi vaurioitua.
• Valurautaiset ja alumiiniset keittoastiat tai pohjasta vaurioituneet keittoastiat voivat
naarmuttaa pintaa, jos vedät niitä keittotasolla.
• Älä anna nesteen kiehua kuiviin, jotta keittoastia ja keraaminen taso eivät vaurioidu.
• Älä laita keittoalueille tyhjiä astioita äläkä kytke alueita toimintaan ilman keittoastiaa.
• Älä peitä mitään laitteen osaa alumiinifoliolla.
VAROITUS!
Jos keittotason pintaan tulee särö, katkaise virta laitteesta sähköiskuvaaran välttämiseksi.
ASENNUSOHJEET
Kirjaa ennen asennusta muistiin arvokilven sarjanumero (Ser. Nr.). Arvokilpi sijaitsee laitteen pohjassa.
Made in Switzerland
220-240V ~50/60Hz
3,5 kW
Typ: 55FED02BO
Turvallisuusohjeet
PNC: 941 560 803/00
Serie:
HC452020EB
37
VAROITUS!
Lue ohjeet huolellisesti!
Tarkista, ettei laite ole vaurioitunut kuljetuksessa. Vaurioitunutta laitetta ei saa kytkeä verkkovirtaan. Ota tarvittaessa yhteys jälleenmyyjään.
Laitteen asennuksen, sähköliitännän ja korjaukset saa suorittaa vain valtuutettu huoltoliike.
Käytä vain alkuperäisiä varaosia.
Kalusteeseen sijoitettavia laitteita saa käyttää vasta, kun ne on asennettu sopiviin, määräystenmukaisiin kalusteisiin ja työtasoihin.
Laitteen teknisten ominaisuuksien muuttaminen tai muiden muutosten tekeminen laitteeseen on kielletty. Ne voivat aiheuttaa henkilövahinkoja ja laitteen vaurioitumisen
Asennuksessa tulee noudattaa käyttömaassa voimassa olevia lakeja, määräyksiä, direktiivejä
ja standardeja (turvallisuusmääräykset, kierrätysmääräykset, sähköturvallisuusmääräykset
jne.).
Noudata mainittuja minimietäisyyksiä muihin laitteisiin ja kalusteisiin.
Asennuksen on taattava kosketussuojaus. Esimerkiksi laatikoita saa asentaa vain, kun välittömästi laitteen alapuolella on suojaava lattia.
Suojaa työtason leikatut pinnat kosteudelta käyttäen sopivaa tiivistettä.
Kiinnitä tiiviste siten, että laitteen ja työtason väliin ei jää aukkoja.
Suojaa laitteen alapinta esimerkiksi astianpesukoneesta tai uunista tulevalta höyryltä ja
kosteudelta.
Älä asenna laitetta oven viereen tai ikkunan alapuolelle. Avautuva ovi tai ikkuna voi tönäistä
keittoastian tasolta aiheuttaen vaaratilanteen.
Page 38

38 Asennusohjeet
VAROITUS!
Sähköiskuvaara. Noudata tarkasti sähköliitäntää koskevia ohjeita.
• Sähköverkon liitin on jännitteinen.
• Tee sähköverkon liitin jännitteettömäksi.
• Varmista, että kosketussuoja on asennettu asianmukaisesti.
• Löysät tai vääränlaiset pistokkeet ja pistorasiat voivat aiheuttaa liittimen ylikuumenemisen.
• Myös pistorasian ja pistokkeen käsittely on annettava ammattitaitoisen sähköasentajan
tehtäväksi.
• Käytä kaapelissa vedonpoistajaa.
• Yksi- tai kaksivaiheliitännässä on käytettävä yksivaiheista virtajohtoa, jonka tyyppi on
H05BB-F Tmax 90°C (tai korkeampi)
• Vaihda vahingoittuneen virtajohdon tilalle erikoisjohto (tyyppi H05BB-F Tmax 90°C tai
korkeampi). Ota yhteys valtuutettuun huoltoliikkeeseen.
Sähköliitäntään on asennettava kytkin, joka erottaa laitteen kaikki navat sähköverkosta ja
jonka kontaktien väli on vähintään 3 mm.
Sopivia erotuslaitteita ovat esimerkiksi: suojakytkimet, sulakkeet (ruuvattavat sulakkeet on
irrotettava kannasta), vikavirtakytkimet ja kontaktorit.
Jos käytät lisävarustetta C-KEHYS, lue kehyksen mukana toimitetut ohjeet ennen laitteen
asentamista.
Asennus
min. 50mm
R 5mm
=
490
min. 500mm
+1
mm
=
340+1mm
min.
50mm
600mm
Page 39

min.
20 mm
min.
28 mm
Useamman kuin yhden laitteen asentaminen
Lisäosat: liitostanko(-tangot), lämmönkestävä silikoni, kumimuotti, tiivistenauha.
Käytä ainoastaan erityistä lämmönkestävää silikonia.
Asennusohjeet
min.
25 mm
39
Työtason leikkaus
Välimatka seinästä: vähintään 50 mm
Syvyys: 490 mm
Leveys: laske yhteen kaikkien kalusteeseen asennettavien laitteiden leveydet ja vähennä siitä
20 mm (katso myös "Kaikkien laitteiden leveyksien yleiskatsaus").
Esimerkki:
+-=
580 mm
520 mm
360 mm
20 mm 920 mm
490 mm
Useamman kuin yhden laitteen asentaminen
1. Merkitse ylös työtason aukon mitat ja leikkaa aukko.
2. Aseta laitteet yksi kerrallaan pehmeälle alustalle, esimerkiksi peiton päälle, alaosa ylös-
päin osoittaen.
3. Aseta tiivistenauha laitteen alareunan ympärille lasikeraamisen pinnan ulkoista reunaa
pitkin.
Page 40

40 Asennusohjeet
4. Kiinnitä asennuslevyt löysästi suojakotelon vastaaviin reikiin.
5. Aseta ensimmäinen laite työtason asennusaukkoon. Aseta liitostanko työtason asennu-
saukkoon ja paina puolet sen leveydestä laitetta vasten.
6. Käännä asennuslevyt sisään ja liitostankoon työtason alapuolelta.
7. Aseta seuraava laite työtason asennusaukkoon. Varmista, että laitteiden etuosat ovat
samalla tasolla.
8. Kiristä asennuslevyn/kiinnityskahvan ruuvit.
9. Aseta silikonia laitteiden väliin jäävään tilaan.
10. Aseta silikonin päälle hiukan saippuavettä.
11. Paina kumimuottia lasikeraamista pintaa vasten voimaa käyttäen ja siirrä sitä hitaasti
aukkoa pitkin.
12. Älä kosketa silikoniin, ennen kuin se on jähmettynyt. Tähän voi mennä yksi päivä.
13. Poista ulos tuleva silikoni varoen leikkuuterällä.
14. Puhdista lasikeraaminen pinta kokonaan.
Page 41

LAITTEEN KUVAUS
Laitteen kuvaus
Laitteen kuvaus 41
mm
120/175/210
1
1 Kolmen lämpöalueen keittoalue
800/1600/2300 W
145
mm
2
3
4
2 Keittoalue 1200 W
3 Lasipalkki
4 Käyttöpaneeli
Käyttöpaneelin painikkeet
5 63
7 84
2
1
1014 1113 912
Laitetta käytetään kosketuspainikkeilla. Näytöt, merkkivalot ja äänimerkit ilmaisevat, mitkä
toiminnot ovat käytössä.
kosketuspainike toiminto
1
2
Tehotason näyttö Näyttää tehotason.
3
Keittoalueiden ajastimen merkkivalot Näyttää keittotasot, joihin aika asetetaan.
4
Ajastimen näyttö Näyttää ajan minuutteina.
5
6
7
8
9
10
11
/
Laitteen kytkeminen päälle ja pois päältä.
Lukitsee käyttöpaneelin/poistaa käyttöpaneelin lukituksen.
Näyttää, että ajastin toimii.
Näyttää, että ajastin tai hälytysajastin toimii.
Ulompien lämpöalueiden kytkeminen päälle ja pois
päältä.
Käynnistää automaattisen kuumennustoiminnon.
Lisää tai vähentää aikaa.
Keittoalueen asettaminen.
Page 42

42 Käyttöohjeet
kosketuspainike toiminto
12
säätöpalkki Tehotason säätäminen.
13
14
Ajastimen asettaminen.
STOP+GO-toiminnon kytkeminen päälle ja pois
päältä.
Tehotasojen näytöt
Näyttö Kuvaus
Keittoalue on kytketty pois toiminnasta
-
+ numero
/ /
Keittoalue on toiminnassa
Lämpimänäpito/ on toiminnassa
Automaattinen kuumennus on toiminnassa
Toimintahäiriö
OptiHeat Control (3-vaiheinen jälkilämmön ilmaisin): edelleen toiminnassa / lämpimänäpito / jälkilämpö
Toimintalukitus/lapsilukko on kytketty
Automaattinen poiskytkentä on toiminnassa
OptiHeat Control (3-portainen jälkilämmön merkkivalo)
VAROITUS!
/ / Palovammojen vaara jälkilämmön vuoksi!
OptiHeat Control ilmaisee jälkilämmön tason.
KÄYTTÖOHJEET
Kytkeminen toimintaan ja pois toiminnasta
Laite kytketään toimintaan ja pois toiminnasta koskettamalla painiketta sekunnin ajan.
Automaattinen poiskytkentä
Virta katkeaa automaattisesti keittotasosta seuraavissa tilanteissa:
• Kaikki keittoalueet on kytketty pois toiminnasta.
• Et aseta tehotasoa kytkettyäsi keittotason toimintaan.
• Jonkin kosketuspainikkeen päällä on esimerkiksi kattila, pyyheliina tms. yli 10 sekunnin
ajan. Laitteesta kuuluu äänimerkki, kunnes poistat esineen.
• Keittoalue ylikuumenee (esimerkiksi kun neste kiehuu kuiviin paistinpannulla). Keittoalueen on annettava jäähtyä, ennen kuin voit käyttää keittotasoa uudelleen.
• Keittoaluetta ei kytketä pois toiminnasta eikä tehotasoa muuteta. Jonkin ajan kuluttua
merkkivalo
syttyy ja keittoalue kytkeytyy pois toiminnasta. Katso taulukko.
Page 43

Käyttöohjeet 43
Automaattisen virrankatkaisun ajat
Tehotaso
Virta katkeaa
- - - -
6 tuntia 5 tuntia 4 tuntia 1,5 tuntia
seuraavan ajan
kuluttua
Tehotaso
Kosketa säätöpalkkia tehotason kohdalta. Säädä
asetusta tarvittaessa vasemmalle tai oikealle. Älä
poista sormeasi palkista, ennen kuin tehotaso on
haluamasi. Tehoasetus näkyy näytössä.
Automaattinen kuumennus
14
13
12
11
10
9
8
7
6
5
4
3
2
1
MIN.
0
1234567891011121314
TEM.
Voit saavuttaa vaaditun tehotason nopeammin, jos otat automaattisen kuumennustoiminnon käyttöön. Kyseinen toiminto asettaa korkeimman tehotason joksikin aikaa (katso kaavio), ja laskee tehotason sen jälkeen vaadittuun asetukseen.
Automaattisen kuumennustoiminnon asettaminen keittoalueeseen:
1. Kosketa
2. Kosketa välittömästi vaadittua tehotasoa. 3 sekunnin kuluttua näyttöön tulee näkyviin
.
Lopeta toiminto muuttamalla tehotasoa.
(näyttöön tulee näkyviin ).
Ajastin
Ajanlaskenta.
Ajanlaskenta-automatiikan avulla voit asettaa keittoalueen toiminta-ajan yhtä käyttökertaa
varten.
Page 44

44 Käyttöohjeet
Aseta ajanlaskenta-automatiikka valittuasi ensin keittoalueen.
Ajastintoiminto voidaan valita keittoalueille, jotka on aktivoitu ja tehoasetus on asetettu.
• Keittoalueen asettaminen: kosketa painiketta
lueen merkkivalo syttyy.
Kun toiminto on kytketty toimintaan,
• Ajastimen aktivoiminen: Kosketa ajastimen painiketta
nuuttia). Kun keittoalueen merkkivalo alkaa vilkkumaan hitaasti, ajan laskenta on käynnissä.
• Jäljellä olevan ajan tarkistaminen: Valitse keittoalue painikkeella
merkkivalo alkaa vilkkumaan nopeasti. Jäljellä oleva aika näkyy näytössä.
• Ajastimen muuttaminen: valitse keittoalue painikkeella
• Ajastimen poistaminen käytöstä: Valitse keittoalue painikkeella
kuluminen näkyy näytössä arvoon
Kun ajastimen aika on kulunut loppuun, äänimerkki kuuluu ja
keytyy pois toiminnasta.
• Äänimerkin deaktivoiminen: kosketa painiketta
CountUp Timer (Ajanlaskenta).
Käytä CountUp Timer-toimintoa keittoalueen toiminta-ajan tarkkailemiseen.
• Keittoalueen valitseminen (jos toiminnassa on useampi kuin yksi keittoalue) : kosketa
toistuvasti, kunnes haluamasi keittoalueen merkkivalo syttyy.
Kun toiminto on kytketty toimintaan,
• ToiminnonCountUp Timer kytkeminen toimintaan:
Kosketa painiketta
Symboli
• Keittoalueen jäljellä olevan toiminta-ajan tarkistaminen: Valitse keittoalue painikkeella
toiminta-aika. Näytössä näkyy sen keittoalueen toiminta-aika, joka toimii pisimpään.
• Toiminnon CountUp Timer kytkeminen pois toiminnasta: Valitse keittoalue painikkeella
sammuu ja syttyy.
Kun molemmat ajastintoiminnot toimivat samanaikaisesti, näytössä näkyy ensin ajaslaskenta.
häviää ja syttyy.
. Keittoalueen merkkivalo alkaa vilkkumaan nopeasti. Näytössä näkyy keittoalueen
ja kosketa painiketta tai ajastimen kytkemiseksi pois toiminnasta. Symboli
.
syttyy.
saakka. Keittoalueen merkkivalo sammuu.
00
syttyy.
toistuvasti, kunnes haluamasi keittoa-
ja aseta aika ( 00 - 99 mi-
. Keittoalueen
kosketa painiketta tai .
. Kosketa . Ajan
vilkkuu. Keittoalue kyt-
00
Hälytysajastin.
Voit käyttää ajastinta myös hälytysajastimena silloin, kun keittoalueet eivät ole toiminnassa. Kosketa painiketta
Aseta aika koskettamalla ajastimen painiketta
puun, äänimerkki kuuluu ja
• Äänimerkin deaktivoiminen: kosketa painiketta
.
tai . Kun ajastimen aika on kulunut lop-
vilkkuu.
00
Page 45

Käyttöohjeet
STOP+GO
-toiminto kytkee kaikki toiminnassa olevat keittoalueet alhaisimpaan tehoasetukseen -
lämpimänäpidon asetukseen (
on toiminnassa, tehoasetusta ei voida muuttaa.
Kun
-toiminto ei peruuta asetettua ajastusta.
• Kytke toiminto päälle koskettamalla
• Kytke toiminto pois päältä koskettamalla
voimaan.
).
. Symboli syttyy.
. Aikaisemmin asettamasi tehoasetus tulee
Lukko
Voit lukita käyttöpaneelin painikkeet virtapainiketta lukuun ottamatta. Lukitseminen estää tehotason muuttamisen vahingossa.
Kytke toiminto päälle koskettamalla
Ajastin toimii edelleen.
Kytke toiminto pois päältä koskettamalla
maan.
Kun sammutat laitteen, myös tämä toiminto sammuu.
. Symboli palaa neljän sekunnin ajan.
. Aikaisemmin asettamasi tehoasetus tulee voi-
Lapsilukko
Toiminto estää keittotason käyttämisen vahingossa.
Lapsilukon kytkeminen toimintaan
• Kytke virta keittotasoon painikkeella
• Kosketa painiketta
• Katkaise virta keittotasosta painikkeella
Lapsilukon kytkeminen pois toiminnasta
• Kytke virta keittotasoon painikkeella
neljän sekunnin ajan. Symboli syttyy.
• Katkaise virta keittotasosta painikkeella
Lapsilukon kytkeminen pois toiminnasta väliaikaisesti
• Kytke virta keittotasoon painikkeella
• Kosketa painiketta
voit käyttää keittotasoa.
• Kun katkaiset virran keittotasosta painikkeella
neljän sekunnin ajan. Symboli syttyy.
neljän sekunnin ajan. Aseta tehotaso 10 sekunnin kuluessa. Nyt
. Älä aseta tehotasoa .
.
. Älä aseta tehotasoa . Kosketa painiketta
.
. Symboli syttyy.
, lapsilukko on edelleen kytkettynä.
45
OffSound Control (Äänimerkkien poistaminen käytöstä ja käyttöön ottaminen)
Äänimerkkien poistaminen käytöstä
Kytke laite pois päältä.
Kosketa painiketta
niketta 3 sekunnin ajan.
näkyy
Kun kyseinen toiminto on päällä, äänimerkit kuuluvat vain seuraavissa tapauksissa:
• painiketta
• hälytinajastin aktivoituu
ja äänimerkki on poistettu käytöstä.
kolmen sekunnin ajan. Näytöt syttyvät ja sammuvat. Kosketa -pai-
syttyy, äänimerkki on käytössä. Kosketa painiketta . Näytössä
kosketetaan
Page 46

46 Hyödyllisiä neuvoja ja vinkkejä
• ajastimen aika kuluu umpeen
• käyttöpaneelin päälle asetetaan jokin esine.
Äänimerkkien ottaminen käyttöön
Kytke laite pois päältä.
Kosketa painiketta
niketta 3 sekunnin ajan.
kolmen sekunnin ajan. Näytöt syttyvät ja sammuvat. Kosketa -pai-
syttyy, koska äänimerkki on pois käytöstä. Kosketa , syt-
tyy. Äänimerkki on käytössä.
HYÖDYLLISIÄ NEUVOJA JA VINKKEJÄ
Keittoastiat
• Keittoastian pohjan tulee olla mahdollisimman paksu ja tasainen.
• Emaloidusta teräksestä valmistetut tai alumiini- tai kuparipohjaiset keittoastiat voivat
tehdä läiskiä keraamiseen pintaan.
Energiansäästö
• Mikäli mahdollista, peitä keittoastia aina kannella.
• Aseta keittoastia keittoalueelle, ennen kuin kytket alueen toimintaan.
• Kytke keittoalueet pois toiminnasta ennen kypsennysajan päättymistä ja hyödynnä jälkilämpö.
• Keittoastioiden pohjan tulee olla keittoalueen kokoinen.
Öko Timer (Säästöajastin)
Energian säästämiseksi keittoalueen vastus kytkeytyy pois toiminnasta jo ennen vähenevän
aikanäytön ajastimen merkkiäänen kuulumista. Kuumennusajan lyhentyminen riippuu tehotasosta ja toiminta-ajasta.
Esimerkkejä keittotoiminnoista
Taulukossa annetut tiedot ovat ainoastaan suuntaa-antavia.
Läm-
pötila-
asetus
1 Valmiiden ruokien lämpimänäpito tarpeen
1-3 Hollandaise-kastike, sulatus: voi, suklaa,
liivate
1-3 Hyydyttäminen: munakkaat, munajuus-to10-40
3-5 Riisin ja maitoruokien haudutus, valmis-
ruokien kuumentaminen
Käyttökohde: Aika Vinkkejä
mukaan
5-25
min
min
25-50
min
Peitä kannella
Sekoita välillä
Keitä kannen alla
Lisää nestettä riisin suhteen kaksinkertainen määrä, sekoita maitoruokia kypsennyksen aikana
Page 47

Hoito ja puhdistus
47
Läm-
pötila-
asetus
5-7 Höyrytetyt vihannekset, kala, liha 20-45
7-9 Höyryssä kypsennetyt perunat 20-60
7-9 Suurten ruokamäärien kypsentäminen,
pataruoat ja keitot
9-12 Kevyt paistaminen: leikkeet, vasikanliha,
kotletit, pyörykät, makkarat, maksa, kastikepohja, kananmunat, ohukaiset,
munkit
12-13 Voimakas paistaminen: sipuliperunat,
ulkofilee, pihvit
14 Suuren vesimäärän keittäminen, pastan keittäminen, lihan ruskistaminen (gulassi, pata-
paisti), ranskalaiset perunat
Käyttökohde: Aika Vinkkejä
min
min
60-150
min
tarpeen
mukaan
5-15
min
Lisää nestettä muutama ruokalusikallinen
Käytä korkeintaan ¼ litraa vettä/
750 g perunoita
Enintään 3 litraa nestettä + valmistusaineet
Käännä kypsennyksen puolivälissä
Käännä kypsennyksen puolivälissä
Tietoa akryyliamidista
Tärkeää Tuoreimpien tieteellisten tutkimustulosten mukaisesti (erityisesti tärkkelyspitoisten)
ruokien voimakas ruskistaminen voi aiheuttaa terveysvaaran akryyliamidin vuoksi. Sen
vuoksi suosittelemme ruokien kypsennystä mahdollisimman alhaisessa lämpötilassa sekä
liiallisen ruskistamisen välttämistä.
HOITO JA PUHDISTUS
Puhdista keittotaso jokaisen käytön jälkeen.
Tarkista aina, että keittoastian pohja on puhdas.
VAROITUS!
Terävät esineet ja hankaavat pesuaineet vahingoittavat laitetta.
Turvallisuussyistä laitetta ei saa puhdistaa höyrypesulaitteella tai painepesurilla.
Keraamisen pinnan naarmut tai tummat läiskät eivät vaikuta laitteen toimintaan.
Lian poistaminen:
1. – Poista välittömästi: sulanut muovi, muovikelmu ja sokeripitoinen ruoka. Muutoin li-
ka voi aiheuttaa laitteeseen vaurioita. Käytä erityistä lasipintaan tarkoitettua kaavinta. Aseta kaavin viistosti lasipintaa vasten ja liikuta kaavinta pintaa pitkin.
– Poista sitten, kun laite on jäähtynyt riittävästi: kalkkirenkaat, vesirenkaat, rasva-
tahrat, kirkkaat metalliset värimuutokset. Käytä keraamisen keittotason tai ruostumattoman teräksen puhdistukseen tarkoitettua puhdistusainetta.
2. Puhdista laite kostealla liinalla käyttäen vähän puhdistusainetta.
3. Kuivaa pinta lopuksi puhtaalla liinalla.
Page 48

48 Käyttöhäiriöt
VAROITUS!
• Älä käytä kaavinta tai teräviä esineitä lasipalkin
ja palkin ja lasikeraamisen pinnan välisen tilan
puhdistamiseen. Lasipalkki on liitetty keraamiseen levyyn.
• Älä aseta keittoastioita lasipalkin päälle.
• Varmista, etteivät pannut ja keittoastiat kosketa lasipalkkiin.
KÄYTTÖHÄIRIÖT
Ongelma Mahdollinen syy ja korjaustoimenpide
Laite ei kytkeydy
toimintaan tai ei
toimi muuten.
Laitteesta kuuluu
merkkiääni virran
ollessa katkaistu.
Jälkilämmön merkkivalo ei syty.
Ulommat lämpöalueet eivät kytkeydy
toimintaan.
Laitteesta kuuluu
merkkiääni ja laite
käynnistyy ja kytkeytyy taas pois
toiminnasta. Viiden
sekunnin kuluttua
kuuluu yksi tai
useampia merkkiääniä.
Näytössä näkyy
.
Näytössä näkyy
ja jokin numero.
• Kytke laite uudelleen toimintaan ja aseta tehotaso 10 sekunnin kuluessa.
•
Lapsilukko tai
minnasta. Lue ohjeet kohdasta "Lapsilukko" tai "Stop and go -toiminto".
• Olet koskettanut useampaa kosketuspainiketta samanaikaisesti. Kosketa
vain yhtä kosketuspainiketta.
• Käyttöpaneelilla on vettä tai rasvaroiskeita. Pyyhi käyttöpaneeli puhtaaksi.
Yksi tai useampi kosketuspainike on peitetty. Poista kosketuspainikkeen päällä
oleva esine. Pyyhi käyttöpaneeli puhtaaksi.
Keittoalue ei ole kuuma, koska sitä on käytetty vain vähän aikaa. Jos keittoalueen pitäisi olla kuuma, ota yhteys valtuutettuun huoltoliikkeeseen.
Kytke ensin sisempi lämpöalue toimintaan.
Painikkeen päällä on jotain. Poista kosketuspainikkeen päällä oleva esine
tms.
Automaattinen virran katkaisu on toiminnassa. Katkaise virta laitteesta ja kytke se uudelleen toimintaan.
Laitteessa on jokin vika.
Kytke laite irti verkkovirrasta lyhyeksi ajaksi. Irrota sulake sulaketaulusta. Kyt-
ke virta uudelleen. Jos merkkivalo
tuun huoltoliikkeeseen.
on kytketty toimintaan. Kytke lapsilukko tai pois toi-
syttyy uudelleen, ota yhteys valtuutet-
Page 49

Ympäristönsuojelu
Ongelma Mahdollinen syy ja korjaustoimenpide
Merkkiääntä ei
kuulu, kun kosketat
käyttöpaneelin painikkeita.
Merkkiäänet on poistettu käytöstä.
Ota merkkiäänet käyttöön.
Ellei ongelma poistu edellä kuvattujen toimenpiteiden avulla, ota yhteys valtuutettuun
huoltoliikkeeseen. Ilmoita arvokilpeen merkityt tiedot, keraamisen keittotason kolmikirjaiminen tunnus (keittotason kulmassa) sekä näytössä näkyvä virheilmoitus.
Valtuutetun huoltoliikkeen käynnistä aiheutuvat kulut voidaan veloittaa myös takuuaikana,
jos toimintahäiriö on aiheutunut virheellisen käytön vuoksi. Kuluttajaneuvonnon yhteystiedot ja takuuehdot on mainittu takuu- ja huoltokirjassa.
YMPÄRISTÖNSUOJELU
Tuotteeseen tai sen pakkaukseen merkitty symboli , osoittaa, että tätä tuotetta ei saa
laittaa sekajätteen joukkoon, vaan se on toimitettava erilliseen sähkö- ja
elektroniikkajätteiden keräyspisteeseen.
Asianmukaisella jätehuollolla estetään mahdolliset ympäristö- ja terveyshaitat. Laitetta ei
saa purkaa ennen jätehuoltoon luovuttamista eikä laitteen sisälle saa laittaa muita jätteitä.
Tarkempia tietoja tämän tuotteen kierrättämisestä saat kuntasi jäteasioita hoitavalta
viranomaiselta, liikkeestä josta tuote on ostettu tai internet sivuiltamme www.electrolux.fi.
Pakkausmateriaalit
49
Pakkausmateriaalit ovat ympäristöystävällisiä, ja ne voidaan kierrättää. Muoviosiin on merkitty materiaalin tunniste: >PE<,>PS< jne. Vie pakkausmateriaalit asianmukaisiin jätteenkeräysastioihin.
Page 50

50
POUR DES RÉSULTATS PARFAITS
Merci d'avoir choisi ce produit AEG. Nous l'avons créé
pour vous offrir la meilleure performance pour une
longue durée, avec des technologies innovantes qui vous
simplifient la vie - autant de caractéristiques que vous ne
trouverez pas sûrement pas sur d'autres appareils.
Veuillez prendre quelques instants pour lire cette notice
afin d'utiliser au mieux votre appareil.
ACCESSOIRES ET CONSOMMABLES
Dans la boutique en ligne d'AEG, vous trouverez tout ce
qu'il vous faut pour que vos appareils AEG fonctionnent
parfaitement. Sans oublier une vaste gamme d'accessoires
conçus et fabriqués selon les critères de qualité les plus
élevés qui soient, des articles de cuisine spécialisés aux
range-couverts, des porte-bouteilles aux sacs à linge
délicats...
Visitez la boutique en ligne sur
www.aeg-electrolux.com/shop
Page 51

SOMMAIRE
Sommaire
52 Consignes de sécurité
53 Instructions d'installation
58 Description de l'appareil
59 Notice d'utilisation
63 Conseils utiles
64 Entretien et nettoyage
65 En cas d'anomalie de
fonctionnement
66 En matière de protection de
l'environnement
51
Les symboles suivants sont utilisés dans ce
manuel:
Informations importantes pour votre sécurité
et pour éviter d’abîmer l’appareil.
Informations générales et conseils
Informations écologiques
Sous réserve de modifications
Page 52

52 Consignes de sécurité
CONSIGNES DE SÉCURITÉ
Pour votre sécurité et le bon fonctionnement de l'appareil, lisez attentivement ce manuel
avant l'installation et l'utilisation. Conservez ces instructions à proximité de l'appareil. Les
utilisateurs doivent connaître parfaitement le fonctionnement et les fonctions de sécurité
de l'appareil.
Avertissements importants
AVERTISSEMENT
Cet appareil n'est pas conçu pour être utilisé par des personnes (y compris des enfants)
dont les facultés physiques, sensorielles ou mentales sont réduites, ou qui manquent d'expérience et de connaissances, à moins qu'une personne responsable de leur sécurité ne les
supervise ou leur donne des instructions sur la manière de l'utiliser.
Sécurité des enfants
• Cet appareil a été conçu pour être utilisé par des adultes. Veillez à ce que les enfants n'y
touchent pas et ne l'utilisent pas comme un jouet.
• Ne laissez pas les emballages à portée de main des enfants. Ils pourraient s'asphyxier !
• Tenez les enfants éloignés de l'appareil pendant son fonctionnement.
AVERTISSEMENT
La sécurité enfants empêche l'utilisation accidentelle ou involontaire de l'appareil.
Utilisation
• Retirez tous les emballages, les étiquettes et les films protecteurs de l'appareil (sauf la
plaque signalétique) avant de l'utiliser pour la première fois.
• Mettez les zones de cuisson à l'arrêt après chaque utilisation.
• Risque de brûlures ! Ne posez aucun objet contenant du métal, comme les couverts et
couvercles de récipients sur la table de cuisson. Ils risqueraient de s'échauffer.
AVERTISSEMENT
Danger d'incendie ! Surveillez attentivement la cuisson lors de friture dans l'huile ou la
graisse : les graisses surchauffées s'enflamment facilement.
Utilisation
• Surveillez toujours l'appareil pendant son fonctionnement.
• Votre appareil est destiné à un usage domestique normal.
• N'utilisez pas l'appareil comme plan de travail ou support.
• Ne posez pas ou ne stockez pas de liquides ou des matériaux inflammables, des objets
susceptibles de fondre (plastique, aluminium) sur ou à proximité de l'appareil.
• Faites attention si vous branchez d'autres appareils électriques à des prises situées à
proximité de la table de cuisson. Contrôlez que les câbles d'alimentation n'entrent pas en
contact avec les surfaces brûlantes de l'appareil ou les récipients brûlants. Contrôlez que
les câbles ne soient pas enchevêtrés.
Page 53

Instructions d'installation 53
Comment éviter d'endommager l'appareil
• Des objets ou des récipients de cuisson peuvent, en tombant, endommager la surface vitrocéramique.
• N'utilisez pas de récipients en fonte, ni de récipients dont le fond est endommagé et rugueux. Ils risqueraient de rayer la table de cuisson.
• Ne faites pas "brûler" les récipients et ne laissez pas le contenu s'évaporer en totalité.
Cela peut entraîner des dégats permanents des récipients et de la table de cuisson.
• Ne placez pas de plats de cuisson vides sur les zones de cuisson et ne mettez pas ces
dernières en fonctionnement sans récipient.
• Ne recouvrez aucune partie de l'appareil à l'aide de feuilles d'aluminium.
AVERTISSEMENT
Si votre table de cuisson est endommagée (éclat, fêlure,...), débranchez votre appareil
pour éviter tout risque d'électrocution.
INSTRUCTIONS D'INSTALLATION
Avant d'installer l'appareil , notez le numéro de série qui figure sur la plaque signalétique.
La plaque signalétique se trouve sur la partie inférieure de l'appareil.
Made in Switzerland
220-240V ~50/60Hz
3,5 kW
Typ: 55FED02BO
PNC: 941 560 803/00
Serie:
HC452020EB
Page 54

54 Instructions d'installation
Avertissement importants
AVERTISSEMENT
Veuillez lire attentivement cette notice d'utilisation ainsi que les recommandations et les
avertissements qu'elle contient avant de procéder à l'installation et à la première utilisation
de l'appareil.
Vérifiez que l'appareil n'a pas été endommagé pendant le transport. Ne branchez jamais un
appareil endommagé. Si nécessaire, contactez le magasin vendeur.
Les opérations d'installation, de branchement et de réparation sont du ressort exclusif d'un
technicien qualifié. En cas d'intervention sur l'appareil, exigez du Service Après-vente des
pièces de rechange certifiées constructeur.
Les appareils encastrables ne peuvent être mis en fonctionnement qu'après avoir été installés dans des meubles et des plans de travail homologués et adaptés.
Ne modifiez pas ou n'essayez pas de modifier vous-même les caractéristiques de cet appareil. Cela représenterait un danger pour vous.
L'installation doit être conforme à la législation, la réglementation, les lignes directrices et
les normes en vigueur dans le pays de résidence (consignes de sécurité électro-techniques
et réglementation, recylage conforme et réglementaire, etc.).
Respectez l'espacement minimal requis par rapport aux autres appareils !
La protection contre les contacts accidentels doit être assurée par le montage, par exemple
les tiroirs doivent être installés uniquement avec un plancher de protection directement
sous l'appareil.
Protégez l'appareil de l'humidité en plaçant un joint d'étanchéité dans les rainures du plan
de travail.
Le joint comble les fentes entre le plan de travail et l'appareil.
Protégez la partie inférieure de l'appareil de la vapeur et de l'humidité émanant, par exemple, d'un lave-vaisselle ou d'un four.
N'installez pas l'appareil à proximité d'une porte ou sous une fenêtre ! Les récipients chauds
sur la table de cuisson risquent de tomber lors de l'ouverture de la porte ou de la fenêtre.
AVERTISSEMENT
Le courant électrique peut provoquer des blessures. Les opérations d'installation et de branchement doivent être réalisées par un technicien qualifié.
• La borne d'alimentation est sous tension.
• Mettez la borne d'alimentation hors tension.
• Assurez-vous que l'appareil est correctement installé de manière à éviter tout contact.
• Des connexions desserrées ou incorrectes peuvent être à l'origine d'une surchauffe des
bornes.
• Le raccordement électrique ne doit être effectué que par un électricien qualifié.
• Le câble ne doit pas être tendu.
• En cas de raccordement monophasé, utilisez impérativement le câble d'alimentation approprié de type H05BB-F Tmax 90 °C (ou plus).
• Si le câble d'alimentation est endommagé, il doit être remplacé par un câble spécial (type
H05BB-F Tmax 90 °C ; ou plus). Veuillez vous adresser au Service Après-vente.
Page 55

Instructions d'installation 55
Dans le cas d'une installation fixe, le raccordement au réseau doit être effectué par l'intermédiaire d'un interrupteur à coupure omnipolaire, ayant une distance d'ouverture des contacts d'au moins 3 mm.
Les dispositifs d'isolement comprennent : des coupe-circuits, des fusibles (les fusibles à visser doivent être retirés du support), des disjoncteurs de mise à la terre et des contacteurs.
Si vous utilisez le cadre d'accessoire C-FRAME, lisez d'abord les instructions fournies avec le
cadre avant d'installer l'appareil.
Montage
min. 500mm
min.
50mm
min. 50mm
=
R 5mm
490
+1
mm
=
340+1mm
600mm
min.
20 mm
min.
25 mm
Page 56

56 Instructions d'installation
min.
28 mm
Installation de plusieurs appareils.
Pièces ajoutées : barre(s) d'accouplement, silicone résistant à la chaleur, forme en caout-
chouc, bride d'étanchéité.
N'utilisez que du silicone spécial résistant à la chaleur.
Découpe de la table de travail.
Distance du mur : 50 mm minimum
Profondeur : 490 mm
Largeur : additionnez les largeurs de tous les appareils à encastrer et soustrayez 20 mm
(voir également « Vue d'ensemble de toutes les largeurs d'appareils »)
Exemple :
+-=
580 mm
360 mm
20 mm 920 mm
520 mm
490 mm
Installation de plusieurs appareils.
1. Notez la dimension de découpe de la table de travail et sciez-la.
2. Posez les appareils, un à la fois, sur une surface souple, une couverture par exemple, le
dessous vers le haut.
3. Placez le joint d'étanchéité autour du bord inférieur de l'appareil le long du bord exter-
ne de la surface vitrocéramique.
4. Vissez légèrement les plaques de fixation dans les trous prévus dans le boîtier de pro-
tection.
5. Placez le premier appareil dans la découpe de la table de travail. Placez la barre d'ac-
couplement dans la découpe de la surface de travail et appuyez-la contre l'appareil sur
la moitié de la largeur.
Page 57

Instructions d'installation
6. Tournez légèrement les plaques de fixation de dessous sur la table de travail et sur la
barre de raccordement.
7. Placez l'appareil suivant dans la découpe de la surface de travail. Veillez à ce que
l'avant des appareils soit au même niveau.
57
8. Serrez la plaque de fixation/les vis de retenue.
9. Appliquez le silicone dans l'espace entre les appareils.
10. Appliquez de l'eau savonneuse sur le silicone.
11. Appuyez fermement la forme en caoutchouc contre la surface vitrocéramique et dé-
placez-la lentement le long de l'espace.
12. Ne touchez pas le silicone tant qu'il n'a pas durci. Cela peut prendre une journée.
13. Enlevez soigneusement le silicone en trop avec une lame de rasoir.
14. Nettoyez soigneusement la surface vitrocéramique.
Page 58

58 Description de l'appareil
DESCRIPTION DE L'APPAREIL
Description de l'appareil
mm
120/175/210
1
1 Triple zone de cuisson 800/1600/2300 W
2 Zone de cuisson 1200 W
145
mm
4
2
3
3 Plaque en verre
4 Bandeau de commande
Description du bandeau de commande
5 63
7 84
2
1
1014 1113 912
Les touches sensitives permettent de commander l'appareil. Des voyants et des signaux sonores
confirment l'activation des fonctions sélectionnées.
Touche sensitive Fonction
1
2
Indicateur du niveau de cuisson Pour afficher le niveau de cuisson.
3
Voyants du minuteur des zones de
4
cuisson
Affichage du minuteur Pour afficher la durée en minutes.
5
6
7
8
9
Pour mettre en marche ou à l'arrêt l’appareil.
Pour verrouiller/déverrouiller le bandeau de commande.
Indique la zone pour laquelle vous avez réglé le
temps de cuisson.
Il montre la durée pendant laquelle la fonction de
chauffe fonctionne.
Il montre que la fonction Minuteur fonctionne et
que le compte à rebours à démarré.
Met en fonctionnement ou à l'arrêt les circuits extérieurs.
Pour activer la fonction de cuisson automatique.
Page 59

Touche sensitive Fonction
10
11
12
13
14
/
Bandeau de commandes Pour régler le niveau de cuisson.
Affichage des niveaux de cuisson
Affichage Description
La zone de cuisson est à l'arrêt
-
+ chiffre
/ /
La zone de cuisson est en fonctionnement
La fonction de maintien au chaud / est activée
La fonction de démarrage automatique de la cuisson est activée
Anomalie de fonctionnement
OptiHeat Control (Indicateur de chaleur résiduelle à 3 paliers) : cuisson / maintien au chaud / chaleur résiduelle
La Sécurité enfants est activée
L'arrêt de sécurité est activé
Notice d'utilisation
Augmentation ou diminution de la durée
Sélection d'une zone de cuisson
Pour définir les réglages du minuteur.
Pour activer et désactiver la fonction STOP+GO.
59
OptiHeat Control (Indicateur de chaleur résiduelle à 3 paliers)
AVERTISSEMENT
/ / La chaleur résiduelle peut être source de brûlures !
OptiHeat Control indique le niveau de chaleur résiduelle.
NOTICE D'UTILISATION
Mise en fonctionnement et mise à l'arrêt
Appuyez sur pendant 1 seconde pour mettre l'appareil en fonctionnement ou à l'arrêt.
Mise à l'arrêt automatique
La table de cuisson est automatiquement mise à l'arrêt si :
• toutes les zones de cuisson sont mises à l'arrêt.
• vous ne réglez pas le niveau de cuisson après avoir mis la table en fonctionnement.
• vous avez posé un objet (casserole, chiffon, etc.) sur une touche sensitive pendant plus
de 10 secondes. Le signal sonore retentit jusqu'au retrait de l'objet.
• la table de cuisson surchauffe (tout le liquide s'est évaporé du récipient). Laissez refroidir
la zone de cuisson avant de réutiliser la table de cuisson.
Page 60

60 Notice d'utilisation
• la zone de cuisson n'est pas mise à l'arrêt ou le niveau de cuisson n'est pas modifié. Après
un certain temps,
s'affiche et la table de cuisson se met à l'arrêt. Reportez-vous au
tableau.
Temporisation de l'arrêt de sécurité
Niveau de cuis-
- - - -
son
Arrêt au bout de 6 heures 5 heures 4 heures 1,5 heure
Le niveau de cuisson
Appuyez, sur le bandeau de commande, sur le niveau de cuisson souhaité. Corrigez-le au besoin en
effleurant une autre position, à droite ou à gauche. Ne relâchez pas la pression tant que le niveau
de cuisson souhaité n’est pas atteint. L'affichage
indique le niveau de cuisson.
Démarrage automatique
14
13
12
11
10
9
8
7
6
5
4
3
2
1
MIN.
0
1234567891011121314
TEM.
On peut obtenir plus rapidement la température de chauffe choisie en activant la fonction
de démarrage automatique. Cette fonction active la température la plus élevée pendant un
certain temps (voir le diagramme) puis redescend à la température sélectionnée.
Activation de la fonction pour une zone de cuisson :
1. Appuyez sur
2. Apuyez immédiatement sur le niveau de cuisson souhaité. Après 3 secondes,
che.
Pour désactiver cette fonction, modifiez le niveau de cuisson.
( s'affiche).
s'affi-
Page 61

00
00
Notice d'utilisation
Minuteur
Minuteur (Compte à rebours)
Utilisez le minuteur pour régler la durée de fonctionnement de la zone de cuisson pendant
une session.
Réglez le minuteur après la sélection de la zone de cuisson.
Il est possible de sélectionner la fonction de minuterie pour les zones de cuisson actives et
dont le niveau de cuisson est réglé.
61
• Pour régler la zone de cuisson: appuyez sur
cateur d'une zone de cuisson nécessaire s'allume.
Lorsque cette fonction est activée, s'allume.
• Pour activer le minuteur en fonction Décompte du temps : appuyez sur
teur pour régler la durée (
clignote plus lentement, le décompte a commencé.
• Pour savoir combien de temps il reste : paramétrez la zone de cuisson avec
ant de la zone de cuisson commence à clignoter rapidement. L'afficheur indique le temps
qui reste.
• Pour modifier le minuteur : paramétrez la zone de cuisson avec la touche
• Pour désactiver le minuteur : paramétrez la zone de cuisson avec
temps restant est décompté jusqu'à
clignoter rapidement.
Lorsque le décompte du temps du minuteur est terminé, le signal sonore retentit et
clignote. La zone de cuisson se désactive.
• Pour désactiver le signal sonore : appuyez sur
CountUp Timer (Minuteur progressif)
Utilisez la fonction CountUp Timer pour vérifier la durée de fonctionnement de la zone de
cuisson sélectionnée.
• Sélection de la zone de cuisson (si plus d'une seule zone de cuisson fonctionne) :
appuyez sur
haitée s'allume.
Lorsque cette fonction est activée, s'allume.
• Pour activer le CountUp Timer :
Appuyez sur
Le symbole s'éteint et s'allume.
• Pour voir comment fonctionne la zone de cuisson : paramétrez la zone de cuisson avec
. Le voyant de la zone de cuisson commence à clignoter rapidement. L'afficheur indi-
que l'heure à laquelle la zone de cuisson fonctionne.
• Pour désactiver le CountUp Timer : paramétrez la zone de cuisson avec
ou pour désactiver le minuteur. Le symbole disparaît et apparaît.
Lorsque les deux fonctions de minuterie fonctionnent à la fois, l'affichage indique d'abord
le compteur progressif.
à plusieurs reprises jusqu'à ce que le voyant de la zone de cuisson sou-
- 99 minutes). Lorsque le voyant de la zone de cuisson
00
. Le voyant de la zone de cuisson commence à
à plusieurs reprises jusqu'à ce que l'indi-
du minu-
. Le voy-
ou .
. Touche . Le
et la touche
Page 62

62 Notice d'utilisation
Minuterie
Vous pouvez vous servir du minuteur pour le rappel des minutes lorsque les zones de cuisson ne sont pas en service. Touche
Appuyez sur la touche ou du minuteur pour régler la durée. Une fois le temps écoulé,
le signal sonore retentit et
• Arrêt du signal sonore : appuyez sur
clignote.
00
STOP+GO
La fonction permet de basculer simultanément toutes les zones de cuisson actives au
niveau de cuisson le plus bas - Maintien au chaud (
Quand
La fonction
• Pour activer cette fonction, appuyez sur
• Pour désactiver cette fonction, appuyez sur
est activé, le niveau de cuisson ne peut pas être modifié.
n'interrompt pas le minuteur.
me.
).
. Le symbole s'allume.
. Le niveau de cuisson précédent s'allu-
Verrouillage
Vous pouvez verrouiller le bandeau de commande à l'exception de la touche . Ce qui
permet d'éviter une modification involontaire du niveau de cuisson par exemple.
Pour démarrer cette fonction, appuyez sur
Le minuteur reste allumé.
Pour mettre à l'arrêt cette fonction, appuyez sur
me.
Lorsque vous mettez l'appareil à l'arrêt, vous désactivez également cette fonction.
. Le symbole s'allume pendant 4 secondes.
. Le niveau de cuisson précédent s'allu-
Le dispositif de sécurité enfants
Ce dispositif permet d'éviter une utilisation involontaire de l'appareil.
Activation de la Sécurité enfants
• Mettez la table de cuisson en fonctionnement avec
de cuisson .
• Appuyez sur
• Mettez à l'arrêt la table de cuisson avec
Désactivation de la Sécurité enfants
• Mettez la table de cuisson en fonctionnement avec
de cuisson . Appuyez sur
• Mettez à l'arrêt la table de cuisson avec
Bridage de la sécurité enfants le temps d'une cuisson
• Mettez la table de cuisson en fonctionnement avec
• Appuyez sur
qui suivent. Vous pouvez utiliser la table de cuisson.
• Lorsque vous mettez la table de cuisson à l'arrêt avec
veau activée.
pendant 4 secondes. Le symbole s'allume.
.
pendant 4 secondes. Le symbole s'allume.
.
pendant 4 secondes. Réglez le niveau de cuisson dans les 10 secondes
. Ne sélectionnez aucun niveau
. Ne sélectionnez aucun niveau
. Le symbole s'allume.
, la Sécurité enfants est de nou-
Page 63

Conseils utiles
OffSound Control (Désactivation et activation des signaux sonores)
Désactivation des signaux sonores
Mettez l'appareil à l'arrêt.
Appuyez sur
pendant 3 secondes. s'allume, le signal sonore est activé. Appuyez sur ,
sur
s'allume, le signal sonore est désactivé.
Lorsque cette fonction est activée, l'appareil émet des signaux sonores uniquement dans les
circonstances suivantes :
• quand vous appuyez sur
• quand le minuteur arrive en fin de course
• quand le décompte se termine
• quand vous posez un objet sur le bandeau de commande.
Activation des signaux sonores
Mettez l'appareil à l'arrêt.
Appuyez sur
pendant 3 secondes. s'allume, le signal sonore est désactivé. Appuyez sur ,
sur
s'allume. Les signaux sonores sont activés.
pendant 3 secondes. Tous les indicateurs s'allument et s'éteignent. Appuyez
pendant 3 secondes. Tous les indicateurs s'allument et s'éteignent. Appuyez
CONSEILS UTILES
Plats de cuisson
63
• Le fond du récipient de cuisson doit être lisse, propre et sec, aussi plat et épais que possible avant chaque utilisation.
• Les récipients de cuisson avec un fond en émail, en aluminium ou en cuivre peuvent laisser des traces sur les zones de cuisson vitrocéramiques.
Économie d'énergie
• Si possible, couvrez toujours les récipients de cuisson avec un couvercle pendant la cuisson.
• Déposez toujours le récipient sur la zone de cuisson avant de mettre celle-ci en fonctionnement.
• Mettez à l'arrêt les zones de cuisson avant la fin du temps de cuisson pour utiliser la
chaleur résiduelle.
• Sur la table de cuisson, utilisez des récipients de cuisson dont le diamètre correspond au
diamètre de la zone de cuisson utilisée.
Öko Timer (Minuteur Eco)
Pour réaliser des économies d'énergie, le foyer s'éteint automatiquement avant le signal du
minuteur. La réduction du temps de cuisson dépend de la puissance et de la durée de la
cuisson.
Page 64

64 Entretien et nettoyage
Exemples de cuisson
Les valeurs figurant dans le tableau suivant sont indicatives.
Niveau
de
cuisson
1 Conserver les aliments cuits au chaud selon
1-3 Sauce hollandaise, faire fondre : beurre,
chocolat, gélatine
1-3 Solidifier : omelettes, œufs au plat 10-40
3-5 Riz et plats à base de riz ; cuisson de
petites quantités de pomme de terre ou
de légumes à la vapeur ; réchauffage
des plats cuisinés
5-7 Faire cuire à la vapeur les légumes, le
poisson, la viande
7-9 Faire cuire à la vapeur des pommes de
terre
7-9 Cuisson de grandes quantités d'ali-
ments, ragoûts et soupes
9-12 Cuisson à feu doux : escalopes, cordons
bleus de veau, côtelettes, rissolettes,
saucisses, foie, roux, œufs, crêpes, beignets
12-13 Cuisson à température élevée des pom-
mes de terre rissolées, longe de bœuf,
steaks
14 Faire bouillir de grandes quantités d'eau, cuire des pâtes, de la viande (goulasch, bœuf en
daube), grande friture pour frites.
Adapté à : Durée Conseils
besoin.
5-25
min.
min.
25-50
min.
20-45
min.
20-60
min.
60-150
min.
selon
besoin.
5-15
min.
Recouvrir
Remuer de temps en temps.
Couvrir pendant la cuisson.
Ajouter au moins deux fois plus
d'eau que de riz. Remuer car les aliments à base de lait se séparent durant la cuisson.
Ajouter quelques cuillères à soupe
de liquide.
Utiliser max. ¼ l d'eau pour 750 g
de pommes de terre.
Ajouter jusqu’à 3 l de liquide, plus
les ingrédients.
Retourner à mi-cuisson.
Retourner à mi-cuisson.
ENTRETIEN ET NETTOYAGE
Nettoyez l'appareil après chaque utilisation.
Utilisez toujours des récipients de cuisson dont le fond est propre et sec, lisse et plat.
AVERTISSEMENT
Les objets tranchants et les produits de nettoyage agressifs ou abrasifs endommagent l'appareil.
Par mesure de sécurité, il est interdit de nettoyer la table de cuisson avec un appareil à jet
de vapeur ou à haute pression.
Les égratignures ou les taches sombres sur la vitrocéramique n'ont aucune influence sur le
fonctionnement de l'appareil.
Page 65

En cas d'anomalie de fonctionnement 65
Retrait des salissures :
1. – Retirez immédiatement : plastique fondu, feuilles plastiques et aliments sucrés. En
cas de non-respect de cette consigne, la salissure risque d'endommager l'appareil.
Utilisez un racloir spécial pour la vitre. Tenez le racloir incliné sur la surface vitrée et
faites glisser la lame du racloir pour enlever les salissures.
– Une fois que l'appareil s'est suffisamment refroidi, enlevez : les cernes de calcaire,
traces d'eau, projections de graisse, décolorations métalliques luisantes. Utilisez un
agent de nettoyage spécial pour vitrocéramique ou acier inoxydable.
2. Nettoyez l'appareil à l'aide d'un chiffon humide et un peu de détergent.
3. Et enfin, essuyez l'appareil à l'aide d'un chiffon propre.
AVERTISSEMENT
• Ne nettoyez pas la plaque en verre et l'espace
qui sépare celle-ci du vitrocérame avec le grattoir ou des objets pointus. La plaque en verre
est fixée à la plaque en céramique.
• Ne posez pas les casseroles sur la plaque en
verre.
• Veillez à ce que la batterie de cuisine ne soit
pas en contact avec la plaque en verre.
EN CAS D'ANOMALIE DE FONCTIONNEMENT
Anomalie Cause possible et solution
Vous ne réussissez
pas à mettre l'appareil en fonctionnement.
Un signal sonore
retentit lorsque
l'appareil est à l'arrêt.
Le voyant indicateur de chaleur résiduelle ne s'allume
pas.
• Remettez l'appareil en fonctionnement et réglez le niveau de cuisson dans
les 10 secondes qui suivent.
•
La sécurité enfants ou
fonction
ou « Stop and go ».
• Vous avez appuyé sur 2 ou plusieurs touches sensitives en même temps.
N'appuyez que sur une seule touche sensitive à la fois.
• Il y a de l'eau ou des projections de graisse sur le bandeau de commande.
Nettoyez le bandeau de commande
Vous avez recouvert une ou plusieurs touches sensitives. Enlevez ce qui recouvre la ou les touches sensitives. Nettoyez le bandeau de commande.
La zone de cuisson n'a été activée que pendant un court laps de temps et,
par conséquent, n'a pas eu le temps de chauffer. Si la zone de cuisson est
censée être chaude, faites appel à votre Service Après-vente.
. Reportez-vous au chapitre « Dispositif de sécurité enfants »
est activée. Désactivez la Sécurité enfants ou la
Page 66

66 En matière de protection de l'environnement
Anomalie Cause possible et solution
Il est impossible
d'activer les circuits
de cuisson extérieurs.
Un signal sonore
retentit et l'appareil
se remet en fonctionnement et à
l'arrêt. Au bout de 5
secondes, un signal
sonore retentit de
nouveau.
s'allume
Affichage de et
d'un chiffre.
Aucun signal sonore ne retentit quand
vous appuyez sur
les touches
Activez d'abord le circuit intérieur.
La touche est recouverte. Enlevez ce qui recouvre la touche sensitive.
L'arrêt de sécurité est activé. Mettez l'appareil à l'arrêt, puis remettez-le en
fonctionnement.
Erreur du système électronique.
Débranchez électriquement l'appareil pendant quelques minutes. Déconnectez le fusible de l'installation électrique de l'habitation. Rebranchez. Si
s'allume de nouveau, faites appel au Service Après-vente.
Les signaux sont désactivés.
Activez les signaux sonores.
Si les indications ci-dessus ne vous permettent pas de remédier au problème, veuillez vous
adresser à votre magasin vendeur ou au Service Après-vente. Veuillez lui fournir les informations figurant sur la plaque signalétique, la combinaison à 3 lettres et chiffres pour la
vitrocéramique (située dans un des coins de la table de cuisson) et le type de message d'erreur qui s'affiche.
En cas d'erreur de manipulation de la part de l'utilisateur, le déplacement du technicien du
Service Après-vente ou du magasin vendeur peut être facturé même en cours de garantie.
Les instructions relatives au Service Après-vente et aux conditions de garantie figurent dans
le livret de garantie.
EN MATIÈRE DE PROTECTION DE L'ENVIRONNEMENT
Le symbole sur le produit ou son emballage indique que ce produit ne peut être traité
comme déchet ménager. Il doit être remis au point de collecte dédié à cet effet (collecte et
recyclage du matériel électrique et électronique).
En procédant à la mise au rebut de l'appareil dans les règles de l’art, nous préservons
l'environnement et notre sécurité, s’assurant ainsi que les déchets seront traités dans des
conditions optimum.
Pour obtenir plus de détails sur le recyclage de ce produit, veuillez prendre contact avec les
services de votre commune ou le magasin où vous avez effectué l'achat.
Page 67

Emballage
Tous les matériaux d'emballage sont écologiques et recyclables. Les composants en plastique sont identifiables grâce aux sigles : >PE<,>PS<, etc. Veuillez jeter les matériaux d'emballage dans le conteneur approprié du centre de collecte des déchets de votre commune.
67
Page 68

www.aeg-electrolux.com/shop 892933009-C-352010
 Loading...