


user manual
istruzioni per l’uso
Dishwasher
Lavastoviglie
ESI 66010

2 electrolux
Electrolux. Thinking of you.
Share more of our thinking at www.electrolux.com
Contents
Safety information 2
Product description 3
Control panel 4
Use of the appliance 5
Setting the water softener 6
Use of dishwasher salt 7
Use of rinse aid 7
Loading cutlery and dishes 8
Use of detergent 11
Multitab function 12
Subject to change without notice
Setting and starting a washing programme
Washing programmes 14
Care and cleaning 15
What to do if… 16
Technical data 17
Installation 17
Water connection 18
Electrical connection 19
Environment concerns 19
Safety information
For your safety and correct operation of
the appliance, read this manual carefully
before installation and use. Always keep
these instructions with the appliance
even if you move or sell it. Users must
fully know the operation and safety features of the appliance.
Correct use
• The appliance is designed exclusively for
domestic use.
• Only use the appliance to clean household
utensils that are applicable for dishwashers.
• Do not put solvents in the appliance. Risk
of explosion.
• Put the knives and all items with sharp
points in the cutlery basket with their
points down. If not, put in a horizontal position in the upper basket.
• Use only branded products for dishwashers (detergent, salt, rinse aid).
• If you open the door while the appliance is
in operation, hot steam can escape. Risk
of skin burns.
•Do not remove dishes from the dishwasher
before the end of the washing programme.
• When the washing programme is completed, disconnect the mains plug from the
mains socket and close the water tap.
• Only an authorised service engineer can
repair this appliance. Use only original
spare parts.
• Do not do repairs yourself to prevent injury
and damage to the appliance. Always contact your local Service Force Centre.
General safety
• Persons (including children) with reduced
physical sensory, mental capabilities or
lack of experience and knowledge must
not use the appliance. They must have supervision or instruction for the operation of
the appliance by a person responsible for
their safety.
• Obey the safety instructions from the manufacturer of the dishwasher detergent to
prevent burns to eyes, mouth and throat.
• Do not drink the water from the dishwasher. Detergent residues can stay in your appliance.
• Always close the door when you do not
use the appliance to prevent injury and not
to stumble over the open door.
• Do not sit or stand on the open door.
Child safety
• Only adults can use this appliance. Children must get supervision to make sure
that they do not play with the appliance.
• Keep all the packaging away from children.
There is a risk of suffocation.
• Keep all detergents in a safe area. Do not
let children touch the detergents.
• Keep children away from the appliance
when the door is open.
12
electrolux 3
Installation
• Make sure that the appliance is not damaged because of transport. Do not connect a damaged appliance. If necessary,
contact the supplier.
• Remove all packaging before first use.
• A qualified and competent person must do
the electrical installation.
• A qualified and competent person must do
the plumbing installation.
• Do not change the specifications or modify
this product. Risk of injury and damage to
the appliance.
• Do not use the appliance:
Product description
– if the mains cable or water hoses are
damaged,
– if the control panel, worktop or plinth
area are damaged, that you can get access to the inner side of the appliance.
Contact your local Service Force Centre.
• Do not drill into the sides of the appliance
to prevent damage to hydraulic and electrical components.
Warning! Carefully obey the
instructions for electrical and water
connections.
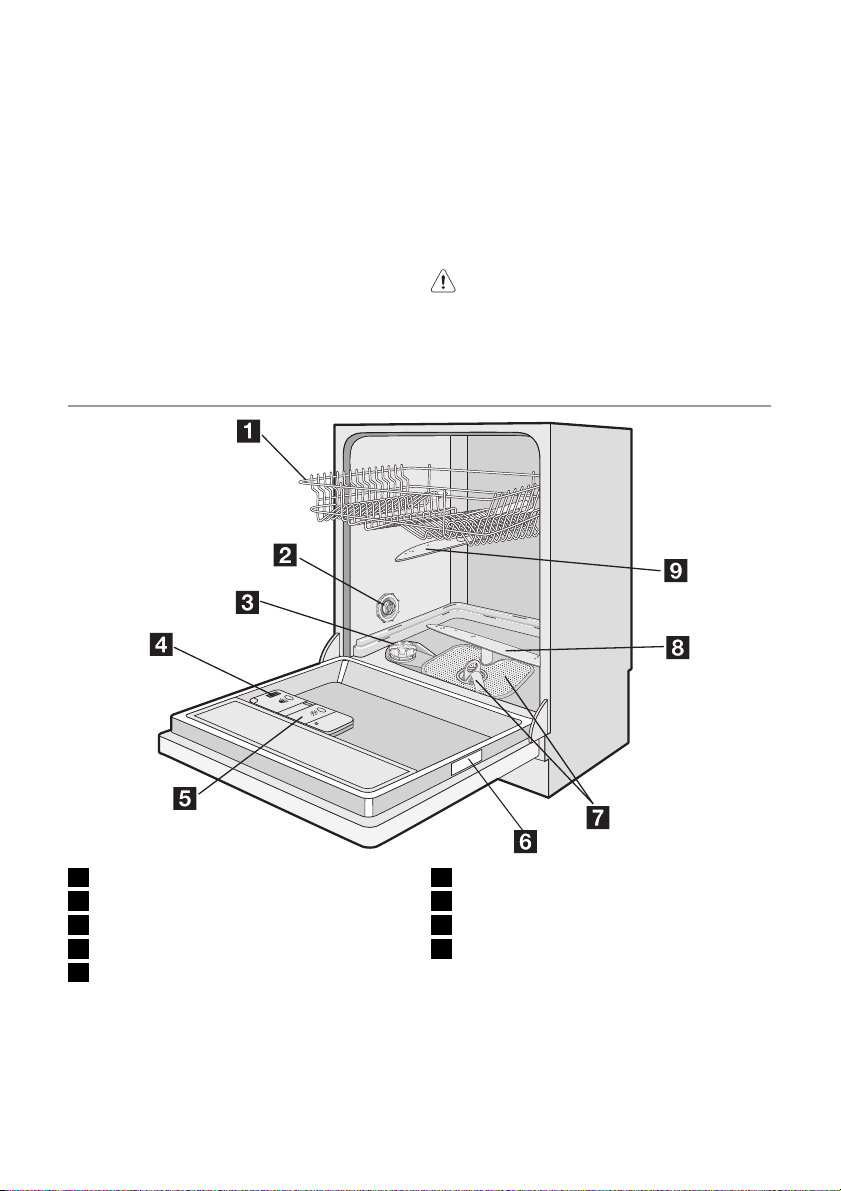
1 Upper basket
2 Water hardness dial
3 Salt container
4 Detergent dispenser
5 Rinse aid dispenser
6 Rating plate
7 Filters
8 Lower spray arm
9 Upper spray arm
4 electrolux
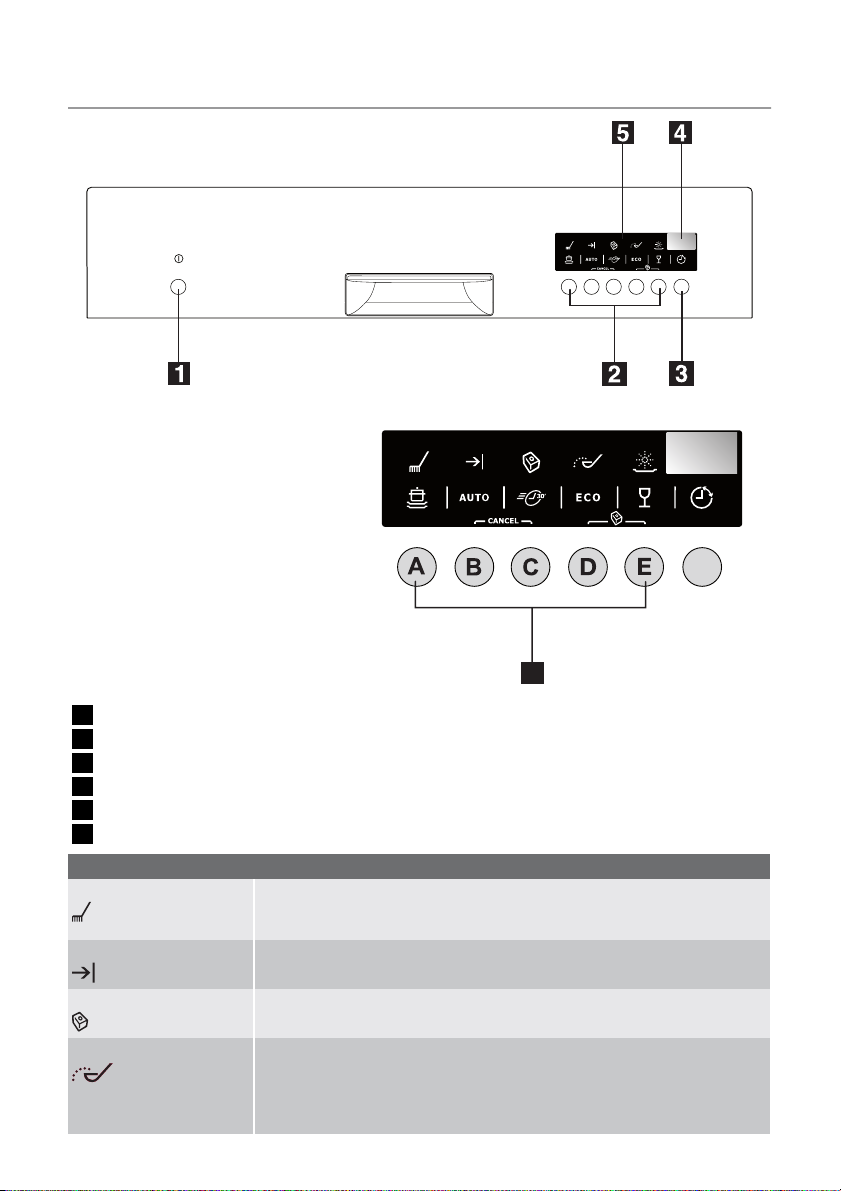
Control panel
6
1 On/off button
2 Programme selection buttons
3 Delay start button
4 Digital display
5 Indicator lights
6 Function buttons
Indicator lights
Programme-in-progress – Comes on when you select a washing programme.
End-of-programme Comes on when the washing programme is completed.
Multitab Comes on when you activate the multitab function. Refer to 'Multitab func-
1)
Salt
– Stays on for all the duration of the washing programme.
– Goes off at the end of the washing programme.
tion'.
Comes on when it is necessary to fill the salt container. Refer to 'Use of
dishwasher salt'.
After you fill the container, the salt indicator light can continue to stay on
for some hours. This does not have an unwanted effect on the operation
of the appliance.

electrolux 5
Indicator lights
Rinse aid
1) When the salt and/or rinse aid containers are empty, the related indicator lights do not come on while
1)
a washing programme operates.
Programme selection buttons
With these buttons you can select the washing programme. Press a programme button,
the related indicator light comes on. Refer to
'Washing programmes' chapter for more data about the washing programmes.
Delay start button
Use the delay start button to delay the start
of the washing programme with an interval
between 1 and 19 hours. Refer to the chapter
'Setting and starting a washing programme'.
Digital display
The display shows:
• the set level of the water softener.
• Remaining time to the end of the programme.
• Activation/deactivation of the rinse aid dispenser (only with multitab function on).
• End of the washing programme. The display shows a zero.
• Number of hours in delay start.
• Fault codes.
Function buttons
Use the function buttons for these operations:
• To set the water softener. Refer to the
chapter 'Setting the water softener'.
• To cancel the washing programme in pro-
Comes on when it is necessary to fill the rinse aid. Refer to 'Use of rinse
aid'.
the chapter 'Setting and starting a washing
programme'.
• To activate/deactivate the multitab function. Refer to the chapter 'Multitab function'.
• To deactivate/activate the rinse aid dispenser, when multitab function is active.
Refer to the chapter 'Multitab function'.
Setting mode
The appliance must be in setting mode for
these operations:
• To set a washing programme.
• To set the water softener level.
• To deactivate/activate the rinse aid dispenser.
Press the on/off button. The appliance is in
setting mode when:
– All the programme indicator lights come
on.
Press the on/off button. The appliance is not
in setting mode when:
– Only one programme indicator light comes
on
– A washing programme is set. It is neces-
sary to cancel the programme to go back
to the setting mode. Refer to the chapter
'Setting and starting a washing programme'.
gress or a delay start in progress. Refer to
Use of the appliance
Refer to the following instructions for each
step of procedure:
1. Make a check if the water softener level
is correct for the water hardness in your
area. If necessary set the water softener.
2. Fill the salt container with dishwasher salt.
3. Fill the rinse aid dispenser with rinse aid.
4. Load cutlery and dishes into the dishwasher.
5. Set the correct washing programme for
the type of load and soil.
6. Fill the detergent dispenser with the correct quantity of detergent.
7. Start the washing programme.
If you use combi detergent tablets ('3 in
1', '4 in 1', '5 in 1', etc.), refer to the
chapter 'Multitab function'.
6 electrolux
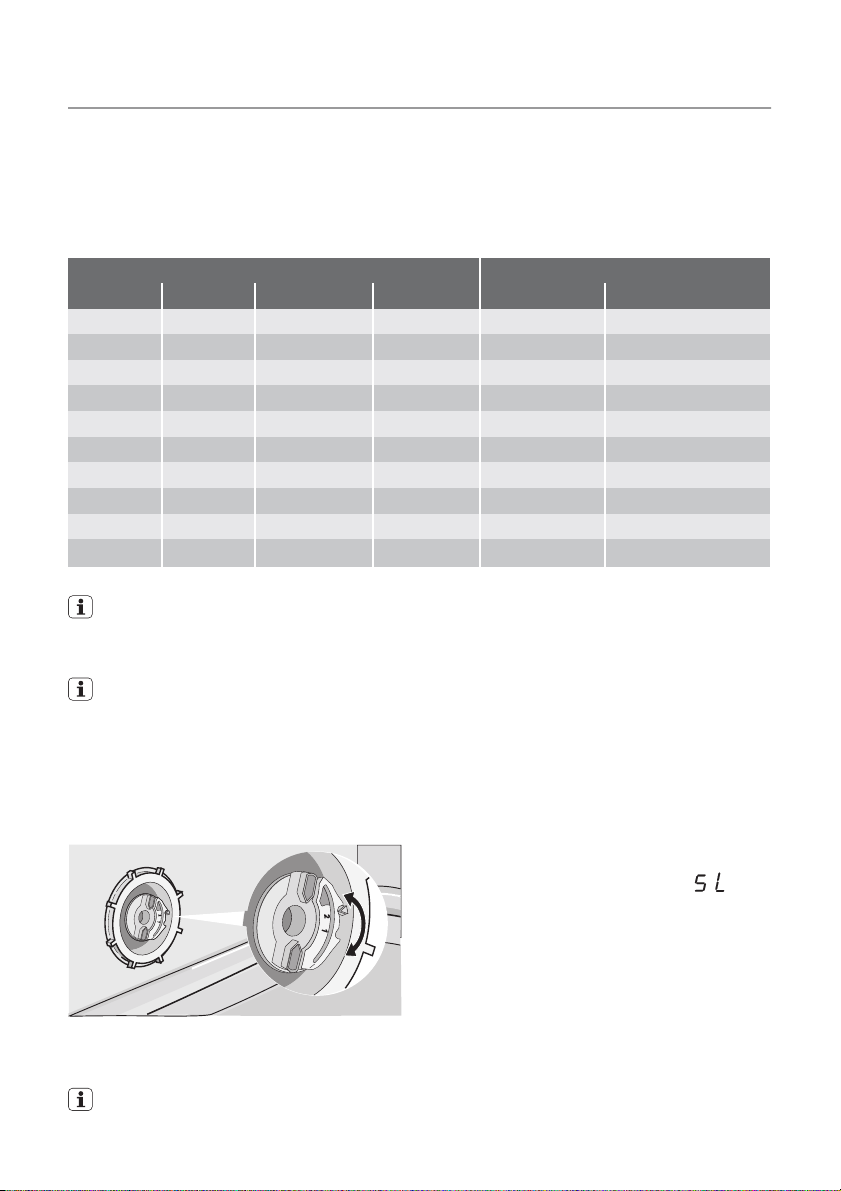
Setting the water softener
The water softener removes minerals and
salts from the water supply. Minerals and
salts can have bad effect on the operation of
the appliance.
Water hardness is measured in equivalent
scales:
• German degrees (dH°).
Water hardness Water hardness setting
°dH °TH mmol/l Clarke manually electronically
51 - 70 91 - 125 9,1 - 12,5 64 - 88 2 10
43 - 50 76 - 90 7,6 - 9,0 53 - 63 2 9
37 - 42 65 - 75 6,5 - 7,5 46 - 52 2 8
29 - 36 51 - 64 5,1 - 6,4 36 - 45 2 7
23 - 28 40 - 50 4,0 - 5,0 28 - 35 2 6
19 - 22 33 - 39 3,3 - 3,9 23 - 27 2 5
15 - 18 26 - 32 2,6 - 3,2 18 - 22 1 4
11 - 14 19 - 25 1,9 - 2,5 13 - 17 1 3
4 - 10 7 - 18 0,7 - 1,8 5 - 12 1 2
< 4 < 7 < 0,7 < 5
1) No use of salt required.
You must set the water softener manually and electronically.
Manual adjustment
The appliance is set at the factory at position 2.
1. Open the door.
2. Remove the lower basket.
3. Turn the water hardness dial to position
1 or 2 (refer to the chart).
4. Install the lower basket.
• French degrees (°TH).
• mmol/l (millimol per litre - international unit
for the hardness of water).
•Clarke.
Adjust the water softener to the water hardness in your area. If necessary, contact your
local water authority.
1)
1
1. Switch on the appliance.
2. Make sure that the appliance is in setting
mode.
3. Press and hold function buttons B and C
until the indicator lights of function buttons A, B and C start to flash.
4. Release function buttons B and C.
5. Press function button A.
– The indicator lights for function buttons
B and C go off.
– The indicator light for function button A
continues to flash.
– The digital display shows the current
level.
Example: digital display shows
el 5.
6. Press the function button A one time to
increase the water softener level by one
step.
7. Press the on/off button to save the operation.
1)
1
= lev-
5. Close the door.
Electronic adjustment
The water softener is set at the factory at level 5.
Use of dishwasher salt
Caution! Only use dishwashers salt.
Types of salt that are not applicable for
dishwashers cause damage to the water
softener.
Caution! Grains of salt and salty water
on the bottom of the appliance can
cause corrosion. Fill the appliance with
salt before you start a washing
programme to prevent corrosion.
Do these steps to fill the salt container:
1. Turn the cap anticlockwise to open the
salt container.
2. Fill the salt container with 1 litre of water
(only the first operation).
3. Use the funnel to fill the salt container with
salt.
electrolux 7
4. Remove the salt around the opening of
the salt container.
5. Turn the cap clockwise to close the salt
container.
It is normal that water overflows from the
salt container when you fill it with salt.
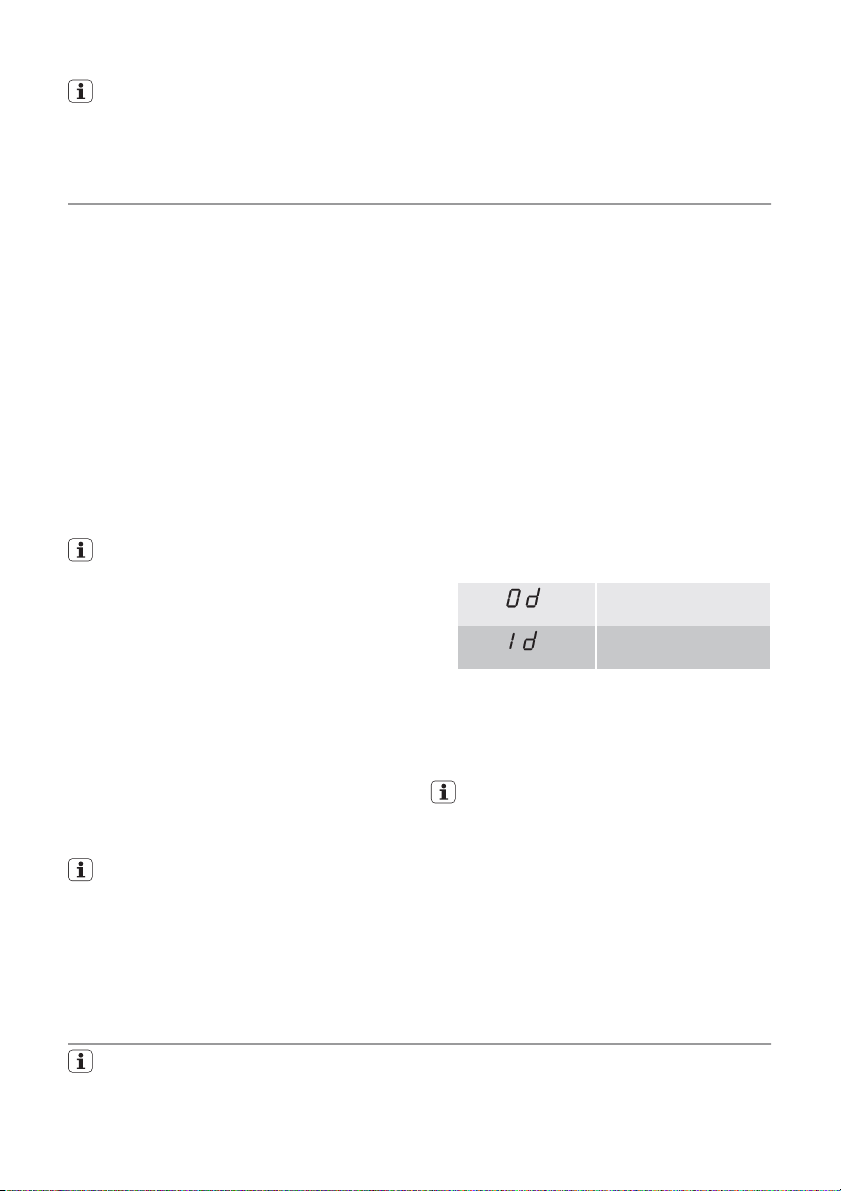
When you set electronically the water softener to level 1, the salt indicator light does
not stay on.
Use of rinse aid
Caution! Only use branded rinse aid for
dishwashers.
Do not fill the rinse aid dispenser with
other products (e.g. dishwasher cleaning agent, liquid detergent). This can
cause damage to the appliance.
Rinse aid makes it possible to dry the
dishes without streaks and stains.
Rinse aid is automatically added during
the last rinsing phase.
Do these steps to fill the rinse aid dispenser:
1. Press the release button (A) to open the
rinse aid dispenser.
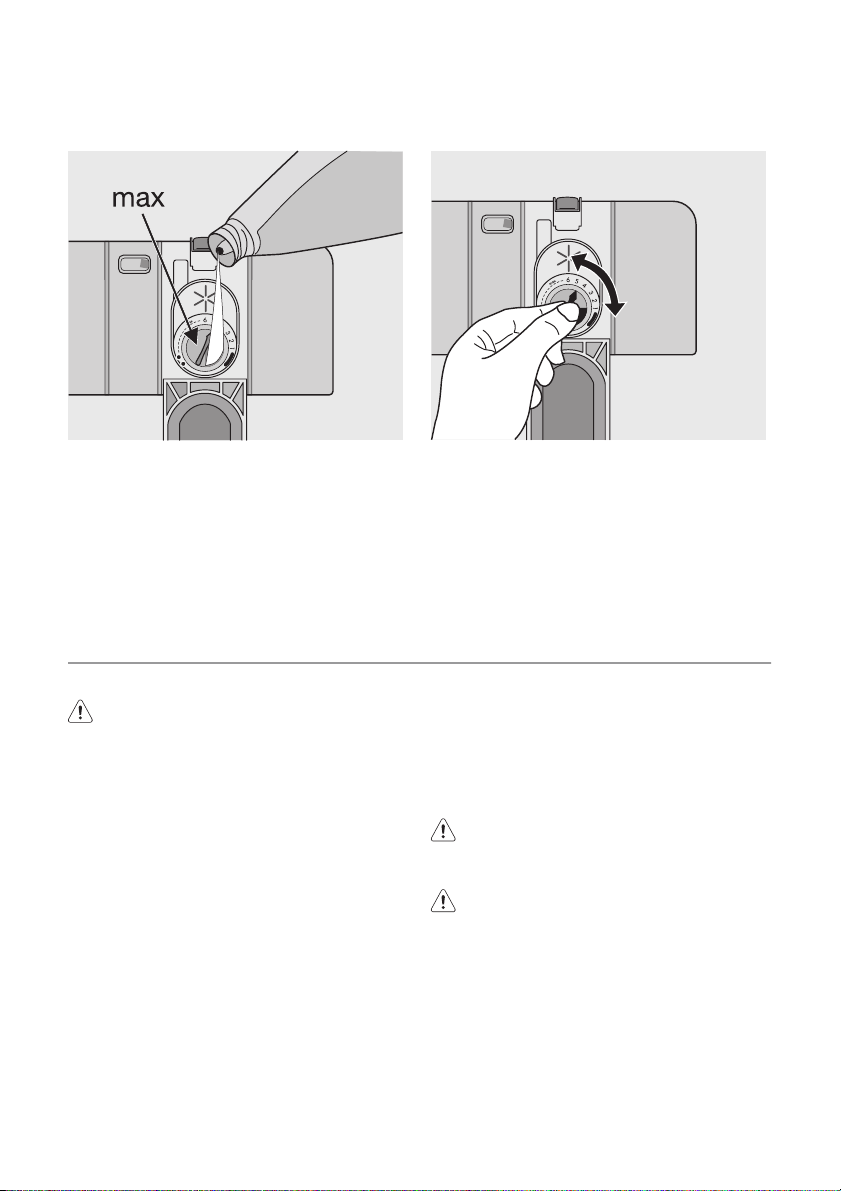
8 electrolux
2. Fill the rinse aid dispenser with rinse aid.
The mark 'max.' shows the maximum
level.
3. Remove the spilled rinse aid with an absorbent cloth to prevent too much foam
during the subsequent washing programme.
4. Close the rinse aid dispenser.
Adjusting the rinse aid dosage
The rinse aid is set at the factory at position
4.
Loading cutlery and dishes
Helpful hints and tips
Caution! Only use the appliance for
household utensils that are applicable
for dishwashers.
Do not use the appliance to clean objects
that can absorb water (sponges, household
cloths, etc.).
• Before you load cutlery and dishes, do
these steps:
– Remove all food remainings and debris.
– Make burnt, remaining food in pans soft.
• While you load cutlery and dishes, do
these steps:
– Load hollow items (e.g. cups, glasses
and pans) with the opening down.
– Make sure that water does not collect in
the container or in a deep base.
– Make sure that cutlery and dishes do not
lie inside one another.
– Make sure that cutlery and dishes do not
cover other cutlery and dishes.
– Make sure that glasses do not touch
other glasses.
You can set the rinse aid dosage between
position 1 (lowest dosage) and position 6
(highest dosage).
1. Turn the rinse aid dial to increase or decrease the dosage.
– Increase the dosage if there are water
droplets or limescale on the dishes.
– Decrease the dosage if there are
streaks, whitish stains or bluish layers
on the dishes.
– Put small objects in the cutlery basket.
• Plastic items and pans with non-stick
coatings can keep water droplets. Plastic
items do not dry as well as porcelain and
steel items.
• Put light items in the upper basket. Make
sure that the items do not move.
Caution! Make sure that the spray arms
can move freely before you start a
washing programme.
Warning! Always close the door after
you load or unload the appliance. An
open door can be dangerous.
Lower basket
Put saucepans, lids, plates, salad bowls and
cutlery in the lower basket. Arrange service
dishes and large lids around the edge of the
basket.
The rows of prongs in the lower basket can
be flat to load pots, pans and bowls.
electrolux 9
Mix spoons with other cutlery to prevent
them to bond together.
Lower the handle of the cutlery basket to put
the cutlery in the basket.
Cutlery basket
Warning! Do not put long-bladed knives
in a vertical position in the cutlery basket.
Arrange long and sharp cutlery
horizontally in the upper basket. Be
careful with sharp items.
Put forks and spoons with the handles down.
Put knives with the handles up.
Use the cutlery grids. If the dimensions of the
cutlery prevent use of the cutlery grids, you
can easily hide them.
10 electrolux
The cutlery basket has two parts. You can
use these parts separately for more loading
flexibility. To disassemble the parts, move
them horizontally in opposite directions and
pull them apart. To assemble the parts, put
them together and move horizontally to each
other.
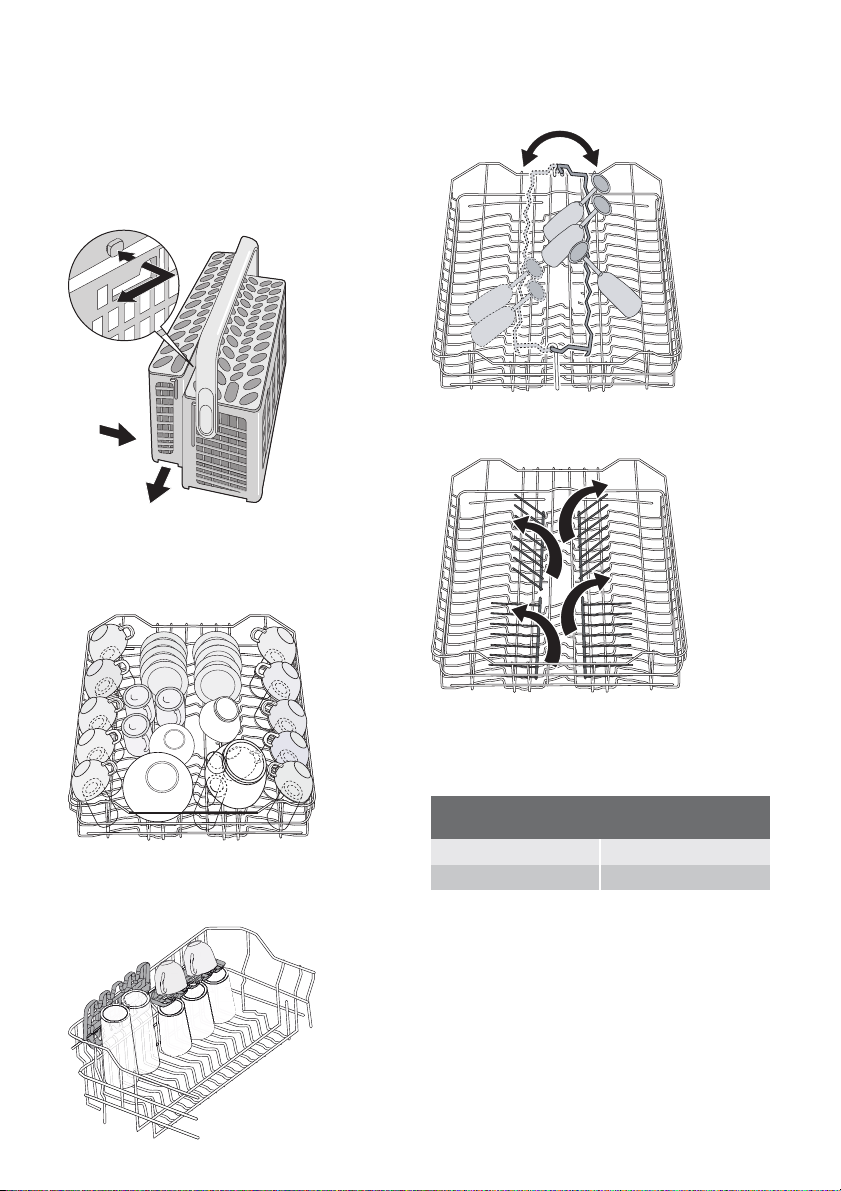
Upper basket
The upper basket is for saucers, salad bowls,
cups, glasses, pots and lids. Arrange the
items to let water touch all surfaces.
For glasses with long stems, turn the glass
holder to the left or to the right.
You can easily lower the central rows of
prongs for more loading flexibility.
Put glasses with long stems in the cup racks
with the stems up. For longer items, fold the
cup racks up.
Adjustment of the height of the upper
basket
If you put large plates in the lower basket, first
move the upper basket to the upper position.
Maximum height of the dishes in the lower
basket
Upper position 31 cm
Lower position 27 cm
Do these steps to move the upper basket to
the upper position:
1. Pull the basket out until it stops.
2. Carefully lift the two sides until the mechanism is engaged and the basket is stable.
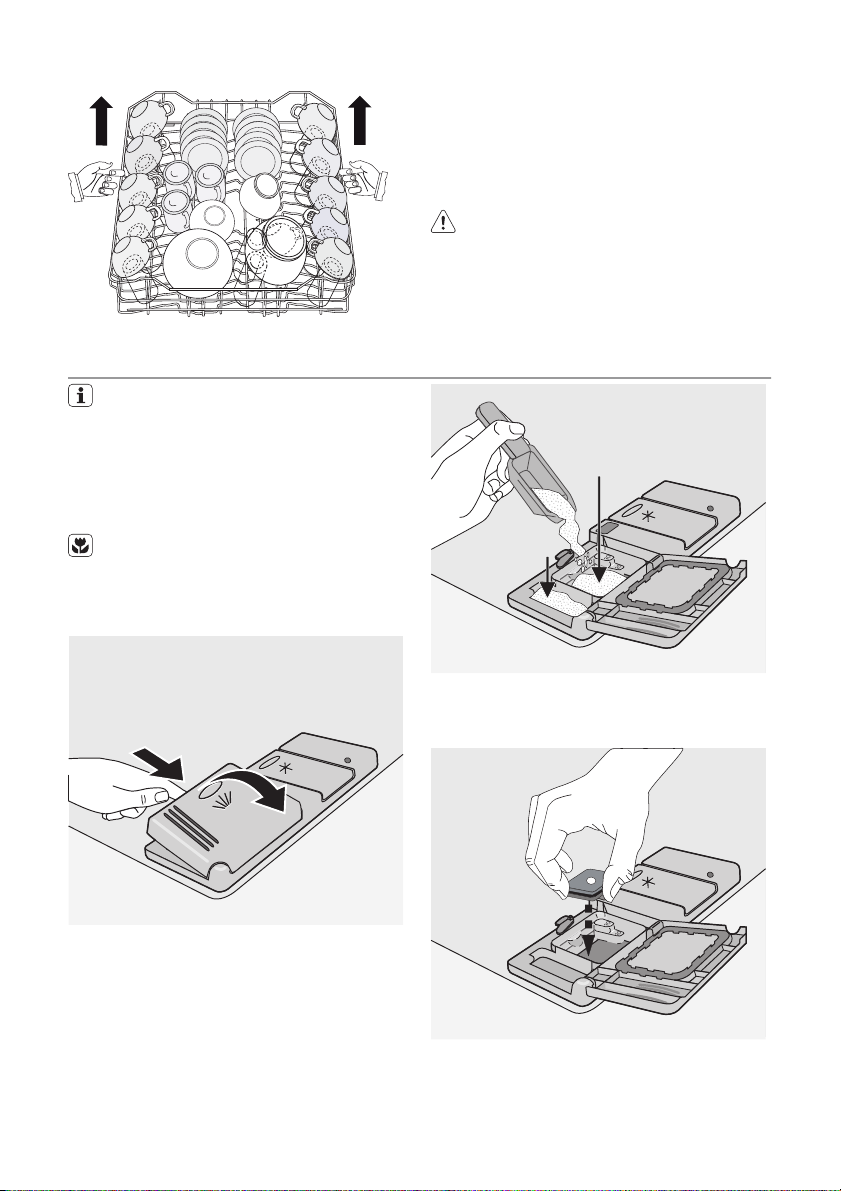
Use of detergent
Only use detergents (powder, liquid or
tablet) that are applicable for dishwashers.
Follow the data on the packaging:
• Dosage recommended by the manufacturer.
• Storage recommendations.
Do not use more than the correct quantity of detergent to save an environment.
Do these steps to fill the detergent dispenser:
1. Open the lid of the detergent dispenser.
electrolux 11
Do these steps to move the upper basket to
the lower position:
1. Pull the basket out until it stops.
2. Carefully lift the two sides upwards.
3. Hold the mechanism and let it fall back
down slowly.
Caution!
• Do not lift or lower the basket on one
side only.
• If the basket is in the upper position,
do not put cups on the cup racks.
A
B
2. Fill the detergent dispenser (A) with detergent. The marking shows the dosage:
20 = approximately 20 g of detergent
30 = approximately 30 g of detergent.
3. If you use a washing programme with
prewash phase, put more detergent in
the prewash detergent compartment (B).
4. If you use detergent tablets, put the detergent tablet in the detergent dispenser
(A).
5. Close the lid of the detergent dispenser.
Press the lid until it locks into position.
12 electrolux
Different brands of detergent dissolve in
different times. Some detergent tablets
do not have the best cleaning results
during short washing programmes. Use
Multitab function
The multitab function is for combi detergent
tablets.
These tablets contain agents such as detergent, rinse aid and dishwasher salt. Some
types of tablets can contain other agents.
Do a check if these tablets are applicable for
the local water hardness. Refer to the instructions from the manufacturer.
When you set the multitab function, it stays
on until you deactivate it.
The multitab function stops automatically the
flow of rinse aid and salt. The rinse aid indicator light and salt indicator light are deactivated.
The programme duration can increase if you
use the multitab function.
Activate or deactivate the multitab function before the start of a washing programme.
You cannot activate or deactivate the
multitab function when the programme
operates. Cancel the washing programme, then set the programme again.
To activate the multitab function:
•Press and hold the two multitab buttons
(function buttons D and E). The multitab
indicator light comes on.
To deactivate the multitab function:
•Press and hold the two multitab buttons
(function buttons D and E). The multitab
indicator light goes off.
Do these steps if the drying results
are not satisfactory:
1. Fill the rinse aid dispenser with rinse
aid.
2. Activate the rinse aid dispenser.
3. Set the rinse aid dosage to position
2.
long washing programmes when you
use detergent tablets to fully remove the
detergent.
• You can only activate or deactivate
the rinse aid dispenser when the multitab function is activated.
To activate/deactivate the rinse aid dispenser:
1. Switch on the appliance.
2. Make sure that the appliance is in setting
mode.
3. Press and hold function buttons B and C.
– The indicator lights for function buttons
A, B, and C start to flash.
4. Release function buttons B and C.
5. Press function button B.
– The indicator lights for function buttons
A and C go off.
– The indicator light for function button B
continues to flash.
– The digital display shows the setting.
Rinse aid dispenser deactivated
Rinse aid dispenser activated
6. Press function button B again.
– The digital display shows the new set-
ting.
7. Switch off the appliance to save the operation.
To use normal detergent again:
1. Deactivate the multitab function.
2. Fill the salt container and rinse aid
dispenser.
3. Adjust the water hardness setting to
the highest level.
4. Do a washing programme without
dishes.
5. Adjust the water softener to the water hardness in your area.
6. Adjust the rinse aid dosage.
Setting and starting a washing programme
Set the washing programme with the
door ajar. The washing programme only
starts after you close the door. Until then
it is possible to modify the settings.
Do these steps to set and start a washing
programme:
1. Switch on the appliance.
2. Make sure that the appliance is in setting
mode.

electrolux 13
3. Press one of the programme buttons.
Refer to the chapter 'Washing programmes'.
– The programme indicator light comes
on.
– All other programme indicator lights go
off.
– The digital display shows in flashing the
programme duration.
– The programme-in-progress indicator
light comes on.
4. Close the door.
– The washing programme starts auto-
matically.
– The programme-in-progress indicator
light remains on.
When the washing programme operates, you cannot change the programme. Cancel the washing programme.
You can select the washing programme
also with the door closed. When you
press a programme button you have only 3 seconds to select a different washing programme. After these 3 seconds,
the selected programme starts automatically.
Warning! Only interrupt or cancel a
washing programme if necessary.
Caution! Open the door carefully. Hot
steam can come free.
Interrupting a washing programme
Open the door.
• The programme stops.
Close the door.
• The programme continues from the point
of interruption.
Cancelling a washing programme
1. Press and hold function buttons B and C
until:
– All the programme lights come on,
– The programme-in-progress indicator
light goes off.
2. Release function buttons B and C to cancel the washing programme.
At this time you can do these steps:
1. Switch off the appliance.
2. Set a new washing programme .
Fill the detergent dispenser with detergent
before you set a new washing programme.
Setting and starting a washing
programme with delay start
1. Press the on/off button.
2. Set a washing programme.
3. Press the delay start button until the display shows on flashing the necessary delay start of the washing programme.
4. Close the door.
– The number on the display comes on
with fixed light.
– The programme-in-progress indicator
light goes off.
– The countdown of the delay start
starts.
– The countdown of the delay start de-
creases with steps of 1 hour.
– When the countdown is completed,
the washing programme starts automatically.
– The programme-in-progress indica-
tor light comes on.
Do not open the door during the countdown to prevent interruption of the
countdown. When you close the door
again, the countdown continues from
the point of interruption.
Cancelling a delay start:
1. Press and hold function buttons B and C
until:
– All the programme lights come on
When you cancel a delay start, you also
cancel the washing programme.
2. Set a new washing programme.
End of the washing programme
• The appliance stops automatically.
• The display shows 0.
• The end-of-programme indicator light
comes on.
• The programme-in-progress indicator light
goes off.
1. Switch off the appliance.
2. Open the door.
3. For better drying results, keep the door
ajar for some minutes before you remove
the dishes.
Let the dishes cool down before you remove
them from the appliance. Hot dishes are
easily damaged.

14 electrolux
Removing the load
• First remove items from the lower basket,
then from the upper basket.
• There can be water on the sides and door
of the appliance. Stainless steel becomes
cool more quickly than the dishes.
Washing programmes
Washing programmes
Programme Degree of soil Type of load Programme description
Intensive Heavy soil Crockery, cutlery, pots
Automatic
Quick
Economy
Glass Normal or light
1) During the Automatic programme, the soil level of the dishes is given by how cloudy the water is. The
2) This is the perfect daily programme to clean a not fully load. Ideal for a family of 4 persons who only
3) Test programme for test institutes. Please refer to separate leaflet supplied, for test data.
1)
2)
3)
programme duration and consumptions can change. This depends if the appliance is fully or not and
on the level of soil on the dishes. The appliance adjusts automatically the temperature of the water
during the main wash.
want to load breakfast and dinner crockery and cutlery.
Any Crockery, cutlery, pots
Normal or light
soil
Normal soil Crockery and cutlery Prewash
soil
and pans
and pans
Crockery and cutlery Main wash up to 60°C
Delicate crockery and
glassware
Consumption values
Programme
Intensive - 1,8 - 2,0 23 - 25
Duration (in minutes)
1)
Energy (in kWh) Water (in litres)
Prewash
Main wash up to 70°C
2 intermediate rinses
Final rinse
Drying
Prewash
Main wash up to 45°C or 70°C
1 or 2 intermediate rinses
Final rinse
Drying
Final rinse
Main wash up to 50°C
1 intermediate rinse
Final rinse
Drying
Main wash up to 45°C
1 intermediate rinse
Final rinse
Drying
Automatic - 1,1 - 1,7 12 - 23
Quick - 0,9 9
Economy - 150 - 160 12 - 13
- 0,8 - 0,9 14 - 15
Glass
1) The digital display shows the programme duration.

electrolux 15
The pressure and temperature of the
water, the variations of power supply
Care and cleaning
Warning! Switch the appliance off
before you clean the filters.
Cleaning the filters
Caution! Do not use the appliance
without the filters. Make sure that the
installation of the filters is correct.
Incorrect installation will cause
unsatisfactory washing results and
damage to the appliance.
If necessary, clean the filters. Dirty filters decrease the washing results.
The dishwasher has three filters:
1. coarse filter (A)
2. microfilter (B)
3. flat filter (C)
A
and the quantity of dishes can change
these values.
4. Remove the filter system.
5. Hold the coarse filter (A) by the handle
with the hole.
6. Remove the coarse filter (A) from the mi-
crofilter (B).
7. Remove the flat filter (C) from the bottom
of the appliance.
B
C
Do these steps to clean the filters:
1. Open the door.
2. Remove the lower basket.
3. To unlock the filter system, turn the handle on the microfilter (B) approximately
1/4 anticlockwise.
8. Clean the filters below running water.
9. Put the flat filter (C) in the bottom of the
appliance.
10. Put the coarse filter (A) in the microfilter
(B) and push the filters together.
11. Put the filter system in position.
12. To lock the filter system, turn the handle
on the microfilter (B) clockwise until it
lock in position.
13. Install the lower basket.
14. Close the door.
Do not remove the spray arms.
If the holes in the spray arms become clogged, remove remaining parts of soil with a
cocktail stick.

16 electrolux
External cleaning
Clean the external surfaces of the appliance
and control panel with a damp soft cloth.
Only use neutral detergents. Do not use
abrasive products, scouring pads or solvents
(acetone, trichloroethylene etc...).
The manufacturer is not responsible for
damage because of frost.
If not possible, empty the appliance and
close the door. Disconnect the water inlet
hose and remove water from the water inlet
hose.
Frost precautions
Caution! Do not install the appliance
where the temperature is below 0 °C.
What to do if…
The appliance does not start or stops during
operation.
If there is a fault, first try to find a solution to
the problem yourself. If you cannot find a solution to the problem yourself, contact the
Service Force Centre.
Fault code and malfunction Possible cause and solution
•
digital display shows
The dishwasher does not fill with water
•
digital display shows
The dishwasher will not drain
•
digital display shows
The anti-flood device operates
The programme does not start • The appliance door is not closed.
• The water tap is blocked or furred with limescale.
Clean the water tap.
• The water tap is closed.
Open the water tap.
• The filter in the water inlet hose is blocked.
Clean the filter.
• The connection of the water inlet hose is not correct. The
hose can be kinked or squashed.
Make sure that the connection is correct.
• There is a blockage in the sink spigot.
Clean the sink spigot.
• The connection of the water drain hose is not correct. The
hose can be kinked or squashed.
Make sure that the connection is correct.
• Close the water tap and contact your local Service Force
Centre.
Close the door.
• Mains plug is not connected in.
Put in the mains.
• The fuse has blown out in the household fuse box.
Replace the fuse.
• Delay start is set.
Cancel the delay start to start the programme immediately.
After the check, switch on the appliance. The
programme continues from the point of interruption. If the malfunction shows again,
contact your Service Force Centre.
If the display shows a fault code, not described in the chart, contact your Service Force
Centre.
These data are necessary to help you quickly
and correctly:
Caution! Switch off the appliance
before you do the below suggested
corrective actions.
• Model (Mod.)
• Product number (PNC)
• Serial number (S.N.)
For these data, refer to the rating plate.
Write the necessary data here:
Model description : ..........
Product number : ..........
Serial number : ..........

electrolux 17
The cleaning results are not satisfactory
The dishes are not clean • The selected washing programme is not applicable for the type of
Limescales particles on the
dishes
The dishes are wet and dull • No rinse aid has been used.
There are streaks, milky spots
or a bluish coating on glasses
and dishes
Dry water drop signs on
glasses and dishes
load and soil.
• The baskets are loaded incorrectly so that water cannot reach all
surfaces.
• Spray arms do not turn freely because of incorrect arrangement of
the load.
• The filters are dirty or not correctly installed.
• The quantity of detergent is too little or missing.
• The salt container is empty.
• The water softener is adjusted on a wrong level.
• The salt container cap is not closed correctly.
• The rinse aid dispenser is empty.
• Decrease the rinse aid dosage.
• Increase rinse aid dosage.
• The detergent can be the cause.
Technical data
Dimensions Width cm 59,6
Height cm 81,8 - 87,8
Depth cm 57,5
Electrical connection - Voltage -
Overall power - Fuse
Water supply pressure Minimum 0,5 bar (0,05 MPa)
Maximum 8 bar (0,8 MPa)
Capacity Place settings 12
Information on the electrical connection is given on the rating plate
on the inner edge of the dishwasher door.
Installation
Warning! Make sure that mains plug is
disconnected from the mains socket
during installation.
Important! Obey the instructions in the
enclosed template to:
• Build-in the appliance.
• Install the furniture panel.
• Connect to the water supply and drain.
Install the appliance under a counter (kitchen
worktop or sink).
If a repair is necessary, the appliance must
be easily accessible for the engineer.
Put the appliance adjacent to a water tap and
a drain.
For the venting of the dishwasher only water
fill, water drain and power supply cable openings are necessary.
The dishwasher has adjustable feet to allow
the adjustment of the height.
Make sure that the water inlet hose, the drain
hose and the supply cable are not kinked or
squashed, when you insert the machine.
Attaching the appliance to the adjacent
units
Make sure that the counter below which you
attach the appliance is a safe structure (adjacent kitchen units, cabinets, wall).
Adjusting the level of the appliance
Make sure that the appliance is level to close
and seal the door correctly. If the level of the

18 electrolux
appliance is correct, the door does not catch
on the sides of the cabinet. If the door does
Water connection
Water inlet hose
Connected the appliance to a hot (max. 60°)
or cold water supply.
If the hot water comes from alternative sources of energy that are more environmentally
friendly (e.g. solar or photovoltaic panels and
aeolian), use a hot water supply to decrease
energy consumption.
Connect the inlet hose to a water tap with an
external thread of 3/4”.
Caution! Do not use connection hoses
from an old appliance.
The water pressure must be in the limits (refer
to 'Technical data'). Make sure that the local
water authority gives you the average mains
pressure in your area.
Make sure that there are no kinks in the water
inlet hose and that the water inlet hose is not
squashed or entangled.
Fit the locknut correctly to prevent water
leaks.
Caution! Do not connect the appliance
to new pipes or pipes that are not used
for a long time. Let the water run for
some minutes, then connect the inlet
hose.
The water inlet hose is double-walled and
has an inner mains cable and a safety valve.
The water inlet hose is under pressure only
while the water is running. If there is a leak in
the water inlet hose, the safety valve interrupts the running water.
Be careful when you connect the water inlet
hose:
• Do not put the water inlet hose or the safety valve in water.
• If the water inlet hose or the safety valve is
damaged, immediately disconnect the
mains plug from the mains socket.
• Only let the Service Force Centre replace
the water inlet hose with safety valve.
Warning! Dangerous voltage
not close correctly, loosen or tighten the adjustable feet until the appliance is level.
Water drain hose
1. Connect the water drain hose to the sink
spigot and attach it under the work surface. This prevents that the waste water
from the sink goes back into the appliance.
2. Connect the water drain hose to a stand
pipe with vent-hole (minimum internal diameter 4 cm).
The waste connection must be at a maximum height of 60cm from the bottom of the
appliance.
Make sure that the drain hose is not bent or
squashed to prevent that the water drains
does not drain correctly.
Remove the sink plug when the appliance
drains the water to prevent that the water
goes back into the appliance.
The total length of the drain hose, extension
included, must not be longer than 4m. The

electrolux 19
internal diameter must not be smaller than
the diameter of the hose.
If you connect the water drain hose to a trap
spigot under the sink, remove the plastic
membrane (A). If you do not remove the
membrane, remaining food can cause a
blockage in the drain hose spigot
Electrical connection
Warning! The manufacturer is not
responsible if you do not follow these
safety precautions.
Ground the appliance according to safety precautions.
Make sure that the rated voltage and
type of power on the rating plate agree
with the voltage and the power of the local power supply.
Always use a correctly installed shockproof socket.
The appliance has a security feature to
prevent that dirty water goes back into
the appliance. If, the spigot of the sink
has a 'non-return valve', this valve can
cause the appliance to drain incorrectly.
Remove the non-return valve.
Caution! Make sure that the water
couplings are tight to prevent water
leakage.
Do not use multi-way plugs, connectors
and extension cables. There is a risk of
fire.
Do not replace the mains cable yourself.
Contact the Service Force Centre.
Make sure that the mains plug is accessible after installation.
Do not pull the mains cable to disconnect the appliance. Always pull the
mains plug.
Environment concerns
The symbol on the product or on its
packaging indicates that this product may
not be treated as household waste. Instead
it should be taken to the appropriate
collection point for the recycling of electrical
and electronic equipment. By ensuring this
product is disposed of correctly, you will help
prevent potential negative consequences for
the environment and human health, which
could otherwise be caused by inappropriate
waste handling of this product. For more
detailed information about recycling of this
product, please contact your local council,
your household waste disposal service or the
shop where you purchased the product.
The packaging materials are environmentally
friendly and can be recycled. The plastic
components are identified by markings, e.g.
>PE<, >PS<, etc. Discard the packaging
materials in the applicable container at the
community waste disposal facilities.
Warning! To discard the appliance,
follow the procedure:
• Pull the mains plug out of the socket.
• Cut off the mains cable and mains
plug and discard them.
• Discard the door catch. This prevents
the children to close themselves inside the appliance and endanger their
lives.

20 electrolux
Electrolux. Thinking of you.
Per conoscere meglio il nostro modo di pensare, visitate il sito
www.electrolux.com
Indice
Informazioni per la sicurezza 20
Descrizione del prodotto 21
Pannello dei comandi 22
Preparazione al primo utilizzo 23
Regolazione del decalcificatore dell’acqua
Uso del sale per lavastoviglie 25
Uso del brillantante 25
Sistemazione di posate e stoviglie 26
Uso del detersivo 29
Uso di pastiglie combinate 30
Con riserva di modifiche
Selezione e avvio di un programma di
lavaggio 31
Programmi di lavaggio 33
Pulizia e cura 34
Cosa fare se… 35
Dati tecnici 36
24
Installazione 36
Collegamento dell’acqua 37
Collegamento elettrico 38
Considerazioni ambientali 38
Informazioni per la sicurezza
Per la sicurezza dell'utente e per il buon
funzionamento dell'apparecchio, è importante leggere attentamente il presente libretto di istruzioni prima dell'installazione e dell'uso. Conservare sempre
queste istruzioni assieme all'apparecchio anche in caso di trasferimento o
vendita dell'apparecchio stesso. L'utente deve acquisire dimestichezza con le
funzioni e dotazioni di sicurezza dell'apparecchio.
Uso corretto
• Questo apparecchio è destinato solo all'uso domestico.
• Utilizzare l'apparecchio solo per lavare
utensili idonei alla lavastoviglie.
• Non inserire solventi nell'apparecchio. Rischio di esplosione.
• Mettere i coltelli e gli altri utensili appuntiti
nel cestello delle posate con la punta rivolta verso il basso. Altrimenti metterli orizzontalmente nel cestello superiore.
• Usare solo prodotti di marca per lavastoviglie (detersivo, sale, brillantante).
• Se si apre la porta mentre l'apparecchio è
in funzione, può fuoriuscire vapore caldo.
Rischio di scottature.
• Non togliere i piatti dalla lavastoviglie prima
del termine del programma di lavaggio.
• Quando il programma di lavaggio è completato, scollegare la spina e chiudere il rubinetto dell'acqua.
• L'apparecchio può essere riparato solo da
personale autorizzato. Utilizzare solo ricambi originali.
• Non cercare di riparare da soli l'apparecchio per evitare lesioni e danni. Contattare
sempre il servizio di assistenza locale.
Sicurezza generale
• Persone (bambini inclusi) con ridotte capacità fisiche, sensoriali e mentali o prive
di esperienza e conoscenza non dovrebbero utilizzare l'apparecchio. Una persona
responsabile della loro sicurezza deve
controllare o istruire tali persone per un utilizzo corretto dell'apparecchio.
• Seguire le istruzioni di sicurezza del produttore di detersivo per lavastoviglie per
evitare ustioni chimiche a occhi, bocca e
gola.
• Non bere l'acqua della lavastoviglie. Potrebbe contenere residui di detersivo.
• Tenere sempre chiusa la porta quando
non si utilizza l'apparecchio per evitare di
ferirsi e di inciampare.
• Non sedersi o salire in piedi sopra la porta
aperta dell'apparecchio.

electrolux 21
Per la sicurezza dei bambini
• Solo persone adulte possono utilizzare
l'apparecchio. Controllare che i bambini
non giochino con l'apparecchio.
• Tenere i materiali di imballaggio al di fuori
della portata dei bambini per evitare il rischio di soffocamento.
• Conservare i detersivi in un luogo sicuro.
Evitare che i bambini tocchino i detersivi.
• Tenere i bambini lontano dalla lavastoviglie
quando lo sportello è aperto.
Installazione
• Controllare che la lavastoviglie non presenti danni dovuti al trasporto. Non collegare l'apparecchio se è danneggiato. Se
necessario, contattare il fornitore.
• Rimuovere tutti i materiali di imballaggio
prima dell'uso.
• Gli interventi elettrici devono essere eseguiti da un tecnico qualificato e competente.
Descrizione del prodotto
• Gli interventi idraulici devono essere eseguiti da un tecnico qualificato e competente.
• Non cambiare le specifiche tecniche né
modificare questo prodotto. Rischio di lesioni e danni all'apparecchio.
• Non utilizzare l'apparecchio:
– se il cavo di rete o i tubi dell'acqua sono
danneggiati
– se il pannello dei comandi, il piano di la-
voro o il basamento presentano danni
tali da consentire l'accesso a parti interne dell'apparecchio.
Contattare il centro di assistenza locale.
• Non forare le pareti laterali della lavastoviglie per evitare di danneggiare i componenti idraulici ed elettrici.
Avvertenza Seguire attentamente le
istruzioni dei paragrafi corrispondenti
per i collegamenti elettrici e idraulici.
1 Cestello superiore
2 Indicatore durezza acqua
3 Contenitore sale
4 Erogatore del detersivo
5 Erogatore del brillantante
6 Targhetta di identificazione
7 Filtri
8 Mulinello inferiore

22 electrolux
9 Mulinello superiore
Pannello dei comandi
6
1 Tasto On/Off
2 Tasti di selezione dei programmi
3 Tasto Partenza ritardata
4 Display digitale
5 Spie
6 Tasti funzione
Spie
Programma in corso – Si accende quando è selezionato un programma di lavaggio.
Fine del programma Si accende quando il programma di lavaggio è terminato.
Tasto MULTITAB Si accende quando si attiva la funzione MULTITAB. Fare riferimento alla
– Resta accesa per tutta la durata del programma di lavaggio.
– Si spegne alla fine del programma di lavaggio.
sezione 'Funzione MULTITAB'.

electrolux 23
Spie
1)
Sale
Brillantante
1) Quando il contenitore del sale e/o il contenitore del brillantante sono vuoti, la spia corrispondente non
si accende durante l'esecuzione di un programma.
1)
Tasti di selezione dei programmi
Questi tasti consentono di selezionare un
programma di lavaggio. Premendo il tasto di
un programma, la spia corrispondente si accende. Fare riferimento al capitolo 'Programmi di lavaggio' per ulteriori informazioni.
Tasto Partenza ritardata
Utilizzare il tasto della partenza ritardata per
posticipare l'inizio di un programma di lavaggio da 1 a 19 ore. Fare riferimento al capitolo
'Impostazione e avvio di un programma di
lavaggio'.
Display digitale
Il display mostra:
• Livello impostato del decalcificatore del-
l'acqua.
• Tempo residuo al termine di un program-
ma.
• Attivazione/disattivazione del contenitore
del brillantante (solo con la funzione MULTITAB attiva).
• Termine del programma di lavaggio. Il di-
splay digitale mostra uno zero.
• Numero di ore della partenza ritardata.
• Codici di errore.
Tasti funzione
Utilizzare i tasti funzione per queste operazioni:
• per impostare il decalcificatore dell'acqua.
Fare riferimento al capitolo 'Impostazione
del decalcificatore'.
La spia si accende quando è necessario riempire il contenitore del sale.
Fare riferimento al capitolo 'Uso del sale per lavastoviglie'.
Dopo avere riempito il contenitore, la spia del sale può rimanere ancora
accesa per qualche ora. Ciò non compromette il buon funzionamento dell'apparecchiatura.
Si accende quando è necessario aggiungere il brillantante. Fare riferimento
al capitolo 'Uso del brillantante'.
• Per annullare il programma di lavaggio in
corso o una partenza ritardata. Fare riferimento al capitolo 'Impostazione e avvio di
un programma di lavaggio'.
• Per attivare/disattivare la funzione MULTITAB: Fare riferimento alla sezione 'Funzione MULTITAB'.
• Per disattivare/attivare il contenitore del
brillantante quando è attiva la funzione
MULTITAB. Fare riferimento alla sezione
'Funzione MULTITAB'.
Modalità Impostazione
L'apparecchiatura deve essere in modalità
impostazione per le seguenti operazioni:
• Impostazione di un programma di lavaggio.
• Impostazione del livello del decalcificatore
dell'acqua.
• Disattivazione/attivazione del contenitore
del brillantante.
Premere il tasto On/Off. L'apparecchiatura è
in modalità impostazione quando:
– Tutte le spie dei programmi si accendono.
Premere il tasto On/Off. L'apparecchiatura
non è in modalità impostazione quando:
– Si accende solo una spia dei programmi
– È stato impostato un programma di lavag-
gio. Annullare il programma per tornare alla
modalità di impostazione. Fare riferimento
al capitolo 'Impostazione e avvio di un programma di lavaggio'.
Preparazione al primo utilizzo
Fare riferimento alle seguenti istruzioni per
ciascun punto della procedura:
1. Verificare che il livello del decalcificatore
sia corretto per la durezza locale dell'acqua. Se necessario, impostare il decalcificatore dell'acqua.
2. Riempire il contenitore del sale con sale
per lavastoviglie.
3. Riempire l'erogatore del brillantante con
brillantante.
4. Mettere posate e piatti nella lavastoviglie.

24 electrolux
5. Impostare il programma corretto per il tipo di carico e il grado di sporcizia.
6. Riempire l'erogatore del detersivo con un
Se si utilizzano pastiglie combinate ('3 in
1', '4 in 1', '5 in 1' ecc.), fare riferimento
al capitolo 'Funzione Multitab'.
quantitativo corretto di detersivo.
7. Avviare il programma di lavaggio.
Regolazione del decalcificatore dell’acqua
Il decalcificatore dell'acqua elimina dalla rete
idrica i sali minerali che possono compromettere il buon funzionamento dell'apparecchio.
La durezza dell'acqua è misurata in scale
equivalenti:
• scala tedesca (dH°).
Durezza dell'acqua
°dH °TH mmol/l Clark manuale elettronica
51 - 70 91 - 125 9,1 - 12,5 64 - 88 2 10
43 - 50 76 - 90 7,6 - 9,0 53 - 63 2 9
37 - 42 65 - 75 6,5 - 7,5 46 - 52 2 8
29 - 36 51 - 64 5,1 - 6,4 36 - 45 2 7
23 - 28 40 - 50 4,0 - 5,0 28 - 35 2 6
19 - 22 33 - 39 3,3 - 3,9 23 - 27 2 5
15 - 18 26 - 32 2,6 - 3,2 18 - 22 1 4
11 - 14 19 - 25 1,9 - 2,5 13 - 17 1 3
4 - 10 7 - 18 0,7 - 1,8 5 - 12 1 2
< 4 < 7 < 0,7 < 5
1) Non è richiesto l'uso di sale.
Impostazione manuale ed elettronica del
livello del decalcificatore.
Regolazione manuale
L'apparecchio viene impostato in fabbrica a livello 2.
1. Aprire la porta.
2. Togliere il cestello inferiore.
3. Ruotare il selettore per la durezza dell'acqua sulla posizione 1 o 2 (fare riferimento
alla tabella).
4. Rimettere il cestello inferiore.
• scala francese (°TH).
• mmol/l (millimol per litro, unità internazionale di durezza dell'acqua).
•Clark.
Regolare il decalcificatore in base alla durezza locale dell'acqua. Se necessario, contattare l'ente erogatore locale.
Regolazione della durezza dell'ac-
1)
1
qua
5. Chiudere la porta.
Regolazione elettronica
Il decalcificatore dell'acqua viene
impostato in fabbrica a livello 5.
1. Accendere l'apparecchiatura.
2. Verificare che l'apparecchiatura sia in
modalità impostazione.
3. Tenere premuti i tasti funzione B e C fino
a quando le spie dei tasti funzione A, B e
C non incominciano a lampeggiare.
1)
1

electrolux 25
4. Rilasciare i tasti funzione B e C.
5. Premere il tasto funzione A.
– Le spie dei tasti funzione B e C si spen-
gono.
– La spia del tasto funzione A lampeggia.
– Il display digitale mostra il livello cor-
rente.
Uso del sale per lavastoviglie
Attenzione Utilizzare solo sale per
lavastoviglie. Altri tipi di sale possono
danneggiare il decalcificatore.
Attenzione Residui di sale e acqua
salata sul fondo dell'apparecchio
possono causare corrosione. Riempire
di sale l'apparecchio prima di iniziare un
programma di lavaggio per impedire la
corrosione.
Riempire il contenitore del sale procedendo nel modo seguente:
1. Ruotare il tappo in senso antiorario per
aprire il contenitore del sale.
2. Versare 1 litro di acqua nel contenitore del
sale (solo la prima volta).
3. Riempire il contenitore con il sale servendosi dell'imbuto.
Esempio: il display digitale mostra
livello 5.
6. Premere una volta il tasto funzione A per
incrementare il livello del decalcificatore di
un livello.
7. Premere il tasto On/Off per memorizzare
l'operazione.
4. Togliere l'eventuale sale rimasto attorno
all'apertura del contenitore.
5. Ruotare il tappo in senso orario per chiudere il contenitore del sale.
È normale che l'acqua fuoriesca dal contenitore quando si riempie con il sale.
Quando si imposta elettronicamente il decalcificatore del sale al livello 1, la spia del sale
non si accende.
=
Uso del brillantante
Attenzione Usare solo brillantanti
specificatamente indicati per
lavastoviglie.
Non riempire l'erogatore del brillantante
con altri prodotti (per es. detersivo, detersivo liquido). Rischio di lesioni e danni
all'apparecchio.
Il brillantante permette di asciugare le
stoviglie senza striature o macchie.
Il brillantante viene aggiunto automaticamente durante l'ultima fase di risciacquo.
Riempire l'erogatore del brillantante procedendo nel modo seguente:
1. Premere il tasto di sgancio (A) per aprire
l'erogatore del brillantante.

26 electrolux
2. Riempire l'erogatore del brillantante con
brillantante. Il simbolo 'max.' indica il livello massimo.
3. Togliere l'eventuale brillantante fuoriuscito con un panno assorbente per evitare
la formazione di schiuma eccessiva durante il lavaggio successivo.
4. Chiudere l'erogatore del brillantante.
Regolazione del quantitativo di
brillantante
L'apparecchio viene impostato in fabbrica a
livello 4.
È possibile impostare il livello del brillantante
da 1 (dosaggio minimo) a 6 (dosaggio massimo).
1. Ruotare il selettore del brillantante per aumentare o diminuire il dosaggio.
– Aumentare il dosaggio se sulle stoviglie
rimangono goccioline di acqua o macchie di calcare.
– Diminuire il dosaggio se sulle stoviglie
rimangono striature, macchie bianche
o iridescenze bluastre.
Sistemazione di posate e stoviglie
Consigli e suggerimenti pratici
Attenzione Utilizzare l'apparecchio
solo per lavare utensili idonei alla
lavastoviglie.
Non utilizzare l'apparecchio per lavare oggetti che possano assorbire acqua (spugne,
strofinacci ecc.).
• Prima di caricare posate e piatti, procedere nel modo seguente:
– Eliminare eventuali residui di cibo.
– Ammorbidire i residui di bruciato nei te-
gami.
• Mentre si caricano posate e piatti, procedere nel modo seguente:
– Caricare utensili cavi (per es. tazze, bic-
chieri e padelle) con l'apertura rivolta
verso il basso.
– Verificare che l'acqua non si fermi nel
contenitore o in una sua parte concava.
– Controllare che posate e stoviglie non
siano le une dentro alle altre.
– Controllare che posate e stoviglie non
coprano altri oggetti.
– Verificare che i bicchieri non si tocchino
l'un l'altro.
– Mettere gli utensili di piccole dimensioni
nel cestello delle posate.

• Oggetti in plastica e padelle con fondo antiaderente tendono a trattenere maggiormente le gocce d'acqua. Gli oggetti in plastica non si asciugano altrettanto rapidamente quanto quelli in porcellana o acciaio.
• Mettere gli utensili leggeri nel cestello superiore. Controllare che non si possano
muovere.
Attenzione Controllare che i mulinelli
possano ruotare liberamente prima di
avviare un programma di lavaggio.
Avvertenza Chiudere sempre la porta
dopo avere caricato e scaricato la
lavastoviglie. Lasciare aperto la porta
può essere pericoloso.
Nel cestello inferiore
Mettere nel cestello inferiore salsiere, coperchi, piatti, insalatiere e posate. Disporre piatti
di portata e coperchi di grandi dimensioni ai
lati del cestello.
electrolux 27
Cestello portaposate
Avvertenza Non mettere coltelli con la
lama lunga in posizione verticale nel
cestello. Disporre orizzontalmente
posate lunghe e/o affilate nel cestello
superiore. Prestare attenzione agli
oggetti affilati.
Mettere forchette e cucchiai con l'impugnatura rivolta verso il basso.
Mettere i coltelli con il manico rivolto verso
l'alto.
Le file di supporti nel cestello inferiore possono essere abbassate per caricare pentole,
padelle insalatiere.
Alternare i cucchiai con altre posate per evitare che si sovrappongano gli uni con gli altri.
Abbassare la maniglia per inserire i coltelli nel
cestello.

28 electrolux
Usare il separatore del cestello portaposate.
Se le dimensioni delle posate impediscono
l'uso dei separatori, è possibile toglierli.
Il cestello portaposate è costituito da due
parti. Per garantire una maggiore flessibilità
di carico, è possibile utilizzare le due parti separatamente. Per separarle, farle scorrere
orizzontalmente in senso opposto l'una rispetto all'altra, quindi separarle. Per montarle, avvicinarle e farle scorrere l'una verso l'altra.
Cestello superiore
Il cestello superiore è ideale per salsiere, insalatiere, tazze, bicchieri, piccoli tegami e coperchi. Disporre le stoviglie in modo che l'acqua possa raggiungere tutte le superfici.
Mettere i bicchieri a calice nelle apposite griglie portatazze con lo stelo rivolto verso l'alto.
Per oggetti più alti, ripiegare le griglie portatazze.
Per i bicchieri a calice, piegare il supporto
verso sinistra o destra.

electrolux 29
Per garantire una maggiore flessibilità di carico, è facile abbassare le file centrali di supporti.
Regolazione dell'altezza del cestello
superiore
Se si mettono piatti di grandi dimensioni nel
cestello inferiore, prima spostare il cestello
superiore in una posizione più alta.
Altezza massima dei piatti nel cestello in-
feriore
Posizione alta 31 cm
Altezza massima dei piatti nel cestello in-
feriore
Posizione bassa 27 cm
Per modificare la posizione del cestello superiore, procedere nel modo seguente:
1. Estrarre il cestello fino all'arresto.
2. Sollevarlo attentamente dai due lati fino a
quando il meccanismo è bloccato e il cestello è stabile.
Per mettere il cestello superiore nella posizione più bassa, procedere nel modo seguente:
1. Estrarre il cestello fino all'arresto.
2. Sollevarlo attentamente afferrandolo dai
due lati verso l'alto.
3. Tenendo stretto il meccanismo, farlo ricadere delicatamente indietro.
Attenzione
• Non sollevare o abbassare il cesto su
un solo lato.
• Se il cestello è nella posizione superiore, non mettere tazze sulle griglie
porta-tazze.
Uso del detersivo
Usare solo detersivi specifici per lavastoviglie (in polvere, liquidi o in pastiglie).
Seguire le istruzioni riportate sulla confezione:
• Dosaggio consigliato dal produttore.
• Consigli per la conservazione.
Non utilizzare un quantitativo di detersi-
vo maggiore di quello indicato per non
danneggiare l'ambiente.
Riempire il contenitore del detersivo procedendo nel modo seguente:
1. Aprire il coperchio dell'erogatore del detersivo.

30 electrolux
2. Riempire il contenitore del detersivo ( A).
Le tacche indicano i livelli di dosaggio:
20 = circa 20 g di detersivo
30 = circa 30 g di detersivo
3. Se il programma prevede una fase di prelavaggio, aggiungere detersivo anche
nella vaschetta corrispondente ( B).
A
4. Se si utilizzano detersivi in pastiglie, inserire la pastiglia nell'erogatore ( A).
5. Chiudere il coperchio del contenitore del
detersivo. Premere il coperchio fino a
quando non si blocca.
Detersivi di marca diversa si sciolgono in
tempi differenti. Alcune pastiglie combinate non garantiscono ottimi risultati di
pulizia nei programmi brevi. Per eliminare completamente il detersivo, usare
programmi di lavaggio lunghi con il detersivo in pastiglie.
B
Uso di pastiglie combinate
La funzione Multitab è per pastiglie di detersivo combinate.
Tali pastiglie contengono detersivo, brillantante e sale. Alcuni tipi di pastiglie possono
contenere altri agenti.
Verificare che le pastiglie siano idonee per la
durezza dell'acqua locale. Seguire le istruzioni del produttore.
Quando si imposta la funzione Multitab, rimane attiva fino a quando non viene disattivata.
La funzione Multitab arresta automaticamente l'erogazione di brillantante e sale. Le spie
del brillantante e del sale sono disattivate.
La durata del programma può aumentare se
si utilizza la funzione Multitab.
Attivare o disattivare la funzione Multitab
prima di avviare un programma di lavaggio.
Non è possibile attivare/disattivare la
funzione Multitab quando un programma è in corso. Annullare il programma di
lavaggio, quindi impostare nuovamente
il programma.
Per attivare la funzione Multitab:

electrolux 31
• Tenere premuti i due tasti Multitab (tasti
funzione D ed E). La spia Multitab si accende.
Per disattivare la funzione Multitab:
• Tenere premuti i due tasti Multitab (tasti
funzione D ed E). La spia Multitab si spegne.
Se i risultati di asciugatura non sono
soddisfacenti, procedere nel modo
seguente:
1. Riempire l'erogatore del brillantante
con brillantante.
2. Attivare l'erogatore del brillantante.
3. Impostare il dosaggio del brillantante
sulla posizione 2.
• È possibile attivare o disattivare l'ero-
gatore del brillantante quando la funzione Multitab è attiva.
Per attivare/disattivare l'erogatore del brillantante:
1. Accendere l'apparecchio.
2. Verificare che l'apparecchio sia in modalità impostazione.
3. Tenere premuti i tasti funzione B e C.
– Le spie dei tasti funzione A, B e C lam-
peggiano.
4. Rilasciare i tasti funzione B e C.
5. Premere il tasto funzione B.
– Le spie dei tasti funzione A e C si spen-
gono.
– La spia del tasto funzione B lampeggia.
– Il display digitale mostra l'impostazio-
ne.
Erogatore del brillantante disattivato
Erogatore del brillantante attivato
6. Premere nuovamente il tasto funzione B.
– Il display digitale mostra la nuova im-
postazione.
7. Spegnere l'apparecchio per memorizzare l'operazione.
Per usare nuovamente un detersivo normale:
1. Disattivare la funzione Multitab.
2. Riempire il contenitore del sale e l'erogatore del brillantante.
3. Impostare il decalcificatore al livello
più alto.
4. Eseguire un programma di lavaggio
senza piatti.
5. Regolare il decalcificatore in base alla
durezza locale dell'acqua.
6. Regolare l'erogatore del brillantante.
Selezione e avvio di un programma di lavaggio
Impostare il programma di lavaggio con
la porta socchiusa. Il programma di lavaggio incomincia solo dopo la chiusura
della porta. Fino a quel momento è possibile modificare le impostazioni.
Procedere nel modo seguente per impostare
e avviare un programma di lavaggio:
1. Accendere l'apparecchiatura.
2. Verificare che l'apparecchiatura sia in
modalità impostazione.
3. Premere uno dei tasti di selezione dei
programmi. Fare riferimento al capitolo
'Programmi di lavaggio'.
– La spia del programma si accende.
– Tutte le altre spie dei programmi si
spengono.
– Il display digitale mostra la durata del
programma.
– La spia del programma in corso si ac-
cende.
4. Chiudere la porta.
– Il programma di lavaggio inizia auto-
maticamente.
– La spia del programma in corso rimane
accesa.
Non è possibile modificare un programma di lavaggio in corso. Annullare il programma di lavaggio.
La selezione del programma di lavaggio
è possibile anche se la porta è chiusa.
Quando si preme il tasto di un programma, si hanno solo 3 secondi per selezionare un altro programma di lavaggio.
Trascorso questo tempo, il programma
selezionato incomincia automaticamente.
Avvertenza Interrompere o annullare
un programma di lavaggio solo se
effettivamente necessario.

32 electrolux
Attenzione Aprire la porta con
attenzione. Può fuoriuscire vapore
caldo.
Interruzione di un programma di
lavaggio
Aprire la porta.
• Il programma si ferma.
Chiudere la porta.
• Il programma riprende dal punto in cui era
stato interrotto.
Annullamento di un programma di
lavaggio
1. Tenere premuti i tasti funzione B e C fino
a quando:
– Tutte le spie dei programmi si accen-
dono,
– La spia del programma in corso si spe-
gne.
2. Rilasciare i tasti funzione B e C per annullare il programma di lavaggio.
A questo punto è possibile:
1. Spegnere l'apparecchiatura.
2. Impostare un nuovo programma di lavaggio .
Riempire il contenitore del detersivo prima di
impostare un nuovo programma di lavaggio.
Impostazione e avvio di un programma
di lavaggio con partenza ritardata
1. Premere il tasto On/Off.
2. Impostare un programma di lavaggio.
3. Tenere premuto il tasto Partenza ritardata
fino a quando sul display non lampeggia
il ritardo desiderato.
4. Chiudere la porta.
– Il numero del display diventa fisso.
– La spia del programma in corso si spe-
gne.
– Il conto alla rovescia incomincia.
– Il conto alla rovescia diminuisce con in-
tervalli di 1 ora.
– Appena è completato il conto alla ro-
vescia, il programma si avvia automa-
ticamente.
– La spia del programma in corso si
accende.
Il conto alla rovescia viene interrotto se
si apre la porta. Quando si chiude nuovamente la porta, il conto alla rovescia
viene ripreso dal punto in cui era stato
interrotto.
Annullamento di una partenza ritardata
impostata:
1. Tenere premuti i tasti funzione B e C fino
a quando:
– Tutte le spie dei programmi si accen-
dono
Quando si annulla una partenza ritardata,
si annulla anche il programma di lavaggio.
2. Impostare un nuovo programma di lavaggio.
Termine del programma di lavaggio
• L'apparecchiatura si ferma automatica-
mente.
• Il display digitale mostra 0.
• La spia di fine programma si accende.
• La spia del programma in corso si spegne.
1. Spegnere l'apparecchiatura.
2. Aprire la porta.
3. Per migliori risultati di asciugatura, lasciare la porta socchiusa per alcuni minuti
prima di togliere i piatti dalla lavastoviglie.
Lasciare raffreddare i piatti prima di estrarli
dall'apparecchiatura. Le stoviglie calde sono
più facilmente danneggiabili.
Scaricare la lavastoviglie
• Vuotare prima il cestello inferiore e quindi
quello superiore.
• Può rimanere dell'acqua di condensa sulle
pareti interne e sulla porta dell'apparecchio. L'acciaio si raffredda più rapidamente dei piatti.

electrolux 33
Programmi di lavaggio
Programmi di lavaggio
Programma Grado di spor-
Intensivo Intensivo Stoviglie, posate, pen-
Automatico
Rapido
Eco
Cristalli Sporco normale
1) Nel programma di lavaggio Automatico il grado di sporco sulle stoviglie è stabilito in base alla torbidità
dell'acqua. La durata del programma e i consumi possono variare. poiché dipendono dal livello di
carico della lavastoviglie e dal grado di sporco delle stoviglie. L'apparecchiatura regola
automaticamente la temperatura dell'acqua durante il lavaggio principale.
2) Programma quotidiano perfetto per lavare un carico non completo. Ideale per una famiglia di 4 persone
che deve caricare solo le stoviglie e le posate della colazione e della cena.
3) Programma di prova a fini normativi. Fare riferimento alla documentazione separata allegata per i dati
sul programma di prova.
1)
2)
3)
co
Qualsiasi Stoviglie, posate, pen-
Sporco normale
o leggero
Sporco normale Stoviglie miste Prelavaggio
o leggero
Valori di consumo
Programma
Intensivo - 1,8 - 2,0 23 - 25
Durata (in minuti)
Tipo di carico Descrizione programma
tole e padelle
tole e padelle
Stoviglie miste Lavaggio principale fino a 60°C
Vasellame e bicchieri
delicati
1)
Energia (in kWh) Acqua (in litri)
Prelavaggio
Lavaggio principale fino a 70°C
2 risciacqui intermedi
Risciacquo finale
Asciugatura
Prelavaggio
Lavaggio principale a 45°C o 70°C
1 o 2 risciacqui intermedi
Risciacquo finale
Asciugatura
Risciacquo finale
Lavaggio principale fino a 50°C
1 risciacquo intermedio
Risciacquo finale
Asciugatura
Lavaggio principale fino a 45°C
1 risciacquo intermedio
Risciacquo finale
Asciugatura
Automatico - 1,1 - 1,7 12 - 23
Rapido - 0,9 9
Eco - 150 - 160 12 - 13
- 0,8 - 0,9 14 - 15
Cristalli
1) Il display digitale mostra la durata del programma.
Questi valori dipendono dalla pressione
e dalla temperatura dell'acqua, dalle va-
riazioni dell'alimentazione elettrica e dalla quantità di piatti.

34 electrolux
Pulizia e cura
Avvertenza Spegnere l'apparecchio
prima di pulirle i filtri.
Pulizia dei filtri
Attenzione Non utilizzare l'apparecchio
senza i filtri. Controllare che i filtri siano
stati installati correttamente. Un
montaggio non corretto dei filtri
determina risultati di lavaggio non
soddisfacenti e può danneggiare
l'apparecchio.
Se necessario, pulire i filtri. I filtri sporchi diminuiscono i risultati di lavaggio.
La lavastoviglie ha tre filtri:
1. filtro a maglie larghe (A)
2. microfiltro (B)
3. filtro piatto (C)
A
B
C
4. Togliere il gruppo di filtraggio.
5. Afferrare il filtro a maglie grosse (A) mediante il manico ad anello.
6. Togliere il filtro a maglie grosse (A) dal
microfiltro (B).
7. Togliere il filtro piatto (C) dal fondo dell'apparecchio.
8. Pulire i filtri sotto l'acqua corrente.
9. Rimettere il filtro piatto (C) nel fondo dell'apparecchio.
10. Rimettere il filtro a maglie grosse (A) nel
microfiltro (B) e spingere insieme i filtri.
11. Posizionare i filtri.
12. Per bloccare il sistema di filtraggio, ruotare il manico sul microfiltro (B) in senso
orario fino a bloccarlo.
13. Rimettere il cestello inferiore.
14. Chiudere la porta.
Non rimuovere i mulinelli.
Per pulire i filtri procedere nel modo seguente:
1. Aprire la porta.
2. Togliere il cestello inferiore.
3. Per sbloccare il sistema di filtraggio, ruotare il manico sul microfiltro (B) di circa
1/4 di giro in senso antiorario.
Se i fori dei mulinelli sono intasati, rimuovere
i residui di sporco con uno stuzzicadenti.
Pulizia esterna
Pulire le superfici esterne dell'apparecchio e
il pannello dei comandi con un panno morbido inumidito. Utilizzare solo detergenti neutri. Non usare prodotti abrasivi, spugnette
abrasive o solventi (acetone, trielina, ecc.).
Precauzioni antigelo
Attenzione Non collocare
l'apparecchio in un luogo in cui la
temperatura possa scendere al di sotto
di 0 °C. Il produttore non è responsabile
di eventuali danni dovuti al gelo.
Se ciò non fosse possibile, svuotare l'apparecchio e chiudere la porta. Scollegare il tubo

di carico dell'acqua e vuotarlo completamente.
Cosa fare se…
La lavastoviglie non si avvia o si blocca durante il funzionamento.
In caso di malfunzionamento, cercare dapprima di risolvere il problema senza contattare l'assistenza tecnica. Qualora non sia
possibile trovare una soluzione al problema,
contattare il centro di assistenza locale.
Codice guasto e malfunziona-
•
il display digitale mostra
La lavastoviglie non carica acqua
•
il display digitale mostra
La lavastoviglie non scarica l'acqua
•
il display digitale mostra
Il dispositivo anti-allagamento è attivato
Il programma non si avvia • La porta dell'apparecchiatura non è chiusa.
mento
• Il rubinetto dell'acqua è bloccato o intasato dal calcare.
Pulire il rubinetto dell'acqua.
• Il rubinetto dell'acqua è chiuso.
Aprire il rubinetto dell'acqua.
• Il filtro nella valvola di ingresso dell'acqua è bloccato.
Pulire il filtro.
• Il raccordo della valvola di ingresso dell'acqua non è corretto.
Il tubo può essere piegato o schiacciato.
Controllare che il raccordo sia corretto.
• Lo scarico è ostruito.
Pulire lo scarico.
• Il raccordo del tubo di ingresso dell'acqua non è corretto. Il
tubo può essere piegato o schiacciato.
Controllare che il raccordo sia corretto.
• Chiudere il rubinetto dell'acqua e contattare il servizio di assistenza locale.
Chiudere la porta.
• La spina di alimentazione non è inserita nella presa di corrente.
Inserire la spina di alimentazione elettrica.
• Un fusibile domestico è bruciato.
Sostituire il fusibile.
• È stata impostata la Partenza ritardata.
Annullare la partenza ritardata per avviare il programma immediatamente.
Una volta effettuati questi controlli, accendere l'apparecchiatura. Il programma riprende
dal punto in cui era stato interrotto. In caso
di ricomparsa del codice di allarme o dell'anomalia, contattare il centro di assistenza.
Se il display indica un codice di guasto non
descritto nella tabella, contattare il Centro di
assistenza locale.
Tenere a portata di mano questi dati, permettendoci di aiutarvi in maniera tempestiva
e corretta:
Attenzione Spegnere l'apparecchio
prima di eseguire le seguenti azioni
correttive consigliate.
Possibile causa e soluzione
• Modello (Mod.)
• Numero prodotto (PNC)
• Numero serie (S.N.)
Per questi dati fare riferimento alla targhetta
nominale.
Scrivere di seguito i dati necessari:
Descrizione modello : ..........
Numero prodotto : ..........
Numero serie : ..........
electrolux 35

36 electrolux
I risultati del lavaggio non sono soddisfacenti
Le stoviglie non sono pulite • Il programma di lavaggio selezionato non è corretto per il tipo di
Macchie di calcare sulle stoviglie
Le stoviglie sono bagnate e
opache
Bicchieri e stoviglie presentano striature, macchie biancastre o una patina bluastra
Bicchieri e stoviglie presentano macchie dovute all'asciugatura di gocce d'acqua
carico e il grado di sporcizia.
• I cestelli non sono stati caricati correttamente per cui l'acqua non
raggiunge tutte le superfici.
• I mulinelli non girano liberamente, per la sistemazione non corretta
delle stoviglie.
• I filtri sono sporchi o non sono correttamente installati.
• È stata utilizzata una dose insufficiente di detersivo o non è stato
messo affatto.
• Il contenitore del sale è vuoto.
• Il decalcificatore è regolato su un livello sbagliato.
• Il tappo del contenitore del sale non è chiuso correttamente.
• Non è stato utilizzato il brillantante.
• L'erogatore del brillantante è vuoto.
• Ridurre il dosaggio del brillantante.
• Aumentare il dosaggio del brillantante.
• La causa potrebbe essere il detersivo.
Dati tecnici
Dimensioni Larghezza cm 59,6
Altezza cm 81,8 - 87,8
Profondità cm 57,5
Collegamento elettrico - Tensio-
ne - Potenza totale - Fusibile
Pressione dell'acqua di rete Minima 0,5 bar (0,05 MPa)
Massima 8 bar (0,8 MPa)
Capacità Coperti 12
Le informazioni sulla connessione elettrica sono fornite sulla targhetta dei dati applicata sullo spigolo interno della porta della lavastoviglie.
Installazione
Avvertenza Verificare che la spina sia
staccata dalla presa elettrica durante
l'installazione.
Importante Seguire le istruzioni nel modello
allegato per:
• incassare l'apparecchio.
• installare il pannello di copertura.
• Collegare l'apparecchio all'alimentazione
e allo scarico.
Installare l'apparecchio sotto un piano (piano
di lavoro o lavello).
Se sono necessarie riparazioni, l'apparecchio deve essere facilmente accessibile al
tecnico.
Collocare l'apparecchio vicino ad un rubinetto dell'acqua e ad uno scarico.
Per la ventilazione della lavastoviglie sono necessarie soltanto aperture per il passaggio
dei tubi di carico e scarico dell'acqua e del
cavo d'alimentazione.
Mediante i piedini regolabili aggiustare l'altezza dell'apparecchio.
Verificare che i tubi di carico e di scarico e il
cavo di alimentazione non siano piegati o
schiacciati quando si installa l'apparecchio.

electrolux 37
Fissaggio dell'apparecchio alle unità
adiacenti
Verificare che il piano sotto il quale si installa
l'apparecchio sia solido (basi adiacenti, mobiletti, pareti).
Regolazione del livellamento
dell'apparecchio
Un buon livellamento è essenziale per la corretta chiusura e tenuta dello sportello. Se
Collegamento dell’acqua
Tubo di carico dell'acqua
Collegare l'apparecchio ad un rubinetto dell'acqua calda (max. 60°) o fredda.
Se l'acqua calda proviene da fonti alternative
di energia ecologiche (per esempio da pannelli solari o fotovoltaici e impianti eolici), utilizzare l'acqua calda per diminuire il consumo
energetico.
Collegare il tubo di carico a un rubinetto dell'acqua con filettatura esterna di 3/4".
Attenzione Non utilizzare tubi di
apparecchi usati.
La pressione dell'acqua deve rientrare nei limiti (fare riferimento al capitolo 'Caratteristiche tecniche'). Verificare che l'ente locale per
le forniture idriche fornisca la pressione media per l'area.
Verificare che il tubo di carico dell'acqua non
sia piegato né schiacciato o impigliato.
Serrare correttamente il controdado per impedire perdite d'acqua.
Attenzione Non collegare
l'apparecchio a nuovi tubi o a tubi che
non sono stati utilizzati per lungo tempo.
Lasciare scorrere l'acqua per alcuni
minuti, poi collegare il tubo flessibile di
entrata.
Il tubo di carico ha una doppia parete e ha un
cavo interno di rete e una valvola di sicurezza.
Il tubo di carico dell'acqua è sotto pressione
solo durante il passaggio dell'acqua. In caso
di una perdita nel tubo di carico dell'acqua,
la valvola di sicurezza interrompe il passaggio
dell'acqua.
Prestare attenzione quando si collega il tubo
di carico dell'acqua:
• Non immergere nell'acqua il tubo di carico
o la valvola di sicurezza.
l'apparecchio è livellato correttamente, la
porta non può urtare contro i lati del mobile.
Se la porta non si chiude correttamente, allentare o serrare i piedini regolabili fino a mettere l'apparecchio in piano.
• Se il tubo di carico o la valvola di sicurezza
sono danneggiati, scollegare immediatamente la spina dalla presa elettrica.
• Fare sostituire il tubo di carico dell'acqua
con valvola di sicurezza solo da personale
specializzato.
Avvertenza Apparecchio sotto
tensione
Tubo di scarico
1. Collegare il tubo flessibile di scarico allo
scarico del lavandino e fissarlo sotto al
piano di lavoro. Ciò impedisce che l'acqua di scarico del lavandino refluisca nell'apparecchiatura.
2. Collegare il tubo flessibile di scarico ad un
tubo verticale con sfiato (diametro interno
minimo 4 cm).

38 electrolux
La connessione dello scarico deve essere ad
una altezza massima di 60 cm dal fondo dell'apparecchiatura.
Verificare che il tubo flessibile di scarico non
sia piegato né schiacciato impedendo il corretto scarico dell'acqua.
Togliere il tappo del lavandino quando l'apparecchiatura scarica l'acqua per evitare che
l'acqua refluisca nell'apparecchiatura.
La lunghezza totale del tubo di scarico, incluse eventuali prolunghe, non deve essere
maggiore di 4 m. Il diametro interno non deve
essere più piccolo del diametro del tubo.
Se si collega il tubo di scarico ad un rubinetto
posto sotto al lavello, togliere la membrana in
plastica (A). In caso contrario, l'accumulo di
residui di alimenti può bloccare il rubinetto del
tubo di scarico
L'apparecchiatura è dotata di un dispositivo di sicurezza che impedisce che
l'acqua sporca ritorni nell'apparecchiatura. Se lo scarico del lavandino è dotato
di una "valvola di non ritorno", questa
valvola può essere la causa del non corretto scarico dell'apparecchiatura. Togliere la valvola di non ritorno.
Attenzione Assicurarsi che gli attacchi
dell'acqua siano ben serrati per impedire
perdite d'acqua.
Collegamento elettrico
Avvertenza Il produttore non è
responsabile qualora non siano
applicate queste precauzioni di
sicurezza.
Mettere a terra l'apparecchio conformemente alle precauzioni di sicurezza.
Assicurarsi che la tensione e l'alimentazione elettrica corrispondano alla tensione e al tipo di alimentazione riportate
nella targhetta della lavastoviglie.
Utilizzare sempre una presa antishock
elettrico correttamente installata.
Considerazioni ambientali
Il simbolo sul prodotto o sulla confezione
indica che il prodotto non deve essere
considerato come un normale rifiuto
domestico, ma deve essere portato nel
punto di raccolta appropriato per il riciclaggio
di apparecchiature elettriche ed elettroniche.
Non utilizzare prese multiple, connettori
e prolunghe. Questi componenti possono determinare un rischio di incendio.
Non cambiare mai il cavo elettrico da
soli. Contattare il centro di assistenza locale.
Controllare che la presa sia accessibile
dopo l'installazione.
Non staccare mai la spina tirando il cavo.
Tirare solo la spina.
Provvedendo a smaltire questo prodotto in
modo appropriato, si contribuisce a evitare
potenziali conseguenze negative per
l’ambiente e per la salute, che potrebbero
derivare da uno smaltimento inadeguato del
prodotto. Per informazioni più dettagliate sul

electrolux 39
riciclaggio di questo prodotto, contattare
l’ufficio comunale, il servizio locale di
smaltimento rifiuti o il negozio in cui è stato
acquistato il prodotto.
I materiali di imballaggio sono ecologici e
possono essere smaltiti. I materiali in plastica
sono contrassegnati da marchi, per es.
>PE<, >PS< ecc. per consentirne il corretto
smaltimento.
Avvertenza Per smaltire la lavastoviglie
procedere nel modo seguente:
• Togliere la spina dalla presa.
• Tagliare il cavo di rete e smaltirlo insieme alla spina.
• Eliminare i dispositivi di chiusura. Queste azioni sono intese ad impedire che
i bambini possano restare chiusi accidentalmente all'interno dell'apparecchio o trovarsi in situazioni pericolose.

www.electrolux.com
www.electrolux.it
117951750-00-062009
 Loading...