

AEG BE501310AM User Manual
EN User Manual
Oven
BE501310A

www.aeg.com
2
CONTENTS
1. SAFETY INFORMATION.................................................................................................3
2. CONDITIONS OF USE....................................................................................................4
3. SAFETY INSTRUCTIONS................................................................................................ 4
4. PRODUCT DESCRIPTION.............................................................................................. 7
5. BEFORE FIRST USE.........................................................................................................8
6. DAILY USE........................................................................................................................8
7. CLOCK FUNCTIONS.................................................................................................... 11
8. USING THE ACCESSORIES..........................................................................................12
9. ADDITIONAL FUNCTIONS..........................................................................................14
10. HINTS AND TIPS.........................................................................................................15
11. CARE AND CLEANING.............................................................................................. 27
12. TROUBLESHOOTING.................................................................................................29
13. INSTALLATION........................................................................................................... 31
14. ENERGY EFFICIENCY.................................................................................................33
15. WARRANTY ................................................................................................................ 34
FOR PERFECT RESULTS
Thank you for choosing this AEG product. We have created it to give you impeccable
performance for many years, with innovative technologies that help make life simpler
features you might not find on ordinary appliances. Please spend a few minutes
reading to get the very best from it.
Visit our website for:
Get usage advice, brochures, trouble shooter, service information:
www.aeg.com/webselfservice
Register your product for better service:
www.registeraeg.com
CUSTOMER CARE AND SERVICE
Always use original spare parts.
When contacting our Authorised Service Centre, ensure that you have the following
data available: Model, PNC, Serial Number.
The information can be found on the rating plate.
Warning / Caution-Safety information
General information and tips
Environmental information
Subject to change without notice.

1. SAFETY INFORMATION
Before the installation and use of the appliance,
carefully read the supplied instructions. The
manufacturer is not responsible for any injuries or
damages that are the result of incorrect installation or
usage. Always keep the instructions in a safe and
accessible location for future reference.
1.1 Children and vulnerable people safety
• This appliance can be used by children aged from 8
years and above and persons with reduced physical,
sensory or mental capabilities or lack of experience
and knowledge if they have been given supervision or
instruction concerning the use of the appliance in a
safe way and understand the hazards involved.
• Do not let children play with the appliance.
• Keep all packaging away from children and dispose of
it appropriately.
• Keep children and pets away from the appliance when
it operates or when it cools down. Accessible parts are
hot.
• If the appliance has a child safety device, this should
be activated.
• Children shall not carry out cleaning and user
maintenance of the appliance without supervision.
• Children aged 3 years and under must be kept away
from this appliance when it is in operation at all times.
ENGLISH
3
General Safety
1.2
• Only a qualified person must install this appliance and
replace the cable.
• WARNING: The appliance and its accessible parts
become hot during use. Care should be taken to
avoid touching heating elements. Children less than 8
years of age shall be kept away unless continuously
supervised.

www.aeg.com4
• Always use oven gloves to remove or put in
accessories or ovenware.
• Before maintenance cut the power supply.
• Ensure that the appliance is switched off before
replacing the lamp to avoid the possibility of electric
shock.
• Do not use a steam cleaner to clean the appliance.
• Do not use harsh abrasive cleaners or sharp metal
scrapers to clean the glass door since they can scratch
the surface, which may result in shattering of the glass.
• If the mains power supply cable is damaged, it must
be replaced by the manufacturer, its Authorised
Service Centre or similarly qualified persons to avoid
an electrical hazard.
• To remove the shelf supports first pull the front of the
shelf support and then the rear end away from the
side walls. Install the shelf supports in the opposite
sequence.
• The means for disconnection must be incorporated in
the fixed wiring in accordance with the wiring rules.
2.
CONDITIONS OF USE
This appliance is intended to be used in
household and similar applications such
as:
• Farm houses
3. SAFETY INSTRUCTIONS
3.1 Installation
WARNING!
Only a qualified person must
install this appliance.
• Remove all the packaging.
• Do not install or use a damaged
appliance.
• Follow the installation instruction
supplied with the appliance.
• Always take care when moving the
appliance as it is heavy. Always use
safety gloves and enclosed footwear.
• By clients in serviced apartments,
holiday apartments and other
residential type environments.
• Do not pull the appliance by the
handle.
• Keep the minimum distance from the
other appliances and units.
• Make sure that the appliance is
installed below and adjacent safe
structures.
• The sides of the appliance must stay
adjacent to appliances or to units with
the same height.
• The appliance is equipped with an
electric cooling system. It must be
operated with the electric power
supply.

ENGLISH
5
3.2 Electrical connection
WARNING!
Risk of fire and electrical
shock.
• All electrical connections should be
made by a qualified electrician.
• The appliance must be earthed.
• Make sure that the electrical
information on the rating plate agrees
with the power supply. If not, contact
an electrician.
• Always use a correctly installed
shockproof socket.
• Do not use multi-plug adapters and
extension cables.
• Make sure not to cause damage to
the mains plug and to the mains
cable. Should the mains cable need
to be replaced, this must be carried
out by our Authorised Service Centre.
• Do not let mains cables touch or
come near the appliance door,
especially when the door is hot.
• The shock protection of live and
insulated parts must be fastened in
such a way that it cannot be removed
without tools.
• Connect the mains plug to the mains
socket only at the end of the
installation. Make sure that there is
access to the mains plug after the
installation.
• If the mains socket is loose, do not
connect the mains plug.
• Do not pull the mains cable to
disconnect the appliance. Always pull
the mains plug.
• Use only correct isolation devices: line
protecting cut-outs, fuses (screw type
fuses removed from the holder), earth
leakage trips and contactors.
• The electrical installation must have
an isolation device which lets you
disconnect the appliance from the
mains at all poles. The isolation
device must have a contact opening
width of minimum 3 mm.
• This appliance complies with the
E.E.C. Directives.
3.3 Use
WARNING!
Risk of injury, burns and
electrical shock or explosion.
• This appliance is for household use
only.
• Do not change the specification of
this appliance.
• Make sure that the ventilation
openings are not blocked.
• Do not let the appliance stay
unattended during operation.
• Deactivate the appliance after each
use.
• Be careful when you open the
appliance door while the appliance is
in operation. Hot air can release.
• Do not operate the appliance with
wet hands or when it has contact with
water.
• Do not apply pressure on the open
door.
• Do not use the appliance as a work
surface or as a storage surface.
• Open the appliance door carefully.
The use of ingredients with alcohol
can cause a mixture of alcohol and air.
• Do not let sparks or open flames to
come in contact with the appliance
when you open the door.
• Do not put flammable products or
items that are wet with flammable
products in, near or on the appliance.
• Do not use microwave function to
preheat the oven.
WARNING!
Risk of damage to the
appliance.
• To prevent damage or discoloration
to the enamel:
– do not put ovenware or other
objects in the appliance directly
on the bottom.
– do not put aluminium foil directly
on the bottom of the appliance.
– do not put water directly into the
hot appliance.
– do not keep moist dishes and
food in the appliance after you
finish the cooking.
– be careful when you remove or
install the accessories.
6
www.aeg.com
• Discoloration of the enamel has no
effect on the performance of the
appliance.
• Use a deep pan for moist cakes. Fruit
juices cause stains that can be
permanent.
• This appliance is for cooking
purposes only. It must not be used for
other purposes, for example room
heating.
• Always cook with the oven door
closed.
• If the appliance is installed behind a
furniture panel (e.g. a door) make sure
the door is never closed when the
appliance is in operation. Heat and
moisture can build up behind a
closed furniture panel and cause
subsequent damage to the appliance,
the housing unit or the floor. Do not
close the furniture panel until the
appliance has cooled down
completely after use.
3.4 Care and cleaning
WARNING!
Risk of injury, fire, or damage
to the appliance.
• Before maintenance, deactivate the
appliance and disconnect the mains
plug from the mains socket.
• Make sure the appliance is cold.
There is the risk that the glass panels
can break.
• Replace immediately the door glass
panels when they are damaged.
Contact the Authorised Service
Centre.
• Be careful when you remove the door
from the appliance. The door is
heavy!
• Clean regularly the appliance to
prevent the deterioration of the
surface material.
• Clean the appliance with a moist soft
cloth. Only use neutral detergents. Do
not use any abrasive products,
abrasive cleaning pads, solvents or
metal objects.
• If you use an oven spray, obey the
safety instructions on the packaging.
• Do not clean the catalytic enamel (if
applicable) with any kind of
detergent.
3.5 Internal light
• The type of light bulb or halogen
lamp used for this appliance is only
for household appliances. Do not use
it for house lighting.
WARNING!
Risk of electrical shock.
• Before replacing the lamp, disconnect
the appliance from the power supply.
• Only use lamps with the same
specifications.
3.6 Disposal
WARNING!
Risk of injury or suffocation.
• Disconnect the appliance from the
mains supply.
• Cut off the mains electrical cable
close to the appliance and dispose of
it.
• Remove the door catch to prevent
children or pets from becoming
trapped in the appliance.
3.7 Service
• To repair the appliance contact an
Authorised Service Centre.
• Use original spare parts only.
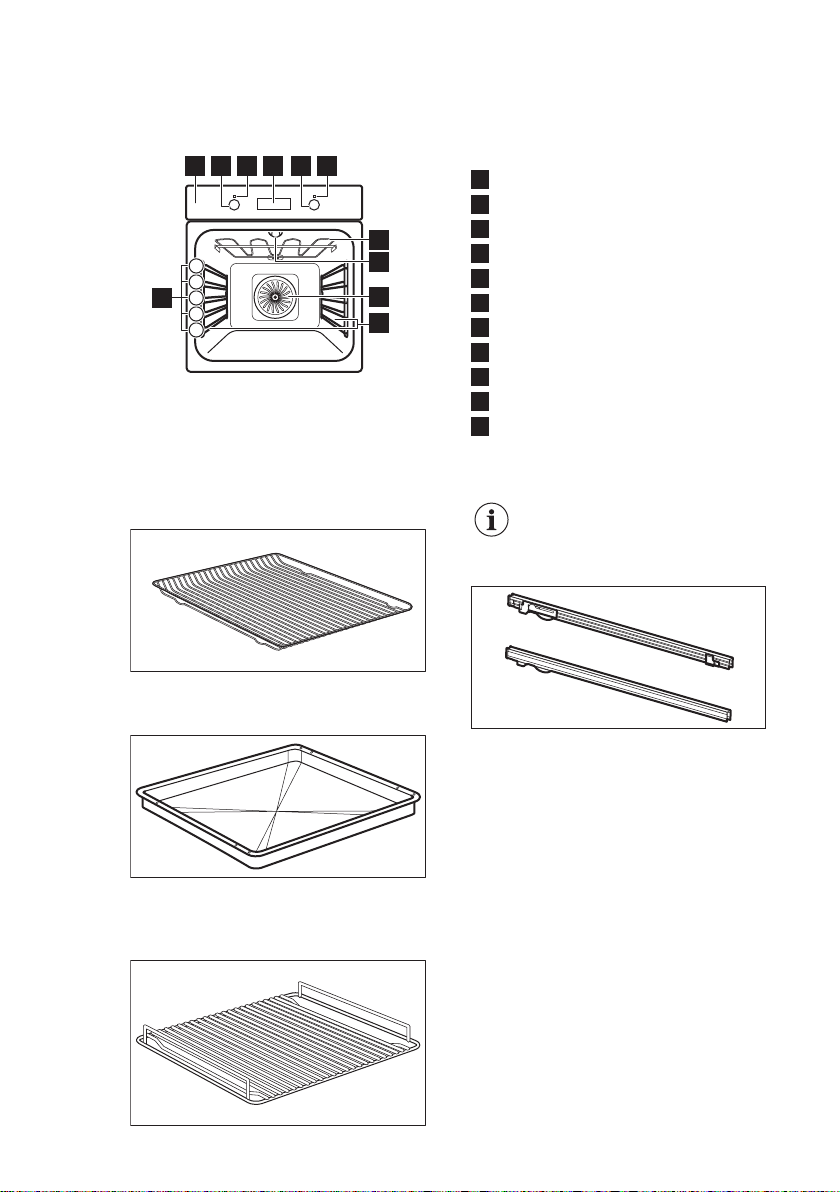
4. PRODUCT DESCRIPTION
7
9
8
41 2 3 5 6
1
2
3
4
5
11
10
4.1 General overview
Control panel
1
Knob for the oven functions
2
Power lamp / symbol
3
Electronic programmer
4
Knob for the temperature
5
Power lamp / symbol
6
Heating element
7
Lamp
8
Fan
9
Shelf support, removable
10
Shelf positions
11
ENGLISH
7
4.2 Accessories
Nonstick wire shelf
For roasting and grilling.
Use the trivet only with the
Grill- / Roasting pan.
Telescopic runners
For cookware, cake tins, roasts.
Nonstick grill- / Roasting pan
For shelves and trays.
To bake and roast or as a pan to collect
fat.
Nonstick trivet
8
www.aeg.com
5. BEFORE FIRST USE
WARNING!
Refer to Safety chapters.
5.1 Initial Cleaning
Remove all accessories and removable
shelf supports from the appliance.
Refer to "Care and
cleaning" chapter.
Clean the appliance and the accessories
before first use.
Put the accessories and the removable
shelf supports back to their initial
position.
5.2 Setting the time
After the first connection to the mains, all
symbols in the display are on for some
seconds. For the subsequent few
seconds the display shows the software
version.
After the software version goes off, the
display shows
flashes.
6. DAILY USE
and "12:00". "12"
1. Press or to set the current
hour.
2. Press to confirm or the set hour
will be saved automatically after 5
seconds.
The display shows and the set
hour. "00" flashes.
3. Press or to set the current
minutes.
4. Press to confirm or the set
minutes will be saved automatically
after 5 seconds.
The display shows the new time.
5.3 Changing the time
You can change the time of day only if
the oven is off.
Press again and again until the
indicator for the time of day flashes in
the display.
To set a new time, refer to "Setting the
time".
WARNING!
Refer to Safety chapters.
6.1 Retractable knobs
To use the appliance, press the control
knob. The control knob comes out.
6.2 Activating and
deactivating the appliance
It depends on the model if
your appliance has lamps,
knob symbols or
indicators:
• The lamp comes on when
the appliance operates.
• The symbol shows
whether the knob
controls the oven
functions or the
temperature.
• The indicator comes on
when the oven heats up.
1. Turn the knob for the oven functions
to select an oven function.
2. Turn the knob for the temperature to
select a temperature.
3. To deactivate the appliance turn the
knobs for the oven functions and
temperature to the off position.
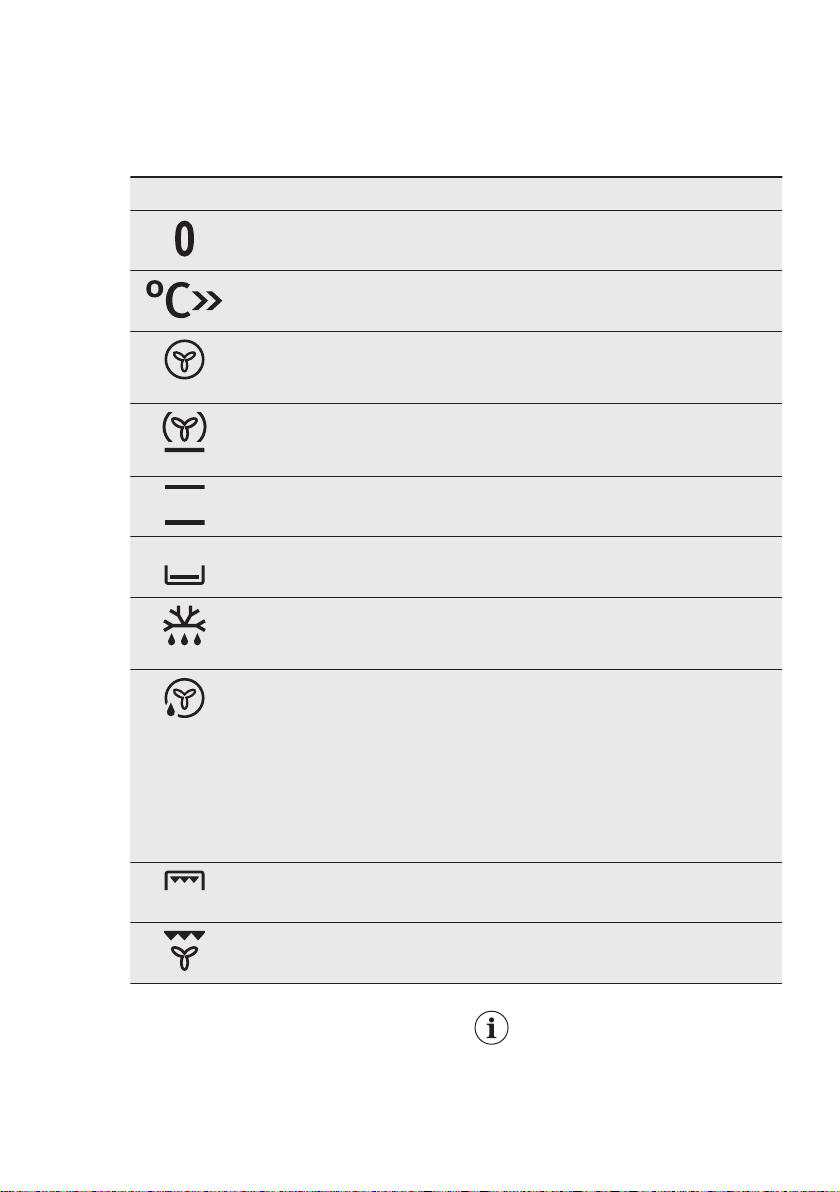
6.3 Oven functions
Oven function Application
Off position The appliance is off.
Fast Heat Up To decrease the heat-up time.
ENGLISH 9
True Fan Cooking
Pizza Setting To bake food on one shelf position for a more intensive
Top / Bottom
Heat
Bottom Heat To bake cakes with crispy bottom and to preserve food.
Defrost This function can be used for defrosting frozen foods,
Moist Fan Baking To prepare baked goods in tin on one shelf position.
Grilling To grill flat food and to toast bread.
To bake on up to three shelf positions at the same time
and to dry food. Set the temperature 20 - 40 °C lower
than for Top / Bottom Heat.
browning and a crispy bottom. Set the temperature 20
- 40 °C lower than for Top / Bottom Heat.
To bake and roast food on one shelf position.
such as vegetables and fruits. The defrosting time depends on the amount and size of the frozen food.
To save energy during cooking. This function must be
used in accordance with the cooking tables in order to
achieve the desired cooking result. To get more information about the recommended settings, refer to the
cooking tables. This function was used to define the
energy efficiency class acc. to EN 60350-1.
To get more information about the recommended settings, refer to the cooking tables.
Turbo Grilling To roast larger meat joints or poultry with bones on
one shelf position. Also to make gratins and to brown.
6.4 Fast heat up function
The fast heat up function decreases the
heat up time.
Do not put food in the oven
when the Fast heat up
function operates.
1. Set the fast heat up function. Refer to
the Oven functions table.
A B C
D
EFG
www.aeg.com10
2. Turn the knob for the temperature to
set the temperature.
An acoustic signal sounds when the
appliance is at the set temperature.
The fast heat up function
does not deactivate after the
acoustic signal. You must
deactivate the function
manually.
3. Set an oven function.
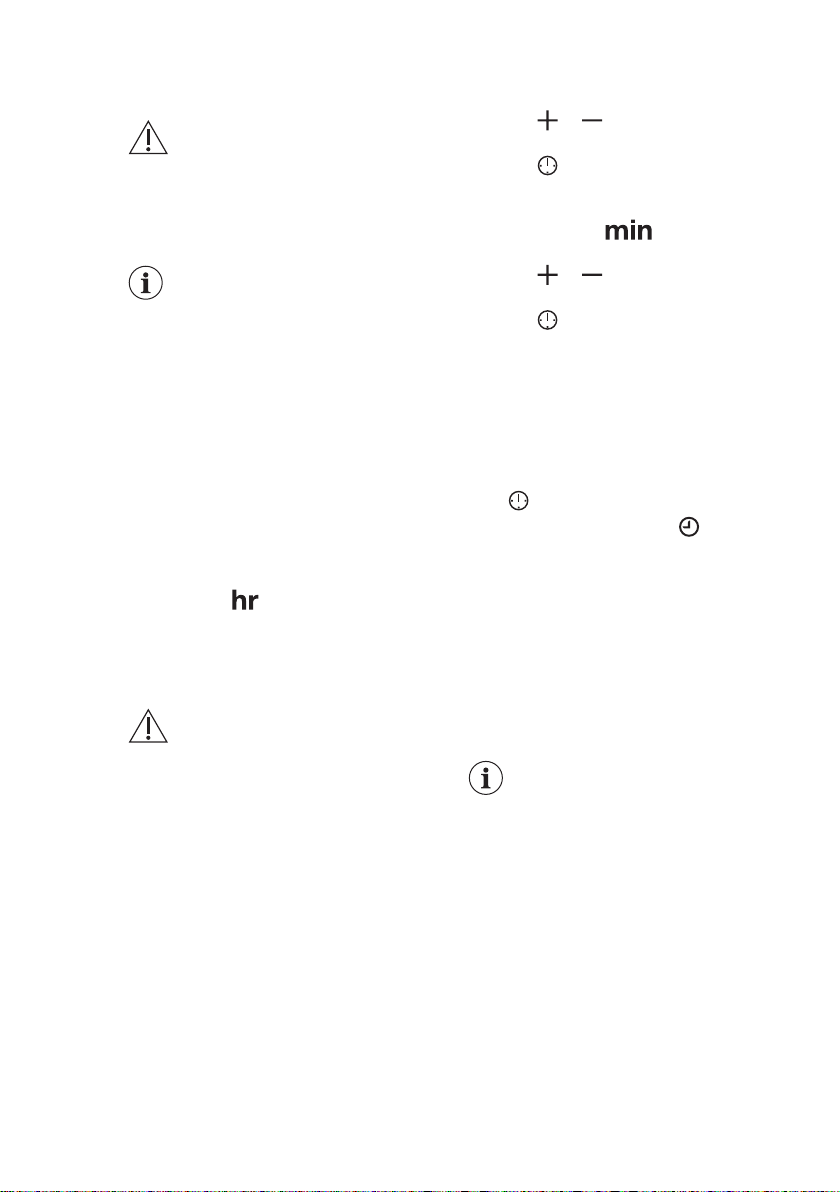
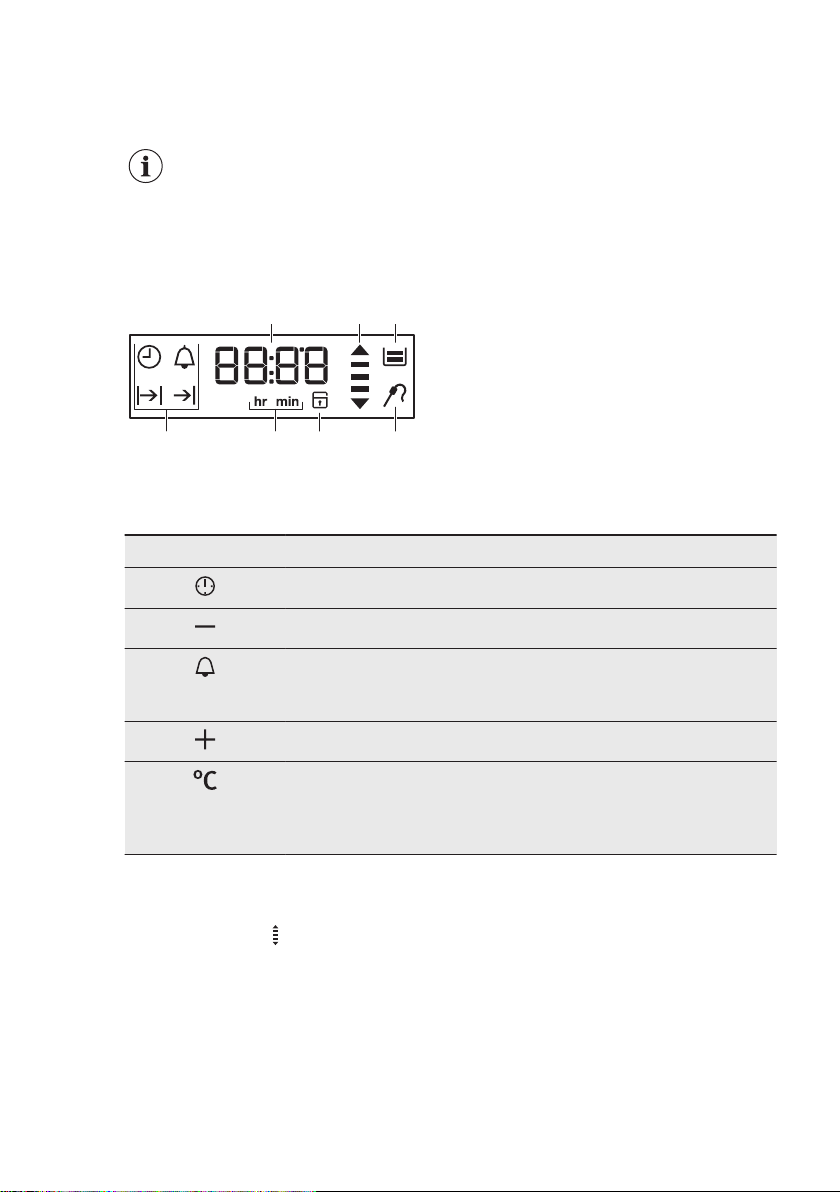
6.5 Display
A. Timer
B. Heat-up and residual heat indicator
C. Water drawer (selected models only)
D. Core temperature sensor (selected
models only)
E. Door lock (selected models only)
F. Hours / minutes
G. Clock functions
6.6 Buttons
Button Function Description
CLOCK To set a clock function.
MINUS To set the time.
MINUTE MINDER To set the MINUTE MINDER. Hold the
PLUS To set the time.
TEMPERATURE To check the oven temperature or the
6.7 Heat-up indicator
When you activate an oven function, the
bars in the display come on one by
button for more than 3 seconds to activate or deactivate the oven lamp.
temperature of the core temperature sensor (if applicable). Use only while an oven
function is in operation.
one. The bars show that the oven
temperature increases or decreases.
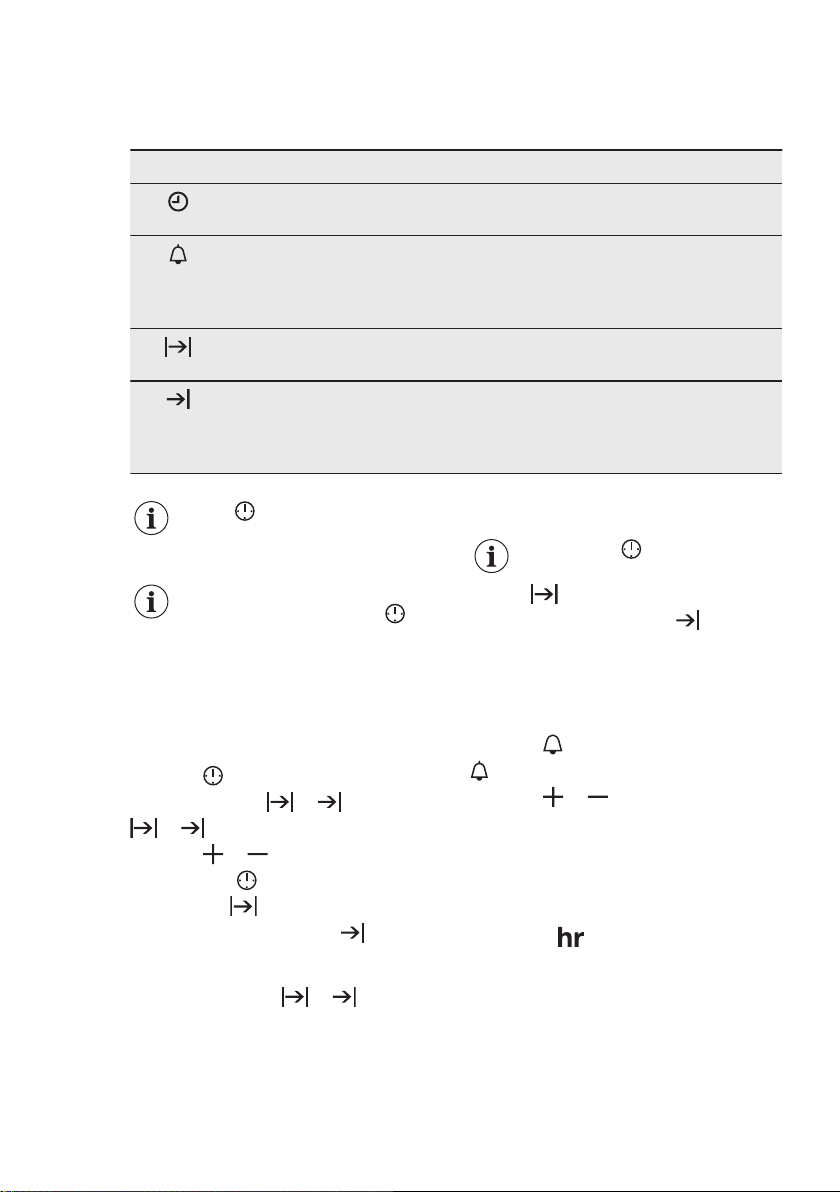
7. CLOCK FUNCTIONS
7.1 Clock functions table
Clock function Application
TIME OF DAY To set, change or check the time of day. Refer to "Set-
MINUTE MINDER Use to set a countdown time (maximum 23 h 59 min).
DURATION To set how long the appliance operates. Use only when
END To set when the appliance must deactivate. Use only
ENGLISH
ting the time".
This function has no effect on the operation of the appliance. You can set the MINUTE MINDER at any time,
also if the appliance is off.
an oven function is set.
when an oven function is set. You can use Duration and
End at the same time (time delay), if the appliance is to
be activate and deactivate automatically later.
11
Press again and again to
switch between the clock
functions.
To confirm the settings of
the clock functions, press
or wait 5 seconds for an
automatic confirmation.
7.2 Setting the DURATION or END
1. Set an oven function.
2. Press again and again until the
display shows
or flashes in the display.
3. Press
and press to confirm.
For Duration first you set the minutes
and then the hours, for End first you
set the hours and then the minutes.
An acoustic signal sounds for 2 minutes
after the time ends.
and time setting flash in the display. The
oven stops.
4. Press any button to stop the acoustic
signal.
or to the set the values
or .
or symbol
5. Turn the knob for the oven functions
to the off position.
If you press when you set
the hours for DURATION
, the appliance goes to
setting of the END
function.
7.3 Setting the MINUTE MINDER
1. Press .
and "00" flash in the display.
2. Press or to set the MINUTE
MINDER.
First you set the seconds, then the
minutes and then the hours.
At first, the time is calculated in
minutes and seconds. When the time
you set is longer than 60 minutes, the
symbol comes on in the display.
The appliance now calculates the time in
hours and minutes.
3. The MINUTE MINDER starts
automatically after five seconds.
After 90% of the set time, an acoustic
signal sounds.
4. When the set time ends, an acoustic
signal sounds for two minutes.
 Loading...