

Page 1

Chapter 1:
User Guide
Copyright
Page 2

© 2005 Adobe Systems Incorporated. All rights reserved.
®
Encore® DVD 2.0 User Guide for Windows
Adobe
®
If this guide is distributed with software that includes an end user agreement, this guide, as well as the software described in it, is furnished under license and may be used or
copied only in accordance with the terms of such license. Except as permitted by any such license, no part of this guide may be reproduced, stored in a retrieval system, or transmitted, in any form or by any means, electronic, mechanical, recording, or other wise, without the prior written permission of Adobe Systems Incorporated.Pleasenotethatthe
content in this guide is protected under copyright law even if it is not distributed with software that includes an end user license agreement.
Thecontentofthisguideisfurnishedforinformationaluseonly,issubjecttochangewithoutnotice,andshouldnotbeconstruedasacommitmentbyAdobe Systems Incorporated. Adobe Systems Incorporated assumes no responsibility or liability for any errors or inaccuracies that may appear in the informational content contained in this guide.
Please remember that existing artwork or images that you may want to include in your project may be protected under copyright law. The unauthorized incorporation of such
material into your new work could be a violation of the rights of the copyright owner. Please be sure to obtain any permission required from the copyright owner.
Any references to company names in sample templates are for demonstration purposes only and are not intended to refer to any actual organization.
Adobe, the Adobe logo, Acrobat, Adobe Audition, Adobe Encore, Adobe Premiere, After Effects, Illustrator, InDesign, Photoshop, and Version Cue are either registered trademarks or trademarks of Adobe Systems Incorporated in the United States and/or other countries.
Dolby is a trademark of Dolby Laboratories. Microsoft and Windows are either registered trademarks ortrademarks of Microsoft Corporation in the United States and/or other
countries. All other trademarks are the property of their respective owners.
MPEG Layer 3 audio compression technology is licensed by Fraunhofer IIS and Thomson.
Proximity notices: © 1990 William Collins Sons & Co. Ltd. © 1990 all rights reserved, Proximity Technology, Inc.; © 1992 Hachette © 1992 all rights reserved, Proximity
Technology Inc.; © 1991 Dr. Llui de Yzaguirre i Maura © 1990 all rights reserved, Proximity Technology, Inc.; © 1990 IDE a.s. © 1990 all rights reserved, Proximity Technology,
Inc.; © 1995 Van Dale Lexicografie bv © 1996 all rights reserved, Proximity Technology, Inc.; © 1997 Bertelsmann Lexicon Verlang © 1997 all rights reserved, Proximity
Technology, Inc. © 1991 Text & Satz Datentechnik © 1991 all rights reserved, Proximity Technology, Inc.; © 1994 Franklin Electronic Publishers © 1994 all rights reserved,
Proximity Technology, Inc.; © 1990/1994 Merriam-Webster Inc./Franklin Electronic Publishers Inc. © 1994 all rights reserved, Proximity Technology, Inc.
Notice toU.S. Governmentend users: The Software and Documentationare “Commercial Items,” as thatterm is defined at 48C.F.R. §2.101,consisting of“Com mercia l Compu ter
Software” and “Commercial Computer Software Documentation,” as such terms are used in 48 C.F.R. §12.212 or 48 C.F.R. §227.7202, as applicable. Consistent with 48 C.F.R.
§12.212 or 48 C.F.R. §§227.7202-1 through 227.7202-4, as applicable, the Commercial Computer Software and Commercial Computer Software Documentation are being
licensed to U.S. Government end users (a) only as Commercial Items and (b) with only those rights as are granted to all other end users pursuant to the terms and conditions
herein. Unpublished-rights reserved under the copyright laws of the United States. Adobe agrees to comply with all applicable equal opportunity laws including, if appropriate,
the provisions of Executive Order 11246, as amended, Section 402 of the Vietnam Era Veterans Readjustment Assistance Act of 1974 (38 USC 4212), and Section 503 of the
Rehabilitation Act of 1973, as amended, and the regulations at 41 CFR Parts 60-1 through 60-60, 60-250, and 60-741. The affirmative action clause and regulations contained in
the preceding sentence shall be incorporated by reference.
Adobe Systems Incorporated, 345 Park Avenue, San Jose, California 95110, USA.
Page 3

Contents
Chapter 1: Getting started
Installation and registration . . . . . . . . . . . . . . . . . . . . . . . . . . . . . . . . . . . . . . . . . . . . . . . . . . . . . . . . . . . . . . . 1
Adobe Help Center . . . . . . . . . . . . . . . . . . . . . . . . . . . . . . . . . . . . . . . . . . . . . . . . . . . . . . . . . . . . . . . . . . . . . . . 2
Using Help . . . . . . . . . . . . . . . . . . . . . . . . . . . . . . . . . . . . . . . . . . . . . . . . . . . . . . . . . . . . . . . . . . . . . . . . . . . . . . . . 3
Tips, training, and other resources . . . . . . . . . . . . . . . . . . . . . . . . . . . . . . . . . . . . . . . . . . . . . . . . . . . . . . . . . 5
New features . . . . . . . . . . . . . . . . . . . . . . . . . . . . . . . . . . . . . . . . . . . . . . . . . . . . . . . . . . . . . . . . . . . . . . . . . . . . . 8
Chapter 2: Workflow and workspace
Workflow and workspace basics . . . . . . . . . . . . . . . . . . . . . . . . . . . . . . . . . . . . . . . . . . . . . . . . . . . . . . . . . . . 9
Customizing the workspace . . . . . . . . . . . . . . . . . . . . . . . . . . . . . . . . . . . . . . . . . . . . . . . . . . . . . . . . . . . . . . 17
Predefined workspaces . . . . . . . . . . . . . . . . . . . . . . . . . . . . . . . . . . . . . . . . . . . . . . . . . . . . . . . . . . . . . . . . . . 20
Chapter 3: Planning the project
Planning the DVD . . . . . . . . . . . . . . . . . . . . . . . . . . . . . . . . . . . . . . . . . . . . . . . . . . . . . . . . . . . . . . . . . . . . . . . . 22
Balancing file size and quality . . . . . . . . . . . . . . . . . . . . . . . . . . . . . . . . . . . . . . . . . . . . . . . . . . . . . . . . . . . . 23
Bit budgeting . . . . . . . . . . . . . . . . . . . . . . . . . . . . . . . . . . . . . . . . . . . . . . . . . . . . . . . . . . . . . . . . . . . . . . . . . . . . 26
Transcoding . . . . . . . . . . . . . . . . . . . . . . . . . . . . . . . . . . . . . . . . . . . . . . . . . . . . . . . . . . . . . . . . . . . . . . . . . . . . . 28
Presets . . . . . . . . . . . . . . . . . . . . . . . . . . . . . . . . . . . . . . . . . . . . . . . . . . . . . . . . . . . . . . . . . . . . . . . . . . . . . . . . . . 30
iii
Chapter 4: Adobe Bridge and Stock Photos
The basics of Bridge . . . . . . . . . . . . . . . . . . . . . . . . . . . . . . . . . . . . . . . . . . . . . . . . . . . . . . . . . . . . . . . . . . . . . . 34
Files and folders in Bridge . . . . . . . . . . . . . . . . . . . . . . . . . . . . . . . . . . . . . . . . . . . . . . . . . . . . . . . . . . . . . . . . 39
Running automated tasks with Bridge . . . . . . . . . . . . . . . . . . . . . . . . . . . . . . . . . . . . . . . . . . . . . . . . . . . . 44
Metadata in Bridge . . . . . . . . . . . . . . . . . . . . . . . . . . . . . . . . . . . . . . . . . . . . . . . . . . . . . . . . . . . . . . . . . . . . . . . 45
Adobe Stock Photos . . . . . . . . . . . . . . . . . . . . . . . . . . . . . . . . . . . . . . . . . . . . . . . . . . . . . . . . . . . . . . . . . . . . . 50
Comp images . . . . . . . . . . . . . . . . . . . . . . . . . . . . . . . . . . . . . . . . . . . . . . . . . . . . . . . . . . . . . . . . . . . . . . . . . . . . 53
Buying stock photos . . . . . . . . . . . . . . . . . . . . . . . . . . . . . . . . . . . . . . . . . . . . . . . . . . . . . . . . . . . . . . . . . . . . . 53
Stock Photos Accounts . . . . . . . . . . . . . . . . . . . . . . . . . . . . . . . . . . . . . . . . . . . . . . . . . . . . . . . . . . . . . . . . . . . 55
Chapter 5: Creating projects and importing assets
Working with projects . . . . . . . . . . . . . . . . . . . . . . . . . . . . . . . . . . . . . . . . . . . . . . . . . . . . . . . . . . . . . . . . . . . . 59
Aspect ratios . . . . . . . . . . . . . . . . . . . . . . . . . . . . . . . . . . . . . . . . . . . . . . . . . . . . . . . . . . . . . . . . . . . . . . . . . . . . . 60
Importing . . . . . . . . . . . . . . . . . . . . . . . . . . . . . . . . . . . . . . . . . . . . . . . . . . . . . . . . . . . . . . . . . . . . . . . . . . . . . . . 63
Adobe Dynamic Link . . . . . . . . . . . . . . . . . . . . . . . . . . . . . . . . . . . . . . . . . . . . . . . . . . . . . . . . . . . . . . . . . . . . . 67
XMP metadata . . . . . . . . . . . . . . . . . . . . . . . . . . . . . . . . . . . . . . . . . . . . . . . . . . . . . . . . . . . . . . . . . . . . . . . . . . . 71
Working in the Project panel . . . . . . . . . . . . . . . . . . . . . . . . . . . . . . . . . . . . . . . . . . . . . . . . . . . . . . . . . . . . . 72
Chapter 6: Menus
Menu basics . . . . . . . . . . . . . . . . . . . . . . . . . . . . . . . . . . . . . . . . . . . . . . . . . . . . . . . . . . . . . . . . . . . . . . . . . . . . . 75
Creating menus . . . . . . . . . . . . . . . . . . . . . . . . . . . . . . . . . . . . . . . . . . . . . . . . . . . . . . . . . . . . . . . . . . . . . . . . . . 81
Adding objects to menus . . . . . . . . . . . . . . . . . . . . . . . . . . . . . . . . . . . . . . . . . . . . . . . . . . . . . . . . . . . . . . . . 83
Editing menu objects . . . . . . . . . . . . . . . . . . . . . . . . . . . . . . . . . . . . . . . . . . . . . . . . . . . . . . . . . . . . . . . . . . . . 85
Transforming menu objects . . . . . . . . . . . . . . . . . . . . . . . . . . . . . . . . . . . . . . . . . . . . . . . . . . . . . . . . . . . . . . 88
Page 4

Predefined styles . . . . . . . . . . . . . . . . . . . . . . . . . . . . . . . . . . . . . . . . . . . . . . . . . . . . . . . . . . . . . . . . . . . . . . . . 92
Using guides in menus . . . . . . . . . . . . . . . . . . . . . . . . . . . . . . . . . . . . . . . . . . . . . . . . . . . . . . . . . . . . . . . . . . . 94
Adding text to menus . . . . . . . . . . . . . . . . . . . . . . . . . . . . . . . . . . . . . . . . . . . . . . . . . . . . . . . . . . . . . . . . . . . . 95
Chapter 7: Menus: Beyond the basics
Motion menus . . . . . . . . . . . . . . . . . . . . . . . . . . . . . . . . . . . . . . . . . . . . . . . . . . . . . . . . . . . . . . . . . . . . . . . . . . 103
Video thumbnail buttons . . . . . . . . . . . . . . . . . . . . . . . . . . . . . . . . . . . . . . . . . . . . . . . . . . . . . . . . . . . . . . . . 104
Menu display time and looping . . . . . . . . . . . . . . . . . . . . . . . . . . . . . . . . . . . . . . . . . . . . . . . . . . . . . . . . . . 107
Menu templates . . . . . . . . . . . . . . . . . . . . . . . . . . . . . . . . . . . . . . . . . . . . . . . . . . . . . . . . . . . . . . . . . . . . . . . . 109
Replacement layers . . . . . . . . . . . . . . . . . . . . . . . . . . . . . . . . . . . . . . . . . . . . . . . . . . . . . . . . . . . . . . . . . . . . . 111
Chapter indexes . . . . . . . . . . . . . . . . . . . . . . . . . . . . . . . . . . . . . . . . . . . . . . . . . . . . . . . . . . . . . . . . . . . . . . . . 112
Using Photoshop to create menus . . . . . . . . . . . . . . . . . . . . . . . . . . . . . . . . . . . . . . . . . . . . . . . . . . . . . . . 114
Using After Effects to enhance menus . . . . . . . . . . . . . . . . . . . . . . . . . . . . . . . . . . . . . . . . . . . . . . . . . . .118
Creating button subpictures in Adobe Encore DVD . . . . . . . . . . . . . . . . . . . . . . . . . . . . . . . . . . . . . . . 120
Creating subpictures outside Adobe Encore DVD . . . . . . . . . . . . . . . . . . . . . . . . . . . . . . . . . . . . . . . .122
Menu color sets . . . . . . . . . . . . . . . . . . . . . . . . . . . . . . . . . . . . . . . . . . . . . . . . . . . . . . . . . . . . . . . . . . . . . . . . .125
Setting remote control buttons . . . . . . . . . . . . . . . . . . . . . . . . . . . . . . . . . . . . . . . . . . . . . . . . . . . . . . . . . . 129
Creating styles for menu elements . . . . . . . . . . . . . . . . . . . . . . . . . . . . . . . . . . . . . . . . . . . . . . . . . . . . . . . 130
iv
Chapter 8: Timelines
Timeline basics . . . . . . . . . . . . . . . . . . . . . . . . . . . . . . . . . . . . . . . . . . . . . . . . . . . . . . . . . . . . . . . . . . . . . . . . . 133
Adding assets to timelines . . . . . . . . . . . . . . . . . . . . . . . . . . . . . . . . . . . . . . . . . . . . . . . . . . . . . . . . . . . . . . 136
Moving around in the timeline . . . . . . . . . . . . . . . . . . . . . . . . . . . . . . . . . . . . . . . . . . . . . . . . . . . . . . . . . . 137
Chapter points . . . . . . . . . . . . . . . . . . . . . . . . . . . . . . . . . . . . . . . . . . . . . . . . . . . . . . . . . . . . . . . . . . . . . . . . . . 139
Editing assets in timelines . . . . . . . . . . . . . . . . . . . . . . . . . . . . . . . . . . . . . . . . . . . . . . . . . . . . . . . . . . . . . . . 141
Chapter 9: Slide shows
Slide show basics . . . . . . . . . . . . . . . . . . . . . . . . . . . . . . . . . . . . . . . . . . . . . . . . . . . . . . . . . . . . . . . . . . . . . . . 146
Formatting slide shows . . . . . . . . . . . . . . . . . . . . . . . . . . . . . . . . . . . . . . . . . . . . . . . . . . . . . . . . . . . . . . . . . 148
Chapter 10: Working with multiple audio and subtitle tracks
Audio and subtitle basics . . . . . . . . . . . . . . . . . . . . . . . . . . . . . . . . . . . . . . . . . . . . . . . . . . . . . . . . . . . . . . . . 152
Audio clips . . . . . . . . . . . . . . . . . . . . . . . . . . . . . . . . . . . . . . . . . . . . . . . . . . . . . . . . . . . . . . . . . . . . . . . . . . . . . 153
Subtitle basics . . . . . . . . . . . . . . . . . . . . . . . . . . . . . . . . . . . . . . . . . . . . . . . . . . . . . . . . . . . . . . . . . . . . . . . . . . 154
Importing subtitles . . . . . . . . . . . . . . . . . . . . . . . . . . . . . . . . . . . . . . . . . . . . . . . . . . . . . . . . . . . . . . . . . . . . . 158
Creating and editing script files . . . . . . . . . . . . . . . . . . . . . . . . . . . . . . . . . . . . . . . . . . . . . . . . . . . . . . . . . . 162
Subtitle colors . . . . . . . . . . . . . . . . . . . . . . . . . . . . . . . . . . . . . . . . . . . . . . . . . . . . . . . . . . . . . . . . . . . . . . . . . . 165
Setting navigation to select audio and subtitle tracks . . . . . . . . . . . . . . . . . . . . . . . . . . . . . . . . . . . . 167
Closed captions basics . . . . . . . . . . . . . . . . . . . . . . . . . . . . . . . . . . . . . . . . . . . . . . . . . . . . . . . . . . . . . . . . . . 169
Chapter 11: Creating and managing links
Understanding navigation . . . . . . . . . . . . . . . . . . . . . . . . . . . . . . . . . . . . . . . . . . . . . . . . . . . . . . . . . . . . . . 170
Setting navigation and properties . . . . . . . . . . . . . . . . . . . . . . . . . . . . . . . . . . . . . . . . . . . . . . . . . . . . . . . 172
Working with playlists and chapter playlists . . . . . . . . . . . . . . . . . . . . . . . . . . . . . . . . . . . . . . . . . . . . . . 175
Managing links and modifying elements . . . . . . . . . . . . . . . . . . . . . . . . . . . . . . . . . . . . . . . . . . . . . . . . . 178
Working in the Flowchart . . . . . . . . . . . . . . . . . . . . . . . . . . . . . . . . . . . . . . . . . . . . . . . . . . . . . . . . . . . . . . . 179
User operations . . . . . . . . . . . . . . . . . . . . . . . . . . . . . . . . . . . . . . . . . . . . . . . . . . . . . . . . . . . . . . . . . . . . . . . . .184
Page 5

Chapter 12: Testing and building DVDs
Testing DVD projects . . . . . . . . . . . . . . . . . . . . . . . . . . . . . . . . . . . . . . . . . . . . . . . . . . . . . . . . . . . . . . . . . . . .186
Security and additional content . . . . . . . . . . . . . . . . . . . . . . . . . . . . . . . . . . . . . . . . . . . . . . . . . . . . . . . . . 190
Building the finished project . . . . . . . . . . . . . . . . . . . . . . . . . . . . . . . . . . . . . . . . . . . . . . . . . . . . . . . . . . . . 192
Chapter 13: Keyboard shortcuts
Using keyboard shortcuts . . . . . . . . . . . . . . . . . . . . . . . . . . . . . . . . . . . . . . . . . . . . . . . . . . . . . . . . . . . . . . . 195
Index . . . . . . . . . . . . . . . . . . . . . . . . . . . . . . . . . . . . . . . . . . . . . . . . . . . . . . . . . . . . . . . . . . . . . . . . . . . . . . . . . . 200
v
Page 6

Chapter 1: Getting started
Installation and registration
To install
1 Close any Adobe
2 Insert the product disc into your computer’s DVD drive.
3 Double-click the disc icon, and then follow the on-screen instructions.
After installing the product for the first time on a computer, you will be prompted to activate your copy of the
product. (See “To activate” on page 1.)
For more detailed instructions for installing or uninstalling the product, see the ReadMe file on the product disc.
To activate
Activation is a simple, anonymous process that you must complete within 30 days of installing the product.
Activation allows you to continue using the product, and it helps prevent casual copying of the product onto more
computersthanthelicenseagreementallows.Afteryouhaveinstalledtheproductforthefirsttimeonacomputer,
the Activation dialog box opens, prompting you to activate your copy of the product.
®
applications that are open.
1
1 If the Activation dialog box is not already open, start the product and choose Help > Activate.
2 Follow the on-screen instructions.
Important: If you want to install the product on a different computer, you must first transfer the activation to that
computer. To transfer an activation, choose Help > Transfer Activation.
To learn more about activation, visit the Adobe website at
www.adobe.com/activation/main.html.
To register
Register your Adobe product to receive complimentary support on installation and product defects and notifications
about product updates.
Registering your product also gives you access to the wealth of tips, tricks, and tutorials in Resource Center and
access to Adobe Studio Exchange, an online community where users download and share thousands of free actions,
plug-ins, and other content for use with Adobe products.
Note: An active Internet connection is required for registration.
The Registration dialog box may open after activation, prompting you to register your copy of the product.
1 If the Registration dialog box is not already open, start the product and choose Help > Registration.
2 Follow the on-screen instructions.
See also
“Resource Center” on page 6
Page 7

ADOBE ENCORE DVD 2.0
User Guide
Adobe Help Center
About Adobe Help Center
Adobe® Help Center is a free, downloadable application that includes three primary features.
Product Help Provides Help for Adobe desktop products installed on your system. (If no Adobe desktop products
are installed, topics for them aren’t available.) Help topics are updated periodically and can be downloaded through
Adobe Help Center preferences. For the products you’ve installed, Product Help also provides dynamic listings of
the top support issues and the most recent support documents published on Adobe.com.
Expert Support Provides information about Adobe Expert Support plans and lets you store details about plans
you’ve purchased. If you have an active support plan, you can also use the Expert Support section to submit web
cases—questions sent to Adobe support professionals over the web. To access links in the Expert Support section,
you must have an active Internet connection.
More Resources Provides easy access to the extensive resources on Adobe.com, including support pages, user
forums, tips andtutorials, andtraining. You can also use this areato storecontact information for friends,colleagues,
or support professionals, or even websites you turn to for inspiration or troubleshooting information.
See also
“Using Help” on page 3
2
“To search Help topics” on page 4
“To navigate Help” on page 4
“To view support documents” on page 3
To check for updates
Adobe periodically provides updates to software and to topics in Adobe Help Center. You can easily obtain these
updates through Adobe Help Center. An active Internet connection is required.
1 Click the Preferences button in the top-right corner.
2 In the Preferences dialog box, click Check For Updates. If updates are available, follow the on-screen directions to
download and save them.
You can also check for updates from within many Adobe applications by choosing Help > Updates.
To set Adobe Help Center preferences
1 Click the Preferences button in the top-right corner.
2 Set any of the following options, and click OK.
Region Specifies your geographical location. Changing this option may affect which services are available to you.
Language Specifies the language in which Expert Support content is displayed.
Display Renewal Reminders For Expert Support Contracts Displays reminder screens when your Expert Support
plan has almost expired. Deselect this option if you’d like to turn off these reminders.
Enable Auto Login For Web Case Submission Allows you to submit support questions over the web. This option is
available only if you have an active Expert Support plan.
Page 8

ADOBE ENCORE DVD 2.0
User Guide
User Interface Language Specifies the language in which Adobe Help Center interface text is displayed.
Check For Updates Searches for new updates to software and Help topics as they become available from Adobe. This
option also lets you specify notification options and choose which applications to update.
Network Administrators Displays options for network administration.
To view support documents
From within Adobe Help Center, you can get up-to-the-minute listings of the top support issues and the most recent
documents added to the support knowledgebase. Each time you start Adobe Help Center, it uses RSS (Really Simple
Syndication) technology to gather this information from the Adobe website and update the listings dynamically.
1 In Adobe Help Center, click Product Help and select a product from the For menu.
2 Click the Contents tab in the navigation pane, and do either of the following:
• Click Recent Documents to display a summary of the most recent documents for the selected product.
• Click Top Issues to display a summary of the top issues documents for the selected product.
3 To view a document in full on the Adobe website, click its link. (An active Internet connection is required.)
To display More Resources
The More Resources section in Adobe Help Centerprovides easy accessto some of the content andservices available
from the Adobe website, including support, training, tutorials, and forums.
3
❖ To display this section, click More Resources.
To add contact information in More Resources
1 Click More Resources, and then click Personal Contacts.
2 Do any of the following:
• To add a contact, click New, type the contact information you want to save, and click OK.
• To edit a contact, click a contact in the list, click Edit, make changes to the information, and click OK.
• To delete a contact, click a contact in the list, and then click Delete. To confirm the deletion, click Yes.
Using Help
Using Help
The complete documentation for using your Adobe product is available in Help, a browser-based system you can
access through Adobe Help Center. Help topics are updated periodically, so you can always be sure to have the most
recent information available. For details, see “To check for updates” on page 2.
Important: Adobe Help systems include all of the information in the printed user guides, plus additional information
not included in print. A PDF version of the complete Help content, optimized for printing, is also provided on the CD or
DVD in the product box.
Page 9

ADOBE ENCORE DVD 2.0
User Guide
See also
“To navigate Help” on page 4
“To search Help topics” on page 4
To navigate Help
❖ Do any of the following:
• To view Help for a product, choose the product name from the For menu.
• To expand or collapse a section, click the blue triangle to the left of the section name.
• To display a topic, click its title.
See also
“To use bookmarks” on page 5
To search Help topics
Search using words or phrases to quickly find topics. You can search Help for one product or for all Adobe products
you’ve installed. If you find a topic that you may want to view again, bookmark it for quick retrieval.
4
1 In Adobe Help Center, click Product Help, and choose a product from the For menu.
2 Type one or more words in the Search For box, and choose an option from the In menu:
This Product Searches Help for the selected product.
All Products Searches Help for all Adobe products you have installed.
3 Click Search. Topics matching the search words appear in the navigation pane, grouped by product and listed in
order of relevance.
4 To view a topic, click its title.
5 To return to the navigation pane, do one of the following:
• Click the Home button.
• Click the Back button.
• Click Next Topic or Previous Topic.
See also
“To print a topic from Help” on page 5
“To use bookmarks” on page 5
Search tips
The search feature in Adobe Help Center works by searching the entire Help text for topics that contain any of the
words typed in the Search For box. These tips can help you improve your search results in Help:
• If you search using a phrase, such as “shape tool,” put quotation marks around the phrase. The search returns only
those topics containing all words in the phrase.
• Make sure that the search terms are spelled correctly.
Page 10

ADOBE ENCORE DVD 2.0
User Guide
• If a search term doesn’t yield results, try using a synonym, such as “web” instead of “Internet.”
To print a topic from Help
1 Select the topic you want to print, and click the Print button.
2 Choose the printer you’d like to use, and then click Print.
To change the view
By default, Adobe Help Center opens in Full view. Full view gives you access to the Product Help, Expert Support,
and More Resources sections. Switch to Compact view when you want to see only the selected Help topic and you
want to keep the Help window on top of your product workspace.
❖ Click the view icon to switch between Full and Compact views.
To use bookmarks
You can bookmark especially helpful topics for easy access, just as you bookmark pages in a web browser, and reread
them at another time.
• To view bookmarks, click the Bookmarks tab in the navigation pane.
• To create a bookmark, select the topic you want to mark, and click the Bookmark button . When the New
Bookmark dialog box appears, type a new name in the text box if desired, and then click OK.
• To delete a bookmark, select it in the Bookmarks pane, and click the Delete button. Click Yes to confirm the
deletion.
• To rename a bookmark, select it in the Bookmarks pane, and then click the Rename Bookmark button . In the
dialog box, type a new name for the bookmark and then click OK.
• To move a bookmark, select it in the Bookmarks pane, and then click the Move Up button or the Move Down
button .
5
Tips, training, and other resources
Learning resources
Adobe provides a wide range of resources to help you learn and use Adobe products.
• “Total Training Video Workshop DVD” on page 6: Professional training videos from experts.
• “Resource Center” on page 6: Videos, tips and tricks, and other learning material on Adobe products.
• “Other resources” on page 7: Training, books, user forums, product certification, and more.
• Support: Complimentary and paid technical support options from Adobe.
• “Extras and other downloads” on page 7: Other software and content.
See also
“About Adobe Help Center” on page 2
“Using Help” on page 3
Page 11
ADOBE ENCORE DVD 2.0
User Guide
Total Training Video Workshop DVD
Presented by experts in their fields, Total Training videos provide overviews, demonstrations of key new features,
and many useful tips and techniques for beginning and advanced users. Look for accompanying step-by-step
instructions to selected Total Training videos in monthly updates to Resource Center.
In addition to the Total Training Video Workshop DVD included with your software, short Total Training web
videos on a variety of products and topics are also available in Resource Center, and complete Total Training
courseware can be purchased online from the Adobe Store.
See also
“Resource Center” on page 6
Resource Center
Resource Center provides a wealth of tips, tricks, tutorials, and instructional content in video, PDF, and HTML
formats, authored by experts from Adobe and its publishing partners. You can search the entire collection or sort by
product, topic, date, and type of content; new content is added monthly. Resource Center is available in English,
French, German, and Japanese. Find it from the home page of the Adobe website.
6
Tips and tutorials in Resource Center
Forfreecontentandadd-ons,visitAdobeStudioExchange,anonlinecommunitywhereusersdownloadandshare
thousands of free actions, plug-ins, and other content for use with Adobe products. To visit Adobe Studio Exchange,
go to Resource Center from the home page of the Adobe website.
Page 12

ADOBE ENCORE DVD 2.0
User Guide
See also
“Total Training Video Workshop DVD” on page 6
“Other resources” on page 7
Other resources
Additional sources of information and help are available for Adobe products.
• Visit the Training area of the Adobe website for access to Adobe Press books; online, video, and instructor-led
training resources; Adobe software certification programs; and more.
• Visit the Adobe user forums, where users share tips, ask questions, and find out how others are getting the most
out of their software. User forums are available in English, French, German, and Japanese from the main Support
page of your local Adobe website.
• Visit the Support area of the Adobe website for additional information about free and paid technical support
options. Top issues are listed by product on the Adobe U.S. and Adobe Japan websites.
• ClickMoreResourcesinAdobeHelpCentertoaccessmanyoftheresourcesontheAdobewebsiteandtocreate
your own list of frequently visited user groups and websites and valuable contacts.
• For complete developer documentation and resources, visit the Developers area of the Adobe website at
http://partners.adobe.com/public/developer/main.html. For additional backgroundersand instructional content,
visit Resource Center.
7
Extras and other downloads
Your product includes Adobe Stock Photos, an integrated service available within Adobe Bridge that lets you search,
view, try, and buy royalty-free stock photography from leading stock libraries. Because of the tight integration
between Stock Photos and Adobe products, you can download images directly into your projects.
TheDownloadsareaoftheAdobewebsiteincludesfreeupdates,tryouts,andotherusefulsoftware.Inaddition,the
Plug-ins section of the Adobe Store provides access to thousands of plug-ins from third-party developers, helping
you automate tasks, customize workflows, create specialized professional effects, and more.
Adobe periodically provides downloadable updates to topics in Adobe Help Center and to Adobe Help Center
software itself.
See also
“About Adobe Bridge” on page 34
“About Adobe Stock Photos” on page 50
“Resource Center” on page 6
“Other resources” on page 7
“About Adobe Help Center” on page 2
Page 13

ADOBE ENCORE DVD 2.0
User Guide
New features
What’s new
Slideshow Editor Build and rearrange slide shows using the new Slideshow Editor. Define shows as browsable or
autoplay, with optional narration or background music for autoplay shows. Define global and override settings for
slide durations, slide end actions, pan-and-zoom effects, transitions, and subtitles. (See “About slide shows” on
page 146.)
Flowchart Define and view your DVD’s navigation using a visual flowchart representation of all points and links.
(See “About the Flowchart” on page 179.)
Automated chapter menus Create multipage submenus automatically from chapters or slide shows in your project.
(See “About chapter indexes” on page 112.)
Multiple clips on single timeline track Save time with easy assembly of multiple video and audio clips on a timeline.
There’s no need for a separate video editing application to achieve seamless playback of multiple clips.
Royalty-free templates and menu art Jump-start DVD menu creation using any of the royalty-free templates,
®
motion menus, and other artwork files included inAdobe Encore
panel” on page 81.)
DTS audio support Increase your options for the creation of surround-sound DVDs with newly added support for
DTS audio.
DVD 2.0. (See “To create a menu using theLibrary
8
Closed caption support Import line21 files to add closed captions to DVDs. Applies toNTSC titles only. (See “About
closed captions” on page 169.)
Add chapter points at intervals Use a single command to add chapter points at fixed intervals, enabling viewers to
skip quickly through content. (See “To add chapter points at intervals” on page 140.)
Workspace panels that dock and group Organize your desktop quickly with workspace panels that dock and group.
Movedivider lines between panels to adjust your layout quickly with no needto resizemultiple windows. (See “About
the Adobe workspace” on page 15.)
Adobe Bridge Browse, organize, and preview content files, and then drag what you need right from Adobe Bridge.
Search by or edit file information (XMP metadata) such as keywords, language, and format. (See “About Adobe
Bridge” on page 34.)
XMP metadata support Use XMP metadata to identify assets quickly or to automate tasks. View and edit XMP
metadatafrom withinthe Project panel inAdobeEncore DVD, or use metadata keywords to search for files inAdobe
Bridge. (See “About XMP metadata” on page 71.)
Chapter playlists Useplaylists to create differentplay orderswithout duplicating content.The disc spaceyou save by
using playlists may let you use lower compression and produce higher-quality video. (See “About playlists” on
page 175.)
Menu replacement layers Specify locations for graphic objects in a menu template by using replacement layers.
Objects dropped on a replacement layer scale to fit the size designated in the layer. (See “About replacement layers”
on page 111.)
Rotate tool Rotate objects in the Menu panel with fine control by using the new Rotate tool. (See “To rotate menu
objects” on page 88.)
Page 14
Chapter 2: Workflow and workspace
Workflow and workspace basics
Workflow overview
Adobe Encore DVD lets you create many different kinds of DVDs. Whether the content is a feature film, a wedding,
a training course, or an art collection, the basic steps of creating a DVD are the same.
Althoughthe orderof thetasks can vary somewhatfrom projectto project,DVD authoring with Adobe EncoreDVD
involves the following basic tasks:
Visit Resource Center on the Adobe website to view a tutorial detailing how to quickly create a DVD.
3a
9
12
3b
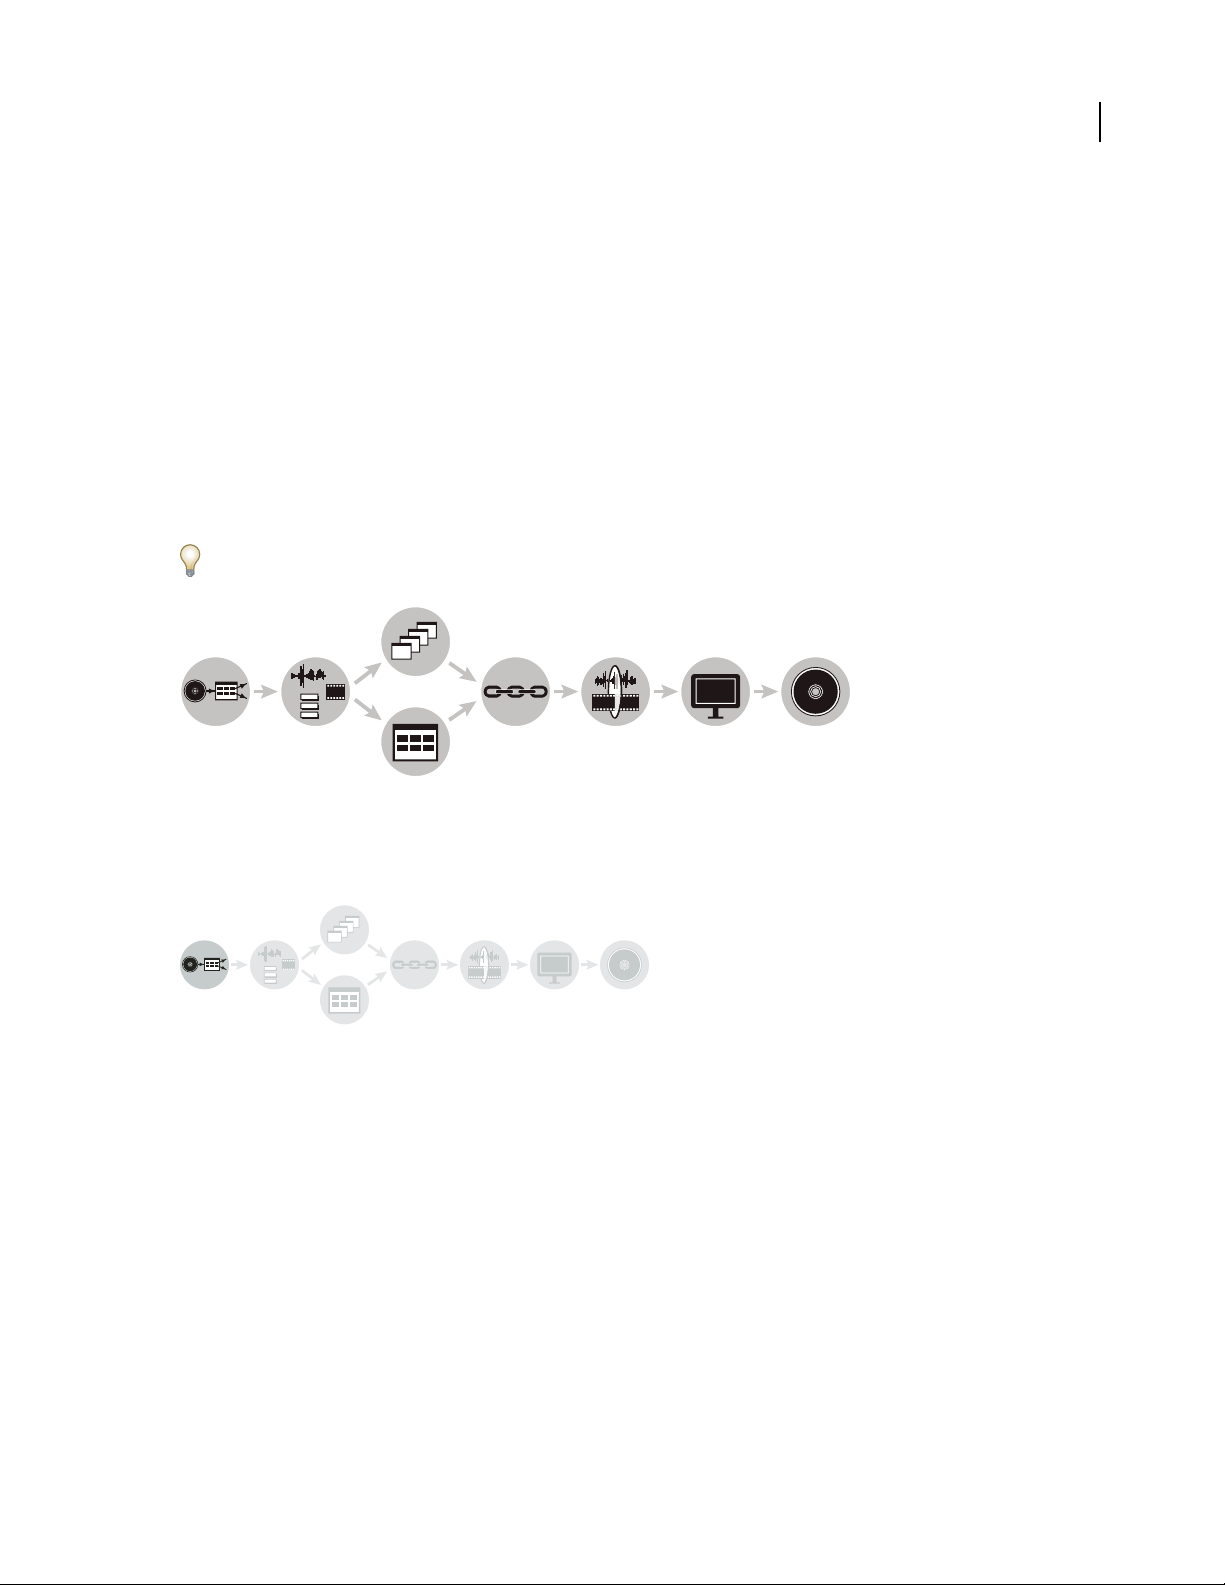
Encore DVD workflow
1. Plan project 2. Impor t 3a. Create DVD elements 3b. Create menus 4. Specify navigation 5. Tra ns co de 6. Preview 7. Burn
Plan the project
4
5
6
7
Regardless of the project's complexity, it is helpful to plan the content and flow of your DVD. Whether you sketch
each of the elements, create a flowchart, or use a spreadsheet to map the path through the content, drafting a
navigation scenario can help you clarify your ideas and anticipate problems before you start. For more information,
see “About planning” on page 22.
Page 15
ADOBE ENCORE DVD 2.0
User Guide
10
1
2
3
1a
2a
2b
2c
3a
3b
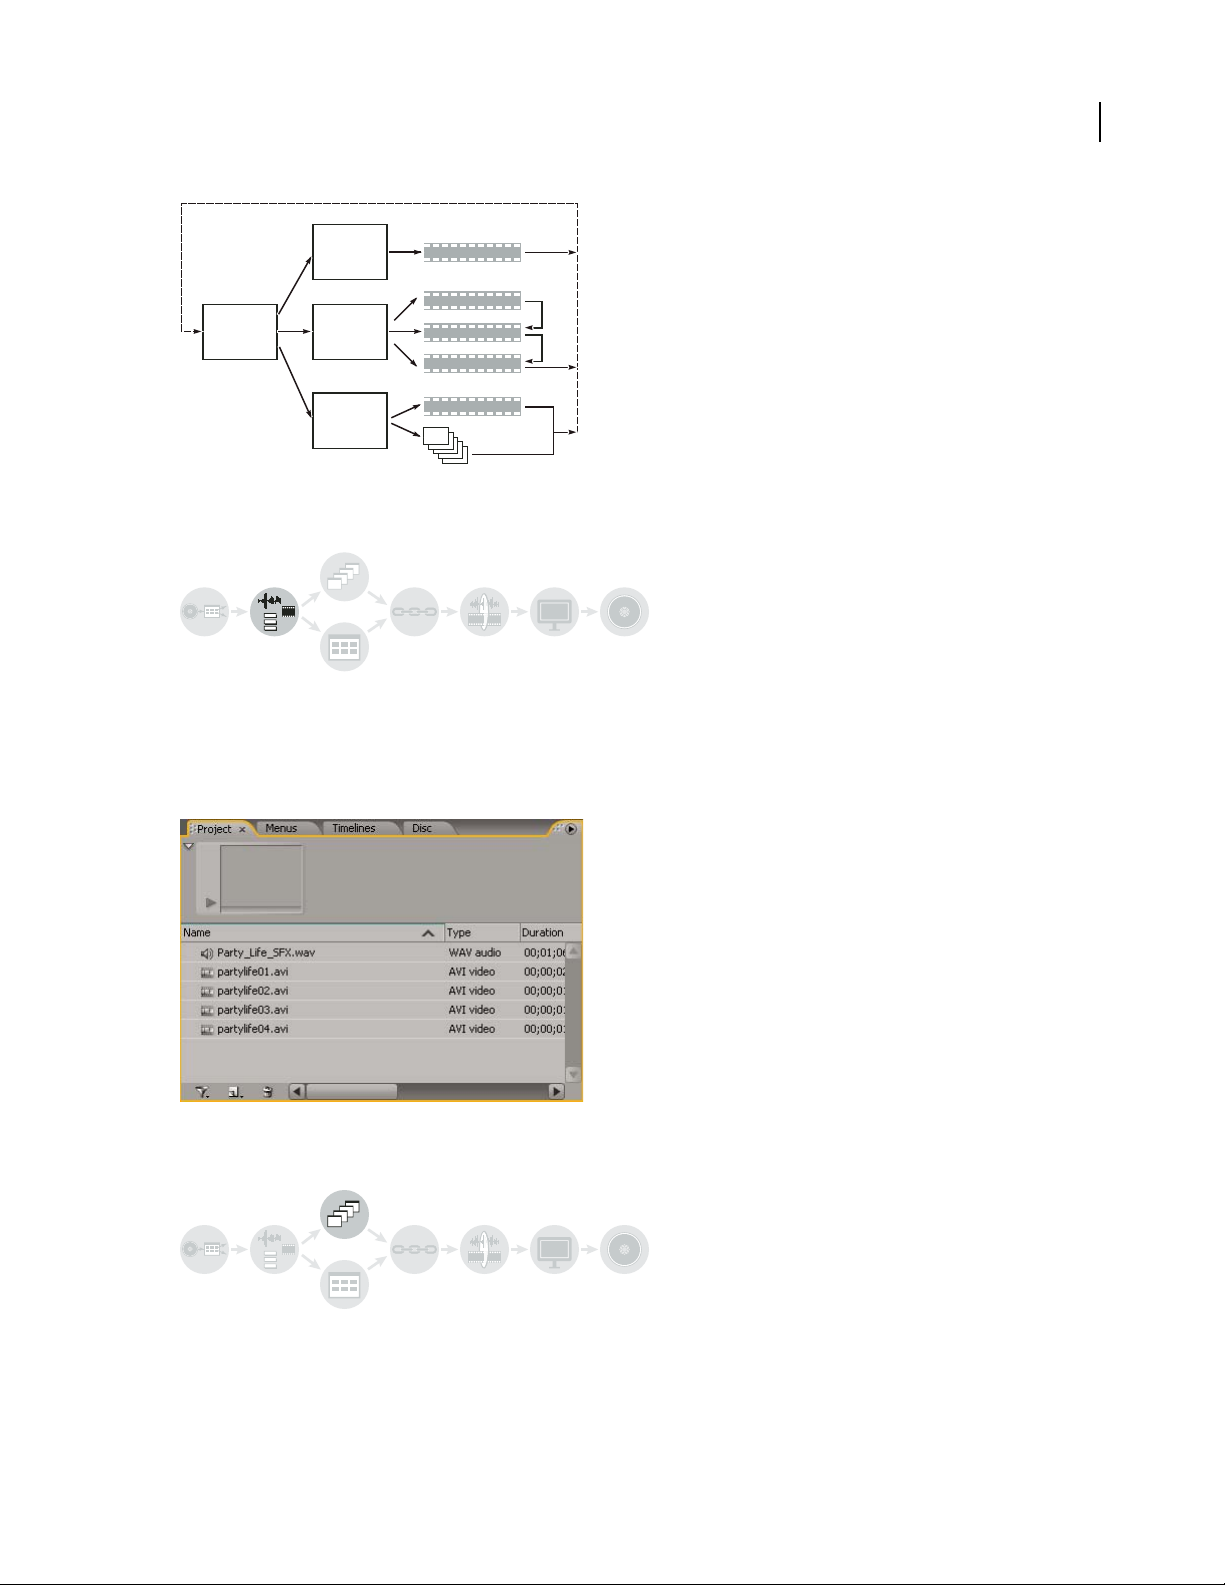
Simple sketch of intended navigation scheme
Import assets
Prepare your source material (assets) for the DVD, and import them into Adobe Encore DVD. The assets include
any video, still images, audio, and subtitles for your project. Before you import your content into Adobe Encore
DVD, combine video clips, add transitions, or create special effects in a video-editing or compositing application,
®
such as Adobe Premiere
as Adobe Audition
Pro or Adobe After Effects®. You can compile the audio in an audio-editing application, such
®
. For more information, see “To import an asset” on page 65.
Imported assets displayed in Project panel
Create DVD elements and add assets
A DVDincludes several elements types such as timelines andslide shows. Youadd assets to these elements to include
the assets in the project. Depending upon an asset’s type, you can add it to timelines, slide shows, playlists, and
chapter playlists. For more information, see “About timelines” on page 133, “About slide shows” on page 146, “About
playlists” on page 175, and “About chapter playlists” on page 177.
Page 16
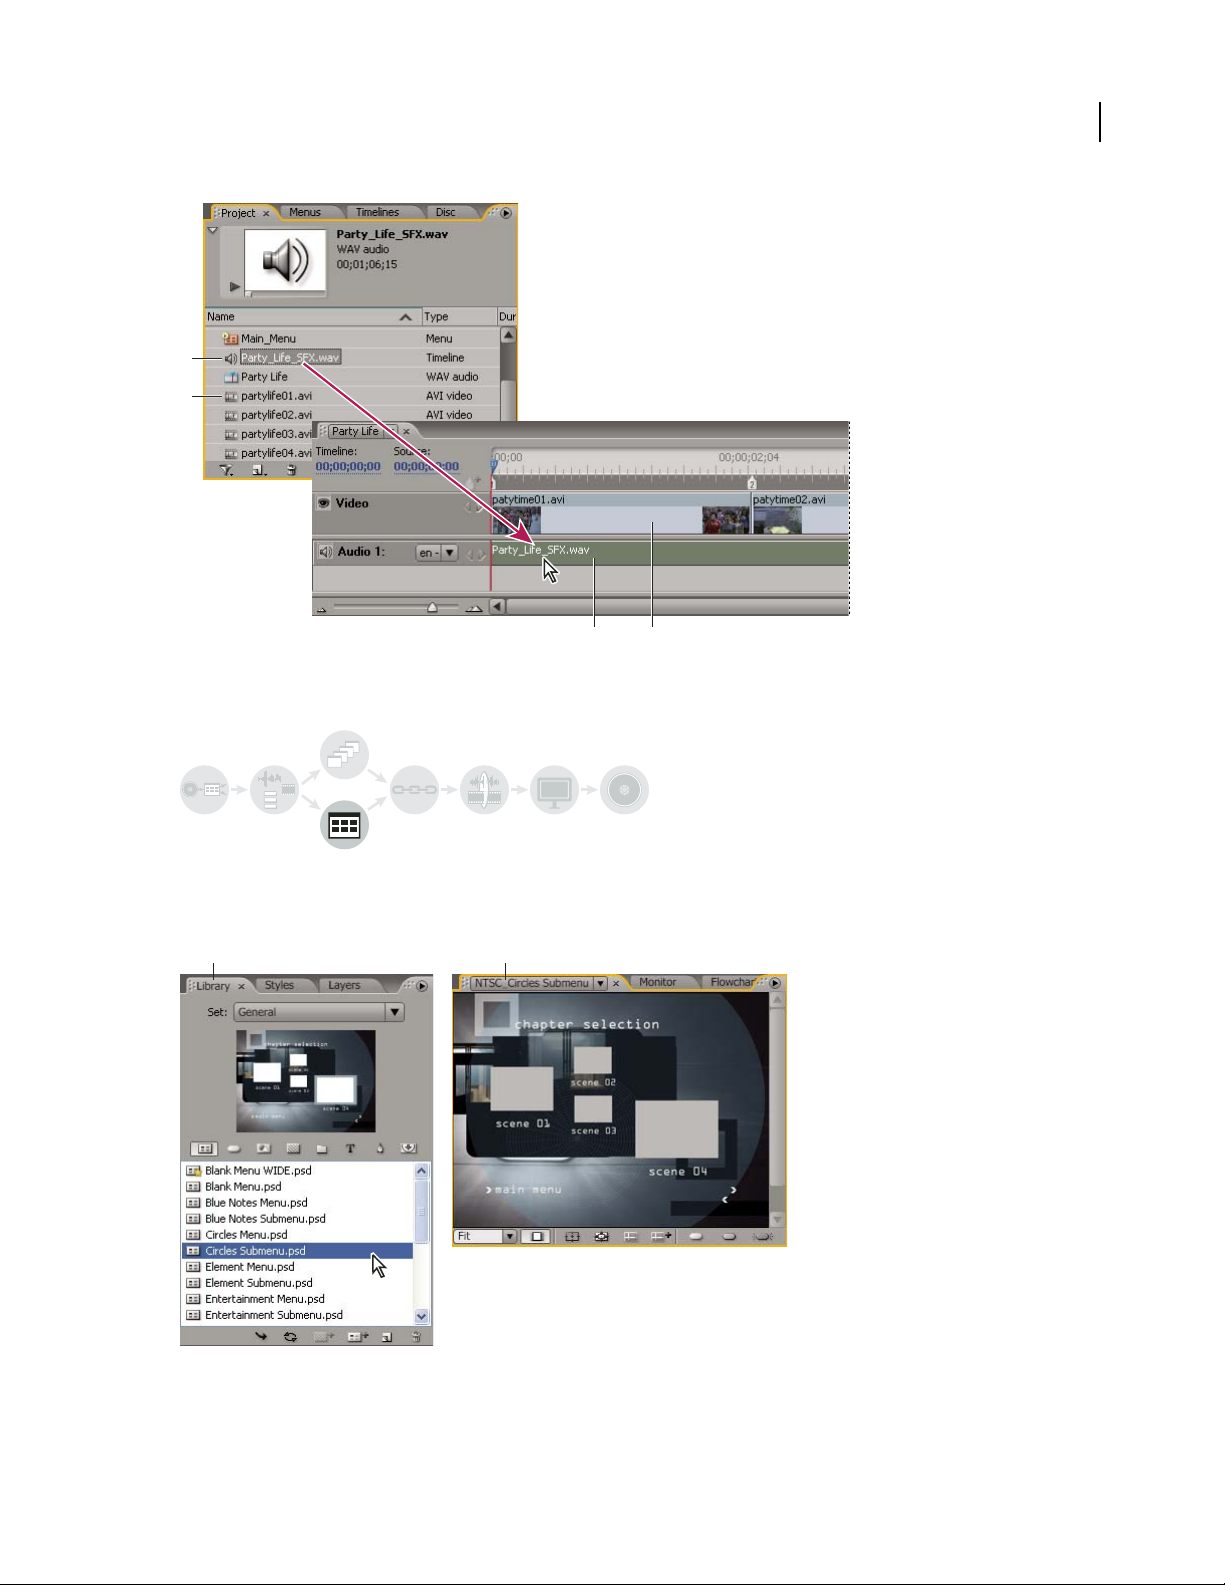
A
B
AB
Project panel containing audio asset (A) and video asset (B) being added to timeline element
ADOBE ENCORE DVD 2.0
User Guide
11
Create menus
The menus give the viewer access to the DVD content. You can create menus directly in Adobe Encore DVD,
customize predesigned menus included with the application, or create and edit menus in Adobe Photoshop
more information, see “About menus” on page 75.
AB
®
. For
Library (A) with predesigned menus and Menu Viewer (B) for customizing menus
Page 17
ADOBE ENCORE DVD 2.0
User Guide
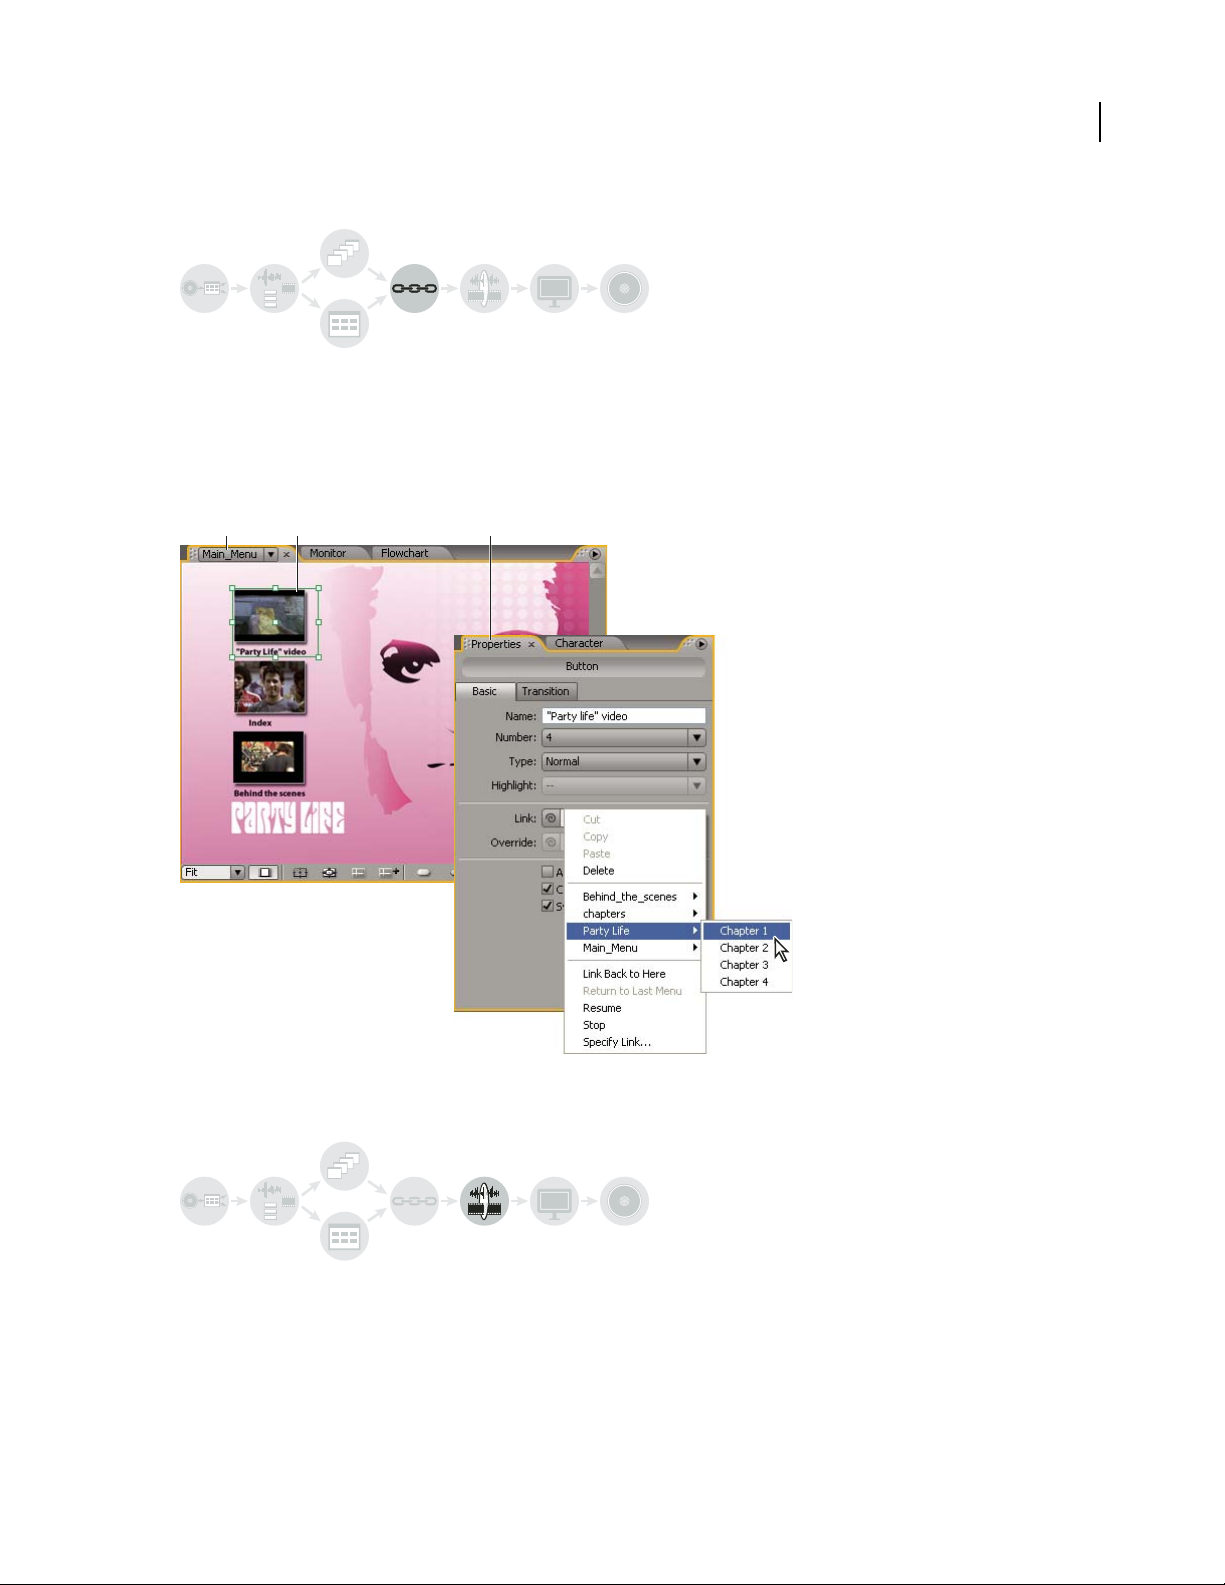
Specify navigation
Menus provide the main way for viewers to navigate through the DVD’s content. In addition to menus, you also use
other types of navigation settings, such as end actions and overrides, to guide the viewer. Encore gives you several
methods for setting the navigation—you can drag between the elements and buttons in the Menu Viewer, use the
Properties panel, or work with navigation in the Flowchart. For a typical project, you’ll set navigation with all of these
methods, choosing whichever is most convenient at the time. For more information, see “Project navigation and
links” on page 170.
A CB
12
Setting links by selecting button (B) in Menu Viewer (A) and specifying links in Properties panel (C)
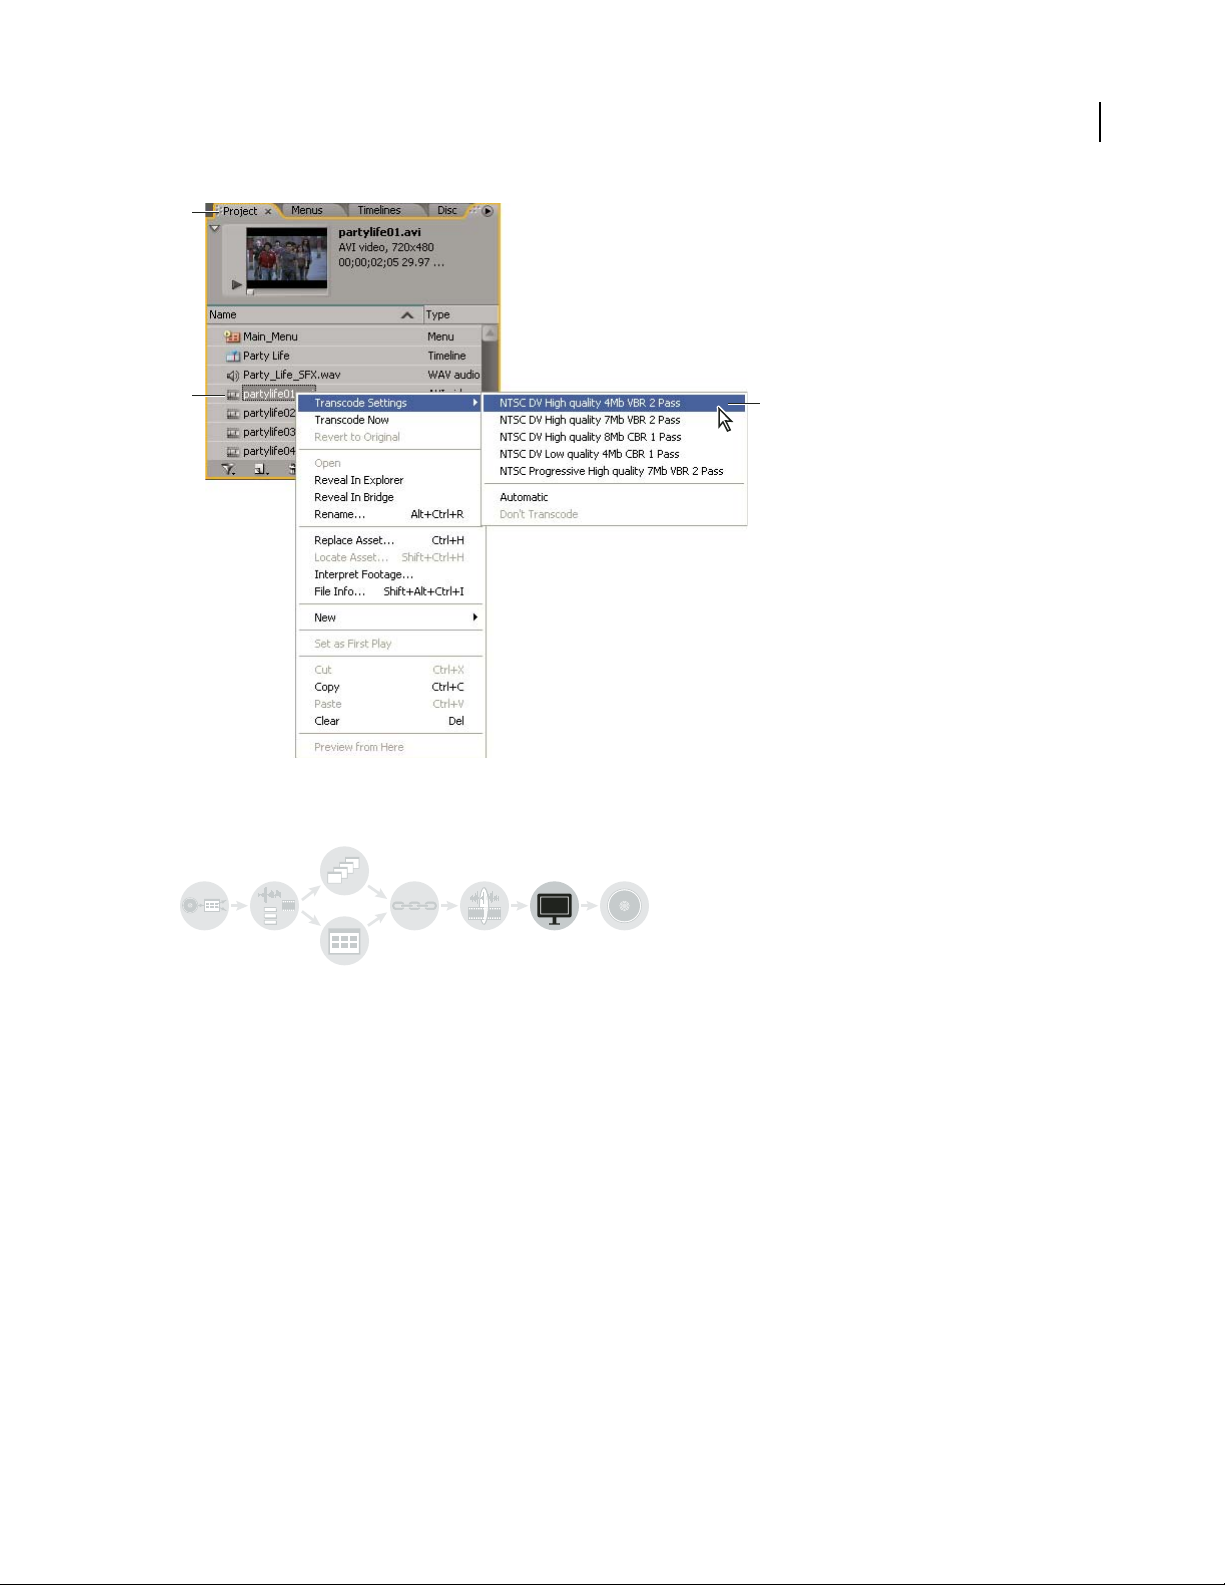
Make video and audio DVD-compatible (transcoding)
If you imported video and audio files that aren’t DVD-compatible, Adobe Encore DVD transcodes the files before
you burn the DVD. You can let Adobe Encore DVD determine the best settings for transcoding or select the options
you feel are best for your project. For more information, see “About transcoding” on page 28.
Page 18
ADOBE ENCORE DVD 2.0
User Guide
A
13
B
Right-clicking asset (B) in Project panel (A) and choosing preset from Transcode Settings submenu (C)
C
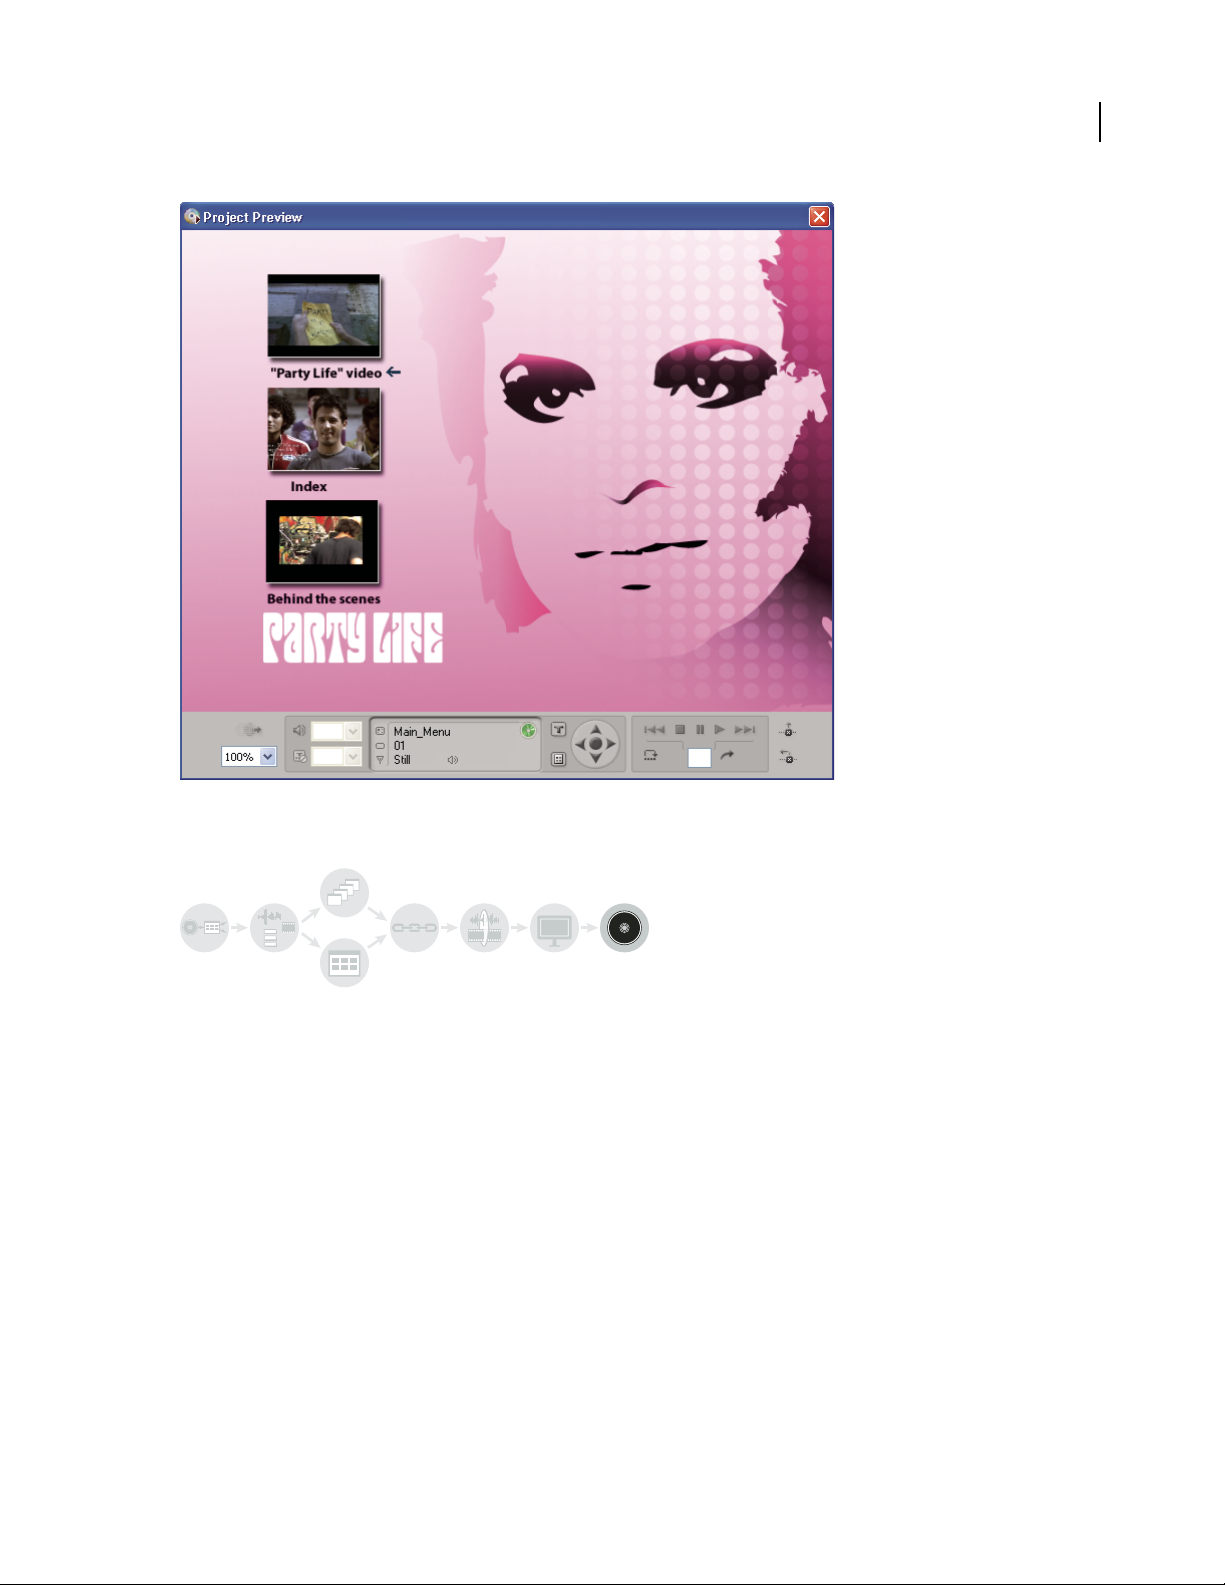
Preview the project
You should preview and check a project throughout the authoring process, especially before you burn the DVD.
Previewing lets you experience the project as a viewer would, using the remote control to move through it. The
Check Project feature verifies technical details and informs you of any problems, such as broken links or invalid end
actions. For more information, see “To preview a project” on page 187, and “To check a project” on page 189.
Page 19
ADOBE ENCORE DVD 2.0
User Guide
14
Controls in Preview panel simulating remote control
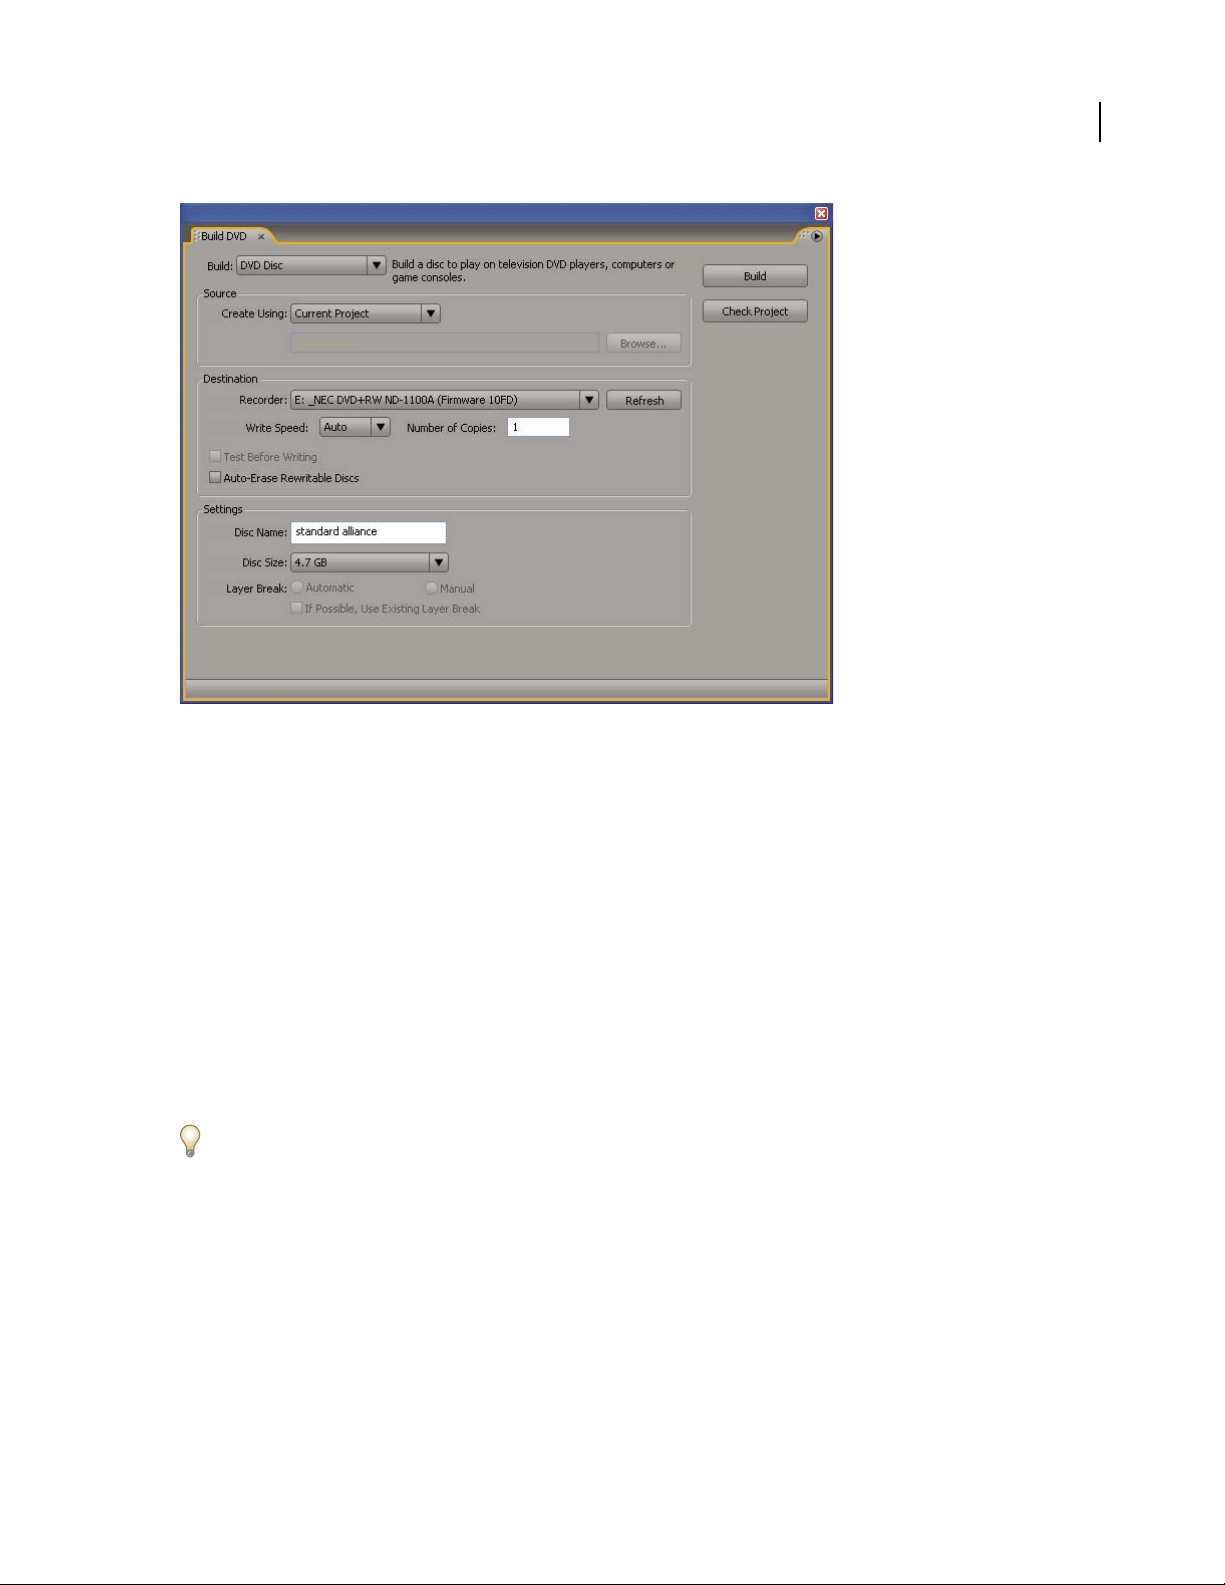
Burn the DVD
You can build or burn, the DVD directly from Adobe Encore DVD. Or, if you plan to use a replication facility, you
can write to a DLT drive, prepare a folder, or create a DVD image to give to the replicator. For more information, see
“To build a DVD” on page 192.
Page 20
ADOBE ENCORE DVD 2.0
User Guide
15
Build DVD panel with output settings
About the Adobe workspace
Adobe video and audio applications provide a consistent, customizable workspace. Although each application has its
own set of panels (such as Tools, Properties, Timeline, and so on), you move and group panels on your computer
screen in the same way across products.
The main window of a program is the application window. The various panels are organized in this window in an
arrangement called a workspace. The default workspace contains groups of panels as well as panels that stand alone.
You customize a workspace by arranging the panels, usually by dragging them, in the layout that best suits your style
of working. You can create and save several custom workspaces for different tasks—for example, one for editing and
one for previewing.
You can drag panels to new locations, move panels into or out of a group, place panels alongside each other, and
undock a panel so that it floats in a new window above the application window. As you rearrange panels, the other
panels resize automatically to fit the window.
YoucanusefloatingwindowstocreateaworkspacemorelikethoseinpreviousversionsofAdobeapplications,orto
place panels on multiple monitors.
Page 21

ADOBE ENCORE DVD 2.0
User Guide
BC
A
16
Example of workspace
A. Application window B. Grouped panels C. Panels
About menus
In addition to the menus at the top of your screen, Adobe Encore DVD also provides context, panel, and viewer
menus. Context menus contain commands relative to the active tool or selection. Panel menus contain commands
relevant to the active panel. You use the viewer menus tochoose which item to display in the viewer, or to close items.
To use a context or panel menu
❖ Do one of the following:
• To use a context menu, position the pointer over the active window or selection and right-click. Choose a menu
item, or click outside the menu to close it.
• To use a panel menu, click the triangle in the upper right corner of a panel, and then choose a menu item or click
outside the menu to close it.
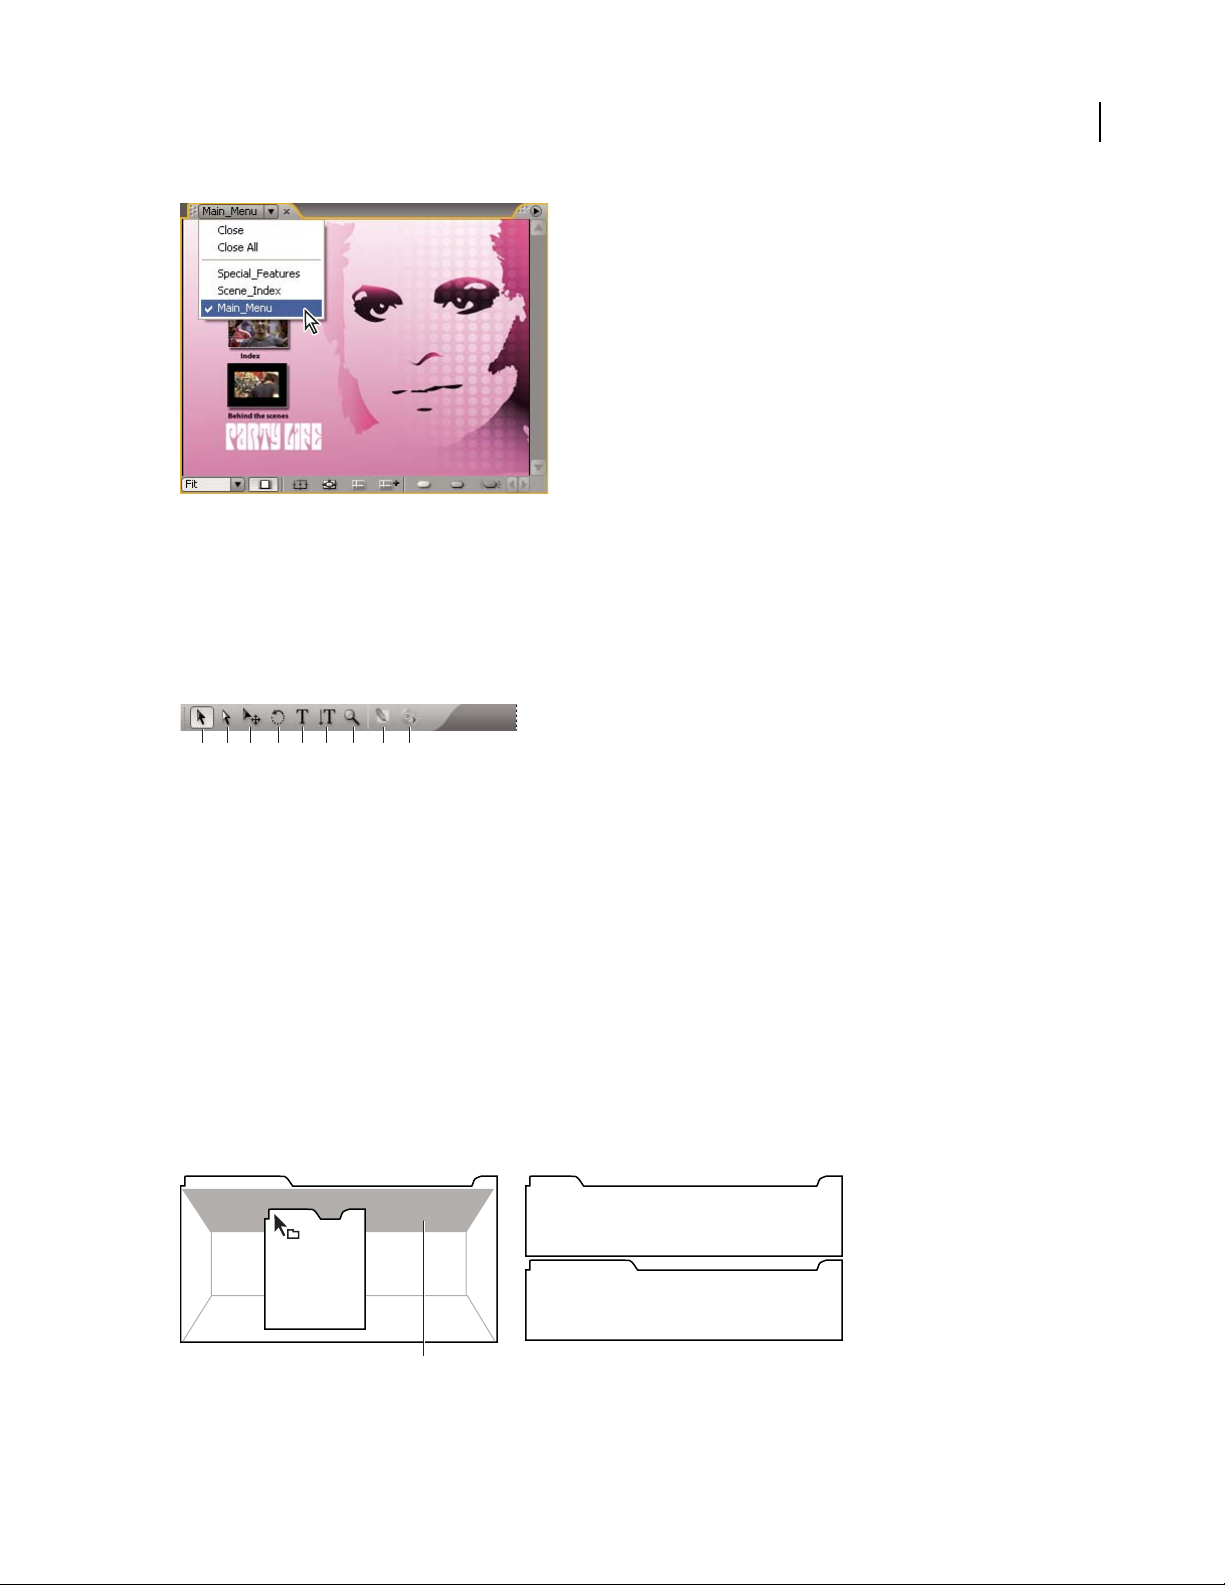
To use a viewer menu
Adobe Encore DVD provides viewers for its timelines, slide shows, menus, and chapter playlists. Viewers are panels
in which you edit a type of DVD element. The Slideshow Viewer, for example, lets you edit slide shows. You can set
the General preferences to specify whether items of the same type open in a single viewer or in multiple viewers. For
viewers with multiple items open, use the viewer menu to select the item you want to work with.
❖ Click the triangle in the Viewer tab and choose the element you want to work with. You can also close the current
item or all the items.
Page 22
ADOBE ENCORE DVD 2.0
User Guide
Selecting items from viewer menu
About the toolbox
YouusethetoolboxwhenworkingintheMenuViewerandtheFlowchart.Itcontainstoolstoselectlayersorobjects
in a menu, enter text, zoom in and out, and move objects in the Flowchart. It also contains shortcuts for editing a
menu in Adobe Photoshop and previewing a project. (See “About text in menus” on page 95, “About subtitles” on
page 154, and “Using Photoshop to create Adobe Encore DVD menus” on page 114.)
17
A B C D E F G H I
To ol b ox
A. Selection tool B. Direct Select tool C. Move tool D. Rotate tool E. Text tool F. Vertical Text tool G. Zoom tool H. Edit Menu in Photoshop
I. Preview
Customizing the workspace
Drop zones
Drop zones are areas onto which you can drop or move panels. As you drag a panel, the drop zones become
highlighted. The drop zone determines where and how the panel is inserted into the workspace. Dragging a panel to
a drop zone results in one of two behaviors: docking or grouping.
Docking
Drop zones along the edges of a panel, group, or window are docking zones. Docking a panel places it adjacent to the
existing group, resizing all groups to accommodate the new panel.
C
A
B
Dragging panel (A) onto docking zone (B) to dock it (C)
Page 23
ADOBE ENCORE DVD 2.0
User Guide
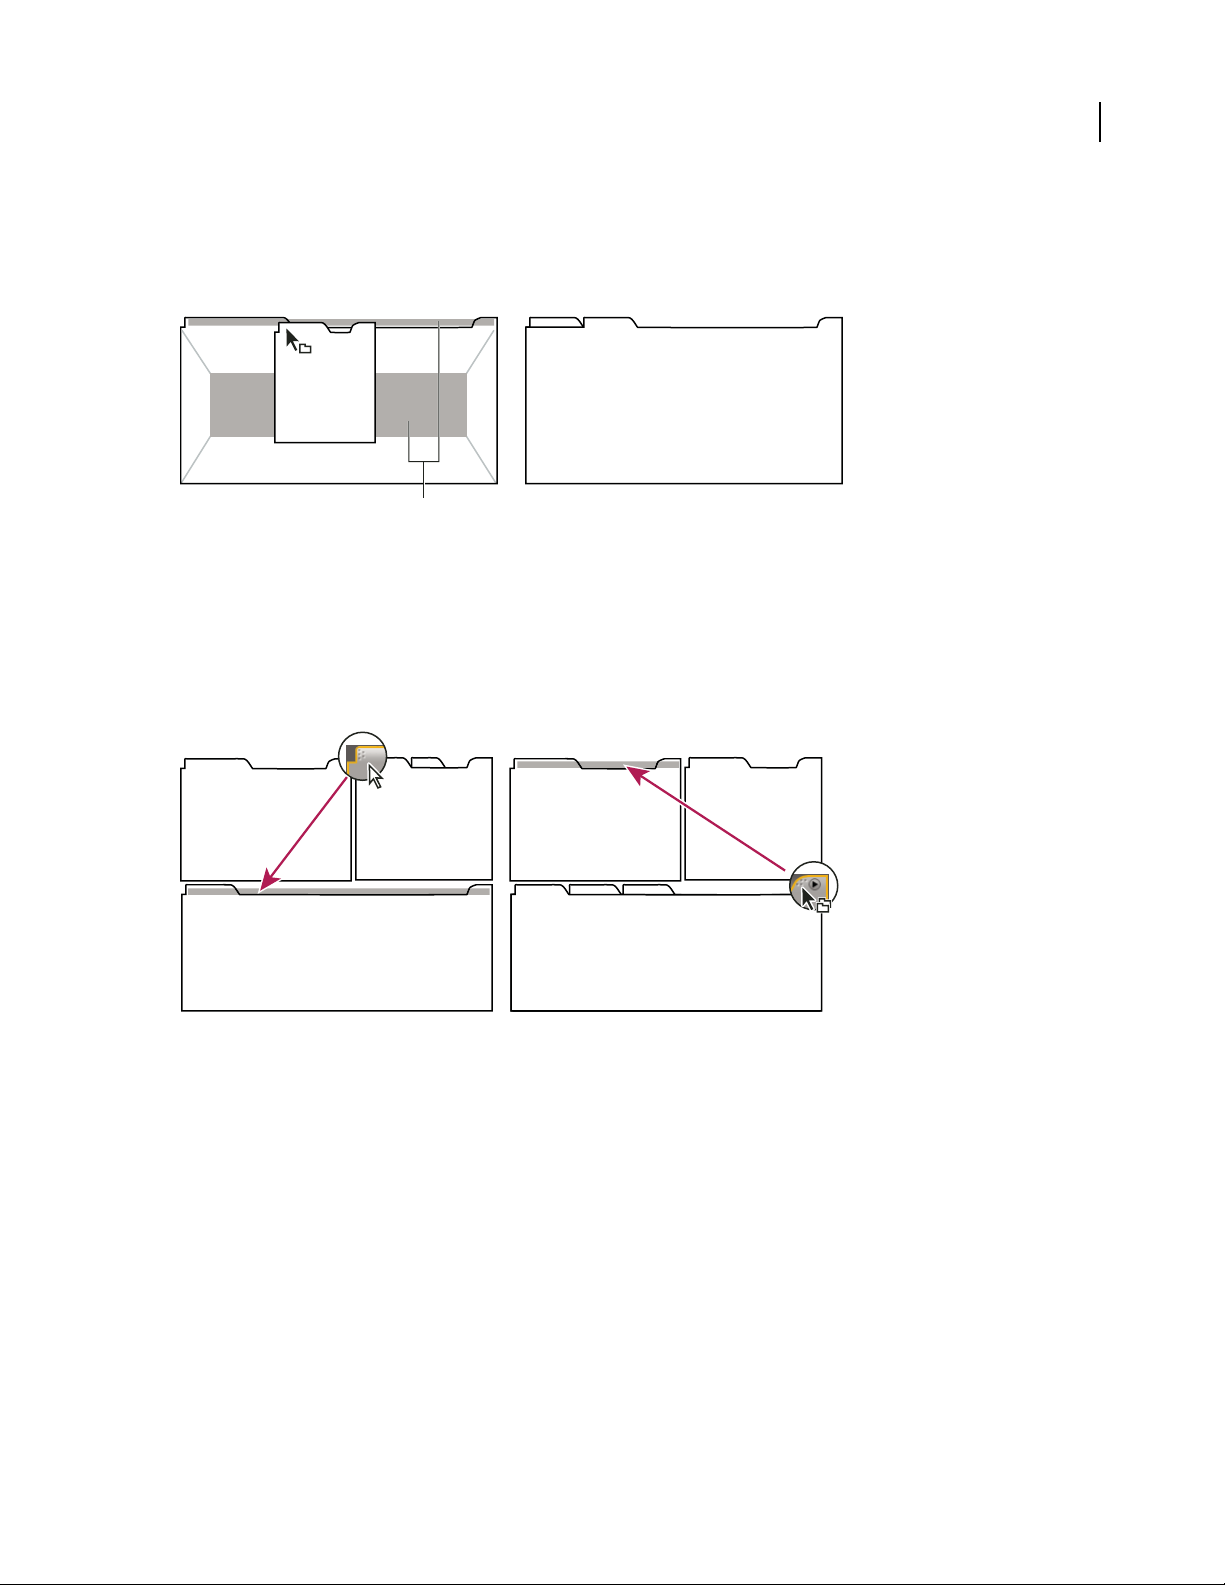
Grouping
Thedropzoneinthemiddleofapanelorgroup,aswellasthezonealongthetabareaofapanel,aregroupingzones.
Grouping a panel adds it to an existing group, placing it at the top of the stacking order. Grouping a panel does not
resize other groups.
18
A
B
Dragging panel (A) onto grouping zone (B) to group it with existing panels (C)
C
To dock or group panels
You dock and group panels by dragging them onto drop zones. As you drag a panel over a drop zone, the zone
becomes highlighted to provide a visual reference for the drop.
Drag the gripper area in the upper left corner of a panel’s tab to move an individual panel. Drag the group gripper at
the upper right corner to move an entire group.
A
Dragging panel gripper (A) to move one panel; dragging group gripper (B) to move entire group
B
1 Selectthepanelyouwanttodockorgroupbyclickingitstab.Ifthepanelisnotvisible,chooseitfromtheWindow
menu to open it.
2 Drag the panel by its tab onto the desired drop zone. The application docks or groups the panel, according to the
type of drop zone.
See also
“Drop zones” on page 17
Page 24
ADOBE ENCORE DVD 2.0
User Guide
To open a panel in a floating window
You can open a panel in a floating window. You can add panels to the floating window or otherwise modify it, as you
do the application window. You can use floating windows to create a workspace like those in earlier versions of
Adobe applications, or to make use of a secondary monitor.
❖ Select the panel you want to open (if it’s not visible, choose it from the Window menu), and then do one of the
following:
• Choose Undock Panel or Undock Frame from the panel menu. Undock Frame undocks the panel group.
• Ctrl-click (Windows) or Command-click (Mac OS, After Effects only) and drag the panel or group from its
current location. When you release the mouse, the panel or group appears in a new floating window.
• Drag the panel or group outside the application window. (If the application window is maximized, drag the panel
to the Windows task bar.)
To close a panel or window
When you close a panel group in the application window, the other groups are resized to make use of the newly
available space. When you close a floating window, the panels within it close, too.
❖ Click the Close button on the panel or window that you want to close.
19
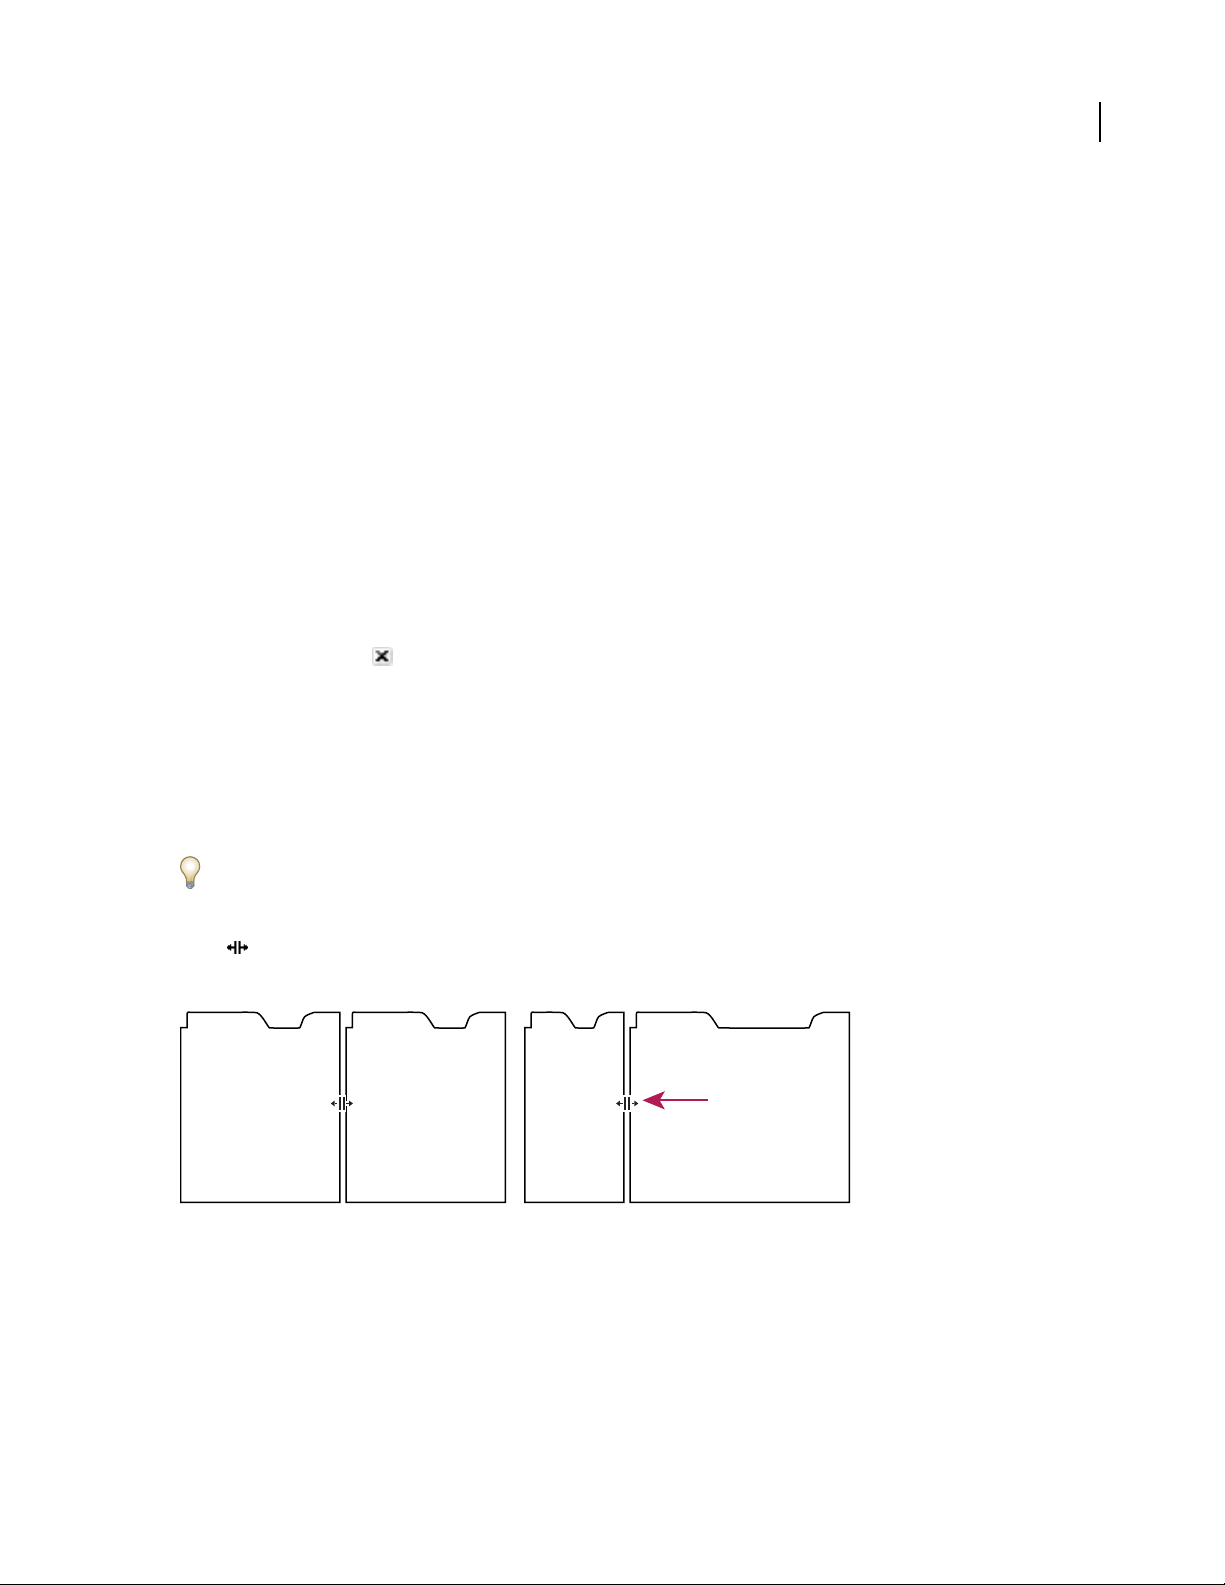
To resize panel groups
The dividers between panel groups have resizehandles. You resize a group in onedirection at a time, either vertically
or horizontally. When you drag a divider between panel groups, all groups that share the divider are resized. For
example, suppose your workspace contains three panel groups stacked vertically. If you drag the divider between the
bottom two, they are resized, but the topmost group doesn’t change.
You can quickly maximize a panel beneath the pointer by pressing the tilde(~) key.(Do not press the Shift key.) Press
the tilde key again to return the panel to its original size.
1 Position the pointer over the divider between the panel groups that you want to resize. The pointer changes
shape .
2 Hold down the mouse button, and drag to resize the panel groups.
A
Dragging divider between panel groups to resize them
A. Original group with divider selected B. Resized groups
B
Working with multiple monitors
You can use multiple monitors to increase the available screen space. When you work with multiple monitors, the
application window appears on the main monitor, and you place a floating window on the second monitor. Monitor
configurations are stored in the workspace.
Page 25

ADOBE ENCORE DVD 2.0
User Guide
To show or hide a panel
YoucanusetheWindowmenutoshowandhidepanels.Evenifapanelisopen,itmaybeoutofsight,beneathother
open panels. Choosing a panel from the Window menu opens it and brings it to the front.
❖ From the Window menu, choose the panel you want to show or hide.
To set General preferences
General preferences include application-wide settings, several of which influence the workspace.
1 Choose Edit > Preferences > General.
2 Set the preferences as desired from the following options:
Brightness Use the slider to set the brightness of the interface. Click Default to return the brightness to the factory
default.
Separate Viewers For Specifies how new timelines, menus, slide shows, and chapter playlists are opened. In Encore,
you edit each element type in its own viewer. Timelines, for example, are edited in the Timeline Viewer. Select an
option to open that element type in a new viewer; deselect an option to open all elements of that type in a single
viewer.For example, to open all menus ina single Menu Viewer, deselectMenus. When a single viewercontains more
thanoneitem,useitsviewermenutoaccessthedesiredelement.Formoreinformation,see“Touseaviewermenu”
on page 16.
20
Show Tool Tips Specifies whether tool tips (brief labels or explanations) appear as the pointer moves over tools and
other interface elements. This setting is enabled by default.
Beep When Done Specifies whether Adobe Encore DVD beeps when it’s completed building a DVD or transcoding
a file. Select the option to enable the beep.
Library Content Specifies the location for functional content (such as predesigned menus and buttons).
Television Standard For New Projects Specifies the default TV standard (either NTSC or PAL) for new projects.
Adobe Encore DVD determines the default setting based on the operating system’s language.
Playback Quality Specifies the playback quality for the Preview and Monitor panels, as well as thumbnails. Select the
desired setting from the menu: High to display video at full resolution; Draft to display video at one-half resolution;
and Automatic to use draft quality for playback, which changes to high quality when the playback is paused or
stopped.
Reset Warning Dialogs Enables all dialog boxes that you previously disabled by selecting Don’t Show Again.
Predefined workspaces
To use an Adobe workspace
Each Adobe video and audio application includes several workspaces for various tasks. For example, Adobe Encore
DVD has workspaces for editing in the Timeline and for designing slideshows, menus, and navigation. You can
choose a workspace at any time. When you choose one of these workspaces, the current workspace is redrawn
accordingly.
®
❖ With the project you want to work on open, choose Window > Workspace, and select the desired workspace.
Page 26

ADOBE ENCORE DVD 2.0
User Guide
To create or modify a workspace
As you modify a workspace, the application trackschanges, savingany modifications with the project. The next time
you open the project, the most recent version of the workspace is used. You can also choose to restore the original
layout of the workspace.
Youcansaveanyworkspace,atanytime,asacustomworkspace.Oncesaved,newandeditedworkspacesappearin
the Workspace menu on the local computer. If a project with a custom workspace is opened on a system other than
the one on which it was created, the application looks for a workspace with a matching name. If the application finds
a match (and the monitor configuration matches), it uses that workspace; if it can’t find a match (or the monitor
configuration doesn’t match), it opens the project using the current local workspace.
❖ Arrange the framesand panels as desired, then choose Window > Workspace > New Workspace, and enter a name
for the workspace. Click OK.
To restore a workspace
You can remove changes made to a workspace, restoring its original layout.
❖ With the workspace you want to restore active, choose Window > Workspace > Revert Workspace, and thenclick
Discard Changes.
21
To delete a workspace
1 Choose Window > Workspace > Delete Workspace.
2 Choose the workspace you want to delete, and then click Delete.
Page 27

Chapter 3: Planning the project
Planning the DVD
About planning
The first task of authoring a DVD is planning. This planning can be as minimal as deciding to use a template to
organize your family’s vacation photos and video, or as robust as using project management software to coordinate
a production team creating an interactive kiosk.
Whatever the scope of planning, you should understand what the project will contain and how you want to present
it. By the end of the planning stage, you should have a good understanding of the following parameters:
The navigation scheme
A well-produced DVD employs a hierarchy of navigation that gives the viewer clear and easy access to the content.
Think through your DVD project. After you decide which clips you want to include, you need to figure out how the
viewer will access those clips. Whether you use a spreadsheet or a pencil sketch, it is worth the time to draft your
navigation scheme before you start.
22
The intended playback environment
Is the DVD intended for television viewing? Will it play unattended in a kiosk? Is it for use in an educational setting
on computers? The playback environment affects your approach to navigation and the design of the menus as well
as thecontent. If theDVD will beused only on acomputer (via the desktop),you caninclude content that atelevision
DVD player cannot access. For instance,you can include PDFs of exercises in an educational DVD to be used on the
computer.
Note: Some DVD players, notably set-top DVD players, may not read DVD content on CDs. Most DVD players will play
audio CDs.
Types and amount of content to be included
To make certain decisions—for instance, about disc size and video data rate—you need to know how much content
you have to fit on the disc. Small projects that include mostly audio may fit on a CD, whereas projects containing
feature-length movies and many supplemental materials may require a dual-layer or double-sided DVD.
See also
“About bit budgeting” on page 26
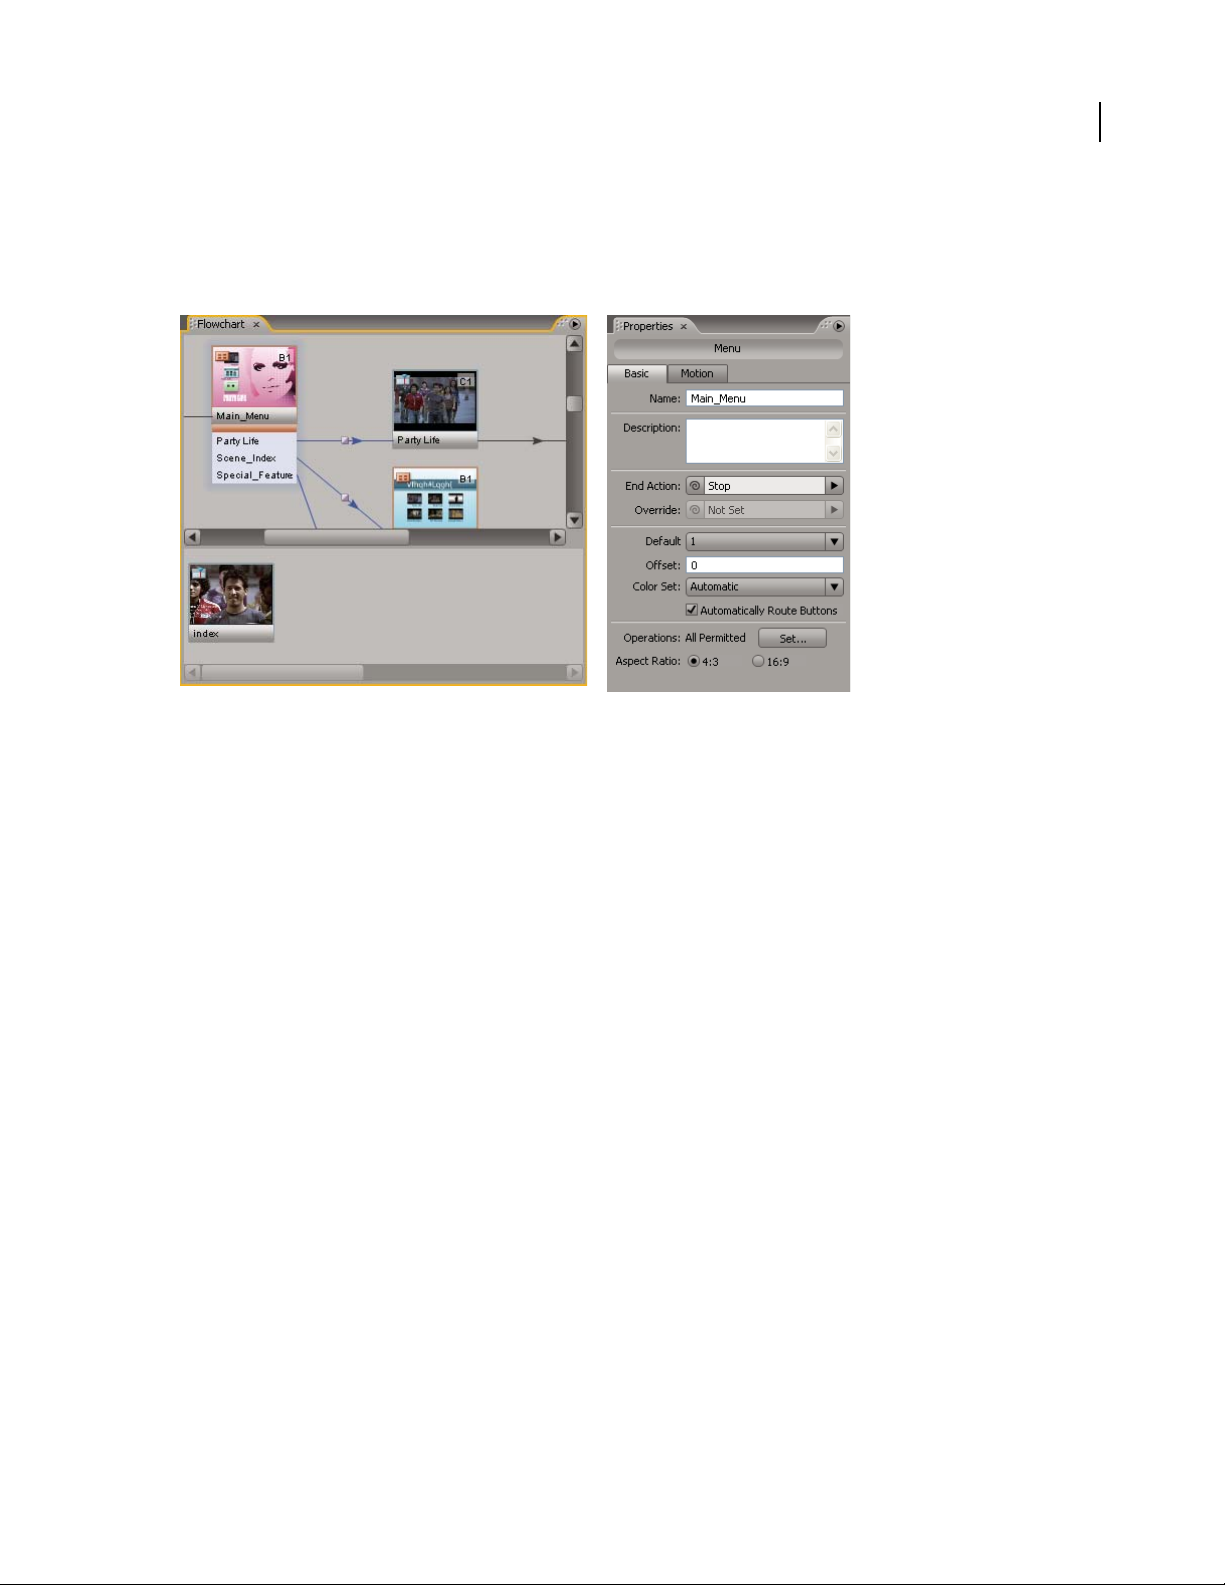
Planning with the Flowchart
TheFlowchartfeatureprovidesavisualinterfacethathelpsyoutoplanandmanagethecreationofDVDs.Although
youcanusetheFlowchartatanytimeduringtheauthoringprocess,it’sespeciallyusefulduringtheinitialstagesof
the project, when you determine navigation and begin organizing assets.
Note: If you’re new to authoring DVDs, it may be best to plan your first navigation scheme on paper and postpone using
the Flowchart until you are familiar with the different element types and their properties.
Page 28
ADOBE ENCORE DVD 2.0
User Guide
The Flowchart displays the content of the project graphically, in a tree structure, detailing the navigation between
DVD elements. This visual representation can help you to see areas where the navigation is cluttered and needs to
be refined. Beyond providing a visual representation of the project, the Flowchart also lets you perform many
authoring tasks, including editing.
23
The Flowchart displays project navigation and, when used with the Properties panel, lets you complete a majority of authoring tasks.
See also
“About the Flowchart” on page 179
Balancing file size and quality
File size and quality
Authoring a DVD involves striking a balance between two competing properties: file size and video quality. As
quality increases, so does file size. You want to achieve the highest possible quality for your content while keeping
thefilesizessmallenoughsothatallofthecontentwillfitonthedisc.Thisbalanceisachievedbymanipulatingthe
video content’s data rate—either automatically(by lettingAdobe Encore DVD set the data rate) or directly (by setting
the transcoding settings or using a third-party application).
You determine the optimal data rate through the process of bit budgeting. To understand bit budgeting, you first
need to understand the variables involved: disc size, types and amounts of assets (audio, video, and motion menus),
and data rates and transcoding. Once familiar with the variables involved, you’ll be able to produce a bit budget to
guide you in producing high-quality projects that fit within the allotted disc space.
See also
“About transcoding” on page 28
Page 29

ADOBE ENCORE DVD 2.0
User Guide
Determining disc size
Before you can prepare a bit budget,you mustdetermine the sizeof DVD on which to distribute your project. Adobe
Encore DVD can create projects for a variety of DVD sizes. The size you choose is based on the amount of video and
the replication method. Typically, desktop DVD burners use a recordable DVD-5 disc (DVD-R), which has 4.7 GB
capacity. A DVD-5 can hold approximately two hours of high-quality video. Adobe Encore DVD also supports
CD-Rs (recordable CDs) and DLT (digital linear tape), as well as dual-layer and double-sided discs.
Note: Although disc capacity is the prime consideration, there are other variables you need to consider when choosing a
DVD. If you’re burning the DVD yourself, you must choose a DVD that your DVD recorder supports. If you’re creating
a dual-layer or a double-sided DVD, be aware that you may need to duplicate it at a DVD replication facility. For more
information, see “To build a DVD” on page 192.
Dual-layer and dual-sided discs
Adobe Encore DVD supports creating projects for dual-layer discs and dual-sided discs. These discs, however,
cannot be burned by all conventional DVD burners; check your burner’s documentation to see if it can create dualsided or dual-layer discs. If your DVD burner cannot produce these discs, Adobe Encore DVD can still create the
project files for them, but you’ll need to replicate the DVD at a replication facility.
When preparing a project for dual-layer or dual-sided discs, keep the following in mind:
Dual-layer disc Dual-layer discs from Adobe Encore DVD require using +R DVDs; check your burner’s documen-
tation to see what type of DVDs (+R or -R) it requires. To replicate dual-layer DVDs at a replication facility, you first
must write your project to two separate DLTs (Digital Linear Tapes), one tape for each layer of the disc. (See “Build
options” on page 192.)
24
Note: Be aware that +R discs may have compatibility problems with some DVD players. Before replicating a large
quantity of discs, it’s worthwhile to create a sample disc and test it on several different DVD players. Replication facilities,
whose paramount purpose is duplicating discs, create discs with the widest possible compatibility.
Dual-sided disc For dual-sided discs, you must create two separate projects. If you’ll be replicating the DVDs at an
outside facility, write each project to its own DLT. (See “Replicating DVDs” on page 194.)
Dual-sided, dual-layer disc In this case, you needto build two projects, each producing two tapes. Thefirst two tapes
represent the twolayers of the first project (Side 1).The other twotapes representthe two layersof the second project
(Side 2).
See also
“To specify a layer break” on page 193
To set the disc size
1
Click the Disc tab, and then click the Project Settings button to open the Project Settings dialog box.
2 Choose a size from the Disc Size menu. To enter a custom disc size, choose Custom and then type a size in the
text box.
3 If you want to create a dual-sided DVD, specify which side this project is for.
Page 30

ADOBE ENCORE DVD 2.0
User Guide
About free/used space information
The Disc panel displays the available space and the used space for the specified disc size during the authoring
process. The display conveys size information only and has no bearing on quality. Adobe Encore DVD calculates the
free space using the transcoding data rate (whether it was set automatically or manually). It then combines this
estimated bit rate with the actual bit rate of any transcoded clips and, based on the disc size, calculates the space
remaining on your disc.
When transcoding assets, Adobe Encore DVD attempts to maintain the highest quality (highest data rate) for the
amount of video in the project. If you continue to add video to a project, the program lowers the video data rate to
squeeze in the additional content. Adobe Encore DVD will warn you if quality dips below a certain level once you
build the project or run Check Project. For more information, see “About transcoding” on page 28.
To check the space remaining on your disc
❖ Click the Disc tab to display the Disc panel. The disc graphic shows the space used and space remaining.
Asset types and amounts
Of all the content types, the video portion of a DVD occupies the most disc space. Depending on the data rate, one
minute of video can occupy anywhere from 180 to 588 MB. One minute of compressed audio, on the other hand,
occupies only 11.5 MB. Still menus are negligible in terms of size. (See “Average asset size” on page 27.)
25
The amount of video in a project directly affects the optimal data rate. You need an accurate tally of the amount of
video in a project to develop a bit budget and to choose a disc size. If the project contains one hour of video, for
example,itcanbetranscodedattwicethedatarateasaprojectwithtwohoursofvideocontent.Althoughthevideo
content in each project occupies the same amount of disc space, the quality of the hour-long video will be superior
(though not necessarily by a factor of 2).
See also
“About transcoding” on page 28
Data rates
Data rates, usually expressed in Mbps (megabits per second, or 1,000,000 bits/sec), specify the amount of data
contained in an asset stream and directly affect the quality of video. The data rate is used during transcoding to
compress the asset. For video assets, the Adobe Encore DVD transcode presets use data rates ranging from 4 to 9
Mbps. You can edit the presets’ data rates, but you cannot exceed 9.0 Mbps, nor can you go below the Adobe Encore
DVD minimum data rate of 2.0 Mbps. Typical data rates for video range between 4 and 6 Mbps. If bit budgeting
targets a data rate less than 6 Mbps, you should consider using variable bit rate (VBR) encoding. For more information about VBR, see “To calculate a bit budget” on page 26. For more information about transcoding, see “About
transcoding” on page 28.
While data rates are a general indicator ofquality, there are no hard-and-fast rules toequate data rate to quality. That
is, a data rate of 4 Mbps may or may not produce a high-quality asset—quality depends on the image data and type
ofcompressionusedaswellasdatarate.Forexample,videoofaseatedpersonshotagainstasolidbackgroundcan
probably be compressed to a lower data rate than a fast-paced car chase with constantly changing visuals, with no
noticeable differences in quality.
Page 31

ADOBE ENCORE DVD 2.0
User Guide
Bit budgeting
About bit budgeting
Bit budgeting, or estimating the amount of space your project will occupy on DVD, is an important part of planning.
Bitbudgetinghelpsyoustrikeabalancebetweenthequantityandqualityofcontentanddeterminetheoptimalvideo
data rate. If your DVD includes minimal amounts of content, you can encode that content at a higher data rate
(which translates to higher quality) to take advantage of all available space on the DVD. Conversely, if your project
contains a large amount of content, you need to use a lower data rate (which translates to lower quality) to squeeze
it all onto the DVD.
Adobe Encore DVD automaticallytracks bit budgeting during the authoring process. For smallprojects with limited
content, simply checking the amount of available space on the Disc panel during the authoring process is usually
sufficient to track your space usage. For large, complex projects, though, bit budgeting becomes much more
important to the authoring process, providing a check against the actual data rates achieved.
Generally, for projects with less than two hours of video, you can skip bit budgeting and let Adobe Encore DVD set
the data rate automatically.
To calculate a bit budget
Bit budgeting provides a target video data rate for the project. You can either use a pencil and paper to quickly
develop one, or you can create a spreadsheet to do the calculations for you.
26
When bit budgeting for projects to be distributed on 4.7 GB DVDs that contain a single stream of compressed audio,
you can use the simplified formula of 560 / x = bit rate in Mbps, where “x” represents minutes of video.
1 Calculate the total disc space available for the entire project.
2 Calculate the disc space available for video. You achieve this by calculating the space required for audio, slide
shows, subtitles, and motion menus (other types of content are negligible in terms ofbit budgeting), and subtracting
that amount from the total disc space. For more information, see “Average asset size” on page 27.
Note: If you include ROM content, make sure to include it in the space calculation.(See “To add ROM data to a DVD”
on page 191.)
3 Calculate the target data rate of the video. You determine this by dividing the amount of space available for video
by the amount of video in the project.
4 Determine the maximum video bit rate by subtracting the combined audio and subtitle rate from the DVD data
rate limit of 9.8 Mbps. (For example, if your combined audio and subtitle rate is 3.0 Mpbs, subtracting that from 9.8
Mpbs gives you a video rate of 6.8 Mbps.) Your goal is to determine the highest possible target video data rate within
the DVD data rate limit. If your target data rate is below 6 Mbps, consider using Variable Bit Rate (VBR) encoding.
When you use VBR encoding, you specify the maximum video data rate. (The average data rate is the target, but the
maximum rate provides some flexibility when encoding.)
Note: Keep your calculations simple by working with megabits (Mbits) and not megabytes (MB) when bit budgeting.
Mbps denotes Megabits per second. Also, hard disk capacity is typically calculated as a power of 2 (1 Kb = 2^10 bytes =
1024 bytes)while optical disc (DVD) capacity is labeled as a powerof 0 (1 Kb= 10^3 bytes =1,000 bytes). Use the powerof-10 scheme for bit budgeting. The following conversion factors will aid in the calculations: 1 GB = 10^9 bytes =
1,000,000,000 bytes = 8,000,000,000 bits; 1,000,000 bits = 1 Megabit.
Page 32

ADOBE ENCORE DVD 2.0
User Guide
Average asset size
Use the following averages for bit budgeting:
Audio If compressed usingthe DolbyDigital Stereostandard, audio is generally 192,000 bps (0.192Mbps). Use 0.192
Mbps or reference the settings for the audio encoder you plan to use.
Subpictures Insignificant in terms of bit budgeting, unless you include subtitles. If you do include subtitles, use
0.010 Mbps per subpicture stream for calculations.
Motion menus Typically have a data rate of 8 Mbps for the transcoded video; add this to the audio data rate. (If the
video is already DVD-compliant, then it won’t be transcoded, and you should use the data rate of the video file.)
Still menus Typically insignificant in terms of bit budgeting and can usually be left out of the calculation.Still menus
average 230 Kb in size.
Slide shows The asset size for a slide show depends on whether you include transitions or the Random Pan Zoom
effect:
• If the slide show contains no transitions or effects, the slides are written to the DVD as MPEG stills, which require
minimal space. Stills average 230 Kb in size, which is typically negligible for bit budgeting. If you have a large
number of images, however, you should include them in your calculation.
• If the slide show includes transitions, then Encore DVD writes both stills and transcoded MPEG video files for
the transitions. For example, if agiven imageappears for 10 seconds, with atwo-second transition at the beginning
and the end, then the still is written to the disc (displayed for six seconds) as well as two 2-second MPEG video
files that contain the transition frames.
• If the slide show includes pan and zoom, then Encore DVD transcodes the stills into an MPEG video file. Slide
shows with pan and zoom, in essence, become video content and require the same space allotment as video files.
For example, a five-minute slide show that uses pan and zoom throughout counts as five minutes of video content
for bit-budgeting purposes.
27
Sample budget #1
Bit budgeting for a simple project containing 2 hours and 13 minutes of video, without any audio, to be distributed
on a 4.7 GB disc proceeds as follows:
1 Calculate the total available disc space in bits. A 4.7 GB (gigabyte) disc contains 4,700,000,000 bytes; each byte
contains 8 bits. 4,700,000,000 x 8 = 37,600,000,000 bits.
2 Calculate the disc space available for video. Combine the size of the audio, subtitles, motion menus, and 4% of the
disccapacity(foroverhead,justtobesafe)andthensubtractthatsumfromthetotalavailablespaceyoucalculated
in step 1. Since this example has no audio, subtitles, or motion menus, you subtract only the 4% for overhead
(1,504,000,000 bits) to get a value of 36,096,000,000 bits.
3 Calculate the data rate of the video. Divide the disc space available for video that you determined in step 2 by the
amount of video (in seconds) the project contains. 36,096,000,000 bits / (133 minutes x 60 seconds/minute) =
4,523,308.27 bits/second. Divide the bits/sec amount by one million bits/Mbitto convertthe video data rate to Mbps.
4,523,308.27 / 1,000,000 = 4.5 Mbps (Megabits per second).
4 Determine the maximum video data rate. Subtract the combined audio, subtitles, and motion menu data rates,
zero in this instance, from the maximum DVD video data rate of 9.8 Mbps. 9.8 Mbps - 0 = 9.8 Mbps. Since this is
very close to the maximum rate for DVD, you can lower it to 9.0 Mbps to be safe.
So the video will fit onthe disc using a data rateof 4.5 Mbps. 4.5 Mbps is low enough (below 6 Mbps)that you should
use VBR encoding. The maximum video data rate for VBR encoding is 9.0 Mbps.
Page 33

ADOBE ENCORE DVD 2.0
User Guide
Sample budget #2
Proceed as follows for bit budgeting of a 120-minute video with three audio tracks, two subtitle tracks, two motion
menus, and a one-minute movie preview to be burned to an 8.54 GB disc:
1 Calculate the total available disc space in bits. An 8.54 GB (gigabyte) disc contains 8,540,000,000 bytes; each byte
contains 8 bits. 8,540,000,000 x 8 = 68,320,000,000 bits = 68,320 Mbits.
2 Calculate the disc space available for video. Combine the size of the audio, subtitles, motion menus, movie
preview, and 4% of the disc capacity (foroverhead, just to be safe) and then subtract that sum from the total available
space you calculated in step 1.
• Three 120-minute audio streams, two with a data rate of 0.192 Mbps and one with a rate of 0.448 Mbps: (2 x (120
min x 60 sec/min x 0.192 Mbps) + (120 min x 60 sec/min x 0.448 Mbps) = 5,990.4 Mbits.
• Two subtitles with a data rate of 0.010 Mbps: 2 x (120 min x 60 sec/min) x 0.010 Mbps = 144 Mbits.
• Two 24-second motion menus with an estimated data rate of 8 Mbps: 2 x (24 sec x 8 Mbps) = 384 Mbits.
• One-minute movie preview with a data rate of 4.5 Mbps: 60 sec x 4.5 Mbps =270 Mbits.
• 4% overhead: 0.04 x 68,320,000,000 bits = 2,732,800,000 bits = 2,732.8 Mbits.
• Total audio, subtitles, motion menus, preview, and overhead sizes: 5,990.4 Mbits + 144 Mbits + 384 Mbits + 270
Mbits + 2,732.8 Mbits = 9,521.2 Mbits.
• Disc space available for video: 68,320 Mbits - 9,521 Mbits = 58,799 Mbits.
3 Calculate the data rate of the video. Divide the disc space available for video that you determined in step 2 by the
amount of video (in seconds) the project contains: 58,799 Mbits / (120 minutes x 60 seconds/minute) = 8.16 Mbps.
4 Determine the maximum video data rate. Subtract the combined audio and subtitles data rates from the
maximum DVD video data rate of 9.8 Mbps: 9.8 Mbps - (0.192 + 0.192 + 0.448 + 0.010 + 0.010) = 8.95 Mbps.
28
So the video will fit on the disc using a data rate of 8.16 Mbps, which is below the maximum video data rate of 8.95.
Furthermore, since the target video data rate of 8.16 Mbps is above 6 Mbps, you do not need to use VBR.
Transcoding
About transcoding
Tra ns co din g is the process by which Adobe Encore DVD converts your original, non-DVD-compliant video and
audio asset files to the DVD-compliant elements that will be burned to the disc. (Files that are already DVDcompliant do not require transcoding.) The transcoding feature of Adobe Encore DVD is flexible enough for a
variety of users. New users unfamiliar with transcoding can let the application manage the process entirely, while
those with more experience can control it precisely. If you choose to manage transcoding yourself, Adobe Encore
DVD provides DVD-compliant transcode presetscustomized for several different quality andstorage requirements.
You can also create your own custom transcode presets.
You can work with your original, untranscoded files throughout the production process—Adobe Encore DVD
performs any required transcoding when you build the DVD. If you want more control over transcoding, however,
you can choose to transcode at any time on a per-item basis. If a transcoded version of a file is available,
Adobe Encore DVD uses that version for authoring, previewing, and building; if no transcoded version is available,
the application uses the original file for authoring and previewing, and transcodes the files as necessary when
building the DVD.
Page 34

ADOBE ENCORE DVD 2.0
User Guide
See also
“Transcoding assets from the Project panel” on page 29
Transcode settings
You can specify an item’s transcode settings (by using a preset) from the Transcode Settings column in the Project
panel. (A separate column, Transcode Status, displays either Transcoded or Untranscoded to show the item’scurrent
state.) When you specify a preset, that preset’s data rate is used, not the data rate you calculated in bit budgeting.
Assets are designated as follows in the Transcode Settings column:
Automatic Displayed for all non-DVD-compliant assets by default. For assets with the Automatic designation,
Adobe Encore DVD determines theoptimal settings for transcoding. Adobe Encore DVD bases these settings on the
number, length, and size of the assets and the available disc space. (See “About bit budgeting” on page 26.) You can
override the Automatic data ratesetting by specifying the MaximumAutomatic transcoding bitrate in the Encoding
preferences. Alternatively, you can specify a transcode preset for any of these assets.
[A transcode preset name] Displayed for all non-DVD-compliant assets for which you have specified a Project
Transcode Preset.
Don’t Transcode Displayed for those assets that are already DVD-compliant. You can override this setting and
specify Automatic or a transcode preset, if desired.
29
Note: DVD-compliant, audio-only files that don’t match the audio encoding preference are the exception; Adobe Encore
DVD assigns these audio files a designation of Automatic. You can override this setting and specify either Don’t
®
Transcode or a transcode preset. (Dolby
purposes; this designation can also be overridden to transcode to Dolby
N/A Displayed for those items, such as menus and timelines, that don’t require transcoding.
Digital 5.1 AC3 files retain the Don’t Transcode designation for quality
®
Stereo format.)
Transcoding assets from the Project panel
You can assign transcode settings and transcode assets directly from the Project panel. Upon transcoding a file,
Adobe Encore DVD updates the project link so that it points to the transcoded file. Consequently, unless you delete
the original file, you can revert transcoded assets to their original version. Adobe Encore DVD transcodes in the
background, so you can continue to work while transcoding.
Note: If Adobe Encore DVD is transcoding an asset in the background, you cannot delete timelines associated with the
asset or assign a different preset.
The data rate calculated for the Automatic transcode setting, determined by Adobe Encore DVD, appears in the
Bitrate column. You can specify the maximum automatic data rate using the Encoding preferences.
To assign a transcode setting to an asset
1
Right-click the asset you want to transcode.
2 Choose Transcode Settings, and then choose a transcode preset from the list. (See “About Project Transcode
Presets” on page 30.)
To override the Automatic data rate setting
1
Choose Edit > Preferences > Encoding.
2 Choose the data rate limit from the Maximum Automatic Transcoding Bitrate menu, and then click OK.
Page 35

ADOBE ENCORE DVD 2.0
To transcode an asset
1
Right-click the asset you want to transcode.
2 Choose Transcode Now. The asset is transcoded, and the Transcode Status column displays Transcoded. The
transcoded asset is now used for authoring, previewing, and building.
To revert a transcoded asset to the original asset
1
Right-click the asset you want to replace.
2 Choose Revert To Original.
User Guide
Presets
About Project Transcode Presets
You work with presets in the Project Transcode Presets dialog box. The left portion of the dialog box displays either
the source or the output, while the right portion lists the various settings available. Use the Source tab to see the
original, and the Ouput tab to preview the effects of your selections.
The default parameters in the Project Transcode Presets dialog box are designed to achieve optimal quality for
various project types. You can save, import, export, and delete presets.
30
If you are experienced with MPEG-2 encoding, you can further fine-tune your projects for specific playback situations by creating custom presets. You create a custom preset by adjusting the video and audio parameters of any of
the existing presets. Once you save this custom preset, you can use it in later projects or share it with other users.
Note: All available transcode presets are based on the project settings. For example, if you choose PAL project settings,
then only PAL-compatible presets are available.
Page 36

ADOBE ENCORE DVD 2.0
User Guide
31
A B
The Project Transcode Settings dialog box displays the Source or Ouput image (A) and the preset settings (B).
See also
“About transcoding” on page 28
Preset options for video
Depending on the preset you’ve selected, the Video tab of the Project Transcode Presets dialog box contains some or
all of the following options:
Quality Specifies the encoding quality. Quality values range from 1 to 5, with higher values increasing quality and
render time.
Field Order Specifies the output field order, Upper or Lower. Only appears if you select Interlaced as the Program
Sequence option.
Bitrate Encoding Specifies the compression technique used. Constant Bit Rate (CBR) compressesdata toa fixed rate.
CBR keepsthe rate constant by varying the amount of compression(and thereby quality) as required by the specified
data rate. Variable Bit Rate (VBR) compresses data to fit between a fixed minimum and fixed maximum rate. VBR
allows the compression to vary, which can result in better quality than CBR.
Page 37

ADOBE ENCORE DVD 2.0
User Guide
Bitrate Specifies the number of megabits per second you want the encoded file to have. Only appears if you select
CBR as the Bitrate Encoding option.
The following options appear only if you select VBR as the Bitrate Encoding option:
Encoding Passes Specifies the number of times the encoder will analyze the clip before encoding. Enabled for VBR
only.
Target Bitrate Specifies the number of megabits per second you want the encoded file to have. For VBR, the target
provides an average bit rate. (See “To calculate a bit budget” on page 26.)
Maximum Bitrate Used with VBR only. Specifies the maximum number of megabits per second you want the
encoder to allow. The maximum allowable rate is 9.0 Mbps, providing a safety margin.
Minimum Bitrate Used with VBR only. Specifies the minimum number of megabits per second you want the
encoder to allow. The minimum bit rate must be at least 1.5 Mbps.
M frames Specifies the number of B frames between consecutive I and P frames.
N frames Specifies the number of frames between I frames. This value must be a multiple of the M frames value.
Preset options for audio
The Audio tab of the Project Transcode Presets dialog box contains the following options, depending on the codec
chosen:
32
Audio format Specifies the codec the encoder uses to compress the audio:
®
Note: NTSC discs must contain either PCM Audio or Dolby
Digital; they cannot contain only MPEG audio. This
restriction does not apply to PAL discs.
• Dolby
®
Digital isa high-quality encoding format developed formulti-channel digital soundand the most common
®
encoder for DVD-video. Adobe Encore DVD encodes Dolby
Digital 2.0 (stereo) audio files.
• MainConcept MPEG Audio uses MPEG-1Layer II audio in stereo.
• PCM (Pulse-Code Modulation) Audio is a lossless audio format sampled at 48 kHz in Adobe Encore DVD. Files
of this format tend to be large, occupying more disc space than the other encoder formats.
Bitrate Specifies the output bit rate of the audio. This option is only available for Dolby
®
Digital and MainConcept
MPEG Audio codecs.N
To view a preset’s parameters
1 Choose File > Transcode > Edit Project Transcode Presets.
2 Choose a preset from the Preset menu. Note the preset summary in the summary, and click OK.
Note: The summary displays the estimated file size per second in the lower right corner. If you change a preset’s
parameter that affects file size, such as target bit rate, the estimate updates to reflect your change.
To create a custom preset
1 Choose File > Transcode > Edit Project Transcode Presets.
2 Choose the preset you want to edit from the Presets pop-up menu.
3 If applicable, type a comment in the Comment box.
Page 38

ADOBE ENCORE DVD 2.0
User Guide
4 Click either the Audio or Videotab andadjust an option asdesired. (See “Presetoptions for video” onpage 31 and
“Preset options for audio” on page 32.)
5 When you are finished adjusting the options, click the Save button .
6 Type a name for your preset, and click OK.
7 Click OK in the Project Transcode Presets dialog box.
To export a preset
1 Choose File > Transcode > Edit Project Transcode Presets.
2 Choose the preset you want to export from the Presets pop-up menu.
3 Alt-click the Disk button to display the Export Preset dialog box.
4 Choose the location to save the preset, name it, and then click Save.
To import a preset
1 Choose File >Transcode > Edit Project Transcode Presets.
2 Click the Import Preset button to open the Import Preset dialog box.
3 Navigate to the location of the preset, select it, and then click Open.
4 Enter a name for the imported preset, and then click OK.
33
To delete custom presets
1 Choose File > Transcode > Edit Project Transcode Presets.
2 Do one of the following:
• To delete a single preset, choose the preset you want to delete from the Preset pop-up menu, and then click the
Delete Preset button . Click OK to confirm the deletion.
• To delete all custom presets, Ctrl-Alt-click the Delete Preset button. Click OK to confirm the deletion.
To specify a pre- or post-encoding task
Included with the transcode presets arepre- and post-encoding tasks. Youcan use these tasks tomake changes to the
asseteitherbeforeorafterit’stranscoded.Youcanapplyafiltertoreducenoiseinthefilesbeforethey’retranscoded,
or you can specify that a text log of errors, warnings, and settings be saved with the transcoded file. When you add
encoding tasks to a preset, you generate a custom preset.
1 Choose File > Transcode > Edit Project Transcode Presets.
2 Select the transcode preset you want to add a task to.
3 Add tasks as follows:
• To add the pre-encoding task of applying a noise reduction filter, click the Filters tab and select Video Noise
Reduction. Set the slider to the level of reduction you want.
• To add the post-encoding task of logging, click the Others tab and select Log File Details. Then select the details
you want logged.
4 Click OK, and then enter a name for the custom preset.
Page 39

Chapter 4: Adobe Bridge and Stock Photos
The basics of Bridge
About Adobe Bridge
Adobe Bridge is across-platform applicationprovided with Adobe Creative Suite and Adobe Production Studio. You
can use Bridge to organize, browse, and locate the assets you need to create content for print, the web, television,
DVD, film, and mobile devices. Bridge keeps native Adobe files (such as PSD and PDF) as well as non-Adobe application files available for easy access. You can drag assets into your layouts, projects, and compositions as needed,
preview them, and even add metadata (file information), making the files easier to locate.
File browsing FromBridgeyoucanview,search,sort,manage,andprocessimagefiles.YoucanuseBridgetocreate
new folders; rename, move, and delete files; edit metadata; rotate images; and run batch commands. You can also
view information about files and data imported from your digital or DV camera.
34
Version Cue If you have Adobe Creative Suite 2, you can use Bridge as a central location from which to use Adobe
®
Version Cue
applicationforeachfile,includingnon-Adobeapplicationfiles.Also,youcancreatenewVersionCueprojects,delete
projects, create versions, save alternates, and set access privileges in Bridge.
Note: Adobe Version Cue is not included with Production Studio.
Bridge Center If you have Adobe Creative Suite 2, Adobe Bridge includes Bridge Center, where you can view news
readersinyourwebbrowser,seeyourmostrecentactivity,readabouttipsandtricksforusingAdobeproducts,save
groups of files, and more. Adobe CreativeSuite 2 users can also use Bridge to specify color management settings and
access scripts that help automate your workflow.
Note: Bridge Center is not included with Production Studio.
Camera Raw If you have Adobe Photoshop
files from Bridge, edit them, and save them in a Photoshop-compatible format. You can edit the image settings
directly in the Camera Raw dialog box without starting Photoshop. If you don’t have Photoshop or After Effects
installed, you can still preview the camera raw files in Bridge.
Stock Photos Click Adobe Stock Photos from the Favorites pane in Bridge to search leading stock libraries for
royalty-free images. You can download low-resolution, complimentary versions of the images and try them out in
your projects before purchasing them.
Color management You can use Bridge to synchronize color settings across Adobe Creative Suite 2 applications.
This synchronization ensures that colors look the same no matter which Creative Suite application you view them in.
. From Bridge, you can browse all the files in a project in one place without having to start the native
®
or Adobe After Effects installed, you can open or import camera raw
See also
“About Adobe Stock Photos” on page 50
Page 40

ADOBE ENCORE DVD 2.0
User Guide
The Bridge work area
These are the main components of the Adobe Bridge window:
The Look In menu Lists the folder hierarchy, as well as favorite and recent folders. This menu gives you a quick way
to find folders containing the items you want to display. The menu is at the top of the Bridge window.
The Favorites panel Gives you quick access to folders as well as to Adobe Stock Photos and collections. If you have
Adobe Creative Suite 2, you also have access to Version Cue and Bridge Center.
The Folders panel Shows the folder hierarchy. Use it to navigate to the correct folder.
The Preview panel Displays a preview of the selected file. The preview is separate from, andtypically larger than, the
thumbnail image displayed in the content area. You can reduce or enlarge the preview.
The Metadata panel Contains metadata information for the selected file. If multiple files are selected, shared data
(such as keywords, date created, and exposure setting) is listed.
The Keywords panel Helps you organize your images by attaching keywords to them.
To start and quit Bridge, and to return to an application
Do any of the following:
• To open Bridge from an application, choose File > Browse from your application.
• (Windows) To open Bridge directly, choose Adobe Bridge from the Start menu.
• (Mac OS) To open Bridge directly, double-click the Adobe Bridge icon . By default, this is located in the Appli-
cations/Adobe Bridge folder.
• To quit Bridge, choose File > Exit (Windows) or Bridge > Quit Bridge (Mac OS).
• To return to the last open application that started Bridge, choose File > Return To [Application].
35
If Production Studio is installed, using File > Browse to launch Bridge within a Production Studio application lets
you double-click a file to open or import it within that application. For example, if you choose File > Browse from
within Adobe Premiereand then double-clicka Photoshop file, the file is added to the Premiere Project panel, not opened
in Photoshop.
See also
“To manage files with Bridge” on page 41
To create and close Bridge windows
❖ Do one of the following:
• Choose File > New Window to create a full-size Bridge window.
• Choose File > Close Window. In Windows, this command quits Bridge as well.
See also
“The Bridge work area” on page 35
Page 41

ADOBE ENCORE DVD 2.0
User Guide
To use Bridge in Compact mode
SwitchtoCompactmodewhenyouwanttoshrinktheBridgewindow.InCompactmode,thepanelsarehiddenand
the content area is simplified. A subset of common Bridge commands remains available from the pop-up menu at
the upper right portion of the window.
By default, the Compact mode Bridge window floats on top of all windows. (In Full mode, the Bridge window can
movebehindapplicationwindows.)Thisfloatingwindowisusefulbecauseitisalwaysvisibleandusableasyouwork
in different applications. For instance, you might use Compact mode after you select the files you plan to use, and
then drag them into the application as needed.
1 Click the Switch To Compact Mode button .
2 Do any of the following:
• Choose commands from the menu at the top right of the Bridge window.
• Click the Switch To Ultra Compact Mode button to hide the content area, further minimizing the Bridge
window. You can click the button again to return to Compact mode.
• Click the Switch To Full Mode button to return to Full mode, displaying the content area and the panels, and
letting Bridge move behind the current application window.
See also
“The Bridge work area” on page 35
36
To adjust the Bridge window
You can adjust the Bridge window by moving and resizing the panels. For example, you can enlarge the Preview panel
to display bigger thumbnails. However, you can’t move panels outside the Bridge window.
❖ Do any of the following:
• Drag a panel by its tab up or down into another panel area.
• Drag the horizontal divider bar between panels to make them larger or smaller.
• Drag the vertical divider bar between the panels and the content area right or left to resize the panels or content
area.
• Click the Show/Hide Panes button at the lower left of the Bridge window to display or hide the panels.
• Choose View, followed by the name of the panel you want to display or hide.
See also
“The Bridge work area” on page 35
To select Bridge workspaces
A Bridge workspace is a certain configuration or layout of the work area. You can select either a premade workspace
or a custom workspace that you have previously saved.
❖ Choose Window, followed by the name of the workspace you want, or choose Window > Workspace, followed by
one of the following commands:
Lightbox Displays just the content area of Bridge, so that you can concentrate on viewing the files.
File Navigator Displays the content area in Thumbnails view, along with the Favorites panel and Folder panel.
Page 42

ADOBE ENCORE DVD 2.0
Metadata Focus Displays the content area in Thumbnails view, along with the Metadata panel prominently shown.
Filmstrip Focus Displays just the content area, in Filmstrip view.
User Guide
To save and delete Bridge workspaces
You can save the current Bridge layout (that is, the work area configuration) as a workspace and reuse it later. By
saving Bridge in various configurations, you can work in (and quickly switch between) different layouts of the work
®
area. For instance, you might use one workspace to sort new photos and another to work with Adobe InDesign
❖ Choose Window > Workspace, followed by one of these commands:
Save Workspace Saves the current Bridge layout as a workspace so that you can reuse it later, even if you move a
files.
panelorchangetheviewinthecontentarea.Ifyouchoosethiscommand,enteranamefortheworkspaceandclick
Save.YoucanalsoassignakeyboardshortcuttotheworkspaceandspecifywhethertosavethelocationoftheBridge
window as part of the workspace.
Delete Workspace Deletesthesavedworkspace.Ifyouchoosethiscommand,choosetheworkspacefromthemenu,
and click Delete.
Reset To Default Workspace Restores the workspace to the default configuration.
To set Bridge preferences
1 Choose Edit > Preferences (Windows) or Bridge > Preferences (Mac OS).
2 Select any of the preferences categories on the left:
General Controls the general appearance settings.
37
Metadata Controls which sections and fields are displayed in the Metadata panel.
Labels Assigns names to each color label and specifies whether you need to press Ctrl as part of the keyboard
shortcut combination to apply labels and ratings to files.
File Type Associations Specifies which application to use from Bridge to open files of the named type. For any file
type, you can click the name of the application (or None) and click Browse to locate an application to use. You can
also reset the file type associations to their default settings as well as hide any file types that don’t have an associated
application.This affects only those files that you open with Bridge, and overrides theExplorer (Windows) and Finder
(Mac OS) settings.
Adobe Stock Photos Specifies Adobe Stock Photos settings.
Advanced Specifies advanced settings, including cache options and language options.
3 Click OK.
See also
“Bridge General preferences” on page 38
“Bridge Advanced preferences” on page 38
“To set Adobe Stock Photos preferences” on page 58
Page 43

ADOBE ENCORE DVD 2.0
User Guide
Bridge General preferences
Set any of the following General preferences and click OK:
Background Specifies the darkness of the content area in which thumbnails are shown.
Show Tooltips Specifies whether to display Bridge help information when you position the pointer over an item.
(This preference does not affect settings for Version Cue tool tips, which display metadata for items.)
Additional Lines Of Thumbnail Metadata Specifies whether to show additional metadata information with thumb-
nailsinthecontentarea.Ifyouselectthisoption,youcanchoosethetypeofmetadatatoshowfromtheassociated
menu. You can display up to three extra lines of information.
Favorites Items Specifies what items to show in the Favorites panel. Certain options are dimmed if you do not have
those items.
Reveal Scripts In Explorer/Finder Opens the folder that contains scripts (the commands available in the Tools
menu).
Reset All Warning Dialogs Resets warning notices in Bridge to their default settings.
Bridge Advanced preferences
Set any of the following Advanced preferences and click OK:
38
Do Not Process Files Larger Than Specifies the maximum file size of documents for which Bridge automatically
creates thumbnails. Displaying large files can slow performance.
Number Of Recently Visited Folders To Display In The Look In Popup Sets the number of most recently viewed
folders that appear in the Look In menu.
Language Sets the language used in the Bridge interface.
Double-Click Edits Camera Raw Settings In Bridge Opens camera raw files in the Adobe Camera Raw dialog box in
Bridge.
Use A Centralized Cache File Places the two cache files created for each folder you view in a centralized folder. A
centralized cache is generally easier to use than a distributed cache. For instance, when the cache is centralized, you
don’t have to search in multiple, distributed locations if you want to remove the cache. To specify a new name or
location for this centralized cache folder, click Choose.
Use Distributed Cache Files When Possible Placesthetwocachefilescreatedforeachfolderdisplayedintheviewed
folder,ifpossible.Forinstance,it’snotpossibletoplacethecachefilesintheviewedfolderifthatfolderisonaburned
CD. In that case, Bridge places the cache files in the centralized folder instead. However, if you are burning a CD,
using a distributed cache means that you don’t have to export the cache to the CD, because it is already in the folder
being burned to the CD.
Note: Cache files are hidden files. To view them in Bridge, choose View > Show Hidden Files.
To work with the cache in Bridge
The cachestores thumbnail, metadata,and file information to shortenloading times when you return to a previously
viewed folder. However, storing the cache takes up disk space.
Page 44

ADOBE ENCORE DVD 2.0
User Guide
Note: Purging the cache deletes the metadata cache and thumbnail cache. If the metadata can’t be written to a file, label
and rating information is lost as well.
❖ Choose any of the following commands from the Tools > Cache submenu:
Build Cache For Subfolders Builds, asa background process, a cache for the selected folder and all the folders within
it (except aliases/shortcuts to other folders). This shortens the time spent waiting for the cache to be displayedas you
look in subfolders.
Purge Cache For This Folder Clears the cache for the selected folder. This command is useful if you suspect that the
cache for a folder is old and needs to be regenerated.
Purge Central Cache Clears the entire centralized cache and any distributed cache in the currently viewed folder,
freeing room on the hard drive. The command does not otherwise clear local caches.
Export Cache Exports the cache, allowing you to burn a CD with the cache already generated. Because the folder
cache is written into the folder, the thumbnail cache and metadata cache are available after you burn the CD. This
option is active only if you chose Use A Centralized Cache File in the Preferences dialog box.
Files and folders in Bridge
39
To view file and folder thumbnails in Bridge
The content area of Bridge displays thumbnails of the files and folders of the selected folder, along with information
about them. You can specify how you want files and folders to be displayed in the content area.
❖ Do any of the following:
• Drag the Thumbnail slider at the bottom of the Bridge window to adjust the size of thumbnails.
• Choose View > As Thumbnails to display items in a grid.
• Choose View > As Filmstrip to display thumbnails in a scrolling list along with an extra-large thumbnail of the
currently selected item. Click the Back button or Forward button directly below the extra-large thumbnail to go
to the previous or next thumbnail. Click the Switch Filmstrip Orientation button to change from a horizontal
slide show to a vertical one. Note that you can page through a PDF preview in Filmstrip view.
• Choose View > As Details to display a scrollable list of thumbnails along with information about the selected file.
• Choose View > As Versions And Alternates to display a scrollable list of thumbnails, including thumbnails of any
Version Cue alternates and versions for each item (Adobe Creative Suite 2 only). Only the current file appears
unless you have created an alternates group containing the file or created previous versions of the file. Click Alternates View or Versions View at the top right of the content area to display thumbnails of alternates or versions. In
Alternates View, you can also create alternates groups containing files that are not in the current folder.
• Choose View > Show Thumbnail Only to view thumbnails without any text information listed. However, Version
Cue tool tips still display Version Cue information when you position the pointer over the thumbnail.
• Choose View > Slideshow to view thumbnails as a slide show that takes over the entire screen. This is a quick and
easywaytodisplayandworkwithlargeversionsofallthegraphicsfilesinafolder.Instructionsonhowtousethe
slide show are displayed on the screen when you choose this command.
Depending on the view you’re in, you can display extra file information by positioning the pointer over a thumbnail
in the content area. For files in Version Cue projects (Adobe Creative Suite 2 only), you can also choose File >
Versions or File Alternates. This command opens a dialog box that lets you work with the file’s versions or alternates
without having to select that view in the Bridge content area.
Page 45

ADOBE ENCORE DVD 2.0
User Guide
To specify how files and folders are shown in Bridge
You can specify what type of files and folders you want to display as thumbnails in the content area, as well as the
order in which to display them.
❖ Choose any of the following commands from the View menu:
• Sort, followed by the order in which you want to sort files. Choose Ascending to sort in ascending rather than
descending order. Choose Manually to sort by the last order in which you dragged the files.
• Show Hidden Files to display hidden files, such as cache files and Version Cue files that have been provisionally
removed (not permanently deleted) from Version Cue projects.
• Show Folders to display folders as well as individual files.
• Show All Files to display all files regardless of type, even non-Adobe files that Bridge doesn’t normally display.
• Show Graphic Files Only to display only files in graphic file formats, such as EPS, JPEG, BMP, PS, TIFF, and GIF.
• Show Camera Raw Files Only to display only camera raw files.
• Show Vector Files Only to display only files created with drawing programs such as Adobe Illustrator
and PS files.
• Refresh (or choose Refresh from the Folders panel menu) to update the content area. This is useful, for instance,
when you perform certain Version Cue actions that don’t automatically refresh the view in the content area.
Closing and reopening Bridge also refreshes the view.
®
, and EPS
40
YoucanalsoclickUnfilteredatthetoprightoftheBridgewindowandchoosethefilesyouwanttodisplaybasedon
their rating or label. The Unfiltered menu operates independently of the View > Sort commands.
To navigate folders and files with Bridge
❖ Do any of the following:
• Select theFolders paneland click to select the folder you want. Click the plus sign(Windows) or triangle(Mac OS)
next to a folder or double-click the folder to open subfolders within it.
• Select the Favorites panel and click to select the folder you want.
• Choose a folder from the Look In menu. You can click the Go Back button, Go Forward button, or Go Up button
next to the menu to navigate within the current folder listed in the menu.
See also
“To specify how files and folders are shown in Bridge” on page 40
To select files in Bridge
Before you can work with a file, you need to select it. You can select more than one file at a time.
❖ Do one of the following in the current folder:
• Click the thumbnail of a file.
• To select contiguous files, Shift-click them.
• To select noncontiguous files, Ctrl-click (Windows) or Command-click (Mac OS) them.
• To select all labeled or unlabeled files, choose Edit > Select Labeled or Edit > Select Unlabeled.
• To select the opposite of the current selection, choose Edit > Invert Selection.
Page 46

ADOBE ENCORE DVD 2.0
To open files in Bridge
You can open files in Bridge, even files that were not made with Adobe applications.
1 Select the file in the current folder.
2 Do one of the following:
• Choose File > Open.
• Press Enter (Windows) or Return (Mac OS).
• Double-click the file in the content area or Preview panel.
• Choose File > Open With, followed by the name of the application with which to open the file.
• Drag the file into the working area of an application, such as an open Illustrator document.
• Drag the file onto the application icon.
• Choose File > Open In Camera Raw to edit the Adobe camera raw settings for the file.
• Choose File > Open In Adobe Encore DVD As, followed by the file type (Asset, Menu, Timeline, or Slideshow)
you want to use (Windows only).
If you choose File > Browse to launch Bridge within a Production Studio application, double-clicking a file opens or
imports that file within the application.
User Guide
41
To manage files with Bridge
Adobe Bridge makes it easy to drag and drop files, move them between folders, copy and duplicate them, and
otherwise manipulate them.
Note: IfyouhaveAdobeCreativeSuite2,youcanalsouseAdobeVersionCuefromBridgetomanagefilesyouauthor.
You can create and manage revisions to files kept in Version Cue projects. Version Cue is also a convenient environment
for collaborative file management in workgroups. You can manage not only Adobe Creative Suite files but also other
Adobe and non-Adobe files.
❖ Do any of the following:
To delete files Select the files and click the Delete button or press Delete.
To copy files and folders Select the files or folders and choose Edit > Copy, or Ctrl-drag (Windows) or Option-drag
(Mac OS) the file or folders to a different folder.
To move files to another folder Select the files and drag them to a different folder. (When you search for Adobe
Stock Photos, you can’t drag images to other areas, because some images may be comp thumbnails. To drag a comp
image, first download it and then drag it from the downloaded comp’s folder.)
To quickly attach an image to an e-mail message, drag the image from Bridge and drop it into the e-mail message.
To display the location of a file in the operating system Select the file and choose File > Reveal In Explorer
(Windows) or File > Reveal In Finder (Mac OS).
To find the location of a file in a collection Select a file and choose File > Reveal In Bridge. A collection is a saved
search. By default, if you select a file in a collection, the file is listed as being located in the folder “File Results.”
Selecting Reveal In Bridge moves you to the folder in which the file is located.
To place files into an application SelectthefilesandchooseFile >Place,followedbythenameoftheapplication.For
instance, you can use this command to place a JPEG image into Illustrator. You can also drag files from Bridge into
an application. Depending on the file, the document into which you want to place it may need to be opened first.
Page 47

ADOBE ENCORE DVD 2.0
User Guide
To drag files out of Bridge Selectthefilesanddragthemontothedesktoporintoanotherfolder.Thisactionmoves
the file onto the desktop or folder.
To drag files into Bridge Select one or more files on the desktop, in a folder, or in another application that supports
drag and drop, and drag them into the content area in Bridge. The files are moved from their current folder into the
one displayed in Bridge. (If the file you are dragging is in a different mounted volume than Bridge, the file is copied
into Bridge.)
Drag a file or folder onto the Preview panel to display the contents of the folder in Bridge.
To manage folders with Bridge
❖ Do any of the following:
To create new folders Choose File > New Folder. Then, enter a name when the folder appears in the content area.
To delete folders Select the folder and press Delete.
To add folders to Favorites Choose a folder from the Look In menu or Folders panel or select it in the content area.
Then choose File > Add To Favorites. You can also drag the folder from the content area to the Favorites panel.
To remove folders from Favorites In the Favorites panel, select the folder you want to remove. Then choose File >
Remove From Favorites.
42
To reorganize folders in the Favorites panel Drag the folder to the desired location in the panel.
To rotate images with Bridge
You can rotate the view of JPEG, PSD, TIFF, and camera raw file images in Bridge. Rotating an image in Bridge may
rotate it in the application in which it was created as well. Rotating does not affect the data in the image file.
1 Select one or more images in the content area.
2 Choose Edit > Rotate 90˚ Clockwise, Rotate 90˚ Counterclockwise, or Rotate 180˚.
To label files with Bridge
Labeling files with a certain color is a flexible way to mark a large number of files quickly. Using the View > Sort
menu or Unfilter button, you can choose to view files according to their color label.
For example, suppose you’ve just imported a large number of images and are viewing them in Bridge. As you review
each new image, you can label those you want to keep. After this initial pass, you can use the Unfilter button to
display and work on files that you’ve labeled with a particular color.
You can assign names to labels through the Preferences dialog box. The name is then added to the file’s metadata
when you apply the label.
Note: When you view folders, Bridge shows both labeled and unlabeled files until you choose another option. Also,
purging the cache deletes labels from files that don’t support XMP write (such as BMP, DCS, Pict, PS6 PDF, and PSB
files), locked files, or read-only files (such as files on CDs).
1 Select one or more files.
2 Do one of the following:
• To label files, choose a color from the Label menu.
• To remove labels from files, choose Label > No Label.
Page 48

ADOBE ENCORE DVD 2.0
User Guide
See also
“To specify how files and folders are shown in Bridge” on page 40
To rate files with Bridge
When assigning ratings tofiles, you can award from zero tofive stars. Using theView > Sort menu or Unfilter button,
you can choose to view files according to their rating.
For example, suppose you’ve just imported a large number of images and are viewing them in Bridge. As you review
eachnewimage,youcanratethemfrombesttoworst.Afterthisinitialpass,youcanviewonlyfilesyou’veratedwith
four or five stars and work on those.
1 Select one or more files.
2 Do any of the following:
• In Thumbnail view, click the dot representing the number of stars you want to give the file. (Dots do not appear
in very small thumbnail views. If necessary, rescale the thumbnail view until the dots appear.)
• Choose a rating from the Label menu.
• To add or remove one star, choose Label > Increase Rating or Label > Decrease Rating.
• To remove all stars, choose Label > No Rating.
43
See also
“To specify how files and folders are shown in Bridge” on page 40
To search for files and folders with Bridge
You can perform searches with Bridge. You can narrow your search by adding multiple search criteria. You can even
save your search criteria as a collection, so that you can perform the same search again later.
1 Choose Edit > Find.
2 In the Find dialog box, choose asource folder from the Look In menu. By default, the menu displays the currently
active folder. Click the Browse button to navigate to another folder.
3 (Optional) Select Include All Subfolders to expand the search to any subfolders in the source folder.
4 (Optional) Select Search Past Versions Of Version Cue Files to include past versions of Adobe Version Cue files,
as well as current ones, in the search (Adobe Creative Suite 2 only).
5 (Optional) Select Show Find Results In A New Browser Window to display the search results in a new Bridge
window. If left unselected, the search results appear in the content area of the current window.
6 Choose a criterion for your search by selecting an option from the leftmost Criteria menu.
7 Select a limiter from the center Criteria menu.
8 Enter the search text in the text box at the right, if needed. You can enter basic search terms such as AND, OR,
and * (for wild cards).
9 To add search criteria, click the plus sign button. To remove search criteria, click the minus sign button.
10 Click Find. Bridge displays the files that match the search criteria, and you can navigate through the files.
11 (Optional) To save the search criteria to perform the same search again, click Save As Collection. Enter a name
for the collection. Select Start Search From Current Folder to search from the same folder in the future. Then, click
Save. The search criteria are saved in the Collections folder listed in the Favorites panel.
Page 49

ADOBE ENCORE DVD 2.0
See also
“To search with criteria saved as collections” on page 44
To search with criteria saved as collections
If you saved search criteria by using the Save As Collection option in the Find dialog box, you can run that search
again by using that collection.
1 Select Collections in the Favorites panel or Look In menu.
2 Double-click the collection you want.
A new Bridge window appears containing the results of the search.
See also
“To search for files and folders with Bridge” on page 43
Running automated tasks with Bridge
User Guide
44
To run automated tasks with Bridge
The Tools menu contains submenus for various commands available in the different Adobe applications. For
instance, if you have Adobe Photoshop installed, you can use the commands under the Tools > Photoshop submenu
to make picture packages and create Photomerge panoramas using photos you select in Bridge. Running these tasks
from Bridge saves time because you don’t have to open each file individually.
Note: Third parties can also create and add their own items to the Tools menu for added functionality in Bridge. For
information about creating your own scripts, see Bridge JavaScript Scripting Reference.
1 Selectthefilesorfoldersyouwanttouse.Ifyouselectafolder,thecommandisappliedwherepossibletoallfiles
in the folder.
2 Choose Tools > [Application], followed by the command you want. (If your application doesn’t have any
automated tasks available, no application name appears in the menu.)
For information about a particular command, see the documentation for that application.
To batch-rename files with Bridge
You can rename files andfolders ina group, orbatch. When you batch-rename files, you canchoose the samesettings
for all the selected files.
1 Do one of the following:
• Select the files that you want to rename.
• Select a folder in the Folders panel. The new setting will apply to all the files in the folder.
2 Choose Tools > Batch Rename.
3 Set the following options and click Rename:
• For Destination Folder, select whether you want to place the renamed files in the same folder or in a different
folder, move them to another folder, or place a copy in another folder. If you select Move To Other Folder or Copy
To Other Folder, click Browse to select the folder.
Page 50

ADOBE ENCORE DVD 2.0
User Guide
• For New Filenames, choose elements from the menus or enter text into the text boxes. The specified elements and
text are combined to create the new file name. You can click the + button or - button to add or delete elements. A
preview of the new file name appears at the bottom of the dialog box.
Note: If you choose Sequence Number, enter a number. The number is automatically incremented for each file named.
• Select Preserve Current File Name In XMP Metadata if you want to retain the original file name in the metadata.
• For Compatibility, select the operating systems with which you want renamed files to be compatible. The current
operating system is selected by default, and cannot be deselected.
Metadata in Bridge
About metadata
Metadata is information about the file, such as the author’s name, resolution, color space, copyright, and keywords
applied to it. You can use metadata to streamline your workflow and organize your files. This information is stored
in a standardized way using the Extensible Metadata Platform (XMP) standard on which Adobe Bridge and the
Adobe Creative Suite applications are built. XMP is built on XML, and in most cases the information is stored in the
file so that it cannot be lost. If it is not possible to store the information in the file itself, XMP metadata is stored in
a separate file called a sidecar file.
45
Many of the powerful Bridge features that allow you to organize, search, and keep track of your files and versions
depend on XMP metadata in your files. Bridge provides two ways of working with metadata: through the Bridge
Metadata panel and through the File Info dialog box. These methods provide different views into the XMP metadata
stored in the file. In some cases, multiple views may exist for the same property. For example, a property may be
labeled Author in one view and Creator in another, but both refer to the same underlying property. Even if you
customize these views for specific workflows, they remain standardized through XMP. The Advanced view in the
File Info dialog box displays the fundamental values being stored.
Metadata that is stored in other formats, such as EXIF, IPTC (IIM), GPS, and TIFF, is synchronized and described
with XMP so that it can be more easily viewed and managed. Other applications and features (for example, Adobe
Version Cue) also use XMP to communicate and store information such as version comments. For instance, when
yousaveafileinVersionCue,youmightaddthecommentthatyourotatedthefilewhenyouworkedonit.Lateron,
you could use Bridge to navigate to that Version Cue project and search for the term “rotate” to locate that file.
In most cases the metadata remains with the file even when the file format changes, for example, from PSD to JPG.
Metadata is also retained when those files are placed in an Adobe InDesign layout.
You can use the XMP Software DevelopmentKit to customize thecreation, processing, and interchange of metadata.
For example, you can use the XMP SDK to add fields to the File Info dialog box. More information on XMP and the
XMP SDK is available from the Adobe Solutions Network on the Adobe Website.
About the Metadata panel in Bridge
From the Metadata panel, you can view and edit the metadata for selected files, use metadata to search for files, and
use templates to append and replace metadata. Metadata preserves information about the contents, copyright status,
origin, and history of documents. Version Cue uses metadata to manage files.
You can specify the types of metadata displayed in the Metadata panel.
®
Note: If you have applied metadata to an Adobe Acrobat
keywords are still attached to the PDF file.
PDF file, some keywords may not appear; however, these
Page 51

ADOBE ENCORE DVD 2.0
User Guide
Depending on the selected file, the following types of metadata appear in the Bridge Metadata panel:
File Properties Describes the characteristics of the file, including the size, creation date, and modification date.
IPTC Core Displays editable metadata. You can add captions to your files as well as copyright information. IPTC
Core is a new specification that was approved by IPTC (International Press Telecommunications Council) in
October 2004. It differs from the older IPTC (IIM, legacy) in that new properties have been added, some property
names have changed, and some properties have been deleted. You can display the older IPTC (IIM, legacy) metadata
by selecting it from the Metadata options in the Preferences dialog box.
IPTC (IIM, legacy) Displays editable metadata. As with IPTC Core, you can add captions to your files as well as
copyright information.This set of metadata is hidden by default, because it has been superseded by IPTC Core.
However, you can choose it by selecting it from the Metadata options in the Preferences dialog box.
Fonts Lists the fonts used in Adobe InDesign files.
Swatches List the swatches used in Adobe InDesign files.
Camera Data (Exif) Displays information assigned by digital cameras. EXIF information includes the camera
settings used when the image was taken.
GPS Displays navigational information from a global positioning system (GPS) available in some digital cameras.
Photos without GPS information don’t have GPS metadata.
46
Camera Raw Displays settings applied by the Camera Raw plug-in.
Edit History Keeps a log of changes made to images with Photoshop.
Adobe Stock Photos Lists information about images obtained from Adobe Stock Photos.
Version Cue Lists any Version Cue version information about the file.
Note: Depending on the applications you are using, custom panels for various properties may appear here as well.
To view metadata with Bridge
❖ Do any of the following:
• SelectoneormorefilesandviewtheinformationintheMetadatapanel.Ifyouselectmultiplefiles,onlymetadata
that is common to the files appears. Use the scroll bars to view hidden categories. Click the triangle to display
everything within a category.
You can change the font size in the panel by choosing Increase Font Size or Decrease Font Size from the panel menu.
• Select one or more files and choose File > File Info. Then, select any of the categories listed on the left.
• Choose View > As Details or View > As Versions And Alternates to display the metadata next to the thumbnails
in the content area. This is especially useful for viewing Version Cue files.
• Position the pointer over a thumbnail in the content area. (Metadata appears in a tool tip only if Show Tooltips is
selected in General preferences.)
To edit metadata with Bridge
1 Click the pencil icon to the far right of the metadata field you want to edit.
2 Type in the text box to edit or add metadata.
3 Press Tab to move through metadata fields.
Page 52

ADOBE ENCORE DVD 2.0
User Guide
4 When you have finished editing the metadata, click the Apply button at the bottom of the Metadata panel. To
cancel any changes you’ve made, click the Cancel button at the bottom of the panel.
To specify the metadata displayed in the Metadata panel
1 Do one of the following:
• Choose Preferences from the Metadata panel menu.
• Choose Edit >Preferences (Windows) or Bridge > Preferences (Mac OS), and thenclick Metadata from the liston
the left side of the dialog box.
2 Select the metadata fields that you want to display in the Metadata panel.
3 Select the Hide Empty Fields option if you don’t want to view fields with no information in them.
4 Click OK.
To add metadata using the File Info dialog box
The File Info dialog box displays camera data, other file properties, an edit history, copyright and authorship information (if any), and custom metadata panels (if the application has installed them). You can add metadata directly
from the File Info dialog box. If you select multiple files, the dialog box shows where different values exist for a text
field. Any information you add to a field is applied to all selected files.
47
Note: You can also view metadata in the Metadata panel, incertain views in the content area, and by placing the pointer
over the thumbnail in the content area.
1 Select one or more files.
2 Choose File > File Info.
3 Select any of the following from the list on the left side of the dialog box:
Description Lets you enter document information about the file, such as document title, author, description, and
keywords that can be used to search for the document. You can also choose text from the menu to the right of the
text fields. To specify copyright information, select Copyrighted from the Copyright Status pop-up menu. Then
enter the copyright notice string and the URL of the person or company holding the copyright.
Audio Data 1 Lets you enter information about the audio file, including the title, artist, and album.
Audio Data 2 Lists information about the audio file, including bit rate, duration, and loop settings.
Categories Lets you enter information based on Associated Press categories.You can also choose text from the menu
to the right of the text fields. The Categories option appears only if Adobe Photoshop is installed.
History Displays Adobe Photoshop history log information for images saved with Photoshop. The History option
appears only if Adobe Photoshop is installed.
Camera Data 1 Displays read-only information about the camera and settings used to take the photo, such as make,
model, shutter speed, and f-stop. The Camera Data 1 option appears only if Adobe Photoshop or Production Studio
is installed.
Camera Data 2 Lists read-only file information about the photo, including pixel dimensions and resolution. The
Camera Data 2 option appears only if Adobe Photoshop or Production Studio is installed.
Adobe Stock Photos Lists read-only information about images obtained from Adobe Stock Photos.
Video Data 1 Lists information about the video file, including video frame width and height; and lets you enter
information about the video file, including tape name and scene name.
Page 53

ADOBE ENCORE DVD 2.0
User Guide
Video Data 2 Lists information about the video, including alternate tape name and timecode values.
Origin Lets you enter file information that is useful for news outlets, including when and where the file was created,
transmission information, special instructions for handling the file, and headline information. You can also choose
text from the menu to the right of the text fields.
Advanced Displays fields and structures for storing metadata using namespaces and properties, such as file format
and XMP, EXIF, and PDF properties. You can do any of the following with the information listed:
• Click Save to export the metadata to a text file (with the .xmp file-name extension).
• Click Replace to replace the metadata in the existing files with metadata saved in an XMP file. Values in existing
properties are replaced with the new values.
• Click Append to add the metadata in the existing files to metadata saved in an XMP file. Values in existing
properties are not replaced, and new values are appended or inserted where appropriate.
• Click Delete to remove the currently selected Advanced property. You can Shift-click to select multiple properties.
Note: Hold down theAlt key (Windows) or Option key (Mac OS) to change these commands to Replace All, Append All,
and Delete All. These commands then affect all information in the file; that is, EXIF information that is not modifiable
by the user, such as the f-stop and the Photoshop file ID information, as well as user-modifiable information, such as
document title and keywords. Holding down Alt (Windows) or Option (Mac OS) alsodisplays the Resetbutton to restore
the previous settings.
48
4 Click OK to apply the changes.
To work with metadata templates in Bridge
You can modify the metadata in the File Info dialog box and save it as a template for use with other files.
1 Create a new file using an Adobe Creative Suite or Production Studio application. This creates a file without
metadata from any other source.
2 Select the file.
3 Choose File > Info.
4 Enter the desired information in the File Info dialog box.
5 Choose any of the following from the menu at the upper right of the File Info dialog box:
• To save the metadata in the File Info dialog box as a template for use with other files, choose Save Metadata
Template. Enter a name for the template and click Save.
• To delete an existing metadata template, choose Delete Metadata Template. Choose the template you want to
delete from the menu in the dialog box and click Delete.
• To open the folder containing metadata templates, choose Show Templates.
6 Click OK. You can now also apply metadata templates to files with the Append Metadata and Replace Metadata
commands in the Tools menu and in the Metadata panel menu.
To apply metadata templates to files in Bridge
After you have saved metadata for one file, you can apply it to others.
1 Select one or more files.
Page 54

ADOBE ENCORE DVD 2.0
User Guide
2 Choose either of the following commands from the Metadata panel menu or the Tools menu:
• Append Metadata, followed by the nameof the template. This command applies thetemplate metadata only where
no metadata value or property currently exists in the file.
• Replace Metadata, followed by the name of the template. This command completely replaces any existing
metadata in the file with the metadata in the template.
To apply keywords to files with Bridge
The Keyword panel lets you create and apply Bridge keywords to files. Keywords can be organized into categories
called keyword sets.Usingkeywords,youidentifyfilesbasedontheircontent.Later,youcanviewallfileswithshared
keywords as a group.
Note: Bridge keywords are distinct from XMP keywords created with the File Info dialog box. The latter are displayed
in Version Cue files in the “Other Metadata” section of the File Info dialog box.
❖ Do any of the following:
• To add a keyword to files, select one or more files. In the Keywords panel, click the box next to the name of the
keyword you want to add. A check mark appears in the box next to the keyword when it’s added to a file.
• Toaddasetofkeywordstofiles,selectoneormorefiles.IntheKeywordspanel,clicktheboxnexttothenameof
the keyword set. A check mark appears in the box next to the keyword set when it’s added to a file.
49
Create a group of frequently used keywords so that you can apply them as a group.
• To remove keywords from a file, select the file, and then click the box next to the name of the keyword or keyword
set that you want to remove.
• To create a new keyword, click the New Keyword button at the bottom of the panel or choose New Keyword
from the panel menu. A new default keyword name appears in the panel. To create the new keyword, type over
the default name and press Enter (Windows) or Return (Mac OS).
• To create a new keyword set, click the New Keyword Set button at the bottom of the panel or choose New
Keyword Set from the panel menu. A new default keyword set name appears in the panel. To create the new
keyword set, type over the default name and press Enter (Windows) or Return (Mac OS).
• To rename a keyword or keyword set, select the keyword or keyword set and choose Rename from the panel menu.
Then, type over the name in the panel and press Enter (Windows) or Return (Mac OS).
Note: When you rename a keyword, the keyword’s name isn’t changed in files that currently contain it. The original
name stays in the file.
• To move a keyword to a different keyword set, drag the keyword from one set to another.
• Todeleteakeyword,selectthekeywordbyclickingitsname,andthenclicktheDeleteKeywordbutton atthe
bottom of the panel or choose Delete from the panel menu.
Note: Keywords that you get from other users appear in the Other Keywords category until you recategorize them. To
make these keywords permanent in Bridge, select the keyword and then choose Persistent from the context menu.
• To find a file using the keyword, choose Find from the panel menu.
Note: You can’t modify keywords in search results for Adobe Stock Photos.
See also
“To search for files and folders with Bridge” on page 43
Page 55

ADOBE ENCORE DVD 2.0
User Guide
Adobe Stock Photos
About Adobe Stock Photos
Adobe Stock Photos lets you view, try, and buy royalty-free images from leading stock libraries. With Adobe Stock
Photos, you won’t have to interrupt your design process to find quality images. Instead, from inside your favorite
applications, you can use the powerful search capabilities of Adobe Stock Photos to find and download images.
From Bridge, the Favorites pane gives you quick access to these stock images. With your computer connected to the
Internet, simply click the Adobe Stock Photos icon to start browsing thousands of available images. Because of the
tight integration between Stock Photos and Adobe applications, you can download images from Adobe Stock Photos
directly into many Adobe applications.
In the design process, you need the flexibility to try different images before deciding which one you want. Adobe
Stock Photos gives you the option to download low-resolution, complimentary (comp) versions of images you’re
considering. You can work with the comps until you make your final decision, at which point you can purchase and
download a high-resolution image.
For maximum convenience, you can open an account with Adobe. The benefit of opening an account is that you
enter your personal information only once, greatly simplifying the checkout process. You can also look back at
previous purchases, and even download photos again after you purchase them.
50
See also
“About comp images” on page 53
“Benefits of Stock Photos accounts” on page 55
“Buying stock photos” on page 53
Searching for images in Adobe Stock Photos
ThereareafewwaystosearchforimagesinStockPhotos.Ifyouneedhelpgettingaprojectstarted,abroadsearch
may yield a fund of possibilities and suggest areas to explore. If you have a clear idea of what you need, then you can
use Advanced Search to narrow the field.
Related keywords also help you find photos. After you find photos, you can start a new search by selecting one or
more related keywords. Each image is associated with keywords that help you find similar images. The more
keywords you select, the narrower the search results.
Photos matching the search criteria appear as thumbnails in the main Bridge window. You can resize the thumbnail
by dragging the Thumbnail slider at the bottom of the screen. When you click an image in search results, a lowresolution comp image appearsin thePreview pane (it may take several seconds for the imageto appear in the pane).
To enlarge the comp, simply resize the Preview pane. You can view metadata information about the image in the
Metadata pane under Adobe Stock Photos Metadata.
YourprevioussearchesareautomaticallysavedinPreviousPhotosintheFavoritespane.ClickPreviousSearchesto
display the list. To see the search results, double-click a search. To delete a search, select it and press the Delete key
(Windows), right-click the search and then choose Send To Recycle Bin (Windows), or Control-click the search and
choose Move To Trash (Mac OS).
Page 56

ADOBE ENCORE DVD 2.0
User Guide
Allthumbnailsfromrecentsearchesaresavedonyourcomputer.Havingthethumbnailsavailableofflineishelpful
ifyouwanttobrowsethroughtheimageswhenyourcomputerisn’tconnectedtotheInternet.However,thethumbnails do take up some space on your hard drive. At some point, if you want to delete these thumbnails, delete the
searches (as described above), or remove them manually from the default file location: My Documents/AdobeStockPhotos/Previous Searches (Windows), or Documents/AdobeStockPhotos/Previous Searches (Mac OS).
See also
“To adjust the Bridge window” on page 36
“To view file and folder thumbnails in Bridge” on page 39
To search for stock photos
1 In Bridge, click Adobe Stock Photos in the Favorites pane.
2 Inthetextboxatthetopofthescreen,typethewordorphrasethatdescribesthesubjectofthephotosyouwant
to search for.
3 Click the Search button or press Enter.
Images matching the search criteria are displayed in batches. (There is a preference for changing the number of
images displayed in a batch.) To view more images, click More Results.
51
See also
“Search tips for stock photos” on page 52
“To view image price and keywords” on page 52
To use Advanced Search
Advanced Search is a powerful tool that helps you find exactly the right photo. You can combine several search
criteria to narrow your results.
1 In Bridge, click Adobe Stock Photos in the Favorites pane.
2 Click the Advanced Search button .
3 Search using any combination of the following options:
• Type a descriptive keyword or keywords in the text box to find related images. Alternatively, type an image ID, if
you know the ID of the photo you want to use.
• To restrict searches to a specific media type, choose one or more options under Media Types.
• To search by the orientation of the photo, select the acceptable shapes under Orientation.
• Select the name of one or more providers to limit the search.
4 Click the Search button to display images matching the search criteria.
See also
“Search tips for stock photos” on page 52
To search with related keywords
1 In Bridge, click Adobe Stock Photos from the Favorites pane.
Page 57

ADOBE ENCORE DVD 2.0
User Guide
2 Inthetextboxatthetopofthescreen,typethewordorphrasethatdescribesthesubjectofthephotosyouwant
to search for.
3 In the search results, click a photo to select it.
4 Do one of the following:
• Click the Get Price & Keywords button.
• Right-click the image (Windows) and choose Get Price & Keywords from the menu.
5 When the Price & Keywords dialog box appears, select keywords under Keywords For This Image. The more
keywords you select, the narrower the search.
6 When you finish selecting keywords, click the Search Again button to begin a new search using the keywords.
To view image price and keywords
You can view size and price information, as well as related keywords, in the Image Detail dialog box.
1 In the search results window, click an image to select it.
2 Do one of the following:
• Click the Get Price & Keywords button.
• Right-click the image (Windows) and choose Get Price & Keywords from the menu.
3 To close the dialog box, click the Close button.
52
Note: ThecurrencydisplayedinthePrice&Keywordsdialogboxmaynotbethenativecurrencyofyourbillingcountry;
it is the supported currency for purchases made from your country. When you purchase photos from Adobe Stock Photos,
your credit card will be billed in the supported currency.
Search tips for stock photos
Here are some helpful pointers for refining your searches:
Misspelled words Double-check your search entries to make sure they’re spelled correctly.
Trademarked names Brand names may not return full search results. Instead, search for the item by its general
name.
Exact phrase searches To view images that exactly match a phrase, type the whole phrase in the Search text box. You
can enter Boolean operators such AND, OR, or NOT to narrow your search.
Search by subject To search for a specific subject, use nouns that describe the main subject of a photo, such as
“bicycle” or “house,” as well as adjectives that modify the nouns, such as “vintage” or “red.” To narrow the search
further, use verbs that describe an action in the photo.
Search by concept Try searching with concepts, or perceptions, such as “romance,” “vitality,” “frustration,” or
“excitement,” to find an inspiring image.
Search by style To find photos that reflect a specific photographic or artistic technique, try searching onterms such
as “profile”, “studio shot,” or “clipping path.”
Page 58

ADOBE ENCORE DVD 2.0
User Guide
Comp images
About comp images
Comp images are free, nonwatermarked, low-resolution versions of stock photos that you can download. You can
use compsto capture a feeling, idea, or concept before choosing the final image for aproject. Comps are not licensed
for production, but you can use them in mock-ups or other preliminary work. Because comps are low-resolution
images, they’re not suitable for printing or publishing. After an evaluation period, you can purchase a highresolution version of the image to continue working with the photo.
Metadata is bundled with comp images. This metadata is used in Adobe applications to recognize images as stock
photos, even if you rename them. You canpurchase high-resolution versions of the images later, even after you move
a comp to a project folder or create other versions of the image.
You can view your downloaded comps by clicking Downloaded Comps in the Favorites pane, or you can navigate to
the default folder where comps are saved: My Documents/AdobeStockPhotos (Windows) or Documents/AdobeStockPhotos (Mac OS). You can move downloaded comps to any folder you want. To delete a comp in the Stock
Photos window, right-click it and then choose Send To Recycle Bin (Windows) or Control-click it and choose Move
To Trash (Mac OS).
For more information on using comps, see the terms of service (TOS), which describe when and for how long you
can use a comp. A Terms Of Service link is available on the main Adobe Stock Photos screen.
53
To download comps from Adobe Stock Photos
1 In the search results, click a photo to select it.
2 Do one of the following:
• Click the Download Comp button.
• Right-click the photo (Windows) and select Download Comp from the menu.
• Click Get Prices & Keywords and select Free Comp Image in the dialog box.Click the icon to download the comp.
To view saved comps in Stock Photos
To help you keep track of downloaded comps, you can view them in Bridge. If you decide to purchase a comp, put
the comp in your shopping cart.
1 In the Favorites pane, click Adobe Stock Photos.
2 Click Downloaded Comps to see the comps.
Buying stock photos
Buying stock photos
It’s simple to buy images through Adobe Stock Photos. When you find the photos you want to buy, put them in your
shopping cart. The photos remain in your cart until you’re ready to complete your purchase. When you finish
browsing, you can check out and have your images automatically downloaded to your computer.
Having an account with Adobe speeds the checkout process. Because your contact and billing information is saved,
you can complete your purchase with just a few clicks.
Page 59

ADOBE ENCORE DVD 2.0
User Guide
Adobe Stock Photos maintains a secure site, and you can rest assured that your personal information is kept in strict
confidence. Any information you enter is used only for Adobe Stock Photos purposes.
To view your photos, click Purchased Images in the Favorites pane, or navigate to the default Stock Photos folder:
My Documents/AdobeStockPhotos (Windows) or Documents/AdobeStockPhotos (Mac OS).
See also
“To buy photos” on page 54
To place photos in the shopping cart
As you find photos you want to purchase, add them to the shopping cart until you’re ready to check out.
1 In the search results window, right-click (Windows) or Control-click (Mac OS) a photo, and then choose Add To
Cart from the context menu. You see a dialog box confirming that the photo is your shopping cart.
2 Click OK to continue, or click View Shopping Cart to see the contents of your cart.
If you want to disable this dialog box, select Don’t Show Again.
To buy photos
1 To access your shopping cart, click the Shopping Cart icon.
2 Choosearesolutionforthephotosyouwanttobuy.(Youcanremoveanitemfromtheshoppingcartatanytime
by clicking the Delete icon .)
3 Click Check Out.
4 Do one of the following:
• If you have an Adobe account, enter your ID and password.
• If you want to open an Adobe account, click Set Up An Account. You are prompted to enter your billing and
account information.
• Ifyouwanttobuytheimageswithoutanaccount,clickContinueAsGuest.Youarepromptedtoenteryourbilling
information. Click Continue.
5 Do one of the following:
• If you have an Adobe account, confirm your billing information and click Continue.
• If you don’t have an Adobe account, enter your billing information and click Continue.
6 In theOrder Summary page, confirm your choices. To delete a photofrom the shopping cart, click the Delete icon.
7 If you have a promotion code, enter it in the Promotion Code text box and click Apply. You see any changes made
to your order as a result of applying the promotion code.
8 Click the check box to accept the terms of the Adobe Stock Photos License Agreement (click the blue text to read
the agreement).
9 Finally, click the Purchase Now button to complete the checkout process. Your purchase is processed, then you’re
prompted to download your photos.
10 Click Start Download. After the photos are saved, click View Purchased Imagesif you want to start working with
them right away.
54
Page 60

ADOBE ENCORE DVD 2.0
User Guide
11 To view the receipt for your purchase, in the Thank You page click View Receipt. You can also monitor the
progress of the download by clicking Open Download Status. When you finish, click Find More Images if you want
to find new photos, or click Go To Your Account.
If you have been working with a comp version of the image you purchased, you need to replace the comp with the
high-resolution image in your art.
Note: Todeletethelistofhigh-resolutionimageswaitingfordownloadfromtheDownloadStatusscreen,chooseEdit>
Preferences (Windows) or Bridge > Preferences (Mac OS). Select Adobe Stock Photos, and then click the Clear Now
button.
See also
“To create a Stock Photos account” on page 56
“To set Adobe Stock Photos preferences” on page 58
To view order details
A benefit of having an Adobe account is that you can go back and view your previous orders.
1 In Adobe Stock Photos, click the Your Account button .
2 In the Your Account page, click View Order History.
3 The Your Order History page shows all of your previous orders. To view details about a particular order, click the
order number (highlighted in blue).
4 IntheOrderDetailpage,youcanseethebillinginformation,aswellasadescriptionofthephotosyoupurchased.
Click Return To Your Account if you’re done, or click Return To Order History if you want to review other orders.
55
You can also redownload the photos you purchased.
Stock Photos Accounts
Benefits of Stock Photos accounts
Creatingan Adobe account makes purchasing photos quick and easy. When you log in with your e-mail addressand
password, you can work with your account in several ways:
Manage your profile After you complete the registration process, modify your account information anytime by
clicking the Your Account link in the navigation bar.
See your order history Track orders made through Adobe Creative Suite Stock Photos to check the specific items
ordered, the total cost of the purchase, or the order date.
Download previously purchased items again Access your order history and click Re-download to replace a lost or
corrupted file for up to one year from the original purchase date.
Shop with ease Purchase photos without providing profile information. Adobe Stock Photos automatically enters
your name and address when you make any purchases. All your personal information is securely stored.
Page 61

ADOBE ENCORE DVD 2.0
User Guide
To create a Stock Photos account
1 In Adobe Stock Photos, do one of the following:
• Click the Your Account button , and then click the Continue button under Set Up An Account.
• If you have photos in the shopping cart, click the Shopping Cart icon, and then click Checkout. Click Set Up An
Account.
2 If you haven’t chosen your billing country, you see adialog box witha list of countries. Choose the country of your
billing address and click Continue.
3 In the text boxes, type your e-mail address and choose a password (at least six characters long and containing a
mix of letters and numbers).
4 Enter your billing address, and then type your payment information. The billing address must exactly match the
address where your credit card statements are mailed.
5 When you finish, click Continue.
After you create your account, Adobe Stock Photos sends a confirmation e-mail to the address you entered.
To log into your Stock Photos Account
1 In Adobe Stock Photos, click the Your Account button .
2 When prompted, type your e-mail address and password, and then click Continue. If your login is successful, the
Your Account page appears.
56
If you’re having trouble logginginto youraccount, makesure thatyou have spelled your e-mailaddress andpassword
correctly. Also make sure that you haven’t pressed the Caps Lock or Number Lock keys.
To edit your Stock Photos account profile
Your account profile includes your name and password settings.
1 Click the Your Account button .
2 Log into your account.
3 In the Your Account page, click Edit Your Profile. Do any of the following:
• To change your password, type a new word in the Password text box. Passwords can contain only letters and
numbers and must be at least six characters long.
• To sign up to get e-mail from Adobe Stock Photos about promotions or other special information, select the check
box.
4 To confirm your changes, click Save. To go back to the main Your Account page without saving changes, click
Return To Your Account.
To change Stock Photos account address information
You can change your default billing address or add other addresses. Make sure that any new addresses match the
address on your credit card billing statements exactly to avoid any problems.
1 Click the Your Account button .
2 Log into your account.
3 In the Your Account page, click Edit Your Address.
Page 62

ADOBE ENCORE DVD 2.0
User Guide
4 Do any of the following:
• To change the nickname associated with the default address, type a new name in the Billing Address Nickname
text box.
• Type any changes to the default address in the text boxes.
• To add a new address to your account, click Add New Address, and then enter the information in the text boxes.
• To edit a non-default address, click Edit under the address, and make any changes.
• To make an address the default, click Set Default under the address.
• To delete an address, click Delete under the address.
5 To confirm your changes, click Save. To go back to the main Your Account page without saving changes, click
Return To Your Account.
To change Stock Photos account payment information
You can change your saved credit card information or add additional credit cards. Enter your credit card number
without spaces or dashes. You can give each credit card a nickname to keep track of which card you’re using.
1 Click the Your Account button .
2 Log into your account.
3 In the Your Account page, click Edit Your Payment Information.
4 Do any of the following:
• To change the nickname of the default credit card, type a new name in the Payment Nickname text box.
• To change the default credit card number, type the new number in the Credit Card Number text box, and then
choose the expiration date for the new card from the month and year menus.
• To add a new card to your account, click Add New Payment Method, and then type a nickname and the card
number. Enter the expiration date.
• To delete a payment method, click Delete under the payment nickname.
5 To confirm your changes, click Save. To go back to the main Your Account page without saving changes, click
Return To Your Account.
57
To download previously purchased images from Stock Photos
To download previously purchased images, you need to have a Stock Photos Account. You can download images
onto a different computer than the one you used to purchase the photos originally (see the license agreement for
information about restrictions).
1 Click the Your Account button .
2 In the Your Account page, click View Order History.
3 In the Your Order History page, click the order number (highlighted in blue) of the photo you want to download
again.
4 In the Order Detail page, click the arrow under Download. The photo is downloaded. By default, purchased
images are located at My Documents/AdobeStockPhotos/Purchased Images (Windows) or Documents/AdobeStockPhotos/Purchased Images (Mac OS).
Page 63

ADOBE ENCORE DVD 2.0
User Guide
To set Adobe Stock Photos preferences
1 In Adobe Bridge, choose Edit > Preferences (Windows) or Bridge > Preferences (Mac OS).
2 Select Adobe Stock Photos from the list on the left.
3 Set any of the following preferences, and then click OK:
Thumbnails Per Search Group To set how many thumbnail images are displayed in a search group, choose an option
from the Thumbnails Per Search Group menu.
Search language To search using a different language, select the language from the Search Language menu. Note
that you get the best results from most providers if you search in English. This setting doesn’t affect the interface
display language.
Destination folder for downloads To select a new default folder in which to store photos, downloaded comps, and
purchased photos, click Change Location. Click Reset to restore the default location.
Billing Country Or Region To change your default billing country, choose the name of the country from the Billing
Country menu. The currency displayed next to the Billing Country menu may not be the native currency of that
country (not all currencies are supported). Instead, it’s the currency Adobe allows for that country. Your credit card
is billed in the supported currency.
Alert messages To enable or disable the messages that appear when you download a comp or add a photo to your
shoppingcart,selectordeselectDisplayMessageAfterDownloadingComporDisplayMessageAfterAddingImage
To Shopping Cart.
58
Automatic downloading to default folder To save your photos automatically to your default folder, select Auto-
Download Images After Purchasing Them. Deselect this option if you want to choose a location in which to save the
photos (for example, in a Version Cue project or other project-specific folder on your computer).
Downloading after lost connection To resume downloading automatically after a connection is lost, select Resume
Interrupted Downloads When Bridge Starts.
Page 64

Chapter 5: Creating projects and importing assets
Working with projects
About projects
AdobeEncoreDVDfilesarecalledprojects. A project stores links to all the content that you intend to include on the
DVD, as well as the menus and timelines (which combine video or stills, audio, and subtitles). Adobe Encore DVD
creates a folder for your project in the same location as the project file.
A project must conform to one of two TV standards, either NTSC (National Television Standards Committee) or
PAL (Phase Alternating Line). TV standards are the specifications to which any video intended for broadcast in a
certain country or region must conform. These specifications include, among other things, specific frame rate and
frame size requirements of the video. Your final output from Adobe Encore DVD will comply with one of these
standards:
59
TV standard Frame rate Frame size Aspect ratio Regions
NTSC 29.97 fps 720 x 480 pixels 4:3 or 16:9 North America,
PAL 25 fps 720 x 576 pixels 4:3 or 16:9 Europe
Note: The table above specifies output requirements. Requirements for imported assets vary. See “Supported file formats
for import” on page 63.
Japan
To create and open projects
Before you canimport your assets, you need to create or open a project. You can have only oneproject open at a time.
Unless you have changed the preferences setting, Adobe Encore DVD prompts you to select a default TV standard
when you create a project.
If you generally create projects using the same TV standard, you can set the default standard (the standard used for
new projects) in the Preferences dialog box. A project can conform to only one TV standard.
• To set the TV standard preferences for new projects, choose Edit > Preferences > General. Specify your TV
standard.
• To create a new project, choose File > New > Project. If Adobe Encore DVD prompts you to select a TV standard
for the project, select NTSC or PAL.
• To open an existing project, choose File > Open Project. Navigate to the project you want to open, and click Open.
• To open a recently saved project, choose File > [file name]. (At the bottom of the File menu, Adobe Encore DVD
lists the last five projects you saved in the order in which you saved them.)
Page 65

ADOBE ENCORE DVD 2.0
User Guide
To move or rename a project
Each project requires a project file (with the .ncor file-name extension) that contains links to—and instructions for
using—the various assets in the project. Projects also require a project folder (named to match the project and at the
same folderlevel as the project file), which stores previews, transcoded assets, and otherfiles used in the project. You
can move a project file and its folder as long as you keep the relative positions the same. You can rename them, as
long as you match the new project file name with the new project folder name.
• Tomovetheproject,dragthefolderandfiletoanewlocation,orcopyandpastetheminthenewlocation.Make
sure that their relative positions remain the same; that is, they should both be in the same parent folder.
Note: Whenyouopenaprojectfileyou’vemoved,adialogboxmayappeariftheapplicationcan’tlocatespecificassets.
You can either relink them in thedialog box or click Offline to open theproject without them. When working with offline
assets, use the Locate Asset command to relink them before you build or preview the project.
• To rename the project, select the file and folder in Windows Explorer and enter matching names (make sure to
leave the .ncor extension in the project file name).
Aspect ratios
60
Types of aspect ratios
Digital video uses two types of aspect ratios: pixel aspect ratios and screen aspect ratios (also referred to as frame
aspect ratios). Although related, they describe distinct properties. The pixel aspect ratio describes the pixel dimen-
sions within the screen, while screen aspect ratio details the screen dimension relationship.
See also
“About screen aspect ratios” on page 61
“About pixel aspect ratios” on page 60
About pixel aspect ratios
Pixel aspect ratios describe the width to height ratio of the pixels that make up a video or still-image file. Pixels are
either square or nonsquare (rectangular). Square pixels have a ratio of 1:1. In the film and video industry, however,
the “:1” is usually dropped and ratios are expressed as a single number. The table below lists the nonsquare pixel
aspect ratios for the two TV Standards:
TV Standard Fullscreen pixel
aspect ratio
NTSC 0.9 1.22
PAL 1.066 1.422
The type of pixels in an image, combined with its dimensions, determine its screen aspect ratio. An NTSC 720 x 480
pixel video, for example, displays as widescreen if it contains nonsquare pixels with a ratio of 1.22, and as a regular
4:3 screen if it contains nonsquare pixels with a ratio of .9. Adobe Encore DVD lets you specify the pixel aspect ratio
of imported assets.
Widescreen pixel
aspect ratio
Page 66

ADOBE ENCORE DVD 2.0
User Guide
A B C D
A 720 x 480 pixel image can have a screen aspect ratio of either
A. 4:3, or D. 16:9, depending on whether it has a pixel aspect ratio of B. 9, or C. 1.2.
About still-image pixels
Most digital still cameras and graphic applications use square pixels. You should set the pixel aspect ratio of stillimage assets to square to ensure that they display correctly. An exception to this rule are files created in Adobe
Photoshop CS and Adobe Photoshop CS2. Adobe Photoshop lets you work in nonsquare pixels when creating
imagesforDVDsandvideo.UsethePhotoshoppresetthatmatchesyourproject.Forexample,ifyou’reworkingwith
NTSC DV footage at 720 x 480, you’d use preset, “NTSC DV 720 x 480 (with guides).”
To specify an asset’s pixel aspect ratio
You can mix assets with different pixel aspect ratios in the same project. Adobe Encore DVD interprets each asset’s
pixel aspect ratio on import. Occasionally, an asset may contain incorrect information which, in turn, prevents
Adobe Encore DVD from identifying it correctly. If you need to change an asset’s pixel aspect ratio, you can use the
Interpret Footage command to specify it.
61
Changing the pixel aspect ratio for a video asset used in a timeline changes that timeline’s screen aspect ratio. To
change the screen aspect ratio for a still timeline, see “To specify the screen aspect ratio” on page 63.
1 Select the file in the Project tab.
2 Choose File > Interpret Footage.
3 In the Interpret Footage dialog box, select Conform to, and then choose the appropriate pixel aspect ratio:
• Square Pixels (1.0) for a file created using square pixels.
• Standard (0.9)or (1.066) for a file created using nonsquare pixels with an aspect ratio of 0.9 (NTSC) or 1.066
(PAL).
• Widescreen (1.2) or (1.422) for a file created using nonsquare pixels with an aspect ratio of 1.2 (NTSC) or 1.422
(PAL).
4 Click OK.
About screen aspect ratios
Screen aspect ratios describe the width to height ratio of an image or device. A standard television has a 4:3 ratio
(referred to asfullscreen) and a widescreentelevision has a 16:9 ratio. Theseratios are also noted as 1.33 for fullscreen
(4 / 3 = 1.33) and 1.78 for widescreen. (Film, which comprises a majority of widescreen content, actually uses screen
aspect ratios ranging from 1.66to 1.85, oreven 2.35 for scope footage—but these all work well within the format and
can be considered widescreen.)
Page 67

ADOBE ENCORE DVD 2.0
User Guide
The screen aspect ratio is determined by two factors: the resolution of the image and the size of the pixels within it,
or the pixel aspect ratio. As the resolution for a given asset is constant, (for example 720 x 480), Adobe Encore DVD
sets screen aspect ratios based on the asset’s pixel aspect ratio. For more information about pixel aspect ratios, see
“About pixel aspect ratios” on page 60.
Widescreen content on fullscreen TVs
There are several different methods used to convert widescreen content to 4:3 format for display. Some of the
methods convert the widescreen format to fullscreen format and store the converted fullscreen video on the DVD.
The preferred method storesthe original widescreen video on the DVD, and the DVD playerconverts it as necessary
during playback to a fullscreen device. Adobe Encore DVD stores the original widescreen footage on the disc and
instructs the DVD player to letterbox it on playback to a 4:3 TV, regardless of the DVD player’s settings.
If you’re working with widescreen footage, you typically work with and store the content in its widescreen format and
let the DVD player convert it during playback.
DVD players use the following methods to convert widescreen video for display on a 4:3 device:
Pan and scan Cropsthewidescreenvideotofitthefullscreenframe.Panandscanlosesthevisualdataoutsideofthe
4:3 frame. Traditionally, an editor or technician guides the pan and scan process during conversion from film to TV
formats. DVD players use an automatic pan and scan. Automatic pan and scan (limited to horizontal tracking of the
full height of the picture) crops the image that is stored on the DVD in widescreen format, and displays it on 4:3
devices.
62
Note: If a set-top DVD player is set to pan and scan, Adobe Encore DVD overrides the player and displays the footage
in letterbox format.
Letterbox Shrinks the image until it fits the 4:3 format horizontally and displays black bars in the blank spaces atthe
top and bottom of the frame. The resolution of the image is lowered, but the image remains whole—no cropping
occurs. DVD players use automatic letterbox to display footage stored as widescreen on 4:3 devices.
A B
C D
16:9 NTSC footage
A. Original B. DisplayedbyaDVDplayerusingtheoriginalwidescreenformatonawidescreenTV C. Using automati c pan and scan to crop
the image on a 4:3 TV D. Using automatic letterbox to reduce resolution and display the entire image on a 4:3 TV
Page 68

ADOBE ENCORE DVD 2.0
User Guide
To specify the screen aspect ratio
Adobe Encore DVD determines the screen aspect ratio for you. You can, however, change it if necessary. The type of
asset determines how you specify the screen aspect ratio. For menus, and timelines containing still images but no
video, you specify the screen aspect ratio in the Properties panel. For timelines with video, you specify the screen
aspect ratio by setting the pixel aspect ratio of the video asset. For more information about setting the ratio for video
timelines, see “To specify an asset’s pixel aspect ratio” on page 61.
1 Select the menu or still timeline in the Project panel.
2 Click the desired aspect ratio in the Properties panel.
Note: When you change the aspect ratio in the Properties panel, Adobe Encore DVD actually changes the asset’s pixel
aspect ratio, which in turn affects the screen aspect ratio.
Importing
Supported file formats for import
Imported files may require transcoding. DVD-compliant assets typically do not require transcoding, while nonDVD-compliant assets do.
63
Supported audio file formats
You can import any of the following types of audio files:
• AC3 (Dolby
• Audio Interchange File Format (AIF, AIFF; not AIFF-C)
• Digital Theater Sound (DTS)
• MP3
• MPG or M2P (including MPEG1, Layer 2)
• QuickTime (MOV)
• WAV (32-bit floating point files are transcoded; 96kHz 16/24 bit are not transcoded)
• WMA
• Windows Media File (WMV)
Supported still-image formats
®
Digital)
You can import any of the following types of still-image files:
• Adobe Photoshop (PSD)
• Bitmap (BMP)
• GIF
• JPEG
• PICT
• Portable Network Graphics (PNG)
• Targa (TGA)
Page 69

ADOBE ENCORE DVD 2.0
User Guide
• TIFF
Supported video file formats
You can import any of the following types of video files:
• AV I
• MPEG-2 (including MPG, MPV, and M2V)
• QuickTime (MOV; including Reference Movies)
Video must conform to one of the following frame rates and frame sizes, depending on the TV standard you plan to
use for the project:
Standard NTSC PAL
64
Frame rate (frames per second) 29.97
23.976*
23.978*
24*
Frame size (pixels) 720 x 480
720 x 486
704 x 480
25
720 x 576
704 x 576
*Transcoded on import to convert to 29.97
Advantages of transcoding before or after import
A DVD player can play only video that conforms to DVD standards (called DVD-compliant). However, video does
not need to be DVD-compliant before you import it (though it does need to have the correct frame rate and frame
size). Adobe Encore DVD includes a transcoding engine that can compress (or transcode) files for DVD playback.
You can transcode video before you import it (in a video-editing application), on import, or when you are ready to
build the DVD.
Whether you transcode before or after import is up to you. Adobe Encore DVD handles both transcoded and
untranscoded files equally well.
Importing transcoded DVD-compliant content allows you to work with the exact assetsthat willappear onthe DVD.
Also, because the content is already DVD-compliant, the time it takes to build the project will be reduced.
Note: In certain instances, Adobe Encore DVD needs to transcode DVD-compliant files. For example, if the data rate of
a DVD-compliant file is too high for the amount of content, the program transcodes the file to bring its data rate down.
Allowing Adobe EncoreDVD totranscode yourcontent gives youmore flexibilityin placingchapter points (markers
within the timeline of the video), inserting subtitles, and trimming your files. The MPEG-2 compression scheme
used in transcoding divides the footage into chunks, called a Group of Pictures (GOP). Once transcoded, you can
place chapter points and trim only at the header of each GOP, not at specific frames within the group. If you haven’t
transcoded the file, you are not restricted by GOP headers. In addition, when Adobe Encore DVD does transcode
the file, it creates GOP headers at every chapter point you set. (See “To add chapter points to timelines” on page 139.)
Nontranscoded files also give you more flexibility at build time. In large projects, you often need to adjust the video
data rate to fit all the video and audio assets on the DVD. If a file is already transcoded, you might have to transcode
it again at a lower data rate, or lower the data rate of the other content to reduce file size.
Page 70

ADOBE ENCORE DVD 2.0
User Guide
Transcoding 23.976, 23.98, or 24-fps files
Because the frame rate doesn’t conform to NTSC standards, Adobe Encore DVD must transcode 23.976, 23.98, or
24 fps footage files upon import. When you import files with these frame rates, Adobe Encore DVD prompts you to
choose an appropriate transcoding preset. By default, the program transcodes the files internally at 24 fps (to save
disc space and maintain quality) but tags them to be played back at 29.97 fps, as required by the DVD specification.
Note: If you import several 23.976, 23.98, or 24 fps footage files at once, the files are all transcoded independently of one
another. Cancelling the transcoding of one item only halts the process for that particular item.
To import an asset
Assets can include any combination of the supported content types. You can use video and audio files for your
program content or for motion and sound in menus. You can use still images for menu and program content. You
can import files stored on your local drive or a network drive.
For a list of supported file types, see “Supported file formats for import” on page 63.
1 Make sure that the Project panel is active, and do one of the following:
• Choose File > Import As > Asset.
• Double-click any empty area below the asset list.
2 Navigate to the file or files thatyou wantto import, select them, and click Open. To importthe contents of a folder,
select the folder and click Import Folder.
65
You can also drag an asset, or folder of assets, from Microsoft Windows Explorer into the Project panel.
To import as a timeline
You can import an asset and create a timeline for it in one step. When you import an asset as a timeline, Adobe
Encore DVD places both the asset and its timeline in the Project panel. The timeline also appears in the Timeline
panel. For more information, see “About timelines” on page 133.
1 Choose File > Import As > Timeline.
2 Navigate to the file you want to import, select it, and then click Open.
To import as a slide show
Youcanimportstillimagesasaslideshow.Whenyouimportimagefilesasaslideshow,AdobeEncoreDVDplaces
both the images and the slide show in the Project panel. The slide show also appears in the Slideshow panel, where
you do a majority of slide show authoring. For more information, see “About slide shows” on page 146.
1 Choose File > Import As > Slideshow.
2 Navigate to the image files you want to import, select them and then click Open. (You can select multiple, discon-
tiguous files by Ctrl-selecting them.)
To import a PSD file as a menu
Menus are an essential element in your DVD content because they provide the viewer with access to the content
containedontheDVD.YoucancustomizethetemplatesincludedwithAdobeEncoreDVD,buildmenuswithinthe
program using your imported assets, or assemble your menus in Adobe Photoshop and import them into Adobe
Encore DVD.
Page 71

ADOBE ENCORE DVD 2.0
User Guide
Adobe Encore DVD interacts closely with Adobe Photoshop. If you follow a specific layer-naming convention for
the menus you create in Photoshop, Adobe Encore DVD recognizes those layers as specific menu elements, such as
buttons and subpictures. (See “Understanding layer name prefixes for Photoshop menus” on page 115.) Also,
because Adobe Encore DVD creates all menus as PSD (Photoshop) files, you update your menus in Photoshop,
directly from Adobe Encore DVD. Photoshop files imported as menus appear both in the Project panel and in the
Menu panel and, upon import, automatically open in the Menu Editor.
1 Choose File > Import As > Menu.
2 Navigate to the PSD file or files you want to import, select them, and click Open.
When dragging the file from windows Explorer to the Project tab, it imported a PSD file as a menu. However, when
clicking holding down Alt as drag the file, a PSD file is not imported as a menu.
Importing from Adobe Premiere Pro
You can import movie files exported from Adobe Premiere Pro into Adobe Encore DVD. In Adobe Premiere Pro,
export the file you want to use in one of the following formats:
• MPEG-2 files, which include a project link by default.
• AVI files using the export movie command. When you export, make sure that you choose Project from the
Embedding Options menu.
66
If you follow a few rules when exporting from Adobe Premiere Pro, you can use the Edit Original command within
Adobe Encore DVD to open and edit the original file. For more information, see “To edit clips in Adobe Premiere
Pro and Adobe After Effects” on page 143.
Note: Whenimportingfiles,AdobeEncoreDVDcancreatechapterpointsfromnumberedmarkers.Tousethemarkers,
Adobe Encore DVD requires that they contain text in the Chapter field. It names each chapter point using this text. For
information on numbered markers, see Adobe Premiere Pro Help. Adobe Encore DVD does not currently recognize the
DVD markers in Premiere Pro files. You must use chapter markers in Adobe Premiere Pro if you want them to become
chapter points in Adobe Encore DVD.
Importing from Adobe After Effects
You can import a file from Adobe After Effects either as a discrete movie file, or as an Adobe Dynamic Link. The
Adobe Dynamic Link option provides the most workflow-friendly import. It lets you import an After Effects composition without rendering it. Using Adobe Dynamic Link, you can switch between Adobe Encore DVD and After
Effects as needed to update either project until you build the DVD.
Note: Adobe Dynamic Link is available only if Adobe Production Studio is installed.
If you need to import a discrete movie from After Effects, export an AVI or MPEG file using the Composition >
Make Movie command. When the Render Queue opens, click Output Module and select Project Link from the
Embed menu. See After Effects Help for more information on exporting movie files.
Note: When importing files, Adobe Encore DVD can create chapter points from layer markers. To import the markers,
Adobe Encore DVD requires that they contain text in the Chapter field. It names each chapter point using this text. For
information on layer markers, see After Effects Help.
Page 72

ADOBE ENCORE DVD 2.0
User Guide
To add items or sets to the Library
The Library panel contains predesigned templates for menus and other designelements, suchas buttons, images, and
shapes. If you have still images, logos, buttons, and menus that you use frequently, you can store them in the Library,
where you can quickly access them from any project. To keep them organized, you can group them into sets. The
Library imports layered Photoshop files, as well as BMP, GIF, JPEG, PNG, and TIFF images.
The Library categorizes items you add based on theircontent. Menus andbuttonsrequire special layer nameprefixes.
(See “About menus” on page 75.)
Category File type File must contain
67
Menu PSD, EM At leastone button layerset (layer setswith names thatbegin with the
Button PSD A singlelayer setwith the (+)prefix before itslayer name.The layer set
Image PSD, BMP, GIF,
Replacement
Layers
Background PSD Background layer only.
Layer set PSD A single layer set without the button layer name prefix. (No back-
Text PSD A single text layer. (No background layer.)
Vector Shape PSD A single vector shape layer. (No background layer.)
JPEG, PNG, TIFF
PSD A single-layer PSD file with a (!) in the name; or a file with a single-
(+) prefix) and at least one additional layer that serves as the background of the menu.
may contain subpicture layers and video thumbnail layers. (No background layer.)
Image file, or a PSD file not imported as a menu or button.
layer-set, with a layer named (!), without the button flag.
ground layer.)
Add items and sets to the Library in any of the following ways:
• In the Menu Editor or the Project panel, select the button, layer, or layer set you want to add, and then drag it to
the list of items in the Library.
• In the Project panel, select a still or menu and then drag it to the list of items in the Library.
• From Windows Explorer, drag the item to the Library.
• In the Library, click the New Item button , navigate to the file you want to add, and click OK.
• To create a new Library set, choose New Set from the Library menu. Type a name for the new set, and click OK.
Adobe Dynamic Link
About Adobe Dynamic Link (Adobe Production Studio only)
Until now, sharing media assets among post-production applications has required you to render your work in one
application before importing it into another—an inefficient and time-consuming workflow. If you wanted to make
changes in the original application, you had to re-render the asset. Multiple rendered versions of an asset consume
disk space and can lead to file-management challenges.
Page 73

ADOBE ENCORE DVD 2.0
User Guide
Adobe Dynamic Link, a feature of Adobe Production Studio, offers an alternative to this workflow: the ability to
create dynamic links, without rendering, between new or existing compositions in After Effects and either Adobe
Premiere Pro or Adobe Encore DVD. Creating a dynamic link is as simple as importing any other type of asset, and
dynamically linked compositionsappear withunique iconsand label colors to help youidentify them. Dynamic links
are saved as part of the Adobe Premiere Pro or Adobe Encore DVD project.
Changes you make to a dynamically linked composition in After Effects appear immediately in the linked files in
Adobe Premiere Pro or Adobe Encore DVD; you don’t have to render the composition or even save changes first.
When you link to an After Effects composition, it appears in the target product’s Project panel.You canuse thelinked
composition as you would any other asset. When you insert a linked composition into the target product’s timeline,
a linked clip, which is simply a reference to the linked composition in the Project panel, appears in the Timeline
panel. After Effects rendersthe linked composition on a frame-by-frame basis during playback in the target product.
• In Adobe Premiere Pro, youcan preview the linked composition in the Source Monitor, set Inand Out points, add
it to a sequence, and use any of the Adobe Premiere Pro tools to edit it. When you add a linked composition that
contains both footage and audio layers to a sequence, Adobe Premiere Pro inserts linked video and audio clips in
the timeline. (You can unlink these to edit them separately; search for “To unlink video and audio” in Adobe
Premiere Pro Help.)
• In Adobe Encore DVD, you can use the linked composition to create a motion menu or insert it into a timeline,
and use any of the Adobe Encore DVD tools to edit it. When you add a linked composition that contains both
video and audio layers to an Adobe Encore DVD timeline, Adobe Encore DVD inserts separate video and audio
clips in the timeline.
68
Other ways to share content among Production Studio applications include copying and pasting between After
EffectsandAdobePremierePro,exportingAfterEffectsprojectstoAdobePremierePro,usingtheCaptureInAdobe
Premiere Pro command in After Effects, creating After Effects compositions from Adobe Encore DVD menus, or
importing Adobe Premiere Pro projects into After Effects. For more information, see the relevant product’s Help.
For a tutorial on Adobe Dynamic Link, go to Resource Center on the Adobe website.
Adobe periodically provides updates to software and Help. To check for updates, click the Preferences button in
Adobe Help Center, and then click Check For Updates. Follow the on-screen instructions.
Saving and Adobe Dynamic Link (Adobe Production Studio only)
YoumustsaveyourAfterEffectsprojectatleastoncebeforeyoucancreateadynamiclinkfromAdobePremierePro
orAdobeEncoreDVDtoacompositionwithinit.However,youdon’thavetosubsequentlysavechangestoanAfter
Effects project to see changes to a linked composition in Adobe Premiere Pro or Adobe Encore DVD.
If you use the Save As command to copy an After Effects project that contains compositions referenced by Adobe
Dynamic Link, Adobe Premiere Pro or Adobe Encore DVD uses the original composition—not the new copy—as
its source for the linked composition. You can relink a composition to the new copy at any time (see “To relink a
dynamically linked composition (Adobe Production Studio only)” on page 71).
Managing performance and Adobe Dynamic Link (Adobe Production Studio only)
Because a linked composition may reference a complex source composition, actions you perform ona linked composition may require additional processing time as After Effects applies the actions and makes the final data available
to Adobe Premiere Pro or Adobe Encore DVD. In some cases, the additional processing time may delay preview or
playback.
Page 74

ADOBE ENCORE DVD 2.0
User Guide
If you’re working with complex source compositions and experiencing playback delays, you can take the composition offline or disable a linked clip to temporarily stop referencing a dynamically linked composition (see “To take
a dynamically linked composition offline (Adobe Production Studio only)” on page 71), or render the composition
and replace the dynamically linked composition with the rendered file. If you commonly work with complex source
compositions, try adding RAM or using a faster processor.
Color and Adobe Dynamic Link (Adobe Production Studio only)
Adobe After Effects works in the RGB (red, green, blue) color space. Adobe Premiere Pro, however, works in the
YUV color space. When you work with a dynamically linked composition, Adobe Premiere Pro either converts it to
YUV or retains the RGB color space, depending on the output format.
Dynamically linked compositions are rendered in the color depth of the After Effects project (8-, 16-, or 32-bpc,
depending on Project Settings). Set the After Effects project color depth to 32-bpc if you’re working with HDR (high
dynamic range) assets.
In Adobe Premiere Pro, choose Project > Project Settings > Video Rendering, and select Maximum Bit Depth to have
Adobe Premiere Pro process at the highest possible quality. This option may slow processing.
To link to a new composition with Adobe Dynamic Link (Adobe Production Studio only)
When you link to a new composition from Adobe Premiere Pro or Adobe Encore DVD, After Effects starts and
creates a new project and composition with the dimensions, pixel aspect ratio, frame rate, and audio sample rate of
your Adobe Premiere Pro or Adobe EncoreDVD project. (If After Effects is already running, it creates a new compositioninthecurrentproject.)ThenewcompositionnameisbasedontheAdobePremiereProorAdobeEncoreDVD
project name, followed by “Linked Comp [x].”
69
1 InAdobePremiereProorAdobeEncoreDVD,chooseFile>AdobeDynamicLink>NewAfterEffectsCompo-
sition.
2 If the After Effects Save As dialog box appears, enter a name and location for the After Effects project, and click
Save.
When you link to a new After Effects composition, the composition duration is set to 30 seconds. To change the
duration, select the composition in After Effects and choose Composition > Composition Settings. Click the Basic tab,
and specify a new value for Duration.
To link to anexisting compositionwith Adobe Dynamic Link(Adobe Production Studio only)
For best results, composition settings (such as dimensions, pixel aspect ratio, frame rate, and audio sample rate)
should match those used in the Adobe Premiere Pro or Adobe Encore DVD project.
❖ Do one of the following:
• In Adobe Premiere Pro or Adobe Encore DVD, choose File > Adobe Dynamic Link > Import After Effects
Composition. Choose an After Effects project file (.aep), and then choose one or more compositions.
• Drag one or more compositions from the After Effects Project panel to the Adobe Premiere Pro or the Adobe
Encore DVD Project panel.
• InAdobePremierePro,chooseFile>Import.ChooseanAfterEffectsprojectfileandclickOpen,andthenchoose
a composition in the Import Composition dialog box and click OK.
Page 75

ADOBE ENCORE DVD 2.0
User Guide
• In Adobe Premiere Pro, drag an After Effects project file into the Project panel. If the After Effects project file
contains multiple compositions, Adobe Premiere Pro displays the Import Composition dialog box.
Note: You can link to a single After Effects composition multiple times in a single Adobe Premiere Pro project. In an
Adobe Encore DVD project, however, you can link to an After Effects composition only once.
Adobe Encore DVD and After Effects: If you are linking to DVD menus or buttons, turn off subpicture highlight
layers in After Effects so that you can control their display in Adobe Encore DVD. For more information, search for
“subpicture” in Adobe Encore DVD Help or Adobe After Effects Help.
Dynamically linked After Effects compositions
To delete a dynamically linked composition or clip (Adobe Production Studio only)
You can delete a linked composition from an Adobe Encore DVD project if the composition isn’t used in the project.
YoucandeletealinkedcompositionfromanAdobePremiereProprojectatanytime,evenifthecompositionisused
in a project.
You can delete linked clips, which are simply references to the linked composition in the Project panel, from the
timeline of an Adobe Premiere Pro sequence or from an Adobe Encore DVD menu or timeline at any time.
70
❖ In Adobe Premiere Pro or Adobe Encore DVD, select the linked composition or clip and press the Delete key.
To edit a dynamically linked composition in After Effects (Adobe Production Studio only)
Use the Edit Original command in Adobe Premiere Pro or Adobe Encore DVD to edit a linked After Effects composition. Once After Effects is open, you can make edits without having to use the Edit Original command again.
1 Select the After Effects composition in the Adobe Premiere Pro or Adobe Encore DVD Project panel, or choose
a linked clip in the Timeline, and choose Edit > Edit Original.
2 Make edits in After Effects, and then switch back to Adobe Premiere Pro or Adobe Encore DVD to view your
changes.
Note: If you change the name of the composition in After Effects after you’ve created a dynamic link to it from Adobe
Premiere Pro, Adobe Premiere Pro doesn’t update the linked composition name in the Project panel, but retains the
dynamic link.
About offline compositions and Adobe Dynamic Link (Adobe Production Studio only)
Adobe Premiere Pro and Adobe Encore DVD display dynamically linked compositions as offline in any of the
following circumstances:
• You’ve renamed, moved, or deleted the After Effects project that contains the composition.
• You’ve purposefully taken the composition offline.
• You’ve opened the project that contains the composition on a system on which the Adobe Production Studio isn’t
installed.
Page 76

ADOBE ENCORE DVD 2.0
User Guide
Offline compositions appear with an Offline icon in the Adobe Premiere Pro or Adobe Encore DVD Project
panel. If you’re working with an offline composition, you can relink it to the original After Effects composition. You
can also choose to relink a linked composition to a different source composition.
To take a dynamically linked composition offline (Adobe Production Studio only)
You can take a dynamically linked composition offline if system resources are low, preventing you from smoothly
playing back or previewing, or if you want to share your project without having to open it on a system with
Production Studio installed. When you take a composition offline, you sever the dynamic link with After Effects,
and the linked composition is replaced in the Project panel with an offline composition.
In Adobe Encore DVD, you take a composition offline by transcoding it (transcoding is the process by which Adobe
Encore DVD converts non-DVD compliant files to the DVD-compliant files that are burned to disc).
❖ Select the composition in the Project panel and do one of the following:
• In Adobe Premiere Pro, choose Project > Make Offline.
• In Adobe Encore DVD, choose File > Transcode Now.
You can temporarily suppress a linked clip in Adobe Premiere Pro by selecting the clip and choosing Clip > Enable.
To relink the clip, choose Clip > Enable again (a check mark next to the command indicates that the clip is enabled).
For more information about disabling clips, see Adobe Premiere Pro Help.
71
To relink a dynamically linked composition (Adobe Production Studio only)
❖ Do one of the following:
• In Adobe Premiere Pro, select the composition and choose Project > Link Media. In the Import Composition
dialog box, choose an After Effects project, and then choose a composition.
• In Adobe Encore DVD, right-click the composition and choose Locate Asset. In the Open dialog box, locate the
composition you want to link to and then click Open.
XMP metadata
About XMP metadata
Metadata is descriptive file information a computer can search and process. The Adobe eXtensible Metadata
Platform (XMP) lets you embed metadata into afile to provide information about the contents of a document.Applications that support XMP can read, edit, and share this information across databases, file formats, and platforms.
Adobe Encore DVD lets you create, view, and edit metadata.
To view or edit metadata
1 In the Project panel, select the file for which you want to view or edit the metadata, and then choose File > File
Info.
2 Select the appropriate category from the left pane of the dialog box, and enter information in the desired fields in
the right pane. Click OK when finished.
Page 77

ADOBE ENCORE DVD 2.0
User Guide
Working in the Project panel
About the Project panel
The Project panel contains all the audio, video, and still-image assets you can use for a project. It also lists the
timelines, menus,slide shows, playlists, andchapter playlistscreated for the project. Each asset you bring into Adobe
Encore DVD is identified by a representative icon in the asset list. The list can be customized to group assets into
various categories, and to group them into folders you create.
A
B
C
D
E
F
72
G
H
Project panel
A. Preview B. Audio C. Menu D. Tim elin e E. Still image F. Vid eo G. Toggle display of different item types H. Create a new item
When you select an asset, a thumbnail preview appears in the upper left corner of the Project panel. If the asset
contains video or audio, a play controller appears below it so that you can preview the asset. Next to the thumbnail
is information about the displayed asset. If you select more than one asset, the text next to the thumbnail indicates
the number of assets selected.
Note: You import subtitle script files directly into the timeline in which they belong, not the Project panel. (See “About
subtitles” on page 154.)
Project panel columns
The Project panel contains the following columns, which provide information about the assets you’ve imported:
Name Displays the name of the asset or element. You can rename any element.
Type Displays the asset type or element type.
Duration Displays the duration of the asset or element, where applicable, in the format hours; minutes; seconds;
frames.
Dimensions Displays the dimensions of the image, in pixels.This field is useful for identifying still-image assets that
are not the correct size for the broadcast standard for the project.
Transcode Status Displays the transcoded state of the asset: transcoded or untranscoded.
Transcode Settings This column displays the setting used to encode the asset. (See “About transcoding” on page 28.)
Size Displays the file size of the asset.
Bitrate Displays the bitrate of the selected asset. (For untranscoded assets, the bitrate is an estimate.)
Page 78

ADOBE ENCORE DVD 2.0
User Guide
Media Category Displays the asset type. This category is useful for sorting your assets according to their status as
audio or video files, or both.
Description Displays any comments you add to this row. You may type up to 254 characters in the Properties panel.
Last Modified Displays date and time of the last modification to the file.
File Path Displays the system location of the asset. This column is blank if Adobe Encore DVD can’t find the asset.
(See “To locate a missing asset” on page 74.)
To customize the Project Panel
You can customize the Project panel columns to best suit your working style and needs.
• Tosortlistitemsbycategory,clickthecolumnnamerepresentingthecategorybywhichyouwanttosorttheitems.
Successive clicks sort them alternately in ascending or descending order.
• To hide or show a column, right-click anywhere in a column header, and choose the column you want to hide or
show. Alternatively, right-click the name of a column, and choose Hide This.
Note: A check mark next to the column name indicates that the column is shown.
• To resize columns, position the cursor over the right edge of the column you want to resize, and, when the cursor
becomes a resize cursor , drag the edge. You can also double-click on the right edge of the column you want to
resize. The panel resizes to the length of the longest line of text in that column.
• To rearrange columns, drag the column name to a different location along the column header.
• To show or hide items of a certain type, choose the item type from the Toggle Display of Different Item Types
menu at the bottom of the Project panel.
73
To organize items in the Project panel
To help organize the numerous elements of a project listed in the Project panel, you can group your assets, menus,
and timelines into folders. You can nest folders within other folders as well.
Organize items as follows:
• TocreateafolderattherootlevelintheProjectpanel,makesurenothingisselectedandthenchooseFile>New>
New Folder.
• To create a folder at a specific level of the hierarchy, select an item currently at that level and then choose File >
New > New Folder.
• To show or hide the contents of a folder, click the triangle to the left of the folder icon.
• To rename a folder, select a folder in the Project panel and then choose Edit > Rename. Type a new name, and
click OK.
To preview assets in the Project panel
YoucanpreviewanyassetfromtheAssetPreviewthumbnailattheupperleftcorneroftheProjectpanel.Textnext
to thethumbnail displays the file nameand file format ofthe selected asset.It alsodisplays, ifapplicable, the duration,
image dimensions, and frame rate of the selected asset. If you are previewing video footage, you can either view a
particular frame or set the footage to play from any point in its progression.
Page 79

B
A
Asset Preview thumbnail
A. Play/Pause B. Current-time indicator
ADOBE ENCORE DVD 2.0
User Guide
Note: If a still image (such as a TIFF file) doesn’t match the project aspect ratio, Adobe Encore DVD crops or mattes it
to fit the project’s frame size. Using the Still Clip Properties panel, you can control how the image is placed in a timeline,
such as whether it is scaled and cropped or matted with black. (See “To scale and crop still images” on page 143.)
• To show or hide the preview thumbnail, click the triangle in the upper left corner of the Project panel.
• To preview a still asset, select the asset you want to view.
• To preview a video or audio asset, select the asset you want to view. To begin playing the asset, click the Play
button . To pause playback, click the Pause button . To play from a specific location, whether the asset is
currently playing or paused, drag the current-time indicator until you reach the location you want to play from.
If the preview was paused when you began dragging, click the Play button, and if the preview was playing when
you began dragging, stop dragging for playback to resume.
74
To locate a missing asset
If Adobe Encore DVD cannot find an asset when you open a project, the Locate Asset dialog box appears. You can
then choose to select the missing asset, skip the file, or work offline. Missing or offline assets names appear italicized
in the Project panel.
1 Click the Project panel, and select the missing asset.
2 Choose File > Locate Asset.
3 Navigate to the location of the missing asset, select it and then click Select.
To replace an asset
You can work with offline assets in the Project tab. You can use a placeholder for the offline asset and, when you are
ready to work with the actual offline asset, you replace the placeholder with the asset.
1 Click the Project panel, and select the placeholder asset.
2 Choose File > Replace Asset.
3 Navigate to the location of the asset you want to use as a replacement, select it, and then click Open.
Page 80

Chapter 6: Menus
Menu basics
About menus
Menus contain navigation buttons that give viewers access to the DVD contents. Menu buttons can play a movie or
individual chapter, jump to other menus, set active audio and subtitle tracks, or play back special features on the
DVD.
The main menu in a DVD project is usually the first screen the viewer sees when a DVD starts. Depending upon the
complexity of a project, a project may contain a single menu or multiple menus. Many DVD projects require that
buttons on the main menu link to additional menus, called submenus. For example, a main menu may have a button
that lets you play the entire movie, another button that links to a submenu that lets viewers choose which chapter
they want to view, and a third button that links to a submenu with audio and subtitle options.
75
Main menus and submenus give viewers access to DVD contents.
A DVD need not open immediately to the main menu. A DVD can display other types of menus (or video, for that
matter) before leading tothe main menu. For example,the startup screen canbe a single-button menu that welcomes
the viewer or a multi-button menu that allows the viewer to choose the appropriate language.
Types of menus
A menu consists of a background, buttons, and button subpictures. Button subpictures change the appearance of
buttons when the viewer selects or activates the button with the remote control or mouse. (See “Button subpicture
states” on page 76.)
Page 81

ADOBE ENCORE DVD 2.0
A B C
DVD menu
A. Buttons lead to DVD content B. Subpicture highlights button when selected or activated C. Background
A menu can include text, still images, motion footage, and audio. Depending on its composition, a menu is
considered either a still menu or a motion menu:
Still menu A menu composed of static images. It contains no moving footage or audio.
Motion menu A menu that includes moving footage or audio. A video can play in the background of the menu.
Menu buttons can include thumbnail versions of the movies to which they’re linked. You can even include audio,
such as music or narration, while the menu is displayed.
User Guide
76
Buttons display thumbnail versions of linked video.
Button subpicture states
Button subpictures let you change the look of buttons in response to the remote control or mouse. Each button has
three possible states:
Normal Displayed when the button is not selected by the remote control or mouse.
Selected Triggeredwhen the viewer navigates to the button with the remote controlor mouse. When a menuopens,
one button is always preselected.
Activated Triggered when the viewer presses Enter on the remote control after navigating to the button or when the
viewerclicksthebuttonwiththemouse.DependingupontheDVDplayer,thedisplaytimeoftheactivatedstatecan
be very short, so designers often make the selected and activated state the same.
Page 82

ADOBE ENCORE DVD 2.0
User Guide
Adobe’s predesigned menus and buttons include subpictures. You can let Adobe Encore DVD create subpictures for
you by using the Create Subpicture command or the Convert To Button command. In Adobe Photoshop, you can
design your own subpictures. (See ““Using Photoshop to create Adobe Encore DVD menus” on page 114”.)
See also
“About button subpictures” on page 120
Menu Viewer
TheMenuViewerprovidesacanvasforcreatingandmodifyingamenu.Youcanplace,move,resize,flip,rotate,or
delete buttons, and you can add text. When creating and editing a menu in the Menu Viewer, you frequently use
other panels. For example, you can use the Project panel to drag and drop video clips, audio clips, and images onto
a menu. You can use the Library panel to add content, including predesigned templates and buttons, to your menu.
YouusetheLayerspaneltoview,navigate,andeditthelayerstructureofamenu.UsethePropertiespaneltochange
motion and navigation options for either menus or menu buttons.
You can display the Menu Viewer on an attached DV device (IEEE 1394). In the Audio/Video Out panel of the
Preferences dialog box, select the Show Menu Editor On DV Hardware option.
77
A CB
Menu Viewer
A. Selected object B. Show Safe Area C. Subpicture display buttons
The Menu Viewer contains the following controls:
Zoom Level Controlsthe magnification of the menu. Choose a preset zoom level,or type avalue from 25% to 1600%
and press Enter. You can also choose Fit to view the entire menu, even if you resize the Menu Viewer.
Correct Menu Pixels For TV Display Toggles between displaying the menu as it will appear on a television monitor
(default setting) and displaying the menu’s true dimensions and uncorrected pixel aspect ratio (if different from the
project frame size).
Show Safe Area Displays guides that mark the action safe areas and title safe areas. Television monitors reduce
the visible area of footage and menus. You should keep important visual elements within the outer guide, and keep
text and buttons within the inner guide. (The actual amount that is clipped varies from monitor to monitor.)
Page 83

ADOBE ENCORE DVD 2.0
User Guide
Show Button Routing Displays remote control routing and button numbers of all buttons in the menu. You can
customize the routing only if the Automatically Route Buttons menu property is turned off. (See “To change the
routing order” on page 130.)
Show Guides Displays any guides you added to the menu for aligning buttons and objects.
New Guide DisplaystheNewGuidedialogbox,whereyoucanspecifythetypeofguide(horizontalorvertical)
you want to add and its position in pixels coordinates within the menu. Guides are saved with the menu and can be
viewed in Photoshop.
Show Normal Subpicture Highlight Displays the normal (unselected) state of all buttons.
Show Selected Subpicture Highlight Displays the selected (highlighted) state of all buttons.
Show Activated Subpicture Highlight Displays the activated state of all buttons.
To improve performance, turn off the display of subpictures when they’re not needed.
Library panel
The Library panel includes predesigned templates for menus and otherdesign elements. You can create menus based
on these predesigned templates, and you can customize menus using other design elements, such as buttons, images,
and shapes, found in the Library panel. You can also create menu templates and add your own design elements to
the Library panel so that menus and designs that you use frequently are right at hand. Visit Resource Center on the
Adobe website to view a tutorial about using the menus in the Library.
78
Items in the Library panel are organized into thematic sets, such as Education, Corporate, or Wedding. You can
create your own sets or add to the existing sets. In addition, buttons on the panel let you view the elements of the
current set by type: menus, buttons, images,backgrounds, layersets, text, shapes, and replacement layers. When you
select an item, its preview appears at the top of the panel.
B C A
D
E
F
Library panel
A. Name of currently displayed set B. Preview of selected item C. Panel menu with additional options D. Buttons to display different types
of items E. Predesigned items F. Buttons to place, replace, add, and remove items
Page 84

ADOBE ENCORE DVD 2.0
User Guide
The Library panel contains the following controls:
Set Displays the currently selected set. Items in the Library panel are organized into thematic sets, such as
Education, Corporate, or Wedding. You can create your own sets or add to the existing sets.
Panel menu Contains commands to add or delete items or sets and to rename existing sets. It also includes
commands for undocking and closing panel for frame within the panel.
Category buttons Display predesigned items of a specific type: Menus , Buttons , Images ,
Backgrounds , Layer Sets , Text , Shapes , and Replacement Layers . Shift-click to view additional
categories. Alt-click to view all categories together.
Place Places the selected item in thecurrently displayed menu. Buttons are added on the leftedge of the title safe
guide withoutoverlapping previously placed buttons. Images, shapes, and layer sets are centered in the middle of the
menu.
Replace Replacesthe objects selected in themenu with theitem selectedin the Library panel. The Replace button
resizes the Library panel item to fit the dimensions of the object in the menu. You can also use the Replace button to
replace a menu with another menu while preserving links and text. (See “To replace a menu with another menu” on
page 82.)
Set Background Replaces the background layer of the currently active menu. This option is enabled only if a
background is selected in the Library panel.
79
New Menu Creates a new menu using the selected menu or background.
New Item Opensadialogboxtoletyouselectafile.Onceselected,addstheitemtotheLibrarypanelandcopiesthe
item to the Library set folder.
Delete Item Removes the selected item from the panel. You can delete only items you’ve created.
See also
“About menu templates” on page 109
Methods for creating menus
You can create menus using any of the following methods:
Predesigned menus You can customize the numerous predesigned menus included in the Library panel and on the
applicationDVD. These menus give your project aprofessional look quickly and easily. (See “To create a menu using
the Library panel” on page 81.)
Predesigned buttons and backgrounds You can use the predesigned buttons and backgrounds included in the
Library panel to create menus right in Adobe Encore DVD. (See “To create a menu using backgrounds and other
predesigned items” on page 81.)
Assets from projects You can compose a menu using any visual asset that you import into your project. You can use
both still and moving images for either the background or buttons. (See “To add objects from the Project panel to a
menu” on page 83.)
You can also design entire menus in Adobe Photoshop and import them into your project. (See “Using Photoshop
to create Adobe Encore DVD menus” on page 114.)
To name menus
Use the Properties panel to rename menus and include notes about menus.
Page 85

ADOBE ENCORE DVD 2.0
User Guide
Properties panel for selected menu (left) and selected button (right)
1 Select the menu in the Project panel or Menus panel.
2 In the Properties panel, select the current name and type a new name.
3 In the Description box, type any notes about the menu.
To rename a menu or button, you can also right-click it and choose Rename. Type the new name in the dialog box,
and click OK.
To name a menu button
1 In the Menu Viewer, select the button.
2 Do one of the following:
• Tospecifyanewbuttonname,deselectSyncButtonTextAndNameintheBasictabofthePropertiespanel,and
type a name in the Name box of the Properties panel.
• To use the same name as the topmost text layer in the button layer set, make sure that Sync Button Text And Name
is selected. (This option is selected by default.) If you change the button text, the button name updates automatically. Likewise, if you change the button name, the button text updates automatically. Sync Button Text and Name
also ensures the button takes on the name of the element it links to.
80
See also
“To renumber buttons” on page 129
To specify the default button for the menu
Whenever a menu is displayed on DVD, one button is selected. The default button is selected, unless a link to the
menu specifies a different button to be selected. If your menu displays audio or subtitle options, you can also use the
active audio or subtitle track as the default button when the viewer returns to a menu.
1 Select the menu in the Project panel or Menus panel.
2 In the Basic tab of the Properties panel, choose None, a button number, Active Audio Track, or Active Subtitle
Tr ac k.
If you choose None, button 1 in the menu is selected by default. If the viewer makes a different button selection, the
selected button will be highlighted when the viewer returns to the menu.
See also
“To indicate the active audio or subtitle track” on page 169
Page 86

ADOBE ENCORE DVD 2.0
User Guide
Creating menus
To create a menu using the Library panel
The Library panel includes predesigned menus that represent a wide spectrum of visual styles and themes. Many
menus have a companion submenu that reflects the same style and contains a different number of buttons. The
menus include buttons with subpictures (for highlighting when the button is selected) and fully styled placeholders
for text. The buttons on some menus provide a thumbnail layer for video. You can use a menus as is, just changing
the text, or you can swap out images that better reflect the look and feel of your project.
Note: Menus in the Library panel can be saved as regular menus (PSD) or as menu templates (EM). Regular menus
usually include a background and buttons, but no settings or links are stored. Menu templates include additional information such as menu settings and background video and audio clips. (See “About menu templates” on page 109.)
1 IntheLibrarypanel,selectthesetyouwanttoviewfromtheSetmenu,andthenclicktheToggledisplayofMenus
button to display the menus.
2 Select the menu that you want to use, and click the New Menu button at the bottom of the Library. (Press the
Up Arrow and Down Arrow keys to browse through the templates.)
The new menu appears in the Menu Viewer, and the menu is added to the Project panel.
81
3 Edit the menu to suit the needs of your project:
• Editthetext.Inthetoolbox,clicktheappropriatetexttool.Then,clickinthemenutocreateanewtextobject,or
click an existing text layer and edit the text as desired.
• Delete or duplicate buttons as desired. (See “To cut, copy, or duplicate a menu object” on page 87.)
• Set links from the buttons to other submenus or to items in the Project panel. (See “About buttons and navigation”
on page 173.)
Note: For a tutorial on creating menus using the Library panel, go to Resource Center on the Adobe website.
See also
“Using Photoshop to create Adobe Encore DVD menus” on page 114
To create a menu using backgrounds and other predesigned items
Instead of using a template to create a menu, you can piece together a menu using the predesigned backgrounds,
buttons, images, shapes, and replacement layers included with Adobe Encore DVD. These items are located in the
Library panel.
Page 87

ADOBE ENCORE DVD 2.0
User Guide
Sample buttons and design items from Library panel
Each button includes subpictures that define how the button looks when selected (highlighted) or activated. The
buttons are in layer sets together with the subpictures, so you can adjust individual elements or the entire button
easily using the Layers panel.
1 In the Library panel, select the set that you want to view from the Set menu, and then click the Toggle Display Of
Backgrounds button .
2 Select the background you want to use, and click the New Menu button at the bottom of the panel.
82
A new menu appears in the Menu Viewer, and the menu is added to the Project panel.
3 Add buttons and other design elements as desired. For example, to add a button, click the Toggle Display Of
Buttons icon in the Library panel, and then drag a button into the Menu Viewer. (See “To place objects from the
Library panel into a menu” on page 84.)
4 Edit the menu items as needed.
To replace a menu with another menu
If you want to change the menu design after you create and edit a menu, you can use the Replace Menu command.
When you replace a menu, Adobe Encore DVD preserves menu settings, including button links, button order, and
loop count.
1 Open the menu in the Menu Viewer.
2 Select a menu template in the Library panel, and choose Menu > Replace Menu, or click the Replace button .
The appearance and layout of the menu are replaced by those of the selected template. If the replacement menu
contains more buttons than exist in the original menu, the extra buttons link to no destination. If the replacement
menu contains fewer buttons, the buttons from the original menu are preserved, but in the style of the default button
in the replacement menu. Both the original menu and its replacement must have at least one button.
Page 88

ADOBE ENCORE DVD 2.0
User Guide
To change the default menu in the Library panel
Adobe Encore DVD uses the default menu as the basis for any menu you create by using the Menu > New Menu
command(ortheNewMenubuttonatthebottomoftheProjectpanel).Astarappearsintheiconnexttothecurrent
defaultmenu.YoucanselectanymenuintheselectedLibrarysettobethedefaultmenu.Youcanevenaddyourown
menu to the panel (using the panel’s Add Item button) and set your menu as the default. You can set different default
menus for different sets.
❖ In the Library panel, right-click the menu template that you want to be the default menu, and choose Set As
Default Menu.
To change the default button in the Library panel
Adobe Encore DVD uses the default button when you drag an item such as a video, timeline, or menu from the
Project panel to a menu in the Menu Viewer. This shortcut lets you quickly place a button and automatically link it
to the dragged element. In this shortcut, Adobe Encore DVD places the default button on the menu. You can set the
default buttonto any button in the selected Library set. (A starappears in the iconnext to the current default button.)
❖ In the Library panel, right-click the button that you want to be the default, and choose Set As Default Button.
83
Adding objects to menus
To add objects from the Project panel to a menu
1 Create or open a menu.
2 Drag the object (such as a video file, timeline, or menu) from the Project panel to the menu in the Menu Viewer.
If you drag an object such as a timeline or slide show to a blank area, Adobe Encore DVD creates a button (based on
the default button in the currently active set in the Library panel) and links it to the destination. If you drag a video
file, a timeline is created for it as well. If you drag such an object to an existing button, its contents and link are
replaced.
See also
“About replacement layers” on page 111
To add still images from the Project panel to a menu
You can include still images in a menu as part of the background.
1 Open an existing menu or create a new one.
2 In the Project panel, drag the desired image to the Menu Viewer.
3 Using the Direct Select tool , position and size the image as necessary.
If you want to use the still image as a button, select the image and choose Object > Convert to Button.
Note: You can also drag an image from Adobe Bridge directly to the menu.
Page 89

ADOBE ENCORE DVD 2.0
User Guide
See also
“About Adobe Bridge” on page 34
“Using Photoshop to create Adobe Encore DVD menus” on page 114
To place objects from the Library panel into a menu
1 Open the menu to which you want to add a Library panel element.
2 In the Library panel, select the set you want to view from the Set menu, and then click any of the icons to display
the items for that type. For example, click the Toggle display of Buttons icon to display only buttons.
Shift-click any of the icons to view multiple categories. Alt-click any of the icons to view all categories.
3 Select the desired item in the Library panel, and either click the Place button or drag the item from the panel
to the Menu Viewer. Repeat until you have placed all the items you need.
If you click the Place button repeatedly, Adobe Encore DVD aligns buttons in a grid, starting along the left edge of
the title safe guide. You can then select them and move them as a group.
4 Position and resize the items as needed.
84
See also
“Library panel” on page 78
“To add items or sets to the Library” on page 67
To convert an object to a button
1 Open the menu that you want to modify.
2 In the Menu Viewer or Layers panel, select the object you want to convert to a button. Select multiple objects to
convert them all to buttons at the same time or select a layer set to convert the entire set into a button.
3 Choose Object > Convert To Button (or click the Button column next to the image layer in the Layers panel).
Adobe Encore DVD creates a layer set with the prefix denoting a button set (+) attached to the name. It places the
object into the layer set and creates a subpicture for the button. (If you converted a layer set, it creates a subpicture
layer only if one doesn’t already exist).
To convert a button or replacement layer to an object
Whenyouconvertabuttontoanobject,youremovelinkingandnavigationcapabilitiesfromthebutton.Whenyou
convert a replacement layer to an object, you remove the ability to replace the layer’s contents by dragging and
dropping.
1 Open the menu that you want to modify.
2 IntheMenuViewerorLayerspanel,selectoneormorebuttonsorreplacementlayersthatyouwanttoconvertto
objects.
3 Choose Object > Convert To Object.
See also
“To convert an object to a replacement layer” on page 112
Page 90

ADOBE ENCORE DVD 2.0
User Guide
Editing menu objects
Selection tools
The toolbox contains two selection tools for objects:
Selection tool Selects an entire button set (a button, its text, and subpictures together) so that it can be manipu-
lated as a unit.
Direct Select tool Selects individual layers so that they can be manipulated on their own.
Note: The Move tool does not select objects. The Move tool is used for moving objects after you select them. (See “To
move menu objects or layer sets” on page 87.)
85
AB
Selecting objects
A. Selected button B. Selected layer
When selecting objects, remember that each object is on a separate layer and that the layers are stacked one on top
of another. Using the selection tools, you can select objects on lower layers as long as you click at a point where no
other object overlaps. Using the Layers panel, you can easily select objects individually even when several elements
overlap.
To select objects or a layer set
1 Open the menu that you want to modify.
2 Do one of the following:
• Click an objectdirectly in the Menu Viewer using either the Selection tool to select a button or the Direct Select
tool to select a layer. Shift-click each additional object that you want to select.
• Using the Selection tool, drag a box (or marquee) around one or more objects in the Menu Viewer.
• In the Layers panel, click the object’s layer or the layer set. Shift-click each additional layer or layer set that you
want to select.
Selection handles appear on all the selected items in the Menu Viewer. When you select a button, a heavy outline
appears. This outline encompasses all elements within the button.
Page 91

ADOBE ENCORE DVD 2.0
User Guide
Layers panel
Adobe Encore DVD uses the Photoshop file structure for creating menus. The Layers panel in Adobe Encore DVD
displays the contents of the Photoshop file that is used as the basis for the menu. Therefore, you can edit menus in
either program without losing the layer organization.
Each object you add to a menu appears on a separate layer in the Layers panel in Adobe Encore DVD. Selecting
objects in the Menu Viewer is sometimes easier when you use the Layers panel. Regardless of where an object is in
the stacking order, you can quickly select it by selecting its layer in the Layers panel. When you select a layer or layer
set, selection handles appear on the element in the Menu Viewer. You can isolate elements to change them together
or individually, view only specific layers while hiding others, and lock layers or layer sets so that their elements
cannot be modified. The Layers panel is especially useful when working on multilayered menus, such as menu
templates.
A B C
D
E
F
G
H
86
Layers panel
A. Display/Hide column B. Lock/Unlock column C. Button/Object column D. Layer set E. Button layer set F. Text layer G. Subpicture
layers H. Open/Close layer set
The three columns adjacent to the layers let you selectively hide, display, or lock the contents of layers and layer sets,
as well as convert objects to buttons and convert button sets to individual elements. Clicking the column next to a
layer turns the option on or off.
Display/Hide column HidesordisplaysthelayerintheMenuViewer.TheEyeicon nexttoalayerindicatesthat
it is visible. Hiding layers lets you work on a layer in isolation and makes it easier to adjust a layer that is behind other
objects.
Note: You cannot hide button layer sets, only the elements within them. You also cannot use the Display/Hide column
on subpicture layers—layers with names that begin with (=1), (=2), or (=3). To hide or display subpicture layers, you
use the Show Normal Subpicture Highlight button , Show Selected Subpicture Highlight button , and Show
Activated Subpicture Highlight button in the Menu Viewer. (See “Button subpicture states” on page 76.)
Lock/Unlock column Locks or unlocks a layer in the Menu Viewer so that it can’t be selected, moved, or modified.
Locking layers or layer sets protects the elements from accidental changes. The Lock icon indicates that it is
locked.
Button/Object column Converts the layer to a button or back to an object. The Button icon indicates that the
layer is a button. Converting an object to a button creates a new button layer set with a plus-sign prefix (+) added to
its name. Converting a button set to an object removes the prefix from the layer set name, but leaves the button
elements grouped in a layer set.
Page 92

To rename a layer or layer set
1
In the Layers panel, double-click the layer name you want to change.
2 In the Rename Layer dialog box, type the new name and click OK.
ADOBE ENCORE DVD 2.0
User Guide
Note: In Adobe Encore DVD, you can’t change the layer name prefixes of a button layer set (+), subpicture layers (=1),
(=2), or (=3), replacement layers (!), or thumbnail layers (%). You can edit the prefixes in Photoshop.
To move menu objects or layer sets
1 Open the menu that you want to modify.
2 In the Menu Viewer or Layers panel, use a selection tool to select the object or layer set you want to move. (See
“To select objects or a layer set” on page 85.)
3 In the Menu Viewer, do one of the following:
• Drag the button set or object in the menu using the appropriate selection tool. Shift-drag to constrain the
movement horizontally, vertically, or diagonally. Alt-drag to create a copy and move it to a new location.
• To prevent a different object from being selected, click the Move tool in the toolbar, and then drag anywhere
in the Menu Viewer to move the selected object.
• Press an arrow key to nudge an object one pixel at a time. Press Shift+arrow key to move an object 10 pixels at a
time.
87
To select and move an object within a stack
In some cases, you may not be able to click directly on a layer to select it in the Menu Viewer because the layer is
obscured by overlapping layers. Using thecontext menu lets you select alayer withina stack. Toprevent another layer
from being selected accidentally when you try to move the layer within a stack, use the Move tool.
1 Using a selection tool, right-click the stacked objects in the Menu Viewer.
2 Choose Select from the context menu, and then choose a named object in the list.
3 Click the Move tool , and then drag the object to the desired location. (Ctrl+right-click to view a menu of the
layers beneath the cursor.)
You can also select an object using the Layers panel.
To cut, copy, or duplicate a menu object
1 Open the menu that you want to modify.
2 In the Menu Viewer or Layers panel, select the object.
3 Do one of the following:
• To remove the object, choose Edit > Clear, or press the Delete key.
• Toduplicatetheobject,chooseEdit>Duplicate.AdobeEncoreDVDduplicatestheobject,offsettingitfromthe
original. If the object was in a layer set, it copies the object to the top layer of the same layer set.
• To copy the object and move it to a new location, Alt-drag the object.
• To copy the object and paste it into the same menu, choose Edit > Copy. Then choose Edit > Paste.
• To copy the object and paste into a different menu, choose Edit > Copy. Then open the other menu in the Menu
Viewer, and without selecting anything, choose Edit > Paste. The object is pasted in the same position as in the
original menu.
Page 93

ADOBE ENCORE DVD 2.0
User Guide
To move or copy a menu object into another layer set
For multilayered menus, selecting using the Layers panel is helpful.
1 Open the menu that you want to modify.
2 In the Menu Viewer or Layers panel, select the object.
3 Choose Edit > Cut to move the object or Edit > Copy to copy it.
4 In the Layers panel, open the layer set into which you want to add the object, and select any object in the layer set.
5 Choose Edit > Paste.
AdobeEncoreDVDaddstheobjecttothetoplayerofthelayerset.YoucanalsousetheObject>Arrangecommands
to change the order of objects.
Transforming menu objects
To rotate menu objects
1 In the Menu Viewer, select one or more objects.
2 Do one of the following:
• To rotate in 90˚ increments, choose Object > Rotate > 180˚, 90˚ CW (clockwise), or 90˚ CCW (counter-
clockwise).
• To rotate in any increment, click the Rotate tool in the toolbar, and drag from outside one of the object’s eight
selection handles (the pointer becomes a curved, two-sided arrow). Drag left to rotate counter-clockwise or right
to rotate clockwise. Holding down the Shift key constrains rotation to 45˚ increments. Items rotate around their
center points.
88
To change the stacking order of menu objects
As inPhotoshop, the stackingorder in the Layers paneldetermines whether the content ofa layer or layer set appears
in front of or behind other elements in the menu. When you create or import a menu, the background is always the
bottommost layer. A menu can have only one background, and it must remain the bottom layer.
Comparison of object in front (left) and sent backward with Arrange command (right)
1 Open the menu that you want to modify.
2 In the Menu Viewer, select the object you want to move in the stacking order.
Page 94

ADOBE ENCORE DVD 2.0
User Guide
3 Choose Object > Arrange, and then choose one of the following:
• Bring To Front to move the selected item to the front.
• Bring Forward to move the selected item one level forward.
• Send Backward to move the selected item one level backward.
• Send To Back to move the selected item to the back.
See also
“To select and move an object within a stack” on page 87
To align menu objects
Using the Align command, you can easily align buttons and subpictures with each other or with other design
elements in a menu. Adobe Encore DVD gives you several options for aligning objects. You can align the left, center,
or right edges on the vertical axis; or you can align the top, middle, or bottom on the horizontal axis. You can either
align theobjects relativeto each other or align themto the title safe area. Alignment always occurs withina rectangle,
either theTitle Safearea or the bounding box thatencompasses all the objects. TheAlign Center option, for example,
centers the objects within this rectangle.
89
A B C
Comparison of the Align Center command with and without Relative To Safe Areas Selected
A. Original position B. Align Center with Relative To Safe Areas off C. Align Center with Relative To Safe Areas on
1 Open the menu that you want to modify.
2 In the Menu Viewer or Layers panel, select the objects you want to align.
3 Choose Object > Align > Relative To Safe Areas if you want the objects aligned to the Title Safe Area and the
option is not already selected.
Note: A check mark next to the Relative To Safe Areas indicates it is turned on. To turn the option off, choose it again
(Object > Align > Relative To Safe Areas).
4 Choose Object > Align and one of the following options:
Left Aligns the left sides of the selected objects to either the left side of the Title Safe area or the leftmost object.
Center Aligns on a vertical axis the center of the selected objects to either the center of the Title Safe area or to the
center of a bounding box that encompasses all the objects.
Right Aligns the right side of the selected objects to either the right side of the Title Safe area or the rightmost object.
To p Aligns the top of the selected objects to either the top of the Title Safe area or the topmost object.
Middle Aligns on a horizontal axis the middle of the selected objects to either the center of the Title Safe area or the
center of a bounding box that encompasses all the objects.
Bottom Aligns the bottom of the selected objects to either the bottom of the Title Safe area or the lowest object.
Page 95

ADOBE ENCORE DVD 2.0
User Guide
To distribute menu objects
If you want a series of buttons or objects to be evenly spaced, you don’t need to calculate the appropriate distance
between them. The distribute options can place them evenly apart for you, either horizontally or vertically. You can
choose to distribute them between the two outermost objects or between the borders of the Title Safe area.
A B C
Distributed objects
A. Originalposition B. Distribute Verticallywith RelativeToSafe Areasturned off C. Distribute Vertically with Relative To Safe Areas turned
on
1 Open the menu that you want to modify.
2 In the Menu Viewer or Layers panel, select the objects you want to distribute.
3 Choose Object > Distribute > Relative To Safe Areas if you want the objects distributed relative to the Title Safe
area and the option is not already selected.
90
Note: A check mark next to the Relative To Safe Areas indicates it is turned on. To turn the option off, choose it again.
4 Choose Object > Distribute, and then choose one of the following from the list that appears:
Vertically Distributes the objects evenly between the top and bottom boundaries of the title-safe area (if Relative To
Safe Areas is turned on) or between the topmost and bottommost objects (if Relative To Safe Areas is turned off).
Horizontally Distributestheobjectsevenlybetweentheleftandrightboundariesofthetitle-safearea(ifRelativeTo
Safe Areas is turned on) or between the leftmost and rightmost objects (if Relative To Safe Areas is turned off).
To resize (scale) menu objects
As you fine-tune your menu, you often need to adjust the size of the elements. You scale objects on a menu manually
with the mouse. You can scale multiple objects or layer sets together as a group.
1 Open the menu that you want to modify.
2 In the Menu Viewer or Layers panel, select the objects you want to scale.
3 Do one of the following:
• Drag a handle.
• Shift-drag a handle to proportionally scale the object.
• Alt-drag a handle to scale from the object’s center point. (The center point maintains its position on the page.)
• Shift-Alt-drag a handle to scale proportionally from the object’s center point. (The center point maintains its
position on the page.)
Note: If multiple items are selected, dragging the handle of one object scales all the objects at the same time.
To flip menu objects
You can flip an object in a menu either horizontally or vertically.
Page 96

ADOBE ENCORE DVD 2.0
A B C
Comparison of flipping object horizontally and vertically
A. Object as originally placed B. Flipped horizontally C. Flipped vertically
1 Open the menu containing the object you want to flip.
2 In the Menu Viewer or Layers panel, select the object (or objects) you want to flip.
3 Choose either Object > Flip Horizontal or Object > Flip Vertical.
About drop shadows
Drop shadows add depth to a menu. You can apply the drop shadow effect to any objects in the menu, be it text,
buttons, or other graphic elements.
User Guide
91
Original (left) and drop shadow applied to text and button image (right)
Adobe Encore DVD gives you extensive control over the look of the shadow, letting you specify its color, opacity,
angle, offset, size, and spread. You apply drop shadows to individual elements or to layer sets. Because the effect is
applied to the element, when you move or resize the element, or edit the text, the drop shadow moves, resizes, or
changes shape accordingly. If you apply a drop shadow to a button or layer set, Adobe Encore DVD applies it to the
bottommost layer.
The Styles panel contains many predesigned Photoshop layer effects that let you quickly change the look of a button
or other element. See “About predefined styles” on page 92.
To add a drop shadow to a button or object
1 Open the menu containing the buttons you want to modify.
2 In the Layers panel, click the layer of the element to which you want to add a drop shadow. If the element is in a
layer set, you may need to open the layer set first.
3 Choose Object > Drop Shadow, and select Drop Shadow in the Drop Shadow dialog box.
4 To change the color, click the color swatch.
5 To limit your color selection to NTSC-safe colors, click NTSC Colors Only in the Color Picker dialog box.
Page 97

ADOBE ENCORE DVD 2.0
User Guide
6 Adjust the color using one of the following methods (the color you select appears in the top half of the color
swatch; the original color remains in the bottom half):
• Locate the color range you want using the triangle sliders on the color spectrum bar, and then click a color in the
color field.
• Change the numeric values for Hue, Saturation, Brightness, Red, Green, or Blue.
7 Click OK. The new color replaces the original color in the Drop Shadow dialog box.
8 Type new values or use the up or down arrows to specify the desired values for the following options, and then
click OK:
Opacity Sets the opacity of the shadow.
Angle Specifies the lighting angle of the shadow.
Distance Specifies how far the shadow should be offset from the object.
Size Sets the size of the shadow.
Spread Expands the boundaries of the shadow.
When editing the menu in Photoshop, you can edit the drop shadow applied to a menu object in Adobe Encore DVD.
92
Drop shadows applied using Object > Drop Shadow may be replaced or removed when you apply a predefined style.
Predefined styles
About predefined styles
Styles let you quickly change the appearance of a layer or object in a menu. Styles are predesigned Photoshop layer
effects, such as shadows, glows, bevels, overlays, and strokes, that you can apply to most layers in a menu. Once
applied, the effects are linked to the object. When you move or edit the object, the effects change with the object.
Page 98

ADOBE ENCORE DVD 2.0
User Guide
AB
C
D
EFG
Styles panel
A. Name of currently displayed set B. Preview of selected style C. Panel menu with additional options D. Buttons to display different types
of styles: Image, Text, and Shape E. Apply Style F. Add Style G. Delete Style
93
TheStylespaneldividesstylesintothreecategories:Image,Text,andShape.Youcanapplyanystyletoanindividual
layer, except subpicture highlight layers—layers with the (=1), (=2), or (=3) prefix. When styles are applied to layer
sets or buttons, they affect the layers within the set according to their style category. The layers they affect depend
upon the category:
Image Applies the style to all layers in a layer set (except highlight layers).
Tex t Applies the style to the first text layer in a layer set that is not a highlight layer.
Shapes Applies the style to the first shape layer in a layer set that is not a highlight layer.
Styles generally fully replace any existing effects applied to a layer. The Styles panel includes a few styles that add to
the existing effects in a layer rather than completely restyle it. Additive styles have a plus sign (+) at the beginning of
their names.You can create your own styles and add themto the Styles panel, or group styles into sets. (See “Creating
styles for menu elements” on page 130.)
To apply a preset style to a layer or button set
1 Select the layer (or button set) in the Menu Viewer or Layers panel.
2 In the Styles panel, select the style, and click the Apply Style button .
If your menu contains a styled layer that you like, you can quickly create a new style by dragging the layer directly
to the Styles panel. The new style contains any effects applied to the layer. (See “Creating styles for menu elements”
on page 130.)
Page 99

ADOBE ENCORE DVD 2.0
User Guide
Using guides in menus
About guides
Guides help you position items in menus. You can add, move, remove, or lock guides, and turn them on or off.
Guides are visible only in the Menu Viewer. You do not see them when previewing or in the final DVD. Guides have
an optional setting that makes objects youdrag snapto them. The selectionboundary and thecenter point of objects,
as well as the baseline of type, snap to the guides.
You place guides at pixel locations in the menu; the zero point being the top left corner of the menu.
A
B
C
94
Menu with guides displayed
A. Zero point of menu B. Horizontal guide C. Ver tical guide
The guidesyou createare specific to that menu. They are saved inthe menu and transfer with a menu betweenAdobe
Encore DVD and Photoshop. Any changes you make to the guides in either program transfer with the menu.
Note: When setting guides to align objects in several menus, it is important to remember that you place guides at the
pixellocationofthemenu,notthescreen.Therefore,ifyouhavemenuscreatedusingsquarepixelsinthesameproject
as menus using rectangular pixels, guides placed atthe same pixel location in each menucan result in different locations
on the screen. For example, horizontal guides placed at 75 pixels do not line up between a 720 x 534 pixels menu (square
pixels) and a 720 x 480 pixels menu (rectangular pixels).
To place a guide
1 Open the menu to which you want to add guides.
2 Choose View > New Guide or click the New Guide Button at the bottom of the Menu Viewer.
3 Select Horizontal or Vertical orientation, enter a position, and click OK.
To use guides
• To show or hide guides, choose View > Show Guides or click the Show Guides button at the bottom of the
Menu Viewer.
• To move guides, using a selection tool, position the pointer over the guide. When the pointer turns into a double-
headed arrow, move the guide.
• To lock all guides, choose View Lock Guides.To remove guides from the menu, using a selection tool, drag the
guide completely outside the Menu Viewer. To remove all guides, choose View > Clear Guides.
Page 100

ADOBE ENCORE DVD 2.0
User Guide
• To turn snapping to guides on or off, choose View > Snap To Guides.
Adding text to menus
About text in menus
Adobe Encore DVD lets you type text directly onto a menu. You can type text either horizontally or vertically, and
either freely or constrained to a bounding box. In addition to providing standard control over the appearance of the
type, Adobe Encore DVD also lets you transform a text block as if it were an object. You can edit the text you add to
a menu in either Adobe Encore DVD or Photoshop. Any changes you make to the text in Photoshop appear in the
Adobe Encore DVD menu.
The toolbox contains two different text tools: the Horizontal Text tool and the Vertical Text tool . Using either
tool, you can enter text either freely or within a bounding box.
To enter text freely, you simply click where you want the text to begin. You control how the text wraps by using the
Enter key. The text is not constrained. Typing text freely is convenient for quickly entering single words, such as on
buttons.
To enter text withina bounding box, you firstdrag the pointer to define the text block. Whenyou type, the textwraps
when it reaches the edge of the box. While you can continue to enter text when the type hits the bottom (or edge for
vertical type), Adobe Encore DVD displays only the text that fits in the box. The bounding box can be useful when
trying to arrange type in aspecific area of the menu. You can resize the bounding box,which causes the text toreflow,
changing the line endings and possibly how many lines of text display.
95
Comparison of entering text freely (left) or within bounding box (right)
To add text to a menu
1 Open the menu to which you want to add text.
2 Select either the Vertical Text or Horizontal Text tool from the toolbox. The pointer changes to an I-beam within
a dotted box. The small horizontal line near the bottom of the I-beam marks the baseline on which the text rests.
3 Do one of the following:
• Position the baseline of the I-beam pointer where you want the text to be located, and click to set the entry point
for the text. The insertion point appears.
• DragtheI-beampointertodefinetheboundingboxforthetext.Whenyoureleasethemousebutton,theinsertion
point appears. Its location is determined by the alignment option set in the Character panel.
4 In the Character panel, select the attributes you want for the text. (See “Character panel” on page 97.)
You canchange the orientation of vertical text by using the Rotate Character command in theCharacter Panelmenu.
5 Type the desired text.
To reposition the text without switching tools, Ctrl-drag it as needed. When you release the Ctrl key, the text pointer
returns.
 Loading...