


 Loading...
Veriton Series
3700GX/5700GX/
6700GX/7700GX User’s Guide
Copyright © 2004 Acer Incorporated
All Rights Reserved.
Veriton series User’s Guide
First Issue 2004
Changes may be made periodically to the information in this publication without obligation to notify any person of such revision or changes. Such changes will be incorporated in new editions of this manual or supplementary documents and publications. This company makes no representations or warranties, either expressed or implied, with respect to the contents hereof and specifically disclaims the implied warranties of merchantability or fitness for a particular purpose.
Record the model number, serial number, purchase date, and place of purchase information in the space provided below. The serial number and model number are recorded on the label affixed to your computer. All correspondence concerning your unit should include the serial number, model number, and purchase information.
No part of this publication may be reproduced, stored in a retrieval system, or transmitted, in any form or by any means, electronic, mechanical, photocopy, recording, or otherwise, without the prior written permission of Acer Incorporated.
Model Number : _________________________________
Serial Number: ___________________________________
Purchase Date: ___________________________________
Place of Purchase: ________________________________
Acer and the Acer Logo are registered trademarks of Acer Inc. Other company’s product names or trademarks are used herein for identification purposes only and belong to their respective companies.
1 First things first
System specifications Package contents Accessing the user’s guide
2 System tour
Features Performance Multimedia Connectivity
Front panel Rear panel Keyboard
Internet/E-mail/Search keys Multimedia keys
Volume control/Mute keys Lock keys
Cursor keys Windows keys Function keys Palm rest
Optical drive
Taking care of your CDs and DVDs
Hard disk
3 Setting up your computer
Arranging a comfortable work area Adjusting your chair Positioning your PC Positioning your monitor Positioning your keyboard Positioning your mouse
Connecting peripherals
Connecting your mouse and keyboard USB interface
PS/2 interface Connecting a monitor Connecting the power cable
Turning on your computer Turning off your computer Connecting options
Connecting your printer Connecting the modem (optional)
iii
1 |
Contents |
|
3 |
||
|
5
6
7
9
9
9
9
10
12
15
16
16
17
17
18
18
19
19
20
22
22
23
25
25
25
26
26
26
27
27
27
27
28
29
30
30
31
31
32
iv |
Contents |
Connecting to the network |
32 |
Connecting multimedia devices |
33 |
Connecting USB devices |
35 |
4 Upgrading your computer |
37 |
Installation precautions |
39 |
ESD precautions |
39 |
Preinstallation instructions |
39 |
Post-installation instructions |
40 |
Opening your computer (3700GX) |
41 |
To remove the computer cover |
41 |
To replace the computer cover |
42 |
Opening your computer (5700GX) |
43 |
To remove the computer cover |
43 |
To replace the computer cover |
43 |
Opening your computer (6700GX/7700GX) |
44 |
To remove the side panel |
44 |
To replace the side panel |
45 |
System boards |
46 |
Mainboard layout |
46 |
Audio board |
48 |
Upgrading your computer |
49 |
Installing additional memory |
49 |
To remove a DDR2 DIMM |
49 |
To install a DDR2 DIMM |
50 |
To reconfigure your computer |
51 |
Replacing the hard disk (3700GX) |
51 |
Installing an expansion card |
53 |
Replacing the hard disk (5700GX) |
53 |
Installing an expansion card |
54 |
Replacing the hard disk (6700GX/7700GX) |
55 |
Installing an expansion card |
56 |
5 System utilities |
57 |
Acrobat Reader |
60 |
Acer LANScope (optional) |
61 |
Norton AntiVirus |
62 |
How do I check for viruses? |
62 |
NTI CD&DVD-Maker |
|
(for models with CD or DVD Burner) |
63 |
PowerDVD (for models with DVD) |
64 |
How do I open and watch a DVD? |
64 |
BIOS utility |
65 |
v
Reinstalling programs |
66 |
Acer eManager |
67 |
Acer eLock |
68 |
Acer eSetting |
69 |
Acer eRecovery |
70 |
Using Backup (Windows® XP only) |
71 |
How do I back up files from my hard drive? |
71 |
Disk Defragmenter (Windows® XP only) |
72 |
How do I defragment my hard drive? |
72 |
6 Frequently asked questions |
73 |
Frequently asked questions |
75 |
Appendix A: Notices |
77 |
Energy Star Guidelines Compliance |
78 |
FCC notice |
78 |
Notice: Canadian users |
79 |
Declaration of Conformity for EU countries |
79 |
Modem notices |
79 |
Notice for USA |
79 |
TBR 21 |
80 |
Notice for Australia |
80 |
Important safety instructions |
80 |
Macrovision® copyright protection notice |
81 |
Lithium battery statement |
82 |
Laser compliance statement |
82 |
Federal Communications Comission |
|
Declaration of Conformity |
83 |
Declaration of Conformity for CE marking |
84 |
Appendix B: Taking care of your computer |
85 |
Important tips |
86 |
Cleaning and servicing |
86 |
To clean your computer and keyboard |
86 |
To clean your pointing device |
87 |
To clean your monitor |
87 |
When to contact a service technician |
87 |
Asking for technical assistance |
87 |
Index |
89 |
vi |
Contents |
1First things first
This chapter describes the system specifications and the contents of your computer package.
3
System specifications
Component |
Specification |
|
|
|
|
Processor |
• |
Intel® Pentium® 4 2.8 - up to 3.8 GHz |
|
• |
Intel® Celeron® 2.8 - up to 3.4 GHz |
|
|
|
System memory |
Four SDRAM slots support a maximum of 4 GB dual-channel |
|
|
DDR2 memory |
|
|
|
|
Chipset |
• |
Intel® 915G Express + ICH6 chipset |
|
|
|
Graphics |
• |
With support for both the built-in Intel® Graphics Media |
|
|
Accelerator (GMA) 900, which supports widescreen LCD |
|
|
displays and accelerated DirectX 9 3D, plus support for |
|
|
PCI Express graphics cards. |
|
• |
Dynamic Video Memory Technology (DVMT) 3.0 |
|
|
supports up to 224MB of video memory; system memory |
|
|
is allocated where it is needed dynamically. |
|
|
|
Audio |
Intel® High Definition Audio, HD Audio hardware is capable |
|
|
of delivering the support and sound quality for up to eight |
|
|
channels at 192 kHz/32-bit quality. |
|
|
|
|
LAN |
10/100/1000 Base-T Gigabit Ethernet connectivity |
|
|
|
|
IDE |
One 40-pin parallel ATA IDE slot |
|
|
Four Serial ATA ports |
|
|
|
|
FDD |
1.44 MB 3.5 inch floppy drive |
|
|
|
|
PS/2 |
• |
PS/2 keyboard port |
|
• |
PS/2 mouse port |
|
|
|
USB |
Eight external USB 2.0 ports |
|
|
|
|
Serial port |
One serial port on I/O bracket |
|
|
(Optional 2nd serial port connection) |
|
|
|
|
Printer port |
One parallel printer port |
|
|
|
|
Thermal |
Dynamic fan speed control |
|
|
|
|
Security |
• |
Chassis lock pad |
|
• |
Chassis intrusion alarm |
|
|
|
4 |
|
1 First things first |
|
|
|
||
Component |
Specification |
|
|
|
|
|
|
Wake system |
Wake on LAN |
||
|
Wake on modem |
||
|
USB mouse/keyboard |
||
|
|
|
|
HDD |
• |
Parallel ATA (5400, 7200 RPM) |
|
|
• Serial ATA (7200 RPM) |
||
|
|
|
|
Optical Drive |
CD-ROM, CD-RW, DVD-ROM, DVD/CD-RW combo,DVD-Dual |
||
|
or DVD-Super multi |
||
|
|
|
|
Operating system |
• |
Windows® XP Home |
|
|
• |
Windows® XP Professional |
|
|
• Red Hat® Linux(driver support) |
||
|
|
|
|
Dimensions |
• |
3700GX/Small Form Factor |
|
|
|
345.0mm(H) /101.3mm(W) /414.7mm(D) |
|
|
• |
5700GX/Desktop |
|
|
|
130.2mm(H) /370mm(W) /435mm(D) |
|
|
• |
6700GX/Mini-Tower |
|
|
|
360mm(H) /180mm(W) /440mm(D) |
|
|
• |
7700GX/Mini-Tower |
|
|
|
438.5mm(H) /186mm(W) /475mm(D) |
|
|
|
|
|
Gross weight |
• |
3700GX/Small Form Factor |
|
|
|
5.3 kg/11.7lb |
|
|
• |
5700GX/Desktop |
|
|
|
6.5 kg/14.3lb |
|
|
• |
6700GX/Mini-Tower |
|
|
|
7.2 kg/15.8lb |
|
|
• |
7700GX/Mini-Tower |
|
|
|
8.5 kg/18.7lb |
|
|
|
|
|
5
Package contents
Before you unpack your computer, make sure that you have enough space to set up your computer.
Carefully unpack the carton and remove the contents. If any of the following items are missing or damaged, contact your dealer immediately:
•Veriton series
•Items contained in the accessory box
•USB or PS/2 keyboard
•USB or PS/2 mouse
•User’s guide and installation poster
•Other user documentation and third-party software
6 |
1 First things first |
Accessing the user’s guide
This user’s guide is also available on your computer as an Adobe Acrobat™ PDF file.
To access the user’s guide (for Windows® XP)
1On the Windows® XP taskbar, click on the start button then select Help and Support.
2On the Help and Support Center home page, double-click the Veriton series Online icon.
2 System tour
This chapter discusses the features and components of your computer.
9
Features
Here are just a few of your computer’s many features:
Performance
•Intel® Pentium® 4/Celeron® supporting FSB (Front Side Bus) up to 800 / 533MHz and HyperThreading™ Technology (Pentium® 4 only)
•Intel® 915G Express + ICH6 chipset
•DDR2-SDRAM 400/533, 4 DIMM slots, Expandable to 4GB dual-channel memory
•Power management function
•CD-ROM, CD-RW, DVD-ROM, DVD/CD-RW combo, DVD-Dual or DVDSuper multi drive
•High-capacity, Enhanced-IDE hard disk
Multimedia
•Intel® High Definition Audio
•Supporting up to 7.1 surround sound, Audio codec support for 192 kHz quality, multiple streams.
•3-D quality audio system via onboard audio controller
•Audio-in/Line-in, Audio-out/Line-out, Headphone-out, and Microphonein interfaces
Connectivity
•Two PS/2 interfaces for mouse and keyboard
•One serial port (Optional 2nd serial port connection)
•One parallel port
•One VGA port
•Eight Universal Serial Bus (USB) 2.0 ports (four on the front and four on the rear panel)
•High-speed V.92, 56K Fax/modem (manufacturing optional)
•Gigabit Ethernet LAN support with remote wake-up function
10 |
2 System tour |
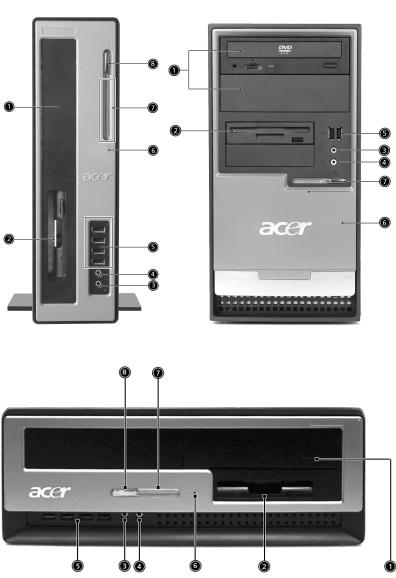
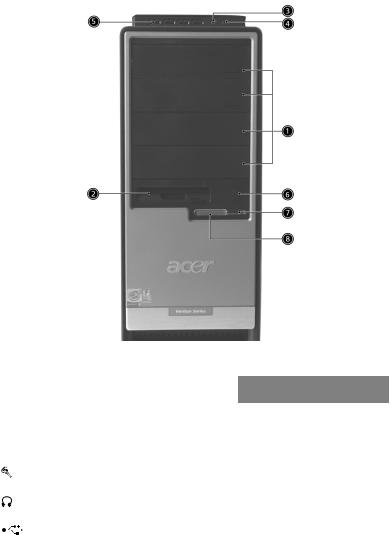
Front panel
Your computer’s front panel consists of the following:
3700GX/6700GX
5700GX
11
7700GX
Icon Component |
6700GX |
3700GX/5700GX/7700GX |
|
|
|
5.25-inch drive bay(s) |
1 |
1 |
|
|
|
3.5-inch floppy drive |
2 |
2 |
|
|
|
Microphone-in jack (front) |
3 |
3 |
|
|
|
Speaker-out/Line-out port |
4 |
4 |
|
|
|
USB ports |
5 |
5 |
|
|
|
One button recovery slot |
|
6 |
|
|
|
Indicators |
6 |
7 |
|
|
|
Power button |
7 |
8 |
|
|
|

12 |
2 System tour |
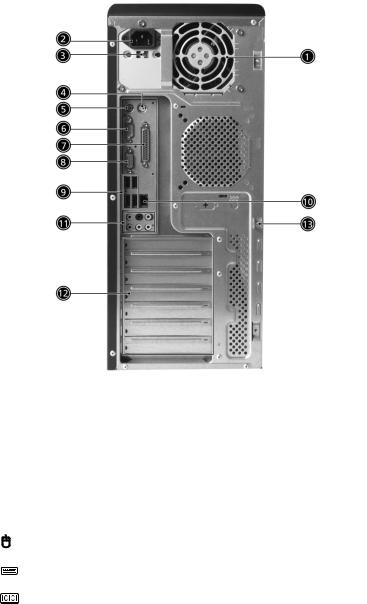
Rear panel
Your computer’s rear panel consists of the following:
3700GX/6700GX
5700GX
13
7700GX
Icon Component |
3700GX/5700GX/6700GX/7700GX |
|
|
Power supply |
1 |
|
|
Power cord socket |
2 |
|
|
Voltage selector switch |
3 |
|
|
PS/2 mouse port |
4 |
|
|
PS/2 keyboard port |
5 |
|
|
Serial port |
6 |
|
|
14 |
2 System tour |
Icon Component |
3700GX/5700GX/6700GX/7700GX |
Parallel/Printer port |
7 |
CRT/LCD monitor port |
8 |
USB ports |
9 |
Network port |
10 |
Audio jacks* |
11 |
Expansion slots |
12 |
Chassis lock pad |
13 |
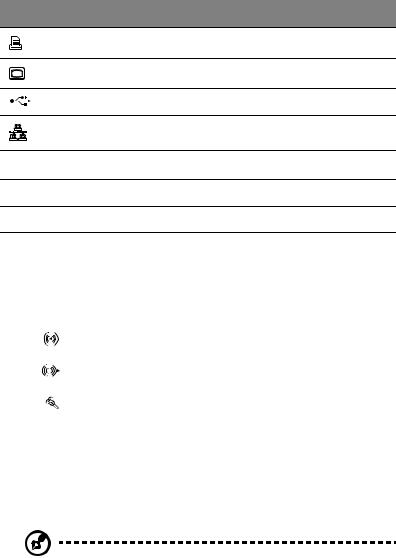
*. For information on audio ports, please reference the function table of the audio ports.
The audio jack function table
Color\Use |
Headphone |
1.1 CH |
3.1 CH |
5.1 CH |
7.1 CH |
|||
|
|
|
|
|
|
|
|
|
Blue |
|
|
Line-in |
Line-in |
Line-in |
Line-in |
Line-in |
|
|
|
|
|
|
|
|
||
|
|
|
|
|
|
|
|
|
Green |
|
|
|
Headphone |
Line-out |
Front |
Front |
Front |
|
|
|
|
|
|
|
||
|
|
|
|
|
|
|
|
|
Pink |
Mic-in |
Mic-in |
Mic-in |
Mic-in |
Mic-in |
|||
|
|
|
|
|
||||
|
|
|
|
|
|
|
|
|
Orange |
Center & |
Center & |
Center & |
Center & |
Center & |
|||
|
|
|
|
Woofer |
Woofer |
Woofer |
Woofer |
Woofer |
|
|
|
|
|
|
|
|
|
Black |
Rear |
Rear |
Rear |
Rear |
Rear |
|||
|
|
|
|
|
|
|
|
|
Grey |
Side |
Side |
Side |
Side |
Side |
|||
|
|
|
|
|
|
|
|
|
Note : For information on how to connect the peripherals, see page 27 and “Connecting options” on page 31.
15
Keyboard
The keyboard has full-sized keys that include separate cursor keys, two Windows keys, four multimedia keys, and twelve function keys.
For information on how to connect your keyboard, see “Connecting your mouse and keyboard” on page 27.
No. |
Description |
No. |
Description |
|
|
|
|
1 |
Sleep button |
2 |
Internet/E-mail/Search keys |
|
|
|
|
3 |
Multimedia keys |
4 |
Volume control/Mute keys |
|
|
|
|
5 |
Scroll lock key |
6 |
Num lock key |
|
|
|
|
7 |
Cursor keys |
8 |
Application key |
|
|
|
|
9 |
Windows logo key |
10 |
Caps lock key |
|
|
|
|
11 |
Function keys |
|
|
|
|
|
|
16 |
2 System tour |
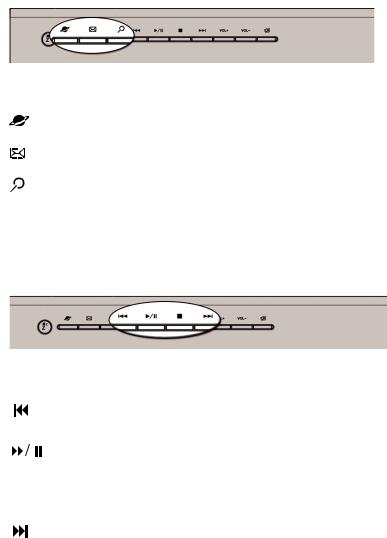
Internet/E-mail/Search keys
Icon |
Key |
Description |
|
|
|
|
Web browser |
Launches your current default browser. |
|
|
|
|
Launches your email application. |
|
|
|
|
|
Search |
Opens a search window. |
|
|
|
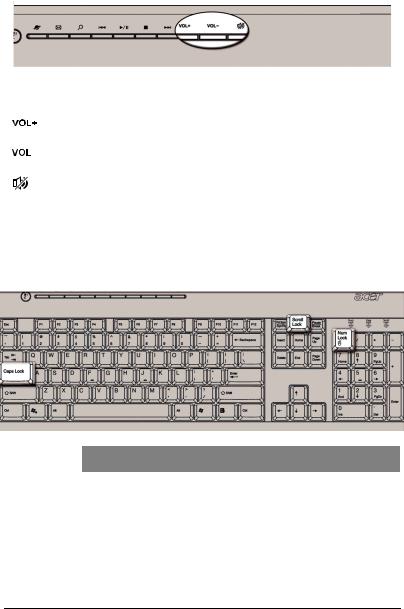
Multimedia keys
Allow you to conveniently play, pause, stop, advance, or rewind a song or movie using your keyboard.
Icon |
Key |
Description |
||
|
|
|
|
|
|
|
|
Backward |
Press to skip backward to the previous track or |
|
|
|
|
video file. |
|
|
|
|
|
|
|
|
Play/Pause |
Press to start playing the audio track or video |
|
|
|
|
file. Press again to pause. |
|
|
|
|
|
|
|
|
Stop |
Press to stop playing the audio track or video |
|
|
|
|
file. |
|
|
|
|
|
|
|
|
|
|
|
|
|
Forward |
Press to skip forward to the next track or video |
|
|
|
|
file. |
|
|
|
|
|
17
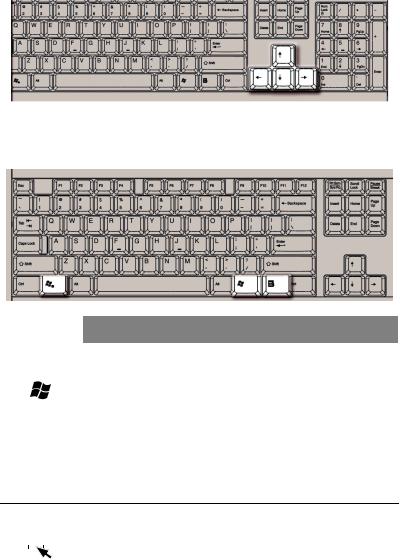
Volume control/Mute keys
Icon |
Key |
Description |
|
|
|
|
|
|
|
Volume up |
Press to increase audio volume. |
|
|
|
|
|
|
Volume down |
Press to decrease audio volume. |
|
|
|
|
|
|
Mute |
Toggle sound on/off. |
|
|
|
|
Lock keys
The keyboard has three lock keys which you can toggle on and off to switch between functions.
Lock key |
Description |
|
|
Scroll Lock |
When activated, the screen moves one line up or down |
|
when you press the up arrow or down arrow respectively.* |
|
|
Num Lock |
When activated, the keypad is set to numeric mode; i.e., the |
|
keys function as a calculator (complete with arithmetic |
|
operators such as +, -, * and /). |
|
|
Caps Lock |
When activated, all alphabetic characters typed appear in |
|
uppercase (same function as pressing Shift + <letter>). |
*. Scroll Lock may not work with some applications.
18 |
2 System tour |
Cursor keys
The cursor keys, also called the arrow keys, let you move the cursor around the screen. They serve the same function as the arrow keys on the numeric keypad when the Num Lock is toggled off.
Windows keys
The keyboard has two keys that perform Windows-specific functions.
Key |
Description |
|
|
Windows |
Start button. Combinations with this key perform special |
logo key |
functions, such as: |
|
• Windows + Tab: Activate the next Taskbar button |
|
• Windows + E: Explore My Computer |
|
• Windows + F: Find Document |
|
• Windows + M: Minimize All |
|
• Shift + Windows + M: Undo Minimize All |
|
• Windows + R: Display the Run dialog box |
Application |
Opens the applications context menu (same function as |
||
key |
clicking the right button of the mouse). |
||
|
|
|
|
|
|
|
|
|
|
|
|
|
|
|
|
|
|
|
|
|
|
|
|
|
|
|
|
|
|
|
|
|
|
|
|

19
Function keys
The function keys, F1 - F12, let you perform specific functions, depending on the application that uses them.
Palm rest
The detachable palm rest provides you with a comfortable place to rest your hands while typing.
20 |
2 System tour |
Optical drive
Your computer may come with a CD-ROM, DVD-ROM, DVD/CD-RW combo, DVD-Dual or DVD-Super multi drive. This drive is located on the front panel of your computer. The CD drive allows you to play different types of compact discs (CDs). The DVD drive allows you to play not only old CD-ROMs, CD-I discs, and video CDs, but digital video discs (DVDs) as well. DVD-ROM is a type of disc media enough for a full-length movie. The CD-RW, DVD-Dual and DVD-super multi drive allow you to record or burn recordable and rewritable discs.
CDs and DVDs, like diskettes, are also compact, lightweight, and easy to carry around. However, they are more delicate than diskettes and must be handled with extra care.
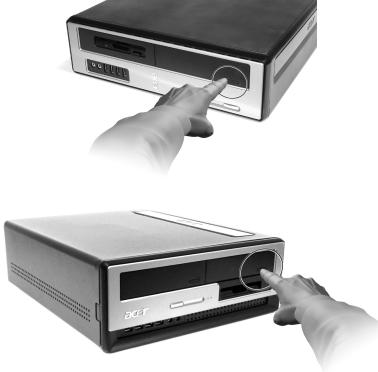
To insert a CD or DVD into your computer’s CD or DVD drive: 1. Gently push the Eject button located on the front panel.
3700GX
5700GX

21
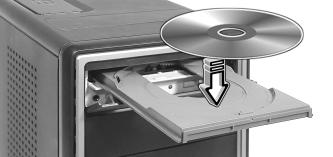
6700GX/7700GX
2.When the disc tray slides open, place the CD or DVD gently on the tray. Make sure that the label or title side of the disc is facing upward. When holding a disc, hold it by the edges to avoid leaving smudges or fingerprints.
3700GX
5700GX
22 |
2 System tour |
6700GX/7700GX
3.Push the tray and the tray will close automatically.
Taking care of your CDs and DVDs
•Keep your disc in its case when not in use to avoid scratches or other damage. Any kind of dirt or damage can affect the data on the disc, impair the disc lens reader on the CD or DVD drive, or stop the computer from successfully reading the disc.
•When handling discs, always hold them by the edges to avoid smudges or fingerprints.
•When cleaning discs, use a clean, dust-free cloth and wipe in a straight line from the center to the edge. Do not wipe in a circular motion.
•Clean your CD or DVD drive periodically. You may refer to the Cleaning kit for instructions. Cleaning kits can be purchased in any computer or electronics shop.
Hard disk
Your computer is pre-installed with a high-capacity Enhanced-IDE (E-IDE) hard disk.
For instructions on how to upgrade or replace your hard disk, see “Replacing the hard disk (3700GX)” on page 51
“Replacing the hard disk (5700GX)” on page 53 “Replacing the hard disk (6700GX/7700GX)” on page 55.
3Setting up your computer
Loading...