


Operating System
(DeTOS)
Administration
Manual

Notes, Cautions, and Warnings
NOTE: A NOTE indicates important information that helps you make better use of your computer.
CAUTION: A CAUTION indicates potential damage to hardware or loss of data if instructions are not followed.
WARNING: A WARNING indicates a potential for property damage, personal injury, or death.
______________
Information in this publication is subject to change without notice.
2013 - 01 |
Rev. A06 |
Contents
Introduction .................................................................................... |
6 |
What is DeTOS?....................................................................................... |
6 |
DeTOS Features ...................................................................................... |
6 |
DeTOS Installation ................................................................................... |
7 |
First Boot Wizard ...................................................................................... |
7 |
Getting Started ............................................................................... |
8 |
Control Panel.......................................................................................... |
11 |
Network Tools ........................................................................................ |
11 |
Echo Agent System Information ............................................................. |
13 |
Persistence................................................................................... |
15 |
Persistence in DeTOS Thin Clients ........................................................ |
15 |
System Settings ........................................................................... |
18 |
Contents | 3
Display Settings...................................................................................... |
18 |
Input/Time .............................................................................................. |
21 |
Local Storage ......................................................................................... |
22 |
Management .......................................................................................... |
23 |
Network .................................................................................................. |
26 |
Printer Settings ....................................................................................... |
28 |
Sounds ................................................................................................... |
29 |
Advanced Options ....................................................................... |
30 |
Launch Terminal..................................................................................... |
30 |
Export Config.......................................................................................... |
32 |
ELO Touch Screen Support.................................................................... |
33 |
Manage Packages.................................................................................. |
35 |
Connections ................................................................................. |
39 |
Citrix ICA ................................................................................................ |
41 |
Firefox Web Browser .............................................................................. |
46 |
No Machines .......................................................................................... |
49 |
VMware View ......................................................................................... |
51 |
X11 Connection...................................................................................... |
53 |
4 | Contents
rDesktop ................................................................................................. |
54 |
VDI In A Box........................................................................................... |
59 |
Getting Help.................................................................................. |
60 |
Contents | 5
1
Introduction
What is DeTOS?
Acer Terminal Operating System (DeTOS) is an embedded Thin Client Operating System designed to be simple, secure, and centrally manageable. DeTOS can be used to access hosted desktops using Microsoft Remote Desktop Services, VMware View, Citrix XenApp or XenDesktop, web-based applications, and more.
DeTOS Features
Simple-Configuring a session out of the box is quick and painless using the DeTOS intuitive web based control panel. The same control panel can be used either locally from the thin client or remotely from the management software.
Modern-DeTOS can connect to hosted desktops using the industry’s best protocols including PCoIP, Citric ICA Client, Citrix
XenDesktop, rDesktop (RDP) or Windows Terminal Services, and VMware View Client. DeTOS also includes a built-in browser that allows accessing web-based applications or kiosk usage.
Centrally Managed-DeTOS-based terminals can be centrally managed using Acer Echo Management Console.
Echo is shipped as a virtual appliance, so it is easy to set up.
Echo can automatically discover and inventory the thin clients on your network.
Echo has the concept of a default profile. Using a default profile, additional thin clients are automatically configured when you plug them into your network.
6 | Introduction
Echo allows individual profiles for different users, including specific Connections, Thin Client Settings, Passwords, and Customizable Desktop Icons.
Echo allows you to update the thin client’s embedded OS. Updates can be scheduled to happen outside of production hours, for example over the weekend.
DeTOS Installation
No installation is required for customers who have purchased DeTOS based thin clients from Acer. Your thin client already contains a factory installed DeTOS operating system. A USB re-flash utility is available if you need to reinstall the operating system at any point in the future.
Visit acer global download center to download the USB re-flash utility tool for reinstalling the operating system for Acer terminals.
First Boot Wizard
The first time your terminal boots up, you will be taken through a first boot wizard. This wizard can help you to configure a variety of settings in order to better utilize your terminal. It is advised that you are familiar with the material in this guide as well as the Echo Administration Guide to best utilize the first boot wizard.
.
Introduction | 7
2
Getting Started
After the initial bootup, or when booting up after having selected the Reset to Factory Settings, your thin client will ask if you wish to run as a Devon Zero™ client, or as a thin client console running DeTOS. If running in Devon Zero™ mode, see the section titled “Devon Zero™” in the “Advanced Options” chapter to continue. If you chose to operate your thin client using DeTOS instead, you will be shown the DeTOS desktop and taskbar. To get started, do the following:
Check that your thin client is connected to the network.
If you have set up a management server in your network, check that the thin client was able to contact the management server and is in managed mode.
Create a desktop shortcut to allow thin client users to get connected to a remote server. (See Chapter 6, “Connections,” for more information.)
To check the network connection status, click the DeTOS button and then select Control Panel.
8 | Getting Started
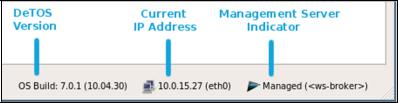
Along the bottom of the Control Panel is a row of status messages. These messages include the DeTOS build number, the terminal's current IP address, and a Thin Client Management Connection Indicator.
DeTOS default factory setting is DHCP. If you have a DHCP server on your network, the status bar should show the leased IP address. If you want the thin client to use a fixed IP address please refer to this guide's network section. A message of no ip address will appear if network connectivity is lost or was never established in the first place. This may be related to a loose or faulty network cable. It may also be an indication of DHCP issues. If you need to troubleshoot a network issue, please refer to the network diagnostic section below.
Along with the IP address, the Control Panel status section also shows you whether your thin client is in managed or unmanaged (stand alone) mode. By default, DeTOS based terminals try to locate a management server. If a management server is found, the terminal switches to managed mode, where it “pulls” its configuration from the management server. If not, it will stay in standalone/unmanaged mode and use its local configuration.
The Control Panel status area also shows the OS build. This is a string based on the DeTOS version and the build date, using the following format: 7.x.x (YY.MM.DD)
Getting Started | 9
Management Server Splash Screen
During bootup, if the terminal cannot make contact with a Management Server, then a black splash screen will appear just prior to the DeTOS desktop loading. This screen contains the Acer logo and displays a message saying, Attempting to connect to Management Server. The splash screen will be displayed until successful contact is made with a management server, the cancel button is pressed, or the specified timeout (30 seconds by default) is reached.
The Management section, found under the Control Panel, allows you to configure the behavior of this splash screen. Configuration options include:
Setting the terminal to Managed or Unmanaged modes.
Specifying a different management server address
Adjusting the timeout value
Enabling or disabling the splash screen Cancel button
Management Server Indicator
Once you are on the DeTOS Desktop, the Echo Agent running on your terminal will continue to periodically contact a Management Server named ws-broker on your local area network. When successful, the Management Server Indicator box found along the bottom of the Control Panel will read Managed. Otherwise, the icon will change to a red circle and the status will say Unmanaged. In this case, verify that your management server is online and accessible on your LAN. Also be sure to check your DNS server to verify that an entry for ws-broker exists and points to the IP address of your management server.
10 | Getting Started
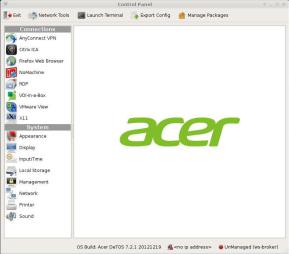
Control Panel
The Control Panel is the local tool for configuring Connection and System settings on your thin client.
Connection Settings - Your terminal has the ability to connect to remote servers utilizing several types of protocols. The rDesktop client uses the RDP protocol and allows you to connect to Microsoft Windows Terminal Servers. The Citrix ICA client is used
to establish connections to Citrix Presentation and XenApp servers. The VMware View client allows you to connect to a VMware View server, which in turn, provides the end-user with their own virtual desktop session. Lastly, you may create a Firefox web browser connection to surf the web. This can be used for several purposes:
Connect to a web applications; e.g., a webmail server.
Connect to a connection broker web interface; e.g., Citrix XenDesktop.
Use the thin client as a Kiosk (select the Enable Kiosk Mode button under the Kiosk Mode panel)
System Settings - These are the display, sound, keyboard, mouse, printer and date/time configurations for your terminal. Also under the System section is the ability to set an administrative password for the control panel and change the local storage mode.
Network Tools
The toolbar along the top of the Control Panel window contains a button named Network Tools. Clicking this button will open a separate, smaller window that provides you with current network status and useful diagnostic programs.
Interface Status
Click the Interface Status tab along the top of the Network Tools window to view the IP address that is currently assigned to this terminal. The MAC Address for this machine is also reported on this screen.
Getting Started | 11

Diagnostics
If you are experiencing difficulty connecting to servers on certain segments of your LAN, then you may want to use the ping command to verify you are reaching specific servers and/or gateways on the subnet in question. To use ping:
1.Select the Diagnostics tab from the Network Tools window.
2.In the Host Address field, type in the IP address or website you
want to test against and then press the Ping button.
3.If there is an error in the delivery to the destination, the ping command displays an error message. Otherwise, replies will continuously display for each packet successfully sent and received.
4.Press the Stop button to terminate the ping loop.
12 | Getting Started
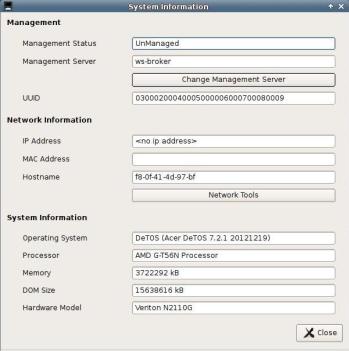
Echo Agent System Information
Echo Management- Displays the current status and information of the Echo Management server to which your thin client is connected.
Management Status-Displays when the thin client is being managed by an Echo server.
Management Server-Displays the current address of the Echo server.
Change Management Server-Allows you to change the Echo server.
UUID-Displays the current UUID assigned to the terminal.
Network Information-This displays information about the current network connection.
IP Address-Displays the current IP address assigned to the thin client.
MAC Address-Displays the current MAC address assigned to the thin client.
Hostname-Displays the name assigned to the thin client.
Network Tools-Allows you to run diagnostics test with the network connection and to check on the current status of the network connection.
System Information-Displays information about the operating system and the thin client.
Operating System-Displays the name of the image or operating system that is in use.
Processor-Displays the processor that the thin client is using.
Memory-Displays the total internal memory of the thin client.
DOM Size-Displays the total storage capacity size of the thin client.
Hardware Model-Displays the name of the thin client in use.
Getting Started | 13
14 | Getting Started
3
Persistence
Persistence, within the scope of thin client computing, refers to the continuing existence of connections and settings after a terminal has been rebooted.
Default Behavior
By default, or after resetting your terminal to default factory setting, DeTOS is set to persistent mode. This means that any configuration change you make will persist across reboots. You can change this to a stateless mode where the thin client settings and connections are dynamically “pulled” from the management server, or a snapshot mode where you define the desired configuration and prevent users from making any changes. These options are all configured in the Control Panel, under the System Settings, in a section called Local Storage.
Persistence in DeTOS Thin Clients
There are two strategies for achieving persistence on DeTOS-based thin clients.
Strategy #1: Maintain Profiles via Remote Management Server
DeTOS thin clients can be centrally managed using the Acer Echo Management Console. Using Echo, administrators can create several connections and settings and then group them together to form one single collection called a profile. This profile can then be pushed or assigned to one or more thin clients. With your profile properly configured, each time a terminal is booted up and discovered by Echo, all connections and system settings according to its assigned profile are immediately applied – or pushed out – to that terminal.
Persistence | 15
Strategy #2: Allow Configurations to be Stored Locally on the Thin Client
The second approach for achieving persistence is to allocate a specific area of the local DOM (disk) for reading and writing system settings and connections. DeTOS allows for even greater flexibility by offering two variations of this strategy:
Enable Local Storage-While running in this mode, DeTOS will write to the local DOM each and every time configurations are added, deleted or modified under the Control Panel.
Enable Snapshot Storage-When this mode is selected, DeTOS allows writes to the local DOM, but in a more finely controlled manner. An administrator can configure the settings and then store the current configurations to the DOM by clicking Take Snapshot. The only settings and connections that will persist across reboots are the ones captured during the snapshot. The terminal essentially falls back into a non-persistent operating mode after the snapshot and discards any new configurations from here on out – until the administrator clicks Take Snapshot again, and a new snapshot is used as the primary configuration. In some ways, this mode can be thought of as a hybrid of the standard Enable Local Storage and No Local Storage modes.
Case Examples
The Local Storage section of the Control Panel allows you to use three methods for local storage:
No Local Storage
Enable Local Storage
Enable Snapshot Storage
These case examples are provided below to help you decide which of these three options will work best for you.
16 | Persistence

Case 1: “I do not want any users to mess up the thin client’s configuration. I am currently using, or plan to use, Acer Echo Management Console to centrally manage my thin client.”
Solution: You will be utilizing strategy #1, as described earlier. Choose the No Local Storage option on the thin client and make sure you have an Echo server properly configured and accessible on your LAN. With persistence disabled, the thin client becomes stateless and relies completely on the management server for all its configurations.
Case 2: “I simply want the thin client to maintain its configuration settings locally. I do not want to rely on a management server.”
Solution: Choose the Enable Local Storage radio button option. While running in this mode, DeTOS will write to the local DOM (disk) each and every time configurations are added, deleted, or modified. A remote management server is not needed.
Case 3: “I like the idea of having a non-persistent terminal with an assigned profile, but do not want to use Acer Echo Management Console to manage my terminals. What's the alternative?”
Solution: Choose the Enable Snapshot Storage radio button option, press Apply, and then reboot the terminal. Next, configure the terminal as desired, and then press the Take Snapshot button. From then on, the thin client will use the same exact configuration as when the snapshot was taken – even after being rebooted. A remote management server is not needed.
NOTE: If you would like to change your configuration later, you will have to press the Take Snapshot button again to save all of the changes made to your terminal. Upon reboot, your terminal will load whichever Snapshot was is currently being used. Pressing the Clear Local Storage button will ask the terminal to clear all connections and settings saved locally, clear the current snapshot used for the reboot, and restore itself to factory settings on the next reboot.
Persistence | 17
4
System Settings
Display Settings
Strategy #1: Maintain Profiles via Remote Management Server
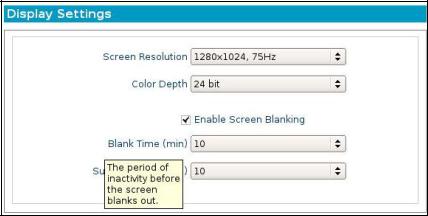
This section describes the display options available for a single monitor attached to a terminal.
1From the DeTOS desktop, select DeTOSControl Panel.
2Click the Display icon on the left-hand side of the Control Panel, under System Settings.
Screen Resolution-Select the desired resolution from the dropdown list OR select Auto-detect to allow DeTOS to automatically choose the best resolution for the attached monitor.
18 | System Settings
 Loading...