

Page 1
MBU 400
MBU 400
TM
User Guide
Release 1.0
41-001286-00
Rev 00
Page 2

Aastra Telecom will not accept liability for any damages and/or long distance charges, which result from unauthorized and/or
unlawful use. While every effort has been made to ensure accuracy, Aastra Telecom will not be liable for technical or editorial errors
or omissions contained within this documentation. The information contained in this documentation is subject to change without
notice.
Copyright 2008 Aastra Telecom. www.aastratelecom.com
All Rights Reserved.
Page 3

Table of Contents
Important Safety Instructions...................................................................................................... 5
Importantes mesures de sécurité ................................................................................................................................ 5
Software License Agreement........................................................................................................ 6
FCC Information........................................................................................................................... 7
Consumer Information ............................................................................................................................................... 8
Applicable for Coin or Pay Phone Only .................................................................................................................... 9
Safety Information ...................................................................................................................... 10
About This Guide ........................................................................................................................ 13
Documentation ......................................................................................................................................................... 13
Introduction ................................................................................................................................. 14
Features .................................................................................................................................................................... 14
Requirements ........................................................................................................................................................... 17
Installation and Setup ............................................................................................................................................... 17
Getting Started ............................................................................................................................ 18
MBU Gateway ......................................................................................................................................................... 18
Registering the 420d Handset .................................................................................................................................. 19
420d Handset Key Descriptions ............................................................................................................................... 20
MBU 400 IP Address and System Status ................................................................................................................. 21
Configuring Your Phone for First-Time Use ........................................................................................................... 22
Using the 420d Handset .............................................................................................................. 25
Handset Main Menu ................................................................................................................................................. 26
Using the Volume Control ....................................................................................................................................... 27
Using the Speakerphone .......................................................................................................................................... 27
Locking/Unlocking the Keypad ............................................................................................................................... 28
Changing the PIN Code for VoIP Settings .............................................................................................................. 28
Changing the Access Code ...................................................................................................................................... 28
Customizing Your Phone ............................................................................................................ 30
Changing the Handset Name .................................................................................................................................... 30
Entering Text, Numbers, and Symbols .................................................................................................................... 30
Text Input Modes ..................................................................................................................................................... 31
Specifying a Language on the Handset .................................................................................................................... 32
Setting Time and Date .............................................................................................................................................. 32
Specifying the Primary Line for Outgoing Calls ..................................................................................................... 35
Specifying Call Groups ............................................................................................................................................ 36
Changing the Display Contrast ................................................................................................................................ 36
Setting Do Not Disturb ............................................................................................................................................ 37
Setting Call Waiting ................................................................................................................................................. 37
Setting Audio ........................................................................................................................................................... 37
Changing Emergency Line Settings ......................................................................................................................... 41
Table of Content
Aastra MBU 400 User Guide 3
s
Page 4

Making and Answering Calls..................................................................................................... 42
VoIP Calls ................................................................................................................................................................ 42
Landline Calls .......................................................................................................................................................... 43
Intercom Calls .......................................................................................................................................................... 43
Calling from the Contacts List ................................................................................................................................. 44
Calling from the Call Log ........................................................................................................................................ 45
Calling Using Redial ................................................................................................................................................ 46
Calling Using Speeddial .......................................................................................................................................... 47
Answering Calls ....................................................................................................................................................... 47
Caller ID ................................................................................................................................................................... 48
Making Emergency Calls ......................................................................................................................................... 49
Handling Calls ............................................................................................................................. 50
Placing a Call on Hold ............................................................................................................................................. 50
Calling with a Call on Hold ..................................................................................................................................... 50
Muting/Unmuting a Call .......................................................................................................................................... 51
Transferring Calls .................................................................................................................................................... 52
Ending Calls ............................................................................................................................................................. 53
Managing Calls............................................................................................................................ 54
Table of Contents
Contacts List ............................................................................................................................................................ 54
Call Log ................................................................................................................................................................... 58
Voicemail ................................................................................................................................................................. 59
Additional Features..................................................................................................................... 60
Resetting the MBU .................................................................................................................................................. 60
Manually Registering/De-registering a Handset ...................................................................................................... 60
Updating the MBU 400 System Firmware ............................................................................................................... 61
Changing Internet Settings ....................................................................................................................................... 61
Troubleshooting........................................................................................................................... 62
Limited Warranty ....................................................................................................................... 65
Index.............................................................................................................................................. 67
4 Aastra MBU 400 User Guide
Page 5

Important Safety Instructions
When using your telephone equipment, basic safety precautions should always be
followed to reduce the risk of fire, electric shock and injury to persons, including the
following:
1. Do not use this product near water, for example, near a bath tub, wash bowl,
kitchen sink or laundry tub, in a wet basement or near a swimming pool.
2. Avoid using a telephone (other than a cordless type) during an electrical storm.
There may be a remote risk of electric shock from lightning.
3. Do not use the telephone to report a gas leak in the vicinity of the leak.
4. Use only the power cord and batteries indicated in this manual. Do not dispose of
batteries in a fire. They may explode. Check with local codes for possible special
disposal instructions.
5. CAUTIONRISK OF EXPLOSION IF BATTERY IS REPLACED BY AN
INCORRECT TYPE. DISPOSE OF USED BATTERIES ACCORDING TO THE
INSTRUCTIONS. USE ONLY WITH Shenzhen Bak Technology Co., Ltd,
BAK06-AS02-10128I 3.7V 650mAh Li-ion rechargeable battery pack.
SAVE THESE INSTRUCTIONS
Importantes mesures de sécurité
Certaines mesures de sécurité doivent être prises pendant l’utilisation de matérial
téléphonique afin de réduire les risques d’incendie, de choc électrique et de blessures.
En voici quelquesunes:
1. Ne pas utiliser l’appareil près de l’eau, p.ex., près d’une baignoire, d’un lavabo,
d’un évier de cuisine, d’un bac à laver, dans un sous-sol humide ou près d’une
piscine.
2. Éviter d’utiliser le téléphone (sauf s’il s’agit d’un appareil sans fil) pendant un
orage électrique. Ceci peut présenter un risque de choc électrique causé par la
foudre.
3. Ne pas utiliser l’appareil téléphonique pour signaler une fuite de gaz s’il est situé
près de la fuite.
4. Utiliser seulement le cordon d’alimentation et le type de piles indiqués dans ce
manuel. Ne pas jeter les piles dans le feu: elles peuvent exploser. Se conformer aux
règlements pertinents quant à l’élimination des piles.
5. La socklet-sortie sera installée près de l’équipement et serafacilement accessible
6. ATTENTION
Il y a danger d’explosion s’il y a remplacement incorrect de la batterie. Remplacer
uniquement avec une batterie du même type ou d’un type équivalent recommandé par le
constructeur. Mettre au rebut les batteries usagées conformément aux instructions du
fabricant. (Shenzhen Bak Technology Co., Ltd, BAK06-AS02-10128I 3.7V 650mAh Li-ion
rechargeable battery pack).
Important Safety Instructions
CONSERVER CES INSTRUCTIONS
Aastra MBU 400 Administrator Guide 5
Page 6

Software License Agreement
Aastra Telecom Inc., hereinafter known as "Seller", grants to Customer a personal,
worldwide, non-transferable, non-sublicenseable and non-exclusive, restricted use
license to use Software in object form solely with the Equipment for which the
Software was intended. This Product may integrate programs, licensed to Aastra by
third party Suppliers, for distribution under the terms of this agreement. These
programs are confidential and proprietary, and are protected as such by copyright law
as unpublished works and by international treaties to the fullest extent under the
applicable law of the jurisdiction of the Customer. In addition, these confidential and
proprietary programs are works conforming to the requirements of Section 401 of title
17 of the United States Code. Customer shall not disclose to any third party such
confidential and proprietary programs and information and shall not export licensed
Software to any country except in accordance with United States Export laws and
restrictions.
Customer agrees to not reverse engineer, decompile, disassemble or display Software
furnished in object code form. Customer shall not modify, copy, reproduce, distribute,
transcribe, translate or reduce to electronic medium or machine readable form or
language, derive source code without the express written consent of the Seller and its
Suppliers, or disseminate or otherwise disclose the Software to third parties. All
Software furnished hereunder (whether or not part of firmware), including all copies
thereof, are and shall remain the property of Seller and its Suppliers and are subject to
the terms and conditions of this agreement. All rights reserved.
Customer's use of this software shall be deemed to reflect Customer's agreement to
Software License Agreement
abide by the terms and conditions contained herein. Removal or modification of
trademarks, copyright notices, logos, etc., or the use of Software on any Equipment
other than that for which it is intended, or any other material breach of this
Agreement, shall automatically terminate this license. If this Agreement is terminated
for breach, Customer shall immediately discontinue use and destroy or return to
Seller all licensed software and other confidential or proprietary information of Seller.
In no event shall Seller or its suppliers or licensors be liable for any damages
whatsoever (including without limitation, damages for loss of business profits,
business interruption, loss of business information, other pecuniary loss, or
consequential damages) arising out of the use of or inability to use the software, even
if Seller has been advised of the possibility of such damages.
6 Aastra MBU 400 User Guide
Page 7

FCC Information
Contact your System Administrator or Technical Support for any questions
regarding your MBU 400. Have your serial number and MAC address ready when
contacting support. You can locate the serial number and MAC address on the bottom
of the MBU. For inquiries concerning telephony services, contact your Internet
Telephony Service Provider. For inquiries concerning your broadband connection,
contact your Internet Service Provider (ISP), and for inquiries concerning on-screen
information services, contact your information services provider.
For the EU: The telephone’s conformity with EU directives is confirmed by the
CE symbol. We hereby declare that the MBU and/or the Aastra 420d Handset are in
compliance with the essential requirements and other relevant provisions of Directive
1999/5/EC.
For the US: This equipment complies with Part 15 of the FCC rules and Part 68 of
the FCC rules, and the requirements adopted by the Administrative Council for
Terminal Attachments (ACTA). Located on the equipment is a label that contains,
among other information, the FCC registration number, and the ringer equivalence
number (REN). If requested, this information must be provided to the telephone
company.
The REN is used to determine the number of devices which may be connected to the
telephone line. Excessive RENs on the telephone line may result in devices not
ringing in response to an incoming call. In most, but not all areas, the sum of the
RENs should not exceed five (5.0). To ascertain the number of devices that may be
connected to the line, as determined by the total RENs, contact the telephone
company to determine the maximum REN for the calling area.
This equipment cannot be used on the telephone company-provided coin service.
Connection to Party Line Service is subject to State Tariffs.
If this equipment causes harm to the telephone network, the telephone company will
notify you in advance that temporary discontinuance of service may be required. If
such advance notice is not practicable, the telephone company will notify the
customer as soon as possible. Also, you will be advised of your right to file a
complaint with the FCC if you believe this is necessary.
The telephone company may make changes in its facilities, equipment, operations, or
procedures that could affect the operation of the equipment. If this happens, the
telephone company will provide advance notice to enable you to make the necessary
modifications in order to maintain uninterrupted service. If the trouble is causing
harm to the telephone network, the telephone company may request you to disconnect
the equipment from the network until the problem is resolved.
This equipment uses the following USOC jacks: RJ11C.
It is recommended that the customer install an AC surge arrester in the AC outlet to
which this device is connected. This is to avoid damage to the equipment caused by
local strikes of lightening and other electrical surges.
This product is manufactured for Aastra Telecom, Inc. Copyright© 2008. All rights
reserved. Any copying or reproduction of the product or its associated user manual is
strictly prohibited. The content of this document is subject to change without prior
notice.
Aastra MBU 400 User Guide 7
FCC Information
Page 8

FCC Information
US Service Center:
Aastra Telecom US - Service Center
900 Technology Park Drive
Billerica, MA, 01821, USA
Phone (978) 262-3200
For Industry Canada: "This product meets the applicable Industry Canada
technical specifications."
Before installing this equipment, users should ensure that it is permissible to be
connected to the facilities of the local telecommunications company. The equipment
must also be installed using an acceptable method of connection. In some cases, the
company’s inside wiring associated with a single line individual service may be
extended by means of a certified connector assembly (telephone extension cord). The
customer should be aware that compliance with the above conditions may not prevent
degradation of service in some situations.
Repairs to certified equipment should be made by an authorized Canadian
maintenance facility designated by the supplier. Any repairs or alterations made by
the user to this equipment, or equipment malfunctions, may give the
telecommunications company cause to request the user to disconnect the equipment.
Users should ensure for their own protection that the electrical ground connections of
the power utility, telephone lines and internal metallic water pipe system, if present,
are connected together. This precaution may be particularly important in rural areas.
CAUTION: Users should not attempt to make such connections themselves, but
should contact the appropriate electric inspection authority, or electrician, as
appropriate.
‘’The Ringer Equivalence Number is an indication of the maximum number of
terminals allowed to be connected to a telephone interface. The termination on an
interface may consist of any combination of devices subject only to the requirement
that the sum of the Ringer Equivalence Numbers of all the devices does not exceed
five.’’
Le présent materiel est conforme aux specifications techniques applicables
d’Industrie Canada. L’indice d’équivalence de la sonnerie (IES) sert à indiquer le
nombre maximal de terminaux qui peuvent être raccordés à une interface
téléphonique. La terminaison d’une interface peut consister en une combinaison
quelconque de dispositifs, à la seule condition que la somme d’indices d’équivalence
de la sonnerie de tous les dispositifs n’excèdepas 5.
Consumer Information
This equipment complies with Part 68 of the FCC rules and the requirements adopted
by the ACTA. On the back of this equipment is a label that contains, among other
information, a product identifier in the format US:T7HIP06B8015. If requested, this
number must be provided to the telephone company.
An applicable certification jacks Universal Service Order Codes (USOC) for the
equipment is provided (i.e., RJ11C) in the packaging with each piece of approved
terminal equipment.
A plug and jack used to connect this equipment to the premises wiring and telephone
network must comply with the applicable FCC Part 68 rules and requirements
adopted by the ACTA. A compliant telephone cord and modular plug is provided with
this product. It is designed to be connected to a compatible modular jack that is also
compliant. See installation instructions for details.
8 Aastra MBU 400 User Guide
Page 9

The REN is used to determine the number of devices that may be connected to a
telephone line. Excessive RENs on a telephone line may result in the devices not
ringing in response to an incoming call. In most but not all areas, the sum of RENs
should not exceed five (5.0). To be certain of the number of devices that may be
connected to a line, as determined by the total RENs, contact the local telephone
company. [For products approved after July 23, 2001, the REN for this product is part
of the product identifier that has the format US:T7HIP06B8015. The digits
represented by ## are the REN without a decimal point (e.g., 06 is a REN of 0.6). For
earlier products, the REN is separately shown on the label.]
If this equipment MBU 400 causes harm to the telephone network, the telephone
company will notify you in advance that temporary discontinuance of service may be
required. But if advance notice isn’t practical, the telephone company will notify the
customer as soon as possible. Also, you will be advised of your right to file a
complaint with the FCC if you believe it is necessary.
The telephone company may make changes in its facilities, equipment, operations or
procedures that could affect the operation of the equipment. If this happens the
telephone company will provide advance notice in order for you to make necessary
modifications to maintain uninterrupted service.
Should you experience trouble with this equipment, please contact: Aastra Telecom
US – Service Centre, 900 Technology Part Drive, Billerica, MA, 01821, USA, Phone
(978) 262-3200, for repair or warranty information. If the equipment is causing harm
to the telephone network, the telephone company may request that you disconnect the
equipment until the problem is resolved.
Please follow instructions for repairing if any (e.g. battery replacement section);
otherwise do not alternate or repair any parts of device except specified.
Connection to party line service is subject to state tariffs. Contact the state public
utility commission, public service commission or corporation commission for
information.
NOTICE: If your home has specially wired alarm equipment connected to the
telephone line, ensure the installation of this 1.9GHz DECT Product for VoIP and
PSTN does not disable your alarm equipment. If you have questions about what will
disable alarm equipment, consult your telephone company or a qualified installer.
This equipment is hearing aid compatible.
NOTICE: According to telephone company reports, AC electrical surges, typically
resulting from lightning strikes, are very destructive to telephone equipment
connected to AC power sources. To minimize damage from these types of surges, a
surge arrestor is recommended.
Applicable for Coin or Pay Phone Only
To comply with state tariffs, the telephone company must be given notification prior
to connection for customer-owned coin or credit card phone. In some states, the state
public utility commission, public service commission or corporation commission
must give prior approval of connection.
FCC Information
Aastra MBU 400 User Guide 9
Page 10

Safety Information
Important Safety Information
Important Battery Information
Safety Information
Sensitive Electronic Environment
Charge the battery or handset only in combination with 420d Charger and the
SALOM SSW-1444 adapter that comes with the product. Plug the SALOM SSW1444 AC/DC adaptor in a wall outlet socket near the equipment for easy access/
removal of the AC/DC adaptor.
This product uses rechargeable Lithium-ion batteries 3.7V, 650mAh. Only use
batteries that come with the handset or dedicated spare batteries marked with “Battery
Pack 3.7V 650mAh Li-ion”. Do not use any other type, since this may present a risk
of leakage, fire, explosion or other hazardous situation. For battery replacement or
removal please remove the battery cover of the handset. Never disassemble,
customize or short-circuit batteries. Do not place battery in fire or heat the battery.
Charge the battery or handset only in combination with 420d Charger and the
SALOM SSW-1444 adapter that comes with the product.
Any radio-based equipment can potentially cause interference with other equipment
and can be interfered from other equipment. This also applies for DECT equipment.
However due to the very low transmission power level the chances for interference
are very small. Research proves that operational DECT phones normally don’t
influence electronic equipment however some precautions must be taken into account
for sensitive electronic equipment e.g. sensitive laboratory equipment. When DECT
phones operate in straight nearness of sensitive electronic equipment incidental
influence can appear. You are advised not to place the DECT phone on or close (less
than 10cm) to this kind of equipment, even in standby mode. Please also use the other
documentation supplied with the various parts of your telephone system.
Product Disposal Information
For countries in the European Union
The symbol depicted here has been affixed to your product in order to
inform you that electrical and electronic products should not be disposed
of as municipal waste.
Electrical and electronic products including the cables, plugs and accessories should
be disposed of separately in order to allow proper treatment, recovery and recycling.
These products should be taken to a designated facility where the best available
treatment, recovery and recycling techniques are available. Separate disposal has
significant advantages: valuable materials can be re-used and it prevents the
dispersion of unwanted substances into the municipal waste stream. This contributes
to the protection of human health and the environment.
Please be informed that a fine may be imposed for illegal disposal of electrical and
electronic products via the general municipal waste stream. In order to facilitate
separate disposal and environmentally sound recycling, arrangements have been
made for local collection and recycling. In case your electrical and electronic products
need to be disposed of please refer to your supplier or the contractual agreements that
your company has made upon acquisition of these products.
10 Aastra MBU 400 User Guide
Page 11

For countries outside the European Union
Disposal of electrical and electronic products in countries outside the European Union
should be done in line with the local regulations. If no arrangement has been made
with Aastra or your supplier, please contact the local authorities for further
information.
Battery Disposal Information
Defect or exhausted batteries should never be disposed of as municipal waste. Return
old batteries to the battery supplier, a licensed battery dealer or a designated
collection facility. Do not incinerate batteries.
Aastra MBU 400 User Guide 11
Safety Information
Page 12

Page 13

About This Guide
This User Guide provides the information required to use and configure the MBU 400
on your business or home network. It includes a description of the features and
functions of the Mobility Base Unit (MBU) and the Aastra 420d Handset. We
recommend reviewing the material in this guide before using the MBU 400 system on
your network.
Documentation
The following documentation can be found on the Aastra Telecom website at
www.aastratelecom.com:
• Aastra MBU 400 Installation Guide – Contains installation and set-up
instructions, general features and functions of the MBU and Handset. This
Installation Guide is included in the box with your MBU 400.
• Aastra MBU 400 User Guide – Describes the most commonly used features and
functions for an end user. Provides brief configuration information.
• Aastra MBU 400 Administrator Guide – Contains advanced Administrator
information and procedures for setting up and using the MBU and Aastra 420d
Handset. It also includes advanced configuration information. This Administrator
Guide is intended for the System Administrator only.
Aastra MBU 400 User Guide 13
About This Guide
Page 14

Introduction
Introduction
The MBU 400 consists of a Mobility Base Unit (MBU) and the Aastra Digital
Enhanced Cordless Telephone handset (420d) that provide telephony service over the
Internet and over the Public Service Telephone Network (PSTN or landlines). You
can install the MBU on a desktop or on a wall, while the 420d handset sits in its
charging cradle on a desktop. You can register up to 8 handsets with the MBU. The
MBU supports up to 3 SIP calls and 1 PSTN call simultaneously.
You can setup the MBU 400 in your business or home environment to act as a small
hub with group calling, voicemail, individual SIP accounts, or SIP lines shared across
a group. Once installed, the handsets can handle all calls for every line (IP calls and
PSTN calls). Your System Administrator can configure your phone via transfer of a
configuration file over TFTP or HTTP, a local web interface, or the handset user
interface.
The MBU can be connected to the Internet (service provider required) via an Ethernet
cable connected to the LAN port, and/or the PSTN via a regular telephone cable
connected to the LINE (or landline) port. The LINE connection also allows for
emergency calling and provides the handling of call overflow on the MBU.
Features
MBU Features
Call and Telephony Features
• VoIP calling (based on SIP 2.0 - RFC3261)
• (optional) Landline calling over Public Service Telephone Network (PSTN)
• Up to 8 paired handsets, one line per handset (MBU supports up to 3 SIP calls and
1 PSTN call simultaneously)
• VoIP DTMF digit support (inband, SIP Info, RFC2833)
• Voicemail support (indicators for receiving and handling of voicemail, and call-tovoicemail server)
14 Aastra MBU 400 User Guide
Page 15

Other MBU Features
• System Administrator Web Interface Support ( English only)
• SIP accounts configured via WebUI, TFTP, or handsets
• Quality of Service
• Type of Service (ToS)
• CODECs
• Pulse Code Modulation A-law (PCMA) (G.711, 64 kbps)
• Pulse Code Modulation u-law (PCMU) (G.711, 64 kbps)
• iLBC (20 ms)
• G.729
• Maintenance, administration, and provisioning
• Digital Enhanced Cordless Telephone (DECT) interface
• Firmware updates via:
- Over-the-air programming
- File transfer of a configuration file over TFTP or HTTP, local Web interface, or
the handset user interface (System Administrator PIN required)
• Provisioning allowed via a configuration file, Web interface, or the handset user
interface*
• Debug and SIP trace report ability (via Web interface)
* The configuration file provisioning allows access to additional configuration
parameters. The local Web interface allows access to most configuration settings.
The handset user interface enables access to some VoIP account settings (access
can be controlled by a System Administrator PIN code if required).
Aastra 420d Handset Features
Display
• 128 x 128 pixels, 65K color support, backlight
• Graphical menu system
Introduction
Aastra MBU 400 User Guide 15
Page 16

Introduction
Call and Telephony Features
• 12 numerical keys, 5 navigation keys, 2 function keys
• Auto answer (when handset is lifted from the charger)
• Key lock option
• Call forward - all, busy, no answer
• Call timer
• Call transfer and call hold (for internal calls)
• Call waiting indication
• Caller ID with name from phone book
• Distinctive ringing
• Call log of incoming/outgoing/missed calls
• Call return (from call log)
• Customizable phone settings
• Intercom (handset to handset through MBU)
• Contacts List (up to 200 entries and 4 numbers per entry)
• Voicemail message support
• Speeddial support
• Three-way conferencing (2 handsets)
• Call hang up (upon return to charging cradle)
• On-hook dialing (pre-dial numbers before pressing off-hook button)
Audio Features
• Mute (disable microphone)
• Receiver volume control
• Ring tone melodies
• Ringer volume control
• Key sounds (click, DTMF, and special tones)
• Low battery and out-of-range audible warnings
• Speakerphone
• Headset jack (2.5 mm)
Other Handset Features
• Separate handset charging station
• Hearing aid compatible
• Multi-language support (Danish, German, English, Spanish, French, Italian,
Dutch, Portuguese, Finnish)
• Li-Ion battery pack
• Automatic or fixed registration of handset to MBU
• Status indicators in idle mode (signal, battery level, date and time)
• Message waiting indicator (missed calls, voicemail)
• Vibrator mode on handset
16 Aastra MBU 400 User Guide
Page 17

Requirements
Before using the MBU 400 on your network, the following may be required
depending on your network connection:
• Broadband Internet connection – cable, DSL, or equivalent
• Internet Telephony Service Provider subscription – to make voice calls over your
Internet connection
• Analog telephone line subscription – to make ordinary phone calls (and
emergency calls) over the LINE port on the MBU (optional)
• In addition, before you start the installation process, the following may be
required:
— (optional) Wired Ethernet router or broadband modem for network and IP
connections
— (required) Power outlets for the MBU and the handset charger
— (optional) Telephone wall outlet used for landline telephony
Installation and Setup
If your System Administrator has not already setup your MBU 400, please refer to the
Aastra MBU 400 Installation Guide for basic installation and physical setup. For
advanced administration and configuration information, System Administrators
should refer to the Aastra MBU 400 Administrator Guide.
Aastra MBU 400 User Guide 17
Introduction
Page 18

Getting Started
CALL
VOIP
I-NET
POWER
MBU Gateway
Getting Started
The MBU 400 must be set up and configured prior to its first use. This section
describes the behavior and start up screens you may see on the 420d handset when the
MBU 400 is first plugged in, or when it is restarted.
See the MBU 400 Installation Guide for detailed installation instructions.
The Lights on the front of the MBU 400 indicate the current status. When starting the
system for the first time, the POWER and I-NET and VOIP lights should remain lit. If
the VOIP is not lit, the system has not yet been configured for internet calls.
To configure your MBU 400 for internet calls using the handset, see Configuring
Your Phone for First-Time Use on page 22, or ask your System Administrator for
assistance.
RESET
DC9-20V
CALL
VOIP
LAN
LINE
Side view
Front view
I-NET
POWER
The following describes the indicator lights, ports and buttons on the MBU 400 which
provide information on the operating state, and allow you to enter the handset
registration mode.
Label Description
POWER Remains lit when the power is on.
I-NET Remains lit when the MBU has an IP address. Flashes during
18 Aastra MBU 400 User Guide
boot.
Page 19
Label (Continued) Description (Continued)
VOIP Remains lit when the MBU is connected to an Internet
Telephony Service Provider.
CALL Remains lit when a call is in progress (for both landline and
Internet calls).
Flashes during firmware updates.
RESET
(side panel)
DC 9-20V
(side panel)
LAN
(side panel)
LINE
(side panel)
Press to reboot the unit, activate configuration changes, and
enable handset registration mode.
Press and hold 15 seconds to reboot with factory default
settings. All front panel lights come on when a factory restart is
initiated.
NOTE: Configuration settings are lost during a factory default.
Indicates the power connection.
Indicates the Internet port.
Indicates the Telephone Line Connection port (PSTN).
Registering the 420d Handset
Each handset must be registered with your MBU 400 gateway before it can be used. If
the handset is not registered, one of the following message appears on the handset
displays:
Searching for Gateway
or
Please place handset in charger to start auto-registration with the gateway.
Reset the gateway to enable registration mode.
To register your handset do the following.
1. Ensure the base unit is connected to power.
2. Place the handset in the charger.
3. If the handset does not register automatically, press and release the
RESET button
on the side of the MBU 400.
Pressing
RESET reboots the MBU, following which it remains in registration
mode for 5 minutes. More than one handset can be registered in this period. To start
a new 5 minute registration period, press and release the
RESET button again.
Successful registration ends with the idle screen on the handset as shown in the
section Handset Idle Screen on page 25.
Note: If you encounter problems registering your handset, try removing the handset
from the charger and replacing it, then resetting the MBU once again. If you have
changed the gateway access code, see Changing the Access Code on the Handset on
page 29 to change the handset access code so it matches the gateway.
Getting Started
Handsets can be registered and de-registered through the handset menu options. See
Manually Registering/De-registering a Handset on page 60 for further information.
Aastra MBU 400 User Guide 19
Page 20

420d Handset Key Descriptions
R
CLR
R
CLR
Getting Started
The Aastra 420 handset has a front keypad as well as some side keys. These keys can be used to
customize your handset as well as make and manage calls.
CLR
4
7
1
GHI
PQRS
*
2
5
8
ABC
0
JKL
TUV
3
6
9
DEF
MNO
WXYZ
#
The following table describes the keys on the key panel of your 420d handset.
Keys Key Description
Softkeys - Select from the right and left choices
displayed in the bottom corners of the handset
screen using the softkeys. The handset idle screen
softkeys are Call log (left key) and Options (right
key).
Green Key - Answer an incoming call with the green
R
CLR
z
key. From idle mode the green key connects to the
primary line (set as Landline or VoIP) and dials the
number you have entered or selected.
Red Key - End calls, return to calls placed on hold,
and exit menus using the red key. (Pressing the red
key while within a menu may exit without saving
changes.)
OK Key - Access the Main Menu from idle mode,
and use the OK key to select menu items whenever
the icon appears at the bottom of the handset
screen.
20 Aastra MBU 400 User Guide
Page 21

Keys (Continued) Key Description (Continued)
!
Navigation Keys - Scroll though menu items using
the left, right, top, and bottom navigational keys.
Star Key - Change the input mode while entering text
using the star key. The current input mode displays
*
#
+
on the upper right corner of the screen. (See Text
Input Modes on page 31 for text input details.)
Lock or unlock the keypad from idle mode using the
star key (press * then the Lock or Unlock softkey). A
key appears at the top of the handset display when
the keypad is locked. (See Locking/Unlocking the
Keypad on page 28 for details.)
Number Key - Toggle on or off the silent mode from
the idle screen by pressing the “#” key, and pressing
the Silence on or Silence off softkey as required
Volu m e K e y s - (Located on the side of the handset.)
Use the volume + and - keys during an active call to
adjust the call volume.
From idle mode, use the volume + key to view the
system status menu, including the MAC address and
IP address of your phone system.
-
Speakerphone Key - (Located on the side of the
handset.) Toggle the speakerphone on and off using
the speakerphone key.
MBU 400 IP Address and System Status
To set some advanced MBU configuration options using an Internet browser, the
System Administrator needs the IP address of the phone. You can view the MBU IP
address and status information from the 420d handset screen. For setting advanced
configuration options, ask your System Administrator or refer to the Aastra MBU
400 Administrator Guide
To view the IP address and status of the MBU, do the following.
Getting Started
1. After pairing the handset to the MBU, press the + volume button on the side of the
handset.
Aastra MBU 400 User Guide 21
Page 22
Getting Started
CLR
The message "Connecting... Please wait" appears on the handset, followed shortly
by the MBU status screen.
2. Scroll down to see the IP address and other MBU status information.
System Status
--Network--
MAC Address
IP Address
MAC Address
00-08-7g-98-45-cf
IP address
192.345.43.54 (D)
Boot Status
Failed
--Gateway--
Version
Sw: 01:08 Hw: 1
Serial no.
255
Handset ID
0280000002340
--VoIP status--
VoIP register domain
Registration
SIP1:Registered
SIP2: Not registered
SIP3: Not registered
SIP4: Not registered
SIP5: Not registered
SIP6: Not registered
SIP7: Not registered
SIP8: Not registered
--EMS status-EMS server
Registration
Failed
--RTP packets-Received
No
3. Press the red key to exit.
CLR
Note: If the MBU did not download a configuration file or did not receive an IP
address using DHCP, a Boot Status of "Failed" appears on the System Status page.
If your MBU 400 system is not using configuration files, for example, the Boot
Status will be "Failed" under normal operation.
Configuring Your Phone for First-Time Use
This section describes how to configure and set up your MBU 400 phone for first use.
If your MBU 400 System has been pre-configured by the Internet Telephony Service
Provider you purchased it from, the phone is ready for use once you have plugged in
all cables and connected the power. You can customize your phone using the
information provided in Customizing Your Phone on page 30.
The MBU 400 phone functions much like an ordinary analog telephone. However,
because it is connected to the Internet, you have to configure your phone before it is
ready for first use. The initial configuration may have already been done for you by
your System Administrator.
22 Aastra MBU 400 User Guide
Page 23

If your MBU 400 has not yet been configured for internet calls, you will see this
message on the handset screen:
Configure SIP
domain
If you try to initiate a VoIP call, you will see the disconnected screen:
Disconnected
Connection error...
0:00:00
Configuration information can be entered through the handset, or by the System
Administrator using a web browser. See the Aastra MBU 400 Administrator Guide
for details of web configuration menus.
Configuring the Phone Using the Handset
In order to configure your phone using the handset, you need the Domain Name and
SIP Proxy information from your Internet Service Provider (ISP). If a PIN code has
been set by your System Administrator, you will also need the 4-digit PIN code.
To configure your phone using the handset, do the following.
1. In Idle mode, press OK z(the black circular button) to display the Main Menu.
2. Select
3. Select
4. If prompted, enter the 4-digit PIN code and press OK z.
5. Select
Specify the Domain and the SIP proxy:
6. Select
7. Enter the domain name provided by your ISP, and press OK z.
8. Select
9. Enter the domain name or IP address of the SIP proxy, if it is different from the
10. Press OK z.
Settings and press OK z.
VoIP settings, and press OK z.
Accounts and press OK z.
Domain, and press OK z.
SIP Proxy and press OK z.
domain name in Step 2.
Note: If you have more than one VoIP account, you must repeat the procedure
above for each account. You can have up to 8 phones registered with the MBU 400
gateway, and up to 8 VoIP accounts.
Getting Started
11. Select a SIP account, and press OK z. Valid values are
Aastra MBU 400 User Guide 23
SIP 1 through SIP 8.
Page 24

12. Select the listed parameters one by one and press OK z.
For each parameter, key in the relevant information based on the account
information you received from your Internet Telephony Service Provider.
Getting Started
To switch between entering text, numbers, and symbols, press the
Options softkey,
or see the section, Text Input Modes on page 31 for more details.
Display name (optional) – Caller ID that the called party sees.
SIP user name – usually the phone number you received from your ISP.
Authentication name – often the same as the SIP user name.
SIP password – the password you received from your ISP.
Nickname – name of the account used in Account and VoIP line settings within your
MBU 400 system.
Domain – registrar or domain address you received from your ISP; often the same
as the SIP proxy address.
SIP proxy–outbound proxy address you received from your ISP.
13. After each change, press OK z, then press the
Yes softkey when prompted to
save changes.
14. You may be prompted to reset the gateway when you exit the VoIP settings menu;
if so press the
Yes softkey to confirm. Otherwise press the RESET button on the
rear of the gateway when you have completed all changes.
Note: You must press the
RESET button on the gateway after making configuration
changes from the handset in order for the changes to take affect.
24 Aastra MBU 400 User Guide
Page 25

Using the 420d Handset
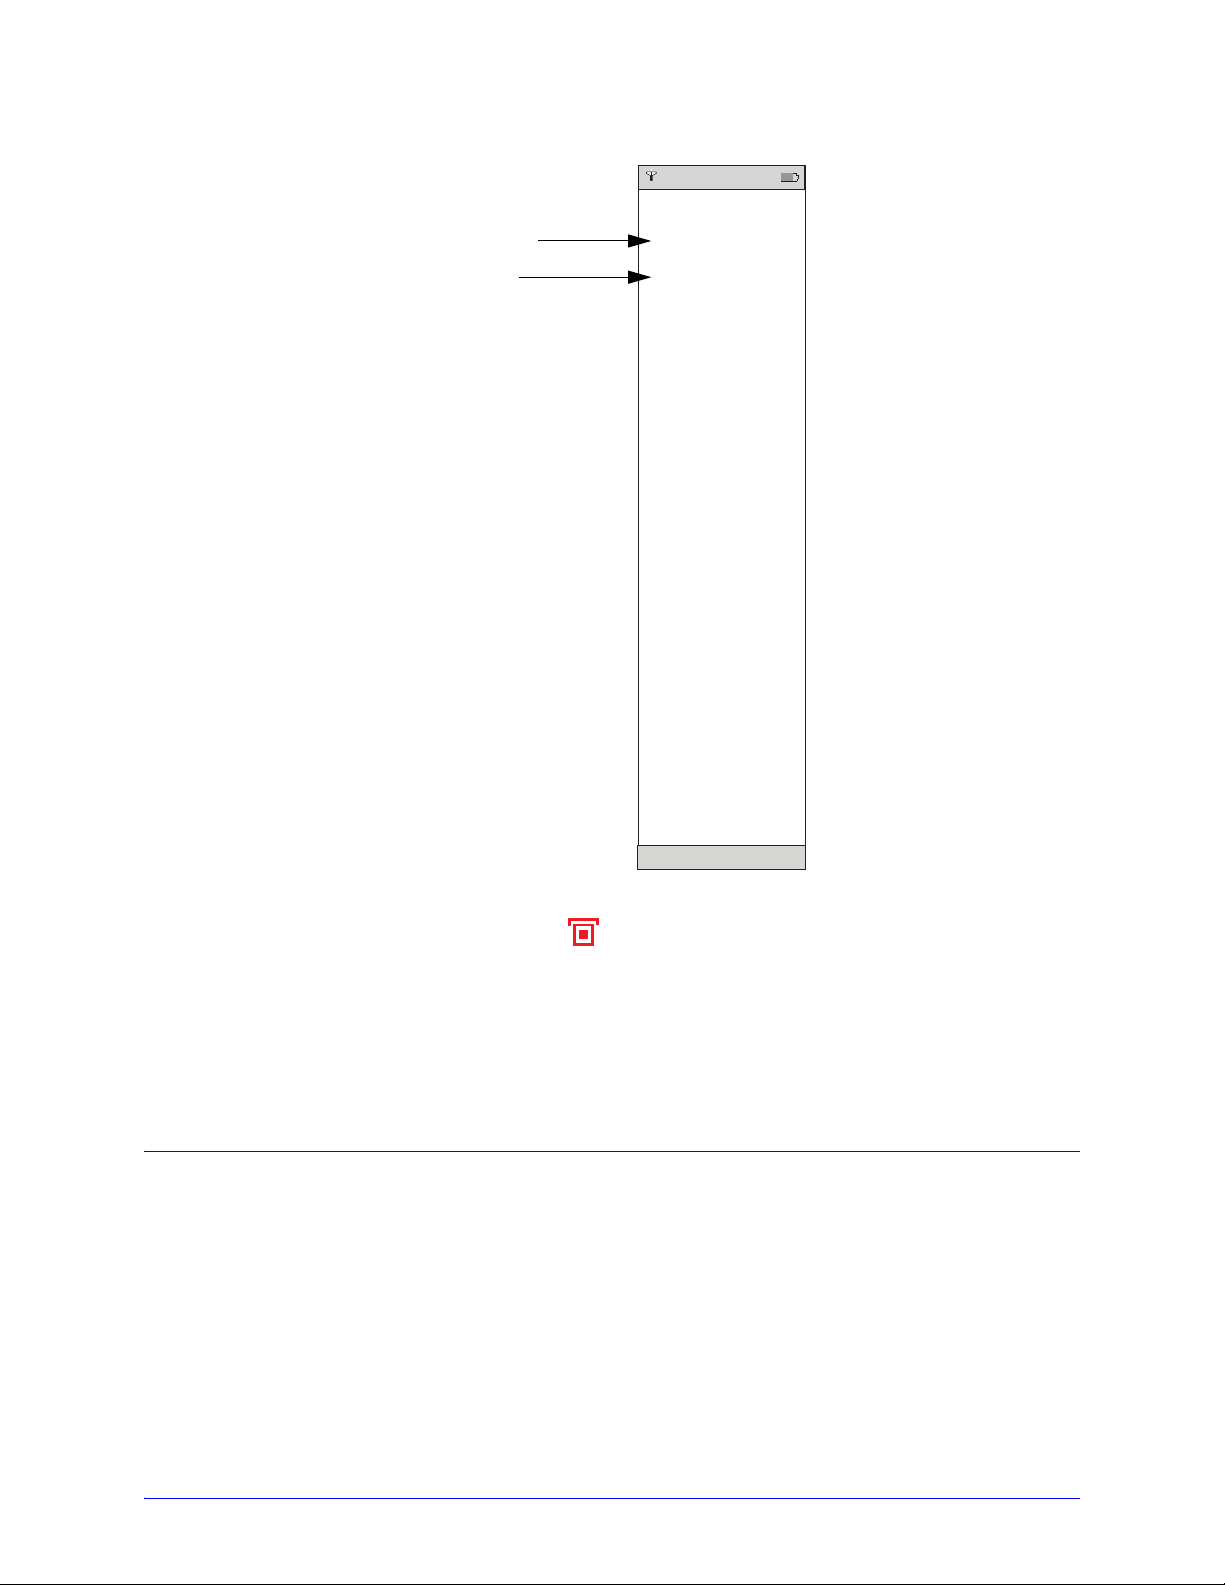
Handset Idle Screen
After successful registration of the handset to the MBU, the idle screen displays. The
following illustration describes the icons that appear on the idle screen.
Connection Status Indicator*
(See the connection states
listed below.)
Call Log
For incoming, outgoing,
and missed calls (activated
with the left softkey).
*The various states for the connection status indicator are described here.
Connection Status Description
Handset Name
Battery Status
(and charging indicator)
Handset 1
01:55
PM
08/05/08
Call Log Options
OK Key Indicator
Indicates that the OK
key can be used.
Black | Black - Indicates out of range of the MBU
Time and Date
Options
For redialing calls, viewing
active calls, landline calls,
and setting DND or call
waiting.
Idle Mode Options
When in idle mode, an Options softkey displays in the lower right corner of the
screen. Pressing the
Redial Allows you to redial the last number dialed.
Active Calls Displays the active calls for all handsets registered to the same
Using the 420d Handset
White | Black - Indicates within range of the MBU, but not
ready for SIP calls
White | White - Indicates within range of the MBU and ready
for SIP calls on primary line
Options softkey displays the following options:
Idle Mode Options
See Calling Using Redial on page 46.
MBU.
Aastra MBU 400 User Guide 25
Page 26

Landline Allows you to place a call using the landline.
Contacts
DND Allows you to enable/disable Do Not Disturb on your phone.
Call Waiting Allows you to enable/disable Call Waiting on your phone.
Handset Main Menu
To display the Main Menu on the handset, press the circular OK key z in the center of
the navigation keys as shown below.
Idle Mode Options (Continued)
See Landline Calls on page 43.
See Setting Do Not Disturb on page 37.
See Setting Call Waiting on page 37.
Navigation Keys
Using the 420d Handset
Main Menu
The following icons appear on the Main Menu screen.
Intercom
Contacts
The Handset Main Menu has five options to choose between when customizing and
operating the phone.
OK Key
(opens the Main Menu)
Contacts
Settings
Call Log
Messages (voicemail)
OK Key Indicator
Indicates that the OK key can
be used.
Main Menu Icon Description
Intercom - Allows you use the Intercom to communicate between two handsets
registered to the same MBU.
For more information, see Intercom Calls on page 43.
Messages - Allows you to access and play your voicemail messages. Your voicemail
service can be provided by your Service Provider or a local mail server. If using a Service
Provider for voicemail, contact that provider for more information on how to use your
voicemail service.
For more information, see Voicemail on page 59.
26 Aastra MBU 400 User Guide
Page 27

Main Menu Icon Description (Continued)
!
Call Log - Allows you to access and view the Call Log which contains a list of all
incoming, outgoing, and missed calls. From the Call Log, you can also perform the
following:
• Add a selected entry as a contact in the Contacts List
• Remove an entry from the Call Log and place it in the Contacts List
• Place a call from the entry over a landline
• Place a call from the entry over VoIP
• Edit the entry for placing a call
• Delete a single entry
• Delete all entries
For more information, see Call Log on page 58.
Settings - Allows you to customize your phone using the following settings:
• Audio Settings
• Telephony Settings
• VoIP Settings
• Internet Settings (This menu contains administrator settings. See the Aastra MBU 400
Administrator Guide for more information.)
• System Settings
For more information, see Customizing Your Phone on page 30.
Contacts - Allows you to access and view your Contacts List. From the Contacts List,
you can also perform the following:
• Place a call over the landline
• Place a call over VoIP
• Add a contact
• Edit a contact
• Delete a contact
• Delete all contacts
• Set up a speeddial
• Set up a group of contacts
For more information, see Contacts List on page 54.
Using the Volume Control
The volume control is located on the left side of the phone. You can increase or
+
decrease the volume while on an active call as required.
To adjust the volume on the phone, do the following.
1. Press the + key to increase the volume as required.
2. Press the - key to decrease the volume as required.
-
Using the Speakerphone
The speakerphone control is located on the left side of the phone beneath the volume
control. You can use the speakerphone key while dialing or during an active call to
turn the speakerphone on and off.
To turn the speakerphone on and off do the following.
1. Press the speakerphone key to turn the speakerphone on.
A speaker appears at the top of the handset display when the speakerphone is
on.
Using the 420d Handset
2. Press the speakerphone key again to turn the speakerphone off.
Aastra MBU 400 User Guide 27
Page 28

Locking/Unlocking the Keypad
You can lock and unlock the keypad on the phone when required. When locked, it
prevents unauthorized users from using your phone, and prevents you from accidently
hitting the keypad if you are carrying the phone around.
To lock or unlock the keypad do the following.
1. Press the * key.
2. Press the
Note: The keypad unlocks automatically when you answer an incoming call, or if you
make an emergency call. For more information about emergency calls, see Making
Emergency Calls on page 49.
Changing the PIN Code for VoIP Settings
Under some configurations, selected menus are protected with a PIN code. With a
PIN code set no one is able to access these menus on your handset without first
entering the 4-digit code. If you need to know your PIN code, contact your System
Using the 420d Handset
Administrator or try the default value "2222". Once you have entered the correct PIN
code you can change it using the phone handset.
To change a VoIP PIN code, do the following.
Lock or Unlock softkey.
1. In Idle mode, press OK z to display the Main Menu.
2. Select
3. Select
4. If prompted, enter the current 4-digit PIN code and press OK z.
5. Select
6. Enter a new PIN code using the numbers on the keypad, and press OK z.
7. Press the
8. For future reference, write your new PIN code here:
Settings and press OK z.
VoIP settings, and press OK z.
Change PIN code and press OK z.
You can enter up to 4 numerical characters for your PIN. The characters display as
you type, but are encrypted after saving the PIN.
Note: If you or someone else has already set a PIN code, you need to enter the old
code to access the
Yes softkey when prompted to save the PIN code.
Note: The new PIN code does not take effect until the MBU 400 has been reset.
VoIP settings menu.
Changing the Access Code
The access code is used to ensure your handset connects to the correct gateway in an
environment with more than one gateway present. Handset and gateway access codes
must be the same at all times, and all handsets must use the same code as the gateway.
Note: If you forget the gateway access code and are unable to register a handset, the
access code can be reset by the System Administrator using the web interface.
When registering a new handset, ensure that its access code is modified to the same
value as the access code of the gateway. For information on how to register the
handset, see Manually Registering/De-registering a Handset on page 60.
28 Aastra MBU 400 User Guide
Page 29

Changing the Access Code on the Gateway:
CLR
To change the gateway access code using the handset, do the following.
1. In Idle mode, press OK z to display the Main Menu.
2. Select
3. Select
4. Select
5. Select
Settings and press OK z.
System Settings, and press OK z.
Access Code, and press OK z.
Gateway, and press OK z.
6. Enter a new access code.
The characters display as you type, but are encrypted after saving the access code.
7. Press OK.
8. Press the
Yes softkey when prompted to save the access code.
The new access code is saved by the gateway. Record the access code here for
future reference:
Note: All handset access codes must match the gateway access code, or the
handsets will not register after the next reset.
Changing the Access Code on the Handset
To change the handset access code, do the following.
1. In Idle mode, press OK z to display the Main Menu.
2. Select
3. Select
Settings and press OK z.
System Settings, and press OK z.
4. Select
5. Select
Access Code, and press OK z.
Handset, and press OK z.
6. Enter a new access code.
The characters display as you type, but are encrypted after saving the access code.
7. Press OK z.
8. Press the
9. Press the red key to exit.
Yes softkey when prompted to save the access code.
CLR
Note: All handset access codes must match the gateway access code, or the
handsets will not register after the next reset.
Using the 420d Handset
Aastra MBU 400 User Guide 29
Page 30

Customizing Your Phone
CLR
Changing the Handset Name
After handsets register with the gateway, the default names assigned to each handset
are Handset 1, Handset 2, Handset 3,.........up to Handset 8.
If required, you can assign a name to your handset to identify your handset from any
other handsets registered with the same gateway.
For more information about entering text, numbers, and symbols, see the section, Text
Input Modes on page 31.
To change the handset display name do the following.
1. In Idle mode, press OK z to display the Main Menu.
2. Select
3. Select
4. Select
Customizing Your Phone
5. Select
6. Press the * key to toggle the input mode for entering characters.The input mode
7. Enter the handset name using the keypad on the phone.
8. Press OK z, and press the
Settings and press OK z.
System Settings, and press OK z.
Handset Settings, and press OK z.
Handset name, and press OK z.
you select displays in the upper right corner on the screen. Press the
softkey and select the
Note: Before saving the new handset name, you can cancel at any time by pressing
the red key and pressing the
name returns to its previous setting.
Entering Text, Numbers, and Symbols
The handset interface allows you to perform several options to customize your phone,
some of which require you to enter text and numbers on the handset screen. This
section describes how to enter text and numbers on your phone.
When in an option requiring you to enter or edit text or numbers (for example when
adding contacts to the Contacts List), the following softkeys display for your use:
CLR
Options
Insert symbol option to insert symbols if required.
Yes softkey at the save prompt.
Yes softkey at the discard prompt. The handset
The
Erase softkey enables you to backspace and erase characters that was just
entered.
The
Options softkey provides you with the following two options:
Input mode
Insert symbol
30 Aastra MBU 400 User Guide
Page 31

Text Input Modes
When you reach a screen requiring text or numerical input, the Options softkey on the
right allows you to switch between different types of input. Pressing the
softkey you can choose between
Input Characters:
Input mode allows you to select the format you want to enter text or numbers. You can
select from the following formats for entering characters:
ABC Types all upper case letters.
Abc Types first letter in a sentence in upper case and the remaining
abc Types all lower case letters.
123 Types numbers only.
You can change the case of the letters as required and enable the numbers (even in the
middle of text characters) by pressing the * key.
To change the text input mode when on a screen that requires you to enter or edit
characters do the following.
1. Press the
Options
Input mode (for characters) and Insert symbol.
letters in lower case.
Options softkey.
2. Select
3. From the list of input modes, select the format you want to use to input characters
or numbers, and press OK z.
Note: While entering characters, you can press the * (star key) to quickly change
the input mode. Whether selecting an input mode from the list, or pressing the* key,
the current input mode displays in the upper right corner of the screen.
Input Symbols
While inputting text or numbers, you can also insert symbol characters if required.
Input symbol brings up a screen of available symbols allowing you to insert symbols
as needed.
To insert symbols when on a screen that requires you to enter or edit characters do the
following.
1. Press the
2. Select
A screen displays available symbols.
3. Use the navigation keys to scroll to the symbol you want to insert.
4. Press OK z.
The symbol you select displays in the position your cursor was in before you
selected the symbol.
Input Mode and press OK z.
Customizing Your Phone
Options softkey.
Insert Symbol and press OK z.
Aastra MBU 400 User Guide 31
Page 32

Specifying a Language on the Handset
CLR
The individual handset language settings determines in which language the text on the
display is presented.
Note: Before you start using your phone, we strongly recommend that you specify
handset language, country selection, time zone, and routing of emergency dials to
ensure that your Aastra phone functions properly.
To set the handset language do the following.
1. In Idle mode, press OK z to display the Main Menu.
2. Select
3. Select
4. Select
5. Select the preferred language to display on your handset, and press OK z.
6. Press the red key to exit.
Settings and press OK z.
System Settings, and press OK z.
Language, and press OK z.
Available languages are English, French, Spanish, German, Portuguese, Danish,
Dutch, Finnish, and Italian.
Customizing Your Phone
Reaching the Language List Directly
If you have selected a language you do not understand and you cannot find the
language menu again, do the following:
1. In Idle mode, press OK z to display the Main Menu.
2. Enter
3. Select the applicable language you want to use on the phone.
4. Select OK z to save the language setting.
Setting Time and Date
888. The language list displays.
CLR
By default, time and date are automatically synchronized with a time server on the
Internet to ensure that the time and date displayed on the MBU 400 System is always
correct. However, you can disable automatic time setting and set the time and date on
your phone manually.
Some Time and Date options are not available unless the automatic time setting is
disabled and the gateway reset. Unavailable options appear in red and cannot be
selected.
Automatic Time/Date Settings
Automatic time setting is enabled by default. You can disable automatic time setting
if required.
To disable automatic time setting do the following.
1. In Idle mode, press OK z to display the Main Menu.
2. Select
3. Select
32 Aastra MBU 400 User Guide
Settings and press OK z.
System Settings, and press OK z.
Page 33

4. Select Time and date, and press OK z.
5. Select
Auto set time, and press OK z.
6. Select
7. Press the
Disabled, and press OK z.
RESET button on the rear of the gateway for the changes to take effect,
or press the
Setting Time Manually
The correct time can be entered on the handset if required.
Note: You must disable automatic time/date setting before manually setting the time.
To manually set the time on the phone, do the following.
1. In Idle mode, press OK z to display the Main Menu.
2. Select
3. Select
4. Select
5. Select
Settings and press OK z.
System Settings, and press OK z.
Time and date, and press OK z.
Set time, and press OK z.
6. Use the keypad to enter the correct time in the format "hours:minutes" and press
OK z when done.
Note: To switch the time format between 12 and 24 hour formats, see Changing
Tim e Forma t on page 33.
Changing Time Format
Yes softkey when prompted to reset the gateway from the handset.
The handset time format can be switched between 12 hour (am/pm) and 24 hour
format.
To change the time format, do the following.
1. In Idle mode, press OK z to display the Main Menu.
2. Select
3. Select
4. Select
5. Select
Settings and press OK z.
System Settings, and press OK z.
Time and date, and press OK z.
Time format, and press OK z.
6. Select a time format to use, and press OK z.Valid values are AM/PM or 24 hour.
Setting Date Manually
The correct date can be entered on the handset if required.
Note: You must disable automatic time/date setting before manually setting the date.
To manually set the date on the phone, do the following.
1. In Idle mode, press OK z to display the Main Menu.
2. Select
3. Select
4. Select
5. Select
Settings and press OK z.
System Settings, and press OK z.
Time and date, and press OK z.
Set date, and press OK z.
Customizing Your Phone
Aastra MBU 400 User Guide 33
Page 34

6. Use the key pad to enter the correct date in the format "month/day/year" or "day-
month-year" and press OK z when done.
Note: To switch the date format between US month/day/year and European daymonth-year formats, see Changing Date Format on page 34.
Changing Date Format
The handset date format can be switched between US (month/day/year) and European
(day-month-year) format.
To change the date format do the following.
1. In Idle mode, press OK z to display the Main Menu.
2. Select
3. Select
4. Select
5. Select
Settings and press OK z.
System Settings, and press OK z.
Time and date, and press OK z.
Date format, and press OK z.
6. Select a date format to use, and press OK z.
Changing Time Zone
Customizing Your Phone
Setting the time zone properly ensures that the time displayed on the Idle mode screen
corresponds to the time zone in your geographical location. Time zones on the phone
are specified in Greenwich Meridian Time (GMT) (same as Universal Time). GMT is
measured from the Greenwich Meridian Line at the Royal Observatory in Greenwich.
Greenwich is the place from where all time zones are measured. For automatic time
setting to function properly, it is important that you have specified the correct time
zone.
To change the time zone:
1. In Idle mode, press OK z to display the Main Menu.
2. Select
3. Select
4. Select
5. Select
Settings and press OK z.
System Settings, and press OK z.
Time and Date, and press OK z.
Time Zone and press OK z.
6. Select the appropriate time zone and press OK z.The following table lists some
common time zones.
Time Zone Location
GMT+10 Australian Eastern Standard Time (AEST)
Sydney
GMT+9:30 Australia Central Standard Time (ACST)
Darwin; Adelaide
GMT+9 Japan Standard Time (JST)
Tokyo
GMT+8 Australian Western Standard Time (AWST)
China Coast Time (CCT)
Perth; Beijing
GMT+3 Bagdad Time (BT)
Moscow
34 Aastra MBU 400 User Guide
Page 35

Time Zone Location (Continued)
R
GMT+2 Eastern European Time (EET)
Cairo
GMT+1 Central European Time (CET)
Paris; Stockholm; Vienna
GMT Greenwich Mean Time (GMT)
London
GMT-4 Atlantic Standard Time (AST)
GMT-5 Eastern Standard Time (EST)
New York; Washington DC; Ottawa; Toronto
GMT-6 Central Standard Time (CST)
Mexico City
GMT-7 Mountain Standard Time (MST)
Denver; Phoenix
GMT-8 Pacific Standard Time (PST)
Los Angeles; Vancouver
Setting Daylight Saving Time (DST)
To set daylight saving time:
1. In Idle mode, press OK z to display the Main Menu.
2. Select
3. Select
4. Select
5. Select
Settings and press OK z.
System Settings, and press OK z.
Time and date, and press OK z.
Daylight saving, and press OK z.
6. Select the appropriate DST option, and press OK z.Valid values are 1 hour DST or
No DST.
Specifying the Primary Line for Outgoing Calls
You must specify the primary line each handset uses for outgoing calls when you
press the green key . You can choose a Landline or VoIP line as the primary line.
When you make a call, the primary line is used unless you specify otherwise. You can
tell which type of line you are using by checking the call icon, with indicating a
VoIP line and indicating a landline.
Note: For detailed instructions on making calls using the primary or secondary line,
see Making and Answering Calls on page 42.
Choosing VoIP or Landline
R
Customizing Your Phone
To set the primary line for your handset do the following:
1. In Idle mode, press OK z to display the Main Menu.
2. Select
3. Select
Aastra MBU 400 User Guide 35
Settings and press OK z.
Telephony Settings, and press OK z.
Page 36

4. Select Primary line, and press OK z.
5. Choose
Landline or VoIP line, and press OK z.
Choosing SIP Account
If you have more than one registered SIP account, you can choose which to use for
outgoing calls when VoIP is selected.
To set the SIP account for your handset to use for outgoing VoIP calls do the
following:
1. In Idle mode, press OK z to display the Main Menu.
2. Select
3. Select
4. Select
5. Choose one of the registered accounts listed (
Settings and press OK z.
Telephony Settings, and press OK z.
VoIP line, and press OK z.
OK z.
Specifying Call Groups
Customizing Your Phone
If you have more than one handset, you must specify from which account or accounts
each handset receives calls. To change this you use the Call Groups settings.
To specify which accounts a handset receives calls from, do the following.
1. In Idle mode, press OK z to display the Main Menu.
2. Select
3. Select
4. Press OK z.
5. Clear any accounts you do not want the current handset to receive calls from, and
Settings and press OK z.
Telephony Settings, and press OK z.
All nicknames for the VoIP accounts you subscribe to are listed, in addition to the
landline account.
then press OK z.
SIP1, SIP2, and so on) and press
Changing the Display Contrast
The brightness and contrast of the handset display can be changed as required for
your operating environment.
To change the display contrast:
1. In Idle mode, press OK z to display the Main Menu.
2. Select
3. Select
4. Select
5. Select
36 Aastra MBU 400 User Guide
Settings and press OK z.
System settings, and press OK z.
Handset settings, and press OK z.
Display Contrast, and press OK z.
Page 37

6. Use the navigation keys to move the center bar higher or lower to adjust contrast,
CLR
CLR
and press OK z.
Note: To restore the contrast to the default settings, from the Display Contrast screen
press the Restore softkey or from the Main Menu press 555, and then press the
softkey.
Setting Do Not Disturb
You can set your phone to send incoming calls directly to voicemail (or a busy signal
if voicemail is not enabled) when you don’t want to be interrupted. When Do Not
Disturb (DND) is enabled, DND appears in the handset idle screen as shown.
Handset 1
DND
Yes
01:55
Call Log Options
To enable or disable Do Not Disturb (DND) do the following.
1. From the idle screen, press the
2. Select
3. Select
4. Press the red key to exit.
Setting Call Waiting
You can set your phone to alert you when another call comes in during an active call
using the call waiting feature. You can then choose to answer the new call (leaving the
original call on hold). Call waiting can be turned off for important calls you don’t
want interrupted.
To enable or disable call waiting do the following.
1. From the idle screen, press the
2. Select
PM
08/05/08
Options softkey.
DND and press OK z.
Enabled or Disabled and press OK z.
CLR
Options softkey.
Call Waiting and press OK z.
Customizing Your Phone
3. Select
4. Press the red key to exit.
Enabled or Disabled and press OK z.
CLR
Setting Audio
The Aastra 420d handset has a variety of audible indicators, ranging from incoming
call rings to keypad button sounds. All sounds can be turned off or customized
through the handset menu.
Aastra MBU 400 User Guide 37
Page 38

Resetting the Handset
All handset sounds can be reset to the default values in a single step, along with the
display contrast and other customizable handset settings.
To reset all audio settings on your Aastra 420d handset to default values do the
following.
1. In Idle mode, press OK z to display the Main Menu.
2. Select
3. Select
4. Select
5. Select
Settings and press OK z.
System settings, and press OK z.
Handset Settings, and press OK z.
Reset handset, and press OK z.
6. Confirm the reset by pressing the
Changing the Ringer Melody
You can specify a ringer melody for each type of call that you receive, to easily
distinguish between VoIP, landline, and intercom calls.
To change the ringer melody do the following.
Customizing Your Phone
1. In Idle mode, press OK z to display the Main Menu.
2. Select
3. Select
4. Select
Settings and press OK z.
Audio settings, and press OK z.
Ringer Melody, and press OK z.
5. Select the type of call for which you want to specify a ringer melody, and press
OK z. Valid selections are VoIP, Landline, and Intercom.
6. Select a ringer melody from the list to assign to the selected type of call.
You can scroll through the list of melodies using the navigation keys and can hear a
sample of the assigned melody by pressing the
melodies, see the table below.
7. Press OK z.
Yes softkey when prompted.
Play softkey. For available
Ringer Melodies
Apache I Classic twist
Apache II Marimba
Apache III NeoRetro
Classic Rhythm chords
Classic rise
Changing the Ringer Volume
You can increase or decrease the ringer volume on a handset.
To change the ringer volume do the following.
1. In Idle mode, press OK z to display the Main Menu.
2. Select
38 Aastra MBU 400 User Guide
Settings and press OK z.
Page 39

3. Select Audio settings, and press OK z.
4. Select
Ringer volume, and press OK z.
5. Use the navigation keys to adjust the volume, and press OK z.
Changing the Message Tone
You can set a tone that notifies you of a message waiting on your phone. You can also
disable message tones if required.
To set a message tone on your phone do the following.
1. In Idle mode, press OK z to display the Main Menu.
2. Select
3. Select
4. Select
Settings and press OK z.
Audio settings, and press OK z.
Message tone, and press OK z.
5. Select a tone from the list that notifies you of messages on your phone.
You can scroll through the list of tones using the navigation keys and hear a sample
of the tone by pressing the
For available tones, see the table below.
6. Press OK z.
Base ramp Little bell
Crazy echo X-low
Echo Silent
Changing the Keypad Sound
When you press the keys on the keypad, a default tone is audible. You can change this
tone or disable it if required. To change the keypad sound:
1. In Idle mode, press OK z to display the Main Menu.
Play softkey. To disable message tones, select Silent.
Message Tones
Customizing Your Phone
2. Select
3. Select
4. Select
Settings and press OK z.
Audio settings, and press OK z.
Keypad sound, and press OK z.
5. Select a sound from the list that you want to hear when you press the keypad.
You can scroll through the list of sounds using the navigation keys. To disable
keypad sounds, select
Silent.
6. Press OK z.
For available sounds, see the following table.
Keypad Sounds
Silent Dimp
Ditter Pip
Doomp
Aastra MBU 400 User Guide 39
Page 40

Changing Advisory Tones
Advisory tones warn you that something is about to happen or is happening. There are
three advisory tones you can enable or disable individually. By default all advisory
tones are enabled.
To set Advisory Tones on the handset do the following.
1. In Idle mode, press OK z to display the Main Menu.
2. Select
3. Select
4. Select
Settings and press OK z.
Audio settings, and press OK z.
Advisory tones, and press OK z.
5. Select the type of tone you want to enable or disable by pressing the OK z key.
For available sounds, see the table below.
Advisory Tone Meaning
Battery Alert The batteries must be recharged.
Range Tone The handset is out of range of the gateway.
Confirmation You have saved or deleted an entry, or made a selection.
Customizing Your Phone
Enabling/Disabling Silent Mode
You can enable or disable a silent mode on the phone. When disabled, all ringer
melodies, tones, confirmation sounds, and advisory tones are disabled. To enable/
disable silent mode:
1. In Idle mode, press OK z to display the Main Menu.
2. Select
3. Select
Settings and press OK z.
Audio settings, and press OK z.
4. Select
5. Select
Silence, and press OK z.
Silent on to disable all sounds on the phone. Select Silent off to hear all
sounds as you use the phone.
6. Press OK z to save the setting.
Note: You can also enable or disable the silent mode from the idle screen by pressing
the “#” key, and pressing the
Setting Your Phone to Vibrate
You can select from different vibrator modes which vibrates the phone with an
incoming call. You can choose between vibrating only, vibrating and then ringing,
and vibrating as well as ringing.
To set your phone to vibrate do the following.
1. In Idle mode, press OK z to display the Main Menu.
2. Select
3. Select
4. Select
Settings and press OK z.
Audio settings, and press OK z.
Vibrator Mode, and press OK z.
Silence on softkey or Silence off softkey as required.
40 Aastra MBU 400 User Guide
Page 41

5. Select a vibration mode to use when your phone receives an incoming call. Valid
R
values are
6. Press OK z to save the setting.
Vibrator off, Vibrate then ring, Vibrate only, Vibrate and ring.
Changing Emergency Line Settings
The default setting of emergency calls is over the landline (the LINE port on the
gateway). Check that you have a working landline connection for emergency calls. If
you are using VoIP calls exclusively you should change the emergency call setting to
a registered SIP account.
Note: It is recommended that you check with your System Administrator for the
method of routing emergency calls in your network.
To change the emergency line setting on your handset do the following.
1. In Idle mode, press OK z to display the Main Menu.
2. Select
3. Select
4. Select
5. Select from Landline, SIP1, SIP2, etc.
6. Press OK z for the change to take affect.
To make emergency calls:
• Enter the emergency number for your geographical location, and then press the
Note: Changing your primary line settings does not change your emergency line
setting.
Settings and press OK z.
Telephony Settings, and press OK z.
Emergency line
green key .
R
Customizing Your Phone
Aastra MBU 400 User Guide 41
Page 42

Making and Answering Calls
R
The MBU 400 System allows you to make both Internet and landline calls. Landline
calls are calls made over the Public Service Telephone Network (PSTN) just like a
regular phone. All outgoing calls (except emergency calls) are Internet calls by
default, unless you specify otherwise. All emergency calls default to the landline. (If
you don’t have a landline connected, you must change the emergency line setting. See
Changing Emergency Line Settings on page 41 for details.)
The following sections describe how to make and answer Internet, landline, and
intercom calls with the MBU 400 System.
VoIP Calls
To make internet calls on your Aastra MBU 400 phone, you must have registered an
account on the MBU system through either the handset, Web UI, or configuration file.
This may have been done for you by your System Administrator. If there are no VoIP
accounts in the system, you will not be able to make internet calls, and attempts to do
so will result in a red IP icon on the handset display. For more information see
Configuring the Phone Using the Handset on page 23, the Aastra MBU 400
Administrator Guide, or contact your system administrator.
When you make and receive Internet phone calls, the following icons display:
Making and Answering Calls
Entering or editing a number
Dialing or ringing
Active Call
Incoming Call
Making a VoIP Call (over the Internet)
If your primary line is set as VoIP, do the following to make a VoIP call:
1. In Idle mode, enter the number you want to dial.
2. Press the green key .
If your primary line is set as Landline and you want to make a VoIP call, do the
following:
1. In Idle mode, enter the number you want to dial.
2. Press the
3. Select
The phone dials the number as a VoIP call and displays the IP dialing icon.
Options softkey.
Call on VoIP, and press OK z.
R
42 Aastra MBU 400 User Guide
Page 43

Landline Calls
R
Making a Landline Call
To make landline calls on your Aastra MBU 400 phone you must have a telephone
line connected to the MBU base unit through the
enabled by the system administrator. If landline calls are disabled, you may not see
any of the landline options on your Aastra 420d handset. If landline calls are enabled
but no telephone line is connected to the system, landline calls will not connect to a
dialtone. For more information see the Aastra MBU 400 Administrator Guide or
contact your system administrator.
When you make and receive landline calls, the following icons display:
Entering or editing a number
Dialing or ringing
Active Call
Incoming Call
LINE port, and PSTN calls must be
Intercom Calls
If your primary line is set as Landline, do the following to make a landline call:
1. In Idle mode, enter the number you want to dial.
2. Press the green key .
If your primary line is set as VoIP and you want to make a landline call, do the
following:
1. In Idle mode, enter the number you want to dial.
2. Press the
3. Select
You can register up to 8 handsets with the same gateway, and you can have up to 8
different VoIP accounts provided they belong to the same Internet Telephony Service
Provider. However, you can only have 4 active calls at a time: 3 Internet calls and 1
landline call.
Note: If you use Call Groups, you should only include up to 6 handsets in a Call
Group, because only 6 handsets at a time can receive incoming calls.
If you have more than one handset you can make intercom calls and transfer calls
between handsets. You can answer incoming calls on any of the registered handsets,
and if you reject a call on one handset you can still answer the call on another
registered handset. By default the Contacts List and Call Log are shared between all
handsets. To make the Contacts List or Call Log private instead of shared, contact
your System Administrator or see the Aastra MBU 400 Administrator Guide.
Options softkey.
Call on landline, and press OK z.
R
Making and Answering Calls
Aastra MBU 400 User Guide 43
Page 44

When you make and receive intercom calls between handsets connected to the same
R
R
gateway, the following icon displays:
Dialing or ringing
Active Call
Incoming Call
Making an Intercom Call
1. In Idle mode, press OK z to display the Main Menu.
2. Select
3. Select a handset from the list to call, and then press the green key .
Intercom and press OK z.
Your handset lists other handsets registered with your gateway.
Calling All Handsets
You can make a call to all handsets connected to the same gateway, and then connect
to the first handset to answer the call.
To make a call to all handsets do the following.
1. In Idle mode, press OK z to display the Main Menu,
Making and Answering Calls
2. Select
3. Select
Intercom, and press OK z.
All handsets, and press OK z.
The first handset to answer the call receives the call.
Calling from the Contacts List
You can call contacts entered in your Contacts List using a VoIP line or Landline.
Since contacts may have more than one number listed, the number set as the default is
dialled unless you specify otherwise.
R
Calling a Contact on the Primary Line
Your primary outgoing line uses either the internet for VoIP calls, or a landline. To
change the primary line setting see Specifying the Primary Line for Outgoing Calls on
page 35.
To call a contact in the Contacts List using your primary line and dialing the default
number for that contact, do the following.
1. In Idle mode, press OK z to display the Main Menu.
2. Select
3. Select a contact from the Contacts List to call, and then press the green key .
44 Aastra MBU 400 User Guide
Contacts c and press OK z.
R
The phone dials the default phone number assigned to that contact.
For more information about default numbers, see Contacts List on page 54.
Page 45

If you want to dial one of the other numbers for the contact instead of the default
R
R
number, do the following.
1. In Idle mode, press OK z to display the Main Menu.
2. Select
3. Select a contact from the Contacts List to call, and press OK z.
4. Select a phone number from the list of numbers for that contact, and then press the
Contacts c and press OK z.
green key .
For more information about default numbers, see Contacts List on page 54.
R
Calling a Contact on a Secondary Line
Your primary outgoing line uses either the internet for VoIP calls, or a landline. When
you make a call out, you can choose not to use the primary line setting.
To call a contact in the Contacts List using a line of your choice, do the following.
1. In Idle mode, press OK z to display the Main Menu.
2. Select
3. Select a contact from the Contacts List to call, and press the
4. Select "
Contacts c and press OK z.
Call on landline" or "Call on VoIP", and press OK z.
The default number associated with the contact you selected is dialed.
Calling from the Call Log
Options softkey.
You can call numbers listed in your Call Log using a VoIP line or Landline. Numbers
can also be edited before dialling using the
For more information about the Call Log, see Call Log on page 58.
Options softkey from the Call Log screen.
Calling from the Call Log on the Primary Line
Your primary outgoing line uses either the internet for VoIP calls, or a landline. To
change the primary line setting see Specifying the Primary Line for Outgoing Calls on
page 35.
To call from an entry in the Call Log using your primary line, do the following.
1. In Idle mode, press OK z to display the Main Menu.
2. Select
3. Select the number you want to call, and then press the green key .
Call Log and press OK z (or In Idle mode, press the Call log softkey).
Making and Answering Calls
R
Aastra MBU 400 User Guide 45
Page 46

Calling from the Call Log on a Secondary Line
R
R
Your primary outgoing line uses either the internet for VoIP calls, or a landline. When
you make a call out, you can choose not to use the primary line setting.
To call a number in the Call Log using a line of your choice, do the following.
1. In Idle mode, press OK z to display the Main Menu.
2. Select
3. Select the number you want to call, and then press the
4. Select "
Call Log and press OK z (or in Idle mode, press the Call log softkey).
Call on landline" or "Call on VoIP", and press OK z.
The phone dials the number you selected.
Calling Using Redial
Redialing on a Primary Line
Your primary outgoing line uses either the internet for VoIP calls, or a landline. To
change the primary line setting see Specifying the Primary Line for Outgoing Calls on
page 35.
To call using redial on the primary line do the following.
1. In Idle mode, press the
Making and Answering Calls
2. Select
3. Press the green key
Redial, and then press OK z.
The most recently dialed number displays.
Options softkey.
R
to call the number.
Options softkey.
Redialing on a Secondary Line
Your primary outgoing line uses either the internet for VoIP calls, or a landline. When
you make a call out, you can choose not to use the primary line setting.
To redial a number using a line of your choice, do the following.
1. In Idle mode, press the
2. Select
3. Press the
4. Select "
5. Press the green key
Redial, and then press OK z.
The most recently dialed number displays.
Options softkey.
Call on landline" or "Call on VoIP", and press OK z.
R
Options softkey.
to call the number.
46 Aastra MBU 400 User Guide
Page 47

Calling Using Speeddial
R
R
R
Speeddialing on a Primary Line
Your primary outgoing line uses either the internet for VoIP calls, or a landline. To
change the primary line setting see Specifying the Primary Line for Outgoing Calls on
page 35.
To call using a speeddial key on a primary line, do the following.
Note: You must preconfigure the speeddial keys before using these procedures. To
configure a speeddial on the phone, see Creating a Speeddial for a Contact on page
57.
1. In Idle mode, press the speeddial key assigned to the contact you want to call.
2. Press the green key .
Speeddialing on a Secondary Line
Your primary outgoing line uses either the internet for VoIP calls, or a landline. When
you make a call out, you can choose not to use the primary line setting.
To call using a speeddial key and a line of your choice, do the following.
Note: You must preconfigure the speeddial keys before using these procedures. To
configure a speeddial on the phone, see Creating a Speeddial for a Contact on page
57.
1. In Idle mode, press the speeddial key assigned to the contact you want to call.
2. Press the
3. Select "
4. Press the green key .
Answering Calls
Your handset allows you to turn on and off auto answer features, such as answering a
call when removed form the charging cradle, or connecting to incoming calls when
any key is pressed.
R
Options softkey.
Call on landline" or "Call on VoIP", and press OK z.
R
Making and Answering Calls
Answering a Call
To answer a call from the handset do the following.
1. Pick up the handset
2. Press the green key .
Note: If the handset has auto answer enabled and is in the handset cradle, simply
picking up the phone will answer the call.
R
Auto Answer Mode
In auto answer mode your handset can answer a call automatically when you pick it
up from the charging cradle. If the phone is not in the charger, you must still press a
key to answer a call.
Aastra MBU 400 User Guide 47
Page 48

To enable or disable auto answer mode do the following.
1. In Idle mode, press OK z to display the Main Menu.
2. Select
3. Select
4. Select
5. Select
6. Navigate to
Settings and press OK z.
Telephony settings, and press OK z.
Answer Mode, and press OK z.
Auto answer, and press OK z.
Enabled or Disabled, and press OK z to select.
Any Key Answer Mode
You can choose to answer incoming calls by pressing any key, using the any key
answer setting.
To enable or disable any key answer mode do the following.
1. In Idle mode, press OK z to display the Main Menu.
2. Select
3. Select
4. Select
5. Select
6. Navigate to
Settings and press OK z.
Telephony settings, and press OK z.
Answer Mode, and press OK z.
Any key answer, and press OK z.
Enabled or Disabled, and press OK z to select.
Making and Answering Calls
Caller ID
When you receive an incoming VoIP call, the Caller ID always displays. Usually
Caller ID also displays on incoming landline calls, but some telephony providers may
require that you subscribe to a Caller ID service. If the caller is stored as a contact, the
contact name displays instead of the Caller ID. If the caller has blocked display of the
number, no Caller ID displays.
48 Aastra MBU 400 User Guide
Page 49

Making Emergency Calls
RRR
The default setting of emergency calls is over the landline (the LINE port on the
gateway). Check that you have a working landline connection for emergency calls. If
you are using VoIP calls exclusively you should change the emergency call setting to
a registered SIP account.
Note: It is recommended that you check with your System Administrator for the
method of routing emergency calls in your network.
For more information on setting the emergency call line, see Changing Emergency
Line Settings on page 41.
To make emergency calls:
• Enter the emergency number for your geographical location, and then press the
green key .
R
When you make emergency calls, always press the green key
whether your emergency calls are routed via a landline or over the Internet.
IMPORTANT: You cannot make emergency calls in the following situations:
• Firmware update is in progress
• Handset batteries are drained
• Power failure
• Handset is out of range of the gateway
regardless of
Making and Answering Calls
Aastra MBU 400 User Guide 49
Page 50

Handling Calls
CLR
R
Placing a Call on Hold
Handling Calls
The MBU 400 offers standard call handling features whether connected through a
landline or a VoIP internet line. Intercom calls (between handsets on the same
gateway) also have several call handling options.
You can place an active external call on hold if required. When a call is on hold, the
“
Call held” message displays at the top of the phone’s screen and the active call icon
turns yellow as shown below. The caller on hold hears music playing until
reconnected as an active call.
VoIP call on hold
Landline call on hold
To place a call on hold do the following.
1. During an active call, press the
Hold softkey.
2. Press the
Back softkey or the red key to return to the call.
Calling with a Call on Hold
You can make a call while a second call is on hold. When a call is on hold and you
connect to a second call the active call icon is yellow and blue as shown below (or
yellow only for intercom calls). The caller on hold hears music playing until
reconnected as an active call.
VoIP call with a call on hold
Landline call with a call on hold
Intercom call with a call on hold
To make a call while leaving a call on hold do the following.
1. Place the active call on hold if you haven’t already done so (press the
softkey).
2. Enter a number or use the
Log number.
CLR
Hold
Options softkey to find an Intercom, Contact, or Call
3. Press the green key to complete the call.
50 Aastra MBU 400 User Guide
R
Page 51

When the active call has disconnected or you have ended the call pressing the red
CLR
key , you are left with a call on hold.
4. Press the red key to return to the call on hold.
Swapping Calls
While on an active call with a call on hold you can swap calls, switching which call is
on hold.
To make the call on hold active and leave the active call on hold do the following.
1. Press the
CLR
Options softkey.
2. Select
Swap calls and press OK z.
Conferencing Calls
While on an active call with a second call on hold, you can connect to both calls at
once by conferencing the three calls together.
To connect to both calls do the following.
1. Press the
2. Select
Options softkey.
Conference and press OK z.
Transferring a Call
While on an active call with another call on hold, you can transfer the active call to a
number you enter or select from the Contacts list. See Transferring Calls on page 52
for details.
Transferring to the Call on Hold
While on an active call with another call on hold, you can transfer one call to the
other.
To transfer an active call to a call on hold do the following.
1. Press the
2. Select
The active call and call on hold connect, and your phone disconnects.
Options softkey.
Transfer to and press OK z.
Muting/Unmuting a Call
You can mute/unmute active calls if required. When a call is muted the bottom left
softkey label reads
connected to the call can hear you.
To mute or unmute a call do the following.
1. During an active call, press the
2. Press the
Aastra MBU 400 User Guide 51
Mute off, and although you can still hear the call, no one else
Mute softkey.
Mute off softkey to unmute the call.
Handling Calls
Page 52

Transferring Calls
R
R
Handling Calls
You can transfer calls from your handset to other handsets registered with the same
gateway, or to other destinations on the VoIP or landline network.
Transferring to another Handset
You may want to transfer an active call to another headset connected to the same
gateway.
To transfer a call to another handset through the intercom system do the following.
1. During an active call, press the
2. Press the
3. Select
Options softkey.
Intercom, and press OK z.
Hold softkey.
4. Select a handset to transfer the active call to, and press OK z.
5. When the other handset answers, press
Options.
6. Select
Transfer and press OK z to transfer the call.
Transferring to a VoIP or Landline:
You may want to transfer an active call to another number outside of your gateway.
To transfer a call to a number you enter do the following.
1. During an active call, press the
2. Press the
3. Select
Options softkey.
Transfer, and press OK z.
Hold softkey.
4. Enter the number to transfer the call to.
5. Press the green key
R
to connect the call on hold to the number you entered.
Transferring to a Contacts List Number:
You may want to transfer an active call to a number in your Contacts List.
To transfer a call to a number in your Contacts List do the following.
1. During an active call, press the
2. Press the
3. Select
4. Press the
Options softkey.
Transfer, and press OK z.
Contacts softkey.
Hold softkey.
5. Scroll through the contacts list and select the number you want, then press the
Select softkey.
6. Press the green key
52 Aastra MBU 400 User Guide
R
to connect the call to the contact you selected.
Page 53

Ending Calls
CLR
Press the red key , or place the handset in the charger. The handset displays the
call terminated icon, and then returns to the idle state screen.
VoIP call terminated
Landline call terminated
Intercom call terminated
CLR
Handling Calls
Aastra MBU 400 User Guide 53
Page 54

Managing Calls
Contacts List
Managing Calls
All handsets connected to the same gateway can have a shared Contacts List. Before
entering personal contacts into your handset you should check whether your System
Administrator has configured a "private" or "public" Contacts List.
The Contacts List on your phone is empty by default. You can enter new contacts in
the list as required. The features of the Contacts List allow you to enter a name and
multiple numbers for each contact, as well as entering them in a contact group and
assigning a special ring tone. Each contact entry has the following information
associated with it (scroll down on the handset display to see everything).
(home number)
(mobile number)
(work number)
(other number)
Groups
Ringer melody
Note: To add a contact to a group, a group must already exist on your phone. See
Groups of Contacts on page 57 to create and edit groups on your phone.
The Contact screen also provides an
additional tasks in the Contacts List.
Option Description
Call on landline Allows you to place a call from a contact in the list, over a
landline. For more information about calling from the
Contacts List over a landline, see Landline Calls on page 43.
Call on VoIP Allows you to place a call from a contact in the list, over
VoIP. For more information about calling from the Contacts
List over VoIP, see VoIP Calls on page 42.
Add contact Allows you to add new contacts to the Contacts List. See
Adding a Contact on page 55.
Edit contact Allows you to edit contacts in the Contacts List. See Editing
a Contact on page 55.
Delete contact Allows you to delete a contact from the Contacts List. See
Deleting a Contact on page 56.
Delete all contacts Allows you to delete all of the contacts from the Contacts
List.
Options softkey that allows you to perform
54 Aastra MBU 400 User Guide
Page 55

Speeddial Allows you to add a selected contact to a specific speeddial
Groups Allows you to add, edit, delete, and assign ring melodies to a
Adding a Contact
To add a contact to the contacts list do the following.
1. In Idle mode, press OK z to display the Main Menu.
Option Description
key. Available speeddial keys are 1 through 9. The
speeddial can be used by pressing the applicable key on the
phone’s keypad. You can also use this option to delete a
contact from a speeddial key. See Creating a Speeddial for a
Contact on page 57.
group of contacts. See Groups of Contacts on page 57.
2. Select
3. Press the
4. Select
5. Press the
When entering the name, press the * key to toggle the input modes. The current
input mode displays in the upper right corner of the screen. Press the
softkey to select
6. Scroll to the type of number you want to add, and press OK z.
For each contact, you can assign the following phone numbers:
• Home number
• Cell number
• Business number
• Other number
7. Enter the phone number and press OK z.
8. Press the
Editing a Contact
To edit an existing contact, do the following.
1. In Idle mode, press OK z to display the Main Menu.
Contacts c and press OK z.
Options softkey.
Add contact, and press OK z.
Edit softkey, enter a name for this contact, and press OK.
Options
Insert symbol if required.
Save softkey to save the contact.
2. Select
Contacts c and press OK z.
3. Select the contact you want to edit.
4. Press the
5. Select
A. To edit the name of the contact, scroll to the name and press the
Options softkey.
Edit contact, and press OK z.
Edit softkey.
Edit the contact name as applicable.
B. To edit a number for the contact, scroll to the number and press the
softkey. Edit the number as applicable. Press the
Options softkey to set the Number
Edit
Type (Home, Mobile, Work, Other), set the number to be used as the Default
number, or place a Pause after a digit to pause between digits when dialing.
Aastra MBU 400 User Guide 55
Managing Calls
Page 56

C. To edit the ringer melody for the contact scroll down to Ringer melody and
CLR
press the Edit softkey. Scroll to the melody you want and press OK z to select.
Press the
Back softkey to return to the contact entry.
6. Press OK z twice.
Deleting a Contact
Managing Calls
Deleting All Contacts
7. Press the
Save softkey, and then press the Yes softkey at the save prompt.
To delete a contact from the contacts list, do the following.
1. In Idle mode, press OK z to display the Main Menu.
2. Select
Contacts c and press OK z.
3. Select the contact you want to delete.
4. Press the
5. Select
6. Press the
Options softkey.
Delete contact, and press OK z.
Yes softkey at the delete prompt.
To delete all contacts in the handset list, do the following.
1. In Idle mode, press OK z to display the Main Menu.
2. Select
3. Press the
4. Select
Contacts c and press OK z.
Options softkey.
Delete all contacts, and press OK z.
5. Press the
Yes softkey at the delete prompt.
Changing the Default Number for a Contact
The first number you save for a contact is automatically the default number. If you’ve
created a speeddial for a contact, for example, it is always the default number that is
dialed. You can change the default number for a contact as required.
To change the default number for a contact:
1. In Idle mode, press OK z to display the Main Menu.
2. Select
3. Select the contact for which you want to change the default number.
4. Press the
5. Select
6. Select the number you want to use as the default number for this contact, and press
7. Press the
8. Select
9. Press the red key to return to the contact.
Contacts c and press OK z.
Options softkey.
Edit contact, and press OK z.
the
Edit softkey.
Options softkey.
Default from the list of options, and press OK z.The number is now set as
the default for this contact.
CLR
56 Aastra MBU 400 User Guide
Page 57

10. Press the Save softkey to save the setting, and press the Yes softkey at the save
CLR
prompt.
Creating a Speeddial for a Contact
You can create a speeddial to use for a specific contact in your Contacts List allowing
you to call the number quickly.
To create a speeddial for a contact:
1. In Idle mode, press OK z to display the Main Menu.
2. Select
Contacts c and press OK z.
3. Select the contact for which you want to create a speeddial, and press the
softkey.
4. Select
Speeddial, and press OK z.
5. Select a
6. Press the
The speeddial is immediately applied.
7. Press the red key to exit.
Note: To call a speeddial entry press the speeddial number and then press OK
Note: In the speeddial screen, to replace an existing entry select the speeddial entry
you want to replace, and press the
the speeddial you want to delete and press the
Groups of Contacts
Adding contacts to groups allows you to view pages of entries by group, simplifying
looking people up in a large Contacts List. You can also assign ring tones to groups of
contacts, helping you identify incoming calls.
speeddial key (from 1 through 9) to assign to the contact.
Add softkey to add the contact to that speeddial key.
CLR
Replace softkey. To delete a speeddial key, scroll to
Delete softkey.
Options
z
.
Creating a Contact Group
Before you can add a contact to a group, you must create the empty group. Each
group has its own page in the Contacts List accessed using the right and left
navigation keys.
To add a group to your Contacts List do the following.
1. In Idle mode, press OK z to display the Main Menu.
2. Select
3. Press the
4. Scroll down to select
5. Press the
6. Select
Contacts c and press OK z.
Options softkey.
Groups and press OK z.
Options softkey again.
Add group and press OK z.
7. Enter the name for your new group, and press OK z.
8. Press the
Yes softkey when prompted to save.
Managing Calls
Aastra MBU 400 User Guide 57
Page 58

Adding a Contact to a Group
CLR
1. In Idle mode, press OK z to display the Main Menu.
Managing Calls
Call Log
2. Select
3. Select the contact to add to a group and press the
4. Scroll down to
5. On the Contacts page scroll past the icons to
Contacts c and press OK z.
Options softkey.
Edit contact and press OK z.
Groups and press OK z.
6. Select the group or groups you want this contact added to using the OK z key.
7. Press the red key to return to the contact page.
8. Press the
Save softkey to save your changes to this contact, pressing the Yes
CLR
softkey when prompted.
All handsets connected to the same gateway can have a shared Call Log. You can
check whether your System Administrator has configured a "private" or "public" Call
Log, or use your handset to check your call log for calls received by other handsets.
The call log keeps track of all your incoming and outgoing calls. It consists of four
pages or screens that you can scroll through using the navigation keys on the handset,
including a page of all calls, and then lists by category. The following icons apply to
calls in the Call Log.
Missed calls
Incoming calls
Outgoing calls
The call log stores up to 30 numbers. For each call the call log keeps track of the
number, the date and time of the call, and the type of call: incoming, outgoing, or
missed. If the caller’s name and number is stored in the Contacts List, the caller’s
name displays. A number or name is only listed once, but all missed calls are counted
so you can see how many times the same caller has tried to reach you.
Viewing Entries in the Call Log
To view entries in the Call Log:
1. In Idle mode, press OK z to display the Main Menu.
2. Select
3. Use the up and down navigation keys to scroll through the names and numbers on
4. Use the right and left navigation keys to scroll through each page (
Call Log and press OK z (or in Idle mode, press the Call log softkey).
each page.
calls
, Incoming calls, Outgoing calls).
All calls, Missed
58 Aastra MBU 400 User Guide
Page 59

Voicemail
5. Use the Options softkey on each page to perform additional tasks as described in
the following table.
Option Description
Add as contact Allows you to add the selected number to the Contacts List.
Append to contact Allows you to append the selected number to an existing
Contacts List entry.
Call on landline Dials the selected number using the landline.
Call on VoIP Dials the selected number using a VoIP line.
Edit for call Allows you to edit the selected number before dialling.
Delete Allows you to delete to selected number from the Call Log.
Delete List Allows you to delete all numbers on the current page from the
Call Log. (For example this option will delete all missed calls if
you are on the missed calls page.)
To receive voicemail messages on your phone, voicemail service must be provided by
a local mail server on your network or by your Internet Service Provider. Check with
your System Administrator for more information about your voicemail service.
If you have voicemail on your network, you can receive voicemail messages if your
phone is not answered after several rings or if Do Not Disturb is set on your phone.
To access your voicemail messages:
1. In Idle mode, press OK z to display the Main Menu.
2. Select
3. Depending on your mail server setup, select
4. Select a voicemail and press the
Messages and press OK z.
Landline or VoIP, and press OK z.
Play softkey to listen to your message.
Managing Calls
Aastra MBU 400 User Guide 59
Page 60

Additional Features
This section describes other tasks you can perform, if required, on the MBU and the
Aastra 420d Handsets.
Resetting the MBU
In order for handsets to register with the MBU you must press the RESET button on
the rear of the MBU. Each time you reset the MBU, the handsets must re-register.
Make sure handsets are within range of the MBU to register properly.
Note: When you reset the MBU, the MBU waits until active calls have been
completed on the handsets before starting the reset process. If a registered handset is
off during an MBU reset, it reconnects when turned on as long as the MBU was not
factory defaulted.
Additional Features
To reset the MBU:
• Press and release the
On the front of the MBU,
When the reset is complete
use.
Note: Check to be sure all handsets are registered (or reconnected) properly with
the MBU after the reset is complete.
RESET button on the rear of the MBU (do not hold it down)
POWER lights steadily during a reset and I-NET flashes.
I-NET lights steadily, indicating the MBU is ready to
Manually Registering/De-registering a Handset
Handsets will usually register without any action on your part if they are close to the
MBU 400 after a reset. If required, you can manually register and deregister a
handset. Make sure your handset is within range of the MBU.
To register or deregister the handset do the following.
1. In Idle mode, press OK z to display the Main Menu.
2. Select
3. Select
4. Select
5. Select
Settings and press OK z.
System settings, and press OK z.
Handset settings, and press OK z.
Register handset or Deregister handset and press the Yes softkey at the
prompt.
If registering, the handset prompts to be placed in its charger cradle so auto-
registration can occur.
Listing all Registered Handsets
To view a list of all registered handset do the following.
1. In Idle mode, press OK z to display the Main Menu.
2. Select
3. Select
4. Select
60 Aastra MBU 400 User Guide
Settings and press OK z.
System settings, and press OK z.
Handset settings, and press OK z.
Page 61

5. Select Handsets, and press OK z.
All registered handsets are listed.
Updating the MBU 400 System Firmware
To ensure that your MBU 400 System has the latest features installed, we recommend
that you update the firmware once you have configured and set up the phone.
Updating the Firmware
When new software is available the handset display reads, “New firmware available.”
To update the firmware from the handset do the following.
1. In Idle mode, press OK z to display the Main Menu.
2. Select
3. Select
4. Select
Settings and press OK z.
System settings, and press OK z.
Firmware update, and press OK z.
The gateway proceeds to download the latest firmware from the configuration
server and updates the gateway and the handset when successful.
The update time varies depending on the size of the update and the speed of your
Internet connection. Handsets in the MBU 400 system can take 10 minutes each to
update fully. During the update process the following steps are listed in the display:
Getting gateway
Updating gateway
Getting handset
Updating handset
Once a step is complete, a green checkmark appears next to the step. When the
entire update has been successfully completed, the display reads
<version number>
Note: In some cases the handset may repeat the handset update. Ensure that the
handset update has been completed (to 100%) at least once, then reset the MBU
400 base unit.
.
Upgraded to
Additional Features
Note: While the update is in progress you cannot receive incoming calls or make
calls, including emergency calls, on the phone. Also note that we recommend you
do not reset the gateway during the installation process.
Changing Internet Settings
Through the handset you can access the Internet Settings menu. The settings located
here are administrator settings, and should be set by your System Administrator. For
more information see the Aastra MBU 400 Administrator Guide.
Aastra MBU 400 User Guide 61
Page 62

Troubleshooting
CLR
The following is a list of solutions to the most common issues that you may
experience when you install and use the MBU 400. Most of the problems you can
easily solve yourself, whereas others require that you contact your service provider.
To view the most recently updated troubleshooting information, go to
www.aastratelecom.com.
Issue Causes Solution
The handset keeps repeating the
checking step of the handset
update.
Troubleshooting
The handset display is black. Handset is in power saving mode. Press any key.
The handset does not charge. The charger is not powered. Check that the power cord is connected
The handset registration failed,
and the status indicator on the
display is black.
The display reads, "Searching for
Gateway" or "Registering to
Gateway" without registering
successfully.
The POWER indicator on the MBU
is not lit.
The I-NET indicator on the MBU is
not lit.
When you launch the upgrade
process the first time, the handset
update may loop.
Batteries are drained. Charge the batteries.
Power is not turned on. Check that the batteries are inserted with
Batteries are not inserted
correctly.
Handset is out of range of the MBU. Move the handset closer to the MBU,
Handset is out of range of the MBU. Move the handset closer to the MBU.
MBU is not powered. Plug MBU into a power outlet. (If
Access codes don’t match. Change the handset access code to
MBU is not powered. Check that the MBU power cord is
The Ethernet cable is not
connected.
The router or modem is not
powered.
The MBU cannot retrieve an IP
address.
First ensure that the handset update has
been completed (to 100%) at least once.
Then reset the MBU 400 by pressing the
RESET button on the side of the base
unit.
the plus and minus ends facing the
correct way. Press and hold the red key
.
CLR
properly to the charger, and that power is
turned on.
Check that the batteries are inserted with
the plus and minus ends facing the
correct way.
place it in the charger, and reset the
MBU.
possible, a continuous power outlet.)
match the gateway access code. (If you
don’t know the gateway access code, it
can be reset by your System
Administrator.) Once the access codes
match, reset the gateway to initiate
handset registration mode.
connected properly, and that the adapter
is plugged into a power outlet. (If
possible, a continuous power outlet.)
Check that the Ethernet cable between
the WAN port on the MBU and the LAN
port on your modem or router is
connected properly.
Turn on the power to the modem or
router.
In Internet settings, check that the IP
mode corresponds to the IP mode of
your Internet connection.
62 Aastra MBU 400 User Guide
Page 63

Issue (Continued) Causes (Continued) Solution (Continued)
There is no audio when I make
Internet calls.
I cannot make landline calls. The landline cable is not connected. Check that the landline cable between
I cannot receive landline calls. The country setting is wrong. Check that you have chosen the country
I cannot make Internet calls, the
VoIP indicator on the MBU is not
lit, and the right status indicator
in the upper left corner of the
display is black.
The router blocks audio. Use port forwarding. Check your router’s
user manual to see how to configure port
forwarding.
the Line port on the MBU and the
telephone wall outlet is connected
properly.
The landline is out of order. Contact your landline provider.
that you are in. Open the System
settings menu, choose Country
selection, and then choose the country
that you are in.
The configuration of the phone is
not complete.
The MBU has not been reset after
you saved the configuration.
The router uses port forwarding. Check that you have configured your
The router blocks Internet
telephony.
Check that you have configured your
phone properly. See Configuring Your
Phone for First-Time Use on page 22.
For more information, contact your
Internet Telephony Service Provider or
your System Administrator.
Reset the MBU and allow the MBU 2
minutes to log in at your Internet
Telephony Service Provider.
router so that it always assigns the same
IP address to your phone’s MAC address
when using port forwarding. Otherwise
incoming traffic is probably not forwarded
to your phone. For more information,
check your router’s manual.
Use port forwarding. The default SIP port
is 5060, and the default RTP port is
5004. Ensure that your router always
assigns the same IP address to your
phone when using port forwarding.
For more information, check your
router’s manual.
The router firmware needs updating. Check your router’s user manual to see
how to update the firmware.
When I make Internet calls, the
sound quality is poor.
Aastra MBU 400 User Guide 63
There is too much simultaneous
data traffic on your broadband
connection.
Your Internet Telephony Service
Provider’s Quality of Service is
based on a “best efforts” rather than
a guaranteed voice priority method.
a) Reduce the amount of traffic on your
broadband connection.
b) Sign up for a Quality of Service
agreement with your broadband
provider.
c) Order a connection with higher speed
from your broadband provider.
Contact your Internet Telephony Service
Provider regarding ensured voice
prioritization across the network.
Troubleshooting
Page 64

Issue (Continued) Causes (Continued) Solution (Continued)
I cannot make Internet calls, but it
worked yesterday.
How do I determine the software
version of my Handset?
The MBU is not logged in at the
Internet Telephony Service Provider.
The router is turned off. Turn on the router.
The SIP server is down. Contact your Internet Telephony Service
The Internet connection is down. Contact your broadband provider.
I need to know the software version
currently installed on my MBU 400.
Check that all cables are connected
properly, and check that power is turned
on, and then reset the MBU.
Provider.
a) Press Volume-Up button on the left
side of the registered 420d handset to
display the system status.
b) Scroll down to see the Version SW:
xx.xx field.
Page 65

Limited Warranty
Aastra Telecom warrants this product against defects and malfunctions during a one
(1) year period from the date of original purchase. If there is a defect or malfunction,
Aastra Telecom shall, at its option, and as the exclusive remedy, either repair or
replace the MBU 400 at no charge, if returned within the warranty period.
If replacement parts are used in making repairs, these parts may be refurbished, or
may contain refurbished materials. If it is necessary to replace the MBU 400, it may
be replaced with a refurbished MBU 400 of the same design and color. If it should
become necessary to repair or replace a defective or malfunctioning MBU 400 under
this warranty, the provisions of this warranty shall apply to the repaired or replaced
MBU 400 until the expiration of ninety (90) days from the date of pick up, or the date
of shipment to you, of the repaired or replacement set, or until the end of the original
warranty period, whichever is later. Proof of the original purchase date is to be
provided with all MBU 400s returned for warranty repairs.
Exclusions
Aastra Telecom does not warrant its MBU 400 to be compatible with the equipment
of any particular telephone company. This warranty does not extend to damage to
products resulting from improper installation or operation, alteration, accident,
neglect, abuse, misuse, fire or natural causes such as storms or floods, after the MBU
400 is in your possession.
Aastra Telecom shall not be liable for any incidental or consequential damages,
including, but not limited to, loss, damage or expense directly or indirectly arising
from the customers use of or inability to use this MBU 400, either separately or in
combination with other equipment. This paragraph, however, shall not apply to
consequential damages for injury to the person in the case of MBU 400s used or
bought for use primarily for personal, family or household purposes.
This warranty sets forth the entire liability and obligations of Aastra Telecom with
respect to breach of warranty, and the warranties set forth or limited herein are the
sole warranties and are in lieu of all other warranties, expressed or implied, including
warranties or fitness for particular purpose and merchantability.
Warranty Repair Services
Should the set fail during the warranty period;
In North America, please call 1-800-574-1611 for further information.
Outside North America, contact your sales representative for return instructions.
You will be responsible for shipping charges, if any. When you return this MBU 400
for warranty service, you must present proof of purchase.
After Warranty Service
Aastra Telecom offers ongoing repair and support for this product. This service
provides repair or replacement of your Aastra Telecom product, at Aastra Telecom's
option, for a fixed charge. You are responsible for all shipping charges. For further
information and shipping instructions;
In North America, contact our service information number: 1-800-574-1611.
Outside America, contact your sales representative.
Note: Repairs to this product may be made only by the manufacturer and its
authorized agents, or by others who are legally authorized. This restriction applies
during and after the warranty period. Unauthorized repair will void the warranty.
Aastra MBU 400 User Guide 65
Limited Warranty
Page 66

Page 67

Index
A
about this guide 13
access code
changing 28
gateway 29
handset 29
accounts, each handset 36
active calls 25
advisory tones 40
answer modes 47
answering a call 47
any key answer mode 48
audio settings
defaults 38
authentication name 24
auto answer mode 47
B
battery alert tone 40
Battery Disposal Information 11
Battery Information 10
boot status 22
C
call groups 36
call log 27
about 58
icons 58
viewing entries 58
call waiting 26, 37
caller ID 48
calls
handling 50
managing 54
Coin or Pay Phone 9
configure SIP screen 23
configuring using handset 23
configuring your phone 22
confirmation tone 40
connection status 25
connection status indicator 25
Consumer Information 8
contacts 27
D
Danish language setting 32
date format 34
daylight savings time 35
disconnected screen 23
display contrast
restore default 36
setting 36
display name 24
DND 26, 37
do not disturb 37
documentation 13
domain 24
Dutch language setting 32
E
emergency calls 41, 49
English language setting 32
Aastra MBU 400 User Guide 67
Index
Page 68

F
L
Index
G
H
I
FCC Information 7
features, MBU and 420d handset 14
Finnish language setting 32
French language setting 32
German language setting 32
getting started 18
green key 20
handset
accounts 36
features 15
idle screen 25
name 30
resetting 38
handset, about 20
handset, using 25
landline 26
call icons 43
primary line setting 35
language settings 32
language, setting menu 32
lock 28
M
MAC address 21
main menu 26
MBU features 14
MBU Gateway, about 18
message waiting tone 39
messages 26
N
navigation keys 21
nickname 24
number key 21
O
Important Safety Instructions 5, 10
Importantes mesures de sécurité 5
input
numbers 30
symbols 30
text 30
input mode 31
insert symbols 31
installation and setup 17
intercom
calls 26, 43
internet calls 42
internet settings 61
Introduction 65
IP
address 21
address, finding 21
call icons 42
Italian language setting 32
K
keypad sound 39
OK key 20
options softkey 25
options, idle mode 25
out of range 25
P
PIN code 28
setting 28
VoIP settings 28
Portuguese language setting 32
primary line, setting 35
Product Disposal Information 10
68 Aastra MBU 400 User Guide
Page 69

R
V
range tone 40
red key 20
redial 25
registering, 420d Handset 19
requirements, MBU and 420d handset 17
reset button 19
ringer melody 38
ringer volume 38
S
Safety Information 10
Sensitive Electronic Environment 10
setting audio 37
settings 27
silent mode 40
SIP
account, choosing 36
password 24
proxy 24
user name 24
softkeys 20
Spanish language setting 32
speakerphone 27
speakerphone key 21
star key 21
system status 21
vibrate 40
voicemail 26
Vo I P
call icons 42
calls 42
primary line setting 35
volume control 27
volume keys 21
W
warranty, limited 65
within range 25
T
text input 30
time and date
automatic 32
setting 32
time format 33
time zone 34
Troubleshooting 62
U
unlock 28
Aastra MBU 400 User Guide 69
Index
Page 70

Page 71

Page 72

Aastra Telecom will not accept liability for any damages and/or long distance charges, which result
from unauthorized and/or unlawful use.
While every effort has been made to ensure accuracy, Aastra Telecom will not be liable for technical
or editorial errors or omissions contained within this documentation. The information contained
in this documentation is subject to change without notice.
Copyright 2008 Aastra Telecom. www.aastra.com
All Rights Reserved.
 Loading...