

Page 1

Page 2

Table of Contents
Introduction..................................1
Emergency Service Feature........1
Unpacking the Phone..................1
Key Description............................2
Installation....................................4
Prompts and Indicators...............6
How do I use softkeys?...............6
Display Prompts..........................6
Making and Answering Calls......7
Predialing a number....................7
Handsfree Calling .......................7
Timing a call................................7
Table of Contents
Using Flash.................................7
Extension in Use.........................7
Using the Redial List...................7
Status lights ................................8
Using Hold key............................8
Adjusting the Volume..................8
Customizing your phone.............9
Setting your Options ...................9
Using the Directory....................11
Adding a name and number
to the Directory..........................11
Entering Letters and
Characters ................................11
Finding entries in the
Directory....................................11
Changing entries in the
Directory....................................11
Copying to the Directory............12
Dialing from the Directory..........12
Deleting an entry in the
Directory....................................12
Deleting all entries in the
Directory....................................12
Locking the Directory ................12
the Directory.......................... 13
Changing a number in the Callers
List before dialing.................. 13
Deleting an entry in the Callers
List......................................... 13
Deleting all entries in the Callers
List......................................... 13
Headset/ Dataport Operation ... 14
Using a Headset with your
Telephone................................14
Making and Receiving Calls
using a Headset ....................... 14
Using the Dataport ................... 14
Using Services .......................... 15
Icons........................................... 16
Troubleshooting ........................ 17
Limited Warranty....................... 19
Using the Callers List................13
Viewing the Callers List.............13
Calling an entry in the
Callers List................................13
Copying from the Callers List to
i
Page 3
Introduction
Congratulations on your purchase
of the Model
Model
timesaving and advanced features,
including:
• a large 8-line backlit display
• a 200 Name/Number Directory
with 100 entry Callers List
• a speakerphone for handsfree
calls
• access to advanced services
• a jack for headset usage
Use this guide to learn more about
the Model
1
1
boasts several
1
telephone! The
’s features.
Emergency Service Feature
The Model 1 will provide basic
telephone service during a power
failure. However, only the dial pad,
ringer and handset will function. If
you are on a handset call during a
power interruption, the Model
1
will keep the call, although
the display will not work while the
power is off. Handsfree calls will
not be re-established during a
power interruption.
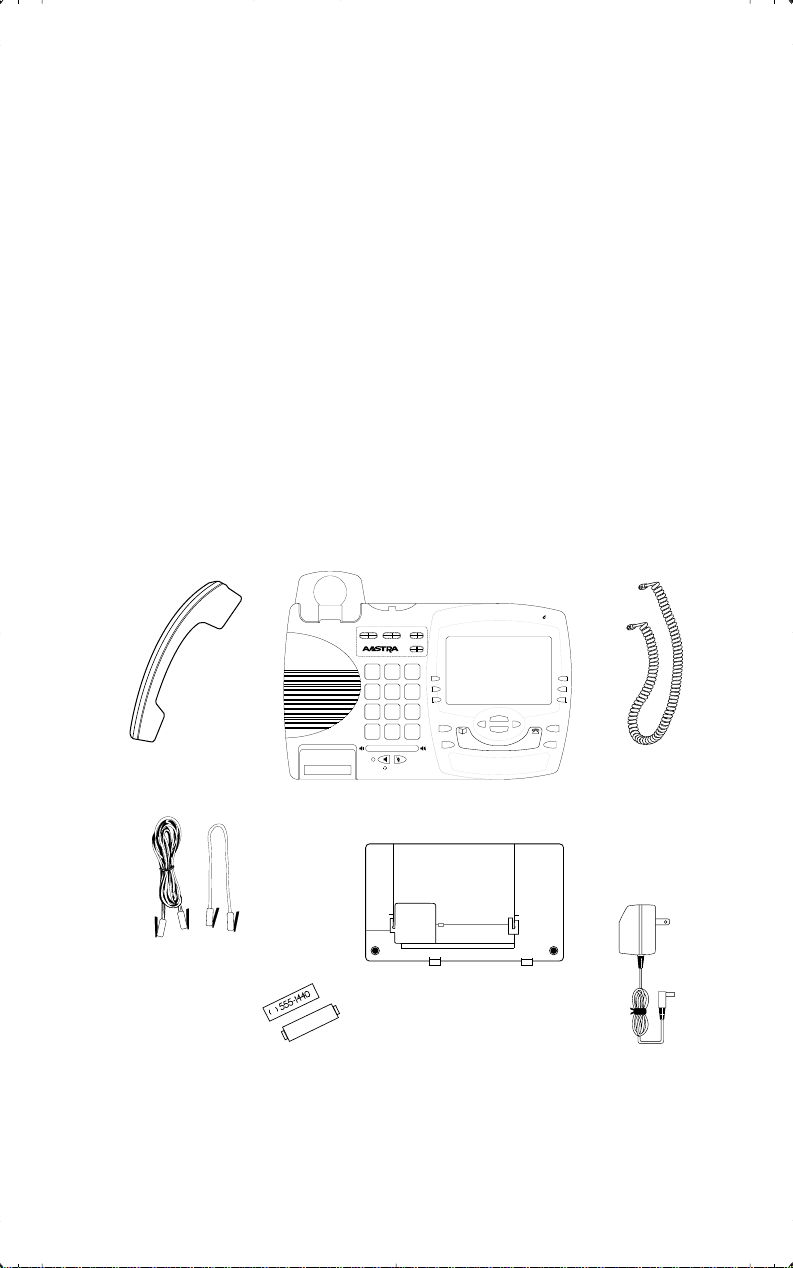
Unpacking the Phone
When you unpack your telephone,
you should ensure that you have all
of the following items. If any part is
missing, contact the supplier of
your telephone.
Introduction
480
handset
Hold Redial
ABC DEF
14362
GHI JKL MNO
5
PQRS
TUV
798
0
*
Goodbye
Options
WXYZ
#
Copy Services
telephone
2 line cords
stand
number card and lens
The power adaptor is 16 VAC, 250mA – please see the regulatory sheet for
safety instructions regarding the power adaptor and operation of the telephone.
handset cord
power adaptor
Model 1 User Guide 1
Page 4
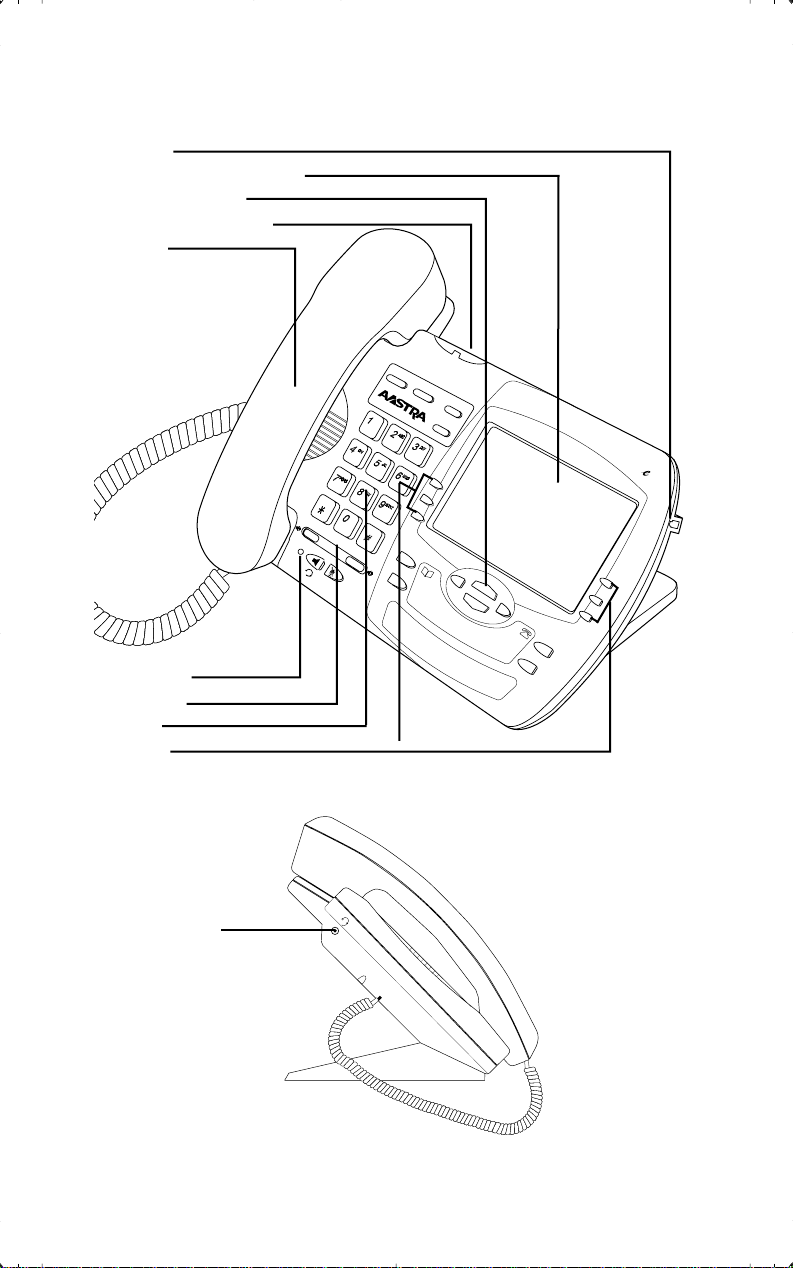
Key Description
Dataport
Large 8 Line Backlit Display
Navigational Keys
Telephone Status Light
Handset
Key Description
Hold
Redial
G
o
o
d
b
y
e
O
p
tio
n
s
480
Copy
Speaker/Headset
Status Light
Volume Bar
Dial Pad
Softkeys
Headset Jack
2 Model 1 User Guide
Services
Page 5

Keys Key Description
o
∑
k
£
u
d
f
a
c
J
i
b
Í
Places an active call on hold or releases this call from
being held. This key also enters pauses during predial or
editing mode. See the section
information.
Displays the last 10 numbers dialed. See the section
“Using the Redial List”
Pressing
open list, such as the Directory or Callers List, but if a call
is active when the list is open, it will also end the call. It
will not hang up a call that is on hold.
The
tomize your telephone. See the section
your
Adjusts the volume for the handset, headset, ringer and
handsfree speaker. See the section
ume"
Pressing d activates Handsfree so you can make and
receive calls without lifting the handset. When the audio
mode option is activated, this key is used to switch
between a headset and the Handsfree speakerphone. See
the sections
phone
Mute, when activated, prevents the caller from hearing
you through the handsfree, handset or headset. The display will show
Headset call is muted, the speaker light blinks. To take a
call off mute, press
Directory, which can store up to 200 names and numbers
in alphabetical order. See the section
tory”
Pressing
Directory.
Pressing
when you are using services. These buttons also let you
scroll through menu selections, such as the Options List.
When you are editing entries on the display,
character or number, and
or editing names.
Callers List, which stores the last 100 callers. See the section
Pressing
stored in memory. See the section
information on downloading and using services.
k
£
phone”
for more information.
" for more information.
for more information.
J
s
“Using the Callers List”
Í
ends an active call.
button lets you access nine options to cus-
for more information.
"Handsfree calling"
Microphone muted
a
copies a displayed number into the
and r
opens a list of Services scripts that are
“Using Hold key”
for more information.
again.
lets you move between screens
4
adds a space when entering
for more information.
for more
k
“Customizing
"Adjusting the Vol-
and "
Customizing your
. When a Handsfree or
“Using the Direc-
“Services”
exits an
3
deletes a
for more
Key Description
Key Description
Model 1 User Guide 3
Page 6
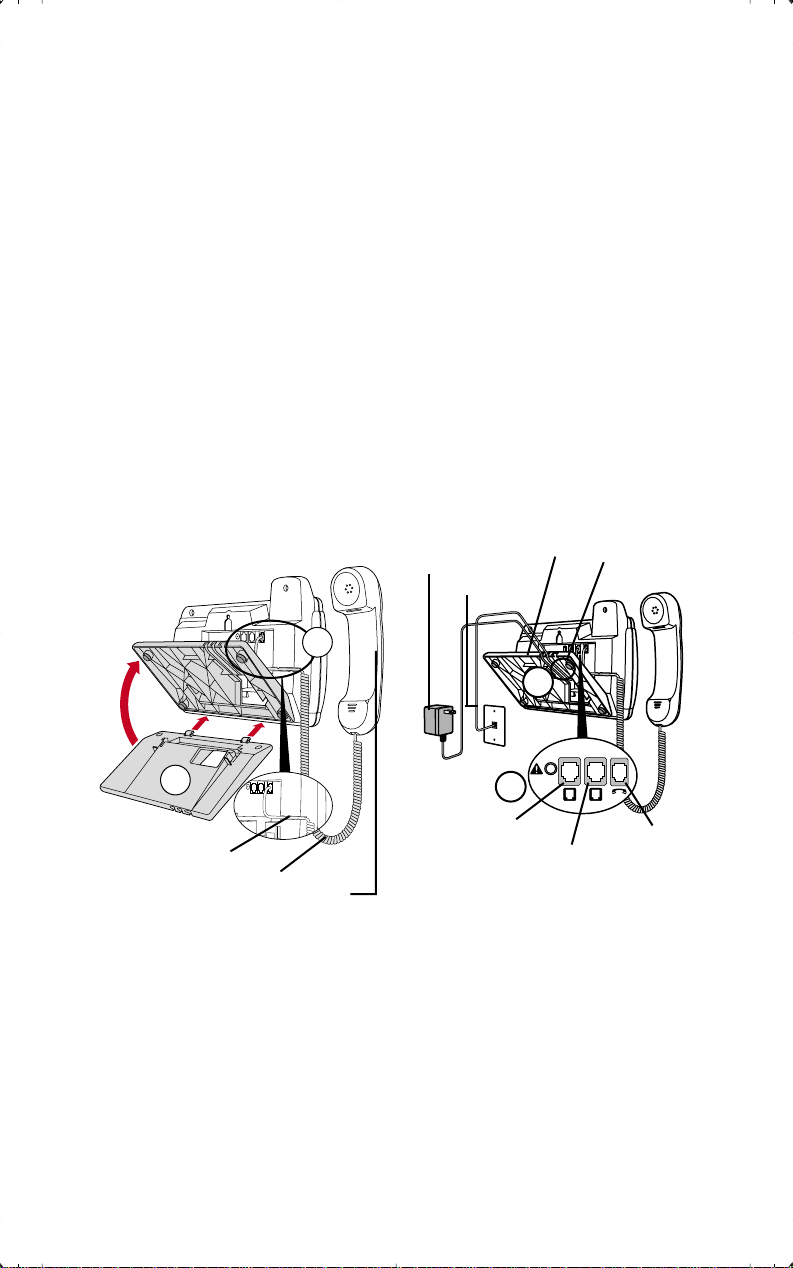
Installation
Your Model 1 telephone can be
installed on a desk or mounted on
the wall. To use the phone’s Call
Waiting and Caller IdentiÞcation
capabilities, contact your local
Service Provider for subscription
details. Your Service Provider may
call these services by different
names.
Installation
1. Connect the handset cord
Turn the telephone over and locate
the handset jack marked
Insert one end of handset cord into
the jack until it clicks into place.
Then route the handset cord
through the groove as shown in the
illustration below.
Attach the handset to the other end
of the handset cord.
j .
viewing angle, use the slots marked
m. Then slide the stand towards
the phone until it snaps into place
(B).
3. Connect the cords
If you attached the stand to install
the phone on a desk, route both the
phone cord and power adapter cord
through the opening in the stand.
Insert the phone cord into the
middle slot on the back of the
telephone marked l until it clicks
into place. Insert the power cord
into the power jack marked k
.
4. Press the cords into grooves
Press the cords into two of the
grooves provided on the bottom of
the stand. This will allow the stand
to sit ßat on a desk surface.
Power Adaptor
Phone cord
Stand
Line grooves
1
B
A
2
Handset groove
Handset cord
Handset
2. Attach the stand
If you plan to mount the phone on
the wall, you do not need to attach
the stand; skip this step. If you plan
to use the phone on a desk, attach
the stand by inserting the tabs on
the stand (marked with oooo ) into the
slots on the bottom of the telephone
(A). For a higher viewing angle, use
the slots marked n. For a lower
4 Model 1 User Guide
4
3
Headset cord jack
Phone cord jack
Handset cord jack
5. Install the phone
If you have installed the stand and
are using the phone on a desk:
Simply turn the telephone over so it
rests on the stand. Connect the
phone cord to a phone jack and plug
the power adapter into a power
outlet.
Note: You should connect the
power adaptor to a surge protector or power bar.
Page 7
6. Install on a wall
To install the Model 1 on a wall:
Connect the cord to the wall jack
(A). Coil the phone cord into the
space provided on the back of the
phone (B). Then align the telephone
so the hooks on the wall plate (C)
align with the wall-mount slots on
the back of the phone, as shown
here. Push the phone onto the pegs,
then slide it down until it is secure
(D). Plug the power adaptor into a
power outlet (E).
D
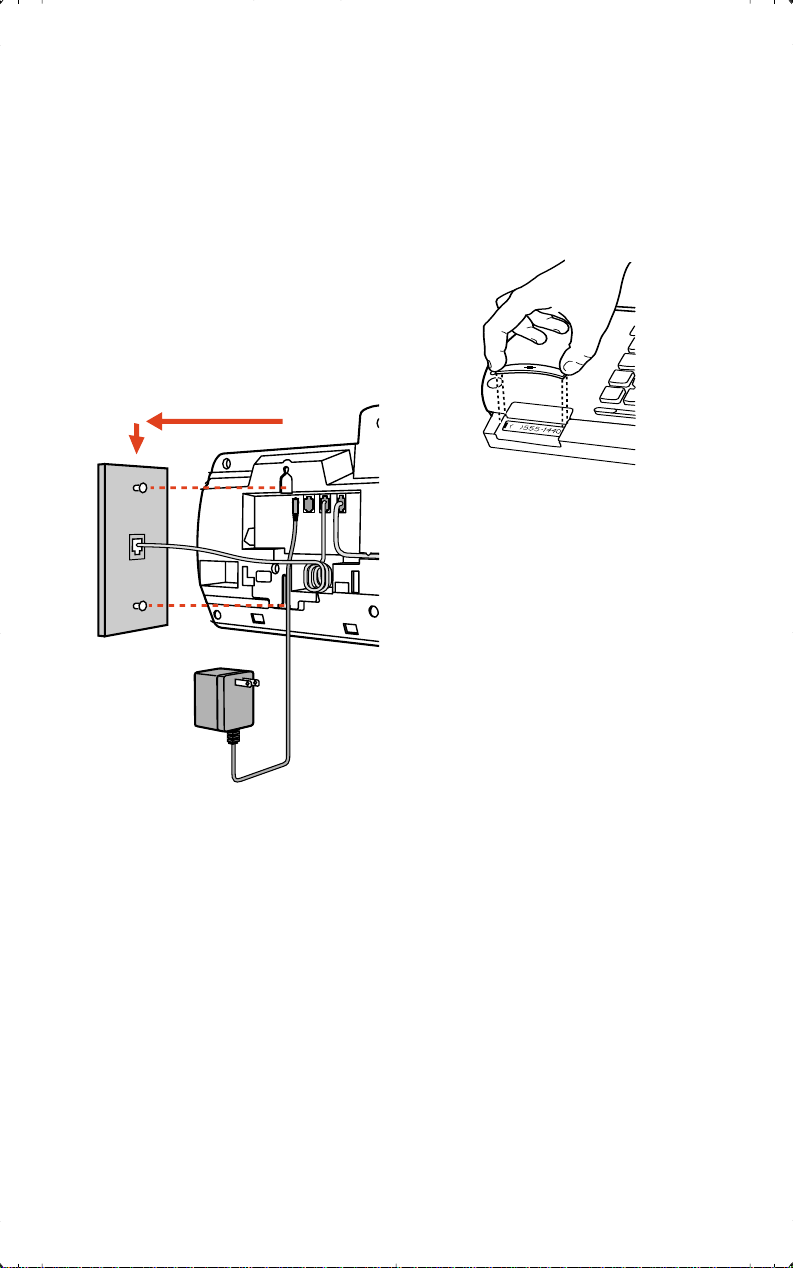
7. Insert number card
Write your telephone number on
the number card, and place it into
the card slot on the telephone,
located under the mouthpiece in the
handset cradle. Gently bend the
clear plastic lens into the slot, over
the number card.
Installation
A
C
E
Note: You should connect the
power adaptor to a surge protector or power bar.
8. Customize the telephone
Follow the instructions in the
section “Customizing your phone”
B
to customize your Model
telephone.
1
Model 1 User Guide 5
Page 8

Prompts and Indicators
How do I use softkeys?
This telephone uses softkeys to give
you commands to choose from.
Each choice corresponds to the
Enter the name>
Drew
Use Save to end
-Save
-Backspace
-ChangeCase
Display Prompts
Instructions and information are
displayed on the large screen. If you
are unsure what a certain prompt
Display Prompt Explanation
Prompts and Indicators
Call is on hold A call is on hold. Press the o key or the
Handsfree key to speak with the caller.
Check phone cord A line cord (l) may not be connected properly.
Directory is full The Directory has reached its maximum number of
entries. If you want to add entries, you must Þrst
delete some entries.
Directory locked The Directory has been locked, and you cannot edit,
add, or delete entries. See the section “Using the
Directory” for more information.
Message Waiting Check for new messages in your Voice Mail service*.
more 4 Press 4 to see other display prompts.
Private Name or
Private Number
Ringer is OFF No audible ringing. To turn the ringer on again, press
Unknown name or
Unknown number
XX New callers XX new calls have been added to the Callers List since
XX Call(s) bumped XX callers have been deleted from the Callers List to
* You must subscribe to a Message Waiting service for this feature to work.
Consult your local telephone company for information.
The caller has requested that the name (or number)
not be shown.
the right side of u.
The telephone company is unable to provide the
name (or number) of the caller.
you last checked it.
make room for new callers.
button next to it. In this illustration,
the user is selecting NextSpace to
insert a space. Commands will
change depending upon the action
you are performing.
NextSpace-
Quit-
means, Þnd it here, or see the
Troubleshooting or index section
for additional information.
6 Model 1 User Guide
Page 9

Making and Answering
Calls
Predialing a number
Predialing lets you view a number
before you dial. Enter the number
using the dial pad before lifting the
handset. Use the Backspace softkey
or 3 to correct any errors. To dial
the number, lift the handset, or
press the Dial softkey, or press d.
Note: This feature is not available if
you choose to use the Live
DialPad option. See the section "Customizing your
phone" for more information.
Timing a call
When you make or answer a call,
the Timer shows the elapsed time of
the call.
Using Flash
The Flash softkey allows you to
access telephone company
subscribed services, such as call
waiting and three-way calling.
These services vary from area to
area, so contact your telephone
company for instructions on using
available services with your Model
1 telephone. If these
instructions say to press the “hookswitch” or “receiver button,” press
the Flash softkey.
Making and Answering Calls
Handsfree Calling
The Handsfree feature allows you to
speak to someone without using the
handset. To dial using Handsfree,
enter a number and then press d
or the Dial softkey. To answer using
Handsfree, press d when a call is
ringing. To switch between
Handsfree and the handset when
the handset is off hook, press d.
When the handset is on hook, press
d to disconnect a Handsfree call.
When Handsfree is on, the speaker
light turns on. When the speaker
light is on, press a at any time to
mute Handsfree. The speaker light
will ßash and you will hear the
caller, but they will not hear you. To
switch between Handsfree and
mute press a.
Note: Handsfree operation as
described above will be
affected and may be disabled
if the set audio option has
been activated. See the section "Customizing your
phone" for more information.
Extension in Use
The Extension in use prompt
appears on the telephone display
and the telephone status light turns
on when someone uses another
telephone on the same line.
This message also appears when the
telephone is not properly connected
to a phone line.
Using the Redial List
The Redial List records the last 10
numbers you dialed.
Redialing a number
1. Press ∑ to view the
Redial List.
2. Use the sr keys to move
the cursor to the number you
want to dial.
3. Lift the handset to dial the
number, or press the Dial
softkey or d to dial the
number using Handsfree.
Deleting the Redial List
1. Press ∑ to view the
Redial List.
2. Press the DeleteList softkey.
3. Press the Delete softkey to
conÞrm.
Model 1 User Guide 7
Page 10

Status lights
Speaker Light
• Speaker light is on: a call is on
Handsfree (speaker).
• Speaker light ßashes slowly:
indicates that the headset/handsfree option is being used. See the
section "Customizing your
phone" for more information.
• Speaker light ßashes and the display shows Microphone muted: a
call is muted. Press a to take the
call off mute.
Telephone Light
• Light ßashes and the display
shows Call is on hold: a call is on
hold. Press o or lift the
handset to take the call off hold.
• Light ßashes and the display
shows Message Waiting:a message is waiting for you at your
message or voice mail service
• Light ßashes quickly and the
ringer sounds: you have an
incoming call.
• Light is on and the display shows
Extension in use: an extension
Making and Answering Calls
telephone is using the line. The
message also appears when the
telephone is not propertly connected to a phone line.
†
.
Using Hold key
Pressing o puts a call on
hold.
• You can hang up the handset
without losing the call.
• The display will show the message Call is on hold.
• The telephone light will ßash.
• To retrieve the call, lift the handset or press o again. You
can also press d to retrieve a
Headset or Handsfree call.
Note: A call is taken off hold auto-
matically after 15 minutes. If
the handset is on the phone,
the call will be disconnected.
If the handset is off, the caller
will be able to hear you again.
Adjusting the Volume
Pressing the volume button adjusts
the receiver, headset, speaker, and
ringer volume.
• To adjust the ringer volume,
leave the handset in the cradle
and press the volume bar
u while there is no
active call. There are 8 settings for
the ringer – the display will temporarily indicate the current
ringer volume setting.
• To adjust the handset volume, lift
the handset and press the volume
button while you are on a call.
The handset will return to the
default volume after you hang
up.
• To adjust the headset volume,
press the volume button while on
a call. The headset will return to
the default volume after you end
the call.
Note: The default handset and
headset volume is always set
at medium.
• To adjust the speaker volume,
press the volume button while
the speaker is activated (activate
the speaker by pressing d). The
speaker will remain at this volume until it is adjusted again.
†
You must subscribe to a Message Waiting
service for this feature to work. Consult your
local telephone company for information.
8 Model 1 User Guide
Page 11

Customizing your phone
There are nine conÞguration
options, accessed by pressing
£.
Setting your Options
1. Press £ to enter the
Options List.
2. Use s and r to scroll
through the list of nine options.
3. Press the Show softkey to
conÞgure an option.
4. Use the softkeys to change a
selected option.
5. Press the Done softkey at any
time to exit the option, or press
£ to exit the Options
list.
The following nine options may be
changed on the Model
1.Language – Select a language for
the display prompts (English,
French, or Spanish).
2.Time / Date – Use this option to
change the time and date setting on
the display. Press the appropriate
softkey to increase that item by 1.
For example, press the Hour softkey
to increase the hour from 1 to 2.
Note: The time and date are auto-
matically set when the phone
receives its Þrst Caller ID
call.
3. Set ring tone – Press the Change
softkey to select one of four ring
tones.
4. Clear Msg. Wtg. – Sometimes the
Message Waiting prompt will
appear and the light will ßash when
there are no messages waiting on
your Voice Mail
this option, select the Clear softkey
to clear the prompt and ßashing
1:
†
service. When in
†
light. The light will ßash again
when there are new messages
waiting.
5. Area Code – In some locations,
you cannot dial a local number
using the area code. By default,
incoming calls are recorded with
area codes in the Callers List. This
option allows you to enter up to
three local area codes to be removed
from incoming calls. Press the
Change softkey to enter an area
code.
6. Contrast Level – Use the Change
softkey to cycle through 8 contrast
settings, which brighten or darken
the display.
7. Security Numbers – This option
allows you to keep selected
numbers from appearing on the
screen when dialed. Use this option
to protect passwords, access codes
etc. When a security number is
used, your telephone displays the
asterisk * symbol for all digits that
you dial after the security number
and the digits do not appear in the
Redial list display. Up to three
security numbers can be created
using this option. Press the Change
soft key and then enter the security
number.
8. Live Dialpad – Use this option to
turn on or off the dial pad mode.
With live dialpad on, the telephone
automatically dials out and turns on
Handsfree as soon a dial pad key or
softkey is pressed. With live
dialpad off, you must dial the
number Þrst and then lift the
handset or press the d
before the number is dialed. Press
the Change soft key to turn on or off
the dial pad mode.
/f button
Customizing your phone
Model 1 User Guide 9
Page 12

9. Set Audio – The Model 1
telephone allows you to use a
handset, headset or handsfree to
handle incoming and outgoing
calls. This option provides different
combinations of these three
methods to provide maximum
ßexibility in handling calls. There
are four options to choose from:
• Handsfree – this is the default
setting. Calls can be made or
received using the handset or
handsfree speakerphone and can
be switched between the two
modes.
• Headset – choose this setting if
you want to make or receive all
calls using a headset.
Note: If this option is chosen, the
handsfree speakerphone will
not function.
• Spkr/Hset – calls will be sent to
the handsfree speakerphone. By
pressing the d
phone you can switch between
Customizing your phone
the handsfree speakerphone and
a headset.
• HSet/Spkr – calls will be sent to
the headset. By pressing the d
f button on the phone you can
switch between the headset and
the handsfree speakerphone.
/f button on the
/
†
These services may have different names in
your area, and may require paid subscription.
Contact your telephone company for details.
10 Model 1 User Guide
Page 13

Using the Directory
The Directory can store up to 200
names and numbers, which are
displayed in alphabetical order.
Tip: Store all your Directory con-
tacts the same way, either Þrst
name Þrst, or last name Þrst.
This will make it easier to Þnd
names and numbers.
Adding a name and number to
the Directory
1. Press the Directory button c.
2. Press the AddNew softkey.
3. Enter the number using the dial
pad. You can enter up to 24
digits. Hyphens will be
automatically added. If you
need to enter a pause (between
your voice mail number and
password, for example), press
the Pause softkey. The pause
icon p will appear. To program
a number that uses Flash, press
the Flash softkey where it is
required in the number. The
Flash icon q will appear. Press
the Backspace softkey or 3 to
erase a number.
4. Press the Save softkey.
5. Enter a name using the letters
on the dial pad. See the
following instructions
“Entering Letters and
Characters” to enter names
using the dial pad. The name
can have up to 16 characters,
including spaces. Press the
NextSpace softkey or 4 to
move to the next letter or add a
space. Press the Backspace
softkey or 3 to erase a
character.
6. Press the Save softkey. The new
entry now shows on the
display.
Note: You can also copy an entry
from the Callers List to the
Directory using the J
button, before or after you
have changed it.
Entering Letters and Characters
You can enter characters using the
telephone’s dial pad. To enter a
letter, press the key with that letter
on it. If the letter is the second one on
that key, press the key twice. For
example, to enter ‘R’ , press 7 three
times. The cursor will advance to the
next space after a delay of 2 seconds
or if you press a different key.
To change the case of a letter, press
the ChangeCase softkey, and then
enter the letter. By default the Þrst
letter of a word or name will be
capitalized, and the letters
following will be lower case.
Special characters are entered by
pressing the 1 and the # keys.
Characters will appear in this order:
1: & , ( ) ` . _ - 1.
#: # / \ @.
Finding entries in the Directory
1. Press the Directory button c.
2. Once in the Directory, press s
to scroll down and r to
scroll up one listing at a time.
Hold either key down to scroll
continuously.
OR
Press a dial pad key to see
listings that start with that
letter. For example, 5 takes
you to the Þrst “J” listing, 55
takes you to the Þrst “K”
listing.
Changing entries in the Directory
1. Press the Directory button c.
2. Find the entry you would like
to change.
3. Press the Change softkey.
Using the Directory
Model 1 User Guide 11
Page 14

4. To change the number, use the
Backspace softkey or 3 to
erase digits. Use the dial pad to
add digits. Use the Pause
softkey to insert a 2 second
pause. The pause icon p will
appear.
5. Press Save to move to the
name.
6. To change the name, use the
Backspace softkey or 3 to
erase letters. Use the dial pad
and the NextSpace softkey to
add letters. Press the
ChangeCase softkey to switch
between upper and lower case.
7. Press Save to save changes.
Copying from the Callers List,
Using the Directory
the Redial List, or the Display
to the Directory
1. Open the Callers List, Redial
List, or answer a call.
2. When the number is displayed
on the screen, press J.
If the entry includes a name
and number, the display will
show Saved: Directory.
3. If the entry is a number only
(such as in the Redial List), you
will be prompted to enter a
name. Once you’ve pressed the
Save softkey to save the name,
the display will show Saved:
Directory.
Dialing from the Directory
1. Press the Directory button c.
2. Find the entry you would like
to call in the Directory.
3. Lift the handset to dial the
number, or press the Dial
softkey or d to dial the
number using Handsfree.
Deleting an entry in the Directory
1. Press the Directory button cccc.
2. Find the entry you would like
to delete.
3. Press the Delete softkey.
4. Press the Delete softkey again
to conÞrm.
Deleting all entries in the
Directory
Once you have deleted the
Directory, you cannot get entries
back. You can protect the Directory
by locking it.
To permanently delete all entries in
the directory:
1. Press the Directory button c to
open the Directory.
2. Press the DeleteList softkey.
3. Press the Delete softkey to
conÞrm.
Locking the Directory
You can lock the Directory so that
entries cannot be deleted or
changed. You cannot add entries to
a locked directory.
1. Press £.
2. Press o.
3. Press *. The display shows
Directory locked.
To unlock the Directory
1. Press £.
2. Press o.
3. Press #. The display shows
Directory unlocked.
12 Model 1 User Guide
Page 15

Using the Callers List
The Callers List records the last 100
callers, in the order they called. The
telephone display will indicate
when there are new callers.
When the Callers List is full, new
callers are added to the list, and the
oldest callers are deleted. In the
Callers List you will see the
message XX New caller(s), XX
Call(s) bumped on the display.
Viewing the Callers List
1. Press the Callers button b.
2. Press r and s to move up
and down in the Callers List.
Hold either key down to scroll
continuously.You can also press
the Resume softkey to see the
last caller you viewed the
previous time you entered the
Callers List.
3. Press the Callers button b, the
Quit softkey, or k at
any time to leave the Callers
List.
Note: k will also hang up a
caller if you are on a call.
Calling an entry in the Callers
List
1. Press the Callers button b.
2. Find the entry you would like
to call in the Callers List.
3. Lift the handset to dial the
number, or press the Dial
softkey or d to dial the
number using Handsfree.
If the entry in the Callers List does
not have a name (i.e. if the name is
listed as Unknown or Private),
you will be prompted to enter a
name. You can edit a number in the
Callers List and then copy it to the
Directory.
Changing a number in the Callers List before dialing
Tip: If you have to frequently
remove area codes to return
local calls, you should use the
Area Codes option and add
your local area code(s).
Note: The Callers List does not save
changes. If you plan to dial
the number again, copy it to
the Directory and change it
there.
1. Press the Callers button b.
2. Find the caller in the Callers
List you wish to dial.
3. To add digits, use the dial pad.
4. To delete digits, press the
EditNum softkey to begin editing.
Use the dial pad to add digits.
5. Lift the handset to dial the
number, or press the Dial
softkey or d to dial the
number using Handsfree.
Deleting an entry in the Callers
List
1. Press the Callers button b.
2. Find the entry you would like
to delete in the Callers List.
3. Press the Delete softkey.
4. Press the Delete softkey again
to conÞrm. The display shows
Item is erased.
Using the Callers List
Copying from the Callers List
to the Directory
When the number is displayed in
the Callers List, press J.
The display will show Saved:
Directory.
Deleting all entries in the Callers List
1. Press the Callers button b.
2. Press the DeleteList softkey.
3. Press the Delete softkey to
conÞrm. The display shows
Callers list is empty.
Model 1 User Guide 13
Page 16

Headset/ Dataport
H
Operation
Using a Headset with your
Telephone
The Model 1 is equipped to
accept headsets with either a
modular RJ22 jack or a 2.5mm
standard jack. Headsets with a
modular RJ22 jack can be connected
to the phone by using the jack on
the back of the set. Headsets with a
standard 2.5mm jack can be
plugged into the headset jack
located on the left hand side of the
telephone.
Making and Receiving Calls
using a Headset
1. Ensure that you have selected a
headset audio mode by accessing the Options menu. See the
section "Customizing your
phone" for detailed information.
2. Plug the headset into jack.
3. Press the d
dialtone or answer an incoming
call. Depending on the audio
mode selected from the
Options menu, dialtone or an
incoming call will be received
on either the headset or the
handsfree speakerphone.
4. Press the k key to end
the call.
Using the Dataport
Located on the right hand side of
the Model
used to connect another device such
as a fax machine or computer
modem to the phone. Plug one end
Headset/ Dataport Operation
of a line cord to the phone and the
other end to the device to be
connected.
1, the dataport can be
/f key to obtain
Note: The dataport will only oper-
ate when the handset is on
hook (in the phone base cradle).
eadset cord jack
Phone cord jack
Contact your telephone equipment
retailer or distributor to purchase a
headset. Customers should read
and observe all safety
recommendations contained in
headset operating guides when
using any headset.
14 Model 1 User Guide
Handset cord jack
Page 17

Using Services
The Model 1 telephone allows
you to access enhanced telephone
company subscription features and
services, which can include home
banking, catalogue shopping,
restaurant guides, and voice mail.
Services may be free or may have a
subscription cost. Contact your
telephone company for information.
Before selecting a service, you must
download the service into your
telephone. Contact your telephone
company for information on
downloading services in your area.
Downloading a service is as simple
as dialing the subscription number
and following any voice prompts.
Your phone may be capable of
automatically dialing out to update
your subscribed features and
services. For more information on
this ability, contact your telephone
company.
Some services may be available by
dialing them directly. You do not
have to download these services,
but you may wish to save them in
your Directory.
Note: Some options, such as the call
timer, may be disabled when
you are using a service.
Activating services:
1. Dial the number provided by
your telephone company and
follow the prompts.
2. Once you have successfully
downloaded the services of
your choice, press the Í
key. The Services menu
appears.
3. Use the sr keys to move
the 4 indicator to the Service
you want to select.
4. Press the Select softkey to
activate the service next to the
4 indicator.
5. Once you have connected to the
service, follow the instructions
on the display.
6. To exit a service session, press
the Quit softkey, Í or
k to leave the Services
List.
Deactivating services:
You may deactivate a service by
contacting your telephone company.
You can delete a downloaded
service in the Services menu by
selecting it and pressing the Delete
softkey. The service will appear as
<deleted>.
If you download another service, it
may overwrite any service
displayed as <deleted>.
Using Services
Model 1 User Guide 15
Page 18

Icons
Other List Icons
The display uses icons to convey
information about calls, Directory
entries, Callers, and services.
Icons
Icons in the Callers List
You are viewing the
Callers List.
You answered the call
when it came in.
You did not answer the
call when it came in.
You were on another
call when this call came
in.
You have returned the
call from the Callers
List.
Icons in the Directory
You are viewing the
Directory.
You are viewing the
Redial List.
You are viewing the
Options List.
Icons in the Services List
You are viewing the
Services List.
Press 4 or 3 for more
information.
Service information is
being downloaded to
your telephone.
You pressed the Flash
softkey, or Flash has
been programmed into
a number.
You pressed the Pause
softkey or a pause
(which is about 2 seconds) has been programmed into a
number.
16 Model 1 User Guide
Page 19

Troubleshooting
What are services, and how do I
use them?
Services are provided by your
telephone company, and include basic
features such as Caller ID
services can be accessed through the
Í key, and may include
services such as Call Forwarding
Voice Mail
services, you must activate them by
contacting your local telephone
company. See the section “Using
Services” for more information.
†
. Before using your
I’m having trouble with services
I have subscribed to – how do I
get help?
Usually your telephone company
supplies a special number to call for
activation of your services. When
you call this number, you must
follow the recorded instructions
carefully. This allows the telephone
company’s system to recognize
your phone and customize it with
the services you have subscribed to.
If you have any activation problems
call your local telephone company.
Why are there no prompts on
the screen when a Call Waiting
call comes in?
You must subscribe to Call Waiting
IdentiÞcation
company.
†
from your telephone
Why is the light not coming on
with a new Voice Mail Message?
You must subscribe to the “Visual”
Message Waiting
telephone company for this function
to work.
Why don’t numbers I return
from the Callers List connect?
Incoming calls are recorded with the
area code attached, whether they are
†
. Other
†
and
†
service from your
long distance or local calls.You may
have to remove the area code from
local calls in order to call from the
Callers List, or use the Area Code
option in the options list to have local
area codes automatically removed. See
the section “Customizing your
phone” for information about the Area
Code option. Alternatively, you may
need to add ‘1’ before long distance
numbers in order to dial long distance.
Why is my handset not working?
Check to ensure that the handset
cord is fully connected to both the
phone and handset.
“Installation” for information.
See the section
Why is my speakerphone not
working?
If you press d/f and the speaker
light ßashes and you do not hear
dialtone, the Set Audio option has
been used to set up the phone for
headset use. Press d
time. If the light goes out, the
phone is set up to be used only with
a headset or handset. If the light
stays on steady and you hear
dialtone, you can alternate between
the speakerphone and the headset
by pressing d
“Customizing your phone” for
instructions on how to change the
Audio
feature.
/f a second
/f.
See the section
Set
Why is my display blank?
Ensure that the power adaptor is fully
plugged into the electrical outlet, and
that the outlet is supplying power
(you can test this with another
electrical device, such as a lamp).
How do I set the time and date?
If you subscribe to the Caller ID†
service, the Þrst incoming call will
update the phone with the correct
time & date. Otherwise, use the
Time/Date option in the options list
to manually set the time and date.
Troubleshooting
Model 1 User Guide 17
Page 20

Why can I only see 4 options
when the user guide says there
are 9?
The telephone screen will only
show 4 options at a time. To see
more, press the down arrow button
s.
Why does the telephone wobble?
Make sure the cords are routed
properly through the stand, as
indicated in the Installation section.
Check that the stand has been
properly snapped into place.
How do I remove the stand from
the phone?
Place one hand on top of the phone,
and place the other hand on the top
of the stand. Pull the stand away
from the telephone. You will have to
pull quite forcefully, but this will
not break the stand.
Troubleshooting
Can I turn the light on the screen
off?
No. You can only adjust the contrast
of the display.
Why are Callers not identified
on the display?
Caller ID† information usually
arrives between the Þrst and second
ring. Let the telephone ring at least
once before answering. Make sure
you subscribe to Caller ID
from your local telephone company.
†
services
Why can’t I dial a number in the
Callers List?
You must subscribe to a Caller ID†
service for names and/or numbers
to be recorded in the Callers List. If
the number of the caller is unknown
or private, you cannot return the
call. Or, the number may require an
area code. Press the EditNum softkey
to edit the number, then press the
Dial softkey.
What does Hold Msg do?
This is an option available with
some Call Waiting
you are on a call, and another call
comes in on Call Waiting, you can
press the Hold Msg softkey to send a
network message to the caller. The
message will ask the caller to hold,
and tell them that you will be with
them shortly. You can then answer
the call at your convenience.
Contact your local telephone
company for activation information.
What does
†
services. When
AAAAnnnnsssswwww____CCCCWW
WW
or
SSSSwwwwiiiittttcccchhhh
do?
This is an option available with
some Call Waiting
softkeys allow you to put the
current call on hold, and answer a
Call Waiting call. You can then
switch between calls normally.
Contact your local telephone
company for activation information.
†
services. These
What is a softkey?
There are three keys on both the left
and right side of the display. They
do different things, depending on
the command displayed next to
them. See the section “How do I use
softkeys?” for more information.
†
These services may have different names
in your area. Contact your telephone
company for details.
18 Model 1 User Guide
Page 21

Limited Warranty
Aastra Telecom warrants this product
against defects and malfunctions during
a one (1) year period from the date of
original purchase. If there is a defect or
malfunction, Aastra Telecom shall, at its
option, and as the exclusive remedy,
either repair or replace the telephone set
at no charge, if returned within the
warranty period.
If replacement parts are used in making
repairs, these parts may be refurbished,
or may contain refurbished materials. If
it is necessary to replace the telephone
set, it may be replaced with a
refurbished telephone of the same
design and color. If it should become
necessary to repair or replace a defective
or malfunctioning telephone set under
this warranty, the provisions of this
warranty shall apply to the repaired or
replaced telephone set until the
expiration of ninety (90) days from the
date of pick up, or the date of shipment
to you, of the repaired or replacement
set, or until the end of the original
warranty period, whichever is later.
Proof of the original purchase date is to
be provided with all telephone sets
returned for warranty repairs.
Exclusions
Aastra Telecom does not warrant its
telephone sets to be compatible with the
equipment of any particular telephone
company. This warranty does not
extend to damage to products resulting
from improper installation or operation,
alteration, accident, neglect, abuse,
misuse, Þre or natural causes such as
storms or ßoods, after the telephone is
in your possession.
Aastra Telecom shall not be liable for
any incidental or consequential
damages, including, but not limited to,
loss, damage or expense directly or
indirectly arising from the customers
use of or inability to use this telephone,
either separately or in combination with
other equipment. This paragraph,
however, shall not apply to
consequential damages for injury to the
person in the case of telephones used or
bought for use primarily for personal,
family or household purposes.
This warranty sets forth the entire
liability and obligations of Aastra
Telecom with respect to breach of
warranty, and the warranties set forth or
limited herein are the sole warranties
and are in lieu of all other warranties,
expressed or implied, including
warranties or Þtness for particular
purpose and merchantability.
Warranty Repair Services
Should the set fail during the warranty
period;
In North America, please call 1-800574-1611 for further information.
Outside North America, contact your
sales representative for return
instructions.
You will be responsible for shipping
charges, if any. When you return this
telephone for warranty service, you
must present proof of purchase.
After Warranty Service
Aastra Telecom offers ongoing repair
and support for this product. This
service provides repair or replacement
of your Aastra Telecom product, at
Aastra Telecom's option, for a Þxed
charge. You are responsible for all
shipping charges. For further
information and shipping instructions;
In North America, contact our service
information number: 1-800-574-1611.
Outside North America, contact your
sales representative.
Note:
Repairs to this product may be
made only by the manufacturer
and its authorized agents, or by
others who are legally authorized. This restriction applies
during and after the warranty
period. Unauthorized repair
will void the warranty.
Limited Warranty
Model 1 User Guide 19
Page 22

Index
A
Area Code 9, 13, 18
Index
Audio Mode 7, 9, 14
B
Backlit Display 2, 18
C
Callers
Key
3
Callers List
Calling an entry
Changing a listing 13
Copying from 12, 13
Deleting all entries 13
Deleting an entry 13
Viewing 13
Contrast Level 9
Copy key 3
D
Dataport 2, 14
Date and Time 9
Directory
Adding name/number
Changing entries 11
Copy to 12, 13
Deleting all entries 12
Deleting an entry 12
Dialing from 12
Entering
letters/characters 11
Finding entries 11
Key 3
Locking 12
Unlocking 12
Display
13
11
Contrast
See Contrast Level
Language 9
Prompts 6
E
Emergency Service Feature 1
Extension in Use 7
F
Flash 7, 11, 16
G
Goodbye key 3
H
Handsfree calling 3, 7
Headset
Jack
2
Making calls 14
Receiving calls 14
Switch 2, 14, 17
Hold key 3, 8
I
Icons 16
Insert Number Card 5
Installation 4
K
Key Description 2
L
Language selection
See Display
Lights
Live Dialpad
Locking Directory
See Status Lights
7, 9
20 Model 1 User Guide
Page 23

Index
Index
See Directory
M
Message Waiting 6, 8, 9
Mute key 3
O
Options
Area Code
Audio Mode 9
Clear Message Waiting 9
Contrast level 9
Language 9
Live Dialpad 9
Ring Tone 9
Security Numbers 9
Time/Date 9
Options key 3
9
P
Pause
Icon
16
Inserting 3, 11
Predialing 7
Prompts 6
R
Redial key 3
Redial List
Deleting List
Redialing a number 7
Ringer
ON/OFF
Tone 9
Volume 8
7
6
S
Security Numbers 9
Services 15, 16
Services key 3
Softkeys 6, 18
Speaker
Key
3
Light See Status Lights
Operation
Stand 4
Status Lights
Speaker
Telephone 8
7
8
T
Timing a call 7
Troubleshooting 17
V
Viewing items
Callers List
Directory 16
Redial List 16
Voice Mail 6, 17
Volume
Handset
Key 3
Ringer 8
Speaker 8
13, 16, 18
8
W
Warranty 19
Model 1 User Guide 21
Page 24

If you’ve read this owner’s manual and consulted the Troubleshooting section and still have
problems, please visit our website at www.aastra.com or call 1-800-574-1611 for technical
assistance.
© Aastra Telecom 2003
D0041-0049-00-00 Rev.01
 Loading...