


3M™ MPro120
PocketProjector
Operator’s Guide
3

3M™ Pocket Projector MPro120
English
2 © 2009 3M. All Rights Reserved.

3M™ Pocket Projector MPro120
Contents
Intended Use Statement .........................................................................................4
Trademarks and Copyrights ....................................................................................4
Safety Information ..................................................................................................4
Safety Labels ........................................................................................................7
Package Contents ................................................................................................10
Parts ................................................................................................................... 11
Getting Started ....................................................................................................12
Making Connections ............................................................................................. 15
Operating Instructions ..........................................................................................19
Troubleshooting ...................................................................................................24
Specifications ...................................................................................................... 26
Limited Warranty .................................................................................................. 28
English
© 2009 3M. All Rights Reserved. 3

3M™ Pocket Projector MPro120
English
Intended Use Statement
The 3M™ Pocket Projector MPro120 is designed to operate with the 3M-specified battery and
3M battery charger and in a normal office and home environment.
• 10˚–35˚C (50˚–95˚F)
• 10–80% RH (without condensation)
• 0–1829 m (0–6000 feet) above sea level
The ambient operating environment should be free of airborne smoke, grease, oil and other
contaminants that can affect the operation or performance of the projector.
Use of this product in adverse conditions will void the product warranty.
Trademarks and Copyrights
3M is a trademark of 3M Company.
VGA and XGA are trademarks of International Business Machines Corporation.
S-VGA is a registered trademark of the Video Electronics Standards Association.
No publication or commercial use may be made of this material without the express written
permission of 3M.
Safety Information
Please read, understand, and follow all safety information contained in these instructions prior
to the use of this projector. Retain these instructions for future reference.
Explanation of Signal Word Consequences
m Warning:
m Caution:
4 © 2009 3M. All Rights Reserved.
Indicates a potentially hazardous situation, which, if not avoided, could result in
death or serious injury and/or property damage.
Indicates a potentially hazardous situation, which, if not avoided, may result in minor
or moderate injury and/or property damage.

3M™ Pocket Projector MPro120
m Warning
To reduce the risk associated with hazardous voltage:
• Do not modify this product in any way. Use only 3M approved replacement components.
• Do not attempt to service this projector other than battery replacement. There are
no user serviceable parts other than the battery. Service to be performed only by a
3M-authorized service provider using 3M-approved system components.
• Do not use the wall power supply in a wet environment.
• Do not use with a damaged wall power supply. Replace damaged part prior to use.
To reduce the risk associated with fire and explosion :
• Do not immerse the projector or battery in any liquid or allow either to get wet.
• Use only 3M approved power supply and Li-Ion polymer battery provided.
• Do not disassemble or short circuit the battery.
• Do not dispose of the battery by incineration or fire.
• Do not operate this projector in any environment above 35°C (95°F).
• Do not expose the projector or battery to direct sunlight in a closed space such as
a vehicle.
• Do not carry the battery in pockets, purses or handbags where it may contact
metal objects.
• Do not place battery in contact with metal objects.
• Do not expose or store battery in direct sunlight, or excessive heat (>60 C or 140 F)
moist or caustic environments.
To reduce the risks associated with driver distraction:
• Do not use this projector in a moving motor vehicle.
English
© 2009 3M. All Rights Reserved. 5

3M™ Pocket Projector MPro120
English
m Warning
To reduce the risk associated with fire and explosion, battery leakage or
overheating:
• Do not immerse the battery in water or allow to get wet.
• Do not reverse the positive(+) and negative(-) terminals.
• Do not connect the battery directly to a wall outlet. Use only the 3M-specified wall
charger or automobile charger.
• Do not strike, throw or subject the battery to physical shock.
• Do not pierce the battery or break it open.
• Keep batteries out of the reach of children.
• Do not recharge the battery near a heat source or in extremely hot conditions.
• Do not use the battery if it gives off an odor, generates heat, or becomes discolored
or deformed.
• Keep away from exposed flames if the battery leaks or emits an odor.
• Flush the eyes with water and seek medical attention if the battery leaks and electrolyte
gets in the eyes.
m Caution
To reduce the risk associated with environmental contamination:
• Dispose of all system components in accordance with applicable government
regulations.
To reduce the risks associated with LED bright light :
• Do not stare directly into the projector lens.
To reduce the risks associated with tripping and falling:
• Position the charging cord and data cables so that they can not be tripped over.
SAVE THESE INSTRUCTIONS
6 © 2009 3M. All Rights Reserved.
3M™ Pocket Projector MPro120
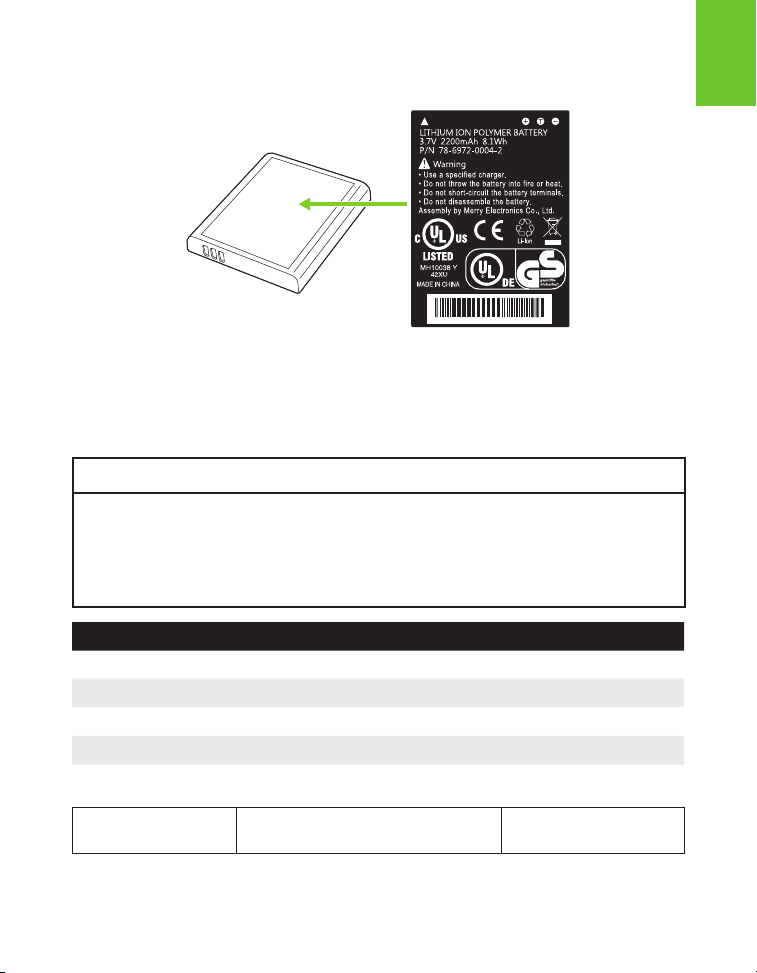
Safety Labels
LITHIUM ION POLYMER BATTERY
Model No. BLP508-001
3.7V 2200mAh 8.1Wh
P/N 78-6972-0004-2
m Warning
• Use a specified charger.
• Do not throw the battery into fire or heat.
• Do not short-circuit the battery terminals.
• Do not disassemble the battery.
English
X X X X X X X X X X X X X X X X X X X
Charging Specification
Standard Charge 0.44A/4.2V
Cut Off Current 44mA
Max Charge 2.2A/4.2V
Cut Off Current 44mA
LED Light Output
CLASS 1 LED PRODUCT IEC60825-1 :1993+A1 :1997+A2:2001
© 2009 3M. All Rights Reserved. 7
Maximum Radiant Power:
0.59 mW

3M™ Pocket Projector MPro120
English
FCC STATEMENT - CLASS B
This equipment generates, uses and can radiate radio frequency energy, and if not installed
and used in accordance with the instruction manual may cause interference to radio
communications. It has been tested and found to comply with the limits for a Class “B”
computing device pursuant to Subpart B of Part 15 of the FCC Rules, which are designed
to provide reasonable protection against such interference when operated in a residential
installation. However, there is no guarantee that interference will not occur in a particular
installation. If this equipment does cause harmful interference to radio or television reception,
which can be determined by turning the equipment off and on, the user is encouraged to try to
correct the interference by one or more of the following measures:
• Reorient or relocate the receiving antenna.
• Increase the separation between the equipment and receiver.
• Connect the equipment into an outlet on a circuit different from that to which the receiver
is connected.
• Consult the dealer or an experienced radio/TV technician for help.
NOTICE: This Class B digital apparatus complies with Canadian ICES-003.
Cet appareil numérique de la classe B est conforme à la norme NMB-003 du Canada.
INSTRUCTIONS TO USERS: This equipment complies with the requirements of FCC
equipment provided that the following conditions are met. If the cables include a EMI ferrite
core, attach the ferrite core end of the cable to the projector. Use the cables which are included
with the projector or specified.
Note: Changes or modifications not expressly approved by the party responsible for
compliance could void the user’s authority to operate the equipment.
CE Statement
ElectroMagnectic Compatibility Statement: Meets 2004/108/EC Directive
Low Voltage Directive : Meets 2006-95-EC Directive.
8 © 2009 3M. All Rights Reserved.

3M™ Pocket Projector MPro120
WEEE Statement
The following information is only for EU-members States:
The mark shown to the right is in compliance with Waste Electrical
and Electronic Equipment Directive 2002/96/EC (WEEE). The
mark indicates the requirement NOT to dispose the equipment as
unsorted municipal waste, but use the return and collection systems
according to local law.
RoHS Statement
3M Projection Systems can provide RoHS certification for products meeting the RoHS
directive.1
European (EU) Restriction of Hazardous Substances (RoHS) Directive, 2002/95/EC,
1
RoHS compliant means that the product or part does not contain any of the substances in excess of the
following maximum concentration values in any homogeneous material, unless the substance is in an
application that is exempt under RoHS, as amended:(a) 0.1% (by weight) for lead, mercury, hexavalent
chromium, polybrominated biphenyls or polybrominated diphenyl ethers; or ( b) 0.01% (by weight) for
cadmium. This information represents 3M’s knowledge and belief, which may be based on information
provided by third party suppliers to 3M.
English
© 2009 3M. All Rights Reserved. 9
English
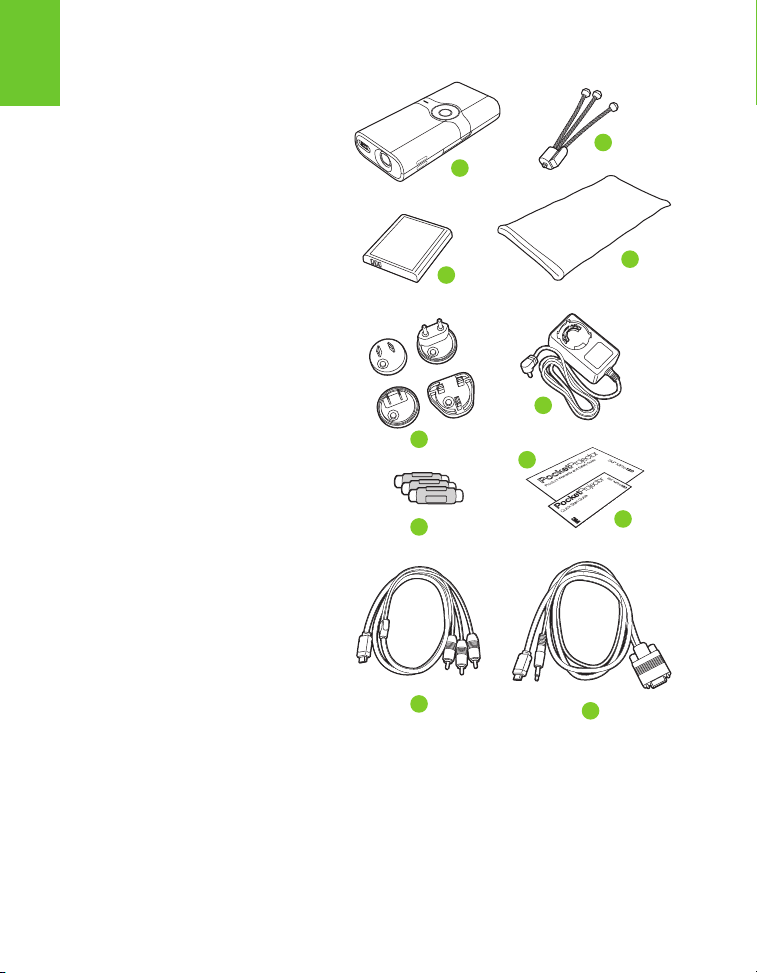
Package Contents
1 3M Pocket Projector MPro120
2 Table Top Tripod
3 Rechargeable Battery
4 Carrying Pouch
5 Outlet Adapters (4)
6 Power Adapter
7 AV Adapters
8 Product Warranty and Safety Guide
9 Quick Start Guide
10 AV Cable
11 VGA-Audio Cable
3M™ Pocket Projector MPro120
2
1
3
6
5
8
4
7
10
10 © 2009 3M. All Rights Reserved.
9
11
3M™ Pocket Projector MPro120
English
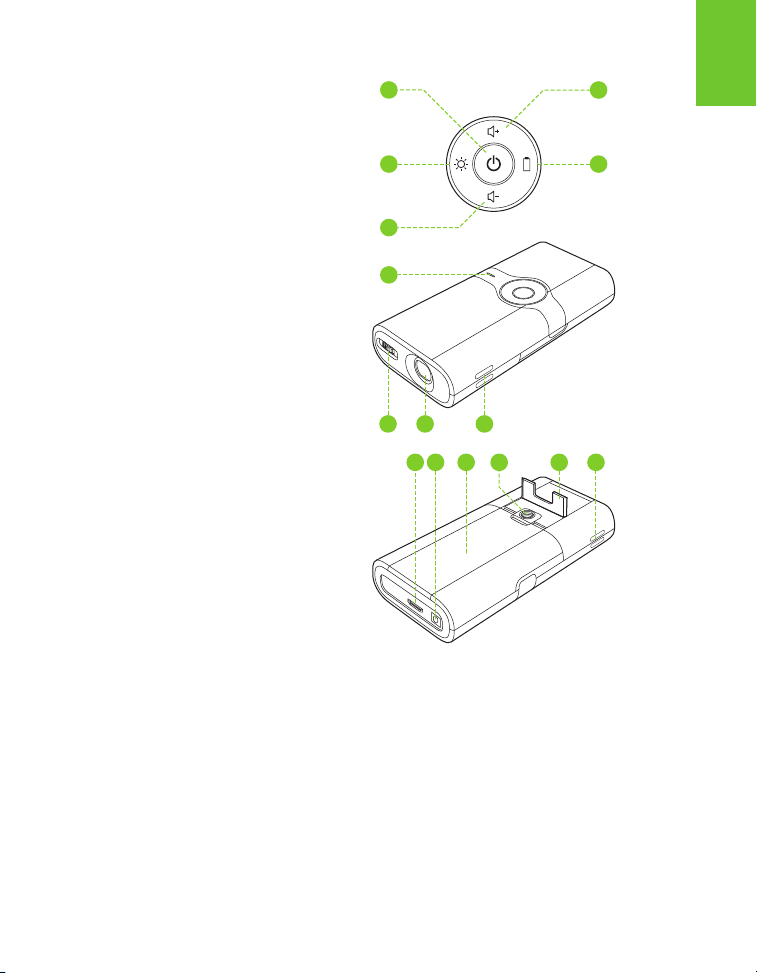
Parts
1 Power Button
2 Brightness Mode Button
3 Volume Down Button
4 Volume Up Button
5 Battery Status Button
6 Status Indicator
7 Focus Wheel
8 Lens
9 Speaker
10 VGA-AV Input
11 DC Power Input
12 Battery Cover
13 Tripod Socket
14 Flip Stand
1
2
3
6
7 8 9
12
4
5
14
910 11 13
© 2009 3M. All Rights Reserved. 11

3M™ Pocket Projector MPro120
English
Getting Started
Install Battery
The 3M MPro120 comes with a rechargeable battery. The battery is quick and easy to install
and comes partially charged.
To install the battery: slide the back cover off, insert the battery, and reinstall the cover.
Important Note: Use only the 3M-specified battery: 78-6972-0004-2.
Battery Maintenance Tips:
• Remove the battery when the projector will not be used for one or more weeks.
• Charge and discharge the battery at least once a month.
• When storing a battery for more than a month, store the battery at 50% charge.
• Do not store a fully discharged battery because it may lose the ability to be recharged.
• Do not store a fully charged battery because it may lose the ability to be recharged to
full power.
12 © 2009 3M. All Rights Reserved.

3M™ Pocket Projector MPro120
Power Adapter
The power adapter is used to charge the battery or power the projector. There are four outlet
adapters to give you the flexibility to power the 3M MPro120 in most countries.
You can also power the projector with the 3M MPro120 Car Charger, available separately.
Installing An Outlet Adapter Onto The Power Adapter
1 Select the outlet adapter that will plug into your wall outlet.
2 Align the outlet adapter to the power adapter. Turn the outlet adapter in the direction of
the “LOCK” arrow to lock it in place.
Replacing the Outlet Adapter
1 Push the button on the outlet adapter.
2 Turn the outlet adapter in the direction of the “OPEN” arrow.
3 Remove outlet adapter.
4 Replace with the new outlet adapter.
English
© 2009 3M. All Rights Reserved. 13

3M™ Pocket Projector MPro120
3:00:00
English
Charge the Battery
The 3M MPro120 rechargeable battery gives you up to 4 hours of battery life in normal
brightness mode. When the battery needs to be charged, the Status Indicator will flash red.
The battery is charged by connecting the 3M MPro120 power adapter to the projector.
1 Turn the projector power off.
2 Connect the power adapter to the projector’s DC in.
3 Connect the other end of the power adapter into the electrical outlet.
4 The Status Indicator will change to amber while the battery is charging.
5 When charging is complete, the Status Indicator will turn off.
110–240 VAC
50/60 Hz
Important Notes:
The battery will take longer to charge when the projector is being used.
On average, the battery will take 3 hours to charge.
The battery has a lifespan and ages every time it is fully charged and discharged. The
battery will gradually loose charge capacity as it ages. Therefore, as the battery ages the
battery life will decrease.
14 © 2009 3M. All Rights Reserved.
3M™ Pocket Projector MPro120
Making Connections
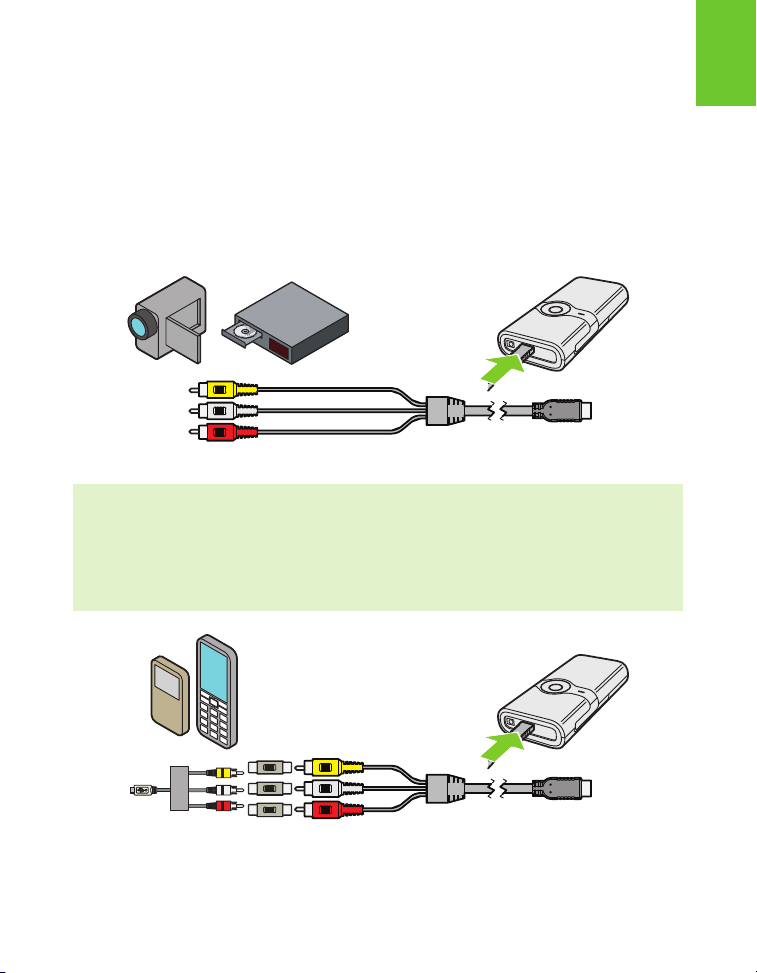
Connecting to a Composite Video Device
Use the AV Cable to input video from camcorders, digital cameras, DVD players and digital
media players into the VGA - AV input on the projector.
1 Connect the AV cable to the projector’s VGA-AV input.
2 Connect the other end of the AV cable to the video device’s audio and video outputs.
Tip: Some video devices do not have the standard audio and video connections and may
require an AV cable specified by the manufacturer. The AV cable allows you to connect
your video device to your TV monitor or your projector and may be purchased from
the video device manufacturer. Once you have the AV cable, you may need the cable
adapters to connect the video device cable and the projector cable.
English
© 2009 3M. All Rights Reserved. 15
3M™ Pocket Projector MPro120
English
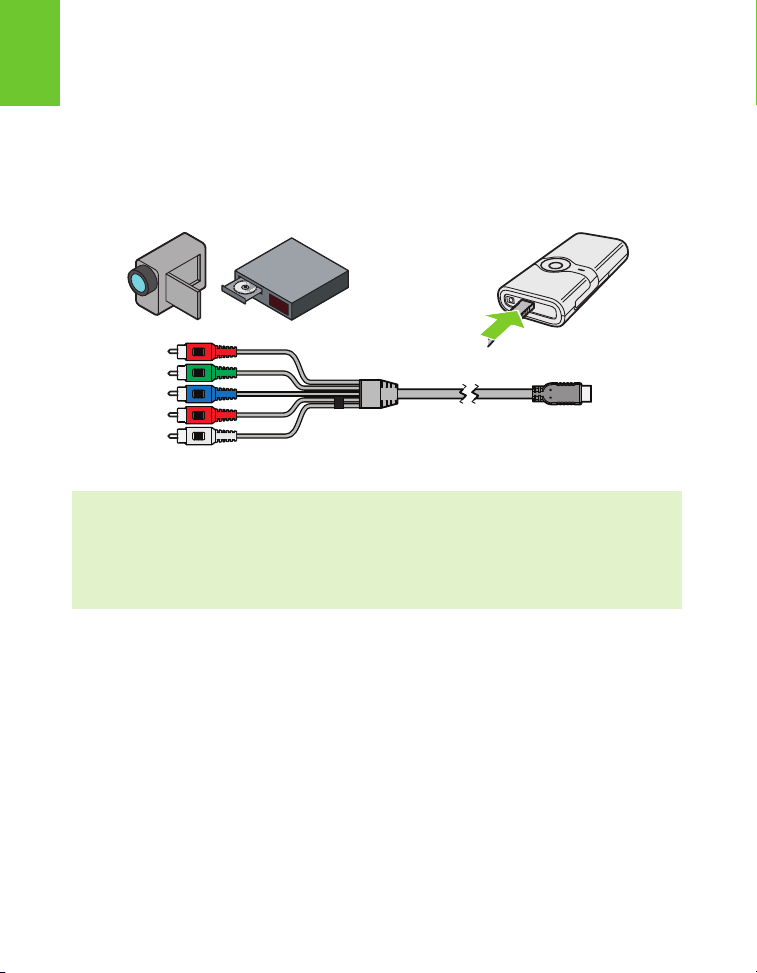
Connecting to a Component Video Device
For component video input, you must purchase the optional 3M MPro120 Component AV
Cable. This cable sends a higher quality video signal for the best possible image.
1 Connect the Component AV cable to the projector’s VGA-AV input.
2 Connect the other end of the AV cable to the video device’s audio and video outputs.
Important Note: There are two red connectors on the Component AV cable. One is for
the right audio channel and the other is for the Pr component video signal. Be careful to
connect the red audio to red audio and red video to red video. If these connectors are
switched, the projected image will appear green and an abnormal noise will come from
the right speaker.
16 © 2009 3M. All Rights Reserved.

3M™ Pocket Projector MPro120
Tip: Some video devices do not have the standard audio and video connections and may
require an AV cable specified by the manufacturer. The AV cable allows you to connect
your video device to your TV monitor or your projector and may be purchased from
the video device manufacturer. Once you have the AV cable, you may need the cable
adapters to connect the video device cable and the projector cable.
Some video devices, by default, will not output a video signal. The video device's manual
should provide instruction to change the video output setting.
English
© 2009 3M. All Rights Reserved. 17
3M™ Pocket Projector MPro120
English
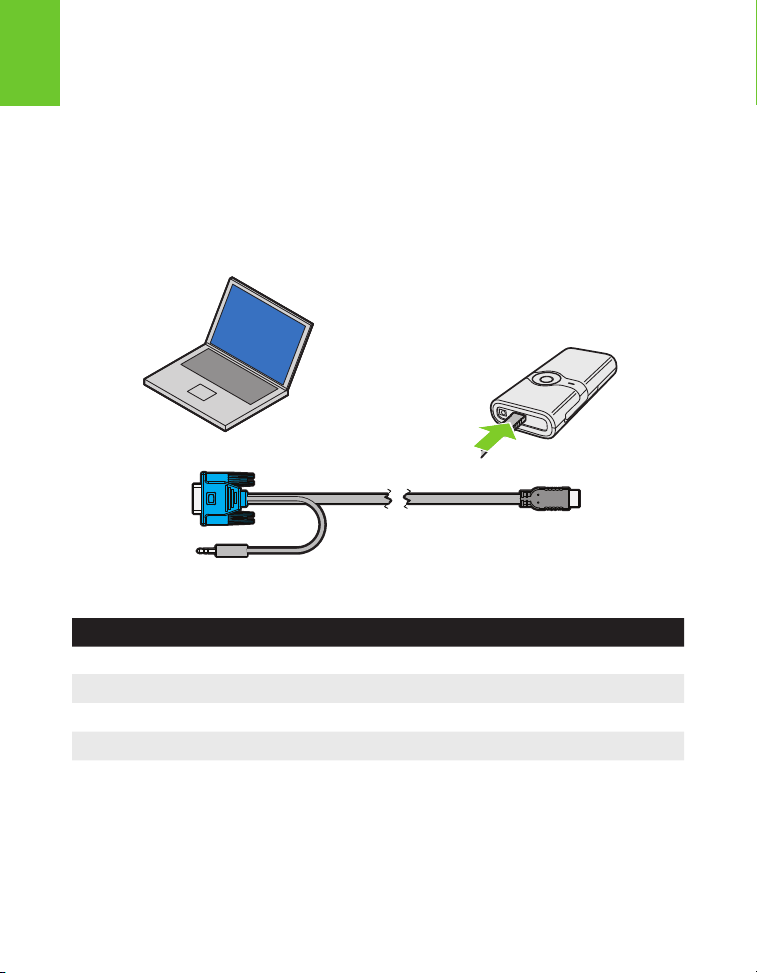
Connecting to a Computer
Use the VGA-Audio cable to connect the projector to desktop computers, laptop computers,
ultra-portable computers and some personal digital assistants (PDAs). The projector supports
VGA, SVGA, XGA, and WXGA resolutions.
1 Connect the VGA Cable to the MPro120 projector.
2 Connect the VGA Cable to the computer’s video and audio outputs.
3 Set the computer resolution to one of the supported resolutions.
Description Resolution (width x height) Refresh Rate
VGA 640 x 480 60 Hz
SVGA 800 x 600 60 Hz
XGA 1024 x 768 60 Hz
WXGA 1280 x 768 60 Hz
18 © 2009 3M. All Rights Reserved.

3M™ Pocket Projector MPro120
00:03
Operating Instructions
Powering On
Press and hold the power button for 3 seconds. Release the power button when the projector
begins to project an image and the status indicator turns green.
English
Tip: The video output on some devices is turned off by default. Please refer to the
device’s documentation for details on enabling the video output.
Powering Off
Press and hold the power button for 3 seconds. Release the power button when the projected
image is gone. The projector is OFF when the Status indicator is OFF or during battery
charging when the Status Indicator is amber.
© 2009 3M. All Rights Reserved. 19

3M™ Pocket Projector MPro120
English
Adjusting Image Size
The 3M MPro120 can project an 8 to 50 inch ( 203–1270 mm) diagonal image. Refer to the
chart below.
Diagonal SIze Image Width Image Height Projector-to-Screen
8 in (20.32 cm) 6 3/8 in (16.2 cm) 4 3/4 in (12.2 cm) 6 3/4 in (17.0 cm)
14 in (35.56 cm) 11 1/4 in (28.4 cm) 8 3/8 in (21.3 cm) 11 3/4 in (29.9 cm)
20 in (50.8 cm) 16 in (40.6 cm) 12 in (30.5 cm) 16 3/4 in (42.7 cm)
26 in (66.04 cm) 20 3/4 in (52.8 cm) 15 5/8 in (39.6 cm) 21 7/8 in (55.5 cm)
32 in (81.28 cm) 25 5/8 in (65.0 cm) 19 1/4 in (48.8 cm) 26 7/8 in (68.3 cm)
38 in (96.52 cm) 30 3/8 in (77.0 cm) 22 3/4 in (57.9 cm) 31 7/8 in (81.1 cm)
44 in (111.76 cm) 35 1/4 in (89.0 cm) 26 3/8 in (67.6 cm) 37 in (93.9 cm)
50 in (127 cm) 40 in (101.6 cm) 30 in (76.2 cm) 42 in (106.7 cm)
Distance
Important Note: As you increase the size of the projected image, you will need to
decrease (darken) the ambient room lighting.
Adjusting the Focus
Turn the focus wheel to sharpen the image.
20 © 2009 3M. All Rights Reserved.

3M™ Pocket Projector MPro120
Changing the Brightness
Press the Brightness button to switch between normal brightness (conserves battery power)
and high brightness (increases light output by 20%). An icon will appear on the screen to
indicate the current setting.
High Brightness Low Brightness
Adjusting the Volume
Press the Volume up or Volume down button to adjust the sound. A volume bar will appear on
the screen to help you set the volume level.
Checking the Battery Level
To check the battery, press the Battery Status button. A battery bar will appear on the screen
indicating the amount of charge currently in the battery.
English
Power Adapter
Note: The battery status will not appear when the power adapter is connected to
the projector. The power adapter icon will appear instead.
© 2009 3M. All Rights Reserved. 21

3M™ Pocket Projector MPro120
English
Attaching the Tripod
The projector includes a table top tripod that mounts to the bottom of the projector.
Tip: The 3M MPro120 will attach to most camera tripods.
Cleaning Projector
1 Turn off the projector and disconnect power and other cables.
2 Use a soft cloth such as the 3M™ High Performance Cleaning Cloth to wipe off dust.
If the dust is difficult to remove, dampen the cloth with clean water and then wipe the
projector clean. Then use a clean cloth to dry the projector.
Important Note: Do not use cleaning chemicals or solvents to clean the projector.
Cleaning chemicals and solvents may cause the plastic parts to discolor.
22 © 2009 3M. All Rights Reserved.

3M™ Pocket Projector MPro120
Status Indicator Lights and On Screen Icons
Icon Description/ Meaning
The projector is waiting for the A/V cable to be connected.
The projector detects the audio/video cable.
The projector detects an NTSC video input signal.
NTSC
The projector detects a PAL video input signal.
PAL
The projector detects the component audio/video cable.
The projector detects the video input signal and displays the video
RGB 480i 60Hz
800x600 60Hz
source’s resolution and refresh rate below the component icon.
The projector detects the VGA-Audio cable.
The projector detects computer input signal and displays the input
resolution and refresh rate
English
The projector does not support the video signal.
The projector is measuring and synchronizing to video input signal.
Status Indicator Blank
Projector is off. If the power adapter is connected to the projector and the
battery is installed, the battery is fully charged.
Status Indicator Green The projector is on.
Status Indicator Amber The projector is off and charging the battery.
Status Indicator Flashing Red The projector can not turn on because the battery needs to be charged.
Status Indicator Flashing Green The projector has overheated and needs to cool.
© 2009 3M. All Rights Reserved. 23

3M™ Pocket Projector MPro120
English
Troubleshooting
The projector will not turn on.
• The battery is not installed or the power adapter is not connected to the projector and a
working wall outlet. Test the electrical outlet by plugging another electrical device (like a
radio) into the wall outlet and confirm that the wall outlet works.
• The battery is installed in the wrong orientation. See “Install Battery” on page 12.
• Hold down the power button until the projector powers up.
The Status Indicator is flashing red when the power button is held down.
• The battery needs to be charged. See “Charge the Battery” on page 14.
The image is not visible or is very dim.
• The 3M MPro120 is a battery operated projector and requires controlled lighting
conditions. The image may appear very dim in brightly lit rooms.
• Make sure the status indicator is green. This indicates that the projector is powered on
and projecting an image.
• Project the image onto a flat, white surface.
• Decrease the light on the surface where the image is being projected.
• Decrease the size of the image.
• When there is nothing connected to the projector, it will project a white image with the
red 3M logo.
The projector is displaying a question mark.
• The projector does not support the video or computer input signal. Switch to a video
or computer signal that the projector supports. See “Supported Computer Signals” on
page 27.
24 © 2009 3M. All Rights Reserved.

3M™ Pocket Projector MPro120
A computer is connected to the projector but the projector will not display the
computer’s image.
• Unplug the VGA-Audio cable from the projector and a white image with the 3M logo
will display.
• Plug the VGA – Audio cable into the projector and the icon in the upper-left corner of the
image will change from a “waiting on cable” to the “VGA-Audio cable” icon. See “Status
Indicator Lights and On Screen Icons” on page 23.
The projector is making a noise.
• The projector has a small fan for cooling the LED light source. The fan turns on and off
automatically based on the projector’s internal temperature. The fan will turn on more
often in warm environments or at high altitudes.
• The speakers make noise when the volume setting is 4 and nothing is connected to the
projector audio inputs. This is typical. Reduce the projector’s volume setting to 0.
• The speakers make noise when the component AV cable is not correctly connected
to the video device. There are two red connectors on the component AV cable. One is
for the right audio channel and the other is for the Pr component video signal. If these
connectors are switched, the projected image will appear green and an abnormal noise
will come from the right speaker.
My video device is connected to the projector but the projector will not display
the video.
• Unplug the AV cable from the projector and a white image with the 3M logo will display.
• Plug the AV cable into the projector and the icon in the upper-left corner of the image will
change from a “waiting on cable” to the “VGA-Audio cable” icon. See “Status Indicator
Lights and On Screen Icons” on page 23.
• The video output on some devices is turned off by default. Please refer to the device’s
documentation for details on enabling the video output.
English
© 2009 3M. All Rights Reserved. 25

3M™ Pocket Projector MPro120
English
Specifications
Projector
Description Specification
Imager Technology LCOS
Size 9.4 mm (0.37")
Resolution 640 x 480 Pixels
Aspect Ratio 4:3
Projection Distance 6 ¾ in. – 42 in. (171–1067 mm)
Image Size 8 in. – 50 in. Diagonal
Throw Ratio (Diagonal: Distance) 0.84:1
Lens Offset 1:1 (none)
Inputs DC-in, VGA-AV
Compatible Resolutions VGA, SVGA, XGA, WXGA
Vertical Scan Rate 60 Hz
Horizontal Scan Rate 31.5 kHz – 49.68kHz
Video Compatibility NTSC, PAL
Video Resolutions 480i, 480p, 576i, 576p
Dimensions 4.72 x 2.4 x 0.98 in.
Weight 5.6 oz (160 g)
Tripod Socket ¼" - 20
Operating Conditions Temperature Range 50 – 95°F (10-35°C)
Humidity Range 10–80% RH without condensation
Altitude Range Sea Level to 1,829 m (6000')
(120 x 60 x 25 mm)
26 © 2009 3M. All Rights Reserved.

3M™ Pocket Projector MPro120
BLP508-001 Rechargeable Lithium-Ion Battery
Description Specification
Type (BLP508-001) Rechargeable Lithium-Ion Polymer Battery
Rated Capacity 3.7V 2200 mAh, 8.1 Wh
Dimensions 62.4 x 53.8 x 10.5 mm
Important Note: Do not throw battery into trash. Please dispose of according to federal,
state, or local laws
Supported Computer Signals
Description Resolution (width x height) Refresh Rate
VGA 640 x 480 60 Hz
SVGA 800 x 600 60 Hz
XGA 1024 x 768 60 Hz
WXGA 1280 x 768 60 Hz
Replacement Parts / Accessories
Description 3M Part Number
Power Adapter with US, EU, UK, AUS plugs 78-6972-0003-4
Lithium-Ion Polymer Battery 78-6972-0004-2
AV Video Cable 78-6972-0006-7
VGA Cable 78-6972-0007-5
Car Charger 78-6972-0002-6
Component AV cable 78-6972-0005-9
3M Adapter Cable for Apple® 78-6972-0001-8
Portable Presentation Binder 78-6969-9997-4
English
© 2009 3M. All Rights Reserved. 27

3M™ Pocket Projector MPro120
English
Limited Warranty
• The 3M™ Pocket Projector MPro120 (the “3M product”) is warranted to be free from
defects in material or manufacture for a period of 1 year from the date of purchase.
• All other accessories included with the 3M product are warranted to be free from defects
in material or manufacture for a period of 1 year from the date of purchase.
• Optional product accessories that are not sold as part of the 3M product are subject to
individual warranties.
THE WARRANTIES STATED ABOVE ARE EXCLUSIVE AND ARE MADE IN PLACE OF ANY AND
ALL WARRANTIES, E XPRESS OR IMPLIED WARRANTIES OR CONDITIONS, INCLUDING ANY
IMPLIED WARRANT Y OF MERCHANTABILITY OR FITNESS FOR A PARTICULAR PURPOSE, OR
ANY INDUSTRY PRACTICE OR CUSTOM OR TRADE USAGE.
In the event the 3M product fails to conform to the above stated warranties within the
applicable warranty period, your exclusive remedy shall be, at 3M’s option, to replace or
repair the 3M product or to refund the purchase price of the 3M product. All replaced parts
or products become property of 3M. If the product is repaired, 3M will repair the defective
part(s) with a new or used part(s). If the 3M product is replaced, 3M will replace the 3M
product with the same or equivalent model and with a new or refurbished 3M product. In the
case of an approved warranty claim, the replacement 3M product will carry only the remaining
term of the original 3M product’s warranty period as stated above. For warranty service, you
must provide proof of the date of the original purchase else the manufacturing code date will
be used to establish the start date of the warranty. The following are exclusions to the above
listed warranty:
a. This warranty does not cover 3M product that is modified or damaged through improper
storage, misuse, abuse, accident, vandalism, improper installation, neglect, improper
shipping, damage caused by acts of war, disasters such as fire, flood, and lightning,
improper electrical current, software problems, interaction with non-3M products, or
service other than by an 3M Authorized Service Provider, neglect or mishandling by any
person. Normal wear and tear is not covered under warranty.
28 © 2009 3M. All Rights Reserved.

3M™ Pocket Projector MPro120
b. 3M product is designed to operate in the typical indoor environment. This warranty does
not cover 3M product used outside of the following circumstances:
• 100V–240V AC, 50 /60 Hz
• 10˚–35˚C (50˚–95˚F)
• 10–80% RH (without condensation)
• 0–1829 m (0–6000 feet) above sea level
c. The air intake and exhaust vent must be clear of obstructions. Inadequate air ventilation
will cause the 3M product to malfunction or will cause damage to the 3M product which
will void the warranty.
d. This warranty does not cover any additional costs including, but not limited to, those
associated with removal, cleaning or installation of the 3M product, adjustments,
(mechanical or electronic) made to the 3M product.
e. This warranty covers only normal use of the product. 24-hour-per-day or other excessive
continual use causes strain and is not considered normal use.
f. This warranty does not cover consumables (e.g., batteries).
g. This warranty is not transferable.
h. 3M is not responsible for warranty service should the 3M label or logo or the rating
label or serial number be removed unless otherwise stated in writing for the purposes of
private labeling for partnership requirements.
i. This warranty does not cover postage, insurance, or shipping costs incurred in presenting
your 3M product for warranty service. Said costs are the customer’s responsibility. If a
claimed defect cannot be identified or reproduced in service, the customer may be held
responsible for cost incurred. Should your warranty upgrade include a “change out”
service and the claimed defect cannot be identified or reproduced by the technician, the
customer will be responsible for call out costs.
FAILURE TO FOLLOW THE INSTRUCTIONS CONTAINED IN THE APPROPRIATE 3M
PRODUCT MANUAL OR TO USE THE 3M PRODUCT IN ACCORDANCE WITH 3M’S
INTENDED USE STATEMENT, WILL VOID ALL WARRANTIES AND LIMITED REMEDIES.
English
© 2009 3M. All Rights Reserved. 29

3M™ Pocket Projector MPro120
English
EXCEPT AS SPECIFICALLY STATED IN THE APPLICABLE 3M PRODUCT MANUAL, 3M SHALL
NOT BE LIABLE FOR ANY INDIRECT, INCIDENTAL, SPECIAL OR CONSEQUENTIAL DAMAGES
(INCLUDING, BUT NOT LIMITED TO, LOSS OF PROFITS, REVENUE OR BUSINESS) RESULTING
FROM, OR IN ANY WAY RELATED TO PERFORMANCE, USE OR INABILITY TO USE ANY OF
THE 3M PRODUCT. This limitation applies regardless of the legal theory upon which damages
are sought.
For warranty support, please call or write your local 3M office or a 3M Authorized Service
Provider to obtain an RMA # (Return Material Authorization number) before returning
the product. If you are inside the Continental United States of America, please contact
3M Customer Service at 1-866-631-1656 or email meetings@mmm.com.
What 3M Will Do To Correct Problems:
• If your 3M product requires service, 3M will ask you to bring or send the 3M product,
securely packaged in its original container or equivalent, along with proof of the date of
original purchase, to your 3M Service Dealer or 3M Service Center.
• 3M will, at its option, repair or replace the defective unit without charge for parts or labor.
Return of the 3M product will be at 3M’s expense.
• When warranty service involves the exchange of the 3M product or of a part, the item
replaced becomes 3M property.
• The exchanged 3M product or part may be new or previously refurbished to the
3M standard of quality, and at 3M’s option, the replacement may be another model of
like kind and quality.
• 3M’s liability for replacement of the warranted 3M product or part will not exceed the
original retail selling price of the 3M product. Exchange or replacement products or parts
assume the remaining warranty period of the product covered by this limited warranty.
30 © 2009 3M. All Rights Reserved.

3M™ Pocket Projector MPro120
English
© 2009 3M. All Rights Reserved. 31

3M is a trademark of 3M Company.
3
Projection Systems
3M Austin Center
6801 River Place Blvd.
Austin, TX 78726-9000
866-631-1656
www.3M.com/meetings
meetings@mmm.com
Please Recycle. Printed in USA.
© 3M 2009. All Rights Reserved.
78-6971-1494-6-A
 Loading...