


User Manual
3M™ Mobile Projector MP300
2 |
© 2012 3M. All Rights Reserved. |
3M™ Mobile Projector MP300
Important Notice
All statements, technical information, and recommendations related to 3M’s products are based on information believed to be reliable, but the accuracy or completeness is not guaranteed. Before using this product, you must evaluate it and determine if it is suitable for your intended application. You assume all risks and liability associated with such use. Any statements related to the product which are not contained in 3M’s current publications, or any contrary statements contained on your purchase order shall have no force or effect unless expressly set forth in a written agreement signed by an authorized officer of 3M.
Technical Support
For technical support, call 1-866-631-1656 or email meetings@mmm.com
© 2012 3M. All Rights Reserved. |
3 |
3M™ Mobile Projector MP300
Copyright, Trademarks and Properties Notices
3M and the 3M logo are trademarks of 3M Company. Used under license in Canada. MHL and the MHL logo are a trademark, registered trademark or service mark of MHL, LLC in the United States and/or other countries.
High Definition Multimedia Interface (HDMI) is a registered trademark of HDMI Licensing, LLC in the United States and/or other countries.
iPad is a trademark of Apple, Inc., registered in the U.S. and other countries. DLP and the DLP® logo are trademarks of Texas Instruments.
DisplayPort, Certified DisplayPort, Dual-mode DisplayPort and VESA are registered Trademarks of the Video Electronics Standards Association.
microSD™ and the microSD logo are Trademarks of the SD Card Association.
All other product names are trademarks, registered trademarks, or servicemarks of their respective owners.
4 |
© 2012 3M. All Rights Reserved. |
3M™ Mobile Projector MP300
Intended Use Statement
The 3M™ Mobile Projector MP300 is designed to operate with the 3M Power Adapter and an HDMI® or MHL™ enabled device in environments that meet these conditions.
•0° to 35°C (32° to 95°F)
•10–80% RH (without condensation)
•0–1829 m (0–6000 feet) above sea level
Continued exposure to smoke, grease, oil and other airborne contaminants can affect the operation or performance of the projector. Use of this product in adverse conditions will void the product warranty.
Safety Information
Please read, understand, and follow all safety information contained in these instructions prior to the use of this projector. Retain these instructions for future reference.
Explanation of Signal Word Consequences
Warning: Indicates a potentially hazardous situation, which, if not avoided, could result in death or serious injury and/or property damage.
Caution: Indicates a potentially hazardous situation, which, if not avoided, may result in minor or moderate injury and/or property damage.
© 2012 3M. All Rights Reserved. |
5 |
3M™ Mobile Projector MP300
Warning
To reduce the risk associated with hazardous voltage, fire, explosion, battery leakage or overheating which may cause serious injury or death:
•Do not leave the product in a car or in direct sunlight for extended periods of time. (-20 C to 70 C)
•Do not disassemble/ modify the product or attempt to remove the battery.
•Do not attempt to service this product. Contact manufacturer.
•Do not use the product in water or a damp environment.
•Do not use a damaged product, cables or power adapter.
•Charge with 3M power adapter only.
•Do not dispose of the remote control battery by incineration or fire.
To reduce the risks associated with driver distraction:
•Do not shine light into the driver's eyes.
•Driver should not operate product while driving.
To reduce the risks associated with choking:
•Keep the remote control, all cables, and small parts away from young children.
To reduce the risks associated with hearing loss:
•Be sure to read earphone manufacturer's instructions with respect to volume level.
•User is responsible to set a safe volume level.
To reduce the risk of injury to small children:
•Supervise the use of this product by small children.
•Keep small children away from the projector lens when the product is powered on.
6 |
© 2012 3M. All Rights Reserved. |
3M™ Mobile Projector MP300
Caution
To reduce the risk associated with environmental disposal hazards which may cause minor or moderate injury:
•Dispose of the product and accessories in accordance with the federal, state, local or regional laws which cover the disposal of electrical and electronic waste.
To reduce the risks associated with projector LED bright light:
•Do not look directly into the projector lens or shine it into anyone’s eyes.
To reduce the risks associated with tripping and falling:
•Position the cables so that they are not a tripping hazard.
To reduce the risk of muscle strain which if not avoided may cause minor or moderate injury:
•Do not mount or position the projector in awkward viewing positions.
SAVE THESE INSTRUCTIONS
© 2012 3M. All Rights Reserved. |
7 |
3M™ Mobile Projector MP300
Introduction
Thank You
This product has been produced in accordance with 3M quality and safety standards to provide smooth and trouble-free use in the years to come. For optimum performance, please follow the operating instructions carefully.
Product Features
Quick, seamless visual presentations are critical in today’s business world, however, projectors often act as a roadblock to accomplishing this fundamental task. Many professionals are opting for lugging around a huge projector, renting a projector at a substantial cost, or opting for no projector at all and eating the cost of printing color presentations. Say goodbye to these frustrations. Say hello to simple, plug-n-play projection. Introducing the 3M™ Mobile Projector MP300
•Ultra portable – small enough to put into a coat pocket with up to 3.5 hour battery life
•Quick set up – turn on and present in seconds
•Built in speaker
•Bright enough for a variety of settings – 60 lumens (not designed for brightly lit environments)
•Beautiful design – intuitive plug-n-play interface
•HDMI/MHL – mirror* your iPad®, tablet, laptop and smartphone device
8 |
© 2012 3M. All Rights Reserved. |
3M™ Mobile Projector MP300
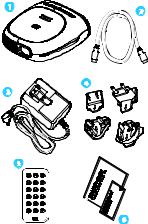
Package Contents
The 3M™ Mobile Projector MP300 comes with the following items. If you are missing any of these items please contact 3M.
1 3M Mobile Projector MP300
2 HDMI Cable
3 Power Adapter
4 Outlet Adapters (4)
5 Remote Control
6 Product Warranty and Safety Guide and
Quick Start Guide
© 2012 3M. All Rights Reserved. |
9 |
3M™ Mobile Projector MP300
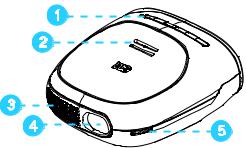
Parts of Projector
Front-Top View
1 Button Panel - Turn on and control projector
2 Speaker
3Air Vent - Do not block the air vents while projector is operating or cooling down. This will cause projector to overheat and automatically turn off.
4 Projection Lens
5 Focus Wheel - Adjusts the image sharpness
10 |
© 2012 3M. All Rights Reserved. |
3M™ Mobile Projector MP300
Bottom-Rear View
6 |
Tripod Mount |
7 |
Air Vents - Do not block fans or vents while projector is operating or |
|
cooling down. This will cause projector to overheat and automatically |
|
turn off. |
8DC Input - Powers the projector or charges the battery using the 3M power supply.
9Audio Output – Allows you use earphones or external speakers instead of the built-in speaker.
10Service Port
11Projector Reset Button
12HDMI/MHL Port – Receives HDMI and MHL signal from compatible video devices
13Cover
© 2012 3M. All Rights Reserved. |
11 |

3M™ Mobile Projector MP300
Projector Button Panel
1 |
2 |
3 |
4 |
5 |
6 |
7 |
1Volume Down Button -Turns down speaker or audio out output. Down
and Left Arrow for projector menu system.
2Volume Up Button - Turns up speaker or audio out output. Up and Right Arrow for projector menu system.
3Information Button – Opens the projector information window.
4Remote Control Receiver - Accepts commands from 3M remote
control.
5Menu Button – Opens the projector menu
6Power Button - Powers the projector on and off.
7Status Light – Provides the projector's power and charging status.
12 |
© 2012 3M. All Rights Reserved. |
3M™ Mobile Projector MP300
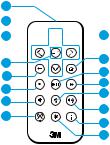
Parts of Remote Control
1
2 3
3 


 9
9
4 |
10 |
|
|
||
5 |
11 |
|
12 |
||
6 |
||
13 |
||
7 |
||
14 |
||
8 |
||
15 |
||
|
||
|
16 |
1 Infrared LED – Transmit remote control commands to projector.
2 Arrow Buttons – Moves the selector or cursor in projector menu or the MHL enabled device's screen.
3 Standby – Turns the projector's lamp off or on. 4 OK Button – Press to select or click an item.
5 Back Button – Press to open previous screen on the MHL enabled device.
6 Rewind – Rewinds video and music during playback.
7 Volume Down - Decreases the audio volume.
8 Lamp ON/OFF – Turn off the projector lamp while keeping projector power on.
9 Menu Button – Press to open the projector menu. 10 Home Button – Press to open the Home screen on
the MHL enabled device.
11 Fast Forward – Advances video music playback.
12 Play/Pause - Start or Pause video or music playback.
13 Volume Up – Increases the audio volume.
14 Info Button – Opens the projector information window and is the select button when the projector menu is open.
15 Options – View more options on the MHL-enabled device.
© 2012 3M. All Rights Reserved. |
13 |
3M™ Mobile Projector MP300
Getting Started
In the following section, charge the projector's battery, and turn on the projector.
Power Adapter
The power adapter is used to charge the battery or power the projector. There are four outlet adapters. When the power adapter is first shipped, it is fitted with a blank outlet adapter. This must be removed before installing an outlet adapter.
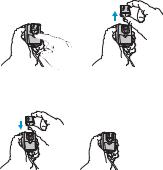
Installing an Outlet Adapter
1 Press the "PUSH" button on the underside of the power adapter. 2 Remove the blank outlet adapter by sliding up.
3 Select the outlet adapter that will plug into your wall outlet and align to the power adapter.
4 Slide the outlet adapter down until it clicks into place.
14 |
© 2012 3M. All Rights Reserved. |
3M™ Mobile Projector MP300
Charging the Battery
The rechargeable battery in 3M Mobile Projector MP300 gives you up to three hours of battery life while in ECO lamp mode. When the battery needs to be charged, the status indicator LED starts flashing red. The battery should be fully charged before using the projector for the first time.
Charge the battery:
1 Turn the projector power off.
2 Connect the power adapter to the projector’s DC input.
3 Connect the other end of the power adapter to the electrical outlet.
4 The status indicator will change to amber while the battery is charging.
5 Allow three hours to fully charge the battery. When charging is complete, the status indicator will flash green.
Battery Charging Notes:
•If the projector power is off, allow three hours for the battery to fully recharge. If the projector power is on, the battery will take longer to charge.
•The battery has a lifespan and ages every time it is fully charged and discharged. The battery will gradually lose charge capacity as it ages.
Battery Maintenance Tips:
•Charge and discharge the battery by turning on the projector at least once a month.
•When storing the projector for more than a month, store it at 50% charge.
•The battery is at 50% charge when half of the battery icon is white.
© 2012 3M. All Rights Reserved. |
15 |
 Loading...