


 Loading...
3M™ MP180
Operator’s Guide
PocketProjector
3

3M™ Pocket Projector MP180
English
2 |
© 2011 3M. All Rights Reserved. |

3M™ Pocket Projector MP180
Contents
Intended Use Statement 4 Safety Information 4 Safety Labels 7 Introduction 8 Package Contents 9 Parts 10 Installing and Charging the Projector Battery 11 Making Connections 15 Basic Operating Instructions 18 Basic File Operations 26 Remote Control 27 Home Screen 29 Joining a Wi-Fi Network and Internet Browsing 30 Browsing the Internet 31 Viewing a Webpage 31 Media Files 35 Watching Video 36 Listening to Music 39 Viewing Photos 41 Viewing Office and PDF Files 45 Microsoft Word and Adobe PDF Files 46 Presentation Files 48 Deleting a File 49 Favorites 49 Settings 50 Software Update 53 Cleaning the Projector 55 Troubleshooting 55 Specifications 57 Limited Warranty 59 Video and Audio Decoder Notices 64
English
© 2011 3M. All Rights Reserved. |
3 |

English
3M™ Pocket Projector MP180
Intended Use Statement
The 3M™ MP180 Projector is designed to operate with the 3M-specified battery and 3M power adapter in normal office or home environments.
•10˚–35˚C (50˚–95˚F)
•10–80% RH (without condensation)
•0–1829 meters (0–6000 feet) above sea level
The ambient operating environment should be free of airborne smoke, grease, oil and other contaminants that can affect the operation or performance of the projector.
Use of this product in adverse conditions will void the product warranty.
Safety Information
Please read, understand, and follow all safety information contained in these instructions prior to the use of this projector. Retain these instructions for future reference.
Explanation of Signal Word Consequences
m Warning: Indicates a potentially hazardous situation, which, if not avoided, could result in death or serious injury and/or property damage.
m Caution: Indicates a potentially hazardous situation, which, if not avoided, may result in minor or moderate injury and/or property damage.
Warning: Hazardous voltage
4 |
© 2011 3M. All Rights Reserved. |

3M™ Pocket Projector MP180
m Warning
To reduce the risk associated with hazardous voltage:
•Do not modify this product in any way. Use only 3M-approved replacement components.
•Do not attempt to service this projector other than battery replacement. There are no user-serviceable parts other than the battery. Service to be performed only by a 3M-authorized service provider using 3M-approved system components.
•Do not use the wall power supply in a wet environment.
•Do not use with a damaged wall power supply. Replace damaged part prior to use.
To reduce the risk associated with fire and explosion:
•Do not immerse the projector or battery in any liquid or allow either to get wet.
•Use only 3M-approved power supply and lithium ion battery provided.
•Do not disassemble or short circuit the battery.
•Do not dispose of the battery by incineration or fire.
•Do not operate this projector in any environment above 35°C (95°F).
•Do not expose the projector or battery to direct sunlight in a closed space such as a vehicle.
•Do not carry the battery in pockets, purses or handbags where it may contact metal objects.
•Do not place battery in contact with metal objects.
•Do not expose or store battery in direct sunlight or excessive heat (above 60°C [140°F]), or in moist or caustic environments.
To reduce the risks associated with driver distraction:
• Do not use this projector in a moving motor vehicle.
To reduce the risks associated with choking:
•Keep microSD card, AV adapters and other small parts away from young children.
English
© 2011 3M. All Rights Reserved. |
5 |

English
3M™ Pocket Projector MP180
m Warning
To reduce the risk associated with fire and explosion, battery leakage or overheating:
•Do not immerse the battery in water or allow it to get wet.
•Do not reverse the positive(+) and negative(-) terminals.
•Do not connect the battery directly to a wall outlet. Use only the 3M-specified wall charger or automobile charger.
•Do not strike, throw or subject the battery to physical shock.
•Do not pierce the battery or break it open.
•Keep batteries out of the reach of children.
•Do not recharge the battery near a heat source or in extremely hot conditions.
•Do not use the battery if it gives off an odor, generates heat, or becomes discolored or deformed.
•Keep away from exposed flames if the battery leaks or emits an odor.
•Flush the eyes with water and seek medical attention if the battery leaks and battery fluid gets in the eyes.
m Caution
To reduce the risks associated with hearing loss:
•Be sure to read earphone manufacturer's instructions with respect to volume level.
•User is responsible to set a safe volume level.
To reduce the risk associated with environmental contamination:
•Dispose of all system components in accordance with applicable government regulations.
To reduce the risks associated with LED bright light:
• Do not stare directly into the projector lens.
To reduce the risks associated with tripping and falling:
•Position the charging cord and data cables so that they are not a tripping hazard.
SAVE THESE INSTRUCTIONS
6 |
© 2011 3M. All Rights Reserved. |

3M™ Pocket Projector MP180
Safety Labels
English
LITHIUM ION BATTERY 11.1V 2600mAh 28.86Wh
P/N 78-6972-0026-5 3ICR19/66
WARNING Use a specified charger. Do not throw the battery into fire or heat. Do not short-circuit the battery terminals. Do not disassemble the battery.
Assembly by Merry Electronics Co., Ltd.
|
|
|
|
||
|
|
|
|
|
T - |
|
|
|
|
||
|
|
|
|
|
|
E321072 Y |
MADE IN CHINA |
|
|
||
|
3TDM |
+ |
|||
|
|
|
|
|
|
|
|
|
|
|
|
X X X X X X X X X X X X X X X X X X X
LITHIUM ION BATTERY
Model No. LIN370-001 28.86Wh (11.1V 2600mAh) P/N 78-6972-0026-5
m Warning
•Use a specified charger.
•Do not throw the battery into fire or heat.
•Do not short-circuit the battery terminals.
•Do not disassemble the battery.
Charging Specification |
|
Standard Charge |
11.1V/1.3A |
Cut Off Voltage |
8.5V |
Max Charge |
12.3V/1.3A |
LED Light Output
CLASS 1 LED PRODUCT |
IEC60825-1 :1993+A1 |
Maximum Radiant |
|
:1997+A2:2001 |
Power: 1.693 mW |
||
|
|||
|
|
|
© 2011 3M. All Rights Reserved. |
7 |

English
3M™ Pocket Projector MP180
Introduction
Thank You for Choosing 3M
This product has been produced in accordance with 3M quality and safety standards to provide smooth and trouble-free use in the years to come. For optimum performance, please follow the operating instructions carefully.
Product Features
The 3M MP180 projector is an all-in-one pocket projector. It supports common business application file formats such as Microsoft® PowerPoint® and Adobe® PDF, as well as standard movie and music files. Using Bluetooth, a USB cable, or the interchangeable microSD™ card, you can load your presentation from a computer, cell phone, or smartphone and view it on the 3M MP180 projector.
Storage: microSDHC™ card slot capable of reading up to 32 GB cards and 4 GB of memory built-in.
Media: Connects to your favorite digital media sources: MP3 players, PCs, DVD players, digital cameras and smartphones.
Features: Fully equipped with sound, 120 minutes of battery life, screen size up to 80 inches, 32 lumens of brightness.
Compatibility: View files created in Microsoft® Word, Microsoft® PowerPoint®, Microsoft® Excel® or Adobe® Acrobat PDF. Share files, photos and movies from your computer, cell phone or smartphone.
8 |
© 2011 3M. All Rights Reserved. |
3M™ Pocket Projector MP180
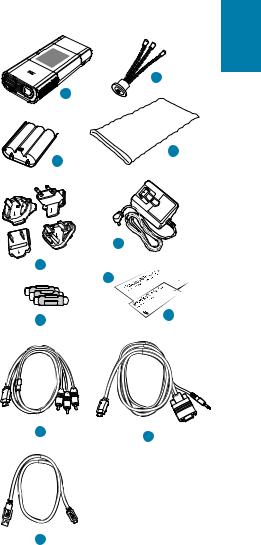
Package Contents |
|
||
1 |
3M MP180 Projector |
2 |
|
|
|
||
2 |
Table-Top Tripod |
1 |
|
3 |
Rechargeable Battery |
|
|
4 |
Carrying Pouch |
|
|
5 |
Outlet Adapters (4) |
4 |
|
|
|
3 |
|
6 |
Power Adapter |
|
|
7 |
AV Adapters (3) |
|
|
8 |
Product Warranty and |
|
|
|
Safety Guide |
6 |
|
|
|
||
9 |
Quick Start Guide |
5 |
|
10 |
AV Cable |
||
8 |
|||
11 |
VGA-Audio Cable |
|
|
12 |
USB Cable |
7 |
|
10 |
11 |
|
12
English
© 2011 3M. All Rights Reserved. |
9 |
English
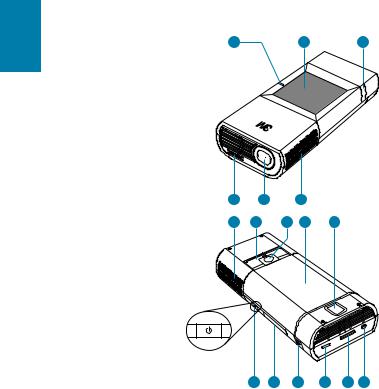
Parts
1Status Indicator
2Touch Screen
3Remote Sensor
4Focus Wheel
5Lens
6Speaker
7Flip Stand
8Tripod Socket
9Battery
10Battery Latch
11Power Button
12microSD Card Slot
13Earphone Jack
14USB Port
15VGA-A/V Input
16DC Power Input
3M™ Pocket Projector MP180
1 |
2 |
3 |
4 |
5 |
|
6 |
|
6 |
7 |
8 |
9 |
10 |
11 |
12 |
13 |
14 |
15 |
16 |
10 |
© 2011 3M. All Rights Reserved. |
3M™ Pocket Projector MP180
Installing and Charging the Projector Battery
Removing the Protective Film
When the projector is shipped, there is a protective film between the battery and the battery contacts on the projector. Remove the protective film by removing the battery and the protective film, discard the film and finally install the battery.
Install Battery
The 3M projector comes with a rechargeable battery. The battery should be fully charged before using the projector with the battery.
To install the battery, orient the contacts on the battery toward the contacts on the projector, insert the end farthest from the battery latch first, then push down until the battery clicks into place. The projector will automatically turn on.
Remove Battery
To remove the battery, slide the battery latch away from the battery and then lift the battery out, starting at the end closest to the latch.
English
Important Note: Use only the 3M-specified battery: 78-6972-0026-5.
Note: The projector will turn on automatically when the battery is installed.
© 2011 3M. All Rights Reserved. |
11 |

English
3M™ Pocket Projector MP180
Power Adapter
The power adapter is used to charge the battery or power the projector. There are four outlet adapters to give you the flexibility to power the 3M MP180 in most countries.
Installing an Outlet Adapter onto the Power Adapter
1Select the outlet adapter that will plug into your wall outlet.
2Align the outlet adapter to the power adapter and slide the outlet adapter into place.
Replacing the Outlet Adapter
1Push the button on the outlet adapter.
2Slide the outlet adapter up.
3Remove the outlet adapter.
4Replace with the new outlet adapter.
12 |
© 2011 3M. All Rights Reserved. |
3M™ Pocket Projector MP180
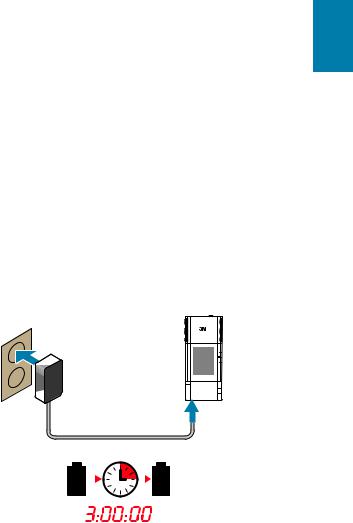
Charge the Battery
The 3M MP180 rechargeable battery gives you up to two hours of battery life. When the battery needs to be charged, the status indicator LED flashes red. The battery should be fully charged before using the 3M MP180 projector.
Charge the battery by connecting the 3M MP180 power adapter to the projector. When the power adapter is connected, the LED flashes green three times and then stays solid green. When looking at the home screen, the battery status icon is animated while charging and full when charging is complete.
1Turn the projector power off.
2Connect the power adapter to the projector’s DC input.
3Connect the other end of the power adapter into the electrical outlet.
4The status indicator will change to amber while the battery is charging.
5Allow three hours to fully charge the battery. When charging is complete, the status indicator will turn off.
110–240 VAC
50/60 Hz
English
|
|
|
|
|
|
|
|
|
|
|
|
|
|
|
|
|
|
|
|
|
|
|
|
|
|
|
|
|
|
|
|
|
|
|
|
© 2011 3M. All Rights Reserved. |
13 |
|
|
|
|
|||

English
3M™ Pocket Projector MP180
Battery Charging Notes:
•If the projector power is off, allow three hours for the battery to fully recharge. If the projector power is on, the battery will take longer to charge.
•The battery has a lifespan and ages every time it is fully charged and discharged. The battery will gradually lose charge capacity as it ages. Therefore, as the battery ages, the battery life will decrease.
•The battery cannot be charged using the USB port.
Battery Maintenance Tips:
•Remove the battery when the projector will not be used for one week or longer.
•Charge and discharge the battery by turning on the projector at least once a month.
•When storing the battery for more than a month, store it at 50% charge. The battery is at 50% charge when the battery icon has two bars.
•Do not store a fully discharged battery because it may lose the ability to be recharged.
•Do not store a fully charged battery because it may lose the ability to be recharged to full power.
14 |
© 2011 3M. All Rights Reserved. |
3M™ Pocket Projector MP180
Making Connections
The 3M MP180 projector will display informational icons depending on the input device and signal being detected. If no devices or input cables are connected to the projector, the home screen will display. The 3M MP180 was designed to operate with the 3M VGA and AV cables only.
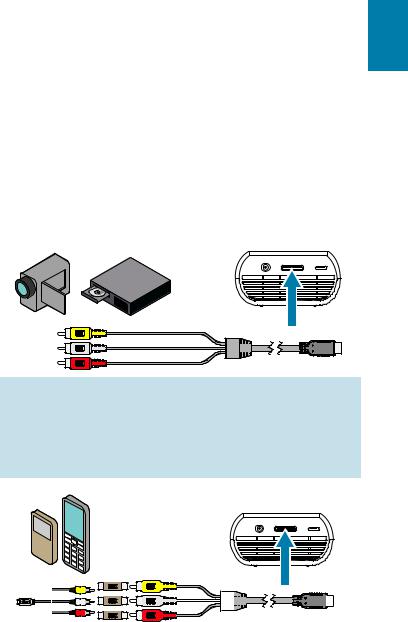
Connecting to a Composite Video Device
Use the AV cable to input video from camcorders, digital cameras, DVD players and digital media players into the VGA-AV input on the projector.
1Connect the AV cable to the projector’s VGA-AV input.
2Connect the other end of the AV cable to the video device’s audio and video outputs.
English
Tip: Some video devices do not have the standard audio and video connections and may require an AV cable specified by the manufacturer. The AV cable allows you to connect your video device to your TV monitor or your projector and may be purchased from the video device manufacturer. Once you have the AV cable, use the cable adapters to connect the video device cable and the projector cable.
|
|
|
|
|
|
|
|
|
|
|
|
|
|
|
|
|
|
|
|
|
|
|
|
|
|
|
|
|
|
|
|
|
|
|
|
|
|
|
|
|
|
|
|
|
|
|
|
|
|
|
|
|
|
|
|
|
|
|
|
|
|
|
|
|
|
|
|
|
|
|
|
|
|
|
|
|
|
|
|
|
|
|
|
|
|
|
|
|
|
|
|
|
|
|
|
|
|
|
|
|
|
|
|
|
|
|
|
|
|
|
|
|
|
|
|
|
|
|
|
|
|
|
|
|
© 2011 3M. All Rights Reserved. |
15 |
|
|
|
|
|
|
|
|
|
|
|
||||||||||||

English
3M™ Pocket Projector MP180
Connecting to a Component Video Device
For component video input, you must purchase the optional 3M MP180 Component AV Cable. This cable sends a higher quality video signal for the best possible image.
1Connect the component AV cable to the projector’s VGA-AV input.
2Connect the other end of the AV cable to the video device’s audio and video outputs.
Important Note: There are two red connectors on the Component AV cable. One is for the right audio channel and the other is for the Pr component video signal. Be careful to connect the red audio to red audio and red video to red video. If these connectors are switched, the projected image will appear green and an abnormal noise will come from the right speaker.
Tip: Some video devices do not have the standard audio and video connections and may require an AV cable specified by the manufacturer. The AV cable allows you to connect your video device to your TV monitor or your projector and may be purchased from the video device manufacturer. Once you have the AV cable, use the cable adapters to connect the video device cable and the projector cable.
Some video devices, by default, will not output a video signal. The video device’s manual should provide instructions on how to change the video output setting.
|
|
|
|
|
|
|
|
|
|
|
|
|
|
|
|
|
|
|
|
|
|
|
|
|
|
|
|
|
|
|
|
|
|
|
|
|
|
|
|
|
|
|
|
|
|
|
|
|
|
|
|
|
|
|
|
|
|
|
|
|
|
|
|
|
|
|
|
|
|
|
|
|
|
|
|
|
|
|
|
|
|
|
|
|
|
|
|
|
|
|
|
|
|
|
|
|
|
|
|
|
|
|
|
|
|
|
|
|
|
|
|
|
|
|
|
|
|
|
|
|
|
|
|
|
|
|
|
|
|
|
|
|
|
|
|
|
|
|
|
|
|
|
|
|
|
|
|
|
|
|
|
|
|
|
|
|
|
|
|
|
|
|
|
|
|
|
|
|
|
|
|
|
|
|
|
|
|
|
|
|
|
|
|
|
|
|
|
|
|
|
|
|
|
|
|
|
|
|
|
|
|
|
16 |
|
|
© 2011 3M. All Rights Reserved. |
|||||||||||||||||||||||||
3M™ Pocket Projector MP180
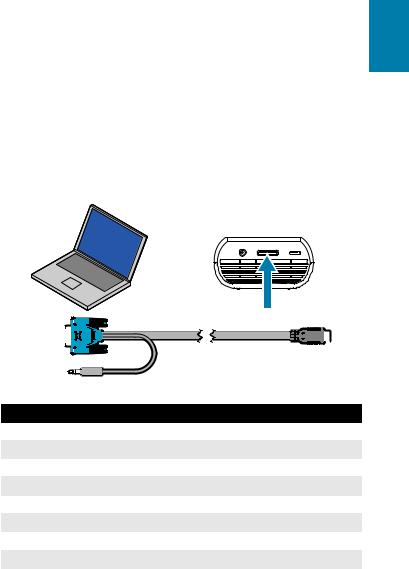
Connecting to a Computer
Use the VGA-audio cable to connect the projector to desktop computers, laptop computers, ultra-portable computers and some personal digital assistants (PDAs). The projector supports VGA, SVGA, XGA, and WXGA resolutions. For best results, set the computer’s resolution to SVGA (800x600).
1Connect the VGA cable to the 3M MP180 projector.
2Connect the VGA cable to the computer’s video and audio outputs.
3Set the computer resolution to one of the supported resolutions.
English
|
|
|
|
|
|
|
|
|
|
|
|
|
|
|
|
|
|
|
|
|
|
|
|
|
|
|
|
|
|
|
|
|
|
|
|
|
|
|
|
|
|
|
|
|
|
|
|
|
|
|
|
|
|
|
|
|
|
|
|
|
|
|
|
|
|
|
|
|
|
|
|
|
|
|
|
|
|
|
|
|
|
|
|
|
|
|
|
|
|
|
|
|
|
|
|
|
|
|
|
|
|
|
|
|
Description |
|
|
|
Resolution (width x height) |
Refresh Rate |
|
||||||||
VGA |
|
|
|
640 x 480 |
60 Hz |
|
||||||||
SVGA |
|
|
|
800 x 600 |
60 Hz |
|
||||||||
XGA |
|
|
|
1024 x 768 |
60 Hz |
|
||||||||
WXGA |
|
|
|
1280 x 768 |
60 Hz |
|
||||||||
|
|
|
|
|
|
|
1280 x 960 |
60 Hz |
|
|||||
|
|
|
|
|
|
|
1440 x 900 |
60 Hz |
|
|||||
MAC |
|
|
|
640 x 480 |
67 Hz |
|
||||||||
|
|
|
|
|
|
|
832 x 624 |
75 Hz |
|
|||||
|
|
|
|
|
|
|
1152 x 870 |
75 Hz |
|
|||||
© 2011 3M. All Rights Reserved. |
17 |
English
3M™ Pocket Projector MP180
Basic Operating Instructions
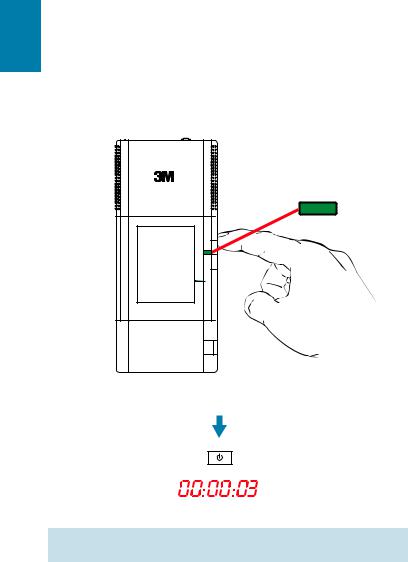
Powering On
Press and hold the power button until the start up screen appears on the touch screen and the status indicator begins to flash green.
Tip: The video output on some devices is turned off by default. Please refer to the device’s documentation for details on enabling the video output.
Sleep Mode
Press and hold the power button until the projected image is gone and the touch screen turns off. The projector goes into sleep mode. Sleep mode enables the projector to turn on quickly while conserving battery power. When the status indicator is solid amber, the battery is charging. While in sleep mode, the projector consumes a small amount of battery power. Remove the battery from the projector to save battery power.
18 |
© 2011 3M. All Rights Reserved. |

3M™ Pocket Projector MP180
Status Indicator Light
The status indicator light provides information about the projector’s state.
Status Indicator Light
Flashes green three times
Blank
Flashes green Solid green Solid amber Flashes amber
Flashes red twice and pauses then repeats
Flashes red
Meaning
A new power source is connected to the projector and the projector is ready to be powered on.
Projector is off or in sleep mode. If the power adapter is connected to the projector and the battery is installed, the battery has finished charging.
The projector is starting up. The projector is on.
The projector is off and charging the battery. The projector has overheated and needs to cool.
The projector cannot charge the battery.
The battery needs to be charged.
Video Mode Icons
The projector will display a video icon when it is connected to a video cable or a video source. If no cables or devices are detected, the home screen will display.
|
Icon |
|
Description/ Meaning |
|
|
|
The projector detects the AV cable. |
|
|
|
The projector detects an NTSC video input signal. |
|
|
|
|
|
|
|
|
|
NTSC |
|
|
|
|
|
The projector detects a PAL video input signal. |
|
|
|
|
|
|
|
|
|
PAL |
|
|
|
|
|
The projector detects the component AV cable. |
|
|
|
The projector detects the video input signal and displays the video |
|
|
|
|
|
|
|
source’s resolution and refresh rate below the component icon. |
RGB 480i |
60Hz |
||
|
|
|
The projector detects the VGA-audio cable. |
|
|
|
The projector detects computer input signal and displays the input |
|
|
|
|
|
|
|
resolution and refresh rate. |
800x600 |
60Hz |
||
|
|
|
The projector does not support the video signal. |
|
|
|
The projector is measuring and synchronizing to video input signal. |
English
© 2011 3M. All Rights Reserved. |
19 |
English
3M™ Pocket Projector MP180
Adjusting Image Size
The 3M MP180 projector can project a diagonal image of 10 to 80 inches (254– 2032 mm). Refer to the chart for associated dimensions.
Image Size |
|
|
|
|
Distance |
|
Diagonal |
Width |
|
Height |
|
|
|
10 in (25.4 cm) |
8 in (20.3 cm) |
6 in (15.2 cm) |
12 in (30.5 cm) |
|||
14 in (35.56 cm) |
11 1/4 in (28.4 cm) |
8 3/8 in (21.3 cm) |
16 3/4 in (42.7 cm) |
|||
20 in (50.8 cm) |
16 in (40.6 cm) |
12 in (30.5 cm) |
24 in (61 cm) |
|||
26 in (66.04 cm) |
20 |
3/4 in |
(52.8 cm) |
15 5/8 in (39.6 cm) |
31 |
2/8 in (79.2 cm) |
32 in (81.28 cm) |
25 |
5/8 in |
(65 cm) |
19 1/4 in (48.8 cm) |
38 |
3/8 in (97.5 cm) |
38 in (96.52 cm) |
30 |
3/8 in |
(77.2 cm) |
22 3/4 in (57.9 cm) |
45 |
5/8 in (115.8 cm) |
44 in (111.76 cm) |
35 1/4 in |
(89.4 cm) |
26 3/8 in (67.1 cm) |
53 in (134.1 cm) |
||
50 in (127 cm) |
40 in (101.6 cm) |
30 in (76.2 cm) |
60 in (152.4 cm) |
|||
60 in (152.4 cm) |
48 in (121.9 cm) |
36 in (91.4 cm) |
72 in (182.9 cm) |
|||
70 in (177.8 cm) |
56 in (142.2 cm) |
42 in (106.7 cm) |
84 in (213.4 cm) |
|||
80 in (203.2 cm) |
64 in (162.6 cm) |
48 in (121.9 cm) |
96 in (243.8 cm) |
|||
Important Note: As you increase the size of the projected image, you will need to decrease (darken) the ambient room lighting.
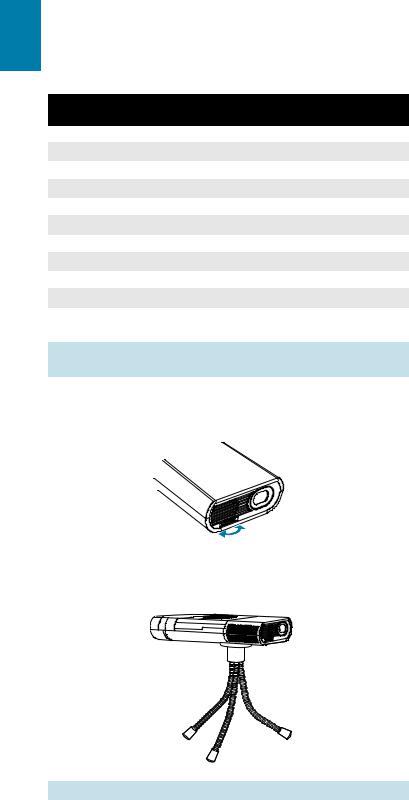
Adjusting the Focus
Turn the focus wheel to sharpen the image.
Attaching the Tripod
The projector includes a table-top tripod that mounts to the bottom of the projector.
Tip: The 3M MP180 projector will attach to most camera tripods.
20 |
© 2011 3M. All Rights Reserved. |
Loading...