

Manual Tape Applicator MTA-2
3M™ Stamark™ Pavement Marking Tapes
Information Folder IF MTA-2 June 2010
Health and Safety Information
Precautions:
Wear safety shoes and appropriate gloves while handling
and using the Manual Tape Applicator.
Description
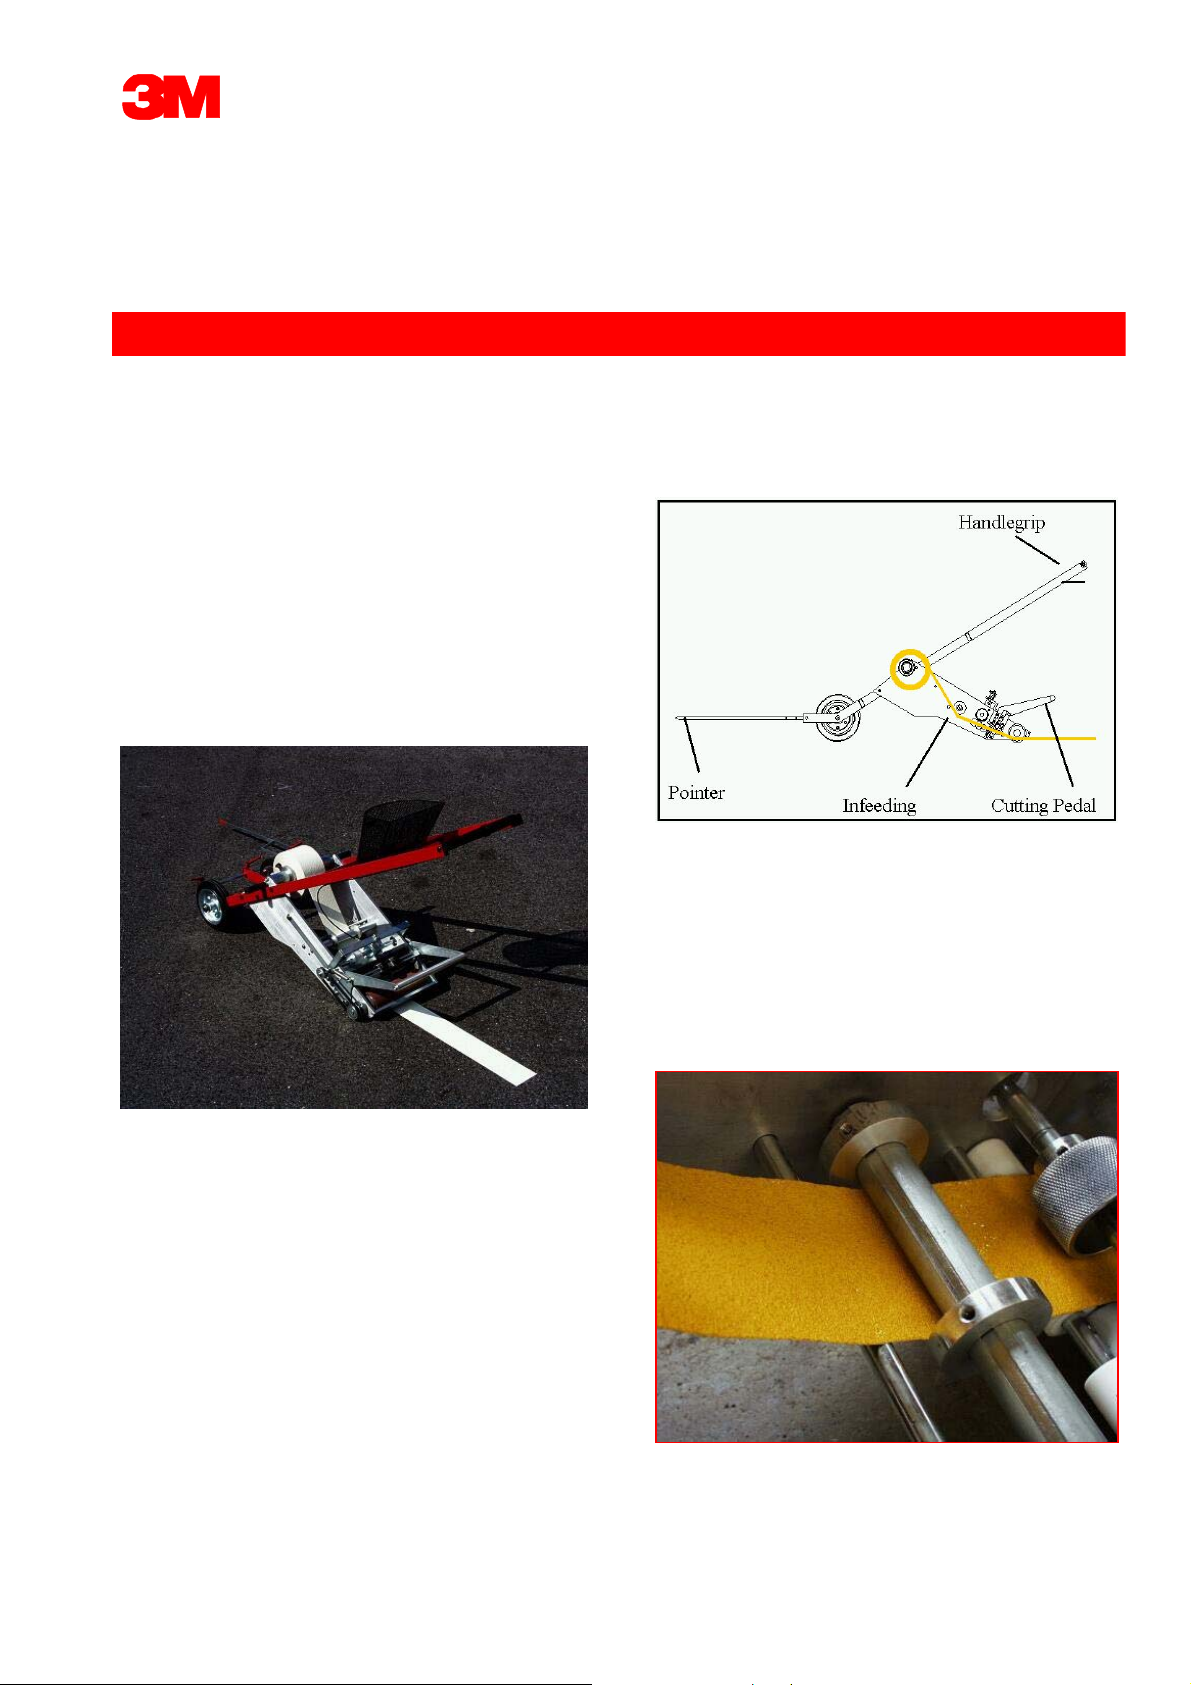
The 3M™ Manual Tape Applicator MTA-2 is intended
to be used for the application of 3M™ Stamark™
Pavement Marking Tapes. It is a simple-to-use, twowheeled, robust, push-type device. (Figure 1)
The usage of A 380ESD(high tack adhesive) demands
installation of the MTA-2 upgrade-kit DR995032239
to prevent roll blocking by the high tack adhesive
during the tape application.
The application rates depend on the individual
application conditions and environment. Typically tape is
being applied at walking speed.
Figure 1: MTA-2 Tape applicator
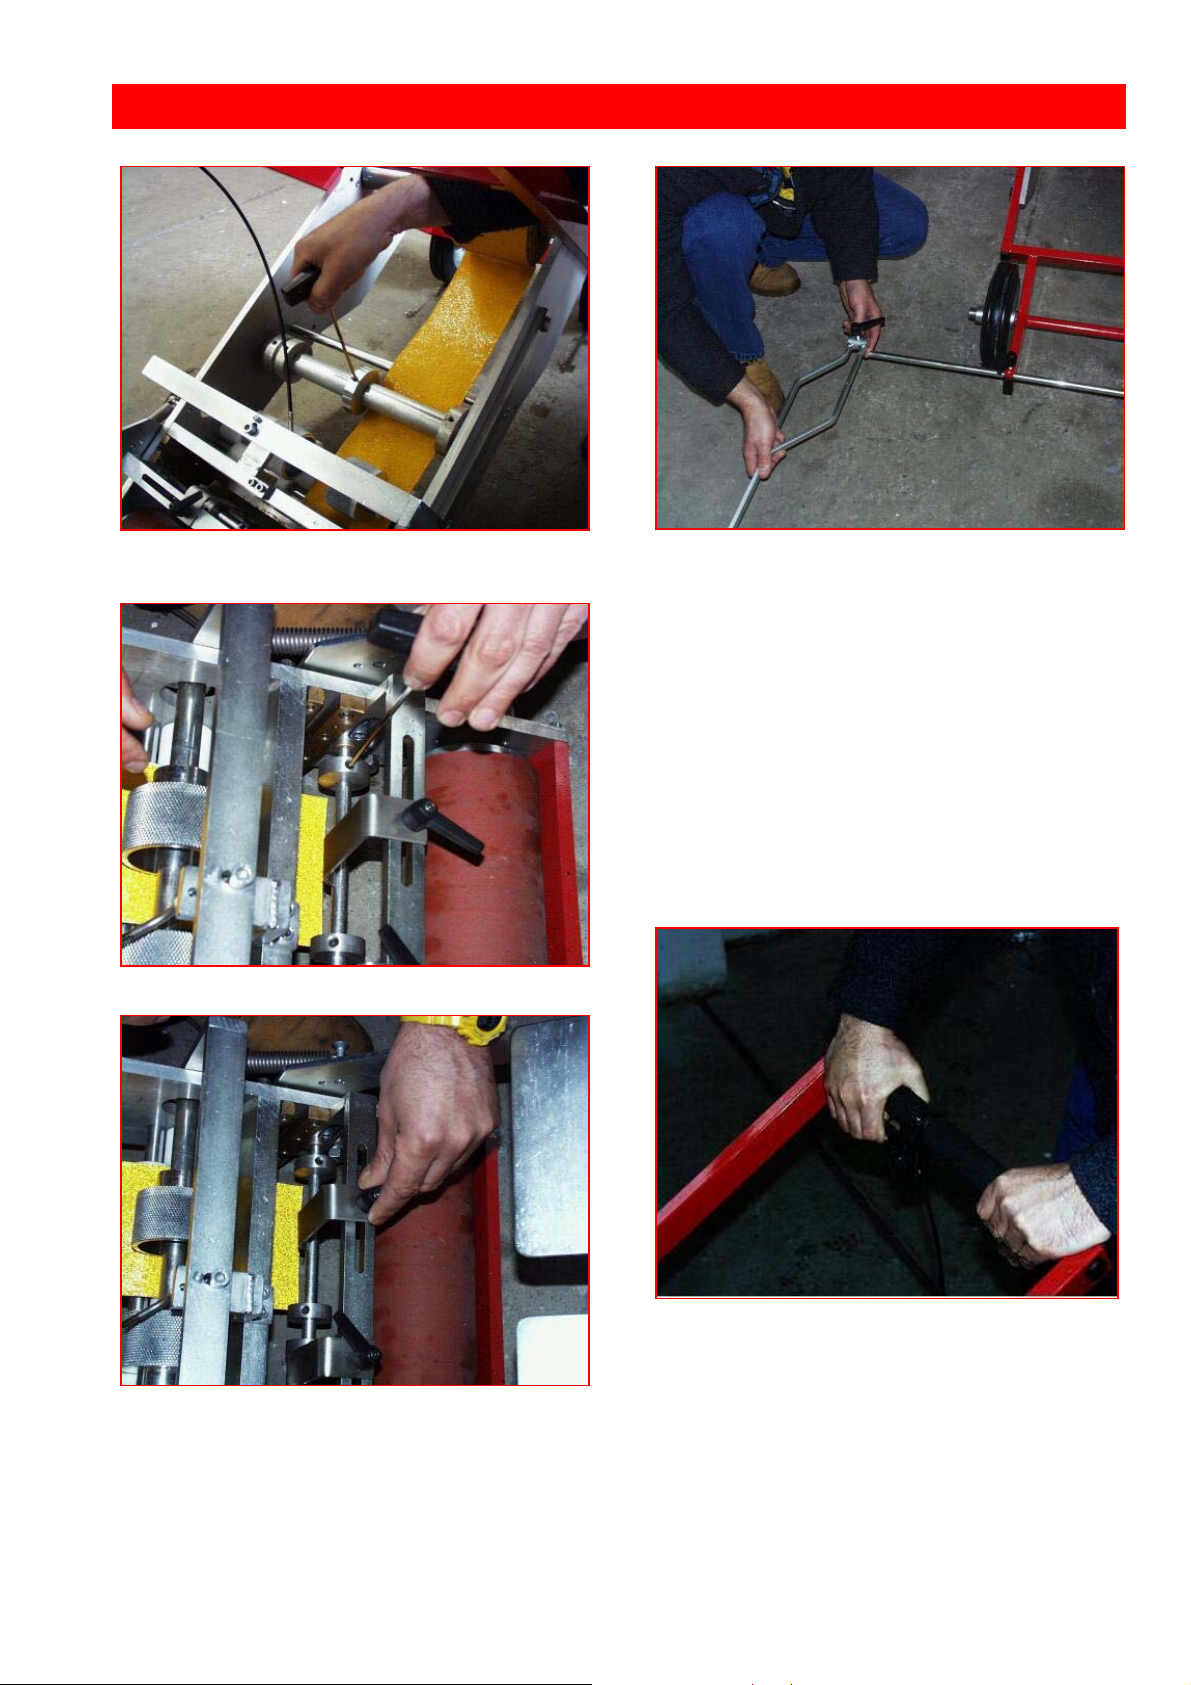
The device is specifically designed to apply pavement
marking tapes precoated with pressure sensitive
adhesive.
The applicator weighs 75kg and can be partially
disassembled for transporting in a van, truck or station
wagon.
Product Width and Spacing
The MTA-2 can be used to apply all Stamark™
pavement marking tapes at all standard roll length.
Note: If special roll with larger length are being ordered,
the maximum roll diameter must not exceed 50cm, if the
material is to be applied with a Manual Tape Applicator.
Operation
The MTA-2 is operated by one person.
Note: Pavement Marking Roll changing should be
supported by a second person due to the weight of a tape
roll in order to avoid extensive workload for a single
operator.
Figure 2: Schematic drawing MTA-2
Procedure for Adjusting Machine and Tape
Load the tape roll, feed it in to the machine and do the
necessary adjustments, as shown in Figure 3 to 8. As
soon as these steps are done, the machine is ready for the
application.
Caution: Do not activate the cutting knife, while doing
adjustments!
Figure 3: Feeding of the Tape
Manual Tape Applicator MTA-2 Page 2
Figure 4: Adjustment of the upper tape guide rolls
Figure 5: Adjustment of the lower tape guide rolls
Figure 7: Adjustment of the pointer system
Tape Application
Determine where the first skip or long line starts by
measuring from the last existing skip or reference mark.
Adjust the pointer to the pre-marking. Best case is when
the pre-marking and the later tape position are in between
the wheels of the applicator. If primer is used apply tape
exactly on primer.
For starting the application pull handgrip and watch tape
being moved by infeeding-transportation roll. Position
tape start at start of pre-marking. Push applicator forward
and keep handle grip pulled u ntil tape appears on other
side of rubber application roll. Release handle-grip and
keep pushing applicator.
Figure 6: Adjustment of vertical guide plate
Figure 8: Infeeding Handle Grip
Tape Cutting
Bring the applicator to a complete stop. Keep tape under
slight tension.
Cut tape with one strong and fast movement of foot
pedal. Release the pedal slowly. Do not attempt to cut the
tape while moving. Cutting the tape in motion will
stretch and tear the tape, causing the n ext line to start off
center.

Manual Tape Applicator MTA-2 Page 3
Adjustments
The Knifes are pre-adjusted by the manufacturer to slide
across each other with a minimum of friction in a scissors
action. Adjustment is needed when the tape is not
properly cut.
Either the stationary knife or the sliding knife may be
adjusted. To adjust the stationary knife, untighten the
mounting screws slightly. Turn the setscrews to bring the
cutting edge down, and retighten the mounting screws.
The same procedure is followed to adjust the sliding
knife. Each knife has two cutting edges. The knives may
be removed and new cutting edges exposed. The knives
may be sharpened after the cutting edges are dull.
Figure 10: Cutting the tape
Tamping
After applying the pavement marking tape tamp it
thoroughly with the RTC-3 with a minimum 90kg
(200lb.) load.
When using the RTC-3 Roller Tamper Cart:
• Do not twist or turn the tamping device on the tape.
• Make three passes back and forth over each part of
the tape
• Move the RTC-3 slowly (4-5 km/h) over the tape
• Make sure all edges are firmly adhered
• If applying block markings or pedestrian crossings,
start in the center of the marking, then work towards
the edges to remove trapped air.
• Open road to traffic as soon as tamping is completed
Tamping is most important !
Maintenance
Keep all Fasteners Tight
Lubrication: The pivot points and sliding areas should
be kept lubricated with light oil.
Cleaning: The silicone application roller wheels and
cutting mechanism must be kept clean.
Mineral spirits, fuel oil or any other light oil cleaners
may be used on the wheels and knives.
Check knife blades from time to time to prevent adhesive
build-up.
Solvents may be used occasionally for difficult cleaning
problems. A spray bottle of cleaner or silicone spray is
useful to prevent asphalt and dirt pickup on the wheels
and adhesive buildup on the knives during operation.
Caution: Do not use solvents or petroleum products on
the silicone application roll when working on new, hot
asphalt surfaces.
To prevent asphalt buildup around the roller, untighten
the scraper mounting screws and move the scraper back.
Tighten the screws.
Trouble Shooting
Tape is not properly cut: The tape will no t cut cleanly if
cutting is done while the applicator is in motion. If the
knife edges are dull or out of alignment, the knives
should be sharpened and adjusted. (See Adjustments).
Clean adhesives build up from knives. (See
Maintenance).
MTA-2 - Spare Parts:
Spare parts can be ordered directly at the machine
manufacturer. Please contact your 3M representative for
further information.
Literature Reference
For additional information on 3M™ Stamark™ Tapes,
Application Instructions or 3M™ Application
Equipment, refer to the following publications:
IF OV Information Folder Overlay Application
IF AP Information Folder Inlay Application
IF BPlus Information Folder BitumenPlus Application
IF PS-98 Information Folder Adhesive Spray
Applicator PS-98
IF P50 Information Folder Surface Preparation
Adhesive 3M™ Stamark™ P50
IF RTC-3 Information Folder Tamper Cart RTC-3
PB A340 Product Bulletin 3M™ Stamark™ Durable
Tape Series A340
PB A380 Product Bulletin 3M™ Stamark™
High Performance Tape Series A380SD/ESD
PB A820 Product Bulletin 3M™ Stamark™
Wet Reflective Tape Series A820
PB A650 Product Bulletin 3M™ Stamark™ Temporary
Tape Series A650
PB A540 Product Bulletin 3M™ Stamark™ Temporary
Tape Series A540
PB A720 Product Bulletin 3M™ Stamark™ Temporary
Wet Reflective Tape Series A720
PB A750 Product Bulletin 3M™ Stamark™ Temporary
Wet Reflective Tape Series A750

Manual Tape Applicator MTA-2 Page 4
3M assumes no responsibility for any injury, loss or damage arising out of the use of a product that is not of our manufacture. Where
reference is made in literature to a commercially available product, made by another manufacturer, it shall be the user's responsibility to
ascertain the precautionary measures for its use outlined by the manufacturer.
Important Notice
All statements, technical information and recommendations herein are based on tests we believe to be reliable, but the accuracy or
completeness thereof is not guaranteed. 3M shall not be liable and no warranty shall be liable and no warranty shall apply for products not
applied according to our published information folder.
Before using, the user must determine the suitability of the product for its intended use, and the user assumes all risk and liability
whatsoever in connection therewith. All questions of warranty and liability relating to this product are governed by the terms of the sale
subject where applicable to the prevailing law. No statement or recommendation not contained herein shall have any force or effect unless
in an agreement signed by officers of us.
3M Deutschland GmbH
Display & Graphics Laboratory
Traffic Safety Systems Division
Carl-Schurz-Str. 1, 41453 Neuss, Germany
Tel: +49 (0) 21 31 / 14 0
Fax: +49 (0) 21 31 / 14 36 94
 Loading...