

Page 1
operator's
guide
Page 2

3M™ Pocket Projector MP220
Contents
Important Notice ..................................................................................................3
Technical Support................................................................................................3
Intended Use Statement .......................................................................................3
Safety Information................................................................................................4
Safety Labels ......................................................................................................8
Introduction .........................................................................................................9
Overview .............................................................................................................9
Package Contents..............................................................................................10
Parts of Projector ...............................................................................................11
Getting Started ..................................................................................................13
Home Screen.....................................................................................................29
Remote Control (Optional Accessory)...................................................................41
Search ..............................................................................................................43
Opening and Switching Applications....................................................................44
Transferring Files to the Projector........................................................................45
Video/VGA Pass Through....................................................................................49
Gallery ..............................................................................................................55
Music................................................................................................................63
Video Player ......................................................................................................71
Clock ................................................................................................................74
Documents To Go...............................................................................................78
Word To Go™....................................................................................................86
Sheet To Go®....................................................................................................97
Slideshow To Go®...........................................................................................120
PDF to Go........................................................................................................130
Fun Pack.........................................................................................................133
Cannon Ball Pro...............................................................................................137
Settings...........................................................................................................138
Limited Warranty..............................................................................................144
2
© 2012 3M. All Rights Reserved.
Page 3

3M™ Pocket Projector MP220
Important Notice
All statements, technical information, and recommendations related to 3M’s
products are based on information believed to be reliable, but the accuracy or
completeness is not guaranteed. Before using this product, you must evaluate it
and determine if it is suitable for your intended application. You assume all risks and
liability associated with such use. Any statements related to the product which are
not contained in 3M’s current publications, or any contrary statements contained
on your purchase order shall have no force or effect unless expressly set forth in a
written agreement signed by an authorized officer of 3M.
Technical Support
For technical support, call 1-866-631-1656 or email meetings@mmm.com.
Intended Use Statement
The 3M Mobile Projector MP220 is designed to operate with the 3M specified
battery and 3M power adapter in normal office or home environments.
t 0˚–30˚C (32˚–86˚F)
t 10–80% RH (without condensation)
t 0–1829 m (0– 6000 feet) above sea level
Continued exposure to smoke, grease, oil and other airborne contaminants can
affect the operation or performance of the projector. Use of this product in adverse
conditions will void the product warranty.
© 2012 3M. All Rights Reserved.
3
Page 4

3M™ Pocket Projector MP220
Safety Information
Please read, understand, and follow all safety information contained in these
instructions prior to the use of this projector. Retain these instructions for future
reference.
Explanation of Signal Word Consequences
m Warning:
m Caution:
c Warning:
Indicates a potentially hazardous situation, which, if not avoided, could result
in death or serious injury and/or property damage.
Indicates a potentially hazardous situation, which, if not avoided, may result
in minor or moderate injury and/or property damage.
Hazardous voltage
4
© 2012 3M. All Rights Reserved.
Page 5

3M™ Pocket Projector MP220
m Warning
To reduce the risk associated with hazardous voltage:
t Do not modify this product in any way. Use only 3M approved replacement
components.
t Do not attempt to service this projector other than battery replacement.
There are no user-serviceable parts other than the battery. Service to be
performed only by a 3M authorized service provider using 3M approved
system components.
t Do not use the wall power supply in a wet environment.
t Do not use with a damaged wall power supply. Replace damaged part prior
to use.
To reduce the risk associated with fire and explosion:
t Do not immerse the projector or battery in any liquid or allow either to get
wet.
t Use only 3M approved power supply and lithium ion battery provided.
t Do not disassemble or short circuit the battery.
t Do not dispose of the battery by incineration or fire.
t Do not operate this projector in any environment above 30°C (86°F).
t Do not expose the projector or battery to direct sunlight in a closed space
such as a vehicle.
t Do not carry the battery in pockets, purses or handbags where it may
contact metal objects.
t Do not place battery in contact with metal objects.
t Do not expose or store battery in direct sunlight or excessive heat (>60°C
[140°F]), or in moist or caustic environments.
© 2012 3M. All Rights Reserved.
5
Page 6

3M™ Pocket Projector MP220
m Warning
To reduce the risks associated with driver distraction:
t Do not use this projector in a moving motor vehicle.
To reduce the risks associated with choking:
t Keep AV adapters and other small parts away from young children.
To reduce the risk associated with fire and explosion, battery leakage
or overheating:
t Do not immerse the battery in water or allow it to get wet.
t Do not reverse the positive(+) and negative(-) terminals.
t Do not connect the battery directly to a wall outlet. Use only the 3M
specified wall charger or automobile charger.
t Do not strike, throw or subject the battery to physical shock.
t Do not pierce the battery or break it open.
t Keep batteries out of the reach of children.
t Do not recharge the battery near a heat source or in extremely hot
conditions.
t Do not use the battery if it gives off an odor, generates heat, or becomes
discolored or deformed.
t Keep away from exposed flames if the battery leaks or emits an odor.
t Flush the eyes with water and seek medical attention if the battery leaks
and battery fluid gets in the eyes.
6
© 2012 3M. All Rights Reserved.
Page 7

3M™ Pocket Projector MP220
m Caution
To reduce the risks associated with hearing loss:
t Be sure to read earphone manufacturer's instructions with respect to volume
level.
t User is responsible to set a safe volume level.
To reduce the risk associated with environmental contamination:
t Dispose of all system components in accordance with applicable government
regulations.
To reduce the risks associated with LED bright light:
t Do not stare directly into the projector lens.
To reduce the risks associated with tripping and falling:
t Position the charging cord and data cables so that they are not a tripping
hazard.
SAVE THESE INSTRUCTIONS
© 2012 3M. All Rights Reserved.
7
Page 8

Safety Labels
LITHIUM ION BATTERY
Model No. LIN376-001
28.86Wh (11.1V 2600mAh x 3)
P/N 78-6972-0053-9
m Warning
t Use a specified charger.
t Do not throw the battery into fire or heat.
t Do not short-circuit the battery terminals.
t Do not disassemble the battery.
3M™ Pocket Projector MP220
Charging Specification
Standard Charge 11.1V/1.3A
Cut Off Voltage 8.5V
Max Charge 12.3V/1.3A
LED Light Output
CLASS 1 LED PRODUCT
IEC60825-1 :1993+A1
:1997+A2:2001
8
Maximum Radiant
Power: 1.693mW
© 2012 3M. All Rights Reserved.
Page 9

3M™ Pocket Projector MP220
Introduction
Thank You for Choosing 3M
This product has been produced in accordance with 3M quality and safety
standards to provide smooth and trouble-free use in the years to come. For
optimum performance, please follow the operating instructions carefully.
Overview
Product Features
The 3M™ Mobile Projector MP220 makes it easy to project information almost
anywhere you go, instantly — all with 65 lumens of brightness. It is perfect for
presenting to small groups. The 3M MP220 projector includes these features:
+ Battery or plug-in for super mobility
+ 2-hour battery life ensures that it’s ready when you are
+ WSVGA resolution for crisp image
+ Simple-to-use Android™ OS and user interface
+ Optical mouse, buttons
+ 2 x 0.75W speakers
© 2012 3M. All Rights Reserved.
9
Page 10

3M™ Pocket Projector MP220
Package Contents
1 3M MP220 Projector
2 Power Adapter
3 Outlet Adapters (4)
4 USB Cable
5 Product Warranty and
Safety Guide
6 Quick Start Guide
1
2
3
4
5
6
10
© 2012 3M. All Rights Reserved.
Page 11
3M™ Pocket Projector MP220
Parts of Projector
1
8
2
3
4
5
6
7
1 Navigation pad – For more information, see “Navigation Pad” on page 21
2 Power On/Off – Powers the projector on and off, or turns off the lamp.
3 microSD card slot – Accepts a 32GB or less microSD card.
4 Volume down – Turns down speaker or audio out output.
5 Volume up – Turns up speaker or audio out output.
6 Infrared sensor – Accepts commands from 3M remote control. Remote
control sold separately.
7 Air vents – Do not block fans or vents while projector is operating or cooling
down. This will cause projector to overheat and automatically turn off.
8 Status indicator LED
9Focus wheel – Adjusts to sharpen image.
10 Cooling fans – Do not block fans or vents while projector is operating or
cooling down. This will cause projector to overheat and automatically turn off.
11 Le ns
7
9
10
11
© 2012 3M. All Rights Reserved.
11
Page 12

3M™ Pocket Projector MP220
18
12
13
14
15
16
17
10
7
14
19
12 Battery compartment
13 Battery cover securing screw
14 Speakers
15 DC power in – Powers the projector or charges the battery using the 3M
power supply.
16 microUSB – Transfer files back and forth from your computer to the projector.
Attach a USB computer mouse, or keyboard. Access files on USB memory
stick.
17 VGA-AV – Connect the 3M VGA or Video cable to your computer, DVD Player,
or other video device and project its image. Cables sold separately.
18 Tripod Mount
19 Earphone jack – Attach earphones or computer speakers.
12
© 2012 3M. All Rights Reserved.
Page 13

3M™ Pocket Projector MP220
Getting Started
Power Adapter
The power adapter is used to charge the battery or power the projector. There
are four outlet adapters to give you the flexibility to power the 3M MP220 in most
countries.
When the power adapter is first shipped, it is fitted with a blank outlet adapter. This
must be removed before installing an outlet adapter.
Installing an Outlet Adapter onto the Power Adapter
1 Press the "PUSH" button on the underside of the power adapter.
2 Remove the blank outlet adapter by sliding up.
3 Select the outlet adapter that will plug into your wall outlet and align to the
power adapter.
4 Slide the outlet adapter down until it clicks into place.
© 2012 3M. All Rights Reserved.
13
Page 14

3M™ Pocket Projector MP220
Battery
The 3M projector comes with a rechargeable battery. When the projector is
shipped, there is a protective film between the battery and the battery contacts on
the projector.
Battery Maintenance Tips:
t Remove the battery when the projector will not be used for one week or
longer.
t Charge and discharge the battery by turning on the projector at least once a
month.
t When storing the battery for more than a month, store it at 50% charge. The
battery is at 50% charge when half of the battery icon is green.
t Do not store the battery when it is fully discharged. It will lose the ability to
charge.
Removing the Protective Film
Remove the protective film by pulling in the direction shown below.
remove
to
Pull
Replacing the battery
Remove the battery
1 Remove the screw securing the battery cover using a Phillips-head
("crosshead") screwdriver.
14
© 2012 3M. All Rights Reserved.
Page 15
3M™ Pocket Projector MP220
2 Slide the battery cover off.
3 Lift the battery out.
Install the battery
1 Orient the battery so that its contacts line up with the battery contacts inside
the projector.
2 Place the battery into the battery compartment.
3 Slide the battery cover on.
4 Replace the battery cover securing the screw using a Phillips-head
("crosshead") screwdriver.
© 2012 3M. All Rights Reserved.
15
Page 16

3M™ Pocket Projector MP220
Charging the battery
The 3M MP220 rechargeable battery gives you up to two hours of battery life.
When the battery needs to be charged, the status indicator LED starts flashing red.
The battery should be fully charged before using the 3M MP220 projector.
Charge the battery:
1 Turn the projector power off.
2 Connect the power adapter to the projector’s DC input.
3 Connect the other end of the power adapter to the electrical outlet.
4 The status indicator will change to amber while the battery is charging.
5 Allow three hours to fully charge the battery. When charging is complete, the
status indicator will turn off.
110–240 VAC
50/60 Hz
Battery Charging Notes:
t If the projector power is off, allow three hours for the battery to fully recharge.
If the projector power is on, the battery will take longer to charge.
t The battery has a lifespan and ages every time it is fully charged and
discharged. The battery will gradually lose charge capacity as it ages.
t The battery cannot be charged using the USB port.
16
© 2012 3M. All Rights Reserved.
Page 17

3M™ Pocket Projector MP220
Power Button
The power button turns on or shuts down the projector. When you turn on the
projector, it is ready to use in 30 seconds. While the projector is on, you can turn
the projector’s lamp on or off using the power button. The projector's lamp turns
on and off in only a second. You can turn on the projector's lamp by pressing any
button on the projector.
Turning the Projector On
Press the power button.
Note that the projector might take 30 seconds or more to power on.
Turning the Projector Off
1 Press and hold the power button until the device options menu appears on the
screen.
2 Select Power off from the menu.
3 Confirm that you wish to turn the projector off by selecting OK
Turning the Lamp On and Off
You can turn the projector's lamp off without turning the projector off. Press
and quickly release the power button and the projector's lamp with turn off. The
projector lamp will turn off immediately while the cooling fans continue to run for a
few seconds.
While the projector lamp is off, the status indicator will flash green. This tells you
that the lamp is off but the projector is still on. Press any button on the projector
and the lamp will turn on.
Important Note: When the lamp is off, the projector continues to use power. Do
not place projector in a bag in this state as it can easily be turned back on.
© 2012 3M. All Rights Reserved.
17
Page 18

3M™ Pocket Projector MP220
Status Indicator lights
The status indicator light provides information about the projector’s power, battery,
and error status.
Status Indicator Light Meaning
Solid amber Projector is charging
Solid Green Projector is on
Slow flashing green The projector is on but the projector's lamp is off.
Flashes red twice The projector cannot charge the battery
Flashes amber Projector has overheated
Flashes red The battery power is low.
Adjusting Image Size
The 3M MP220 projector can project a diagonal image of 10 to 70 inches (254–
1778 mm). Refer to the chart for associated dimensions.
Image Size
Diagonal Width Height Distance
10 in (25.4 cm) 8 5/8 in (21.9 cm) 5 1/16 in (12.8 cm) 18 1/2 in (46.7 cm)
20 in (50.8 cm) 17 1/4 in (43.8 cm) 10 1/8 in (25.7 cm) 36 3/4 in (93.5 cm)
30 in (76.2 cm) 25 7/8 in (65.7 cm) 15 1/4 in (38.5 cm) 55 1/4 in (140.2 cm)
40 in (101.6 cm) 34 1/2 in (87.7 cm) 20 1/4 in (51.4 cm) 73 5/8 in (186.9 cm)
50 in (127 cm) 43 1/8 in (109.6 cm) 25 1/4 in (64.2 cm) 92 in (233.7 cm)
60 in (152.4 cm) 51 3/4 in (131.5 cm) 30 1/2 in (77 cm) 110 3/8 in (280.4 cm)
70 in (177.8 cm) 60 1/2 in (153.4 cm) 35 3/8 in (89.9 cm) 129 in (327.2 cm)
Important Note: As you increase the size of the projected image, you will need
to decrease (darken) the ambient room lighting.
18
© 2012 3M. All Rights Reserved.
Page 19

3M™ Pocket Projector MP220
Adjusting the Focus
Rotate the focus wheel to sharpen the image.
Attaching the Tripod (Optional Accessory)
The bottom of the projector includes a tripod socket that fits most standard camera
tripods, including the optional 3M tripod (78-6972-0073-7).
© 2012 3M. All Rights Reserved.
19
Page 20

3M™ Pocket Projector MP220
Volume Up/Down
The volume up and down buttons adjust the volume for media such as videos and
music. The volume buttons also adjust volume for audio input through the VGA-A/V
port.
Display Volume Level: Press the volume up or down button to display the volume
slider.
Increase or Decrease Volume: Press the volume up button to increase the audio
volume or press the volume down button to decrease the audio volume.
Quickly Increase or Decrease Volume: Press and hold the volume up button
to quickly increase the audio volume or press and hold the volume down to quickly
decrease or mute the audio volume.
20
© 2012 3M. All Rights Reserved.
Page 21

3M™ Pocket Projector MP220
Navigation Pad
The navigation pad allows you the maneuver through the screens. Each one of the
buttons has one or more functions or modes.
1
2
3
1 Touch Sensor – Moves the mouse pointer or selector on the screen.
2 Home Button – Press to open the Home screen. Press and hold to open
recently used applications.
3Menu Button – Press to open the menu for the current screen or application.
4Search Button – Press to open search. Press and hold to open the Mouse
mode menu.
5Back Button – Press to open previous screen or close onscreen keyboard.
4
5
Home button
Returning to the Home screen
Switching between recently used applications
Menu Button
Opening options and context menus. Press and hold to display the on-screen
keyboard
Back Button
Returning to the previous screen
Search Button
The Search button opens the Search app or the Touch Sensor Mode dialog.
© 2012 3M. All Rights Reserved.
21
Page 22

3M™ Pocket Projector MP220
Opening the Search Application: Press the Home button and then the Search
button. The Search app will open.
Switching Touch Sensor Mode: Press and hold the Search button until the
Touch Sensor Mode switch dialog appears. Press the OK button if you want to
switch the mode. See the Touch Sensor Sections for more information.
Touch Sensor
The Touch Sensor is located in the center of the navigation pad and moves the
mouse pointer, selector or cursor on the screen. The Touch Sensor has two modes:
mouse point and trackball.
t When in mouse pointer mode, you move your finger across the Touch Sensor
to control the mouse pointer (or small arrow) on the screen. Use the mouse
pointer to select screen menu items, launch applications and move icons.
t When in trackball, you move a red or gray selector.
Switching Between Mouse and Trackball Mode
There are two ways to switch between the two modes: Use the Search Button or
Settings Menu.
Switch the modes using the Search Button: Press and hold the Search button
and the “Touch Sensor Mode switch” dialog will appear. Press OK to switch from
the mode.
22
© 2012 3M. All Rights Reserved.
Page 23

3M™ Pocket Projector MP220
Switch the modes using the Setting Screen: Press the Home and then the
Menu button. An options menu will appear. Select “Settings” and the Setting
Screen will appear. Select Touch Sensor and put a check mark beside Mouse if you
want to use mouse mode or uncheck if you want to use trackball mode.
Mouse Mode
Mouse Mode uses a pointer to select items on the screen and navigate the screens
and menus. Just like using your computer’s mouse to move the pointer on the
computer’s screen, you can move your finger across the Touch Sensor and move
the pointer.
Moving the mouse pointer: Lightly drag your finger across the Touch Sensor in
the direction you want the pointer to move.
Clicking an item on the screen: Use the pointer and Touch Sensor to click
application icons and settings icons or type letters using the onscreen keyboard.
Move the pointer to where it is over the item and press the Touch Sensor to click
the item.
Double-Clicking an item: Quickly press the Touch Sensor twice to zoom and
unzoom a picture in the gallery, for example.
Click and Hold: Use the Touch Sensor to activate additional features by pressing
down and holding. You can add a new shortcut or widget to the Home screen by
clicking and holding down the Touch Sensor until the dialog appears.
© 2012 3M. All Rights Reserved.
23
Page 24

3M™ Pocket Projector MP220
Click, hold and swipe: You can view the next photo in the Gallery by clicking and
holding the Touch Sensor and then moving your finger across the sensor in the
direction you want to move through the photo album.
Trackball Mode
Trackball Mode highlights selected items on the screen and the focus of the screen
follows the highlighter. Move your finger across the Touch Sensor to select items on
the screen. The selected item is highlighted gray, red, blue, or yellow depending on
the screen, app, or dialog.
Select an item: Gently move your finger across the Touch Sensor in the direction
of the item you wish to select. This works best if you move your finger up and down
or right and left rather than diagonally.
Click: Press the Touch Sensor to select the item. You will feel and hear the Touch
Sensor click.
Double-Click: Quickly press the Touch Sensor twice to zoom and unzoom a
picture in the gallery, for example.
Click and Hold: Press and hold the Touch Sensor down while an app or widget on
the Home screen is selected and the choose your action dialog will appear.
24
© 2012 3M. All Rights Reserved.
Page 25

3M™ Pocket Projector MP220
Initial Setup
The first time you switch on your MP220, you will need to set up your locale and the
date & time.
Setting your Locale
To set the locale, click Locale. This chooses the language that the projector's
interface and menus display. The following screen will appear. Click on your locale.
If your locale does not appear on the screen, you may have to scroll down.
Note: You can customize some parts of the projector's interface, such as the
tabs on the Home Screen, that do not change with this setting.
© 2012 3M. All Rights Reserved.
25
Page 26
3M™ Pocket Projector MP220
Setting the Date and Time
To set the date and time, click Date & Time. The following screen will appear.
Setting the Time
Click on Set time.
26
© 2012 3M. All Rights Reserved.
Page 27

3M™ Pocket Projector MP220
The following screen will appear. Click the + or – symbols to change the hours and
minutes. To change from AM to PM, click on AM. Once finished, click Set.
Note: Clicking and holding + or - will cycle through the hours or minutes.
Setting the Date
Click on Set date.
© 2012 3M. All Rights Reserved.
27
Page 28

3M™ Pocket Projector MP220
The following screen will appear. Click the + or – symbols to change the month, day
and year. Once finished, click Set.
Note: Clicking and holding + or - will cycle through the days, months or years.
To return to the Home screen, press the Home key on the navigation panel.
Note: You can change the language and date or time at any time by going into
Settings and choosing Language or Date & Time. For more infomation, see
“Settings” on page 138.
28
© 2012 3M. All Rights Reserved.
Page 29
3M™ Pocket Projector MP220
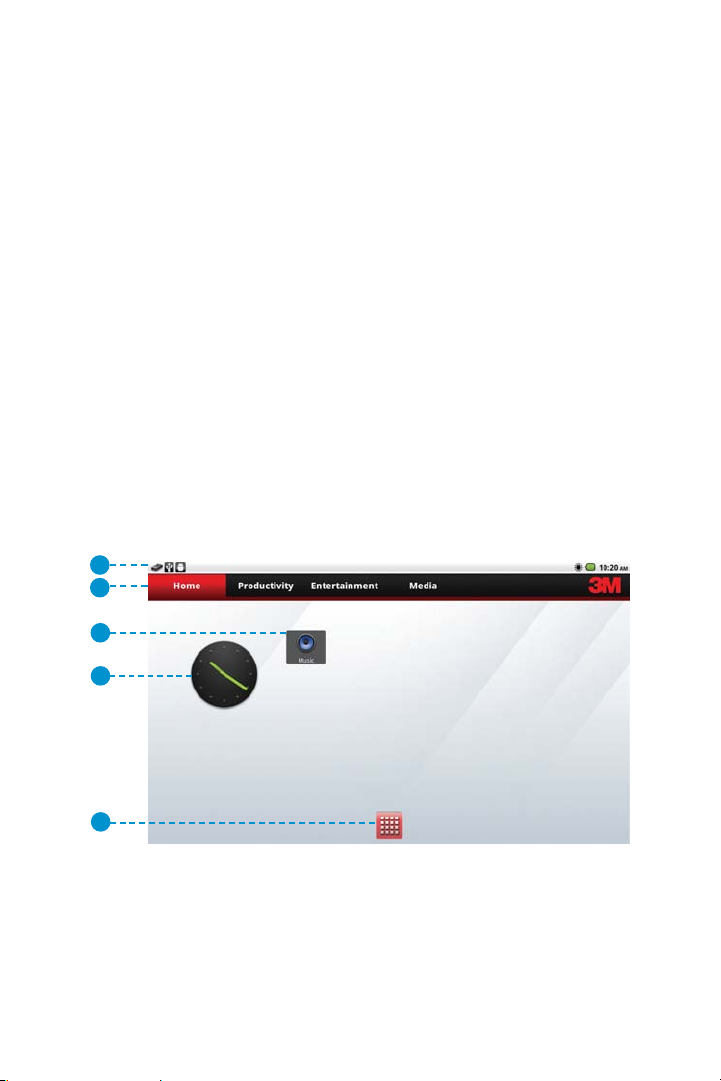
Home Screen
After booting up, the Home screen will display.
The Home screen displays
t application icons,
t widgets, and
t shortcuts
You can customize the Home screen display:
t by changing the wallpaper (or background) and tab names, or
t by adding shortcuts or widget to a tab.
To learn more about customizing the Home screen, please see “Customizing the
Home Screen” on page 32.
The Status bar is at the top of the Home screen. The Status bar displays information
about the projector and its status. For more information about the status bar and
icons you might see there, see “Status Bar” on page 30.
1
2
3
4
5
1 Status bar - Provides information about the projector such as connectivity,
battery power and time.
2 Pane Tabs – Use customizable tabs to provide a way to organize applications
and widgets on the HOME SCREEN
© 2012 3M. All Rights Reserved.
29
Page 30
3M™ Pocket Projector MP220
3 Shortcuts – Provides quick access to application, music playlist, and
projector settings. See Adding Shortcuts to Home screen for more
information.
4Widget – Provides the application’s functions from the Home screen.
5 App Launcher - Takes you to a list of installed apps.
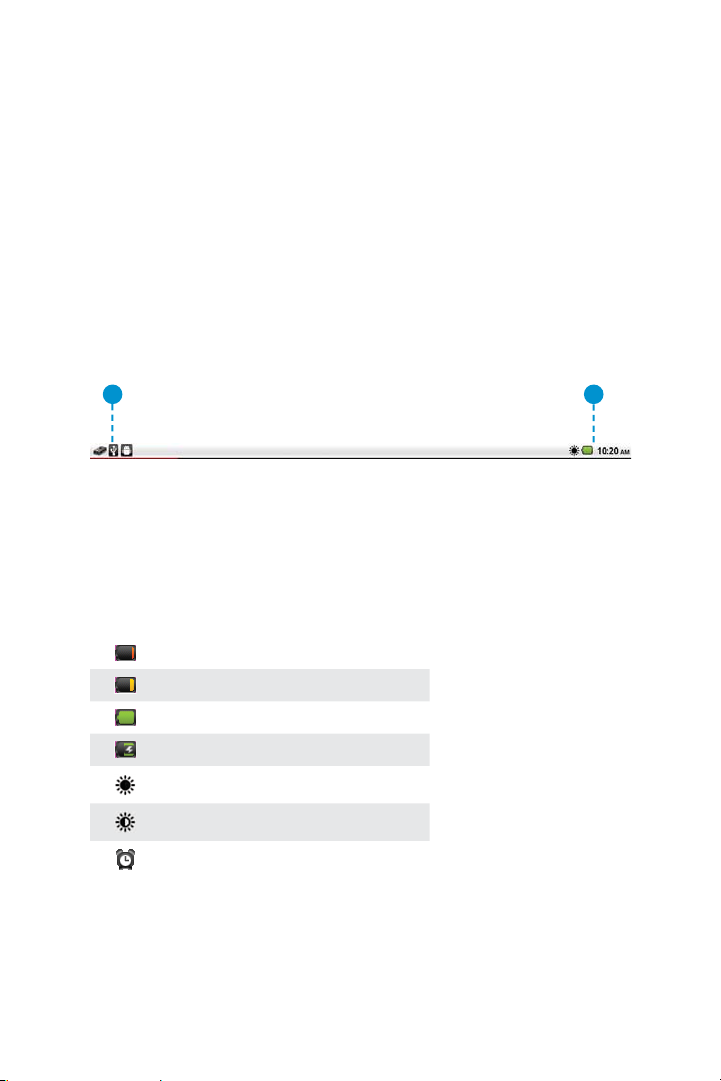
Status Bar
The status bar shows the time, battery status, brightness level and system
notifications. It appears at the top of every screen. The status icons appear on the
right and notification on the left.
1 2
1 Notifications Area
2 Projector Status Area
Projector Status Area
The Status icons provide information about the projector such as battery level and
projector brightness. Below is a list and their descriptions.
Battery is very low
Battery is partially drained
Battery is full
Battery is charging
Brightness at maximum
Brightness at minimum
Alarm is set
30
© 2012 3M. All Rights Reserved.
Page 31

3M™ Pocket Projector MP220
Notifications Area
The Notification icons make you aware of events occurring in the background. Here
is a list of icons you may see. For more information, see Notifications.
Media is being scanned
Video/VGA Pass Through is ready for use
Song is playing
The projector has unmounted the SD card or the SD card is safe to remove
Mounting SD Card
SD card is full
USB is connected
Home Screen Tabs
The Home Screen Tabs provides a way for you to organize the available shortcuts
and widgets. Each tab contains its own set of shortcuts and widgets and they can
be arranged in any order.
Additionally, you can modify the tab labels and decide whether or not the label
appears on the Home Screen. See “Customizing the Home Screen” on page 32.
Selecting a Home Screen Tab
t Mouse Mode: Position the mouse pointer over the tab and press the Touch
Sensor.
t Using Trackball Mode: Move your finger across the Touch Sensor and you
will see a gray highlight moving from one tab to another. Highlight the tab and
press the Touch Sensor to select it. The tab will turn red and the shortcuts
and widgets in the tab will appear.
© 2012 3M. All Rights Reserved.
31
Page 32

3M™ Pocket Projector MP220
Add a Shortcut or Widget
t Mouse Mode: Move the mouse pointer to a location where you want
the item within the Home screen tabs. Press and hold the Touch Sensor.
Select Shortcuts or Widget from the Add to Home screen dialog. Select the
application or widget you wish to add.
t Mouse or Trackball Modes: Press the Menu button. Choose Add from the
options menu. Select Shortcuts or Widgets. Choose the shortcut or widget you
wish to add.
Remove a Shortcut or Widget
t Mouse Mode: Move the mouse pointer over the item to be removed. Press
and hold the Touch Sensor and drag your finger across the Touch Sensor to
move the item into the trash can located at the bottom in the center of the
screen.
t Trackball Mode: Highlight the item. Press and hold the Touch Sensor. Select
Remove.
Move a Shortcut or Widget
t Mouse Mode: Move the mouse pointer over the item to be removed. Press
and hold the Touch Sensor. Drag your finger across the Touch Sensor to move
the item towards the location where you want to place it.
t Trackball Mode: Highlight the item. Press and hold the Touch Sensor and
the Choose your action dialog appears. Select one of the arrows.
Customizing the Home Screen
You can customize the Home Screen further with the options menu items:
Wallpaper and Launcher Settings.
Customize the Wallpaper
1 From the Home screen, press the Menu key.
2 Select Wallpaper from the options.
3 Browse to the location of the image you wish to use as wallpaper.
4 Click on the image.
32
© 2012 3M. All Rights Reserved.
Page 33

3M™ Pocket Projector MP220
Note: You choose an image or animated wallpaper from one of three locations:
Gallery, Live wallpapers or Wallpapers.
t Gallery refers to your own photo album.
t Live wallpapers contains animated wallpaper.
t Wallpapers contains still (unanimated) wallpaper.
Launcher Settings
The Launcher Settings is where you customize the appearance of the Home Screen
items and tabs.
Customizing the Home Screen Tabs
You can change the names, show or hide the tabs and set the default tab selected.
Home Screen Tab Label:
1 Press the Home button.
2 Press the Menu button.
3 Select Launcher Settings.
4 Select Tab Settings and then Tab Names.
5 Select the tab name you want to rename. The Rename dialog will appear.
6 Select the text entry box to display the onscreen keyboard.
7 Enter the new name. For more information on entering text, see “Onscreen
Keyboard” on page 37.
© 2012 3M. All Rights Reserved.
33
Page 34

3M™ Pocket Projector MP220
Show or Hide a Tab:
1 Press the Home button.
2 Press the Menu button.
3 Select Launcher Settings.
4 Select Tab Settings and then Show/Hide Tabs.
5 Place a checkmark beside the tabs you want to appear on the Home screen.
Set the Tab that is highlighted by default:
1 Press the Home button.
2 Press the Menu button.
3 Select Launcher Settings.
4 Select Tab Settings and then Default Tab.
5 Place a checkmark beside the tabs you want to appear on the Home screen.
Customizing the Icons on the Home Screen
You can customize the shortcut and widget icons that appear on the Home Screen.
You can choose to either display or not display the labels, icon shadows or large
icons.
Change Icon Appearance Settings:
1Press Home.
2Press Menu.
3 Select Launcher Settings.
4 Select Appearance Settings. The table below shows you how each setting
affects the icons on the Home screen.
Setting
Hide Icon Labels
Show Icon Showdows
Enlarge Icons
With Labels Without Labels
Without Shadow With Shadow
Small Icon
34
Large Icon
© 2012 3M. All Rights Reserved.
Page 35

3M™ Pocket Projector MP220
Restart Launcher
The Home Screen is an application called Launcher. If the Home Screen stops
responding, Restart Launcher will close and then reopen the Home Screen. When
you restart the Launcher, it does not affect the Home Screen appearance settings.
1 Press the Home button.
2 Press the Menu button.
3 Select Restart Launcher.
Restoring the Default Home Screen Setup
You can return the Home Screen to the factory default configuration. This is the
configuration you saw when you first used the software.
1 Press the Home button.
2 Press the Menu button.
3 Select Restore Defaults.
4 Select OK when the Restore Defaults dialog appears.
About 3M Launcher
This opens the About 3M Launcher screen which displays the software version and
copyright information.
App Launcher
The App Launcher is located at the bottom-center of the Home screen. When
opened, the App Launcher screen opens and displays all of the applications
installed on the projector.
To view all the applications installed on the projector:
1 Select the App Launcher. The App screen appears.
2 View the applications installed on the projector and select an application to
launch it.
Menus
The menus provide additional options for screen, application, settings or items on
the screen.
© 2012 3M. All Rights Reserved.
35
Page 36

3M™ Pocket Projector MP220
Options Menus
The options menus provide access to additional tasks related to the current screen.
Press the Menu Button to view menu. Some screens may not have a menu such the
Settings screens.
Opening an options menu: When viewing a screen or application, press the
Menu button. The options menu will appear at the bottom of the screen.
Close an option menu: While the options menu is open, press Menu and the
options menu will close.
Context Menus
The context menu provides additional options for a specific item the screen. For
example, you can select a file from a list in the video play and press Menu and the
delete option will appear.
Notifications
Icons that appear in the Notifications area of the status bar make you aware of
events occurring in the background. Notifications will appear when:
t a new video device is connected or
t the SD card is inserted.
Opening the Notification Panel
1 Press the Home button.
2 Press the Menu button.
3 Select Notifications. The Notifications panel displays.
Respond to Notifications
1 Open the Notification panel.
2 Select the notification and the Notification panel closes and depending on the
application – a new screen or dialog may appear.
Clearing Notifications
This will clear all inactive notifications.
1 Open the Notifications panel.
36
© 2012 3M. All Rights Reserved.
Page 37

3M™ Pocket Projector MP220
2 Select Clear at the top-right of the panel. All active notifications will remain.
Closing Notifications
Press the Back button
Onscreen Keyboard
You can enter text using the onscreen keyboard. Some applications open the
keyboard automatically (such as the Search app), but others require you to select
a text field. When the keyboard opens, the Touch Sensor automatically switches
to Mouse mode. When you exit the keyboard, the Touch Sensor will return to its
previous mode.
Selecting a Text Field
t Mouse Mode: Using the Touch Sensor, position the mouse pointer over the
text field. Press the Touch Sensor and the onscreen keyboard will display.
t Trackball Mode: Using the Touch Sensor, highlight the text field. A red
border around the text field and a cursor will appear. Press the Touch Sensor
to open the onscreen keyboard. The Touch Sensor will automatically switch to
Mouse mode while the onscreen keyboard is displayed.
Typing into Text Field
1 Select a text field.
2 Using the Touch Sensor, move the mouse pointer over a letter and press the
Touch Sensor to type text.
3 While you type, suggestions will appear below the text entry field.
Using the Suggestions While You Type
The suggestions offered by the onscreen keyboard are based on the keyboard
context.
t If you press the Search button and the keyboard displays, the suggestion will
be names of files and folder located on the projector or SD card.
t If you select a text field in a dialog or app, the suggestion will come from the
dictionary.
Whether the word you type is in the dictionary or not, the onscreen keyboard will try
to make suggestions.
© 2012 3M. All Rights Reserved.
37
Page 38

3M™ Pocket Projector MP220
1 The first suggestion is the original text that you typed. The bold, orange word
will be entered when you type a space or punctuation mark.
2 Select one of the suggestions and the underlined word in the text field will be
replaced by it.
3 When you press the spacebar, the suggestion bar will offer some common
punctuation marks.
Entering New Words into the Dictionary
The onscreen keyboard makes suggestions based on words stored in the dictionary.
You add new words to the dictionary as follows:
1 Type a word.
2 Move the mouse pointer over the word in the suggestions area.
3 Press and hold the Touch Sensor until the text is no longer underlined. The
next time you type, the word will show up as a suggestion.
38
© 2012 3M. All Rights Reserved.
Page 39

3M™ Pocket Projector MP220
1
2
4
5
8 9
1 Text Entry Area
2 Suggestions
3 Scroll Arrows
4 Keyboard
5 Shift and Caps Lock
6 Delete
7Done
8 Numbers and Symbols
9 Space/ Language Selection
Entering Numbers and Symbols
Select the Numbers and Symbols key and the keyboard will switch to number and
symbols. Press the Alt key to display addition symbols.
Entering Accented and Alternate Letters
Move the mouse pointer over the letter and press and hold the Touch Sensor. A
context menu will display the accented or alternate letter available. Type the letter
by moving the mouse pointer over the letter and pressing the Touch Sensor.
3
6
7
© 2012 3M. All Rights Reserved.
39
Page 40

3M™ Pocket Projector MP220
Accented and Alternate Letters
Accented and alternate letters display when you move the mouse point over the
letter and then press and hold the Touch Sensor.
Shortcut for Entering Commonly Used Punctuation and Symbols
Press and hold the “.” period key and a context menu displays with other
punctuation marks and symbols. Select one and it will be entered into the text field.
Changing the Keyboard Language
You can change the keyboard language using the spacebar. You select the language
you want to use in the Input Languages selection in the Language & keyboard
Settings.
1 Position the mouse pointer over the spacebar.
2 Press down and slide your finger across the Touch Sensor. You will see the
new language coming from the left or the right. Make sure the new language
is centered on the space bar before releasing the button.
40
© 2012 3M. All Rights Reserved.
Page 41
3M™ Pocket Projector MP220
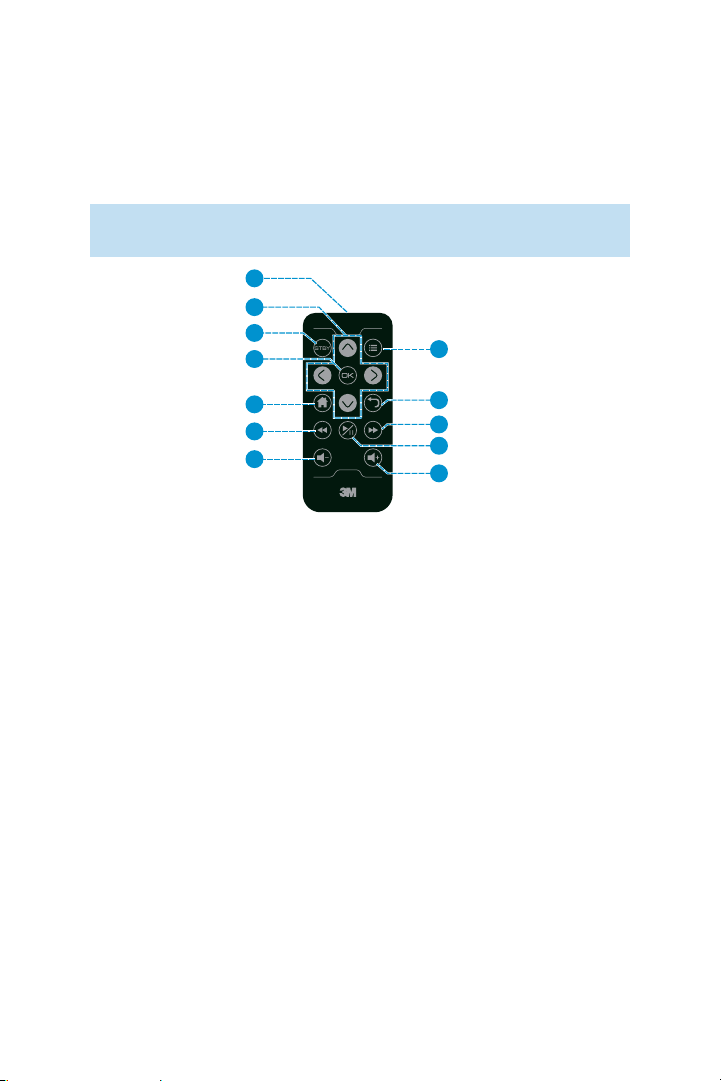
Remote Control (Optional Accessory)
The Remote Control for the 3M MP220 projector controls the projector's screens as
well as volume level on the projector, and video and audio playback.
Note: The remote control cannot be used for some operations such as typing
on the onscreen keyboard.
1
2
3
4
8
5
6
7
9
10
11
12
Button Descriptions
1 Infrared LED – Transmits remote control commands to projector.
2Arrow Buttons – Moves selector or cursor on the screen.
3Standby – Turns the projector's lamp off or on.
4OK Button – Press to select or click an item.
5 Home Button – Press to open the Home screen. Press and hold to open
recently used applications.
6Rewind – Rewinds video and music during playback.
7Volume Down - Decreases the audio volume.
8Menu Button – Press to open the menu for the current screen or application.
9Back Button – Press to open previous screen or closes onscreen keyboard.
10 Fast For ward – Advances video music playback.
11 Play/Pause - Start or Pause video or music playback.
12 Volu me Up – Increases the audio volume.
© 2012 3M. All Rights Reserved.
41
Page 42

3M™ Pocket Projector MP220
Remove Protective Film
Before you can begin using the battery, you must remove the protective film from
the battery compartment. Remove the film as shown below.
Using the Remote
When using the remote control, point the remote control's infrared transmitter at the
receiver on the projector. The receiver is beside volume up button.
Note: Sun light and some indoor lighting may reduce the range of the remote
control.
Replacing the Remote Battery
Replace the battery in the remote control with a CR2025 battery.
1 Remove the battery and
battery tray by holding latch
toward the center of the
tray and then pull the tray
out of the remote control.
latch
2 Place the new battery into
the tray and orientating the
battery positive size (+) as
indicated on the tray.
3 Finally Slide the tray into the
remote Control.
42
© 2012 3M. All Rights Reserved.
Page 43

3M™ Pocket Projector MP220
Search
The Search app performs a text search for folder, files, and applications. At the
bottom of the text entry box, a list of folders with the files that match, files that
match and applications with names that match will appear. The search button
opens the Search app and then you can enter search text. Select the file or
application you wish to open.
1
2
4
1 Text Entry Box
2 List of results
3 List Scroll Arrows
4 Keyboard
Searching for a file or app: Press the Search button and the Search app will
appear with a keyboard.
When the Search app appears, the Touch Sensor automatically switches to Mouse
mode for use with the keyboard.
Viewing more results: On either side of the results list, there are arrows. Press
the arrow and the next set of results will slide into view.
Search Settings
Your search results will contain applications or files. When you select an item from
the list of results, it is saved as a shortcut. The shortcut will be displayed in the bar
below the text entry box.
© 2012 3M. All Rights Reserved.
43
3
Page 44

3M™ Pocket Projector MP220
Filtering Searchable Items: You can narrow your search by removing apps or
files from searchable items. Remove the check mark beside the item you do not
wish to see in the results.
Clearing Shortcuts: Select Clear Shortcuts and a dialog will appear. Select OK.
Opening and Switching Applications
The App Launcher contains all of the installed applications. You can open the App
Launcher from the Home screen by selecting the App Launcher at the bottom
center of the screen. When you open an application, it continues to run in the
background after you leave it. This allows you to switch between application and
return to the previous screen instead of starting over.
For example, you can open a document using Documents To Go ™ and then return
to the App Launcher and open Video/ VGA Pass Through. While you are viewing
VGA Pass Through, you can quickly switch back to the opened document.
Note There is no need to exit applications because the projector’s operating
system manages the applications running in the background so that they do
not consume resources unnecessarily.
Open and Close the App Launcher
Select the Launcher Icon from the Home screen to open it.
Adding an application to Home screen from Launcher:
t Mouse Mode: Move the Mouse pointer over the application icon and press
and hold the Touch Sensor. The screen will switch from the Launcher screen
to the Home Screen. Move your finger across the Touch Sensor and position
the icon where you want it on the Home screen.
t Trackball Mode: Not available.
Opening an application: Select an application icon on the Launcher.
Switching to a recently used application: Press and hold the Home button. A
window will appear showing all recently used applications. Use the Touch Sensor to
select the application or press the Back button to return to the current screen.
44
© 2012 3M. All Rights Reserved.
Page 45

3M™ Pocket Projector MP220
Transferring Files to the Projector
The MP220 has both built-in memory and a removable microSD™ card where
you can place files. You can put files on the 3M MP220 projector using a USB
connection, or you can transfer files to a microSD card prior to inserting it into the
MP220. The following sections cover transferring files using a microSD card or a
USB connection.
Note: The projector cannot transfer files from the microSD card to the
projector’s internal memory.
Using the microSD Card Slot
The 3M MP220 projector has a microSD card slot that supports SDHC and can
read up to a 32 GB card. You can either place files on the card before you insert it
into the projector’s card slot or while the projector is connected to a USB port on
a computer. The projector must access (or mount) the file system on the SD Card
after a microSD is inserted.
TIP: Use a microSD card class 4 or higher for best performance.
Inserting the microSD Card
1 Open the microSD slot door.
2 Insert the microSD card into the microSD slot until it “clicks” into place.
3 Close the microSD door.
4 If the projector is on, it will mount the SD card and scan the files.
© 2012 3M. All Rights Reserved.
45
Page 46

3M™ Pocket Projector MP220
Notification Related to microSD Card
The following icons are notifications you will see when inserting or removing a
microSD card.
The microSD card is installed and the system preparing it for use.
The system is scanning the microSD card for media files.
The microSD card was unexpectedly removed.
The microSD card Remove SD card please insert a new one.
Removing the microSD Card
Before removing the microSD card, the projector must be told to unmount the card.
You will use the SD card & Local Storage Settings screen in Settings to unmount
the card.
Unmount microSD card:
1 Press the Home button.
2 Press the Menu button.
3 Select Settings.
4 Select SD card & local storage.
5 Select Unmount SD card and select OK in the Unmount SD card dialog.
6 A SD card safe to remove notification will appear in the status bar. Now the
SD card is ready for removal. See Ejecting the microSD Card for instructions.
Ejecting the microSD Card
1 Open the microSD slot door.
2 Push the microSD card into the microSD slot until it “clicks”.
3 Release the microSD card and the card will eject.
46
© 2012 3M. All Rights Reserved.
Page 47

3M™ Pocket Projector MP220
Using the USB Port
The MP220 has a USB connection located at the rear of the projector. You can
connect the MP220 projector to a computer and the computer can open both the
MP220 internal memory and microSD card like a disk drive.
Types of devices that may transfer data to the projector:
t Computers
t Netbooks
t Tablet s
Troubleshooting: If your computer is running Microsoft Windows, the USB
Flash drive may not be available on your computer’s Windows Explorer. Please
refer to KB297694 on the Microsoft support website.
Transfer Files Using USB
1 Turn on the projector.
2 Connect the USB cable to the projector.
3 Connect the USB cable to the computer. The projector screen will display the
USB Mass Storage screen
4 Select the Turn on USB Storage button and the USB Android icon will turn red.
5 Select OK when the Turn on USB storage dialog appears.
The projector will be detected as a removable drive labeled “Internal” by the
computer. The drive labeled "Internal" is the projector's on-board memory,
and "Removable Disk" is the microSD card installed into the projector. Note
that the first time you connect your projector to a computer, it may take the
computer some time to detect and install drivers for reading the memory on
the projector.
6 The projector is now ready to receive a file from your computer.
© 2012 3M. All Rights Reserved.
47
Page 48

3M™ Pocket Projector MP220
Disconnecting the Projector from the Computer USB Port
Before you disconnect the USB drive from the device’s USB port, you must properly
eject the removable drives on your computer or you may lose data.
Eject both removable drives on your computer operating system, as follows:
Eject a drive on computers running Microsoft Windows: Open Windows
Explorer, right-click the drive, and click Eject from the context menu.
Eject a drive on a computer running Apple Mac OS 10: Open finder, choose
the drive, and then choose File>Eject.
48
© 2012 3M. All Rights Reserved.
Page 49

3M™ Pocket Projector MP220
Video/VGA Pass Through
The Video/ VGA Pass Through application manages the VGA-AV port on the
projector. When you connect a video cable into this port, the application will
recognize it and open. Once open, the application will either display the video or
VGA image or a status message.
Opening and Exiting VGA Pass Through
Video/VGA Pass Through will open automatically when a cable is plugged into the
VGA-AV input on the project. If the projector detects a video or VGA, it will project
it by default. If you want to acknowledge the input before it is projected, you can
deselect DirectConnect option in the Preferences within the Video/VGA Pass
Through application.
Open Video/VGA Pass Through: Plug a cable into the VGA-A/V port on the
projector or select the app icon in App Launcher.
Exit Video/VGA Pass Through: Select the Exit button on the message screen or
press the Home button
Notifications
The Video/ VGA Pass Through will report changes using notification when the
application is not displayed on the screen. When you select the notification, it will
open the application.
Freeze Video Image
You can freeze (or pause) the image while an input source is connected. When the
image is frozen, changes in the image coming from your computer or video device
will not be displayed.
Freezing the Image: Press Menu and then select Freeze.
UnFreezing the Image: Press Menu and then select Live.
Mute Audio
You can mute the audio using Mute in the options menu.
Muting the Audio: Press Menu and then select Mute.
Unmuting the Audio: Press Menu and then select Unmute.
© 2012 3M. All Rights Reserved.
49
Page 50

3M™ Pocket Projector MP220
Blank Image
You can blank the image while a video input is playing.
Blanking the Image: Press Menu and then select Blank. A blue screen will
appear.
Resume the Image: Press Menu and then select Resume.
Image Capture
The Video/ VGA Pass Through application can capture paused video and computer
images. When an image is captured, the image is saved into the /DCIM/Camera
folder on the projector's onboard memory.
To capture an image: Press Menu and then select Capture. A message appears
when the image capture is complete.
Note: If you get a Save Failed message, the projector's memory is being
scanned or the microSD card is not mounted.
Settings
These settings let you change how you view the video image coming from a video
source. The projector displays a WSVGA image (or 1024x600 pixels) which is a
17:10 image.
Signal Aspect Ratio
Change the aspect ratio (width versus height) of the image. When you choose one
of the aspect ratios, the image is stretched or shrunk to that aspect ratio.
t Default – Aspect Ratio setting for the input resolution
t 4:3 – Scales the image to a 4:3 aspect ratio
t 16:9 – Scales the image to a 16:9 aspect ratio
t Native – Aspect Ratio scales the image to the projector native Aspect ratio,
17:10
Letterbox Cropping
Crops or cuts the image down to the specified aspect ratio.
Edge Cropping
50
© 2012 3M. All Rights Reserved.
Page 51

3M™ Pocket Projector MP220
This is similar to over scanning. Some older videos have noise along the edges of
the image. You use edge cropping to hide that noise.
Display Scaling
Scales the image to fit width, height, or both. Display scaling even displays the
native resolutions.
Making Connections
The 3M MP220 projector will display informational icons depending on the input
device and signal being detected. If no devices or input cables are connected to the
projector, the Home screen will display. The 3M MP220 was designed to operate
with 3M VGA and AV cables only.
Tip: The video output on some devices is turned off by default. Please refer to
the device’s documentation for details on enabling the video output.
Connecting to a Composite Video Device (requires optional
accessory)
For standard (composite) video input, you must purchase the optional 3M MP220
Composite AV Cable. Use the composite AV cable to input video from camcorders,
digital cameras, DVD players and digital media players into the VGA-AV input on the
projector.
1 Connect the AV cable to the projector’s VGA-AV input.
2 Connect the other end of the AV cable to the video device’s audio and video
outputs.
© 2012 3M. All Rights Reserved.
51
Page 52

3M™ Pocket Projector MP220
Tip: Some video devices do not have the standard audio and video connections
and may require an AV cable specified by the manufacturer. The AV cable
allows you to connect your video device to your TV monitor or your projector
and may be purchased from the video device manufacturer. Once you have
the AV cable, use the cable adapters to connect the video device cable and the
projector cable.
Connecting to a Component Video Device (requires optional
accessory)
For component video input, you must purchase the optional 3M MP220 Component
AV Cable. This cable sends a higher quality video signal for the best possible image.
1 Connect the component AV cable to the projector’s VGA-AV input.
2 Connect the other end of the AV cable to the video device’s audio and video
outputs.
52
© 2012 3M. All Rights Reserved.
Page 53

3M™ Pocket Projector MP220
Important Note: There are two red connectors on the Component AV cable.
One is for the right audio channel and the other is for the Pr component video
signal. Be careful to connect the red audio to red audio and red video to red
video. If these connectors are switched, the projected image will appear green
and an abnormal noise will come from the right speaker.
Tip: Some video devices do not have the standard audio and video connections
and may require an AV cable specified by the manufacturer. The AV cable
allows you to connect your video device to your TV monitor or your projector
and may be purchased from the video device manufacturer. Once you have
the AV cable, use the cable adapters to connect the video device cable and the
projector cable.
Some video devices, by default, will not output a video signal. The video
device’s manual should provide instructions on how to change the video
output setting.
Connecting to a Computer (requires optional accessory)
For VGA-audio input, you must purchase the optional 3M MP220 VGA-audio Cable.
Use the VGA-audio cable to connect the projector to home screen computers,
laptop computers, ultra-portable computers and some personal digital assistants
(PDAs). The projector supports VGA, SVGA, XGA, and WXGA resolutions. For best
results, set the computer’s resolution to WXGA (1024x600).
1 Connect the VGA-audio cable to the 3M MP220 projector.
© 2012 3M. All Rights Reserved.
53
Page 54

3M™ Pocket Projector MP220
2 Connect the VGA-audio cable to the computer’s video and audio outputs.
3 Set the computer resolution to one of the supported resolutions.
Description Resolution (width x height) Refresh Rate
VGA 640 x 480 60 Hz
SVGA 800 x 600 60 Hz
XGA 1024 x 768 60 Hz
WXGA 1280 x 768 60 Hz
1366 x 768 60 Hz
1024 x 600 60 Hz
1280 x 960 60 Hz
1440 x 900 60 Hz
MAC 640 x 480 67 Hz
832 x 624 75 Hz
1152 x 870 75 Hz
54
© 2012 3M. All Rights Reserved.
Page 55

3M™ Pocket Projector MP220
Gallery
You can use the Gallery to view pictures that you’ve downloaded onto the projector’s
internal memory or the SD card. You can also perform basic photo editing and set
use the photo as your Home screen wallpaper.
1
2
3
1 Current Open Folder
2 Photos taken with the Video/VGA Pass Through application.
3 Photos in a Folder/Album
Note: Video will not appear in Gallery. If you want to view a list of videos or
play a video you need to use Video Player.
Opening Gallery
Open Gallery to view albums (or folders) of your pictures:
1 Select Gallery from App Launcher or your Home Screen.
2 Once open, Gallery displays pictures from the project’s internal memory and
SD card. Gallery may take seconds to a few minutes to display your entire
album depending on the amount of photos.
Picture Albums
Albums are folders containing pictures that are located on the projector’s internal
memory and SD card.
© 2012 3M. All Rights Reserved.
55
Page 56

3M™ Pocket Projector MP220
Opening an Album and Viewing Its Contents
1Open Gallery.
2 Select the Album that contains pictures you want to view. The screen will
display pictures in a chronological ordered grid. The Album name will appear
at the top of the screen.
3 Select the photo you want to view.
1 2 3 4
1 Name of Album
2 Picture Thumbnails
3 Highlighted Picture
4 Grid/Stack View switch
56
© 2012 3M. All Rights Reserved.
Page 57

3M™ Pocket Projector MP220
Changing How the Contents of an Album Are Displayed
There are two ways to view pictures in Gallery:
t Chronological grid, or
t Stacks.
The pictures are sorted by date in both views.
Grid View
Stack View
Switching between Grid and Stack views:
1 Select an Album.
2 Move the mouse pointer to the Album View switch.
3 Press the Touch Sensor.
4 Move the switch to change the view to either grid or stacks view.
Note: If you don’t see the mouse pointer, switch mouse modes. For more detail
on switching the mouse modes, see Switching Between Mouse and Trackball
Mode.
Getting Details about an Album
1 Press the Menu button twice.
2 Place a checkmark on the albums you want details about.
3 Select More and a menu appears.
4 Select Details and a dialog will appear.
© 2012 3M. All Rights Reserved.
57
Page 58

3M™ Pocket Projector MP220
Deleting an Album
You can delete the entire album and all of its contents from internal memory or the
SD card.
1 Press the Menu button twice.
2 Place a checkmark on the albums and files you want to delete.
3 Select Delete and a confirmation dialog will appear.
4 Select Confirm Delete. Select Cancel if you do not want to delete the albums
and files.
Pictures
Use the Gallery to view picture(s) on the internal memory and the SD card. You can
view, edit, or delete these pictures.
Viewing and Browsing Pictures
1Open Gallery.
2 Open an album.
3 Select a picture.
1
2
1 Album Location
3 4 5
58
© 2012 3M. All Rights Reserved.
Page 59

3M™ Pocket Projector MP220
2 Picture
3 Start Slideshow
4Menu
5 Zoom controls
Opening Controls
If the controls are not visible while viewing a picture, press the Touch Sensor.
Select One of the Controls or Its Menus
t Mouse mode: Mover the mouse pointer over the control and press the Touch
Sensor.
t Trackball mode: After the control opens, move your finger from top to
bottom on the Touch Sensor and select control highlight.
Scrolling Through the Pictures
To scroll through the pictures in an album:
t Mouse Mode: In one motion, press and swipe your finger from across the
Touch Sensor from right to left to reveal the next picture in the album or folder.
Swipe your finger left to right to reveal previous picture in the album or folder.
t Trackball Mode: Move your finger across the Touch Sensor in the direction
you want to scroll the page.
Working with Pictures as a Group or Individually
You can work with a group of pictures or work with pictures individually. You can
perform the following actions on pictures:
t Get details,
t Delete,
t Rotate clockwise or counterclockwise,
t Set as wallpaper or
t Crop.
To select the album(s) or picture(s) you want to work with:
1 Open the album to view the pictures you want to work with
© 2012 3M. All Rights Reserved.
59
Page 60

3M™ Pocket Projector MP220
2 Open the Gallery Menu
t If a picture is highlighted already, press Menu once.
t If a picture is not highlighted, press Menu twice.
3 Place a checkmark on each picture you wish to work with.
t Mouse Mode: Move the mouse pointer over the picture and press the
Touch Sensor
t Trackball Mode: Use the Touch Sensor to move the highlighter over the
picture and press the Touch Sensor.
Note: You can press the Touch Sensor again to deselect (uncheck) the picture.
Getting Details About a Picture
1 Select a picture.
2 Open the controls.
3 Select More.
4 Select Details. A dialog will appear with the file title, type, date, album
location, and GPS location.
Rotating Pictures
1 Select the picture and open the control.
2 Select More and a menu opens.
3 Select either Rotate Right or Rotate Left. The picture will automatically save in
the new orientation.
Zooming a Picture
Quick Zoom In and Out
t Mouse Mode: Move the mouse pointer over area you want to zoom into and
quickly press the Touch Sensor twice (also known as a double click). Double
click again to zoom out.
t Trackball Mode: Press the Touch Sensor to zoom in and press the Touch
Sensor again to zoom back out.
60
© 2012 3M. All Rights Reserved.
Page 61

3M™ Pocket Projector MP220
Zoom In and Out Using the Plus and Minus Magnifying Glass
t Mouse Mode: Press the Touch Sensor to display the controls. Move the
mouse pointer over the – or + magnifying glass button and press the Touch
Sensor.
Panning a Zoomed Picture
t Mouse Mode: Once you zoomed in a picture, press and swipe your finger
from across the Touch Sensor you want to pan the picture.
t Trackball Mode: Once you zoomed in a picture, move your finger across the
Touch Sensor in the direction you want to pan the image.
Watching a Slideshow of Your Pictures
1 Select the picture and open the control.
2 Select Slideshow. A slideshow will begin.
3 Press the Touch Sensor to end the slideshow.
Setting Picture as Wallpaper
You can set a picture as the wallpaper on the Home screen.
1 Select a picture from the Gallery.
2 Open the control.
3 Press Menu button.
4 Select More button.
5 Select Set as wallpaper. The picture with a cropped area will appear.
6 After cropping the picture, select Save. Now the cropped picture will appear
on the Home screen.
Cropping Pictures
You can crop pictures and save the cropped portion of the picture to a file.
You can only crop using Mouse Mode.
1 Press the Touch Sensor on a picture to open the controls.
2 Select More.
© 2012 3M. All Rights Reserved.
61
Page 62

3M™ Pocket Projector MP220
3 Select Crop. The cropping rectangle appears on top of the picture.
t To move a cropped area, move the mouse pointer to the center of the
area and press and hold the Touch Sensor. Move your finger on the
Touch Sensor to move the cropped area.
t To increase or decrease the horizontal size, move the mouse pointer
near the orange, vertical lines and press and hold the Touch Sensor.
Move your finger to the right and left to change the size of the cropped
area.
t To increase or decrease the vertical size, move the mouse pointer near
the orange horizontal lines to change the size of the cropped area.
4 Select Save. The projector will save a copy of the cropped picture.
Delete a Picture
You can delete a picture from the projector’s internal memory or the SD card.
1 Open the controls
2 Press the Menu button
3 Select Delete and OK in the confirm delete dialog.
62
© 2012 3M. All Rights Reserved.
Page 63

3M™ Pocket Projector MP220
Music
You can organize and listen to music stored on the projector’s internal memory or
SD card.
Transferring Music Libraries
Music utilizes the same file and folder structure as many media player applications
for your computer. In most cases, you should be able to copy your song libraries
and playlist onto the projector’s memory or SD card.
Music searches the projector’s internal memory and SD card for supported audio
files and playlists. The supported audio formats are: MP3, M4A, AMR, MIDI,
and OGG Vorbis. It does not support audio files that contain DRM (Digital Rights
Management).
Once Music finds audio files, it looks for:
t The folder containing the songs and uses the folder's label as the album
name.
t A folder containing the album folder and uses the folder's label as the artist
name.
t Album art. The album art work must be in the same folder as the music and
be labeled “albumart.jpg”.
For best performance, place you music library into one folder such as a folder
labeled “Music” or “My Music”. For information about transferring files to the
projector, see Transferring Files to the Projector.
Opening Music and Working with Your Music Library
After you have copied your music to the projector, you can open Music and see your
library of music files. You can view your music files sorted either by Artist, Albums,
Songs, or in Playlist. The main screen for Music is called the Library.
© 2012 3M. All Rights Reserved.
63
Page 64

3M™ Pocket Projector MP220
Opening the Music Library
You can open the music library in one of two ways:
t Press the Home button, select the Media tab, and then select Music.
or
t Press the Home button, select the App Launcher and then select Music.
Note: When Music opens, it catalogs your audio files. The more audio files; the
longer it will take MUSIC to open. Most of the time, Music will open within a
few seconds.
Return to the library from any Music Screen: Press the Menu button and then
select Library or press the Back button.
Searching for a Artist, Album or Song
1 Begin the search:
t Mouse Mode: Select the sorted list you want to search.
t Track Mode: Highlight the sorted list you want to search and then move
the highlighter down into the list.
2 Press and hold the Menu button.
64
© 2012 3M. All Rights Reserved.
Page 65

3M™ Pocket Projector MP220
3 Use the keyboard to type in your text search.
4 Select Done. A list of results displays.
5 Press the back button to clear the results
Deleting a Song
When you delete a song, it is permanently removed from the projector or the SD
card.
Delete a song while in the library screen:
t Mouse Mode: Move the mouse pointer over the song. Press and hold the
Touch Sensor and the album context menu will appear. Select Delete and then
select OK in the delete confirmation dialog.
t Trackball Mode: Select a song. Press and hold the Touch Sensor and the
album dialog will appear. Select Delete and then select OK in the delete
confirmation dialog.
Delete a song while in the playback screen:
Press the Menu button. Select Delete and then select OK in the delete confirmation
dialog.
Playing Music
The MP220 has built-in speakers and headphone jack for listening to music. You
can use the Volume + and Volume – buttons to control the audio level (or volume)
for both. Music can play:
t a single song,
t an album,
t a playlist of songs or
t randomly shuffle songs.
Music can play songs while the projector’s lamp is off or while you are using other
applications.
Play a song from the Library: Select the song and the playback screen will
appear. The song will begin to play.
© 2012 3M. All Rights Reserved.
65
Page 66

3M™ Pocket Projector MP220
21
3 4
9
5
1110 13 14
1 Now Playing
2 Album artwo
rk
3 Now Playing List
4 Shuffle All
5 Repeat Current or Repeat All Songs
6Artist
7Album
8Song
9Play time
10 Playback Progress Slider
11 Previous Song
12 Play/Pause
13 Next S ong
14 Song Time
6 7 8
12
66
© 2012 3M. All Rights Reserved.
Page 67

3M™ Pocket Projector MP220
Opening or Returning to the Playback Screen
The Playback screen automatically opens when you select a song to play. You can
leave the Playback screen without affecting the song playback by pressing the
Home button or Back button.
Return to the Playback Screen Using Mouse and Trackball Mode
1 Press the Home button.
2 Press the Menu button.
3 Select notifications.
4 Select the song and the Playback screen will open.
Return to the Playback Screen While in the Music Library (Mouse Mode
only)
While the Music is on the screen, select the Now Playing tab.
Play All Songs in an Album
1 Select the Albums tab in the Library screen.
2 Select the album and a list of songs within the album will appear.
3 Press the Menu button and select Play all. Music will start playing all of the
songs in the album starting with the first song in the list. Music will stop when
it reaches the end of the album or when you stop playback.
Repeat a Song or All Songs
While the Playback screen is open, select the Repeat Button to toggle through the
repeat options.
Repeat All
Repeat only the Current Song
Repeat is off
Shuffle Currently Playing Playlist or Album
Select the Shuffle button to turn it on or off. Shuffle plays the current playlist or
album in random order.
© 2012 3M. All Rights Reserved.
67
Page 68

3M™ Pocket Projector MP220
Shuffle on
Shuffle off
Party Shuffle is on
Party Shuffle
Music plays all music on the projector (internal and SD card) in random order when
Party Shuffle is on.
Turning Party Shuffle on: Press the Menu button. Select Party Shuffle and Party
Shuffle will turn on or off.
Viewing the current Party Shuffle playlist: In the Playback screen, select Now
Playing button and the Now Playing screen will appear. Party Shuffle starts with six
songs on the playlist and then adds one more after each song in the playlist ends.
Saving the Party Shuffle playlist as a new playlist: While in the Now Playing
screen, press the Save as playlist. Type a name for the new playlist using the
onscreen keyboard and select Save.
Adding a Song to the Party Shuffle Playlist
t Mouse Mode: Move the mouse pointer over the song in the list. Press and
hold the Touch Sensor and the album context menu will appear. Select Add to
playlist and then select Current playlist.
t Trackball Mode: Select a song. Press and hold the Touch Sensor and the
album context menu will appear. Select Add to playlist and then select Current
playlist.
Playlists
Playlist helps you organize your favorite music into sets song, which you can play in
the order you set or in a shuffle.
Creating a Playlist
To create a playlist:
1 Add songs to a new playlist.
68
© 2012 3M. All Rights Reserved.
Page 69

3M™ Pocket Projector MP220
t Mouse Mode: Move the mouse pointer over the song. Press and hold
the Touch Sensor and the album context menu will appear. Select Add to
Playlist. Repeat these steps to add additional songs to the playlist.
t Trackball Mode: Select a song. Press and hold the Touch Sensor and
the album dialog will appear. Select Add to Playlist. Repeat these steps
to add additional songs to the playlist.
2 When you are finished adding songs, select New from the Add to Playlist
context menu.
3 Type the name of the new Playlist using the onscreen keyboard.
4 Select Save.
Add a Song to a Playlist
1 Select the playlist name.
2 Add songs to the playlist.
t Mouse Mode: Move the mouse pointer over the song. Press and hold
the Touch Sensor and the album context menu will appear. Select Add to
Playlist. Repeat these steps to add additional songs to the Playlist.
t Trackball Mode: Select a song. Press and hold the Touch Sensor and
the album dialog will appear. Select Add to Playlist. Repeat these steps
to add additional songs to the Playlist.
3 Select Save.
Remove a Song from a Playlist
1 Open a playlist.
2 Remove the song
t Mouse Mode: Move the mouse pointer over the song. Press and hold
the Touch Sensor and the song context menu will appear. Select Remove
from Playlist.
t Trackball Mode: Select a song. Press and hold the Touch Sensor and
the song dialog will appear. Select Remove from Playlist.
© 2012 3M. All Rights Reserved.
69
Page 70

3M™ Pocket Projector MP220
Rename or Delete a Playlist
1 In the Library screen, select the playlist.
2 Rename or delete the playlist:
t Mouse Mode: Move the mouse pointer over the song. Press and
hold the Touch Sensor and the song context menu will appear. Select
Rename or Delete.
t Trackball Mode: Select a song. Press and hold the Touch Sensor and
the song dialog will appear. Select Rename or Delete
Create Playlists on Your Computer
You can use playlists you have created on your computer in MUSIC. Music supports
the following computer playlist formats: M3U, WPL, and PLS. You copy your playlist
file onto the projector’s internal memory or SD card in the same folder or directory
as the music.
You can create a playlist using a text editor program using the following guidelines:
t Enter each song file name that you want in the playlist.
t Save the file with a M3U extension. For example, myplaylist.m3u.
70
© 2012 3M. All Rights Reserved.
Page 71

3M™ Pocket Projector MP220
Video Player
The Video player plays video stored on the internal memory and SD card. You can
control the video playback and repeat a video. When you open Video Player, Video
Player searches for supported video files and displays them in a list.
The Video Player supports the following file extensions, video and audio codecs and
resolutions.
Video File Support*: mp4, m4a, m4v, mov, avi, Xvid, mkv,mka, Xvid, 3gp, 3gpp,
3g2, 3ggp2
Audio File Support*: mp4, m4a, mp3, aac, adif, adts, wav, amr, awb, ogg, oga,
mka*
Video Codec Support: MPEG4(SP/ASP), Xvid, DivX 4/5, H.264
Audio Codec Support: MP3, ACC(LC, LTP, HEv1, HEv2), AMR-NB, AMR-WB,
MSADPCM, PCM, Vorbis
*The MP220 may not support a specific file, although it is listed, because the video
or audio stream embedded into the file is not supported.
List of videos
This screen shows all of the folders or directory where video files are located.
1
2
1 Root folder for the SD Card (SD_CARD)
2Video files
3 Number of video files in folder
© 2012 3M. All Rights Reserved.
71
3
Page 72

3M™ Pocket Projector MP220
Playing Videos
Select one of the video files and the video will start to play. When the play controls
disappear, you can press the Touch Sensor to display them again.
2 4 5 6 7 81 3
1 Play time
2 Aspect Ratio Options
3 Progress bar
4 Rewind video
5Play/Pause
6 Fast forward
7 Repeat
8 Total time
72
© 2012 3M. All Rights Reserved.
Page 73

3M™ Pocket Projector MP220
Controlling Video Playback
Rewind - Press to rewind within the current track. Press again to
rewind even faster, up to 64 times normal speed. The actual speed is
displayed above the play/pause button.
Play/pause - Press to play or pause the current track.
Fast forward - Press to fast forward within the current track. Press
again to fast forward even faster, up to 64 times normal speed. The
actual speed is displayed above the play/pause button.
Deleting Videos
1 While viewing a file list, press Menu
2 Select the file or files you want to delete.
3 Select the Delete button.
4 Select Confirm Delete.
Compatible Video Formats
Video File Support*: mp4, m4a, m4v, mov, avi, Xvid, mkv,mka, Xvid, 3gp, 3gpp,
3g2, 3ggp2
Audio File Support*: mp4, m4a, mp3, aac, adif, adts, wav, amr, awb, ogg, oga,
mka*
Video Codec Support: MPEG4(SP/ASP), Xvid, DivX 4/5, H.264
Audio Codec Support: MP3, ACC(LC, LTP, HEv1, HEv2), AMR-NB, AMR-WB,
MSADPCM, PCM, Vorbis
*The MP220 may not support a specific file, although it is listed, because the video
or audio stream embedded into the file is not supported.
© 2012 3M. All Rights Reserved.
73
Page 74

3M™ Pocket Projector MP220
Clock
The clock application not only displays the time but gives you quick access to
photo slides, music and alarms. You can also dim the projector while the clock is
displayed. After a few minutes the Clock screen will go into screen-saver mode.
Opening the Clock
Select Clock on the Home screen or in the Launcher.
1
3
4
5 6 7 8
1 Next Alarm – The next alarm that will sound.
2 Dim – Puts the clock screen into dim mode.
3 Time – This is the current system time.
4 Date – This is the current system date.
5 Alarms – Opens the alarms screen.
6 Photo SlideShow – Opens gallery and allow you to start a photo slideshow.
7 Music – Open music and allows you to play a song, album or playlist.
8 Home – Returns you to the Home screen
2
74
© 2012 3M. All Rights Reserved.
Page 75

3M™ Pocket Projector MP220
Dimming the Clock Screen
Dim the clock screen by selecting the Dim button. Select the Dim button again to
return to normal brightness.
Note: Dimming the Clock screen does not reduce the amount of power used
by the projector. In turn, it does not save battery power.
Playing a Slideshow
You can replace the Clock screen with a photo slideshow from your Gallery albums.
Start the slideshow: Select the Photo Slideshow button and the slideshow will
begin.
End the slideshow: Press the Back button.
Playing Music
You can play music while the Clock screen is displayed.
1 Press the Music icon and the Music application opens.
2 Select the song, album or playlist.
3 After the music begins, return to the Clock by pressing the Back button,
pressing and holding the Home button and then selecting Clock.
For more about music, see “Music” on page 63.
© 2012 3M. All Rights Reserved.
75
Page 76

3M™ Pocket Projector MP220
Setting the Alarms
You can set an alarm by modifying an existing alarm or by setting a new one.
Opening Alarms
t Select Alarm button at the bottom of the clock screen.
t Press the Menu button and select Alarms from the options menu.
1
2
3
54
1Add alarm
2Alarms
3 Alarm on/off indicator
4 Return to main Clock screen.
5 Current Time.
76
© 2012 3M. All Rights Reserved.
Page 77

3M™ Pocket Projector MP220
Turn an Alarm On or Off
1 Select an Alarm and press the Touch Sensor to open Set alarm screen.
2 Select Turn alarm on
3 Press the Touch Sensor to check or uncheck Turn alarm on.
Other Alarm Features
While in the Set alarm screen, you can change the time of the alarm; define how
often the alarm goes off; select a ringtone for the alarm; and finally you can label
the alarm.
© 2012 3M. All Rights Reserved.
77
Page 78

3M™ Pocket Projector MP220
Documents To Go
The 3M MP220 projector comes with Documents To Go standard version.
Documents to Go supports Microsoft® Office files such as:
t Word documents,
t Excel workbooks, and
t PowerPoint slideshows.
This version allows you to view, edit and save files.
Registering Documents To Go and Upgrading to the Full
Version
The MP220 does not have a network connection such as Wi-Fi or mobile network.
Therefore, you cannot register or upgrade Documents To Go. When you come to the
registration screen, select Later.
Documents to Go Home Screen
The Documents to Go Home Screen is the starting point when you launch
Documents to Go.
Important Note: The Home Screen Menu options with a lock next to them are
locked and are only available in the Full Version.
78
© 2012 3M. All Rights Reserved.
Page 79

3M™ Pocket Projector MP220
1
2
3
87 9
1 Recent Files – Displays recently viewed files.
2 Local Files – List of files located on your projector’s internal memory and SD
card.
3 Desktop Files – Not supported in the standard version.
4 Starred Files – Displays all files marked as starred. A star appears to the right
of the file. The starred files will appear when viewing the Starred Files list from
the Home Screen.
5 Google Docs – Not supported in the standard version.
6 Upgrade Store – Not supported in the standard version.
7 New Document
8 Locked Feature
– Not supported in the standard version.
– The standard version has some limitations compared to
the Full version. The features that are not available have a lock to the right of
them.
9Settings
– About shows the version of Documents To Go. The Register,
Check for Updates and Give Us Feedback selections are not supported in the
standard version. Only Remember Last Location is supported under Advanced
Options. Remember Last Location brings you back to the last file location you
were in when you last closed Documents To Go.
4
5
6
© 2012 3M. All Rights Reserved.
79
Page 80

3M™ Pocket Projector MP220
Documents To Go Files Screen
After transferring files to the projector’s internal memory or SD card, you can locate
and manage your files and folders on the Files screen.
3 74 85 96 10
1
2
11
1 Current Files Screen – Displays the name of the current file screen that you
have opened: Recent, Local or Starred.
2 Folder Path – Displays the folder path for files which are located in the internal
memory or SD card.
Root Directories for the Internal Memory and microSD card:
Internal Memory – /SD Card/
microSD Card – /SD Card/SD_CARD/
3 Upper Level Folder
4 Selector
– Places a checkbox before the files and folders that you want to
delete or display information.
5 New File
6 Delete
– Not supported in the standard version.
– Deletes all files or folders selected for deletion.
7 Information
8 Send Via Email
9Sort
– Not supported in the standard version.
– Takes you to the upper level (or parent) folder.
– Displays the selected files or folders properties.
– Not supported in the standard version.
80
© 2012 3M. All Rights Reserved.
Page 81

3M™ Pocket Projector MP220
10 Filter – Not supported in the standard version.
11 Star
– Displays when a file is marked as starred.
Locating a Document, Workbook, or Slideshow File
1 From the Documents to Go Home screen, select Local Files. A list of files and
folder appears.
2 Select the folder that contains the file you are looking for.
t Mouse Mode: Select the folder by pressing the Touch Sensor. The
folder opens with a list of files.
t Trackball Mode: Highlight the folder by pressing the Touch Sensor. The
folder opens with a list of files.
3 If you want to go back one level in the folder structure, select the Upper Level
Folder
icon.
Deleting Files or Folders
You can delete one or more files or folders using your Mouse or Trackball.
Delete One File or Folder
1 Select the file or folder you want to delete.
t Mouse Mode: Position the mouse pointer over the file or folder name
you want to delete.
t Trackball Mode: Highlight the file or folder you want to delete.
2 Choose Select.
3 Click Delete.
4 When the Delete confirmation dialog appears, click Yes. The file or folder is
deleted.
© 2012 3M. All Rights Reserved.
81
Page 82

3M™ Pocket Projector MP220
Select the file or
folder you want to
delete.
Click Select and
then click Delete.
Click Yes to
confirm the
deletion.
82
© 2012 3M. All Rights Reserved.
Page 83

3M™ Pocket Projector MP220
The file is removed
from the list.
Delete One or More Files or Folders
1 Choose Select.
2 Place checkmarks next to each file or folder you want to delete.
t Mouse Mode: Position the mouse pointer over the checkmark to the
left of the file or folder you want to delete. Press the Touch Sensor to
place a check next to the file or folder name.
t Trackball Mode: Highlight the file or folder you want to delete. Move
your finger from left to right across the Touch Sensor. A checkmark
appears next to the file or folder name.
3 Repeat Step 2 for each file and folder you want to delete.
4 Click Delete.
5 When the Delete confirmation dialog appears, click Yes. The files or folders
are deleted.
Starring and Unstarring Files
When you star a file or files, the files appear in the Starred Files screen. Starring
makes it quick and easy to access files no matter where they are located. You can
also unstar files.
Starring a File
1 Select the file you want to star.
2 Star the selected file.
© 2012 3M. All Rights Reserved.
83
Page 84

3M™ Pocket Projector MP220
t Mouse Mode: Position the mouse pointer over the star located in the
same row as the filename and press the Touch Sensor. The star is
highlighted.
t Trackball Mode: Highlight the file you want to star and drag your finger
from left to right across the Touch Sensor. The star is highlighted.
Unstarring a File
1 Select the file you want to unstar.
2 Unstar the selected file.
t Mouse Mode: Position the mouse pointer over the star located in the
same row as the filename and press the Touch Sensor. The star is no
longer highlighted.
t Trackball Mode: Highlight the file you want to unstar and drag your
finger from right to left across the Touch Sensor. The star is no longer
highlighted.
Opening Files
After you have located the file you want to open, open the file:
Mouse Mode: Position the mouse pointer over the file you want to open and press
the Touch Sensor. The file opens.
Trackball Mode: Highlight the file you want open and press the Touch Sensor.
The file opens.
84
© 2012 3M. All Rights Reserved.
Page 85

3M™ Pocket Projector MP220
Documents To Go Supported File Formats
Documents To Go supports the following files formats.
t Word 97, 2000, X, XP, 2003, 2007, 2010 for Windows
t Word 98, 2001, 2004, 2008 for Macintosh
t Excel 97, 2000, X, XP, 2003, 2007, 2010 for Windows
t Excel 98, 2001, 2004, 2008 for Macintosh
t PowerPoint 97, 2000, X, XP, 2003, 2007, 2010 for Windows
t PowerPoint 98, 2001, 2004, 2008 for Macintosh
t Apple iWork '08 & '09 (iWork '05, '06 are not supported)
t PDF
t Text (.txt)
t Rich Text Format (.rtf)
t HTML (.html, .htm)
t Images (.bmp, .jpeg, .gif, .tif, .svg, .png)
Important Note: If a file in the file list is not supported by Documents To Go,
the application associated with the file will open instead. For example, if you
select a video from the file list, the video player will open and start playing the
video.
Documents To Go does not officially support documents created or edited with
Open Office, Star Office, or other non-Office ‘compatibility’ formats. While these
files may open in Documents To Go, it is not recommended to use these files with
Documents To Go.
File formats may be distinguished based on the file extension and icon for that file in
Documents To Go:
Example: Word 2007-2008 (top) vs. Word 97-2004 (bottom)
© 2012 3M. All Rights Reserved.
85
Page 86

3M™ Pocket Projector MP220
Documents to Go Settings
t About shows the version of Documents To Go.
t The Register, Check for Updates and Give Us Feedback selections are not
supported in the standard version.
t Only Remember Last Location is supported under Advanced Options.
Remember Last Location brings you back to the last file location you were in
when you last closed Documents To Go.
Word To Go™
Word To Go opens when you open a .doc or .docx file. While the file is opening,
a progress bar appears in the upper right-hand corner of the screen and some
functions, such as creating a new file, are disabled. Some files may take longer
than others due to their content and length.
Viewing and Navigating in a Document
While viewing a document, you can zoom and scroll up or down the page, go to the
top or bottom of the page, or go to a bookmark.
Changing the Page Zoom Level
1 Open the Zoom dialog by pressing the Menu button and selecting View.
2 Choose the zoom level. 100% is the default.
Changing the Zoom Level for an Individual Graphic
1 Place the cursor before the graphic.
2 Choose Selection Mode.
86
© 2012 3M. All Rights Reserved.
Page 87

3M™ Pocket Projector MP220
3 Select the graphic:
t Mouse Mode: Place the mouse pointer over the graphic.
t Trackball Mode: Place the cursor beside the graphic and move the
trackball from left to right to highlight the graphic.
4 Press Touch Sensor to bring the graphic into the zoom state screen.
t Mouse Mode: Click on the graphic and a plus and minus button
appears at the bottom of the screen. (The buttons disappear if you do
not use them within a few seconds.) Use the buttons to increase or
decrease the zoom level.
t Trackball Mode: To increase or decrease the graphic size, you need
to use Mouse Mode. To change to Mouse Mode, hold down the Search
button and follow the instructions above.
5 Press the Back button to return to the document.
Move the cursor
next to the
graphic you
want to zoom.
© 2012 3M. All Rights Reserved.
Choose
Selection Mode.
87
Page 88

3M™ Pocket Projector MP220
Highlight and click on the graphic. The graphic
appears in the zoom state screen.
For Mouse Mode only,
use the plus and minus
signs to increase or
decrease the size of
the graphic.
Scrolling Up or Down a Page
t Mouse Mode: Press the Touch Sensor down and drag your finger across the
button to scroll. Move the button quickly. Tap the button on the screen to stop
the scrolling.
t Trackball Mode: Move your finger across the button to scroll. It moves the
cursor up or down while moving the page up or down.
Go to the Top, Bottom of Document or Go to Bookmark
1 Open the Go dialog by pressing the Menu button.
2 Select View and then Go.
3 Choose Go to Top, Go to Bottom, or Go To Bookmark.
88
© 2012 3M. All Rights Reserved.
Page 89

3M™ Pocket Projector MP220
Icons You May See in a Document
Icon What it means
Headers, footers, comments.
Table of Contents
Object not supported
Basic Editing
You can select text or objects, such as graphics, and cut or copy the selections.
You can then paste the selection into another section of the document or another
document.
Selecting Text or Objects for Copy, Cut or Paste
1 Place the cursor where you want to begin or end the selection.
2 Enable Selection mode or Select All by pressing Menu.
3 Select Edit.
4 Choose Select. The Selection Mode will appear in the lower right-hand corner.
Selection Mode icon
5 Move the cursor up or down to select the text and objects.
6 Press the Touch Sensor. A context menu will appear with the following options
for the selected text or object:
t Cancel Selection – Exit Selection Mode and deselect.
t Copy – Copy the selected text and objects and exit Selection Mode
t Cut – Copy and then delete the selected text and objects and exit
Selection Mode
t Paste – Replace selected text and objects with previously copied text
and exit Selection Mode
© 2012 3M. All Rights Reserved.
89
Page 90
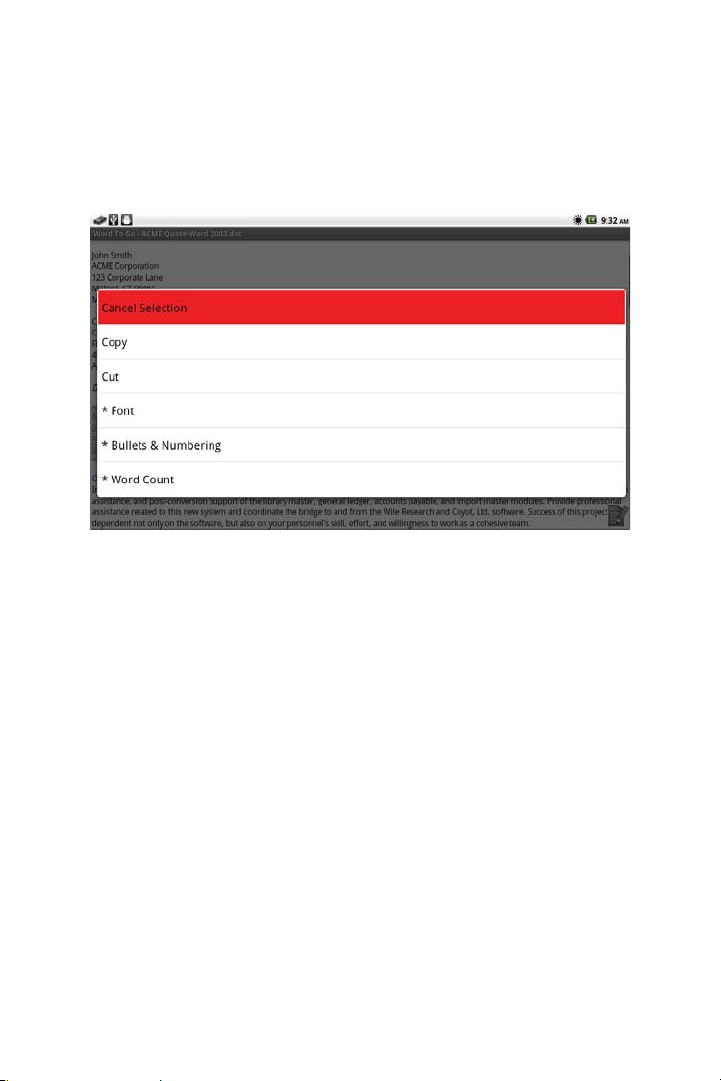
3M™ Pocket Projector MP220
t *Font – Not supported in the standard version.
t *Bullet & Numbering – Not supported in the standard version.
t *Word Count – Not supported in the standard version.
Finding Text in a Document
You can search your document for a word or sentence using the Find function.
1Press Menu.
2 Select View.
3 Select Find.
4 Type the text you want to find using the onscreen keyboard. Open the
onscreen keyboard by pressing the Touch Sensor.
5 Press the Enter button on the onscreen keyboard.
6 Select Find again to find the next occurrence in the document.
90
© 2012 3M. All Rights Reserved.
Page 91

3M™ Pocket Projector MP220
To find text in a
document, press Menu
and then select View.
Select Find and
type in text you want
to find using the
onscreen keyboard.
© 2012 3M. All Rights Reserved.
91
Page 92

3M™ Pocket Projector MP220
Find Options
t Case Sensitive - Finds matches to both text and character case (upper or
lower).
t Whole Words Only – Finds complete words only. For example, if you type
“boat” and do not select Whole Words Only, Find What will find “boat”,
“boathouse” and “sailboat”.
Note: Replace and Replace All is not a supported feature in the standard
version.
Viewing and Editing Tables
Tables will appear as they do in Microsoft Word excluding some table formatting,
such as border and cell color. You can select the text in the table.
Selecting a Cell
Mouse Mode: Position the mouse pointer inside the cell. Press the Touch Sensor
and the cursor will appear in the cell.
Trackball Mode: Move your finger across the Touch Sensor in the direction of the
cell and the selected cell is highlighted.
t Using Mouse Mode,
move the cursor into
the table cell you want
to edit.
t Press the Touch Sensor.
The cursor appears in
the cell.
92
© 2012 3M. All Rights Reserved.
Page 93

3M™ Pocket Projector MP220
t Using Trackball Mode,
use the Touch Sensor to
select a cell. The cell is
highlighted.
t The cursor appears in
the cell.
Editing a Table
Mouse Mode:
1 Press and hold the Menu button until the onscreen keyboard appears.
2 Make your changes using the onscreen keyboard.
3 When you are finished making changes, press Done.
Trackball Mode:
1 Press the Touch Sensor to enter the cell.
2 Press again to open the onscreen keyboard.
3 When you are finished making changes, press Done.
Exiting a Table Edit
Mouse Mode: Position the pointer outside the cell. Press the Touch Sensor to exit.
Trackball Mode: Press the Back button until the cell is highlighted again.
© 2012 3M. All Rights Reserved.
93
Page 94

3M™ Pocket Projector MP220
Selecting Hyperlinks
The 3M MP220 projector does not have a Wi-Fi or mobile network connection, so
hyperlinks that open web pages will not work.
Viewing and Editing Comments
You can view and edit the comments in a document. Each comment is preceded
by the author’s initials and a number. The author’s initials are the highlighted
characters within brackets.
Opening the Comments Pane
1 Press the Menu button.
2 Select View and then Comments. The Comments pane will open.
3 Move to the location in the document where the comment appears
t Mouse Mode: Position the mouse pointer over the comment’s author.
Press the Touch Sensor and you will be brought to that section in the
document.
t Trackball Mode: Move the cursor to one side of the comment’s author.
Move your finger across the Touch Sensor in the direction of the author.
The author is highlighted. Press the Touch Sensor and you will move to
the section of the document.
94
© 2012 3M. All Rights Reserved.
Page 95

3M™ Pocket Projector MP220
To add comments,
select View
and then select
Comments from
the menu.
© 2012 3M. All Rights Reserved.
The Comments
pane opens below
the document.
Press the Menu
button to use
the onscreen
keyboard.
95
Page 96

3M™ Pocket Projector MP220
Editing the Comments
1 Place the cursor in the location of the comment you wish to edit.
2 Press and hold the Menu button.
3 Use the onscreen keyboard to edit the text.
Closing the Comments Pane
Press the Back Button.
Word to Go™ Preferences
Only one preference is supported in the standard version. For this version,
preferences provide a way to fit the table to the screen width.
t Display table in compressed view – When checked, Word to Go fits the table
to the screen width.
Notes:
t The standard version of Word To Go does not handle cropped pictures. In
Microsoft Word, you need to delete the cropped area when compressing
the picture.
t Word To Go does not display tracked changes in the standard version.
t Word To Go Basic does not track changes made while editing in the
standard version.
96
© 2012 3M. All Rights Reserved.
Page 97

3M™ Pocket Projector MP220
Sheet To Go®
Sheet To Go opens an .xls or .xlsx file. While the file opens, a progress bar appears
in the upper right-hand corner of the screen and some functions such as creating
a new file are disabled. Some files may take longer than others due to their content
and length.
Files Supported
Sheet To Go opens Excel 1997–2003 (.xls) and Excel 2007-2010 (.xlsx) workbooks.
t Some features available in Microsoft Excel are not available in Sheet To Go.
t Some unsupported features are embedded objects and data validation
controls.
t Unsupported features are not affected when a workbook is edited or saved.
Viewing and Navigating a Spreadsheet
You can view and navigate within a spreadsheet and workbook files, edit cell
contents, and edit spreadsheet columns and rows.
When you select an .xls or .xlsx file, Sheet To Go opens and displays the
spreadsheet.
1 2
3
4
5
1 Name Box
2 Formula
© 2012 3M. All Rights Reserved.
97
Page 98

3M™ Pocket Projector MP220
3 Selected Cell
4Column Name
5 Row Number
Notes:
1 Picture, SmartArt, and charts are not displayed.
2 Chart sheets will not open. The word (CHART) appears beside the
worksheet name identifying that worksheet as a chart sheet.
3 When number data is greater than the column width, the cell displays
”####”.
Opening and Saving Workbooks
You can perform many file functions within Sheet To Go. Use the File dialog to open
and save your files.
Opening the File Dialog
1 While you have another file open, press the Menu button.
2 Select File and the File dialog will appear.
1 *New – Not supported in the standard version.
98
© 2012 3M. All Rights Reserved.
Page 99

3M™ Pocket Projector MP220
2 Open – Opens local files on the internal memory or SD Card.
3 Close – Closes the current file and returns you to Documents To Go.
4 Save – Saves your changes to the file.
5 Save As – Saves a copy of a file with changes under another filename and
location.
6 Send – Not supported in the standard version.
Viewing and Navigating Within a Spreadsheet and Workbook
The currently selected cell is noted by a black border around the cell and the cell
contents or formula will appear in the formula bar.
Selecting a Cell
Mouse Mode: Move the mouse pointer over the cell. Press the Touch Sensor.
Trackball Mode: Move your finger across the Touch Sensor in the direction of a
cell and the selector will move.
© 2012 3M. All Rights Reserved.
99
Page 100

3M™ Pocket Projector MP220
Selecting More Than One Cell or Range of Cells
1 Select a cell.
2 Press and hold the Touch Sensor. The context menu will appear.
3 Select "Selection Mode".
4 Select the furthest-diagonal cell from the initially selected cell and the
selected area will be grayed out.
Select the
furthest-diagonal
100
Selected area will
be grayed out.
© 2012 3M. All Rights Reserved.
 Loading...