

Page 1
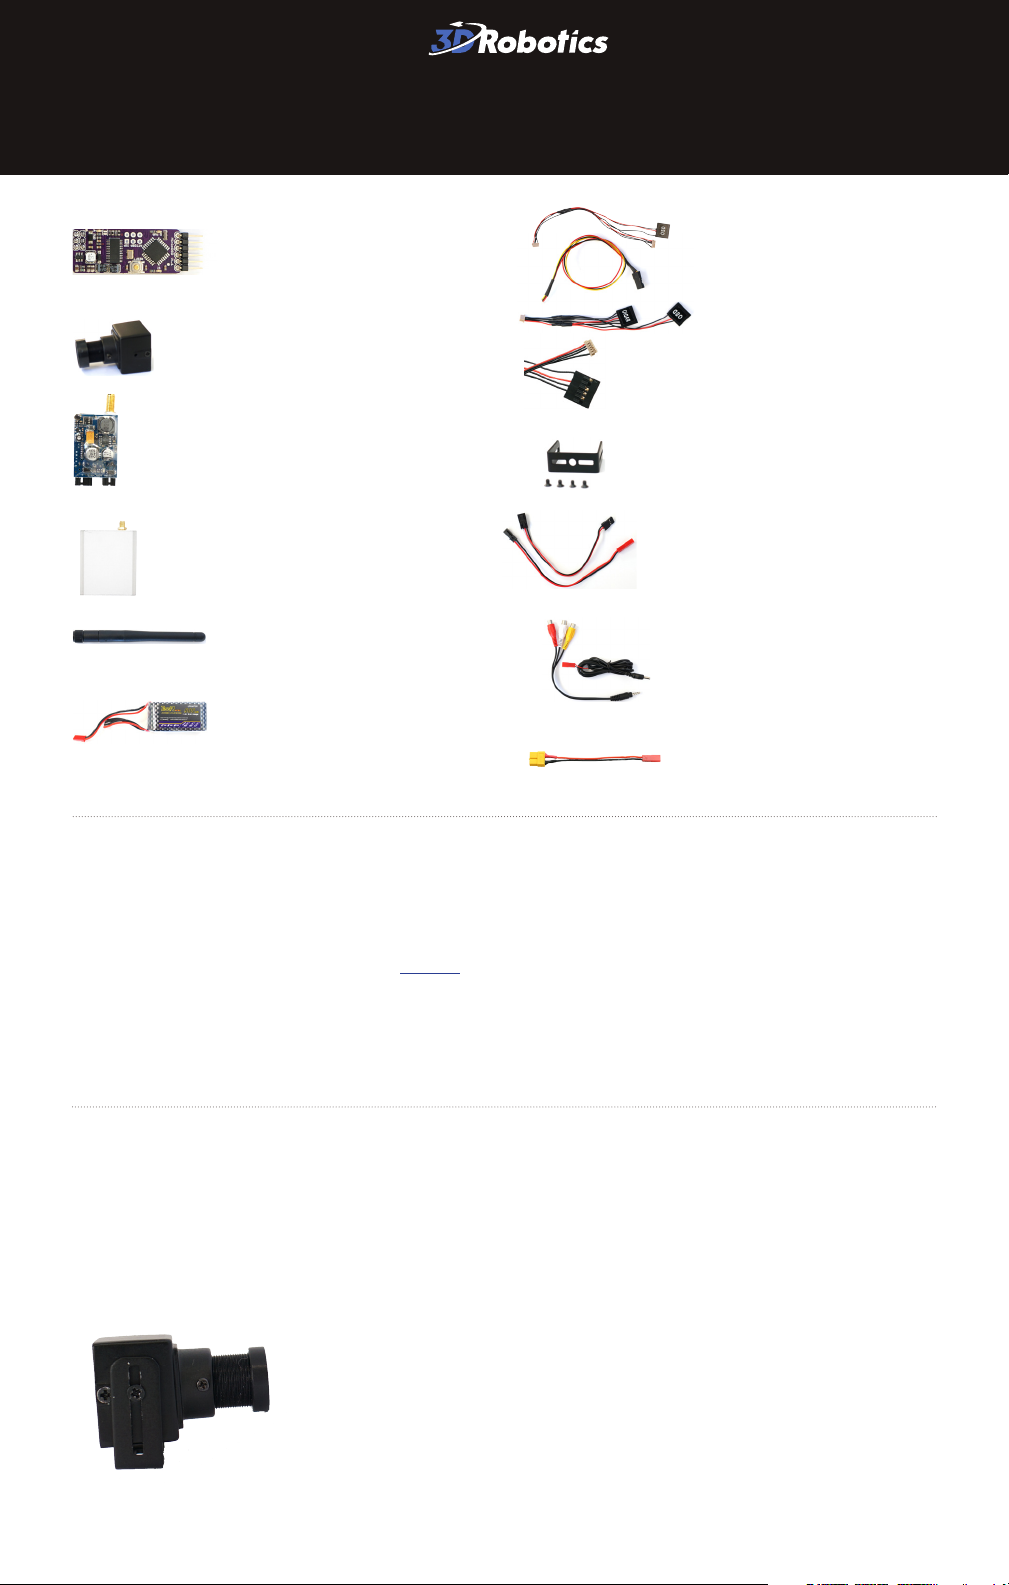
VIDEO/OSD KIT
MinimOSD board
Digital video camera
OSD cables
AV transmitter
AV receiver
Two antennas
Two 900 mAh
LiPo batteries
Thank you for purchasing a OSD/FPV Kit from 3D Robotics!
Your new, lightweight video setup allows you to capture onboard video from your
vehicle using a compact camera, overlay the video with important data from your
autopilot, and transmit the video in flight. This kit does not include a device to view
your video. Please see the section on page 7 for different options for viewing
the video transmitted by your kit.
Camera mount with two
screws plus two spares
Transmitter cables
Receiver cables
Battery charger
adapter
Attach camera mount
Position mount over bottom of camera and attach through the two small holes
on either side with the small screws. This will allow you to mount the camera to
your vehicle and adjust the angle of view.
Page 2
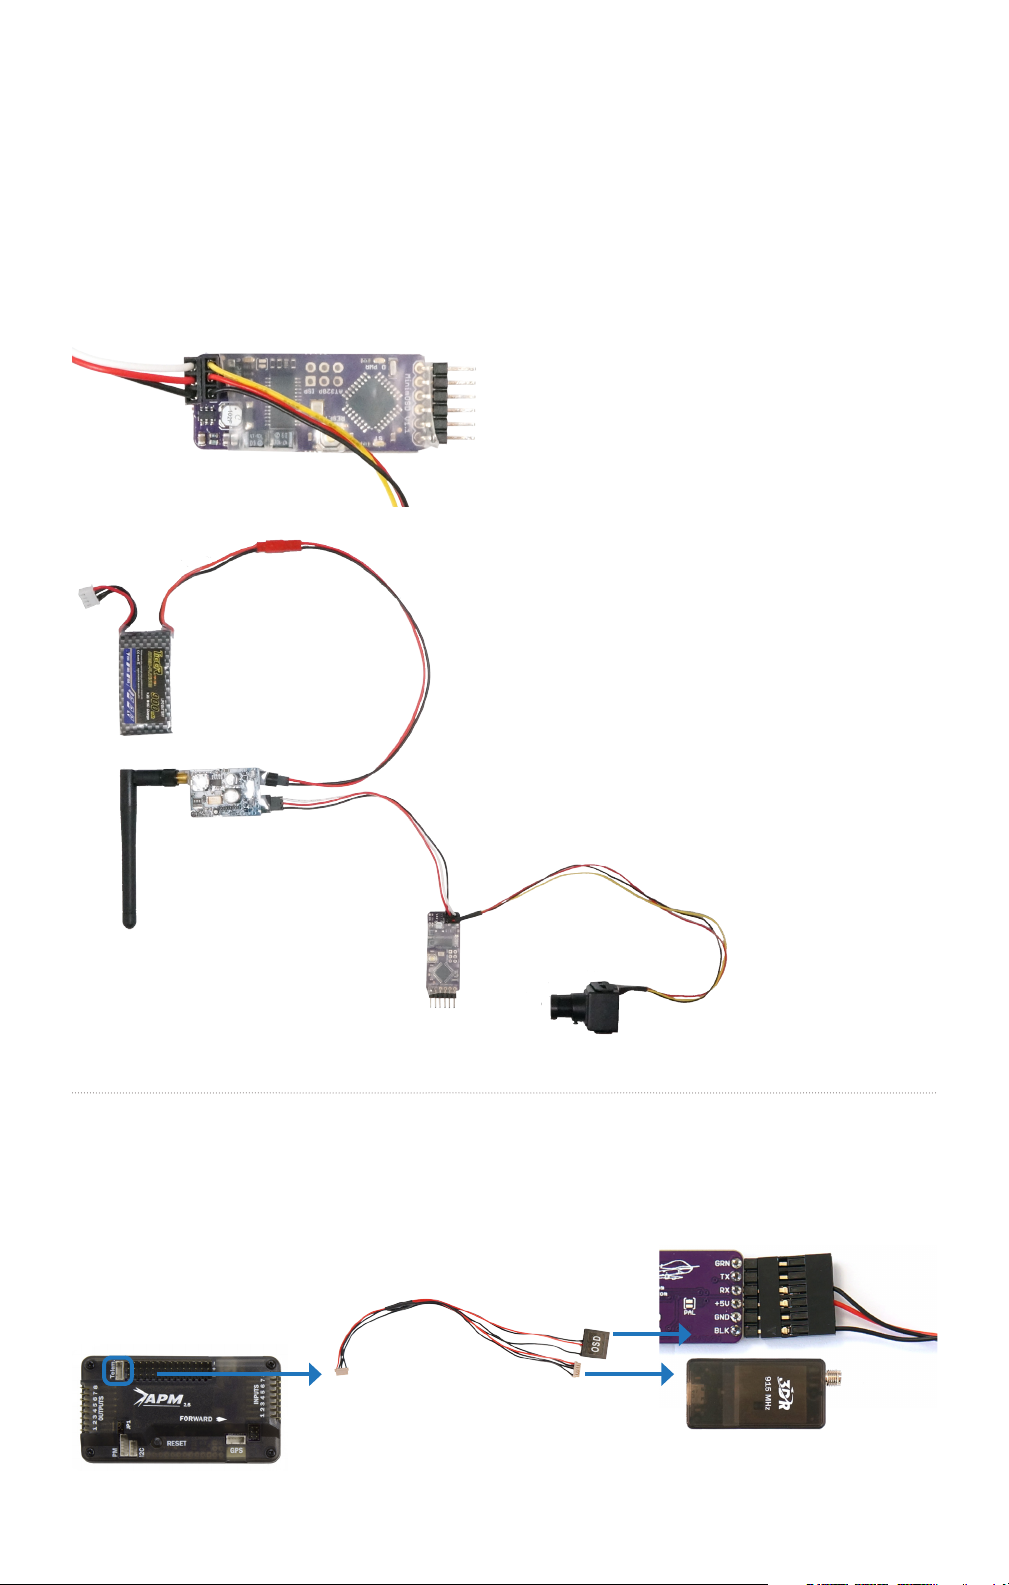
Connect camera and transmitter to OSD
Connect the black, red, and yellow three-wire cable to the camera and
to the three pins on the OSD labeled GND, +12V, and VIN with the black
wire connected to GND and the yellow wire connected to VIN.
Connect the red, black, and white three-wire cable to the transmitter and
to the three pins on the OSD labeled GND, +12V, and VOUT with the
black wire connected to GND and the white wire connected to VOUT.
Attach an antenna
to the transmitter.
Wire onboard components: APM and 3DR Radio V2
Connect the OSD and 3DR Radio to the APM Telem
port using the DF13 to DF13 and FTDI y-cable.
Ensure that the red wire connects to the pin on the
OSD labelled +5V.
Page 3
Connect the five-position connector to the APM Telem port and the FTDI connector to
the six pins on the OSD labeled GRN, TX, RX, +5V, GND, and BLK with the black wire
connected to pin marked BLK. Connect the 3DR Radio to the six-position connector.
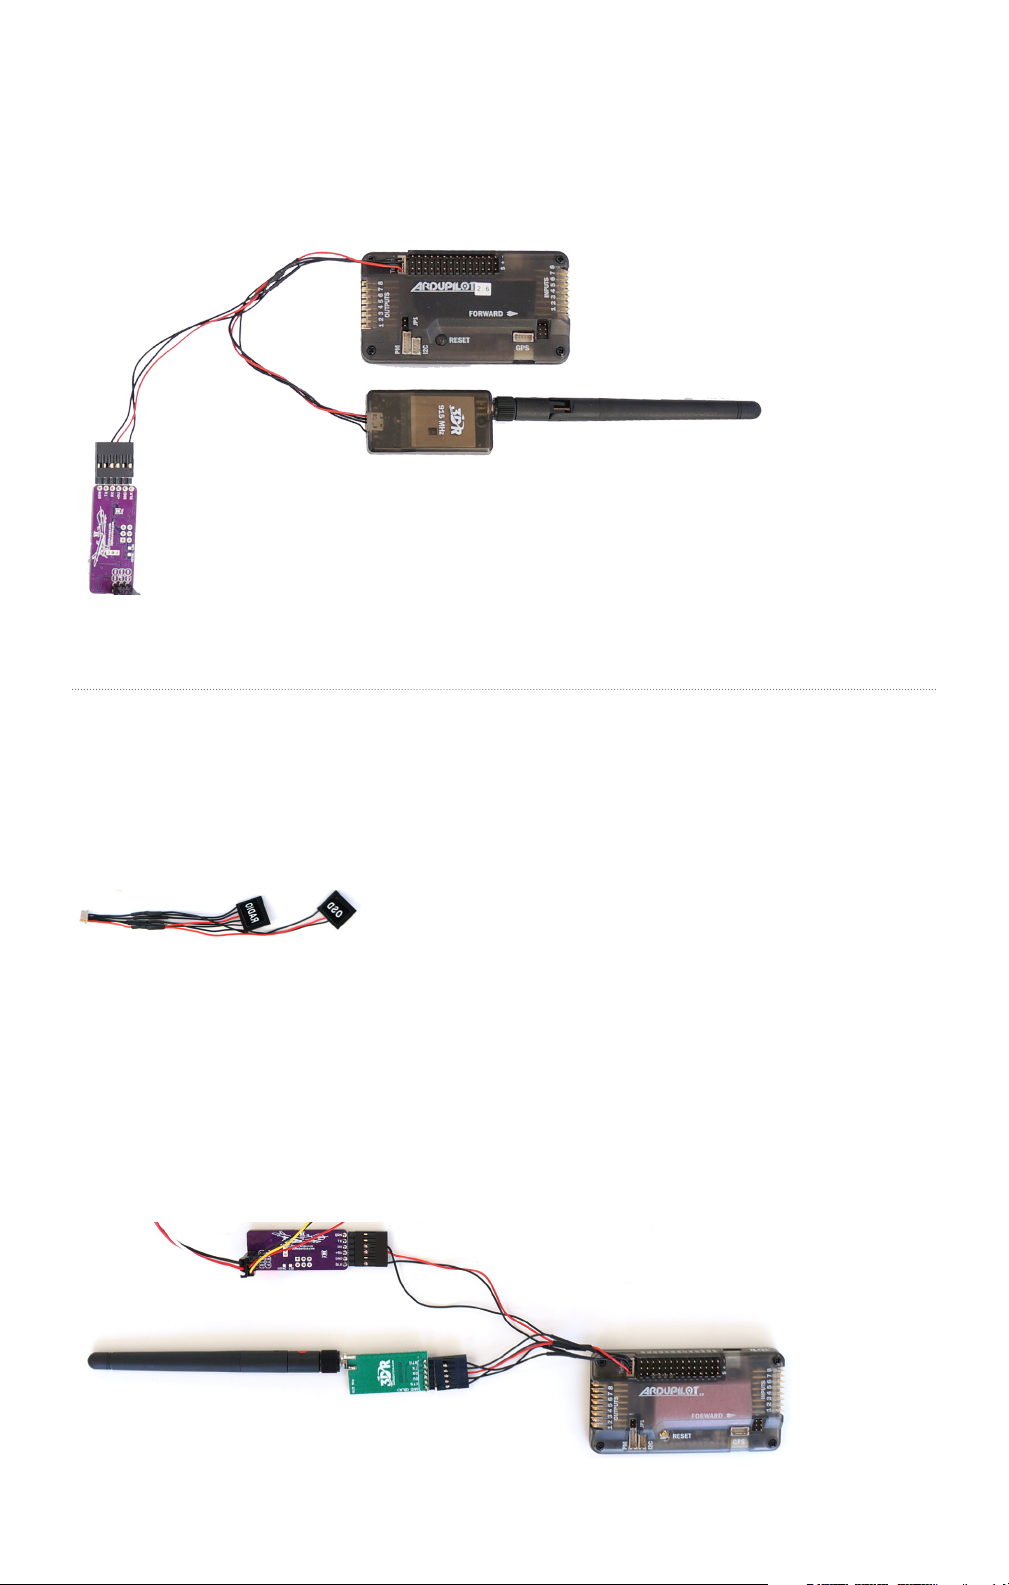
Wire onboard components: APM and 3DR Radio V1
Connect the OSD and 3DR Radio to the APM
Telem port using the DF13 to FTDI y-cable.
Connect the five-position connector to the APM Telem port and the OSD connector
to the six pins on the OSD labeled GRN, TX, RX, +5V, GND, and BLK with the black
wire connected to pin marked BLK. Connect the 3DR Radio to the connector labeled
RADIO with the red wire connected to the 5V pin.
Page 4

Wire onboard components: Pixhawk and 3DR Radio V2
Connect the OSD board to Pixhawk’s TELEM 2 port using the FTDI-to-DF13 cable
included with this kit. Connect the telemetry radio air module to Pixhawk’s TELEM 1
port using the four-position cable provided with the radios. Ensure that the red wire
connects to the pin on the OSD labelled +5V.
Mount components to vehicle
Place and mount the camera, MinimOSD board, and transmitter to your vehicle.
Ensure that the components are placed where the connectors will reach between
them, and where the MinimOSD can reach the autopilot.
3DR Y6
Page 5

Connect the red and black two-wire cable to the transmitter. When you are ready to
power your video system, attach a battery to the red connector. Mount the battery to
your vehicle in a secure location.
Wire and power receiver
Attach an antenna to the receiver. Connect the AV output cable to either receiver
AV OUT port. Connect the RC power cable to the receiver DC IN port, and attach
a battery to the red connector.
Please note that the AV output cable is a custom cable assembly and must be
purchased from 3D Robotics.
Page 6

Battery information
The transmitter and receiver are powered by 3-cell 11.1 V 900 mAh lithium
polymer (LiPo) batteries. Please charge the batteries before each use. Each
full battery provides approximately two hours of operation for your OSD/FPV
system.
Protect battery from extreme heat, extreme cold, puncturing, and flammable
surfaces. Charge battery using a designated LiPo balance charger only. Always
monitor battery while charging, and always fly with a fully charged battery.
Inspect battery for damage before takeo and after landing. If you observe
any swelling of the package or the battery ceases to function, locate your local
battery recycling center to dispose of the battery. In the US and Canada, visit
call2recycle.org to find a location. Do not dispose of the battery in the trash.
To charge the batteries using a 3DR RTF charger, set the charger to LIPO
and 1A. Connect the white battery connector to the 3S port, and connect
the XT60-JST charger adapter to the red battery connector and yellow
charger connector.
3S port
LIPO 1A
*Charger not included with kit
Page 7

Viewing your video
Power your vehicle, and connect the batteries to the transmitter and receiver to
activate your OSD/FPV setup.
We recommend the following devices for displaying the video transmitted by your
3DR Video Kit.
» FPV monitors are a great, portable solution for viewing your video at the field.
Purchase a monitor/receiver compatible with your kit at store.3drobotics.com.
» Turn your computer into a video capturing platform with this AV-USB adapter.
(This solution requires an AV male-to-male adapter.)
Transmitter specifications
» 5.8 GHz 200 mW wireless AV transmitter:
» Transmitter frequency / channel amount: 5705-5945 MHz / 8 CH
» Output power: 200 mW/33 dBm
» Frequency control: Built-in frequency & phase lock loop
» AV input: analog AV signal input
» ANT connector: RP-SMA
» Power supply: DC 7-12 volts
» Current supply: 850 mA
» Size: 68*26*28 mm
» Weight: 60 g (including antenna)
» Gross weight: 85 g
Receiver specifications
» 5.8GHz Wireless AV Receiver:
» Receiving Frequency:5705-5945MHz / 8CH
» Receiving Sensitivity:-90dBm
» Antenna connector: RP-SMA
» Power supply voltage:DC 7-12V
» Supply current: 150mA
» Dimension: 61*52*13mm
Page 8

Camera specifications
» Image device: 1/3” Sony Super HAD Color CCD
» Horizontal resolution: 520 TV line.
» Minimum illumination: 0.1 Lux
» Number of pixels: NTSC: 768(H) x 492(V)
» Scanning system: PAL: 625 lines, 50 field/sec; NTSC: 525 lines, 60 field/sec.
» Sync system: Internal synchronization
» Video output: 1Vp-p 75 Oms , Negative
» White balance: Auto
» S/N ratio: More than 48 dB (AGC off)
» Gamma characteristic: 0.45
» Electronic shutter: PAL : 1/50~1/100,000 sec; NTSC : 1/60~1/100,000 sec, auto
» Lens option: Pinhole lens, board lens, wide angle lens, vari-focal lens available.
» Power consumption: 12V±10%DC, 50mA.
» Operation temperature: -10° ~ + 50°, RH 95% Max.
» Storage temperature: -20° ~ + 60°, RH 95% Max.
» Dimension: 20x20 mm
» Weight: 1.1 oz
OSD specifications
» ATmega328P with Arduino bootloader
» MAX7456 monochrome on-screen display
» FTDI cable compatible pinout
» Standard 6-pin ISP header
» Two independent power sections with an LED indicator on each
» Solder jumpers for combining the power sections
» +5V 500 mA regulator for up to +12V supply input
» Solder jumper for PAL video option
» Exposed test points for HSYNC and LOS
» Dimensions: 0.7”W x 1.7”L (2.4” w/ pins as shown) x 0.3”H
Support
For customer support, contact us at help@3drobotics.com
or call our support line at +1 (858) 225-1414
Monday through Friday, from 8 am to 5 pm, PST.
OSD/FPV Kit Manual C | ©3D Robotics, Inc. | 26 June 2014
 Loading...