


IMPORTANT
Read before flying!
Operation Manual

Contents
01 |
Meet IRIS |
03 |
Parts |
04 |
Charging the Battery |
06 |
Attaching Propellers |
07 |
Safety and Failsafes |
08 Learn to Fly
11 Flight Modes
13Return to Launch
13Geofence
14First Flight
19Planning Missions
20Flying Missions
21Specifications and Resources
22Learn More and Support

Meet IRIS+.
Thank you for purchasing IRIS+.
IRIS is a personal aerial imaging platform powered by open-source hardware, software, and firmware. Please read this manual carefully before your first flight and pay close attention to safety information.
Happy flying!
Important note: When using a GoPro with IRIS, always ensure that the WiFi on the GoPro is turned OFF.
01
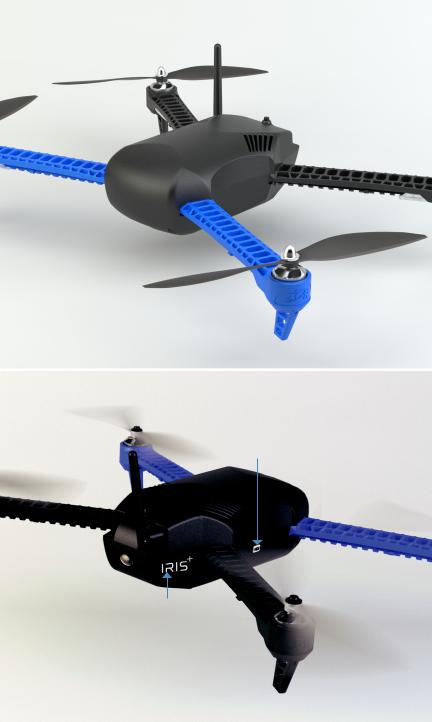
Front
antenna
 safety button
front arms (blue)
Rear
USB port
status LED 
battery compartment
rear arms (black)
02
Parts
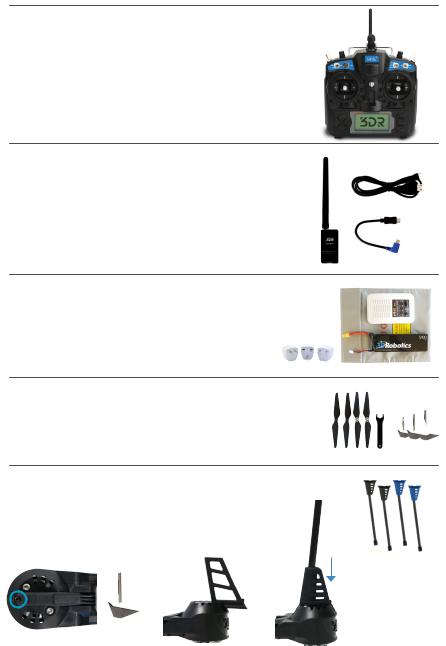
Controller
your direct link to IRIS
Ground station radio
with USB and Android adapters
Battery kit
battery, guard bag, and charger with international travel adapters
Propellers and tool kit
four propellers with propeller tool and small, medium, and large hex keys (1.5 mm, 2 mm, and 3 mm)
Tall legs
Switch to tall legs to use IRIS with the Tarot Gimbal or for extra clearance on landing.
Use the small (1.5 mm) hex key to loosen the set screw in the bottom of the leg.
Slide out the leg to remove it, and replace with the tall leg. Tighten the set screw until it sits flush with the surface. Do not tighten the screw beyond this point.
03
Charging the Battery
IRIS is powered by a rechargeable lithium polymer (LiPo) battery. Store the battery at half charge then charge fully before flying. Batteries must ship at half charge, so please charge before your first flight. Each full battery provides up to 22 minutes of flight time without a gimbal and up to 16 minutes when using a Tarot Gimbal.*
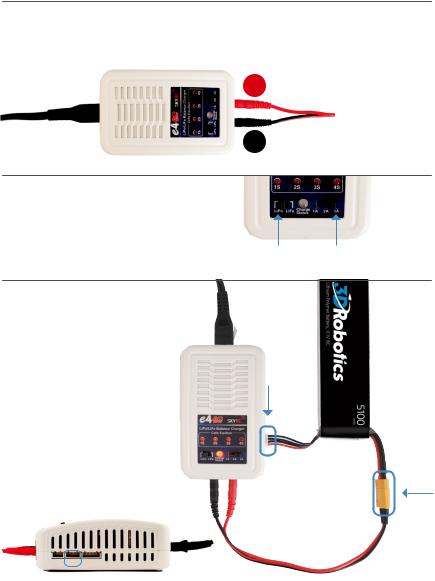
1 |
Connect charger to the |
power adapter cable and |
a wall outlet.
Connect the red cable to the + port and the black cable to the - port.
+
–
2 Set the charger to
LiPo and 3A.
LiPo 3A
3 Connect the white connector to the 3S port. Join the two yellow connectors together.
3S
04
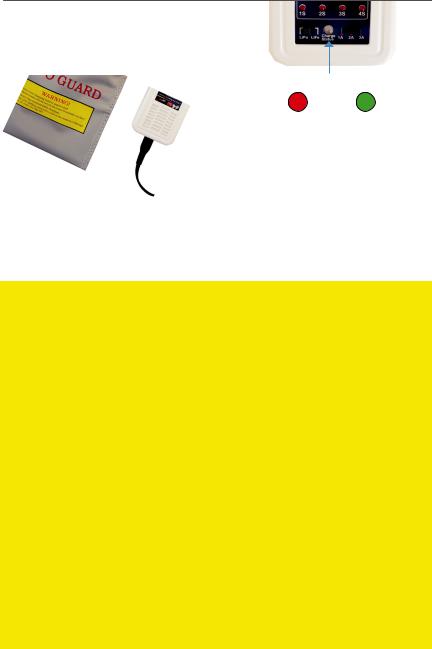
4 Secure battery inside the guard bag while charging. Charge until the status indicator displays green.
Charging Complete
 Battery Safety
Protect the battery from extreme heat, extreme cold, puncturing, and flammable surfaces. Always transport, charge, and store the battery in the guard bag.
Charge the battery using a designated LiPo balance charger only. Always monitor the battery while charging.
Flying with a low battery is a safety risk and can render the battery unusable. Always discontinue use when you receive a low battery notification, and always fly with a fully charged battery.
Inspect the battery for damage before takeoff and after landing. If you observe any swelling of the package or the battery ceases to function, locate your local battery recycling center to dispose of the battery. In the US and Canada, visit call2recycle.org to find a location. Do not dispose of the battery in the trash.
*Flight time varies with payload, wind conditions, altitude, temperature, humidity, flying style, and pilot skill. See the Flight Checklist for instructions on managing battery levels during flight.
05
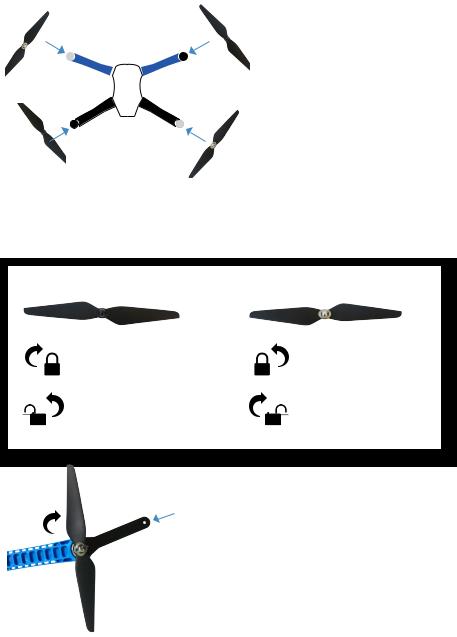
Attaching Propellers
IRIS uses four propellers: two with black nuts and two with silver nuts. Attach the propellers with black nuts to the motors with black tops and the propellers with silver nuts to the motors with silver tops.
Each propeller has locking and unlocking direction symbols. To attach, spin the propeller in the direction of the locking symbol. The propellers will automatically tighten onto the motors when you arm IRIS before takeoff.
For propellers with black nuts: |
For propellers with silver nuts: |
Spin clockwise to attach. |
Spin counterclockwise |
|
to attach. |
||
|
||
Spin counterclockwise |
Spin clockwise to |
|
to remove. |
remove. |
To remove, hold the motor in place with the propeller tool, and spin the propeller in the direction of the unlocking symbol.
06
 Loading...