

Page 1

Fast EtherLink® XL
PCI 10/100BASE-TX
Network Interface Card
User Guide
Member of the 3Com Fast EtherLink XL family
of network interface cards
http://www.3com.com/
Part No. 09-1363-000
Published February 1998
Page 2

3Com Corporation ■ 5400 Bayfront Plaza ■ Santa Clara, California ■ 95052-8145
Copyright © 1998, 3Com Corporation. All rights reserved. No part of this documentation may be
reproduced in any form or by any means or used to make any derivative work (such as translation,
transformation, or adaptation) without written permission from 3Com Corporation.
3Com Corporation reserves the right to revise this documentation and to make changes in content
from time to time without obligation on the part of 3Com Corporation to provide notification of such
revision or change.
3Com Corporation provides this documentation without warranty, term, or condition of any kind,
either implied or expressed, including, but not limited to, the implied warranties of merchantability and
fitness for a particular purpose. 3Com may make improvements or changes in the product(s) and/or the
program(s) described in this documentation at any time.
UNITED STATES GOVERNMENT LEGENDS:
If you are a United States government agency, then this documentation and the software described
herein are provided to you subject to the following:
United States Government Legend:
nature and developed solely at private expense. Software is delivered as Commercial Computer
Software as defined in DFARS 252.227-7014 (June 1995) or as a commercial item as defined in
FAR 2.101(a) and as such is provided with only such rights as are provided in 3Com’s standard
commercial license for the Software. Technical data is provided with limited rights only as provided in
DFAR 252.227-7015 (Nov 1995) or FAR 52.227-14 (June 1987), whichever is applicable. You agree not
to remove or deface any portion of any legend provided on any licensed program or documentation
contained in, or delivered to you in conjunction with, this User Guide.
If there is any software on removable media described in this documentation, it is furnished under a
license agreement included with the product as a separate document, in the hard copy documentation,
or on the removable media in a directory file named LICENSE.TXT. If you are unable to locate a copy,
please contact 3Com and a copy will be provided to you.
Unless otherwise indicated, 3Com registered trademarks are registered in the United States and may or
may not be registered in other countries.
3Com, the 3Com logo, EtherDisk, EtherLink, Net Age, Parallel Tasking, SmartAgent, and Transcend are
registered trademarks of 3Com Corporation. AutoLink, Dynamic
3Com Corporation. 3ComFacts is a service mark of 3Com Corporation.
Magic Packet is a trademark of Advanced Micro Devices, Inc. Anixter is a trademark of Anixter Bros.,
Inc. Artisoft and LANtastic are trademarks of Artisoft, Inc. Banyan and VINES are trademarks of Banyan
Systems, Incorporated. CompuServe is a registered trademark of CompuServe, Inc. Alpha, DEC, and
PATHWORKS are trademarks of Digital Equipment Corporation. Pentium is a registered trademark of
Intel Corporation. IBM and OS/2 are trademarks of International Business Machines Corporation.
Microsoft, Windows, and Windows NT are trademarks of Microsoft Corporation. Novell and NetWare
are trademarks of Novell, Inc. Open Desktop and SCO are trademarks of The Santa Cruz Operation, Inc.
Other brand and product names may be registered trademarks or trademarks of their respective
holders.
Guide written by Jean Anderson. Edited by Nancy Kurahashi. Technical illustration by Mary Inden.
Production by Becky Whitmer.
All technical data and computer software is commercial in
Access
, and PACE are trademarks of
ii
Page 3

C
ONTENTS
ONTENTS
C
A
BOUT THIS GUIDE
Finding Specific Information in This Guide 1
Conventions 2
1
I
NTRODUCTION
Industry-Leading Performance 1-2
DynamicAccess Software 1-2
Remote Wake-up 1-3
Installation and Configuration 1-3
10/100 Mbps Support 1-3
PC and Server Requirements 1-3
How Do I Install the 3C905B-TX NIC? 1-4
2
I
NSTALLING THE
Connecting to the Network 2-3
Connecting the Remote Wake-up Cable 2-4
NIC
3
I
NSTALLING THE NETWORK DRIVER
Windows 95 3-1
Confirming Installation 3-4
Windows NT 3-5
Windows NT Version 4.0 3-5
Updating the Network Driver 3-5
Installing the Network Driver 3-6
Windows NT Version 3.51 3-7
Updating the Network Driver 3-7
Installing the Network Driver 3-8
NetWare for Windows 3.1x, Windows for Workgroups,
and DOS 3-9
AutoLink Requirements 3-9
Running the AutoLink Program 3-9
iii
Page 4

Installing the Novell NetWare Server Driver 3-10
NetWare Version 4.1 3-10
Multiple NICs 3-11
Supported Network Drivers 3-12
4
T
ROUBLESHOOTING
Status LEDs 4-1
3Com NIC Diagnostics Program 4-2
Accessing the 3C905B-TX Help System 4-3
Displaying Release Notes, Frequently Asked Questions,
and the KnowledgeBase 4-3
Running the NIC Self-Test 4-4
Running the Echo Test 4-6
3Com Support Services 4-7
Generating a Problem Report 4-8
Removing the 3C905B-TX NIC PACE and
3NICDIAGS Software 4-11
Windows 95 and Windows NT 4.0 4-11
DOS 4-11
Checking the Remote Wake-up Function 4-11
3Com DOS Diagnostic Program 4-12
Crossover Cable Troubleshooting Tips 4-13
Troubleshooting Hubs with Crossover Cable 4-14
Frequently Asked Questions 4-15
Accessing the 3Com World Wide Web Page 4-19
5
C
HANGING CONFIGURATION
Configuration Settings 5-1
Displaying Configuration Settings 5-2
Changing Configuration Settings 5-2
Changing PACE Configuration 5-4
Selecting PACE Applications 5-4
Changing PACE Ranges and Protocols 5-5
PACE Advanced Options 5-6
Setting Fast IP 5-6
Using the DOS Configuration Program 5-6
iv
Page 5

A
S
PECIFICATIONS
Specifications A-1
RJ-45 Connector Pin Assignments A-2
B
T
ECHNICAL SUPPORT
Support from Your Network Supplier B-1
Online Technical Services B-1
World Wide Web Site B-2
3Com Bulletin Board Service B-2
Access by Analog Modem B-2
Access by Digital Modem B-3
3ComFacts Automated Fax Service B-3
G
LOSSARY
I
NDEX
3COM C
FCC C
FCC D
ORPORATION LIMITED WARRANTY
LASS
B S
ECLARATION OF CONFORMITY
3COM END U
TATEMENT
SER SOFTWARE LICENSE AGREEMENT
v
Page 6

Page 7

IGURES
F
1-1
3C905B-TX NIC 1-1
1-2
3C905B-TX NIC Installation Steps 1-4
2-1
Inserting the NIC 2-2
2-2
Connecting the Network Cable to the RJ-45 Port 2-3
2-3
Connecting the NIC to the Connector 2-4
4-1
LEDs 4-2
4-2
3Com NIC Diagnostics Program General Screen 4-4
4-3
Diagnostics Screen 4-5
4-4
3Com NIC Diagnostics Program Support Screen 4-7
4-5
Problem Report Main Screen 4-9
4-6
Computer Information Screen 4-9
4-7
Straight-through and Crossover Cable Pinouts 4-13
5-1
3Com NIC Diagnostics Program General Screen 5-3
5-2
3Com NIC Diagnostics Properties Screen 5-3
A-1
RJ-45 Connector Pin Assignments A-2
vii
Page 8

ABLES
T
1
Notice Icons 2
2
Text Conventions 2
3-1
Network Driver Text File Names 3-12
4-1
LED Descriptions 4-2
4-2
Frequently Asked Questions 4-15
5-1
Option Settings 5-1
viii
Page 9

BOUT THIS
A
About This Guide provides an overview of this guide,
describes guide conventions, and tells you where to look
for specific information.
This guide describes how to install, configure, and
troubleshoot the 3Com® Fast EtherLink® XL PCI
10/100BASE-TX network interface card (NIC). This NIC is
called the 3C905B-TX NIC in this guide.
If the information in the README.TXT file on the
EtherDisk® diskette shipped with your product differs from
the information in this guide, follow the instructions in the
README.TXT file.
G
UIDE
Finding Specific Information in This Guide
This table shows where to find specific information in this
guide.
If you are looking for Turn to
NIC features and PC and server requirements Chapter 1
Installation and cabling information Chapter 2
Network driver installation instructions Chapter 3
Troubleshooting Chapter 4
Instructions for changing configuration settings Chapter 5
Specifications and RJ-45 pin assignments Appendix A
Technical support Appendix B
Page 10

2
A
BOUT THIS GUIDE
Conventions
Table 1 and Table 2 list conventions that are used
throughout this guide.
Table 1
Icon Notice Type Description
Table 2
Convention Description
Commands
Screen displays
The words “enter”
and “type”
Menu commands
buttons
Words in italicized
type
Words in bold-face
type
Notice Icons
Information note Important features or instructions
Caution Information to alert you to potential damage to a
Warning Information to alert you to potential personal injury
Text Conventions
and
program, system, or device
The word “command” means you must enter the
command exactly as shown in text and press the Return or
Enter key. Example:
To launch the DOS diagnostics, enter the following
command:
a: install
This typeface represents information as it appears on the
screen.
When you see the word “enter” in this guide, you must
type something, and then press the Return or Enter key.
Do not press the Return or Enter key when an instruction
simply says “type.”
Menu commands or button names appear in italics.
Example:
From the
Italics emphasize a point or denote new terms at the place
where they are defined in the text.
Bold text denotes key features.
Help
menu, select
Contents
.
Page 11
1
INTRODUCTION
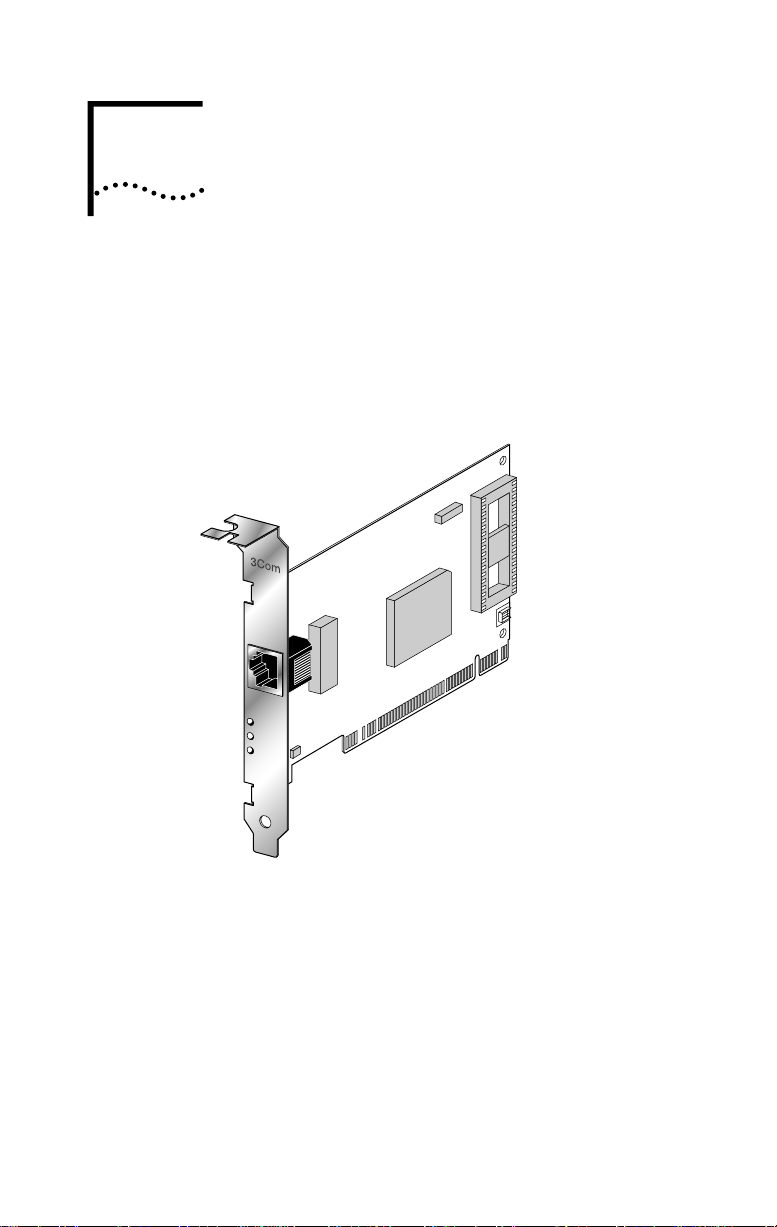
The 3Com® 3C905B-TX network interface card (NIC)
provides a high-performance connection to an Ethernet or
Fast Ethernet network. This NIC operates at 100 Mbps or
10 Mbps automatically, depending on the speed of the
connected hub.
TX
DATA
ACT
10
L
N
100
K
Figure 1-1 3C905B-TX NIC
There are two types of 3C905B-TX NICs: the 3C905B-TX NIC
and the 3C905B-TX-NM NIC.
The 3Com Remote Wake-Up NIC (3C905B-TX), shown in
Figure 1-1, operates as a wake-up NIC only in PCs with the
Remote Wake-Up connector attached to the PC
motherboard. This NIC provides a network connection with
or without the Remote Wake-Up connector installed.
The 3C905B-TX-NM NIC does not have the Remote Wake-Up
connector or functionality.
Page 12

1-2 CHAPTER 1: INTRODUCTION
Unless specifically indicated, the name 3C905B-TX is used
throughout this guide to refer to both NICs.
This chapter describes the 3C905B-TX NIC features and PC
and server requirements.
Industry-Leading Performance
The 3C905B-TX NIC provides the following performance
features:
■ Interactive Access technology to minimize CPU utilization
■ Parallel Tasking
low processor utilization
■ Full-duplex 10 Mbps and 100 Mbps support
■ Hardware IP checksum enabled for better Internet and
intranet performance
■ Fast IP switching solution that allows you to
cost-effectively scale internetwork performance as
bandwidth requirements increase
■ 32-bit bus master design with full scatter gather and
infinite bursting performance
■ Flow control (IEEE 802.1x), which optimizes performance
in switched networks through efficient data transmissions
®
II architecture for high throughput and
DynamicAccess Software
DynamicAccess™ software delivers intelligence at the edge of
the network to optimize network performance and control.
DynamicAccess features include PACE™ Interactive Access
technology, dRMON (distributed RMON) support, and
support for PACE real-time and multimedia applications.
PACE class of service drivers enable prioritization of
multimedia and business-critical applications like video
conferencing and distance learning. With the 3Com PACE
drivers, you can set the class of service for each application.
The 3C905B-TX NIC ships with dRMON SmartAgent®
intelligent agents that collect remote management
information used by the Transcend® Edge Monitor System.
Together, they provide full RMON network management
information for both switched and Fast Ethernet networks.
Page 13

Remote Wake-up
Remote Wake-Up support is enabled for the 3C905B-TX NIC.
If you are using the 3C905B-TX NIC in a PC that supports
Remote Wake-Up through the PCI bus, the 3Com NIC
receives wake-up signals and wakes the PC from a sleep state.
Installation and Configuration
The 3Com NIC Diagnostics program allows you to test
the 3C905B-TX NIC, configure it, and display the NIC
configuration information. If you are running DOS, you
cannot use this program.
The NIC Diagnostics Help system includes the 3C905B-TX
Release Notes, Frequently Asked Questions, and
KnowledgeBase.
Microsoft Windows 95 detects the 3C905B-TX NIC and
installs the network driver from 3Com EtherDisk Diskette #2.
The AutoLink™ installation software automatically installs
all Novell NetWare DOS ODI client software into your
operating system.
Remote Wake-up 1-3
10/100 Mbps Support
The single RJ-45 connector on the network cable supports
10 Mbps or 100 Mbps speeds.
NWay auto-negotiation enables the 3C905B-TX NIC to
automatically run at the speed that the connected hub
supports. The 3C905B-TX NIC works with products that
comply with IEEE 10BASE-T and 100BASE-TX specifications.
PC and Server Requirements
Your PC or server must have:
■ An 80386, 80486, Pentium, or Alpha processor
Alpha processors or drivers work only with
Windows NT 4.0
■ An available bus mastering PCI slot
■ A minimum of 640K of memory
Page 14
1-4 CHAPTER 1: INTRODUCTION
Make sure that you are running the latest BIOS for your PC or
server, even if your PC is new. Contact your PC manufacturer
for more information.
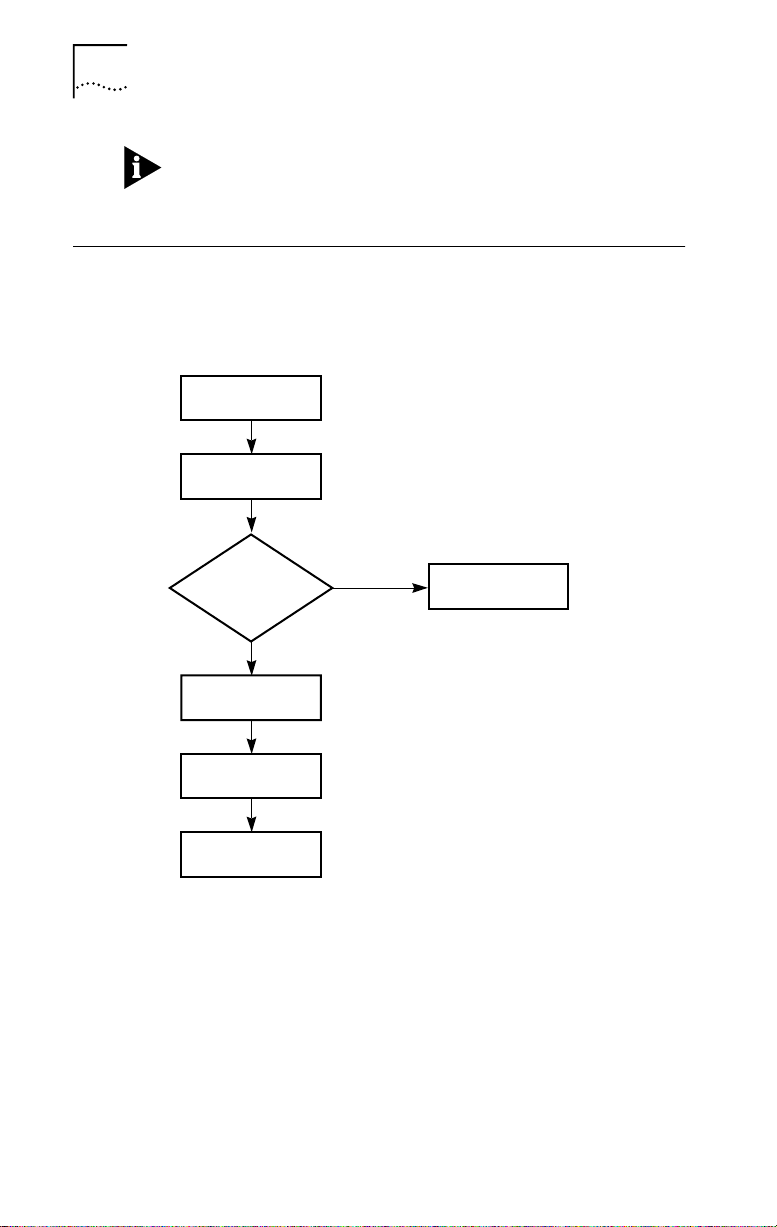
How Do I Install the 3C905B-TX NIC?
To complete installation, install the NIC in your PC or server,
connect it to the network, and install the network driver.
The installations steps are depicted in Figure 1-2.
Insert
3C905B-TX NIC
Connect NIC
to network
Which
driver installation
instructions
should I use
?
I do know
Install 3Com
network driver
Reboot
Log on
to network
Chapter 2
Chapter 2
I don't know
Chapter 3
Chapter 3
Ask
MIS department
Chapter 3
Figure 1-2 3C905B-TX NIC Installation Steps
Proceed to Chapter 2 to install the 3C905B-TX NIC in your
PC or server and connect it to the network.
Page 15

INSTALLING THE NIC
2
There are two types of 3C905B-TX NICs: the 3C905B-TX NIC
and the 3C905B-TX-NM NIC. They are both installed in your
PC and connected to the network in exactly the same way.
After you connect the 3C905B-TX NIC to the network, you
connect the Remote Wake-Up cable to the motherboard.
Before you begin, make sure that you also have the user
guide and the 3C905B-TX EtherDisk diskettes, and that
your PC meets the requirements described in Chapter 1.
CAUTION: Each NIC is packed in an antistatic container to
protect it during shipment. Before handling the NIC, touch
the metal chassis of your PC. Maintain grounding by wearing
a wrist strap attached to the chassis. Handle the NIC by its
backplate and top edge. Do not touch the edge connector.
To install the 3C905B-TX NIC in your PC or server and
connect it to the network, follow these steps:
1 Open the shipping container and inspect each item
for damage.
2 Remove all jewelry from your hands and wrists.
Use only insulated or nonconductive tools.
3 Unplug the PC and disconnect all cables.
4 Remove the PC cover.
5 Choose an empty bus mastering PCI slot.
A sample PCI slot is shown in Figure 2-1. If you do not know
how to identify a PCI slot, check your PC documentation or
ask your system administrator. In most PCs, slots 1 and 2 are
bus mastering slots. Use slot 1 for the 3C905B-TX NIC if
possible. If you have a video PCI card, install it in the last slot
(the one farthest from slot 1).
6 Unscrew the screw holding the PCI slot’s backplate
and remove it.
Page 16
2-2 CHAPTER 2: INSTALLING THE NIC
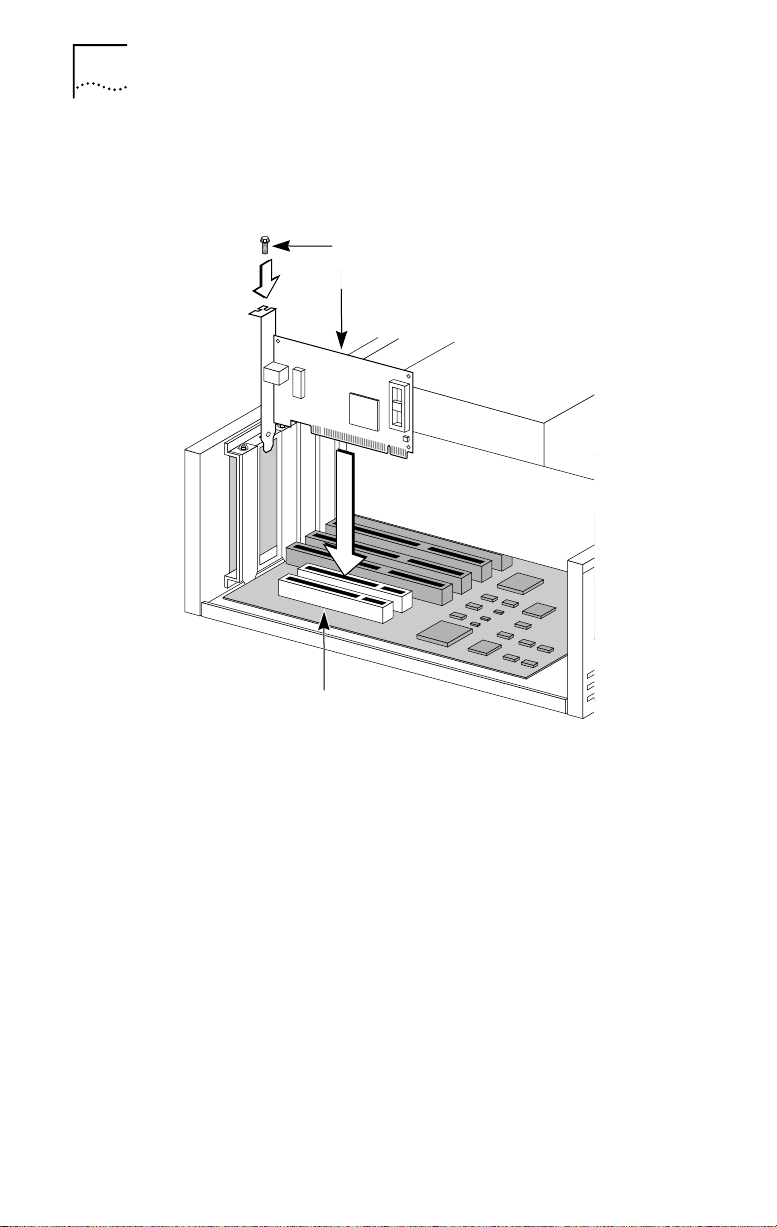
7 Insert the 3C905B-TX NIC into an empty PCI slot,
shown in Figure 2-1.
Make sure that the NIC is firmly seated in the slot.
Screw
3C905B-TX NIC
PCI slot
Figure 2-1 Inserting the NIC
8 Secure the NIC with the screw you removed earlier.
If you are installing the Remote Wake-Up connector, go to
“Connecting the Remote Wake-up Cable” at the end of
the chapter before replacing the PC cover.
9 Replace the PC cover and reconnect all previously
connected cables.
10 Turn on the power to the PC.
11 Proceed to the next section, “Connecting to the
Network.”
Page 17
Connecting to the Network
You must connect the NIC to the network before installing
the network driver. To connect the 3C905B-TX NIC to the
network cable, follow these steps:
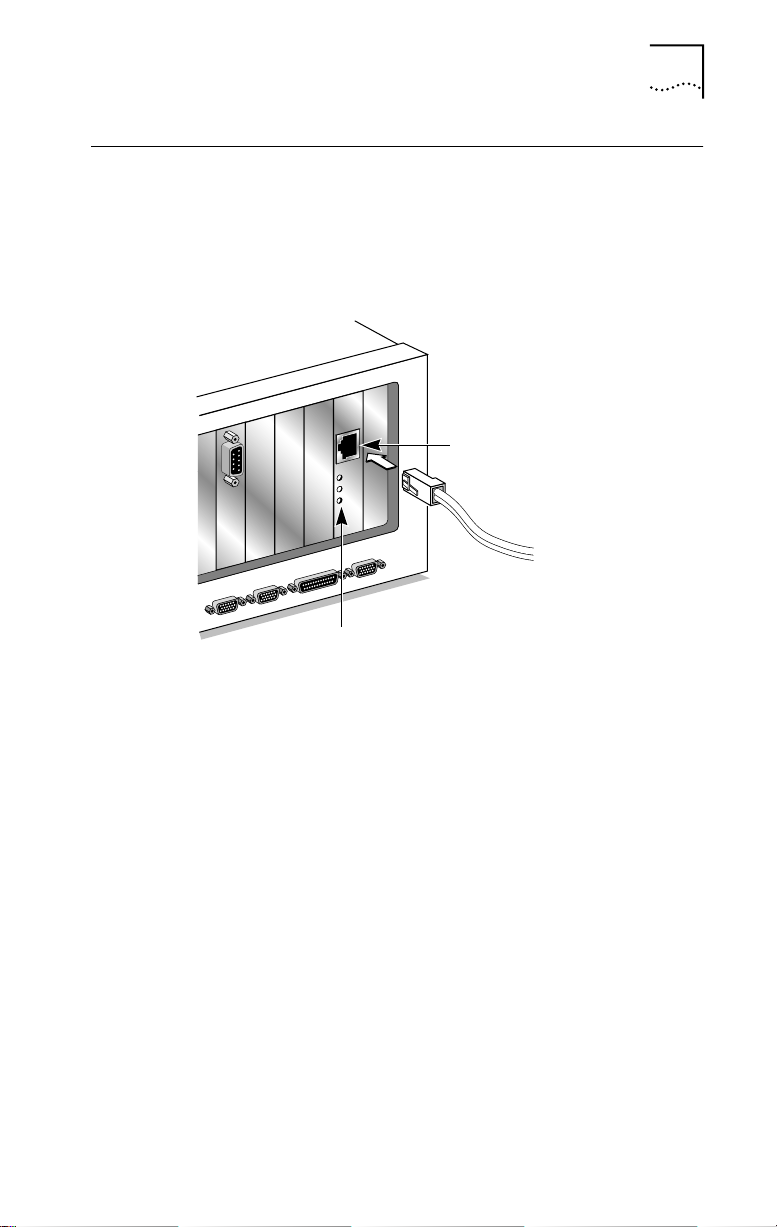
1 Connect the network cable to the RJ-45 port on the
3C905B-TX NIC, as shown in Figure 2-2.
Connecting to the Network 2-3
TX
Data
ACT
L
10
N
K
100
RJ-45 port
RJ-45
connector
LEDs
Figure 2-2 Connecting the Network Cable to the RJ-45 Port
2 Connect the other end of the network cable to a
10BASE-T or a 100BASE-TX network port.
3 Check the LEDs, shown in Figure 2-2.
After installation, and before you install the network driver,
the LEDs indicate the following:
■ 10 LNK LED - green - 10 Mbps link integrity
■ 100 LNK - green - 100 Mbps link integrity
■ ACT LED - OFF - until the network driver is installed
See Table 4-1 for more LED information. If you are not
installing the Remote Wake-Up cable, go to Chapter 3 to
install the network driver.
Page 18
2-4 CHAPTER 2: INSTALLING THE NIC
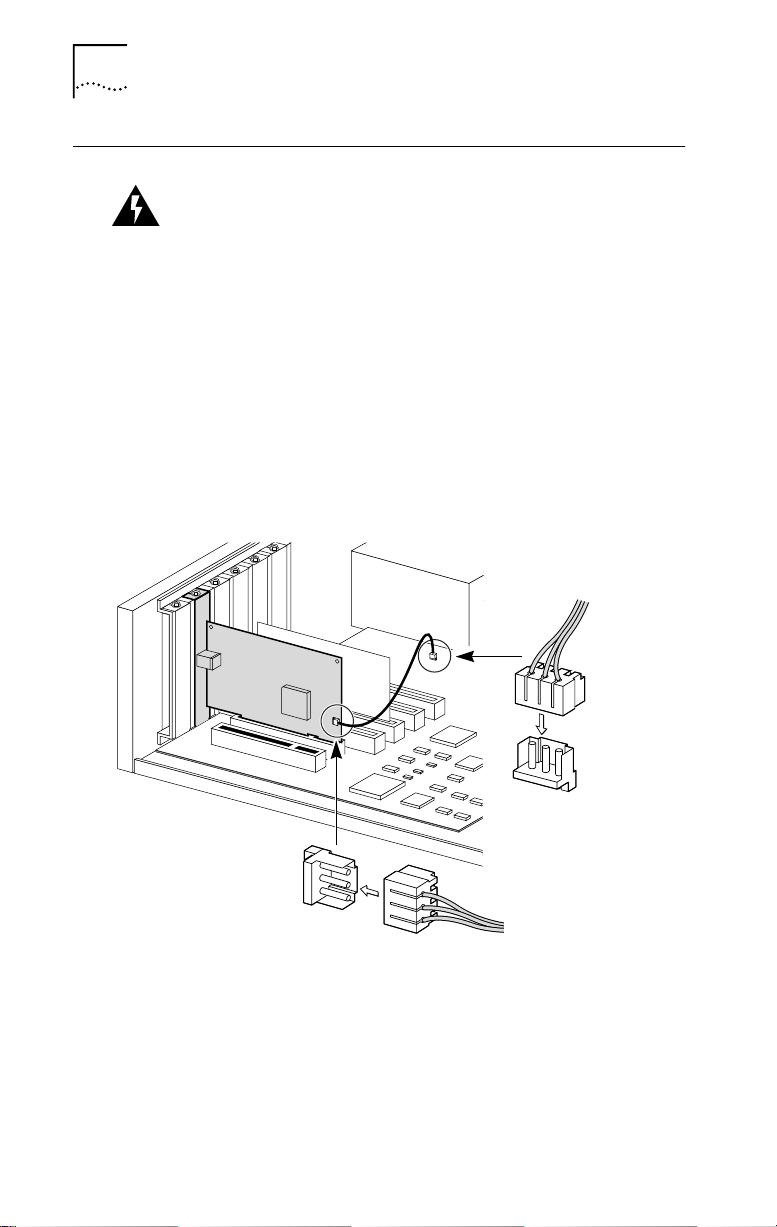
Connecting the Remote Wake-up Cable
WARNING: Install the NIC in slot 1 in the PC (as described
earlier) before plugging in the 3-pin connector. Only properly
trained and authorized personnel should perform service.
Contact your PC manufacturer for information about safe
service techniques.
1 Insert the cable into the connector on the NIC, shown
in Figure 2-3.
Twist the cable twice before attaching the cable to the
motherboard.
2 Attach the cable to the connector on the PC
motherboard, as shown in Figure 2-3.
The connector is located in different locations depending
on the PC.
Power
supply
Connect Remote Wake-Up
cable from NIC to motherboard connector
Plug in Remote Wake-Up
cable to connector here
Figure 2-3 Connecting the NIC to the Connector
3 Reconnect all cables and replace the PC cover.
The 3C905B-TX Remote Wake-Up NIC is installed. Go back
to the previous section “Connecting to the Network” to
complete installation.
Page 19

INSTALLING THE
3
NETWORK DRIVER
This chapter describes how to install the network driver
that completes your PC connection to the network. The
3C905B-TX software is installed with the network driver.
Instructions are provided for Windows 95, Windows NT,
and NetWare DOS client and server driver installation.
Table 3-1 provides a complete list of supported drivers and
text files that describe how to install them.
Go to the section your MIS department recommends and
follow the instructions to install the network driver on
your PC.
You can obtain the latest network drivers on 3Com’s
World Wide Web site. To access the Web site, enter the
3Com URL into your Internet browser:
http://infodeli.3com.com/infodeli/swlib/n_i_c.htm/
The drivers are in the Support area. On the Support Welcome
screen, scroll down to Latest Drivers and click.
Windows 95
This section describes how to install the network driver
when your PC is running Windows 95. This driver supports
dRMON and PACE technology.
This driver can be used in Microsoft and NetWare
environments, and instructions are included for both.
You need the Windows 95 system installation files (CAB files)
to complete the installation.
Do not use the AutoLink software to install the driver if you
are running Windows 95.
Page 20

3-2 CHAPTER 3: INSTALLING THE NETWORK DRIVER
Follow these steps to install the network driver in a PC
running Windows 95:
1 Install and configure Windows 95 before installing
the 3C905B-TX NIC.
2 Install the 3C905B-TX NIC and connect it to the
network, as described in Chapter 2.
3 Restart the PC.
Windows 95 automatically detects the NIC in the PC.
If Windows 95 does not detect the 3C905B-TX NIC, see
Chapter 4,“Troubleshooting.”
4 Select Driver from disk provided by the hardware
manufacturer and click OK.
5 Insert EtherDisk Diskette #2 in your drive and, if the
diskette is in drive A, click OK.
Otherwise, supply the correct drive letter and click OK.
Once the 3Com installation files are read, Windows 95
prompts you for the Windows 95 network installation files.
6 Enter the correct path to the Windows 95 files
(CAB files) and click OK.
If Windows prompts you to reboot, click No.
7 Open the Windows 95 Control Panel.
8 In the Control Panel, double-click Network.
The Network screen appears.
9 For Microsoft networks, select the Configuration tab.
For Novell NetWare networks, go to step 10.
The default Microsoft network setup contains the following
components:
Client for Microsoft Networks
Client for Novell Networks
3Com EtherLink XL Adapter
3Com dRMON SmartAgent PC software
IPX/SPX compatible protocol
NetBEUI protocol
Page 21

Windows 95 3-3
If a protocol is missing, follow these steps:
a Select the protocol and click Add.
b From the Select Network Protocol menu, select
Microsoft in the left pane. In the right pane, select the
protocol and click OK.
If a client is missing, follow these steps:
a Select the client and click Add.
b From the Select Network Client menu, select Microsoft
in the left pane, select the client in the right pane, and
click OK.
10 For NetWare only, on the Network screen, remove the
following network components, if present:
Microsoft Client for Microsoft Network NetBEUI
The network components should now include:
Client for NetWare Networks
3Com EtherLink XL Adapter
3Com dRMON SmartAgent PC software
IPX/SPX Compatible Protocol
If a protocol is missing, follow these steps:
a Select the protocol and click Add.
b From the Select Network Protocol menu, select
Microsoft in the left pane. In the right pane, select the
protocol and click OK.
If a client is missing, follow these steps:
a Select the client and click Add.
b Select Microsoft.
c Click Client for NetWare Networks and then Properties.
To select the NetWare server, follow these steps:
a Under the General tab, set your preferred server and the
first network drive and click OK.
b Set the primary network logon to Client for NetWare
Networks and click OK.
Page 22

3-4 CHAPTER 3: INSTALLING THE NETWORK DRIVER
11 When the configuration is correct, click the
Identification tab.
■ The computer name is the name of your PC. Give your
PC a unique name of up to 15 characters. The PC name
cannot include blank spaces.
■ A workgroup (such as your department) is composed of
the PCs you usually communicate with and the
workgroup’s shared resources (such as printers).
■ If you use peer group networking, the workgroup name
is your peer group. Peers can see each other when they
look in the Network Neighborhood.
For information on peer-to-peer networking, see the
W95NDIS3.TXT file in the HELP directory on
EtherDisk Diskette #1.
■ Your computer description is visible to other members
of your workgroup in the Network Neighborhood.
12 Click OK.
The network connection is configured. Windows 95
prompts you to restart the PC.
13 Click Yes.
After the PC restarts, you can log on to your network.
If you have problems, see Chapter 4.
Confirming Installation
Complete the following procedure to confirm that the
3C905B-TX NIC is properly installed:
1 Double-click the My Computer icon.
2 Double-click the Control Panel icon.
3 Double-click the System icon.
The System Properties box appears, detailing your
system setup.
4 Click the Device Manager tab.
A list of devices appears, arranged by type.
5 Double-click Network Adapters.
The name of the installed 3C905B-TX NIC appears:
3Com EtherLink XL Adapter (3C905B)
Page 23

6 Double-click the 3C905B-TX name to display a
description of the 3C905B-TX NIC and its current status.
The dialog box confirms that the 3C905B-TX NIC is working
properly. If a yellow exclamation point or a red X appears
next to the 3Com EtherLink XL adapter name, go to
“Frequently Asked Questions” in Chapter 4 to troubleshoot
the NIC.
7 Click Cancel to leave each dialog box and return to
the Control Panel.
Windows NT
This section describes how to install the network driver in a
PC running Windows NT versions 4.0 or 3.51.
Do not use the AutoLink software to install the driver if you
are running Windows NT.
Before you begin, obtain EtherDisk Diskette #2 and
Windows NT installation files (on hard disk, diskettes,
or CD).
If Windows NT networking is not installed, you may also
need the following information from your MIS department:
■ Whether you are on a LAN or are connecting to one
■ Protocol used in the Microsoft Windows Network
■ Name of the Windows NT server domain or workgroup
■ IP address if you are not using DHCP
Windows NT 3-5
through a modem
(typically TCP/IP or NetBEUI)
you belong to
Windows NT Version 4.0
If you already have the 3C905B-TX network driver and
want to update it, follow the instructions provided in the
next section.
Updating the Network Driver
To update the driver, follow these steps:
1 Install the 3C905B-TX NIC and connect it to the
network, as described in Chapter 2.
2 Restart the PC and start Windows NT.
Page 24

3-6 CHAPTER 3: INSTALLING THE NETWORK DRIVER
3 In the Control Panel, double-click Network.
4 In the Network window, select the Adapter tab.
5 Select 3Com EtherLink XL NIC.
6 Click Update.
7 Insert EtherDisk Diskette #2.
The driver is updated.
Installing the Network Driver
Follow these steps to install the network driver in a PC
running Windows NT version 4.0:
1 Install the 3C905B-TX NIC and connect it to the
network, as described in Chapter 2.
2 Restart the PC and start Windows NT.
3 In the Control Panel, double-click Network.
4 In the Network window, select the Adapter tab.
If this 3C905B-TX NIC is replacing a NIC already installed,
follow these steps:
a Select the existing 3Com NIC (that is being replaced) in
the Installed Adapters group.
b Click Remove.
c Click Yes in the Warning dialog box.
d Reboot the PC and repeat steps 2, 3, and 4.
5 Click Add Adapter.
6 In the Select Network Adapter window, select
Have Disk.
7 Insert EtherDisk Diskette #2 in drive A and in the
Insert Disk window, click OK.
8 In the Select OEM Option box, select 3Com EtherLink
Adapter (3C905B).
9 Click OK.
10 Select the Protocol tab.
11 Select the appropriate protocol for your network.
Page 25

12 In the Network Settings window, click Close.
If you are prompted for network information, enter the
information supplied by your MIS department.
Windows NT prompts you to reboot.
13 Click Yes to restart your PC.
The driver installation is complete.
To confirm successful installation, double-click the Network
icon in the Control Panel. Click the Adapters tab. The
3C905B-TX NIC should appear in the list. If it does not
appear, see Chapter 4 for troubleshooting information.
Windows NT Version 3.51
If you already have the 3C905B-TX network driver and
want to update it, follow the instructions provided in the
next section.
Updating the Network Driver
To update the driver, follow these steps:
1 Install the 3C905B-TX NIC and connect it to the
network, as described in Chapter 2.
2 Restart the PC and start Windows NT.
3 In the Control Panel, double-click Network.
4 Select the 3Com adapter and click Properties.
5 Record the settings for the NIC resources.
6 Click Cancel.
7 Double-click Network again in the Control Panel.
Windows NT 3-7
8 In the list of Network Software and Adapter Cards,
select the 3Com adapter.
9 Click Update.
10 When prompted, enter the directory path (a:\), insert
EtherDisk Diskette #2, and click OK.
11 Click OK to close the Network dialog box and
complete the process.
Page 26

3-8 CHAPTER 3: INSTALLING THE NETWORK DRIVER
Installing the Network Driver
Follow these steps to install the network driver in a PC
running Windows NT version 3.51:
1 Install the 3C905B-TX NIC and connect it to the
network, as described in Chapter 2.
2 Restart the PC and start Windows NT.
3 In the Control Panel, double-click Network.
4 In the Network Settings window, click Add Adapter.
5 In the Add Network Adapter window, select <Other>
Requires disk from manufacturer.
6 Click Continue.
7 Insert EtherDisk Diskette #2 in drive A and click OK.
8 In the Select OEM Option box, select
3Com EtherLink XL PCI Adapter (3C905B).
9 Click OK.
The Bus Location window appears.
10 Click OK.
Windows NT copies the files from EtherDisk Diskette #2.
If you are prompted for network information, contact your
MIS department for the requested information.
11 In the Network Settings Change window, click OK.
Windows NT completes the installation.
12 Click Restart to restart your PC.
If you have problems, see Chapter 4 for troubleshooting
information.
Page 27

NetWare for Windows 3.1x, Windows for Workgroups, and DOS 3-9
NetWare for Windows 3.1x, Windows for Workgroups,
and DOS
The AutoLink program installs DOS client software and
drivers for Novell NetWare in Windows 3.1x, Windows for
Workgroups 3.11, and DOS environments.
CAUTION: Do not use the AutoLink program if you are
running Windows 95 or Windows NT.
The AutoLink program modifies the CONFIG.SYS and
AUTOEXEC.BAT files. It logs on to the server and updates
the client software if your MIS department has already
configured a 3Install account on your server.
AutoLink Requirements
To use the AutoLink program, your computer should have
only one 3C905B-TX NIC installed and have 1 MB of free
hard disk space.
Running the AutoLink Program
1 Install the NIC and connect it to the network, as
described in Chapter 2.
2 Reboot, using a DOS diskette.
3 Insert EtherDisk Diskette #1 in drive A.
4 Run the Install program. Enter:
a:install
This opens the main menu.
5 From the main menu, select Auto Install and Config
for NetWare (AutoLink) and press Enter.
6 Select DOS, Windows 3.1x, or Windows for
Workgroups 3.11 and follow the instructions.
7 When the auto installation process is finished,
remove EtherDisk Diskette #1 and reboot the PC.
If you are running Windows 3.1x, after you connect to the
NetWare server, run the WSINSTALL program for full
Windows support. Contact your MIS department for the
location of this NetWare utility.
Page 28

3-10 CHAPTER 3: INSTALLING THE NETWORK DRIVER
If you experience problems that occur only when using the
AutoLink program, display or print the AUTOLINK.LOG file.
The AUTOLINK.LOG file contains a list of all the events that
occurred during the AutoLink installation and configuration
process.
■ To display the file, enter:
type autolink.log | more
■ To print the file, enter:
print autolink.log
Installing the Novell NetWare Server Driver
This driver is installed on a Novell NetWare server running
NetWare 4.1.
The \NWSERVER subdirectory on EtherDisk Diskette #1
contains the driver (3C90X.LAN file) and NetWare Loadable
Modules (NLMs) needed for NetWare 4.1.
The NetWare server driver can also be used on a NetWare
version 3.12 server. Contact Novell to obtain the NLM files
and for instructions for installing the driver in a 3.12
environment. The NetWare 3.11 server is not supported by
the 3C905B-TX NIC.
NetWare Version 4.1
This section describes how to install the NetWare server driver
on EtherDisk Diskette #1 on a NetWare version 4.1 server.
To import the server driver into a NetWare 4.1 server, follow
these steps:
1 Install the NetWare server software.
2 When the NIC Selection menu appears, insert
EtherDisk Diskette #1 in the drive.
3 Press Insert to add a driver externally.
4 Press F3 to change the path.
Page 29

5 At the A:\ prompt, enter:
nwserver
The installation program gathers the files and prompts you
for a NIC selection.
6 Select 3Com Fast EtherLink XL 10/100 Ethernet NIC.
7 Press Enter to continue the server installation.
Multiple NICs
To support more than one NIC in a server, edit the
AUTOEXEC.NCF file to the following format:
load C:\SERVER\3C90X.LAN PORT=<port1>
NAME=<name1> FRAME=<frametype>
load C:\SERVER\3C90X.LAN PORT=<port2>
NAME=<name2> FRAME=<frametype>
Port1 and port2 are the 3C905B-TX NIC’s PCI port addresses,
and name1 and name2 are user-specified names assigned to
distinguish the multiple NICs.
The FRAME parameter is optional. The default frame type is
Ethernet_802.2. If you want the ODI server driver to support
more than one frame type, then both the unique NAME=
and FRAME= parameters must be paired on each load
driver line. The valid frame types are Ethernet_802.2,
Ethernet_802.3, Ethernet_II, and Ethernet_SNAP.
The protocols must be bound to the specific driver
configuration using the user-assigned unique names.
The following example shows how this can be done:
load C:\SERVER\3C90X.LAN PORT=1000
FRAME=Ethernet_802.3 NAME=ADPONE
load C:\SERVER\3C90X.LAN PORT=2000
FRAME=Ethernet_II NAME=ADPTWO
bind IPX to ADPONE
bind IPX to ADPTWO
Installing the Novell NetWare Server Driver 3-11
The examples used may require other parameters to work
properly. Consult the appropriate Novell NetWare manuals
for details.
Page 30

3-12 CHAPTER 3: INSTALLING THE NETWORK DRIVER
Supported Network Drivers
Table 3-1 provides the text file names and driver names for
supported network drivers. These text files describe how to
install the network driver and are located in the HELP
directory on EtherDisk Diskette #1.
Table 3-1 Network Driver Text File Names
Network
Operating System
Windows 95 W95NDIS.TXT EL90XND3.SYS/
Windows 95 NDIS 2 W95NDIS2.TXT EL90X.DOS
Windows NT WINNT.TXT EL90XND3.SYS/
NetWare Client 32 CLIENT32.TXT 3C90X.LAN
NetWare 4.1 Server NETWARE.41X 3C90X.LAN
NetWare OS/2 NWOS2ODI.TXT 3C90X.SYS
NetWare client for DOS,
Windows 3.1, and
Windows for Workgroups
Windows for Workgroups
(NetWare)
Windows for Workgroups
(NDIS 2)
Windows for Workgroups
(NDIS 3)
Banyan VINES BANYAN.TXT EL90X.DOS
Microsoft LAN Manager LANMAN.TXT EL90X.DOS
IBM LAN Server (DOS) LANSRV.TXT EL90X.DOS
IBM LAN Server (OS/2) LANSRV.TXT EL90X.OS2
Artisoft LANtastic LANTASTK.TXT EL90X.DOS
DEC PATHWORKS PATHWORK.TXT EL90X.DOS (DOS) and
Text File Name Network Driver Name
EL90XND4.SYS
EL90XND4.SYS
AUTOLINK.TXT
(NETWARE directory)
WFWNETWR.TXT 3C90X.COM
WFWNDIS2.TXT EL90X.DOS
WFWNDIS3.TXT EL90X.386
3C90X.COM
3C90X.COM (NetWare)
Page 31

4
TROUBLESHOOTING
This chapter explains how to isolate and solve NIC problems,
including the following topics:
■ Status LEDs
■ 3Com NIC Diagnostics program
■ Accessing the 3C905B-TX Help system
■ 3Com support services
■ Removing the 3C905B-TX software
■ Checking Remote Wake-Up
■ Crossover cable troubleshooting tips
■ Frequently Asked Questions
■ Accessing the 3Com World Wide Web page
The 3Com World Wide Web site offers the latest drivers,
troubleshooting information, and software updates in the
Support area. To access the Web site, enter the 3Com URL
address into your Internet browser:
http://infodeli.3com.com/infodeli/swlib/n_i_c.htm/
Status LEDs
Before the LEDs can be used for troubleshooting, the NIC
must be connected to the network (Chapter 2) and the
network driver must be installed (Chapter 3).
The 3C905B-TX NIC has three status LEDs, as shown in
Figure 4-1 and described in Table 4-1.
Page 32

4-2 CHAPTER 4: TROUBLESHOOTING
TX
RJ-45 port
DATA
ACT
100
10
L
N
K
ACT LED
10 LNK LED
100 LNK LED
Figure 4-1 LEDs
Table 4-1 LED Descriptions
LED Description Flashing Steady Off
10 LNK Green:
Link integrity
Reversed
polarity
Good 10BASE-T
connection between
NIC and hub
100 LNK Green:
Link integrity
Reversed
polarity
Good 100BASE-TX
connection between
NIC and hub
ACT Yellow:
Port traffic for
Network traffic
present
Heavy network
traffic
either speed
No connection
between NIC
and hub
No connection
between NIC
and hub
No traffic
3Com NIC Diagnostics Program
Use the 3Com NIC Diagnostics program for Windows 95
and Windows NT to test the 3C905B-TX NIC and change
configuration. To change the NIC’s configuration, see
Chapter 5. If you are running NetWare Client 32 with the
NetWare ODI driver, use the DOS diagnostic program
described in the INSTRUCT.TXT file in the HELP directory on
EtherDisk Diskette #1.
The 3Com NIC Diagnostics program is installed with the
driver. Driver installation is described in Chapter 3. You must
install the driver before you run the program.
Page 33

3Com NIC Diagnostics Program 4-3
Accessing the 3C905B-TX Help System
You can display the 3C905B-TX NIC Help system, a
Windows Help application that includes 3C905B-TX
Release Notes, Frequently Asked Questions, and the
3C905B-TX KnowledgeBase. The Help system was installed
with the network driver.
To display the 3Com Help system, follow these steps:
1 Install the 3C905B-TX NIC, connect it to the network
(Chapter 2), and install the driver (Chapter 3).
2 Click the Windows Start menu.
3 Select Programs.
4 Select 3Com NIC Utilities.
5 Select 3Com NIC Diagnostics Help.
The Help screen for the 3Com NIC Diagnostics General
screen appears.
6 Click the links to display information about each of
the 3Com NIC Diagnostics screens.
Displaying Release Notes, Frequently Asked Questions,
and the KnowledgeBase
To access the Release Notes, Frequently Asked Questions,
and KnowledgeBase information, follow these steps:
1 Click the Support tab, shown in Figure 4-2.
2 Click the Release Notes button on the Support screen.
The Release Notes Help screen appears.
■ Click the Release Notes link to display tips about
installing and using the 3C905B-TX NIC.
■ Click the Frequently Asked Questions link to display
common questions asked by customers and answered
by 3Com support experts.
■ Click the KnowledgeBase link to display 3C905B-TX NIC
compatibility topics.
To display the entire Help system, click the Help button on
each NIC Diagnostics screen. To display information about
any item on each screen, click the question mark (?), drag it
to the item, and click. The pop-up box displays information
about the selected item.
Page 34

4-4 CHAPTER 4: TROUBLESHOOTING
Running the NIC Self-Test
Run the NIC self-test to check the physical components,
connectors, and circuitry on the NIC.
1 Make sure that the 3C905B-TX NIC is installed and
connected to the network (Chapter 2) and the
network driver is installed (Chapter 3).
2 Start the 3Com NIC Diagnostics program by clicking
the Windows Start menu.
3 Select Programs.
4 Select 3Com NIC Utilities.
5 Select 3Com NIC Diagnostics.
A warning message appears. Click OK to disconnect your
PC from the network to conduct this test.
The 3Com NIC Diagnostics General screen appears, as
shown in Figure 4-2.
Figure 4-2 3Com NIC Diagnostics Program General Screen
To access the 3Com NIC Diagnostics program later by
clicking its icon in the system tray, click the check box next
to Enable Tray Control.
Page 35

3Com NIC Diagnostics Program 4-5
6 Click the Diagnostics tab to display the Diagnostics
screen, shown in Figure 4-3.
Figure 4-3 Diagnostics Screen
7 Click Start in the Self-Test area.
The following tests run in sequence:
■ Register Access
■ EEPROM
■ FIFO
■ Ethernet Core Loopback
■ Encoder/Decoder Loopback
■ Interrupt
You can click Stop to stop the tests. Otherwise, the tests
run continuously to completion.
Click the Help button to display help for this screen. Click the
question mark (?) at the top of the screen, drag it to a test,
and click. The pop-up box displays information about the
selected test and what to do if the test fails.
Page 36

4-6 CHAPTER 4: TROUBLESHOOTING
Running the Echo Test
The echo test tests the 3C905B-TX NIC’s ability to transmit
and receive data while on the network.
You need two PCs with 3Com NICs installed to run an echo
test: one PC to send data and one PC to receive data.
CAUTION: Running the echo test while connected to an
active network can cause intermittent failures. To avoid
this, connect to an inactive network on which only the PC
being tested is operating.
To run the echo test, follow these steps:
1 Make sure that the 3C905B-TX NIC is installed in the
sending PC and connected to the network (Chapter 2)
and that the network driver is installed (Chapter 3).
2 Install a 3C905B-TX NIC in another PC (the echo server),
connect it to the network, and install the network
driver.
The echo server PC is the responding PC.
3 On both PCs:
a Click the Windows Start menu.
b Select Programs.
c Select 3Com NIC Utilities.
d Select 3Com NIC Diagnostics.
e Click the Diagnostics tab to display the Diagnostics
screen, shown in Figure 4-3.
4 Click Respond on the Diagnostics screen (Figure 4-3)
of the responding PC.
The Echo Test Responder screen appears on the
responding PC.
5 Click Start on the Echo Test Responder screen.
6 On the Diagnostics screen (Figure 4-3) of the sending
PC, click Send.
7 On the Diagnostics screen (Figure 4-3) of the sending
PC, click Start.
The statistics for the test appear in the Statistic section of
the window.
Page 37

Click the Help button to display Help for this screen. Click the
question mark (?) at the top of the screen and drag it to a
statistic and click. The pop-up box displays information
about the selected statistic.
3Com Support Services
The 3Com NIC Diagnostics Program Support screen, shown
in Figure 4-4, provides access to the following support
services:
■ 3Com NIC Diagnostics program
■ 3C905B-TX NIC Release Notes
■ 3Com BBS telephone numbers and modem speeds
■ 3Com World Wide Web information
■ 3Com problem report generator
1 To access the 3Com NIC Diagnostics support screen,
click the Support tab on the 3Com NIC Diagnostics
program main screen, shown in Figure 4-2.
The 3Com NIC Diagnostics Program Support screen
appears, shown in Figure 4-4.
3Com NIC Diagnostics Program 4-7
Figure 4-4 3Com NIC Diagnostics Program Support Screen
Page 38

4-8 CHAPTER 4: TROUBLESHOOTING
■ Click Diagnostics to run the 3Com NIC Diagnostics
program. Refer to the beginning of this chapter for
information on how to use the 3Com NIC Diagnostics
program.
■ Click Release Notes to display the 3C905B-TX Release
Notes, Frequently Asked Questions, and the 3C905B-TX
KnowledgeBase.
■ Click BBS Information to display the BBS telephone
numbers and modem speeds.
■ The http... button displays the 3Com World Wide Web
address.
■ Click Problem Report to generate a 3Com problem report.
Generating a Problem Report
The problem report generator prompts you for the
information that will help 3Com customer support solve
your 3C905B-TX NIC installation and configuration problems.
You can e-mail the completed report to 3Com customer
support and receive an e-mail answer within 2 business days.
To generate a problem report, follow these steps:
1 Click Problem Report on the 3Com NIC Diagnostics
Program Support screen shown in Figure 4-4.
The Problem Report main screen appears, shown in
Figure 4-5.
2 Review the screen text and click Next to begin the
problem report.
The Customer Information screen appears.
3 Enter your company name, address, contact name or
names, phone number, and e-mail address.
4 Click Next to display the Computer Information
screen, shown in Figure 4-6.
Page 39

3Com NIC Diagnostics Program 4-9
Figure 4-5 Problem Report Main Screen
Figure 4-6 Computer Information Screen
Page 40

4-10 CHAPTER 4: TROUBLESHOOTING
5 Enter the following information to complete the form:
a Enter the PC manufacturer and model of your PC.
b Identify your PC as a client, server, or both, using the
pull-down menu.
c Select your CPU type using the pull-down menu.
d Enter the numbers of the PC slots that have boards
installed.
e Enter the numbers of the PC slots that support bus
mastering.
f Select your PC operating system using the pull-down
menu.
g Select your network operating system using the
pull-down menu.
h Select your PC processor speed using the pull-down
menu.
6 Click Next to display the Problem Description screen.
7 Enter your problem description and the 3Com case
number if you have one.
8 Use the pull-down menu to select whether you can
reproduce the problem or not, and if so, how often.
9 Click Next to display the Save screen.
10 Click Finish to save the report to the C:\3REPORT.TXT
file.
The Send Report screen appears. Use your mail application to
mail the report to one of the addresses on the Send Report
screen. Contact your local reseller first, before you e-mail the
report.
The problem report is completed. To view the report,
click View Report.
11 Click OK.
12 The 3Com NIC Diagnostics Program General screen
appears, as shown in Figure 4-2.
To exit the program, click Cancel.
Page 41

Removing the 3C905B-TX NIC PACE and 3NICDIAGS Software 4-11
Removing the 3C905B-TX NIC PACE and
3NICDIAGS Software
You can remove the PACE and 3NICDIAGS software from
your PC using Windows 95, Windows NT, or DOS.
Windows 95 and Windows NT 4.0
To remove the PACE and 3NICDIAGS software, follow these
steps:
1 In the Windows Control Panel, select Add/Remove
Programs.
2 Select 3Com NIC Diagnostic Utilities.
3 Click Add/Remove.
The 3C905B-TX NIC software is removed from your PC.
DOS
To remove the PACE and 3NICDIAGS software, follow these
steps:
At the DOS prompt, enter:
un3c90x.exe
The program removes the 3C905B-TX software.
Checking the Remote Wake-up Function
If the PC does not boot up when a Magic Packet™ wake-up
packet is sent, perform these general troubleshooting steps:
1 Verify that the Wake on Link and Wake on Magic
Packet settings are enabled.
a Click the Network Neighborhood icon.
b Click Properties.
c Double-click the 3Com NIC icon and click the
Advanced tab.
Make sure that Wake on Link and Wake on Magic Packet
are enabled. If these settings do not exist, either the NIC
is not a Remote Wake-Up NIC or the driver installation file
is outdated. For the latest 3C905B-TX drivers and
installation files, download EtherDisk diskette 3.1 or later
from the 3Com Web site:
http://www.3com.com/
Page 42

4-12 CHAPTER 4: TROUBLESHOOTING
2 Verify the driver version.
The driver must be at least version 2.23.40.
a Click Properties.
b Click the Version tab.
c Check the EL90X.SYS driver version.
If the version is lower than 3.1, download an updated
version of the driver from the 3Com Web site:
http://www.3com.com/
3 If the version of the driver is up to date, the keywords
are enabled, and the PC still does not wake up, check
the BIOS.
a Boot the PC and enter the BIOS.
b Locate the Wake-Up on PME signal or Wake-Up on LAN
event setting.
c Verify that the setting is enabled.
If you experience difficulties locating these settings,
consult the reference manual for your PC, or contact
your PC vendor.
4 Remove the PC cover and check the Remote Wake-Up
connection.
Verify that the Remote Wake-Up cable is plugged in to the
NIC as well as to the motherboard. Unplug and reinsert the
cable if necessary.
5 If the NIC still does not wake up, install a known
good working Remote Wake-Up NIC and the Remote
Wake-Up cable in the PC and recheck the PC.
If the PC works, contact your network vendor for a
replacement of the 3Com NIC. After you verify with a
known good working NIC that the PC still does not
wake up, there may be a problem with the motherboard.
Contact your PC vendor.
3Com DOS Diagnostic Program
For information about running the 3Com DOS diagnostic
program, see the INSTRUCT.TXT text file in the HELP
directory on EtherDisk Diskette #1.
Page 43

Crossover Cable Troubleshooting Tips 4-13
Crossover Cable Troubleshooting Tips
When you work with network cabling, concentrators, and
NICs from different vendors, it is possible to connect
everything and still have no communication between
file servers and workstations.
When there are several unknown variables, it is difficult to
determine which component is broken. Use these tips to
isolate the problem.
1 Determine whether your equipment complies with
the 10BASE-T or 100BASE-TX standard.
This is particularly important for concentrators (hubs or
repeaters).
2 Connect a straight-through cable from the PC to
the hub.
The hub performs an internal crossover so that the signal
can go from TD+ to RD+ and TD– to RD–. When you look
at an RJ-45 connector from the front, pin 1 is identified on
the left-hand side when the metal contacts are facing up.
3 Make sure that the TD+ and TD– wires are twisted
together, and that the RD+ and RD– wires are twisted
together. The example in Figure 4-7 shows 10BASE-T
cabling.
.
12345678
Straight-through
10BASE-T cable
1
2
3
4
5
6
7
8
1
2
3
4
5
6
7
8
TD+
TD
RD+
RD
Crossover
10BASE-T cable
1
2
3
4
5
6
7
8
1
2
3
4
5
6
7
8
Figure 4-7 Straight-through and Crossover Cable Pinouts
TD+
TD
RD+
RD
Page 44

4-14 CHAPTER 4: TROUBLESHOOTING
Using wires from opposing pairs can cause signals to
be lost. For a 100BASE-TX cable, pins #1 and #2, and #3
and #6 must be on the same twisted strand.
Troubleshooting Hubs with Crossover Cable
When there is doubt whether a hub is performing correctly,
or if the impedance settings are in question, a crossover
cable can help you isolate the failing component.
1 Connect a file server and a client PC back to back with
a crossover cable to verify that the NIC and network
operating system are properly configured.
2 To make a crossover cable, simply connect TD+ to RD+
and TD– to RD–.
The cable performs the crossover that is usually performed
by the hub. Make sure that two twisted-pair wires are
used. Figure 4-7 shows the pinouts for the crossover cable.
On the straight-through cable, make sure that the wires are
from the same twisted pair.
If the file server and client PC function together as a small
network, then either the existing cabling or the hub is the
problem.
■ If there is a proper crossover, the appropriate LED
comes on.
■ If there is a straight-through connection, the LED does
not light.
■ A blinking LED indicates that there is a polarity mismatch
(that is, TD+ to RD– instead of TD+ to RD+).
Page 45

Frequently Asked Questions 4-15
Frequently Asked Questions
Table 4-2 describes some common questions and answers
about the 3C905B-TX NIC.
Table 4-2 Frequently Asked Questions
Question Answer
Which PCI slot is best for my
PCI NIC?
Do I have to configure the
3C905B-TX NIC?
What interrupts should I avoid? You should avoid using any interrupts used by
Are my Fast EtherLink XL network
drivers Microsoft-certified?
Are my Fast EtherLink XL Bus
Master ODI drivers
Novell-certified?
(continued)
3Com PCI NICs are designed to work in any bus
mastering PCI slot, preferably slot 1. Avoid any
PCI slot next to an ISA slot. This is often a shared
slot and does not support bus mastering.The
NICs perform best in those slots that support bus
mastering data transfers. Refer to your PC
manual for information on which slots support
bus mastering data transfers.
PCI is a self-configuring bus architecture. Most of
the time you only need to install the board in your
PC; PCI does the rest. However, on some PCI
computers, you may be required to configure the
computer’s BIOS manually after installing your PCI
NIC. Refer to the owner’s guide for your PC.
ISA/EISA boards that do not properly support
shared interrupts (level-triggered).
If you do not know or are unsure whether other
devices or adapters in your PC support shared
interrupts, then avoid using them.
Avoid using the same interrupt as your local hard
drive (normally IRQ 14 for IDE drives and IRQ 11
for most SCSI host adapters), since not all hard
drives support shared interrupts at this time.
Avoid using 9 because it cascades with 2.
For Novell NetWare servers, avoid using IRQ 7 or
15. These IRQs only support nonshared devices
and may cause problems if they are shared
between two devices.
Yes, the Fast EtherLink XL network drivers are
Microsoft-certified.
Yes, the Fast EtherLink XL ODI drivers are
Novell-certified.
Page 46

4-16 CHAPTER 4: TROUBLESHOOTING
Table 4-2 Frequently Asked Questions (continued)
Question Answer
How do I remove the 3Com icon
from my system tray?
1 Double-click the 3Com icon to start the 3Com
NIC Diagnostics program.
2 In the right bottom corner of the main
window, click the Enable Tray Control check
box to remove the check mark.
3 Exit the program and the icon will not appear
anymore.
How can I get a SCO driver? You can get the SCO driver from the 3Com
World Wide Web site.
1 Enter the 3Com URL:
http://www.3com.com/
2 Click Drivers.
3 Click Latest Drivers.
4 Download the required files.
■ 90XSCO3.EXE is for SCO Open Desktop.
■ 90xSCO5.EXE is for SCO Open Server.
How can I remove the
3C905B-TX PACE and
3NICDIAGS software?
1 In the Windows 95 Control Panel, select
Add/Remove Programs.
2 Select 3Com NIC Diagnostic Utilities.
3 Click Add/Remove.
The PACE and 3NICDIAGS software is removed
from your PC.
Does the 3C905B-TX NIC
support full-duplex?
Why does the 3C905B-TX NIC
install as a “Generic PCI Ethernet
Controller” under Other Devices
in the Device Manager?
Yes, the 3C905B-TX NIC supports full-duplex at
10 Mbps and 100 Mbps operation.
When Windows 95 is installed with the
3C905B-TX NIC already installed, Windows 95
installs the 3C905B-TX NIC as a generic PCI
Ethernet controller. To work around this problem,
follow these steps:
1 In the Device Manager, double-click
Other Devices.
2 Click PCI Ethernet Controller.
3 Click Remove.
4 Restart your PC.
Does the 3C905B-TX NIC support
Windows NT version 3.51 on the
No, the 3C905B-TX NIC network driver only
supports Windows NT 4.0.
DEC Alpha PC?
(continued)
Page 47

Frequently Asked Questions 4-17
Table 4-2 Frequently Asked Questions (continued)
Question Answer
What should I do if a yellow
exclamation point appears next
to the 3C905B-TX NIC name?
1 In the Device Manager, double-click
Other Devices.
2 Click PCI Ethernet Controller or the duplicate
3C905B-TX NIC entry.
3 Click Remove.
4 Restart your PC.
What is the hardware IP header
checksum?
The header checksum is a field in the IP header.
When the 3C905B-TX NIC receives IP data, it
computes the IP header checksum, and if an error
occurred, the packet is dropped and is not passed
to the protocol stack. By computing the CRC
through hardware, the NIC can increase the
performance of IP traffic and reduce CPU
processing required by the protocol stack.
To avoid having the CRC computed twice (once
in the hardware and again in the software by the
protocol stack), make sure that your IP protocol
does not compute the CRC or if it does, disable
that function.
Does the 3C905B-TX NIC support
NetWare versions 3.11 or 4.0x?
The 3C905B-TX does not support NetWare
versions 3.11 or 4.0x. These versions require the
use of a server driver that conforms to the
HSM 3.2 specification. 3Com no longer develops
NetWare server drivers to the HSM 3.2
specification.
What does Remote Wake-Up do? Remote Wake-Up powers up a PC remotely from
standby or suspend mode using a wake-up packet
that is sent through the LAN. With this method,
no one has to be at the PC to turn it on.
Remote Wake-Up is also known as Wake on LAN.
How can I tell if my PC supports
Remote Wake-Up?
Check to see if there is a 3-pin header for the
Remote Wake-Up connector located on the PC
motherboard and if your PC has a BIOS that
supports wake-up events based on LAN events.
If you are unsure, contact your PC vendor for
further details.
What can wake up the
3C905B-TX NIC?
The NIC can be awakened by a Magic Packet
wake-up packet sent by management software,
or by connecting or disconnecting the TP cable.
(continued)
Page 48

4-18 CHAPTER 4: TROUBLESHOOTING
Table 4-2 Frequently Asked Questions (continued)
Question Answer
What is a Magic Packet? A Magic Packet is a valid Ethernet packet that
What is a cable
connect/disconnect?
What is Fast IP? Fast IP is software that improves performance on
What are the PC and network
requirements to run Fast IP?
What are the network
configuration requirements for
Fast IP?
What is the performance gain
when using Fast IP?
contains a synchronization stream immediately
followed by 16 repetitions of the destination MAC
address. This Magic Packet is not protocol-specific
as long as the protocol contains the sync stream
and the 16 repetitions. This Magic Packet can be
routed in order to wake up a remote PC. Since it is
a valid Ethernet address, the Remote Wake-Up
NIC can accept broadcast or multicast packets.
The NIC can also be awakened by connecting or
disconnecting the network cable.
switched networks. Fast IP allows end systems
(desktops and servers) to discover switched
communication paths. By creating switched
shortcuts, Fast IP allows end stations to bypass
the router and transfer data across wire-speed
switched paths. Fast IP is part of 3Com’s
DynamicAccess software, an advanced network
driver that brings intelligence to end systems to
provide improved network performance and
control.
Client requirements:
PC running Windows 95 or Windows NT
(versions 4 or 3.51), 3Com 3C905B-TX NIC,
and the TCP/IP stack
Network requirements:
Switched path between stations and single
broadcast domain
Fast IP is designed to bypass the router,
particularly where the router is a bottleneck, as
well as to leverage the switched infrastructure.
For Fast IP to create shortcuts around routers,
there must be a switched path between source
and destination.
Fast IP bypasses the router to provide increased
performance in switched networks even if only a
small number of network nodes use Fast IP.
The performance gain obtained when deploying
Fast IP is directly related to traffic load on the
backbone router. The more traffic pumped to
the router, the greater the latency and response
time and the higher the performance gain.
Internal tests show performance increases on the
order of 600% when routers are loaded at 70
to 75%.
Page 49

Accessing the 3Com World Wide Web Page 4-19
Accessing the 3Com World Wide Web Page
The 3Com Web site features news and information about
3Com products, customer service and support, 3Com’s
latest drivers, technical information, and more.
To access 3Com’s World Wide Web site, enter the 3Com
URL into your Internet browser:
http://infodeli.3com.com/infodeli/swlib/n_i_c.htm/
The Customer Support section has the latest troubleshooting
tips for 3Com NICs.
Page 50

Page 51

CHANGING CONFIGURATION
5
This chapter describes how to display and change
configuration settings for the 3C905B-TX NIC using the
3Com NIC Diagnostics program.
Before you change the settings, contact your system
administrator.
Configuration Settings
Table 5-1 lists each configuration option, the default
setting, and the available settings.
Table 5-1 Option Settings
Option Default Setting Available Settings
Network Driver
Optimization
Full-Duplex Auto Select Enabled, Disabled, Auto Select
Boot PROM Disabled Disabled, 8K, 16K, 32K
Media Type Auto Select 100BASE-TX, 10BASE-T, Auto Select
PACE Disabled Enabled, Disabled
NDIS Driver Speed None 100 Mbps, 10 Mbps (Windows NT only),
Remote Wake-Up No Yes, No
.
Normal Minimize CPU Utilization, Maximize
Network Performance, Normal
N/A (Windows 95)
CAUTION: Before setting the 3C905B-TX NIC for full-duplex,
make sure that the switch port is also set to full-duplex or
supports full-duplex and auto-negotiation (NWay).
Full-duplex at 100 Mbps improves the performance of
switch (hub) connections. The 3C905B-TX NIC supports
full-duplex at 10 or 100 Mbps. If the switch supports the
NWay feature and full-duplex, the 3C905B-TX NIC
automatically runs in full-duplex.
Page 52

5-2 CHAPTER 5: CHANGING CONFIGURATION
Displaying Configuration Settings
If you are running Windows 95 or Windows NT, use the
3Com NIC Diagnostics program to display and change
configuration settings.
The 3Com NIC Diagnostics program is automatically
installed with the network driver. Driver installation is
described in Chapter 3.
To display the current configuration of the 3C905B-TX NIC
using the 3Com NIC Diagnostics program, follow these steps:
1 Make sure that the 3C905B-TX NIC is installed and
connected to the network (Chapter 2) and the
network driver is installed (Chapter 3).
2 Start the 3Com NIC Diagnostics program by clicking
the Windows Start menu.
3 Select Programs.
4 Select 3Com NIC Utilities.
5 Select 3Com NIC Diagnostics.
The 3Com NIC Diagnostics Program General screen appears,
as shown in Figure 5-1.
6 Click NIC Details to display the NIC Details screen.
Each configuration setting is displayed with the current
value. Use the scroll bar to display the full list.
Click the Help button to display Help for this screen. Click the
question mark (?) at the top of the screen, drag it to a value,
and click. The pop-up box displays information about the
selected value.
Changing Configuration Settings
To change the 3C905B-TX NIC configuration settings with
the 3Com NIC Diagnostics program, follow these steps:
1 Click the Properties tab on the 3Com NIC Diagnostics
General screen, shown in Figure 5-1.
The 3Com NIC Diagnostics Properties screen appears, as
shown in Figure 5-2.
Page 53

Changing Configuration Settings 5-3
Figure 5-1 3Com NIC Diagnostics Program General Screen
Figure 5-2 3Com NIC Diagnostics Properties Screen
Page 54

5-4 CHAPTER 5: CHANGING CONFIGURATION
2 To display the options for each setting, select the
setting and scroll through the options pull-down
menu to the right.
Click the Help button to display Help for this screen. Click the
question mark (?) at the top of the screen, drag it to a value,
and click. The pop-up box displays information about the
selected value.
3 To select a new value, use the pull-down menu and
release the mouse button at the value you want.
4 Click OK.
The new value is selected. Repeat the process to change
any configuration setting on the Properties screen. Click OK
to save values or Cancel to exit without saving values.
Changing PACE Configuration
PACE technology allows you to establish class of service in
order to prioritize multimedia and real-time data.
Prioritization makes sure that critical data for the selected
applications gets through as fast as possible. To use PACE
technology, you must have a switched connection over
3Com switches that are enabled for PACE technology.
Selecting PACE Applications
To select PACE applications, follow these steps:
1 On the Properties screen shown in Figure 5-2, click
PACE Configuration.
The PACE Applications screen appears.
For the PACE driver to recognize high-priority network
traffic, it must know if a stream of network traffic was
generated by a specific PACE application.
2 To enable PACE support for an application, click the
box next to the appropriate application name.
3 Click OK.
Page 55

Changing PACE Configuration 5-5
Changing PACE Ranges and Protocols
You can add information for PACE applications not listed
on the PACE Applications screen. You must specify the port
or socket ranges as well as the network protocol being
used. Refer to the PACE application user guide. The PACE
network driver uses these ranges to determine whether a
packet should be treated as high-priority.
1 To add the PACE ranges and protocols, click the
Additional Ranges tab.
The PACE Additional Ranges screen appears.
2 Enter the beginning of the port or socket range for
the application in the Range Start box.
The range should be a four-digit hexadecimal value.
3 Enter the Range End value of the port or socket range
for the application.
The range end should be a four-digit hexadecimal number.
If only one port or socket is needed, Range End should
match Range Start.
4 Select the protocol that the application uses.
The protocol can be TCP, UDP, or IPX. Some applications
support multiple protocols and have port or socket ranges
for each protocol. In this case, the range or protocol must
match the protocol on the PC.
For example, if only TCP/IP is installed, do not enter the
socket range for IPX; otherwise, you could experience a
decrease in performance.
5 Once the Range Start, Range End, and Protocol are
entered, click Add.
The range is added to the list.
To remove a range, select the range in the list and
click Remove.
Page 56

5-6 CHAPTER 5: CHANGING CONFIGURATION
PACE Advanced Options
PACE Advanced Options are used to fine-tune the way the
network driver handles types of PACE traffic. In general,
these values need not be altered. Contact your network
administrator before using these options.
1 To display the PACE Advanced Options screen, click
the Advanced Options tab on the PACE Applications
screen.
The PACE Advanced Options screen appears.
2 Enter new information as required.
3 Click OK to set the new value.
To review the PACE settings descriptions, click Help on the
PACE screens.
Setting Fast IP
You can use Fast IP to improve performance in an
environment where most servers and clients are attached
to a switched network. Contact your system administrator
before you implement Fast IP.
You must have the 3C905B-TX NIC installed and be
running either Windows 95 or Windows NT with TCP/IP
enabled. In this environment, any application that uses
TCP/IP or Microsoft Networking over TCP/IP, FTP, or HTTP
can use Fast IP.
For a detailed explanation of Fast IP, go to the 3Com Web
site at:
http://www.3com.com/
1 Click the Fast IP tab on the PACE Applications screen.
2 To enable Fast IP, click Fast IP enabled on the Fast IP
screen.
3 Click OK to save the change.
Using the DOS Configuration Program
To use the DOS diagnostic program, see the INSTRUCT.TXT
file in the HELP directory on EtherDisk Diskette #1.
Page 57

A
This appendix lists the specifications and connector pin
assignments for the 3C905B-TX NIC.
Specifications
Network Interface
10 Mbps Ethernet
10BASE-T
100 Mbps Ethernet
100BASE-TX
Physical Dimensions
Height: 8.57 cm (3.75 in.)
Length: 12.07 cm (4.75 in.)
Environmental Operating Range
Operating temperature: 0˚ to 70 ˚C (32˚ to 158 ˚F)
Humidity: 10 to 90% noncondensing
Power Requirements
Operating voltage: +5 V ± 5% @ 650 mA max
SPECIFICATIONS
Ethernet IEEE 802.3 industry
standard for a 10 Mbps
baseband CSMA/CD local area
network
Ethernet IEEE 802.3u industry
standard for a 100 Mbps
baseband CSMA/CD local area
network
Page 58

A-2 APPENDIX A: SPECIFICATIONS
12345678
1
2
3
4
5
6
7
8
TD+
TD
_
RD
_
RD+
DATA
TX
ACT
10
100
L
N
K
RJ-45 Connector Pin Assignments
Figure A-1 shows the RJ-45 connector pin assignments for
the 3C905B-TX NIC.
Figure A-1 RJ-45 Connector Pin Assignments
Page 59

TECHNICAL SUPPORT
B
Support from Your Network Supplier
If additional assistance is required, contact your supplier for
support and service of your 3Com network interface card.
When you contact your supplier for assistance, have the
following information ready:
■ Diagnostic error messages
■ A list of system hardware and software, including
revision levels
■ Details about recent configuration changes, if applicable
If you are unable to contact your network supplier, see the
following section on how to contact 3Com.
3Com provides easy access to technical support
information through a variety of services. This appendix
describes these services.
Information contained in this appendix is correct at time of
publication. For the very latest, we recommend that you
access 3Com Corporation’s World Wide Web site.
Online Technical Services
3Com offers worldwide product support 24 hours a day,
7 days a week, through the following online systems:
■ World Wide Web site
■ 3Com Bulletin Board Service (3ComBBS)
■ 3ComFacts
SM
automated fax service
Page 60

B-2 APPENDIX B: TECHNICAL SUPPORT
World Wide Web Site
Access the latest networking information on 3Com
Corporation’s World Wide Web site by entering our URL
into your Internet browser:
http://www.3com.com/
This service features the latest information about 3Com
solutions and technologies, customer service and support,
news about the company, Net Age® Magazine, technical
documentation, and more.
3Com Bulletin Board Service
3ComBBS contains patches, software, and drivers for all
3Com products, as well as technical articles. This service is
available through analog modem or digital modem (ISDN)
24 hours a day, 7 days a week.
Access by Analog Modem
To reach the service by modem, set your modem to 8 data
bits, no parity, and 1 stop bit. Call the telephone number
nearest you:
Country Data Rate Telephone Number
Australia up to 14400 bps 61 2 9955 2073
Brazil up to 14400 bps 55 11 5181 9666
France up to 14400 bps 33 1 6986 6954
Germany up to 28800 bps 4989 62732 188
Hong Kong up to 14400 bps 852 2537 5601
Italy up to 14400 bps 39 2 27300680
Japan up to 14400 bps 81 3 3345 7266
Mexico up to 28800 bps 52 5 520 7835
P.R. of China up to 14400 bps 86 10 684 92351
Taiwan, R.O.C. up to 14400 bps 886 2 377 5840
U.K. up to 28800 bps 44 1442 438278
U.S.A. up to 28800 bps 1 408 980 8204
Page 61

Access by Digital Modem
ISDN users can dial in to 3ComBBS using a digital modem
for fast access up to 56 Kbps. To access 3ComBBS using
ISDN, use the following number:
1 408 654 2703
3ComFacts Automated Fax Service
3Com Corporation’s interactive fax service, 3ComFacts,
provides data sheets, technical articles, diagrams, and
troubleshooting instructions on 3Com products 24 hours
a day, 7 days a week.
Call 3ComFacts using your Touch-Tone telephone using
one of these international access numbers:
Country Telephone Number
U.K. 44 1442 438279
U.S.A. 1 408 727 7021
Online Technical Services B-3
Page 62

Page 63

10BASE-T
100BASE-T
100BASE-TX
dRMON
GLOSSARY
The IEEE 802.3 standard for a 10 Mbps baseband network
on twisted-pair cable.
The IEEE 802.3 standard for a 100 Mbps baseband
network over twisted-pair cable.
The IEEE 802.3 standard for a 100 Mbps baseband
network over two-pair Category 5 UTP or STP wire.
Distributed RMON. The 3C905B-TX NIC SmartAgent
intelligent agents collect remote management information
and send it to the Transcend Edge Monitor System to
provide full RMON network management in switched and
Fast Ethernet networks.
DynamicAccess software
3Com proprietary technology that optimizes network
performance. DynamicAccess features include PACE
Interactive Access technology, dRMON (distributed RMON)
support, Efficient Multicast Control, and support for
PACE real-time and multimedia class of service
applications.
full scatter gather
Technique that reduces CPU utilization by coordinating
multiple storage locations for received data with no CPU
utilization and then collecting it from multiple memory
locations for transmission.
Page 64

2 GLOSSARY
infinite bursting
Technology that enables the 3C905B-TX NIC to move data
continuously across the PCI bus without breaks in the data
transfer previously caused by cache size limitations.
Previously, cache limitations caused the NIC to release and
reacquire the PCI bus after every 64-byte burst. Infinite
bursting increases throughput and reduces CPU utilization
for better performance.
NDIS
Network Driver Interface Specification. Defines the network
driver architecture and interfaces that let a PC support
NICs. This architecture provides a standardized way to write
drivers for network NICs.
network interface card (NIC)
Network interface card. Also called adapter.
10/100 auto-negotiation (NWay)
Signaling scheme that allows the NIC and the hub to
negotiate between 10BASE-T and 100BASE-T, and
automatically select the highest performance level
supported by both devices.
PACE technology
Technology that enhances both real-time, interactive
applications and multimedia (data, voice, and video)
applications by enhancing network bandwidth utilization,
reducing latency, controlling jitter, and supporting multiple
traffic priority levels.
Parallel Tasking II architecture
3Com’s third-generation Ethernet NIC architecture.
Parallel Tasking technology accelerates data transfer by
processing data packets simultaneously instead of
sequentially.
PCI
Peripheral Component Interconnect. An advanced
high-performance local bus that supports multiple peripheral
devices. At 33 MHz, the PCI bus transfers data at up to
1056 Mbps.
Page 65

INDEX
Numbers
10/100 auto-negotiation (NWay) 1-3,
5-1
3C90X.LAN file 3-10
3Com Bulletin Board Service
(3ComBBS) B-2
3Com NIC Diagnostics program
echo test 4-6
NIC self test 4-4
3Com URL B-2
3ComFacts B-3
A
Artisoft LANtastic 3-12
AUTOEXEC.BAT file 3-9
AUTOEXEC.NCF file 3-11
AutoLink auto installation
software 1-3, 3-9
AUTOLINK.LOG file 3-10
auto-negotiation 1-3, 5-1
B
Banyan VINES 3-12
bulletin board service B-2
C
changing configuration settings 5-2
checking Remote Wake-Up 4-11
CONFIG.SYS file 3-9
configuration settings 5-1
confirming NIC installation in
Windows 95 3-4
connecting to the network 2-3
conventions
notice icons, About This Guide 2
text, About This Guide 2
CPU utilization 5-1
crossover cable
cable pinouts 4-13
troubleshooting tips 4-13
D
DEC PATHWORKS 3-12
diagnostic tests
NIC echo test 4-6
NIC self-test 4-4
DOS 3-9
drivers, installing 3-1
DynamicAccess features 1-2
E
echo test 4-6
F
Fast IP 5-6
fax service. See 3ComFacts
Frequently Asked Questions 4-15
full duplex 5-1
full-duplex 5-1
H
Help system
accessing 4-3
Frequently Asked Questions 4-3
KnowledgeBase 4-3
Release Notes 4-3
I
IBM LAN Server 3-12
installing drivers
Artisoft LANtastic 3-12
AutoLink 3-12
Banyan VINES 3-12
DEC PATHWORKS 3-12
IBM LAN Server 3-12
LAN Manager 3-12
NetWare Client 32 3-12
NetWare for DOS, Windows 3.1x,
and Windows for
Workgroups 3-9
Page 66

2 INDEX
NetWare server driver 3-10
supported network drivers 3-12
WFW NDIS 2 3-12
WFW NDIS 3 3-12
WFW NetWare 3-12
Windows 95 3-1
16-bit driver 3-12
Windows NT 3-5
installing the NIC 2-1
K
KnowledgeBase 4-3
L
LAN Manager 3-12
LAN Server 3-12
LANtastic 3-12
LEDs 2-3, 4-1
M
Media Type option description 5-1
Microsoft LAN Manager 3-12
N
NDIS 2 network driver 3-12
NetWare 3-9
Client 32 3-12
OS/2 3-12
version 4.10 3-10
network driver optimization 5-1
network supplier support B-1
NIC
connecting to the network 2-3
installing drivers 3-1
LEDs 4-1
network interface A-1
P
PACE technology 5-4
advanced options 5-6
PC and server requirements 1-3
physical dimensions A-1
pin assignments 4-14, A-2
power requirements A-1
problem report, generating 4-8
R
Release Notes 4-3
Remote Wake-Up, checking 4-11
removing the 3C905B-TX NIC PACE and
3NICDIAGS software 4-11
RJ-45 connector pin assignments A-2
S
server driver, Novell NetWare 3-10
support services 4-7
switch port, setting full-duplex 5-1
T
technical support
3Com URL B-2
bulletin board service B-2
fax service B-3
network suppliers B-1
troubleshooting 4-1, 5-1
crossover cable 4-13
LEDs 4-1
U
updating the network driver
Windows NT 3.51 3-7
Windows NT 4.0 3-5
URL B-2
O
online technical services B-1
operating voltage requirements A-1
V
VINES 3-12
Page 67

W
Windows 3.1x 3-9
Windows 95 1-3, 3-1
confirming NIC installation 3-4
installing network driver 3-1, 3-12
Windows for Workgroups 3-9, 3-12
Windows NT 3-5, 3-12
version 3.51 3-7
version 4.0 3-5
World Wide Web (WWW) 4-19, B-2
INDEX 3
Page 68

Page 69

3Com Corporation LIMITED WARRANTY
HARDWARE
3Com warrants its hardware products to be free from defects in workmanship and materials, under
normal use and service, for the following lengths of time from the date of purchase from 3Com or its
Authorized Reseller:
Network interface cards Lifetime
Other hardware products (unless otherwise specified in the warranty statement above) 1 year
Spare parts and spares kits 90 days
If a product does not operate as warranted above during the applicable warranty period, 3Com shall,
at its option and expense, repair the defective product or part, deliver to Customer an equivalent
product or part to replace the defective item, or refund to Customer the purchase price paid for the
defective product. All products that are replaced will become the property of 3Com. Replacement
products may be new or reconditioned. Any replaced or repaired product or part has a ninety (90) day
warranty or the remainder of the initial warranty period, whichever is longer.
3Com shall not be responsible for any software, firmware, information, or memory data of Customer
contained in, stored on, or integrated with any products returned to 3Com for repair, whether under
warranty or not.
SOFTWARE
3Com warrants that the software programs licensed from it will perform in substantial conformance to
the program specifications therefor for a period of ninety (90) days from the date of purchase from
3Com or its Authorized Reseller. 3Com warrants the media containing software against failure during
the warranty period. No updates are provided. The sole obligation of 3Com with respect to this express
warranty shall be (at the discretion of 3Com) to refund the purchase price paid by Customer for any
defective software products, or to replace any defective media with software which substantially
conforms to applicable 3Com published specifications. Customer assumes responsibility for the
selection of the appropriate applications program and associated reference materials. 3Com makes no
warranty or representation that its software products will work in combination with any hardware or
applications software products provided by third parties, that the operation of the software products
will be uninterrupted or error-free, or that all defects in the software products will be corrected. For any
third-party products listed in the 3Com software product documentation or specifications as being
compatible, 3Com will make reasonable efforts to provide compatibility, except where the
noncompatibility is caused by a “bug” or defect in the third party’s product.
STANDARD WARRANTY SERVICE
Standard warranty service for hardware products may be obtained by delivering the defective product,
accompanied by a copy of the dated proof of purchase, to the 3Com Corporate Service Center or to an
Authorized 3Com Service Center during the applicable warranty period. Standard warranty service for
software products may be obtained by telephoning the 3Com Corporate Service Center or an
Authorized 3Com Service Center, within the warranty period. Products returned to the 3Com
Corporate Service Center must be preauthorized by 3Com with a Return Material Authorization (RMA)
number marked on the outside of the package, and sent prepaid, insured, and packaged appropriately
for safe shipment. The repaired or replaced item will be shipped to Customer, at the expense of 3Com,
not later than thirty (30) days after receipt of the defective product by 3Com.
WARRANTIES EXCLUSIVE
IF A 3COM PRODUCT DOES NOT OPERATE AS WARRANTED ABOVE, CUSTOMER’S SOLE REMEDY FOR
BREACH OF THAT WARRANTY SHALL BE REPAIR, REPLACEMENT, OR REFUND OF THE PURCHASE PRICE
PAID, AT THE OPTION OF 3COM. TO THE FULL EXTENT ALLOWED BY LAW, THE FOREGOING
WARRANTIES AND REMEDIES ARE EXCLUSIVE AND ARE IN LIEU OF ALL OTHER WARRANTIES, TERMS,
OR CONDITIONS, EXPRESS OR IMPLIED, EITHER IN FACT OR BY OPERATION OF LAW, STATUTORY OR
OTHERWISE, INCLUDING WARRANTIES, TERMS, OR CONDITIONS OF MERCHANTABILITY, FITNESS FOR A
PARTICULAR PURPOSE, AND SATISFACTORY QUALITY. 3COM NEITHER ASSUMES NOR AUTHORIZES
ANY OTHER PERSON TO ASSUME FOR IT ANY OTHER LIABILITY IN CONNECTION WITH THE SALE,
INSTALLATION, MAINTENANCE, OR USE OF ITS PRODUCTS.
Page 70

3COM SHALL NOT BE LIABLE UNDER THIS WARRANTY IF ITS TESTING AND EXAMINATION DISCLOSE
THAT THE ALLEGED DEFECT IN THE PRODUCT DOES NOT EXIST OR WAS CAUSED BY CUSTOMER’S OR
ANY THIRD PERSON’S MISUSE, NEGLECT, IMPROPER INSTALLATION OR TESTING, UNAUTHORIZED
ATTEMPTS TO REPAIR OR MODIFY, OR ANY OTHER CAUSE BEYOND THE RANGE OF THE INTENDED
USE, OR BY ACCIDENT, FIRE, LIGHTNING, OR OTHER HAZARD.
LIMITATION OF LIABILITY
TO THE FULL EXTENT ALLOWED BY LAW, 3COM ALSO EXCLUDES FOR ITSELF AND ITS SUPPLIERS ANY
LIABILITY, WHETHER BASED IN CONTRACT OR TORT (INCLUDING NEGLIGENCE), FOR INCIDENTAL,
CONSEQUENTIAL, INDIRECT, SPECIAL, OR PUNITIVE DAMAGES OF ANY KIND, OR FOR LOSS OF
REVENUE OR PROFITS, LOSS OF BUSINESS, LOSS OF INFORMATION OR DATA, OR OTHER FINANCIAL
LOSS ARISING OUT OF OR IN CONNECTION WITH THE SALE, INSTALLATION, MAINTENANCE, USE,
PERFORMANCE, FAILURE, OR INTERRUPTION OF ITS PRODUCTS, EVEN IF 3COM OR ITS AUTHORIZED
RESELLER HAS BEEN ADVISED OF THE POSSIBILITY OF SUCH DAMAGES, AND LIMITS ITS LIABILITY TO
REPAIR, REPLACEMENT, OR REFUND OF THE PURCHASE PRICE PAID, AT THE OPTION OF 3COM. THIS
DISCLAIMER OF LIABILITY FOR DAMAGES WILL NOT BE AFFECTED IF ANY REMEDY PROVIDED HEREIN
SHALL FAIL OF ITS ESSENTIAL PURPOSE.
DISCLAIMER
Some countries, states, or provinces do not allow the exclusion or limitation of implied warranties or
the limitation of incidental or consequential damages for certain products supplied to consumers or the
limitation of liability for personal injury, so the above limitations and exclusions may be limited in their
application to you. When the implied warranties are not allowed to be excluded in their entirety, they
will be limited to the duration of the applicable written warranty. This warranty gives you specific legal
rights which may vary depending on local law.
GOVERNING LAW
This Limited Warranty shall be governed by the laws of the State of California, U.S.A., excluding its
conflicts of laws principles and excluding the United Nations Convention on Contracts for the
International Sale of Goods.
3Com Corporation, 5400 Bayfront Plaza, Santa Clara, CA 95052-8145 (408) 764-5000
FCC CLASS B STATEMENT
This device complies with Part 15 of the FCC Rules. Operation is subject to the following two
conditions:
1 This device may not cause harmful interference, and
2 This device must accept any interference received, including interference that may cause undesired
operation.
WARNING: This equipment has been tested and found to comply with the limits for a Class B digital
device, pursuant to Part 15 of the FCC Rules, and the Canadian Department of Communications
Equipment Standards entitled, “Digital Apparatus,” ICES-003.These limits are designed to provide
reasonable protection against harmful interference in a residential installation. This equipment
generates, uses and can radiate radio frequency energy and, if not installed and used in accordance
with the instructions, may cause harmful interference to radio communications. However, there is no
guarantee that interference will not occur in a particular installation. If this equipment does cause
harmful interference to radio or television reception, which can be determined by turning the
equipment off and on, the user is encouraged to try to correct the interference by one or more of the
following measures:
■ Reorient or relocate the receiving antenna.
■ Increase the separation between the equipment and receiver.
■ Connect the equipment into an outlet on a circuit different from the one which the receiver is
connected to.
■ Consult the dealer or an experienced radio/TV technician for help.
Page 71

The user may find the following booklet prepared by the Federal Communications Commission helpful:
The Interference Handbook
This booklet is available from the U.S. Government Printing Office, Washington, D.C. 20402. Stock No.
004-000-00345-4.
NOTE: In order to maintain compliance with the limits of a Class B digital device, 3Com requires that
you use quality interface cables when connecting to this device. Changes or modifications not expressly
approved by 3Com could void the user’s authority to operate this equipment. Refer to the manual for
specifications on cabling types.
FCC DECLARATION OF CONFORMITY
We declare under our sole responsibility that the
Model: Description:
3C905B-TX
3C905B-TX-NM
to which this declaration relates, is in conformity with the following standards or other normative
documents:
■ ANSI C63.4-1992 Methods of Measurement
■ Federal Communications Commission 47 CFR Part 15, subpart B
15.107 (e) Class B Conducted Limits
15.109 (g) Class B Radiated Emissions Limits
3Com Corporation, 5400 Bayfront Plaza, P.O. Box 58145, Santa Clara, CA 95052-8145
Fast EtherLink XL PCI 10/100BASE-TX
Network Interface Card
3COM END USER SOFTWARE LICENSE AGREEMENT
IMPORTANT: Read Before Using This Product
YOU SHOULD CAREFULLY READ THE FOLLOWING TERMS AND CONDITIONS BEFORE USING
THIS PRODUCT. IT CONTAINS SOFTWARE, THE USE OF WHICH IS LICENSED BY 3COM
CORPORATION (“3COM”) TO ITS CUSTOMERS FOR THEIR USE ONLY AS SET FORTH BELOW. IF
YOU DO NOT AGREE TO THE TERMS AND CONDITIONS OF THIS AGREEMENT, DO NOT USE THE
SOFTWARE. USING ANY PART OF THE SOFTWARE INDICATES THAT YOU ACCEPT THESE TERMS.
LICENSE: 3Com grants you a nonexclusive license to use the accompanying software program(s) (the
“Software”) subject to the terms and restrictions set forth in this License Agreement. You are not
permitted to lease, rent, distribute or sublicense the Software or to use the Software in a time-sharing
arrangement or in any other unauthorized manner. Further, no license is granted to you in the human
readable code of the Software (source code). Except as provided below, this License Agreement does
not grant you any rights to patents, copyrights, trade secrets, trademarks, or any other rights in respect
to the Software.
The Software is licensed to be used on any workstation or any network server owned by or leased to
you, provided that the Software is used only in connection with a 3Com adapter. You may reproduce
and provide one (1) copy of the Software and supporting documentation for each such workstation or
network server on which the Software is used as permitted hereunder. Otherwise, the Software and
supporting documentation may be copied only as essential for backup or archive purposes in support
of your use of the Software as permitted hereunder. You must reproduce and include all copyright
notices and any other proprietary rights notices appearing on the Software and the supporting
documentation on any copies that you make.
NO ASSIGNMENT; NO REVERSE ENGINEERING: You may not transfer or assign the Software and/or
this License Agreement to another party without the prior written consent of 3Com. If such consent is
given and you transfer or assign the Software and/or this License Agreement, then you must at the
same time either transfer any copies of the Software as well as the supporting documentation to the
same party or destroy any such materials not transferred. Except as set forth above, you may not
transfer or assign the Software or your rights under this License Agreement.
Modification, reverse engineering, reverse compiling, or disassembly of the Software is expressly
prohibited. However, if you are a European Community (“EC”) resident, information necessary to
achieve interoperability of the Software with other programs within the meaning of the EC Directive on
the Legal Protection of Computer Programs is available to you from 3Com upon written request.
Page 72

EXPORT RESTRICTIONS: You agree that you will not export or re-export the Software or
accompanying documentation (or any copies thereof) or any products utilizing the Software or such
documentation in violation of any applicable laws or regulations of the United States or the country in
which you obtained them.
TRADE SECRETS; TITLE: You acknowledge and agree that the structure, sequence and organization
of the Software are the valuable trade secrets of 3Com and its suppliers. You agree to hold such trade
secrets in confidence. You further acknowledge and agree that ownership of, and title to, the Software
and all subsequent copies thereof regardless of the form or media are held by 3Com and its suppliers.
UNITED STATES GOVERNMENT LEGEND: All technical data and Software are commercial in nature
and developed solely at private expense. The Software is delivered as Commercial Computer Software
as defined in DFARS 252.227-7014 (June 1995) or as a commercial item as defined in FAR 2.101(a) and
as such is provided with only such rights as are provided in this License Agreement, which is 3Com’s
standard commercial license for the Software. Technical data is provided with limited rights only as
provided in DFAR 252.227-7015 (Nov. 1995) or FAR 52.227-14 (June 1987), whichever is applicable.
You agree not to remove or deface any portion of any legend provided on any licensed program or
documentation delivered to you under this License Agreement.
TERM AND TERMINATION: This license will expire fifty (50) years from the date that you first use the
Software, if it is not earlier terminated. You may terminate it at any time by destroying the Software
and documentation together with all copies and merged portions in any form. It will also terminate
immediately if you fail to comply with any term or condition of this License Agreement. Upon such
termination you agree to destroy the Software and documentation, together with all copies and
merged portions in any form.
GOVERNING LAW: This License Agreement shall be governed by the laws of the State of California as
such laws are applied to agreements entered into and to be performed entirely within California
between California residents and by the laws of the United States. You agree that the United Nations
Convention on Contracts for the International Sale of Goods (1980) is hereby excluded in its entirety
from application to this License Agreement.
LIMITED WARRANTY; LIMITATION OF LIABILITY: All warranties and limitations of liability applicable
to the Software are as stated on the Limited Warranty Card or in the product manual accompanying
the Software. Such warranties and limitations of liability are incorporated herein in their entirety by this
reference.
SEVERABILITY: In the event any provision of this License Agreement is found to be invalid, illegal or
unenforceable, the validity, legality and enforceability of any of the remaining provisions shall not in
any way be affected or impaired and a valid, legal and enforceable provision of similar intent and
economic impact shall be substituted therefor.
ENTIRE AGREEMENT: This License Agreement sets forth the entire understanding and agreement
between you and 3Com, supersedes all prior agreements, whether written or oral, with respect to the
Software, and may be amended only in a writing signed by both parties.
3Com is a registered trademark of 3Com Corporation.
3Com Corporation, 5400 Bayfront Plaza, P.O. Box 58145, Santa Clara, CA 95052-8145.
(408) 764-5000
 Loading...