

Page 1

Basic Handbook for the Palm III™ Organi ze r
Page 2

Copyright
Copyright © 1998 3Com Corporation or its subsidiaries. All rights reserved.
3Com, the 3Com logo, Palm Computing, Graffiti and HotSync are registered
trademarks, and PalmPilot, Palm III, Palm OS, Palm, the Palm Computing
platform logo, the PalmPilot logo and the Palm III logo are trademarks of
Palm Computing Inc., 3Com Corporation or its subsidiaries. Other product
and brand names may be tra demarks or regis tered trad emarks of their respective owners. This product is not manufactured by Pilot Corporation or Pilot
Corporation of America, manufacturers and distributors of writing instruments.
Disclaimer and Limitation of Liability
3Com Corporation and its subsidiaries assume no responsibility for any damage or loss resulting from the use of this handbook.
3Com Corporation and its subsidiaries assume no responsibility for any loss
or claims by third parties which may arise through the use of this software.
3Com Corporation and its subsidiaries assume no responsibility for any damage or loss caused by deletion of data as a result of malfunction, dead battery
or repairs. Be sure to ma ke backu p copies o f all import ant da ta on o ther media
to protect against data loss.
Important:Please read the 3Com End User Software License Agreement contained in this handbook before using the accompanying software program(s).
Using any part of t he softwar e indicates t hat you accep t the terms of t he 3Com
End User Software License Agreement.
3.5" Software Diskettes Available
Palm Desktop software is supplied on a CD-ROM disc. If you do not have access to a CD-ROM drive for your co mputer, you may obtain 3.5" disk ettes. S ee
“Technical Support, Service and Repair" for the phone number to obtain these
diskettes, or complete and mail (or fax) the diskette offer card supplied in the
Palm III organizer product package.
P/N: 405-0331
A/N: 423-0219
Page ii Basic Handbook for the Palm III Organizer
Page 3

Contents
Chapter 1: Getting Started With Your Palm III™ Organizer
Locating Front Panel Controls ............................................................2
Protective Flip Cover ...........................................................................3
Locating Back Panel Components .....................................................4
Installing the Batter ies .............................................. ............ .......... .....5
Calib ra t i ng the S creen . .. ................. .......... .......... .......... ......... .......... .....6
Setting the Time ....................................................................................8
Setting the Current Date ......................................................................9
Connecting the Cradle .......................................................................10
Installing Palm Desktop Softw are ...................................................10
Chapter 2: Working with Your Palm III™ Organizer
Selecting Applications .......................................................................13
Using the On-Screen Keyboard ........................................................16
Writing With the Stylus .....................................................................17
Using Application Controls ..............................................................27
Using Menus .......................................................................................28
Choosing Fonts ...................................................................................32
Using Categories .................................................................................33
Attaching Notes ..................................................................................37
Marking Private Entries ....................................................................37
Beaming Informatio n to Othe r 3Com® Connected Organizers ..38
Chapter 3: Finding Information With Your Palm III™ Organizer
Using the Find Command .................................................................41
Using Phone Lookup .........................................................................42
Chapter 4: Installing and Removing Applications
Installing Applica tions ........................................ ...................... ........45
Installing Games .................................................................................47
Removing Applications .....................................................................48
Removing Palm Desktop Software ..................................................49
Chapter 5: Getting Help With Your Palm III™ Organizer
Displaying Online Tips ......................................................................51
Troubleshooting ..................................................................................52
Technical Support, Service and Repair ...........................................57
Corporate Offices ...............................................................................60
Contents Page iii
Page 4

Chapter 6: Maintaining Your Palm III™ Organizer
Caring for Your Palm III Organizer ................................ ..... ....... ....61
Limited Warranty ..............................................................................65
3Com End User Software License Agreement ..............................67
FCC Statement ....................................................................................70
Canadian RFI Statement ................................................................... 70
Index
Index ..................................................................................................... 71
Page iv Basic Handbook for the Palm III Organizer
Page 5

Chapter 1
Getting Starte d With Y our
™
Palm III
This chapter explains the physical buttons and controls on your Palm
III organizer, how to install the batteries, start your Palm III organizer
for the f i rs t time, and set up you r Palm
Orga n i z er
Congratulations on your purchase of the Palm III™
connected organizer. This handbook describes how
to use your Palm III organizer. To learn about the
applications that come with your Palm III organizer,
refer to the Applications Handbook for the Palm III
Organizer.
™
Desktop so f t ware.
Chapter 1 Page 1
Page 6

Locating Front Panel Controls
Palm III organizer screen
Graffiti writing area
Applic a tion buttons
Scroll button
Power button,
Backlight control
Palm III
organizer
screen
®
Graffiti
writing
area
Applicatio n
buttons
Scroll
button
Displays the applications and information stored in
your Palm III organizer. It is touch-sensitive and
responds to the stylus or y o u r f inger.
The area where you write strokes using the Graffiti
alphabet. See “Writing With the Stylus” for details
about how to write Graf fiti character strokes.
Activate the individual Palm III organizer
applications that correspond to the icons on the
buttons: Date Book, Address Book, To Do List and
Memo Pad. You ca n reas sign the se butt ons t o activ ate
any application on your Palm III organizer. See
“Button Preferences” in the Applications Handbook for
the Palm III Organizer.
Note:
If your Palm III organizer is off, pressing any
application button activates the Palm III
organ iz e r a n d opens the corre spondi n g
application.
Displays text and other information that extends
beyond the area of the Palm III organizer screen.
Pressing the lower half of the scrol l button “scrolls
down” to view information below the viewing area,
and pressing the upper half of the button “scrolls up”
to view the information above the viewing area.
Page 2 Basic Handbook for the Palm III Organizer
Page 7

Power
button
Turns your Palm III organizer on or off and controls
the backlight feature. If your Palm III organizer is
turned off, pressing the power button turns the unit
on, and Palm III organizer returns you to the last
screen you were viewing.
If your Palm III organizer is turned on, pressing the
power button turns the un it off, help ing to conserve
battery l ife. Holding the power but ton down for
about two seconds turns the backlight on or off.
Protective Flip Cover
The cover protects the Palm III organizer screen when it is not in use
and helps reduce glare while you use your Palm III organizer. You can
open the cover so that it is at an angle, open it fully or remove it
altogether by pulling the cover out of the holes on the sides of the Palm
III organizer. To reattach the cover, reinsert the pegs in the holes.
Chapter 1 Page 3
Page 8

Locating Back Panel Components
IR
port
Stylus
Reset
button
Contrast
control
Batter y
door
Serial
port
door
Stylus
IR port
Reset button
Slides in and out of the slot on th e bac k si de of
the Palm III organizer. To use the stylus,
remove it from the slot and hold it as you
would a pen or pencil.
Important: Always use the po i nt of th e s tylu s
for tapping or making strokes on
the Palm III organizer screen.
Never use an actual pen, pencil or
other sharp obje ct to write on th e
Palm III organizer screen.
Uses infrared technology to transmit data to
®
and receive data fr om other 3Com
connected
organizers. See “Beaming Information to
Other 3Com Connected Organizers” for more
information.
Under normal use, you should never have to
use the reset button. See “Resetting Your Palm
™
Organi z er” for informat ion about how to
III
use the reset button.
Page 4 Basic Handbook for the Palm III Organizer
Page 9

Contrast
control
Adjusts the appearance of the screen for the
clearest screen display. Depending on the
lighting conditions or temp erat ure of the
environment where you use your Palm III
organizer, you may need to adjust the setting
of the cont rast control.
Battery door
Covers the batteries that power your Palm III
organizer. See “Installing the Batteries” for
information on removing the battery door and
installing batteries.
Serial po rt d o or
Protects the serial port that fits into the
connector of the Palm III organizer cradle to
ensure t hat t he con nection surf ace of th e s erial
port re ma ins clean an d cl e a r o f deb r is.
Installing the Batteries
To use your Palm III organizer, you must install two AAA alkaline
batteries. The batteries fit behind the batte ry door on the back of the
Palm III organizer.
To install the batteries in your Palm III:
1. Press the latch on the battery door and lift the battery door away
from the Palm III organizer.
Press tab
to open
2. Install the two AAA alkaline batteries supplied with your Palm III
organiz er into the battery compa rtment.
Chapter 1 Page 5
Page 10

Note: A diagram in the i nterior of the battery comp artment
shows the orientation of the + and - e nd s of the bat te ries.
When correctly installed , the clips in the batter y
compartment secure the batteries in place.
3. Insert the battery door back into place so that it is flush with the
back of the Palm III organizer and “clicks” into position.
Important: Do not force the battery door. When the batteries are
correctly installed, the battery door clips smoothly into
place. If you feel resistance when replacing the battery
door, make sure the door is ali gne d with the slots on the
back of your Palm III organizer, and that the batteries are
firmly seated in the battery compartment.
Calibrating the Screen
The first time you start your Palm III organizer the calibration screen
automatically appears. Follow the steps in this section to align the
internal circuitry of your Palm III organizer with its touch-sensitive
screen.
To calibrate your Palm III:
1. Press the green power button on the front panel of your Palm III
organizer to di splay the ca li b ration screen.
Power
button
Page 6 Basic Handbook for the Palm III Organizer
Page 11

Note: If necessar y, adjust the c ontrast con trol locate d on the side
of the Palm III organizer, so the alignment screen is clear
and readable.
2. Remove the stylus from its storage slot on the back of the Palm III
organizer.
3. Tap the exact center of each target that appears on the screen with
the tip of the sty lus.
After you tap eac h of the t ar get s, co nt inue w ith the f oll owi ng s ect ions
to set the time and date.
About the Backlight Feature
If you have difficulty seeing the information on your Palm III
organizer, you can use the backlight f eature t o illuminat e your screen .
Note: If you upgraded your Pilot 1000 or Pilot 5000 or g anizer with
the 2MB memory card, the backlight feature is not available. In
this case, only the operating system and applications are
upgraded. To obtain the backlig ht featur e, you must pur chase
™
a PalmPilot
To activate the backlight feature:
■ Press the green power button and hold it down for about two
Professional or Palm III organizer.
seconds. Release the button when the back light tur ns on.
To turn off the backlight feature:
■ Press and ho ld the gr een powe r button for about two sec onds. Th e
backlight feature also turn s of f au tomatically (after a period of
inactivity) with the Auto-off after feature.
In add i tion, you ca n use a f u l l- s creen pe n stroke to activ a te the
backlight feature. See “Buttons Preferences” in the Applications
Handbook for the Palm III Organizer for more informa tion.
Chapter 1 Page 7
Page 12

Setting the Time
The General Preferences screen is the first screen to appear after you
align the digitizer on your Palm III organizer.
Note: If the General Preferences screen is not on your Palm III
organizer screen, you may have pressed one of the application
buttons on the front panel. See “Opening Preference s Screens”
in the Applications Handbook for the Palm III Organizer for
information on displaying the General Preferences screen.
To set the curr ent time:
1. Tap the Set Time box in the General Preferences sc reen to open t he
Set Time dialog.
Tap here
2. Tap the up or down arrows to change the ho ur.
3. Tap the minu te s bo x, and then t ap t he ar rows t o a djus t th e s ettin gs
for th e cu rre nt time.
4. Tap the AM or PM box to select the time of day.
Note: Your Palm III organizer can also display time based on a
24-hour clock. See “Formats Preferences,” in the
Applications Handbook for the Palm III Organizer.
5. Tap the OK button to close the Set Time di alog and retur n to the
General Preferences screen.
Page 8 Basic Handbook for the Palm III Organizer
Page 13

Setting the Current Date
The Set Date box in the General Preferences screen is used to set the
current date for your Palm III organizer.
To set the current date:
1. Tap the Set D a te box to op e n the S e t D a te d ia l o g .
2. Tap the arrows at the top to select the current year.
Tap arrows to select year
Tap to select month
Tap to selec t da te
3. Tap a month bo x to se l e c t the cu rrent mo n t h .
4. Tap the current date to close the Se t Date dialog and retu rn to the
General Preferences screen.
Note: You do not need to adjust the other General Preference
settings at this time. See “General Preferences” in the
Applications Handboo k for the Palm II I Or ganizer for
informati on about the rema ining options.
Chapter 1 Page 9
Page 14

Connecting the Cradle
The cradle that comes with your Palm III organizer enables you to
synchronize the information on your Palm III organizer and the Palm
Desktop software using HotSync
To connect the cradle:
■ Turn off your computer and plug the cable from the Palm III
organize r cradle into the serial communications port on your
computer.
Note: Your Palm III organizer requires a dedicated port. I t cannot
share a por t with an int ernal m odem or other d evice . If you are
unsure about the e xact location of the serial port on your
computer, re f e r to the user’ s manual supplied with the
computer.
®
technology.
Instal ling Palm Desk to p S o ftware
Palm Desktop organizer software extends many of the functions of
your Palm III organizer to your computer. Although using Palm
Desktop software is optional, when you use it with your Palm III
organizer and the built-in HotSync technology, you can fully
synchronize the information on your Palm III organizer with the
information on your computer. Changes you make on your Palm III
organizer or Palm Desktop appear in both places after you
synchronize.
With Palm Desktop software you can:
■ Work with your Palm III organizer application s on your
computer . Palm De sktop duplicat es the Date Book, Addres s Book,
To Do List and Memo Pad applications on your Palm III organizer,
so you can view, enter and modify any data stored on your Palm
III organizer.
Page 10 Basic Handbook for the Palm III Organizer
Page 15

■ Back up the data stored on your Palm III organizer with HotSync
technol o g y and synchroniz e the data with Palm Desktop.
Synchronization is a one-step procedure that ensures your data is
always safe and up-to-date. See th e “HotSync” chapter in the
Applications Handbook for the Palm III Organizer for information
about using thi s f e atu re.
■ Import and export data, so you can easily t ransfer dat a from other
Windows applications i nto Address Book or Memo Pad.
■ Print your Date Book, Address Book, To Do List and Memo Pad
information on any Windows-compatible printer.
System R equirements
To install and operate Palm Desktop, your computer system must
meet the following requirements:
Minimum Re q u ir em en ts
■ Windows 95 or Wind ows NT 4.0
■ IBM-compatible 486 computer or higher
■ 8 MB RAM (memory) minimum, 16 MB recommended
■ 12 MB available hard disk space
■ VGA monitor or better (the Palm Quick Tour requires a 256 color
video display)
■ CD-ROM drive
(3.5" diskettes available upon request. See “Technic al Support,
Service and Repair” for information.)
■ Mouse
■ One available serial port
Optional Equipment
■ Modem (such as PalmPilot Modem)
■ Windows-com patible print er
Chapter 1 Page 11
Page 16

Software Installation
The following instructions guide you through installing Palm
Desktop software. After you inst all the software, refer to the Help
menu for complete information about how to use Palm Desktop.
To ensure a safe and uninterrupted installation of the Palm Desktop
software, pleas e do the follow ing be for e insta lling:
■ Connect the cradle to your computer.
■ If you have placed your Palm III organizer in the cradle, remove it
during software installation.
■ Exit all programs, including those that run automatically at
startup, su ch as fax software, virus p rotection software, screensaver software, and ap p lication toolbars such as Microsoft Office.
■ If you are installing from diskettes (rather than the CD-ROM),
make sure the original Palm Desktop diskettes are writeprotected, and then make backup copies of them. When you finish,
use the copies to install the software, and store the original
disk et t e s i n a sa f e pla ce. Refe r to your compu te r ’s m a nu a l or
Windows User Guide if you need information about locking or
copying diskettes.
■ Do not simpl y cop y the Pal m Desktop files to yo ur hard drive. You
must use the inst aller to plac e the files in their proper locat ions and
to decompress the files.
To install Palm Desktop softw are:
1. Exit any open Windo ws pr ogra ms and disa ble any vi rus- sca nnin g
software.
2. Insert the Palm Desktop CD-ROM into the computer’s CD-ROM
drive (or insert the diskette labeled Setu p into the diskette drive).
3. Wait for the introduction screen to appear.
4. Click the Ins tall button to begin the instal lation proced ur e .
5. Follow the instruction s on the screen t o complete the installation.
Page 12 Basic Handbook for the Palm III Organizer
Page 17

Chapter 2
Working with Yo ur
™
Palm III
Selecting Applications
Your Palm III organizer is equipped with a variety of applications. All
the applications installed on your Palm III organizer appear in the
Applications Launcher. You can use the Applications Launcher to
open any application installed on your Palm III organizer. You can
also open the four main appli cations — Date Book, Address Book, To
Do List and Memo Pad — with the buttons on the front panel your
Palm III organizer.
Tip: When you press th e buttons on the fron t panel, you ha ve
instant access t o the selec ted appli cation. You don’ t even need
to turn on your Palm III organizer first.
Orga n i z er
This chapter explains h ow to open applic ations, us e
the on-scree n keyboard, write with th e stylus and
use common features on your Palm III
organizer.
™
connected
In addition to providing a way for you to open applications, the
Applications Launcher displays the current time, battery level and
application cat egory .
Chapter 2 Page 13
Page 18

To open applications:
1. Tap the icon on the Palm III organizer screen to open the
Applications Launcher.
2. Tap the icon of the application that you want to open. If you have
many applications installed on your Palm III organizer, tap the
scroll bar to see all of your applications.
®
Tip: As a shortcut, you can write th e Graffiti
handwriting
software character st roke for the first letter of the
application you want to use. The Applications Launcher
scrolls to the first application that begins with that le tte r.
Switching Applic ations
When working in any application, you can tap the icon or press the
buttons on the front panel to switch to any other application. Your
Palm III organizer saves your work in the current application and
disp la y s it w h e n y ou re t u rn to the cu rre nt screen .
Changing the Applications Launc her Display Form at
By default the Applications Launcher displays each application as an
icon. As an alternative, you can choose to show a li st of applications.
To change the Applications Launcher display:
1. Tap the icon on the Palm III organizer screen to open the
Applications Launcher.
2. Tap the icon on the Palm III organizer screen to open the
Applications Launcher menus.
3. Tap Preferences from the Options menu to open the Preferences
dialog.
Page 14 Basic Handbook for the Palm III Organizer
Page 19

4. Tap the View By pick li st and select the List option.
5. Tap the OK butt on to close the P reference s dialog and displa y the
Applicatio ns Launche r in list format.
Displaying Applications by Category
The category feature enables you to limit the number of applications
that appear on the screen. You can assign categories to your
applications and then choose to display a single category or all your
applications.
To display applications by category:
1. Tap the icon on the Palm III organizer screen to open the
Applicatio ns Launche r .
2. Tap the icon on the Palm III organizer screen to open the
Applications Launc her menus .
3. Tap Category from the App menu to open the Category dialog.
Chapter 2 Page 15
Page 20

4. Tap the pick list next to each appli cation to assi gn it to a category.
Tip: To create a new categor y, tap Edi t Categor y from the pick
list to open the Edit Categories dialog. Tap the New
button, enter the cate gory name, a nd then tap the OK
button to add the category. Tap OK to close the Edit
Categories dialog.
5. Tap the Don e but ton to c lose the C ategor y d ialo g an d ret urn t o the
Applications Launcher.
6. Tap the pick list in the upper-right corner of the screen and select
the applicati on categor y you want to displa y.
Tip: You can also tap the icon to scroll through the
application catego ries .
Using the On-Screen Keyboard
You ca n ac ti v ate the o n - sc re e n ke y b o a rd any tim e y ou n e e d to enter
text or numbers on your Palm III organizer. Note that you cannot
enter Graffi ti chara ct e rs wh il e using the on-scre e n ke y b o a rd.
To use the on-screen keyboard:
1. Open any Palm III organizer application (such as the Memo Pad
application, as described in the previous section).
2. Tap any record na me, or tap the New b u tt on.
3. Tap the left target to open the Alpha keyboard, or tap the right
target to open the Numeric keyboard.
Tap here for letters
keyboard
Page 16 Basic Handbook for the Palm III Organizer
Tap here for numb ers
keyboard
Page 21

Alpha
Tab
Caps lock
Caps shi f t
Tap here to display
Alpha keyboard
Numeric
Tap here to disp lay
Numeric keyboard
Backspace
Carriage return
International
Tap here to display
International keyboard
4. Tap the characters of the on-screen keyb oard to enter te xt and
numbers.
Note: The on-screen keyboard also includes a dialog for
international characters. You can switch among the three
dialogs at any time to enter the exact text you need.
5. After you finish, tap the Done button to close the on-screen
keyboard and place the text in your Palm III organizer application.
Writing With the Stylu s
Your Palm III organizer includes Graffiti handwriting software as the
primary system for enteri ng text and numbers. Graffiti is a sy stem
where simple strokes yo u wr ite with the stylus are inst antly
recognized as letters or numbers.
This section explains the basics of Graffiti, and how to make strokes in
the Graffiti writing area. Your Palm III organizer also includes Giraffe
— a game you can use to practice writing Graffiti. See “Installing
Games” for instructions on how to install Giraffe.
Chapter 2 Page 17
Page 22

Opening the Memo Pad Application
The Memo Pad application is ideal for prac ticing the Graffit i alphabet.
This section explains how to open the Memo Pad and use it to practice
Graffiti. A complet e explanation of the Memo Pad application appears
in the Applications Hand book for the Pa lm III Organi zer.
To open the Memo Pad application:
1. Press the button on the front of your Palm III organizer to open
the Memo Pad application.
2. Tap the New button to open a new Memo Page.
New
memo
cursor
Tap
New
Write in Graffiti area
Note: A cursor appears in the upper-left corner of the Memo Page to
indicate where new text will appear.
Writing Letters With Graffiti
Most people fi nd t hey c an e nter t ext quick ly and accu ra tely with only
minutes of practice. Graffiti includes any character y o u can type on a
standard keyboard. The Graff iti stro kes closely resemble those of the
regular alphabet which ma kes it q uick and eas y to learn. For example,
the following Graffiti strokes are portions of the regular alphabet
equivalents.
AF
4
Page 18 Basic Handbook for the Palm III Organizer
K
5
T
Page 23

There are four basic concepts for success with Graffiti:
■ If you draw the character shape exactly as shown in the tables later
in this chapte r (like the shap e s shown in the following diagram),
you achieve 100% accuracy.
■ The heavy dot on each shape shows where to begin the stroke.
Certain characters ha ve similar shapes, but different beginning
and end points . Always begin the stroke at the heavy dot.
■ Most charac te rs require onl y a single stroke. Wh e n you lift the
stylus from the Graffiti writing area, your Palm III organizer
recognizes and display s th e text character immediately .
■ The Graffiti writing area is divided into two parts: one for writing
the letters of the alphabet and one for writing numbers. The small
marks at the top and bottom of the Graffiti writing area indicate
the two areas .
Write letters here Write numbers here
Division marks
To write letters o f th e alphabet with Graffiti:
1. Tap the screen where you want your text to go.
2. Use the table on the next page to f ind t he stro ke shape for the letter
you want to create. For example, the stroke shown below creates
the lette r “n.”
Note: There are two different stroke shapes available for some
letters. For these letters, choose the one that’s easiest for
you.
Chapter 2 Page 19
Page 24

Lift stylus
here
Start stroke
at heavy dot
As you’ll see later, you use these shapes to create both upper- and
lowercase lette rs.
3. Position t he st ylus i n the left- han d sid e of t he Gra ffi ti wr iti ng ar ea.
4. Start your stroke at the heavy dot, and dr aw th e stroke shape as it
appears in the table.
Note: Don’t try to draw the dot shape itself. The heavy dot is
ther e to show the starti ng p oi nt of the s troke.
5. Lift the sty lus from the screen at the end of the stroke shape.
That’s all there is to it! When you lift the stylus from the screen, your
Palm III organizer recognizes your stroke immediately and prints the
letter at the insertion point on the scre e n.
As soon as you lift th e stylus from the scr een, you can begin th e stroke
for th e nex t ch a r ac ter you wa nt to wri te.
Important: You must begin the character strokes in the Graffiti
writing ar ea. If you do not make Graffiti strokes in the
Graffiti writing area, your Palm III organizer does not
recognize them as text characters.
Graffiti Tips
When writing wi th Graffiti, keep these tips in mi n d:
■ Accuracy improves when you write large characters. You should
draw strokes that nearly fill the Graffiti writing area.
■ To delete characters, simply set the insertion point to the right of
the character you want to del e te and make the backspac e stroke
(a line from right to left) in the Graffiti writing area.
■ Write at natural speed. Writing too slowly can generate
recognition errors.
■ Do not write on a slant. Verti cal strokes shou ld be parallel to the
sides of the Graffiti writ ing area.
Page 20 Basic Handbook for the Palm III Organizer
Page 25

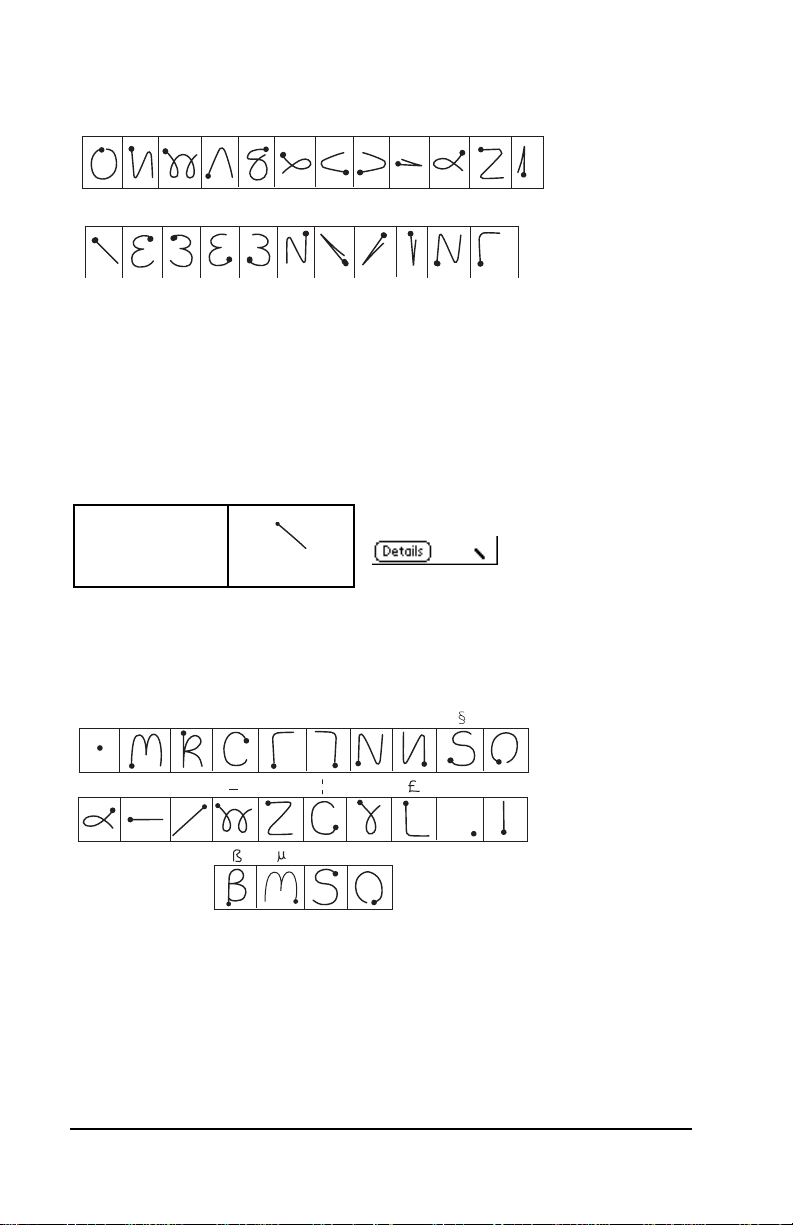
The Graffiti Alphab et
Letter Strokes Letter Strokes
AN
B
O
CP
D
Q
ER
F
G
S
T
HU
IV
JW
KX
LY
M
Z
Space Back Space
Carriage
Period
tap twice
Return
Chapter 2 Page 21
Page 26

Writing Capital Letters With Graffiti
You make capita l letters with the same stroke shap e s as the basic
alphabet characters . To make capital letters, you must first “sh ift” to
caps — just as you press the Shift key on a keyboard — and then wri te
the character stroke s.
Note: Graffiti includes a Smart S hifti ng featur e which auto maticall y
capitalizes the first letter when you create a new entry (by
tapping a New button or a b lank line).
To dr aw the f irst letter of a word as a capi tal letter:
■ Use the Caps Shift stroke:
Caps
Shift
Tip: When Caps Shift is active, an “up arrow” symbol appears in
the lower-right corner of the Palm III organizer screen.
To enter only cap i tal letters (Caps Lock):
■ Use the Caps Lock stroke:
Caps
Lock
Tip: When Caps Lock is active, an underlined “up arrow” symbol
appears in the lower-right corner of the Palm III organizer
screen. To return to lowercase, make the Caps Shift stroke.
Writing Numbers With Graffiti
Writing number s with Graff iti is similar to writing letters of the
alphabet, except that you make the c haracter strokes on the right-h and
side (numbers side) of the Graffiti writing area.
Page 22 Basic Handbook for the Palm III Organizer
Page 27

Graffiti Numbers
Number Strokes Number Strokes
0
5
1
27
38
4
6
9
Writing Punctua tion Ma rks With Graffiti
Graf fi t i can create any pu nc t u a ti o n symbol that you ca n e nte r from a
standard key board. All punctu ati on mark s begi n with a sing le tap on
the Graffiti writing area. When you ma ke th is tap, you activate
Punctuation Shift and a dot appears to show it is active. The next
stroke you make with the stylus creates a punctuation mark.
Punctuation shift
Symbol Stroke Symbol Stroke
Period
.
Dash
—
Comma
,
Apostrophe
'
Question
?
Exclamation
!
Left Paren
(
Right Paren
)
Slash
/
Dollar
$
Chapter 2 Page 23
Page 28
Additional Graffiti Punctuation
@ # % ^ & * < > – + = |
\ { } [ ] ~ ` ; : " tab
Note: When Punctuation Shift is active, you can make a symbol
stroke anywhere in the Graff iti writing area (the let t e rs or
numbers side ) .
Writing Symbols and Extended Characters
All symbols and extended characters begin with the stroke in the
Graffiti writing area of your Palm III:
Symbol
Shift
When the Symbol Shift is active, a slanted shift symbol appears in the
lower-rig ht cor ner of the sc reen. The nex t strok e tha t you mak e crea tes
the symbol or extended character.
,
•
+
–
:
X
,
==c
ƒ
,
,
,
,
Y
∅
.
?
!
Page 24 Basic Handbook for the Palm III Organizer
Page 29

Writing Accented Characters
To create accented characters, draw the stroke normall y used to create
the letter, followed by an accent stroke. Graffiti then adds the accent
to the letter.
For example, the following diagram shows the strokes required to
draw an accented “e.”
= e
Accent Strok es
a a a a a a
Using these accent strokes, you can write the following accented
letters:
à á â ã ä å è é ê ‘ “ ’ ” • ò — ô õ ö ù ú û ü – ÿ
Additional Non-English Characters
You can write the following characters in the lowercase alphabet
mode without any special punctuation or shifting:
c
a
e
Note: You must wri te thes e n on-Eng lish c harac ters in the lef t si de of
the Graffiti writi ng area.
Chapter 2 Page 25
Page 30

Navigation Strokes
In addition to charac ter symb ols, Graf fiti incl ud es spec ia l str okes th at
you can use to navigate within text or fields in your Palm III organizer
applications.
Command Stroke
Move cursor right
Move cursor lef t
Previous field
(Address Book only)
Next Field
(Address Book only)
Open Address Record
(Address Book only)
Graffiti ShortCuts
Graffiti ’s ShortC ut s make entering commonl y used word s or phrases
quick and easy. ShortCuts are similar to the Gl ossary or Autote xt
features of some word processors.
Graffiti comes with several predefined ShortCuts, and you can also
create your own. Each ShortCut can repr esent up to 4 5 character s. For
example, you might create a ShortCut for your name, or for the header
of a memo. See “ShortCuts Preferences” in the Applicatio n s Hand book
for the Palm III Organizer to learn abou t creating your own ShortCuts.
To use a ShortC ut, draw t he Short Cut str oke follo wed by t he Short Cut
characters . W hen you d ra w the Shor tC ut st roke, the Shor tCu t sym bol
appears at the insertion point to show that you ar e i n ShortC ut mode.
ShortCut
Page 26 Basic Handbook for the Palm III Organizer
Page 31

Your Palm III organizer includes the following predefined Graffiti
ShortCuts:
Entry ShortCut Entry ShortCut
Date stamp ds Breakfast br
Time sta mp ts Lunch lu
Date / time stamp dts Dinner di
Meeting me
For example, if yo u wa n t to ent er the current date and ti m e , yo u
would draw the f oll owing strokes:
Using Applicatio n Controls
Palm III applications include several types of controls. Once you
become familiar with using these controls, you can easily select
options and navigate through your Palm III organizer applications.
The following table lists the controls and how to use them.
Check box. When a check mark appears in a check
box, the corresponding option is active. If a check
box is empty, tap it to insert a check mark. If a check
box is checked, tapping it removes the check mark.
Scroll arrows. Tap the up arrow to display the
previous page of information, or tap the down
arrow to display the next page. These arrows
perform the same function as pressing the upper
and lower portions of the scroll button on the fr ont
panel of the Palm III organizer.
Pick list. Tap the arrow to display a list of choices,
and then tap an ite m on the list to select it.
Chapter 2 Page 27
Page 32

Button. Tap a button to perform a command.
Buttons appear with different text depending on
their function. In most cases, tappi ng a button
opens or closes a dialog. A dialo g is a screen th at
appears on your Palm III organizer, prompting you
to enter infor mation or make settings. A dialog
always contains an OK, Cancel or Done button, so
you can close the dialog when you are t hrough with
it. The on-screen keyboard is an example of a
dialog.
Scroll bar. Drag the slider to scroll the display one
line at a time. To scroll to t he previous page, tap t he
arro w a t th e to p of the scroll bar. To scro l l to the
next page, t ap t he arrow at the bottom of the scroll
bar.
Using Menus
Menus are a special set of commands that are available in most of your
Palm III org anizer appli cations (Me mo Pad, Date Book, etc.). The exact
commands that appear in the menus depend on the application that is
currently running on your Palm III organizer.
Some menu command s are common to all Palm III organizer
applications. The common menu commands are described in this
section; other menu commands are descri b ed in the chapters about
each Palm III organizer application in the Applications Handb ook f or th e
Palm III Organizer.
To activate the menus:
1. Open a Palm III organizer application (such as the Memo Pad, as
described earlier in this chapter).
2. Tap the icon to open t he menus fo r the appl ication at the t op of
the screen.
Page 28 Basic Handbook for the Palm III Organizer
Page 33
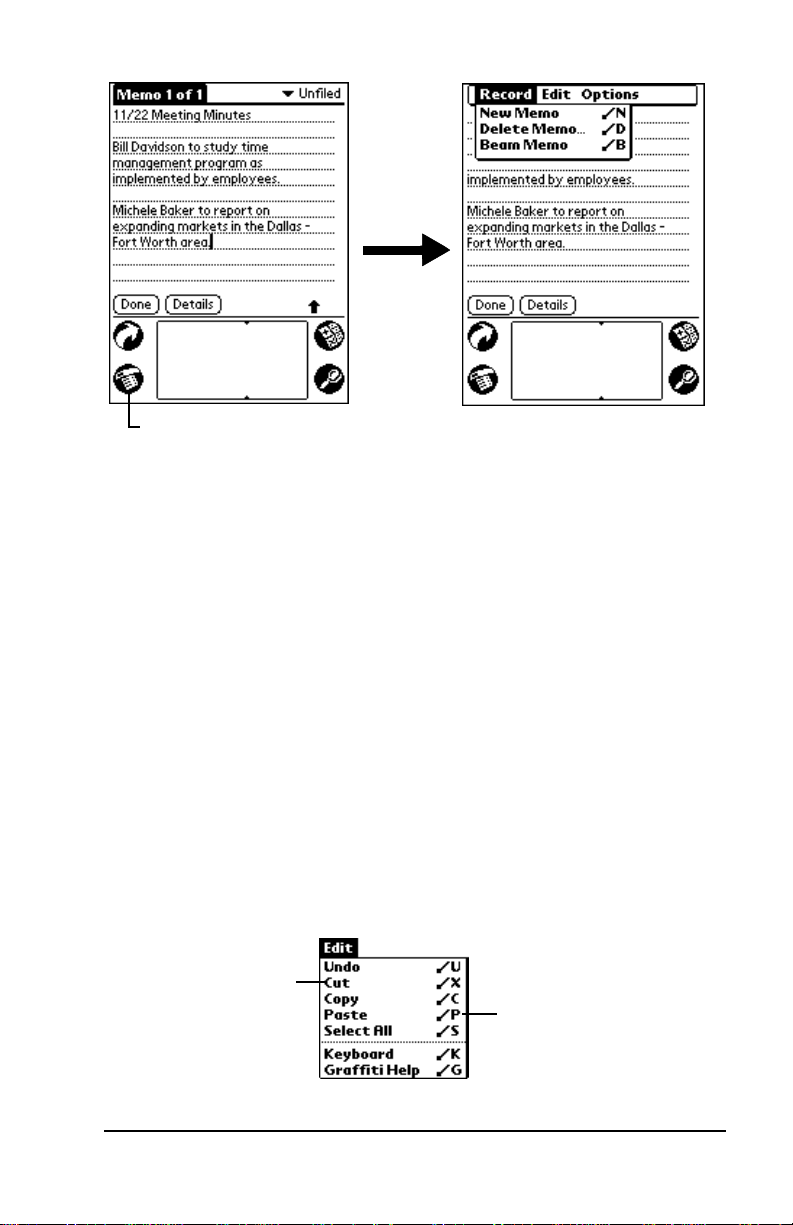
Tap the Menus icon
In this example, three menus are available: Record, Edit and Options.
The Record menu is selected and contai ns the “New Memo,” “Delet e
Memo” and “Beam Memo” commands.
Choosing a Menu
After y o u ac ti v a te the me nus for an a p p li ca t i o n , ta p the me nu that
contains th e command you want to use.
The menus and menu commands that are available depend on the
application that is currently running on your Palm III organizer. Also,
the menus and me nu selections vary depending on which part of the
application is currently on the screen. Using the Memo Pad
application as an example, the menus are di fferent for the Memo List
screen and the Memo screen.
Graffiti Menu Commands
Most menu commands have Graffiti “Command stroke” equivalents
— simi la r to k ey b oa r d co m ma n d s o n co mp u t e rs . The comm a nd
letters appear on the right side of the menu commands.
Menu commands
Command letters
Chapter 2 Page 29
Page 34

To use the Graf f iti menu comma nd s, draw the Command stroke
followed by the corresponding command letter. When you draw the
Command stroke, the Command symbol appears just above the
Graffiti writing area to indicate that you are in Command mode.
Command
For example, to activate the Select All command in the previous
diagram, draw the Command stroke, followed by the letter “s.”
Note: You do not have to tap the icon or access the menus when
you use the Graf fiti menu commands. Howe ve r, since the
Command mode is ac tive for approx imately tw o secon ds, you
must write the letter char acter immediately to activate the
menu command.
Edit Menu Commands
The Edit menu is available with any screen where you enter or edit
text. In ge neral, the Ed it Menu commands availab le i n the Edit men u
appl y to text th a t yo u sel ect in an application.
To select text in an application:
1. Tap the beginning of the text that you want to select.
2. Drag the stylu s over the text to highlight it (in b lack).
Note: You can drag acro ss the te xt t o sel ect addi tional wor ds, or
drag down to select a group of lines.
Page 30 Basic Handbook for the Palm III Organizer
Page 35

The following commands may appear in an Edit menu:
Undo
Cut
Copy
Past e
Select All
Reverses the action of t he last edit comman d. For
example, if you used the Cut command to
remove text, the Undo command replaces the
text you re moved.
Rem ov e s the sel e ct e d te xt and stores it
temporarily in the memory of your Palm III
organizer. You can paste the text you cut into
another area of the Palm III organizer
application or into a different Palm III organizer
application.
Copies the selected text and stores it
temporarily in the memory of your Palm III
organizer. You can paste the text that you copy
into another area of the Palm III organizer
application or into a different Palm III organizer
application.
Inserts the text that you cut or copied at th e
selected point in your Palm III organizer
application. The Paste command replaces any
selected text. If you did not previously cut or
copy text, the Paste command does nothing.
Selects all of the text on the current record or
screen. This ena ble s you to c ut or co py all of t he
text and paste it elsewhere.
Keyboard
Opens the on-screen keyboard. When you finish
with the on-screen keyboard, tap the Done
button.
Graffiti Help
Opens the dialogs that show the Graffiti
character strokes. Use this command any time
you forget a strok e for a partic ul a r charact e r.
Chapter 2 Page 31
Page 36

Choosing Fonts
In most of your Palm III organizer applications, you can change the
font style to make the text on the screen easier to read. You can even
choose a different font style for each application that supports this
feature.
Note: The Expense application does not support changing fonts.
To change the font style:
1. Open a Palm III organizer application.
2. Tap the icon to open the menus at the top of the screen.
3. Tap Font from the Op tions menu to open the Select Font dialog.
Tap here for large font
Tap here for bo ld font
Tap here for small font
4. Tap the font style you want to use.
5. Tap the O K bu tton to clo se t he d ial og and r eturn to th e a pplic ation
with the new font style.
Small font
Bold font
Page 32 Basic Handbook for the Palm III Organizer
Large font
Page 37
Using Categories
Categori e s can help you group Addre ss e ntries, To Do items or
Memos for easy review. You cannot, however, assign categories to
Date Book events.
When you first create an entry, it is “Unfiled,” which means it does not
belong to any particular categor y. You can leave an entry as Unfiled
or assign it to a category at any time. Either way, the entry is always
available until you delete it . The category you ch oose is use d only for
sorting and revie wing recor ds. The cat egory you sele ct does not af fect
the ac tu a l conten ts of th e re cord.
Note: The use of catego ries is optional. You do not need to assign
categories to use Palm III organizer applications.
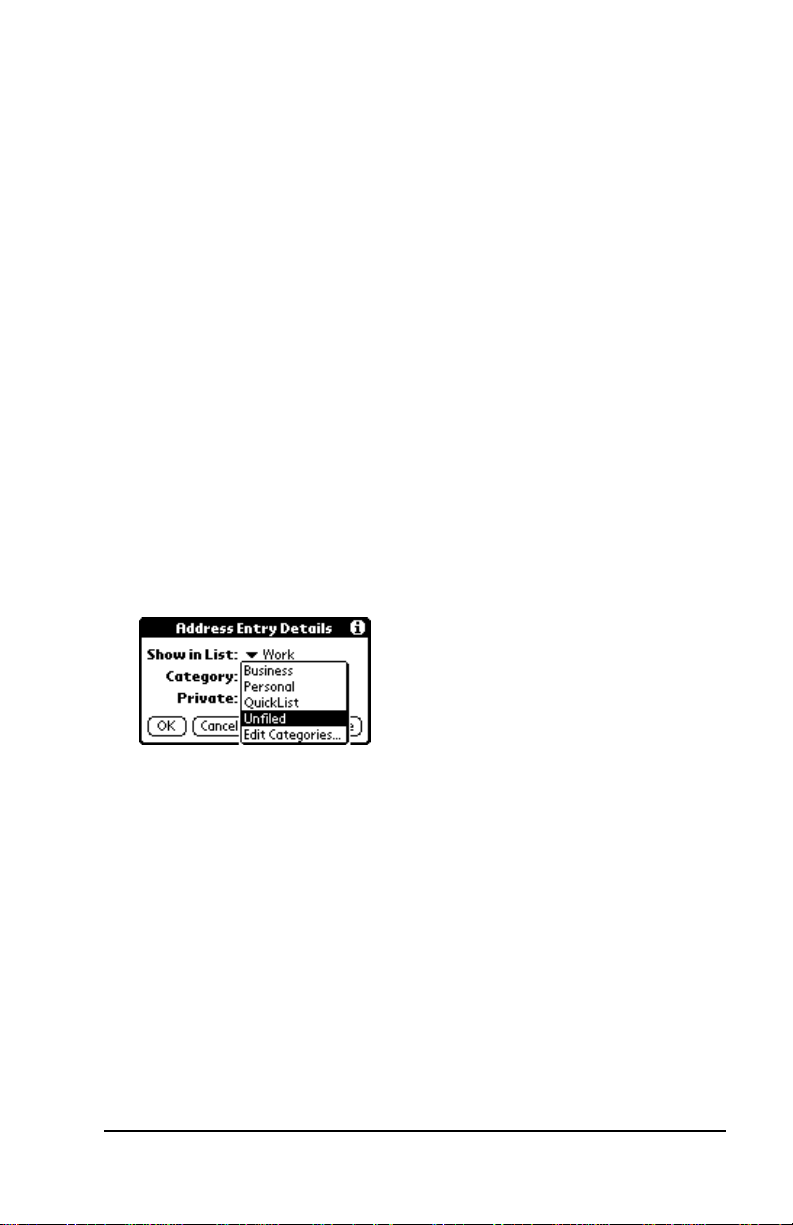
To assign a category to an entry:
1. Tap a To Do item o r Memo, or t ap an Ad dress B ook en try then tap
the Edit button in the Address View screen (refer to the
descriptions in the Applications Handbook for the Palm III Organizer
for details).
2. Tap the Details button to open the D e tails dialog.
3. Tap the Category pic k list to display a list of available catego r ies.
4. Tap the cate g o ry that you want to assign to the entry.
5. Tap the OK button to close the Detai ls dialog and acti vate your
setting.
Chapter 2 Page 33
Page 38

Using Categories in Lists
After you assign categories to your entries, you can easily display lists
of your entries by category.
To use categorie s i n a List screen:
1. Tap the category pick list in the upper-right corner of the List
screen.
Tap here
2. Tap the category of entries th at you want to view.
Note: The List sc reen chang es to sh ow only the records t hat you
filed in the selected category.
3. Repeat the previous steps, and tap All in the category pick list to
rest o re th e l is t of all Address Book ent ri e s .
Tip: Pressing the ap p lication butt on on the front pane l of the
Palm III organizer toggles through the available
categories.
Defining a New Category
Your Palm III organizer comes with two default categories: Business
and Personal. In addition, the Address Book contains the QuickList
category, designed as a “qu ick refer ence” of c ommonly used names,
addresses and phone numbers (such as doctor, lawyer, etc.).
You can change the names of these default categories, or add new
categories to suit your needs. You can define up to 15 categories for
each application.
Page 34 Basic Handbook for the Palm III Organizer
Page 39

To define a new Address Book category:
1. Tap the category pick list in the upper-right corner of the screen.
Tap here
2. Tap the Edit Categories item to open the Edit Categories dialog.
3. Tap the New button to op e n another Edit Ca te gories dialog .
4. Enter the name of the new category, and tap the OK button to close
the Edit Categories dialog.
5. Tap the OK button to close the f irst Edit Categories di alog and
view your new category in the pick list.
Note: You can edit any of your records and file them in the new
categories as appropriate.
Chapter 2 Page 35
Page 40
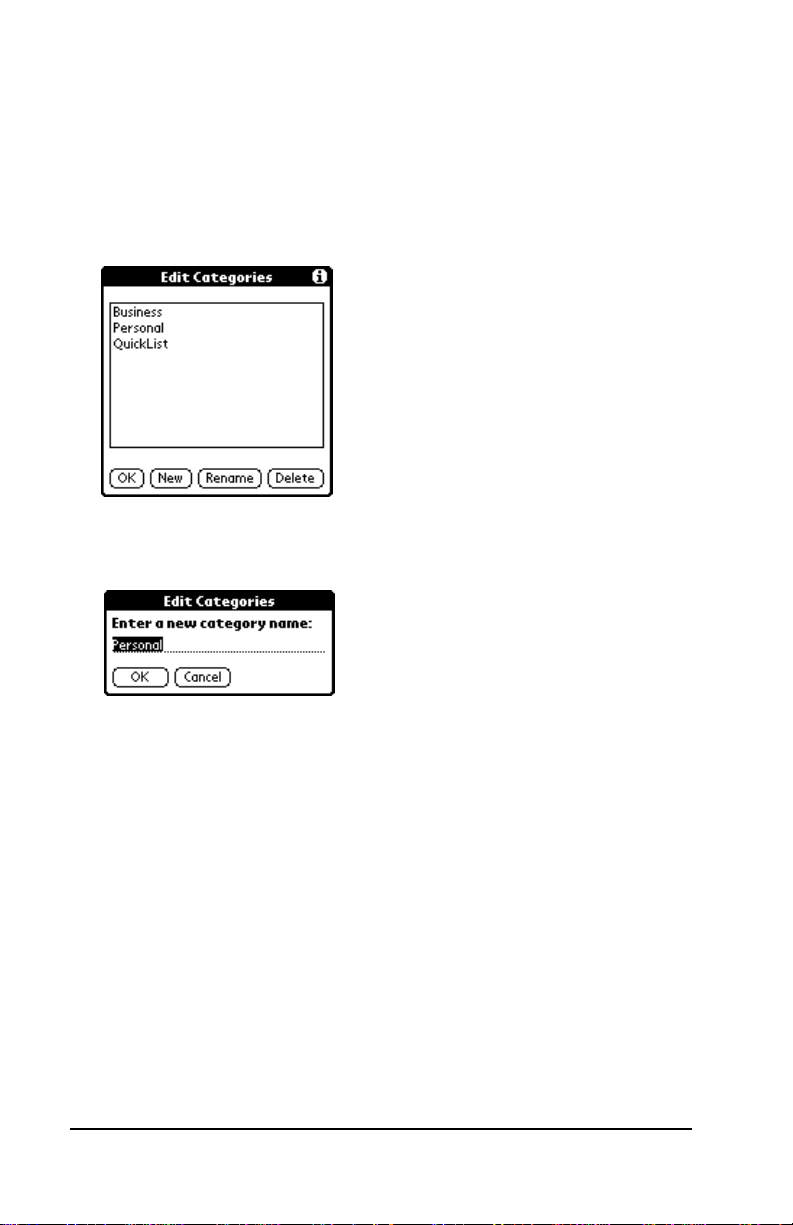
Renaming Categories
You can also use the Edit Categories dialog to change the names of any
existing category.
To change the name of an Address Book category:
1. Tap the category pick list in the upper-right corner of the screen.
2. Tap the Edit Categories item to open the Edit Categories dialog.
3. Tap the category that you want to rename, and then tap the
Rename butto n to open another Ed it Categories dialog.
4. Enter the new name th at you want to assig n to the category, and
tap the OK button to close the Edit Categories dialog.
5. Tap the OK button to close the f irst Edit Categ ories dia log and
view the new name in the pick list.
Note: You can “merge” two or mor e Categories by assigning them
the same name. For example, if you change the name of the
“Personal” category to the n ame “Business,” all e ntries
formerly in the Personal category appear in the Business
category.
Page 36 Basic Handbook for the Palm III Organizer
Page 41

Attaching Notes
Palm III organizer applications (except the Memo Pad) enable you to
attach a note to an e ntry. A note is anything that you want to write,
and can be up to several thousand characters long. For example, if you
have an appointment in t he Date Book appl ication, you could atta ch a
note with directions to th e location .
To attach a no te to an entry:
1. Display the entry where you want to add a note.
2. Tap the Details button to open the Details dialog.
3. Tap the Note button to open the Note dialog.
4. Write Gr affi ti ch arac ter s trok es (or u s e t he on -s cree n ke yboar d) fo r
the text you want to appear in the note. Use the Carriage Return
stroke to mo ve down to new line s in the note.
5. Tap the Done button to clo se the note and retur n to the applicatio n
screen.
Note: A small note icon appears at the right side of any item that
has a note attached. To revie w or edit a note, ta p the
icon.
Note icon
Marking Private Entries
In Palm III organizer applications you can mark individual entries as
Private. Private entries remain visible and accessible until you change
the Palm III organizer Security setting to hide all Private entries. See
“Security” in the Applications Handbook for the Palm III Organizer for
complete information about how to activate and use the Palm III
organize r Security settings.
To mark an entry as Private:
1. Display the entry that you want to mark as Private.
2. Tap the Details button to open the Details dialog.
3. Select the Private check box to insert a check mar k and mark the
entry as Private.
Chapter 2 Page 37
Page 42

Beaming Information to Other
®
3Com
Your Palm III organizer is equipped with an IR (infrared) port that you
can use to “beam” information f rom one 3Com
to another. The IR p ort is located at the top of the Palm III orga nizer
behind the small dark shield.
Connected Organizers
®
connected organizer
Note:
If you are using a device other than a Palm III organizer,
please confirm that your device includes the required infrared
hardware before you use this feature.
You can beam the following information between 3Com connected
organizers:
■ The current Address Book, Date Book, To Do List or Memo Pad
entry
■ All the Address Book, To Do List or Memo Pad entries in the
curre n t ca t e go ry
■ A special Addr e ss Book entry whic h you designate as your
“business card” (see “Beaming Address Entries to Other 3Com
Conne cte d Or ga nize rs ” in the Applications Handbook for the Palm III
Orga n i z er for details)
■ An applica tion inst alle d in RAM me m ory
To beam information:
1. Locate the entry, category, business card or application you want
to beam.
2. Tap the Beam command from the Record menu to ope n the Beam
Status dialog. (See the Applications Handbook for the Palm III
Organizer for details.)
3. Point the IR port directly at the IR port of the receiving 3Com
connected organize r.
Tip:
For best resu lts, the 3Com connected organizers should
be between five centimeters (approximately 2 inches) and
one meter (approximately 40 inches) apart, and the path
between the two devices mu st be clear of ob stacles.
Page 38 Basic Handbook for the Palm III Organizer
Page 43

4. Wait for the Beam Status dialog to indicate that the transfer is
complete before you continue working on your Palm III organizer.
To receive beamed information:
1. Turn on your Palm III organizer.
2. Point the IR port directly at the IR port of the transmitting 3Com
connected organizer to open the Beam Status dialog.
3. Tap the Yes butt on to accept the tr ansmission.
4. Wait for the Beam Status dialog to indicate that the transfer is
complete, and then tap the OK button to di splay the new en try.
Note: Incoming entrie s are filed under the “Unf iled” categ ory .
Chapter 2 Page 39
Page 44

Page 40 Basic Handbook for the Palm III Organizer
Page 45

Chapter 3
Finding Information With Your
™
Palm III
Orga n i z er
This chapter explains how to locate informa ti on on
your Palm III
command and the Phone Lookup command.
™
connecte d organizer with the Find
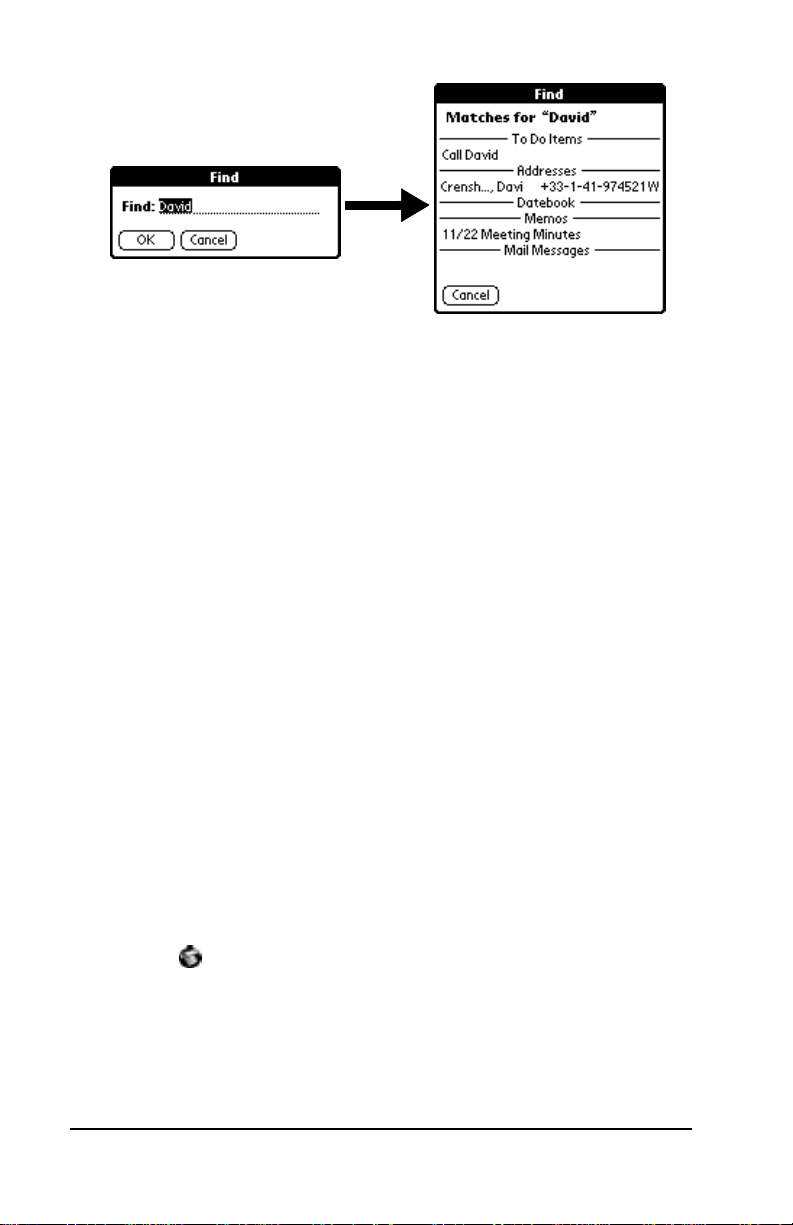
Usi ng the F i nd Comman d
The Find command locates any text that you specify and is available
in any Palm III organizer application. You can search for whole words
or the beginning lette rs of a word. Th e Find command automatically
searches all the data on your Palm III organizer and lists which
applications contain the text.
For example, suppose you want to find a particular name, but aren’t
sure where you stored it. The Find command immediately lists all
instances of that name and enable s y ou to jump direct ly to the name.
To use the Find command:
1. Tap the icon from any Palm III organizer application to open
the Find dialog.
Tip: If you select text in a Palm III organizer application before
you tap the Find button, the selected text automatically
appears in the Find dialog.
2. Enter the text that you want to find in your Palm III organizer.
Note: The Find command is not case-sensitive. In other words,
searchin g for the name “davi dson” also find s
“Davidson.” The Find command also searche s the
contents of notes.
3. Tap the OK button to display a list of all instance s of the text that
you specified.
Chapter 3 Page 41
Page 46
Note: As your Palm III organizer searches for the text, you can
tap the Stop bu tton at any t ime. You may want to do this
if the entry you want appears before your Palm III
organizer f ini shes th e sear ch. To c onti nue the sea rc h aft er
you tap Stop, t ap the Find More button.
4. Tap the text that you want to review to display the selecte d entry
and its corresponding Palm III organizer application on the screen.
Using Phone Lookup
In addition to u sing the Find feature t o locate text, you can search for
and display ph one number s with the Phon e Lookup menu command.
After you find a phone number, you can paste it directly into a Palm
III organizer application.
For example, if you want to include a phone number in a memo, you
could use the Phone Lookup feature to find the phone number and
transfer it directly into the m emo.
To use the Phone Lookup command:
1. Display the entry where you want to insert a phone number. This
can be an event in the Date Book, a To Do List Item or a memo in
the Memo Pad application.
Note: The Phone Lookup feature is n ot avai lable in t he Addres s
Book and Expense applications.
2. Tap the icon to open the menus for your application.
3. Tap Phone Lookup from the Options menu to display the Phone
Number Lookup screen.
Page 42 Basic Handbook for the Palm III Organizer
Page 47

4. Tap the phone number you want to use.
Note: To find a phone number more quickly, you can enter the
first le tter of the name you want to find in th e Look Up
line at the bottom of the screen. The list automatically
scrolls to the first name that starts with that letter. You can
continue to add letters to narrow your search.
5. Tap the Ad d button to cl ose t he Phone Number Look up scr een and
paste the name and phone number you selected into the entry you
selected in step 1.
Phone Lookup Tips
You can also use the Graffiti® Command stroke “/L” to activate the
Phone Lookup feature.
■ You can use Phone Lookup while entering text. For example, to
insert the full name an d p hone number f or someone with the last
name “Williams,” you would write the Graffiti characters for “Wi”
and then the Phone Lookup Command stroke “/L.”
Assuming y ou have only one Addres s Book e ntry tha t begi ns with
“Wi,” your Palm III organizer inserts the full name “Williams”
(and the corresponding phone number). If you have more than
one name that beg ins with “Wi,” the Phone Lookup screen
appears.
■ The Phone Lookup feature also works for selected text. Drag to
highlight the text, and then write the Phone Lookup Command
stroke “/L.” Your Palm III organizer replaces the selected text and
adds the phone numb e r to the name th at it finds.
Chapter 3 Page 43
Page 48

Page 44 Basic Handbook for the Palm III Organizer
Page 49

Chapter 4
Installing and Removing Applications
This chapter explai ns how to install and rem o ve
applications on your Palm III
and how to remove the Palm
from your computer.
™
connected organ izer
™
Desktop so f t ware
Installing Applications
Your Palm III organizer comes with the Date Book, Address Book, To
Do List, Memo Pad, Ex pense, Calcula to r and Ma il applic atio ns
installed and ready to use.
You can also install additional applications on your Palm III
organize r, such as games and other Palm-compatible sof tware. The
Palm Install Tool makes it quick and easy to install software on your
Palm III organizer during a HotSync
third-party applications available for your Palm III organizer. To learn
more about these ap p lications, visit our web site: http://
www.palm.com.
Note: Any game or application that you install on your Palm III
organizer resides in RAM mem ory. A hard reset on the Palm
III organizer automatically deletes these applications; you can
also delete the m man u ally.
To install software on your Palm III organizer:
1. Copy the application you want to install into the Add-on subfolder
in your Palm folder on your computer.
®
operation. There are a variety of
Note: If you prefer to copy the application into another folder,
you ne e d to n av i ga te to that fo lde r before you compl e t e
step 5.
2. Double-cli ck the Pal m Desktop ico n on your Windows d esktop (or
select Palm D e sktop fr om th e S ta rt menu) to op e n the Palm
Desktop software.
Chapter 4 Page 45
Page 50

3. Click the Ins tall button to op e n the P a lm Install Tool d ialog.
Tip: You can also access the Install Tool dialog by sel e cting
Install Tool from the Palm Desktop program group or by
double-clicking any file with a PRC file extension.
Page 46 Basic Handbook for the Palm III Organizer
Page 51

4. Select the name that corresponds to your Palm III organizer in the
User drop-dow n list.
5. Click the Add button to open the Ope n dialog.
6. Click the application(s) that you want to install on your Palm III
organizer.
7. Click the Open button to retur n to the Install Tool di alog.
Note: Review the list of applications you select ed in the Install
Tool dialog. If you do n ot wan t to install an appl ication,
click it and th e n click the Remove button. ( Th is does not
remove the application from your comp uter, it simply
removes it from the list of ap p lication s to install. )
®
8. Perform a local HotSync
operation to install the application(s) you
selected in step 6. See “Conducting a Local HotSync Operation” in
the Applicat ions Handbook for the Palm III Organizer for details.
Installing Games
The CD-ROM that comes with your Palm III organizer includes
several games that you can install with the Palm Install Tool. These
games include:
■ HardBall ■ Puzzle ■ Giraffe
■ MineHunt ■ SubHunt
Note: Giraffe is a fun, easy way for you to pr act i ce writing Graffiti
After you install and start a game, the in structions appear in the Game
menu. Depending on the game, the Game menu may also contain
commands to show high scores, to start a new game or to set
Preferences for the game.
Chapter 4 Page 47
®
.
Page 52

Removing Applications
In the event that you run ou t of memory or decide that you no longer
need an application you installed, you can remove applications from
your Palm III organizer. You can remove only add-on applications,
patches and extensions that you install; you cannot remove the
applications that reside in the ROM portion of your Palm III organizer.
To remove an add-on application:
1. Tap the icon on the Palm III organizer screen to open the
Applications Launcher.
2. Tap the icon on the Palm III organizer screen to open the
Applications Launcher menus.
3. Tap Delete from the App menu to open the Delete dialog.
4. Tap the application that you want to remove.
5. Tap the Delete button to displa y a con f irmation message.
6. Tap the Yes button to indicate that you want to re move the
application from your Palm III organizer.
7. Tap the Done button to close the Delete dialog and return to the
Applications Launcher.
Page 48 Basic Handbook for the Palm III Organizer
Page 53

Removing Palm Desktop Software
If you no long e r want to use the Palm Desktop software, you can
remove it from your computer.
To remove the Palm Desktop software:
1. Select Sett ings and th en C ontr ol Pan el fr om the St art men u to open
the Windows Control Panel.
1. Double-click the Add/Remove Programs icon .
2. On the Install/Uninstall tab, select Palm Desktop from the list.
3. Click the Add /R e move button.
4. Click Yes to confirm that you want to remove the application.
Chapter 4 Page 49
Page 54

Page 50 Basic Handbook for the Palm III Organizer
Page 55

Chapter 5
Getting Help With Your
™
Palm III
Displaying Online Tips
Many of the dialogs that appear on your Palm III organizer contain an
online tips icon in the upper-right corner. Online tips contain a
summary of what is required by the dialog, sh ortcuts for using the
dialog or other useful information.
Online tips always relate to the function that you are currently
performing with your Palm III organizer. Each dialog has its own
online tips that relate to that specific dialog.
Orga n i z er
There are several ways to get help with your Palm
™
connected organizer. You can display online
III
tips on your Palm III organizer and you can review
the trouble shooting section in this chapter and on
your Palm
you need additional assistance, there are several
ways to contact 3Com
chap te r provide s de ta i l s on each of these met h o d s .
™
Desktop sof tware CD or diske ttes. If
®
Technical Support. This
To use the online tips:
1. Tap the icon in the upper-right corner of a dialog to open the
Tips dialog.
2. After you rev iew the Tips dialog, tap the Done butt on.
Chapter 5 Page 51
Page 56

Troubleshooting
If you encounter a problem with your Palm III organizer, look in this
section for the description that most closely matches the symp toms
you observe and try the suggestions listed.
Important: For troubleshooting tips not include d in this handbook,
refer to either the README.TXT file or the HelpNotes file
located in the Palm Desktop directory. These files are also
on the instal lation CD-ROM (and diskettes).
Installation Troubleshooting
Do not place your Palm III organizer in the cradle while installing the
Palm Desktop software. If the Palm III organizer is in the cradle, the
installation program may incorrectly detect that a modem is attached
to one of your ava il a b le serial ports.
HotSync® Troubleshooting
A Loca l HotSync operation does not comple te successfully :
■ Make sure HotSync Manager is running. If HotSync Manager is
running, exit and restart it.
■ Make sure you selected Local from the HotSync Manager menu or
the Palm Desktop menu.
■ Check the cable connection between the Palm III organizer cradle
and the serial port on your compute r.
■ Make su re yo u se le ct e d the co rrect seri al p o rt on the Lo ca l ta b in
the Setup dialog. I t shoul d be set to the port where you connected
the Palm III organizer cradle.
■ Try a lower baud rate setting on the Local tab in the Setup dialog.
■ Make su re y o u are not runn in g another progr a m — su ch a s
America Online, CompuServe or WinFax — that uses the serial
port you selected in the Setup dialog box.
■ Read the HotSyn c Log for the user account for wh ich you are
performing a HotSync operation.
A Modem HotSync operation does not complete successfully:
Check the following on your computer:
■ Make sure your comp uter is tur ned on, and that it does not shut
down a u to matic a l ly as pa rt of an en e r g y - sa v i n g fe ature.
Page 52 Basic Handbook for the Palm III Organizer
Page 57

■ Make s ure the mo dem conn e c te d to yo ur comput er is turned on
and is connecte d to the outgoing phone line.
■ Confirm that your modem doesn't have an auto-off feature
enabled.
■ Make sure the modem is connected properly to a serial port on
your compu t er and is connected to the incoming phone line.
■ Confirm that the Setup String in the Setup dialog box configures
your modem correctly. You may need to select a different Modem
Type or ente r a cu stom Setup Stri ng. Most modems have a Setup
String that causes them to send initial connec tion sound s to a
speaker. You can use these sounds to check the modem
connection.
■ Confirm that the Speed setting in the Setup dialog box is
approp riate for yo u r mo dem.
■ If you have probl e ms u sing the As Fast As Possible optio n or a
specific speed, try using a slower speed.
■ Make sure you selected Modem from the HotSync Manager menu.
■ Make sure you are not running another program — such as
America Online, CompuServe or WinFax — that uses the serial
port you selected in the Setup dialog box.
■ Make sure your modem resets before you try again. (Turn off your
modem, wa it a minute, then turn it back on.)
Check the following on your Palm III organizer:
■ Make sure you are using the Palm modem cable to connect to your
modem.
Important: Do not attempt to use other cables to connect a Palm III
organize r to a modem.
■ Check the modem cable connection between your Palm III
organizer and your modem.
■ Confirm that your modem is turned on.
■ Make sure the modem you are using with your Palm III organizer
has an on-off switch. Your Palm III organizer cannot “wake up” a
modem that has an auto-off feature.
■ Make sure t he diali ng inst ruc tion d i als the cor rec t ph one n umber.
■ If you need to dial an outside line prefix, make sure you selected
the Dial Prefix option on your Palm III organizer and entered the
correct code.
Chapter 5 Page 53
Page 58

■ If the telephone line you are using has Call Waiting, make sur e
you selected the Disable call waiting op tion under Mod em Sync
Phone Setup on your Palm III organizer and entered the correct
code.
■ Make sure the telephone line you are using is not noisy, which can
interrupt communications.
■ Make sure your m odem re sets b efore y ou try a gai n. (Tu rn off y our
modem, wait a minute, then turn it back on.)
General Troubleshooting
Palm III organizer does not turn on:
■ Adjus t th e co nt ra st contro l .
■ Make sure batteries are installed properly.
■ Replace the batteries. If your Palm III organizer still does not
operate, try a soft reset; see “Resetting Your Palm III™ Organizer.”
Low battery warning after replacing the batteries:
■ The battery warning message may appear immediately after
replacing the batteries. In addition, if you check the battery gauge
in the Applications Launc he r imme diate ly after replacing the
batteries , the gauge may st art at “empty ” and slowly ri se to “full. ”
This is norm al. It takes a few minutes for the battery gauge to
accura tely show the conditi o n of the b a tt e r ie s .
No sound:
■ Check the System Sound option in the General Preferences screen.
If the option is set to off, there will be no sound. See “General
Preferences” in the Applic ations Ha ndbook for the Palm I I I Organiz er
for more information.
Palm III organizer turns itself off:
■ Your Palm III organizer is designed to turn itself off after a period
of inactivity. Thi s period can be set at one minute, two minutes or
three minutes. Check the “Auto-off after” setting in the General
Preferences screen, and change the setting if you need a longer
delay before the automatic shutoff feature activates. See “Genera l
Preferences” in the Applic ations Ha ndbook for the Palm I I I Organiz er
for more information.
Page 54 Basic Handbook for the Palm III Organizer
Page 59

Palm III organizer doesn’t recognize my handwriting:
■ For your Palm III organizer to recognize handwriting input with
the stylus, you need to use the Graffiti
®
character strokes. See
“Writing With the Styl us” for information about how to write
Graffiti character strokes.
■ Make the Graffiti character strokes in the Graffiti writing area —
not on the display part of the screen.
■ Make sure you are writing the strokes for letters in the left-h and
side, and the strokes for numbers in the right-hand side of the
Graffiti writing area.
■ Make sure that Graffiti is not shifted into extended or punctuation
modes. See “Writing With the Stylus” for i nforma ti on about
shifting i nto and out of punctuati on modes.
Tapping the screen buttons or icons does not ac ti vate the cor responding feature:
■ Recalibrate the digitizer. Choose Digitizer from the Preferences
application pick list and follow the directions on the screen.
When I tap the icon, nothing happens:
■ Not all applications or screen s hav e me nus. Try changing to a
different applicat io n.
A message appears stating that your Palm III organizer memory is full:
■ Delete u nused memos and records. If necessary, you can save
these records on your computer using the Save Backup Copy
option that appears in the Delete dialogs.
■ Purge the Date Book and To Do List applications. This deletes
complete To Do items and past Date Book events fr om the
memory of your Palm III organizer. Note that you may need to
perform a HotSy n c op er a t ion to recov e r th e m e mo ry.
■ If you have installed additional applications on your Palm III
organi z er, remove them to recove r memory.
Beamed data does not transmit:
■ Confirm that the 3Com connected organizers are between five
centimeters (approximately 2") an d one meter (approx imately 40")
apart, and that the path betwe e n the two devices is cl e a r of
obstacles.
Chapter 5 Page 55
Page 60

When receiving beamed data an out of memory message appears:
■ Your Palm III organizer requires at least twice amount of memory
available as the data you are receiving. For example, if you are
receiving a 30K application, you must have at least 60K free.
Security Troublesh ooting
I forgot the password, and my Palm III organizer is not locked:
■ You can use the Security appl ication to delete t he password. If you
do this, your Palm III organizer deletes all entries marked as
Private. However, you can perform a HotSync operation before you
dele te th e p a ss word: th e HotSync proces s b a ck s up a l l entrie s,
whether or not they are marked priv ate. In t his case, the foll owing
procedure restores your private entries and lets you access them:
1. Use the Palm Desktop software and the Palm III organizer
cradle to sync hronize your data.
2. Tap the Forgotten Password button in the Security ap p lication
to remove the password and delete all Private entr ies.
3. Perform a HotSy nc oper ation to sy n c h r on ize yo u r da ta and
restore the private entries by transferring them from your
computer to your Palm III organizer.
I forgot the password and my Palm III organizer is locked:
■ If you assign a password and lock your Palm III organizer, you
must perform a hard reset to continue using your Palm III
organizer. See “Resetting Your Palm III™ Organizer” for details.
Applications Troubleshooting
The following troubleshooting tips are specific to the various Palm III
organizer applications.
Tapping the Today button doesn’t display the current date:
■ Your Palm III organizer is not set to the current date. Make sure
the Set Date box in the General Preferences screen displays the
current date. See “General Preferences” in the Applications
Handbook for the Palm III Organizer for more informa tion.
Entries seem to be missing in various applications:
■ Check the Categories pick list (upper-right corner of the screen).
Choose All to display all of the records for the appl ication.
■ Check the Security application and make sure that the Private
Records setting is set to Show private records.
Page 56 Basic Handbook for the Palm III Organizer
Page 61

Memo Pad application:
■ If you can not m anua lly ar ran ge th e or der of th e mem os in the L ist
screen, check the Memo Preferences setting. Make sure that Sort
by is set to Manual.
■ If you choose to view your memos alphabetically on Palm
Desktop and then perform a HotSync operation, the memos on
your Palm III organizer still appear in the order defined in the
Memo Preferences setting. In other words, the sort settings that
you use with Palm Desktop are not transferred to your Palm III
organizer.
Date Book application:
■ In the Week View, you cannot select o verlapping events that have
the same sta rt ti me. If you h ave t wo or more even ts wit h t he sa me
start time, choose the Day View for the particular day to see the
overlapping events.
Technical Support, Service and Repair
If you have a problem using your Palm III organizer, make sure you
have reviewed the following:
■ The “Troubleshooting” section earlier in this chapter
■ The README file and HelpNotes located in the folder where you
instal led the Palm Deskto p software on your computer (or on your
installation CD or diskettes)
■ The Palm Desktop software Online Help
■ The most recent Palm III organizer HelpNotes on your regional
web site (listed later in this section)
For further assistance, you can contact your regional technical support
office by e-mail, phone or fax. Before requesting support, please
experiment a bit to reproduce and isolate the problem. When you do
contact support, please be ready to provide the following information:
■ The version of Windows you are using
■ The actual error message or state you are experiencing
■ The steps you take to reproduce the problem
If you need information about Palm Computing products, would like
to order 3.5" diskettes for your Palm Desktop software or want to
purchase accessories. See “Information and Acce ssories” later in this
chapter.
Chapter 5 Page 57
Page 62

Technical Support
United S ta te s
Web site: http://www.palm.com
Email: support@palm.com
Phone: 847 676 1441
Canada
Web site: http://www.palm.com
Email: support@palm.com
Phone: 905 305 6530
Fax: 905 479 3032
Latin America
Web site: http://www.3com.com
Email: l a tinamericasupport@palm.3com.com
Phone: 800 497 8771
Fax: 800 510 8771
Please refe r to the Worldwide Customer Support ca rd for a
complete list of numbers.
U.K.
Web site: http://www.palm-europe.com/uk
Email: eurosupport@palm.3com.com
Phone: 0171 867 0108
Fax: +31 20 586 4680
Othe r Europ e, Middle Eas t , Africa
Web site: http://www.palm-europe.com
Email: eurosupport@palm.3com.com
Phone: + 31 20 586 4681
Fax: +31 20 586 4680
Australia
Web site: http://www.palm-au.com
Email: support@palm-au.com
Phone: 1800 678 515
New Zealand
Web site: http://www.palm-nz.com
Email: support@palm-nz.com
Phone: 0800 446 398
Page 58 Basic Handbook for the Palm III Organizer
Page 63

Asia Pacific
Web site: http://www.3com.com
Email: asiasupport@palm.com
Phone: 1800-678-515
Information and Acce ssorie s
To order 3.5" diskette s of the P alm Deskto p softwar e or acces sories for
your Palm III organizer, please contact your regional office:
United States
Phone: 800 881-7256
Fax: 800 861-2940
Canada
Phone: 800 891-6342
Fax: 800 861-2940
Latin America
See your local retailer or
visit the Web site http://www.3com.com
U.K.
Phone: 0800 7311 064
Fax: 0800 960 273
Other Europe, Middle East, Africa
Phone: + 31 55 384 364
Fax: +31 555 434 455
Australia
Phone: 1800 644 606
Fax: 1800 673 313
New Zealand
Phone: 0800 445 323
Fax: 0800 445 322
Asia Pacific
Phone: + 852 2501 1111 (Hong Kong)
Fax: + 852 2537 1149 (Hong Kong)
Please refer to the Worldwide Customer Support card for a
complete list of locations.
Chapter 5 Page 59
Page 64

Corporate Offices
The following is a list of our corporate off ices. Do not contact these
offices f o r technical support or other questions regarding the use o f
your Palm III organizer.
North America
United States
1565 Charleston Rd.
Mountain View, CA 94043
USA
Canada
1100 Burloak Drive, 5th Floor
Burlington, ON L7L 6B2
Canada
Europe, Middle East, Africa
Europe, Middle East Africa
Tour Kupka A
18 rue Hoche
F-92980 Paris La Defense
France
United Kingdom
220 Wharfdale Rd.
Winnersh, Wokingham
Berkshire
RG41 5TP
UK
Asia Pacific Rim
Japa n
Shin j u k u Sumit o mo Bld g . 2 3F
2-6-1 Nishi-Shi n juk u
Shinjuku-ku
Tokyo 163-02
Japan
Hong Kong
23rd Floor,
Li Po Chun Cha m b ers
189 Des Voeux Road
Central Hong Kong
Australia, New Zealand
Level 7
99 Walker Street
North Sydney, NSW 2060
Australia
Latin America
Latin America Headquarters
5400 Bayfront Plaza
Santa Clara, CA 95052-8145
USA
Brazil
Rua Ve rb o D ivi no,
1661 1 Andar CJ. 13
Sao Paulo SP 04719-002
Brazil
Page 60 Basic Handbook for the Palm III Organizer
Page 65

Chapter 6
Maintaining Your
™
Palm III
Orga n i z er
This chapter provides information to help you take
proper care of your Palm III
and pr ol o n g batter y l if e . I t a l so di s cu s ses how to
reset your Palm III organizer.
™
connec ted organ iz e r
Caring for Your Palm III Organizer
Your Palm III organizer is designed to be rugged and reliable and to
provide years of trouble-free service. However, you should observe
the following general tips when using your Palm III organizer:
■ Take care not to scratch the screen of your P a lm III organizer.
When working with your Palm III organizer, use the supplied
stylus or plastic-tipped pens intended for use with a touchsensitive screen. Never use an actual pen or pencil or other sharp
object on the surface of the Palm III organizer screen.
■ Your Palm III organizer is not waterproof and should not be
exposed to rain or mois ture. Unde r extreme conditions , water may
enter the circuitry through the f ront panel buttons. In general, treat
your Palm III organizer as you would a pocket calculator or other
small electronic instrument.
■ The touch-sensitive screen of your Palm III organizer contains a
glass element. Take care not to drop your Palm III organizer or
subject it to any strong impact. Do not carry your Palm III
organizer in your back pocket: if you sit on it, the glass may break.
■ Protect your Palm III organizer from temperature extremes. Do
not leave your Palm III organizer on the dashboard of a car on a
hot day, and keep it away from heaters and other heat sources.
■ Do not store or use your Palm III organizer in any location that is
extremel y dusty, damp or wet.
■ Use a soft, damp cloth to clean your Palm III organizer. If the
surface of the Palm III organizer screen becomes soiled, clean it
with a soft cloth moisten e d wi th a diluted wi ndow-cleani ng
solution .
Chapter 6 Page 61
Page 66

Battery Considerations
Please note the following considerations when replacing the batteries
in your Palm III organizer:
■ Under normal conditions, your Palm III organizer batteries should
provide several months of use. You can conserve battery life by
minimizing the use of the backlight feature, and changing the
“Auto-off after” setting that automatically turns the Palm III
organizer off after a period of inactivity (see “General Preferen ces”
in the Applications Handbook for the Palm III Organizer).
■ If the batteries become low in the course of normal use, an alert
appears on the Palm III organizer screen describing the low
®
battery condition. If this alert appears, perform a HotSync
synchron ization to back up yo ur data before you re p lace the
batteries . This helps prevent accidental data loss.
■ When replacing the batteries, begin by turning your Palm III
organizer off (so there is no screen display). Never remove the
batteries while your Palm III organizer is turned on.
■ When replacing the batteries, al ways use good quality batt eries of
the same type. Use only alkaline batteries with your Palm III
organizer.
■ When you remove the batteries, the built-in backup power of your
Palm III org anizer maintains memory da ta for a period of up to
one minute. Whenever you remove the batteries, replace them
immediately. If you encounter any difficultie s in the course of
battery replacement, reinst all the or iginal bat teries and wai t a few
minutes for the backup power to recharge.
■ If the batteries drain to the point where your Palm III organizer
does not operate , it stores your data safely for ab out a month. In
this case, there is enough residual energy in the batteries to store
the data, but not enough to turn on your Palm III organizer. If your
Palm III organizer does not turn on when you press the green
power button, you should replace the batteries immediately.
■ If you leave drained batteries in your Palm III organizer for an
extended period of time, you can lose all of the stored data. If this
happens, replace the batteries and use the reset button to reset
™
your Palm III organizer. (See “Resetting Your Palm III
Organize r” later in this chapter for details.) Af te r you reset you r
Palm III org anizer, perf orm a HotSync operation to restore the
data from your computer.
Page 62 Basic Handbook for the Palm III Organizer
Page 67

Resetting Your Palm III Organizer
Under normal circumstances, you will never have to use the reset
button. However, on rare occasions your Palm III organizer may
“hang” (no l onger respond to buttons or the screen). In this case, you
need to perform a reset to get your Palm III organizer running again.
Performing a Soft Reset
A soft reset tells your Palm III organizer to stop what it’s doing and
start over again. All records and entri es stored in your Pal m III
organizer are retained with a soft reset. After a soft reset, the Welcome
to Palm III organizer screen appears followed by the General
Preferences screen (to set time and date).
To perform a soft reset:
■ Use the tip of an unfolded paper clip (or similar object without a
sharp tip) to gently press the reset button inside the hole on the
back panel of your Palm III organizer.
Reset button
Performing a Hard Reset
A hard reset also tells your Palm III organizer to start over again. With
a hard reset all records and entries stored in your Palm III organizer
are erased. Therefore, never perform a hard reset unless a soft reset does not
solve your problem.
Note: You can restore any data previously synchronized with your
computer during the next HotSync oper ation.
Chapter 6 Page 63
Page 68

To perform a hard reset:
1. Hold down the gre e n power b utton on the front panel o f the Palm
III organizer.
2. While holding down the power button, use the tip of an unfolded
paper clip (or similar object without a sharp tip) to gently press the
reset button.
3. When a message appears on the Palm III organizer screen warning
that you are about to erase all the data stored on your Palm III
organizer, do one of the following:
■ Press the upper half of the scroll button on the fr ont panel of the
Palm III organizer to complete the hard reset and display the
Digitiz er screen.
■ Press any other button to perform a soft reset.
Note: With a h a rd r e se t , th e curren t da te a n d ti m e are reta in e d .
Formats Preferences a nd other settings are restored to their
factory de f a u lt settings.
Page 64 Basic Handbook for the Palm III Organizer
Page 69

Limited Warranty
HARDWARE: Palm Computing, Inc., a 3Com company (collectively, “3Com”), warrants to the original purchaser (“Custom er”) that this product will be free from defects
in workmanship and materials, under normal use, for one year from the date of original
purchase from 3Com or its authorized retailer. If this product does not opera te as warranted above during the applicabl e warranty pe riod, 3Com m ay, at its option and expense, replace the defective product or pa rt wi th a com parable product o r part, repair
the defective produc t or part, or, if neither replacem ent nor repair i s reasonably available, refund to Custom er the purchase price for the d efective prod uct o r pa rt. Pro of of
date of original purchase w ill be req uired. Repla ceme nt prod ucts or parts m ay be new
or reconditioned . 3Com will war rant replaced o r re pair ed prod ucts or part s and ha rdware upgrades to which Customer is entitled by agreement between Customer and
3Com for a period of ninety (90) days from shipment of such product, part or upgrade,
or through the end of the original warranty , w hichev er is longe r. All prod ucts or parts
that are replaced become the property of 3Com.
Accessory products, as listed in the applicable 3Com catalog, are not covered under this
Limited Warranty except for the PalmPilot mo dem and the cr adle s, cables, and memory
upgrades. 3Com shall not be responsible for Cu stomer’s softw are, firmware, information, or memory data contained in, stored on, or integrated with any products returned
to 3Com for repair, whethe r under warr anty or not.
SOFTWARE: 3 Com warrants to Cu stom er t hat t h e softw are pro grams licensed from
it will perform in sub st antial c on form ance to t he progr am spec ificati ons therefo r for a
period of ninety (90) days from the date of origin al purchase from 3Com or its authorized retailer. 3Com warrants the media containing software against failure during the
warranty period. Proof of date of purch ase w ill be req ui red. No upda tes ar e provid ed.
The sole obligation of 3Com with respect to this express warranty shall be (at the discretion of 3Com) to refund the purchase price paid by Customer for any defective software
products, or to replace any defective media with software which substantially conforms
to applicable 3Com published specifications. 3Com makes no warranty or representation that its softwar e produ cts wi ll meet y ou r requir ements o r wil l work in co mbination
with any hardware or applications software products provided by third parties, that the
operation of the software products will be uninterrupted or error free, or that all defects
in the software products will be corrected.
OBTAINING WARRANTY SERVICE: Customer must contact 3Com’s Palm Computing, Inc. Technical Support or Customer Service within the applicable warranty period to obtain warranty serv ice aut hor ization . Dated proo f of ori ginal purchase will be
required. 3Com is n ot responsible for Customer produc ts or parts received without
warranty ser vic e auth or izatio n. I n the Uni ted Stat es, r eplac emen t pro ducts o r par ts wil l
be shipped prior to recei pt of the defective prod ucts or parts by 3C om, and repaired
products or parts will be shipped as soon as reasonably practicable, which will be no
later than thirty (30) days after receipt of the defective products or parts by 3Com. Repaired or repla cement products w ill be s hipped to Custo mer at 3 Com’s e xpens e. The r epair and replacement process for product s or parts in locations outside of the United
States will vary dependent on Customer’s locati on.
Chapter 6 Page 65
Page 70

Products or parts shipped by Custo mer m ust be se nt prepa id a nd package d appropr iately for safe shipm ent; obtaining insurance for packages i s advisable. In the United
States, if such products or parts are not shipped by Custome r to arrive at 3Com within
thirty (30) days from the date warranty service authorizati on is provided, Customer will
pay 3Com the price of such product or part at the then-current published catalog price.
WARRANTIES EXCLUSIVE: IF THIS PRODUCT DOES NOT OPERATE AS WARRANTED ABOVE, CUSTOMER’S SOLE REMEDY FOR BREACH OF THAT WARRANTY SHALL BE REPLACEMENT OR REPAIR OF THE PRODUCT OR PART OR
REFUND OF THE PURCHASE PRICE PAID, AT THE OPTION OF 3COM AND DEPENDENT UPON PRI O R A U THORIZATION. TO THE FULL EXTENT ALLOWED
BY LAW, TH E FOREGOING W ARRANTIES AN D REMEDIES AR E EXCLUSIVE
AND ARE IN LIEU OF ALL OTHER WARRANTIES, TERMS, OR CONDITIONS,
EXPRESS OR IMPLIED, EITHER IN FACT OR BY OPERATION OF LAW, STATUTORY OR OTHERWISE, INCLUDING WARRANTIES, TERMS, OR CONDITIONS
OF MERCHANTABILITY, FITNESS FOR A PARTICULAR PURPO SE, AND SATISFACTORY QUALITY. 3COM NEITHER ASSUMES NOR AUTHORIZES ANY
OTHER PERSON TO ASSUME FOR IT ANY OTHER LIABILITY IN CONNECTION WITH THE SALE, INSTALLATION, MAINTENANCE OR USE OF ITS
PRODUCTS.
3Com shall not be liable under th is warranty i f its testing and examina t io n disclose that
the alleged defect in the product does not exist or was caused by Customer’s or any
third person’s misuse, ne glect, imprope r insta llation or t esting, unauthorized attempts
to repair or modify, or any other cause beyond the range of the intended use, or by accident, fire, lightnin g, or other hazards or acts of God. This warranty does not cover
physical damage to the surface of the product, including cracks or scratches on the LCD
touchscreen. This warranty does not apply when the malfunction results from the use
of this product in conjunction with accessories, other products, or ancillary or peripheral equipment and 3Com determines that there is no fault with the product itself. This
warranty does not apply to the failure of the product o r par t due primari ly to any communication service Customer may subscribe to or use with the product.
LIMITATION OF LIA BILIT Y. TO TH E FULL EXTE NT ALLO WE D BY LA W 3COM
ALSO EXCLUDES FOR ITSELF AND ITS SUPPLIERS ANY LIABILITY, WHETHER
BASED IN CONTRACT OR TORT (INCLUDING NEGLIGENCE), FOR INCIDENTAL, CONSEQUENTIAL, INDIRECT, SPECIAL, OR PUNITIVE DAMAGES OF
ANY KIND, OR FOR LOSS OF REVENUE OR PROFITS, LOSS OF BUSINESS,
LOSS OF INFORMATION OR DATA, OR OTHER FINANCIAL LOSS ARISING
OUT OF OR IN CONNECTION WITH THE SALE, INS TALLATION, MAIN TENANCE, USE, PERFORMANCE, FAILURE, OR INTERRUPTION OF THIS PRODUCT, EV EN IF 3C OM OR IT S AUT H OR IZ ED R ESE L LE R HAS BE EN AD VISE D OF
THE POSSIB ILITY OF SUCH DAMAGES, AN D LIMITS ITS LIABILITY TO REPLACEMENT OR REPAIR OF THE PRODUCT OR PART, OR REFUND OF THE
PURCHASE PRICE PAID, AT THE OPTION OF 3COM. THIS DISCLAIMER OF LIABILITY FOR DAMAGES WILL NOT BE AFFECTED IF ANY REMEDY PROVIDED HEREIN SHALL FAIL OF ITS ESSENTIAL PURPOSE.
Page 66 Basic Handbook for the Palm III Organizer
Page 71

GOVERNING L AW : This Limited Warranty shall be governed by the laws of the State
of California, U.S. A. S ome coun tr ies, states, or prov ince s d o not a llo w the e xclus ion or
limitation of impli ed warran ties or the lim itatio n of inciden tal or conseq uenti al damages for certain produc ts supplied to consumers or t h e limit at ion of li abi lity f or person al
inju ry, s o t he ab ove limi tati on s and exc lus ions may be limit ed in th eir appl ica tio n to
you. When the implied warranties are n o t allowed to be excluded in their entirety, they
will be limited to the duration of the applicable written warranty. This warranty gives
you sp e c i f i c le gal rights which m ay vary d e p e nding o n lo c al law.
Palm Computi ng, Inc., a 3Com co mpany
1565 Charles t on Road
Mountain View, California 94043
(650) 237-6000
3Com End User Software License Agreement
YOU SHOU L D C AREF U LLY READ THE F OLL O WIN G TE RM S AND CON D IT ION S
BEFORE USING THIS PRODUCT. IT CONTAINS SOFTWARE, THE USE OF WHICH
IS LICENSED BY PALM COMPUTING, INC., A 3COM COMPANY (COLLECTIVELY,
“3COM”) , TO ITS C UST OME RS FOR T HEIR U SE ON LY AS SET FOR TH BEL OW. IF
YOU DO NOT AGREE TO THE TERMS AND CONDITIONS OF THIS AGREEMENT,
DO NOT USE THE SOFTWARE. USING ANY PART OF THE SOFTWARE INDI CATES
THAT YOU ACCEPT THESE TERMS.
LICENSE: 3Com gr ant s you a nonexclusi ve l ice ns e to u se the ac co m pan yi ng software
program(s) (the “Software”) subject to the terms and restrictions set forth in this License
Agreement. You are not permitted to lease or rent (except under separate mutually
agreeable terms set forth in writing), distribu te or sublicense t he Softwar e or to use the
Software in a time-sharing arrangement or in any other unauthorized manner. Further,
no license is gran ted t o you in the hum an re adab le cod e of the So ftware (source code).
Except as provided below, this License Agreement does not grant yo u any rights to patents, copyrights, trade secrets, trademarks, or any other rights in respect to the Software.
The Softwa re is licens ed to be used on any personal computer and/or any 3Com product, provided that the Software is used only in connection with 3Com products. With
respect to the Desktop Softw are, you may reprod uce and provi de on e (1) copy of suc h
Software for each personal computer or 3Com product on which such Software is used
as permitted hereunder. With respect to the Device Software, you may use such Software only on one (1) 3Com product. Otherwise, the Software and supporting documentation may be copied only as essential for backup or archive purposes in support of your
use of the Software as permitted hereunder. You must reproduce and include all copyright notices and any other proprietary rights notices appearing on the Software on any
copies that you make.
Chapter 6 Page 67
Page 72

NO ASSIGNMENT; NO REVERSE ENGINEERING: You may tra ns fer th e S oft ware
and this License Agreement to another party if the other party agrees in writing to accept the terms and conditions of this License Agreement. If you transfer the Software,
you must at the same time either transfer all copies of the Software as well as the supporting documentation to the same party or destroy any such materials not transferred.
Except as set forth above, you may not transfer or assign the Software or your rights under this License Agreement.
Modification, reverse engineering, reverse compiling, or disassembly of the Software is
expressly prohibited. Howeve r, if you are a Europe an Commun ity (“E C”) reside nt, information necessa ry to achieve interoperab ility of the Software with other prog rams
within the meaning of the EC Directive on the Legal Protection of Computer Programs
is available to you from 3Com upon written request.
EXPORT RESTRICTIONS: You agree that you will not export or re-export the Software or accompanying documentation (or any copies thereof) or any products utilizing
the Software o r suc h docum e ntation in viol ation of an y appli cab le law s o r reg ulat ions
of the United States or the country in which you obtained them.
TRADE SECRETS; TITLE: You acknowledge and agree that the structure, sequence
and organization of the Software are the valuable tra de secrets of 3Com and its suppliers. You agree to hold such tra de secrets in confidence. Y ou further ackn owledge and
agree that ownership of, and title to, the Software and all subsequent copies thereof regardless of the form or media are held by 3Com and its suppliers.
UNITED S TATES GOVERN MEN T LEGEND : The Software is commercial in nature
and developed solely at private expense. The Software is delivered as “Commercial
Computer Soft ware” as defined in DFARS 252.227-7014 (June 1995) or as a commercial
item as def ined in F AR 2.10 1(a) an d as such is provi ded wi th o nly su ch r igh ts as are p rovided in this License Agreement, which is 3Com’s standard commercial license for the
Software. Technical data is provided with limited rights only as provided in DFAR
252.227-7 015 (Nov. 1995) or FAR 52.227-1 4 (June 1987), whichever is applicable.
TERM AND TERMINATIO N: This License Agreement is effective until terminated.
You may terminate it at any time by destroying the Software and documentation together with all copies and merged portions in any form. It will also terminate immediately if you fail to comply with any term or condition of this License Agree ment. Upon
such termination you agree to destroy the Software and documentation, together with
all copies and merged portions in any form.
GOVERNING L AW : This License Agreement shall be governed by the laws of the State
of California as such laws are applied to agreements entered into and to be performed
entirely within Californ ia between Californi a residents and by the laws of the United
States. You agree that the United Nations Convention on Contracts for the International
Sale of Goods (1980) is hereby e x cluded in its entirety from application to thi s Lic ense
Agreement.
LIMITED WARRANTY; LIMITATION OF LIABILIT Y: All warranties and limitations of liability applicable to the Software are as stated on the Limited Warranty Card
or in the product manual accompanying the Software. Such warranties and limitations
of liability are incorporated herein in their entirety by this refe rence.
Page 68 Basic Handbook for the Palm III Organizer
Page 73

SEVERABILITY: In the event any provision of this License Agreement is found to be
invalid, ille gal or unenfo rceab le, the va lidity , le galit y and enf orceab ilit y of a ny o f the r emaining provisions shall not in any way be affected or impaired and a valid, legal and
enforceable provision of similar intent and economic impact shall be substituted therefor.
ENTIRE AG REEMENT: This License Agreement sets forth the entire understanding
and agreement between you and 3Com, supersedes all pr ior ag r eements, whether written or oral, with respect to the Software, and may be amended only in a writing signed
by both parties.
Palm Computi ng, Inc., a 3Com co mpany
1565 Charles t on Road
Mountain View, California 94043
(650) 237-6000
Chapter 6 Page 69
Page 74

FCC Statement
This device compli es with part 15 o f the FC C rules . Opera tion i s subject to the fo llowi ng
two condition s: (1) This dev i ce may not caus e harm ful in terfe rence, a nd (2) t his dev ice
must accept any interference received , includin g interfer ence that may cause undesire d
operation.
Note: This equipment has been tested and found to comply with the limits for a
Class B digital device, pursuant to Part 15 of the FCC rules. These limits are
designed to provide reasonable protection against harmful interference in a
residential installation. This equipment generates, uses, and can radiate radio
frequency energy and, if not inst alled and used in ac co rd ance with the
instructions, may cause harmful interference to radio communications.
However, there is no guar a ntee that inte rfer ence will not occ ur in a part icul ar
installation. I f this equ ipment does cause harmf u l to ra dio or television
reception, which can be determined by turning the equipment off and on, the
user is encouraged to try to correct the interference by one or more of the
following measures:
■ Reorient or relocate the r e ceiving antenna.
■ Increase the separation between the equipment and receiver.
■ Connect the equipment into an outlet on a circuit different from that to which the
receiver is connected.
■ Consult the dealer or an experienced radio/TV technician for help.
The use of shielded I/O cables is required when connecting this equipment to any and
all optional peripheral or host devices. Failure to do so may violate FCC rules.
Caution:
Changes or modifications not covered in this manual must be approved
in writing by the manufacturer’s Regulatory Engineering Department.
Changes or modifications made without written approval may void the
user’s authority to operate this equipment.
Canadian RFI Statement
This Class B digital apparatus meets all requirements of the Canadian InterferenceCausing Equipment Regulations.
Cet appareil numérique de la classe B respecte toutes les exigences du Réglement sur l e
matériel brouilleur du Canad a.
Page 70 Basic Handbook for the Palm III Organizer
Page 75

Index
A
Accented Characters
Graffiti 25
on-screen keyboard 17
Applications
beaming 38
buttons 2
controls 27
finding text 41
font style 32
installing 45
Launcher 13, 14
menus 28
removing 48
sorting 15
starting 14
switching 14
B
Backlight 3, 7
activating 7
Batteri es
battery door 5
battery gauge 13
battery life 62
installing 5
Beam Data 38, 55
Brig htness Control 5
Button 28
C
Calibration 6
Capital Letters 22
Categorie s 33
beaming 38
merging 3 6
renaming 36
using in Applications
Launcher 15
using in lists 34
Check Box 27
Computer
connecting 10
Contrast Control 5
Copy 31
Cover 3
Cradle 10
Cut 31
D
Date
setting 9
Deleting
applications 48
Palm Desktop 49
Digitizer 6
Diskette Fulfillment 59
E
Edit Menu 30
Entri es
assigning categories 33
attaching notes 37
beaming 38
finding 41, 42
private 37
F
FCC Statement 70
Find 41
Fonts 32
G
Games 47
General Preferences 8
setting date 9
setti ng time 8
Graffiti
accent character s 25
alphabet 18, 21
capital letters 22
concepts 19
defined 17
menu commands 29
navigation strokes 26
numbers 22
online help 31
punctuation marks 23
Index Page 71
Page 76

shortcuts 26
symbols 24
tips 20
writing area 2
writing character s 19
H
Hard Reset
procedure 63
reset button 4
Help
Graffiti 31
notes 52
online tips 51
sales 60
tech ni ca l suppor t 5 7
HotSync
communications port 10
troubleshooting 52
I
Infrared Port 4
Infrared port 55
Installing
applications 45
batteries 5
cradle 10
games 47
Palm Desktop 12
troubleshooting 52
International Characters
Graffiti 25
on-screen keyboard 17
IR Port 4
beaming data 38
K
Keyboard 16
screen options 17
L
Letters
font style 32
Graffiti 18, 21
on-screen keyboard 16
M
Maintenance Infor m ation 61
Menus
activating 28
choosing 29
command equivalents 29
edit menu 30
N
New
categories 34
Note 37
Numbers
Graffiti 22
on-screen keyboard 16
writing 22
O
On-Screen Keyboard 16
menu command 31
screen options 17
P
Palm
install tool 45
Palm D e sktop
features 10
install tool 45
obtaining 3.5" diskettes 59
removing 49
software inst allation 12
system requirements 11
Palm III
application buttons 2
applications 13
backlight 7
battery door 5
battery installation 5
caring for 61
connecting to computer 10
contrast control 5
cover 3
cradle 10
menus 28
on-screen keyboard 16
power button 3
Page 72 Basic Handbook for the Palm III Organizer
Page 77

private records 37
reset button 63
safety tips 61
screen 2
scroll button 2
search for text 41
serial port 5
starting 6
starting applicat i on s 14
stylus 4
techn i ca l su p port 57
troubleshooting 52
warranty 65
writing text 17
writing tips 20
Paste 31
Phone Lookup 42
Pick List 27
Power Button 3
Preferences
general 8
Private Rec ords 37
Punctuation Marks
Graffiti 23
on-screen keyboard 16
writing 23
R
Receive Data 38
Records
attaching notes 37
beaming 38
categor ies in lists 34
choosing ca te gories 33
finding 41, 42
private 37
Removing
applications 48
Palm Desktop 49
Reset Button 4 , 63
S
Sales Offices 60
Scroll Arrows 27
Scroll Bar 28
Scroll Button 2
Search
for text 41
phone lookup 42
Security
private records 37
troubleshooting 56
Select All 31
Send Data 38
Serial Port 5, 10
ShortCuts 26
menu commands 29
pre-defined 27
Soft Reset
procedure 63
reset button 4
Software
license agreement 67
obtaining 3.5" diskettes 59
Sort
applications 15
Starting Applications 14
Stylus 4
Symbols
Graffiti 24
on-screen keyboard 16
System Requirements 11
T
Techn i ca l Support 5 7
Text Entry
accent character s 25
capital letters 22
font style 32
Graffiti sh ortcuts 26
numbers 22
on-screen keyboard 16
punctuation marks 23
symbols 24
with Palm III 17
writing tips 20
Time
setting 8
Index Page 73
Page 78

Toubleshooting
infrar e d communications 55
Transmit Data 38
Troubleshooting 52
applications 56
Date Boo k 57
general 54
Graffiti 55
HotSync 52
installation 52
Memo Pad 57
U
Undo 31
W
Warranty 65
Writing
accent characters 25
capital letters 22
Graffiti shortcuts 26
numbers 22
on-screen keyboard 16
punctuation marks 23
symbols 24
text with Palm III 17
tips 20
Page 74 Basic Handbook for the Palm III Organizer
 Loading...