

Page 1

CoreBuilder® 5000 ATM
®
Backbone SwitchModule
User Guide
http://www.3com.com
Part Number 10013037
Published November 1999
Page 2

3Com Corporation
5400 Bayfront Plaza
Santa Clara, California
95052-8145
Copyright © 1999, 3Com Corporation. All rights reserved. No part of this documentation may be
reproduced in any form or by any means or used to make any derivative work (such as translation,
transformation, or adaptation) without written permission from 3Com Corporation.
3Com Corporation reserves the right to revise this documentation and to make changes in content
from time to time without obligation on the part of 3Com Corporation to provide notification of
such revision or change.
3Com Corporation provides this documentation without warranty, term, or condition of any
kind, either implied or expressed, including, but not limited to, the implied warranties, terms, or
conditions of merchantability, satisfactory quality, and fitness for a particular purpose. 3Com may
make improvements or changes in the product(s) and/or the program(s) described in this
documentation at any time.
If there is any software on removable media described in this documentation, it is furnished
under a license agreement included with the product as a separate document, in the hardcopy
documentation, or on the removable media in a directory file named LICENSE.TXT or
LICENSE.TXT. If you are unable to locate a copy, please contact 3Com and a copy will be
provided to you.
UNITED STATES GOVERNMENT LEGEND
If you are a United States government agency, then this documentation and the software
described herein are provided to you subject to the following:
All technical data and computer software are commercial in nature and developed solely at
private expense. Software is delivered as “Commercial Computer Software” as defined in DFARS
252.227-7014 (June 1995) or as a “commercial item” as defined in FAR 2.101(a) and as such is
provided with only such rights as are provided in 3Com’s standard commercial license for the
Software. Technical data is provided with limited rights only as provided in DFAR 252.227-7015
(Nov 1995) or FAR 52.227-14 (June 1987), whichever is applicable. You agree not to remove or
deface any portion of any legend provided on any licensed program or documentation contained
in, or delivered to you in conjunction with, this User Guide.
Unless otherwise indicated, 3Com registered trademarks are registered in the United States and
may or may not be registered in other countries.
3Com, the 3Com logo, CoreBuilder, LANsentry, ONsemble, and Transcend are registered
trademarks of 3Com Corporation. ONline is a trademark of 3Com Corporation. 3Com Facts is a
service mark of 3Com Corporation.
HP and OpenView are registered trademark of Hewlett-Packard Company. Solaris, Sun, and
SunNet Manager are trademarks of Sun Microsystems, Inc. UNIX is a registered trademark in the
United States and other countries, licensed exclusively through X/Open Company, Ltd.
All other company and product names may be trademarks of the respective companies with
which they are associated.
ii
Page 3

C
ONTENTS
BOUT THIS GUIDE
A
Introduction 1
Audience 1
How to Use This Guide 1
Conventions 2
Related Documents 3
3Com Documents 3
Reference Documents 4
SNMP and MIB-Based Information 4
ATM and LAN Documents 5
NTRODUCTION
1
I
ATM Backbone SwitchModule Overview 1-1
ATM Backbone SwitchModule Features 1-1
Seamless ATM Migration 1-1
Multiple Redundancy Levels 1-2
ATM Forum Specification Compliance 1-2
CoreBuilder 5000 Chassis Compatibility 1-2
Switched Virtual Circuit Capacity 1-2
Emulated LAN (ELAN) Capacity 1-2
Hot Swap Feature 1-3
Supported CoreBuilder 5000 SwitchModules 1-3
Supported Management Standards 1-4
ATM Backbone SwitchModule Architecture 1-4
Management Processor 1-5
Packet Switch Processor 1-5
Primary ATM OC-3 Card 1-5
Redundant ATM OC-3 Card 1-5
ATM Backbone SwitchModule Descriptions 1-6
Base Hardware Configuration 1-6
Redundant Hardware Configuration 1-7
Page 4

PacketChannel Backplane Description 1-8
Slot Restrictions Per Backplane 1-8
Sample ATM Backbone SwitchModule Configurations 1-10
Basic Configuration 1-10
Dual-Homing Configuration 1-11
Dual-Homing/Module Redundancy
Configuration 1-12
2
LAN E
General Definition of LAN Emulation 2-1
LAN Emulation Components 2-3
LAN Emulation Data Exchange 2-5
LAN Emulation Connections 2-7
LAN Emulation Operation 2-9
MULATION OVERVIEW
General LANE Components 2-3
LAN Emulation Client (LEC) 2-3
LAN Emulation Configuration Server (LECS) 2-3
LAN Emulation Server (LES) 2-3
Broadcast and Unknown Server (BUS) 2-4
ATM Backbone SwitchModule LANE Components 2-4
Bridgeport-LEC 2-4
Virtual Bridge (vbridge) 2-5
Emulated LAN (ELAN) 2-5
Protocol Stacks 2-5
Packets Versus Cells 2-6
Control VCCs 2-7
Data VCCs 2-8
Initialization 2-9
LECS Connection 2-10
Configuration 2-10
Joining 2-10
BUS Connection 2-11
Data Movement 2-11
Page 5

3
ONFIGURING THE
C
Configuration Tools 3-1
Distributed Management Module 3-2
Advanced Management Tools 3-2
Transcend Network Control Services for UNIX 3-2
Transcend Network Management Software for Windows 3-3
Third-Party SNMP-Based Tools 3-4
Setting Up DMM Access 3-5
Setting Up Direct Terminal Access to the DMM 3-5
Configuring TELNET Access to the DMM 3-5
Configuration Process Overview 3-6
Configuration Components 3-6
LAN Emulation Configuration 3-6
Bridge Configuration 3-6
ATM Configuration 3-7
Configuration Defaults 3-7
Configuring LAN Emulation Parameters 3-8
Automatic Bridgeport-LEC Configuration
Mode 3-8
Manual Bridgeport-LEC Configuration
Mode 3-8
Verifying Bridgeport-LEC Status 3-9
Configuring ATM OC-3 Card Redundancy 3-9
Configuring IGMP Snooping Parameters 3-10
ATM B
ACKBONE SWITCHMODULE
TATUS MONITORING AND STATISTICS
4
S
Using DMM/ADMM Commands 4-1
SHOW VBRIDGE 4-2
Displaying General Vbridge Configuration Information 4-2
Displaying Detailed Vbridge Configuration Information 4-3
Displaying IGMP Snooping Vbridge Information 4-4
SHOW MODULE 4-5
SHOW BRIDGE_PORT 4-6
Displaying General Status Information 4-6
Displaying Detailed Information 4-7
SHOW COUNTER BRIDGE_PORT 4-8
SHOW ATM 4-9
Page 6

ATM Interface Parameters 4-9
ATM ILMI Configuration 4-10
ATM Q93b Parameters 4-10
ATM QSAAL Parameters 4-11
ATM Signal Configuration 4-11
ATM Statistics 4-12
ATM Traffic Description 4-12
ATM VCCs 4-13
SHOW BPORT_LEC 4-13
BPORT_LEC Configuration 4-14
BPORT_LEC Statistics 4-15
BPORT_LEC Status 4-15
BPORT_LEC Server Circuits 4-16
BPORT_LEC
LE_ARP Table 4-16
SHOW SONET 4-17
SHOW SONET Status 4-17
SHOW SONET Statistics 4-18
SHOW IGMP SNOOPING 4-19
Using Graphical Interface Tools 4-20
CoreBuilder 5000 Manager 4-20
Device Management for Hubs 4-21
VLAN Manager 4-21
LANE Manager 4-21
NTERNET GROUP MANAGEMENT PROTOCOL
5
I
NOOPING
S
Overview 5-1
CoreBuilder 5000 Support 5-6
Locating Multicast Routers in the Network 5-6
No Multicast Routers on the Network 5-6
Enabling IGMP Snooping on CoreBuilder 5000 SwitchModules 5-7
(IGMP)
Page 7

ROUBLESHOOTING
6
T
Troubleshooting Using LEDs 6-1
Troubleshooting Base Module LEDs 6-1
Verifying Base Module LED Operation 6-1
Reading the Base Module LEDs 6-2
Determining Corrective Action 6-3
Troubleshooting ATM OC-3 Card LEDs 6-4
Recovering from Problems 6-5
Verifying DMM Communication 6-5
Verifying Software Versions 6-6
Verifying Critical Parameters 6-7
Verifying ATM OC-3 Card Functions 6-7
Verifying ATM Signaling Functions 6-8
Verifying LEC Functions 6-9
Verifying Bridging Configuration 6-11
Verifying Data Movement 6-11
Verifying ATM OC-3 Switchover 6-12
Resetting the ATM Backbone SwitchModule 6-12
Using the Reset Button 6-12
Obtaining Technical Assistance 6-13
A
PECIFICATIONS
S
Environmental Specifications A-1
Mechanical Specifications A-1
Power Specifications A-2
ATM OC-3 Card Fiber Optic Specifications A-2
Page 8

ECHNICAL SUPPORT
B
T
Online Technical Services B-1
World Wide Web Site B-1
3Com Knowledgebase Web Services B-1
3Com FTP Site B-2
3Com Bulletin Board Service B-2
Access by Analog Modem B-2
Access by Digital Modem B-3
3Com Facts Automated Fax Service B-3
Support from Your Network Supplier B-3
Support from 3Com B-3
Returning Products for Repair B-5
NDEX
I
3COM C
ORPORATION LIMITED WARRANTY
Page 9

F
IGURES
ATM Backbone SwitchModule Hardware Components 1-4
1-1
ATM Backbone SwitchModule Base Configuration 1-6
1-2
ATM Backbone SwitchModule with Redundant ATM OC-3 Card 1-7
1-3
Example Base Configuration 1-10
1-4
Example Dual-Homing Configuration 1-11
1-5
Example Dual-Homing/Module Redundancy Configuration 1-12
1-6
LAN Emulation Function 2-2
2-1
ATM Backbone SwitchModule Function 2-2
2-2
General LAN Emulation Components 2-3
2-3
ATM Backbone SwitchModule LANE Components 2-4
2-4
LAN Emulation Protocol Stacks 2-5
2-5
Converting SwitchModule Packets to and from ATM Cells 2-6
2-6
Control VCCs in ATM Backbone SwitchModule LAN Emulation 2-7
2-7
Data VCCs in ATM Backbone SwitchModule LAN Emulation 2-8
2-8
UNIX Tools for Configuring ATM Backbone SwitchModules 3-3
3-1
Windows Tools for Configuring ATM Backbone SwitchModules 3-4
3-2
Multicast Packet Path before Snooping 5-3
5-1
Format of an IGMP Version 1 Message 5-4
5-2
Multicast Packet Path after Snooping 5-4
5-3
FTE DRAM Address Forwarding Entry 5-8
5-4
Page 10

Page 11

T
ABLES
Notice Icons 2
1
Text Conventions 2
2
Supported Standards and MIBs 1-4
1-1
SwitchModule Installation Per Backplane 1-8
1-2
Other Vbridge IGMP Snooping Options 4-4
4-1
Base Module LED Status 6-2
6-1
Base Module LED Corrective Actions 6-3
6-2
ATM OC-3 Card LED Corrective Actions 6-4
6-3
Environmental Specifications A-1
A-1
Mechanical Specifications A-1
A-2
Power Specifications A-2
A-3
ATM Backbone SwitchModule Fiber Optic Specifications A-2
A-4
Page 12

Page 13

A
BOUT
T
HIS
G
UIDE
Introduction
Audience
How to Use This Guide
This guide describes how to install, configure, and manage the 3Com
CoreBuilder
If the information in the release notes shipped with your product differs
from the information in this guide, follow the release note instructions.
This guide is intended for the following people at your site:
■
Network manager or administrator
■
Trained hardware installer or service personnel
The following table shows the location of specific information:
If you are looking for: Tu r n t o :
ATM Backbone SwitchModule features, descriptions, and example
configurations
An overview of LAN Emulation concepts, components, and
operation
Information on configuring ATM Backbone SwitchModules Chapter 3
Information on monitoring ATM Backbone SwitchModule
operation
Information about Information Group Management Protocol
(IGMP) snooping
Information on troubleshooting ATM Backbone SwitchModule
LEDs, management problems, and resetting ATM Backbone
SwitchModules
Detailed ATM Backbone SwitchModule specifications Appendix A
3Com technical support information Appendix B
®
5000 ATM Backbone SwitchModule.
Chapter 1
Chapter 2
Chapter 4
Chapter 5
Chapter 6
Page 14

2
A
BOUT THIS GUIDE
Conventions
The following tables list conventions used throughout this guide:
Table 1
Icon Ty p e Description
Table 2
Convention Description
Enter vs. Type When the word
Syntax vs. Command
Notice Icons
Information Note Information notes call attention to important features
or instructions.
Caution Cautions alert you to personal safety risk, system
damage, or loss of data.
War ning Warnings alert you to the risk of severe personal injury.
Text Conventions
enter
something, then press the Return or Enter key. Do not
press the Return or Enter key when instructed to
Syntax
indicates that the general form of a command
syntax is provided. You must evaluate the syntax and
supply the appropriate port, path, value, address, or
string. For example:
Enable RIPIP by using the following syntax:
SETDefault !<port> -RIPIP CONTrol =
Listen
In this example, you must supply a port number for
!<port>.
Command
have been supplied and you can enter the command as
shown in text. For example:
Remove the IP address by entering the following
command:
SETDefault !0 -IP NETaddr = 0.0.0.0
For consistency and clarity, the full-form syntax (upperand lowercase letters) is provided. However, you can
enter the abbreviated form of a command by typing only
the uppercase portion and supplying the appropriate
port, path, address, value, and so on. You can enter the
command in either upper- or lowercase letters at the
prompt.
indicates that all variables in the command
is used in this guide, it means type
type
.
Page 15

Related Documents
3
Related Documents
Table 2
Convention Description
Text represented as
screen display
Text represented as
commands
Keys Specific keys are referred to in the text as Return key or
Italics Italics
Text Conventions (continued)
This typeface
appear on your terminal screen. For example:
NetLogin:
This typeface
you enter. For example:
SETDefault !0 -IP NETaddr = 0.0.0.0
Escape key, or they may be shown as [Return] or [Esc].
If two or more keys are to be pressed simultaneously, the
keys are linked with a plus sign (+). For example:
Press [Ctrl]+[Alt]+[Del].
are used to denote new terms or emphasis.
is used to represent displays that
is used to represent commands that
This section provides information on supporting documentation,
including:
■
3Com Documents
■
Reference Documents
3Com Documents
The following documents provide additional information on 3Com
products:
■
CoreBuilder 5000 SwitchModule User Guide
— Provides information
on the installation, configuration, operation, and troubleshooting of
CoreBuilder 5000 SwitchModules.
■
CoreBuilder 5000 ATM Backbone SwitchModule Quick Start and
Reference
— Provides information on the installation and basic
configuration of CoreBuilder 5000 ATM Backbone SwitchModules.
■
CoreBuilder 5000 ATM Backbone SwitchModule Command
Reference
— Provides a summarized list of DMM/ADMM commands
and parameters that apply to the ATM Backbone SwitchModule.
■
Redundant ATM OC-3 Card Installation Instructions
— Provides
instructions for installing the redundant ATM OC-3 card on the ATM
Backbone SwitchModule.
Page 16

4
A
BOUT THIS GUIDE
■
CoreBuilder 5000 Integrated System Hub Installation and
Operation Guide
— Provides information on the installation,
operation, and configuration of the CoreBuilder 5000 Integrated
System Hub. This guide also describes the principal features of the
CoreBuilder 5000 Fault-Tolerant Controller Module.
■
CoreBuilder 5000 Distributed Management Module User Guide
—
Provides information on the CoreBuilder 5000 Distributed Management
Module’s operation, installation, and configuration. This guide also
describes the software commands associated with the Distributed
Management Module.
■
CoreBuilder 5000 Distributed Management Module Commands
Guide
— Describes each management command by providing details
on command format and use.
For a complete list of 3Com documents, contact your network supplier.
Reference Documents
SNMP and MIB-Based
Information
This section includes the following types of reference documents:
■
SNMP and MIB-Based Information
■
ATM and LAN Documents
The following documents supply related background information on
SNMP and networking protocols:
■
Case, J., Fedor, M., Schoffstall, M., and J. Davin
, The Simple
Network Management Protocol, RFC 1157, University of Tennessee at
Knoxville, Performance Systems International and the MIT Laboratory
for Computer Science, May 1990.
■
Rose, M., and K. McCloghrie
, Structure and Identification of
Management Information for TCP/IP-based Internets, RFC 1155,
Performance Systems International and Hughes LAN Systems,
May 1990.
■
Rose, M. and McCloghrie, K.,
Management Information Base for
Network Management of TCP/IP-Based Internets: MIB-II, RFC 1213,
Performance Systems International and Hughes LAN Systems, March
1991.
■
Decker, E., Langille, P., McCloghrie, K., and Rijsinghani, A.,
Definitions of Managed Objects for Bridges, RFC 1493, Cisco Systems,
Inc., Digital Equipment Corporation, and Hughes LAN Systems, July
1993.
Page 17

Related Documents
5
ATM and LAN
Documents
■
Kastenholz, F. and McCloghrie, K.,
Evolution of the Interfaces
Group of MIB-II, RFC 1573, FTP Software and Hughes LAN Systems,
January 1994.
■
Brown, T. and Tesink, K.,
Definitions of Managed Objects for the
SONET/SDH Interface Type, RFC 1595, Bell Communications Research,
March 1994.
■
Ahmed, M. and Tesink, K.,
Definitions of Managed Objects for ATM
Management Version 8.0 using SMIv2, RFC 1695, Bell
Communications Research, August 1994.
■
LAN Emulation Client Management Specification v1.0, 0038.000,
ATM Forum, September 1995.
The following documents provide information on ATM and LAN
Emulation technology and specifications:
■
LAN Emulation Over ATM: Version 1.0 Specification, 0021.000, ATM
Forum, January 1995.
■
LAN Emulation Over ATM: Version 1.0 Addendum, 0050.000, ATM
Forum, January 1996.
■
ATM User-Network Interface Specification Version 3.0
©
1993 The ATM Forum. Pub. Prentice-Hall, Inc.
■
ITU-TS draft Recommendation Q.93B “B-ISDN User-Network Interface
Layer 3 for Basic Call/Bearer Control” May 1993.
■
ITU Document DT/11/3-28 (Q.SAAL1) “Service Specific Connection
Oriented Protocol (SSCOP) Specification” May 17 1993, Geneva.
■
ITU Document DT/11/3-XX (Q.SAAL2) “Service Specific Connection
Oriented Protocol (SSCOP) Specification” May 17 1993, Geneva.
■
ATM User-Network Interface Specification Version 3.1
©
1994 The ATM Forum
■
ITU-T draft Recommendation Q.2931 “B-ISDN User-Network Interface
Layer 3 for Basic Call/Bearer Control” March 1994.
■
ITU-T Recommendation Q.2110 BISDN — ATM Adaptation Layer —
Service Specific Connection Oriented Protocol (SSCOP).
Page 18

6
A
BOUT THIS GUIDE
Page 19

1
I
NTRODUCTION
ATM Backbone SwitchModule Overview
This chapter describes the features and components of the 3Com
CoreBuilder
Backbone SwitchModules operate.
This chapter contains the following sections:
■
ATM Backbone SwitchModule Overview
■
ATM Backbone SwitchModule Architecture
■
ATM Backbone SwitchModule Descriptions
■
PacketChannel Backplane Description
■
Sample ATM Backbone SwitchModule Configurations
CoreBuilder 5000 ATM Backbone SwitchModules are high-performance
LAN-switching modules for the 3Com CoreBuilder 5000 Integrated
System Hub.
This section describes:
■
ATM Backbone SwitchModule Features
■
Supported CoreBuilder 5000 SwitchModules
■
Supported Management Standards
®
5000 ATM Backbone SwitchModules and how ATM
ATM Backbone
SwitchModule
Features
ATM Backbone SwitchModules provide the following features.
Seamless ATM Migration
The ATM Backbone SwitchModule protects your investment in LAN
equipment, wiring, and software by providing seamless LAN-to-ATM
communication. You can connect existing Ethernet, Fast Ethernet, and
FDDI legacy LANs with 155 Mbps ATM backbones.
Page 20

1-2
C
HAPTER
1: I
NTRODUCTION
Multiple Redundancy Levels
You can configure the ATM Backbone SwitchModule for two levels of
redundancy:
■
PHY Redundancy
— A secondary ATM OC-3 card provides PHY
redundancy. If the primary ATM OC-3 card or attached cable fails or
performance fails or is no longer receiving light, the redundant ATM
OC-3 card becomes active to maintain operations, if PHY switchover
is enabled.
■
Module Redundancy
— Adding a second ATM Backbone
SwitchModule to the CoreBuilder 5000 hub in a dual-homing
configuration allows you to load-balance ATM requirements while
providing automatic module failover if one of the modules fails.
ATM Forum Specification Compliance
The ATM Backbone SwitchModule is fully compliant with the following
ATM Forum specifications:
■
UNI 3.0/3.1
■
LANE 1.0
CoreBuilder 5000 Chassis Compatibility
You can install and operate the ATM Backbone SwitchModule in any
CoreBuilder 5000 17-slot, 10-slot, or 7-slot chassis that contains a
PacketChannel backplane.
Switched Virtual Circuit Capacity
Each ATM Backbone SwitchModule supports up to 512 simultaneous
switched virtual circuit (SVC) connections.
Emulated LAN (ELAN) Capacity
Each ATM Backbone SwitchModule provides up to 64 LAN Emulation
Clients (LECs) for connection to 64 Emulated LANs (ELANs). These
virtual LANs can be managed using the 3Com Transcend
®
Enterprise
VLAN Manager (v4.1 or later), a graphical interface tool that greatly
simplifies the management of virtual and emulated LANs.
Page 21

ATM Backbone SwitchModule Overview
Hot Swap Feature
You can insert or remove ATM Backbone SwitchModules without
powering off the CoreBuilder 5000 chassis.
1-3
Supported
CoreBuilder 5000
SwitchModules
CoreBuilder 5000 ATM Backbone SwitchModules provide ATM
connectivity for the following CoreBuilder 5000 SwitchModules:
■
2-Port DAS FDDI SwitchModule (3C96604M-F)
■
2-Port DAS FDDI SwitchModule (3C96604M-F-A)
■
4-Port 100BASE-FX SwitchModule (3C96604M-FX-A)
■
4-Port 100BASE-TX SwitchModule (3C96604M-TX-A)
■
10-Port 10BASE-F SwitchModule (3C96610M-F-ST)
■
10-Port 10BASE-F-A SwitchModule (3C96610M-F-A)
■
FDDI CONC (MIC) (3C96612M-FC-A)
■
10-Port 10BASE-T/DAS FDDI SwitchModule (3C96612M-FF-A)
■
12-Port 10BASE-T SwitchModule (3C96612M-TP)
■
12-Port 10BASE-T SwitchModule (3C96612M-TP-A)
■
12-Port 10BASE-T/DAS FDDI SwitchModule (3C96614M-FTP-A)
■
16-Port Ethernet Backplane SwitchModule (3C96616M-BTP-A)
■
18-Port Fast Ethernet 100BASE-T SwitchModule (3C96618M-TX-A)
■
20-port 10BASE-F SwitchModule (3C96620M-F-ST)
■
20-Port 10BASE-F SwitchModule (3C96620M-F-A)
■
20-Port Ethernet 10BASE-T SwitchModule (3C96620M-TP-A)
■
24-Port 10BASE-T SwitchModule (3C96624M-TP-A)
■
24-Port Telco SwitchModule (3C96624M-TPL-A)
Page 22
1-4
C
HAPTER
1: I
NTRODUCTION
Supported
Management
Standards
ATM Backbone SwitchModule Architecture
CoreBuilder 5000 ATM Backbone SwitchModules support the standards
and MIBs shown in Table 1-1.
Ta b le 1 - 1
Standards
MIBs
Supported Standards and MIBs
ATM Forum UNI 3.0/3.1
ATM Forum LANE 1.0
IEEE 802.1D (Spanning Tree)
IEEE 802.1H (Translation)
IEEE 802.3
SNMP (RFC 1157)
Bridge MIB (RFC 1493)
MIB II (RFC 1213)
Interfaces MIB (RFC 1573)
ATM MIB (RFC 1695)
SONET MIB (RFC 1595)
ATM Forum LEC MIB
IANAIFTYPE MIB
3Com ISD MIB
This section describes the hardware components of the
CoreBuilder 5000 ATM Backbone SwitchModule.
Figure 1-1 identifies the significant hardware components of the ATM
Backbone SwitchModule.
CoreBuilder®5000
hub PacketChannel
backplane
Figure 1-1
ATM Backbone SwitchModule
LAN Emulation
Packet Swit ch
Processor
Management
Processor
Primary ATM
OC-3 card
Redundant ATM
OC-3 card
ATM Backbone SwitchModule Hardware Components
155Mbps OC-3
multimode fiber
155Mbps OC-3
multimode fiber
Page 23

ATM Backbone SwitchModule Architecture
The significant hardware components of the ATM Backbone
SwitchModule include:
■
Management Processor
■
Packet Switch Processor
■
Primary ATM OC-3 Card
■
Redundant ATM OC-3 Card
1-5
Management
Processor
Packet Switch
Processor
Primary ATM OC-3
Card
Redundant ATM OC-3
Card
The Management Processor performs processing functions that are not
time critical. Its main functions include:
■
Network management
■
ATM signalling
■
ATM LAN emulation client (LEC) functions
■
Bridging functions
■
Forwarding table maintenance
The Packet Switch Processor performs time-critical processing functions
such as packet forwarding.
The primary ATM OC-3 card provides a SONET PHY ATM interface
operating at 155 Mbps on OC-3, multimode fiber over an SC-type
connector. The maximum distance between links is 2 kilometers.
The redundant ATM OC-3 card is identical to the primary ATM OC-3
card. It becomes active in place of the primary ATM OC-3 card if any of
the following characteristics are lost:
■
Light
■
Frame
■
Cell delineation
■
ATM signalling
■
ILMI (Integrated Local Management interface) channel information
Page 24
1-6
C
HAPTER
1: I
NTRODUCTION
ATM Backbone SwitchModule Descriptions
Base Hardware
Configuration
This section describes the base and redundant hardware configurations
of the ATM Backbone SwitchModule.
Figure 1-2 shows the ATM Backbone SwitchModule with only the
primary ATM OC-3 card installed.
MOD-STAT
PACKETCHANNEL
RESET
Base Module (3C96602M-MOD)
TX
TX
ACTIVE
RX
ALARM
RX
6
6
0
1
D
-1
5
5
S
C
-M
M
Primary ATM OC-3 card
included with base
6602-MOD
Figure 1-2
ATM Backbone SwitchModule Base Configuration
Page 25
ATM Backbone SwitchModule Descriptions
1-7
Redundant Hardware
Configuration
Figure 1-3 shows the ATM Backbone SwitchModule with an optional
redundant ATM OC-3 card installed.
MOD-STAT
PACKETCHANNEL
RESET
Base Module (3C96602M-MOD)
includes primary ATM OC-3 card
TX
RX
6
6
0
1
D
-1
5
5
S
RX
TX
C
-M
M
ACTIVE
ALARM
TX
TX
ACTIVE
RX
ALARM
RX
6
6
0
1
D
-1
5
5
S
C
-M
M
Redundant ATMOC-3 card
(3C96601D-155SC-MM)
6602-MOD
Figure 1-3
See the
ATM Backbone SwitchModule with Redundant ATM OC-3 Card
CoreBuilder
and Reference
®
5000 ATM Backbone SwitchModule Quick Start
for how to install the redundant ATM OC-3 card.
Page 26

1-8
C
HAPTER
1: I
NTRODUCTION
PacketChannel Backplane Description
An ATM Backbone SwitchModule installed in the CoreBuilder 5000 hub
connects to the CoreBuilder 5000 PacketChannel backplane. There are
two kinds of PacketChannel backplanes:
■
Standard PacketChannel
— Supports packet-switching. When you
display hub information, the hub type is listed with the suffix -xP
(x may be A or B) to identify this backplane, and the backplane type
is listed as PacketChannel.
■
PacketChannel plus ATM Cell-Switching (SwitchChannel)
—
Supports both packet-switching and ATM cell-switching. When you
display hub information, the hub type is listed with the suffix -xC
(x may be A or B) to identify this backplane, and the backplane type
is listed as SwitchChannel.
Both the PacketChannel backplane and the packet-switching part of
the SwitchChannel backplane:
■
Support LAN-switching technology.
■
Switch 3.4 million packets per second.
■
Provide a 2 Gigabit-per-second bus.
■
Are designed as a passive bus that contains no active components
that can break down.
■
Occupy the third (upper) backplane slot of the CoreBuilder 5000
hub.
Slot Restrictions Per
Backplane
Ta b le 1 - 2
CoreBuilder
5000 Hub
17-Slot
SwitchModule Installation Per Backplane
Backplane Hub Type
PacketChannel
(Part Number 30-0433)
SwitchChannel
(Part Number 30-0430)
Some slot restrictions apply if the hub uses the SwitchChannel
backplane or if the hub contains no backplane in the third backplane
slot. Refer to Table 1-2 for information about ATM Backbone
SwitchModule installation restrictions and operation.
*
3C96017C-AP
3C96017C-BP
3C96017CH-AP
3C96017C-AC
3C96017C-BC
3C96017CH-AC
SwitchModule Installation and Operation
Install ATM Backbone SwitchModule in any slot in
the hub.
Install ATM Backbone SwitchModule in slots 1
through 8 or 13 through 17.
Page 27

PacketChannel Backplane Description
1-9
Ta b le 1 - 2
CoreBuilder
5000 Hub
10-Slot
7-Slot
17-Slot,
10-Slot, or
7-Slot
* To verify the hub type, enter the DMM command SHOW HUB.
SwitchModule Installation Per Backplane (continued)
Backplane Hub Type
PacketChannel
(Part Number 30-0432)
SwitchChannel
(Part Number 30-0434)
PacketChannel (Part
Number 30-0471)
No PacketChannel or
SwitchChannel
backplane
3C96010C-AP
3C96010C-BP
3C96010CH-AP
3C96010C-AC
3C96010C-BC
3C96010CH-AC
3C96007C-AP
3C96007C-BP
3C96007CH-AP
3C96017C-A
3C96017C-B
3C96010C-A
3C96010C-B
3C96007C-A
3C96007C-B
Refer to the
Operation Guide
*
CoreBuilder 5000 Integrated System Hub Installation and
for more information about CoreBuilder 5000 hub
backplanes.
SwitchModule Installation and Operation
Install ATM Backbone SwitchModule in any slot in
the hub.
Install ATM Backbone SwitchModule in slots 1
through 8.
Install ATM Backbone SwitchModule in any slot in
the hub.
Does not support ATM Backbone SwitchModule.
Contact 3Com Technical Support for information on
upgrading your CoreBuilder
®
5000 hub.
Page 28
1-10
C
HAPTER
1: I
NTRODUCTION
Sample ATM Backbone SwitchModule Configurations
Basic Configuration
This section illustrates three basic configurations of the ATM Backbone
SwitchModule:
■
Basic Configuration
■
Dual-Homing Configuration
■
Dual-Homing/Module Redundancy Configuration
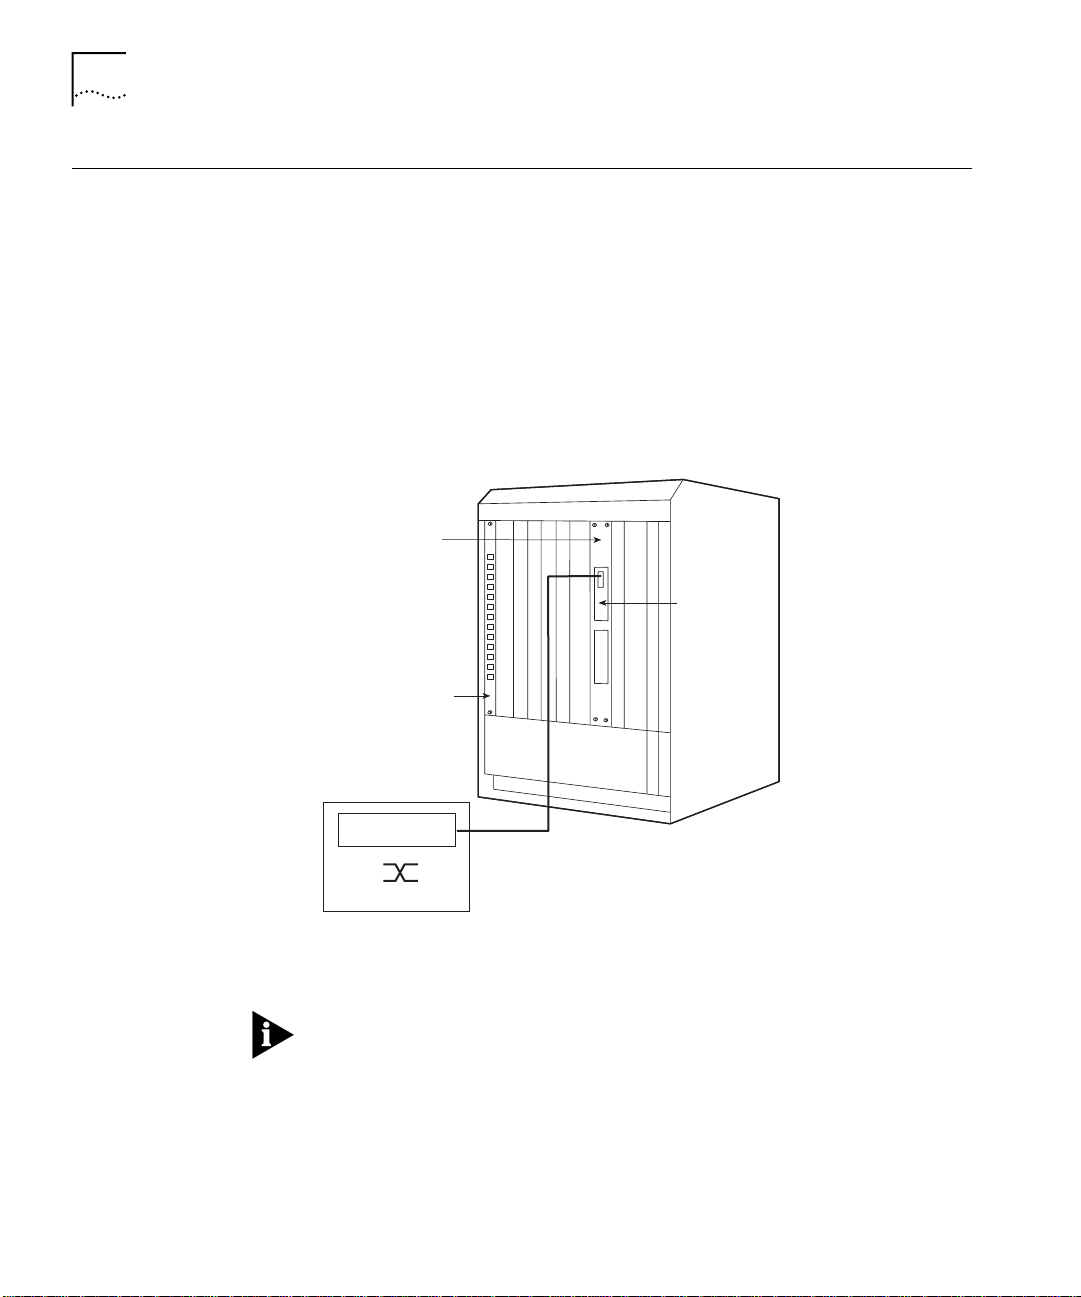
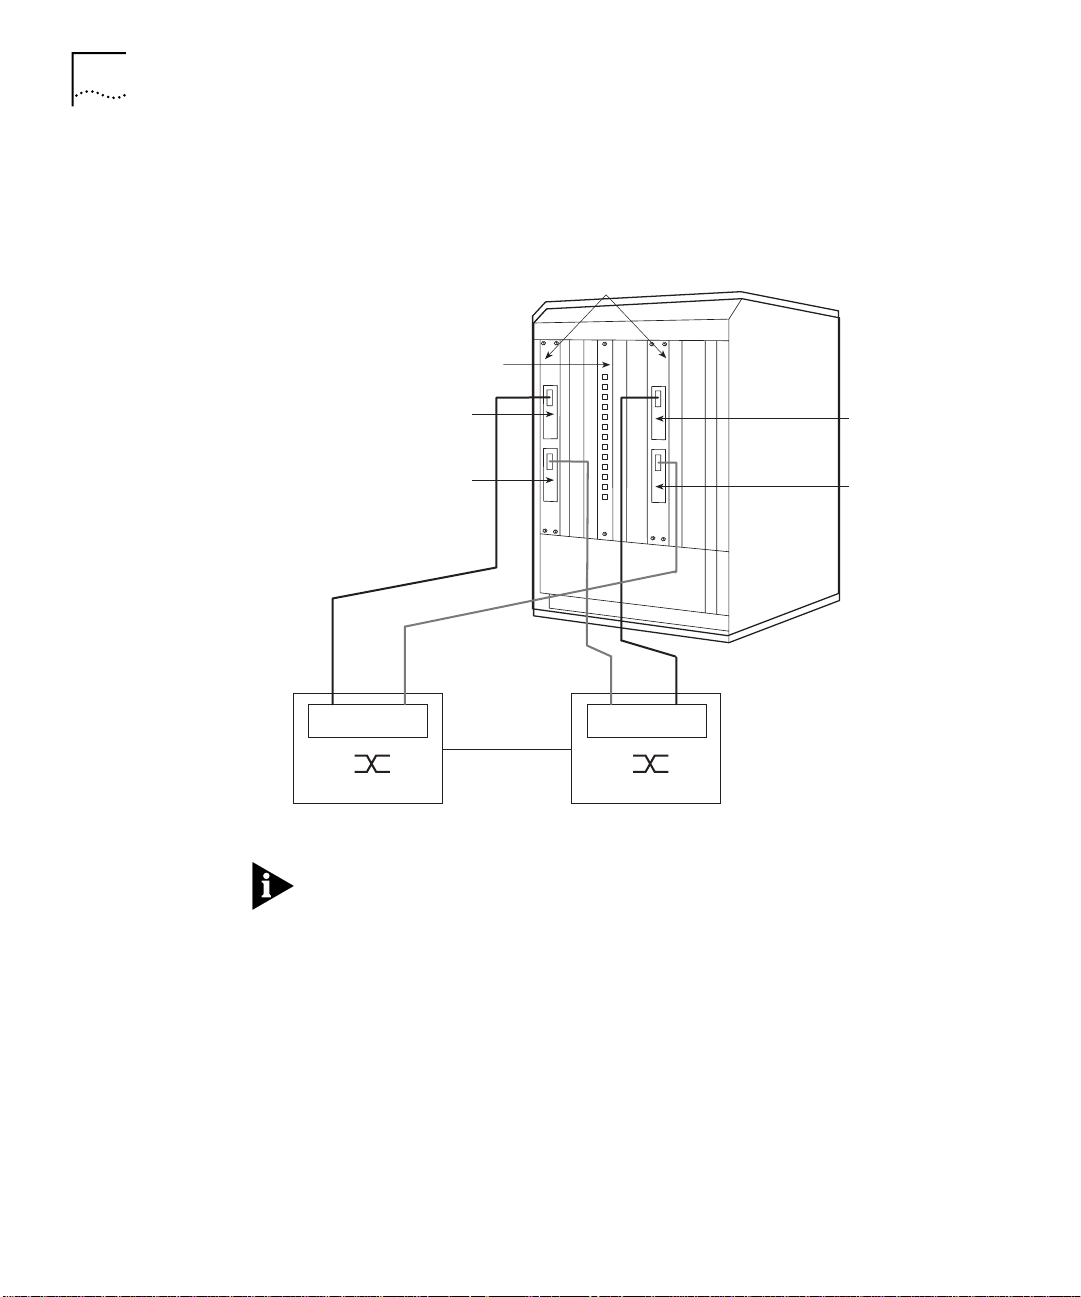
Figure 1-4 illustrates the basic configuration of an ATM Backbone
SwitchModule with only a primary ATM OC-3 card.
ATM Backbone
SwitchModule
Primary
ATM OC-3
LECs 1 to 64
Ethernet or FDDI
SwitchModule
ELANs 1 to 64
ATM Switch
Figure 1-4
Example Base Configuration
See Chapter 2, LAN Emulation Overview, for a description of LAN
Emulation components and operation.
Page 29

Sample ATM Backbone SwitchModule Configurations
1-11
Dual-Homing
Configuration
Figure 1-5 illustrates the dual-homing configuration of an ATM
Backbone SwitchModule with a redundant ATM OC-3 card.
ATM Backbone
SwitchModule
Primary
ATM OC-3
LECs 1 to 64
Redundant
ATM OC-3
Ethernet or FDDI
SwitchModule
ELANs 1 to 64
LECs 1 to 64
NNI
ATM Switch A
ELANs 1 to 64
ATM Switch B
Figure 1-5
Example Dual-Homing Configuration
If the loss of light, frame, or cell delineation is detected, the redundant
ATM OC-3 card becomes active and the primary ATM OC-3 card is
disabled.
Page 30
1-12
C
HAPTER
1: I
NTRODUCTION
Dual-Homing/Module
Redundancy
Configuration
Figure 1-6 illustrates the dual-homing/module redundancy configuration
of two ATM Backbone SwitchModules with redundant ATM OC-3
cards.
ATM Backbone
SwitchModules
Ethernet or FDDI
SwitchModule
Primary
ATM OC-3
LECs 1 to 32
Redundant
ATM OC-3
LECs 1 to 32
ELANs 1 to 64
ELANs 1 to 64
Primary
ATM OC-3
LECs 33 to 64
Redundant
ATM OC-3
LECs 33 to 64
NNI
ATM Switch A
Figure 1-6
Example Dual-Homing/Module Redundancy Configuration
ATM Switch B
The LECs in the example configuration of Figure 1-6 can be manually
distributed between the two ATM Backbone SwitchModules in any
combination.
Page 31

Sample ATM Backbone SwitchModule Configurations
The features of the dual-homing/module redundancy configuration
include:
■
Load balancing
LEC support is distributed manually across two ATM Backbone
SwitchModules
■
ATM PHY redundancy
On either ATM Backbone SwitchModule, if the loss of any critical
function is detected, the redundant ATM OC-3 card becomes active
and the primary ATM OC-3 card is disabled.
■
Module redundancy
Using spanning tree parameters, one ATM Backbone SwitchModule
assumes the LEC support of the other ATM Backbone SwitchModule
if the other ATM Backbone SwitchModule fails.
1-13
Refer to the
CoreBuilder 5000 SwitchModule User Guide
for
information on Spanning Tree parameters and configuration
information.
Page 32

1-14
C
HAPTER
1: I
NTRODUCTION
Page 33

2
LAN E
This chapter describes the LAN emulation technology that provides an
interface between Ethernet and FDDI packet-based networks and ATM
cell-based networks.
This chapter contains the following sections:
■
General Definition of LAN Emulation
■
LAN Emulation Components
■
LAN Emulation Data Exchange
■
LAN Emulation Connections
■
LAN Emulation Operation
This chapter provides a general overview of fundamental LAN
emulation concepts and terminology. For more detailed information on
LAN emulation, refer to ATM Forum specifications LANE 1.0.
MULATION
O
VERVIEW
General Definition
of LAN Emulation
LAN Emulation (LANE) provides an interface between traditional LANs
and ATM networks. LAN emulation is defined by ATM specifications
LANE 1.0.
An ATM emulated LAN conforms to IEEE 802.3 for Ethernet LANs.
The use of LAN emulation bridge allows you to use a high-speed ATM
backbone to connect existing (legacy) Ethernet LANs. Figure 2-1
illustrates the basic function of LAN emulation.
Page 34

2-2
C
HAPTER
2: LAN E
MULATION OVERVIEW
LAN emulation (LANE)
bridges
Legacy
LAN
Figure 2-1
LAN Emulation Function
ATM backbone
network
Legacy
LAN
The ATM Backbone SwitchModule provides a LAN emulation bridge between
an ATM network and a standard Ethernet-based SwitchModule (Figure 2-2).
SwitchModule
Figure 2-2
Virtual Bridge
(vbridge)
ATM Backbone SwitchModule Function
ATM
Backbone
SwitchModule
ATM
network
Emulated LAN
(ELAN )
The ATM Backbone SwitchModule accepts Ethernet and FDDI source
packets from the SwitchModule over the CoreBuilder 5000
PacketChannel backplane and converts the packets to ATM cells for
forwarding to the ATM backbone.
Conversely, ATM cells received by the ATM Backbone SwitchModule
from the ATM backbone are converted to Ethernet packets and sent
over the CoreBuilder 5000 PacketChannel backplane to the destination
SwitchModule.
Page 35

LAN Emulation Components
2-3
LAN Emulation
Components
General LANE
Components
Legacy LANs
This section identifies:
■
General LANE Components
■
ATM Backbone SwitchModule LANE Components
The major components of ATM LAN emulation are identified in
Figure 2-3.
ATM
network
LAN emulation
bridge with one
or more LAN
emulation
clients (LECs)
Figure 2-3
General LAN Emulation Components
LAN Emulation
Configuration Server (LECS)
LAN Emulation
Server (LES)
Broadcast and Unknown
Server (BUS)
LAN Emulation
Client (LEC)
Each of the major LAN emulation components are defined here.
LAN Emulation Client (LEC)
The LAN Emulation Client is the entity in an end system that performs
data forwarding, address resolution, and other control functions for a
single end-system within a single ELAN. Each LEC is identified by a
unique ATM address and is assigned to an ELAN in the ATM network.
LAN Emulation Configuration Server (LECS)
The LAN Emulation Configuration Server assigns individual LECs to a
particular emulated LAN (ELAN) by directing them to the LAN emulation
server that corresponds to the ELAN.
LAN Emulation Server (LES)
The LAN Emulation Server implements the control functions for a
particular ELAN. There is only one logical LES for each ELAN. A LEC that
belongs to a particular ELAN is controlled by the LES for the ELAN.
Page 36

2-4
C
HAPTER
2: LAN E
MULATION OVERVIEW
Broadcast and Unknown Server (BUS)
The Broadcast and Unknown Server is a multicast server that forwards
multicast and broadcast traffic to LECs within a specific ELAN. The BUS
also floods unknown unicast traffic to all LECs in the ELAN.
ATM Backbone
SwitchModule LANE
Components
Implementation of the LAN emulation components in the ATM
Backbone SwitchModule is illustrated in Figure 2-4.
ATM Backbone SwitchModule
Ethernet or FDDI
SwitchModule
Virtual bridge
(Vbridge)
Figure 2-4
Bridgeport-LEC
(up to 64)
ATM Backbone SwitchModule LANE Components
ATM OC-3 card
ATM
network
LANE
service
Emulated LAN
(ELAN)
In addition to the standard LANE service components (see Figure 2-3),
the ATM Backbone SwitchModule includes the following components:
Bridgeport-LEC
You define up to 64 bridgeport-LECs for each ATM Backbone
SwitchModule. A bridgeport-LEC is both a standard ATM LEC that you
assign to an emulated LAN and a bridgeport that you assign to a virtual
bridge.
Page 37

LAN Emulation Data Exchange
2-5
Virtual Bridge (vbridge)
You create virtual bridges on CoreBuilder 5000 SwitchModules. You
assign each bridgeport-LEC to a vbridge on a SwitchModule in the
CoreBuilder 5000 hub.
Emulated LAN (ELAN)
You assign each bridgeport-LEC to an ELAN in the ATM network. An
ELAN is a logical LAN grouping of LECs within an ATM network.
LAN Emulation
Data Exchange
Protocol Stacks
Existing applications
Network interface
driver
LAN emulation
AAL5
ATM
This section identifies important characteristics of data exchange
between a SwitchModule and an ATM network.
The LAN emulation protocol stacks used in the exchange of data
between a SwitchModule-based LAN and ATM host are shown in
Figure 2-5.
ATM sw i tchATM hos t
and Ethernet SwitchModule
Bridging
LAN
emulation
MAC
ATM
AAL5
ATM
Ethernet/FDDI hostATM Backbone SwitchModule
Existing applications
Network interface
driver
MAC
Physical layer
Physical Physical
Figure 2-5
LAN Emulation Protocol Stacks
Physical
Physical layerPhysical
Page 38

2-6
C
HAPTER
2: LAN E
MULATION OVERVIEW
Packets Versus Cells
Padding and
error correction
Segmentation/
Reassembly
Cells
The ATM Backbone SwitchModule converts Ethernet- and
FDDI-originated packets to and from ATM cells.
Figure 2-6 illustrates the conversion of SwitchModule packets to and
from ATM cells.
SwitchModule packet
48 Octets
53 Octets
Figure 2-6
48 Octets
HDRHDR
53 Octets
HDR = ATM Cell Header (5 octets)
HDR
Converting SwitchModule Packets to and from ATM Cells
48 Octets
53 Octets
From
ATM
To AT M
Page 39

LAN Emulation Connections
2-7
LAN Emulation
Connections
Control VCCs
LAN emulation uses VCCs (virtual channel connections) to provide
communications between a LEC and the LANE service.
There are two types of VCCs:
■
Control VCCs
■
Data VCCs
Control VCCs consist of the following three types:
■
Configuration Direct VCC
— A bidirectional point-to-point VCC
from the LEC to the LECS
■
Control Direct VCC
■
Control Distribute VCC
— A bidirectional VCC from the LEC to the LES
— A unidirectional VCC from the LES to
the LEC; typically, a point-to-multipoint connection from the LES to
multiple LECs
Figure 2-7 illustrates the function of the three types of Control VCCs in
ATM Backbone SwitchModule LAN emulation.
ATM Backbone
SwitchModule
LAN Emulation Server
(LES)
Control Direct VCC
LAN Emulation
Configuration Server
(LECS)
Figure 2-7
Control Distribute VCC
Configuration Direct VCC
BridgeportLEC
Control VCCs in ATM Backbone SwitchModule LAN Emulation
Page 40

2-8
C
HAPTER
2: LAN E
MULATION OVERVIEW
Data VCCs
Data VCCs consist of the following three types:
■
Data Direct VCC —
A bidirectional point-to-point VCC set up
between two LECs that want to exchange data
■
Multicast Send VCC
— A bidirectional point-to-point VCC between
the LEC and the BUS
■
Multicast Forward VCC
— A unidirectional VCC from the BUS to
the LEC; typically, a point-to-multipoint connection from the BUS to
multiple LECs
Figure 2-8 illustrates the function of the three basic types of Data VCCs
in ATM Backbone SwitchModule LAN emulation.
ATM Backbone
Broadcast and Unknown
Server
(BUS)
Multicast Forward VCC
ATM LE C
Multicast Send VCC
Data Direct VCC
SwitchModule
BridgeportLEC
Figure 2-8
Data VCCs in ATM Backbone SwitchModule LAN Emulation
Page 41

LAN Emulation Operation
2-9
LAN Emulation
Operation
Initialization
This section describes the simplified operation of a LEC in a LAN
emulation configuration. LEC operation is defined by the protocols of
the LAN Emulation User-Network Interface (LUNI).
LUNI protocol defines each stage of operation for a LEC. The major
stages of operation, defined in this section, are:
■
Initialization
■
LECS Connection
■
Configuration
■
Joining
■
BUS Connection
■
Data Movement
In the initial state, the LEC configuration is initialized from nonvolatile
storage or set to default values.
The next stage of LEC operation depends on the LANE configuration
mode of the LEC:
■
Manual configuration mode
— The LEC proceeds directly to the
Joining stage and uses a locally configured LES ATM address.
■
Automatic configuration mode
— The LEC proceeds to the LECS
Connection stage and attempts to contact the LECS to obtain its
configuration, including ELAN/LES assignment.
Page 42

2-10
C
HAPTER
2: LAN E
MULATION OVERVIEW
LECS Connection
Configuration
The LEC must determine the ATM address of its LECS and establish a
connection to the LECS. The LEC attempts each of the following
methods, in the order provided, to connect to its LECS:
Uses a locally configured LECS ATM address.
1
Queries the ILMI Service Registry MIB of the attached ATM switch for
2
one or more LECS ATM addresses.
Uses a predefined “well-known” LECS ATM address.
3
The use of another LANE 1.0 method of LECS connection, a PVC
(Permanent Virtual Circuit) connection over VPI/VCI 0/17 (Virtual Path
Identifier/Virtual Circuit Identifier), is not supported by the ATM
Backbone SwitchModule.
The LEC proceeds to the Configuration stage when it establishes a
connection to the LECS.
During the configuration stage, the LEC:
Sends a Configuration Request, containing identifying information
1
about itself, to the LECS.
Receives a Configuration Response from the LECS containing the ATM
2
address of the LES to which the LEC is assigned, as well as emulated
LAN parameters such as ELAN type, frame size, and ELAN name.
Joining
During the Joining stage, the LEC:
Connects to the LES and sends a Join Request containing LANE
1
parameter settings that were locally configured (manual mode) or
obtained from the LECS (automatic mode).
Receives a Join Response from the LES indicating whether the LEC is
2
accepted onto the emulated LAN controlled by that LES.
Page 43

LAN Emulation Operation
2-11
BUS Connection
Data Movement
During the BUS Connection stage, the LEC:
Sends an LE-ARP (LAN Emulation-Address Resolution Protocol) request
1
to the LES containing the target MAC address FF-FF-FF-FF-FF-FF
(broadcast MAC address).
The LES returns an LE-ARP response containing the ATM address of the
emulated LAN’s BUS.
Establishes connections to the BUS for transmitting and receiving
2
multicast and unknown unicast traffic.
In the Data Movement stage, the LEC:
■
Sends and receives multicast MAC frames over the connections to
the BUS.
■
Sends and receives unknown unicast MAC frames (unicast MAC
frames for which the corresponding ATM address on the emulated
LAN is unknown) over the connections to the BUS. At the same
time, the LEC conducts an LE-ARP exchange to associate the MAC
address with the ATM address of another station on the
emulated LAN.
■
After a MAC/ATM address binding is resolved using LE-ARP,
establishes a Data Direct VCC to that ATM address. After the Data
Direct VCC is set up between two LECs, a Flush request is sent via
the bus to signal to the receiving LEC to stop sending Data via the
bus and to start sending data over the established Data Direct VCC.
The receiving LEC responds with a Flush response via the bus to
clear the bus channel. Any unicast frames received from the ATM
address from the time the LEC sends out the Flush request until the
time it receives the Flush response are buffered. The buffered frames
are sent out over Data Direct VCC after the LEC receives the Flush
command instead of over the bus.
■
Disconnects a Data Direct VCC that remains idle for a specified
timeout period.
Page 44

2-12
C
HAPTER
2: LAN E
MULATION OVERVIEW
Page 45

C
ONFIGURING THE
ATM
3
Configuration Tools
B
ACKBONE
This chapter provides procedures for configuring the CoreBuilder®5000
ATM Backbone SwitchModule.
This chapter contains the following sections:
■
Configuration Tools
■
Setting Up DMM Access
■
Configuration Process Overview
■
Configuring LAN Emulation Parameters
■
Configuring ATM OC-3 Card Redundancy
■
Configuring IGMP Snooping Parameters
This section identifies the management tools that are available for you
to manage CoreBuilder 5000 ATM Backbone SwitchModules. ATM
Backbone SwitchModule configuration tools include:
S
WITCH
M
ODULE
■
3Com CoreBuilder 5000 Distributed Management Module (DMM)
(includes Advanced DMM)
■
Advanced Management Tools
Page 46

3-2
C
HAPTER
3: C
ONFIGURING THE
ATM B
ACKBONE SWITCHMODULE
Distributed
Management Module
Advanced
Management Tools
The CoreBuilder 5000 Distributed Management Module (DMM) and
Advanced DMM (ADMM) provide commands that allow you to
configure and monitor the ATM Backbone SwitchModule.
The ATM Backbone SwitchModule requires DMM/ADMM Version v5.20
or later.
DMM access to the ATM Backbone SwitchModule is obtained in either
of two ways:
■
Connect a terminal directly to the console port of the DMM
■
TELNET to the IP address of the DMM from which the ATM
Backbone SwitchModule is accessible
Refer to Setting Up DMM Access later in this chapter for more
information.
This section identifies the advanced management tools that are
available for managing CoreBuilder 5000 ATM Backbone
SwitchModules, including:
■
Transcend Network Control Services for UNIX
■
Transcend Network Management Software for Windows
■
Third-Party SNMP-Based Tools
Transcend Network Control Services for UNIX
3Com Transcend
®
Network Control Services for UNIX provides a suite
of advanced graphical tools for network management. Figure 3-1
illustrates the Transcend UNIX graphical tools you can use to configure
CoreBuilder 5000 ATM Backbone SwitchModules.
Page 47

Configuration Tools
3-3
Operating systems
Network management platforms
3Com management
application
Tools accessible
from network management
platform Tools menu
Figure 3-1
UNIX Tools for Configuring ATM Backbone SwitchModules
Transcend Network Control Services for UNIX applications are accessed
by:
■
Selecting the application directly from the Tools menu of the
network platform (for example, HP OpenView)
■
Selecting a launch point from one application to another
You can access VLAN Manager from the network platform Tools menu
only.
HP OpenView, SunNet Manager
Transcend® Network Control Services for UNIX
CoreBuilder® 5000
Manage r
Alternative
launch point
SunOS, Solaris, HP
Devi ce
View
Manage men t
Alternative
launc h poin
Bridge
t
VLAN
Manage r
Transcend Network Management Software for Windows
3Com Transcend Network Management Software for Windows provides
a suite of advanced graphical tools for network management.
Figure 3-2 illustrates the Transcend Windows tools that you can use to
configure CoreBuilder 5000 ATM Backbone SwitchModules.
Page 48

3-4
C
HAPTER
3: C
ONFIGURING THE
ATM B
ACKBONE SWITCHMODULE
Opera ting sys tems
Network management platforms
3Com ma nagem ent
application
Tools accessible
from n et work ma nage men t
platform Tools menu
Devi ce V iew
(embed ded)
Figure 3-2
Windows Tools for Configuring ATM Backbone SwitchModules
Transcend® Network Management Software for Windows
CoreBu ild er® 5000
Manager
Windows 95, Win dows NT
HP Op enVi ew f or W in dows
Bridge
Mana ge me nt
Alternative
launch poi nt
Transcend Network Management Software for Windows applications
are accessed by:
■
Selecting the application directly from the Tools menu of the
Network Platform (for example, HP OpenView)
VLAN
Manager
■
Selecting a launch point from one application to another
You can access VLAN Manager from the Windows NT Tools menu only.
Third-Party SNMP-Based Tools
After you set up the DMM access, you can use any SNMP network
manager for management (if the Management Information Base (MIB)
is correctly installed on your network management station).
To manage the ATM Backbone SwitchModule with a network manager
purchased from another vendor, verify that you have the correct MIB.
Contact your network supplier for advice.
Page 49

Setting Up DMM Access
3-5
Setting Up DMM
Access
Setting Up Direct
Terminal Access to
the DMM
Configuring TELNET
Access to the DMM
This section provides procedures you must follow to set up access to
DMM management tools.
You can access the DMM by:
■
Direct terminal access
■
TELNET access
Refer to the
Guide
for procedures to set up a direct terminal connection to the
CoreBuilder 5000 Distributed Management Module User
DMM.
You can configure in-band access to the DMM, which allows you to
manage the CoreBuilder 5000 hub from a remote terminal or SNMP
manager such as the 3Com Transcend Network Control Services
application.
The CoreBuilder 5000 SwitchModules have embedded network
connectivity to the DMM across the hub management channel.
Be sure that TELNET Access to the DMM is established through the
CoreBuilder 5000 SwitchModule or another module in the hub.
For procedures on setting up Telnet access to the DMM, see the
CoreBuilder 5000 SwitchModule User Guide
.
Page 50

3-6
C
HAPTER
3: C
ONFIGURING THE
ATM B
ACKBONE SWITCHMODULE
Configuration Process Overview
Configuration
Components
This section provides an overview of the following configuration
information:
■
Configuration Components
■
Configuration Defaults
ATM Backbone SwitchModule configuration consists of three main
components, described in the following sections:
LAN Emulation Configuration
Defines up to 64 LECs (LAN Emulation Clients) and assigns each to a
unique ELAN. LEC configuration also involves defining various ELAN
parameters for created LECs.
Initial LEC configuration requirements are specified in Configuring LAN
Emulation Parameters later in this document.
Bridge Configuration
After it is created, a LEC must be assigned to an existing SwitchModule
vbridge and can be configured as a normal SwitchModule bridge port,
except that the SwitchModule never elects a bridgeport-LEC as master
bridge port.
See the
CoreBuilder 5000 SwitchModule User Guide
information on master bridge ports
.
for more
Initial bridge configuration requirements are specified in Configuring
LAN Emulation Parameters later in this chapter. For a complete list of
configurable bridging parameters, see the
SwitchModule User Guide
.
CoreBuilder 5000
Page 51

ATM Configuration
Configuration Process Overview
3-7
CAUTION:
Changes to the ATM parameters can cause problems with
system operation. Only qualified ATM service personnel should attempt
to modify these parameters. We recommend that you do not attempt
to change these parameters.
Various ATM parameters are available to control ATM operating
characteristics but, with the exception of the UNI Version parameter,
ATM parameters typically do not require modification.
The default UNI Version of the ATM Backbone SwitchModule is 3.0.
If necessary, use the following command to change the UNI Version to
match that of the ATM switch:
CB5000> set atm slot uni_version version
The valid UNI Version settings are:
■
3_0
■
3_1
See the following for more information on ATM configuration:
■
ATM Backbone SwitchModule Command Reference for
ATM - re late d
DMM commands and parameters
■
DMM Commands Guide
for commands and examples
Configuration
Defaults
■
ATM Forum specifications UNI 3.0/3.1 and LANE 1.0
After installing the ATM, the following default configuration parameters
are in effect:
■
The number of LECs on the module is set to 8.
■
LE_ARP Quiet Time is set to 5 seconds.
■
UNI version is set to 3_0.
■
LEC 1 is set to the following parameter values:
Configuration mode is Automatic.
■
Interface mode is Enabled.
■
ELAN Name is Admin.
■
Vbridge assignment is vbridge_1.
■
Page 52

3-8
C
HAPTER
3: C
ONFIGURING THE
ATM B
ACKBONE SWITCHMODULE
■
LECs 2 through 8 are set to the following parameter values:
Configuration mode is Manual.
■
Interface mode is Disabled.
■
ELAN Name is None.
■
Vbridge assignment is Unassigned.
■
Configuring LAN Emulation Parameters
Automatic
Bridgeport-LEC
Configuration
Mode
Manual
Bridgeport-LEC
Configuration
Mode
The procedure you use to configure the LAN Emulation parameters for
a LAN Emulation Client depends on whether the LEC is configured for
automatic or manual configuration.
By default, the configuration mode of LEC 1 of the ATM Backbone
SwitchModule is set to Automatic. Upon initial power-on, a LEC that is
set to Automatic configuration mode attempts to establish connection
with the LECS according to established autoconfiguration guidelines.
Refer to Chapter 2, LAN Emulation Overview, for more information.
After the automatic bridgeport-LEC configuration is complete, you must
assign the LEC to a vbridge. Only one bridgeport LEC from the same
ATM Backbone SwitchModule may be assigned to each virtual bridge.
In this example, LEC 1 of a ATM Backbone SwitchModule in slot 4 is
assigned to vbridge 2:
CB5000 > set bridge_port 4.1 vbridge 2
Before the LEC can exchange data, a bridgeport on the Ethernet or
FDDI SwitchModule must also be assigned to the vbridge.
If the module cannot successfully autoconfigure, use the following
procedure to manually configure the required initial parameters.
Configure initial ATM Backbone SwitchModule parameters using the
1
commands in the following example (configuring LEC 1 on a module in
slot 4):
CB5000 >set bport_lec 4.1 mode disable
CB5000>set bridge_port 4.1 vbridge 2
CB5000>set bport_lec 4.1 config_mode manual
CB5000>set bport_lec 4.1 les_atm_address <address>
CB5000>set bport_lec 4.1 elan_name <name>
CB5000 >set bport_lec 4.1 mode enable
(may not be required)
Page 53

Configuring ATM OC-3 Card Redundancy
Save the settings as follows:
2
CB5000 > save all
Repeat steps 1 and 2 for each LEC you require.
3
Assign a unique LES address for each bridgeport LEC on the same
4
module. If a bridgeport LEC has an address configured that is a
duplicate of another bridgeport LEC, it never joins the ELAN.
For a complete list of optional DMM LAN Emulation commands and
parameters, see the
Reference
. For descriptions and examples of the LAN Emulation
commands, refer to the
ATM Backbone SwitchModule Command
DMM Commands Guide
.
3-9
Verifying
Bridgeport-LEC
Status
Configuring ATM
OC-3 Card
Redundancy
After Automatic or Manual LEC configuration, use the SHOW
BPORT_LEC STATUS command to verify that the bridgeport-LEC is
successfully joined to the intended ELAN.
If you install a second ATM OC-3 card on your ATM Backbone
SwitchModule, use the following procedure to configure the module
for ATM OC-3 card redundancy:
Use the following command to designate one of the two ATM OC-3
1
cards as the active ATM OC-3 card.
CB5000 > set mo dule <slot>.1 phy_selection <1 or 2>
The ATM OC-3 card near the top of the ATM Backbone SwitchModule
is 1. The lower ATM OC-3 card is 2.
The ATM OC-3 card you do not make active becomes the redundant
ATM O C- 3 c ard.
Use the following command to enable the ATM Backbone
2
SwitchModule to automatically make the redundant ATM OC-3 card
active if the primary ATM OC-3 card fails (or performance degrades
significantly):
CB5000 > set module <slot> .1 phy_autom atic_failover enable
Page 54

If you disable automatic failover and a primary ATM OC-3 card failure
occurs, you must use the command in step 1 to make the redundant
ATM OC-3 card active.
There is a configurable feature called the loss of signalling delay. The
default is 0 seconds, and the maximum is 60 seconds. PHY failover can
take from 0 through 60 seconds when the automatic failover feature is
enabled. The command is:
CB5000 > set atm <slot>.1 loss_of_si gnalling_dela y <seconds>
Configuring IGMP Snooping Parameters
IGMP snooping must be enabled on both the ATM backbone
SwitchModule and the vbridge on which you plan to use IGMP
snooping.
To enable IGMP snooping on the ATM Backbone SwitchModule:
Before you can enable IGMP snooping, you must set up an IP address
for each vbridge that is configured on the ATM Backbone
SwitchModule. You must setup a subnet mask before you can assign
an IP address. The correct commands are:
SET IP SUBNET_MASK <FF.FF.FF>.00 VBRIDGE 1
SET IP IP_ADDRESS <XXX.XXX.XX>.00 VBRIDGE 1
SAVE ALL
SHOW IP
Enable IGMP snooping on the ATM Backbone SwitchModule.
1
(This saves the address parameters for vbridge 1.)
(This displays the IP address you just created for vbridge 1.)
For example, the following command enables IGMP snooping on an
ATM Backbone SwitchModule in slot 9:
CB5000 > set module 9.1 igmp_snoop ing enable
Enable IGMP snooping on a vbridge configured on the ATM Backbone
2
SwitchModule.
For example, the following command enables IGMP snooping on
vbridge 1 on the ATM Backbone SwitchModule in slot 9:
CB5000 > set vbridge 1 igmp_snooping mode enable
Page 55

Configuring IGMP Snooping Parameters
View the status of IGMP snooping on a vbridge configured on the ATM
3
backbone SwitchModule.
For example, the following command displays the status of IGMP
snooping on vbridge 1 on the ATM Backbone SwitchModule in slot 9:
CB5000 > show vbridge 1 igmp _snooping status
Save the parameter changes you made.
4
For example, the following command saves the parameter changes you
made to the ATM Backbone SwitchModule in slot 9:
CB5000 > save all
This command only saves the parameter changes in RAM. To actually
effect the changes on the ATM Backbone SwitchModule, you must
reset the module.
Reset the ATM Backbone SwitchModule to enable IGMP snooping on
5
the SwitchModule and the vbridge.
For example, the following command resets the ATM Backbone
SwitchModule in slot 9, thus enabling IGMP snooping on the
SwitchModule and vbridge 1:
CB5000 > reset module 9.1
3-11
CAUTION:
Do not use the
RESET HUB
command in this instance.
Parameters saved in NVRam may not get updated if you use the
command. Use only the
HUB
RESET MODULE
command in this
instance.
RESET
Page 56

3-12
C
HAPTER
3: C
ONFIGURING THE
ATM B
ACKBONE SWITCHMODULE
Page 57

S
TATUS
M
ONITORING AND
4
Using DMM/ADMM Commands
S
TATISTICS
This chapter describes the tools that you can use to monitor module
status and gather statistics that help you to analyze the
CoreBuilder
performance.
This chapter contains the following sections:
■
Using DMM/ADMM Commands
■
Using Graphical Interface Tools
You can use the following DMM/ADMM commands to display
configuration and status information about the ATM Backbone
SwitchModule and its ports.
■
SHOW VBRIDGE
■
SHOW MODULE
®
5000 ATM Backbone SwitchModule and network
■
SHOW BRIDGE_PORT
■
SHOW COUNTER BRIDGE_PORT
■
SHOW ATM
■
SHOW BPORT_LEC
■
SHOW SONET
■
SHOW IGMP SNOOPING
See the
Reference
a full list of parameters for each command.
CoreBuilder 5000 ATM Backbone SwitchModule Command
for a complete list of available DMM/ADMM commands and
Page 58

4-2
C
HAPTER
4: S
TATUS MONITORING AND STATISTICS
SHOW VBRIDGE
Use the SHOW VBRIDGE command to display the following vbridge
configuration information about the ATM Backbone SwitchModule:
■
General vbridge configuration information
■
Detailed vbridge configuration information
■
IGMP snooping information on a vbridge
Displaying General Vbridge Configuration Information
The following command shows general vbridge configuration
information about an ATM Backbone SwitchModule in a
CoreBuilder 5000 hub:
You do not have to enter no_verbose to see the general information.
CB5000>
VBridge Bridge Identifier Ports Spanning Tree General Information
-------- ----------------------- --- ---- ------- ------ --- ------------- --1 80-00-08-00-8f-20-e5-f8 41 ENABLED vbridge_1
2 80-00-08-00-8f-11-c5-fa 2 ENABLED vbr idge_2 (r oot)
11 80-00-08-00-8f-11-2e-1b 3 ENABLED vbridge_11 (root)
show vbridge all configuration no_verbose
Page 59

Using DMM/ADMM Commands
4-3
Displaying Detailed Vbridge Configuration Information
The following command shows detailed vbridge configuration
information about an ATM Backbone SwitchModule in a
CoreBuilder 5000 hub:
CB5000 > show vbridge all configuration verbose
Interface Number: 4
Interface Mode: ENABLED
Aging Time: 300
Learned Entry Discards: 0
Spanning Tree Priority: 32768
Spanning Tree Bridge Max Age: 20.00
Spanning Tree Bridge Forward Delay: 15.00
Spanning Tree Bridge Hello Time: 2.00
Spanning Tree Hold Time: 1.00
Spanning Tree Max Age: 20.00
Spanning Tree Hello Time: 2.00
Spanning Tree Forward Delay: 15.00
Designated Root: 80-00-00-02-9c-06-3b-40
Root Cost: 102
Root Port: 289
Topology Changes: 302
Time Since Topology Changed: 1358.83
IGMP Snooping Mode: ENABLED
Page 60

4-4
C
HAPTER
4: S
TATUS MONITORING AND STATISTICS
Displaying IGMP Snooping Vbridge Information
The following command shows IGMP snooping status information for
vbridge 11 configured on an ATM Backbone SwitchModule installed in
the hub:
CB5000 > show v bridge 11 igmp_snooping status
IGMP Snooping Status of VBridge 11
-----------------------------------------------------------IGMP Snooping ENABLED
IGMP Querying ENABLED
Port Aging Time (seconds) 300
Querier IP Address 0.0.0.0
Querier State DISABLED
Querier Listen Time (seconds) 120
Querier Interval 60
Sent Query Packets 0
Group Aging Time (seconds) 300
Table 4-1 lists the other options you can use with the SHOW VBRIDGE
<VBRIDGE_NUMBER> IGMP_SNOOPING
that appears:
command and the information
Ta b le 4 - 1
Option Information Shown
bridge_port IGMP snooping bridge port information for the vbridge
mac IGMP snooping mac address information for the
ip IGMP snooping IP address information for the vbridge
router_ports IGMP snooping router ports information for the vbridge
Other Vbridge IGMP Snooping Options
<number>
vbridge <number>
<number>
<number>
Page 61

Using DMM/ADMM Commands
4-5
SHOW MODULE
Use the SHOW MODULE command to display module-level information
about the ATM Backbone SwitchModule.
The following command shows detailed module information about an
ATM Backbone SwitchModule in slot 4 of a CoreBuilder 5000 hub:
CB5000 > show module 4.1 verbose
Slot Module Version Networ k Genera l Information
------ ------------ ------- --------- -------------------
04.01 6602M-MOD 3.0 N/A
6602M-MOD: ATM Backbone SwitchModule
Boot Version: v2.05
RMON Analyzer: NONE
CPU RAM Size (Mb): 8
FLASH Memory (Mb): 4
Packet Memory (Mb): 16
Shared Memory (Mb): 2
Descriptor Memory (Mb): 1
SAR Control Memory (Kb): 64
Address Cache Entries: 1024
PHY Configuration Select: 2
PHY Current Select: 2
PHY Automatic Failover: ENABLED
IGMP Snooping: ENABLED
Page 62

4-6
C
HAPTER
4: S
TATUS MONITORING AND STATISTICS
SHOW BRIDGE_PORT
Use the SHOW BRIDGE_PORT command to display:
■
General status information for all bridge ports on the module
■
Detailed information about one bridge port on the module
Displaying General Status Information
The following command displays information about all defined bridge ports
(LECs) on an ATM Backbone SwitchModule in slot 4 of a CoreBuilder 5000
hub:
CB5000> show bridge_port 4.all
Bridge Port Display for Module 6602M-MOD:
BPort I/F Status St p State Vbri dge Logical General In fo
----- ------- --- -- ------- ------ -- ------- -- ----------
04.01 ENABLED FORWARDING 11 73
04.02 ENABLED BLOCKED 1 73
04.03 DISABLE D DISABLED UNAS SGN 73
04.04 DISABLE D DISABLED UNAS SGN 73
04.05 DISABLE D DISABLED UNAS SGN 73
04.06 DISABLE D DISABLED UNASSGN 73
Page 63

Using DMM/ADMM Commands
4-7
Displaying Detailed Information
The following command displays information about bridge port 2 on an
ATM Backbone SwitchModule in slot 4 of a CoreBuilder 5000 hub:
CB5000> sh ow bridge_port 4.2 verbose
Bridge Port Display for Module 6602M-MOD:
BPort I/F Status St p State Vbri dge Logical General In fo
----- --------- - -- ------- ------ -- ------- ----- -------
04.02 ENABLED BLOCKED 1 73
MAC Address: 08-00-8f-40-a5-41
Port Name:
Bridge Port STP Mode: NORMAL
Interface Mode: ENABLED
Spanning Tree Priority: 128
Spanning Tree Path Cost: 6
Spanning Tree Forward Transitions:0
Designated Root: 80-00-00-02-9c-06-3b-40
Designated Cost: 102
Designated Bridge: 80-00-08-00-8f-13-e0-d3
Designated Port: 80-79
RMON Monitor Supported: NOT_SUPPORTED
RMON Monitor Source: DISABLED
Page 64

4-8
C
HAPTER
4: S
TATUS MONITORING AND STATISTICS
SHOW COUNTER
BRIDGE_PORT
Use the SHOW COUNTER BRIDGE_PORT command to display statistics
for a bridge port on the module.
The following command displays statistics about bridge port 2 on an
ATM Backbone SwitchModule in slot 4 of a CoreBuilder 5000 hub:
CB5000> show counter bridge_port 4.2 interface
Interface Statistics for Module 6602M-MOD Bridge Port 4.2
------------------------------------------------------------Bridge Received Frames 551932
Bridge Received Discards 0
Bridge Transmitted Frames 1
Bridge Delay Exceeded Discards 0
Received Octets 403424960
Received Unicast Packets 551 942
Received Non-Unicast Packets 551 932
Received Discards 23
Received Errors 0
Received Unknown Protocols 0
Transmitted Octets 498
Transmitted Unicast Packets 4
Transmitted Non-Unicast Packets 1
Transmitted Errors 0
% Non-Unicast Packets 50.0%
% Utilization 0.0%
% Error Frames 0.0%
The following command displays IGMP snooping statistics about bridge
port 2 on an ATM Backbone SwitchModule in slot 4 of a
CoreBuilder 5000 hub:
CB5000 > show count bridge_port 4.2 igmp_snooping
IGMP Snooping Statistics for Module 6602M-MOD Bridge Port 4.2
------ ----------- ----------- ---------- ----------- ----------Transmitted Report Packets 0
Transmitted Query Packets 0
Transmitted Join Packets 0
Transmitted Leave Packets 0
Received Report Packets 0
Received Query Packets 0
Received Join Packets 0
Received Leave Packets 0
Page 65

Using DMM/ADMM Commands
4-9
SHOW ATM
ATM Interface
Parameters
Use the SHOW ATM command to display the following ATM
information:
■
ATM Interface Parameters
■
ATM ILMI Configuration
■
ATM Q93b Parameters
■
ATM QSAAL Parameters
■
ATM Signal Configuration
■
ATM Statistics
■
ATM Traffic Description
■
ATM VCCs
The following command displays information about ATM interface
parameters for an ATM Backbone SwitchModule in slot 4 of a
CoreBuilder 5000 hub:
CB5000 > show atm 4 interface
Slot Module Version Networ k Genera l Information
------ ------------ ------- --------- ------------------04 6602M-MOD 3.0 N/A
Current Next Re set
---------- ---------- ---Max VCCs: 512 512
Active VPI/VCI Bits: 0/9 0/9
Number of LECs: 8 8
UNI Version: 3.0 3.0
LEARP Quiet Time (secs) 5 Loss of Signal Delay: 0 0
Neighbor IP Address: 192.83.237.19
Neighbor Interface Name: <none>
Page 66

4-10
C
HAPTER
4: S
TATUS MONITORING AND STATISTICS
ATM ILM I
Configuration
ATM Q9 3b
Parameters
The following command displays information about the ATM ILMI
configuration for an ATM Backbone SwitchModule in slot 4 of a
CoreBuilder 5000 hub:
CB5000 > show atm 4 ilmi_configuration
Slot Module Version Networ k Genera l Information
------ ------------ ------- --------- ------------------04 6602M-MOD 3.0 N/A
Current Ne xt Reset
---------- -------- ----ILMI PVC: 0/16 0/16
LMI Peak Cell Rate (%line rate): 5 5
LMI Sust Cell Rate (%line rate): 1 1
ILMI Burst Size (cells): 11 11
ILMI Request Timeout (secs): 5 5
ILMI Request Retries: 2 2
ILMI Admin Vbridge: 1 –
The following command displays information about ATM Q93b
parameters for an ATM Backbone SwitchModule in slot 4 of a
CoreBuilder 5000 hub:
CB5000 > show atm 4 q93b
Slot Module Version Networ k Genera l Information
------ ------------ ------- --------- ------------------04 6602M-MOD 3.0 N/A
Current Ne xt Reset
---------- -------- ----T303 (secs): 4 4
T308 (secs): 30 30
T309 (secs): 90 90
T310 (secs): 10 10
T313 (secs): 4 4
T316 (secs): 120 120
T317 (secs): 60 60
T322 (secs): 4 4
Page 67

Using DMM/ADMM Commands
4-11
ATM QSAA L
Parameters
ATM Signal
Configuration
The following command displays information about ATM QSAAL
parameters for an ATM Backbone SwitchModule in slot 4 of a
CoreBuilder 5000 hub:
CB5000 > show atm 4 qsaal
Slot Module Version Networ k Genera l Information
------ ------------ ------- --------- ------------------04 6602M-MOD 3.0 N/A
Current Ne xt Reset
---------- -------- ----Poll Timer (msecs): 100 100
Keepalive Timer (secs): 1 1
No Response Timer (secs): 300 300
Idle Timer (secs): 15 15
CC Timer (secs): 2 2
Max CC Retries: 4 4
Max PD Retries: 25 25
Stat Max Ranges: 67 67
The following command displays information about the ATM signal
configuration for an ATM Backbone SwitchModule in slot 4 of a
CoreBuilder 5000 hub:
CB5000 > sho w atm 4 signal_configuration
Slot Module Version Networ k Genera l Information
------ ------------ ------- --------- ------------------04 6602M-MOD 3.0 N/A
Current Ne xt Reset
---------- -------- ----Sig PVC: 0/5 Sig Peak Cell Rate (% line rate):5 5
Sig Sust Cell Rate (% line rate):1 1
Sig Max Burst Size (cells): 11 11
Page 68

4-12
C
HAPTER
4: S
TATUS MONITORING AND STATISTICS
ATM Stat i s ti cs
ATM Traff ic Description
The following command displays ATM statistics for an ATM Backbone
SwitchModule in slot 4 of a CoreBuilder 5000 hub:
CB5000 > show atm 4 statistics
Slot Module Version Networ k Genera l Information
------ ------------ ------- --------- ------------------04 6602M-MOD 3.0 N/A
ATM AAL5
---------- ---------In Octets: 996327390 7092 47719
In Frames: 18798630 8030817
In Errors: 0 0
In Discards: 0 0
In Unknown Protocols: 0 0
Out Octets: 456665649 278670149
Out Frames: 8616333 4607911
Out Errors: 0 0
Out Discards: 0 0
The following command displays descriptive statistics for ATM traffic on
an ATM Backbone SwitchModule in slot 4 of a CoreBuilder 5000 hub:
CB5000 > show atm 4 traffic_descriptor all
Slot Module Version Networ k Genera l Information
------ ------------ ------- --------- ------------------04 6602M-MOD 3.0 N/A
Index Descr Type PeakCellRate SustCellRate MaxBurstSize
----- ----- ---------------------- -------------------------1 ILMI NoClpScr 17661 3533 11
2 SIG NoClpScr 17661 3533 11
3 155M NoClpNoScr 353208 0 0
4 100M NoClpNoScr 260417 0 0
5 50M NoClpNoScr 130208 0 0
6 25M NoClpNoScr 60377 0 0
7 8M NoClpNoScr 18120 0 0
8 6M NoClpNoScr 13590 0 0
9 2M NoClpNoScr 4530 0 0
Page 69

Using DMM/ADMM Commands
4-13
ATM VC C s
CB5000> show atm 4 vcc all
Slot Module Version Network General Information
------ ---------- ------- --------- ------------------04 6602M-MOD 3.0 N/A
VCC Status TxDescr RxDescr Type TxSDU RxSDU Encap
------------- ------- ------- ------ ------ -------------------0/5 UP SIG N/A AAL5 500 500 OTHER
0/16 UP ILMI N/A AAL5 500 500 OTHER
0/105 UP 155M N/A AAL5 151 6 1516 LANE 8023
0/106 UP 155M N/A AAL5 151 6 1516 LANE 8023
0/107 UP 155M N/A AAL5 151 6 1516 LANE 8023
0/108 UP 155M N/A AAL5 151 6 1516 LANE 8023
0/109 UP 155M N/A AAL5 151 6 1516 LANE 8023
0/110 UP 155M N/A AAL5 151 6 1516 LANE 8023
0/111 UP 155M N/A AAL5 151 6 1516 LANE 8023
0/112 UP 155M N/A AAL5 151 6 1516 LANE 8023
0/113 UP 155M N/A AAL5 151 6 1516 LANE 8023
SHOW BPORT_LEC
The following command displays information about ATM VCCs for an
ATM Backbone SwitchModule in slot 4 of a CoreBuilder 5000 hub:
Use the SHOW BPORT_LEC command to display the following
bridgeport-LEC information:
■
BPORT_LEC Configuration
■
BPORT_LEC Statistics
■
BPORT_LEC Status
■
BPORT_LEC Server Circuits
■
BPORT_LEC LE_ARP Table
Page 70

4-14
C
HAPTER
4: S
TATUS MONITORING AND STATISTICS
BPORT_LEC
Configuration
The following command displays configuration information for
bridgeport-LEC 2 on an ATM Backbone SwitchModule in slot 4 of a
CoreBuilder 5000 hub:
CB5000 > sho w bport_lec 4.2 configuration
Bridge Port LEC Display for Module 6602M-MOD:
BP LEC Mode I/F Status General Info
------ --- -- ---------- -------- ----- ---- ----------- ----
04.02 ENABLED ENABLED
Configuration Mode: MANUAL
ELAN Name: cpsw_2
ELAN Type: UNSPECIFIED
Maximum Data Frame Size: UNSPECIFIED
LES ATM Address:
39.99.99.99.99.99.99.00.00.99.99.02.02.99.99.99.99.99.99.03
LECS ATM Address: <none>
Aging Time (secs): 300
BUS Rate Limit (packets/secs): 5000
Connection Complete Timer (secs): 4
Control Timeout (secs): 120
Expected ARP Response Time (secs): 1
Flush Timeout (secs): 4
Forward Delay Time (secs): 15
Maximum Retry Count: 1
Maximum Unknown Frame Count: 1
Maximum Unknown Frame Time (secs): 1
Number of ELAN VCCs: 512
Path Switching Delay (secs): 6
VCC Timeout Period (secs): 1200
Page 71

Using DMM/ADMM Commands
4-15
BPORT_LEC Statistics
BPORT_LEC Status
The following command displays statistics for bridgeport-LEC 2 on an
ATM Backbone SwitchModule in slot 4 of a CoreBuilder 5000 hub:
CB5000 > sho w bport_lec 4.2 statistics
Bridge Port LEC Display for Module 6602M-MOD:
BP LEC Mode I/F Status General Info
------ --- -- ---------- -------- ----- ---- ----------- ----
04.02 ENABLED ENABLED
LEARP Request Out: 1
LEARP Request In: 1
LEARP Replies Out: 0
LEARP Replies In: 1
Control Frames Out: 4
Control Frames In: 580907
SVC Failures: 0
The following command displays status information for
bridgeport-LEC 2 on an ATM Backbone SwitchModule in slot 4:
CB5000 > sho w bport_lec 4.2 status
BP LEC Mode I/F Status General Info
------ --- -- ---------- -------- ----- ---- ----------- ----
04.02 ENABLED ENABLED
Actual ELAN Name: cpsw_2
Actual ELAN Type: AFLANE 8023
Actual Maximum Data Frame Size: 1516
LECS ATM Address: <none>
LECS Address Source: DID NOT USE LECS
Actual LES ATM Address:
39.99.99.99.99.99.99.00.00.99.99.02.02.99.99.99.99.99.99.03
LEC ID: 17
Link Trap: DISABLED
Interface State: OPERATIONAL
Last Failure Response Code: INSUFF RESOURCES
Last Failure State: BUS CON NECT
LANE Protocol: 1
LANE Version: 1
Topology Change: OFF
Proxy Client: YES
LEC ATM Address:
39.99.99.99.99.99.99.00.00.99.99.02.02.08.00.8f.40.a5.41.02
Page 72

4-16
C
HAPTER
4: S
TATUS MONITORING AND STATISTICS
BPORT_LEC Server
Circuits
BPORT_LEC
LE_ARP Table
CB5000> sh ow bport_lec 4. 2 learp_table all
Bridge Port LEC Display for Module 6602M-MOD:
BP LEC M ode I /F Status General Info
--------- --- --------- - ------------ ------- ------------
04.02 ENABLED ENABLED
The following command displays the server circuits for bridgeport-LEC 2
on an ATM Backbone SwitchModule in slot 4:
CB5000 > sho w bport_lec 4.2 server_circuits
Bridge Port LEC Display for Module 6602M-MOD:
BP LEC Mode I/F Status General Info
------ --- -- ---------- -------- ----- ---- ----------- ----
04.02 ENABLED ENABLED
Configuration Direct VPI/VCI: 0/ 0
Control Direct VPI/VCI: 0/105
Control Distribute VPI/VCI: 0/106
Multicast Send VPI/VCI: 0/107
Multicast Forward VPI/VCI: 0/108
The following command displays information for an ATM Backbone
SwitchModule in slot 4:
MAC Address ATM Address
----------- - ------------- ---------08-01-20-05-05-e3 3 9.99.99.99.99 .99.99.00.00.99.99. 05.07.08.00.8f.40.a4.c0.02
Page 73

Using DMM/ADMM Commands
4-17
SHOW SONET
SHOW SONET Status
Use the SHOW SONET command to display the following ATM SONET
information:
■
SHOW SONET Status
■
SHOW SONET Statistics
The following displays SONET status information for an ATM Backbone
SwitchModule in slot 13:
CB5000 > show sonet 13.1 status
Slot Module Version Networ k Genera l Information
------ ------------ ------- --------- ------------------04 6602M-MOD 3.0 N/A
Medium Type: SONET
Medium Time Elapsed (sec): 665
Medium Valid Intervals: 13
Medium Line Coding: NRZ
Medium Line Type: MULTI-MODE
Medium Clock Source: EXTERNAL
Section Current Status: OKAY
Line Current Status: OKAY
Path Current Status: OKAY
Path Current Width: STS3 C
M/S/L Speed (Mbps): 155520 000
M/S/L Admin Status: ENABLE D
M/S/L Oper Status: UP
M/S/L Last Change: 0
Path Speed (Mbps): 155520000
Path Admin Status: ENABLED
Path Oper Status: UP
Path Last Change: 0
Page 74

4-18
-
-
C
HAPTER
4: S
TATUS MONITORING AND STATISTICS
SHOW SONET
Statistics
The following command displays SONET statistics for an ATM Backbone
SwitchModule in slot 7:
CB5000 > sho w sonet 7.1 statis tics interval all
Slot Module Version Networ k Genera l Information
------ ------------ ------- --------- ------------------04 6602M-MOD 3.0 N/A
SECTION LINE PATH
--------------------------------------------------------------Int hh:mm ES SES SFS CV ES SES UAS CV ES SES UAS
--------------------------------------------------------------1 -00:15 0 0 0 0 0 0 0 0 0 0 0
2 -00:30 0 0 0 0 0 0 0 0 0 0 0
3 -00:45 0 0 0 0 0 0 0 0 0 0 0
4 -01:00 0 0 0 0 0 0 0 0 0 0 0
5 -01:15 0 0 0 0 0 0 0 0 0 0 0
6 -01:30 0 0 0 0 0 0 0 0 0 0 0
7 -01:45 0 0 0 0 0 0 0 0 0 0 0
8 -02:00 0 0 0 0 0 0 0 0 0 0 0
9 -02:15 0 0 0 0 0 0 0 0 0 0 0
10 -02:30 0 0 0 0 0 0 0 0 0 0 0
11-02:45 100 11000 0 000 0
12 -03:00 0 0 0 0 0 0 0 0 0 0 0
13 -03:15 0 0 0 0 0 0 0 0 0 0 0
14 -03:30 11 0 38 88 11 0 21 54 0 0 0
Page 75

Using DMM/ADMM Commands
4-19
SHOW IGMP
SNOOPING
Use the SHOW IGMP SNOOPING command to display the IGMP
snooping information on a module. You can view the IGMP snooping
information on all of the modules installed in a CoreBuilder 5000 hub
using the SHOW IGMP_SNOOPING MODULE ALL
snooping information on a specific module using the
command or IGMP
SHOW
IGMP_SNOOPING MODULE <SLOT.SUBSLOT> command.
The following command shows IGMP snooping information about the
ATM Backbone SwitchModule installed in slot 4 of a CoreBuilder 5000
hub:
CB5000 > show igmp_snooping module 4.1
IGMP Snooping Information
-----------------------------------------------------------IGMP Snooping is currently ENABLED.
IGMP Snooping after Module Reboot is ENABLED.
Entry VBridge IGMP Mo de
-----------------------------------------------------------1 1 ENABLED
2 11 ENABLED
Page 76

4-20
C
HAPTER
4: S
TATUS MONITORING AND STATISTICS
Using Graphical Interface Tools
CoreBuilder 5000
Manager
Tra ns ce nd® Network Control Services provides advanced graphical
management capabilities that enable you to monitor ATM Backbone
SwitchModule operation and collect and display statistics. Transcend
Network Control Services graphical management tools include:
■
CoreBuilder 5000 Manager
■
Device Management for Hubs
■
VLAN Manager
■
LANE Manager
You can also use a third-party network management application for
SNMP-based monitoring and analysis.
3Com CoreBuilder 5000 Manager uses the Simple Network
Management Protocol (SNMP) to poll devices for status, configuration,
and traffic information.
CoreBuilder 5000 Manager monitoring and display functions include:
■
Display of hub status
■
Display of module and port configuration and status
■
Display and logging of traffic statistics
■
Display and logging of alarm conditions and messages (traps)
The ATM Backbone SwitchModule supports the following MIBs:
■
MIB II – RFC 1213
■
Bridge MIB – RFC 1493
■
Interfaces MIB – RFC 1573
■
ATM MIB – RFC 1695
■
SONET MIB – RFC 1595
■
ATM Forum LEC MIB
■
IANAIFTYPE MIB
■
3Com ISD MIB
For specific information on displaying information and statistics using
CoreBuilder 5000 Manager, refer to the CoreBuilder 5000 Manager
documentation for the platform you are running (UNIX or Windows).
Page 77

Using Graphical Interface Tools
4-21
Device Management
for Hubs
VLAN Manager
LANE Manager
Device Management for Hubs allows you to display the operating
status of a selected device, configure the device, or display statistics.
When you launch Device Management for Hubs, an image of the
selected device, known as
Device View
, appears. The Device View
depicts the current configuration of the device. For example, ports
displayed on the Device View are color-coded to indicate the current
state of the port. By selecting various areas of the Device View and
using menus, you can monitor and manage the objects represented by
the selected area of the Device View.
VLAN Manager displays all local VLANs and ATM-based ELANs. You can
move segments between VLANs and view a graphical description of the
path between two segments within a VLAN.
LANE Manager discovers all 3Com-based LECS, LES, and LEC
components in the network and shows you their interconnections.
Page 78

4-22
C
HAPTER
4: S
TATUS MONITORING AND STATISTICS
Page 79

I
NTERNET
G
ROUP
M
ANAGEMENT
5
Overview
P
ROTOCOL
This chapter provides the following information about IGMP snooping:
■
Overview
■
CoreBuilder 5000 Support
■
Locating Multicast Routers in the Network
■
No Multicast Routers on the Network
■
Enabling IGMP Snooping on CoreBuilder 5000 SwitchModules
The Internet Group Management Protocol (IGMP) runs between hosts
and their immediate neighboring multicast routers. This protocol is not
a client/server protocol, but rather a routing protocol.
Through IGMP, a host to inform its local router that it wants to receive
transmissions that are addressed to a specific multicast group. Also,
routers periodically query the LAN to determine if known group members
are still active.
(IGMP) S
NOOPING
Based on the group membership information learned from the IGMP, a
router can determine which (if any) multicast traffic needs to be
forwarded to each of its subnetworks. Multicast routers use this
information in conjunction with a multicast routing protocol to support IP
multicasting across the Internet. Layer 2 switches flood multicast packets
to all ports without the presence of management specified filters.
Page 80

5-2
C
HAPTER
5: I
NTERNET GROUP MANAGEMENT PROTOCOL
(IGMP) S
NOOPING
Disabling IGMP
snooping
Before
implementing IGMP
snooping
The default setting for IGMP snooping is enabled. To disable it, enter
the SET VBRIDGE <X> IGMP_SNOOPING DISABLE command.
Before you implement IGMP snooping within your network, be aware
of how the CoreBuilder
®
5000 SwitchModule and your software
vendor’s multicast applications function with respect to IGMP.
Inherently, all IGMP-compliant viewer applications on your network
issue IGMP Membership Report packets (in response to IGMP Query
Packets sent out from a local IGMP-compliant switch or router)
requesting either to start or to continue sending the multicast stream to
that port. However, some multicast applications do not send IGMP
reports onto the network from the broadcasting server.
Depending on how your network is configured, broadcasters that do
not send report packets onto the network can potentially cause
excessive flooding for that vbridge or subnet. The CoreBuilder 5000
filters multicast traffic on a per-stream basis after receiving an IGMP
report packet on the local vbridge or subnet. If IGMP report packets are
never seen for a particular multicast session, that stream continues to
flood within that vbridge or subnet. This situation may appear as if
IGMP snooping is not functioning properly, when actually it is the
limitation of the broadcasting application that fails to send IGMP Report
packets to the querying switch or router on that subnet.
Placement of IGMP
servers
Placement of IGMP multicast servers that do not issue IGMP Report
packets is critical to the proper functioning of IGMP snooping on the
CoreBuilder 5000 product. If your IGMP Broadcasting application does
not issue IGMP report packets, 3Com recommends that you either
place at least one multicast client within the same subnet or vbridge as
the IGMP multicast server or run the viewer software at the same time
on the broadcasting server.
Page 81

Overview
Figure 5-1 shows a typical packet path before snooping occurs.
Multicast
Router
5-3
Host 1Host 3
Eliminating
unwanted IP
multicast protocols
Host 3 sends a
Multicast Packet
Figure 5-1
CoreBuilder
Host 2
Multicast Packet Path before Snooping
®
5000 Hub
IGMP snooping switch and multicast MAC address filters work together
to eliminate unwanted IP multicast routing protocols as follows:
■
The IGMP snooping switch filters IP multicast packets based on
IGMP/IP and IP multicast packets to only the subset of ports that are in
a multicast group.
■
The multicast MAC address filters
restrict
multicast packets to only the
subset of ports that request this traffic, thus freeing up bandwidth for
useful traffic.
Page 82

5-4
C
HAPTER
5: I
NTERNET GROUP MANAGEMENT PROTOCOL
Figure 5-2 shows the format of a typical IGMP snooping version 1
message that is received after an IGMP snooping query in a multicast
group has been completed.
0 3 4 7 8 15 16 31
4-bit
IGMP
Version
32-bit group address (Class D IP Address)
4-bit
IGMP
Type
8-bit
Unused
(IGMP) S
16-bit checksum
NOOPING
Figure 5-2
Format of an IGMP Version 1 Message
When IGMP snooping is running on a CoreBuilder® 5000 hub, it allows
multicast traffic to ports where:
■
IGMP Report packets for that multicast group have been observed.
■
Multicast routing protocols have been observed.
Figure 5-3 shows a typical multicast packet path after snooping has
occurred.
Multicast
Router
Host 1Host 3
Host 3 sends a
Multicast Packet
Figure 5-3
Host 2
Multicast Packet Path after Snooping
CoreBuilder
®
5000 Hub
Page 83

Overview
5-5
The result is that multicast traffic is flooded through a multicast
group-specific subset of the switched fabric, namely that subset that
contains either end stations that have joined the given multicast group,
or multicast routers.
The location of multicast group members is determined by snooping on
the IGMP/IP report packets sent from the hosts. This information is
aged out and refreshed by hearing new reports. the location of the
multicast routers can either be configured by management or be
determined by snooping on protocols such as:
■
Protocol-Independent Multicast (PIM)
■
Multicast Open Shortest Path First (MOSPF)
■
Distance Vector Multicast Routing Protocol (DVMRP)
The CoreBuilder 5000 hub uses the following two types of IGMP
packets to determine the flow of multicast data:
■
Queries
— Query packets (IGMP Type = 1) are flooded to all ports
in the vbridge.
■
Reports
— Report packets (IGMP Type = 2 and 6) are only sent to
multicast router ports. They are not forwarded to other ports
because they inhibit hosts on those ports from reporting their own
membership in those groups. This results in overly restrictive filtering
by the hub.
IGMP is a host-to-router protocol that assumes there is shared medium
between both types of IGMP packets. Because of this assumption,
when a host hears a report for a host group IP that wants to join, that
host assumes that it does not need to send a report to receive this host
group traffic. This occurs when the IGMP protocol is optimized to
minimize the number of reports sent. This is not true for filtering
switches that interconnect the multicast routers to hosts, however.
Page 84

5-6
C
HAPTER
5: I
NTERNET GROUP MANAGEMENT PROTOCOL
(IGMP) S
NOOPING
CoreBuilder 5000 Support
Locating Multicast Routers in the Network
The CoreBuilder 5000 supports 46 IP multicasting groups by IP relay. If
no multicast router is detected, the CoreBuilder 5000 hub acts as an
IGMP querier to allow the network to determine hosts that are
members of a group.
The CoreBuilder 5000 allows the user to create ports in the vbridge
that are classified as router ports. This ensures that multicast data is
always flowing over the link.
Multicast packets are received by all multicast routers on the LAN
because the switches always flood all multicast packets. Routing
protocol packets and data packets are flooded toward all ports on
which routing protocols have been received. To decrease the flooding
of multicast packets through a hub multicast router, the ports must be
identified.
The location of the multicast routers can either be configured by
management or determined by snooping on protocols such as PIM,
MOSPF, and DVMRP. After the router ports are determined, filters are set
up within the CoreBuilder 5000 hub to identify these ports and the
specific multicast packets flowing to each port.
No Multicast Routers on the Network
To receive the IGMP reports, networks that do not have multicast
capable routers need to have a designated querying device. The
CoreBuilder 5000 hub can be the designated querier in a network
without any multicast routers.
The designated querier is the IGMP query-capable device with the lowest
IP address in a flooding domain. If a multicast router is found on the
network, the CoreBuilder 5000 SwitchModule does not send IGMP
queries, even if it has the lowest IP address. However, in a switched fabric
that does not have any multicast routers, the CoreBuilder 5000 hub elects
a designated querier in the absence of query packets.
You must assign an IP address to a vbridge via the DMM console to
designate the CoreBuilder 5000 SwitchModule as a querying device.
Page 85

Enabling IGMP Snooping on CoreBuilder 5000 SwitchModules
5-7
Enabling IGMP
Snooping on
CoreBuilder 5000
SwitchModules
IGMP snooping on
a CoreBuilder 5000
SwitchModule
IGMP snooping can be enabled on the following CoreBuilder 5000
SwitchModules:
■
FTE SwitchModule v1.2
■
GigaFTE SwitchModules
When you enable IGMP snooping on either an FTE SwitchModule, v1.2,
or a GigaFTE SwitchModule, the IP multicast bit is enabled in the
module’s Receive Control Register. This causes the module’s receive
state machine to parse all IP packets looking for the IGMP protocol. If
the packet is an IGMP packet, it is directed to the management
processor queue for snooping purposes.
The management processor then learns the multicast address and adds
it to the module’s forwarding tables. When the IP multicast bit in the
module’s Receive Lookup Control Register is enabled, the forwarding
table entries have a 36-bit destination port map. When a packet enters
the module, the processor looks up the address and directs the packet
to the allowed destination port map. Figure 5-4 shows a typical FTE
DRAM address forwarding entry.
The only difference between the modules when IGMP snooping is
enabled is that the IP Multicast Bit is Bit <20> in the FTE, v1.2 module
and Bit<13> in the GigaFTE module.
Page 86

5-8
C
HAPTER
5: I
NTERNET GROUP MANAGEMENT PROTOCOL
Figure 5-4 shows a typical FTE DRAM address forwarding entry.
(IGMP) S
NOOPING
SrcAge
LrnPort
HashRem RateLimit
Mgmt
Copy
Lock
Down
Vlan ID
Dest
Slot Unused
FTE Address Forwarding Entry When IGMP Multicast Bit is Disabled
SrcAge
LrnPort
HashRem RateLimit
Allowed Port Map
Mgmt
Copy
Lock
Down
Vlan ID
Unused
Dest
Slot Unused
FTE Address Forwarding Entry When IGMP Multicast Bit is Enabled
Figure 5-4
FTE DRAM Address Forwarding Entry
Frame Tagging can be set on a CoreBuilder 5000 SwitchModule after it
is enabled for IGMP snooping.
Page 87

6
T
ROUBLESHOOTING
This chapter describes:
■
Troubleshooting Using LEDs
■
Recovering from Problems
■
Resetting the ATM Backbone SwitchModule
■
Obtaining Technical Assistance
Troubleshooting
Using LEDs
Troubleshooting Base
Module LEDs
This section identifies possible causes and solutions for ATM Backbone
SwitchModule LED indications. This section describes:
■
Troubleshooting Base Module LEDs
■
Troubleshooting ATM OC-3 Card LEDs
This section explains the procedures for:
■
Verifying Base Module LED Operation
■
Reading the Base Module LEDs
■
Refer to Determining Corrective Action.
Verifying Base Module LED Operation
If a ATM Backbone SwitchModule LED is not illuminated, use the
CoreBuilder 5000 Controller Module or CoreBuilder 5000 Advanced
DMM/Controller Module LED test button to verify operation of the base
module LEDs. The LED test does not disrupt network operation.
Page 88

6-2
C
HAPTER
6: T
ROUBLESHOOTING
When you press the LED test button:
The Controller Module initiates a test to all modules in the hub. All
1
LEDs should respond by lighting continuously for approximately
5 seconds.
During this time, the bi-color LEDs should alternate between green and
2
yellow approximately every ½ second.
See Appendix B for instructions about contacting 3Com Technical
Support for your product.
Reading the Base Module LEDs
Table 6-1 identifies the normal phases of operation of the base module
LEDs upon power-on or hardware reset.
Ta b le 6 - 1
Module Status LED State
Prior to power-on Off Off
Diagnostics upon power-on Yellow Off
Failed diagnostics Yellow Green
Passed diagnostics; ready to exchange data Green Green
Receiving ATM cells and forwarding them to
the packetchannel backplane
Module problem indications during normal
operation
* Refer to Determining Corrective Action.
Base Module LED Status
*
MOD
STAT
Green Yellow
Steady yellow or
Off
PACKET
CHANNEL
Off
Page 89

Troubleshooting Using LEDs
6-3
Determining Corrective Action
Table 6-2 identifies appropriate corrective actions for each base module
LED indication.
Ta b le 6 - 2
LED LED State Possible Cause Corrective Action
MOD STAT Green Normal operating indication. None required.
PACKETCHANNEL Green SwitchModule is correctly
Base Module LED Corrective Actions
Off No power to hub. Check the controller module power
The hub does not have enough
available power for a new
module installation.
The ATM Backbone
SwitchModule is faulty.
Yellow Module failed power-on
diagnostics.
inserted in hub and recognizes
PacketChannel backplane.
Off ATM Backbone SwitchModule
Yellow ATM Backbone SwitchModule
Yellow
Blinking
is not connected to backplane.
Slot does not support
PacketChannel operation. To
verify, enter the command
SHOW MODULE. The General
Information field states “ATM
Slot” if the slot is reserved for
ATM.
PacketChannel backplane not
installed or incorrectly installed
in the hub.
transmitting heavy traffic levels
to the PacketChannel
backplane.
ATM Backbone SwitchModule
transmitting normal traffic
levels to the PacketChannel
backplane.
LEDs.
Add another power supply to the hub.
Use the SHOW POWER BUDGET
command to ascertain available power in
the hub.
Insert a different ATM Backbone
SwitchModule.
Reset ATM Backbone SwitchModule
(page 6-12).
Re-seat ATM Backbone SwitchModule in
CoreBuilder 5000 hub.
Refer to “Recovering from Problems” on
page 6-5.
None required.
Re-seat the ATM Backbone
SwitchModule in the slot.
Install the ATM Backbone SwitchModule
in slots 1 through 8 or 13 through 17.
Re-install the PacketChannel backplane
or purchase a PacketChannel backplane.
Contact your supplier.
None required.
None required.
Page 90

6-4
C
HAPTER
6: T
ROUBLESHOOTING
Troubleshooting ATM
OC-3 Card LEDs
This section explains how to read the ATM OC-3 card LEDs and
determine appropriate corrective action
The LEDs on the base module and ATM OC-3 cards function
independent of each other.
Table 6-3 identifies possible causes and corrective actions for each LED
state.
Ta b le 6 - 3
LED LED State Possible Cause Corrective Action
TX Green ATM signal detected. None required.
RX Green ATM signal detected. None required.
ACTIVE Green Identifies active ATM OC-3
ALARM Green ATM OC-3 card failed. If alternate ATM OC-3 card is installed,
ATM OC-3 Card LED Corrective Actions
Yellow Transmitting ATM cells. None required.
Off Problem with ATM switch
connection (such as cable not
connected to ATM OC-3 card).
ATM OC-3 card failed. If alternate ATM OC-3 card is installed,
Yellow Receiving ATM cells. None required.
Off Problem with ATM switch
connection (such as cable not
connected to ATM OC-3 card).
ATM OC-3 card failed. If alternate ATM OC-3 card is installed,
card.
Off ATM OC-3 card inactive. If alternate ATM OC-3 card is installed,
ATM OC-3 card failed. If alternate ATM OC-3 card is installed,
Off Normal operating condition. None required.
Check ATM switch connection and
interface.
check that switchover to alternate ATM
OC-3 card occurred.
Check ATM switch connection and
interface.
check that switchover to alternate ATM
OC-3 card occurred.
None required.
check that an alternate ATM OC-3 card
is active.
check that switchover to alternate ATM
OC-3 card occurred.
check that a switchover to alternate
ATM OC-3 card occurred.
Refer to “Recovering from Problems” on
page 6-5.
Page 91

Recovering from Problems
6-5
Recovering from
Problems
Use the following procedure to recover from operating problems or
module failure. Each of these steps is explained in more detail in the
sections that follow.
Verify that the DMM can communicate with the ATM Backbone
1
SwitchModule
Verify that the correct software versions are installed.
2
Verify that the critical configuration parameters settings of the ATM
3
Backbone SwitchModule match those of the ATM switch to which it is
connected.
Verify ATM OC-3 Card Functions.
4
Verify ATM Signalling Functions.
5
Verify LEC Functions.
6
Verify Bridging Configuration.
7
Verify that a CoreBuilder 5000 SwitchModule has a vbridge configured
8
on the same bridge port as the CoreBuilder 5000 ATM Backbone
SwitchModule bridge port.
Verify Data Movement.
9
Verify ATM OC-3 Switchover Functions.
10
Record your results for the following procedures. The information may
be required if you need to contact your technical support
representative.
Verifying DMM
Communication
To isolate a problem in the ATM Backbone SwitchModule, you must be
able to communicate with the ATM Backbone SwitchModule from the
DMM.
Use the following command to verify that the DMM can communicate
with the ATM Backbone SwitchModule:
CB5000 > show module all
Check that the display lists the ATM Backbone SwitchModule model
number (6602M-MOD).
Page 92

6-6
C
HAPTER
6: T
ROUBLESHOOTING
If the ATM Backbone SwitchModule model number is not listed, try
each of the following corrective actions:
If the DMM can communicate with the ATM Backbone SwitchModule,
proceed to Verifying Software Versions.
Reset the ATM Backbone SwitchModule by pressing the Reset button
1
on the module front panel (refer to Resetting the ATM Backbone
SwitchModule later in this chapter).
Remove and carefully reinsert the ATM Backbone SwitchModule.
2
Ensure that IP connectivity for the DMM is established. Refer to the
3
CoreBuilder 5000 SwitchModule User Guide
If necessary, obtain Technical Assistance (refer to Obtaining Technical
4
for more information.
Assistance later in this chapter).
Verifying Software
Ver s io ns
Be sure that ATM Backbone SwitchModule is using the correct software
versions for the following hub components:
■
ATM Backbone SwitchModule (Model Number 6602M-MOD)
■
CoreBuilder 5000 Ethernet or FDDI SwitchModule (version v3.0 or
later)
■
DMM or ADMM (version v6.0 or later)
Use the following command to display the software versions of these
components:
CB5000 > show module all
Contact your network supplier to determine the correct versions of
software and arrange to update the software if necessary.
Page 93

Recovering from Problems
6-7
Verifying Critical
Parameters
Verifying ATM OC-3
Card Functions
Verify that the settings of the following critical parameters match those
of the ATM switch to which the ATM Backbone SwitchModule is
connected:
■
UNI version (default is 3.0)
■
LEARP Quiet Time (default is 5 seconds)
■
Configuration mode (LEC 1 default is Auto, default for other LECs is
Manual)
■
Interface mode (LEC 1 default is Enabled, default for other LECs is
Disabled)
■
ELAN Name (LEC 1 default is Admin, default for other LECs None)
■
Vbridge assignment (LEC 1 default is vbridge 1, default for other
LECs is Unassigned)
See the
Reference
CoreBuilder 5000 ATM Backbone SwitchModule Command
for more information on these parameters.
Use the following procedure to verify each of the following ATM OC-3
card functions:
With the OC-3 fiber cables attached, verify that the Alarm LED of the
1
ATM OC-3 card is illuminated green.
If the Alarm LED is illuminated green, reverse the fiber optic cable
connections to the ATM OC-3 card and reverify the Alarm LED.
Use the following command to check the additional port status
2
indicators for the ATM OC-3 card:
CB5000 > show port <slot. phy_num>
Verify that the display lists the following indicators:
■
Status for the (PHY) port is OK
■
Mode for the (PHY) port is Enabled
Page 94

6-8
C
HAPTER
6: T
ROUBLESHOOTING
Use the following command to check the following SONET status
3
indicators:
CB5000 > show sonet <slot .phy_num> status
Verify that the display lists status is OK for the following indicators:
■
Line Current Status
■
Section Current Status
■
Path Current Status
Record any indications that are not as expected and proceed to
4
Verifying ATM Signalling Functions.
Verifying ATM
Signaling Functions
Use the following procedure to verify ATM signaling functions:
Use the following command to check the UNI Version setting of your
1
ATM Backbone SwitchModule:
CB5000 > show atm <slot> interface
Examine the setting of the UNI Version parameter of the ATM
Backbone SwitchModule. It must match the ATM switch setting to
which it is connected. The valid settings are:
■
3_0
■
3_1
Contact your network supplier for the UNI version setting of the ATM
switch.
If necessary, reset the UNI Version parameter and corresponding ATM
2
signalling times using the following command:
CB5000 > set atm <slot> uni_version 3_1
(or
If you made any changes in Step 2, reset the module using the
3
3_0
)
following command:
CB5000 > reset module <slot>
ATM commands do not take effect until you reset the module. Use the
DMM RESET MODULE command to enable any ATM parameter changes.
Page 95

Recovering from Problems
Use the following command to display vcc parameters:
4
CB5000 > show atm <slot> vcc all
Verify the following parameters settings:
■
SIG is 0/5
■
ILMI is 0/16
If necessary, use the following command to reset the ILMI parameter:
5
CB5000 > set atm <slot> ilmi pvc 0/16
ATM commands do not take effect until you reset the module. Use the
DMM RESET MODULE command to enable any ATM parameter
changes.
If the SIG parameter is not set to 0/5, contact your network supplier to
6
set the SIG parameter to 0/5 at the ATM switch.
Record the final settings of your ATM signalling parameters before
7
continuing.
6-9
Verifying LEC
Functions
Use the following procedure to verify the functions of a LEC:
Use the following command to display the configuration mode of the
1
LEC:
CB5000>
■
show bport_lec <slot.l ec> configu ration
If the configuration mode is manual, check the command display to
verify that the correct LES ATM Address is listed. The LES ATM
Address of the LEC must match the LES ATM Address of the ELAN
to which the LEC is assigned.
■
If the configuration mode is automatic, check the command display
to verify that the ELAN Name parameter is set to the ELAN Name
required by the ATM switch.
Contact your ATM switch service representative to determine the
correct LES ATM Address and ELAN Name setting.
Check the command display in step 1 to verify that the Mode
2
parameter for the LEC is set to Enabled.
If the Mode parameter is not set to Enabled, use the following
command to reset the Mode parameter to Enabled:
CB5000 > set bport_lec <slot.lec> mode enable
Page 96

6-10
C
HAPTER
6: T
ROUBLESHOOTING
Use the following command to display the LAN/E status of the LEC:
3
CB5000 > show bport_lec <slot.lec> status
Check the indication of the Interface State parameter. The possible
status indications are:
■
Initial
■
Configure
■
Join
■
Bus connect
■
Operational
If the Interface State is Operational, the LEC and ATM parameters are
configured correctly.
If there is any other indication, record the result and continue with the
procedure.
Check the command display in step 3 and record the Last Failure State
4
parameter.
If the Last Failure State indicates:
■
Configure
— The ATM Backbone SwitchModule is having problems
with the LECS. Contact your ATM switch service representative to
verify the LECS configuration.
■
— The ATM Backbone SwitchModule is having problems
Join
connecting with the LES. Contact your ATM switch service
representative to verify the LES address and ELAN name and the
operation of the BUS service provider.
■
Bus Connect
— Contact your ATM switch service representative to
verify the operation of the BUS service provider.
Page 97

Recovering from Problems
6-11
Verifying Bridging
Configuration
Verifying Data
Movement
Use the following procedure to verify the bridging configuration of the
ATM Backbone SwitchModule:
Use the following command to display information about the LEC
1
bridging configuration.
CB5000 > s how bridge_por t <slot.lec> verbose
Verify that the bridge port is set to a valid vbridge (1 through 240).
If the bridge port is not set to a valid vbridge, use the following
command to reset it to the correct vbridge:
CB5000 > set br idge_port <slot.lec> vbridge <vbridgenumber>
Use the following command to display information about the vbridge
2
configuration:
CB5000 > show bridge_port <slot.bridgeport>
Verify that the vbridge is assigned to the correct Ethernet or FDDI
SwitchModule port.
Use the following procedure to determine if there is packet and ATM
cell data movement through the ATM Backbone SwitchModule:
Use the following command to display ATM statistics:
1
CB5000 > show atm <slot> statistics
Note the values for the ATM and AAL5 ATM cell counters.
Reissue the ATM statistics command and check that the counters have
2
changed.
Use the following command to display bridge port interface statistics:
3
CB5000 > s how counter bri dge_port <slot.lec> interface
Note the values for the Packet Counters statistic
Reissue the bridge port interface command and check that the Packet
4
Counters statistic has changed.
Page 98

6-12
C
HAPTER
6: T
ROUBLESHOOTING
Verifying ATM OC-3
Switchover
Resetting the ATM Backbone SwitchModule
If the Redundant ATM OC-3 card does not become active upon failure
of the primary ATM OC-3, use the following command to verify that
the PHY Automatic Failover parameter is Enabled:
CB5000 > show module <slot. phy> verbose
If the PHY_Automatic_Failover parameter is not Enabled, use the
following command to enable it:
CB5000 > set module <slot>.1 phy_autom atic_failover enable
If the ATM Backbone SwitchModule is still experiencing problems after
you complete the procedures above, refer to Obtaining Technical
Assistance later in this chapter.
You can reset the ATM Backbone SwitchModule by either pressing the
front panel Reset button or issuing the DMM Reset command.
CAUTION:
If you reset the ATM Backbone SwitchModule using the
DMM RESET command, the module does not lose saved setup
information. However, performing a reset may cause some of the data
being transmitted at that moment to be lost and statistic counters to
be reset to zero.
Using the Reset
Button
Each ATM Backbone SwitchModule front panel houses a Reset button.
The Reset button resets the ATM Backbone SwitchModule and executes
power up self-test diagnostics.
CAUTION:
Use the Reset button only if you suspect a problem with the
ATM Backbone SwitchModule. Using the Reset button to reset an ATM
Backbone SwitchModule disrupts network traffic.
To ensure that you do not lose any configuration information, before
you use the Reset button:
■
Save any configuration changes
■
Wait at least 30 seconds after saving configuration changes
Page 99

Obtaining Technical Assistance
6-13
Obtaining Technical
Assistance
You can receive assistance for installing and troubleshooting an ATM
Backbone SwitchModule by calling either your 3Com reseller or 3Com
network supplier. Be prepared to supply a representative with the
following information:
■
Description of the problem
■
Steps you have taken to try and correct the problem
■
Type and software version of the CoreBuilder 5000 management
module being used
■
Version of software installed on your ATM Backbone SwitchModule,
Ethernet or FDDI SwitchModule, and DMM
■
Status of the front panel LEDs
■
Configuration of your hub. (You may find it helpful to refer to the
Slot Usage Chart shipped with the
System Hub Installation and Operation Guide
CoreBuilder 5000 Integrated
for a record of this
information.)
See Appendix B for instructions on how to get technical support for
your product.
Page 100

6-14
C
HAPTER
6: T
ROUBLESHOOTING
 Loading...