

Page 1

EtherLink® 10/100 PCI
Network Interface
Card with 3XP
Processor User Guide
3CR990-TX-95
3CR990-TX-97
3CR990SVR95
3CR990SVR97
10/100 Mbps PCI client and server
network interface cards with
Dynamic
Access® technology
http://www.3com.com/
http://www.3com.com/productreg
Part No. 09-1742-001
Published May 2000
Page 2

3Com Corporation ■ 5400 Bayfront Plaza ■ Santa Clara, California ■ 95052-8145
Copyright © 2000, 3Com Corporation. All rights reserved. No part of this documentation may be
reproduced in any form or by any means or used to make any derivative work (such as translation,
transformation, or adaptation) without written permission from 3Com Corporation.
3Com Corporation reserves the right to revise this documentation and to make changes in content
from time to time without obligation on the part of 3Com Corporation to provide notification of such
revision or change.
3Com Corporation provides this documentation without warranty, term, or condition of any kind,
either implied or expressed, including, but not limited to, the implied warranties, terms or conditions
of merchantability, satisfactory quality, and fitness for a particular purpose. 3Com may make
improvements or changes in the product(s) and/or the program(s) described in this documentation
at any time.
If there is any software on removable media described in this documentation, it is furnished under a
license agreement included with the product as a separate document, in the hard copy documentation,
or on the removable media in a directory file named LICENSE.TXT or !LICENSE.TXT. If you are unable to
locate a copy, please contact 3Com and a copy will be provided to you.
UNITED STATES GOVERNMENT LEGEND
If you are a United States government agency, then this documentation and the software described
herein are provided to you subject to the following:
All technical data and computer software are commercial in nature and developed solely at private
expense. Software is delivered as “Commercial Computer Software” as defined in DFARS 252.227-7014
(June 1995) or as a “commercial item” as defined in FAR 2.101(a) and as such is provided with only such
rights as are provided in 3Com’s standard commercial license for the Software. Technical data is provided
with limited rights only as provided in DFAR 252.227-7015 (Nov 1995) or FAR 52.227-14 (June 1987),
whichever is applicable. You agree not to remove or deface any portion of any legend provided on any
licensed program or documentation contained in, or delivered to you in conjunction with, this User Guide.
Unless otherwise indicated, 3Com registered trademarks are registered in the United States and may or
may not be registered in other countries.
3Com, the 3Com logo, Dynamic
trademarks of 3Com Corporation or its subsidiaries. 3Com Facts is a service mark of 3Com Corporation
or its subsidiaries.
Entrust is a registered trademark of Entrust Technologies, and Entrust/PKI and Entrust/Entelligence
are trademarks of Entrust Technologies. Intel and Pentium are registered trademarks of Intel
Corporation. Microsoft, Windows and Windows NT are registered trademarks of Microsoft
Corporation. Netscape is a registered trademark of Netscape Communications Corporation. NetWare
and Novell are registered trademarks of Novell, Inc. All other company and product names may be
trademarks of the respective companies with which they are associated.
About This Guide
This guide describes how to install, configure, and troubleshoot the 3Com EtherLink 10/100 Mbps PCI
network interface card (NIC) with 3XP Processor, which is available in the following models:
3CR990-TX-95
3CR990-TX-97
3CR990SVR95
3CR990SVR97
Access
, EtherDisk, EtherLink, and Parallel Tasking are registered
Client NIC for 56-bit encryption
Client NIC for 56-bit and 168-bit encryption
Server NIC for 56-bit encryption
Server NIC for 56-bit and 168-bit encryption
This guide is intended for the network administrator, network operator, or network hardware installer.
Knowledge of Ethernet and the server network operating system is required.
Documentation is available in Adobe Acrobat Reader Portable Document Format (PDF) or HTML on the
3Com World Wide Web site: http://www.3com.com/. You can download Acrobat Reader from the
Adobe Systems Incorporated web site: http://www.adobe.com/.
Year 2000 Compliance
For information on Year 2000 compliance and 3Com products, visit the 3Com Year 2000 Web page:
http://www.3com.com/products/yr2000.html
Page 3

ONTENTS
C
A
BOUT THIS GUIDE
Conventions 12
1
I
NTRODUCTION
Overview 13
Onboard 3XP Processor 14
Data Encryption 14
LAN Encryption Software for Windows 95/98 14
High Encryption Pack for Windows 2000 15
3CR990 NIC Features 15
Advanced Server Features 17
Load Balancing 18
Self-Healing Drivers 18
Failover 18
VLANs 19
Traffic Prioritization 20
Server Features Using Other NICs 21
Remote Wake-Up 21
Remote Wake-Up Requirements 21
Remote Wake-Up Cable 22
Remote Wake-Up and Multiple NIC Installations 22
Integrated Boot ROM with Managed PC Boot Agent
(MBA) 22
Desktop Management Interface (DMI) 2.0 23
DHCP Server Prevention 24
Remote System Alerts 24
Hot Plug NIC Installation 24
Offline Diagnostics 25
DynamicAccess LAN Agent 25
Windows 2000 Offload Features 26
Page 4

2
I
NSTALLING AND CONNECTING THE
Overview 27
Installation Overview 27
Safety Precautions 27
Installation Requirements 28
Installing Multiple NICs 29
Upgrading Windows 95 to Windows 98 29
Updating the Network Driver and NIC Software 29
Installing From Diskette 29
Making a DOS-Bootable Diskette 30
Creating Installation Diskettes 30
Product Registration 31
Preparing the NIC and the Computer 32
Installing and Connecting the NIC 34
Connecting the Remote Wake-Up Cable 36
Installing Software 38
3
I
NSTALLING
Overview 39
Software Installation Requirements 39
Getting Help 40
Installing the Network Driver Using the EtherCD 40
Windows 2000 40
Windows NT 4.0 41
Windows 98 43
Windows 95 44
Verifying Successful Installation 48
Windows 2000 48
Windows NT 4.0 49
Windows 95 and Windows 98 49
Installing the 3Com NIC Diagnostics Program 50
Starting the 3Com NIC Diagnostics Program 51
Updating the Network Driver and NIC Software 51
Installing Multiple NICs 52
Windows 2000, Windows 98, and Windows 95 52
Windows NT 4.0 53
NIC D
New Hardware Found 45
Update Device Driver Wizard 46
RIVERS IN WINDOWS
NIC
Page 5

4
I
NSTALLING DYNAMICACCESS SOFTWARE IN WINDOWS
Overview 55
Installing the DynamicAccess LAN Agent for a Client NIC 55
Client PC Requirements 55
Installing the LAN Agent 56
Verifying Successful Installation 57
Configuring the DynamicAccess LAN Agent 57
Removing the DynamicAccess LAN Agent 58
Installing DynamicAccess Software for a Server NIC 58
Verifying Successful Installation 60
Configuring Groups and VLANs for a Server NIC 60
Planning the Configuration 60
Working With Server Features 63
Windows 2000 63
Windows NT 64
Creating a Group 65
Adding NICs to a Group 66
Specifying a Dedicated IP Address 66
Changing an IP Address 67
Creating a VLAN 67
Specifying Traffic Priorities 68
Saving the Configuration 68
Disabling Load Balancing for a Group 69
Changing the Primary NIC 69
Removing a NIC from a Group 69
Deleting or Editing a VLAN 70
Displaying NIC Properties 70
Displaying Group Properties 70
Specifying Failover from Gigabit to 10/100 PCI 70
Troubleshooting a Load Balancing Configuration 71
Changing Windows 2000 Property Settings 72
Identifying Windows 2000 Miniport and LAN
Connections 72
Using Windows 2000 Offload Features 73
Enabling Offloads 74
Configuring Offloads for a Group of Different NICs 76
Installing DynamicAccess LAN Encryption Software 76
Minimum Installation Requirements 77
Hardware Requirements: 77
Software Requirements: 77
Page 6

Installation Overview 77
Installing LAN Encryption Software on Windows 95 77
Installing LAN Encryption Software on Windows 98 82
Adding the Entrust File 85
Starting DynamicAccess LAN Encryption Software 86
Viewing the Administrator’s Guide Online 86
Uninstalling LAN Encryption Software 87
5
I
NSTALLING NETWARE CLIENT AND SERVER DRIVERS
Overview 89
Installing and Configuring the NetWare Server Driver 89
Using the Latest Support Packs 89
Obtaining NetWare Loadable Modules 90
Server Software Installation Requirements 91
Netware Packet Receive Buffers 91
Slot Numbers for Multiple NICs 91
Obtaining Slot Numbers 92
Installing the NetWare 3.12 Server Driver 92
Installing the Server Driver for NetWare 4.11 and 5.0
Using INETCFG 93
Installing the Server Driver and DynamicAccess Technology
Using AUTOEXEC.NCF 95
Loading the 3Com EtherCD 96
Copying the Driver 96
Specifying the Slot Number 97
Loading the Driver 97
Setting Up Another NIC 97
Installing Multiple Server NICs 98
Verifying the PCI Slot Number 99
Installing Server Features 99
Configuring Groups 100
Verifying the Installation and Configuration 102
Changing NetWare Driver Configuration Parameters 103
Maintaining Groups 104
Planning the Configuration 104
Adding a Secondary NIC to a Group 105
Adding a Group 106
Server Feature Commands 108
group 108
display status 108
Page 7

help 109
link timeout 109
probe interval 109
receive timeout 110
retry count 110
send timeout 110
ungroup 111
wait timeout 111
Troubleshooting a Group Configuration 112
6
C
ONFIGURING THE
Overview 113
Default NIC Settings 113
Configuration Methods 116
Changing General NIC Configuration Settings 117
Using the 3Com NIC Diagnostics Program 117
Using the 3Com DOS Configuration Program 118
Configuring the Managed PC Boot Agent (MBA) 120
Enabling or Disabling the Boot ROM Setting 120
Booting From the Network 120
BBS BIOS-Compatible PCs 121
Non-BBS BIOS-Compatible PCs 122
Disabling the 3Com Logo 122
NIC
7
C
ONFIGURING
Overview 123
Creating a Security Policy 124
Defining the Console 124
Creating the Policy 125
Creating a Filter 126
Binding the Filter 127
Creating the Filter Action 127
Binding the Filter Action 127
Enabling Encryption 128
Disabling Encryption 128
IP S
ECURITY
Page 8

8
T
ROUBLESHOOTING THE
Overview 129
Interpreting the LEDs 129
Viewing the NIC LEDs in the Diagnostics Program 130
Accessing 3Com Support Databases 131
Accessing the 3Com Knowledgebase 131
Accessing the 3Com NIC Help System 131
Accessing Release Notes and Frequently Asked
Questions 131
Troubleshooting the NIC Installation 132
Problems/Error Messages 132
Cleaning Up a Failed Installation 132
Troubleshooting the Network Connection 133
Troubleshooting Remote Wake-Up 135
Troubleshooting a Network Connection 136
Troubleshooting Hubs 137
Cabling Pinouts 137
Removing the Network Driver 138
Windows 2000 138
Windows NT 4.0 139
Windows 95 and Windows 98 139
Removing DynamicAccess Server Features 140
Windows NT 4.0 140
Windows 2000 140
NetWare 141
NIC
9
R
UNNING
Overview 143
Running the 3Com DOS Diagnostics Program 144
Running the NIC Diagnostics Tests 144
Viewing the NIC LEDs in the Diagnostics Program 146
Viewing Network Statistics 147
Using the 3Com Icon in the Windows System Tray 148
Removing the 3Com NIC Diagnostics Program 149
NIC D
Running the Network Test 145
Running the NIC Test 146
Enabling the Icon 148
Displaying Network Statistics 148
IAGNOSTICS
Page 9

A
O
BTAINING DRIVERS
B
S
PECIFICATIONS AND CABLING REQUIREMENTS
3CR990 NIC Specifications 153
Cabling Requirements 154
Twisted-Pair Cable 154
10BASE-T Operation 155
100BASE-TX Operation 156
RJ-45 Connector Pin Assignments 156
Flow Control 157
Pause Frames 157
Link Negotiation 157
C
I
NSTALLING THE
Overview 159
About the 3Com DMI Agent 159
System Requirements 160
Client PC Requirements 160
Network Management Requirements 161
Installing the 3Com DMI Agent 161
D
E
THER
CD C
EtherCD Navigation 163
Root Subdirectories 164
Auto Insert 164
Text Files 164
3C
OM
DMI A
ONTENT AND NAVIGATION
GENT
E
I
NSTALLING A
Windows Fresh Installation 167
Windows NT 167
Windows 2000 167
NetWare Fresh Installation 167
Requirements 167
Installation Instructions 168
3COM NIC W
HILE INSTALLING THE
NOS
Page 10

F
T
ECHNICAL SUPPORT
Online Technical Services 171
World Wide Web Site 171
3Com Knowledgebase Web Services 172
3Com FTP Site 172
3Com Bulletin Board Service 172
Access by Analog Modem 172
Access by Digital Modem 173
3Com Facts Automated Fax Service 173
Support from Your Network Supplier 173
Support from 3Com 174
Returning Products for Repair 175
I
NDEX
FCC C
LASS
B S
TATEMENT
FCC D
I
C
ECLARATION OF CONFORMITY
NDUSTRY CANADA CLASS
OMPLIANCE STATEMENT
B EMISSION
AVIS DE CONFORMITÉ À LA RÉGLEMENTATION
D’INDUSTRIE CANADA
VCCI CLASS B STATEMENT
3COM END USER SOFTWARE LICENSE AGREEMENT
PRODUCT REGISTRATION
Page 11

ABOUT THIS GUIDE
This guide describes how to install, configure, and
troubleshoot the following 3Com® EtherLink® PCI
network interface cards (NICs):
NIC/Description Model Number
EtherLink 10/100 Mbps PCI with
3XP Processor
Client NIC for DES (56-bit)
encryption
EtherLink 10/100 Mbps PCI with
3XP Processor
Client NIC for 3DES (168-bit) and
DES (56-bit) encryption
EtherLink Server 10/100 Mbps
PCI NIC with 3XP Processor
Server NIC for DES (56-bit)
encryption
EtherLink 10/100 Mbps PCI
server NIC with 3XP Processor
Server NIC for 3DES (168-bit)
and DES (56-bit) encryption
3CR990-TX-95
3CR990-TX-97
3CR990SVR95
3CR990SVR97
This guide is intended for those who install and configure
Ethernet NICs. Some familiarity with Ethernet networks
and NICs is assumed.
If release notes are shipped with your product and the
information there differs from the information in this
guide, follow the instructions in the release notes.
Most user guides and release notes are available in
Adobe Acrobat Reader Portable Document Format (PDF)
or HTML on the 3Com World Wide Web site:
http://www.3com.com/
Page 12

12 CHAPTER : ABOUT THIS GUIDE
You can download Acrobat Reader from the EtherCD
or from Adobe Systems Incorporated Web site:
http://www.3com.com/
Conventions
The following tables list conventions that are used
throughout this guide.
Icon Notice Type Description
Information note Information that describes important features
or instructions
Caution Information that alerts you to potential loss of
data or potential damage to an application,
system, or device
Warning Information that alerts you to potential
personal injury
Convention Description
Screen displays This typeface represents information as it appears on
the screen.
Commands The word “command” means that you must enter the
command exactly as shown and then press Return or
Enter. Commands appear in bold. Example:
To launch the DOS diagnostics program, enter the
following command:
a: install
The words “enter”
and “type”
When you see the word “enter” in this guide, you
must type something, and then press Return or Enter.
Do not press Return or Enter when an instruction simply
says “type.”
Words in italics Italics are used to:
■ Emphasize a point.
■ Denote a new term at the place where it is defined in
the text.
■ Identify menu names, menu commands, and software
button names. Examples:
From the Help menu, select Contents.
Click OK.
Page 13

1
Overview
INTRODUCTION
This chapter describes the following 3Com® EtherLink®
10/100 Mbps PCI network interface card (NIC) models from
the 3CR990 NIC family.
Product Name/Description Model Number
EtherLink 10/100 Mbps PCI with
3XP Processor
Client NIC for DES (56-bit)
encryption
EtherLink 10/100 Mbps PCI with
3XP Processor
Client NIC for 3DES (168-bit) and
DES (56-bit) encryption
EtherLink Server 10/100 Mbps
PCI NIC with 3XP Processor
Server NIC for DES (56-bit)
encryption
EtherLink 10/100 Mbps PCI
server NIC with 3XP Processor
Server NIC for 3DES (168-bit)
and DES (56-bit) encryption
3CR990-TX-95
3CR990-TX-97
3CR990SVR95
3CR990SVR97
Unless specifically indicated, information in this user guide
refers to all 3CR990 NIC models.
The 3CR990 NIC connects your PCI-compliant PC to
a 10 Mbps or 100 Mbps Ethernet network. It provides
advanced features for high performance and secure
transactions. High performance is achieved through an
onboard RISC processor; secure transactions are achieved
through data encryption.
Page 14

14 CHAPTER 1: INTRODUCTION
Onboard 3XP Processor
The 3CR990 NIC represents a new generation of secure,
intelligent client NICs with an onboard RISC processor
(3XP processor). The 3XP processor is designed to optimize
system and network performance. The NIC off-loads key
networking and security tasks from the host PC CPU
(central processing unit) to the 3XP processor, even when
running bandwidth-intensive applications such as voice,
video, imaging, and Internet and intranet applications.
Data Encryption
The 3CR990 NIC provides DES (Data Encryption Standard
56-bit) encryption and 3DES (triple-DES 168-bit)
encryption. Encryption processing is handled entirely
by the 3XP processor and the encryption chip that resides
on the NIC.
The onboard encryption chip enables true end-to-end
network security (IPSec) at the data capacity of the
connected network cable (wire speed), without sacrificing
performance.
LAN Encryption Software for Windows 95/98
3Com DynamicAccess® LAN Encryption software is
available on the EtherCD packaged with your NIC. The LAN
Encryption utility secures communication for individual
computers by ensuring authentication, encryption, and
data integrity. It intercepts incoming and outgoing
communication and encrypts it, blocks it from passing, or
lets it through without encryption.
DynamicAccess LAN Encryption software supports both
DES (56-bit) and 3DES (168-bit) encryption. For detailed
information on DynamicAccess LAN Encryption, see the
DynamicAccess LAN Encryption Software Administrator’s
Guide, located with the DynamicAccess LAN Encryption
software on the 3Com EtherCD. (For installation
instructions, see Installing DynamicAccess LAN Encryption
Software on page 76.)
Page 15

High Encryption Pack for Windows 2000
The Windows 2000 High Encryption Pack allows you to
enhance your system with the highest available encryption
level (168-bit). You can download the High Encryption Pack
from the following Microsoft World Wide Web site:
http://www.microsoft.com/WINDOWS2000/downloads
/recommended/encryption/default.asp
The Windows 2000 High Encryption Pack is eligible for
export from the U.S. to all customers worldwide, except
to U.S. embargoed destinations. Please see
http://www.microsoft.com/exporting/ for details.
Other countries may exercise separate jurisdiction over
the import, export or use of encryption products. Users
who download this product should observe any local
regulations that may apply to the distribution or use of
encryption products.
3CR990 NIC Features
Parallel Tasking® II hardware technology plus a powerful
suite of DynamicAccess technology software features
relieve network congestion and ensure high performance
and maximum bandwidth availability.
3CR990 NIC Features 15
Page 16
16 CHAPTER 1: INTRODUCTION
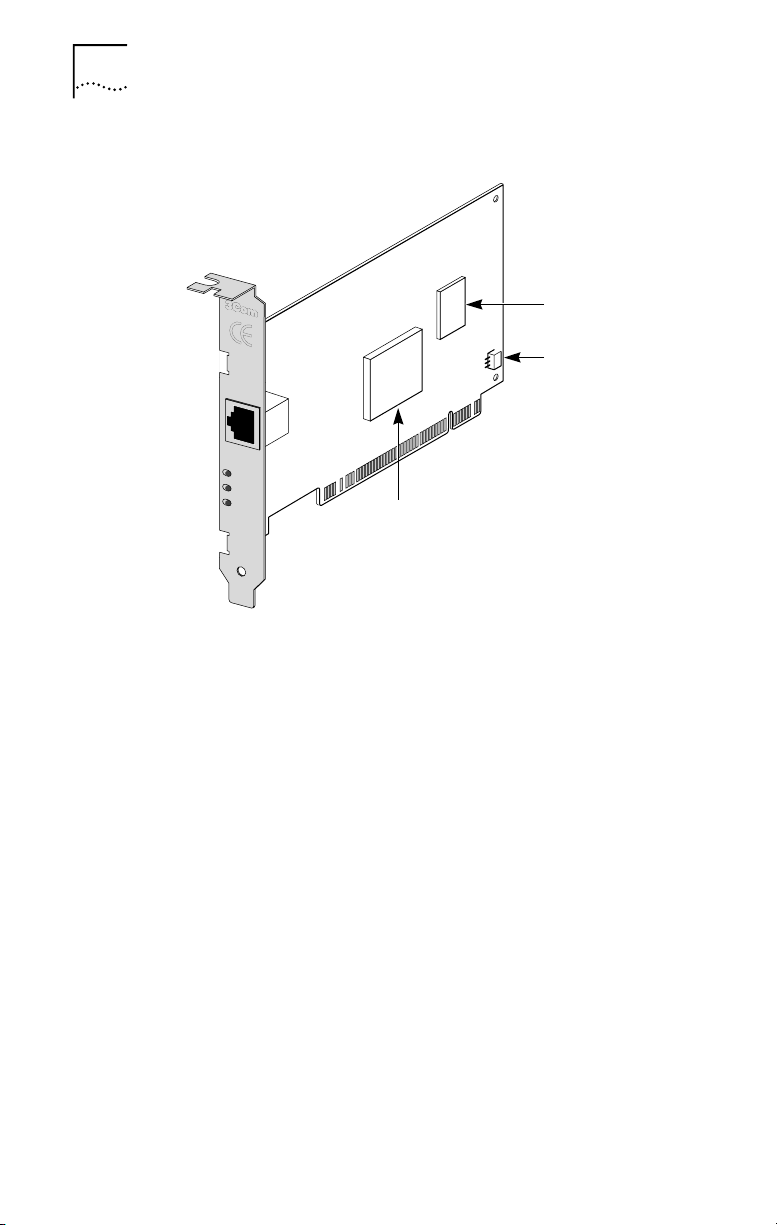
Figure 1 The 3CR990 NIC Supports Up to 168-bit (3DES) Encryption
TX DATA
ACT
10
L
N
100
K
The 3CR990 NIC provides these features for supported IP
and IPX environments:
■ Advanced Server Features (for 3CR990 server NICs
only)—Improved network performance, management,
and control:
■ Load Balancing
■ Self-Healing Drivers
■ Failover
■ VLANs
■ Traffic Prioritization
■ Remote Wake-Up—Lets you power-on a computer
remotely for after-hours administration.
■ Integrated Boot ROM with Managed PC Boot Agent
(MBA)—Adds management capabilities by enabling the
computer to boot from another computer, rather than
from its local drive.
■ Desktop Management Interface (DMI) 2.0—Enables
managed computers and net computers to report
details about themselves and their peripheral devices
Encryption chip
Remote Wake-Up
(RWU) connector
3XP Processor
Page 17

across the network to a DMI 2.0-compliant
management application.
■ Remote System Alerts (heartbeat packets)—Can signal
a possible computer power loss or theft.
■ Hot Plug NIC Installation—Lets you add a new NIC or
remove and replace a NIC without turning off power to
the computer.
■ Offline Diagnostics—Provides offline diagnostics
programs for configuring, testing, and
troubleshooting NICs.
Advanced Server Features
3Com DynamicAccess technology advanced network
software adds intelligence to the NIC to improve network
performance, management, and control. DynamicAccess
server features relieve network congestion and ensure high
performance and maximum bandwidth availability.
■ Load Balancing groups share the network load over
resilient server links (RSLs) that keep traffic flowing even
if a NIC in a group is temporarily disconnected.
■ Self-Healing Drivers (SHDs) detect common error
conditions and correct them while maintaining server link
performance.
■ Failover fault tolerance provides a backup solution in
the event of a NIC failure.
■ VLANs (IEEE 802.1Q multiple virtual LANs) let you divide
network segments into logical partitions that simplify
configuration changes, organize work groups
efficiently, help to control traffic, and provide extra
security.
■ Traffic Prioritization (IEEE 802.1p/Q) ensures that
business-critical and delay-sensitive traffic (such as
multimedia applications) has priority over normal data.
For detailed information on DynamicAccess technology
products, go to:
http://www.3com.com/dynamicaccess
3CR990 NIC Features 17
Page 18
18 CHAPTER 1: INTRODUCTION
Load Balancing
Load balancing maximizes bandwidth at the server through
the use of multiple parallel resilient server links (RSLs) that
share the network load.
An RSL consists of two or more NICs that form a virtual
NIC. Each virtual NIC has multiple physical NICs bound to it,
forming a group. Each NIC in a group uses the same
protocols and frame types. One NIC is designated the
primary NIC and the others secondary NICs.
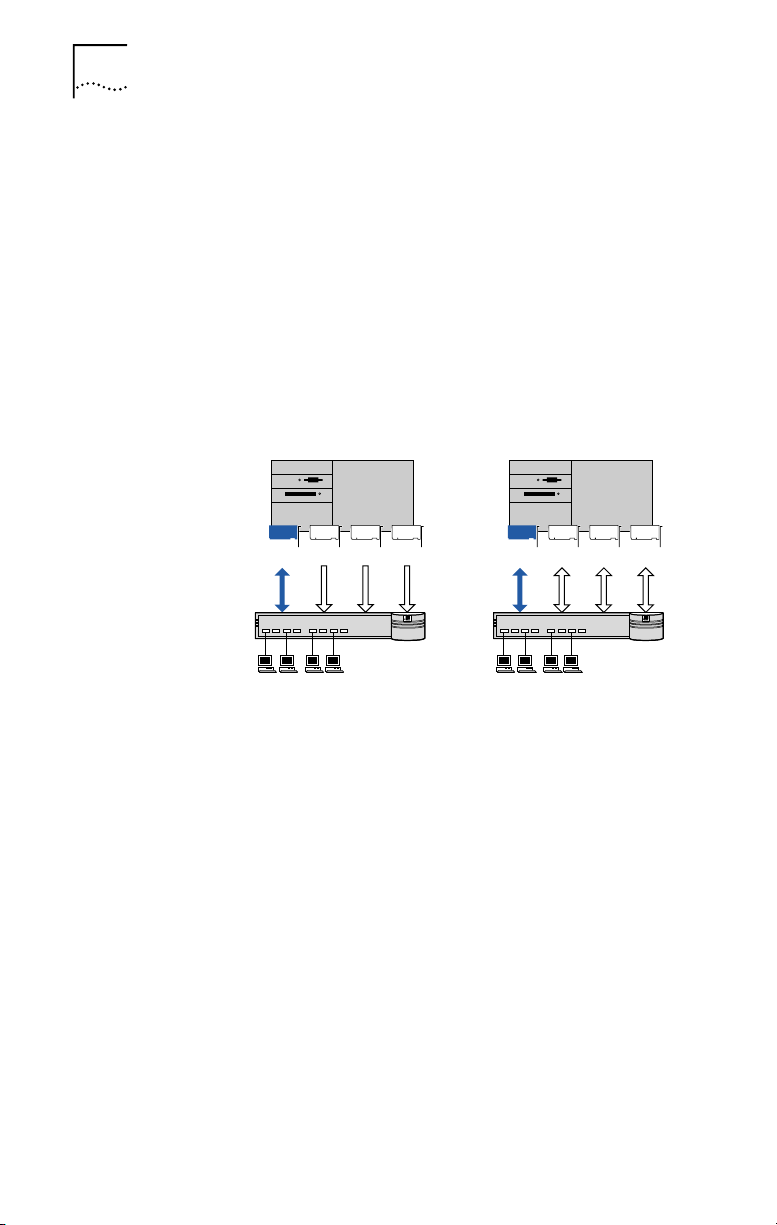
Figure 2 Types of Load Balancing Arrangements
Bidirectional
Primary
Secondaries
Server
Switch
Clients
Transmit-only
Primary
Secondaries
® ®
Self-Healing Drivers
Self-healing drivers (SHDs) are automatically installed with
the NIC software, and work together with RSLs to maintain
the network connection. An SHD monitors the NIC
continuously for error conditions and makes corrections.
These corrections can include resetting the NIC, rebuilding
software data structures, temporarily disabling features, or
transferring all network traffic to secondary NICs (termed a
failover event). An SHD can also continuously monitor the
status of the physical NICs in a virtual NIC group before and
after failover. Errors and actions are reported to the system
console and to the system log file. Error threshold values
can be configured at any time.
Failover
In addition to load balancing, RSLs provide failover fault
tolerance between a server and a switch—if one NIC in a
group fails, the others assume the network load of the
Page 19
3CR990 NIC Features 19
failed NIC. The failover behavior of secondary NICs
depends on how you set load balancing:
■ In a transmit load balancing arrangement, the primary
NIC is the only one that receives packets. If the primary
NIC fails, a secondary NIC assumes the configuration
profile, network traffic, and active status of the failed
primary NIC.
■ In a bidirectional load balancing arrangement, all NICs
receive packets. If any NIC fails, receive load balancing is
disabled, and the other NICs continue transmit-only
load balancing activity. Receive load balancing is
restored when new connections are established with
clients.
If any NIC in a bidirectional arrangement fails, receive load
balancing is disabled, and the other NICs continue
transmit-only load balancing activity. If the primary NIC
fails, a secondary NIC takes over packet reception for
the group.
Bidirectional load balancing is restored after a failure when
applications create new connections and new clients log in.
Server
Switch
Clients
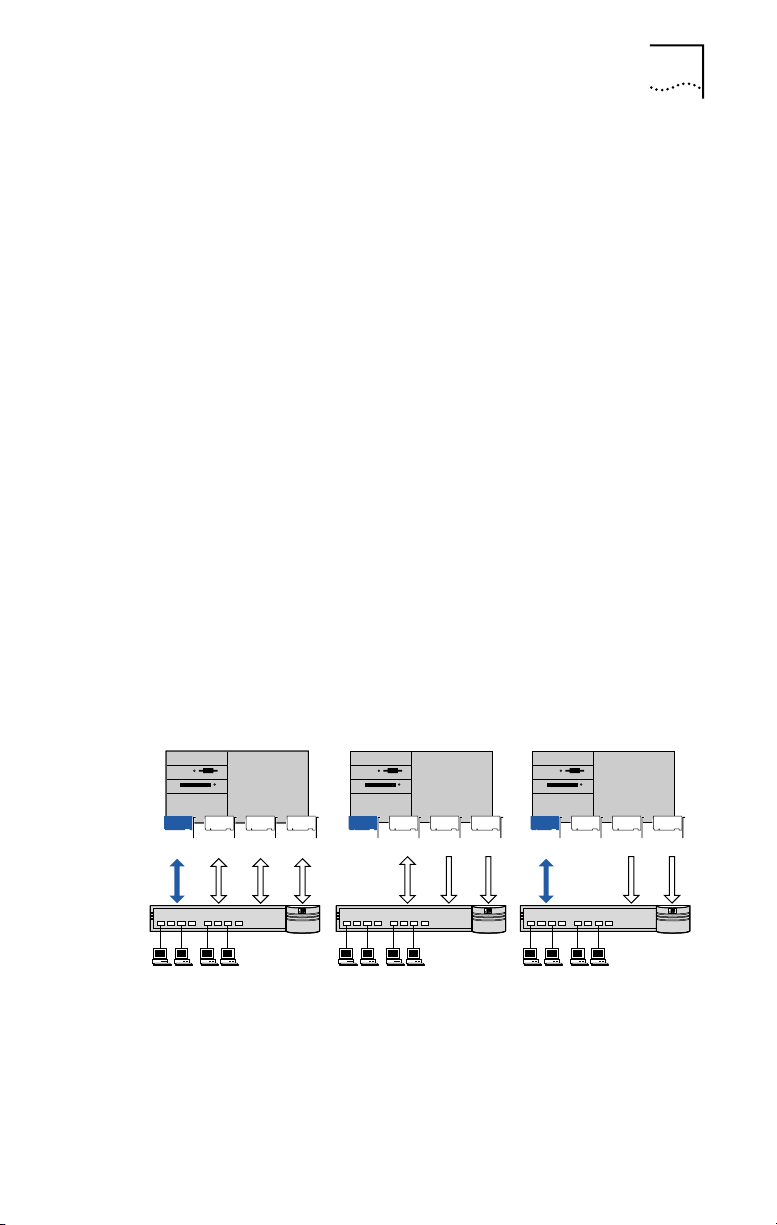
Figure 3 Bidirectional Load Balancing Failover
Bidirectional
load balancing
Primary
Secondaries
® ® ®
Primary failure Secondary failure
Primary
Secondaries
Primary
Secondaries
VLANs
A VLAN is a group of location-independent and
topology-independent devices that communicate as if they
were on the same physical LAN. Network devices on
different LAN segments and of different media types can
Page 20

20 CHAPTER 1: INTRODUCTION
be members of the same VLAN. Membership in a VLAN is
determined by a VLAN tag that is transmitted with the
Ethernet frame for use by a switch.
With VLANs, you can define a network according to:
■ Organizational groups—For example, you can have one
VLAN for the Marketing department and one for the
Finance department.
■ Application groups—For example, you can have one
VLAN for e-mail users and one for multimedia users.
Implementing VLANs on a network has these advantages:
■ It eases the change and movement of devices on
IP networks.
With traditional IP networks, if users move to a different
IP subnet, the IP addresses of each workstation must be
updated manually. With VLANs installed, if an end
station on VLAN 1 is moved to a port elsewhere on the
network, you need only to specify that the new port is
on VLAN 1.
■ It helps to control traffic.
With traditional networks, congestion can be caused by
broadcast traffic that is directed to all network devices
whether they require it or not. Each VLAN can be set up
to contain only those devices that need to communicate
with each other, increasing network efficiency.
■ It provides extra security.
Devices within each VLAN can communicate only with
member devices in the same VLAN. If a device in
VLAN 1 needs to communicate with devices in VLAN 2,
the traffic must cross a router.
The DynamicAccess technology multiple VLAN capability
supports IEEE 802.1Q VLAN tagging and works with any
switch that complies with IEEE 802.1Q specifications. See
your Ethernet switch documentation for more information
on IEEE 802.1Q VLANs.
Traffic Prioritization
Traffic prioritization (IEEE 802.1p/Q) ensures that
business-critical and delay-sensitive traffic (such as
multimedia applications) has priority over normal data.
Page 21

For detailed information on DynamicAccess technology
products, go to:
http://www.3com.com/dynamicaccess
Server Features Using Other NICs
One foreign NIC (one that is not a 3Com EtherLink Server
NIC) is allowed in one group per server. For guidelines on
using foreign NICs, see these topics:
■ Windows NT and Windows 2000—Planning the
Configuration on page 60
■ NetWare—Planning the Configuration on page 104
Remote Wake-Up
Remote Wake-Up provides the ability to remotely power-on
a network computer for after-hours administration. When
the PC is in sleep mode and receives a wake-up packet
(Magic Packet frame) through the LAN, the NIC turns on
the power to the PC. Remote Wake-Up also requires using
a desktop management application that is able to generate
a Magic Packet Remote Wake-Up signal.
If the computer complies with PCI 2.2, Remote Wake-Up is
automatically enabled through the PCI bus. If the computer
complies with PCI 2.1, Remote Wake-Up support is
enabled by connecting a Remote Wake-Up cable from the
NIC’s Remote Wake-Up (RWU) connector
to a 3-pin Remote Wake-Up connector on the computer
motherboard.
3CR990 NIC Features 21
The NIC provides a network connection with or without
the Remote Wake-Up cable installed.
Remote Wake-Up Requirements
The following conditions are required to use Remote
Wake-Up:
■ Management application that supports Remote
Wake-Up
■ BIOS that supports Remote Wake-Up
Page 22

22 CHAPTER 1: INTRODUCTION
■ PCI 2.2-compliant bus or a 3-pin Remote Wake-Up
connector on the computer motherboard and a 5-volt
standby power supply unit rated at a minimum of
375 milliamperes
If you are unsure whether your computer meets the
requirements listed above, see the computer
documentation or contact the computer manufacturer.
For more information on Remote Wake-Up, including a list
of computers that currently support this feature, go to:
http://www.3com.com/partners/acpi
Remote Wake-Up Cable
To order Remote Wake-Up cables, contact 3Com:
■ Toll-free number for the United States and Canada:
1-877-226-4604
■ Toll number for international calls:
■ From the European Community: 001-510-226-4604
■ From other countries: Enter the international access
code followed by 510-226-4604
Remote Wake-Up and Multiple NIC Installations
To use multiple NICs as Remote Wake-Up NICs in the same
computer, the computer must have a power supply that
can support multiple Remote Wake-Up devices.
See your computer documentation if you are unsure
whether your computer power supply can accommodate
more than one Remote Wake-Up device.
Integrated Boot ROM with Managed PC Boot Agent (MBA)
The Managed PC Boot Agent (MBA) software adds
management capabilities to the NIC by enabling the
computer to boot from a network server, rather than from
the computer’s local drive.
This preboot support allows you to use management
applications to perform the following tasks remotely:
■ Install and configure a new computer that has never
been connected to the network.
■ Upgrade software.
Page 23

3CR990 NIC Features 23
■ Configure or reconfigure multiple systems
simultaneously.
■ Scan for viruses.
■ Back-up hard drives and perform disaster recovery
tasks.
In addition to firmware, MBA has a complete set of tools,
utilities, and pre-OS software that enables network
administrators to perform such tasks as:
■ Reconfiguring multiple systems at once.
■ Backing up hard drives automatically.
For information on configuring the MBA to boot from
the network, see Configuring the Managed PC Boot Agent
(MBA) on page 120.
For detailed information on the MBA, see the
Managed PC Boot Agent User Guide, located with the
MBA software on the 3Com EtherCD.
For more information on the management features
supported by the NIC, go to:
http://www.3com.com/managedpc
Desktop Management Interface (DMI) 2.0
Desktop Management Interface (DMI) is a network
management standard that is widely accepted for
managing Intel-based computers.
DMI 2.0 enables managed computers and net computers
to report details about themselves and their peripheral
devices across the network to a DMI 2.0-compliant
management application.
The 3Com DMI Agent allows any DMI management
application to access information such as:
■ the NIC driver location, version, and size
■ packets-sent statistics
■ crc receive errors
A network administrator can then use this type of
information to remotely configure and manage a client or
server computer.
Page 24

24 CHAPTER 1: INTRODUCTION
The 3Com DMI Agent consists of a DMI browser with the
following components:
■ DMI service layer
■ DMI agent
■ GUI installer
■ NDIS drivers
DHCP Server Prevention
This feature prevents the PC from acting like a DHCP server.
All receive packets are passed through a DHCP filter and
are discarded if they are deemed to be destined for the
DHCP process.
Remote System Alerts
The NIC can be configured to continuously transmit a
packet to an alert target management station. If the
management station fails to receive the regularly scheduled
packet, an alert can be triggered that signals a possible
computer power loss or theft.
The NIC can also transmit a workgroup keep-alive packet
periodically while the computer is in a sleep state. This
packet prevents the computer’s workstation address from
being aged-out of switch router tables.
Only system administrators should configure these
features.
Hot Plug NIC Installation
If your computer supports PCI hot plug specifications, you
can add a new 3Com NIC or remove and replace a 3Com
NIC without turning off power to the computer. Hot plug
NIC installation allows you to expand connections without
taking the computer out of service. It makes
troubleshooting faster and easier because you do not need
to wait for the computer to reboot.
For instructions on performing a hot plug NIC installation,
refer to your computer documentation.
Page 25

Offline Diagnostics
The NIC software includes offline diagnostics programs for
configuring, testing, and troubleshooting NICs. The
configuration program within the DOS diagnostics program
is used for a PC running DOS or NetWare. The 3Com NIC
diagnostics program (3Com NIC Doctor) is a
windows-based program used for a PC running
Windows 2000, Windows NT 4.0, Windows 98, or
Windows 95.
DynamicAccess LAN Agent
The DynamicAccess LAN agent is advanced network
software that improves performance, management, and
control of your network.
The DynamicAccess LAN agent enables the following
features:
■ RMON SmartAgents—Enables full RMON reporting on
all network segments, including switched networks,
without the need to place dedicated RMON probes
throughout the network. RMON SmartAgents are for
use with the DynamicAccess network edge monitor or
other remote monitoring applications.
■ Traffic prioritization (IEEE 802.1p/Q)—Ensures that
business-critical and delay-sensitive traffic (such as
multimedia applications) has priority over normal data.
■ Fast IP—Eliminates router bottlenecks and improves
performance in switched networks.
■ Efficient multicast control—Prevents flooding of
switched networks by multicast applications such
as video training, stock quotes, or online news.
The DynamicAccess LAN agent can be installed on a PC
running Windows 2000, Windows NT, Windows 98, or
Windows 95. See Installing the DynamicAccess LAN Agent
for a Client NIC on page 55 for more information.
For detailed information on the DynamicAccess LAN agent,
see the DynamicAccess Technology User Guide located on
the EtherCD. Information is also available at:
http://www.3com.com/dynamicaccess
DynamicAccess LAN Agent 25
Page 26

26 CHAPTER 1: INTRODUCTION
Windows 2000 Offload Features
Additionally, the 3CR990 NIC supports Windows 2000
offload features in an IP environment. The Windows 2000
offload features are designed to enhance the
Windows 2000 operating system capabilities by off loading
key TCP/IP networking and security tasks from the
Windows 2000 operating system:
■ IPSec Offload—reduces CPU utilization by allowing the
3XP processor and a crypto chip on the NIC to perform
data encryption operations.
■ TCP Segmentation Offload—reduces CPU utilization by
allowing the 3XP processor on the NIC to perform
segmentation of TCP packets.
Windows 2000 does not allow IPSec offloads and TCP
Segmentation offloads for the same session. Though all
offload types may be enabled, TCP Segmentation
offloading will not occur during an IPSec session.
■ IP and TCP Checksum Offload—reduced CPU utilization
by allowing the 3XP processor on the NIC to perform
the checksum calculation of TCP/IP and UDP/IP packets.
■ 802.1P Packet Priority Offload—reduces CPU utilization
by allowing the 3XP processor on the NIC to perform
the insertion of the 802.1Q tag header into the packet.
For more information on enabling and disabling offloads
for Windows 2000, see Using Windows 2000 Offload
Features on page 73.
Page 27

INSTALLING AND
2
Overview
Installation Overview
1 Register the product.
2 Install the NIC in the PC.
3 Connect the NIC to the network.
4 Install the network driver.
Safety Precautions
CONNECTING THE NIC
This chapter describes how to install the NIC in your PC and
connect it to an Ethernet or Fast Ethernet network.
There are four steps to the NIC installation:
Observe the following safety precautions.
WARNING: Computers operate with voltages that can be
lethal. Before removing the cover, turn off the computer
and unplug it. Disconnect all cables that are connected to
the main system unit. Remove jewelry from your hands
and wrists. Use insulated or nonconductive tools.
CAUTION: The NIC is packed in an antistatic container to
protect it during shipment. Do not touch the components
or any metal parts on the NIC, except for the backplate.
To avoid damaging the NIC or the computer, reduce static
electricity on your body by wearing an electrostatic
discharge wrist strap attached to the chassis or by
touching an unpainted metal part of the chassis before
unplugging the computer and before handling the NIC.
Page 28

28 CHAPTER 2: INSTALLING AND CONNECTING THE NIC
CAUTION: Install the NIC in a PCI slot that conforms to
PCI 2.1 or higher specifications. Do not attempt to install
the NIC in an ISA or EISA slot. Doing so may damage the
NIC and the computer.
WARNING: Make sure that the computer power cord is
unplugged. Only properly trained and authorized
personnel should perform service. Contact the computer
manufacturer for information about safe service
techniques.
Installation Requirements
The following items are required for hardware and
software installation.
■ Network Interface Card (NIC)—At least one 3Com
10/100 Mbps PCI 3CR990 NIC (included)
■ Processor:
■ Server: Intel-based CPU (Pentium-class processor)
■ Client: 80486 or Pentium-class processor
■ RAM:
■ Server: 128 megabytes minimum; 256 megabytes
recommended
■ Client: 32 MB RAM recommended for running
DynamicAccess Technology
■ PCI slot—For each NIC, one bus master slot that
conforms to PCI 32-bit specifications, revision 2.1
or higher
■ Drive—CD-ROM
■ Cable—Category 5 UTP (included). (See cable
specifications in Preparing the NIC and the Computer
on page 32.)
■ Connector—RJ-45 (included)
■ Software—One 3Com EtherCD with DynamicAccess
technology software and network drivers (included)
■ Operating system—One of the following:
■ Microsoft Windows 2000
■ Microsoft Windows NT version 4.0
■ Microsoft Windows 95/98
Page 29

You can install the NIC base network driver on any
Windows PC without having to also install a specific
Microsoft Service Pack; however, 3Com recommends that
you always try to use the most recent Service Pack
available from Microsoft technical support
(www.microsoft.com).
Running 3Com DynamicAccess software on NetWare 4.0
requires Service Pack 6 or greater from Microsoft.
■ Novell NetWare server version 3.12, 4.11, or 5.0
with the most recent patches and updates available
from Novell technical support (www.novell.com)
■ Computer BIOS—Latest version. Contact the
computer manufacturer to verify.
Remote Wake-Up—For requirements, see Remote
Wake-Up on page 21.
Installing Multiple NICs
If you are installing multiple EtherLink PCI NICs in a
computer, follow the instructions in Installing Multiple NICs
on page 52.
Installing From Diskette 29
Upgrading Windows 95 to Windows 98
If you are upgrading a computer from Windows 95 to
Windows 98, and the computer already has an EtherLink
PCI NIC installed, follow the instructions in the WIN98.TXT
file located in the HELP directory on the EtherCD.
Updating the Network Driver and NIC Software
If you already have an EtherLink PCI NIC installed and want
to update the network driver, follow the instructions in
Updating the Network Driver and NIC Software on
page 51.
Installing From Diskette
If your computer does not have a CD-ROM drive, use a PC
that has a CD-ROM drive and create installation diskettes
from the EtherCD.
Page 30

30 CHAPTER 2: INSTALLING AND CONNECTING THE NIC
You can also download the EtherCD software from the
3Com World Wide Web site:
http://support.3com.com/infodeli/tools/nic
The installation diskettes allow you to install the network
driver only. If you want to install the NIC diagnostics or
desktop management software, you must install them
from the EtherCD.
Making a DOS-Bootable Diskette
For installation and configuration procedures that require
you to boot from DOS, you cannot successfully use the
MS-DOS prompt from within Windows. Perform a “clean”
boot from DOS or use a DOS boot disk.
To use the CD-ROM drive on a PC or server in a DOS
environment, the DOS drivers for the CD-ROM drive must
be installed. Consult the documentation that
accompanied your CD-ROM drive or your motherboard
for information about how to install these drivers.
If the PC or server is only running DOS and a CD-ROM
drive is not installed, you must install the NIC software
using installation diskettes. For more information about
installation diskettes, see the next section,
Installation Diskettes.
To make a DOS-bootable diskette:
1 Insert a blank, formatted diskette in drive A.
2 At the DOS prompt, enter:
sys a:
System files are copied to the diskette.
3 Remove the diskette from drive A and attach a label
for future reference.
Label the diskettes EtherDisk 1 and EtherDisk 2.
Creating Installation Diskettes
To create installation diskettes from the EtherCD:
1 Turn on the power to the PC and start Windows.
2 Insert the EtherCD in the CD-ROM drive.
Creating
Page 31

Product Registration 31
The EtherCD Welcome screen appears.
3 Click NIC Software.
4 Click NIC Drivers and Diagnostics.
5 Click Installation Utilities.
6 Click Create Installation Diskettes.
The EtherCD Diskette Creation Utility Welcome
screen appears.
7 Click Next.
8 Insert the blank, formatted diskette labeled
EtherDisk 1 in the PC, and then click Next.
Files are copied. EtherDisk 1 contains:
■ NDIS 2/3/4/5 drivers
■ DOS utilities
■ README.TXT file
9 Remove the disk and insert the disk labeled
EtherDisk 2 when prompted, and then click OK.
Files are copied. EtherDisk 2 contains:
■ NetWare client and server drivers
■ PACKET driver
■ Help text files
The diskette creation is complete.
For instructions on using the installation diskettes to
install the network driver, see the DISKETTE.PDF file in the
ENGLISH\MANUALS\ETHERDSK directory on the EtherCD.
Product Registration
The United States government places registration
requirements on using data encryption products. To obtain
customer support for the 3CR990 NIC, you are required to
register your NIC product with 3Com. You can register
electronically or by U.S. mail.
In addition to enabling customer support for your NIC,
registration also entitles you to receive upgrade
information and advance feature information.
Page 32

32 CHAPTER 2: INSTALLING AND CONNECTING THE NIC
To be able to register electronically, a web browser
must be installed on your system. You must also have
an active Internet service provider (ISP) connection
The original version of Windows 95 (Build 950) does
not automatically allow you to change your default
browser, even if Microsoft Internet Explorer is not
present. If you are running this version of Windows 95
on your PC, access the following site to register your
3CR990 NIC:
http://www.3com.com/productreg
To register electronically:
1 Insert the EtherCD (that shipped with this product) in
the CD-ROM drive.
The EtherCD Welcome screen appears.
If the Welcome screen does not appear, see EtherCD
Content and Navigation on page 163.
2 Click Register Product, and then Register Online.
3 Follow the prompts as they appear.
.
To register by U.S. mail:
1 Find and remove the registration card included in the
EtherLink 10/100 PCI Network Interface Card Quick
Guide that shipped with this product.
Fill out the registration card and drop it in the mail. (No
postage is required.)
Preparing the NIC and the Computer
Observe the precautions listed in Safety Precautions on
page 27. Follow these preparation steps:
1 Decide whether you want to use Remote Wake-Up.
If you want to use the Remote Wake-Up feature on a
computer that complies with PCI 2.1, you must obtain a
Remote Wake-Up cable for the NIC (for details, see Remote
Wake-Up on page 21). If the computer complies with PCI
2.2, Remote Wake-Up is automatically enabled through the
PCI bus and no Remote Wake-Up cable is required.
Page 33

Preparing the NIC and the Computer 33
2 Make sure that cable requirements are met.
The RJ-45 port provides a 10 Mbps or 100 Mbps
connection automatically, depending on the speed of
the connected hub or switch.
The following table shows the cable requirements and
maximum network cable lengths for the RJ-45 port.
Network Environment
10 Mbps
(10BASE-T)
100 Mbps
(100BASE-TX)
Cable Required
Category 3, 4, or 5
unshielded twisted-pair
Category 5 unshielded
twisted-pair
Maximum
Cable Length
100 m (328 ft)
100 m (328 ft)
3 Unpack and inspect the NIC for damage.
4 Exit all open applications and user processes.
5 Turn off the power to the computer and attached
devices.
6 Unplug the power cables from the power source.
7 Remove the computer cover.
8 Locate an empty, nonshared bus-mastering PCI slot
and remove its slot cover. Save the screw, if there
is one.
Do not install the NIC in a shared PCI slot. Avoid any
PCI slot next to an ISA slot. This is often a shared slot and
does not support bus mastering.
If you do not know how to identify a PCI slot, check the
computer documentation or ask the system administrator.
If you are planning to install the Remote Wake-Up cable,
choose an empty PCI slot that is close to the Remote
Wake-Up connector on the computer motherboard. The
Remote Wake-Up cable is only required if the computer
complies with PCI 2.1 and you want to use the
Remote Wake-Up. The cable is not required if the
computer complies with PCI 2.2. (For information on
obtaining a Remote Wake-Up cable from 3Com, see
Remote Wake-Up Cable on page 22.)
Page 34

34 CHAPTER 2: INSTALLING AND CONNECTING THE NIC
9 Write down the MAC address of the NIC and note the
relative position of the intended PCI slot.
This information is helpful when you are installing the
network drivers and connecting the cables to the hub or
switch. The MAC address is the 12-digit hexadecimal
number printed on the small bar code label on the
component side of the NIC.
The next step is to install the NIC in the computer and
connect it to the network.
Installing and Connecting the NIC
Observe the safety precautions listed in Safety Precautions
on page 27.
Prepare the NIC and the computer as described in
Preparing the NIC and the Computer on page 32.
The following instructions apply to installing the NIC
in most computers. If these instructions are not appropriate
for your computer, refer to the documentation that
accompanied the computer.
Page 35

Figure 4 Installing the NIC
1 Remove slot cover
2 Insert NIC
Installing and Connecting the NIC 35
PCI slots
1 Carefully insert the NIC in the empty PCI slot, as
shown.
Press firmly to ensure that the NIC is fully seated in the slot.
Secure the NIC with the screw if you removed one earlier.
If you want to install the Remote Wake-Up cable, go
to the next section, Connecting the Remote Wake-Up
Cable to continue the installation. If you do not want to
connect the cable, continue with step 2.
2 Replace the computer cover and plug in the power
cord.
Do not turn on the power to the computer.
Page 36

36 CHAPTER 2: INSTALLING AND CONNECTING THE NIC
TX Data
ACT
10
100
L
N
K
3 Plug the RJ-45 connector on the twisted-pair network
cable into the RJ-45 port on the NIC backplate.
4 Connect the other end of the network cable to an
active network port.
Figure 5 Connecting the cable to the NIC backplate
The next step is to install the software, as described in
Installing Software on page 38.
If your site network installation procedures require you
to verify that installed hardware is functional before you
install software, run the 3CR990.EXE DOS diagnostics
program before installing the driver. This program is
located on the 3Com EtherCD.
Connecting the Remote Wake-Up Cable
This section describes how to connect the
Remote Wake-Up cable from the NIC to the PC
motherboard. Connecting the Remote Wake-Up cable is
optional. Connect this cable only if your NIC supports
Remote Wake-Up and you want to use this feature. (For
information on obtaining a Remote Wake-Up cable from
3Com, see Remote Wake-Up Cable on page 22.)
Page 37

Connecting the Remote Wake-Up Cable 37
WARNING: Make sure that the PC power cord is
unplugged. Only properly trained and authorized
personnel should perform service. Contact your PC
manufacturer for information about safe service
techniques.
To connect the Remote Wake-Up cable:
1 Make sure that the NIC is properly installed in a PCI slot.
2 Insert the Remote Wake-Up cable into the
RWU connector on the NIC.
Twist the cable twice before attaching the cable to the PC.
3 Attach the other end of the cable to the connector on
the PC motherboard.
Refer to your PC documentation if you need help locating
the connector.
4 Replace the PC cover and plug in the power cord.
Do not turn on the power to the PC. Continue at step 3 in
Installing and Connecting the NIC.
Page 38

38 CHAPTER 2: INSTALLING AND CONNECTING THE NIC
Installing Software
See the following topics for requirements and instructions
on installing software in various operating systems:
■ Installing NIC Drivers in Windows on page 39
■ Updating the Network Driver and NIC Software on
page 51
■ Installing NetWare Client and Server Drivers on page 89
The next step is to install the network driver.
Go to Installing NIC Drivers in Windows on page 39 or
Installing NetWare Client and Server Drivers on page 89.
Page 39

INSTALLING NIC DRIVERS IN
3
Overview
WINDOWS
This chapter explains the following tasks on a computer
running Windows 2000, Windows NT, Windows 98, or
Windows 95:
■ Install the network driver and NIC software using
EtherCD
■ Update the network driver or NIC diagnostics program
■ Install multiple NICs
To obtain the latest version of a driver, go to:
http://www.3com.com/
The network driver can be used in both Microsoft
and NetWare network environments.
For instructions on using the installation diskettes (which
can be created from the EtherCD) to install the network
driver, see Installing From Diskette on page 29. For
additional information, see the text file for your operating
system in the HELP directory on the EtherCD.
Software Installation Requirements
Before you install software, you may want to verify that
the installed server NICs are functional or change their
configuration settings by running DOS diagnostics. Use the
3C99XCFG.EXE program located on the EtherCD.
If you are installing the software during the installation of
the network operating system, see Installing a 3Com NIC
While Installing the NOS on page 167.
For a list of minimum installation prerequisites, see
Installation Requirements on page 28.
Page 40

40 CHAPTER 3: INSTALLING NIC DRIVERS IN WINDOWS
Getting Help
To display the Help system during the software installation,
click Help on any 3Com window.
Installing the Network Driver Using the EtherCD
To install the network driver using the EtherCD, follow
the steps in the section that is specific to your Windows
operating system.
Before installing the network driver:
■ Make sure that the NIC is installed in the PC and
that it is connected to the network.
■ Make sure that you have the Windows installation files
(for Windows 95/98 only). These files may be on a CD
or diskettes, or they may have been copied to your hard
drive when Windows was installed on your PC.
Windows 2000
This section describes how to install the network driver and
NIC software in a PC or server running Windows 2000.
Before you begin software installation:
■ Make sure that all software installation requirements
are met. See Installation Requirements on page 28.
■ Install the hardware. For instructions, see Installing and
Connecting the NIC on page 34.
Use the following procedure to install the driver for the first
time in a computer that is running Windows 2000. (If you
are updating a previous installation, see Updating the
Network Driver and NIC Software on page 51.)
To install the software:
1 Turn on the power to the PC.
2 Start Windows 2000 and log in to the Windows 2000
Administrator account.
After The Windows 2000 Found New Hardware Wizard
starts. The wizard detects the new NIC(s) and begins the
driver installation.
Page 41

Installing the Network Driver Using the EtherCD 41
3 Click Next.
The Install Hardware Device Drivers screen appears.
4 Insert the EtherCD in the CD-ROM drive.
5 Select Search for a suitable driver for my device
(recommended), and then click Next.
The Locate Driver Files screen appears.
6 Select the CD-ROM drives option, clear any other
checked options, and click Next.
The Driver Files Search Results screen appears.
Windows finds the driver on the EtherCD.
7 Click Next.
The Hardware Install screen appears. Files are copied. Then
the Complete the Found New Hardware Wizard screen
appears, displaying the message “Windows has finished
installing the software for this device.”
8 Click Finish.
The software installation is complete. Go to Verifying
Successful Installation on page 48 to confirm that the NIC
is properly installed.
To change configuration settings, see Configuring the NIC
on page 113.
Windows NT 4.0
This section describes how to install the network driver and
NIC software in a PC or server running Windows NT 4.0
.
CAUTION: Windows NT 4.0 Service Pack 6 (SP6) is a
minimum system requirement for installing 3Com
DynamicAccess technology.
To install the network driver:
1 Turn on the power to the PC and start Windows NT.
2 Log in to the Windows NT Administrator account.
3 Insert the EtherCD in the CD-ROM drive.
4 Right-click the Network Neighborhood icon.
Page 42

42 CHAPTER 3: INSTALLING NIC DRIVERS IN WINDOWS
5 Select Properties on the pop-up menu.
The Network window appears.
6 Click the Adapters tab.
If networking has not been installed on your PC before,
Windows NT asks you if you want to install networking. Click
Yes. See the WINNT.TXT file located on the EtherCD or your
Windows NT documentation for instructions.
7 Click Add.
The Select Network Adapter dialog box appears.
8 Click Have Disk.
The Insert Disk dialog box appears.
9 Make sure that the correct path to your CD-ROM
drive appears in the entry box, for example:
d:
10 Click OK.
The Select OEM Option screen appears, displaying two
driver options:
3Com EtherLink 10/100 Mbps PCI NIC with 3XP
Processor
3Com EtherLink Server 10/100 Mbps PCI NIC with
3XP Processor
11 If you have installed a client NIC (3CR990-TX-95 or
3CR990-TX-97), select:
3Com EtherLink 10/100 Mbps PCI NIC with 3XP
Processor
If you have installed a server NIC (3CR990SVR95 or
3CR990SVR97), select:
3Com EtherLink Server 10/100 Mbps PCI NIC with
3XP Processor
12 Click OK.
Files are copied. The Network screen appears with the
3Com NIC name listed in the Network Adapters list box.
13 Click Close.
If the Microsoft TCP/IP Properties screen appears, enter
the requested information for your network environment.
Page 43

14 Click Yes to restart the PC.
Windows 98
Installing the Network Driver Using the EtherCD 43
Refer to your system administrator or the Windows NT
documentation for assistance. After entering the
appropriate TCP/IP information and clicking OK, the
Network Settings Change window appears.
If the Microsoft TCP/IP Properties screen does not appear,
the installation is complete. The Network Settings Change
window appears.
The network driver installation is complete. Go to Verifying
Successful Installation on page 48 to confirm that the NIC
is properly installed.
This section describes how to install the network driver and
NIC software in a PC or server running Windows 98.
Before installing the NIC software:
■ Make sure that the NIC is installed in the PC and
connected to the network.
■ Make sure that you have the Windows 98 installation
files. These files may be on a CD or diskettes, or they
may have been copied to your hard disk when
Windows 98 was installed on your PC.
If you encounter problems during the installation, see
TROUBLE.TXT (located in the HELP directory on the
EtherCD) for troubleshooting tips.
To install the software:
1 Turn the PC power on.
Windows detects the NIC. The Add New Hardware Wizard
starts.
2 Click Next.
The Add New Hardware Wizard screen prompts you to
select an option.
3 Select the Search for the best driver for your device
(Recommended) option, and then click Next.
The Add New Hardware Wizard screen prompts you for the
driver location.
Page 44

44 CHAPTER 3: INSTALLING NIC DRIVERS IN WINDOWS
4 Select the CD-ROM drive option and clear any other
check options that are selected.
5 Insert the EtherCD in the CD-ROM drive, and then
click Next.
Windows finds the driver file for the device.
6 Click Next.
Files are copied.
The Insert Disk screen appears, prompting you for the
Windows 98 CD-ROM.
7 Click OK.
The Copying Files dialog box appears.
8 Remove the EtherCD from the CD-ROM drive, insert
the Windows 98 CD, enter the path to the CD-ROM
drive, and click OK.
The Add New Hardware Wizard displays a message
informing you that Windows has finished installing the
software.
9 Click Finish.
The Systems Settings Change screen appears, prompting
you to restart your computer.
10 Click Yes to restart your computer.
You must restart your computer to complete the
installation.
Windows 95
The software installation is complete. Go to Verifying
Successful Installation on page 48 to confirm that the NIC
is properly installed.
This section describes how to install the network driver and
NIC software in a PC client or server running Windows 95.
CAUTION: Do not install a 3CR990 NIC while installing
Windows 95 OSR2 using the “Custom” option. Install
Windows 95 OSR2 first, then install the 3CR990 NIC
.
Page 45

Installing the Network Driver Using the EtherCD 45
Before installing the NIC software:
■ Make sure that the NIC is installed in the PC and
connected to the network.
■ Make sure that you have the Windows 95 installation
files. These files may be on a CD or diskettes, or they
may have been copied to your hard disk when
Windows 95 was installed on your PC.
If you encounter problems during the installation, see
W95NDIS.TXT and TROUBLE.TXT (located in the HELP
directory on the EtherCD) for troubleshooting tips.
To begin the driver installation, turn the PC power on.
Windows detects the NIC and depending on the version of
Windows 95 that you have installed, either the New
Hardware Found screen appears, or the Update Device
Driver Wizard starts.
New Hardware Found
If the New Hardware Found screen appears, follow this
procedure to install the NIC driver:
1 Select the Driver from disk provided by hardware
manufacturer option, and then click OK.
The Install From Disk screen appears.
2 Insert the EtherCD in the CD-ROM drive, enter the
path to the CD-ROM drive, and click OK.
■ If networking has already been installed on your PC,
go to step 4.
■ If this is the first time that networking is being
installed on your PC, the Identification tab of the
Network screen appears. Go to step 3.
3 In the specified fields of the Identification tab screen,
enter the following information, and then click Close.
■ Computer Name—Identifies the PC on the network
for other users. This entry must be a unique name of
15 characters or fewer, containing no spaces.
■ Workgroup—Identifies the group (for example,
your department name) to which your PC belongs. If
your computer is connected to a peer-to-peer
Page 46

46 CHAPTER 3: INSTALLING NIC DRIVERS IN WINDOWS
network, this entry must be exactly the same for all
the PCs in your network.
■ Computer Description—Displays additional details
to other users on the network about this PC. For
example, you could specify that the PC is connected
to a printer. Filling in this field is optional.
4 The Insert Disk screen appears, prompting you for the
Windows 95 CD-ROM. Click OK.
The Copying Files screen appears.
5 Do one of the following:
■ If the Windows 95 files were not copied to your
hard drive, remove the EtherCD from the CD-ROM
drive, insert the Windows 95 CD, enter the path to
the CD-ROM drive, and then click OK.
■ If the Windows 95 files were copied to your hard
drive, enter the path to the directory containing
these files, and then click OK.
Files are copied. The Systems Settings Change screen
appears, prompting you to restart your computer.
6 Click Yes.
You must restart your computer to complete the
installation
.
The installation is complete. To verify that the installation was
successful, see Verifying Successful Installation on page 48.
After Windows restarts, double-click the Network icon in
the Control Panel and make sure that the configuration
settings are properly set for your network environment.
Contact your system manager for assistance.
Update Device Driver Wizard
If the Update Device Driver Wizard starts, follow this
procedure to install the NIC driver:
1 Insert the EtherCD in the CD-ROM drive, and then
click Next.
Windows finds the driver.
Page 47

Installing the Network Driver Using the EtherCD 47
2 Click Finish.
■ If networking has already been installed on your PC,
go to step 4.
■ If this is the first time that networking is being
installed on your PC, the Identification tab of the
Network screen appears. Go to step 3.
3 In the specified fields of the Identification tab screen,
enter the following information, and then click Close.
■ Computer Name—Identifies the PC on the
network for other users. This entry must be a unique
name of 15 characters or fewer, containing no
spaces.
■ Workgroup—Identifies the group (for example,
your department name) to which your PC belongs.
If your computer is connected to a peer-to-peer
network, this entry must be exactly the same for all
the PCs in your network.
■ Computer Description—Displays additional details
to other users on the network about this PC. For
example, you could specify that the PC is connected
to a printer. Filling in this field is optional.
4 The Insert Disk screen appears, prompting you for the
EtherCD. Click OK.
The Copying Files screen appears.
5 Enter the path to the CD-ROM drive, and then click
OK.
Files are copied. The Insert Disk screen appears, prompting
you for the Windows 95 CD-ROM.
6 Click OK.
The Copying Files screen appears.
7 Do one of the following:
■ If the Windows 95 files were not copied to your
hard drive, remove the EtherCD from the CD-ROM
drive, insert the Windows 95 CD, enter the path to
the CD-ROM drive, and then click OK.
Page 48

48 CHAPTER 3: INSTALLING NIC DRIVERS IN WINDOWS
■ If the Windows 95 files were copied to your hard
drive, enter the path to the directory containing
these files, and then click OK.
Files are copied. The Systems Settings Change screen
appears, prompting you to restart your computer.
8 Click Yes.
After Windows restarts, double-click the Network icon in
the Control Panel and make sure that the configuration
settings are properly set for your network environment.
Contact your system manager for assistance.
The driver installation is complete. Go to Verifying
Successful Installation on page 48 to confirm that the NIC
is properly installed.
After Windows restarts, double-click the Network icon
in the Windows Control Panel and make sure that
the correct configuration settings are selected for your
network environment. Contact your system administrator
for assistance.
Verifying Successful Installation
Follow the steps for your operating system:
Windows 2000, Windows NT 4.0, or Windows 95 and
Windows 98.
Windows 2000
To verify successful NIC installation:
1 Right-click the My Computer icon, and then click
Properties.
2 Select the Hardware tab, and then click
Device Manager in the middle panel.
3 Double click Network Adapters and make sure that
the name of the 3Com EtherLink NIC appears.
If a red X or a yellow exclamation point (!) appears
by the name of the NIC, the installation was not
successful. See Troubleshooting the NIC on page 129
for troubleshooting help.
Page 49

Windows NT 4.0
To verify successful NIC installation:
1 Double-click the My Computer icon.
The My Computer screen appears.
2 Double-click the Control Panel icon.
The Control Panel screen appears.
3 Double-click the Network icon.
The Network screen appears.
4 Select the Adapters tab.
5 Make sure that the name of the NIC appears in the list
of network adapters.
If the name of the NIC does not appear in the list of
network adapters, the installation was not successful. See
Troubleshooting the NIC Installation on page 132 for
troubleshooting help.
6 Click OK to close the Network screen. Close the
Control Panel screen and the My computer screen.
Verifying Successful Installation 49
You can also use the following alternative method to verify
successful NIC installation:
1 In the Windows task bar, click Start, Programs,
Administrative Tools, and then Windows NT
Diagnostics.
The Windows NT Diagnostics screen appears.
2 Select the Resources tab.
If ELPPx appears in the displayed list in the Device column,
the driver is successfully installed.
If ELPPx does not appear in the displayed list in the Device
column, the installation was not successful. See
Troubleshooting the NIC Installation on page 132 for
troubleshooting help.
Windows 95 and Windows 98
To verify successful NIC installation:
1 Right-click the My Computer icon, and then click
Properties.
2 Select the Device Manager tab.
Page 50

50 CHAPTER 3: INSTALLING NIC DRIVERS IN WINDOWS
3 Double-click Network adapters and make sure that
the name of the 3Com EtherLink NIC appears.
If a red X or a yellow exclamation point (!) appears by the
name of the NIC, the installation was not successful. See
Troubleshooting the NIC Installation on page 132 for
troubleshooting help.
Installing the 3Com NIC Diagnostics Program
This section describes how to install the 3Com NIC
Diagnostics program after you have already installed
the network driver. This program is for PCs running
Windows 2000, Windows NT 4.0, Windows 98, or
Windows 95.
The 3Com NIC Diagnostics program allows you to run tests
that determine the status of your network and the NIC.
It also allows you to configure the NIC, view network
statistics and LEDs, and access support databases.
When you install the 3Com NIC Diagnostics program, the
network driver is automatically updated to the
latest version on the EtherCD.
To install the 3Com NIC Diagnostics program:
1 Turn on the power to the PC and start Windows.
2 Insert the EtherCD in the CD-ROM drive.
The EtherCD Welcome screen appears.
3 Click NIC Software.
4 Click NIC Drivers and Diagnostics.
5 Click Update NIC Driver.
6 Click Update Drivers and Diagnostic Program.
The Update screen appears, displaying a message
indicating the 3Com NIC Update Kit has successfully
updated the network software, and informing you that
you must restart your PC.
7 Click OK to return to the Update NIC drivers screen,
and then exit the EtherCD.
Page 51

Starting the 3Com NIC Diagnostics Program 51
8 Restart Windows.
The installation is complete.
Starting the 3Com NIC Diagnostics Program
To start the 3Com NIC Diagnostics program:
1 Open the Windows Start menu.
2 Select Programs, and then 3Com NIC Utilities.
3 Click 3Com NIC Doctor.
The 3Com NIC Diagnostic screen appears. For instructions
on using the program, see Running the NIC Diagnostics
Tests on page 144.
Alternatively, you can also start the 3Com NIC Diagnostics
program using the following procedure if the 3Com NIC
Diagnostics icon is displayed on right side of the Windows
task bar:
1 Double-click the 3Com NIC Diagnostics icon.
The 3Com NIC Diagnostic screen appears. For instructions
on using the program, see Running the NIC Diagnostics
Tests on page 144.
Updating the Network Driver and NIC Software
The latest 3Com network drivers can be downloaded from:
http://support.3com.com/infodeli/tools/nic/
To update the network driver and NIC diagnostic software:
1 Turn on the power to the PC and start Windows.
2 Insert the EtherCD (or disk 1 downloaded from the
Web or created from the EtherCD) in the appropriate
drive in the PC.
The EtherCD Welcome screen appears.
3 Click NIC Software.
4 Click NIC Drivers and Diagnostics.
5 Click Update NIC Driver.
Page 52

52 CHAPTER 3: INSTALLING NIC DRIVERS IN WINDOWS
6 To update the network driver and NIC diagnostics
software, click Update Drivers and Diagnostics
Program.
To update the network driver and remove the NIC
diagnostics software, click Update Drivers and
remove Diagnostics Program.
The Update screen appears, displaying a message
indicating the 3Com NIC Update Kit has successfully
updated the network software, and informing you that
you must restart your PC.
7 Click OK to return to the Update NIC drivers screen,
and then exit the EtherCD.
8 Restart Windows.
The installation is complete.
Installing Multiple NICs
This section describes how to install multiple EtherLink PCI
NICs in a PC running Windows 2000, Windows 98,
Windows 95, or Windows NT 4.0.
You must use these procedures to install multiple NICs.
Failure to follow these procedures may lead to problems
requiring you to reinstall your operating system.
Windows 2000, Windows 98, and Windows 95
To install multiple NICs in a PC running Windows 2000,
Windows 98, or Windows 95, install and configure
each NIC individually, following these steps:
1 Install the first NIC in your PC and connect it to the
network, as described in Installing and Connecting
the NIC on page 34.
CAUTION: Do not physically install the second NIC in your
PC until you complete the driver installation for the first
NIC, following the steps below.
2 Turn on the power to the PC and start Windows.
3 Insert the EtherCD when prompted, and then
click OK.
Page 53

Installing Multiple NICs 53
4 Follow the prompts on the screen to install the
network driver.
See Windows 2000 on page 40, Windows 98 on page 43,
or Windows 95 on page 44, earlier in this chapter for driver
installation instructions.
5 After the network driver is installed, restart the PC.
6 After the PC restarts, exit Windows and turn
the power off. Make sure that the PC is unplugged.
7 Install the second NIC in your PC and connect it to
the network.
8 Plug in the PC power cord, turn on the power, and
then start Windows.
Windows detects the second NIC. The second NIC uses the
same network driver as the first NIC. You are not prompted
for the EtherCD.
When Windows starts, the second NIC appears under
Network adapters in the Device Manager.
9 Repeat the process for each additional NIC to
be installed.
Windows NT 4.0
To install multiple NICs in a PC running Windows NT 4.0:
1 Install the NICs in your PC and connect each to
the network.
2 Turn on the power to the PC and start Windows NT.
3 Double-click the My Computer icon, then the
Control Panel icon, and then the Network icon.
The Network screen appears.
4 Select the Adapters tab.
5 Click Add.
The Select Network Adapter screen appears.
6 Click Have Disk.
7 Insert the EtherCD.
Page 54

54 CHAPTER 3: INSTALLING NIC DRIVERS IN WINDOWS
8 Make sure that d:\ appears in the entry box (where
d:\ represents the letter name of the CD-ROM drive),
and then click OK.
The Select OEM Option screen appears with the name
of one of the NICs selected. Only one NIC appears on
this screen.
9 Click OK.
Files are copied. The Network screen appears with the
name of the first installed NIC.
10 Close the Network screen.
If you are prompted for network information, enter the
requested information.
11 Restart the PC.
12 When Windows NT starts, repeat steps 3 through 11
for each NIC that is installed in the PC.
You will not be prompted for the EtherCD when you
install the network driver for the second NIC.
Page 55

INSTALLING DYNAMICACCESS
4
SOFTWARE IN WINDOWS
Overview
This chapter explains the following tasks on a computer
running Windows 2000, Windows NT, Windows 98, or
Windows 95:
■ Installing the DynamicAccess LAN Agent for a client NIC
■ Installing DynamicAccess software for a server NIC
■ Configuring Groups and VLANs for a server NIC
■ Using Windows 2000 offload features
■ Installing DynamicAccess LAN Encryption Software
Installing the DynamicAccess LAN Agent for a Client NIC
This section explains how to install and configure the
DynamicAccess LAN agent on a client PC running
Windows 95, Windows 98, or Windows NT 4.0.
For an overview of the DynamicAccess LAN agent, see
DynamicAccess LAN Agent on page 25. For detailed
information on using, configuring, and troubleshooting
the DynamicAccess LAN agent, you can download
it from:
http://www.3com.com/dynamicaccess
Client PC Requirements
The DynamicAccess LAN agent can be installed on a PC
running Windows 95, Windows 98, or Windows NT 4.0.
The DynamicAccess LAN agent is not supported on a PC
running Windows 2000.
CAUTION: Do not install the DynamicAccess LAN agent
on a PC running Windows 98 SE 1. The installation will
result in system failure.
Page 56

56 CHAPTER 4: INSTALLING DYNAMICACCESS SOFTWARE IN WINDOWS
The following table lists the minimum client requirements
and recommended Microsoft Service Packs (if any) for the
version of the DynamicAccess LAN agent that is included
on the EtherCD.
Operating
System
Windows 2000 486/66 MHz CPU
Windows NT 4.0 Pentium/100 MHz CPU
Windows 98 486/76 MHz CPU
Windows 95 486/76 MHz CPU
Requirements for Running
DynamicAccess Technology
on a Client PC
32 MB RAM
5 MB available hard drive space
32 MB RAM
5 MB available hard drive space
32 MB RAM
5 MB available hard drive space
32 MB RAM
5 MB available hard drive space
Installing the LAN Agent
To install the DynamicAccess LAN agent:
1 Make sure that the NIC and the network driver are
installed on your PC.
See Verifying Successful Installation on page 48 to confirm
that the NIC is properly installed in the computer.
2 Start Windows.
3 Insert the EtherCD in the CD-ROM drive.
The EtherCD Welcome screen appears.
Recommended
Microsoft
Service Pack
None required
Service Pack 6
(or later)
Service Pack 1
Windows 95 OSR2 or
Service Pack 1
4 Click NIC Software.
5 Click DynamicAccess Technology.
6 Click Install DynamicAccess Technology.
7 Select the appropriate menu option for your
operating system (Windows 95/98 or
Windows NT 4.0)
Ignore the Windows 2000 menu option. The
DynamicAccess LAN agent is not supported on a PC
running Windows 2000.
Page 57

Installing the DynamicAccess LAN Agent for a Client NIC 57
8 Do one of the following:
■ If you selected Windows 95/98, click Install
DynamicAccess Technology for Windows 95/98.
■ If you selected Windows NT 4.0, click Install
DynamicAccess Technology for Windows NT 4.0.
The DynamicAccess Software Installation program starts.
9 When the DynamicAccess Technology installation is
finished, exit the EtherCD, and then exit Windows.
10 Restart the PC.
You must restart the PC to complete the installation.
Verifying Successful Installation
After the DynamicAccess LAN agent is installed on the
client PC, the following changes are visible in the Windows
Network control panel:
■ For each physical NIC installed in the client PC, a virtual
NIC entry appears in the list of network adapters.
All protocols are re-bound to the virtual NIC. The
bindings to the physical NIC are still intact.
■ A 3Com DynamicAccess LAN agent entry appears as
a protocol.
■ A 3Com DynamicAccess LAN agent icon is installed in
the Windows Control Panel.
Configuring the DynamicAccess LAN Agent
Contact your system administrator about using
DynamicAccess technology at your site.
The DynamicAccess LAN agent configuration instructions
are intended for network administrators who have
experience installing software and using management
tools for an Ethernet network.
The instructions in this section are for configuring the
DynamicAccess LAN agent on a local client PC. You can
obtain the complete configuration instructions by accessing
the DynamicAccess Software User Guide on the EtherCD.
Page 58

58 CHAPTER 4: INSTALLING DYNAMICACCESS SOFTWARE IN WINDOWS
To configure the DynamicAccess LAN agent on a local
client PC:
1 Double-click the 3Com DynamicAccess icon in the
Windows Control Panel.
The Traffic Prioritization tab of the DynamicAccess Setup
screen appears.
2 Select the tab containing the information you want
to configure.
Traffic Prioritization—Allows you to prioritize
applications, which can ease bottlenecks in your network
and allow critical applications to take network precedence.
Fast IP—Allows you to enable and configure Fast IP.
Administration—Allows you to set DynamicAccess
control panel access, set VLAN options, enable efficient
multicast control, and enable the prioritizing of traffic.
For specific instructions on configuring any of the
DynamicAccess technology options, click Help on the
3Com DynamicAccess screen or go to:
http://www.3com.com/dynamicaccess
Removing the DynamicAccess LAN Agent
For instructions on removing the DynamicAccess LAN agent
from your client PC, see the DynamicAccess software user
guide. You can download the user guide from:
http://www.3com.com/dynamicaccess
Installing DynamicAccess Software for a Server NIC
Follow these steps to install DynamicAccess software for a
server NIC installed in a Windows 2000 or Windows NT 4.0
computer:
1 Make sure that the NIC and the network driver are
installed on your PC.
See Verifying Successful Installation on page 48 to confirm
that the NIC is properly installed in the computer.
2 Start Windows.
3 Insert the EtherCD in the CD-ROM drive.
Page 59

Installing DynamicAccess Software for a Server NIC 59
The EtherCD Welcome screen appears.
4 Click NIC Software.
5 Click DynamicAccess Technology.
6 Click Install DynamicAccess Technology.
7 Select the appropriate menu option for your
operating system (Windows 2000 or Windows NT 4.0)
Ignore the Windows 95/98 menu option. DynamicAccess
server software is not supported on a PC running
Windows 95 or Windows 98.
8 Do one of the following:
■ If you selected Windows 2000, click Install
DynamicAccess Technology for Windows 2000
Servers.
When DynamicAccess server features are installed
for Windows 2000, LAN connections bind to the
DynamicAccess protocol and real protocols bind to
the DynamicAccess Miniport. Do not modify these
bindings.
■ If you selected Windows NT 4.0, click Install
DynamicAccess Technology for Windows NT 4.0
Servers.
When DynamicAccess server features are installed
for Windows NT, NICs bind to the DynamicAccess
protocol and real protocols bind to the
DynamicAccess Miniport. Do not modify these
bindings.
The DynamicAccess Software Installation program starts.
9 When the DynamicAccess Technology installation is
finished, exit the EtherCD, and then exit Windows.
10 Restart the PC.
You must restart the PC to complete the installation.
Page 60

60 CHAPTER 4: INSTALLING DYNAMICACCESS SOFTWARE IN WINDOWS
Verifying Successful Installation
After the DynamicAccess software is installed on the server
PC, the following changes are visible in the Windows
Network control panel:
■ For each physical NIC installed in the client PC, a virtual
NIC entry appears in the list of network adapters.
All protocols are re-bound to the virtual NIC. The
bindings to the physical NIC are still intact.
■ A 3Com DynamicAccess entry appears as a protocol.
■ A 3Com DynamicAccess icon is installed in the
Windows Control Panel.
Configuring Groups and VLANs for a Server NIC
DynamicAccess technology server features allow you to
configure load balancing groups and virtual LANs (VLANs).
The features are described in Advanced Server Features on
page 17.
The following DynamicAccess technology server features
are available for NIC groups in Windows:
■ load balancing
■ RSL failover
■ multiple VLANs
The examples in this section illustrate typical actions you
might take in the course of maintaining a DynamicAccess
server configuration in Windows.
Planning the Configuration
Consider these items when planning groups and VLANs:
■ Decide whether you want to use bidirectional load
balancing, or transmit load balancing.
To use bidirectional load balancing, you must assign a
dedicated IP address for each load balancing group. This
address must be unique (not used elsewhere on the
network). For details, see Specifying a Dedicated IP
Address on page 66.
■ Decide which NICs are to be part of each group. Each
group must include at least two NICs.
Page 61

Configuring Groups and VLANs for a Server NIC 61
■ Decide whether you want to use a foreign (non-3Com)
NIC in one of the groups.
One foreign NIC (one that is not a 3Com EtherLink
Server NIC) is allowed in one group per server.
■ Decide which NIC is to be the primary NIC in
each group. If a foreign NIC is used, it must be
designated the primary NIC.
■ Disable load balancing if you have set failover for a
group of NICs operating at different speeds.
DynamicAccess supports failover for a group of NICs
operating at different speeds (for example, with one
NIC operating at 10 Mbps, another operating at
100 Mbps, and another at 1,000 Mbps). However,
DynamicAccess supports load balancing only for a
group of NICs operating at the same speed (with all
NICs operating at 10 Mbps, or all operating at
100 Mbps, or all at 1000 Mbps). For example, if you
specify failover from a 3Com Gigabit EtherLink Server
1000 PCI NIC to a 3Com EtherLink 10/100 PCI NIC, you
must disable load balancing for that group to achieve
the best performance.
■ For the best failover performance, turn the spanning
tree feature off at switches that are connected directly
to the server. If the spanning tree feature is turned on,
a failover may be delayed up to 30 seconds while the
switch processes the spanning tree algorithm.
■ Plan the cable changes required to connect each primary
NIC and all secondary NICs to the same network segment.
■ Observe the recommended support limit of four groups
per server.
■ The following guidelines apply to groups under
Windows 2000:
802.1p Support Property—The value of the
Windows 2000 802.1p support property must be
the same for all NICs in a group. For example, if this
property is enabled for the primary NIC, it must also be
enabled for all other NICs in the group.
Microsoft Task Offload Support—It is possible to
form a group of NICs that have different levels of
support for Microsoft Task Offload features (TCP
Page 62

62 CHAPTER 4: INSTALLING DYNAMICACCESS SOFTWARE IN WINDOWS
Checksum, TCP Segmentation, and IP Sec). In this case,
the offload support is limited to the features supported
by all NICs in the group. For example, if two NICs in a
group support all offload features but one NIC supports
only TCP Checksum, then offload support for the group
is limited to TCP Checksum.
■ Observe these VLAN configuration guidelines:
■ Assign a VLAN ID number to each VLAN. If you are
not using a DHCP server, each VLAN that is using IP
services requires an IP address and subnet mask.
■ DynamicAccess software supports as many as 16
VLANs per server.
■ Each VLAN bound to TCP/IP must exist on a separate
IP subnet. DHCP servers used to allocate IP addresses
must be located on the same IP subnets as the
VLANs.
■ Each VLAN bound to the IPX/SPX protocol must use
a unique network number.
■ To avoid problems associated with blocked multicast
streams, configure end stations that support the
IEEE 802.1p GARP Multicast Registration Protocol
specification (GMRP) on separate switch segments
from stations that do not support it.
■ Under Windows 2000, when VLANs are enabled,
the Windows 2000 802.1p Support property must
be disabled for all the underlying miniports.
■ The following memory requirements are for multiple
VLAN configurations. You can improve overall
system performance with VLANs by increasing
the physical RAM, the virtual memory page size,
or both.
Number of VLANs Minimum RAM Size (MB)
up to 16 128
Page 63

Configuring Groups and VLANs for a Server NIC 63
CAUTION: Before creating or removing a load balancing
group or VLAN, take note of configuration information
such as IP addresses and IPX network numbers.
DynamicAccess server software does not restore a
network configuration to its pre-DynamicAccess state.
Always verify that the network configuration conforms
to your expectations after creating or removing a load
balancing group or VLAN.
Working With Server Features
The DynamicAccess server features window contains tabs
for these windows:
■ In the Load Balance/RSL window, you can create and
change Load Balancing/RSL groups. The NICs in a group
work together to route traffic efficiently and to recover
from failures.
■ In the VLANs window, you can set up virtual LANs. All
groups listed on the Load Balance/RSL window also
appear as groups in the VLAN window. Any ungrouped
NICs in the Load Balance/RSL window are also listed in
the VLAN window.
Windows 2000
Access DynamicAccess server features through the
Windows 2000 Network and Dial-up Connections window
as follows:
1 Log in to Windows 2000 with administrator
privileges.
2 Launch the Windows 2000 Network and Dial-up
Connections window.
3 Select a Local Area Connection icon.
4 Click the right mouse button and select Properties.
The Local Area Connections Properties window appears.
5 Click the General tab.
6 In the General window, select DynamicAccess
Protocol and click Properties.
The DynamicAccess Protocol Properties window appears.
Click the appropriate tab to configure server features.
Page 64

64 CHAPTER 4: INSTALLING DYNAMICACCESS SOFTWARE IN WINDOWS
Windows NT
Start DynamicAccess server features under Windows NT
as follows:
1 Log in to the Windows NT Administrator account.
2 From the Windows Start menu, select
Settings/Control Panel.
Page 65

3 Double-click the DynamicAccess SW Server icon.
The DynamicAccess Resilient Server Link/Load
Balance/VLAN Configuration window appears. Click
the appropriate tab to configure server features.
Creating a Group
1 Click the Load Balance/RSL tab.
2 In the Load Balance/RSL window, click Create Group.
3 In the Create Group dialog box, type a group name.
4 Set the load balancing:
To enable transmit load balancing—Clear the
Receive Load Balance Enabled check box and check the
Transmit Load Balance Enabled box.
To enable bidirectional load balancing—Check both
the Transmit Load Balance Enabled box and the
Receive Load Balance Enabled box. Enter only the Host ID
bytes required for a dedicated IP address. For example:
Class A Network ID Host ID
Class B Network ID Host ID
Class C Network ID Host ID
Configuring Groups and VLANs for a Server NIC 65
Byte 1 Byte 2 Byte 3 Byte 4
24 1 253
2 253
253
See Specifying a Dedicated IP Address on page 66 for more
information on the dedicated IP address.
To disable all load balancing—Clear the
Receive Load Balance Enabled and the
Transmit Load Balance Enabled check boxes.
5 Click OK.
The name of the new NIC group appears in the
Load Balancing/RSL Groups list box.
Page 66

66 CHAPTER 4: INSTALLING DYNAMICACCESS SOFTWARE IN WINDOWS
Adding NICs to a Group
1 Click the Load Balance/RSL tab.
2 In the Load Balance/RSL window:
■ Select a group from the Load Balancing/RSL Groups
list.
■ Select a NIC from the Network Interface Cards list.
3 Click Add NIC.
The NIC appears as part of the group in the Load
Balancing/RSL list box.
If you click Add NIC repeatedly, NICs are added to the
group in the order that they are listed after the first NIC
you selected.
Specifying a Dedicated IP Address
Bidirectional load balancing requires that you specify a
dedicated IP address for the load balancing group. This
address specifies a Network ID and a Host ID, and it must
be unique (not used elsewhere on the network). For
example:
Byte 1 Byte 2 Byte 3 Byte 4
Class A Network ID Host ID
125 24 1 253
Class B Network ID Host ID
139 25 2 253
Class C Network ID Host ID
193 26 3 253
You can specify the dedicated IP address in the Create
Group or Group Properties dialog boxes. You cannot
specify the bytes for the Network ID; they are fixed. Specify
the bytes for the Host ID for various classes of subnets
as follows:
Class Byte 1 Specify only bytes
A 126 2, 3, and 4 (the three rightmost boxes).
B 128 - 191 3 and 4 (the two rightmost boxes).
C 192 - 223 4 (the rightmost box).
Page 67

Configuring Groups and VLANs for a Server NIC 67
Changing an IP Address
If another device is using a bidirectional load balancing
group's dedicated IP address, you must change either the
other device’s IP address or that of the load balancing
group. Use the appropriate procedure below:
Changing the Other
Device's IP Address
Changing the Group's
Dedicated IP Address
After you change the other device's address, restart
receive load balancing as follows:
1 In the Load Balancing/RSL window, select the group
that had the duplicate address.
2 Click Properties.
3 In the Properties dialog box, click OK.
4 In the Load Balancing/RSL window, click OK to exit the
window and restart receive load balancing.
1 In the Load Balancing/RSL window, select the group
that has the duplicate address.
2 Click Properties.
3 In the Properties dialog box, enter a new IP address
and click OK.
4 In the Load Balancing/RSL window, click OK to exit the
window and restart receive load balancing.
Creating a VLAN
1 Click the VLANs tab.
2 In the VLANs window, select a NIC or group from the
VLANs list and click Create VLAN.
3 In the VLAN ID dialog box, type a VLAN ID number
and click OK.
Legal VLAN ID numbers are from 1 – 511 and from
768 – 4095. Numbers in the range 512 – 767 are reserved.
The new VLAN is added to the VLANs list.
Windows 2000—If you create more than one VLAN,
assign a VLAN ID number to each VLAN as follows:
■ Right-click My Network Places and select Properties
■ In the next window, right-click a VLAN and select
■ Click Configure.
■ In the NIC Properties window, click TCP/IP.
from the menu.
Properties from the menu.
Page 68

68 CHAPTER 4: INSTALLING DYNAMICACCESS SOFTWARE IN WINDOWS
■ In the next window, configure the IP address and
subnet mask.
Windows NT—Restart the computer when the software
prompts you to do so.
Specifying Traffic Priorities
You can use the DynamicAccess Software Setup window to
specify traffic priorities.
1 Double-click the 3Com DynamicAccess icon in the
Windows Control Panel.
The DynamicAccess Software Setup window appears.
2 Click the appropriate tab:
■ Traffic Prioritization—Prioritize applications to
ease bottlenecks in the network and allow critical
applications to take network precedence. You can
turn traffic prioritization on or off independently for:
– Each NIC that is not in a group and does not
have VLANs
– Each group that does not have VLANs
– Each VLAN
– Each virtual NIC (NIC, group, or VLAN) shown in
the Traffic Prioritization control panel
■ Administration—Set DynamicAccess control panel
access, set VLAN options, enable efficient multicast
control, and enable the prioritizing of multicast
traffic.
For detailed information on DynamicAccess software,
go to:
http://www.3com.com/dynamicaccess
Saving the Configuration
To save and exit, click OK.
A prompt asks whether you want to configure traffic
prioritization. If you click Yes, the DynamicAccess Software
Setup window appears.
To exit without saving the configuration, click Cancel.
Page 69

Configuring Groups and VLANs for a Server NIC 69
Disabling Load Balancing for a Group
Follow these steps to disable load balancing for a group:
1 Click the Load Balance/RSL tab.
2 In the Load Balance/RSL window:
■ Select a group from the Load Balancing/RSL Groups
list.
■ Click Properties.
3 In the Group Properties dialog box:
To disable receive load balancing only—Clear the
Receive Load Balance Enabled check box.
To disable all load balancing—Clear the
Receive Load Balance Enabled and the
Transmit Load Balance Enabled check boxes.
4 Click OK.
Changing the Primary NIC
The first NIC added to an empty group is automatically
designated the primary NIC. NICs added subsequently are
designated as secondary NICs. If a foreign (non-3Com) NIC
is used, it must be designated the primary NIC. Primary
status is indicated by a P icon at the beginning of the
NIC name.
When there are more than one NIC in a group, you can
change the primary NIC as follows:
1 Click the Load Balance/RSL tab.
2 In the Load Balance/RSL window, select a secondary
NIC from the Load Balance/RSL Groups list.
3 Click Select Primary.
Removing a NIC from a Group
Follow these steps to remove a NIC from a group:
1 Click the Load Balance/RSL tab.
2 In the Load Balance/RSL window, select a NIC from
a group in the Load Balancing/RSL Groups list.
3 Click Remove NIC.
Page 70

70 CHAPTER 4: INSTALLING DYNAMICACCESS SOFTWARE IN WINDOWS
Deleting or Editing a VLAN
When a VLAN is selected, you can delete it or edit its
properties.
1 Click the VLANs tab.
2 In the VLANs window, select a VLAN.
To delete the selected VLAN, click Delete VLAN.
To edit the VLAN ID for the selected VLAN, click Edit VLAN.
Displaying NIC Properties
Follow these steps to display NIC properties:
1 Click the Load Balance/RSL tab.
2 In the Load Balance/RSL window, select a NIC.
3 Click Properties.
The NIC Properties window appears, showing the
properties of the selected NIC.
Displaying Group Properties
Follow these steps to display group properties:
1 Click the Load Balance/RSL tab.
2 In the Load Balance/RSL window, select a group in
the Load Balancing/RSL Groups list box.
3 Click Properties.
The Group Properties window appears, showing the
properties of the selected group.
Specifying Failover from Gigabit to 10/100 PCI
You can specify failover from a 3Com Gigabit Etherlink
Server 1000 PCI NIC to a 3Com EtherLink Server 10/100
PCI NIC. To ensure optimal performance, this type of
failover requires that you disable load balancing for
the group.
1 Create a group.
See Creating a Group.
Page 71

Configuring Groups and VLANs for a Server NIC 71
2 Add 3Com server NICs to the group.
Add at least one 3Com Gigabit Etherlink Server NIC and at
least one 3Com EtherLink Server 10/100 PCI NIC to the
group. Designate the Gigabit Etherlink Server NIC as the
primary NIC.
See Adding NICs to a Group on page 66.
3 Disable load balancing for the group.
See Disabling Load Balancing for a Group on page 69.
Troubleshooting a Load Balancing Configuration
Use the troubleshooting tips in Table 1 to solve problems
that may occur in a load balancing configuration.
To access a database of technical information that can
help you diagnose and solve NIC installation,
configuration, and upgrade problems, go to:
http://knowledgebase.3com.com
Table 1 Troubleshooting Load Balancing In Windows
Symptom Tip
Receive load balancing fails to begin
functioning.
Receive load balancing stops
functioning.
Reconnecting cables does not restore
load balancing.
Check the Group Properties to verify
that the dedicated IP address has been
entered. If no address appears in the
Group Properties dialog box, enter one
to enable receive load balancing.
Cables may be disconnected, or there
may be other hardware problems.
Reconnect or change the cables. Correct
any other hardware problems. Bidirectional load balancing is restored after
this type of failure when applications
create new connections and new clients
log in.
Check the event log for a duplicate IP
address. If another device is using a load
balancing group's dedicated IP address,
change one of the IP addresses. See
“Changing an IP Address” for
instructions.
Page 72

72 CHAPTER 4: INSTALLING DYNAMICACCESS SOFTWARE IN WINDOWS
Table 1 Troubleshooting Load Balancing In Windows (continued)
Symptom Tip
Receive load balancing does not
function across a router.
Receive load balancing across a router is
not supported. Clients across the router
cannot use receive load balancing, but
clients within the subnet get higher
throughput from receive load balancing.
Changing Windows 2000 Property Settings
If you receive warnings about inconsistent property settings
(for example, the 802.1p Support property) while creating
a group, use the following procedure to change a NIC
property:
1 Right-click the My Computer icon and select
Properties from the menu.
2 Click the Hardware tab, then click Device Manager.
3 Double-click Network Adapters.
4 Right-click on the name of the appropriate NIC and
select Properties from the menu.
5 Click the Advanced tab.
6 Select the appropriate property from the list (for
example, 802.1p Support).
7 Use the scroll list to change the property value.
8 Exit the Device Manager.
Identifying Windows 2000 Miniport and LAN Connections
DynamicAccess miniport connections and NIC Local Area
Connections are listed in the Network and Dial-up
Connections window. If a group or VLAN is associated with
a miniport, the group name and VLAN name appear in the
Page 73

Using Windows 2000 Offload Features 73
miniport icon name. If a miniport is associated with an
ungrouped NIC, you can identify the NIC by its MAC
address as follows:
1 In the Network and Dial-up Connections window,
right-click the miniport icon and select Properties
from the menu.
2 In the DynamicAccess Properties window, click the
General tab.
3 In the General tab, move the cursor over the miniport
name. (Do not click the name.)
After a short pause, the MAC address of the associated NIC
appears in a pop-up window.
Using Windows 2000 Offload Features
The 3CR990 NIC supports Windows 2000 offload features
in an IP environment. The Windows 2000 offload features
are designed to enhance the Windows 2000 operating
system capabilities by off loading key TCP/IP networking
and security tasks from the Windows 2000 operating
system:
■ IPSec Offload—reduces CPU utilization by allowing the
3XP processor and a crypto chip on the NIC to perform
data encryption operations.
■ TCP Segmentation Offload—reduces CPU utilization by
allowing the 3XP processor on the NIC to perform
segmentation of TCP packets.
Windows 2000 does not allow IPSec offloads and TCP
Segmentation offloads for the same session. Though all
offload types may be enabled, TCP Segmentation
offloading will not occur during an IPSec session.
■ IP and TCP Checksum Offload—reduced CPU utilization
by allowing the 3XP processor on the NIC to perform
the checksum calculation of TCP/IP and UDP/IP packets.
■ 802.1p Packet Priority Offload—reduces CPU utilization
by allowing the 3XP processor on the NIC to perform
the insertion of the 802.1Q tag header into the packet.
Page 74

74 CHAPTER 4: INSTALLING DYNAMICACCESS SOFTWARE IN WINDOWS
Enabling Offloads
Windows 2000 provides the capability to individually
enable or disable each of the four offload features. (The
default setting for these features is enabled.)
To enable or disable individual offload settings in
Windows 2000:
1 Right-click the My Network Places desktop icon and
select Properties.
The Network and Dial-up Connections screen appears.
2 Right-click the Local Area Connection icon and select
Properties.
The Local Area Connection Properties screen appears.
Page 75

Using Windows 2000 Offload Features 75
3 Click Configure.
The 3Com EtherLink 10/100 Mbps PCI NIC with 3XP
Processor screen appears.
4 Click the Advanced tab.
5 Select Enable Offloads in the Property list box.
6 Select the appropriate value in the Value entry box
(shown in the following table) for the desired offload
state.
7 Close all open windows.
The following table describes values for the offload
functions:
Value Offload Function Enabled
All Offloads Disabled No offloads
cksum TCP Checksum
cksum-ipsec TCP Checksum and IPSec
cksum-tcpseg TCP Checksum and TCP
cksum-tcpseg-ipsec TCP Checksum and TCP
ipsec IPSec
tcpseg TCP Segmentation
tcpseg-ipsec TCP Segmentation and IPSec
802.1p Packet Priority
802.1p-cksum Packet Priority and TCP Checksum
802.1p-cksum-ipsec Packet Priority and TCP Checksum
802.1p-cksum-tcpseg Packet Priority and TCP Checksum
802.1p-cksum-tcpseg-ipsec Packet Priority and TCP Checksum
802.1p-ipsec Packet Priority and IPSec
802.1p-tcpseg Packet Priority and TCP Segmentation
802.1p-tcpseg-ipsec Packet Priority and TCP Segmentation
Segmentation
Segmentation and IPSec
and IPSec
and TCP Segmentation
and TCP Segmentation and IPSec
and IPSec
Page 76

76 CHAPTER 4: INSTALLING DYNAMICACCESS SOFTWARE IN WINDOWS
Configuring Offloads for a Group of Different NICs
Your computer may contain a combination of installed NICs
(including one or more 3CR990 EtherLink 10/100 PCI NICs
with the 3XP Processor) with varying offload capabilities. If
you have a mix of dissimilar NICs configured in a
DynamicAccess group, then DynamicAccess will support
only those offload functions that are supported by the all
the NICs in the group.
For example, if you have created a group consisting of a
3CR990 NIC and another NIC that does not have any
offload capabilities, then the group will not support any
offloads.
In another example, if you have a group of three NICs with
two supporting TCP Checksum, TCP Segmentation, and
IPSec offloads, and one supporting only IPSec, then the
group will support only IPSec offloads.
If you add a NIC to an existing group, and that NIC has
offload capabilities that differ from those of the group,
then you must reconfigure the group: that is, you must
delete the group, recreate the group, and restart the
computer. (If you do not delete and recreate the group,
DynamicAccess will not bind to the NIC.)
Similarly, if you replace a NIC that has been configured as
part of a group with another NIC that has different offload
capabilities, then you must reconfigure the group.
In addition, if you disable or enable any offloads for a
group through the Windows 2000 Advanced tab, then you
must reconfigure the group.
Installing DynamicAccess LAN Encryption Software
This section explains how to install 3Com DynamicAccess
LAN Encryption software in a PC running Windows 95 or
Windows 98.
For complete instructions on using DynamicAccess LAN
Encryption software, see the DynamicAccess LAN
Encryption Software Administrator’s Guide, which you can
download to your PC hard drive from the EtherCD and view
with a current Internet browser.
Page 77

Installing DynamicAccess LAN Encryption Software 77
Minimum Installation Requirements
Your computer must meet the following requirements
before you can successfully install the DynamicAccess LAN
Encryption software.
Hardware Requirements:
■ Pentium 90 or better
■ 24 MB RAM
■ 25 MB free hard disk space (Windows 95);
17 MB free hard disk space (Windows 98)
■ Color monitor
Software Requirements:
■ Windows 95A or Windows 95B (OSR2) or Windows 98
or Windows 98SE. Your Windows operating system
should have the latest Service Pack installed.
■ TCP/IP protocol.
■ Client for Microsoft networks installed and configured
to log in to a domain.
Installation Overview
The 3Com EtherLink 10/100 PCI NIC must be installed and
connected to the network before you install
DynamicAccess LAN Encryption software. See Installing and
Connecting the NIC on page 27 for instructions.
Installing the DynamicAccess LAN Encryption software
involves the following tasks:
1 Installing the software using the Custom option to
download the DynamicAccess LAN Encryption
Software Administrator’s Guide.
2 Certifying each user (this task applies only when
users rely on certificates for authentication).
Installing LAN Encryption Software on Windows 95
To install DynamicAccess LAN Encryption software on
Windows 95, you need the installation CD (EtherCD) with
your customized policy file(s), entrust.ini file (if you are
using certificate-based authentication), and any connection
profiles you wish to include.
Page 78

78 CHAPTER 4: INSTALLING DYNAMICACCESS SOFTWARE IN WINDOWS
The installation process installs the following required
system components: Winsock 2 and DUN 1.3. For this
reason, you may be prompted to reboot the system
several times during installation. (For Windows 95 PCs
without the DUN 1.3 upgrade, you may see as many as
three requests to reboot.) When you click Yes to reboot,
the installation program ignores the reboot and continues
to install the software. This behavior is by design; only the
last reboot request actually reboots the system, after the
installation is complete.
To install DynamicAccess LAN Encryption software from
the EtherCD:
1 Turn on the power to the PC and start Windows.
2 Insert the EtherCD in the CD-ROM drive.
The EtherCD Welcome screen appears.
3 Click NIC Software.
The NIC Software screen appears.
4 Click DynamicAccess Technology.
The 3Com DynamicAccess Technology screen appears.
5 Click Install DynamicAccess Technology.
The 3Com DynamicAccess Technology menu appears.
6 Click Install 3Com DynamicAccess Technology for
Windows 95/98.
The 3Com DynamicAccess Technology menu displays
options for installing either DynamicAccess LAN Encryption
Software or DynamicAccess Technology.
7 Click Install DynamicAccess LAN Encryption Software
Windows 95/98.
The setup wizard launches for either 56-bit LAN (DES)
encryption or 168-bit LAN (3DES) encryption depending on
the model of your installed EtherLink 10/100 PCI NIC and
the EtherCD inserted in your computer. A message prompts
you to exit all Windows applications.
Page 79

Installing DynamicAccess LAN Encryption Software 79
8 If you need to close any open applications, click
Cancel, close the applications, and then restart the
installation process. (Alternatively, you can press
Ctrl-Tab to display each open application and close it.)
Once you are ready to proceed, click Next.
The Software License Agreement screen appears.
9 Click Yes to continue.
The Setup Type screen appears, offering you a Typical or
Custom installation.
■ Typical—the program will be installed without the
online user guide.
■ Custom—you can choose which components to install.
This choice allows you to download and view the
DynamicAccess LAN Encryption Software
Administrator’s Guide.
Installing the DynamicAccess LAN Encryption software
from a login script is not supported.
10 Select Custom Installation to install the
DynamicAccess LAN Encryption software and to
download the user guide to your computer’s hard
drive. Click Next to continue.
The Select Components screen appears, allowing you to
choose the components to be installed.
11 Select both components: DynamicAccess LAN
Encryption Software and Admin Documentation.
Click Next.
The DynamicAccess LAN encryption software screen
appears.
12 Verify that the displayed destination folder is correct
for installation on your computer. Use the Browse
button if necessary to change the destination folder.
Once the appropriate destination folder is displayed,
click Next.
The Start Copying Files screen appears, displaying the
components that will be installed.
Page 80

80 CHAPTER 4: INSTALLING DYNAMICACCESS SOFTWARE IN WINDOWS
13 Verify that the displayed components are correct for
installation on your computer and click Next.
The system copies files from the EtherCD to the destination
location, sets up the registry, builds drivers, and updates
bindings.
The Winsock2 Setup screen appears.
Follow the rest of the setup wizard instructions to install
the software properly. If you see “version conflict”
messages, click Cancel to continue. When prompted to
reboot, click Yes (or OK or Next) to continue.
If you see “Winsock 2 setup” error messages, reboot the
system and re-start the 3Com LAN Encryption installation.
If prompted to insert the Windows CD, insert it so that
certain Windows files can be copied. (Prompting for the
Windows CD depends on your PC configuration.) Follow
the displayed prompts.
14 With the Winsock2 Setup screen displayed, click OK.
A warning message appears regarding the Dial-Up
Networking Upgrade.
15 Click OK.
The Microsoft Dial-Up Networking screen appears,
prompting you to restart.
16 Click Yes.
A message appears.
17 Click Yes.
A warning message appears, informing you that you must
restart and then manually run the installation process again.
18 Click OK.
The computer will restart.
19 Enter your network password when prompted.
The setup wizard continues to build drivers. The Insert Disk
screen appears, prompting you to insert the Windows 95
CD-ROM.
Page 81

Installing DynamicAccess LAN Encryption Software 81
20 Insert the Windows 95 CD-ROM and click OK.
If you are prompted to enter the path to the Windows 95
files (usually d:\win95), enter the appropriate path and
click OK.
The Insert Disk screen appears, prompting you to reinsert
the Windows 95 CD-ROM.
21 Verify that the Windows 95 CD-ROM is inserted in the
CD-ROM drive and click OK.
Continue to respond to prompts for the Windows 95
CD-ROM, and specify the appropriate path for Windows 95
files to be copied until the System Settings Change screen
appears, prompting you to restart the computer.
22 With the System Settings screen displayed, click Yes
to restart the computer.
The system has completed copying files from the EtherCD
and Windows 95 CD to the destination locations, set up
the registry, built drivers, and updated bindings.
After you have successfully installed the DynamicAccess
LAN Encryption client, the physical adapters (NICs) and
upper level protocols (TCP/IP, IPX, etc.) in your computer
bind to the virtual adapters created by the DynamicAccess
LAN Encryption software. The bindings of the upper level
protocols to the physical adapters are removed and
replaced with bindings to the virtual adapters.
If you have not yet created one or more connection
profiles, you may be prompted to use the DynamicAccess
LAN Client dialog box to create the profiles. See the
“Creating a Connection Profile” topic in the administrator’s
guide for more information.
During installation, the policy files tssecmap.cfg and
tssecdes.cfg are automatically copied from the EtherCD to
your PC. See the “3Com LAN Encryption Secure Network
Map File (tssecmap.cfg)” topic and the “Security Level
Definition File (tssecdes.cfg)” topic in the administrator’s
guide for more information.
Page 82

82 CHAPTER 4: INSTALLING DYNAMICACCESS SOFTWARE IN WINDOWS
To use the Certificate Authentication mode, copy the
entrust.ini file to the Windows directory on the client
computer and then restart the PC. You can find a sample of
the entrust.ini file on the EtherCD. See “Adding the Entrust
File” on page 85.
Installing LAN Encryption Software on Windows 98
To install DynamicAccess LAN Encryption software on
Windows 98, you need the software installation CD
(EtherCD), with your customized policy file(s), entrust.ini file
(if you are using certificate-based authentication), and any
connection profiles you wish to include.
To install DynamicAccess LAN Encryption software from the
EtherCD:
1 Turn on the power to the PC and start Windows.
2 Insert the EtherCD in the CD-ROM drive.
The EtherCD Welcome screen appears.
3 Click NIC Software.
The NIC Software screen appears.
4 Click DynamicAccess Technology.
The 3Com DynamicAccess Technology screen appears.
5 Click Install DynamicAccess Technology.
The 3Com DynamicAccess Technology menu appears.
6 Click Install 3Com DynamicAccess Technology for
Windows 95/98.
The 3Com DynamicAccess Technology menu displays
options for installing either DynamicAccess LAN Encryption
Software or DynamicAccess Technology.
7 Click Install DynamicAccess LAN Encryption Software
Windows 95/98.
The setup wizard launches for either 56-bit LAN (DES)
encryption or 168-bit LAN (3DES) encryption depending on
the model of your installed EtherLink 10/100 PCI NIC and
the EtherCD inserted in your computer. A message prompts
you to exit all Windows applications.
Page 83

Installing DynamicAccess LAN Encryption Software 83
8 If you need to close any open applications, click
Cancel, close the applications, and then restart the
installation process. (Alternatively, you can press
Ctrl-Tab to display each open application and close it.)
Once you are ready to proceed, click Next.
The Software License Agreement screen appears.
9 Click Yes to continue.
The Setup Type screen appears, offering you a Typical or
Custom installation.
■ Typical—the program will be installed with the
most common options.
■ Custom—you can choose which components to
install. This choice allows you to download and view
the DynamicAccess LAN Encryption Software
Administrator’s Guide.
Installing the DynamicAccess LAN Encryption software
from a login script is not supported.
10 Select Custom Installation to install the
DynamicAccess LAN Encryption software and to
download the user guide to your computer’s hard
drive. Click Next to continue.
The Select Components screen appears, allowing you to
choose the components to be installed.
11 Select both components: DynamicAccess LAN
Encryption Software and Admin Documentation.
Click Next.
The DynamicAccess LAN encryption software screen appears.
12 Verify that the displayed destination folder is correct
for installation on your computer. Use the Browse
button if necessary to change the destination folder.
Once the appropriate destination folder is displayed,
click Next.
The Start Copying Files screen appears, displaying the
components that will be installed.
Page 84

84 CHAPTER 4: INSTALLING DYNAMICACCESS SOFTWARE IN WINDOWS
13 Verify that the displayed components are correct for
installation on your computer and click Next.
The system copies files from the EtherCD to the destination
location, sets up the registry, builds drivers, and updates
bindings.
After you have successfully installed the DynamicAccess
LAN Encryption client, the physical adapters (NICs) and
upper level protocols (TCP/IP, IPX, etc.) in your computer
bind to the virtual adapters created by the DynamicAccess
LAN Encryption software. The bindings of the upper level
protocols to the physical adapters are removed and
replaced with bindings to the virtual adapters.
Follow the rest of the setup wizard instructions to install
the software properly.
If you see “version conflict” messages, click Cancel to
continue.
When prompted to reboot, click Yes to continue.
If you see “Winsock 2 setup” error messages, reboot the
system and re-start the 3Com LAN Encryption installation.
If prompted to insert the Windows 98 CD, insert it so that
certain Windows files can be copied. (Prompting for the
Windows CD depends on your PC configuration.) Follow
the displayed prompts.
The setup program continues once the appropriate
Windows files have been located and copied to the
appropriate Windows folders.
The Setup Complete dialog box appears.
14 Select Yes, I want to restart my computer now and
click Finish to restart your computer.
If you have not yet created one or more connection
profiles, you will be prompted to use the DynamicAccess
LAN Client dialog box to create the profiles. See the
“Creating a Connection Profile” topic in the administrator’s
guide for more information.
Page 85

Installing DynamicAccess LAN Encryption Software 85
During installation, the policy files tssecmap.cfg and
tssecdes.cfg are automatically copied from the EtherCD to
your PC. See the “3Com LAN Encryption Secure Network
Map File (tssecmap.cfg)” topic and the “Security Level
Definition File (tssecdes.cfg)” topic in the administrator’s
guide for more information.
To use the Certificate Authentication mode, copy the
entrust.ini file to the Windows directory on the client
computer and then restart the PC. You can find a sample of
the entrust.ini file on the EtherCD. See “Adding the Entrust
File.”
Adding the Entrust File
If you select certificates as your form of authentication, you
must add the entrust.ini file to your Windows directory.
This file points to the Entrust CA server and to the X.500
server (which stores certificates). It also lists the path to the
directory containing the user's Entrust profiles
(DynamicAccess LAN Encryption creates this directory as
part of the installation process, and when storing a newly
created certificate).
DynamicAccess LAN Encryption software supports the
Entrust Certificate Authority. If you do not have Entrust on
your network, users must use shared-secret
authentication. To take full advantage of Entrust/PKI
security and key management features, you must install
the Entrust/Entelligence product on the DynamicAccess
LAN Encryption client computer. For more information on
Entrust/Entelligence and Entrust/PKI, or to contact a
representative, go to the Entrust Technologies World
Wide Web site: http://www.entrust.com.
The Entrust/Manager software stores the entrust.ini file in the
Entrust directory on the Entrust CA server. You can find a
copy of the entrust.ini file on the EtherCD. After installing the
DynamicAccess LAN Encryption software, before rebooting
the system, manually copy the entrust.ini file to the Windows
directory on the client computer, and then reboot.
Page 86

86 CHAPTER 4: INSTALLING DYNAMICACCESS SOFTWARE IN WINDOWS
Starting DynamicAccess LAN Encryption Software
You start the DynamicAccess LAN Encryption software by
choosing a secure profile.
1 Right-click the padlock icon in the taskbar to see the
secure profiles on your system.
2 Select the secure profile you want to use from
the list.
■ If your organization is set up to use certificates to
authenticate the users on the network, you are
prompted to provide your user name and password.
Find your name in the User File list and provide your
password in this dialog box.
■ If your organization is not using certificates to
authenticate users, you are prompted to provide the
shared secret for the connection. A shared secret
must be agreed upon between you and the system
to which you are connecting to secure the data
communication.
3 To switch to a different secure profile, right-click the
padlock icon in the taskbar and select a different
profile. The profile in use displays a check mark next
to it.
You will be prompted to enter your user name and
password for certificate authorization, or provide a shared
secret when you switch to a different secure profile.
For further information, view the online DynamicAccess
LAN Encryption Software Administrator’s Guide, as
described in the next section.
Viewing the Administrator’s Guide Online
The EtherCD containing the DynamicAccess LAN
Encryption software also contains an online software
administrator’s guide in WebHelp format. You can view the
guide with the following recommended Internet browsers,
which are freely available on the Internet or from the
manufacturer on CD:
■ Microsoft Internet Explorer Version 4 or later
■ Netscape Navigator Version 4.03 or later
Page 87

Installing DynamicAccess LAN Encryption Software 87
Once you have installed the DynamicAccess LAN Encryption
software and downloaded the DynamicAccess LAN
Encryption Software Administrator’s Guide to your
computer’s hard drive, you can view the guide online
by following these steps:
1 Click the Start button in the taskbar on your
Windows desktop.
2 Select Programs.
3 Select 3Com.
4 Select DynamicAccess LAN Encryption Software
Admin Guide.
Uninstalling LAN Encryption Software
To uninstall DynamicAccess LAN Encryption software from
a Windows 95/98 computer, follow these steps:
1 Click the Start button in the taskbar on your
Windows desktop.
2 Select Settings.
3 Select Control Panel.
4 Double-click the Add/Remove Programs icon.
The Add/Remove Program Properties screen appears.
5 In the Install/Uninstall tab, select DynamicAccess LAN
Encryption Software.
6 Click the Add/Remove button.
The Confirm File Deletion dialog box appears, asking you
to verify that you want to delete DynamicAccess LAN
Encryption Software.
Click Yes.
Page 88

Page 89

INSTALLING NETWARE CLIENT
5
AND SERVER DRIVERS
Overview
This chapter describes how to install server drivers for
Novell NetWare versions 3.12, 4.11, and 5.0.
To obtain the latest shipping version of a driver, go to:
http://www.3com.com/
Installing and Configuring the NetWare Server Driver
This section describes how to install the NetWare driver on
a Novell server running NetWare 3.12, 4.11, or 5.0. The
\NWSERVER directory contains the network driver file
(3C99X.LAN) to be used for servers running NetWare 3.12,
4.11, or 5.0. Additional files (NetWare Loadable Modules
[NLMs]) that are required for servers running NetWare are
on the EtherCD in the \NWSERVER directory, or they can
be obtained from Novell.
Using the Latest Support Packs
The 3CR990 NIC does not support NetWare 3.11 or
4.0x servers. The 3CR990 NIC does not support
NetWare 3.12 or 4.11 servers that are not updated to the
latest Novell Support Pack. NetWare 3.12 does not support
3CR990 NIC load balancing/failover or TCP/IP checksum
offload/hardware checksumming.
CAUTION: If you plan to form load balancing/failover
groups using NetWare 4.11 or 5.0, do not enable TCP/IP
checksum offload for the 3CR990 NIC driver.
Use the following support packs to achieve best results
with the network driver.
NetWare Version Required Support Pack
3.12 Latest patch files.
Page 90

90 CHAPTER 5: INSTALLING NETWARE CLIENT AND SERVER DRIVERS
NetWare Version Required Support Pack (continued)
4.11 Support Pack 6 or later for all types of
5.0 Support Pack 2 or later
operation.
Support Pack 7 or higher is required for
proper operation of the failover mechanism
for the 3CR990 server NIC.
The required support pack must be loaded before you
install the driver for the 3CR990 NIC.
You can obtain the latest support packs from the Novell
World Wide Web site:
http://www.support.novell.com
Obtaining NetWare Loadable Modules
You can obtain current NLMs for the NetWare servers listed
in the table below from the from the \NWSERVER directory
on the EtherCD, or from the Novell World Wide Web site:
http://www.support.novell.com
NetWare Server NLM Name
NetWare 3.12 ETHERTSM.NLM
MSM31X.NLM
NBI31X.NLM
NetWare 4.11, 5.0 ETHERTSM.NLM
TCPIP.NLM
NBI.NLM
MSM.NLM
To upgrade the NetWare driver for a NetWare server, you
must create installation diskettes from the EtherCD that
accompanied this product. Use these diskettes to install
the Netware server driver. See Creating Installation
Diskettes on page 30.
Page 91

Installing and Configuring the NetWare Server Driver 91
Server Software Installation Requirements
Before you install software, you may want to verify
that the installed NICs are functional or change their
configuration settings by running DOS diagnostics. Use
the 3C99XCFG.EXE program located on the EtherCD.
The instructions in this section demonstrate the
fundamentals of setting up a sample server configuration.
Setting up your own configuration may require a slightly
different sequence of tasks and different numbers of NICs.
If you are installing the software during the installation of
the network operating system, see Installing a 3Com NIC
While Installing the NOS on page 167.
For a list of installation requirements, see Installation
Requirements on page 28.
Netware Packet Receive Buffers
Follow these guidelines for NetWare 4.11 and 5.0:
The driver requires 200 packet receive buffers for each
installed NIC. You must increase the minimum and
maximum packet receive buffers values by 200 for
each installed NIC. For example, if you install two NICs,
increase the parameters in the STARTUP.NCF file by
400 as follows:
Before installing
NICs
After installing
two NICs
SET MINIMUM PACKET RECEIVE BUFFERS = 1000
SET MAXIMUM PACKET RECEIVE BUFFERS = 2500
SET MINIMUM PACKET RECEIVE BUFFERS = 1400
SET MAXIMUM PACKET RECEIVE BUFFERS = 2900
Slot Numbers for Multiple NICs
If you are installing more than one NIC on a server, you
must know which NIC corresponds to a given PCI slot to
connect a cable from the NIC to the appropriate port on
the hub or switch. You can correlate slots with physical
NICs by the NIC MAC addresses. (The MAC address is
written on a bar code label on the top component side
of the NIC.)
Page 92

92 CHAPTER 5: INSTALLING NETWARE CLIENT AND SERVER DRIVERS
Obtaining Slot Numbers
The NetWare driver installation program requires you to
enter a PCI slot number for each NIC. In older versions of
NetWare software, the term slot number referred to the
physical slot in which the NIC was installed in the server.
Now, the slot number is a combination of the bus number,
bus type, and the physical slot number. The value of a slot
number can be 10001 or larger.
Follow this procedure to obtain slot numbers for a
multi-NIC installation:
1 Install only one 3CR990 NIC, as described in Installing
and Connecting the NIC on page 34.
2 Follow the installation instructions in this chapter to
load the EtherCD, copy the driver, and load the driver.
You need not specify a slot number when only one NIC
is installed.
3 In the NetWare Console, issue a CONFIG command.
4 Write down the slot number that is listed for the
installed NIC.
5 Install the second 3CR990 NIC.
6 Follow the installation instructions in this chapter to
install the driver on the second NIC.
Each time you load the driver, the CONFIG command
displays the slot numbers for all the 3CR990 NICs in
the system.
Installing the NetWare 3.12 Server Driver
To install the driver in a NetWare 3.12 server:
1 Copy the MSM31X.NLM, ETHERTSM.NLM, and
NBI31.NLM files from the \NWSERVER directory on
the EtherCD to the directory on your hard drive
where other NLM files are located.
Copy the NLM files only if the versions existing on
the server are older than the versions supplied on
the EtherCD.
Page 93

Installing and Configuring the NetWare Server Driver 93
The NLM file location is typically in the sys:system directory.
You need a NetWare client system to copy the NLM files to
the server.
2 Copy the LAN driver file (3C99X.LAN) from the
EtherCD to the same directory.
3 Add the following two lines to the AUTOEXEC.NCF file:
load sys:\system\3c99x.lan slot=<slot>
NAME=<name> FRAME=<frametype>
bind ipx to <name> net=<number>
If you copy the NLM files to a different directory, you must
specify the path in the preceding LOAD statement.
4 Save and exit the file, and then reboot the server.
Installing the Server Driver for NetWare 4.11 and 5.0
Using INETCFG
To install the driver in a NetWare 4.11or 5.0 server:
1 Copy the MSM.NLM, ETHERTSM.NLM, and NBI.NLM
files from the \NWSERVER directory on the EtherCD
to the directory on your hard drive where other NLM
files are located.
Copy the NLM files only if the versions existing on the
server are older than the versions supplied on the
EtherCD.
CAUTION: You can configure load balancing only
through the command line interface or by manually
updating the AUTOEXEC.NCF file. You cannot have load
balancing automatically configured by INETCFG.SYS.
The NLM file location is typically in the sys:system directory.
You need a NetWare client system to copy the NLM files to
the server.
2 Insert installation diskette 2 in drive A.
3 At the server prompt, type:
load inetcfg
Page 94

94 CHAPTER 5: INSTALLING NETWARE CLIENT AND SERVER DRIVERS
4 Press Enter.
The Internetworking Configuration screen appears.
5 In the displayed menu, select Boards, and then
press Enter.
6 Press Insert.
A list of currently installed drivers appears.
7 Press Insert again.
The New Driver dialog box appears.
8 Specify the directory:
a:\nwserver\3c99x.lan
9 Press Enter.
An updated list of installed drivers appears.
10 Select 3C99x, and then press Enter.
You are prompted to name the NIC, for example: 3c99x_1.
11 Type the name of the NIC and press Enter.
You are prompted for the slot number. For information on
how to verify the slot number, see Verifying the PCI Slot
Number on page 99.
12 Enter the slot number, and then press Enter.
13 Press Esc, Enter (to save), and then Esc.
The Internetworking Configuration screen appears.
14 Select Bindings, and then press Enter.
The configured protocols for installed NICs appears.
(This list will be empty if no protocols are currently
bound to the NIC.)
15 Press Insert.
The Select From the List of Configured Protocols screen
appears.
For NetWare 5.0:
■ The default To a Network Interface is selected.
Press Enter.
The Select a Configured Network Interface
screen appears.
Page 95

Installing and Configuring the NetWare Server Driver 95
■ Select the board. For example, enter: 3c99x_1, and
then press Enter.
16 When prompted, enter the network number, and
then press Enter.
17 In the Frame Type field, press Enter to display a list of
frames, choose a frame, and press Enter.
18 Press Esc.
You are prompted to save the changes.
19 Press Enter to save the changes.
The configured Protocol to Network Interface Bindings
screen appears.
20 Press Esc to Exit.
The main menu appears.
■ NetWare 4.11: Restart the server.
■ NetWare 5.0:
■ Select Reinitialize System.
■ Press Enter to reinitialize.
Press Esc to exit from the program.
Installing the Server Driver and DynamicAccess Technology Using AUTOEXEC.NCF
You can also install the server driver by editing (or adding
new) LOAD commands in the AUTOEXEC.NCF file.
With NetWare installed and the server up and running,
complete the following steps to install and configure the
driver and DynamicAccess technology server features on a
NetWare file server.
In NetWare screens, use the arrow keys to select an item
and then press Enter.
Page 96

96 CHAPTER 5: INSTALLING NETWARE CLIENT AND SERVER DRIVERS
Loading the 3Com EtherCD
NetWare 4.11 Insert the CD in the CD-ROM drive and enter
NetWare 5.0 Insert the CD in the CD-ROM drive and enter this
these commands:
load cdrom
cd mount 3C99XC_TXM
command:
load cdrom
Wait for the message that states the CD is
mounted successfully, and then proceed to copy
the driver.
Copying the Driver
1 Enter this command at the prompt:
NetWare 4.11: load install
NetWare 5.0: load nwconfig
2 In the Configuration Options screen, select
Driver options.
3 In the Driver Options screen, select
Configure network drivers.
4 In the Additional Driver Actions screen, select
Select a driver.
The Select a Driver screen appears, listing all previously
saved drivers in the system.
If this is the first installation of the 3Com server NIC driver,
it does not appear in this list.
5 Press Insert.
A system message for selecting a disk drive appears.
6 Press F3.
7 Enter a path to the volume that contains the driver.
For example:
3C99XC_TXM:\nwserver
The Select a Driver to Install screen appears with the 3Com
EtherLink Server NIC driver name highlighted.
8 Press Enter to select the driver.
Page 97

Installing and Configuring the NetWare Server Driver 97
9 Select Yes at the prompt to confirm the name of the
driver to copy.
The installation program copies the driver to the appropriate
server subdirectory. The Configuration screen appears.
Specifying the Slot Number
You need not specify the slot number if you are installing
only one NIC.
1 In the Configuration screen, select Slot Number.
2 Enter the slot number of the NIC that you want to
install. For example:
10001
See Changing NetWare Driver Configuration Parameters on
page 103 for instructions on changing other parameters in
this screen.
Loading the Driver
1 Select Save parameters and load driver.
The installation program loads the configured driver and
then writes the appropriate LOAD and BIND commands to
the AUTOEXEC.NCF file.
The system assigns a network number.
2 Enter a network number, or press Enter to select the
system-assigned number.
If no errors are encountered, the installation program asks
whether you want to select an additional network driver.
3 Select Yes to set up another NIC.
Setting Up Another NIC
1 Follow the prompts for another NIC:
■ Select the driver
■ Enter the slot number
■ Save parameters and load the driver
2 Repeat the process for all NICs to be set up.
3 After all NICs are set up, press Esc several times to
return to the Installation Options screen.
Page 98

98 CHAPTER 5: INSTALLING NETWARE CLIENT AND SERVER DRIVERS
Installing Multiple Server NICs
To support more than one NIC in a NetWare server, change
the AUTOEXEC.NCF file to the following format:
load 3C99X.LAN slot=<slot1> NAME=<name1>
FRAME=<frametype1>
bind ipx to <name1> net=<net1>
load 3C99X.LAN slot=<slot2> NAME=<name2>
FRAME=<frametype2>
bind ipx to <name2> net=<net2>
The values <slot1> and <slot2> are the numbers of
the PCI slots in which the NICs are physically installed.
To view the numbers of these PCI slots, use the
3Com Configuration and Diagnostic program for DOS.
See Verifying the PCI Slot Number on page 99
for instructions.
The values <name1> and <name2> are unique names
assigned to each NIC by your system administrator. The
values <name1> and <name 2> must be different.
The frame parameters <frametype1> and <frametype2>
can be one of the following:
■ Ethernet_802.2
■ Ethernet_802.3
■ Ethernet_II
■ Ethernet_SNAP
Make sure that the frametype for the server and the
workstation is the same. For example, if the server
uses Ethernet_802.2, the workstation must also use
Ethernet_802.2.
The values <net1> and <net2> are unique numbers
assigned by the system administrator to each NIC. Make
sure that <net1> and <net2> are different numbers.
See the appropriate Novell NetWare manuals for
further information.
Page 99

Installing and Configuring the NetWare Server Driver 99
Verifying the PCI Slot Number
To verify the PCI slot number in which a NIC is installed:
1 Boot the NetWare server with the -na option.
This prevents the AUTOEXEC.NCF file from loading. For
example, enter:
server -na
2 Issue the load command for the NIC LAN driver
without a slot parameter.
For example, enter:
load sys:\system\3C99X.lan
3 NetWare lists the valid slot number(s) for the NIC,
depending on how many NICs are installed. The
values appearing in the list are the slot values that
you should use.
Example:
After you issue the command, a message appears. At the
end of the message, additional text similar to the following
appears:
Total of 2 3C99x PCI adapter card(s) found.
Supported slot values are 2,3.
Slot:2
Installing Server Features
Two drivers are associated with DynamicAccess technology
server features under NetWare: SE and LBRSL.
1 From the Configuration Options screen select
Product options.
2 Select Install a product not listed.
The following message appears:
Product will be installed from A:\. If you are
installing from floppy, insert the first
diskette of the product you want to install
into the drive and verify that the path above
is correct.
Press <F3> to specify a different path;
Press <ENTER> to continue.
3 Press F3.
Page 100

100 CHAPTER 5: INSTALLING NETWARE CLIENT AND SERVER DRIVERS
4 Enter this command:
3C99xC_TXM:\nwserver
The following message appears:
Product “3Com DynamicAccess Server Features”
was found. Verify that this is the product you
want to install before proceeding.
Press <ENTER> to continue.
Press <ESC> to abort installation.
5 Press Enter.
The system copies the DynamicAccess technology server
features software to the SYS volume.
Configuring Groups
1 Press Esc to return to the Installation Options screen.
2 From the Configuration Options screen, select
NCF files options (create/edit server startup files)
3 Select Edit AUTOEXEC.NCF file.
4 Make the following changes to the AUTOEXEC.NCF
file:
a Add a command to load the SE and LBRSL drivers before
any commands to load LAN drivers. For example:
load se
load lbrsl
CAUTION: Do not set Novell’s Load Balance Local
LAN=ON when using SE and LIBRSL (the 3Com Load
Balancing suite).
b Add or verify the LOAD commands for the LAN drivers
for all slot-frame instances.
c For each Load Balancing/RSL group, load the same
protocols and frame types on the primary and all
secondary NICs.
d On the primary NIC only, bind a protocol to each
slot-frame instance.
 Loading...