

3B Scientific Physiological Skeleton- Phil - Hanging Stand User Manual [en, ru, de, fr, it, es]
Page 1
A15/3
(1000037)
Page 2

®
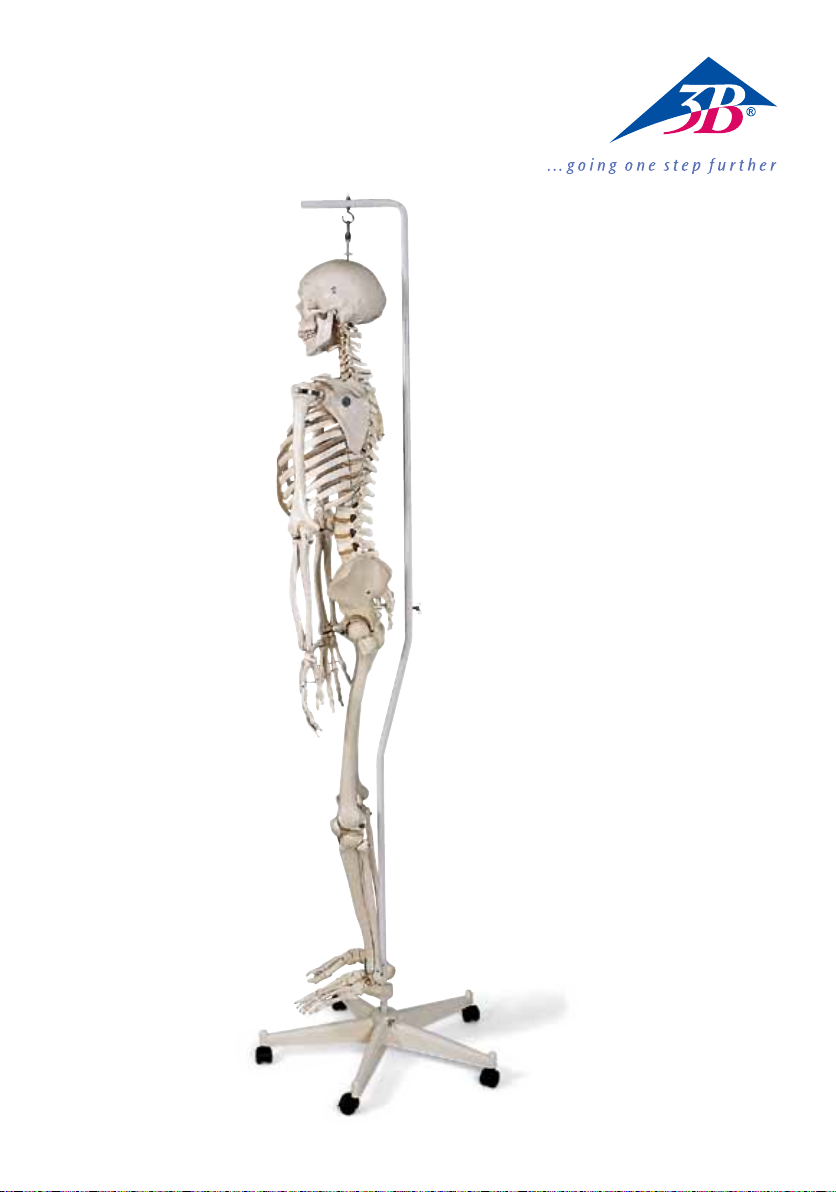
Physiological Skeleton
This unique skeleton was developed in order to illustrate the supporting function of the mobile skeletal
system. Opposed to other skeletons, which are primarily designed as visual models for the study of anatomy, with this skeleton you can simulate the development of physiological movements.
You can both visually illustrate motions, showing the interplay of the individual bones and joints, and
their behavior under pressure (pulling, pushing, stretching). While doing so, one can „feel“ with the hands
how the overall skeletal system reacts to each of the movements and locate the best possible points for the
transfer of forces as determined by the bony structures.
You can work with the skeleton while it is in either an upright (hanging) or horizontal (lying) position.
Assembly
It is easiest to assemble the skeleton by placing all the parts in front of you on the floor.
• Connect the 5 arms of the base to the center section.
• Connect the two halves of the tripod rod to one another and screw the tripod rod in the center section of
the base.
• Affix the skull by leading the rod emerging from the spinal column through the hole in the roof of the
skull. If the rod appears to be too short for assembly, you can bend the spinal column slightly. First place
the metal disc and then the spring over this rod and affix both of them with the knurled nut (= disc
shaped nut). Then screw the hanging device to the rod.
• Lay the skeleton (upper body with arms and skull) in front of you on the floor. The legs are attached
using the connecting pins and screws between the ala of the ilium and the sacrum. The symphysis is
affixed with another connecting pin and screw. We recommend that you do not tighten the screws until
all of the connecting pins are positioned.
• Now, with the hanging device, hang the skeleton onto the hook of the tripod - finished.
Great value was put in the most realistic illustration of movements possible during assembly of the skeleton. In the following we would like to briefly point out the most important features:
English
The Skull
The skull of the model is made up of three parts. The skull roof can be removed to view the inner skull
structure. The lower jaw is movable. A spiral spring in the hanging device above the roof of the skull facilitates good mobility in the area of the cervical spine when the head is bent forward while the skeleton is in
a horizontal position.
The Spinal Column
The spinal column is flexibly assembled and shown with its natural curvature. Physiological exercises can
be carried out very well in the horizontal position.
The Thorax
The sternum and the rib ends are made of an elastic material and stabilized by a spring so that movements
in the thoracic area can be illustrated.
The Shoulder Joint
The upper arm and shoulder blade are realistically connected to one another. When the arm is raised
above the horizontal, the movement is transferred realistically to the shoulder blade.
In order to ensure stability in the shoulder girdle (cf. during transport of the model), the shoulder blade is
attached to the thorax with a screw. This screw can be loosened in order to ease the transfer of movement.
2
Page 3

®
NameEnglish
The Forearm
The connection in the elbow joint makes realistic flexion and extension possible as well as good transfer
of force between the upper and lower arm. The rotating movement of the forearm between the ulna and
radial (pronation and supination) are also possible.
The Hands
Since the assembly of the hand is relatively fixed in order to achieve stability, movement of the carpalia
(wrist bone) is limited. Flexion of the fingers and thumb opposition can be easily simulated.
The Hip Joint
The condyle of the femur and the socket of the hip bone are connected realistically making movement of
the thigh possible in all physiological directions including rotation around the vertical axis. The transfer of
force and movement from the leg to the hip and spinal column is also easily recognizable.
The Knee
The lower leg can be flexed and extended. Outward and inward rotations are easily possible within their
natural limits.
The Foot
Both the tarsal bones and the bones of the individual phalanges are connected to one another elastically
and facilitate good mobility in all of the joints.
Repair kit
In case a screw is lost, a rubber band breaks from excessive pressure or a spring gives way, spare parts are
contained in the enclosed repair kit.
Physiological Skeleton
3
Page 4

®
Physiologisches Skelett
Dieses einzigartige Skelett wurde entwickelt, um die Tragefunktion des bewegten Skelettsystems zu
verdeutlichen. Im Gegensatz zu anderen Skeletten, die überwiegend als reine Anschauungsmodelle
zum Studium der Anatomie konzipiert sind, können Sie mit diesem Skelett die physiologischen
Bewegungsentwicklungen simulieren.
Bewegungen, die das Zusammenspiel der einzelnen Knochen und Gelenke verdeutlichen, können Sie
genauso anschaulich darstellen wie das Verhalten unter Belastung (Zug/Druck/Dehnung). Dabei kann auch
mit den Händen „erspürt“ werden, wie das gesamte Skelettsystem auf die jeweilige Bewegung reagiert und
wo, durch knöcherne Strukturen vorgegeben, die günstigsten Kraftübertragungen möglich sind.
Sie können mit dem Skelett in aufrechter (hängender) wie liegender Position arbeiten.
Aufbau
Am einfachsten läßt sich das Skelett montieren, wenn Sie alle Teile vor sich auf den Boden legen.
• Verbinden Sie die 5 Arme des Sockels mit dem Mittelstück
• Verbinden Sie die beiden Hälften der Stativstange miteinander und schrauben die Stativstange im
Mittelstück des Sockels fest.
• Befestigen Sie den Schädel, indem Sie die aus der Wirbelsäule ragende Stange durch das Loch in der
Schädeldecke führen. Sollte Ihnen die Stange für die Montage zu kurz erscheinen, können Sie die
Wirbelsäule leicht krümmen. Stecken Sie zuerst die Metallscheibe und dann die Feder über diese Stange
und fixieren beides mit der Rändelmutter (= scheibenförmige Mutter). Zum Schluß schrauben Sie die
Aufhängevorrichtung an die Stange.
• Legen Sie das Skelett (Oberkörper mit Armen und Schädel) vor sich auf den Boden. Die Beine werden
zwischen Beckenschaufel und Kreuzbein durch die Verbindungsstifte und Schrauben fixiert. Ein weiterer
Verbindungsstift mit Schraube fixiert die Symphyse. Es empfiehlt sich, die Schrauben erst anzuziehen,
wenn alle Verbindungsstifte positioniert sind.
• Hängen Sie nun das Skelett mit der Aufhängevorrichtung an den Haken des Stativs - fertig.
Bei der Montage des Skeletts wurde der größte Wert auf die möglichst realistische Darstellung der
Bewegunsumfänge gelegt. Wir möchten Sie im folgenden kurz auf die wichtigsten Merkmale hinweisen:
Deutsch
Der Schädel
Der Schädel des Modells besteht aus drei Teilen. Zur Ansicht der inneren Schädelstrukturen ist
das Schädeldach abnehmbar. Der Unterkiefer ist beweglich montiert. Eine Spiralfeder in der
Aufhängevorrichtung über dem Schädeldach ermöglicht eine gute Beweglichkeit im Bereich der
Halswirbelsäule beim Vorbeugen des Kopfes in liegender Position des Skelettes.
Die Wirbelsäule
Die Wirbelsäule ist flexibel montiert und in ihrer natürlichen Krümmung dargestellt. Physiologische
Übungen lassen sich besonders im Liegen sehr gut durchführen.
Der Brustkorb
Das Brustbein sowie die Rippenansätze sind aus elastischem Material gefertigt und werden durch eine
Feder stabilisiert, so daß Bewegungen im Bereich des Brustkorbes gezeigt werden können.
Das Schultergelenk
Oberarm und Schulterblatt sind realistisch miteinander verbunden. Bei Hebung des Arms über die
Horizontale hinaus findet eine realistische Übertragung der Bewegung auf das Schulterblatt statt.
Um eine gute Stabilität im Schultergürtel (v. a. beim Transport des Modells) zu garantieren, ist
das Schulterblatt mit einer Schraube am Brustkorb befestigt. Diese Schraube kann zur leichteren
Bewegungsübertragung gelockert werden.
4
Page 5

®
Deutsch
Der Unterarm
Die Verbindung im Ellenbogengelenk ermöglicht eine realistische Beugung und Streckung sowie eine gute
Kraftübertragung zwischen Unter- und Oberarm. Auch die Drehbewegungen des Unterarms zwischen Elle
und Speiche (Pronation und Supination) sind möglich.
Die Hände
Eine Bewegung der Handwurzelknochen ist nur bedingt möglich, da die Montage relativ fest ist, um eine
gute Stabilität zu erreichen. Eine leichte Beugung der Finger und die Opposition des Daumens können
nachgestellt werden.
Das Hüftgelenk
Der Gelenkkopf des Oberschenkels und die Gelenk-pfanne am Hüftbein sind realistisch miteinander verbunden, so daß die Bewegung des Oberschenkels in alle physiologischen Bewegungsrichtungen, einschließlich der Rotation um die vertikale Achse, möglich ist. Auch die Kraft- und Bewegungsübertragung vom Bein
auf die Hüfte und Wirbelsäule ist gut erkennbar.
Das Kniegelenk
Der Unterschenkel kann gebeugt und gestreckt werden. Eine Außen- und Innenrotation ist in ihrer natürlichen Begrenzung gut möglich.
Der Fuß
Sowohl die Fußwurzelknochen als auch die Knochen der einzelnen Phalangen sind elastisch miteinander
verbunden und ermöglichen eine gute Beweglichkeit in allen Gelenken.
Reparaturset
Sollte einmal eine Schraube verlorengehen, ein Gummiband durch zu starke Belastung reißen oder eine
Feder nachgeben, finden Sie Ersatzteile in dem beiliegenden Reparaturset.
Physiologisches Skelett
5
Page 6

®
EspañolEsqueleto Fisiológico
Este singular esqueleto ha sido desarrollado para explicar la función de soporte del sistema móvil del
esqueleto. En contraposición a otros esqueletos, que han sido concebidos preponderantemente como
modelos de contemplación para el estudio de la anatomía, Vd. puede simular con este esqueleto los desarrollos fisiológicos de los movimientos.
Movimientos que explican el juego de conjunto de cada uno de los huesos y articulaciones, pueden ser
representados con la misma intuición que el comportamiento bajo situaciones de gravamen (tracción/
presión/extensión). Aquí se puede „percibir“ también con las manos, cómo reacciona todo el sistema del
esqueleto a cada uno de los movimientos y donde están situadas posiblemente las transmisiones de fuerza
más favorables, pretendidas mediante las estructuras óseas.
Vd. puede trabajar con el esqueleto en posición erguida (suspendido) y en posición yacente.
Montaje
El esqueleto se deja montar de la forma más sencilla, si Vd. coloca ordenadamente todas las piezas delante
de sí sobre el suelo.
• Una Vd. los 5 brazos del pedestal con la pieza intermedia.
• Una Vd. entre sí las dos mitades de la barra del soporte y atornille firmemente la barra del soporte a la
pieza intermedia del pedestal.
• Sujete Vd. el cráneo mediante introducción de la barra que sobresale de la columna vertebral en el orificio de la tapa del cráneo. Si Vd. cree que la barra para el montaje es demasiado corta, puede Vd. encorvar ligeramente la columna vertebral. Introduzca Vd. primero la arandela metálica y a continuación el
muelle en la barra y sujete Vd. ambos con la tuerca moleteada (= tuerca en forma de disco). Finalmente
atornille Vd. el dispositivo de suspensión a la barra.
• Extienda Vd. el esqueleto delante de Vd. sobre el suelo (parte superior del cuerpo con brazos y tronco).
Las piernas se fijan entre la paletilla de la pelvis y el hueso sacro mediante las clavijas de conexión y
los tornillos. Otra clavija de conexión con rosca fija la sínfisis. Se recomienda apretar los tornillos sólo
después de que las clavijas de conexión se hayan colocado en sus posiciones.
• Cuelgue Vd. ahora el esqueleto con el dispositivo de suspensión en el gancho del soporte - listo.
En el montaje del esqueleto se ha cifrado el máximo valor en una representación lo más realista posible
de las extensiones del movimiento. En lo que sigue deseamos llamar brevemente su atención sobre las
características más importantes.
El cráneo
El cráneo del modelo consta de tres piezas. Para la contemplación de las estructuras interiores del cráneo,
la tapa del cráneo es desmontable. La mandíbula inferior está montada con posibilidad de movimiento. Un
muelle en espiral en el dispositivo de suspensión, sobre la tapa del cráneo, permite una buena movilidad
en la región de las vértebras cervicales, al inclinar hacia adelante la cabeza, en la posición yacente del
esqueleto.
La columna vertebral
La columna vertebral está montada de forma flexible y presentada en su encorvadura natural. Se pueden
practicar muy bien ejercicios fisiológicos, especialmente en posición yacente.
La caja torácica
La caja torácica y las piezas costales están construídas en material flexible y están estabilizadas mediante
un muelle, de forma que se pueden mostrar movimientos en la región de la caja torácica.
La articulación del hombro
El brazo y el omóplato están conectados entre sí de forma real. Al levantar el brazo por encima de la línea
horizontal, tiene lugar una transmisión real del movimiento al omóplato.
6
Page 7

®
Español Esqueleto Fisiológico
Para garantizar una buena estabilidad en el cíngulo del hombro (especialmente durante el transporte del
modelo), el omóplato está sujetado mediante un tornillo a la caja torácica. Este tornillo se le puede aflojar
para una transmisión más fácil de los movimientos.
El antebrazo
La unión en la articulación del codo hace posible un movimiento real y una extensión, así como una buena
transmisión de fuerza entre el antebrazo y el brazo. También son posibles los movimientos de giro del
antebrazo entre el cúbito y el radio (pronación y supinación).
Las manos
Un movimiento de los huesos de la raíz de la mano sólo es posible condicionalmente, ya que el montaje
es relativamente firme, para conseguir una buena estabilidad. Se pueden reajustar, sin embargo, un ligero
movimiento de los dedos y la oposición del dedo pulgar.
La articulación de la cadera
La cabeza de rótula del muslo y la cavidad cotiloidea en el hueso ilíaco están conectados entre sí de una
forma real, de forma que es posible el movimiento del muslo en todas las direcciones de movimiento fisiológico, incluída la rotación en torno al eje vertical. También es fácil de reconocer la transmisión de fuerza y
movimiento de la pierna a la cadera y a la columna vertebral.
La articulación de la rodilla
La pierna se puede doblar y estirar. Es posible una rotación hacia afuera y hacia adentro, dentro de sus
limitaciones naturales.
El pie
Tanto los huesos de la raíz del pie, como los huesos de cada una de las falanges están unidos entre sí de
forma elástica y permiten una buena movilidad en todas las articulaciones.
Juego de piezas para reparaciones
Si alguna vez se pierde un tornillo, o una cinta elástica se rompe debido a tensiones demasiado fuertes, o
un muelle cede, encontrará Vd. piezas de repuesto en el juego de piezas para reparaciones que se acompaña.
7
Page 8

®
FrançaisSquelette physiologique
Ce squelette unique en son genre a été réalisé pour démontrer le rôle actif que joue le système squelettique en mouvement. A l’encontre des autres squelettes, qui sont principalement conçus comme de purs
modèles éducatifs pour l’étude de l’anatomie, vous pouvez simuler, avec ce squelette, le développement
des mouvements physiologiques.
Vous pouvez clairement illustrer aussi bien les mouvements, capables d’élucider le jeu d’ensemble des différents os avec les articulations, que leur comportement sous charge (tension/pression/
extension). Ce faisant, on peut même “sentir” avec les mains comment l’ensemble du système squelettique
réagit au mouvement correspondant et où, dicté par les structures osseuses, les transmissions de force les
plus avantageuses sont possibles.
Vous pouvez travailler avec le squelette aussi bien en position verticale (suspendu) qu’en position horizontale.
Assemblage
Le squelette se laisse monter plus facilement, si vous étalez toutes les pièces devant vous sur le sol.
• Raccordez les 5 bras du socle à la pièce du milieu.
• Raccordez les deux moitiés de la tige du trépied et vissez la tige du trépied sur la pièce du milieu du
socle.
• Fixez le crâne, en introduisant la tige émergeant de la colonne vertébrale dans le trou de la voûte crânienne. Si vous avez l’impression que la tige est trop courte pour l’assemblage, vous pouvez plier légèrement la colonne vertébrale. Faites glisser sur la tige d’abord la rondelle en métal et ensuite le ressort et
fixez les deux avec l’écrou moleté (= écrou en forme de rondelle). Enfin vissez le dispositif de suspension
sur la tige.
• Allongez le squelette (la partie supérieure du corps avec bras et crâne) devant vous sur le sol. Les jambes
sont fixées entre les os du bassin et le sacrum à l’aide de broches de raccord. Une autre broche de raccord fixe la symphyse. Il est à recommander de ne pas serrer les vis, avant que toutes les broches de raccord ne soient mises en place.
• Maintenant, accrochez le squelette avec le dispositif de suspension au crochet du trépied - terminé.
Dans l’assemblage du squelette une très grande importance a été accordée au fait que la représentation
de la totalité des mouvements soit aussi réaliste que possible. Ci-après nous aimerions brièvement attirer
votre attention sur les caractéristiques les plus importantes:
Le crâne
Le crâne du modèle se compose de trois parties. Pour donner une vue sur les structures internes du crâne
la calotte crânienne est amovible. L’assemblage du maxillaire inférieur est flexible. Un ressort spiral, dans
le dispositif de suspension au dessus de la calotte crânienne, assure une bonne flexibilité dans la zone de
la colonne vertébrale cervicale, pour pencher la tête, quand le squelette est à l’horizontale.
La colonne vertébrale
L’assemblage de la colonne vertébrale est flexible et elle est représentée dans sa courbure naturelle. Des
exercices physiologiques se laissent très bien exécuter, surtout dans la position horizontale.
La cage thoracique
Le sternum ainsi que la naissance des côtes sont en matière élastique et sont renforcés par un ressort, de
telle sorte que des mouvements dans la zone de la cage thoracique peuvent être montrés.
L’articulation de l’épaule
Le bras et l’omoplate sont reliés d’une façon réaliste. En élevant le bras au delà de l’horizontale une transmission réaliste du mouvement sur l’omoplate a lieu.
8
Page 9

®
Français Squelette physiologique
Pour garantir une bonne stabilité de la ceinture scapulaire (entre autres pendant le transport du modèle),
l’omoplate est fixée à la cage thoracique par une vis. Pour faciliter la transmission des mouvements cette
vis peut être desserrée.
L’avant-bras
Le raccordement à l’intérieur de l’articulation du coude permet une flexion et une extension réalistes ainsi
qu’une bonne transmission de force entre bras et avant-bras. Les mouvements rotatifs de l’avant-bras entre
le cubitus et le radius (pronation et supination) sont aussi possibles.
Les mains
Un mouvement de l’os du carpe n’est que partiellement possible, vu que, pour atteindre une bonne stabilité, l’assemblage est assez serré. Une légère flexion des doigts et l’opposition du pouce peuvent être
reconstituées.
L’articulation de la hanche
La tête de l’articulation de la cuisse et la cavité cotyloïde sont réunies d’une façon réaliste, permettant à la
cuisse de bouger dans toutes les directions de mouvements, y compris la rotation autour de l’axe vertical.
Aussi la transmission de la force et des mouvements de la jambe à la hanche et à la colonne vertébrale est
bien perceptible.
L’articulation du genou
La jambe peut être fléchie et tendue. Une rotation externe et interne est, dans sa limite naturelle, bien
possible.
Le pied
Aussi bien les os du tarse que les os des différentes phalanges ont des liaisons élastiques, permettant ainsi
une bonne flexibilité dans toutes les articula-tions.
Nécessaire de réparations
Si toutefois une vis se perd, un ruban en caoutchouc surchargé rompt ou si un ressort cède, vous trouverez
des pièces de rechange dans le nécessaire de réparations inclus.
9
Page 10

®
PortuguêsEsqueleto fisiológico
Este esqueleto exclusivo foi desenvolvido buscando ilustrar a função de suporte do sistema esqueletal
móvel. Contrário à outros esqueletos, que são primariamente desenhados como modelos visuais para o
estudo da anatomia, com este esqueleto você poderá simular o desenvolvimento dos movimentos fisiológicos.
Você poderá tanto ilustrar movimentos visualmente, mostrando o interrelacionamento dos ossos individuais e juntas e o seu comportamento sob pressão (puxando, empurrando, esticando). Enquanto você faz isso,
você pode „sentir“ com as mãos como o sistema esqueletal em geral reage a cada um dos movimentos e
localizar os melhores pontos possíveis para a transferência de forças como determinadas pelas estruturas
ósseas.
Você pode trabalhar com o esqueleto enquanto o mesmo permanece na posição ereta (pendurado) ou
deitado.
Montagem
A forma mais fácil de se montar o esqueleto é colocando todas as suas parte no chão, em frente a você.
• Conecte os 5 braços da base na seção central.
• Conecte as duas metades da haste do tripé uma com a outra e parafuse a haste do tripé na seção central
da base.
• Fixe o crânio guiando a haste que sobe da coluna vertebral através do buraco na parte de cima do
crânio. Caso a haste pareça muito curta para a montagem, você poderá inclinar levemente a coluna vertebral. Primeiro coloque o disco de metal e então a mola sobre esta haste e prenda ambos com a porca
serrilhada (= porca com formato de disco). Então parafuse o dispositivo na haste.
• Deite o esqueleto (parte superior com braços e crânio) em frente à você no chão. As pernas são presas
através de pinos e parafusos entre a ala do ílio e do sacro. A sínfise é presa por um outro pino e parafuso. Nós recomendamos que você não enrosque os parafusos até que todos os pinos de conexão estejam
posicionados.
• Agora, com o dispositivo para pendurar, pen dure o esqueleto no gancho do tripé - pronto.
Um grande valor foi colocado nesta ilustração mais realística possível dos movimentos durante a montagem deste esqueleto. Abaixo nós gostaríamos de brevemente apontar os dispositivos mais importantes:
O Crânio
O crânio do modelo é constituído de três partes. A calota craniana pode ser removida para visualizar a
estrutura interna. A mandíbula inferior é móvel. Uma mola espiral no dispositivo para pendurar acima da
calota craniana facilita sua boa mobilidade na área da coluna cervical quando a cabeça é inclinada para
frente enquanto o esqueleto encontra-se deitado.
A Coluna Vertebral
A coluna vertebral é montada flexivelmente e demonstrada com sua curvatura natural. Exercícios fisiológicos podem ser realizados facilmente com o esqueleto deitado.
O Tórax
O esterno e as terminações das costelas são feitos em material elástico e estabilizados por uma mola para
que todos os movimentos na área torácica possam ser livremente reproduzidos.
A Junta do Ombro
A parte superior do braço e o ombro são conectados um ao outro de forma bastante real. Quando o braço
está levantado acima da horizontal, o movimento é transferido realisticamente para a lâmina do ombro.
10
Page 11

®
Português Esqueleto fisiológico
Em busca de assegurar a estabilidade na cinta do ombro (como durante o transporte do modelo), a lâmina
do ombro está presa ao tórax com um parafuso. Este parafuso pode ser solto para facilitar a transferência
do movimento.
O Antebraço
A conexão com a junta do cotovelo torna realista a flexão e extensão, também possível como uma boa
transferência de forças entre a parte superior e o antebraço. O movimento de rotação entre a ulna e o
radio (pronação e supinação) também é possível.
As Mãos
Uma vez que a montagem da mão é relativamente fixa devido à busca da estabilidade, movimentos com a
carpalia são limitados. A flexão dos dedos e a posição do polegar podem ser facilmente simulados.
A Junta do Quadril
O côndilo do fêmur e o soquete do osso do qua-dril são conectados de forma real, fazendo com que a
movimentação da coxa seja possível em todas as direções fisiológicas, incluindo rotação ao redor do eixo
vertical. A transferência de força e o movimento da perna para o quadril e coluna vertebral também pode
ser facilmente distinguido.
O Joelho
A parte inferior da perna pode ser flexionada e estendida. Rotação interna e externa são facilmente simulados dentro dos limites naturais.
Os Pés
Tantos os ossos tarsais como as falanges individuais são ligados uns aos outros elasticamente e facilitam a
mobilidade de todas as juntas.
Kit de Reparos
No caso de perda de um parafuso, uma liga elástica romper-se devido à pressão excessiva ou uma mola
ceder, tais partes para reposição encontram-se no kit de reparos incluso.
11
Page 12

®
Scheletro fisiologico Italiano
Questo scheletro è stato realizzato al fine di illustrare la funzione di supporto del sistema scheletrico mobile. Diversamente da altri scheletri, progettati principalmente come modelli visivi per lo studio anatomico,
questo scheletro consente di simulare lo sviluppo dei movimenti fisiologici.
È possibile illustrare visivamente sia i movimenti, mostrando l’interazione delle singole ossa e articolazioni, sia il loro comportamento sotto carico (tensione, pressione, estensione). Durante queste operazioni,
l’utente può “sentire” con le mani il modo in cui l’intero sistema scheletrico reagisce a ciascun movimento
e individuare i punti migliori per il trasferimento delle forze secondo quanto determinato dalle strutture
ossee.
È possibile lavorare con lo scheletro mentre si trova in posizione eretta (ossia, quando è appeso), oppure in
posizione prostrata.
Assemblaggio:
Il modo più semplice per assemblare lo scheletro consiste nel posizionarne tutte le parti sul pavimento.
• Collegare i 5 raggi della base alla sezione centrale.
• Collegare una all’altra le due metà dell’asta del treppiede e avvitare quest’ultima nella sezione centrale
della base.
• Fissare il cranio conducendo l’asta che emerge dalla colonna vertebrale attraverso il foro nella volta cranica. Se l’asta sembra troppo corta ai fini dell’assemblaggio, è possibile piegare leggermente la colonna
vertebrale. Collocare innanzitutto il disco metallico e poi la molla sull’asta e fissarli con il dado zigrinato
(dado a forma di disco). In seguito, avvitare il dispositivo di sospensione all’asta.
• Posizionare sul pavimento la parte superiore dello scheletro con le braccia e il cranio. Applicare le gambe
usando i perni di connessione e le viti tra l’ala iliaca e l’osso sacro. Per fissare la sinfisi, usare un altro
perno di connessione e un’altra vite. Si consiglia di non serrare le viti finché tutti i perni di connessione
sono in posizione.
• Ora appendere lo scheletro al gancio del treppiede tramite il dispositivo di sospensione e l’assemblaggio
sarà concluso.
Durante la creazione dello scheletro è stata posta una grande attenzione nell’illustrare i movimenti il più
realisticamente possibile. Di seguito sono descritte in breve le caratteristiche più importanti:
Il cranio
Il cranio del modello è costituito da tre parti. La volta cranica può essere rimossa per osservare la struttura
interna, la mandibola è mobile e una molla a spirale nel dispositivo di sospensione sopra alla volta facilita
la mobilità nella zona della vertebra cervicale quando la testa è piegata in avanti mentre lo scheletro si
trova in posizione prostrata.
La colonna vertebrale
La colonna vertebrale è assemblata in modo flessibile e mostrata con la sua naturale curvatura. In posizione prostrata è possibile eseguire con facilità esercizi fisiologici.
Il torace
Lo sterno e le estremità delle costole sono realizzati con un materiale elastico e stabilizzati da una molla in
modo da poter illustrare i movimenti nella zona toracica.
L’articolazione della spalla
La parte superiore del braccio e la scapola sono collegate una all’altra in modo realistico. Quando il braccio
è sollevato oltre la posizione orizzontale, il movimento viene trasferito realisticamente alla scapola.
Al fine di assicurare la stabilità della cintura scapolare (ad es. durante il trasporto del modello), la scapola è
fissata al torace con una vite, che può essere allentata per facilitare il trasferimento del movimento.
12
Page 13

®
Italiano Scheletro fisiologico
L’avambraccio
Il collegamento nell’articolazione del gomito consente una flessione e un’estensione realistiche, oltre a un
buon trasferimento della forza tra le parti superiore e inferiore del braccio. È inoltre possibile il movimento
rotatorio dell’avambraccio tra l’ulna e il radio (pronazione e supinazione).
Le mani
Dato che la struttura della mano è relativamente fissa per assicurarne la stabilità, il movimento delle ossa
del carpo (polso) è limitato. È possibile simulare facilmente la flessione delle dita e l’opposizione del pollice.
L’articolazione dell’anca
Il condilo del femore e la glena dell’osso iliaco sono collegati realisticamente, rendendo possibile il movimento della coscia in tutte le direzioni fisiologiche, inclusa la rotazione intorno all’asse verticale. Sono inoltre facilmente riconoscibili il trasferimento della forza e il movimento dalla gamba all’anca e alla colonna
vertebrale.
Il ginocchio
La parte inferiore della gamba può essere flessa ed estesa. È inoltre semplice eseguire la rotazione verso
l’esterno e l’interno entro i limiti naturali.
Il piede
Le ossa del tarso e delle singole falangi sono collegate le une alle altre in modo elastico e assicurano una
buona mobilità in tutte le articolazioni.
Kit di riparazione:
Nel caso in cui una vite vada persa, una banda elastica si spezzi a causa di una pressione eccessiva o una
molla si allenti, le parti di ricambio sono contenute nel kit di riparazione allegato.
13
Page 14

14
Page 15

15
Page 16

®
РусскийФизиологический скелет
Этот уникальный скелет был разработан для иллюстрации поддерживающей функции подвижной костной
системы. В отличие от других скелетов, которые в основном создают как наглядные модели для изучения
анатомии, этот скелет позволяет имитировать развитие физиологических движений.
Вы можете и наглядно иллюстрировать движения, показывая взаимодействие отдельных костей и суставов
и их поведение под давлением (смещение на себя и от себя, растяжение). При этом можно руками
ощутить реакцию скелета в целом на каждое движение и обнаружить наилучшие точки для передачи
нагрузки в костных структурах.
Вы можете работать со скелетом в вертикальном (подвешенном) или горизонтальном положении.
Сборка
Проще всего собрать скелет, поместив все его части перед собой на полу.
• Присоедините 5 кронштейнов основания к центральному отделу.
• Соедините между собой две половины стержня на треноге и ввинтите стержень на треноге в
центральную секцию основания.
• Прикрепите череп, проведя выходящий из позвоночного столба стержень через отверстие в крыше
черепа. При недостаточной длине стержня можно слегка согнуть позвоночный столб. Сначала
поместите на этот стержень металлический диск, затем пружину и закрепите их рифленой гайкой (=
гайкой в форме диска). Затем прикрутите к стержню подвесное устройство.
• Положите скелет (верхнюю часть туловища с руками и череп) перед собой на полу. Ноги прикрепляют
с помощью соединительных штифтов и прикручивают между крылом подвздошной кости и крестцом.
Симфиз фиксируют с помощью другого соединительного штифта и прикручивают. Мы рекомендуем не
затягивать винты до тех пор, пока не установлены все соединительные штифты.
• Теперь, с помощью подвесного устройства повесьте скелет на крючок треноги – установка закончена.
Особую ценность представляет максимально реалистичное отображение движений во время сборки
скелета. Далее кратко описаны наиболее важные особенности.
Череп
Череп модели состоит из трех частей. Крышу черепа можно удалить, чтобы увидеть внутреннее строение
черепа. Нижняя челюсть подвижная. Спиральная пружина в подвесном устройстве над крышей черепа
обеспечивает хорошую подвижность в области шейного отдела позвоночника, когда голова наклонена
вперед, а скелет находится в горизонтальном положении лицом вниз.
Позвоночный столб
Позвоночный столб соединен подвижно и имеет естественный изгиб. Физиологические движения очень
хорошо выполнять в горизонтальном положении лицом вниз.
Грудная клетка
Грудина и края ребер сделаны из эластичного материала и скреплены пружиной так, чтобы можно было
показать также движения в области грудной клетки.
Плечевой сустав
Плечо и лопатка реалистично соединены между собой. При подъеме руки выше горизонтального уровня
движения реалистично передаются на лопатку.
Для обеспечения устойчивости пояса верхних конечностей (особенно при транспортировке модели)
лопатку крепят к грудной клетке винтом. Этот винт можно ослабить, чтобы облегчить передачу движения.
16
Page 17

®
Русский
Предплечье
Соединение в локтевом суставе делает возможным реалистичное сгибание и разгибание, а также
хорошую передачу нагрузки между плечом и предплечьем. Также возможно вращательное движение
предплечья между плечевой и лучевой костью (пронация и супинация).
Кисти
Подвижность запястья ограничена, поскольку для устойчивости кисть при сборке относительно
фиксирована. Удобно моделировать сгибание пальцев и противопоставление большого пальца.
Тазобедренный сустав
Мыщелок бедренной кости и углубление в тазовой кости соединены реалистично, с движениями бедра
во всех возможных физиологических направлениях, включая ротацию вокруг вертикальной оси. Также
легко определить передачу нагрузки и движение от голени к бедру и позвоночному столбу.
Коленный сустав
Голень можно сгибать и разгибать. Легко выполнять ротацию кнаружи и внутрь в естественном объеме.
Стопа
Эластичное соединение между собой и плюсневых костей, и костей отдельных фаланг обеспечивает
хорошую подвижность всех суставов.
Набор для ремонта
В прилагаемом ремонтном наборе есть запасные части на случай утраты винта, разрыва резиновой ленты
вследствие избыточного давления или неисправности пружины.
Физиологический скелет
17
Page 18

®
生理形态上的骨骼模型
生理形态上的骨骼模型
为了形象的显示人体活动性骨骼系统对人体的支承功能,研究者设计了该独特的骨骼模型。既往的
骨骼模型主要用于解剖学的形态研究,与该模型相比,您会发现该模型有着明显不同的优点,那就
是您可以通过该模型模拟人体骨骼生理运动过程。
在该模型上,您既可以观察各块骨骼、关节之间的相互运动,也可以观察各块骨骼在诸如拉、压以
及伸缩等压力作用下的行为变化。当您在对该骨骼系统上施加上述作用力时,您可以通过您的手感
受到整个骨骼系统在您施加每一种作用力之后的反应,以及可以确定该骨骼的最佳力量转移点。
该骨骼模型无论是处于悬挂的垂直位,还是平卧位,您都可以在上面进行操作。
安装
首先您可以将该模型的各个部件放在地板上按照部位摆放好,然后就可以很容易的将其组装好。
- 将5个部件的基底端与中间部分连接起来。
- 将三脚架的两部分彼此连接起来,并在中间部件的基座上用螺钉旋紧。
- 通过椎管穿入一根固定杆,至颅顶,将头颅固定在模型上。如果该固定杆比较短,您可以通过稍
微弯曲脊柱,使得固定杆能达到颅顶。首先在颅顶固定杆顶端放置一金属盘,然后稍向下压金属
盘,露出固定杆顶端,使用滚花螺母(盘形螺母)在该杆上拧紧。在此之后,在固定杆上装上悬
挂装置。
- 您可以在地板上摆放好上身,上肢以及头颅的骨骼。髂骨翼部以及骶骨之间通过螺母固定在一
起,并通过链接销将双下肢固定在该模型上。前连合之间也是通过连接销或螺母链接在一起。我
们建议您在所有的连接销按上之前,不要将螺母拧的过紧。
- 之后,安上悬挂装置,将该模型悬吊于三脚架的钩子上,也即结束了所有的安装过程。
该模型最大的优点就是在安装好骨骼之后,可以最大可能的模拟人体真实的骨骼运动。为了使您更
清楚的了解该模型,我将该模型最重要的特点简要的概述如下。
英文
头颅
该头颅模型由三部分组成。颅顶部骨质可以摘除,通过该操作,您可以观察到颅内面的结构。下颌
关节是可以活动的。模型颅顶上方的螺旋形弹簧使得该模型的颈椎部有很好的活动性,也就是当您
将该模型平放在地板上时,您还可以将其头颅向前方弯曲。
脊柱
该模型上的脊柱是由单独的活动部件组装在一起的,而且可以显示自然的生理弯曲。当将其平放在
地板上时,您还可以对其进行各种生理训练的操作。
胸部
胸骨与肋骨的末端均是由弹性材料构成,并通过弹簧固定在一起,因此,您可以通过该模型显示胸
部正常的胸廓运动。
肩关节
上臂和肩胛骨通过近似逼真的装置连接在一起。所以当您在抬起模型的上臂超过水平面之上时,您
可以看到该模型的肩胛骨也相应的运动,达到了最逼真的模拟。
在运输的过程中,为了保证模型肩胛带的稳定,我们通常使用一个固定螺母将上臂固定在模型的胸
部。当您再次需要模型人体上臂的运动时,您可以卸下该螺母即可。
前臂
肘关节的连接装置也非常的逼真,其可以模型人体肘部各个方向上的活动,拉伸以及上下臂之间力
量的传导。同样该模型还可以最大可能的模拟人体前壁的尺骨与桡骨之间的旋前与旋后活动。
18
Page 19

®
英文
手
为了保证最大可能的稳定性,该模型上的手与前壁之间是采用相对固定的方式连接在一起的,所以
其不能模拟人体的腕部活动。但是手指之间连接还是采用比较灵活的方式,因此各手指之间的活动
以及拇指的对掌运动很容易模拟的。
髋关节
股骨头与髋臼之间的连接也很逼真,所以该模型可以模拟人体大腿各个方向上的生理运动,甚至可
以模拟大腿沿着垂直轴的旋转运动。而且在此模型上还可以轻松辨认力与运动从腿部向髋部以及脊
柱传导的过程。
膝关节
该模型上,小腿可以通过膝关节向后及前进行曲屈与伸展活动,以及最大可能的模拟人体的小腿旋
外及旋内运动。
足
足部所有跗骨与各趾骨之间均采用弹性材料连接,因此该模型可以模拟人体足部各个关节的活动。
修理工具
如果您在进行操作时,出现如下的情况,比如螺母脱落、橡皮圈断裂以及弹簧损坏,您可以使用修
理包中的备用部件,对上述装置进行更换。
生理形态上的骨骼模型
19
Page 20

A15/3_1000037-06/12-2
®
3B S C I E NT I F I C
3B Scientific GmbH
Rudorffweg 8 • 21031 Hamburg • Germany
Tel.: + 49-40-73966-0 • Fax: + 49-40-73966-100
www.3bscientific.com • 3b@3bscientific.com
© Copyright 1999 / 2012 for instruction manual and design of product:
3B Scientific GmbH, Germany
P R OD U C T S
5001960
 Loading...