2Wire DSL WALLMOUNT FILTER Installation Guide

DSL Filter Installation Guide
For Wall-Mounted Telephones
Usage
•The 2Wire DSL Filter for wall-mounted telephones works with G.lite ADSL, Full-rate G.dmt ADSL, and home phoneline computer networks (HPNA 1.0 and HPNA 2.0).
•Use this filter with all single-line wall-mounted telephones. Other telephone devices (desktop phone, analog modem, FAX, or answering machine), require the 2Wire DSL Filter.
•You need one DSL Filter for each telephone device (desktop phone, analog modem, FAX, or answering machine). If you have several telephone devices connected to each other and are using a single telephone wall jack, install only one filter, connecting it between the wall jack and the first device in the series.
•IMPORTANT: Do not connect a 2Wire DSL Filter to an ADSL modem or to a home phoneline network adapter. The filter blocks access to the phone line for these devices.
Filter installation
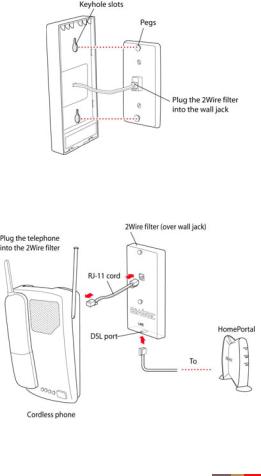
Your objective is to install the filter between the original wall plate and your wall-mounted phone.
1.Lift the telephone from the wall pegs, and disconnect the phone cord from the wall jack.
2.Connect the phone cord from the back of the 2Wire DSL Filter into the wall jack, and mount the filter on the wall plate pegs.
3.Connect the phone cord to the phone jack located on the front of the mounted 2Wire DSL Filter. If you have a DSL modem, you can connect it to the phone jack located
at the bottom of the filter.
4.Attach the telephone to the mounting pegs on the 2Wire DSL Filter and your installation is complete.
For more information on using 2Wire DSL Filters, as well as general DSL and home phoneline (HPNA) information, visit www.2Wire.com.
1
 Loading...