


 Loading...
2Wire Gateway
Installation Guide
For 2000 Series

Notice to Users
©2005 2Wire, Inc. All rights reserved. This manual in whole or in part, may not be reproduced, translated, or reduced to any machinereadable form without prior written approval.
2WIRE PROVIDES NO WARRANTY WITH REGARD TO THIS MANUAL, THE SOFTWARE, OR OTHER INFORMATION CONTAINED HEREIN AND HEREBY EXPRESSLY DISCLAIMS ANY IMPLIED WARRANTIES OF MERCHANTABILITY OR FITNESS FOR ANY PARTICULAR PURPOSE WITH REGARD TO THIS MANUAL, THE SOFTWARE, OR SUCH OTHER INFORMATION, IN NO EVENT SHALL 2WIRE, INC. BE LIABLE FOR ANY INCIDENTAL, CONSEQUENTIAL, OR SPECIAL DAMAGES, WHETHER BASED ON TORT, CONTRACT, OR OTHERWISE, ARISING OUT OF OR IN CONNECTION WITH THIS MANUAL, THE SOFTWARE, OR OTHER INFORMATION CONTAINED HEREIN OR THE USE THEREOF.
2Wire, Inc. reserves the right to make any modification to this manual or the information contained herein at any time without notice. The software described herein is governed by the terms of a separate user license agreement.
Updates and additions to software may require an additional charge. Subscriptions to online service providers may require a fee and credit card information. Financial services may require prior arrangements with participating financial institutions.
2Wire, the 2Wire logo, and HomePortal are registered trademarks, and HyperG, Greenlight, FullPass, and GuestPass are trademarks of 2Wire, Inc. All other trademarks are trademarks of their respective owners.
5100-000334-000 Rev A

Contents
Chapter 1: Getting Started
Remove or Disable Conflicting Applications . . . . . . . . . . . . . . . . . . . . . . . . . . . . . . . . . . . . . . . . . . . . . 1 Check Your Computer’s Browser and System Requirements . . . . . . . . . . . . . . . . . . . . . . . . . . . . . . . . . 1 Browser Requirements . . . . . . . . . . . . . . . . . . . . . . . . . . . . . . . . . . . . . . . . . . . . . . . . . . . . . 1 System Requirements . . . . . . . . . . . . . . . . . . . . . . . . . . . . . . . . . . . . . . . . . . . . . . . . . . . . . . 1
Chapter 2: Connect the First Computer to the Gateway
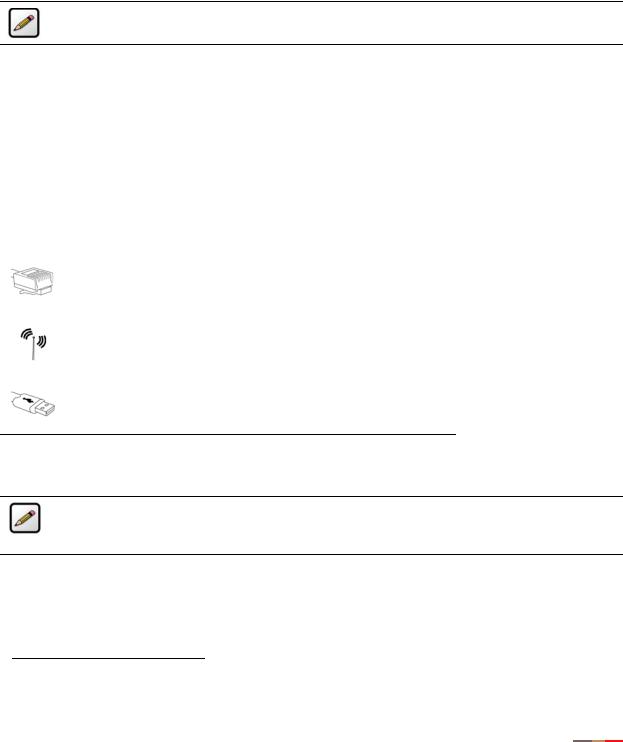
Choose a Computer and Connection Type . . . . . . . . . . . . . . . . . . . . . . . . . . . . . . . . . . . . . . . . . . . . . . 2 Install the DSL Filter . . . . . . . . . . . . . . . . . . . . . . . . . . . . . . . . . . . . . . . . . . . . . . . . . . . . . . . . . . . . . 2 For Wall-Mounted Phones . . . . . . . . . . . . . . . . . . . . . . . . . . . . . . . . . . . . . . . . . . . . . . . . . . . . 3 Ethernet Connection . . . . . . . . . . . . . . . . . . . . . . . . . . . . . . . . . . . . . . . . . . . . . . . . . . . . . . . . . . . . . 4 Check Your Connections . . . . . . . . . . . . . . . . . . . . . . . . . . . . . . . . . . . . . . . . . . . . . . . . . . . . 4 Wireless Connection . . . . . . . . . . . . . . . . . . . . . . . . . . . . . . . . . . . . . . . . . . . . . . . . . . . . . . . . . . . . . 5 Check Your Connections . . . . . . . . . . . . . . . . . . . . . . . . . . . . . . . . . . . . . . . . . . . . . . . . . . . . 6 Non-2Wire Wireless Adapter Configuration . . . . . . . . . . . . . . . . . . . . . . . . . . . . . . . . . . . . . . . . 7 Locating the Serial Number and Wireless Encryption Key . . . . . . . . . . . . . . . . . . . . . . . . . . 7 Configuring the Adapter . . . . . . . . . . . . . . . . . . . . . . . . . . . . . . . . . . . . . . . . . . . . . . . . . . 7
USB Connection . . . . . . . . . . . . . . . . . . . . . . . . . . . . . . . . . . . . . . . . . . . . . . . . . . . . . . . . . . . . . . . . 8 Install the 2Wire Gateway USB Driver - Windows . . . . . . . . . . . . . . . . . . . . . . . . . . . . . . . . . . . 9 Install the 2Wire Gateway USB Driver - Macintosh . . . . . . . . . . . . . . . . . . . . . . . . . . . . . . . . . . 9 Check Your Connections . . . . . . . . . . . . . . . . . . . . . . . . . . . . . . . . . . . . . . . . . . . . . . . . . . . . 9
Chapter 3: Run the 2Wire Setup Wizard
Windows XP/2K/ME/98SE . . . . . . . . . . . . . . . . . . . . . . . . . . . . . . . . . . . . . . . . . . . . . . . . . . . . . . . 10
Macintosh OS 10.1.4/10.1.5/10.2.0 - 10.2.8/10.3.3 - 10.3.8 . . . . . . . . . . . . . . . . . . . . . . . . . . . . . 10
Chapter 4: Add Computers to the Network
Ethernet Connection . . . . . . . . . . . . . . . . . . . . . . . . . . . . . . . . . . . . . . . . . . . . . . . . . . . . . . . . . . . . 12 USB Connection . . . . . . . . . . . . . . . . . . . . . . . . . . . . . . . . . . . . . . . . . . . . . . . . . . . . . . . . . . . . . . . 13 Wireless Connection . . . . . . . . . . . . . . . . . . . . . . . . . . . . . . . . . . . . . . . . . . . . . . . . . . . . . . . . . . . . 14
Chapter 5: Diagnostics |
|
Understanding Broadband Redirect Messages . . . . . . . . . . . . . . . . . . . . . . . . . . . . . . . . . . . . . . . . . . |
15 |
Excessive Sessions Warning . . . . . . . . . . . . . . . . . . . . . . . . . . . . . . . . . . . . . . . . . . . . . . . . |
15 |
Invalid Customer Information (PPP) . . . . . . . . . . . . . . . . . . . . . . . . . . . . . . . . . . . . . . . . . . . . |
15 |
No DSL Connection - Unable to Train . . . . . . . . . . . . . . . . . . . . . . . . . . . . . . . . . . . . . . . . . . |
16 |
Intermittent Connection Issue - Uncanceled Echo . . . . . . . . . . . . . . . . . . . . . . . . . . . . . . . . . . |
16 |
Broadband Link is Currently Not Available - DSL Connection Issue . . . . . . . . . . . . . . . . . . . . . |
17 |
Broadband Link is Currently Not Available - Connection Error . . . . . . . . . . . . . . . . . . . . . . . . . |
17 |
Router Behind Router Detected . . . . . . . . . . . . . . . . . . . . . . . . . . . . . . . . . . . . . . . . . . . . . . |
18 |
Provision Gateway . . . . . . . . . . . . . . . . . . . . . . . . . . . . . . . . . . . . . . . . . . . . . . . . . . . . . . . . |
18 |
Understanding the Indicator Lights . . . . . . . . . . . . . . . . . . . . . . . . . . . . . . . . . . . . . . . . . . . . . . . . . . |
19 |
i

Contents
Appendix A: Install the Gateway on Other Operating Systems
Ethernet Connection . . . . . . . . . . . . . . . . . . . . . . . . . . . . . . . . . . . . . . . . . . . . . . . . . . . . . . . . . . . . 21 USB Connection . . . . . . . . . . . . . . . . . . . . . . . . . . . . . . . . . . . . . . . . . . . . . . . . . . . . . . . . . . . . . . . 22 Configuring the Internet Connection . . . . . . . . . . . . . . . . . . . . . . . . . . . . . . . . . . . . . . . . . . . 23
Regulatory Information
ii

Getting Started
Remove or Disable Conflicting Applications
Internet sharing software and PC based firewall applications typically interfere with the 2Wire gateway, and should be removed or disabled before you install the gateway. The 2Wire gateway provides the same features as the products listed below.
If you have any of the following (or similar) applications installed on your computers, remove or disable them according to the manufacturer’s instructions before proceeding.
Internet Sharing Applications |
Proxy Software |
Security Software |
|
|
|
Microsoft Internet Connection Sharing |
Wingate |
Norton Internet Security |
|
|
|
Intel Anypoint ISS |
Sygate |
Black Ice |
|
|
|
3Com HomeClick |
|
Zone Alarm |
|
|
|
Check Your Computer’s Browser and System Requirements
Verify that your computers meet the following minimum requirements:
Browser Requirements
Windows: Microsoft Internet Explorer 6.0 or higher (included on the 2Wire CD), Netscape Navigator 4.7 or higher, or Firefox 1.0 or higher.
Macintosh: Safari 1.0, Microsoft Internet Explorer 5.0, or Netscape 4.74 or higher.
System Requirements
•5 MB of available hard disk space for 2Wire gateway software.
•Windows XP, Windows 2000, Windows NT 4.0 with Service Pack 6, Windows ME, Windows 98/98SE, or Mac OS 8.6 or higher.
•Network adapter (such as Ethernet , USB, or 802.11b/g wireless).
1
Connect the First Computer to the Gateway
Congratulations on the purchase of your 2Wire gateway. To install your gateway and configure your network, follow these steps.
Note: Features for different models may vary. Product details will be specified for each particular model.
Choose a Computer and Connection Type
There are many ways to set up your network, but typically the first computer is located in the same room as the gateway and your DSL connection. Ethernet is the preferred connection method for your first computer, although instructions for connecting via wireless and USB are also provided.
The first computer you connect to the network is used to configure the 2Wire gateway for proper operation. Choose one of the following methods to connect your first computer to the gateway. Save and close all open programs before you begin connecting your gateway.
Connection Type |
Page |
|
|
Ethernet |
page 4 |
|
|
Wireless |
page 5 |
|
|
USB |
page 8 |
Install the DSL Filter
Note: New DSL customers only. Existing DSL customers with filters already installed should proceed to Ethernet Connection on page 4, Wireless Connection on page 5, or USB Connection on page 8.
Regular telephone and Digital Subscriber Line (DSL) signals are carried over the same line. Converting your regular telephone line to DSL can cause high-pitched tones and static when using the phone.
Installing a filter on every telephone or telephone device sharing the same telephone number as your DSL1 separates these signals and eliminates the noise.
1. Do not install DSL filters if your telephone line is only carrying a DSL signal.
2
Connect the First Computer to the Gateway
To install the DSL filter:
1.Locate the phone jack where you want to connect your 2Wire gateway.
2.Insert the DSL filter into the jack.
3.If you have a phone, answering machine, fax machine, satellite TV equipment, or other phone device in this jack location, plug it into the filter port labeled PHONE.
4.Install a DSL filter on all other phone devices in your house (such as dial-up modems, fax machines, caller ID devices, and set top boxes). Plug each of these devices into the filter port labeled PHONE.
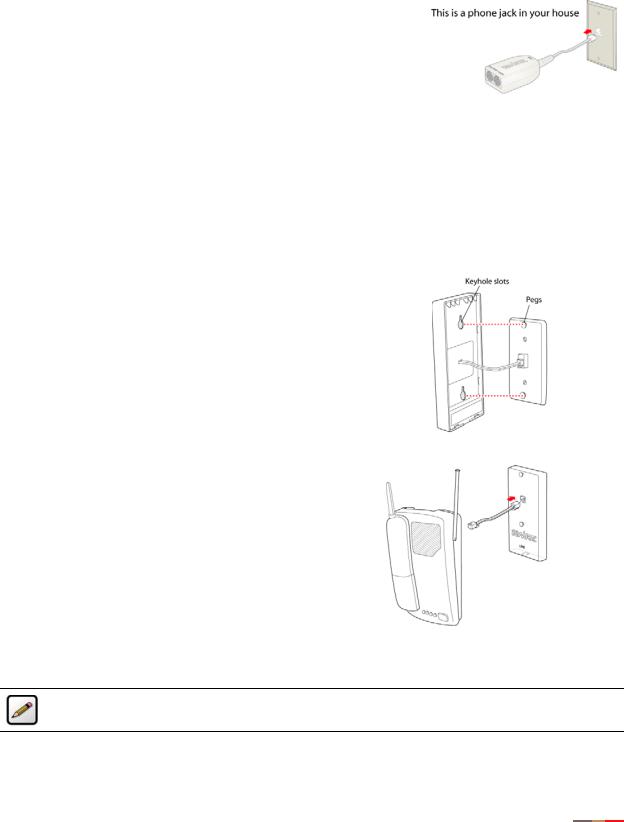
For Wall-Mounted Phones
If you have a wall-mounted telephone, install a wall-mount DSL filter following these steps.
1.Lift the telephone from the wall pegs and disconnect the phone cord from the wall jack.
2.Connect the telephone cord from the back of the DSL filter into the wall jack. Align the keyhole slots on the filter with the wall plate pegs and press down gently to secure.
3.Connect the telephone cord to the phone jack located on the front of the mounted filter.
4. Attach the telephone to the mounting pegs on the DSL filter and your installation is complete.
Note: The extra phone jack located at the bottom of the filter (labeled LINE) is provided should you wish to connect your gateway at this phone connection.
3
Connect the First Computer to the Gateway
Ethernet Connection
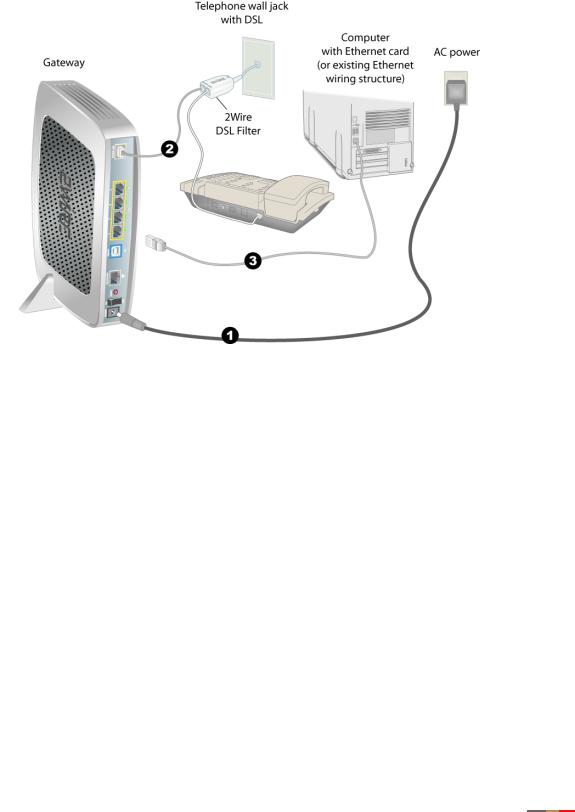
Figure 1. Gateway Connected Via Ethernet
1.Connect the provided power adapter from the gateway's POWER port to an electrical outlet. The POWER light on the front of the gateway should be green.
2.Connect the provided gray phone cable from the gateway's PHONE LINE port to the DSL filter jack labeled DSL/HPNA.
3.Connect the yellow Ethernet cable provided with the gateway from any available ETHERNET port on the gateway to your computer’s Ethernet port.
Check Your Connections
With your computer completely started, verify the POWER and ETHERNET indicator lights on the front of the 2Wire gateway are green. If they are not, see “Understanding the Indicator Lights” on page 19. The
INTERNET indicator light will not turn green until the gateway software has been installed and an Internet connection has been established.
4

Connect the First Computer to the Gateway
Wireless Connection
Requires wireless-enabled notebook or a computer with an 802.11b/g wireless network adapter installed. Wireless adapters can be purchased from your service provider.
Note: The 2Wire 2070, 2070V, and 2070B gateways do not include wireless support. If you are using a 2Wire 2070, 2070V, or 2070B gateway, skip this section.
Figure 2. Gateway Connected Via Wireless
1.Connect the provided AC power adapter from the 2Wire gateway’s POWER port to an electrical outlet. The POWER light on the front of the gateway should be green.
2.Connect the provided gray telephone cable from the gateway’s PHONE LINE port to a telephone jack with DSL service.
3.Install your wireless adapter according to the manufacturer’s instructions (see note below).
Note: If you use a 2Wire wireless adapter (PCI, PC card, or USB adapter) for wireless networking, the 2Wire CD automatically configures it to communicate with the gateway during setup. If you are NOT using a 2Wire wireless adapter, you must manually configure your adapter to communicate with the gateway using the information on page 7.
5
Loading...