


I n s t a l l a t i o n G u i d e f o r M o d e l s 1 0 0 0 S a n d 1 0 0 0 S W
Notice to Users
©2002 2Wire, Inc. All rights reserved. This manual in whole or in part, may not be reproduced, translated, or reduced to any machine-readable form without prior written approval.
2WIRE PROVIDES NO WARRANTY WITH REGARD TO THIS MANUAL, THE SOFTWARE, OR OTHER INFORMATION CONTAINED HEREIN AND HEREBY EXPRESSLY DISCLAIMS ANY IMPLIED WARRANTIES OF MERCHANTABILITY OR FITNESS FOR ANY PARTICULAR PURPOSE WITH REGARD TO THIS MANUAL, THE SOFTWARE, OR SUCH OTHER INFORMATION, IN NO EVENT SHALL 2WIRE, INC. BE LIABLE FOR ANY INCIDENTAL, CONSEQUENTIAL, OR SPECIAL DAMAGES, WHETHER BASED ON TORT, CONTRACT, OR OTHERWISE, ARISING OUT OF OR IN CONNECTION WITH THIS MANUAL, THE SOFTWARE, OR OTHER INFORMATION CONTAINED HEREIN OR THE USE THEREOF.
2Wire, Inc. reserves the right to make any modification to this manual or the information contained herein at any time without notice. The software described herein is governed by the terms of a separate user license agreement.
Updates and additions to software may require an additional charge. Subscriptions to online service providers may require a fee and credit card information. Financial services may require prior arrangements with participating financial institutions.
2Wire, the 2Wire logo, OfficePortal, and HomePortal are trademarks of 2Wire, Inc. All other trademarks are trademarks of their respective owners.
___________________________________________________________________________________________________________________________
Owner’s Record
The serial number is located on the bottom of your 2Wire HomePortal. Record the serial number in the space provided here and refer to it when you call Customer Care.
Serial Number:__________________________
Safety Information
•To prevent fire or shock hazard, do not expose your HomePortal to rain or moisture.
•To avoid electrical shock, do not open the HomePortal. Refer servicing to qualified personnel only.
•Never install modem, cable, or telephone wiring during a lightning storm.
•Never install telephone jacks in wet locations unless the jack is specifically designed for wet locations.
•Never touch uninsulated telephone wire or terminals unless the telephone line has been disconnected at the network interface.
•Use caution when installing or modifying cable or telephone lines.
•Avoid using your modem during an electrical storm.
•Do not use your modem or a telephone to report a gas leak in the vicinity of the leak.
•A socket outlet should be as close as possible to the unit and easily accessible.
Contents
Networking Technology Overview
Ethernet . . . . . . . . . . . . . . . . . . . . . . . . . . . . . . . . . . . . . . . . . . . . . . . . . . . . . . . . . . . . . . . . . . . . . . . . . . . . . . . . 1
USB . . . . . . . . . . . . . . . . . . . . . . . . . . . . . . . . . . . . . . . . . . . . . . . . . . . . . . . . . . . . . . . . . . . . . . . . . . . . . . . . . . . 1
Wireless . . . . . . . . . . . . . . . . . . . . . . . . . . . . . . . . . . . . . . . . . . . . . . . . . . . . . . . . . . . . . . . . . . . . . . . . . . . . . . . . 2
HomePortal . . . . . . . . . . . . . . . . . . . . . . . . . . . . . . . . . . . . . . . . . . . . . . . . . . . . . . . . . . . . . . . . . . . . . . . . . . . . . . 2
Home Phoneline Networking (HomePNA) . . . . . . . . . . . . . . . . . . . . . . . . . . . . . . . . . . . . . . . . . . . . . . . . . . . . . 2
Step 1: Getting Started
First: Locate your HomePortal key code . . . . . . . . . . . . . . . . . . . . . . . . . . . . . . . . . . . . . . . . . . . . . . . . . . . . . . . 3
Second: Remove or disable conflicting applications . . . . . . . . . . . . . . . . . . . . . . . . . . . . . . . . . . . . . . . . . . . . . . 3
Third: Check your computer’s browser and system requirements . . . . . . . . . . . . . . . . . . . . . . . . . . . . . . . . . . . . 3
Browser Requirements . . . . . . . . . . . . . . . . . . . . . . . . . . . . . . . . . . . . . . . . . . . . . . . . . . . . . . . . . . . . . . . . . 3
System Requirements . . . . . . . . . . . . . . . . . . . . . . . . . . . . . . . . . . . . . . . . . . . . . . . . . . . . . . . . . . . . . . . . . 4
Step 2: Connect Your First Computer to the HomePortal
Choose a computer and connection type . . . . . . . . . . . . . . . . . . . . . . . . . . . . . . . . . . . . . . . . . . . . . . . . . . . . . . . . 5 Ethernet Connection . . . . . . . . . . . . . . . . . . . . . . . . . . . . . . . . . . . . . . . . . . . . . . . . . . . . . . . . . . . . . . . . . . 6
Check your connections . . . . . . . . . . . . . . . . . . . . . . . . . . . . . . . . . . . . . . . . . . . . . . . . . . . . . . . . . . . 6 USB Connection . . . . . . . . . . . . . . . . . . . . . . . . . . . . . . . . . . . . . . . . . . . . . . . . . . . . . . . . . . . . . . . . . . . . . 7
Install the 2Wire Gateway USB driver . . . . . . . . . . . . . . . . . . . . . . . . . . . . . . . . . . . . . . . . . . . . . . . . 8 Check your connections . . . . . . . . . . . . . . . . . . . . . . . . . . . . . . . . . . . . . . . . . . . . . . . . . . . . . . . . . . . . 9 Home Phoneline Networking (HomePNA) Connection . . . . . . . . . . . . . . . . . . . . . . . . . . . . . . . . . . . . . . 10
Check your connections . . . . . . . . . . . . . . . . . . . . . . . . . . . . . . . . . . . . . . . . . . . . . . . . . . . . . . . . . . 11 Network with Ethernet Hub or Switch . . . . . . . . . . . . . . . . . . . . . . . . . . . . . . . . . . . . . . . . . . . . . . . . . . . 11
Check your connections . . . . . . . . . . . . . . . . . . . . . . . . . . . . . . . . . . . . . . . . . . . . . . . . . . . . . . . . . . 12 Wireless Connection. . . . . . . . . . . . . . . . . . . . . . . . . . . . . . . . . . . . . . . . . . . . . . . . . . . . . . . . . . . . . . . . . . 12
Check your connections . . . . . . . . . . . . . . . . . . . . . . . . . . . . . . . . . . . . . . . . . . . . . . . . . . . . . . . . . . 13
Step 3: Install the HomePortal Software
Installing the HomePortal Setup Wizard on Windows PCs . . . . . . . . . . . . . . . . . . . . . . . . . . . . . . . . . . . . . . . . 14 Starting the Setup Wizard manually on Windows PCs . . . . . . . . . . . . . . . . . . . . . . . . . . . . . . . . . . . . . . . 14 Installing the HomePortal Setup Wizard on Macintosh computers . . . . . . . . . . . . . . . . . . . . . . . . . . . . . . . . . . 15
Step 4: Add Computers to the Network
Choose a computer and connection type . . . . . . . . . . . . . . . . . . . . . . . . . . . . . . . . . . . . . . . . . . . . . . . . . . . . . . 16 USB Connection . . . . . . . . . . . . . . . . . . . . . . . . . . . . . . . . . . . . . . . . . . . . . . . . . . . . . . . . . . . . . . . . . . . . 17 Home Phoneline Networking (HomePNA) Connection . . . . . . . . . . . . . . . . . . . . . . . . . . . . . . . . . . . . . . 18 Wireless Connection. . . . . . . . . . . . . . . . . . . . . . . . . . . . . . . . . . . . . . . . . . . . . . . . . . . . . . . . . . . . . . . . . . 19
The HomePortal Indicator Lights
HomePortal indicator and status lights . . . . . . . . . . . . . . . . . . . . . . . . . . . . . . . . . . . . . . . . . . . . . . . . . . . . . . . . 20 Diagnosing connection problems . . . . . . . . . . . . . . . . . . . . . . . . . . . . . . . . . . . . . . . . . . . . . . . . . . . . . . . . . . . . 21 POWER indicator light is not lit . . . . . . . . . . . . . . . . . . . . . . . . . . . . . . . . . . . . . . . . . . . . . . . . . . . . . . . . 21 BROADBAND LINK indicator light is red . . . . . . . . . . . . . . . . . . . . . . . . . . . . . . . . . . . . . . . . . . . . . . . 21 HOME NETWORK indicator light is not lit . . . . . . . . . . . . . . . . . . . . . . . . . . . . . . . . . . . . . . . . . . . . . . . 21
Appendix A: 2Wire Wireless Adapter Installation |
|
2Wire Wireless PC Card . . . . . . . . . . . . . . . . . . . . . . . . . . . . . . . . . . . . . . . . . . . . . . . . . . . . . . . . . . . . . . . . . . |
22 |
Installing the Wireless PC Card . . . . . . . . . . . . . . . . . . . . . . . . . . . . . . . . . . . . . . . . . . . . . . . . . . . . . . . . . |
22 |
Installing Drivers For Windows 98SE . . . . . . . . . . . . . . . . . . . . . . . . . . . . . . . . . . . . . . . . . . . . . . . |
23 |
Installing Drivers For Windows ME . . . . . . . . . . . . . . . . . . . . . . . . . . . . . . . . . . . . . . . . . . . . . . . . . |
24 |
Installing Drivers For Windows 2000 . . . . . . . . . . . . . . . . . . . . . . . . . . . . . . . . . . . . . . . . . . . . . . . . |
25 |
Installing Drivers For Windows XP . . . . . . . . . . . . . . . . . . . . . . . . . . . . . . . . . . . . . . . . . . . . . . . . . |
27 |
2Wire Wireless USB Adapter . . . . . . . . . . . . . . . . . . . . . . . . . . . . . . . . . . . . . . . . . . . . . . . . . . . . . . . . . . . . . . |
29 |
Installing the Wireless USB Adapter . . . . . . . . . . . . . . . . . . . . . . . . . . . . . . . . . . . . . . . . . . . . . . . . . . . . . 29
Installing Drivers For Windows 98SE . . . . . . . . . . . . . . . . . . . . . . . . . . . . . . . . . . . . . . . . . . . . . . . 30 Installing Drivers For Windows ME . . . . . . . . . . . . . . . . . . . . . . . . . . . . . . . . . . . . . . . . . . . . . . . . . 31 Installing Drivers For Windows 2000 . . . . . . . . . . . . . . . . . . . . . . . . . . . . . . . . . . . . . . . . . . . . . . . . 32 Installing Drivers For Windows XP . . . . . . . . . . . . . . . . . . . . . . . . . . . . . . . . . . . . . . . . . . . . . . . . . 34
Appendix B: Third-party Wireless Adapter Configuration
Locate the serial number and wireless encryption key . . . . . . . . . . . . . . . . . . . . . . . . . . . . . . . . . . . . . . . . . . . . 36
Agere ORiNOCO PC Card - Silver or Gold . . . . . . . . . . . . . . . . . . . . . . . . . . . . . . . . . . . . . . . . . . . . . . . . . . . |
37 |
Cisco Aironet . . . . . . . . . . . . . . . . . . . . . . . . . . . . . . . . . . . . . . . . . . . . . . . . . . . . . . . . . . . . . . . . . . . . . . . . . . . 39 D-Link Air DWL-650 . . . . . . . . . . . . . . . . . . . . . . . . . . . . . . . . . . . . . . . . . . . . . . . . . . . . . . . . . . . . . . . . . . . . 41 Apple AirPort card . . . . . . . . . . . . . . . . . . . . . . . . . . . . . . . . . . . . . . . . . . . . . . . . . . . . . . . . . . . . . . . . . . . . . . . 43 Other wireless Ethernet adapters . . . . . . . . . . . . . . . . . . . . . . . . . . . . . . . . . . . . . . . . . . . . . . . . . . . . . . . . . . . . 44 Wireless configuration with Windows XP . . . . . . . . . . . . . . . . . . . . . . . . . . . . . . . . . . . . . . . . . . . . . . . . . . . . . 44
Regulatory Information
Declaration of Conformity
License Agreement
Limited Hardware Warranty
Networking Technology Overview
A home network consists of two or more computers that have been connected so they can “talk” with each other. Individual users can now connect to Web servers worldwide through the Internet, a global computer network. A home network enables computer users in a household to share one Internet connection, share files without trading disks, and share peripherals such as printers and external drives. Several technologies are available to connect or “network” computers. These technologies include:
•Ethernet
•Universal Serial Bus (USB)
•HomePNA
•Wireless
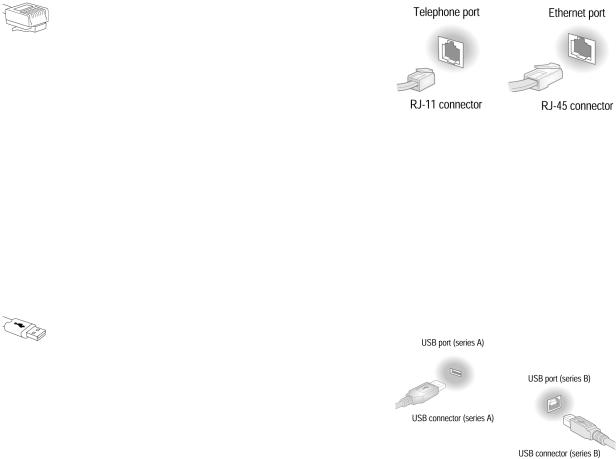
Ethernet
Ethernet is a technology that lets you create a home network using special wiring such as the dark gray cable included with the HomePortal. Many new computers are shipped with a built-in Ethernet adapter. If you have this kind of computer, you can use
Ethernet cable to connect the Ethernet connection jack on the computer to the LOCAL ETHERNET port on the HomePortal. You can identify an Ethernet connection jack by its rectangular shape and size, which is slightly larger than a standard telephone jack. Ethernet is recommended if your primary computer will be in the same room as the HomePortal.
For today’s home networks, you do not necessarily need Ethernet. Alternatives such as USB and HomePNA are equally effective and let you network your computers without special wiring.
USB
Most computers and digital devices manufactured in the last few years come with USB connections. USB ports, which are small and rectangular, are located on the back of the computer. Desktop computers typically have two USB ports, and notebook computers commonly have one. USB connection is
recommended if your primary computer will be in the same room as the HomePortal.
1
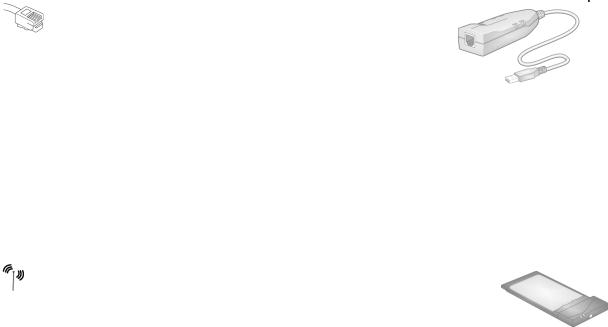
Home Phoneline Networking (HomePNA)
The HomePortal supports the HomePNA (Home Phoneline Networking Alliance) protocol. Home phoneline networking uses HomePNA technology to allow you to connect computers in different rooms using your home’s existing telephone wiring.
To create a home phoneline network, you need either a PCI HomePNA card installed into your computer or an external HomePNA adapter. These devices make it possible to connect each additional computer through the phoneline.
Home phoneline networking (HomePNA) is recommended for connecting secondary computers to your HomePortal if those computers are in the same room as the HomePortal, and for connecting computers in other rooms to the HomePortal.
Wireless
Wireless networking uses radio waves to connect your computers to your network. A PC Card (PCMCIA) wireless adapter looks like a flat, metal credit card with a piece of black plastic attached at one end.
Other types of wireless adapters can be attached using a USB connector. Wireless technology is recommended for networking computers in the same room as the HomePortal or for adding computers in other rooms to the network.
HomePortal
The 2Wire HomePortal residential gateway makes it possible to create a home network using any of the above technologies. By enabling you to connect the computers in your home, the HomePortal provides you with all the benefits of networking, including the ability to share one Internet connection among all the computers and computer users in your household.
The HomePortal securely delivers rich content such as games and music from the Internet, distributing it to multiple simultaneous users within your household. The HomePortal is easy to install and as easy to use as browsing the Web. The HomePortal also makes it easy to share printers, MP3 players, Internet radios, game consoles and other Internet devices.
The HomePortal enables high-speed, always-connected Internet access to the computers on your home network—while keeping your private files safe from Internet hackers. The firewall and denial-of-service attack protection built into the HomePortal keeps your data safe.
2

Step 1
Getting Started
First: Locate your HomePortal key code
Find the Before You Start page included in your HomePortal package. This insert will help you determine the key code that you will need to install the HomePortal residential gateway on your first computer.
Second: Remove or disable conflicting applications
Applications that enable a computer to share its Internet connection (often called Internet sharing software) and PC based firewall applications typically interfere with the HomePortal and should be removed or disabled before you install the HomePortal residential gateway. The HomePortal provides all of the same features as the products listed below so you don’t need to worry about losing Internet sharing and security capabilities. For more information on the HomePortal firewall, see Technical Support at www.2Wire.com.
If you have any of the following (or similar) applications installed on your computers, remove or disable them according to the manufacturer’s instructions before proceeding.
|
Internet sharing applications such as... |
|
Proxy software such as... |
|
Security software such as... |
|
|
|
|
|
|
• |
3Com HomeClick |
• |
WinGate |
• |
Norton Internet Security |
• Microsoft Internet Connection Sharing |
• |
Sygate |
• |
Black Ice |
|
• |
Intel Anypoint ISS |
|
|
• |
Zone Alarm |
|
|
|
|
|
|
Third: Check your computer’s browser and system requirements
Verify that your computers meet the following minimum requirements:
Browser Requirements
Windows: Microsoft Internet Explorer 5.0 or higher (included on the HomePortal Setup Wizard CD) or Netscape Navigator 4.7 or higher.
Macintosh: Microsoft Internet Explorer 5.0 or Netscape 4.74 or higher (included on the HomePortal Setup Wizard CD).
3
System Requirements
•At least 32 MB of RAM
•At least one computer with CD-ROM
•5 MB of available hard disk space for 2Wire HomePortal software
•Windows 98, 98SE, Windows ME, Windows NT 4.0 with Service Pack 6, Windows 2000, Windows XP, or Mac OS 8.6 or higher
•Network interface card(s) appropriate to your HomePortal model.
4

Step 2
Connect Your First Computer to the HomePortal
Choose a computer and connection type
The first computer you connect to your home network is used to configure the HomePortal residential gateway for proper operation. Choose one of the following methods to connect your first computer to the HomePortal. Save and close all open programs before you begin connecting your HomePortal.
Connection Type |
Go to... |
|
|
Ethernet |
page 6 |
Requires: A computer with an Ethernet port. |
|
Recommended for: Primary computer in the same room as the HomePortal. |
|
|
|
USB |
page 7 |
Requires: A Windows 98, 98 SE, ME, Windows 2000, or Windows XP computer |
|
with an available USB port. |
|
Recommended for: Primary computer in the same room as the HomePortal. |
|
|
|
Home phoneline networking (HomePNA) |
page 10 |
Requires: A computer with a HomePNA port or an external HomePNA adapter |
|
such as the 2Wire PC Port. |
|
Recommended for: Additional computers in the same room as the HomePortal |
|
or computers in other rooms. |
|
|
|
Network connection via Ethernet hub or switch |
page 11 |
Requires: An Ethernet hub or switch and a computer with an Ethernet port. |
|
Recommended for: Multiple computers in the same room as the HomePortal. |
|
|
|
Wireless (Model 1000SW only) |
page 12 |
Requires: A computer with an 802.11b wireless network adapter* installed. |
|
Wireless adapters are purchased separately from the HomePortal. |
|
Recommended for: Mobile computers such as laptops. |
|
|
|
*If you use a 2Wire wireless adapter (PC card or USB adapter) for wireless networking, the HomePortal Setup Wizard software automatically configures it to communicate with the HomePortal during setup, but you will need to install the driver. See Appendix A for detailed installation instructions.
If you are NOT using a 2Wire wireless adapter, you will need to manually configure your adapter of choice to communicate with the HomePortal BEFORE installing the HomePortal software. See Appendix B for detailed configuration instructions.
5
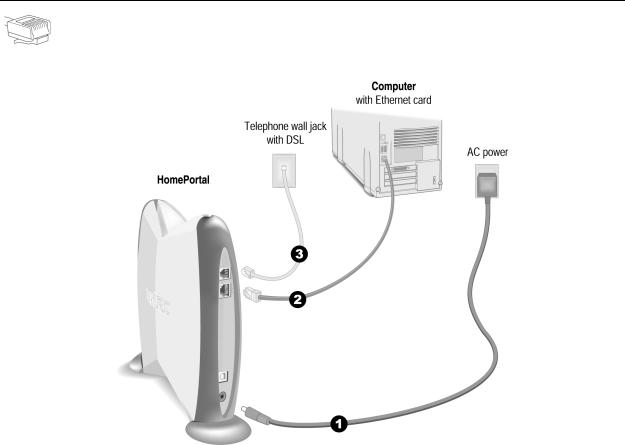
Ethernet Connection
Requires a computer with an Ethernet port
.
1.Connect the provided AC power adapter from the HomePortal’s POWER port to an electrical outlet. The green POWER light on the front of the HomePortal should come on.
2.Connect the provided Ethernet cable from the LOCAL ETHERNET port on the HomePortal to your computer’s Ethernet port.
3.Connect the provided telephone cable from the PHONE LINE port on the HomePortal to a telephone jack with DSL service.
This connects the HomePortal’s internal DSL modem to your DSL service provider and sets up your home network for home phoneline (HomePNA) networking. If you have been using an external DSL modem, you will no longer need it.
Check your connections
With your computer completely started, verify the POWER and HOME NETWORK indicator lights on the front of the HomePortal are green. If they are not, see “Diagnosing connection problems” on page 21. The
BROADBAND LINK indicator light will not turn green until the HomePortal software has been installed and an Internet connection has been established.
Continue from here to Step 3 “Install the HomePortal Software” on page 14.
6
USB Connection
Requires a Windows 98, 98 SE, Windows ME, Windows 2000, or Windows XP computer with an available USB port
Note: In a HomePortal network, only one Windows 98, 98 SE, Windows ME, Windows 2000, or Windows XP computer can be directly connected to the HomePortal residential gateway using the USB connection. Additional computers may be added to the network using connection options such as Ethernet.
HomePortal USB connectivity is NOT available for Macintosh, Windows 95, Windows 95 OSR2, or Windows NT.
1.Connect the provided AC power adapter from the HomePortal’s POWER port to an electrical outlet. The green POWER light on the front of the HomePortal should come on.
2.Connect the provided USB cable from the PC port on the HomePortal to your computer’s USB port.
3.Connect the provided telephone cable from the PHONE LINE port on the HomePortal to a telephone jack with DSL service.
This connects the HomePortal internal DSL modem to your DSL service provider and sets up your home network for home phoneline (HomePNA) networking. If you have been using an external DSL modem, you will no longer need it.
7
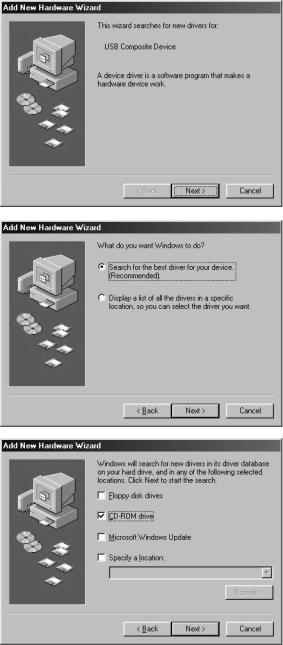
Install the 2Wire Gateway USB driver
Before installing your HomePortal software, you must install the 2Wire Gateway USB driver on your computer. The following screens show the installation under Windows 98SE and may vary somewhat on Windows ME, Windows 2000, and Windows XP.
1.Power on your computer. The Add New Hardware Wizard opens. Click Next to continue.
2.Select Search for best driver for your device and click Next to continue.
3. Place the HomePortal Setup Wizard CD in the CD-ROM tray and select CD-ROM drive. Click Next to continue.
Note: Make sure only the CD-ROM drive is selected. Otherwise, Windows may load the wrong file.
8
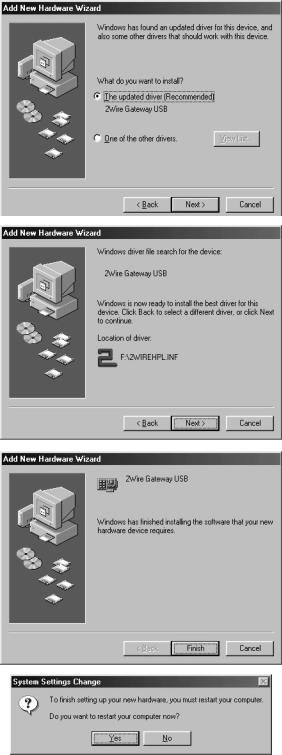
4. Select The updated driver and click Next.
5.Click Next.
Note: If asked to insert your Windows CD, please do so and follow the on screen instructions. If you don’t have your Windows CD handy, look for the Windows.cab files in the locations listed below:
C:\WINDOWS\options\cab
C:\WINDOWS
C:\WINDOWS\system
C:\Win98
6.Click Finish.
7.Remove the CD from the CD-ROM tray, then click Yes to restart your computer.
Check your connections
With your computer completely started, verify the POWER and HOME NETWORK indicator lights on the front of the HomePortal are green. If they are not, see “Diagnosing connection problems” on page 21. The
BROADBAND LINK indicator light will not turn green until the HomePortal software has been installed and an Internet connection has been established.
Continue from here to Step 3 “Install the HomePortal Software” on page 14.
9
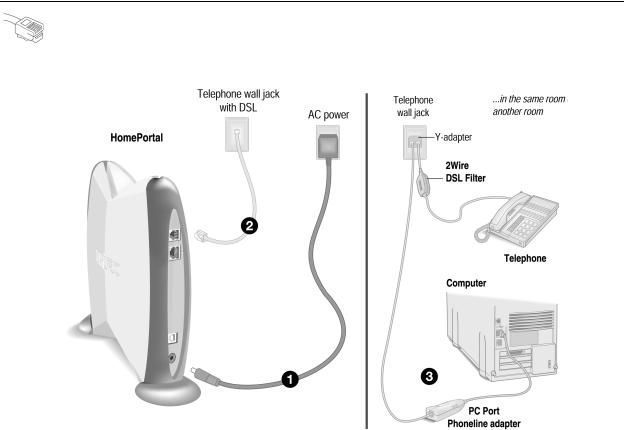
Home Phoneline Networking (HomePNA) Connection
Requires a computer with a HomePNA port or an external HomePNA adapter
Computers connected with HomePNA access the HomePortal’s Internet connection and other computers on the network using existing telephone wiring. You will need one adapter for each computer that you are connecting through HomePNA. If your computer does not have a HomePNA port, you will need to install a PCI HomePNA adapter or an external HomePNA adapter. Specific instructions for installing HomePNA network adapters can be found in the individual adapter’s package (if purchased separately) or on your HomePortal Setup Wizard CD (if included with your HomePortal). The HomePNA adapter shown in this example is a 2Wire PC Port Phoneline Adapter.
1.Connect the provided AC power adapter from the HomePortal’s POWER port to an electrical outlet. The green POWER light on the front of the HomePortal should come on.
2.Connect the provided telephone cable from the PHONE LINE port on the HomePortal to a telephone jack with DSL service.
3.Install your HomePNA adapter according to the manufacturer’s instructions.
Note: If you are installing a phoneline filter, it must be installed directly between the telephone and the wall jack, as shown in the diagram. Do not connect the telephone line from the HomePNA adapter to the phoneline filter. The network will not work properly if the phoneline filter is connected directly to the HomePNA adapter. You can use the provided Y-adapter to connect both the HomePNA adapter and the phoneline filter to the same phone jack.
10
Note: Your HomePNA card or adapter is not the analog V90 dial-up modem that may be integrated in your computer. Please make sure that you connect both separately.
Check your connections
With your computer completely started, verify the POWER and HOME NETWORK indicator lights on the front of the HomePortal are green. If they are not, see “Diagnosing connection problems” on page 21. The
BROADBAND LINK indicator light will not turn green until the HomePortal software has been installed and an Internet connection has been established.
Continue from here to Step 3 “Install the HomePortal Software” on page 14.
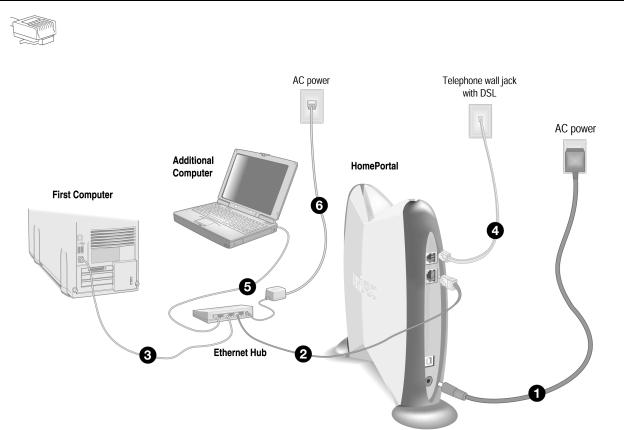
Network with Ethernet Hub or Switch
Computer has Ethernet adapter and you are using an Ethernet hub or switch
Note: The HomePortal has an auto-crossover port. You do not need to use a special crossover cable or make any changes to the configuration of your HomePortal, Ethernet hub, or switch. The HomePortal will establish the type of port needed during setup.
1.Connect the provided AC power adapter from the HomePortal’s POWER port to an electrical outlet. The green POWER light on the front of the HomePortal should come on.
2.Connect the provided Ethernet cable from the LOCAL ETHERNET port on the HomePortal to an open port on the hub or switch.
3.Connect the first computer’s Ethernet adapter to the hub or switch using an Ethernet cable.
11
4.Connect the provided telephone cable from the PHONE LINE port on the HomePortal to a telephone jack with DSL service.
5.Using another Ethernet cable (not provided), connect any additional computers to the hub or switch.
6.Plug the hub or switch into an electrical outlet.
Check your connections
With your computer completely started, verify the POWER and HOME NETWORK indicator lights on the front of the HomePortal are green. If they are not, see “Diagnosing connection problems” on page 21. The
BROADBAND LINK indicator light will not turn green until the HomePortal software has been installed and an Internet connection has been established.
Continue from here to Step 3 “Install the HomePortal Software” on page 14.
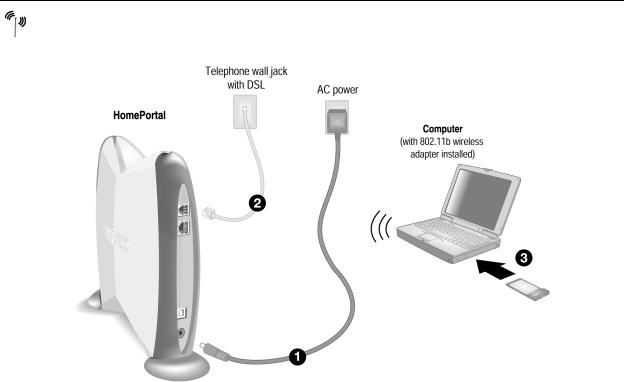
Wireless Connection Model 1000SW only
Requires a computer with 802.11b wireless adapter installed
1.Connect the provided AC power adapter from the HomePortal’s POWER port to an electrical outlet. The green POWER light on the front of the HomePortal should come on.
2.Connect the provided telephone cable from the LINE port on the HomePortal to a telephone wall jack.
3.Install your wireless adapter according to the manufacturer’s instructions (see note below).
Note: If you use a 2Wire wireless adapter (PC card or USB adapter) for wireless networking, the HomePortal Setup Wizard software automatically configures it to communicate with the HomePortal during setup, but you will need to install the driver. See Appendix A for detailed installation instructions.
12
If you are NOT using a 2Wire wireless adapter, you will need to manually configure your adapter of choice to communicate with the HomePortal BEFORE installing the HomePortal software. See Appendix B for detailed configuration instructions.
Check your connections
With your computer completely started and your wireless card properly configured, verify the POWER and HOME NETWORK indicator lights on the front of the HomePortal are green. If they are not, see “Diagnosing connection problems” on page 21. The BROADBAND LINK indicator light will not turn green until the HomePortal software has been installed and an Internet connection has been established.
Continue to Step 3 “Install the HomePortal Software” on page 14.
13
 Loading...