


Moen 7025, 7034, 87030, 7037, 87034 User Manual
...INS215A
OWNER’S MANUAL
Exclusively from
Model Numbers 7025, 7030, 7034, 7037 87025, 87030, 87034 Series
U.S. Patent Pending
Other Foreign and Domestic Patents Pending
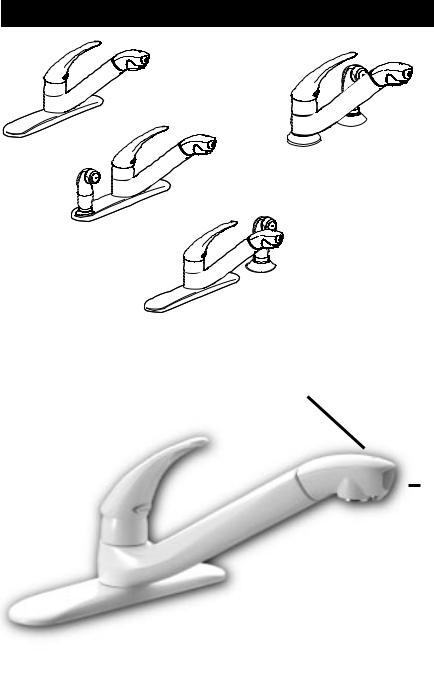
PRODUCT FEATURES
Deck ring model
Deck plate models
|
Electronic |
|
|
|
|
|
Newly styled handle |
filter life |
|
|
|
|
|
indicator |
|
Filtered |
||||
and spout receptor |
|
|
water |
|||
|
|
|||||
|
|
|
button |
|||
|
|
|
|
|
|
|
|
|
|
|
|
|
|
|
|
|
|
|
||
|
|
|
|
|||
|
|
|
|
|
|
|
|
|
|
Filtered |
|||
|
|
water outlet |
||||
Easy to replace water filter
1 |
HELPLINE: 1-877-DRINK-H2O |
INS215A |
|
1-877-(374-6542) |
|

WELCOME TO MOEN®
Congratulations! You’ve purchased the revolutionary PureTouch® Classic Filtering Faucet System. This faucet is designed to provide great tasting, cleaner water with just one touch. To get the most enjoyment from your Moen PureTouch Filtering System, please read all installation and operating instructions carefully. With simple care and maintenance, the PureTouch Filtering Faucet System will provide many years of reliable performance. If you should have any questions, please call us toll-free at 1-877-DRINK-H2O (1-877-374-6542).
TABLE OF CONTENTS
Product Features . . . . . . . . . . . . . . . . . . . . . . . . . . . . . . . . . . .1
Water Filtration Safeguards . . . . . . . . . . . . . . . . . . . . . . . . . .3
Parts Description . . . . . . . . . . . . . . . . . . . . . . . . . . . . . . . . . . .4
Installation Instructions . . . . . . . . . . . . . . . . . . . . . . . . . . . . . .5
Filter Replacement Instructions . . . . . . . . . . . . . . . . . . . . . . .8
Operating Instructions . . . . . . . . . . . . . . . . . . . . . . . . . . . . . . .9
Battery Replacement . . . . . . . . . . . . . . . . . . . . . . . . . . . . . . . .9
Trouble Shooting . . . . . . . . . . . . . . . . . . . . . . . . . . . . . . . . . .10
Warranty . . . . . . . . . . . . . . . . . . . . . . . . . . . . . . . . . . . . . . . . .10
Care and Maintenance . . . . . . . . . . . . . . . . . . . . . . . . . . . . .10
California Certificates . . . . . . . . . . . . . . . . . . . . . . . . . . . . . .11
Performance Data Sheet . . . . . . . . . . . . . . . . . . . . . . . . . . . .13
INS215A |
HELPLINE: 1-877-DRINK-H2O |
2 |
|
1-877-(374-6542) |
|

WATER FILTRATION SAFEGUARDS
Your PureTouch® Classic Filtering Faucet System integrates carbon block filtration technology designed by Culligan® International into a faucet spout. This technology is fast and effective at reducing contaminants commonly found in water and is certified by NSF® International. The PureTouch Filtering Faucet System and installation must comply with State and Local laws and regulations. To ensure optimal operation of your new Moen faucet, please read the following safeguards carefully.
MicroTech™ Filter Cartridges
• MicroTech filter cartridges will reduce :
Chlorine, Taste and Odor (MicroTech 400, 600) Lead (MicroTech 400, 600)
Cysts (Cryptosporidium, Giardia)(MicroTech 600)*
*The contaminants removed or reduced by this filter are not necessarily in your water.
•Do not use with water that is microbiologically unsafe or of unknown quality without adequate disinfection before or after the system. Systems certified for cyst reduction may be used on disinfected waters that may contain filterable cysts.
•MicroTech filter cartridges are designed for replacement after dispensing 200 gallons of filtered water. Water conditions and usage may affect filter life and water taste.
•The electronic indicator will signal when filter replacement is necessary (see page 9).
•Use only MicroTech 400 or 600 filter cartridges with the PureTouch Classic Filtering Faucet System.
•Filter flow rate = .4-.6 gpm at rated pressure (20psi min. - 125psi max.).
Water Temperature
•Minimum/Maximum faucet operating temperature = 40° - 150°F.
•CAUTION: Do not filter water above 100° F.
MicroTech Filter Flushing Instructions
•New MicroTech Filter Cartridge: After installing a new filter into the faucet, allow cold water to run through the filtered water outlet for 5 minutes to flush out any loose carbon particles. The filter life indicator will alternately flash amber and green for the first five minutes after the indicator is manually reset (see page 9) as an aid in timing the filter flushing period.
•Daily Use: Allow cold water to run through the filter for 10-15 seconds prior to first use. If the filter has not been used for several days, run cold water through the filter for 60 seconds prior to use.
Questions |
|
|
|
• If you have any questions please call our toll-free helpline, |
|
||
1-877-DRINK-H2O. Monday through Friday |
8:00 a.m. to 8:00 p.m. |
||
1-877-(374-6542) |
Saturday |
8:00 a.m. to 6:30 p.m. |
|
3 |
HELPLINE: 1-877-DRINK-H2O |
INS215A |
|
|
1-877-(374-6542) |
|
|
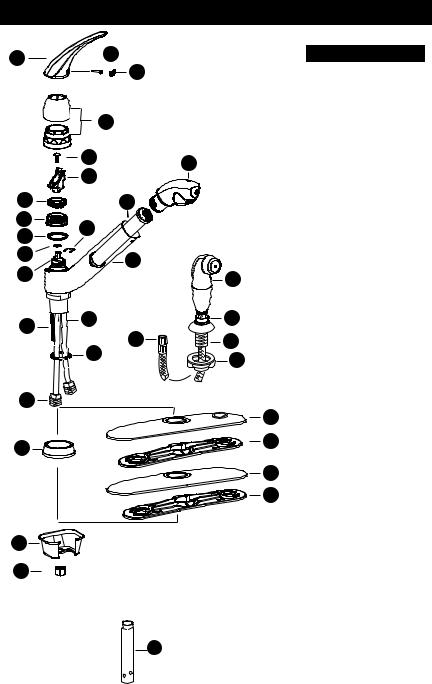
PARTS DESCRIPTION
1 |
2 |
|
|
|
|
|
3 |
|
|
4 |
|
|
5 |
14 |
|
|
|
|
6 |
|
7 |
13 |
|
8 |
11 |
|
9 |
|
|
|
|
|
10 |
15 |
|
|
|
|
12 |
|
24 |
|
|
|
16 |
17 |
25 |
|
|
|
|
28 |
26 |
|
18 |
27 |
|
|
|
19 |
|
|
|
|
30 |
20 |
|
31 |
|
|
|
|
|
21 |
|
|
31 |
22 |
|
|
23 |
|
|
29
|
DESCRIPTION |
|
|
|
|
1 |
Solid Handle Body |
|
|
|
|
2 |
Set Screw |
|
|
|
|
3 |
Plug Button |
|
|
|
|
4 |
Dome & Pivot |
|
Retainer Assembly |
||
|
||
|
|
|
5 |
Cartridge Screw |
|
|
|
|
6 |
Handle Adapter & |
|
Connector Assembly |
||
|
||
|
|
|
7 |
Pivot Stop |
|
|
|
|
8 |
Spout Retaining Nut |
|
|
|
|
9 |
Bearing Washer |
|
|
|
|
10 |
"D" Washer |
|
|
|
|
11 |
Retainer Clip |
|
|
|
|
12 |
1225 Cartridge |
|
|
|
|
13 |
Filter Cartridge |
|
|
|
|
14 |
Filltering Appliance |
|
|
|
|
15 |
Lower Spout Assembly |
|
|
|
|
16 |
Threaded Shank |
|
|
|
|
17 |
Supply Tubes (2) |
|
|
|
|
18 |
Bottom Bearing Washer |
|
|
|
|
19 |
1/2" Threaded Fitting |
|
|
|
|
20 |
Deck Ring with Gasket |
|
|
|
|
21 |
Deck Plate |
|
|
|
|
22 |
Mounting Bracket |
|
|
|
|
23 |
Mounting Nut |
|
|
|
|
24 |
Side Spray |
|
(Spray Models) |
||
|
||
|
|
|
25 |
Hose Guide with Gasket |
|
(Side Spray Models) |
||
|
||
|
|
|
26 |
Spray Hose |
|
|
|
|
27 |
Extended Locknut |
|
(Side Spray Models) |
||
|
||
|
|
|
28 |
Swivel Nut (Spray Models) |
|
|
|
|
29 |
Mounting Tool |
|
|
|
|
30 |
Deck Plate |
|
(Spray in Deck Models) |
||
|
||
|
|
|
31 |
Support Plate with Gasket |
|
|
|
INS215A |
HELPLINE: 1-877-DRINK-H2O |
4 |
|
1-877-(374-6542) |
|
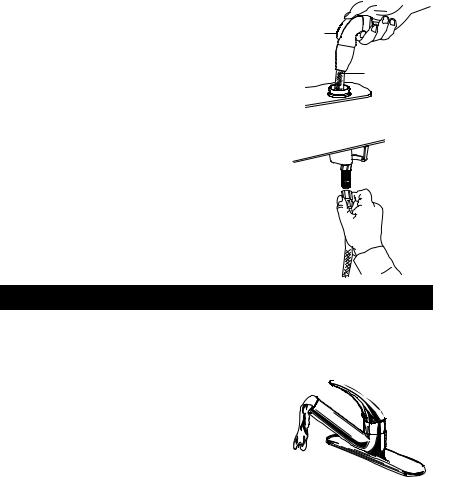
INSTALLATION INSTRUCTIONS
CAUTION: Always turn water supplies OFF before removing existing faucet. Turn faucet on to relieve water pressure and to ensure water is completely off.
OLD FAUCET REMOVAL: Your old faucet may attach in a number of different ways depending on the brand. To remove, reverse steps in installation instruction sheet of old faucet, follow instructions in a DIY type of book or follow instructions listed below.
After years of use, you may need to use a penetrating oil spray on the faucet mounting hardware to help loosen corrosion and assist in removing the faucet connections.
Disconnect water supply lines from faucet supply lines. Remove mounting hardware using a basin wrench or channel lock pliers. Lift out faucet. Thoroughly clean and dry the mounting surface after removal of old faucet.
INSTALLING THE PURETOUCH® Classic FILTERING FAUCET SYSTEM
Helpful Tools: Phillips screwdriver, two adjustable wrenches
CAUTION: Do not use with portable washing devices, i.e. dishwashers, washing machines.
NOTE: Do not bend supply tubes until instructed in step 4.
HINTS: When using flexible supplies, we recommend threaded fittings be installed onto supply lines before placing faucet through sink holes (see step 6). For installations on tile countertops, remove rubber gasket from underneath support plate (31) or deck ring (20) and apply a bead of putty in its place. Roll the putty into the diameter of a pencil. When applied in the groove, the putty should protrude a minimum of 1/16".
Side Spray Installation (side spray models only)
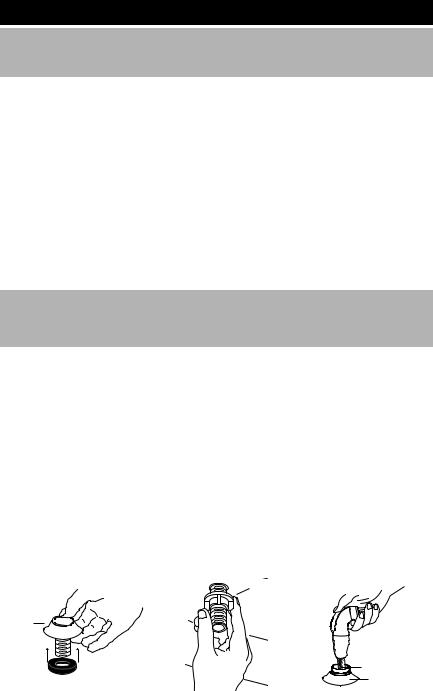
1.Locate foam gasket on hose guide (25) by sliding gasket onto shank and tucking outer edge of gasket under the hose guide (25). Do not drive the center of the gasket up into the hose guide. Install hose guide (25) through furthest left or right hole in sink. From under sink, thread extended locknut (27) (either side up) on shank of hose guide and tighten by hand. Feed spray hose (26) down through the hose guide (25) (do not connect spray hose to faucet until step 6 ).
27
25
26
25
5 |
HELPLINE: 1-877-DRINK-H2O |
INS215A |
|
1-877-(374-6542) |
|
2a. WARNING: Do not straighten bent supply tubes until
step 4. |
SINK |
|
|
||
DECK PLATE MODELS: Install faucet through deck holes |
|
|
(threaded shank (16) to back). Center faucet on sink with |
|
|
support plate (31) oriented in sink holes. |
GROOVE |
|
DECK RING MODELS: Place deck ring (20) over supply |
|
|
tubes (17) and threaded shank (16) against bottom of |
|
|
faucet body. Install faucet through deck hole (threaded |
Back View of |
|
shank (16) to back). |
||
Faucet Installation |
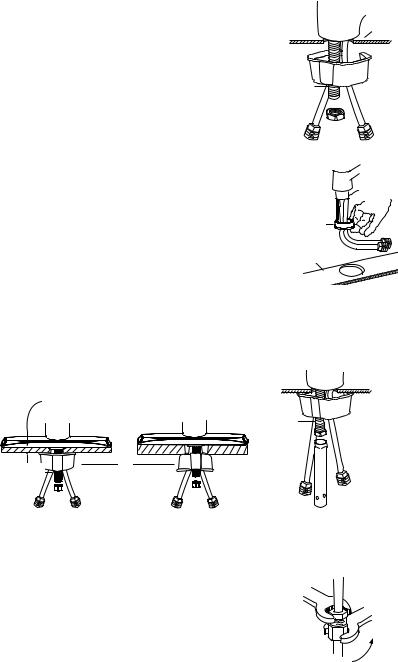
FOR ALL MODELS: Position spout to side to keep faucet from tilting forward. Refer to step 2b for installation of mounting bracket (22).
DeckDECKringRING
2b. IMPORTANT: DECK THICKNESS (countertop)
Your deck thickness determines whether the mounting bracket (22) is installed open side up or down. For spray models, a groove on the threaded shank (16) indicates the
minimum amount of thread length which must be exposed for proper attachment of nuts (23) and (28). For models without spray, a minimum of 1/2" of threaded shank (16) must be exposed for proper attachment of nut (23). Position mounting bracket onto threaded shank (16) and around supply tubes (17). Do NOT kink tubing. Install mounting nut (23) and tighten by hand.
For deck thickness up to |
For deck thickness over |
1-1/8" deep, install |
1-1/8" deep, install |
mounting bracket (22) |
mounting bracket (22) |
OPEN SIDE UP. |
OPEN SIDE DOWN. |
GROOVE
22
GROOVE
3.Be sure faucet is positioned evenly on sink. Make final tightening of mounting nut (23) with mounting tool (29).
4.Carefully straighten each supply tube using two hands. At this time, affix the Caution Hang Tag onto
either supply tube over the 1/2” threaded fitting (19). If using flexible supply lines with compression fittings, thread supply line nuts on finger tight, then holding one threaded fitting with a wrench, tighten nut with another wrench, rotating one half turn. Do not overtighten. Connect the existing hot and cold water supply lines to the two (2) 1/2” threaded fittings. The hot supply tube is always to the left when threaded shank (16) is positioned to rear.
INS215A |
HELPLINE: 1-877-DRINK-H2O |
|
1-877-(374-6542) |
CAUTION:
Severe bends of the supply lines may cause crimping and restricted water flow could result.
6
5. FOR MODELS WITH SPRAY IN DECK PLATE (30), |
|
install spray hose (26) and spray head (24) |
|
through deck plate hole. |
24 |
6.TO CONNECT SPRAY HOSE FOR ALL SPRAY MODELS:
Connect spray hose swivel nut (28) to the threaded shank (16). Tighten swivel nut by hand plus 1/4 turn with pliers or channel locks being careful not to twist the spray hose (26). DO NOT OVERTIGHTEN.
Flushing is required. See flushing instructions below.
26
Sink
LINE FLUSHING INSTRUCTIONS
IMPORTANT: Pipe chips, sand, stones and other solids found in new and renovated plumbing can damage the sealing surfaces of the filter cartridge and cause a leak. To avoid damage, DO NOT TURN ON SUPPLY VALVES until instructed below.
Before you insert the filter and filtering appliance:
1. Turn faucet on in the full cold position (handle pointing to the right) and allow cold water to flow for 15 seconds
2.Without turning the faucet off, turn the handle to the full hot position (handle pointing to the left) and allow hot water to flow for 15 seconds.
3.If side spray is installed, without turning the faucet off, turn the handle to the mid/mix position (handle pointing toward you) and turn on the spray for 15 seconds.
4.Shut off faucet.
5.You are now ready to insert the filter and filtering appliance.
7 |
HELPLINE: 1-877-DRINK-H2O |
INS215A |
|
1-877-(374-6542) |
|
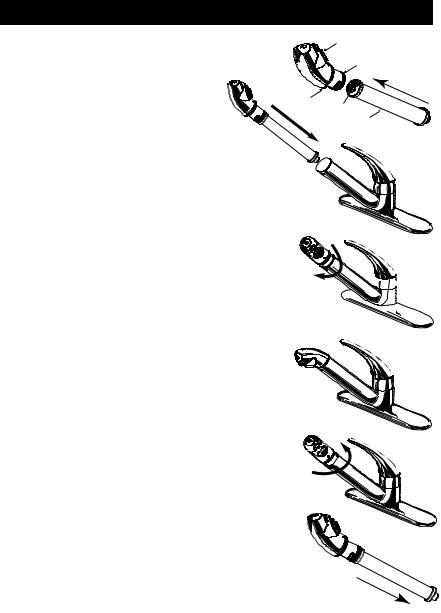
MICROTECH™ FILTER INSTALLATION/REPLACEMENT
1. Install a new filter by wetting the outlet ports with water and then inserting into the round filter ports on the faucet head and pushing the filter and head together. Both outlet ports must be 
fully inserted into the filter ports. 2. Install the filter and faucet head
assembly on to the spout by wetting the faucet head o-ring seal and rubber spacer and then carefully sliding the free end of the filter
into the spout. The head will need to be initially
turned approximately 1/2 turn counter clockwise from its normal position to slip past the safety catch. Lock the head into place by simultaneously pushing and twisting the head clockwise. When properly installed the head will feel secure, and will be correctly oriented on the spout. 
3. Reset the filter life indicator by pushing the filter 


 button 3 times. Wait 10 seconds. You should not be
  running water while resetting the filter life indicator


 because the filter button will remain depressed with the

 first push as it switches to filter mode. The filter life indicator

has been correctly reset if a short series of rapidly flashing green light occurs, indicating that the new filter flushing
period has begun. 4. Flush the filter (see page 3) for 5 minutes before
initial use.
Your new Moen faucet is now ready for normal use.
To replace or install filter - 1. Turn off the faucet. Remove the faucet head by
twisting it approximately 1/4 turn counter clockwise to 
 unlock it. Gently pull the faucet head away from the
  spout and twist it approximately another 1/4 turn to get the faucet head past the safety catch. The faucet head and depleted filter (if one is installed) can now be pulled
completely out of the spout. 2. The filter is held to the faucet head by two outlet
ports, which connect into the head. Remove the old filter by simply pulling it straight off. Discard the old
and install a new MicroTech 400 or 600 filter.
Note: The faucet will function correctly in unfiltered stream with or without a filter installed. The faucet will not function
filter mode without a filter. If a filter is not installed and the filter button is depressed, unfiltered water will flow from both the filtered water outlet and the stream outlet aerator, and the filter button will not automatically stay depressed.
Use only Microtech 400 or 600 filter cartridges with the PureTouch Classic Filtering Faucet system. The Microtech filters are high performance carbon block filters developed specifically for the PureTouch system.
INS215A |
HELPLINE: 1-877-DRINK-H2O |
8 |
|
1-877-(374-6542) |
|

OPERATING INSTRUCTIONS
Controlling The Water
The PureTouch system has two options for water delivery; unfiltered stream and filtered water.
STREAM MODE: Unfiltered water in regular stream flow.
When the water is turned on at the faucet, the spout will always begin operating in the regular stream mode.
FILTERED WATER MODE: Filtered water dispensed through the separate filtered water outlet.
Pressing the front filtered water button will divert water through the filter and dispense filtered water from a separate outlet. To exit the filter mode, shut off the faucet.
CAUTION: Only filter cold water. Do not filter water above 100° F.
Electronic Indicator
The flashing light on the electronic filter life indicator provides information regarding the performance of the filter. The indicator provides you with information throughout the life of the filter to help communicate the level at which it is performing. Only reset the indicator when installing a new filter. Resetting the indicator at any other time will cause incorrect filter life indication.
|
Indicator Color |
Performance |
|
|
Amber & Green |
A new filter must be flushed with cold |
|
|
|
water for 5 minutes after it is installed. |
|
|
|
This procedure helps clean the filter of |
|
|
|
loose carbon particles |
|
|
Green |
Filter performing with optimum |
|
|
|
efficiency |
|
|
Amber |
Caution: Filter is ready for replacement |
|
|
|
(approximately 16 gallons left). |
|
|
Red |
Warning: Filter is ready for replacement |
|
|
|
(approximately 8 gallons left). |
|
|
Red (fast) |
Filter life is depleted, discard old filter |
|
|
|
and replace with a new MicroTech 400 |
|
|
|
or 600 filter. |
|
|
|
|
|
*If fast red doesn’t change to slow amber/green after memory has been reset, reset was not complete and needs to be redone. Follow step 3 on page 8.
The electronic indicator is powered by a replaceable, standard 3V lithium watch battery (2032) designed to last several years.
Battery Replacement
Follow filter replacement instructions to remove filter appliance. Locate battery compartment drawer, pull out and replace battery, positive side up. Keep the battery and battery compartment dry. The electronic indicator will retain the correct filter life information when the battery is removed and replaced.
9 |
HELPLINE: 1-877-DRINK-H2O |
INS215A |
|
1-877-(374-6542) |
|
TROUBLESHOOTING
PROBLEM:
SOLUTION:
PROBLEM:
SOLUTION:
PROBLEM:
SOLUTION:
TURN STEM 1/2 TURN
NOTCHED |
|
FLAT |
|
ON STEM |
|
Water flows from both outlets, filter and unfiltered, when the filter button is pushed.
No filter is installed, install a filter.
After installing a new filter, the filter life indicator still flashes red.
Filter life indicator was not reset, or the attempt to reset the indicator did not work. Perform reset sequence.
Reversed Hot & Cold positions.
HELPFUL HINTS: IT IS NOT NECESSARY TO SHUT OFF WATER SUPPLIES. HANDLE SCREW REQUIRES A 7/64” HEX KEY WRENCH.
|
1. Remove plug button (3) from the handle by prying the button |
|
upwards from the bottom center. If a tool is required, use something |
7which will not scratch the handle. Remove set screw (2), handle body
(1), dome and pivot retainer assembly (4), cartridge screw (5), handle
adapter and handle connector assembly (6).
|
|
2.Turn cartridge stem around so that the notch is turned one half turn or 180°.
3.Reinstall as follows: Be sure retainer clip (11) is present on cartridge stem and raised edge of pivot stop (7) faces front. Note orientation of handle adapter & connector assembly (6 ) in the exploded view. Completely tighten cartridge screw (5) to prevent unwanted closure of faucet. Thread on dome clockwise until hand tight. Reinstall handle body (1), set screw (2) and plug button (3).
PROBLEM: Faucet head is loose and water flows freely from between the head and spout.
SOLUTION: The head was not locked in place correctly. Reinstall the head and filter assembly.
PROBLEM: Slow or uneven water flow in filtered mode.
SOLUTION: Filter cartridge may be clogged with captured contaminants. Replace filter cartridge. If problem persists call Moen Helpline at 1-877-DRINK-H2O (1-877-374-6542)
PROBLEM: Electronic display doesn’t function.
SOLUTION: Replace battery.
PROBLEM: Irregular/low water flow
SOLUTION: Remove the areator from filtering head and flush thoroughly, then reinstall. Moen aerators comply with government regulations to save both water and energy. Your old faucet may not have met these standards.
PROBLEM: Faucet head spacer is mis-aligned
SOLUTION: Wet faucet head spacer prior to installing the filter and faucet head assembly. If condition persists call Moen Helpline at 1-877-DRINK-H2O (1-877-374-6542).
CARE AND MAINTENANCE
All that is needed to clean your faucet is a soft damp cloth. Moen does not recommend the use of scour pads, cleansers or chemicals. The abrasive nature of these substances could damage the faucet’s finish. A non abrasive car wax will help to protect the finish. DO NOT SUBMERGE OR PLACE FAUCET HEAD IN DISHWASHER.
INS215A |
HELPLINE: 1-877-DRINK-H2O |
10 |
|
1-877-(374-6542) |
|

PureTouch Classic Filtering Faucet System Warranty
Definitions:
“Faucet” - That part of the PureTouch Filtering Faucet System that includes the handle, spout receptor, 1225 cartridge, escutcheon, hose and mounting hardware (numbers 1-17 & 23-40 & 42 in parts description (page 4)).
“Filtering Appliance” - The end of the faucet that includes the filter life monitor and push button (number 14 in parts description (page 4)).
“Filter” - That part of the PureTouch Filtering Faucet System that is to be replaced once 200 gallons of water have run through the system (number 13 in parts description (page 4)).
Moen products have been manufactured under the highest standards of quality and workmanship. Moen warrants to the original consumer purchaser that for as long as the original consumer purchaser occupies the location of original product installation (the “Warranty Period”), that the Faucet (see definition for “Faucet” above) will be leak and drip-free during normal use and all parts and finishes of the Faucet will be free from defects in material and manufacturing workmanship (the “Consumer Faucet Warranty Period”). All parts and finishes of the Filtering Appliance (see definition for “Filtering Appliance” above) will be free from defects in material and manufacturing workmanship for a period of one (1) year from the original date of purchase (the “Consumer Filtering Appliance Warranty Period”). All other purchases (including purchases for industrial, commercial and business use) are warranted for a period of five (5) years from the original date of purchase (the “Commercial Warranty Period”) for the Faucet (“Commercial Faucet Warranty Period”) and six
(6) months for the Filtering Appliance (“Commercial Filtering Appliance Warranty Period”). The Filter (see definition for “Filter” above) is warranted to all purchasers to be free from defects in material and manufacturing workmanship for a period of thirty (30 days) from the original date of purchase (“Filter Warranty Period”).
If the Faucet should develop a leak or drip during the applicable “Faucet Warranty Period”, Moen will FREE OF CHARGE provide the parts necessary to put the faucet back in good working condition and will replace FREE OF CHARGE any part or finish that proves defective in material and manufacturing workmanship under normal installation, use and service. If the Filtering Appliance should prove defective in material and manufacturing workmanship under normal installation, use and service during the applicable “Filtering Appliance Warranty Period”, Moen will FREE OF CHARGE replace any part or finish. If the filter should prove defective in material and manufacturing workmanship under normal installation, use and service during the “Filter Warranty Period”, Moen will FREE OF CHARGE replace the filter. Replacement parts may be obtained by calling 1-800-289-6636 (1 -800-465-6130 in Canada), or by writing to the address shown on the back of this booklet. Proof of purchase (original sales receipt) from the original consumer purchaser must accompany all warranty claims. Defects or damage caused by the use of other than genuine Moen parts are not covered by this warranty. This warranty is applicable only to faucets purchased after February 1998 and shall be effective from the date of purchase as shown on the purchaser’s receipt.
This warranty is extensive in that it covers repair or replacement of defective parts and finishes for the periods indicated. However, damage due to installation error, product abuse, product misuse or use of cleaners containing abrasives, alcohol or other organic solvents, whether performed by a contractor, service company or yourself, is excluded from this warranty. Moen will not be responsible for labor charges and/or damage incurred in installation, repair or replacement, nor for any indirect, incidental or consequential damages, losses, injury or costs of any nature relating to this product or its parts. Except as provided by law, this warranty is in lieu of and excludes all other warranties, conditions and guarantees, whether expressed or implied, statutory or otherwise, included without restriction those of merchantability or of fitness for use.
Some states, provinces and nations do not allow the exclusion or limitation of incidental or consequential damages, so the above limitations or exclusions may not apply to you. This warranty gives you specific legal rights and you may also have other rights which vary by state, province or nation. Moen will advise you of the procedure to follow in making warranty claims. Simply write to or call Moen. Explain the defect and include proof of purchase and your name, address, area code and telephone number.
11 |
HELPLINE: 1-877-DRINK-H2O |
INS215A |
|
1-877-(374-6542) |
|
PureTouch® Classic Filtering Faucet System
FEATURES
•Refines treated water to premium quality
•All filters take out disinfectant chlorine
•All filters absorb common earthy, moldy, fishy tastes, and odors
•MicroTech™ 600 reduces parasitic protozoan cysts including Giardia & Cryptosporidium
PERFORMANCE CERTIFIED BY NSF/ANSI* |
|
|
|
|
|
|
|
|
with MicroTech™ 600 FIlter or MicroTech™ 400 (Chlorine & lead only) |
|
|
|
|
||
|
|
|
Average |
Average |
Maximum |
Average |
Minimum |
|
|
USEPA |
Challenge |
Effluent |
Effluent |
Percent |
Percent |
|
Parameter |
MCL |
mg/L |
mg/L |
mg/L |
Reduction |
Reduction |
|
AESTHETIC EFFECTS |
|
|
|
|
93.3 |
|
|
Chlorine |
— |
2.0 |
.14 |
0.35 |
82.5 |
|
|
Taste and Odor |
— |
— |
— |
— |
— |
— |
|
HEALTH EFFECTS |
|
|
|
|
|
|
|
Lead @ 6.5 pH (MicroTech 400) |
.015 |
.15 |
0.002 |
.003 |
98.8 |
98.0 |
Lead @ 6.5 pH (MicroTech 600) |
.015 |
.17 |
0.006 |
.013 |
96.5 |
92.3 |
|
|
Lead @ 8.5 pH (MicroTech 400) |
.015 |
.15 |
0.008 |
.011 |
94.6 |
92.7 |
|
Lead @ 8.5 pH (MicroTech 600) |
.015 |
.13 |
0.003 |
.006 |
97.7 |
95.3 |
|
Cysts (3-4 um particles) |
— |
1,055,000 particles |
24 particles |
45 particles |
99.99 |
99.95 |
*Tested using flow rate = 0.5 gpm; pressure = 60 psig; pH = 7.5 ± .05; temp. = 68°± 5°F, 20°± 2.5°C except where noted.
OPERATING SPECIFICATIONS
•Capacity: MicroTech 600 and 400 Filters certified for chlorine, taste and odor, and lead reduction for up to 200 gallons (750 L)
•Pressure requirement: 20-125 psi (0.7 - 8.6 bar), non-shock
•Temperature: 35-100°F (2-38°C)
•Flow Rate: 0.5 gpm (1.89 Lpm)
GENERAL INSTALLATION/OPERATION/MAINTENANCE REQUIREMENTS
•Flush to drain for 5 minutes at full flow.
•Replace filters when capacity is reached, or when flow becomes too slow.
•Water usage or quality may affect filter life. SPECIAL NOTICES
•Installation instructions, parts and service availability, and warranty are included with the product when shipped.
•This drinking water system must be maintained according to manufacturer's instructions, including replacement of filter cartridges. List price of MicroTech 600 filter is $20.00. List price of MicroTech 400 filter is $16.00. Consumer price varies by retailer.
•Do not use with water that is microbiologically unsafe or of unknown quality without adequate disinfection before or after the system. Systems certified for cyst reduction may be used on disinfected waters that may contain filterable cysts.
•The contaminants or other substances removed or reduced by this water treatment system are not necessarily in your water.
•Check for compliance with state and local laws and regulations.
•The electronic filter life indicator will change from green to red when cartridge needs replacing. See the PureTouch System Owner's Manual for additional electronic filter life indicator information.
•Filter life indicator runs on a standard 3V lithium watch battery (2032).
•Faucet warranted for lifetime on leaks,drips and finish defects, filtering head warranted for one year, filter warranted for 30 days. See Owner's Manual for commercial warranties.
NSF INTERNATIONAL STANDARDS
NORMES INTERNATIONALES NSF
ESTÁNDARES INTERNACIONALES DE LA NSF
Standard No. 42: Aesthetic Effects (PureTouch w/MicroTech 400, 600) Norme 42 Effets visuels : (PureTouch avec MicroTech 400, 600) Estándar No. 47 Efectos Estéticos (PureTouch con MicroTech 400, 600)
Chemical Unit - |
Unité chimique - |
Unidad química |
Chlorine Reduction, Class I |
Réduction de chlore, Classe 1 |
Reducción de cloro, clase I |
Taste and Odor Reduction |
Réduction de goût et d’odeur |
Reducción de olor y gusto |
Standard No. 53: Health Effects (PureTouch w/MicroTech 400, 600)
Norme 53 : Effets sur la santé (PureTouch avec MicroTech 400, 600)
Estándar No. 53 Efectos en la salud (PureTouch con MicroTech 400, 6000)
ANSI
ACCREDITED CERTIFICATION PROGRAM
NSF®
Tested and Certified
to ANSI/NSF
Standards 42 & 53
Cyst Reduction (600 only) |
Réduction de kyste (600 seulement) |
Reducción de quistes |
NSF's Certification Program is |
|
Lead Reduction |
Réduction de plomb |
Reducción de plomo |
accredited by the American |
|
National Standards Institute |
||||
|
|
|
NSF's Certification Program is accredited by
the Dutch Council for Accreditation
The PureTouch Filtering Faucet System has been tested and Certified by NSF only for the functions listed immediately above. Le système de robinet avec filtre PureTouch a été testé et homologué par NSF seulement pour les fonctions précitées.
El Sistema de Mezcladora Filtradora PureTouch ha sido comprobado y Certificado por la NSF únicamente para las funciones indicadas inmediatamente arriba.
For purchases made in Iowa: This form must be signed and dated by the buyer and seller prior to consummation of this sale. This form should be retained on file by the seller for a minimum of two years.
Buyer____________________________________ Seller ____________________________________
Name_____________________________________Name____________________________________
Address___________________________________Address__________________________________
City_____________________State____Zip_______City_____________________State___ Zip _____
Signature______________________ Date________ Signature_______________________ Date______
INS215A |
HELPLINE: 1-877-DRINK-H2O |
12 |
|
1-877-(374-6542) |
|

13 |
HELPLINE: 1-877-DRINK-H2O |
INS215A |
1-877-(374-6542)
 Loading...